

Shopify recently introduced a much-needed feature that finally makes testing new products and product page features a complete experience.
Although Shopify didn’t build this feature specifically for developers, it has become incredibly helpful for them.
How does this help developers?
Previously, when you wanted to test a product, you had to set it as a “Draft” and click the “Preview” button from the product admin page.
This generated a basic preview of the product, but since many apps require a live environment to function properly, most third-party app snippets didn’t work making the preview experience very limited.
In “Draft” mode, you could only preview elements that were native to Shopify, anything third-party simply wouldn’t load.
Another challenge was the complex preview URL structure.
If your custom Shopify features depended on a clean or consistent URL pattern, they often failed to work altogether.
Sharing those long, messy URLs with clients for testing was also frustrating and unprofessional.
In many cases, I had to temporarily keep my test products active just to run proper tests.
This caused issues because those products appeared in store searches and even got indexed by search engines.
To prevent this, I had to rely on various hacks and workarounds to hide my test products.
There were even times when customers accidentally purchased test products because they found them through search, definitely not an ideal experience.
How does this help store owners?
There are many situations where you might need a direct URL to a product, for example, to run a private sale, sell dedicated warranties to VIP clients, or offer a small gift to a specific customer after a purchase.
In the past, managing this was often a real challenge.
You might also want to provide early access to a product and send the link only to a select group of customers via a newsletter.
Unlisted product
To address these challenges, Shopify introduced the “Unlisted product” status.
An “Unlisted” product exists in your store just like an “Active” or “Draft” product, these are simply different product statuses, not different product types.
When you set a product as Unlisted, it is hidden from:
- Search engines
- In-store search (including predictive search)
- Shopify catalog and collection pages
- Sales channels
- Product recommendations
Unlike a “Draft” product, an “Unlisted” one keeps the same URL as its live (Active) version, in fact, it’s exactly the same URL.
Customers can add an unlisted product to their cart and complete the purchase just like with any active product.
The only difference is that they must have the direct link, as it won’t appear anywhere else in your store.
If you want to display the product page but prevent customers from adding it to the cart or making a purchase, you’ll need to either custom-code this restriction or, if your theme supports it, use a predefined template specifically designed for that purpose.
How to set up an unlisted product?
First, log in to your store admin.
Go to Products (marked with 1 in the image below) and either create a new product or select an existing one.
For this tutorial, I will select an existing product (marked with 2 in the image below).
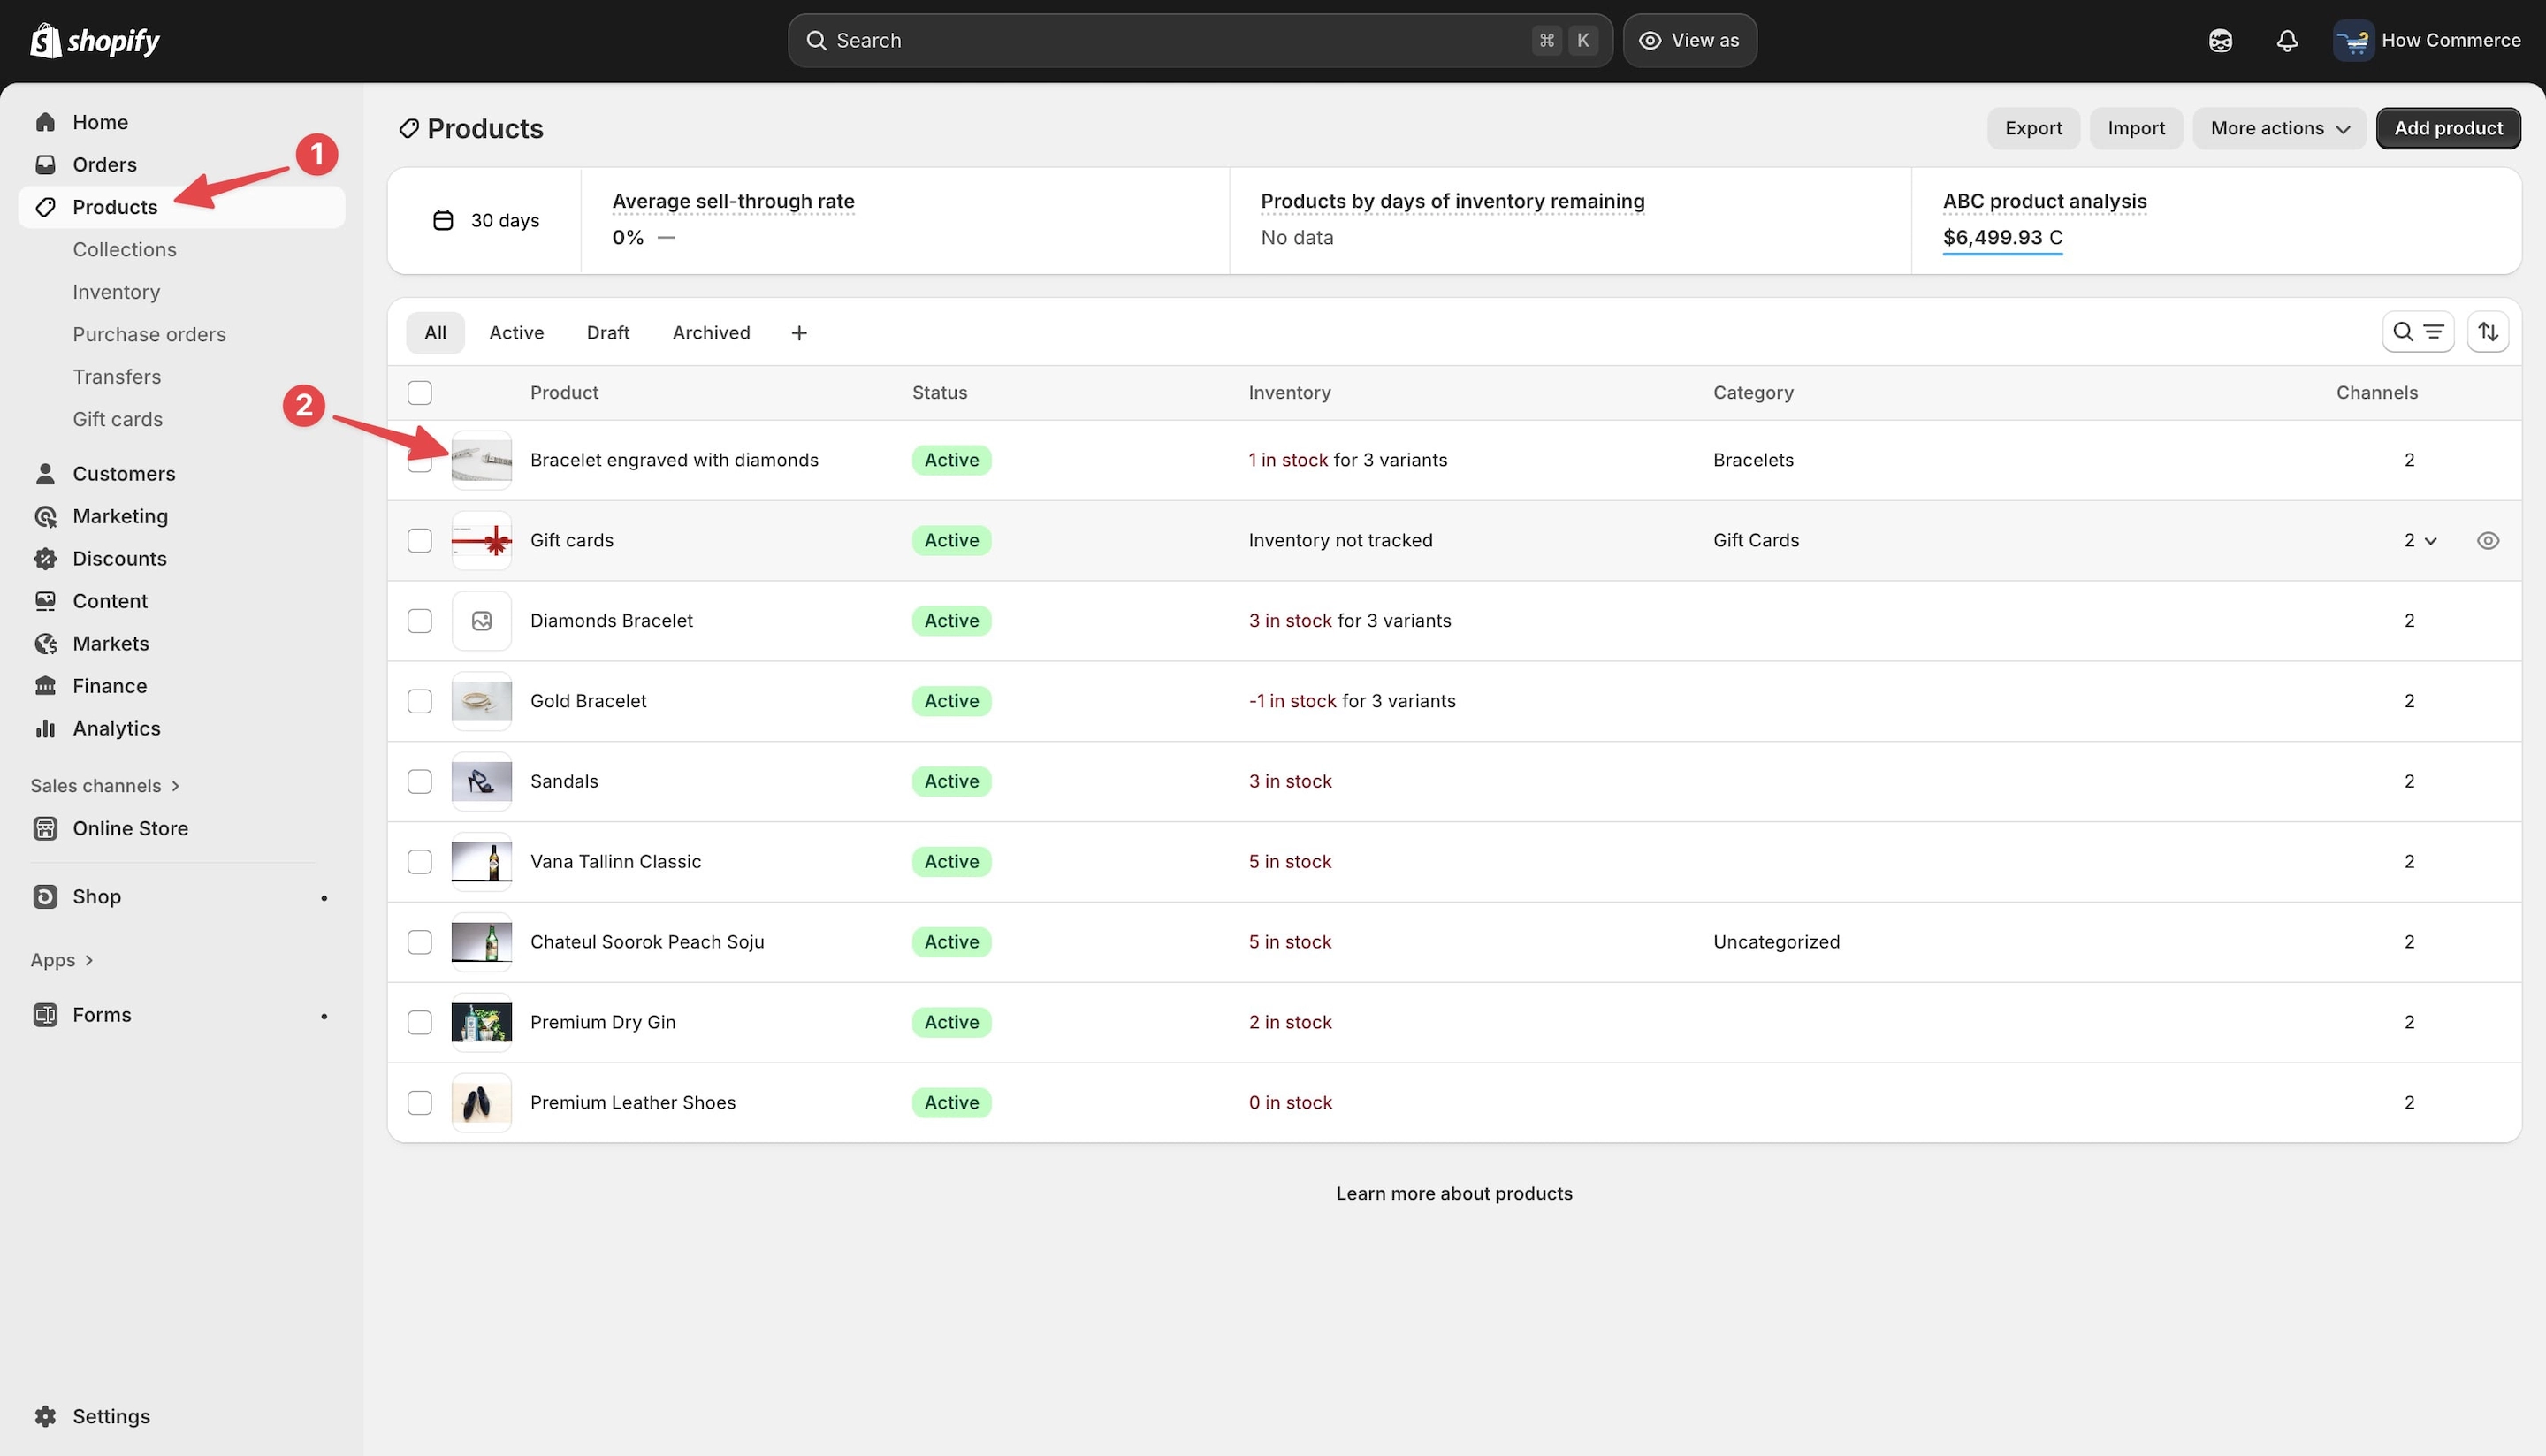
The existing product currently has its status set to “Active”, which means it is listed across all sales channels, markets, and other areas of your store.
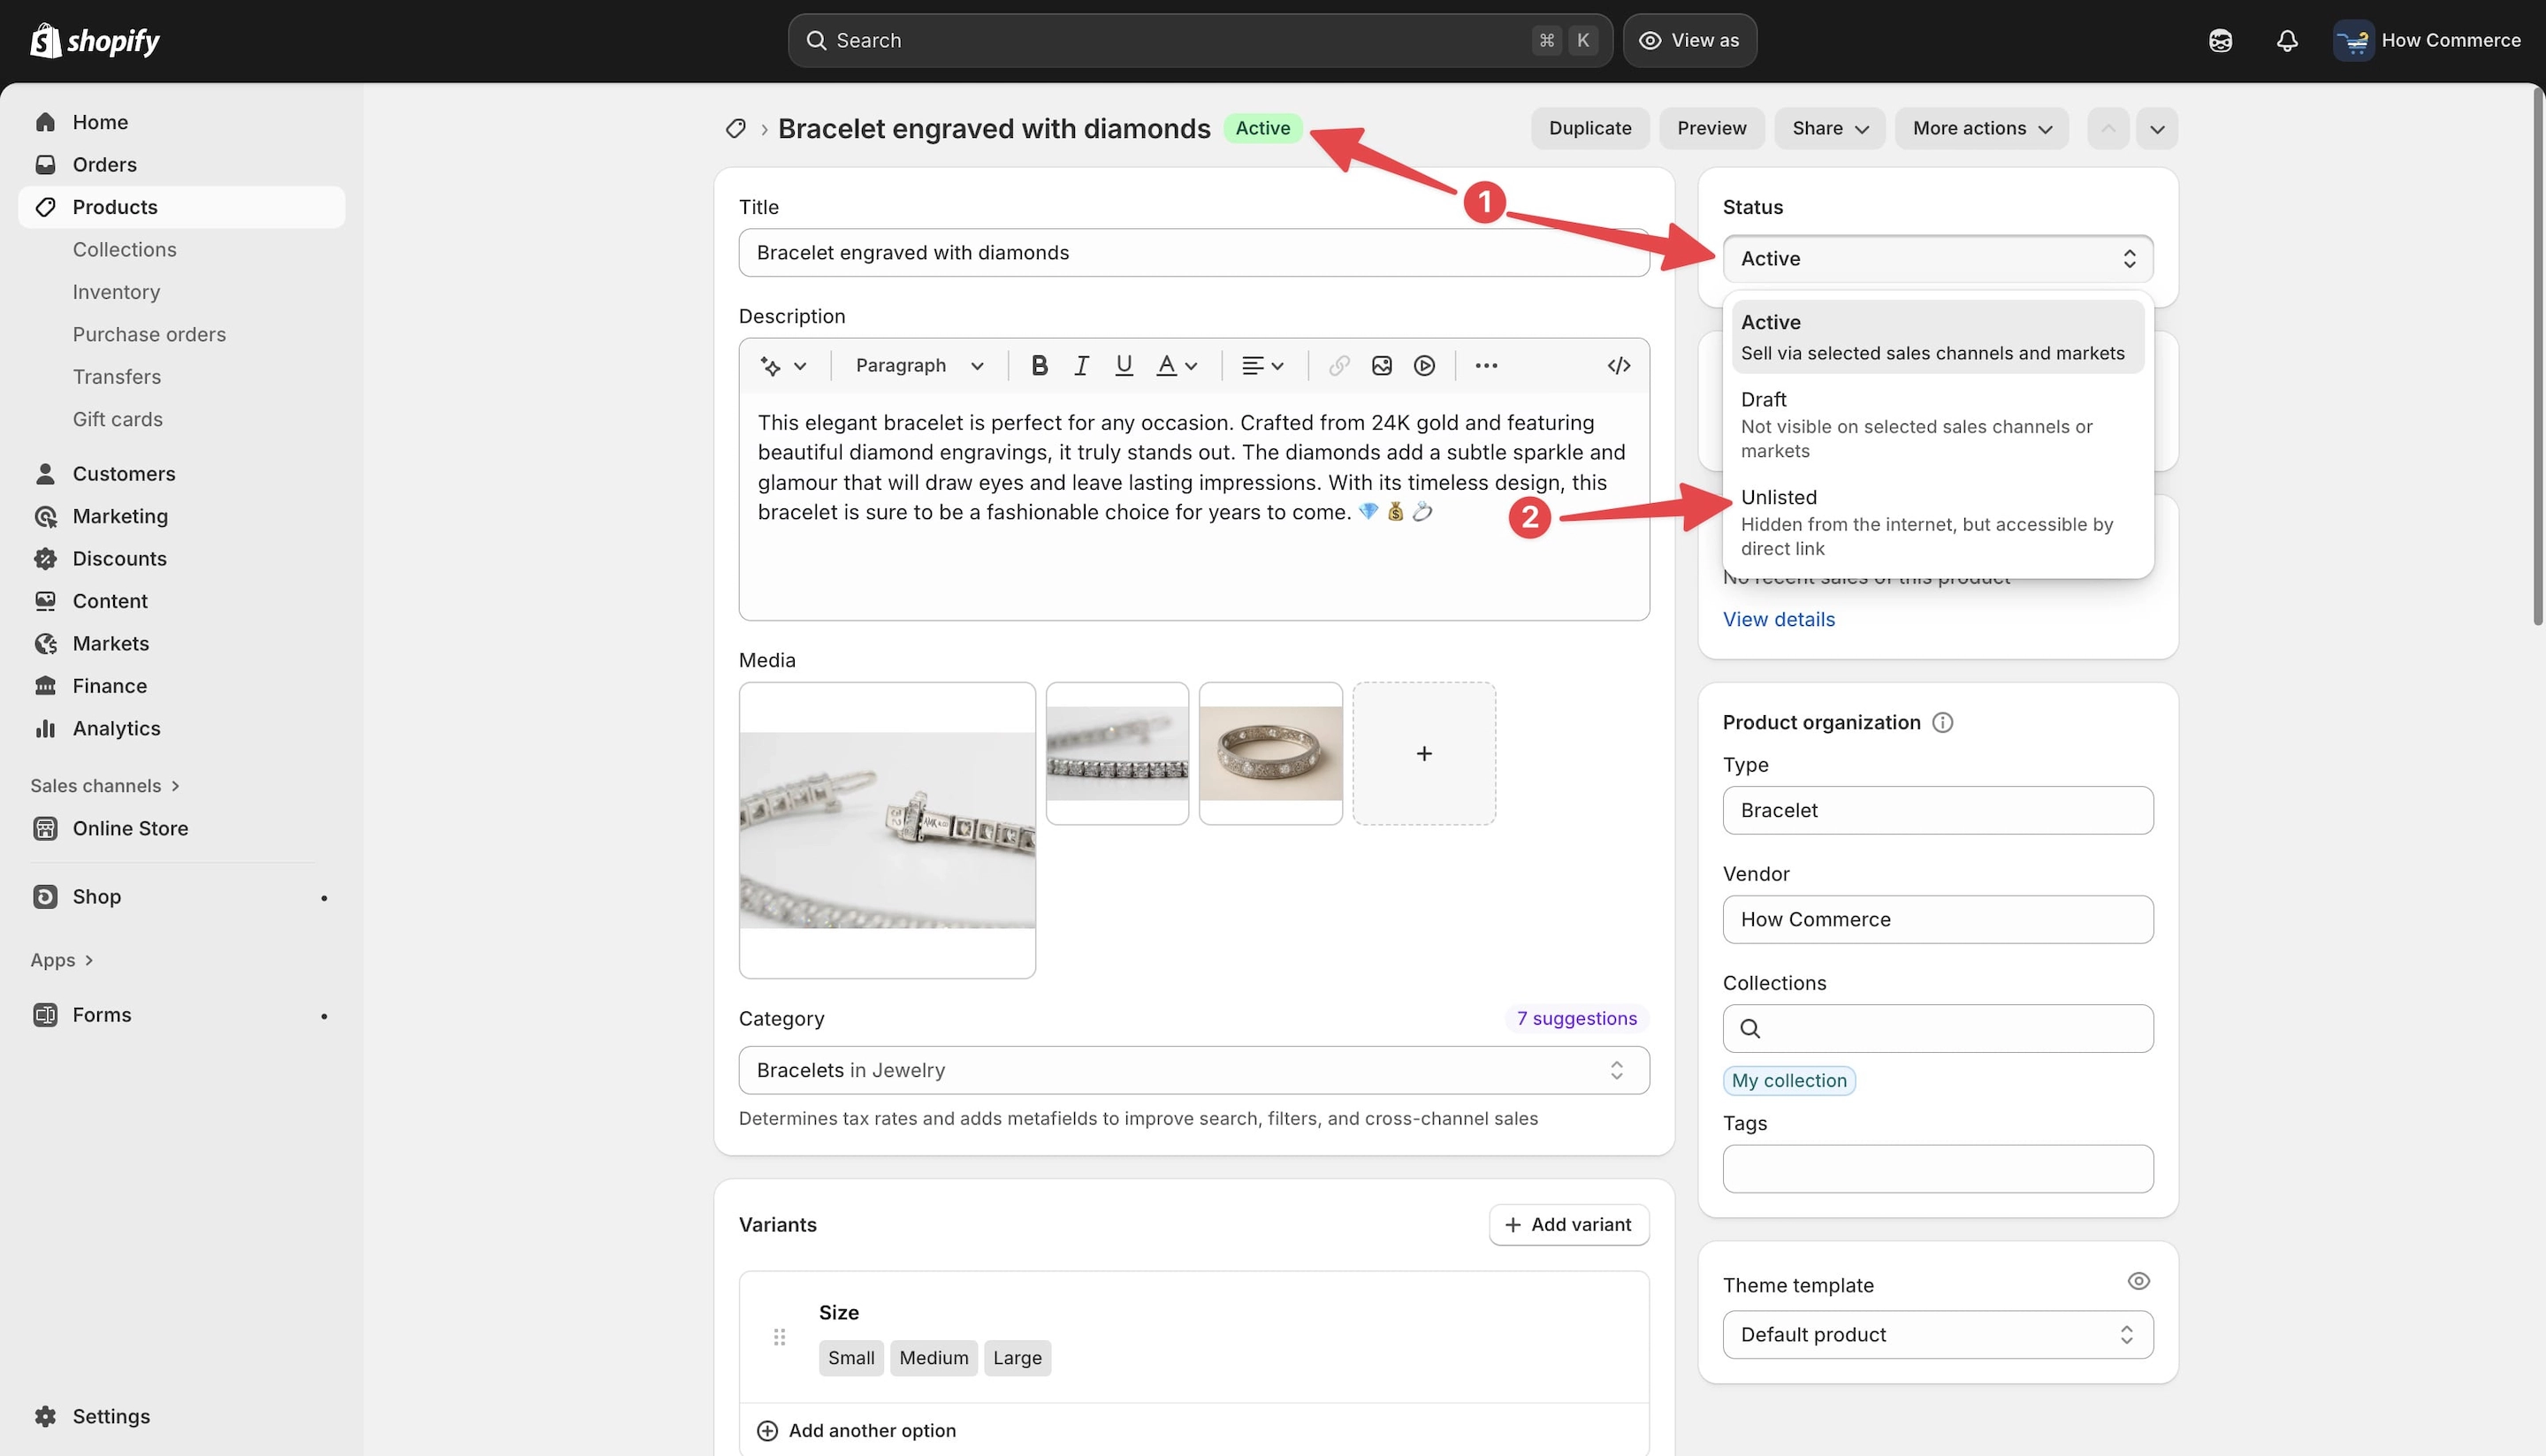
To change the status, go to the “Status” selection section (marked with 1 in the image below), click it, and choose “Unlisted” from the drop-down menu (marked with 2 in the image below).
As shown in the screenshot below, each status option includes a short explanation detailing what happens when you select “Active”, “Draft”, or “Unlisted”.
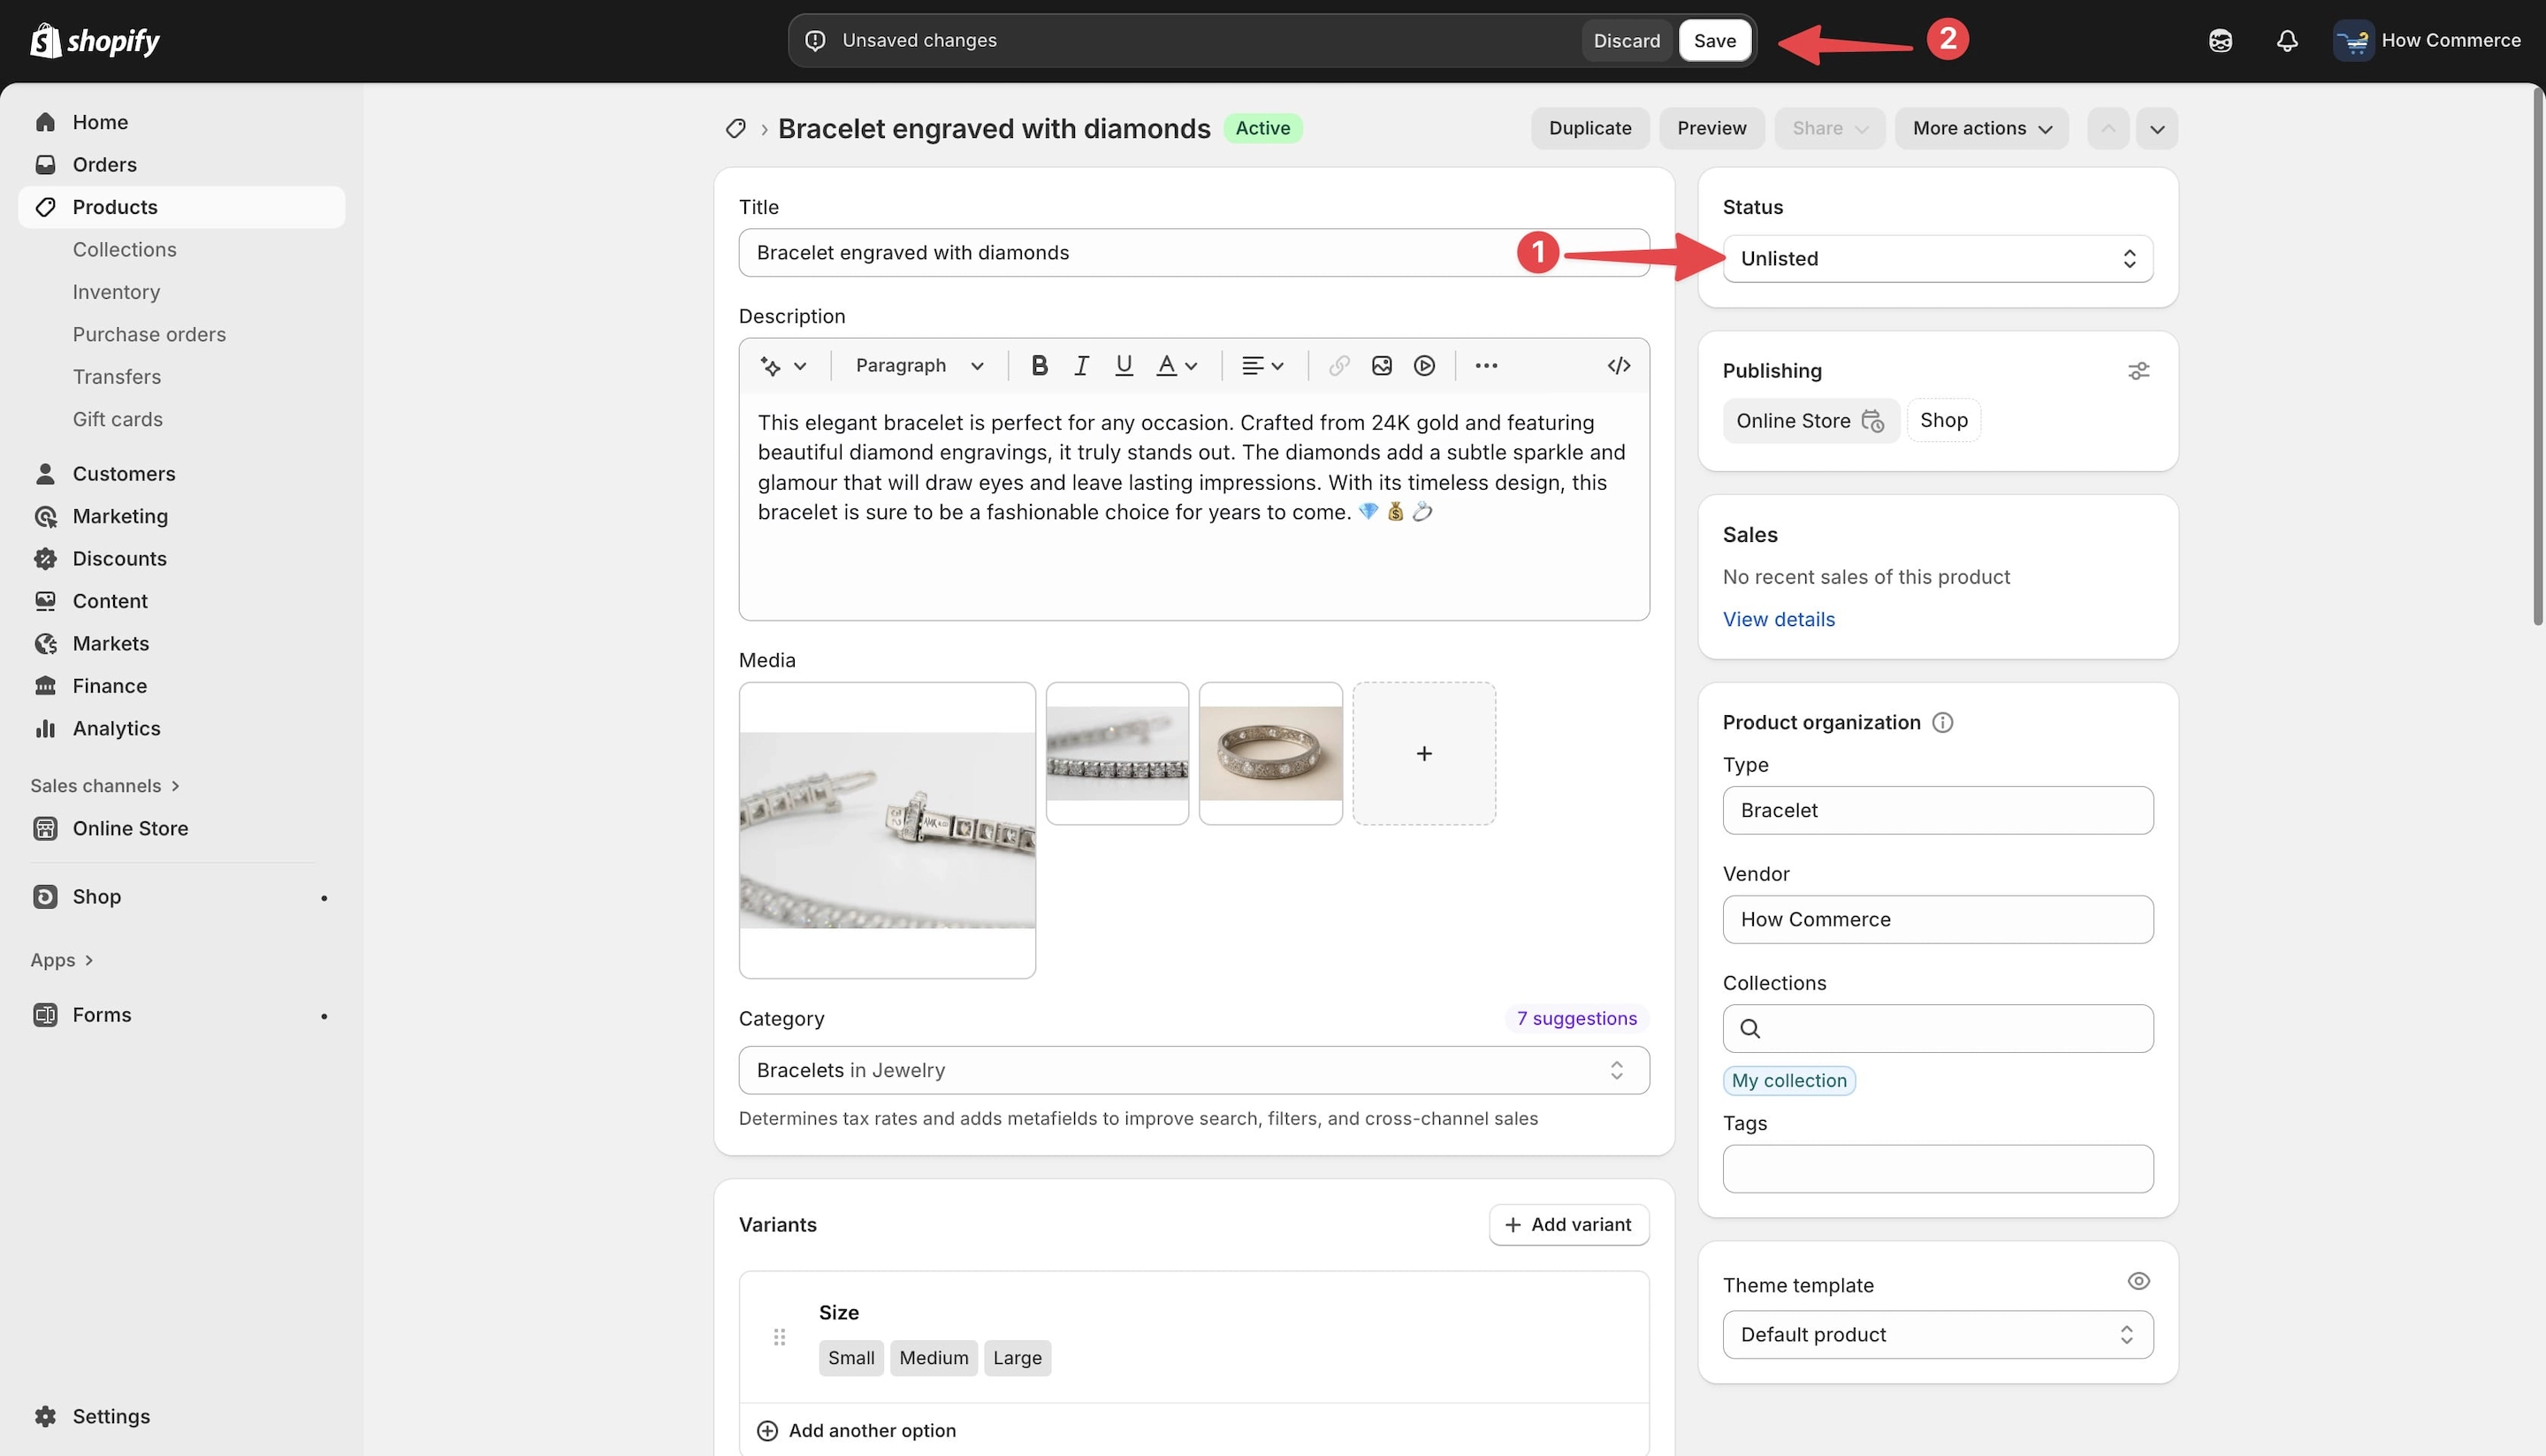
After selecting “Unlisted” (marked with 1 in the image below), click the “Save” button (marked with 2 in the image below) to apply your changes.
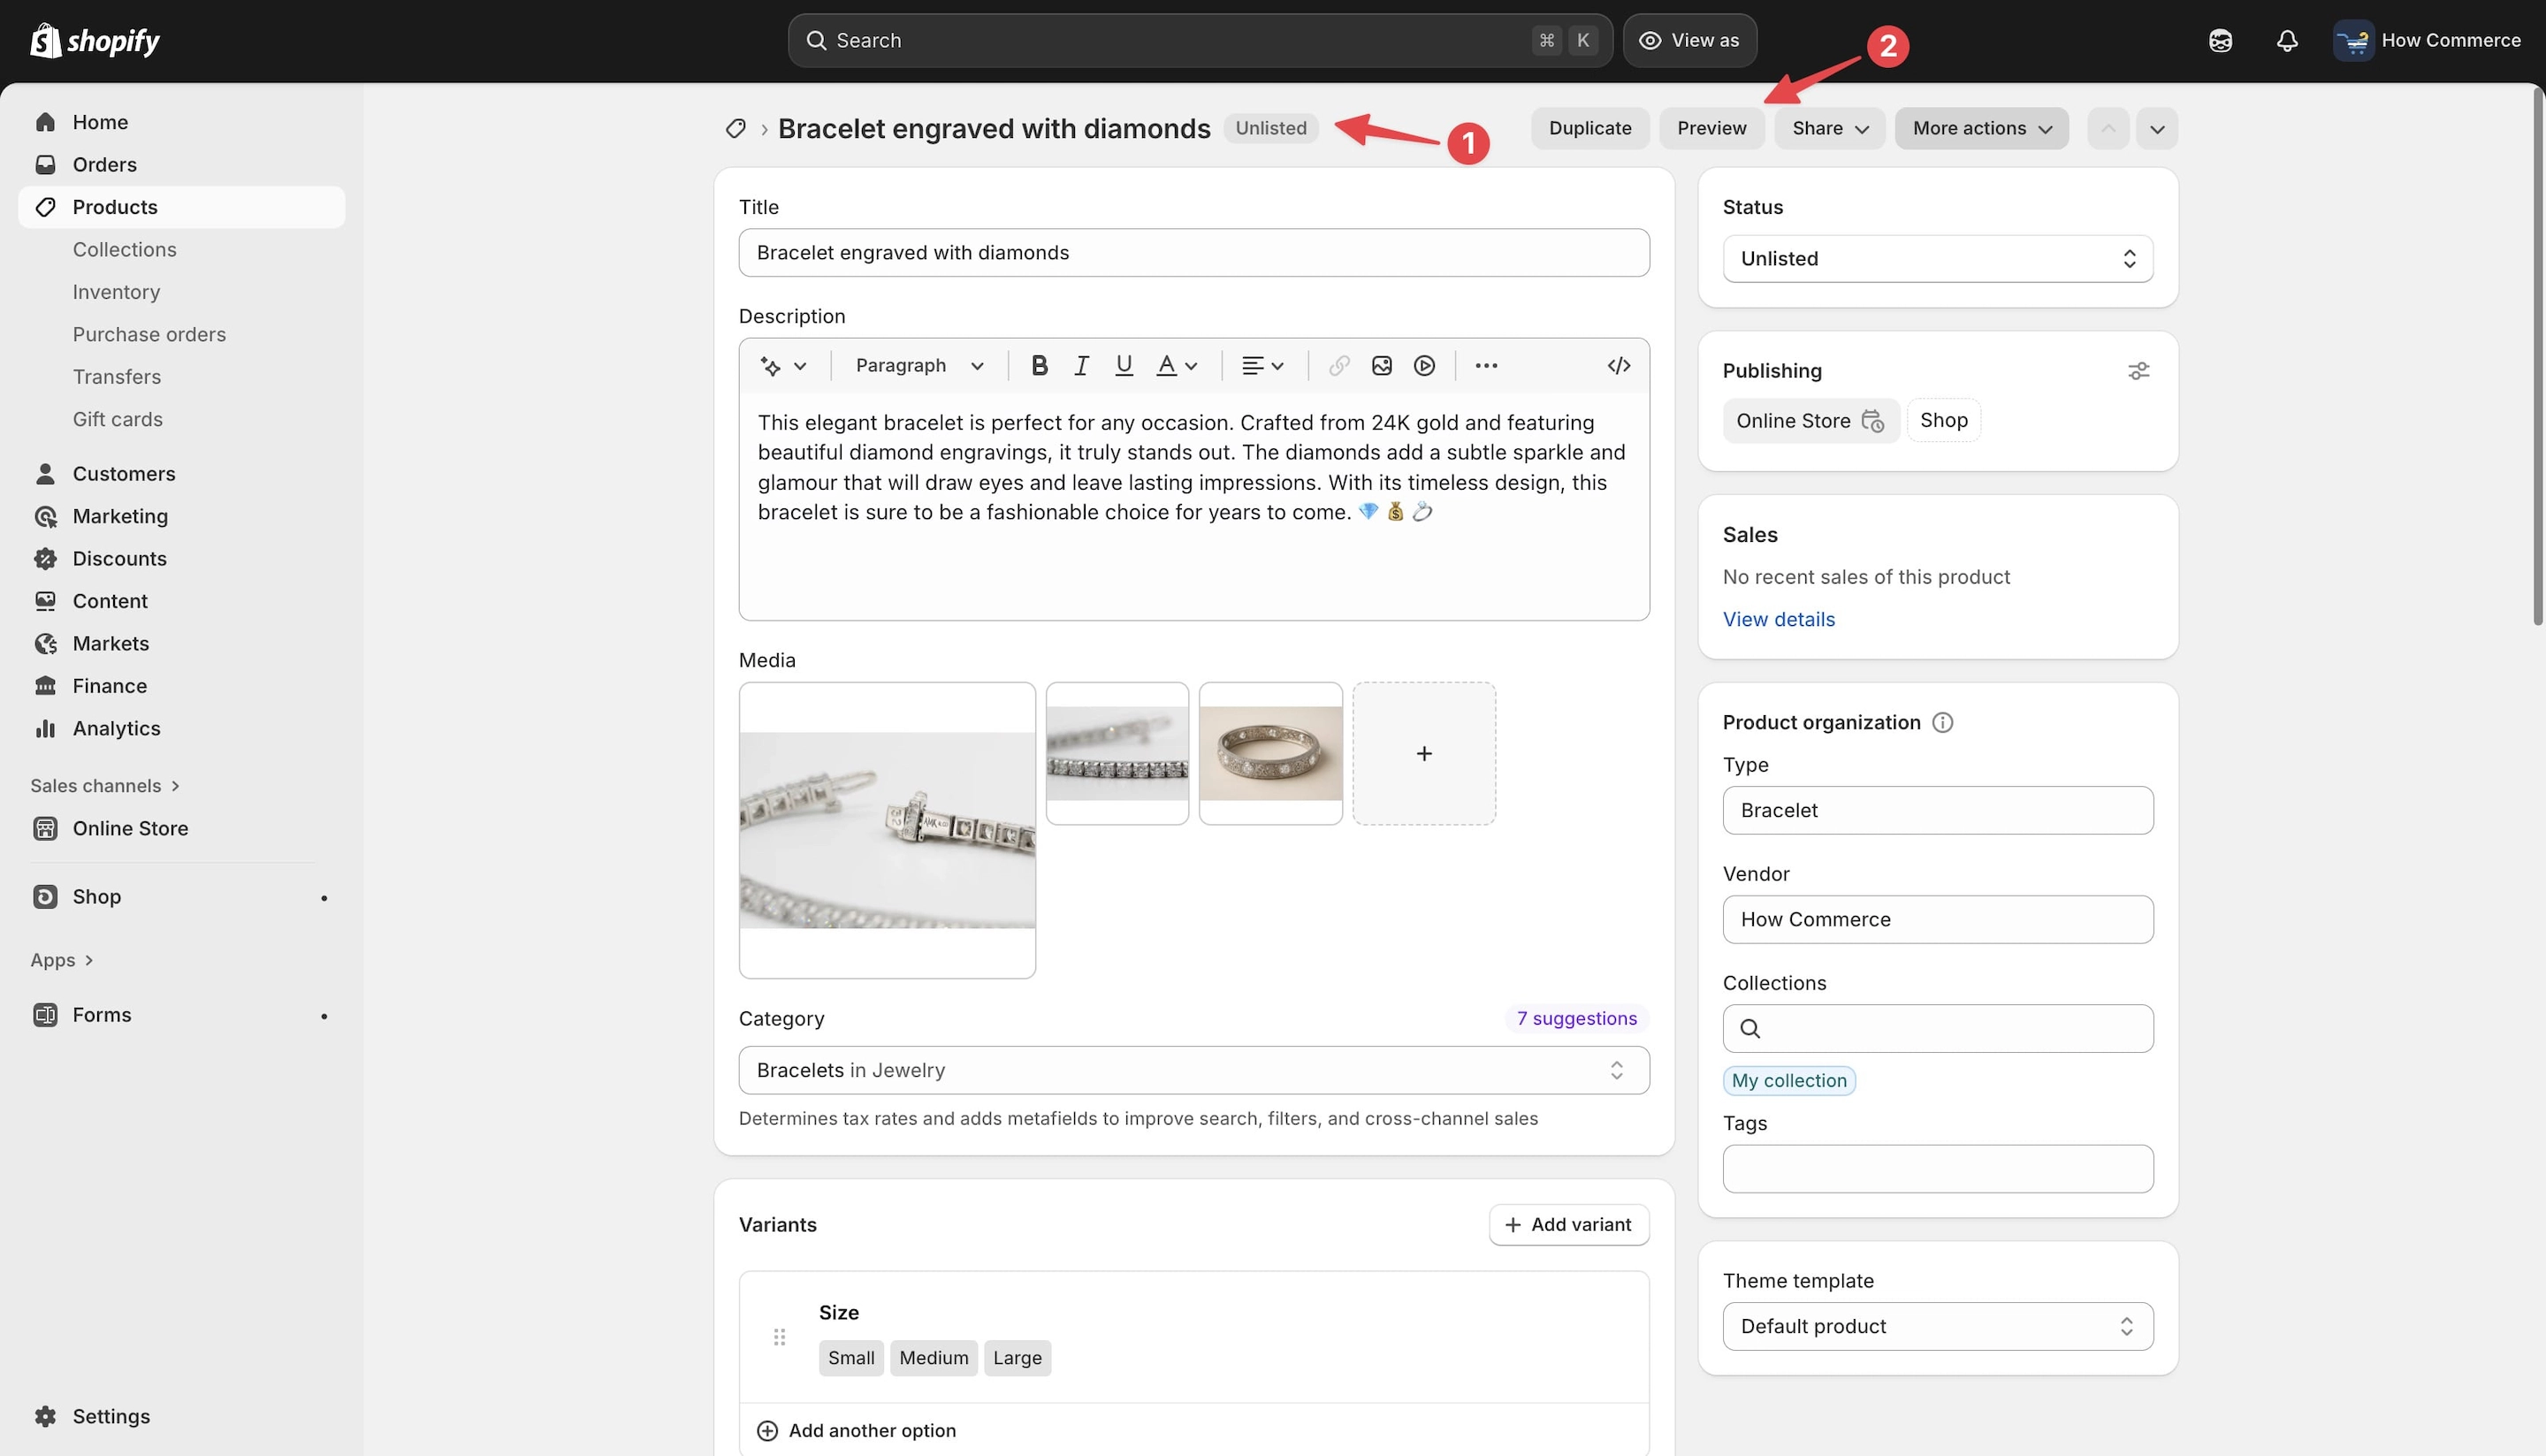
Now the product status has been changed to “Unlisted” (marked with 1 in the image below), and this update will also appear on the admin products listing page.
You can preview the product by clicking the “Preview” button. The preview will look similar to how it appears for products with the “Draft” status.
My recommendation for developers: avoid using the preview feature for testing.
The preview link can be messy, and third-party apps often do not function correctly in this mode.
How to preview the unlisted product correctly?
Scroll to the bottom of the page and copy the product link directly.
In the “Search engine listing” section, click the Edit button, as shown in the image below.
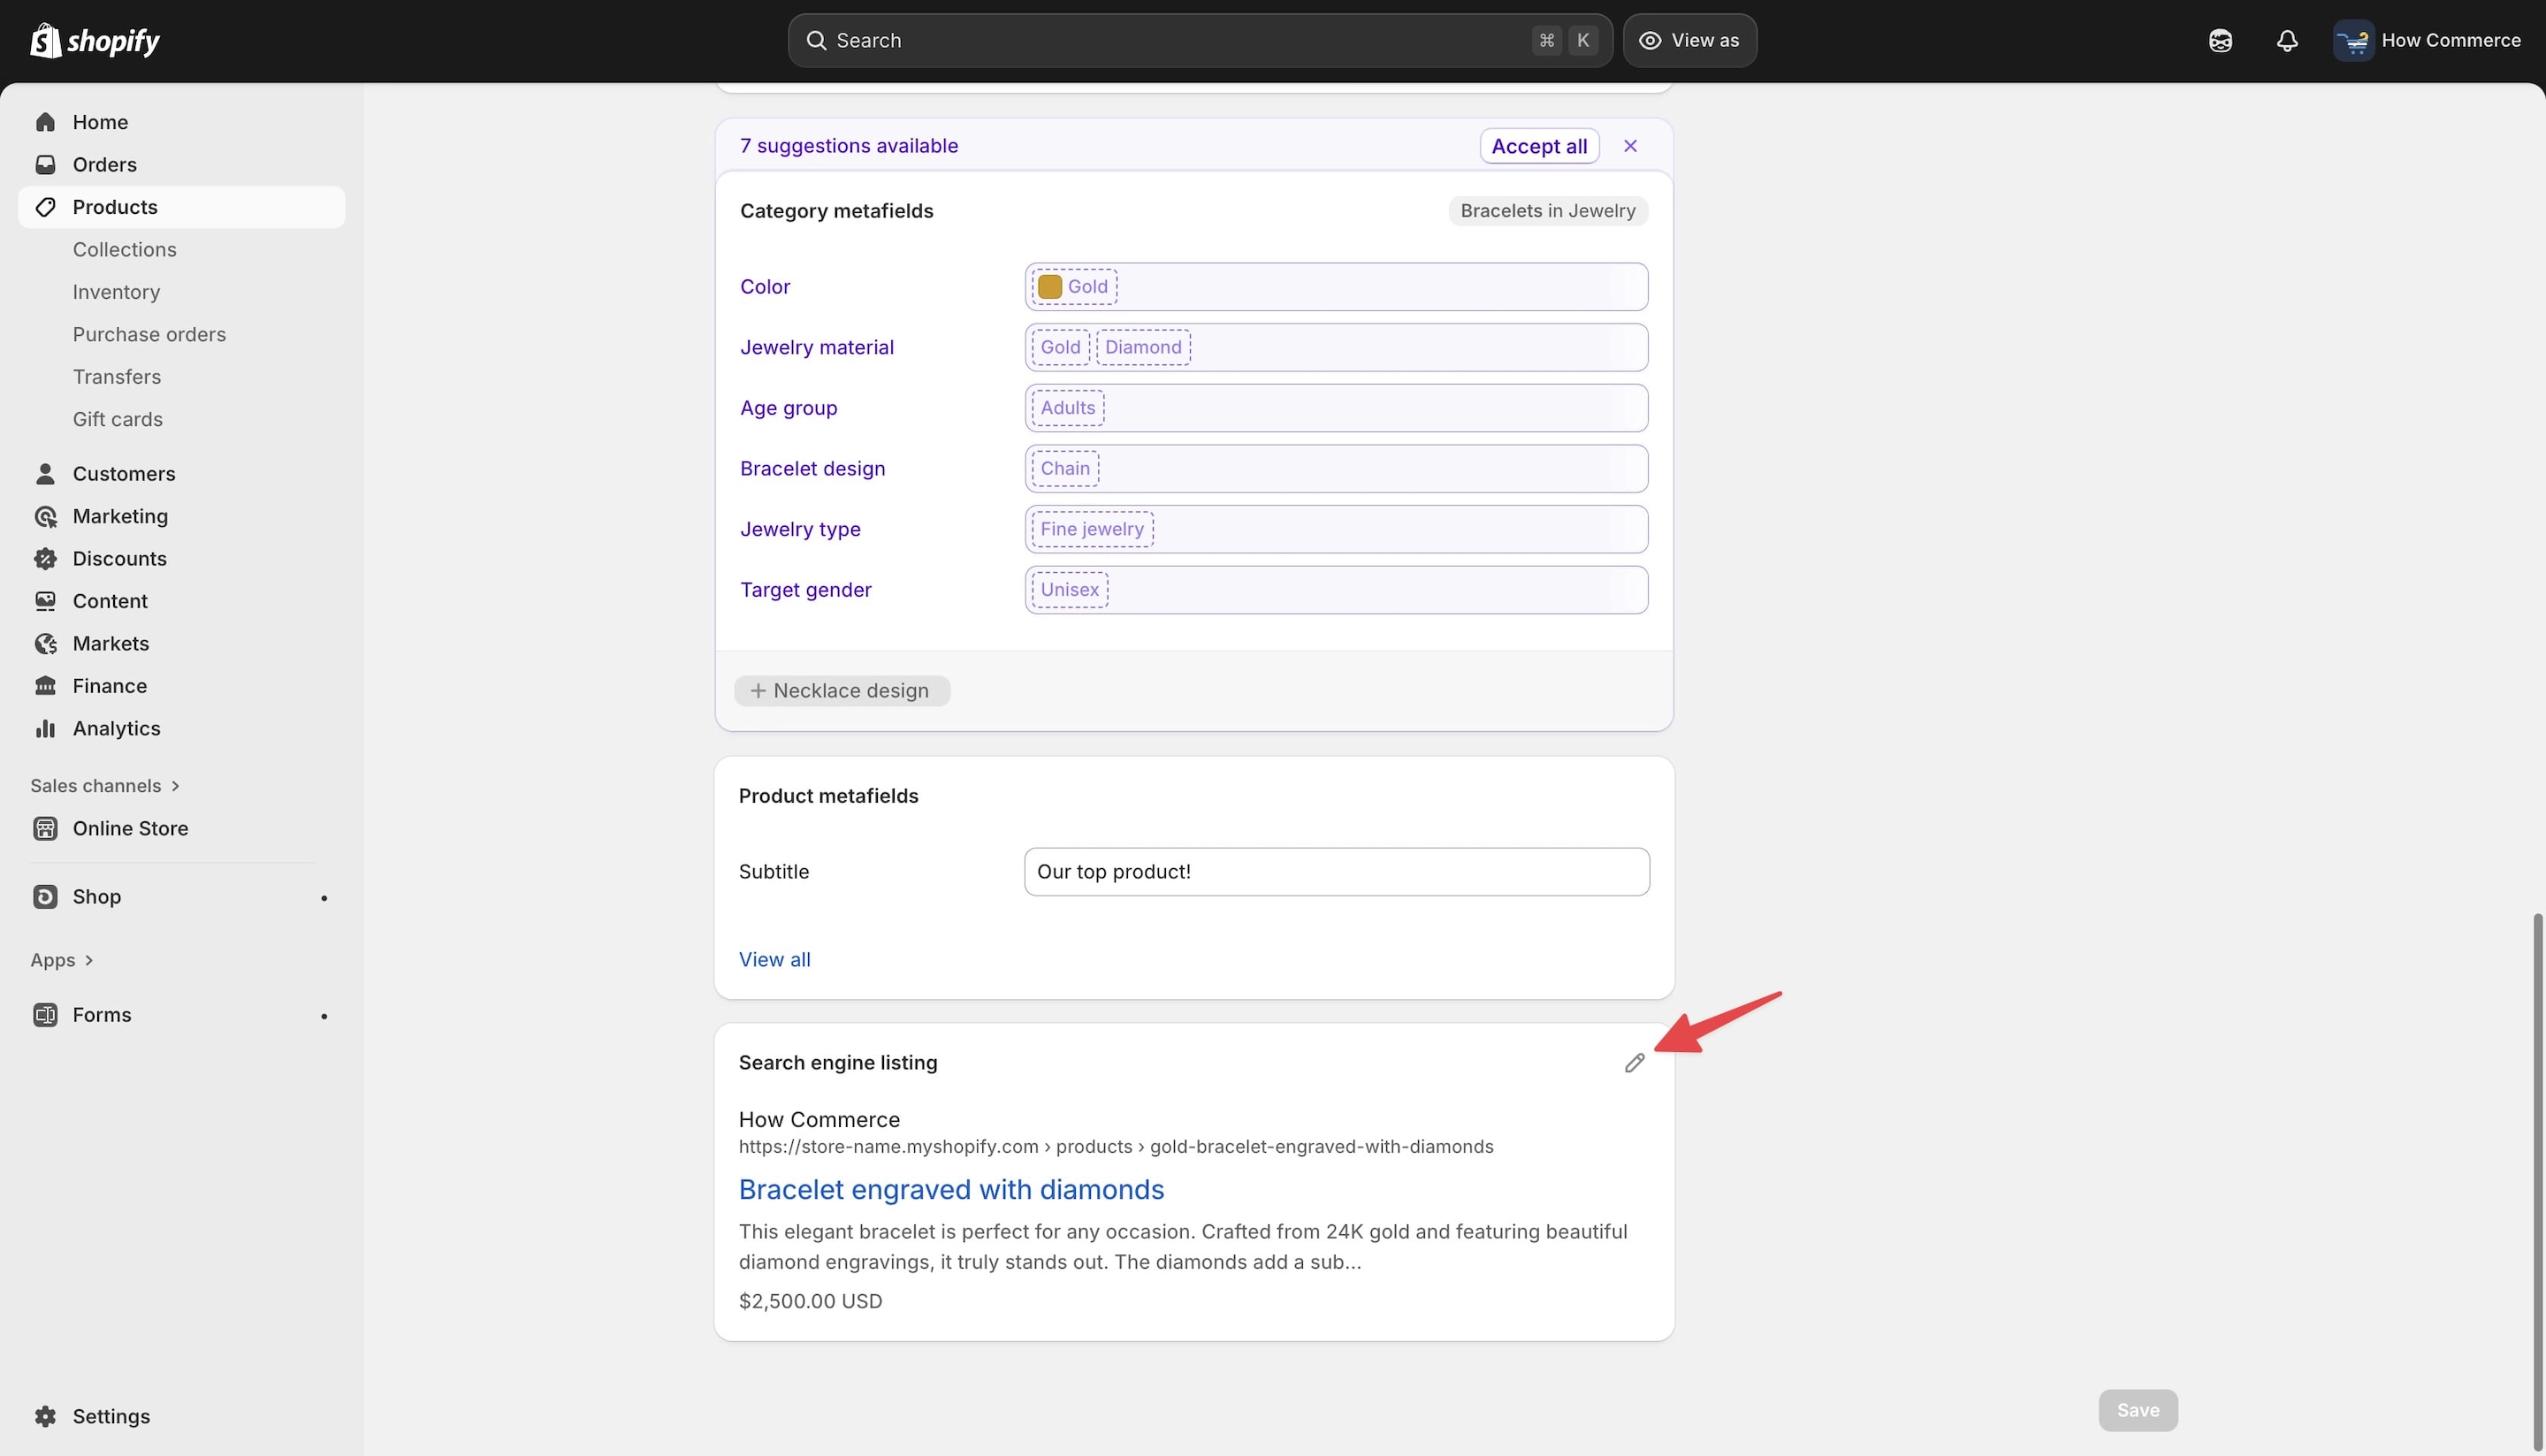
The “Search engine listing” editing panel will open, and at the bottom, you will see the full product page URL.
Select the URL and copy it to your clipboard.
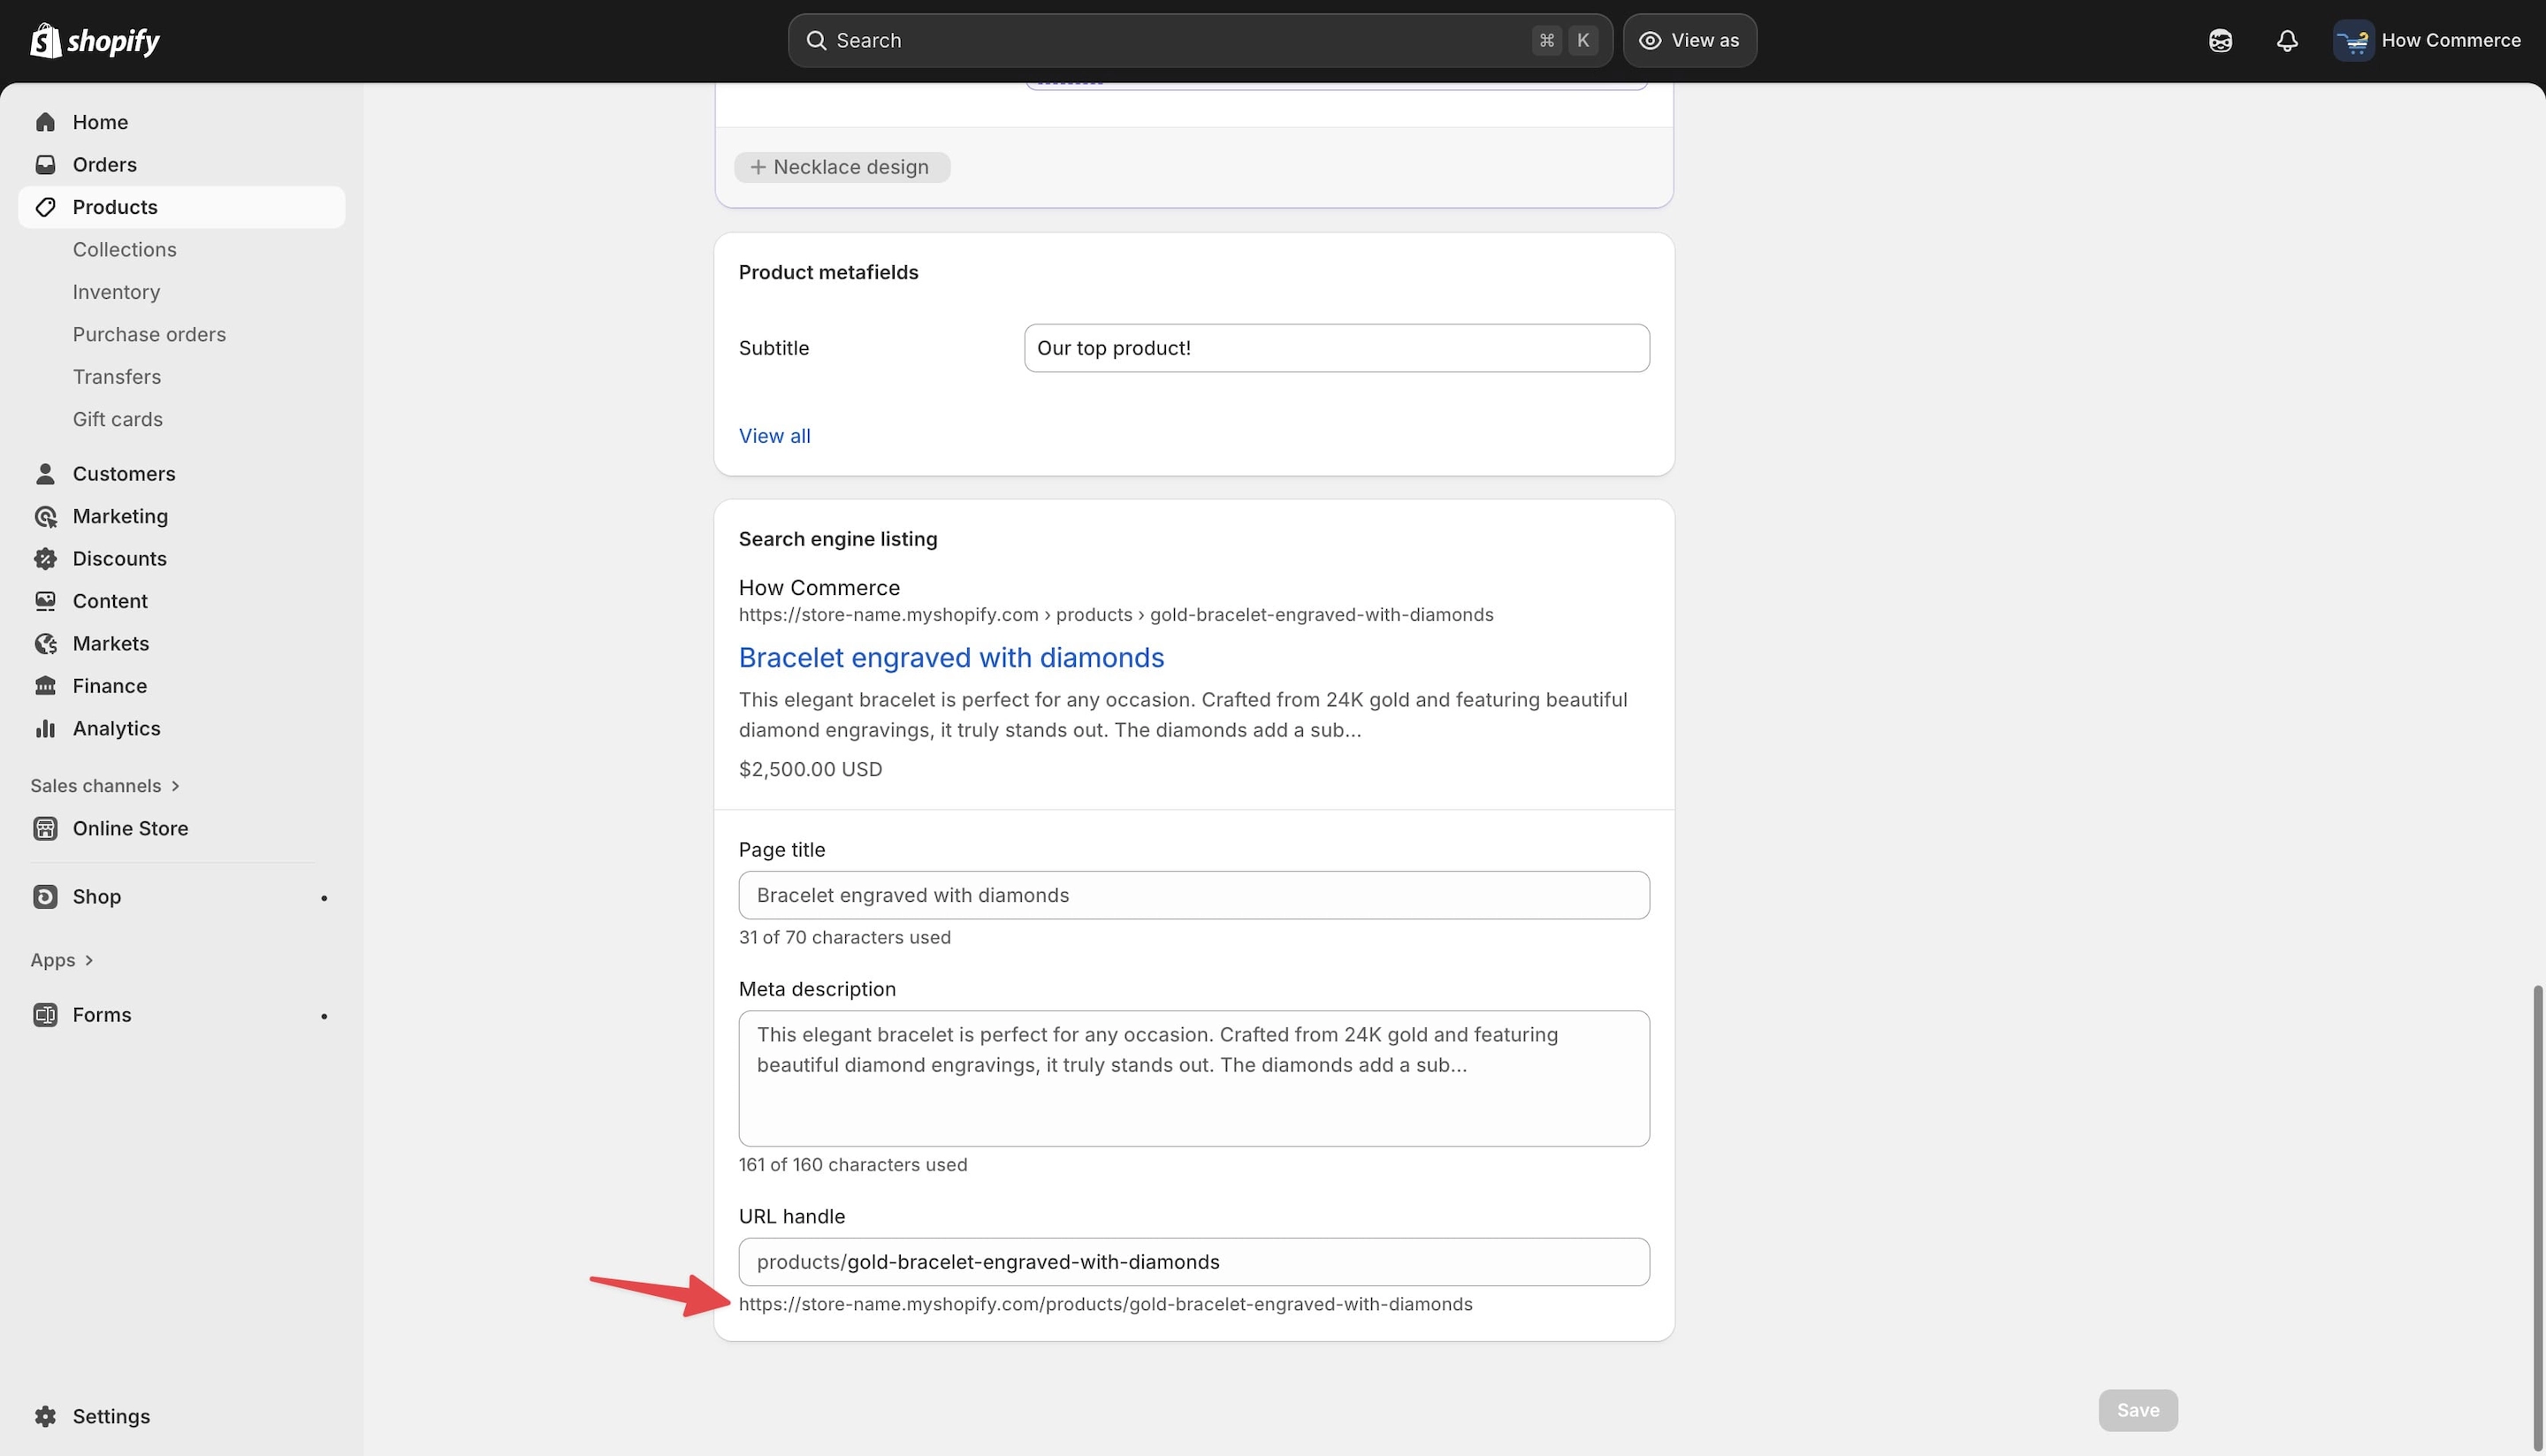
Paste the link into your browser’s address bar. You will now see the full product page, including all customizations that depend on the complete URL, as well as any third-party apps that do not function in preview mode.
How to set up multiple unlisted products?
Multiple selection
Select the products you want to unlist.
In this example, I selected three products (marked with 1 in the image below).
As shown, all selected products currently have the status “Active” (marked with 2 in the image below).
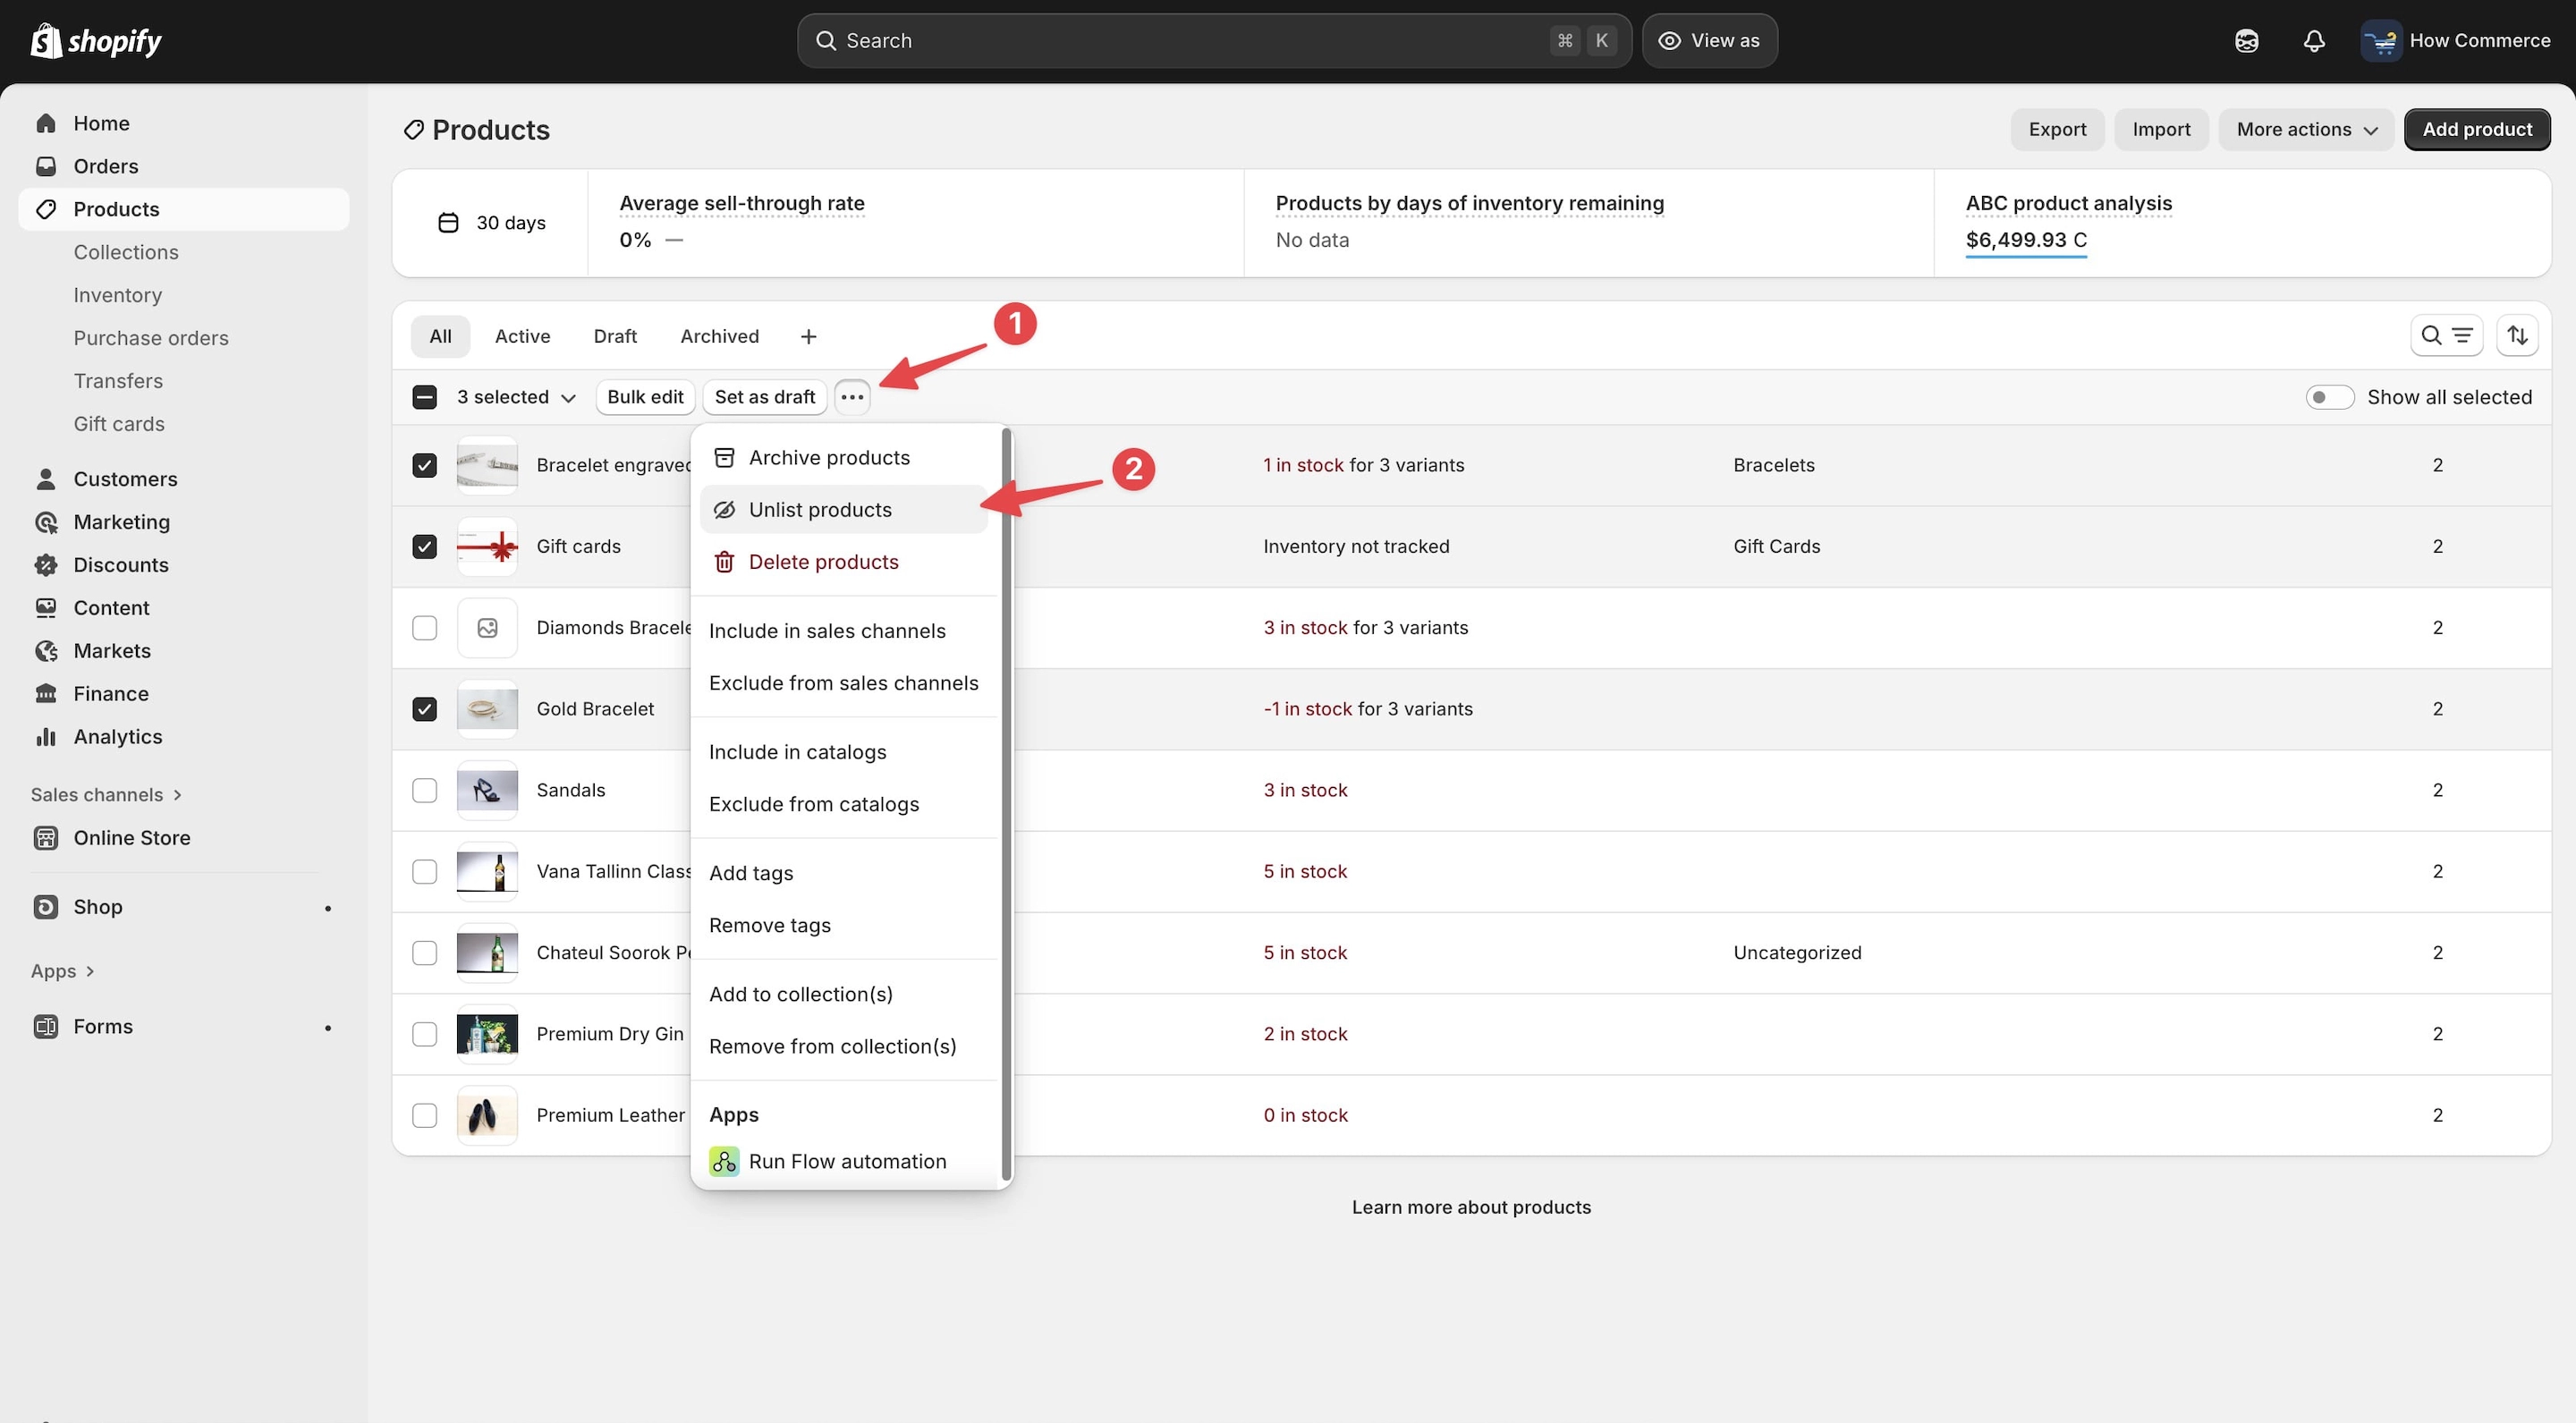
The next step is to change their status to “Unlisted.”
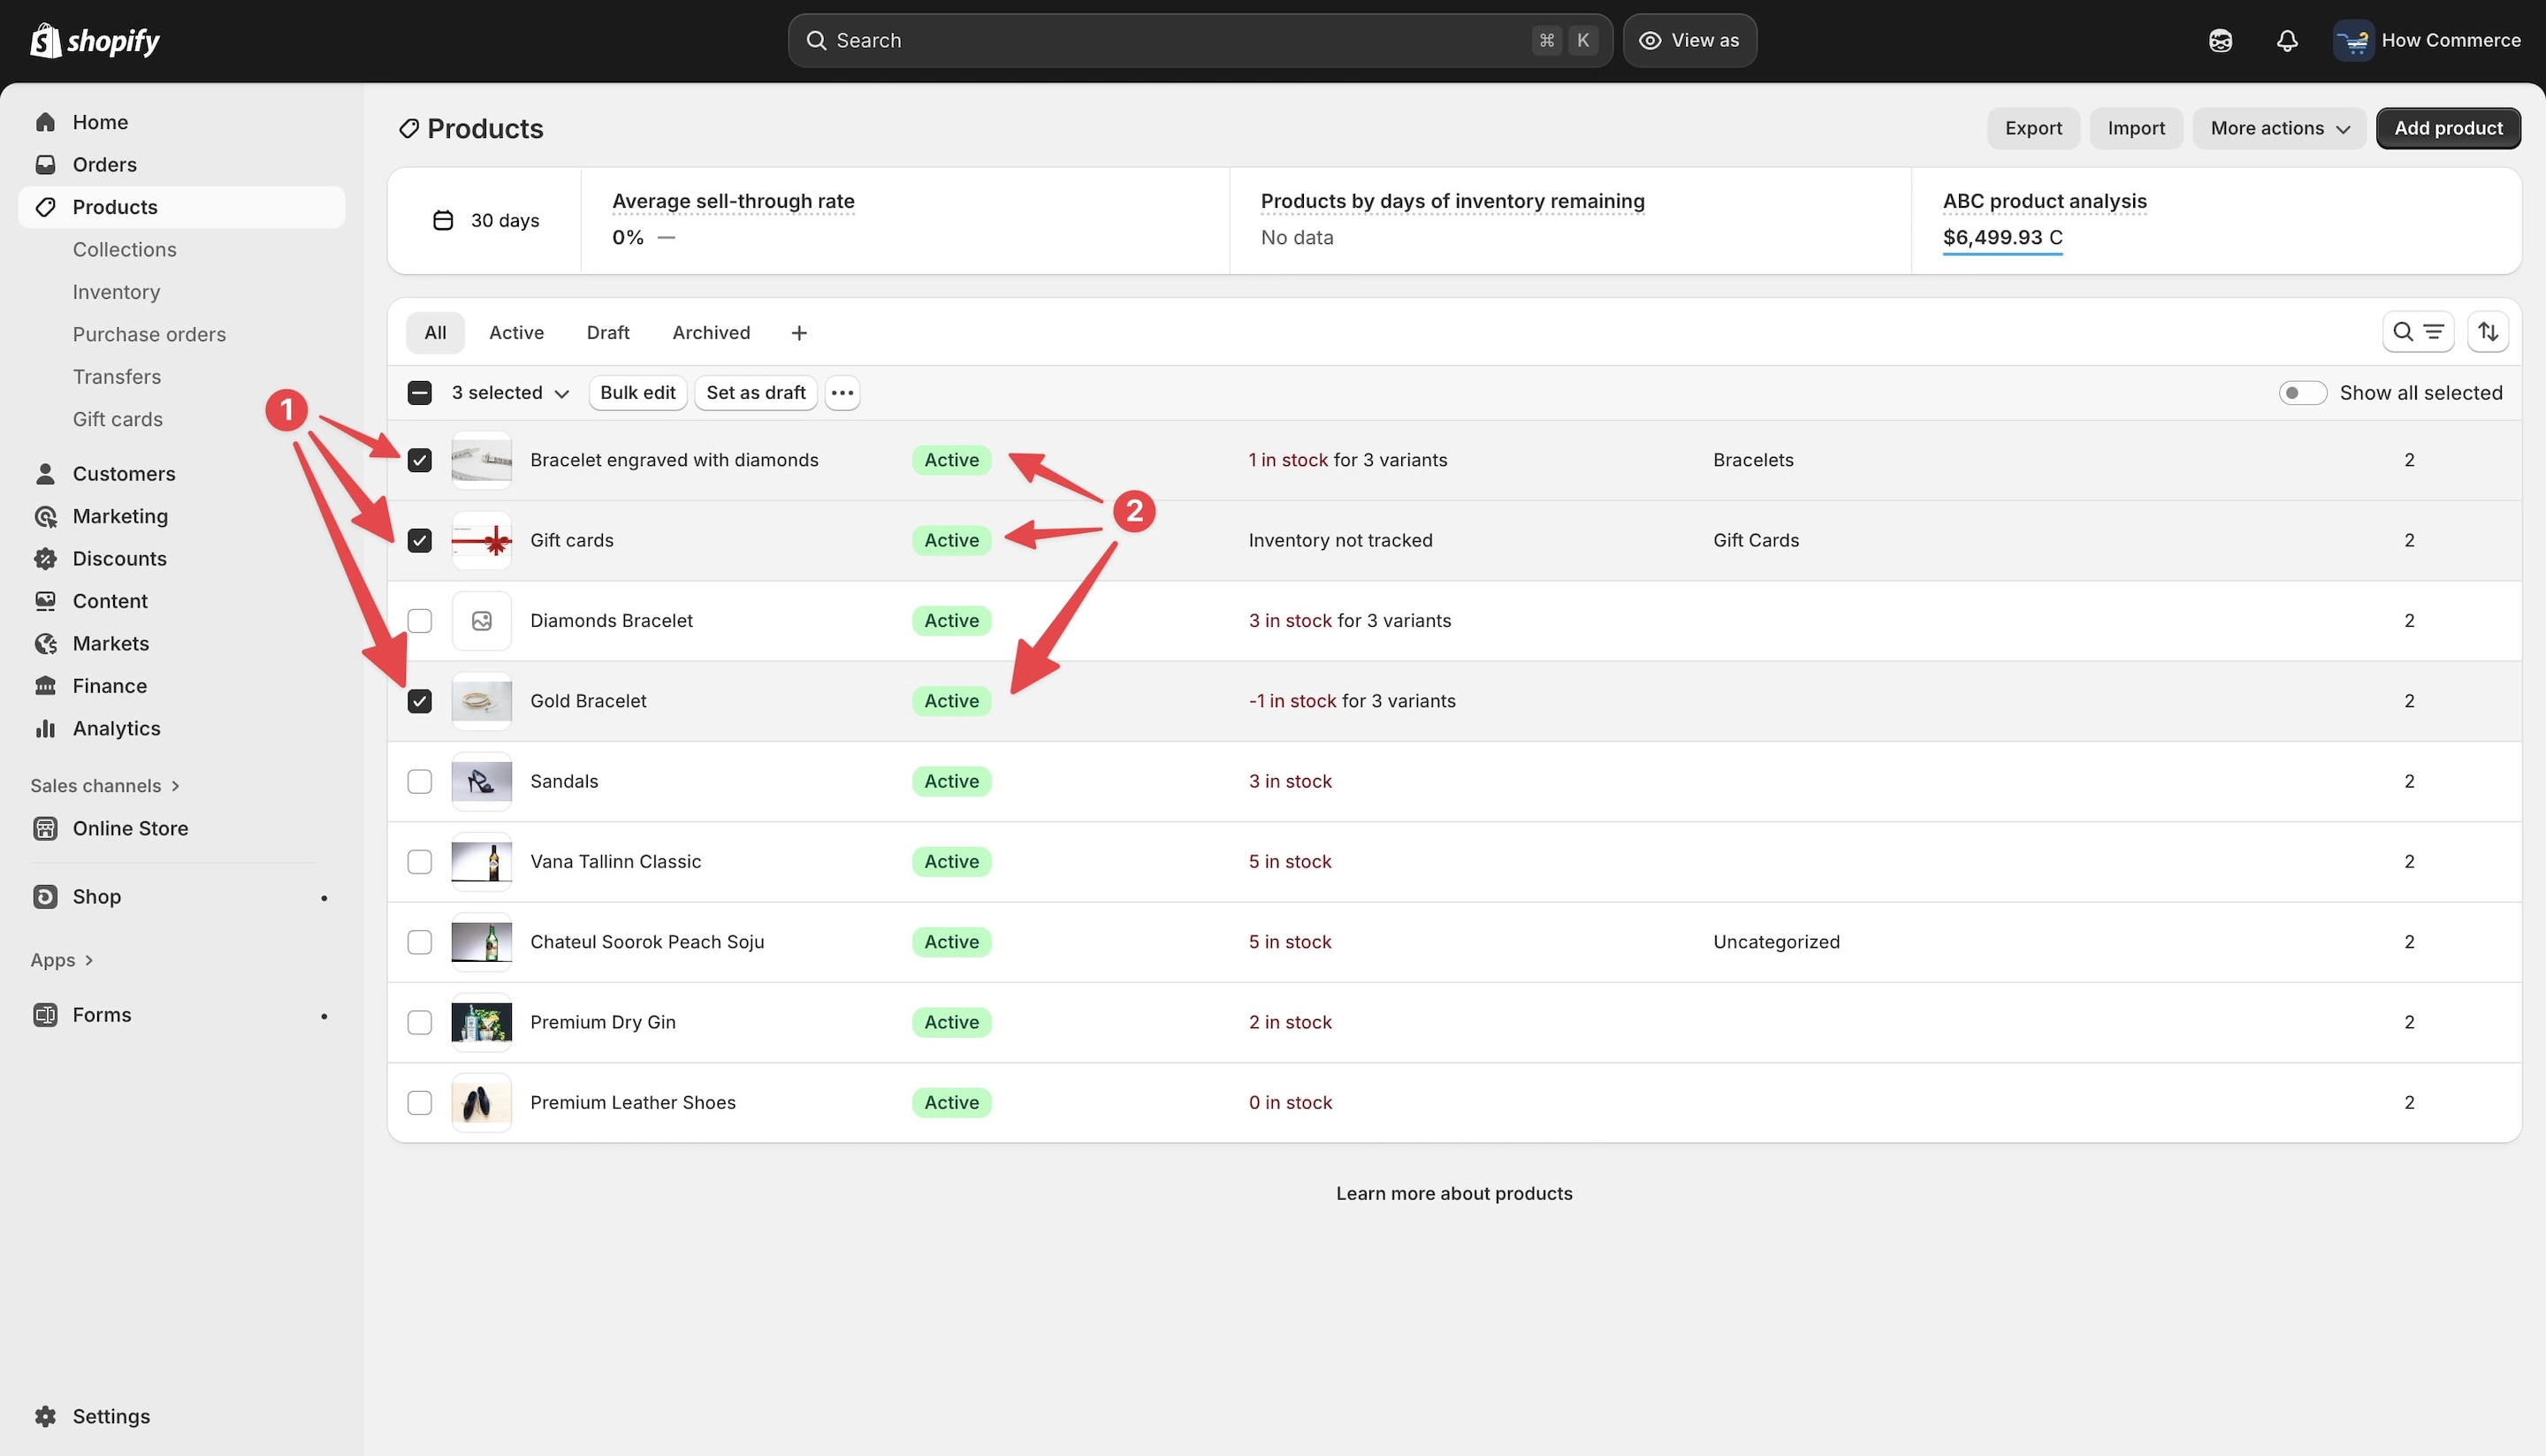
Click the “…” icon (marked with 1 in the image below), and from the drop-down menu, select “Unlist products” (marked with 2 in the image below).
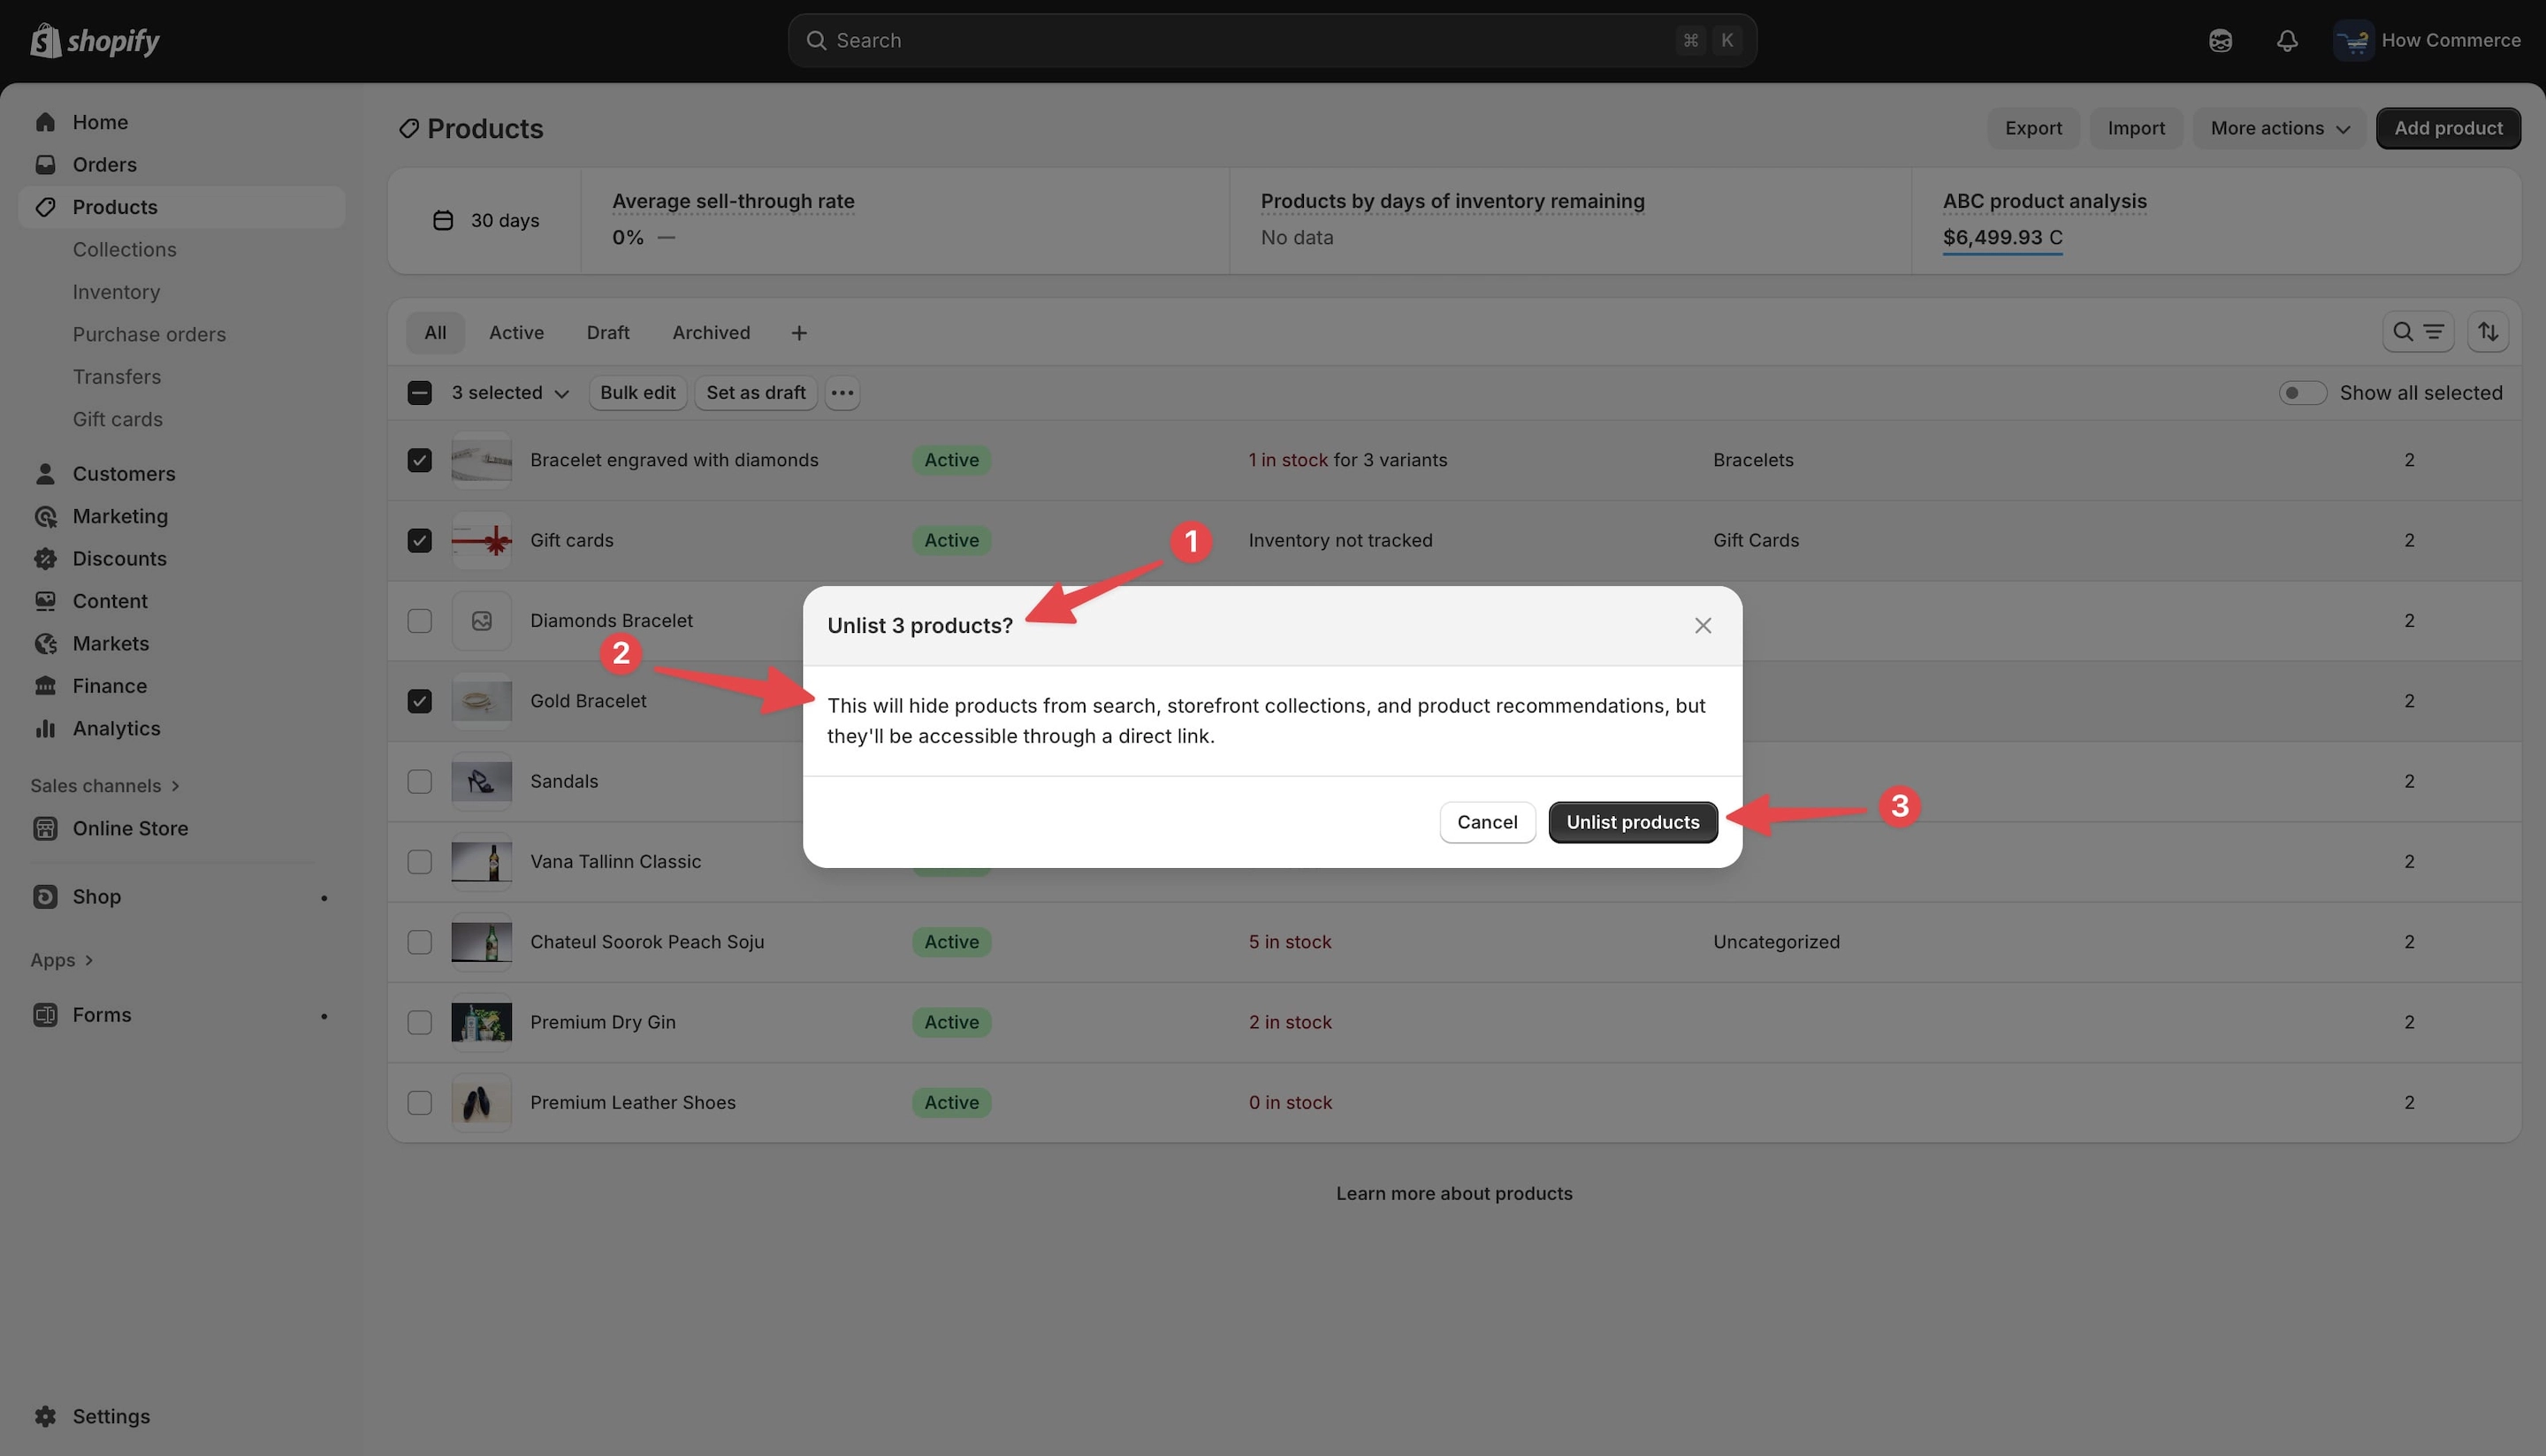
A confirmation modal will appear, asking you to confirm your action.
In the confirmation modal, you will see:
- The number of products selected to be unlisted (marked with 1 in the image below)
- A short explanation of what will happen once you confirm (marked with 2)
- The “Unlist products” confirmation button (marked with 3)
Warning: If the products are currently active, as in this example, changing them to Unlisted can impact your SEO. Search engines will remove those products from their results if they were previously indexed. In addition, any product images indexed by search engines will also be removed.
Use this feature carefully. If not handled properly, it can break your SEO links and negatively affect your sales by reducing visibility and potential traffic.
However, links shared on social media, newsletters, or other channels will not be affected, as the product URLs remain the same.
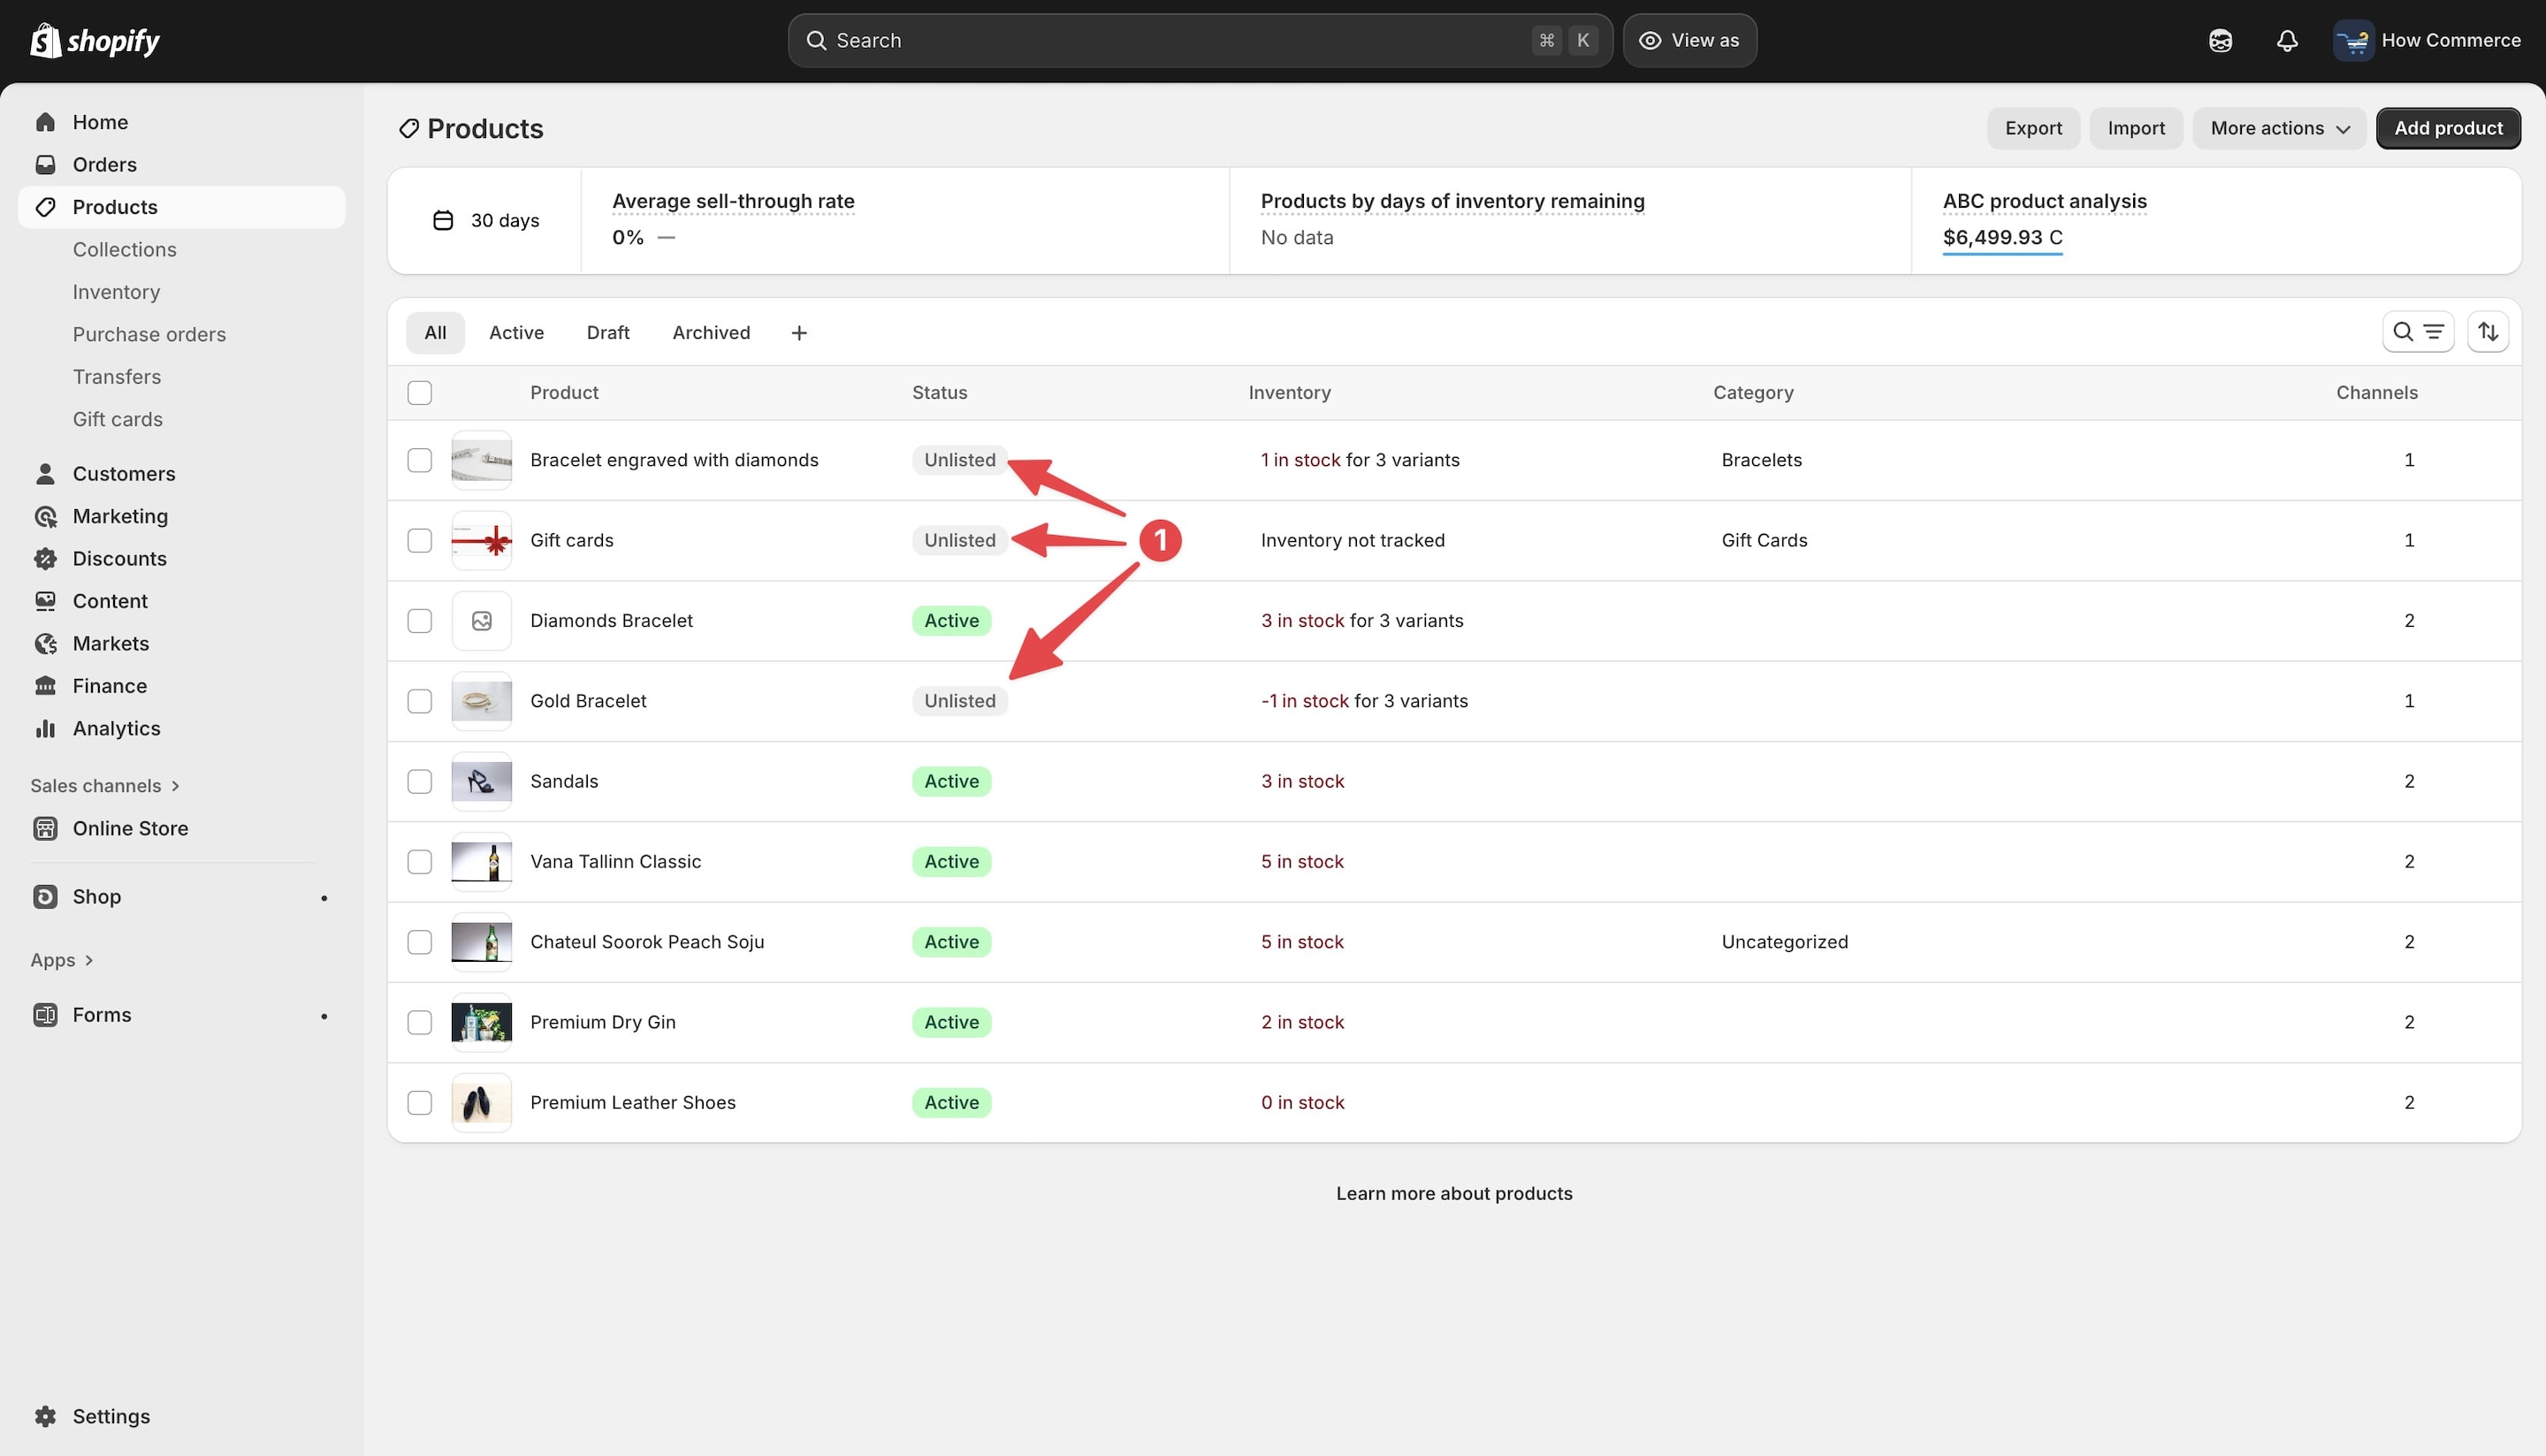
After clicking the “Unlist products” button, you will see that all three products that were previously “Active” are now marked as “Unlisted.”
Bulk editor
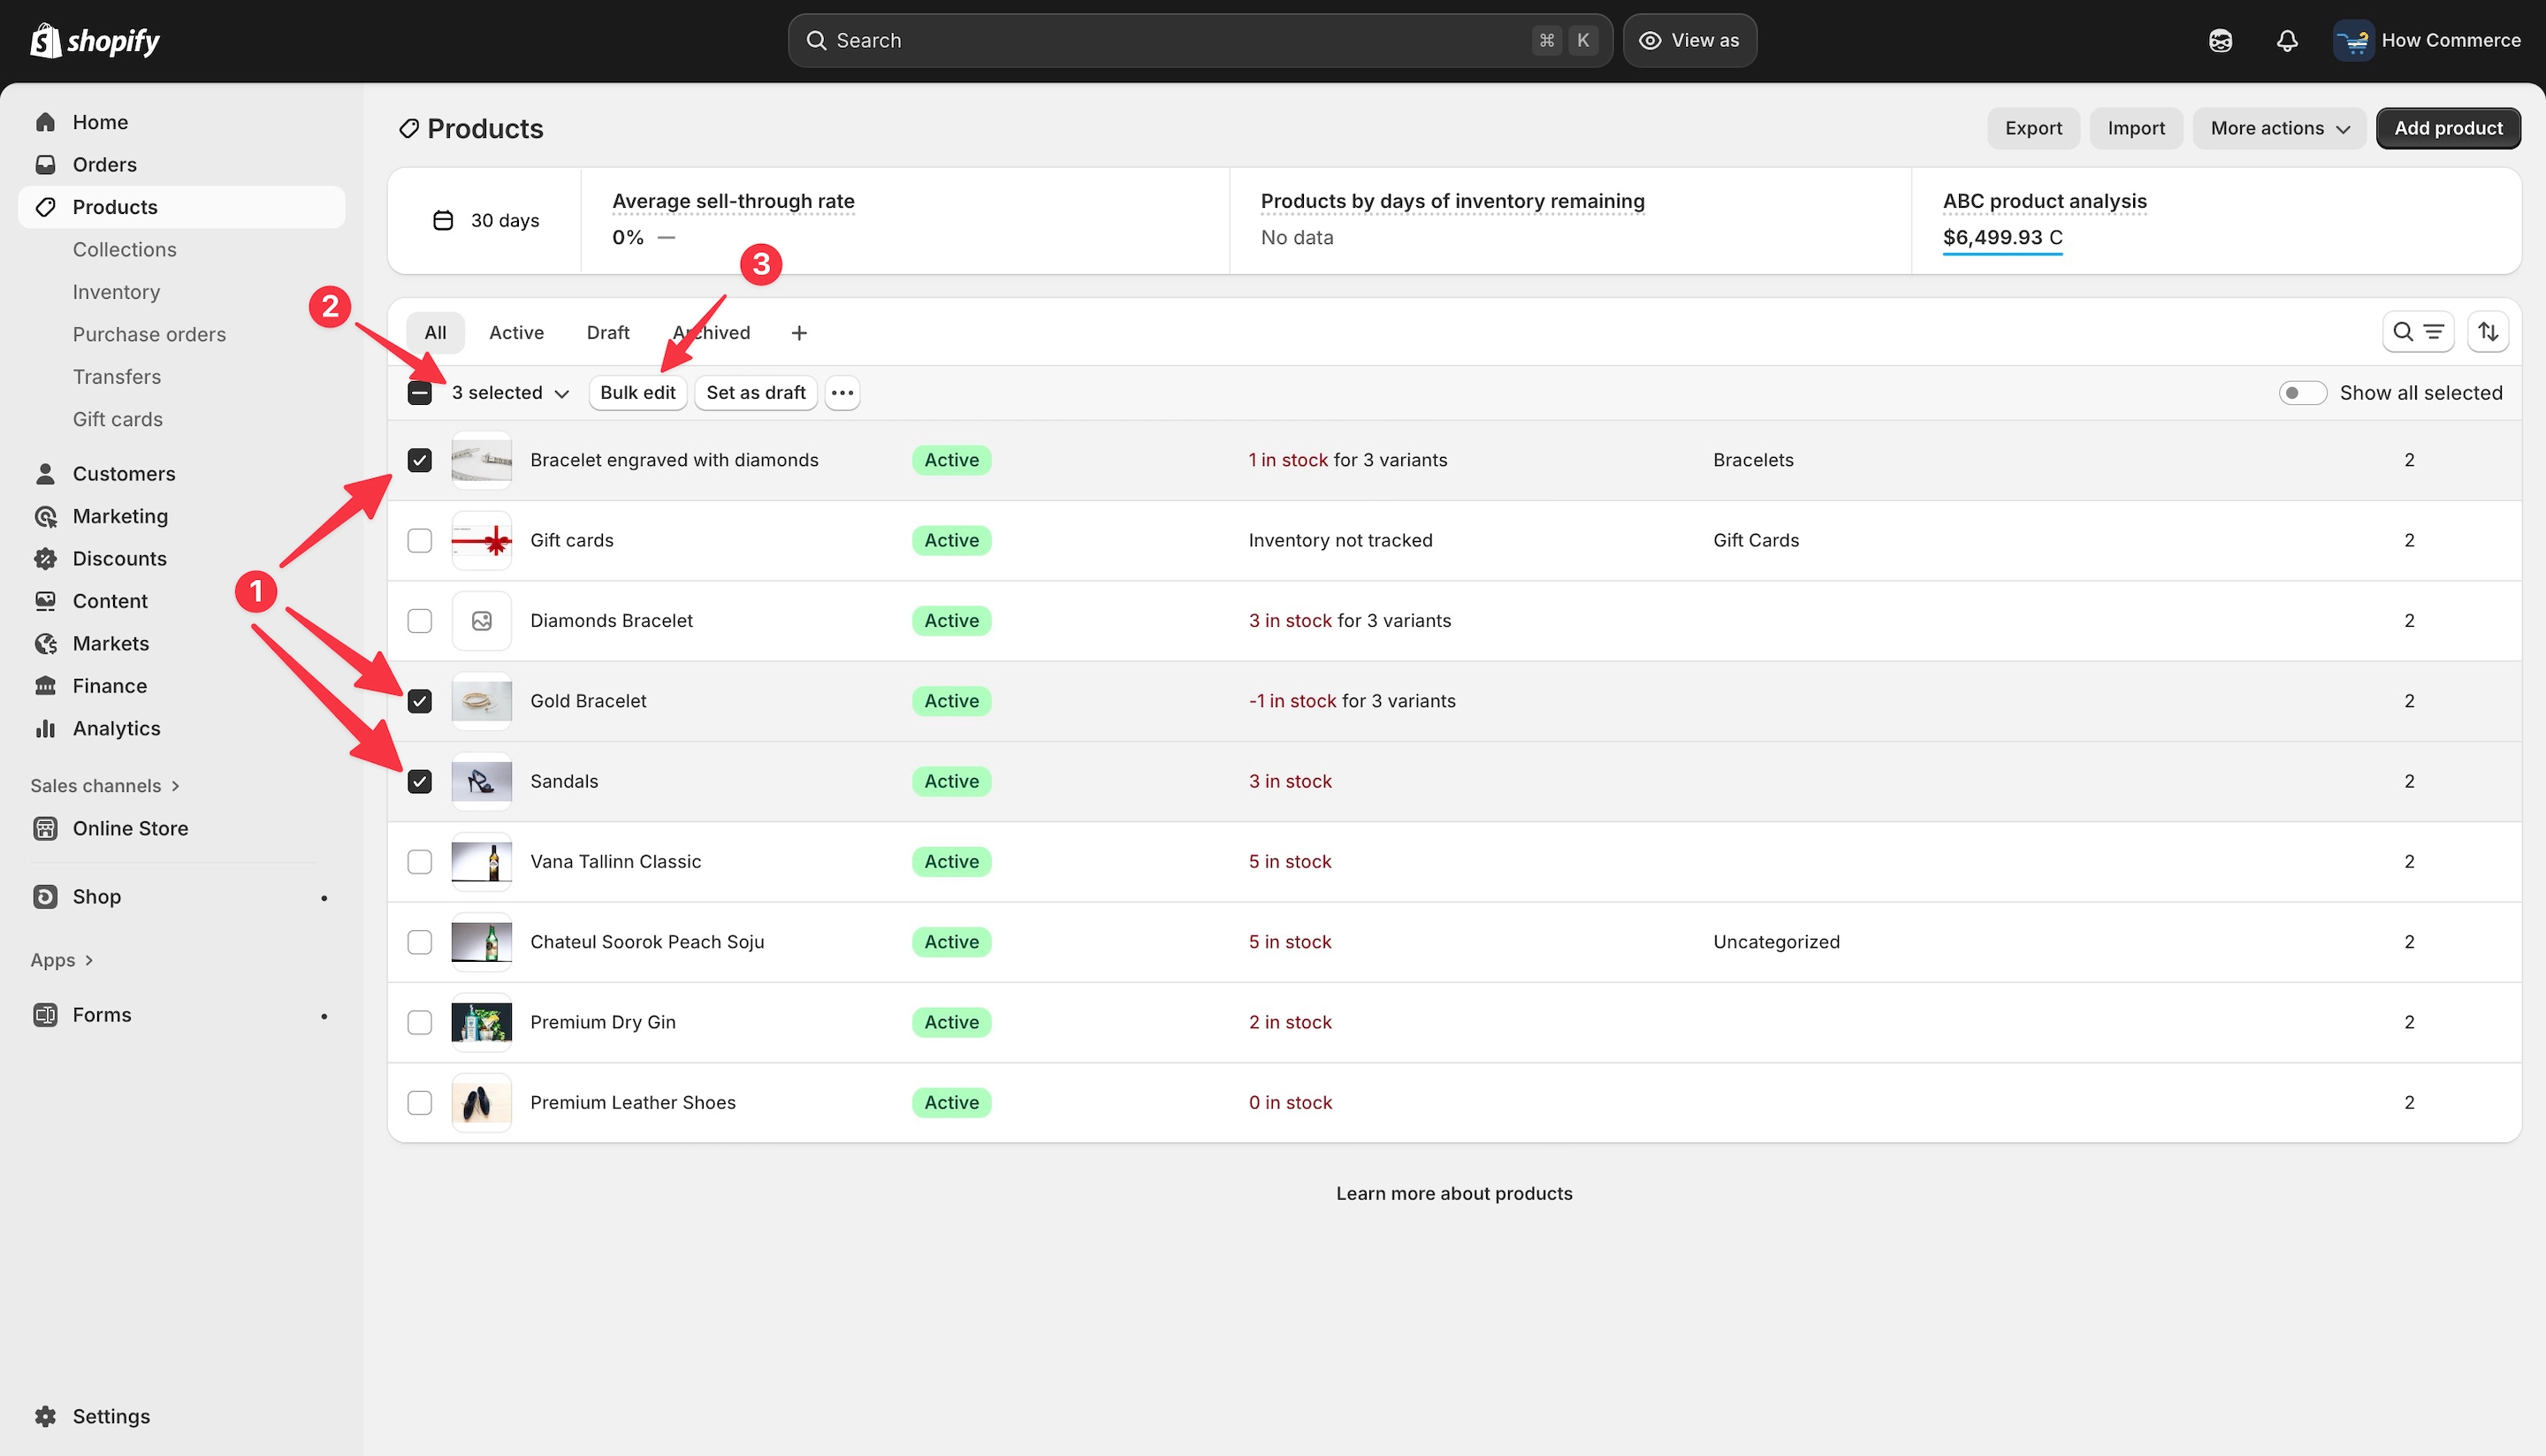
You can also unlist multiple products using the bulk editor.
Select the products you want to unlist. In this example, I selected three products (marked with 1 in the image below), which are also shown at the top (marked with 2).
Next, click the “Bulk edit” button (marked with 3 in the image below) to open the bulk editor.
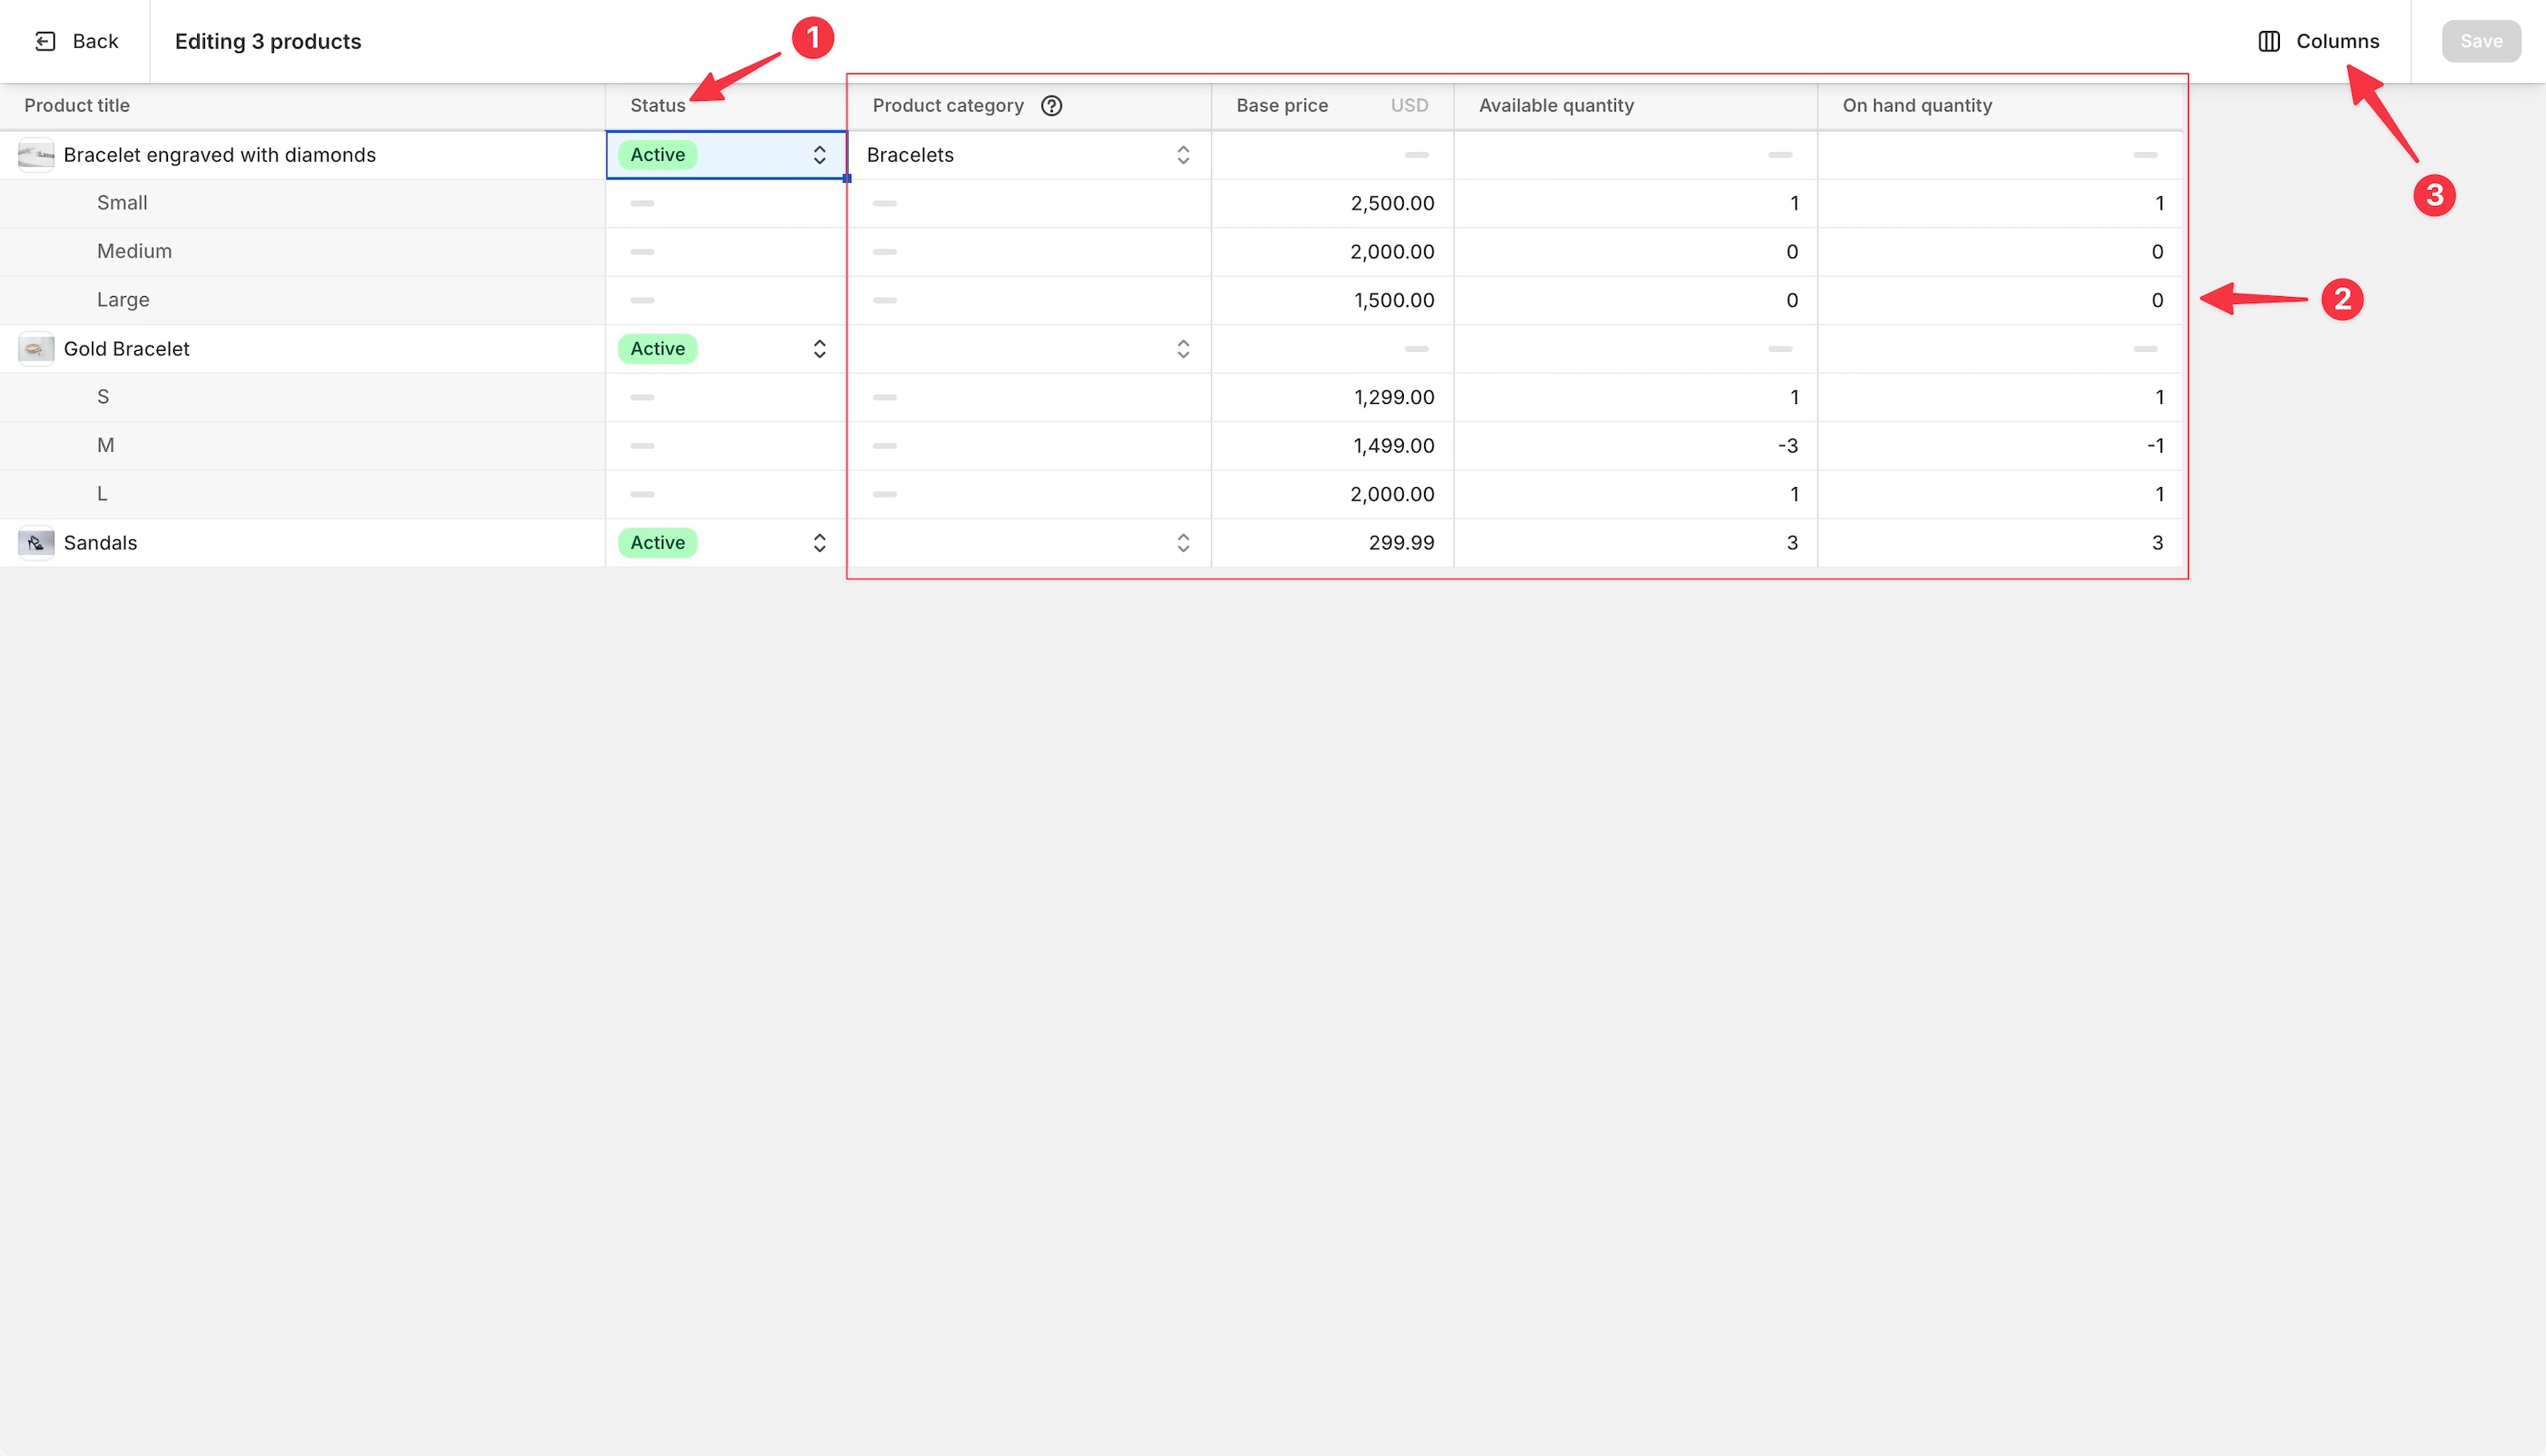
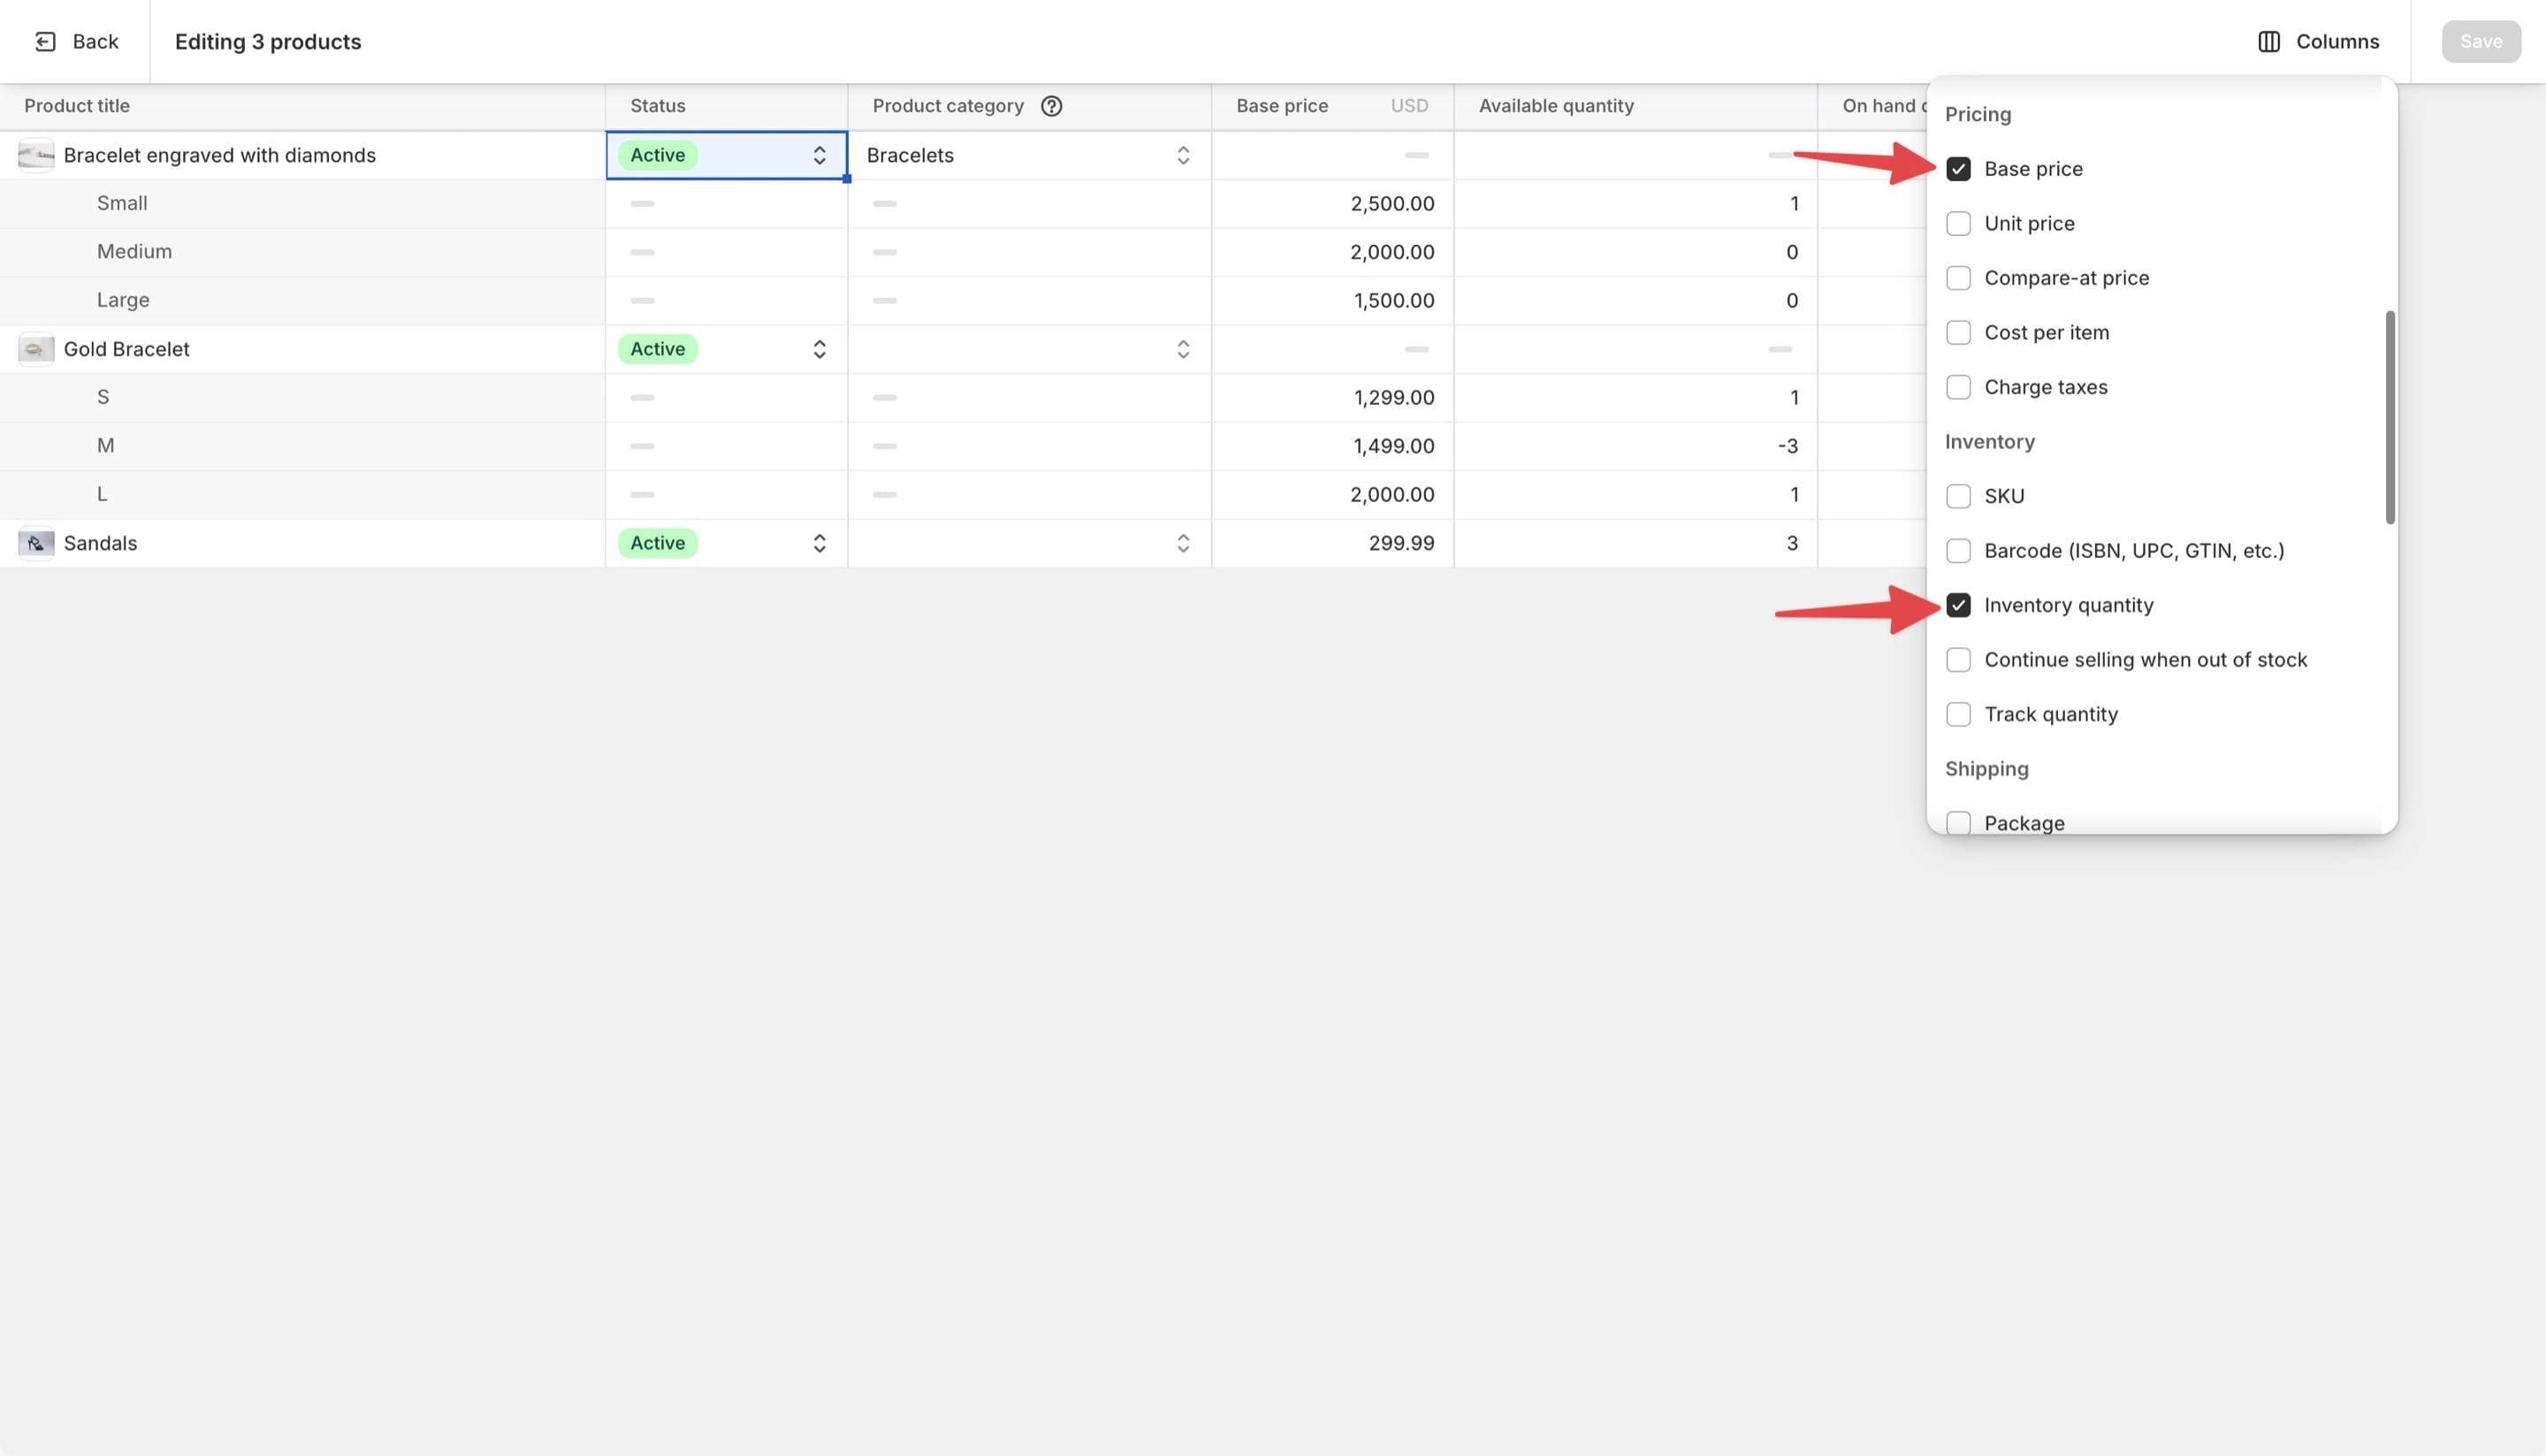
In the bulk editor, you will see several columns displayed by default (marked with 2 in the image below).
You won’t need most of them for this task.
The main column we’re interested in is the “Status” column (marked with 1 in the image below).
I recommend removing all unnecessary columns, as it’s easy to accidentally type or delete data in them without noticing.
To remove the columns you don’t need, click the “Columns” button (marked with 3 in the image below).
This will open a drop-down menu where you can select or deselect the columns you want to display.
Now deselect all columns except the “Status” column, as shown in the screenshot below.
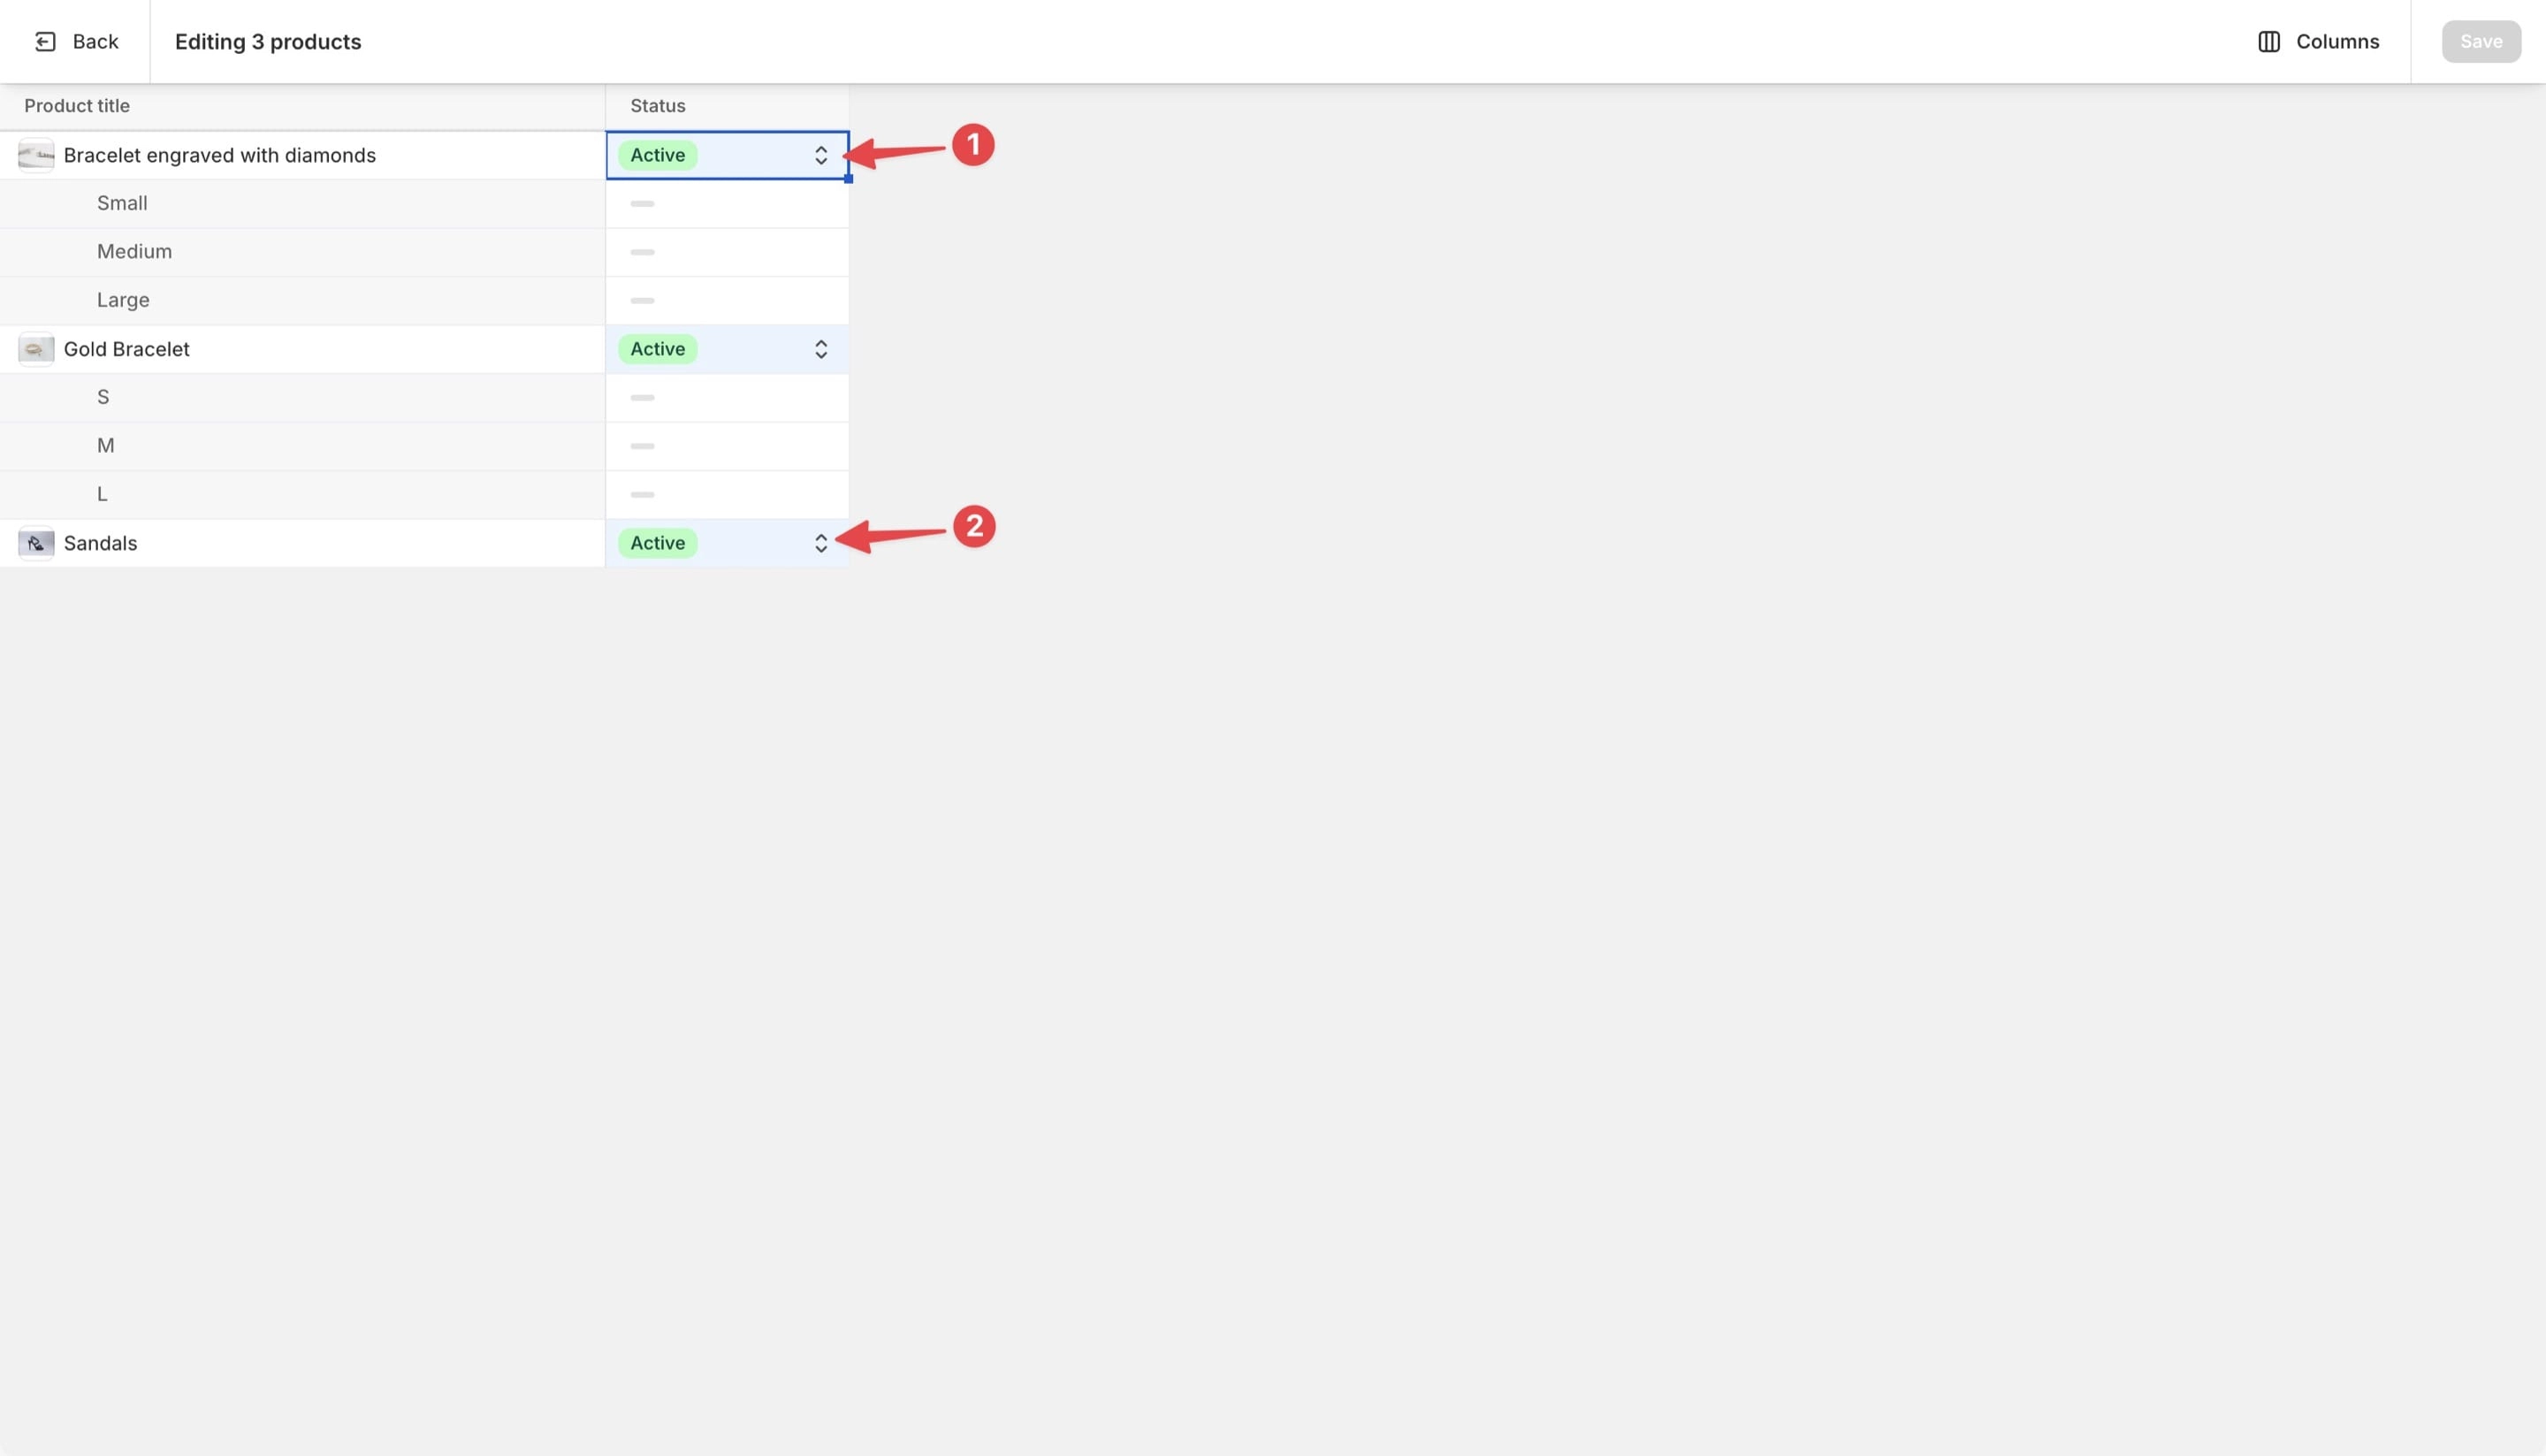
Press and hold the ⇧ (Shift) key, then click the first row in the “Status” column (marked with 1 in the image below).
While still holding the ⇧ (Shift) key, click the last row in the column (marked with 2 in the image below).
Now, click on the first row (marked with 1 in the image below) and select “Unlisted” from the drop-down menu (marked with 2 in the image below).
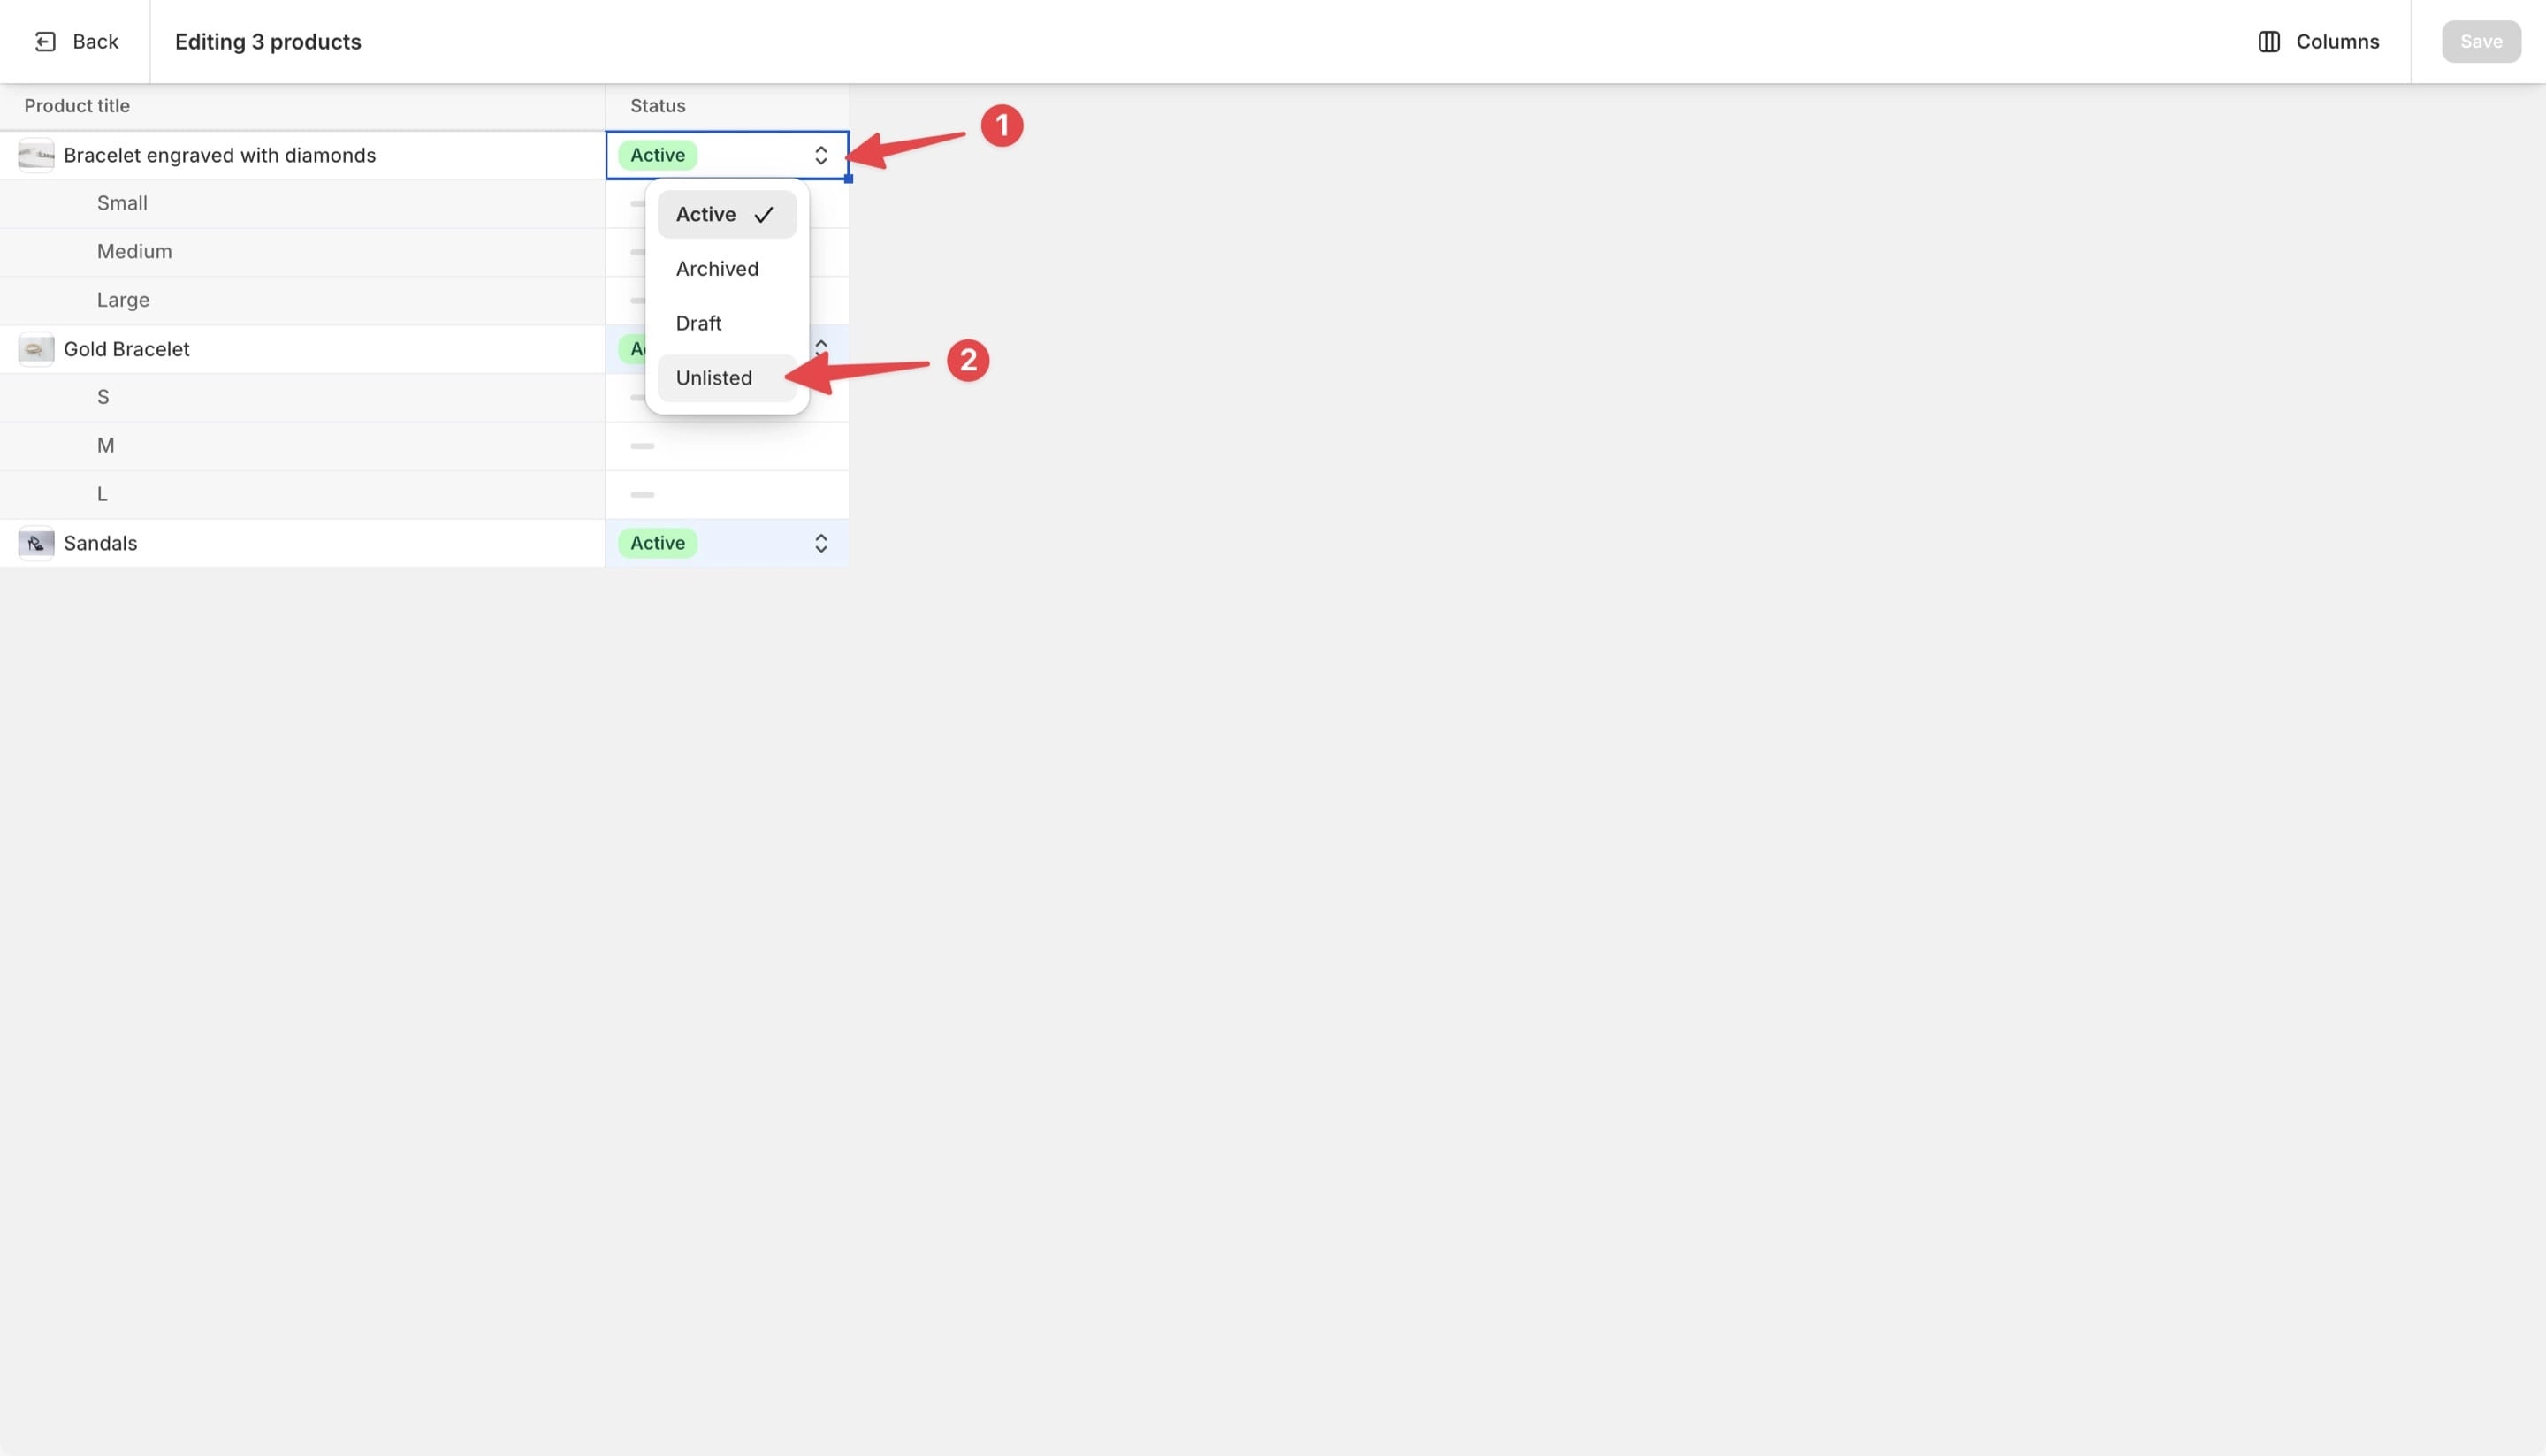
Since all rows were selected, any change you make to the first one will automatically apply to all of them.
This means that instead of manually selecting a value for each product, you only need to do it once, and the change will reflect across all selected products.
This method can save you a lot of time when editing multiple products at once.
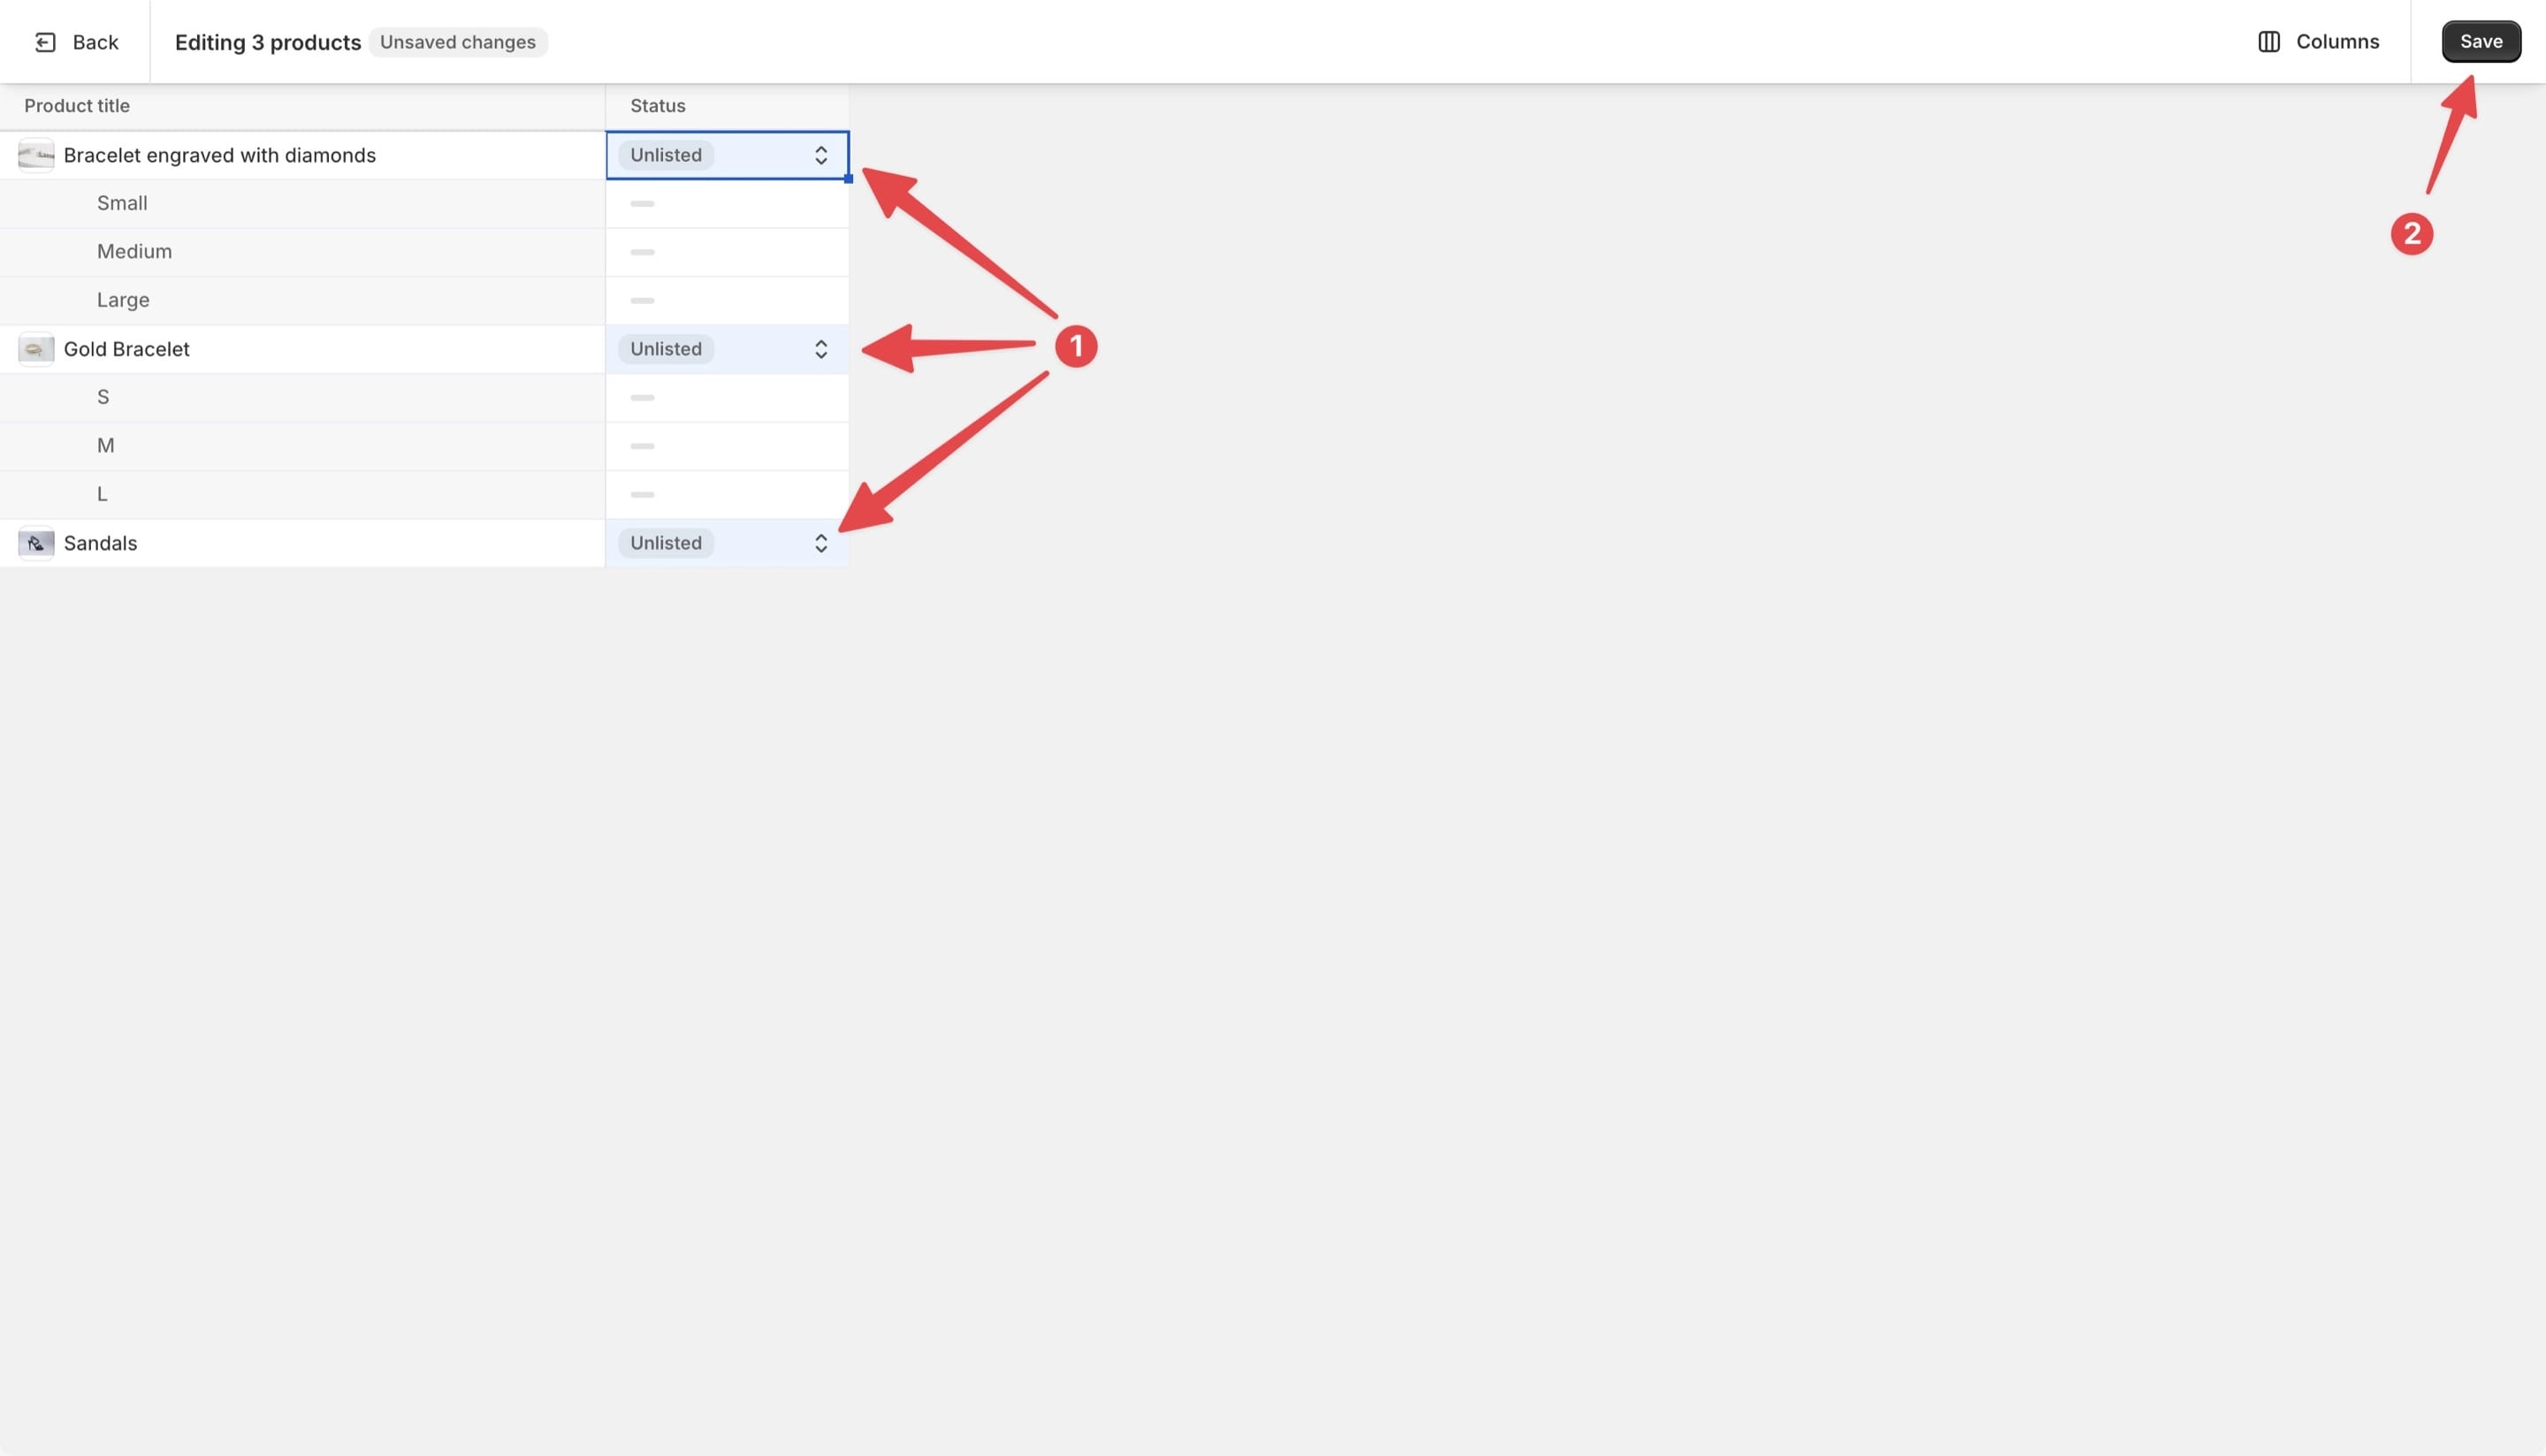
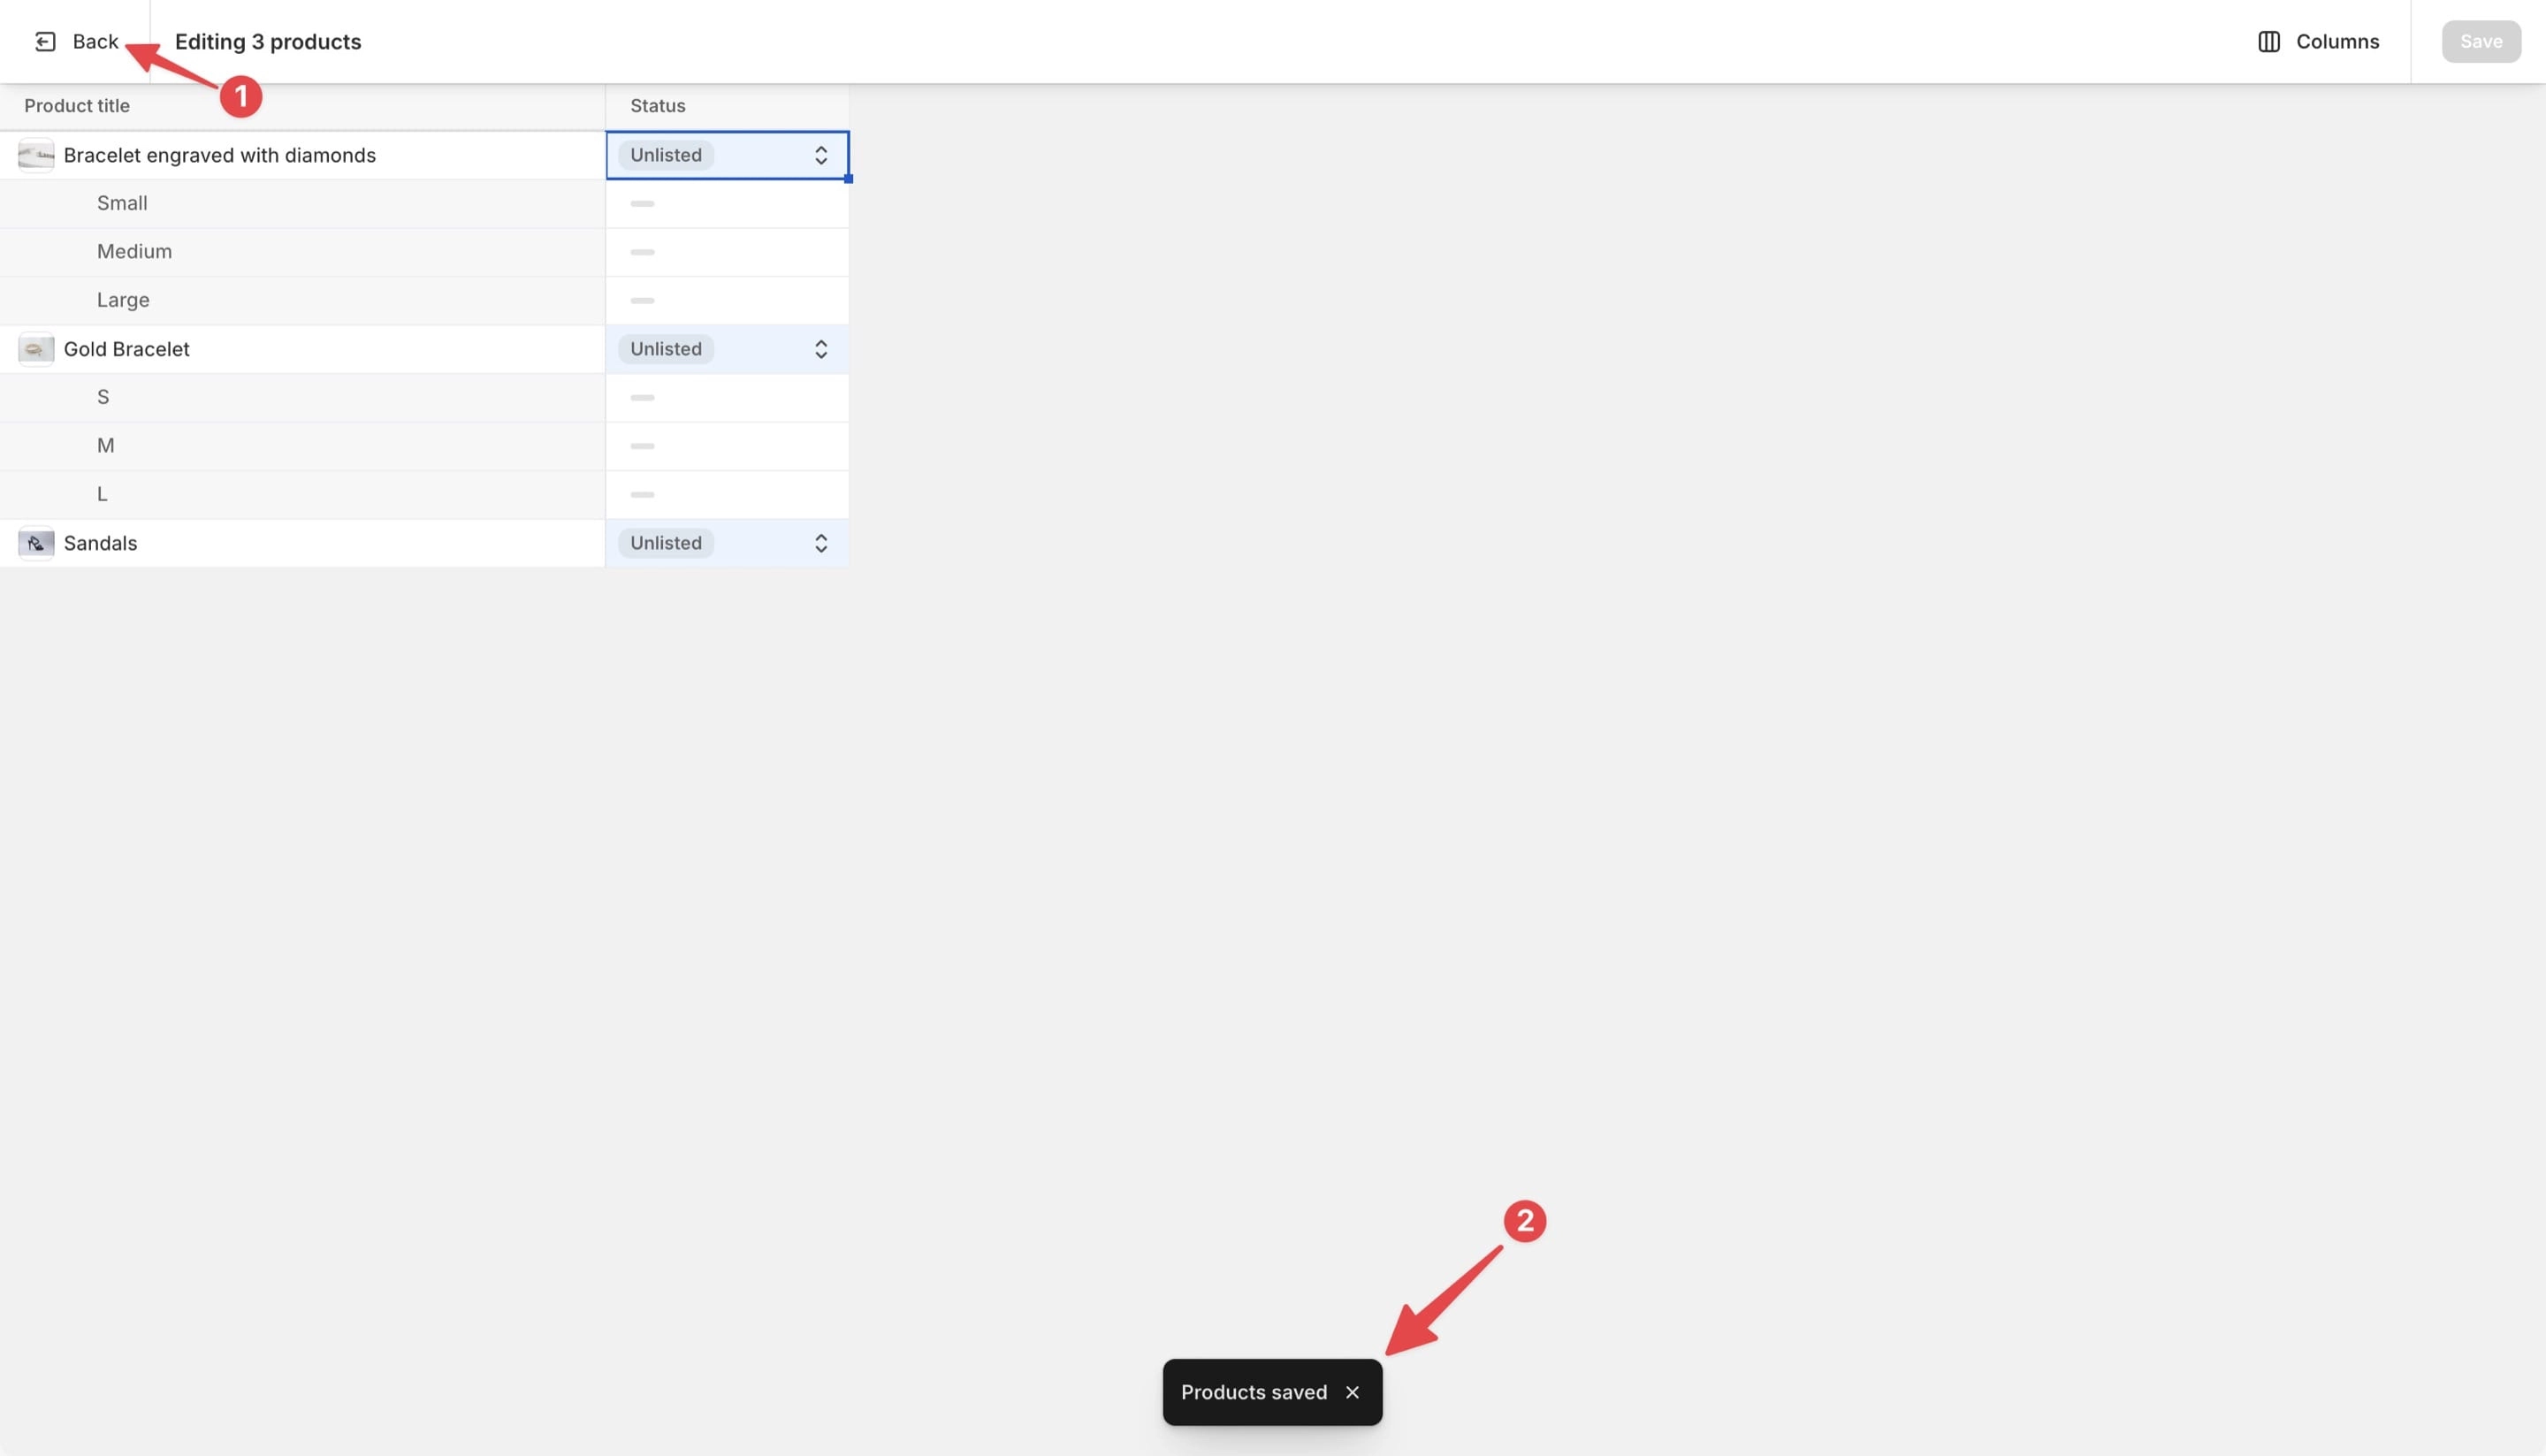
With all products now set to “Unlisted” (marked with 1 in the image below), go ahead and click Save to apply your changes (marked with 2 in the image below).
You can now return to the product listing page by clicking the Back button at the top left of the screen (marked with 1 in the image below).
If your changes were saved successfully, a small “Product saved” pop-up will appear at the bottom of the page (marked with 2 in the image below).
On the product listing page in the admin, products with the “Unlisted” status will appear as shown below:
How to share the product link with customers?
It’s simple, just copy the link directly from the admin:
Or visit your storefront and copy the link from the browser’s address bar.
What to be aware of?
According to Shopify, you cannot publish “Unlisted” products to the Shop app, Shopify POS, the Collective: Supplier sales channel, or any third-party sales channels.
While the unlisted status hides your products from your online store and most sales channels, it’s important to note that some connected apps may still treat them as active products.
For example, apps that don’t yet recognize the new unlisted feature, or certain search integrations, may continue to display these items in search results or product feeds.
Let’s say you sell digital files and want to share a private link with a client.
Even if the product is unlisted in Shopify, it might still appear in your Digital Downloads app until that app fully supports the new status type.
For this reason, it’s best to test visibility using a private browser window (for example, Chrome Incognito mode) or by checking directly within your app integrations.
According to Shopify’s documentation, unlisted products behave similarly to active products in some apps. In practice, this means you should always double-check how your integrations handle product visibility to ensure consistent results.
Conclusion
The new Unlisted product status in Shopify is a small but powerful addition that gives store owners and developers much more flexibility.
Whether you’re testing new features, setting up early access campaigns, or creating private offers for VIP clients, the ability to hide products from search engines and public listings while keeping them live and fully functional is a game-changer.
Unlike draft products, unlisted products maintain their full live URLs, which means they work seamlessly with most third-party apps and integrations.
This allows for realistic testing and private sales without the risks of unwanted visibility, SEO issues, or broken links.
However, it’s important to use this feature thoughtfully.
Because unlisted products can affect how search engines index your store, always double-check your settings and integrations before making major changes.
In short, the Unlisted status bridges the gap between Active and Draft products, offering the perfect balance between privacy, flexibility, and functionality.
For developers, marketers, and store owners alike, it’s one of Shopify’s most practical improvements in recent years.