
Managing products in Shopify can become increasingly time-consuming as your product catalog grows.
Finding the products you need often means applying the same filters repeatedly, especially when working with specific product types, vendors, inventory levels, statuses, or other product attributes.
Shopify product views solve this problem by allowing you to save filtered product lists and access them again directly from the Products page.
In this tutorial, you'll learn how to create and save a product view in Shopify so you can better organize your catalog and manage specific groups of products more efficiently. This is especially useful when working with Shopify collections to quickly filter and access related products.
Note: A product view doesn't create a new group of products or change your existing products. It only provides a saved way to filter and display products in your Shopify admin.
Find the product views
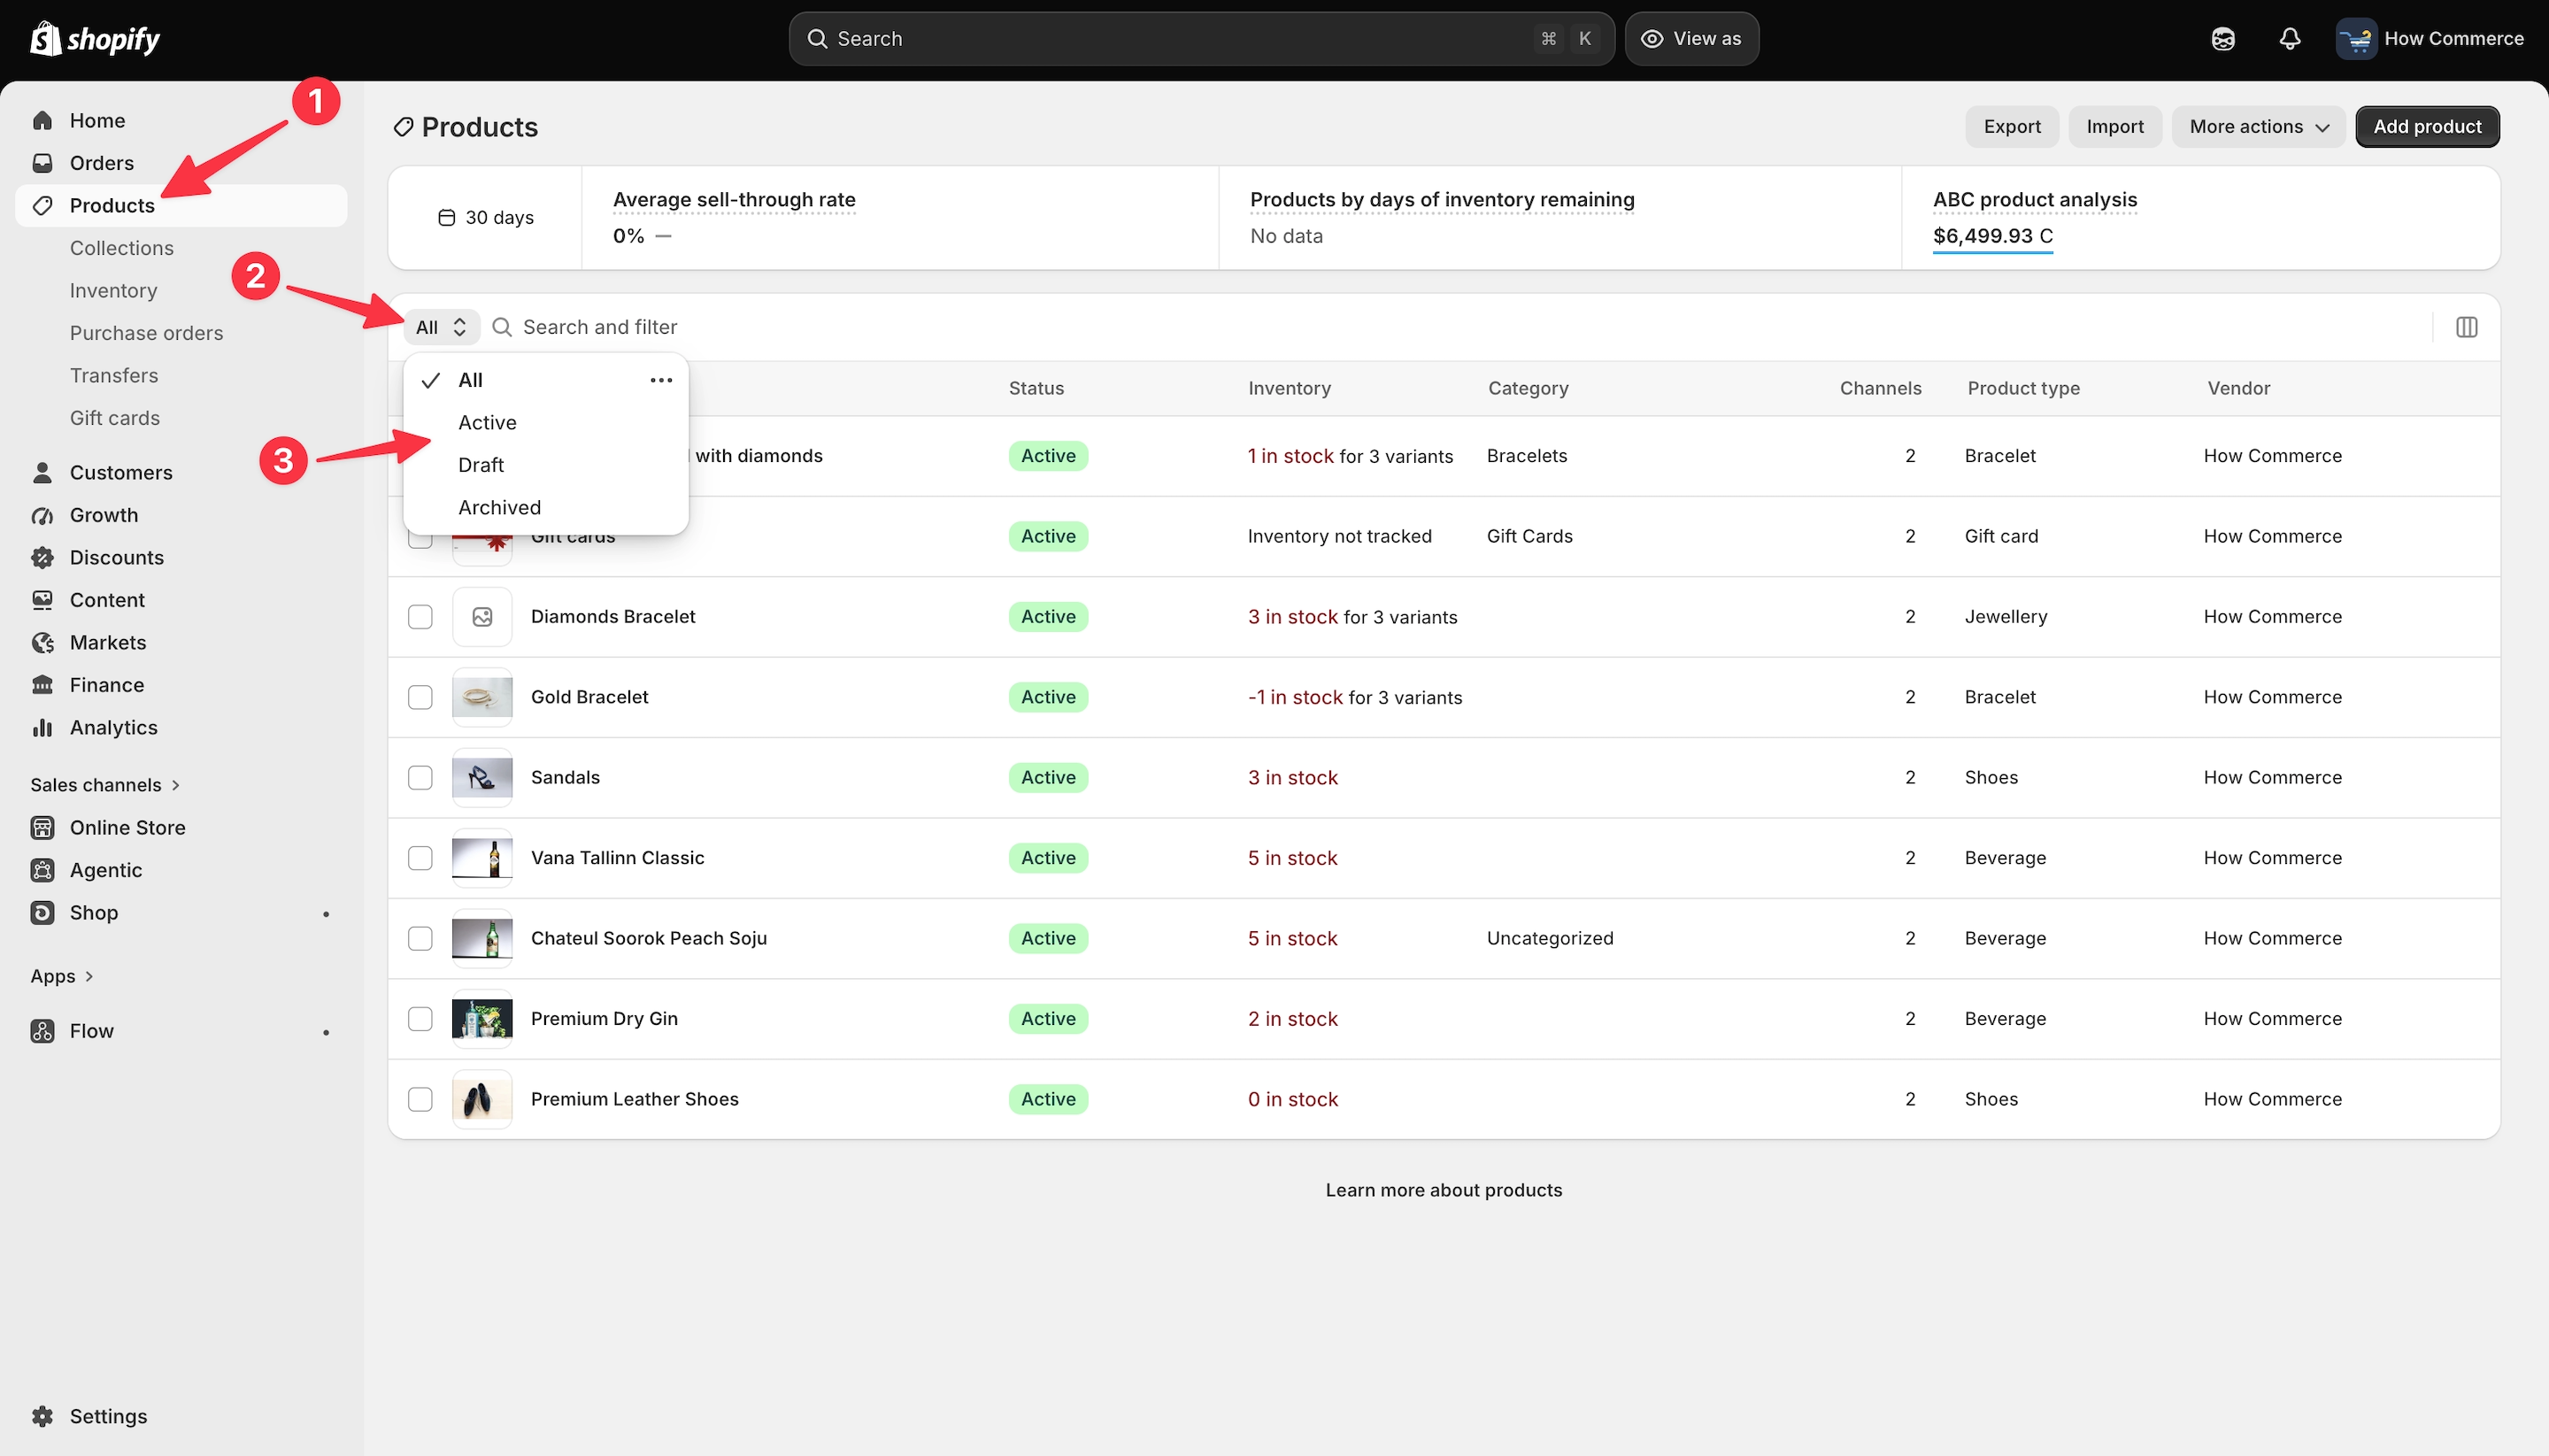
Go to Products (marked with 1 in the image below), then click the All drop-down (marked with 2 in the image below). Here, you can see all the product views provided by Shopify by default (marked with 3 in the image below).
These views are provided by Shopify and can’t be modified, so you’ll use them as they are. They allow you to quickly view all products, active products, draft products, or archived products.
Create a product view
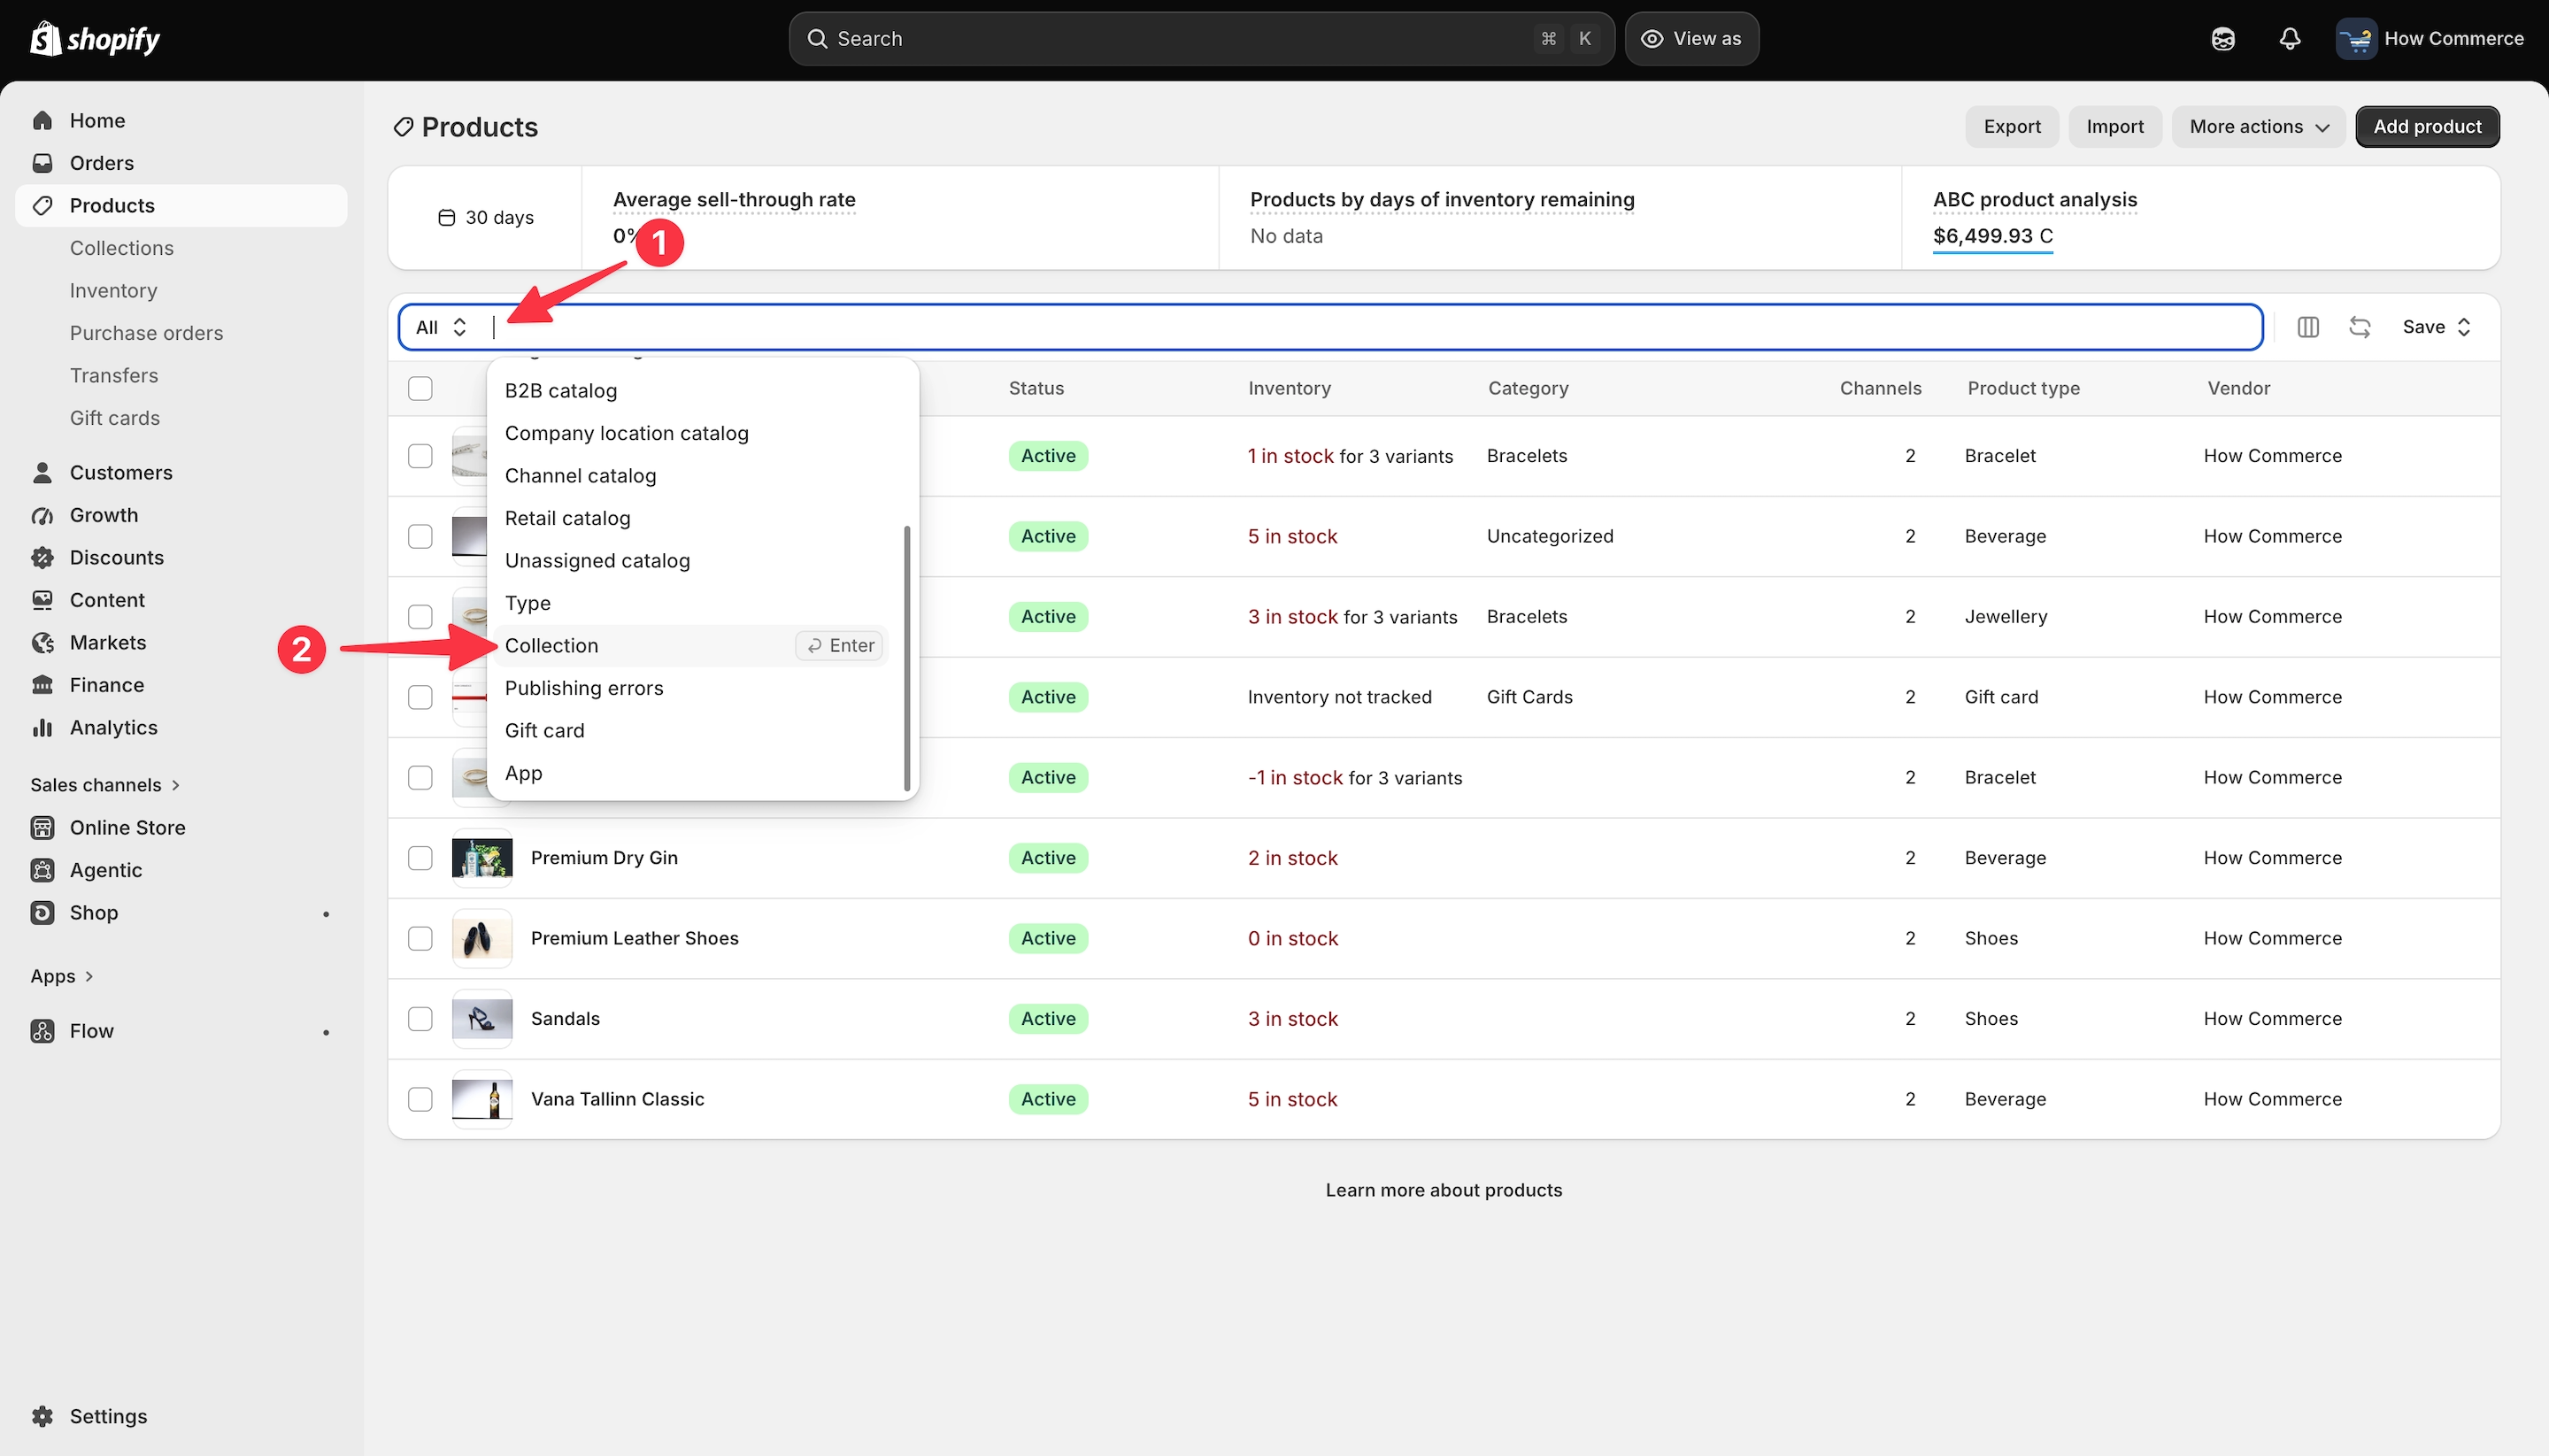
Now click inside the input box (marked with 1 in the image below), and a drop-down menu will appear with multiple filter options to choose from.
Based on my experience working with Shopify Plus clients, one of the most commonly used views is based on product collections, as it allows you to quickly find and manage products belonging to a specific collection.
Select Collection (marked with 2 in the image below).
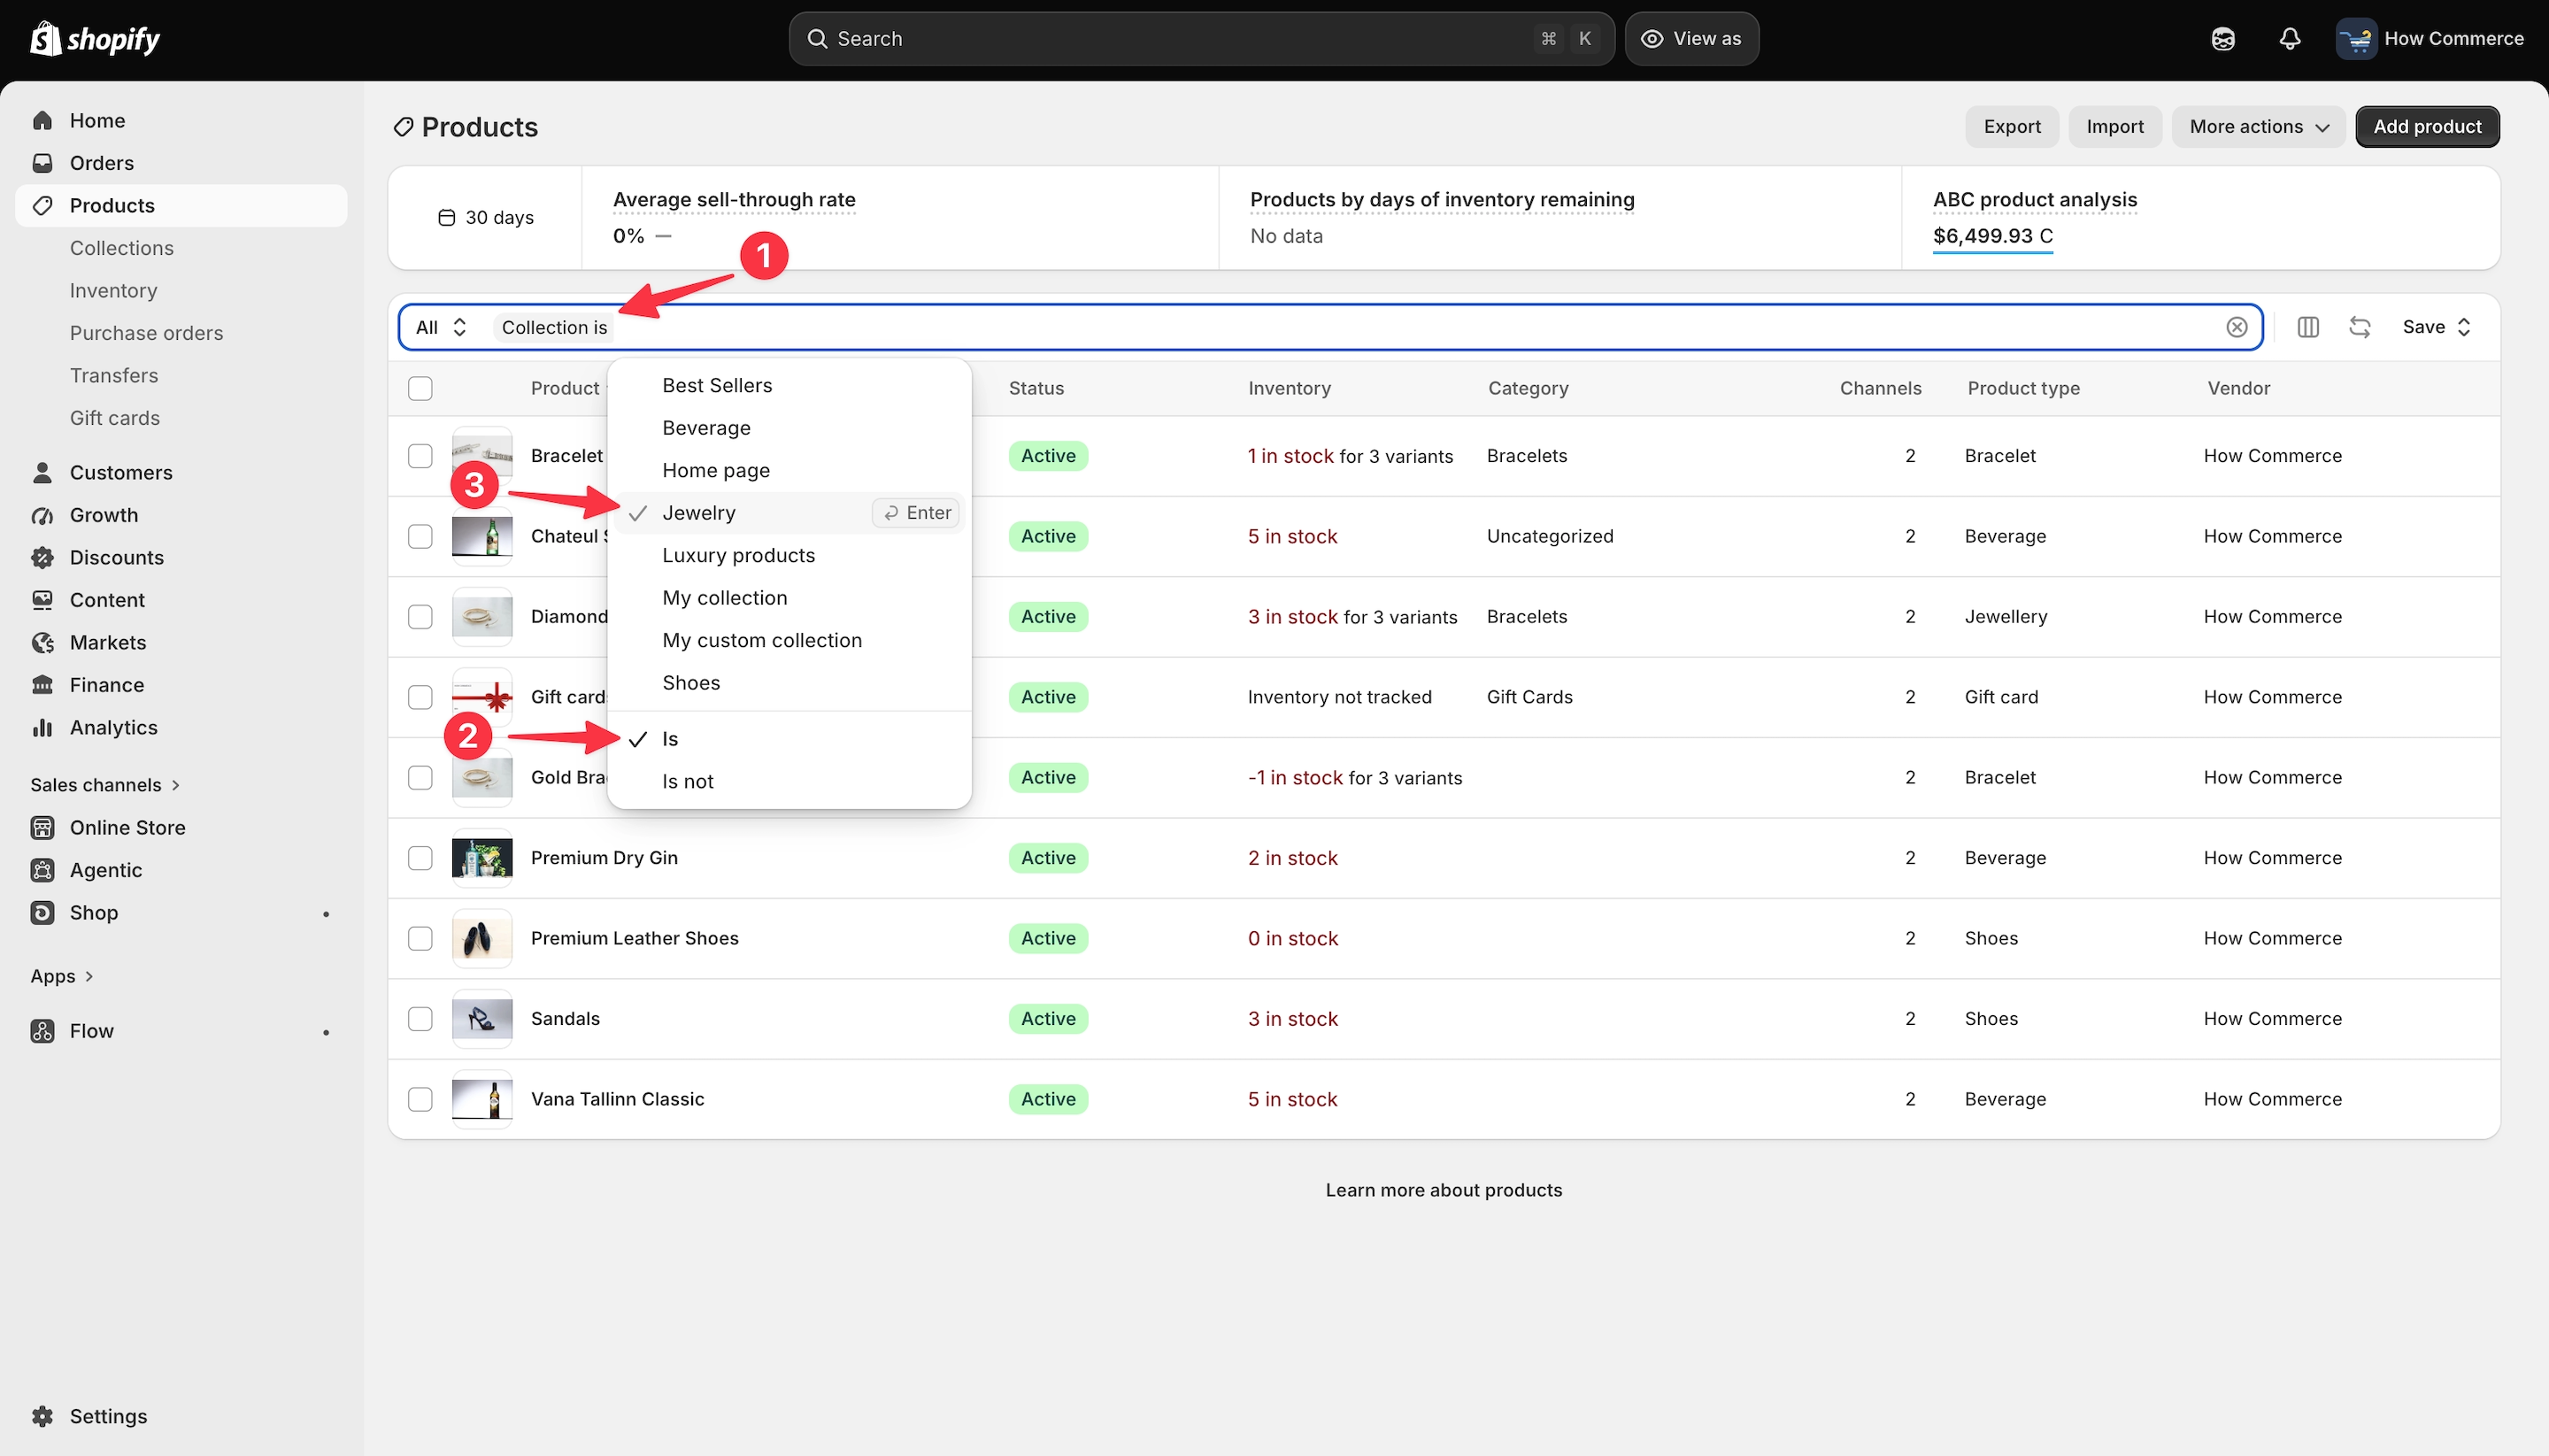
You’ll see Collection is (marked with 1 in the image below), and a new drop-down menu will display all the existing collections in your store.
You also have the option to exclude a collection by changing “is” to “is not” (marked with 2 in the image below).
For this example, I’ll select the Jewelry collection (marked with 3 in the image below), so I can always use this filtered product view to see all the jewelry products available in the store.
The view can be further customized by selecting the columns you want to see every time you access it.
Click the Columns icon (marked with 1 in the image below).
The first option is “Sort by” (marked with 2 in the image below), which allows you to sort the products in the view based on a selected column.
The next option is “Hide archived products” (marked with 3 in the image below). I always enable this option because archived products are no longer actively managed. Hiding them keeps the view focused on the products you’re currently working with.
Next, you can choose the Columns (marked with 4 in the image below) you want to display in the view. Each selected column will display its corresponding product data, allowing you to customize the information available at a glance.
Where you see the eye icon activated (marked with 5 in the image below), it means that those columns will be visible in your newly created view.
For this example, I’ll select Category (marked with 6 in the image below), since I want to display the product category in this specific view.
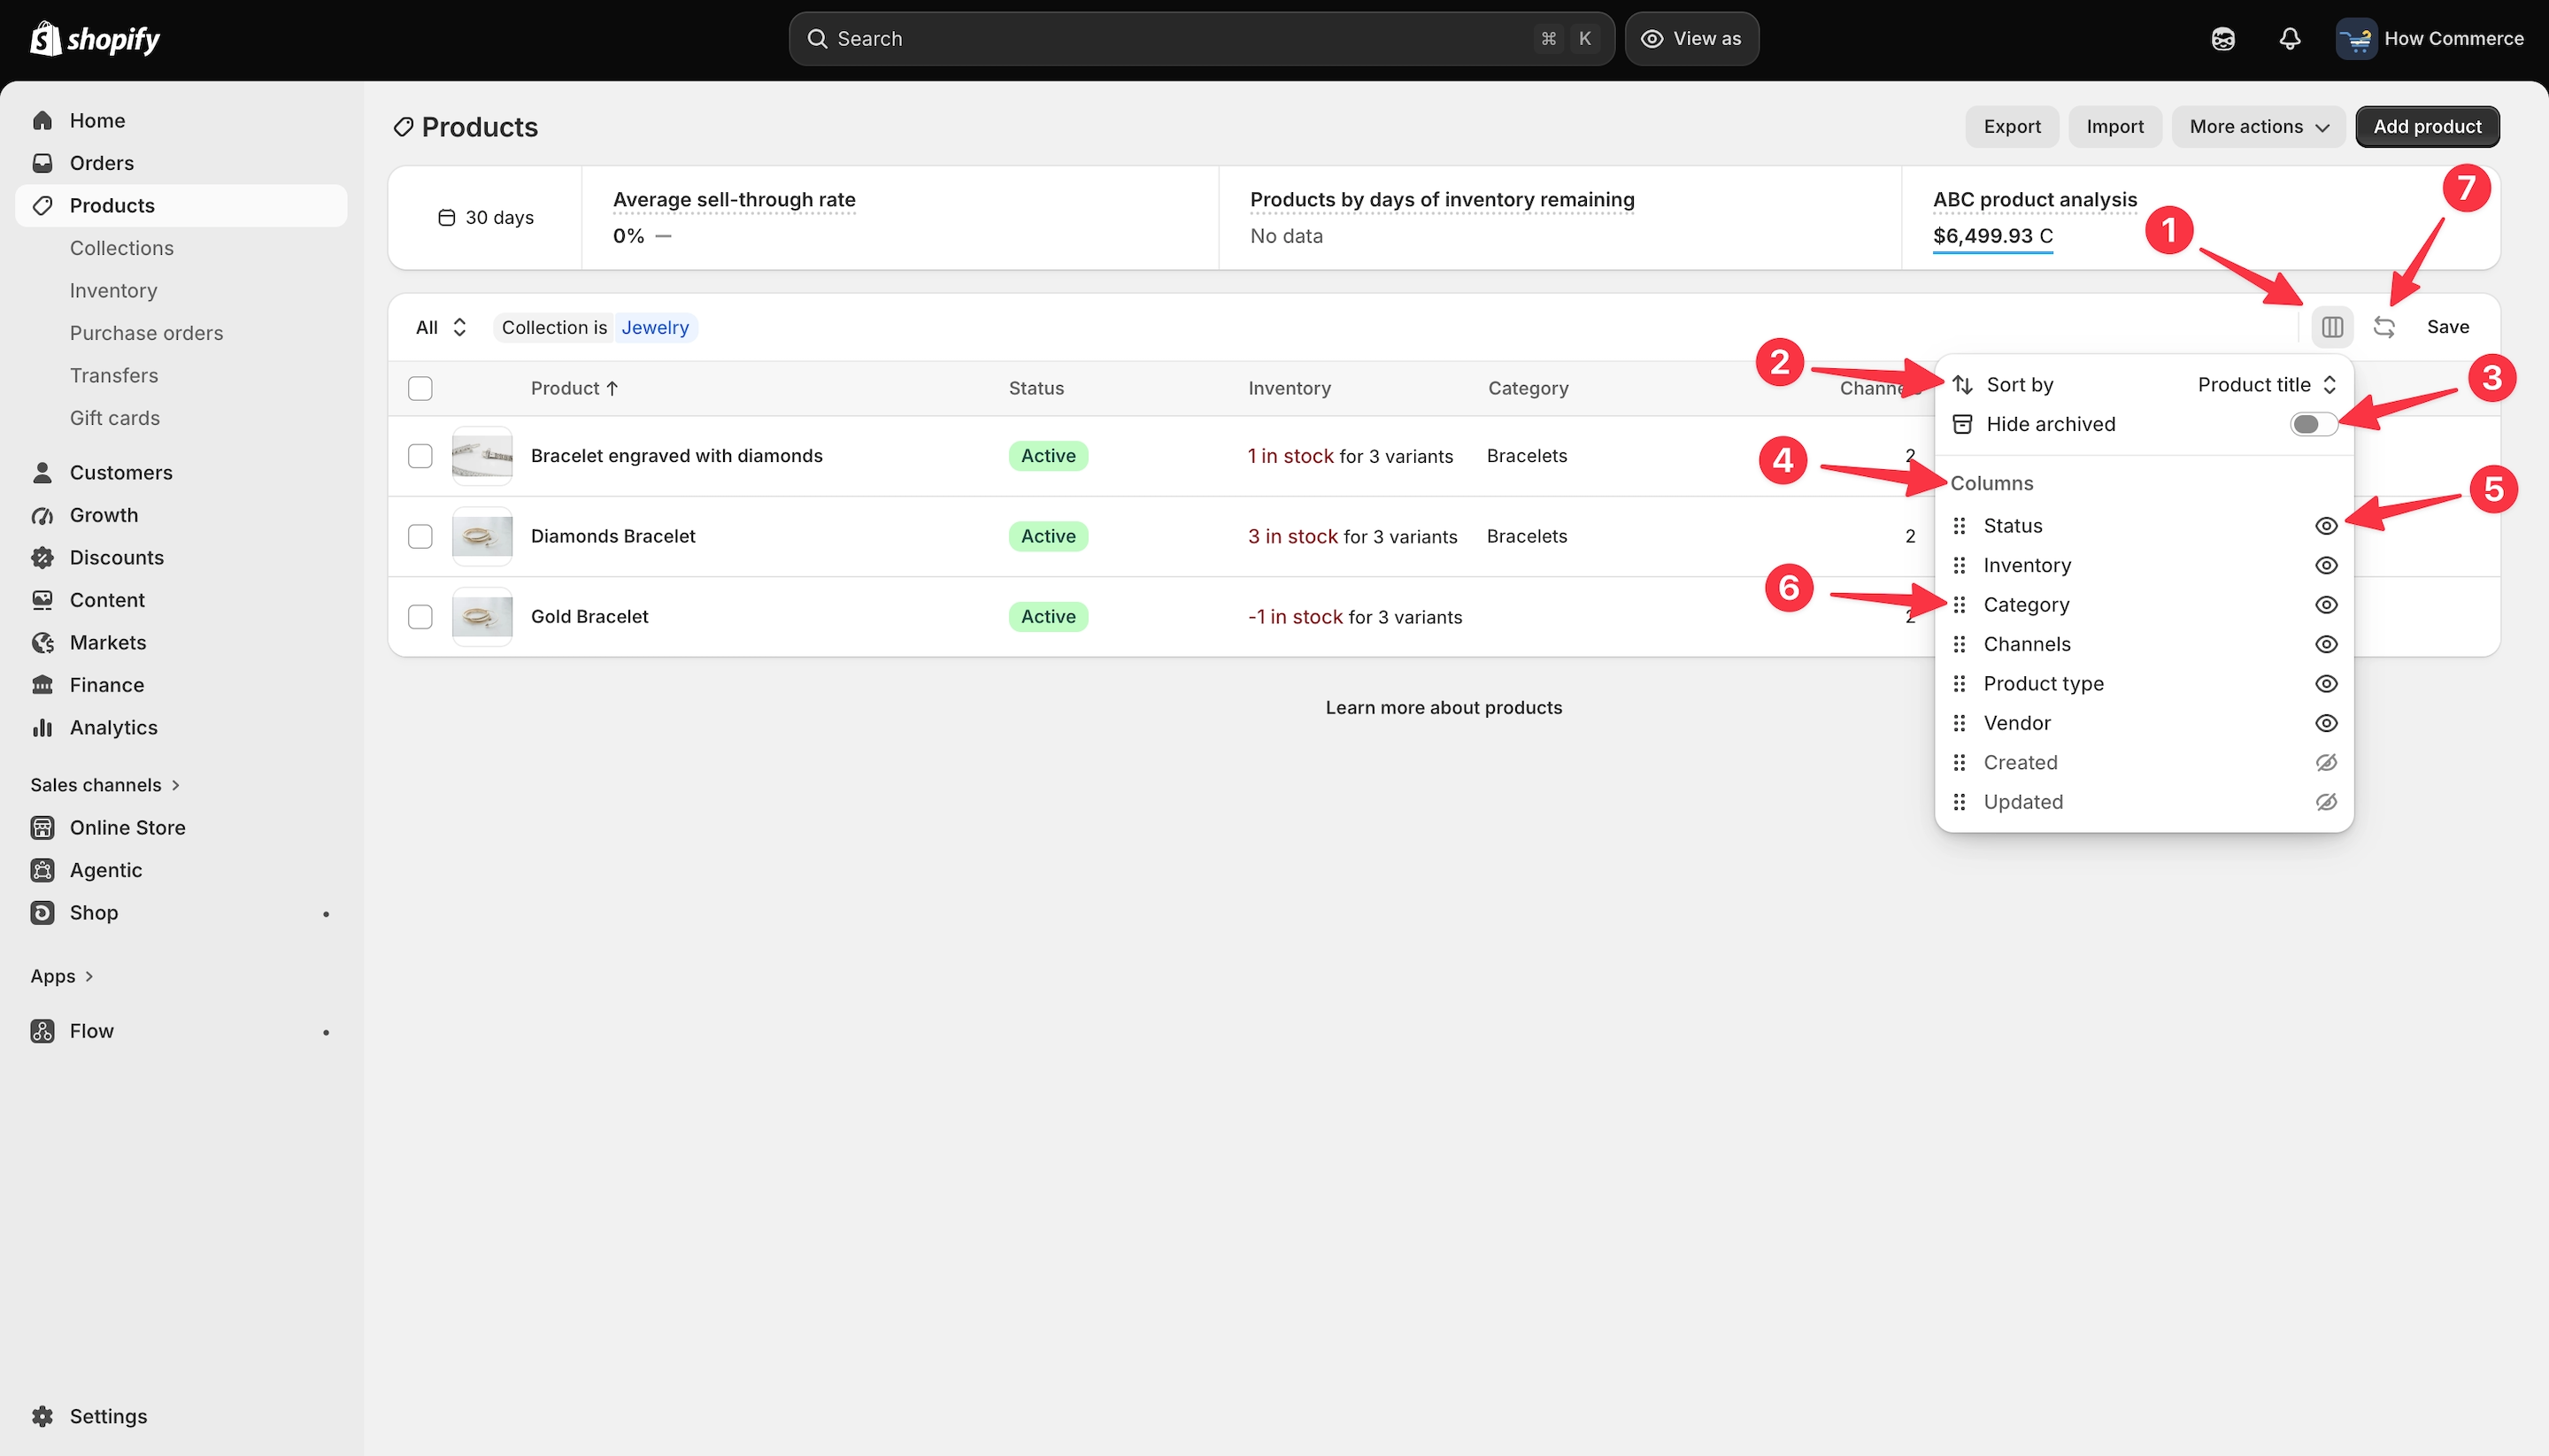
Select all the options and columns you want to have available in this view.
Once you’re done customizing it, click the “Save” button to save your new product view, as shown in the image below:
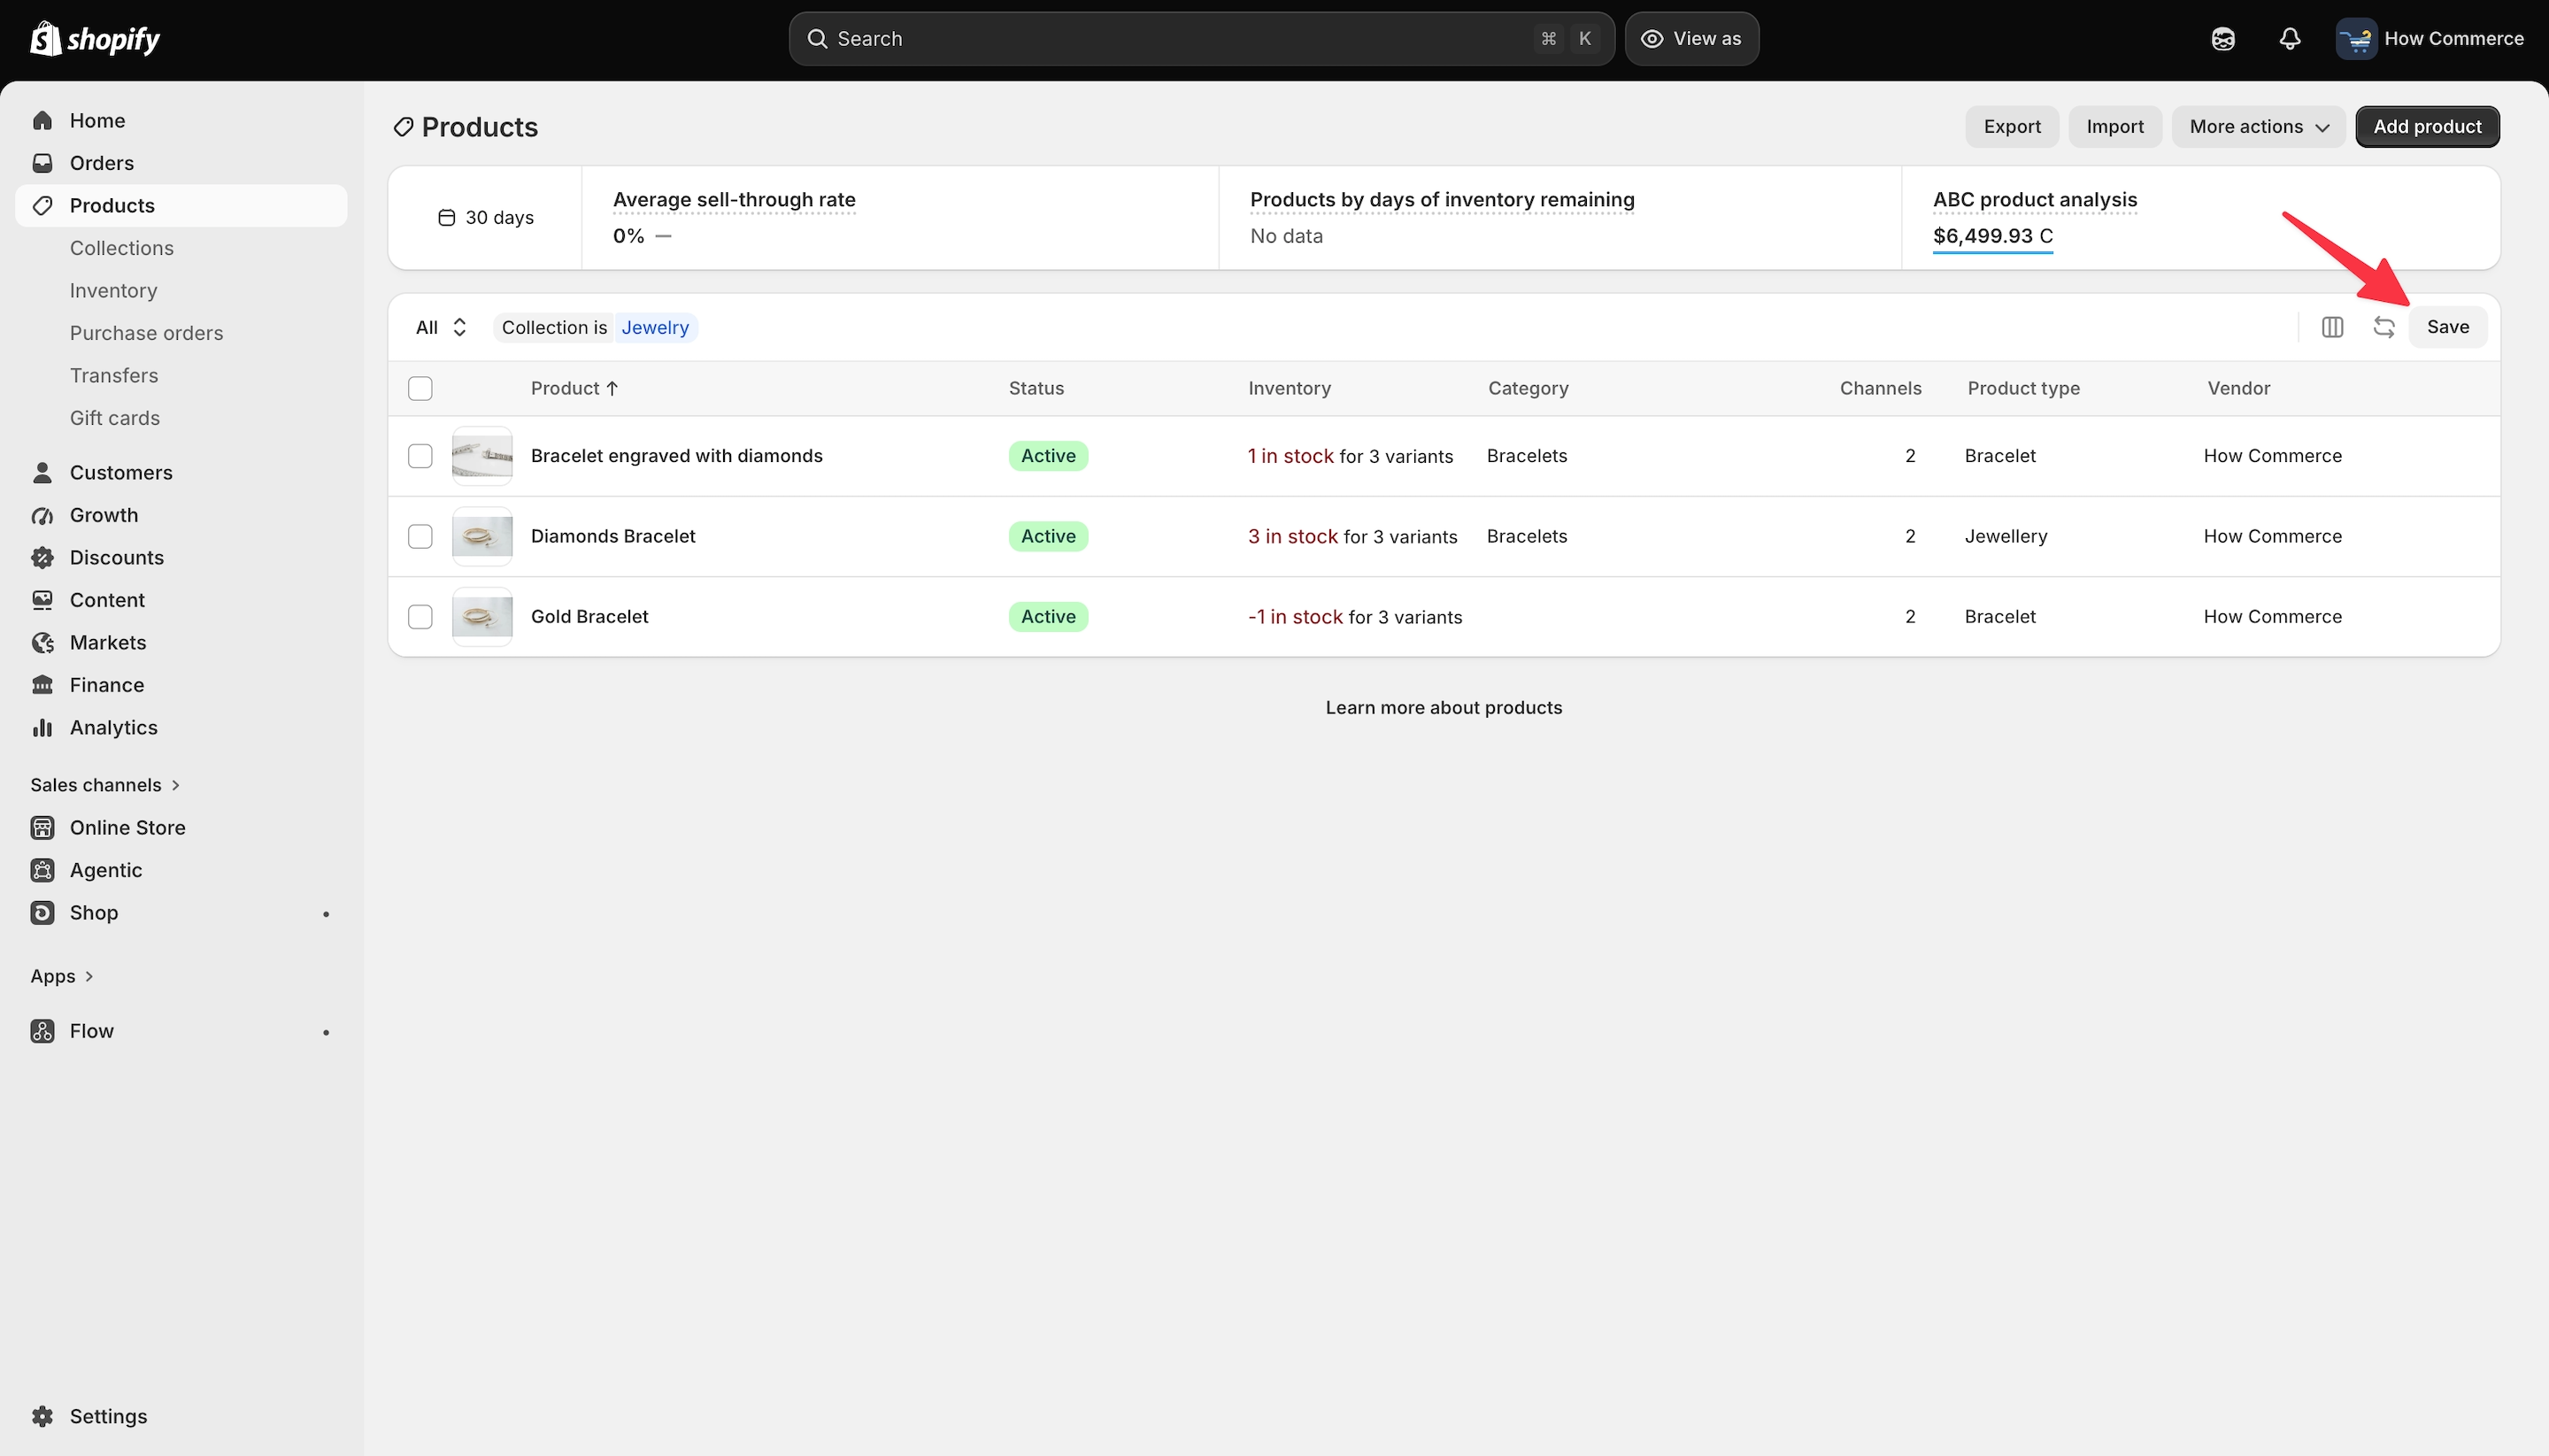
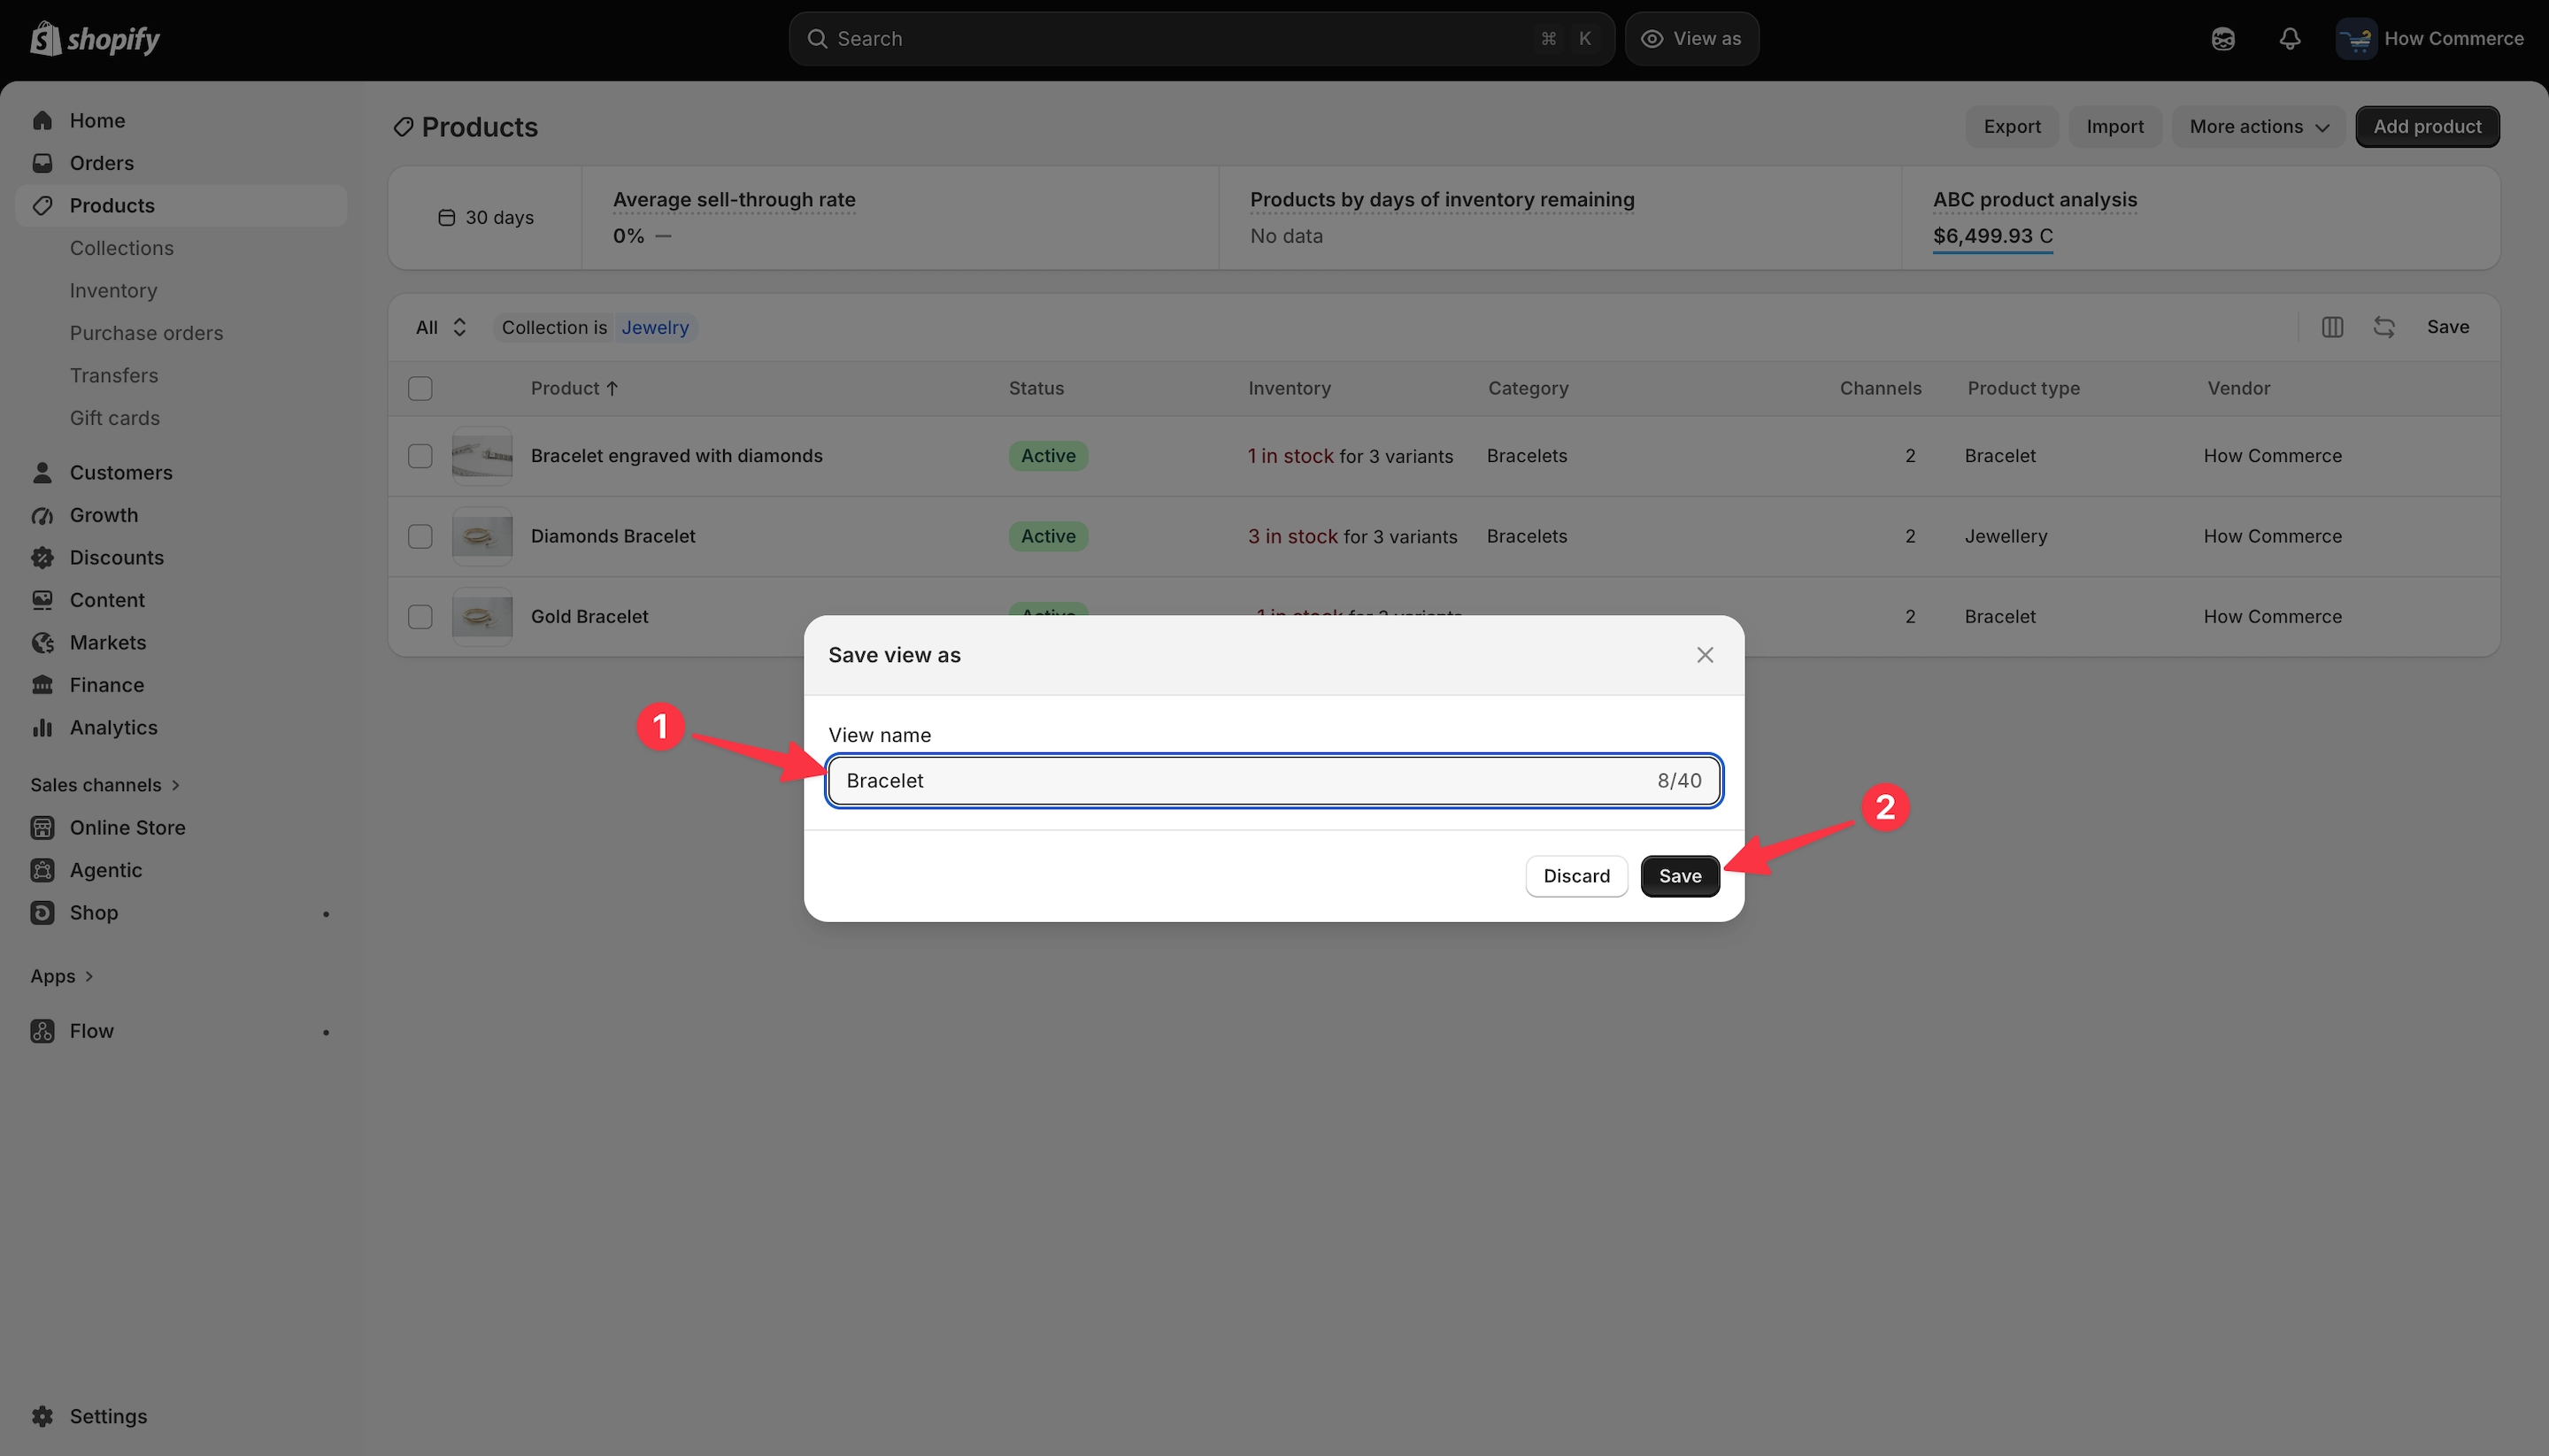
Give your new product view a name.
In most cases, I name product views similarly to their corresponding collections, since the views are filtered based on those collections.
In this example, I’ll name it Bracelets (marked with 1 in the image below), but I could just as easily name it Jewelry.
Now click the Save button (marked with 2 in the image below).
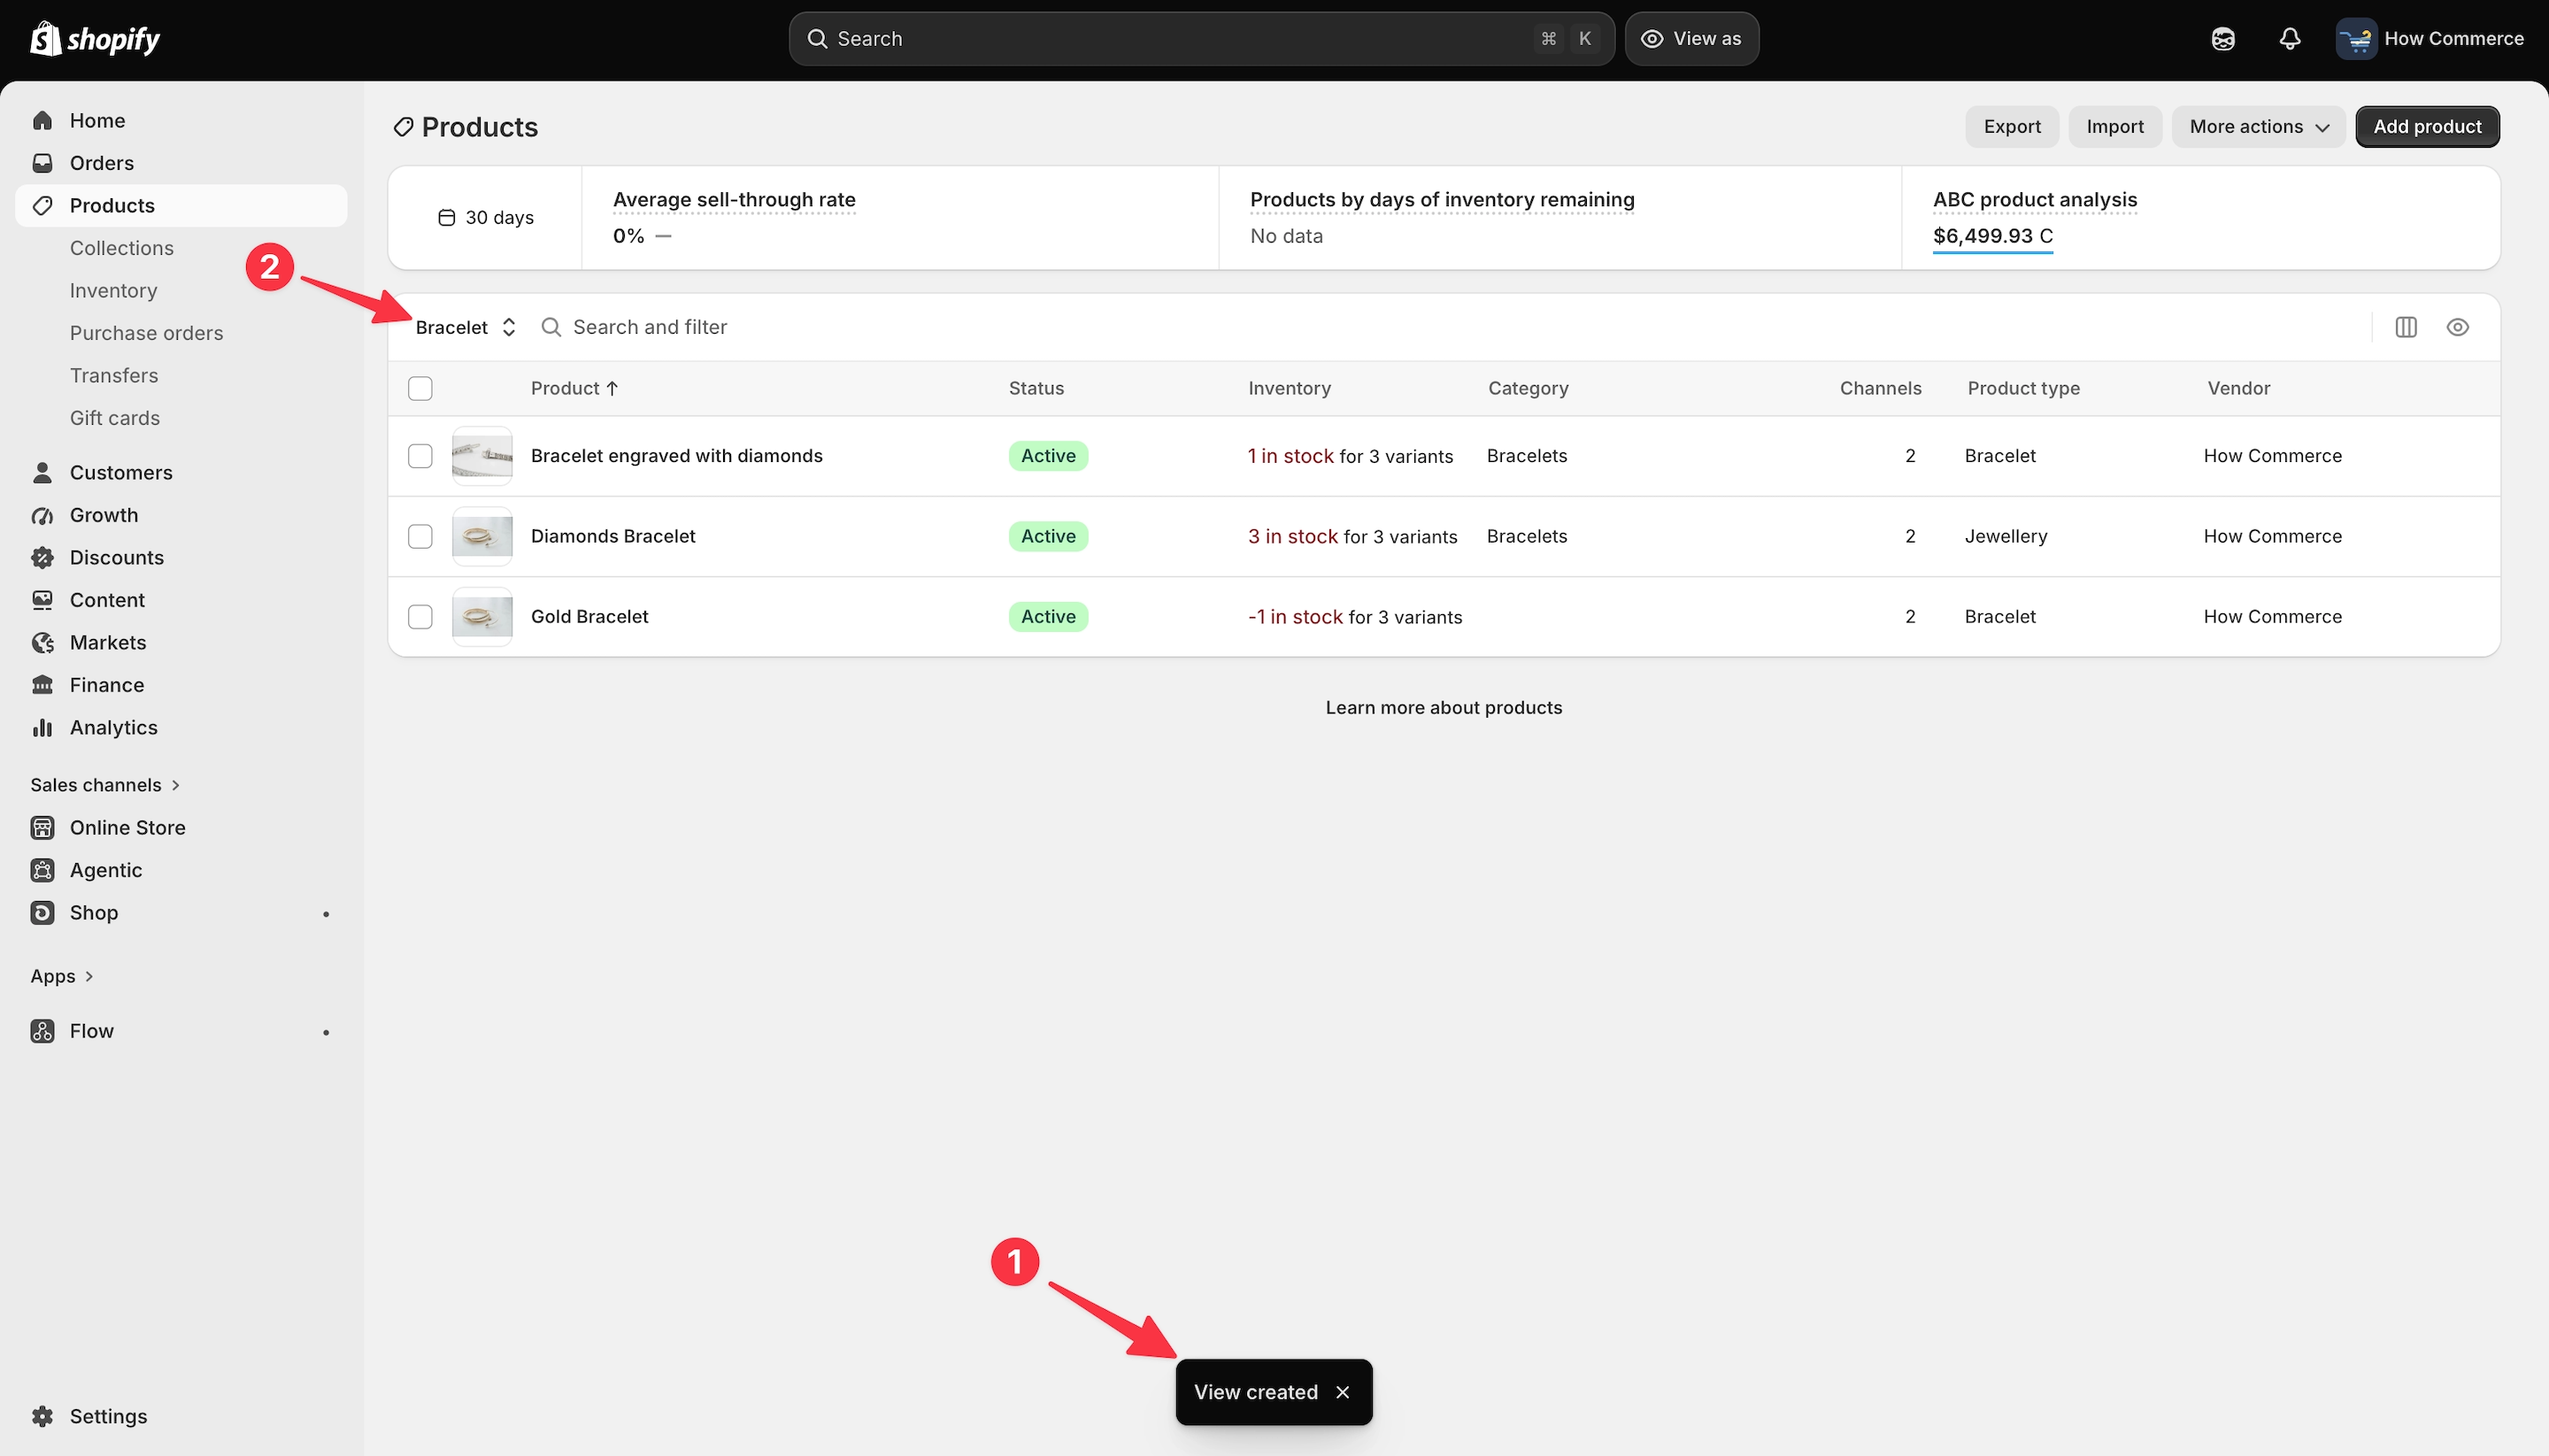
Your new product view is now created, and Shopify will display a confirmation message (marked with 1 in the image below).
The new view will also be listed in the views drop-down menu (marked with 2 in the image below).
If you navigate away from the page and return to the Products listing page later, you can easily access all the products included in your saved view.
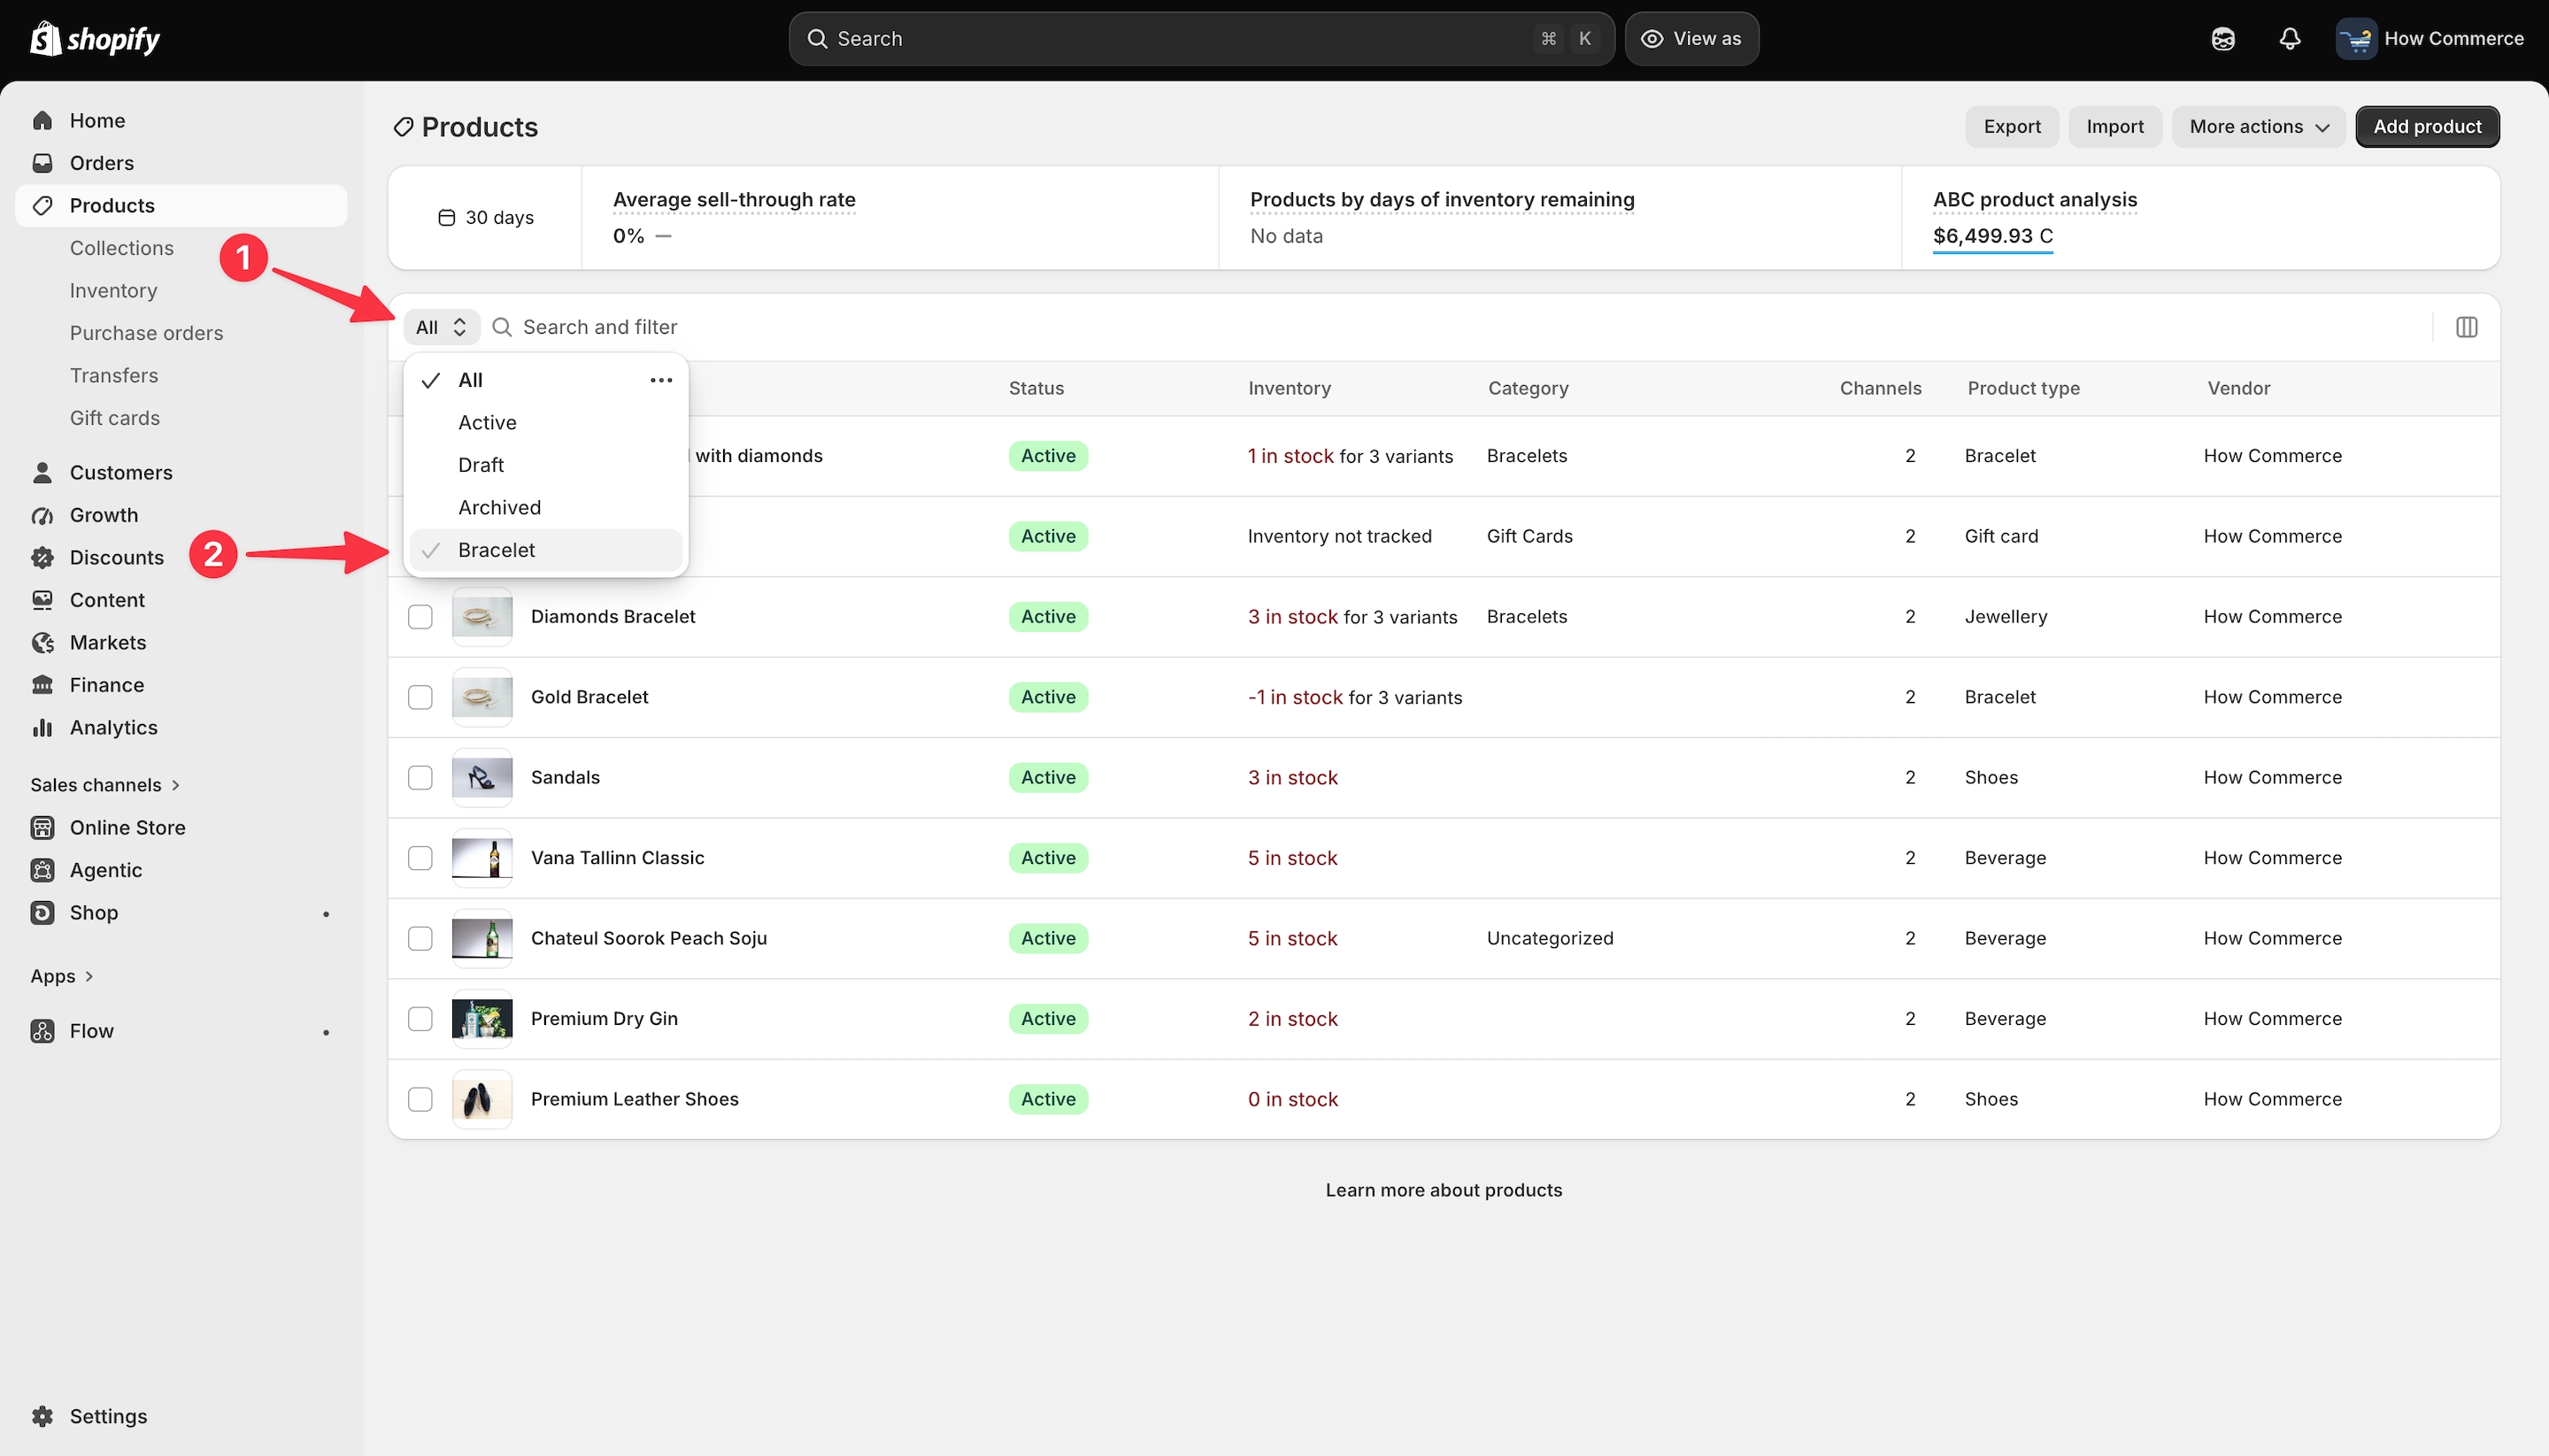
Click All (marked with 1 in the image below) to open the drop-down menu containing all the available product views. From there, select the view you created, which in this example is Bracelets (marked with 2 in the image below).
Remove a product view
Just as you can add a product view, Shopify also allows you to completely remove it when you no longer need it.
The views drop-down menu provides several options for managing each product view.
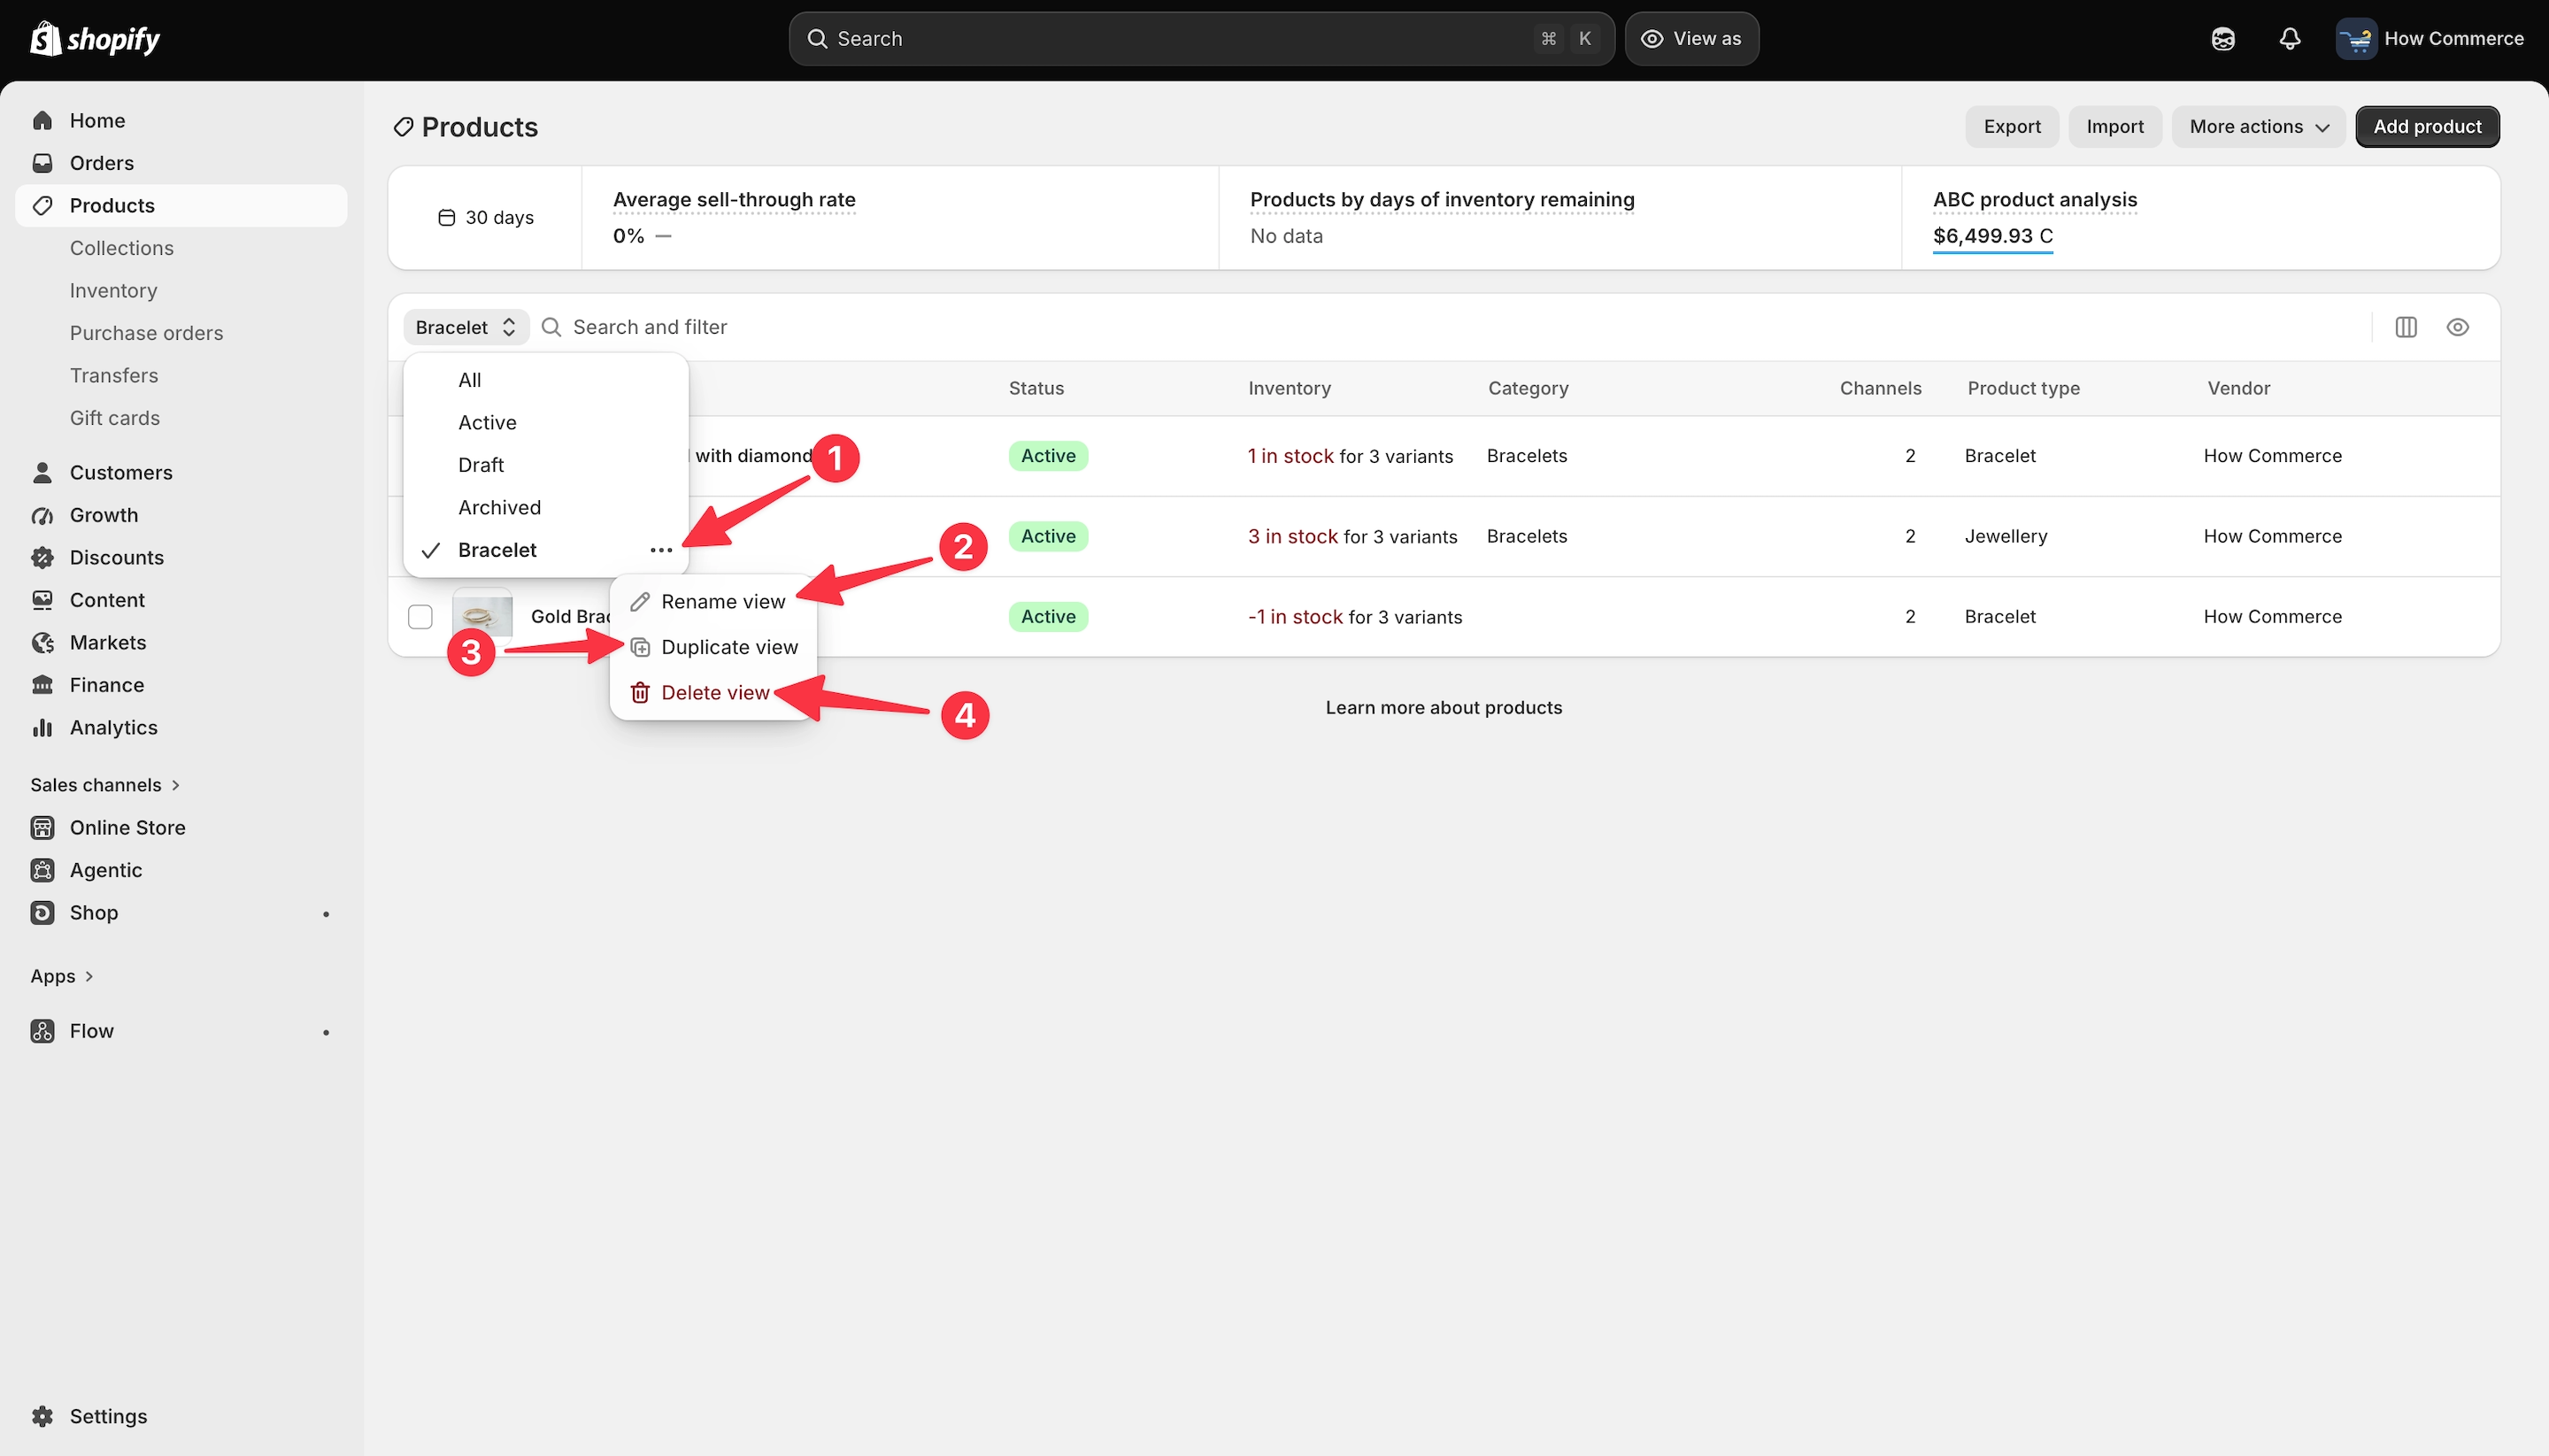
Select the view you want to manage and click the “...” menu.
A second drop-down menu will appear with options such as Rename view (marked with 2 in the image below), Duplicate view (marked with 3 in the image below), and Delete view (marked with 4 in the image below).
Once you click “Delete view” (marked with 4 in the image below), the product view will be completely removed from your store.
Common issues and troubleshooting
Creating and using product views in Shopify is straightforward, but there are a few situations where a view might not display the products or information you expect.
Products are missing from the view
If a product you expect to see is missing, check the filters applied to the view.
The product must match the selected filtering criteria to appear in the view.
For example, if your view is filtered by a specific collection, make sure the missing product has been added to that collection.
Also, if you enable Hide archived products, archived products will not appear in the view even if they match the other filters.
The view displays too many or too few products
Check all the filters currently applied to the view. When multiple filters are used, their combination determines which products are displayed.
Modify or remove filters until the view displays the group of products you need, then save your changes.
A column is missing from the view
If the information you need isn't visible in the product listing, check the Columns settings for the view.
Enable the column you want to display and save the view so it remains available the next time you access it.
You can't modify one of Shopify's default views
Shopify's default product views can't be modified in the same way as the custom views you create.
If a default view doesn't meet your needs, create your own product view and configure its filters and columns instead.
You can't find a previously created view
Open the views drop-down menu from the Products page and look for your custom view.
If the view is no longer listed, make sure it wasn't previously deleted. If it was deleted, you'll need to create the view again.
Final thoughts
Product views are a simple but useful Shopify feature, especially as your product catalog grows and becomes more difficult to manage.
Instead of repeatedly applying the same filters whenever you need to work with a specific group of products, you can create a product view once and access it whenever you need it.
Combined with strategies for managing your product catalog, product views help you stay organized as your store grows.
By combining filters with the columns relevant to your workflow, you can create dedicated views for different collections or groups of products and quickly access the product information you need.
As your store grows, creating a few well-organized product views can save time and make day-to-day product management considerably easier.