

Overview
First thing you need to know is that before you delete an order, it must be archived or canceled or else the “Delete” button will not be available.
Orders where payment has been paid for with a gift card can be archived, but not deleted.
This is why first we are going to talk about how to archive and cancel an order and only afterwards we can talk about deleting a Shopify order.
The following types of orders can be deleted:
- Orders paid using a manual payment method
- Orders initially created as drafts and later marked as paid
- Test orders processed via the Bogus Gateway or Shopify Payments in test mode
- Orders imported through the Shopify API
- Draft orders
If you have one of the order types listed above go on with the tutorial to see how you can delete the order from your store.
Archive an order
Orders can be automatically archived but you can also manually archive them.
Automatic archiving
When automatic order archiving is activated, the following orders are automatically archived:
- orders that are paid for and fulfilled
- orders that are fully refunded
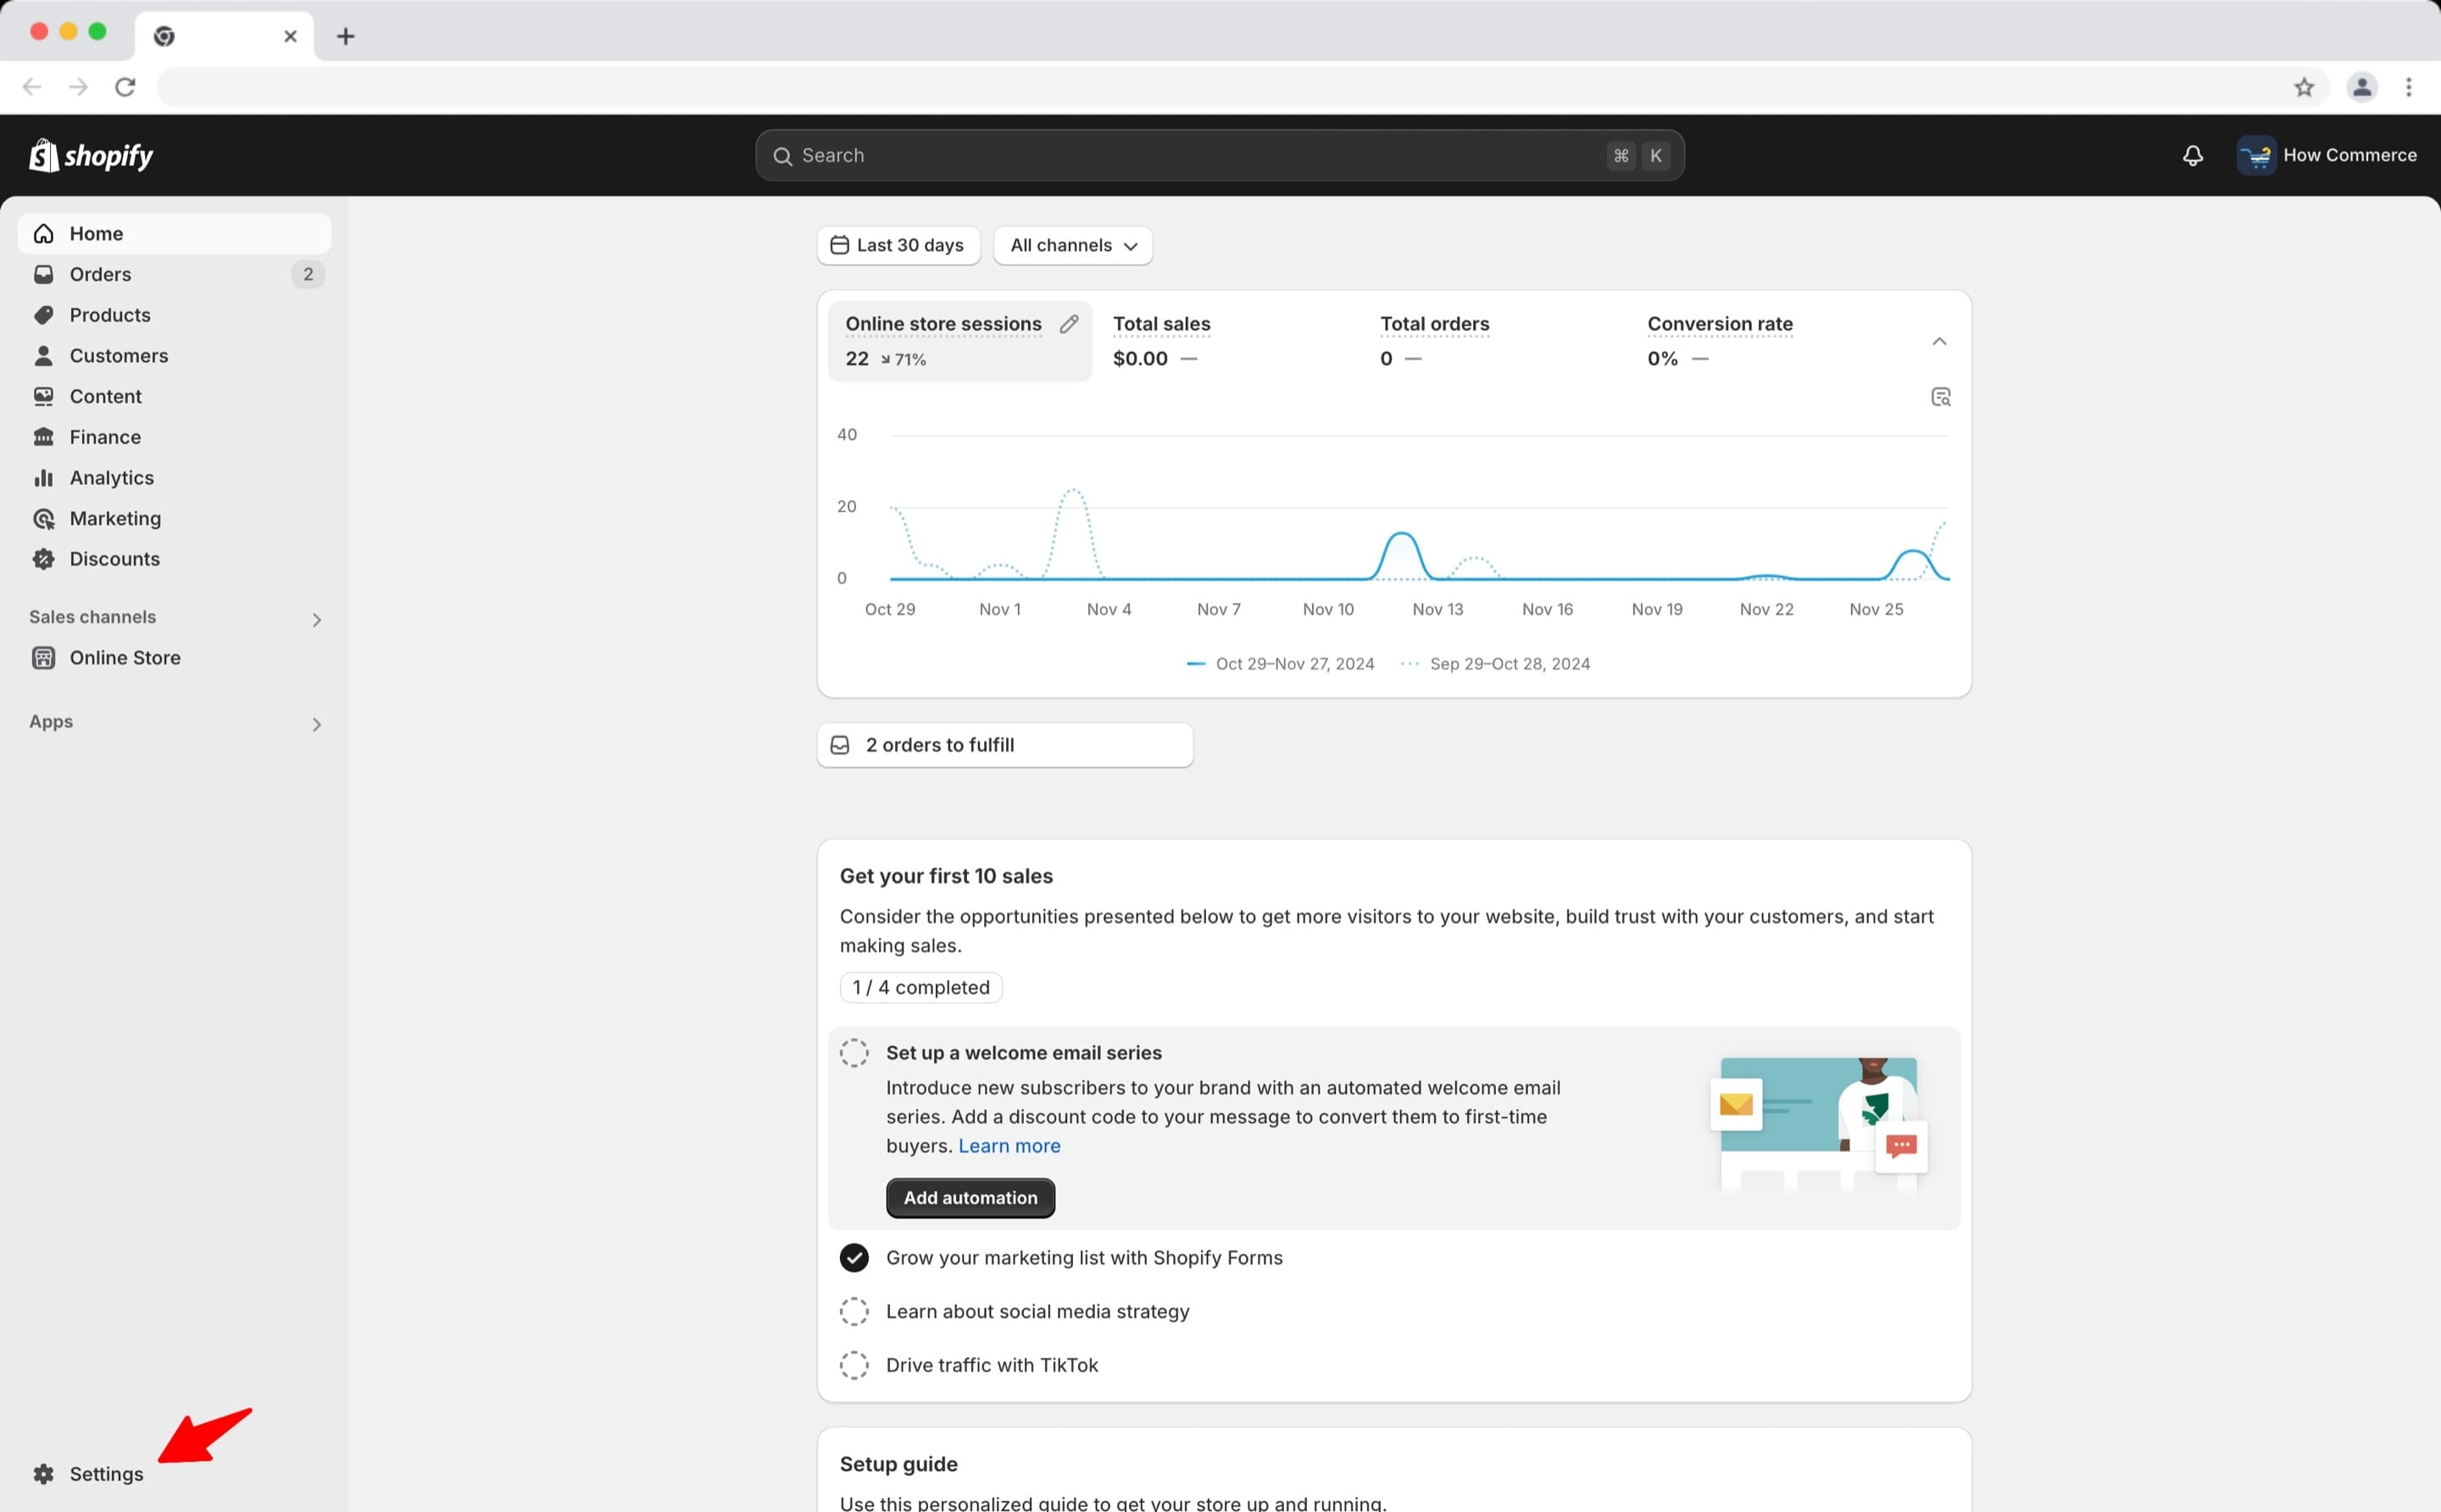
To check if automatic archiving is enabled you need to go inside your Shopify admin and go to “Settings” like in the image below:
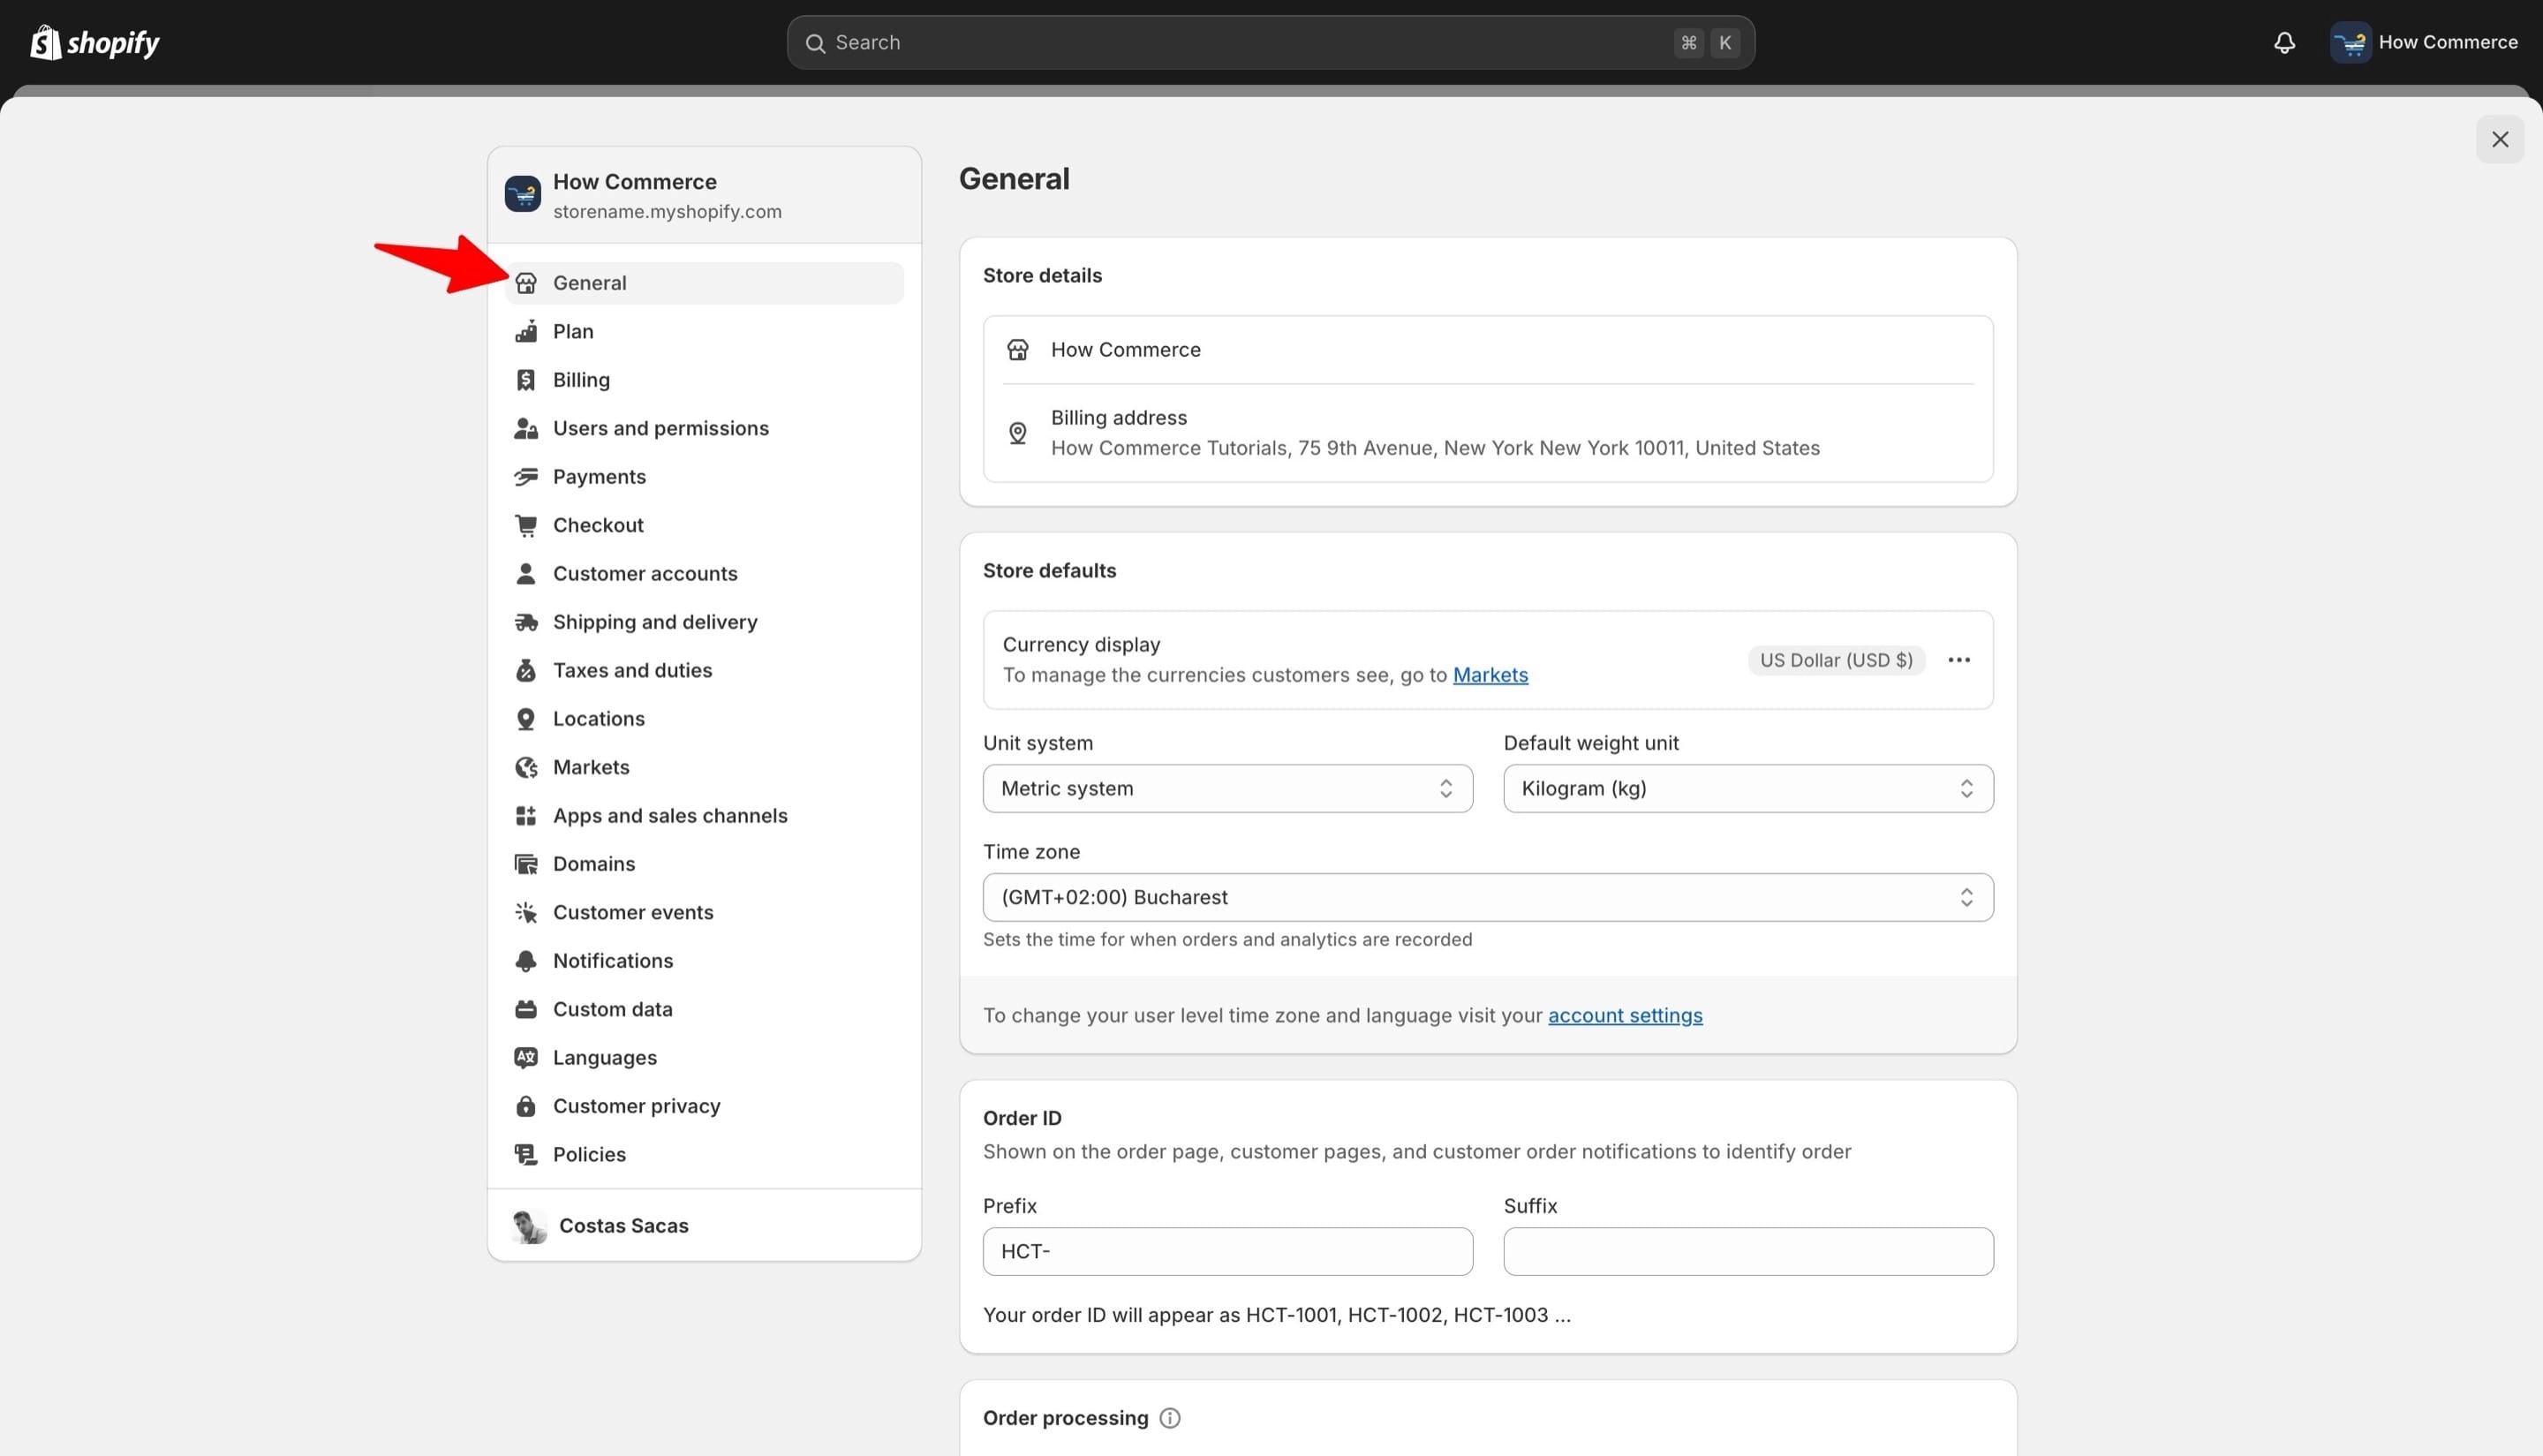
Then go to “General” tab:
Scroll down to the “Order processing section” and if not already enabled select “Automatically archive the order” to activate automatic archiving.
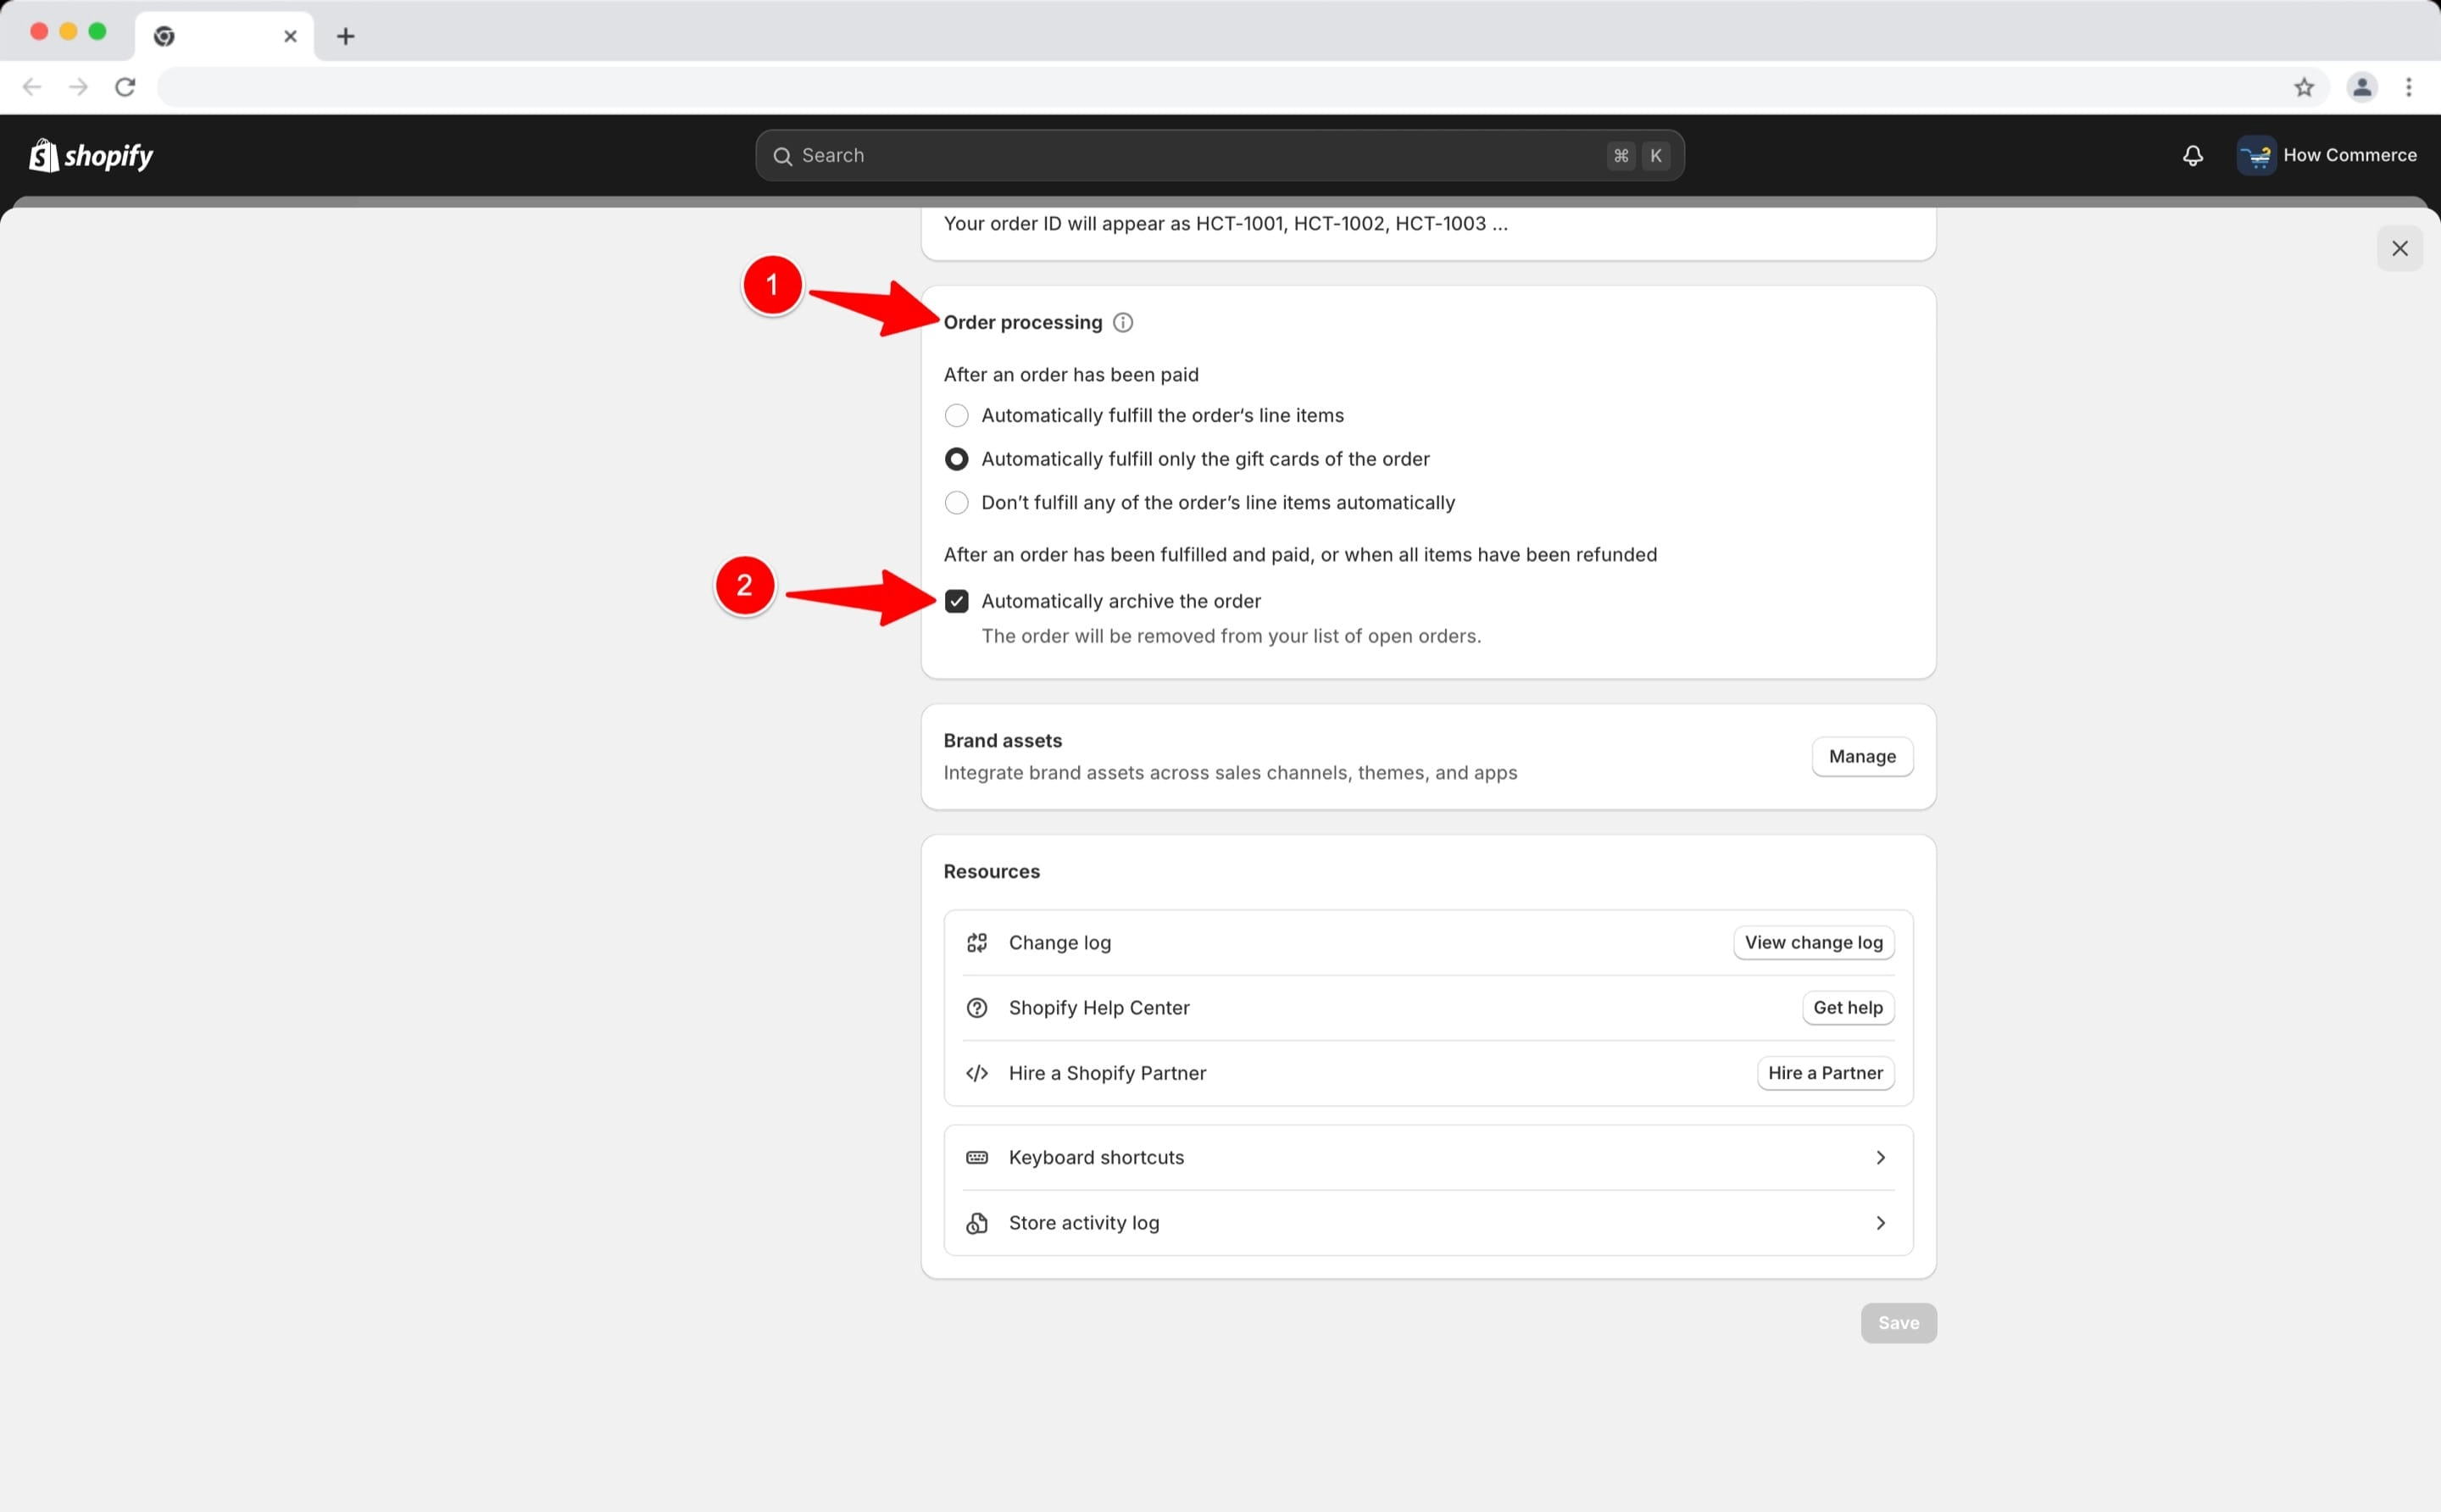
Enabling this setting will automatically archive:
- orders that are paid for and fulfilled
- orders that are fully refunded
- orders that are partially refunded, fulfilled, and have no balance owing
Manual archiving
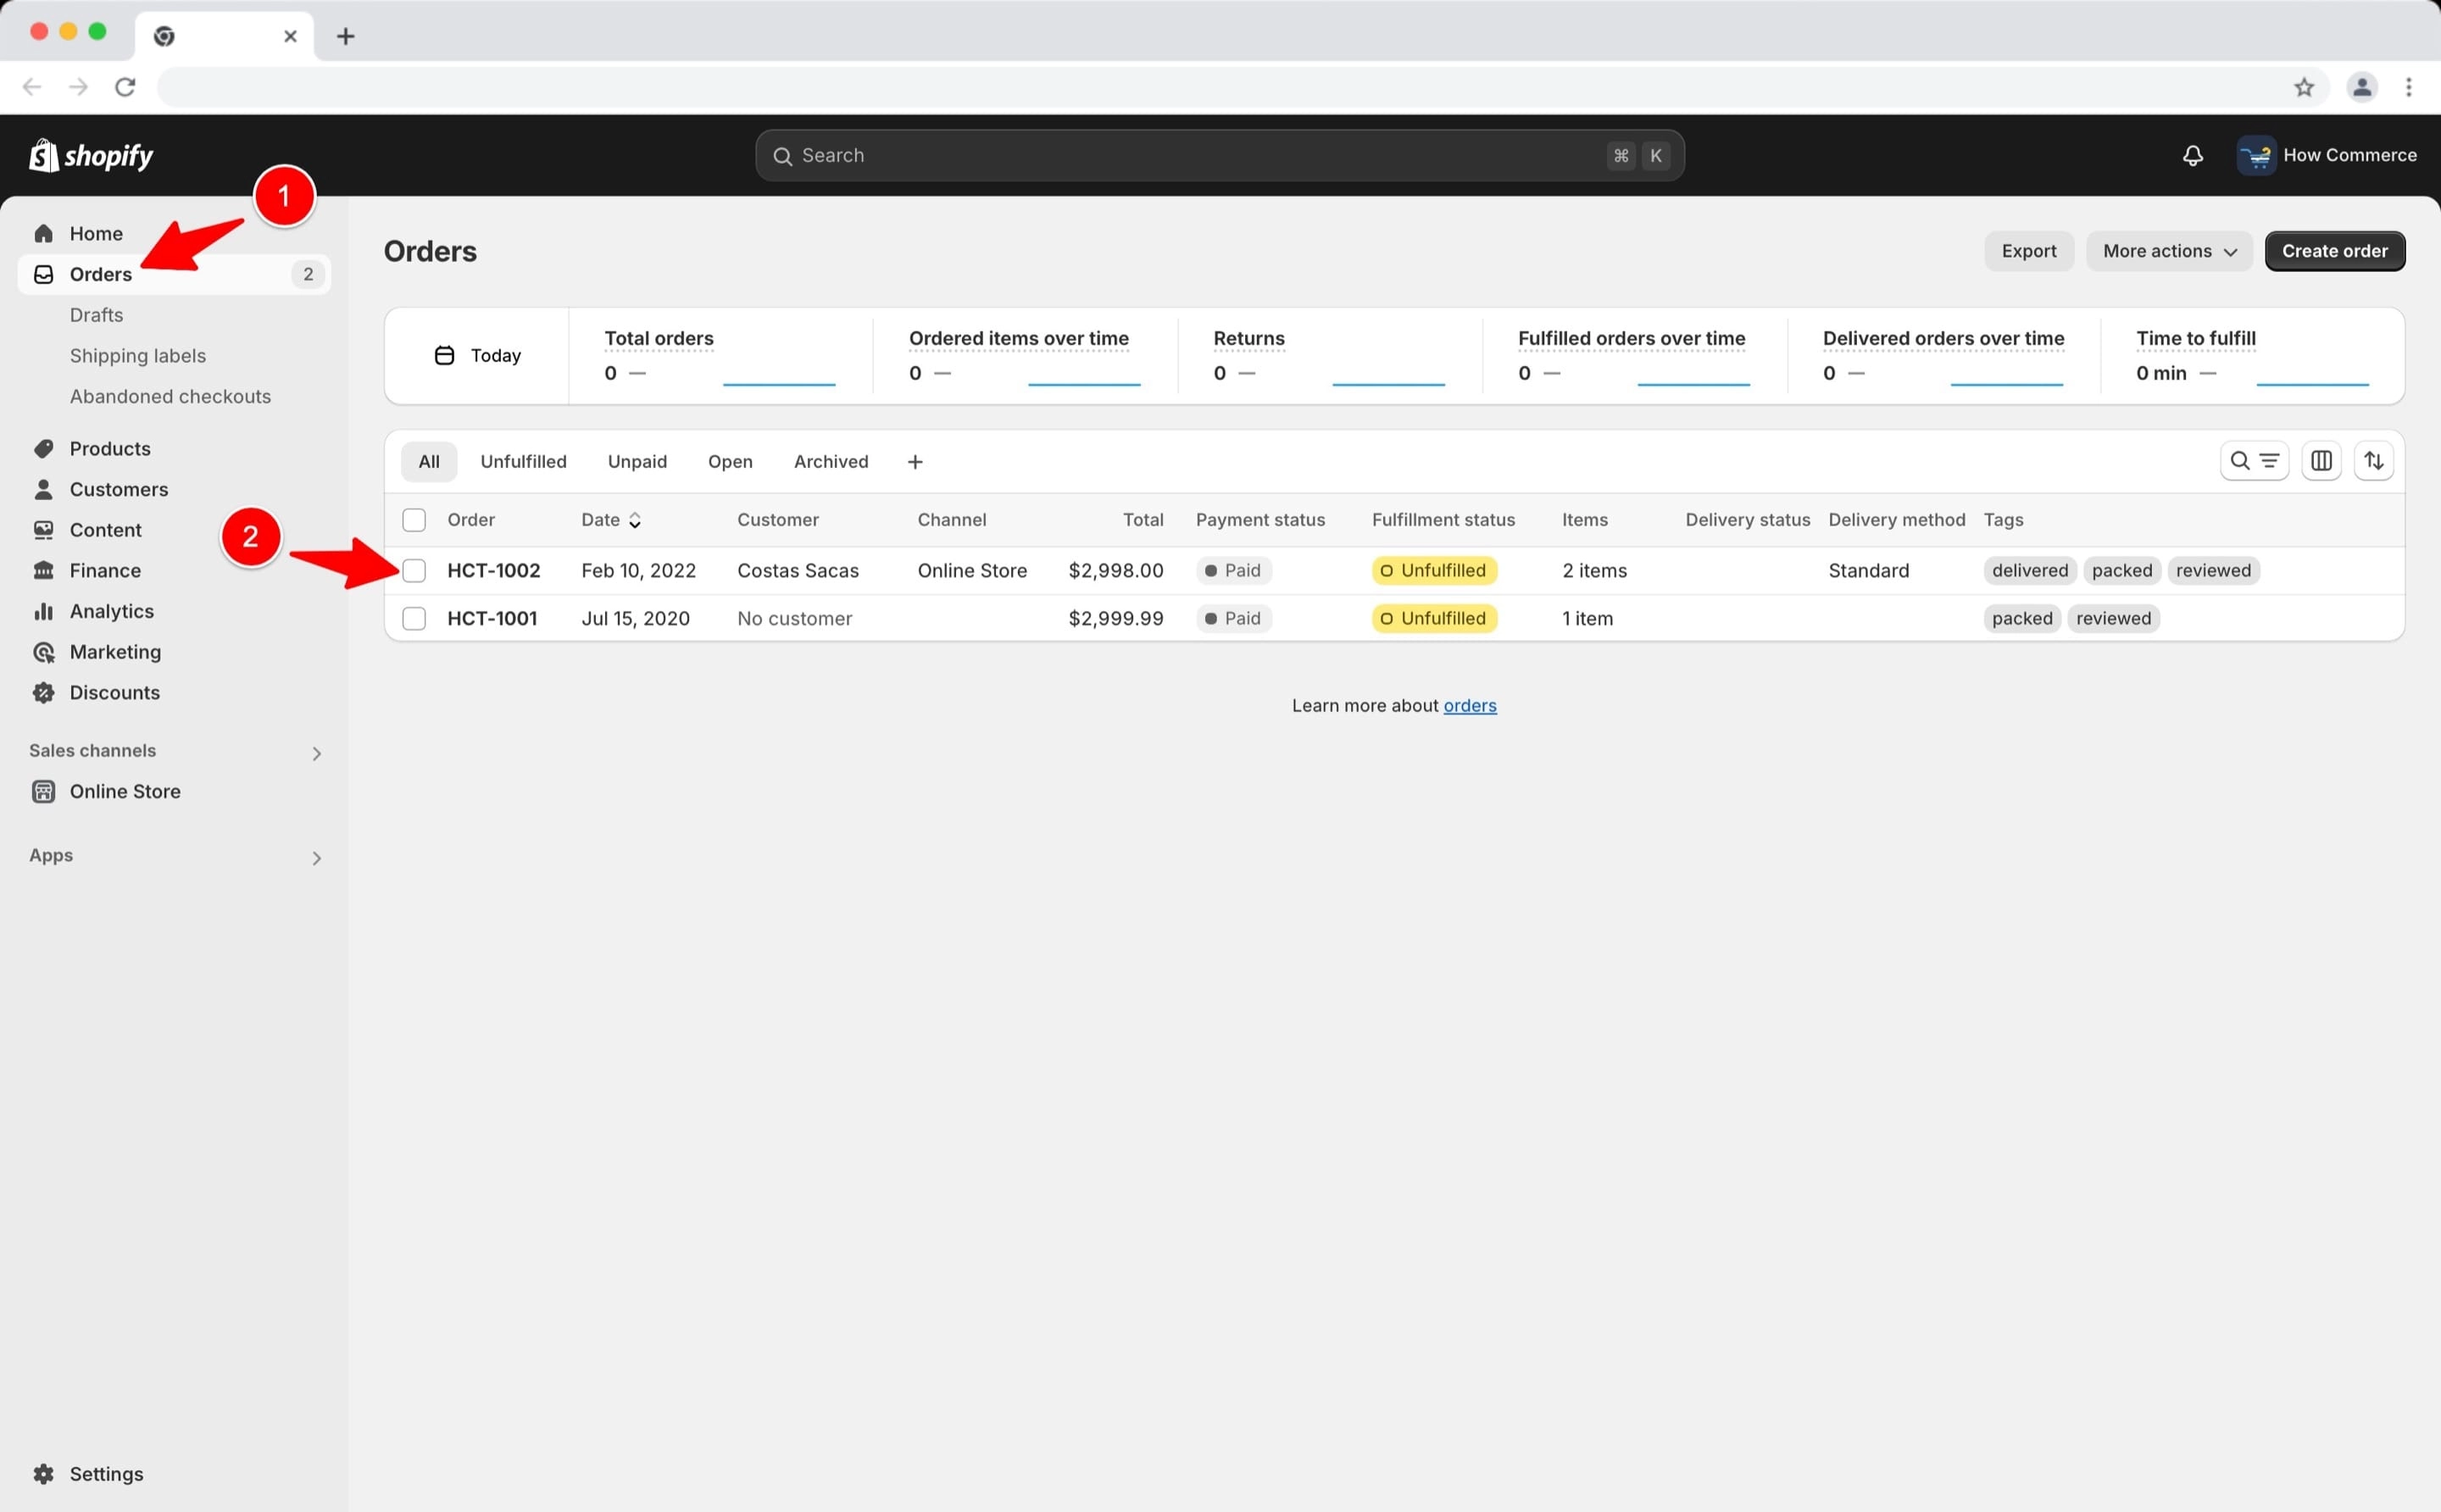
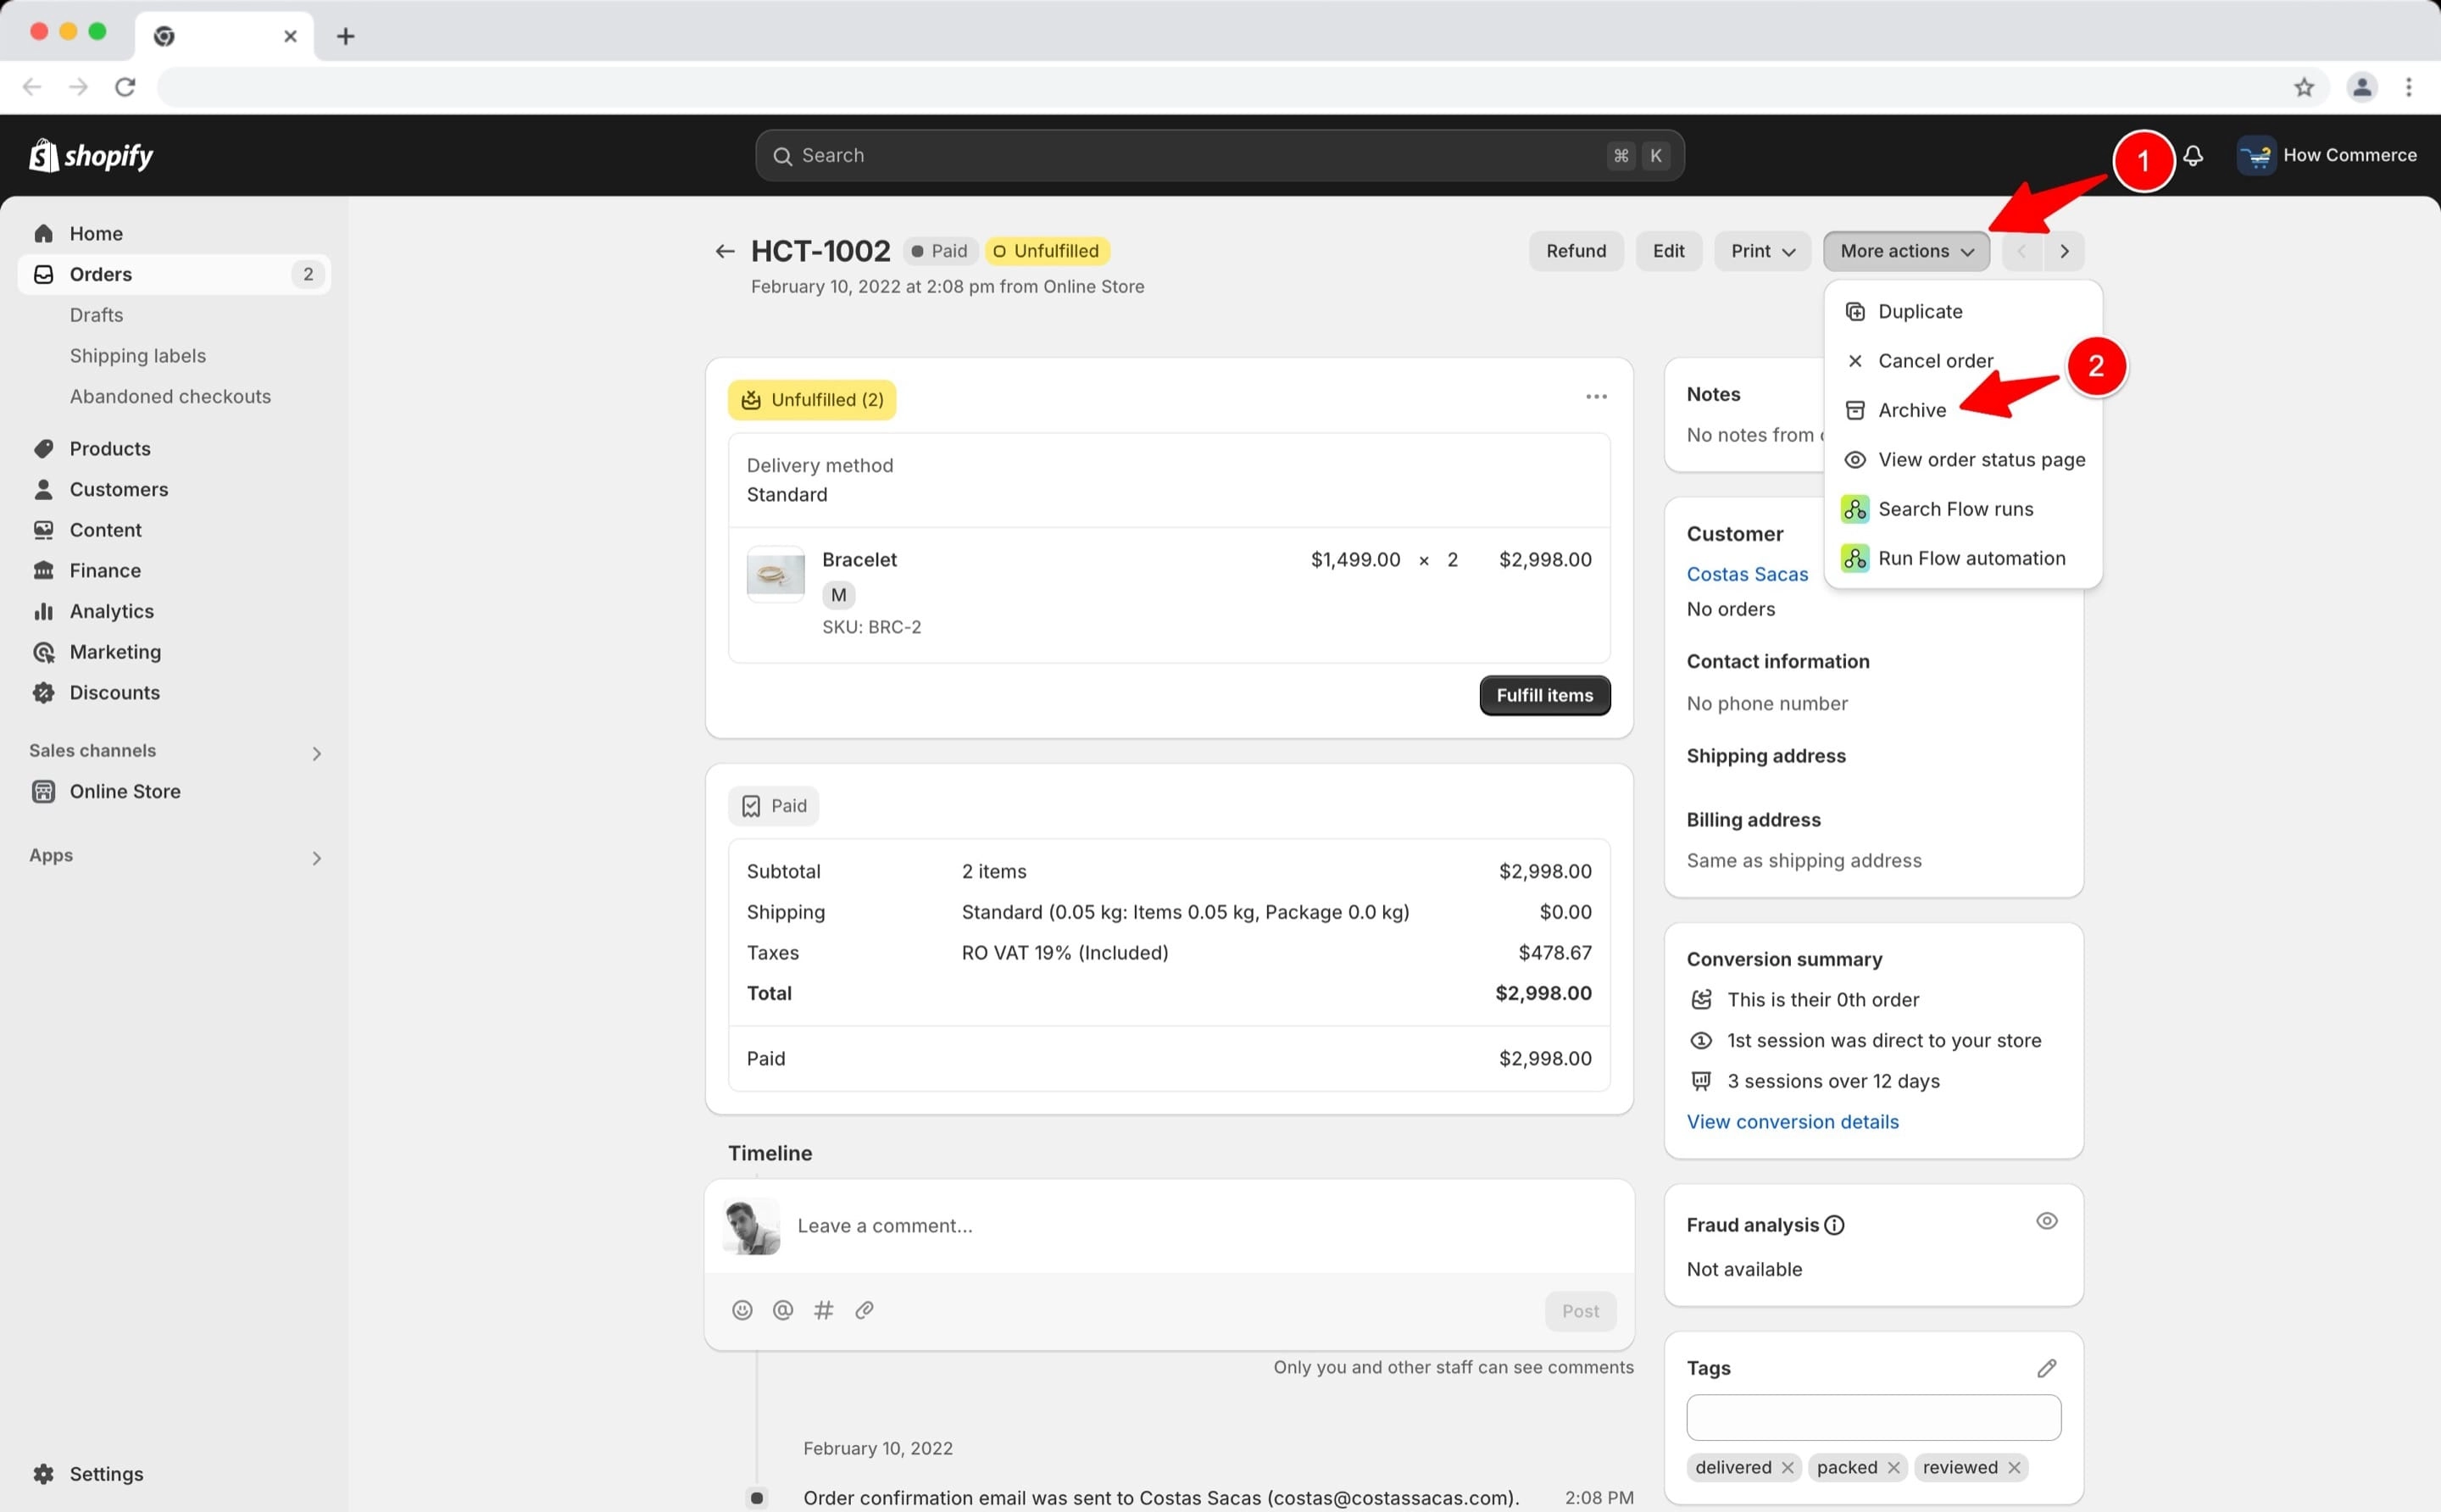
In your Shopify admin, go to “Orders” (marked with 1 in the image below) and select the order that you want to archive (marked with 2 in the image below).
Click “More actions” (marked with 1 in the image below) , and then click “Archive orders” (marked with 2 in the image below).
Manual archiving of multiple orders in bulk
If you have multiple orders that you want to archive it is not a good idea to do it one by one since you’ll waste a lot of time.
For this reason Shopify offers you another way to do it fast and avoid losing a lot of time.
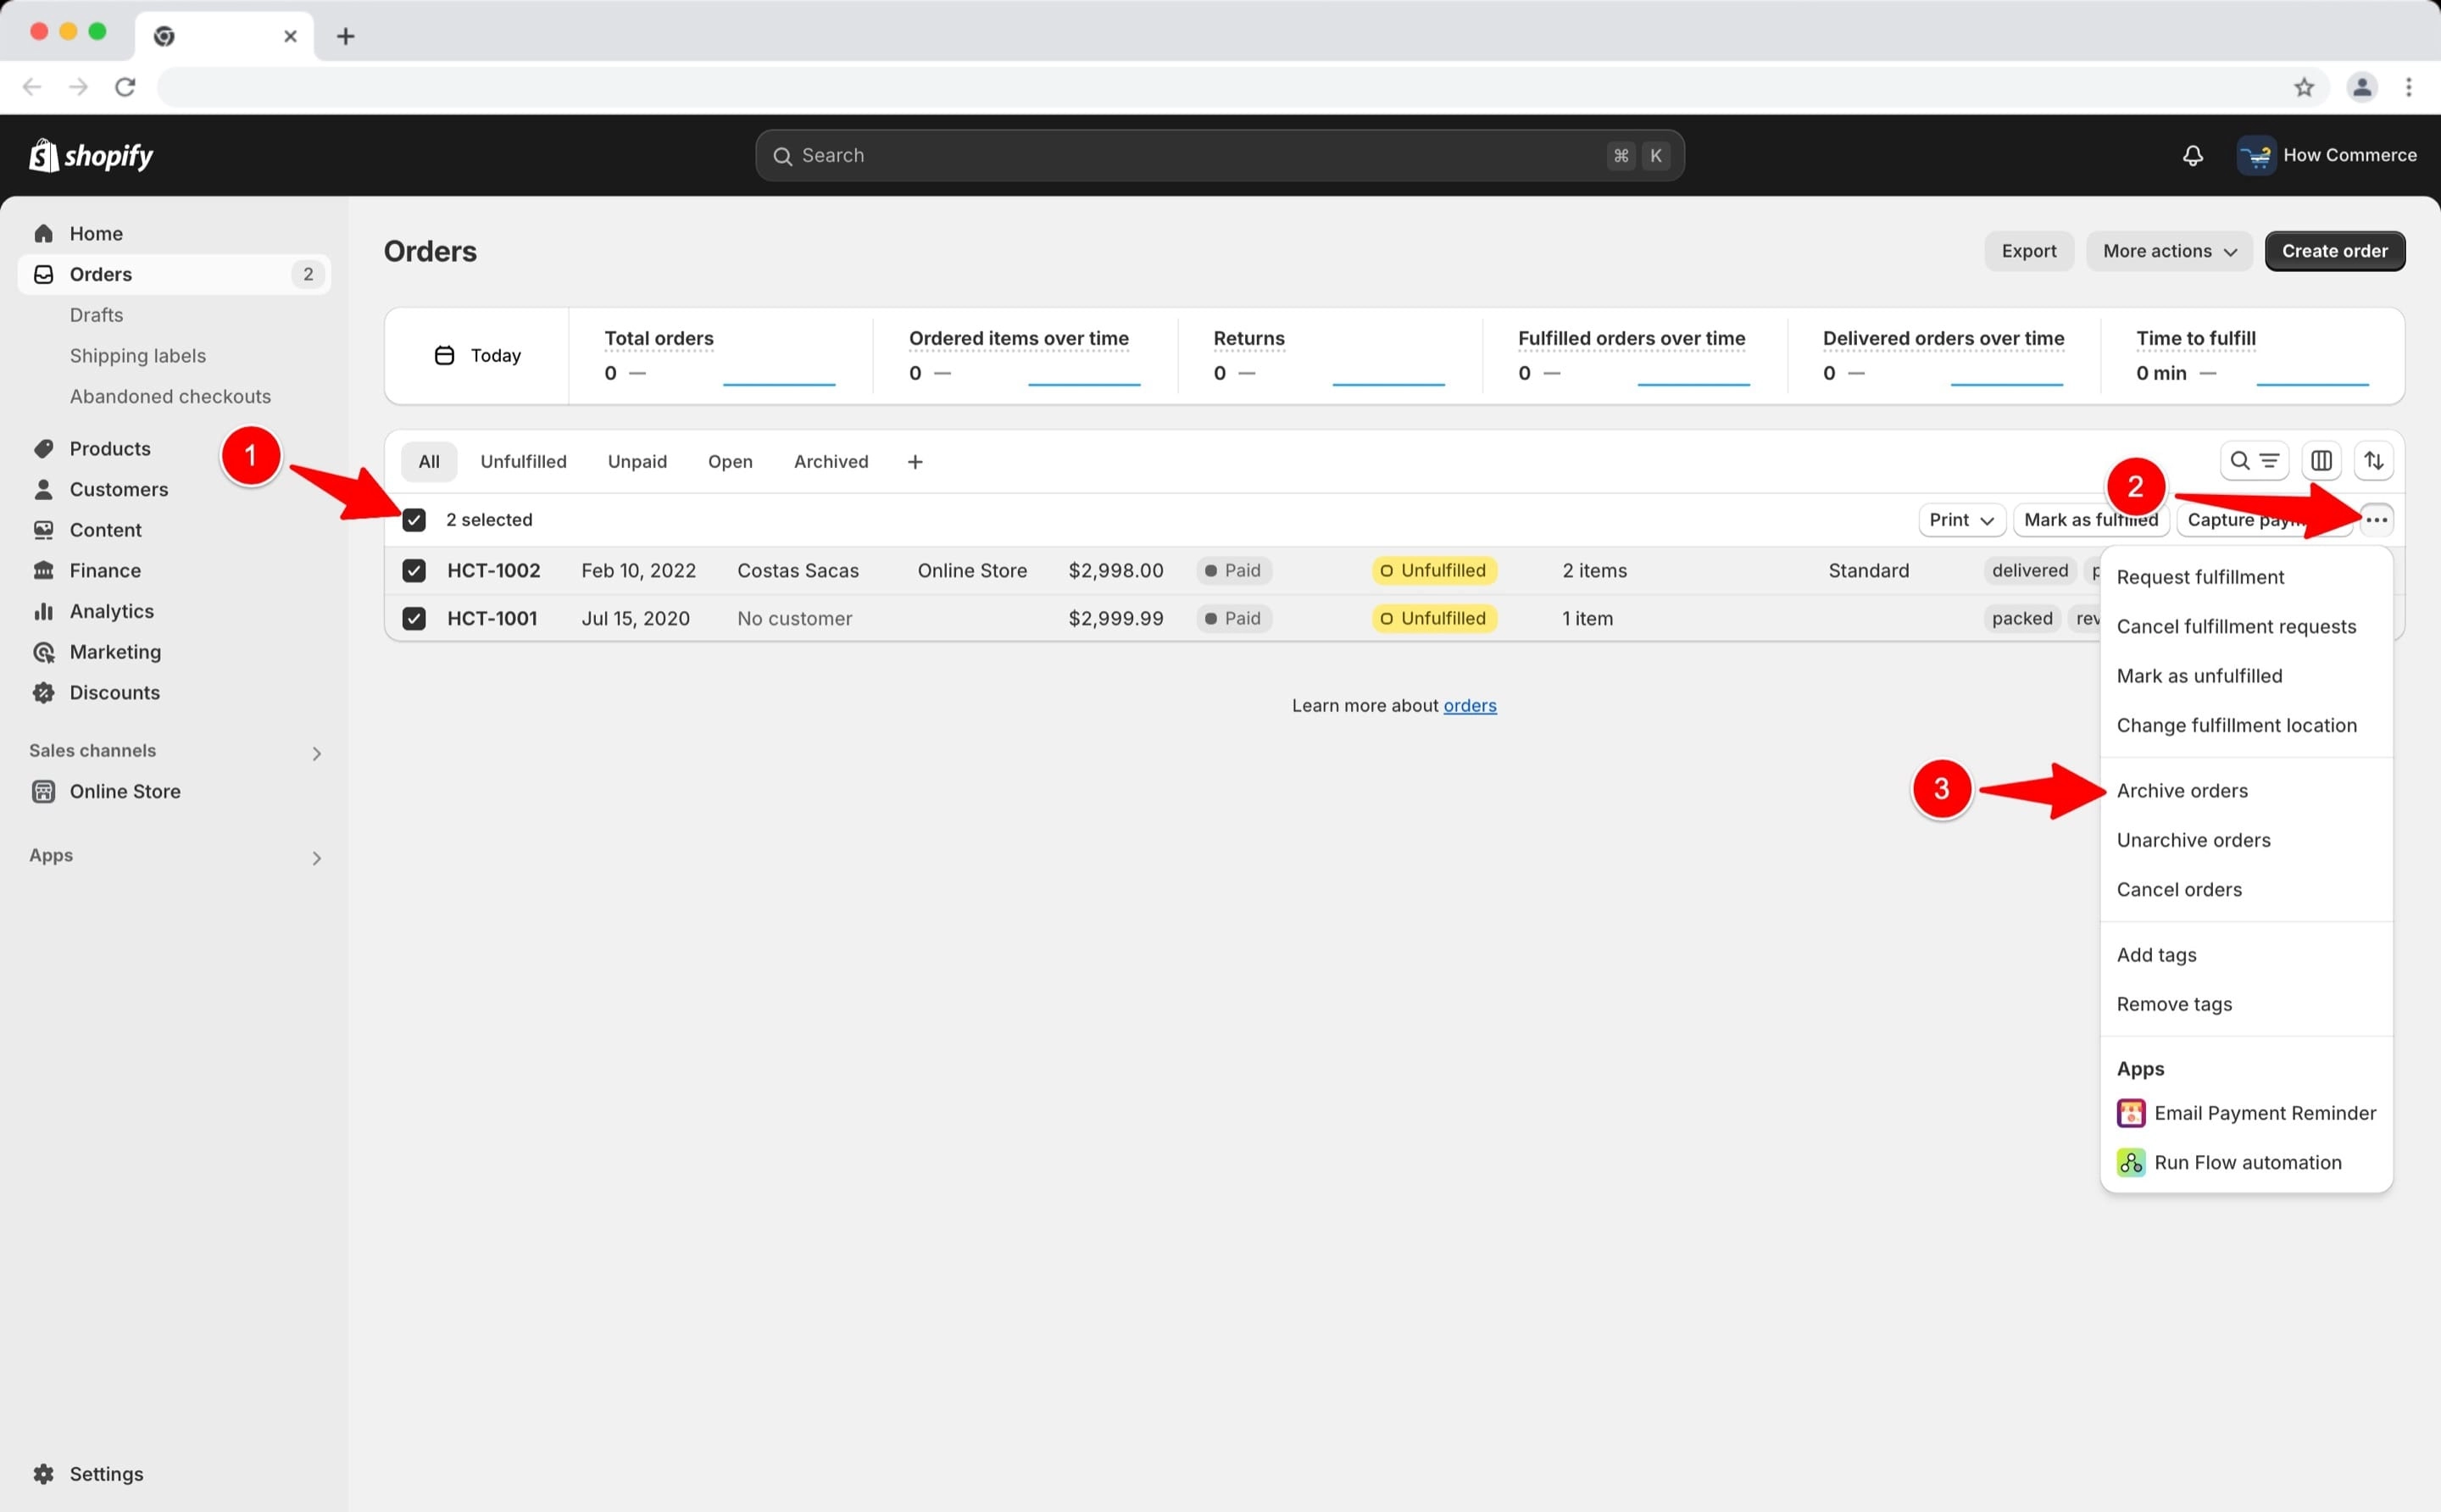
Select all orders that you want to archive (marked with 1 in the image below), click on the “...”(more actions) icon (marked with 2 in the image below) and select from the drop-down menu “Archive orders” (marked with 3 in the image below).
After the operation completes all your orders are archived.
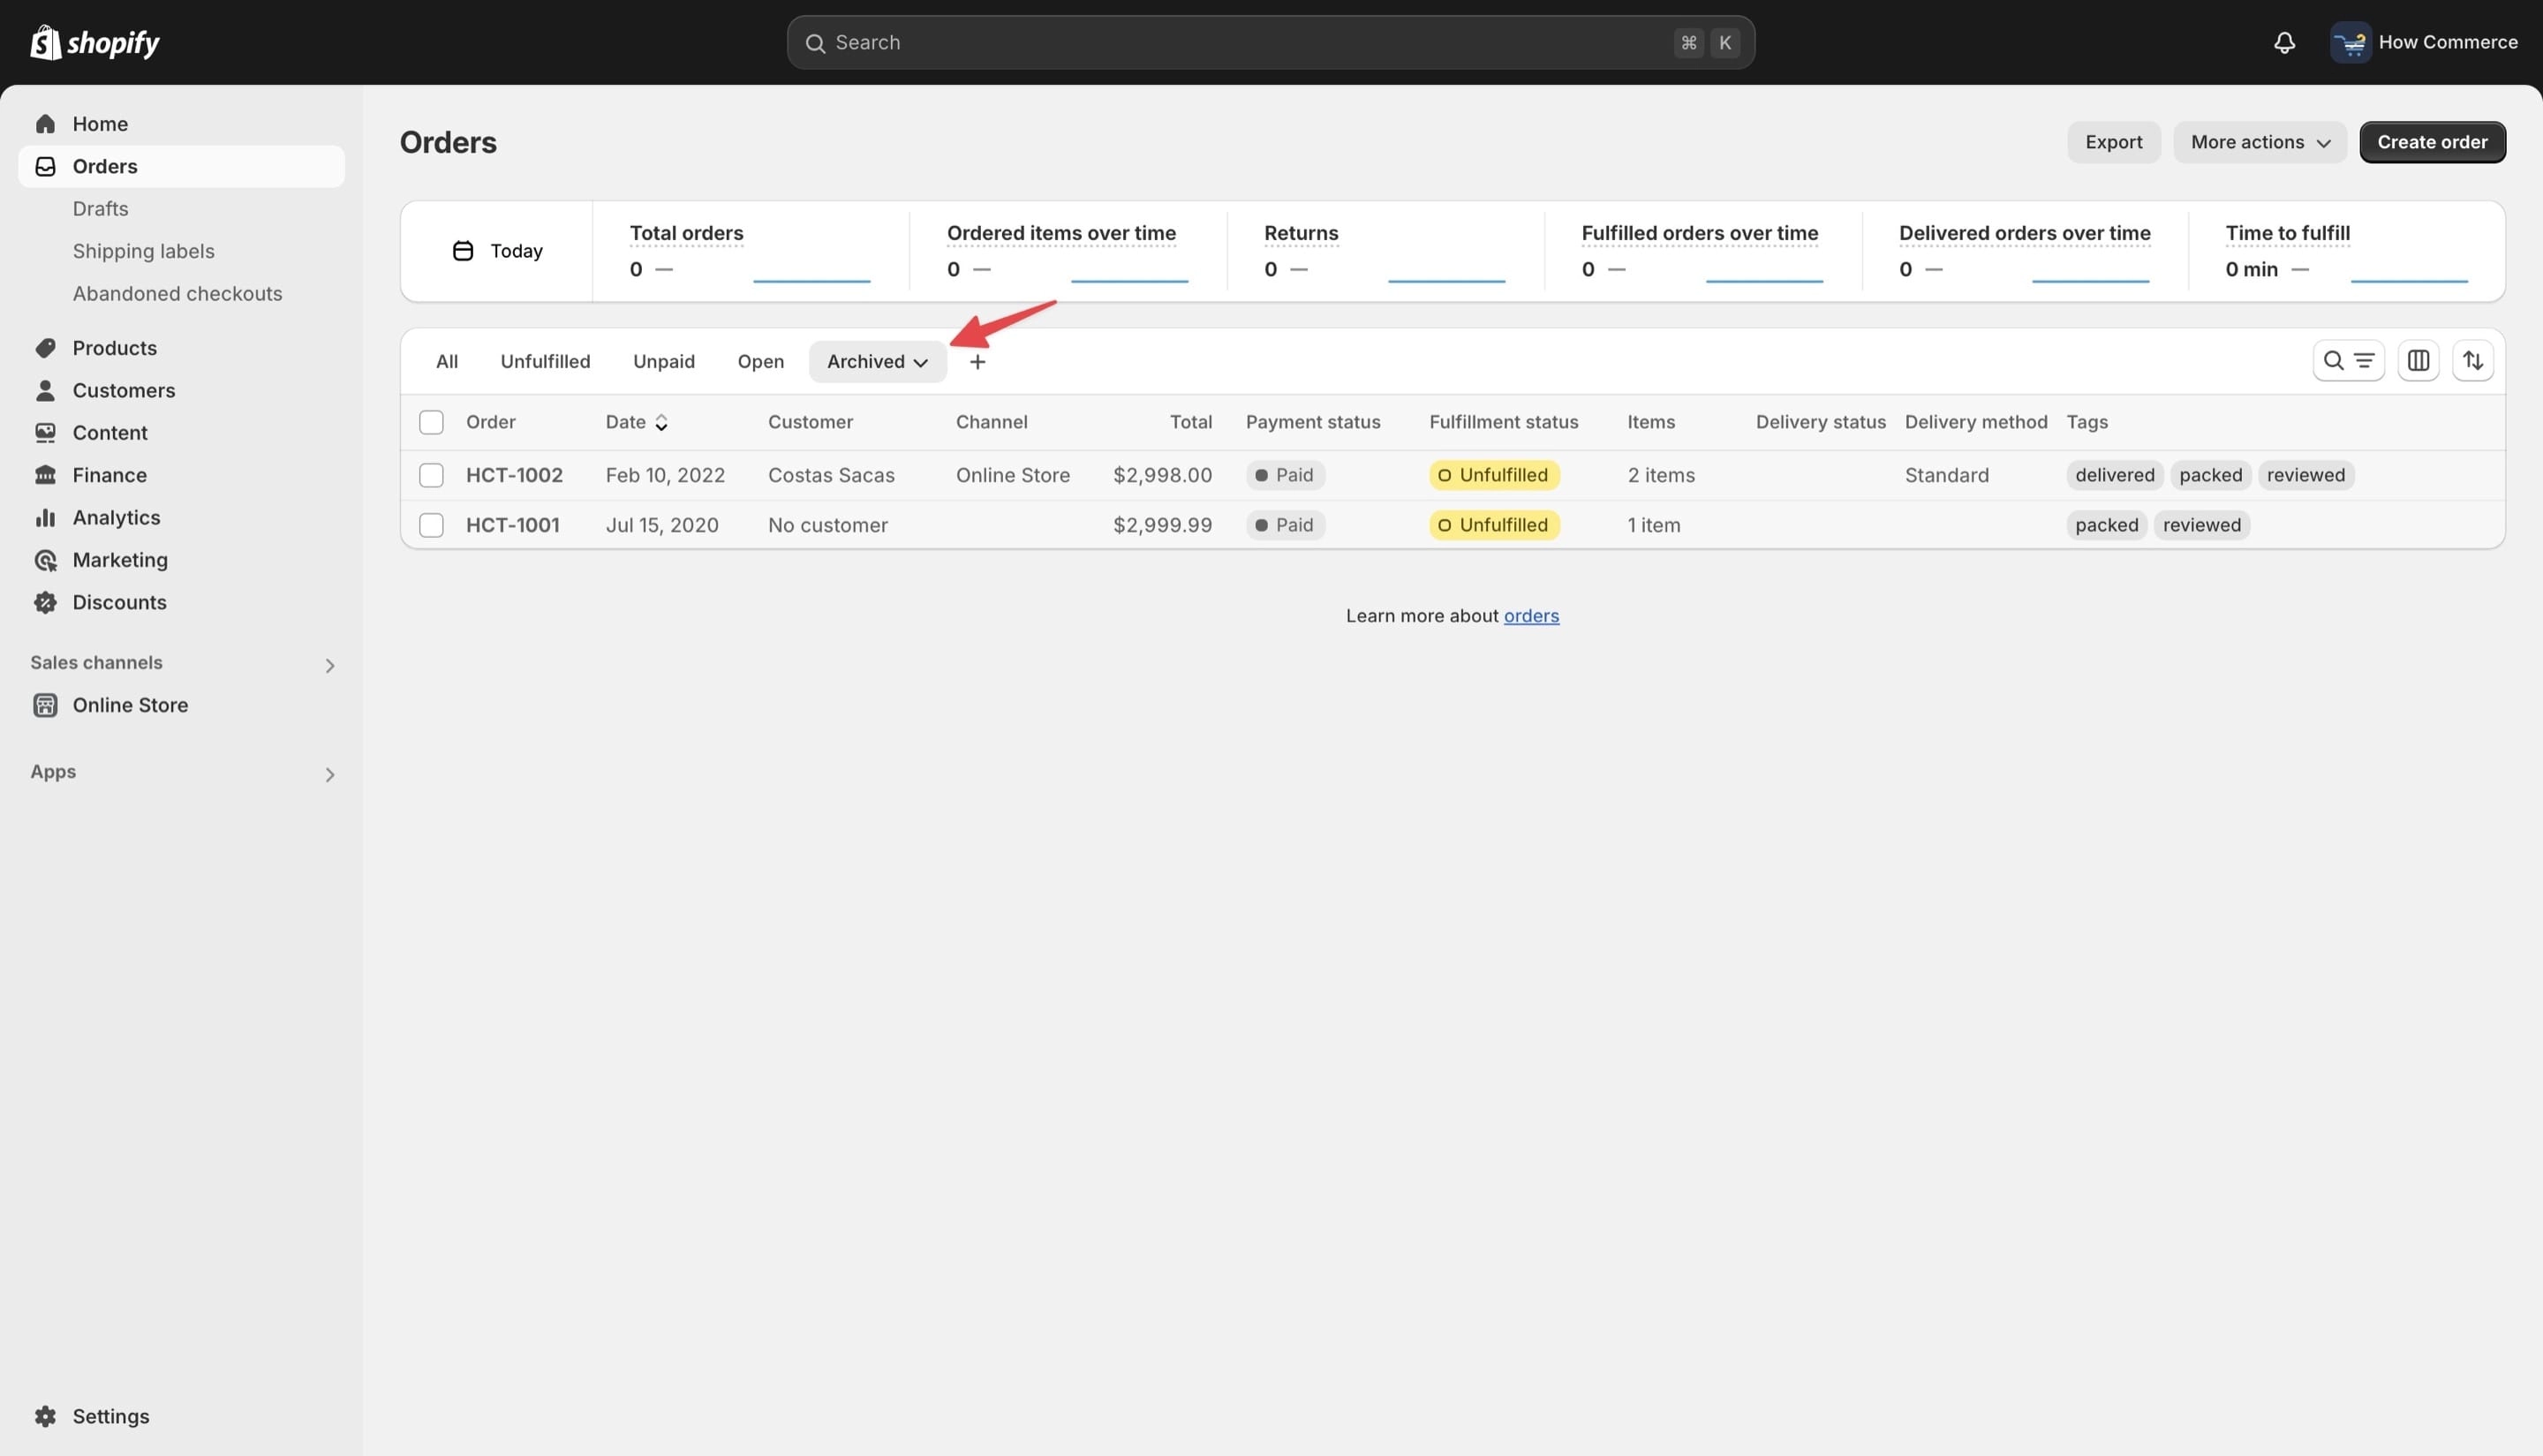
Archived orders are displayed filtered on the “Archived” view like in the image below.
Cancel an order
Canceling an order means stopping its processing.
For instance, you might cancel an order if a customer requests it, if you suspect fraud, or if an item is out of stock.
This helps prevent staff or fulfillment services from proceeding with the order.
Depending on the order's status at the time of cancellation, additional follow-up actions may be required.
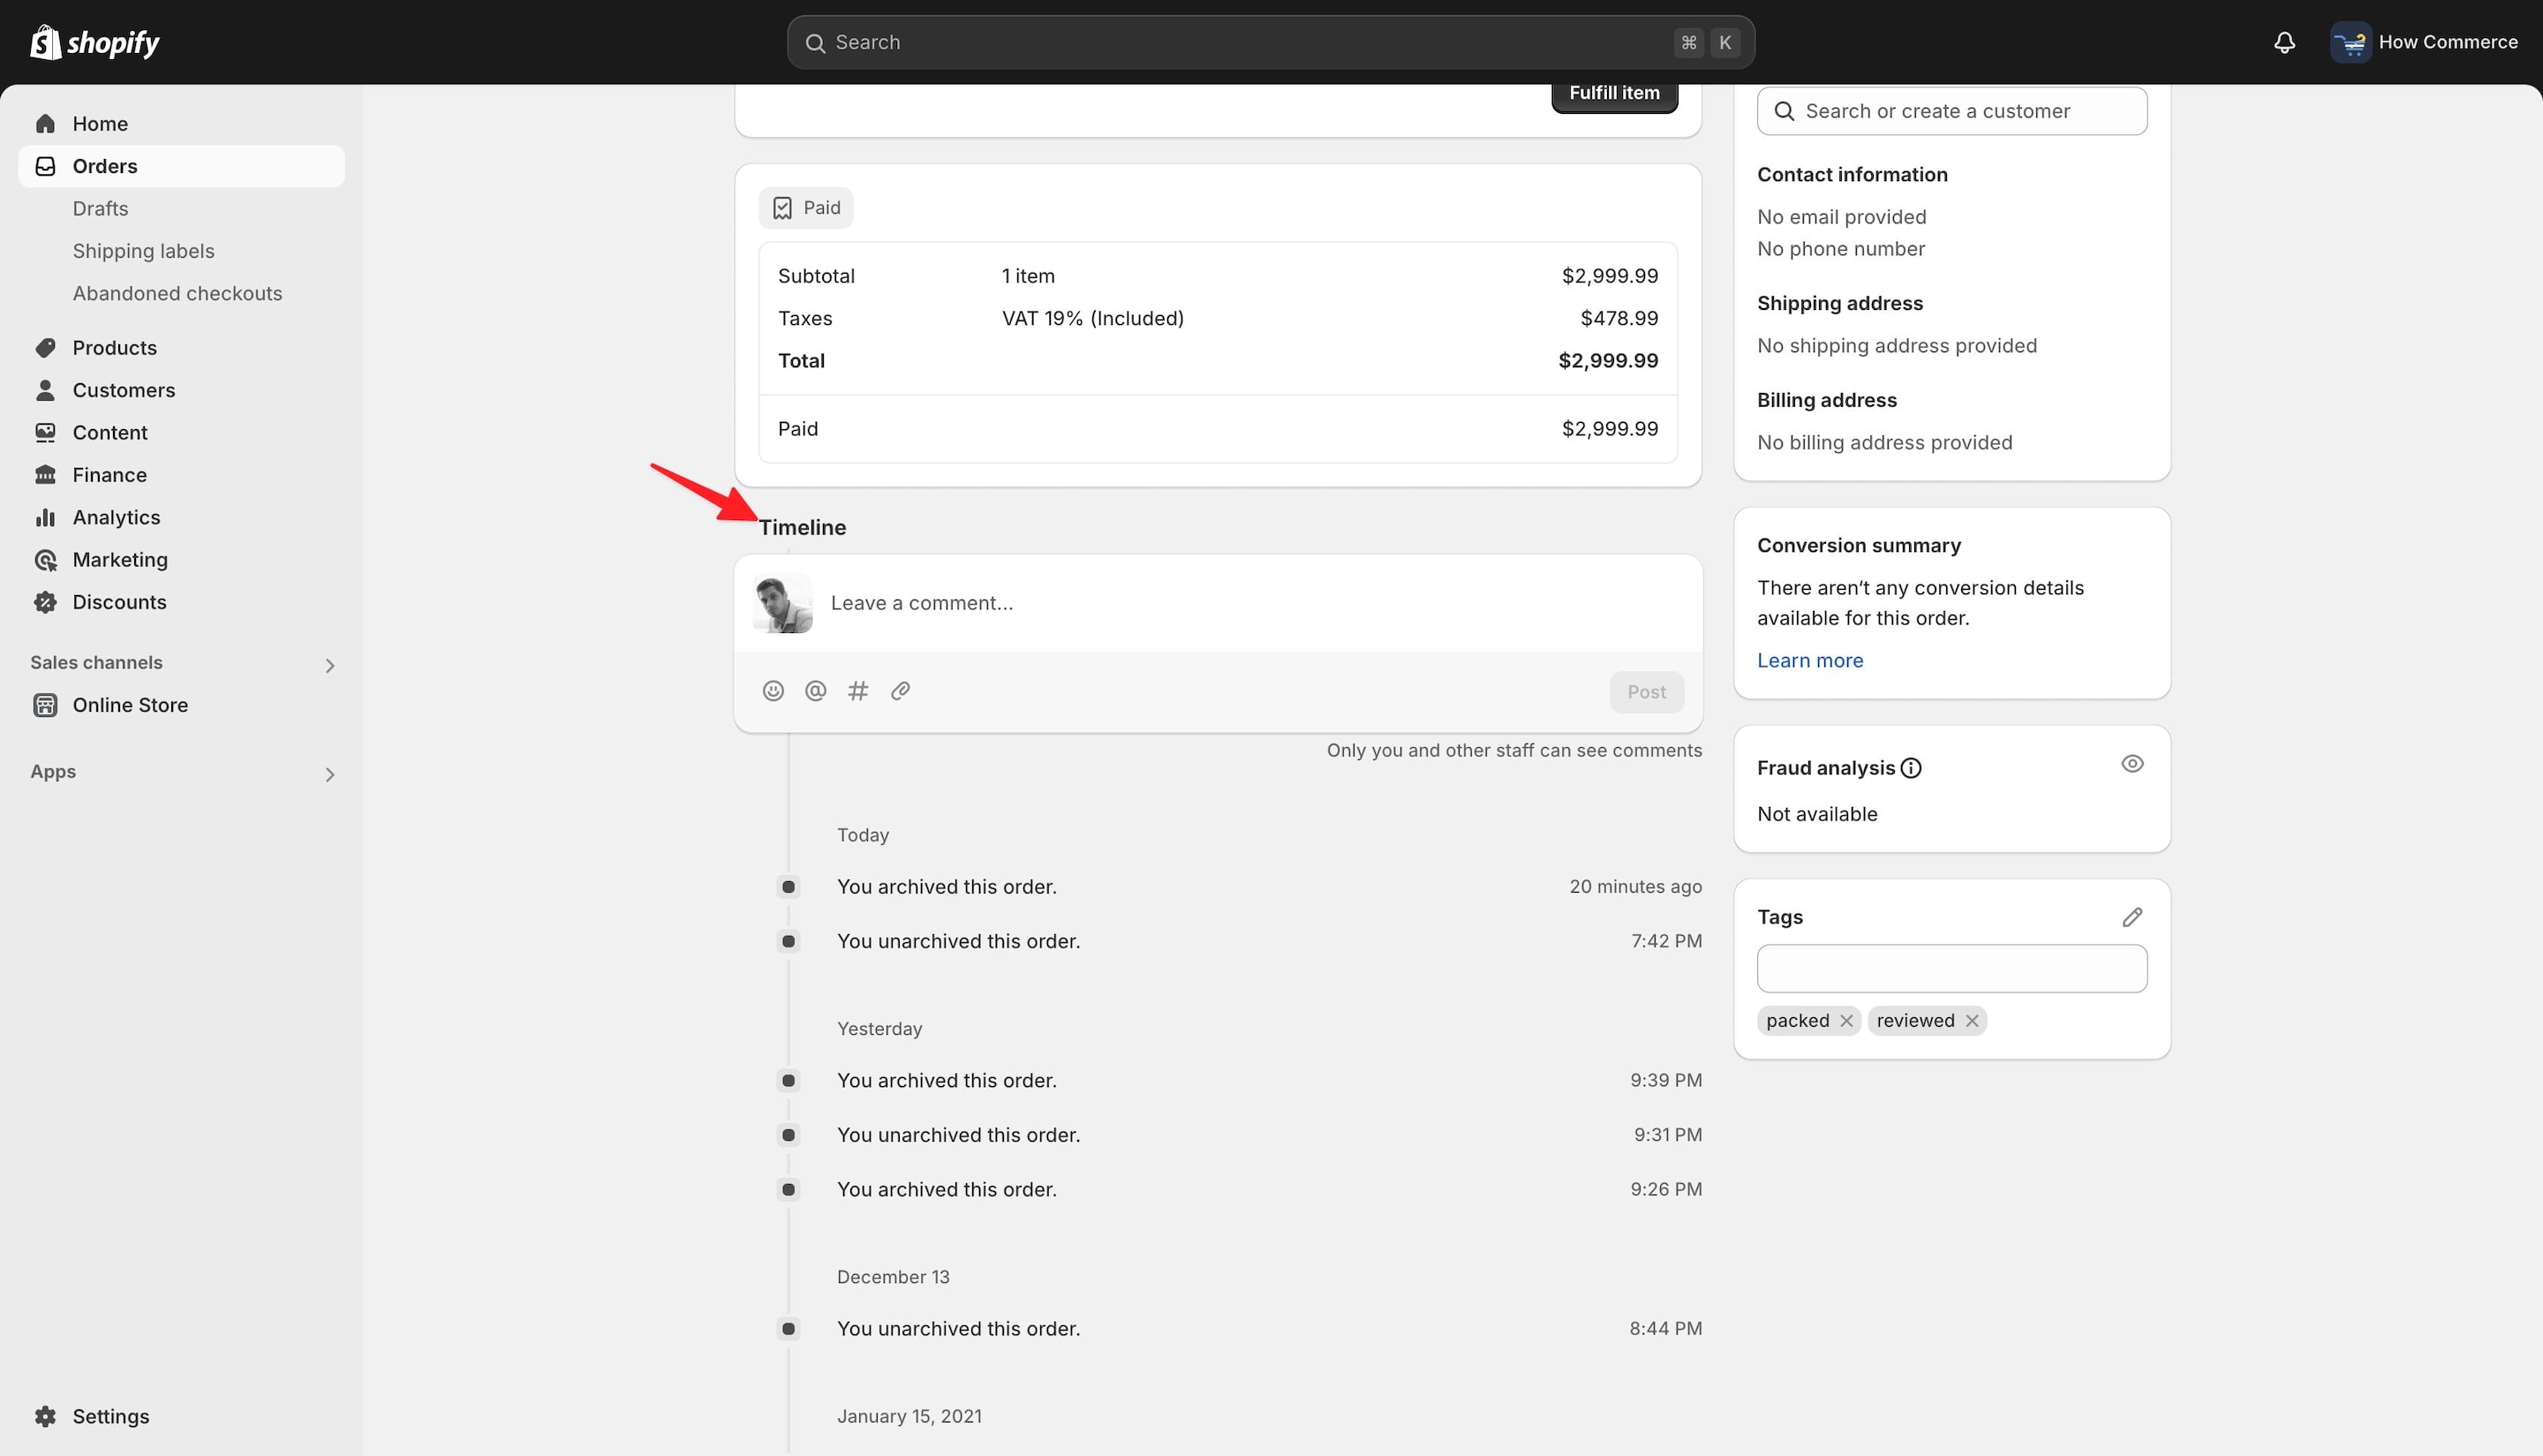
When you cancel an order, details about restocked items and refunds are recorded in the order's Timeline.
The payment status updates as follows upon cancellation:
- If the payment was not captured, the status changes to "Voided."
- If the payment was fully refunded, the status changes to "Refunded."
- If a partial refund is issued later for a canceled order, the status changes to "Partially refunded."
Orders with a "Pending payment" status may not be eligible for cancellation.
Cancel a single order
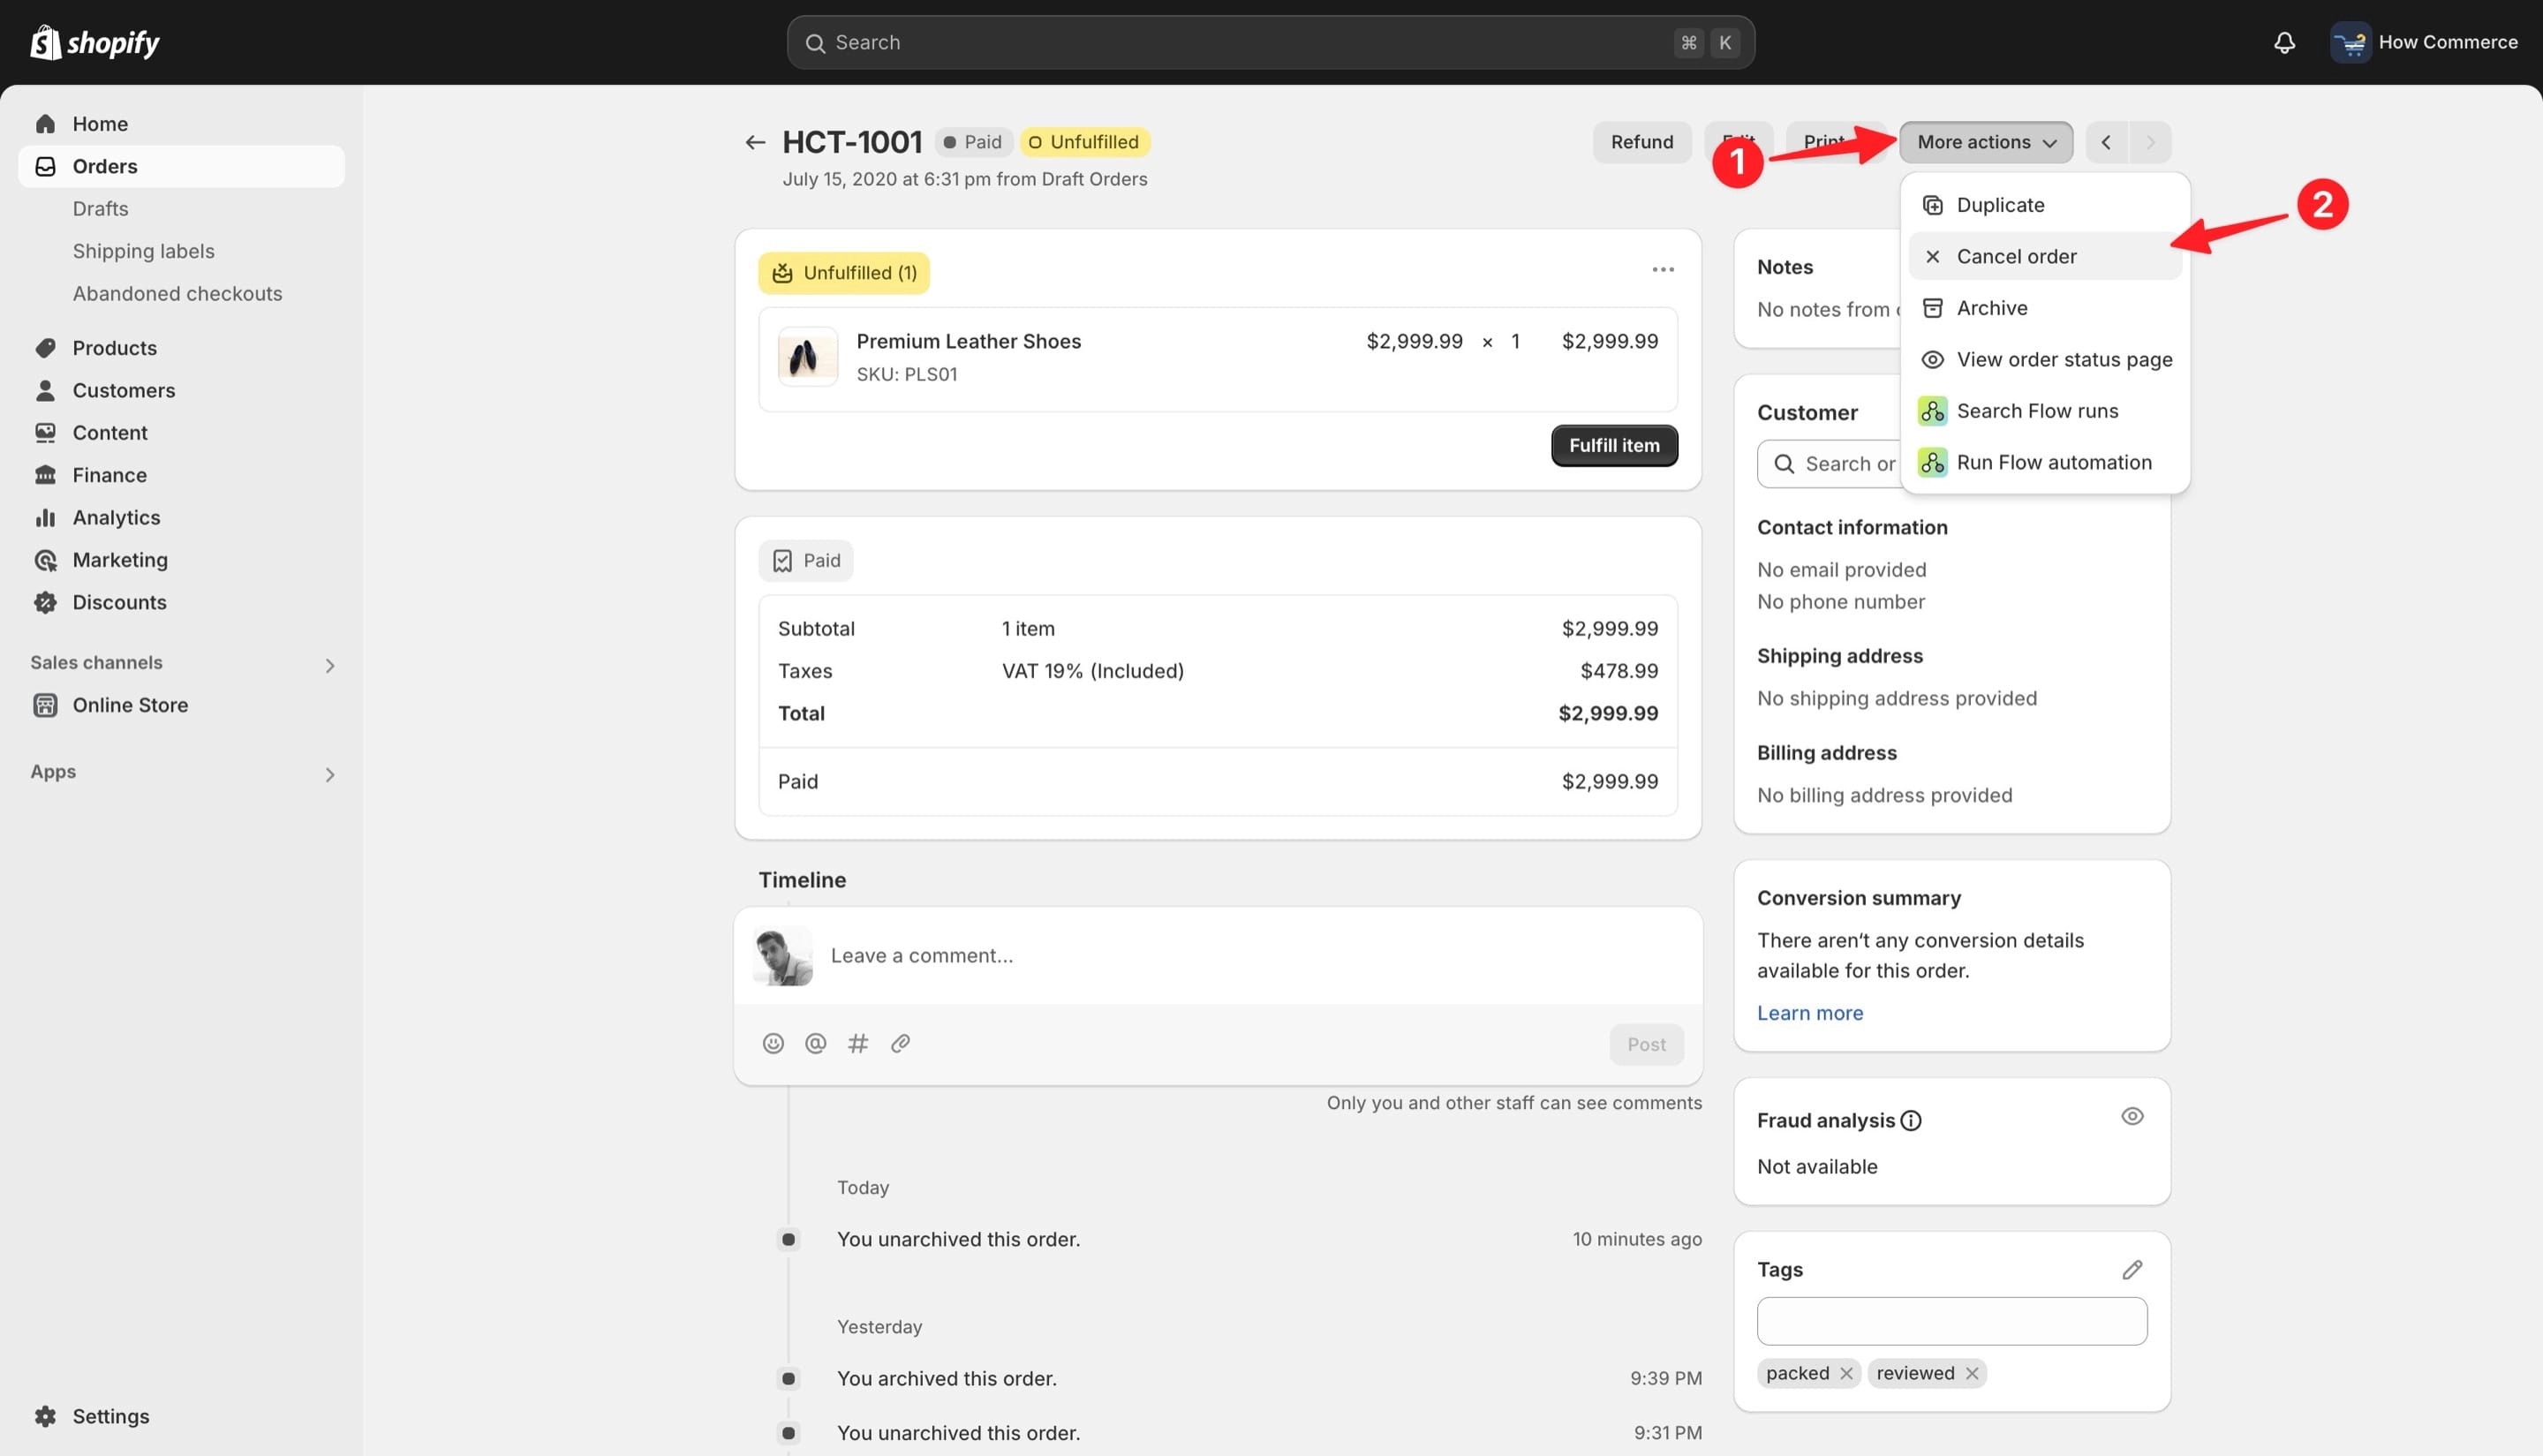
From your Shopify admin, go to “Orders” (marked with 1 in the image below) and select the order you want to cancel (marked with 2 in the image below).
Click the “...” (More actions) (marked with 1 in the image below) and click on the “Cancel order” (marked with 2 in the image below).
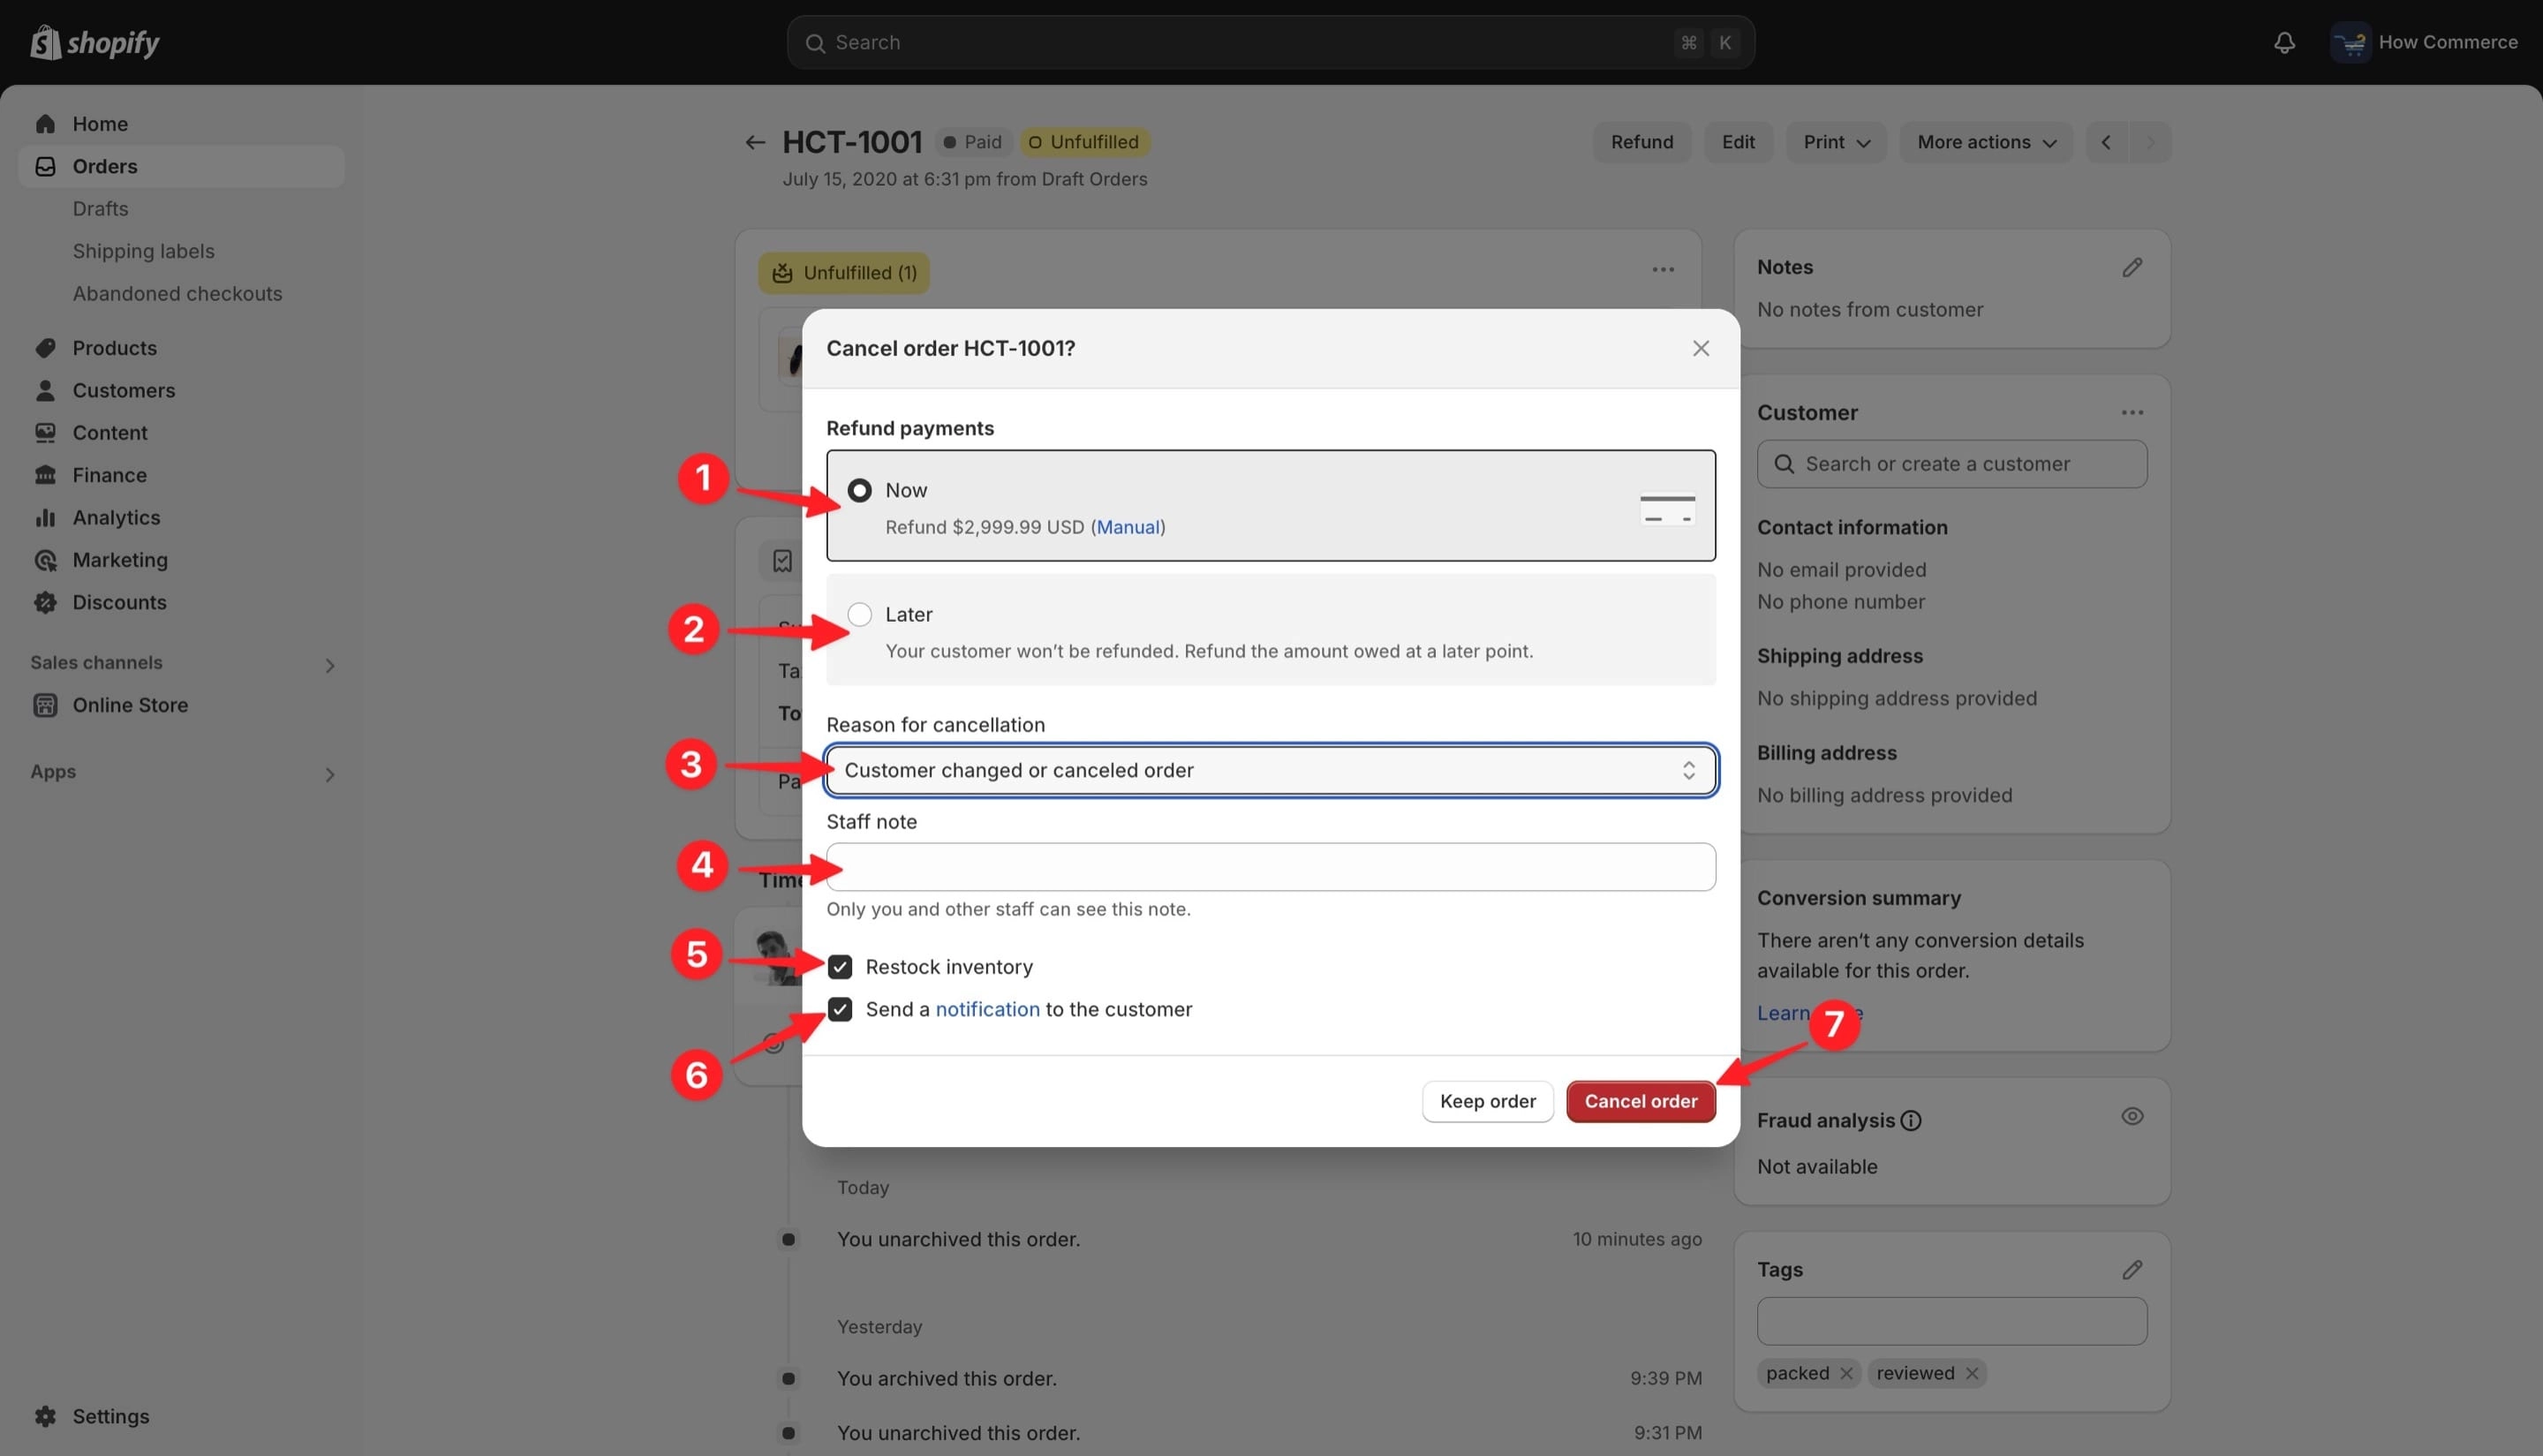
A pop-up window will open where you need to make some selections.
First you have “Refund payments”.
You have the option to refund now (marked with 1 in the image below) and the customer will be refunded on spot or you have the option to refund the customer later (marked with 2 in the image below) meaning that your customer will not be refunded on spot but at a later date, one date that you choose.
Select a “Reason for cancellation” (marked with 3 in the image below).
You have 6 predefined reasons to choose from:
- Customer changed or canceled order
- Payment declined
- Fraudulent order
- Items unavailable
- Staff error
- Other
The reason for cancellation will be sent via email to the customer and will also be listed on the customer account page on storefront so choose one that will represent the best reason for cancellation so the customer will be properly informed why the cancellation of the order took place.
If you want you can add a “Staff note” (marked with 4 in the image below) as well that will be visible only to your staff. If you have a reason here that only you and your staff should know about, it is a good choice to add it.
“Restock inventory” (marked with 5 in the image below) and “Send a notification to the customer” (marked with 6 in the image below) are checked by default, by Shopify.
Since the order was cancelled it is obvious that the item that needs to be shipped to your customer will no longer be shipped so you need to add it back to stock in order to sell it later to another customer and this is why “Restock inventory” is pre-checked.
“Send a notification to the customer” is also needed pre-checked since your customer should know why their order was cancelled, but it is your choice if you want to let him know about that.
Once you have everything in place you can click on the “Cancel order” button (marked with 7 in the image below) and the order will be cancelled.
Cancelled orders do not have a special place where they go, instead they go under the same view like archived orders since once an order is cancelled it will be archived.
Cancel multiple orders in bulk
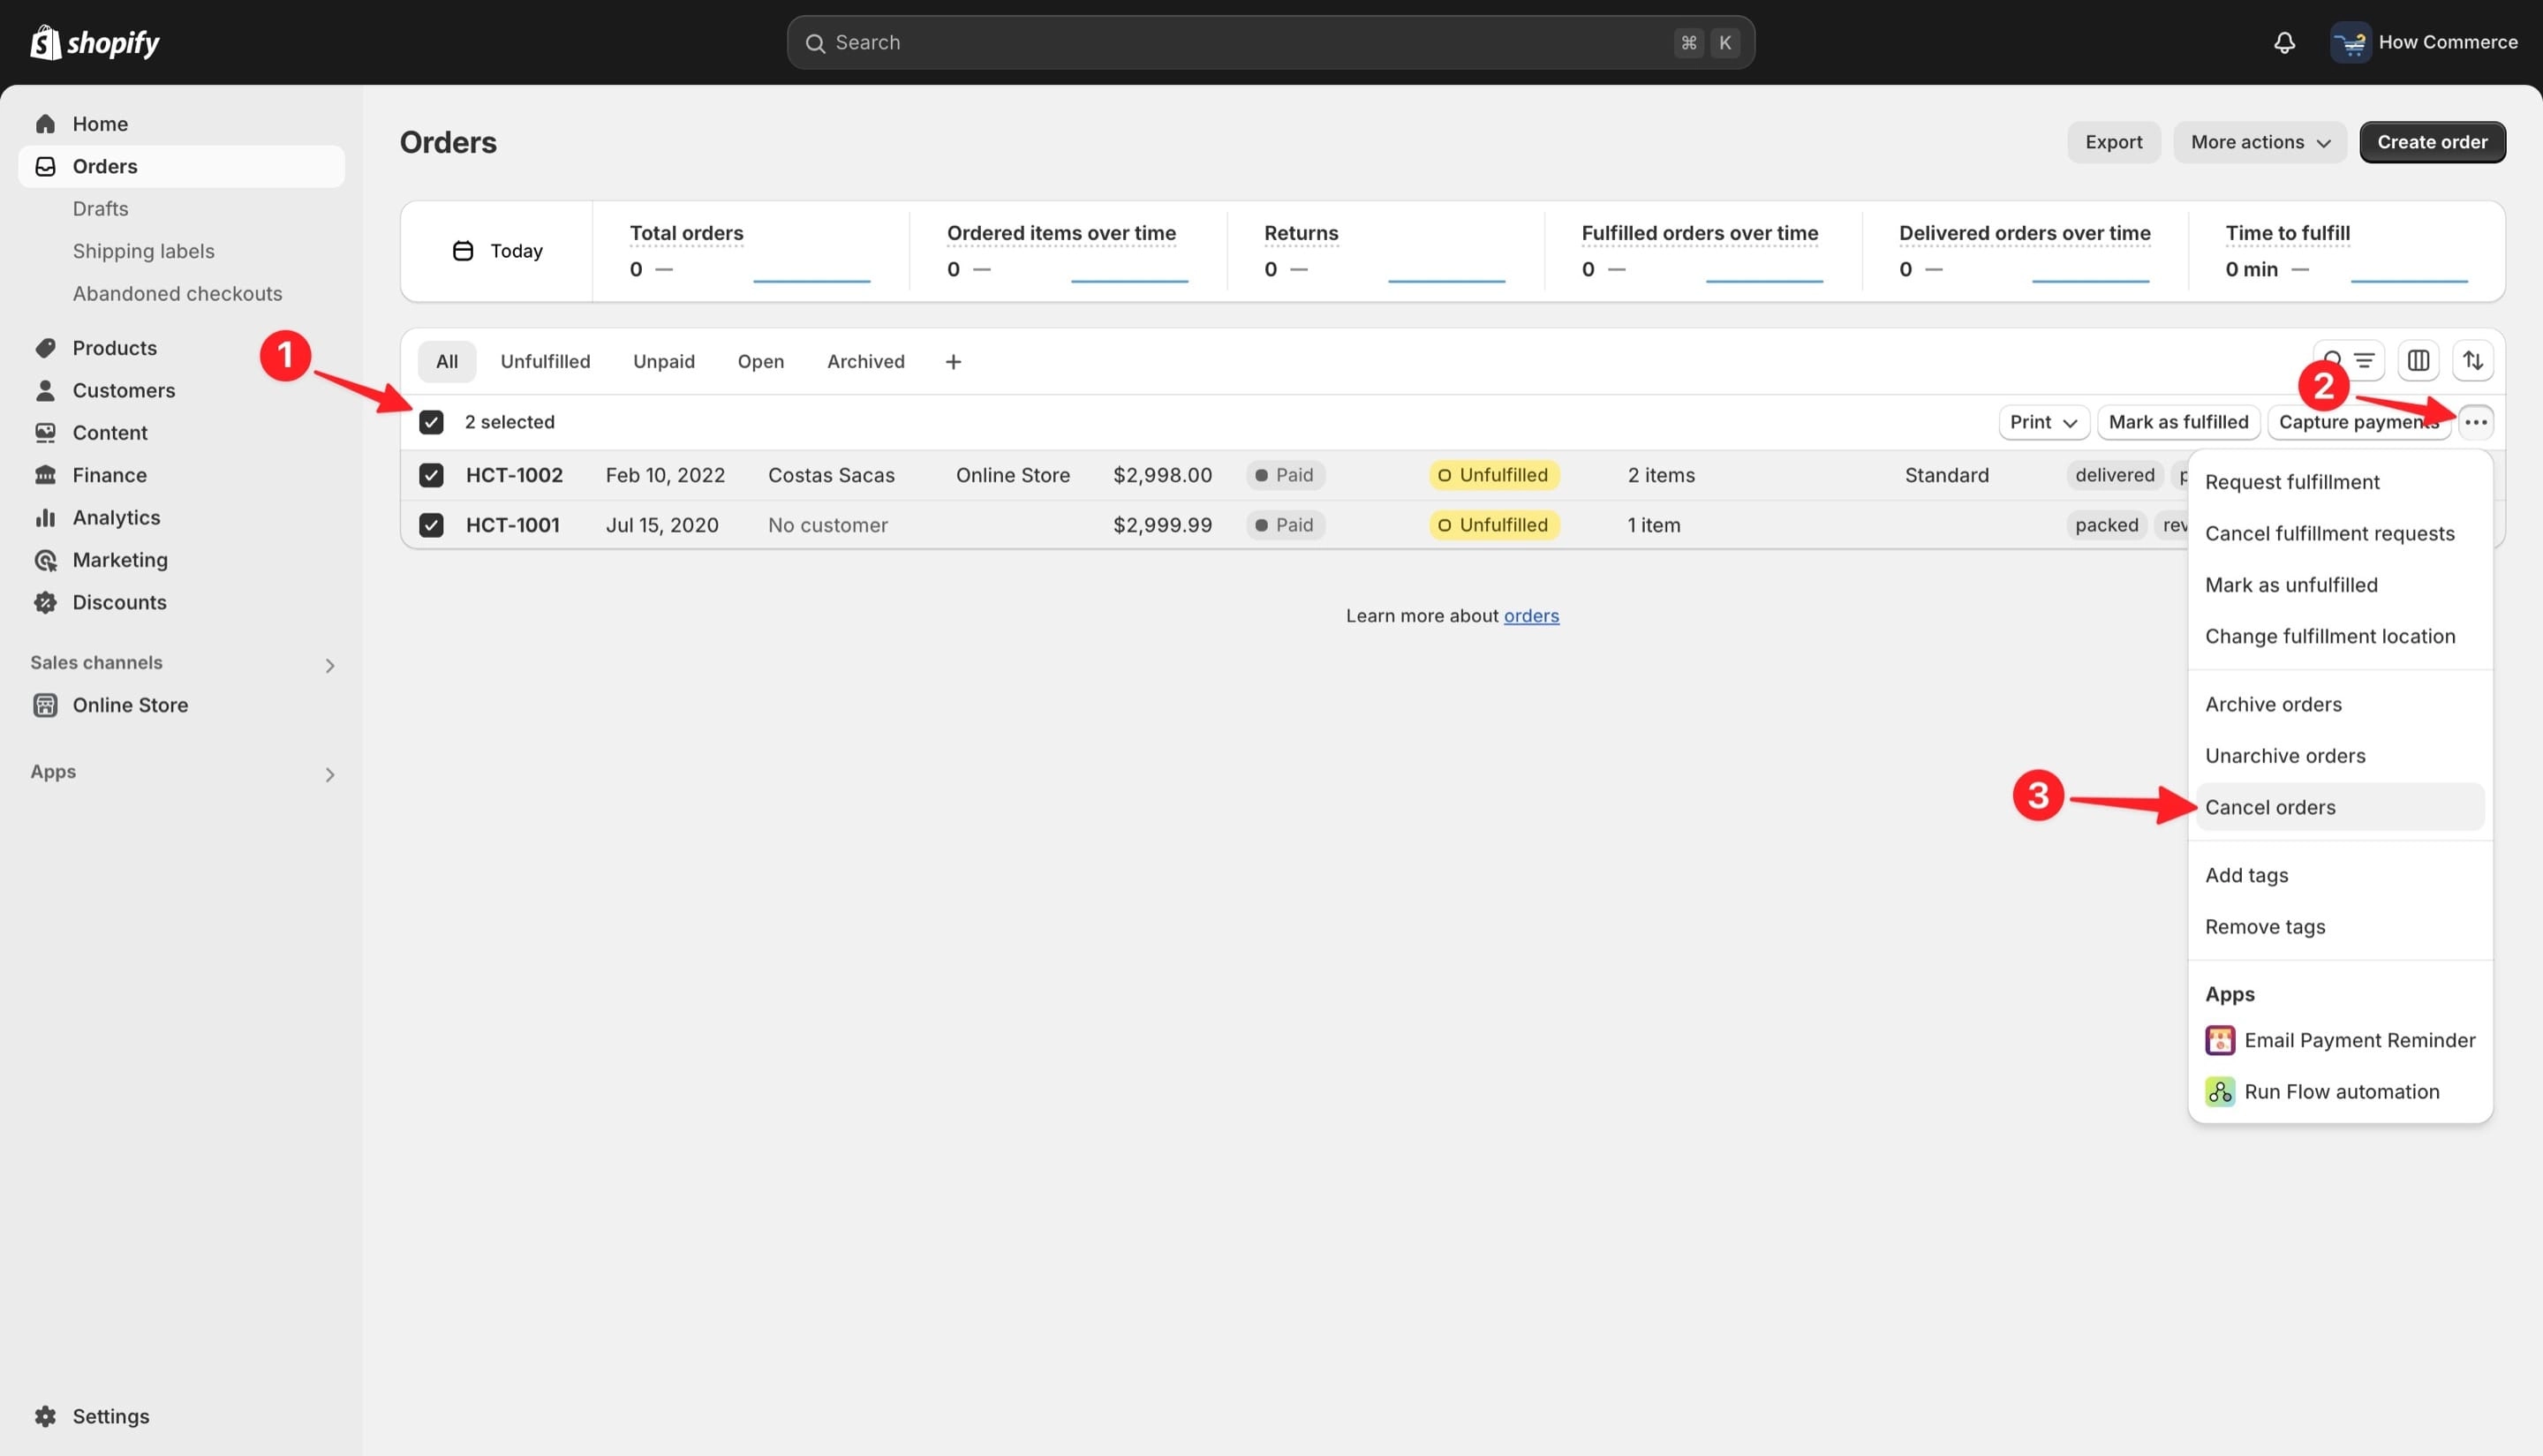
Select all orders (marked with 1 in the image below) that you want to cancel (marked with 1 in the image below) click on the “...” (More actions) (marked with 2 in the image below) and select the “Cancel orders” (marked with 3 in the image below).
The same cancellation pop-up will display asking for cancellation reasons. See above.
Delete an order
Before deleting orders from your store you need to be aware of some criteria.
Orders need to be deleted individually. Unfortunately at this time there isn’t any way to do it in bulk. So if you have a lot of orders to delete it will take you a lot of time to do it one by one.
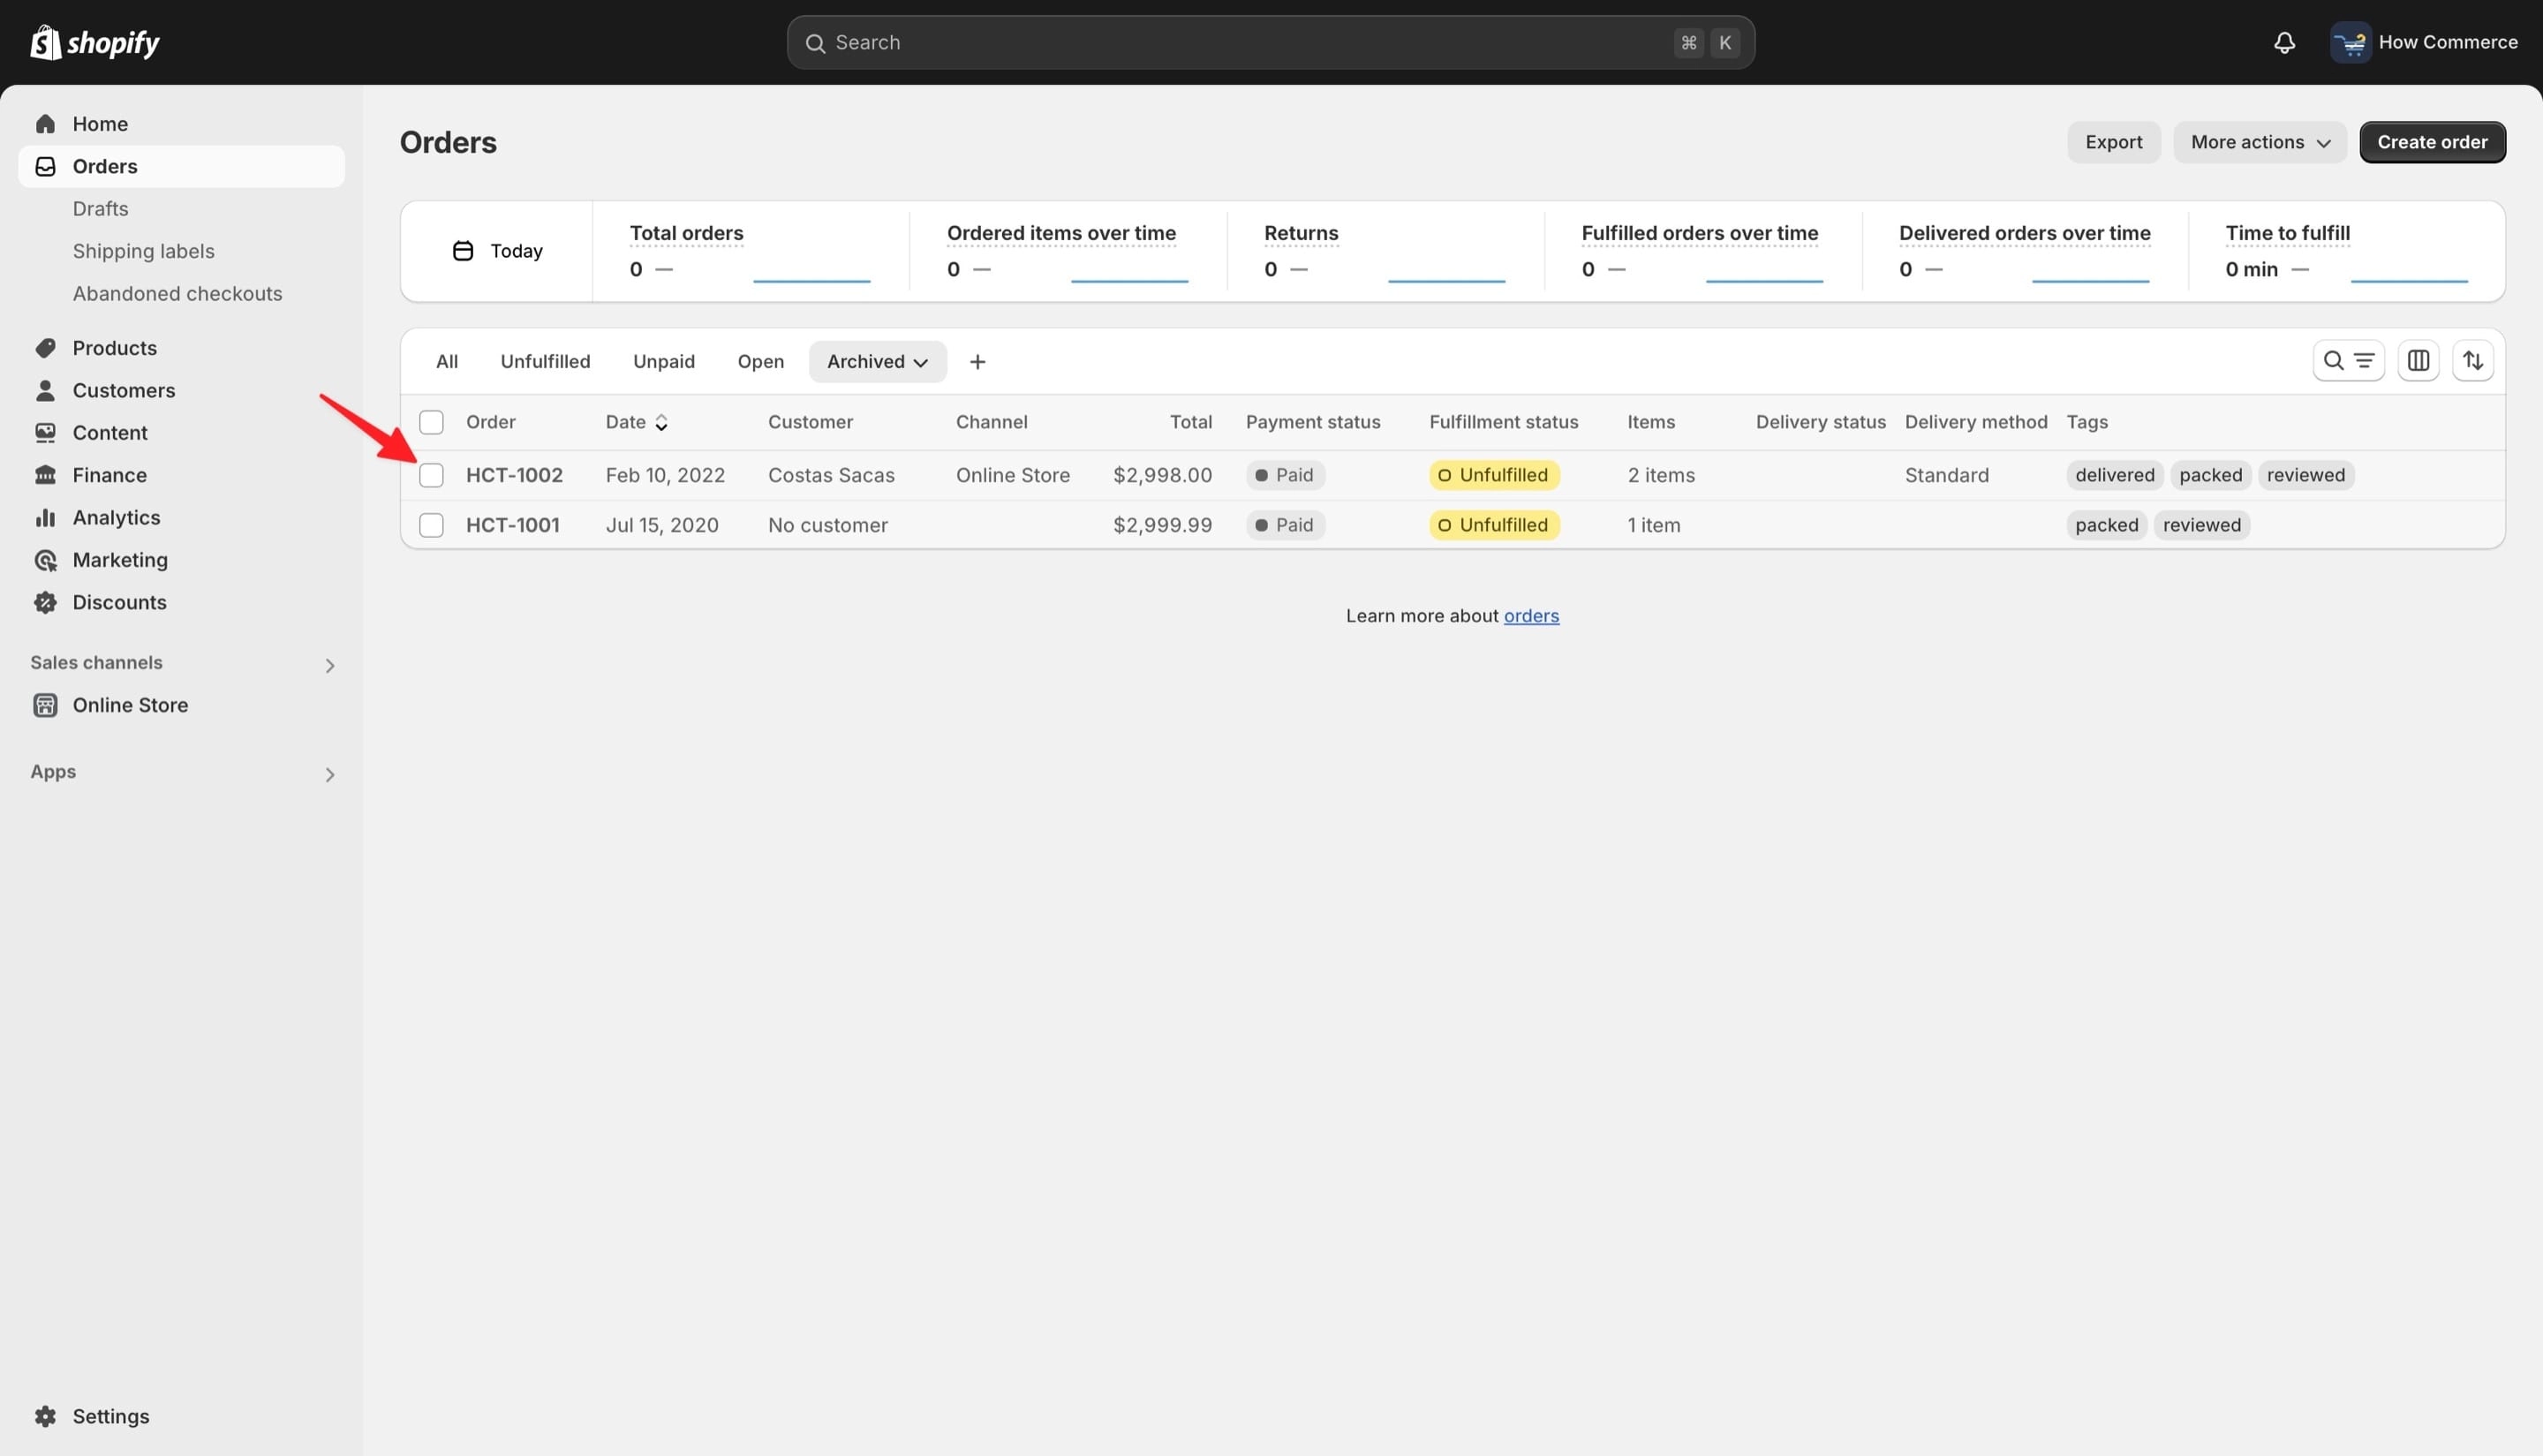
Since an order needs to be archived or cancelled before you are allowed to delete it, in order to delete an order we need to go to the “Archived” (marked with 1 in the image below) view in admin where all archived and cancelled orders reside.
Select the order like in the image below:
Open the order and scroll to the bottom of the page where you’ll see the “Delete order” button:
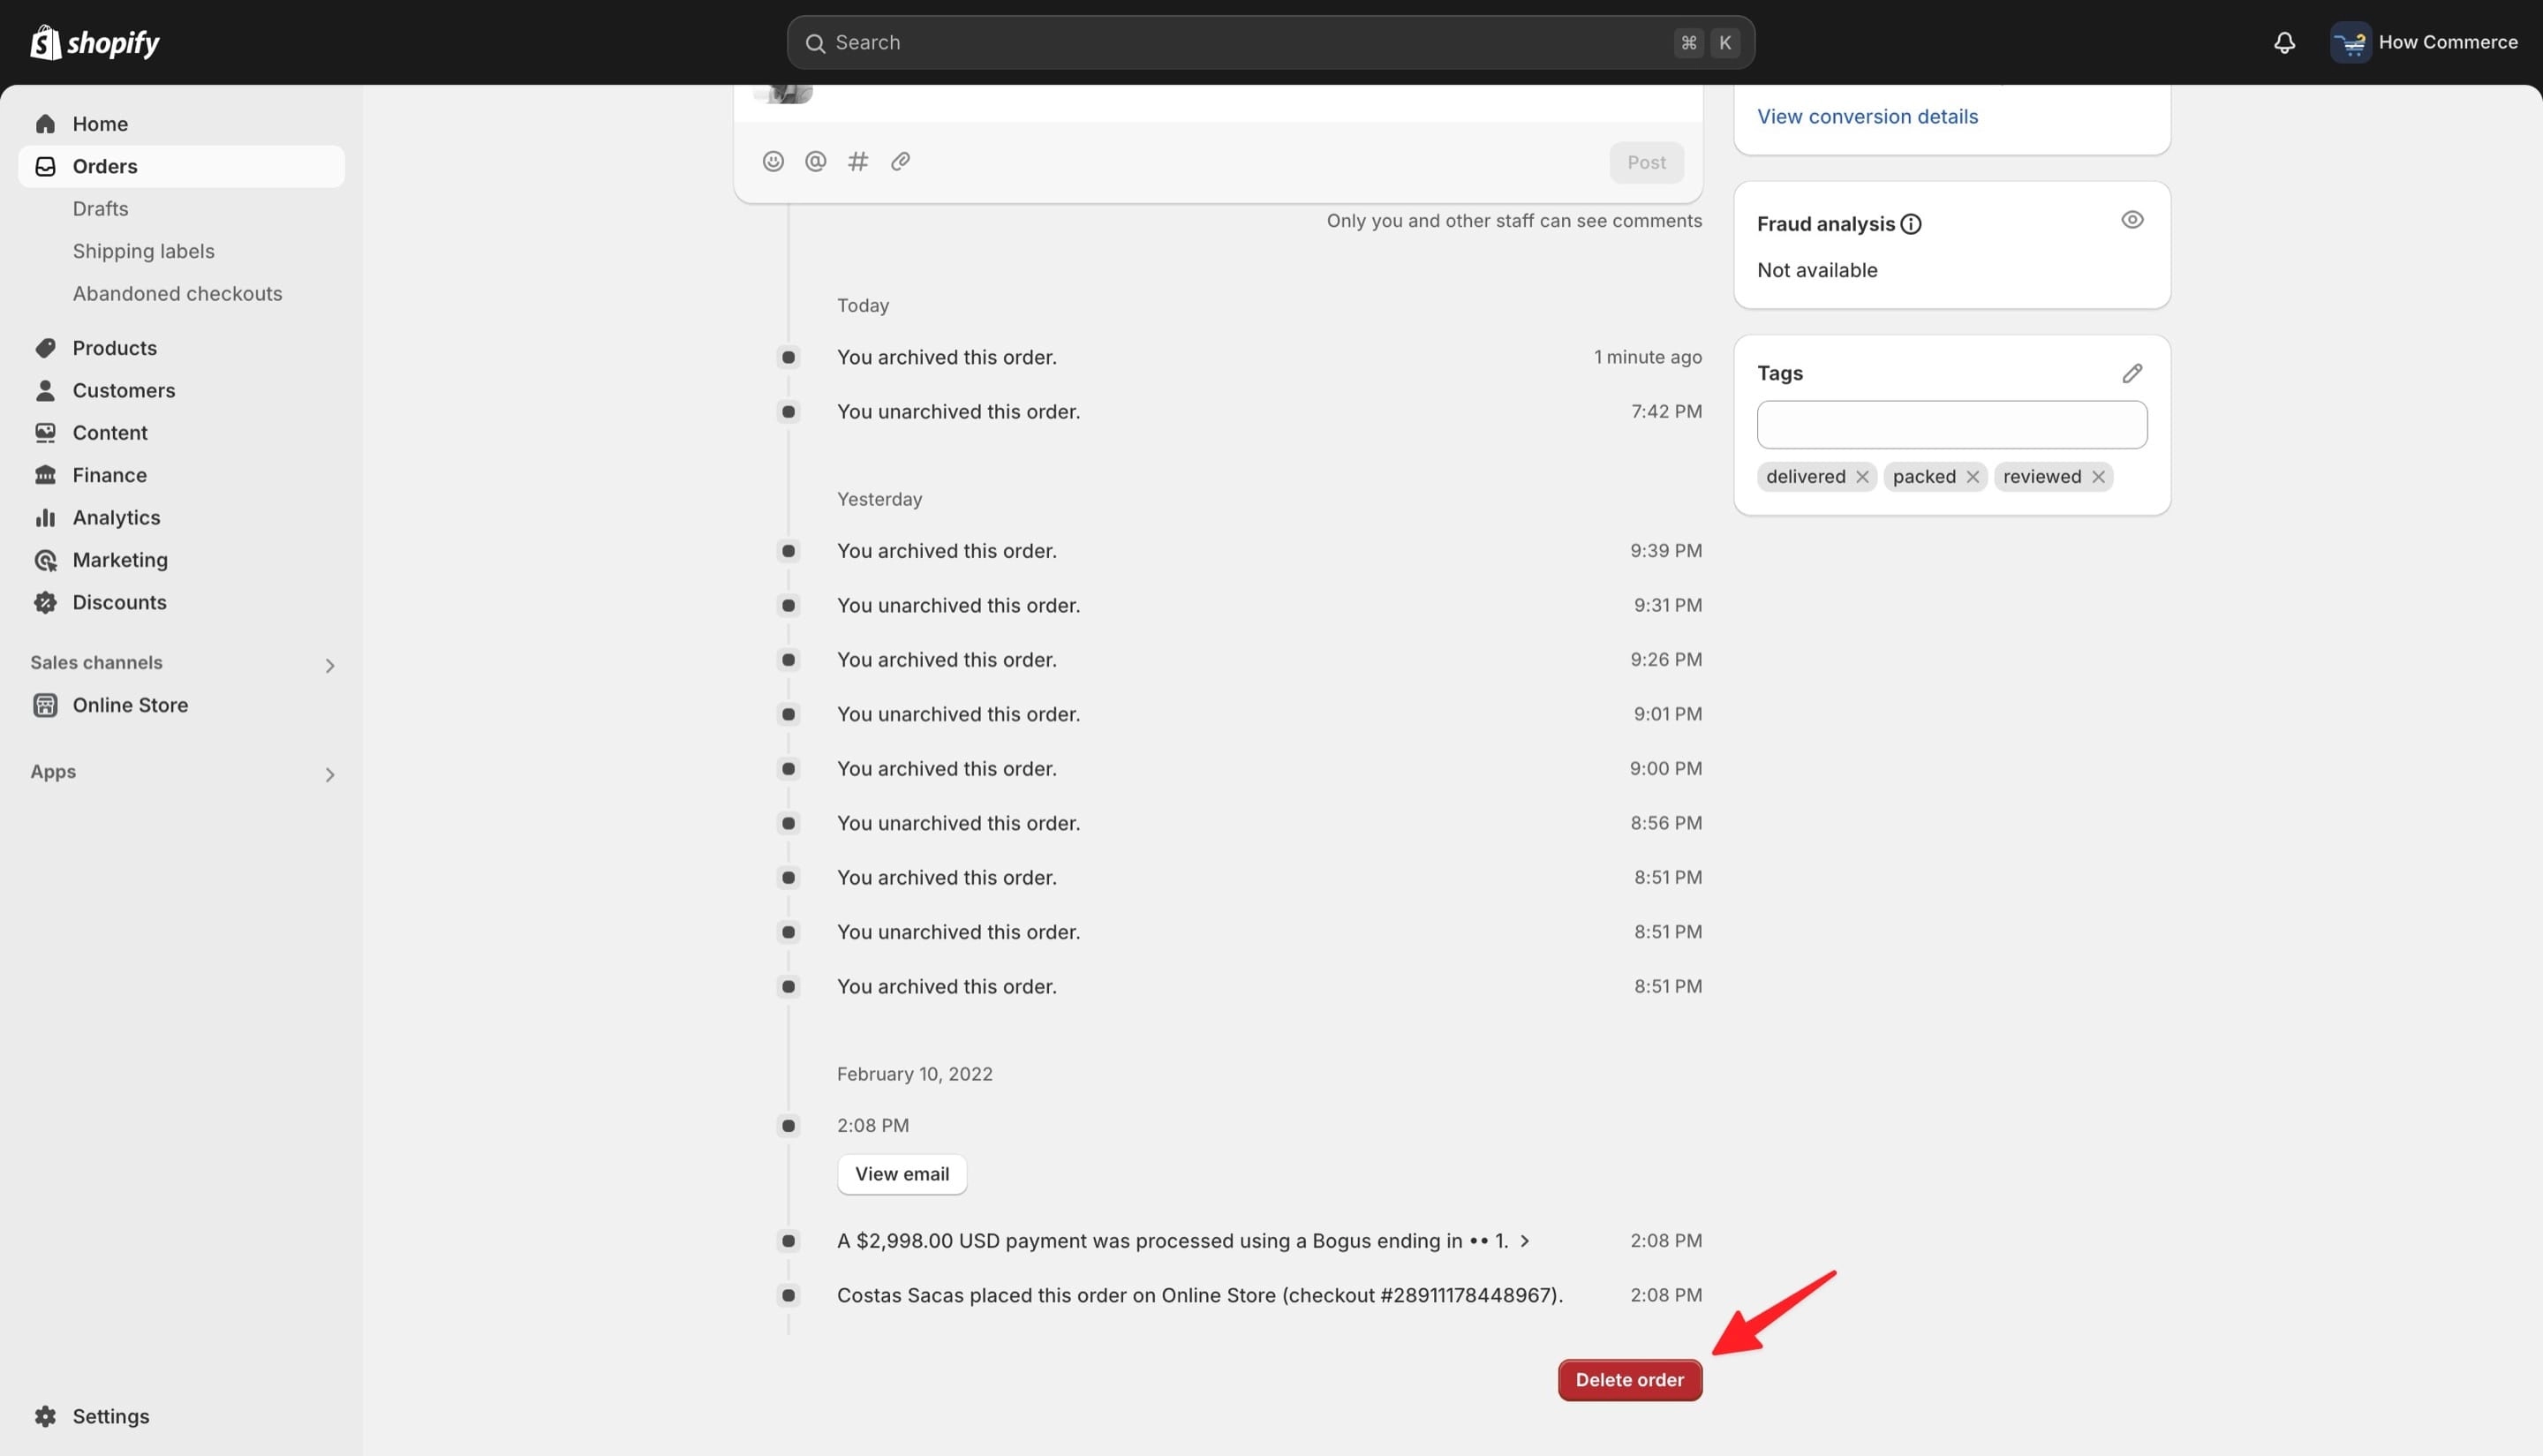
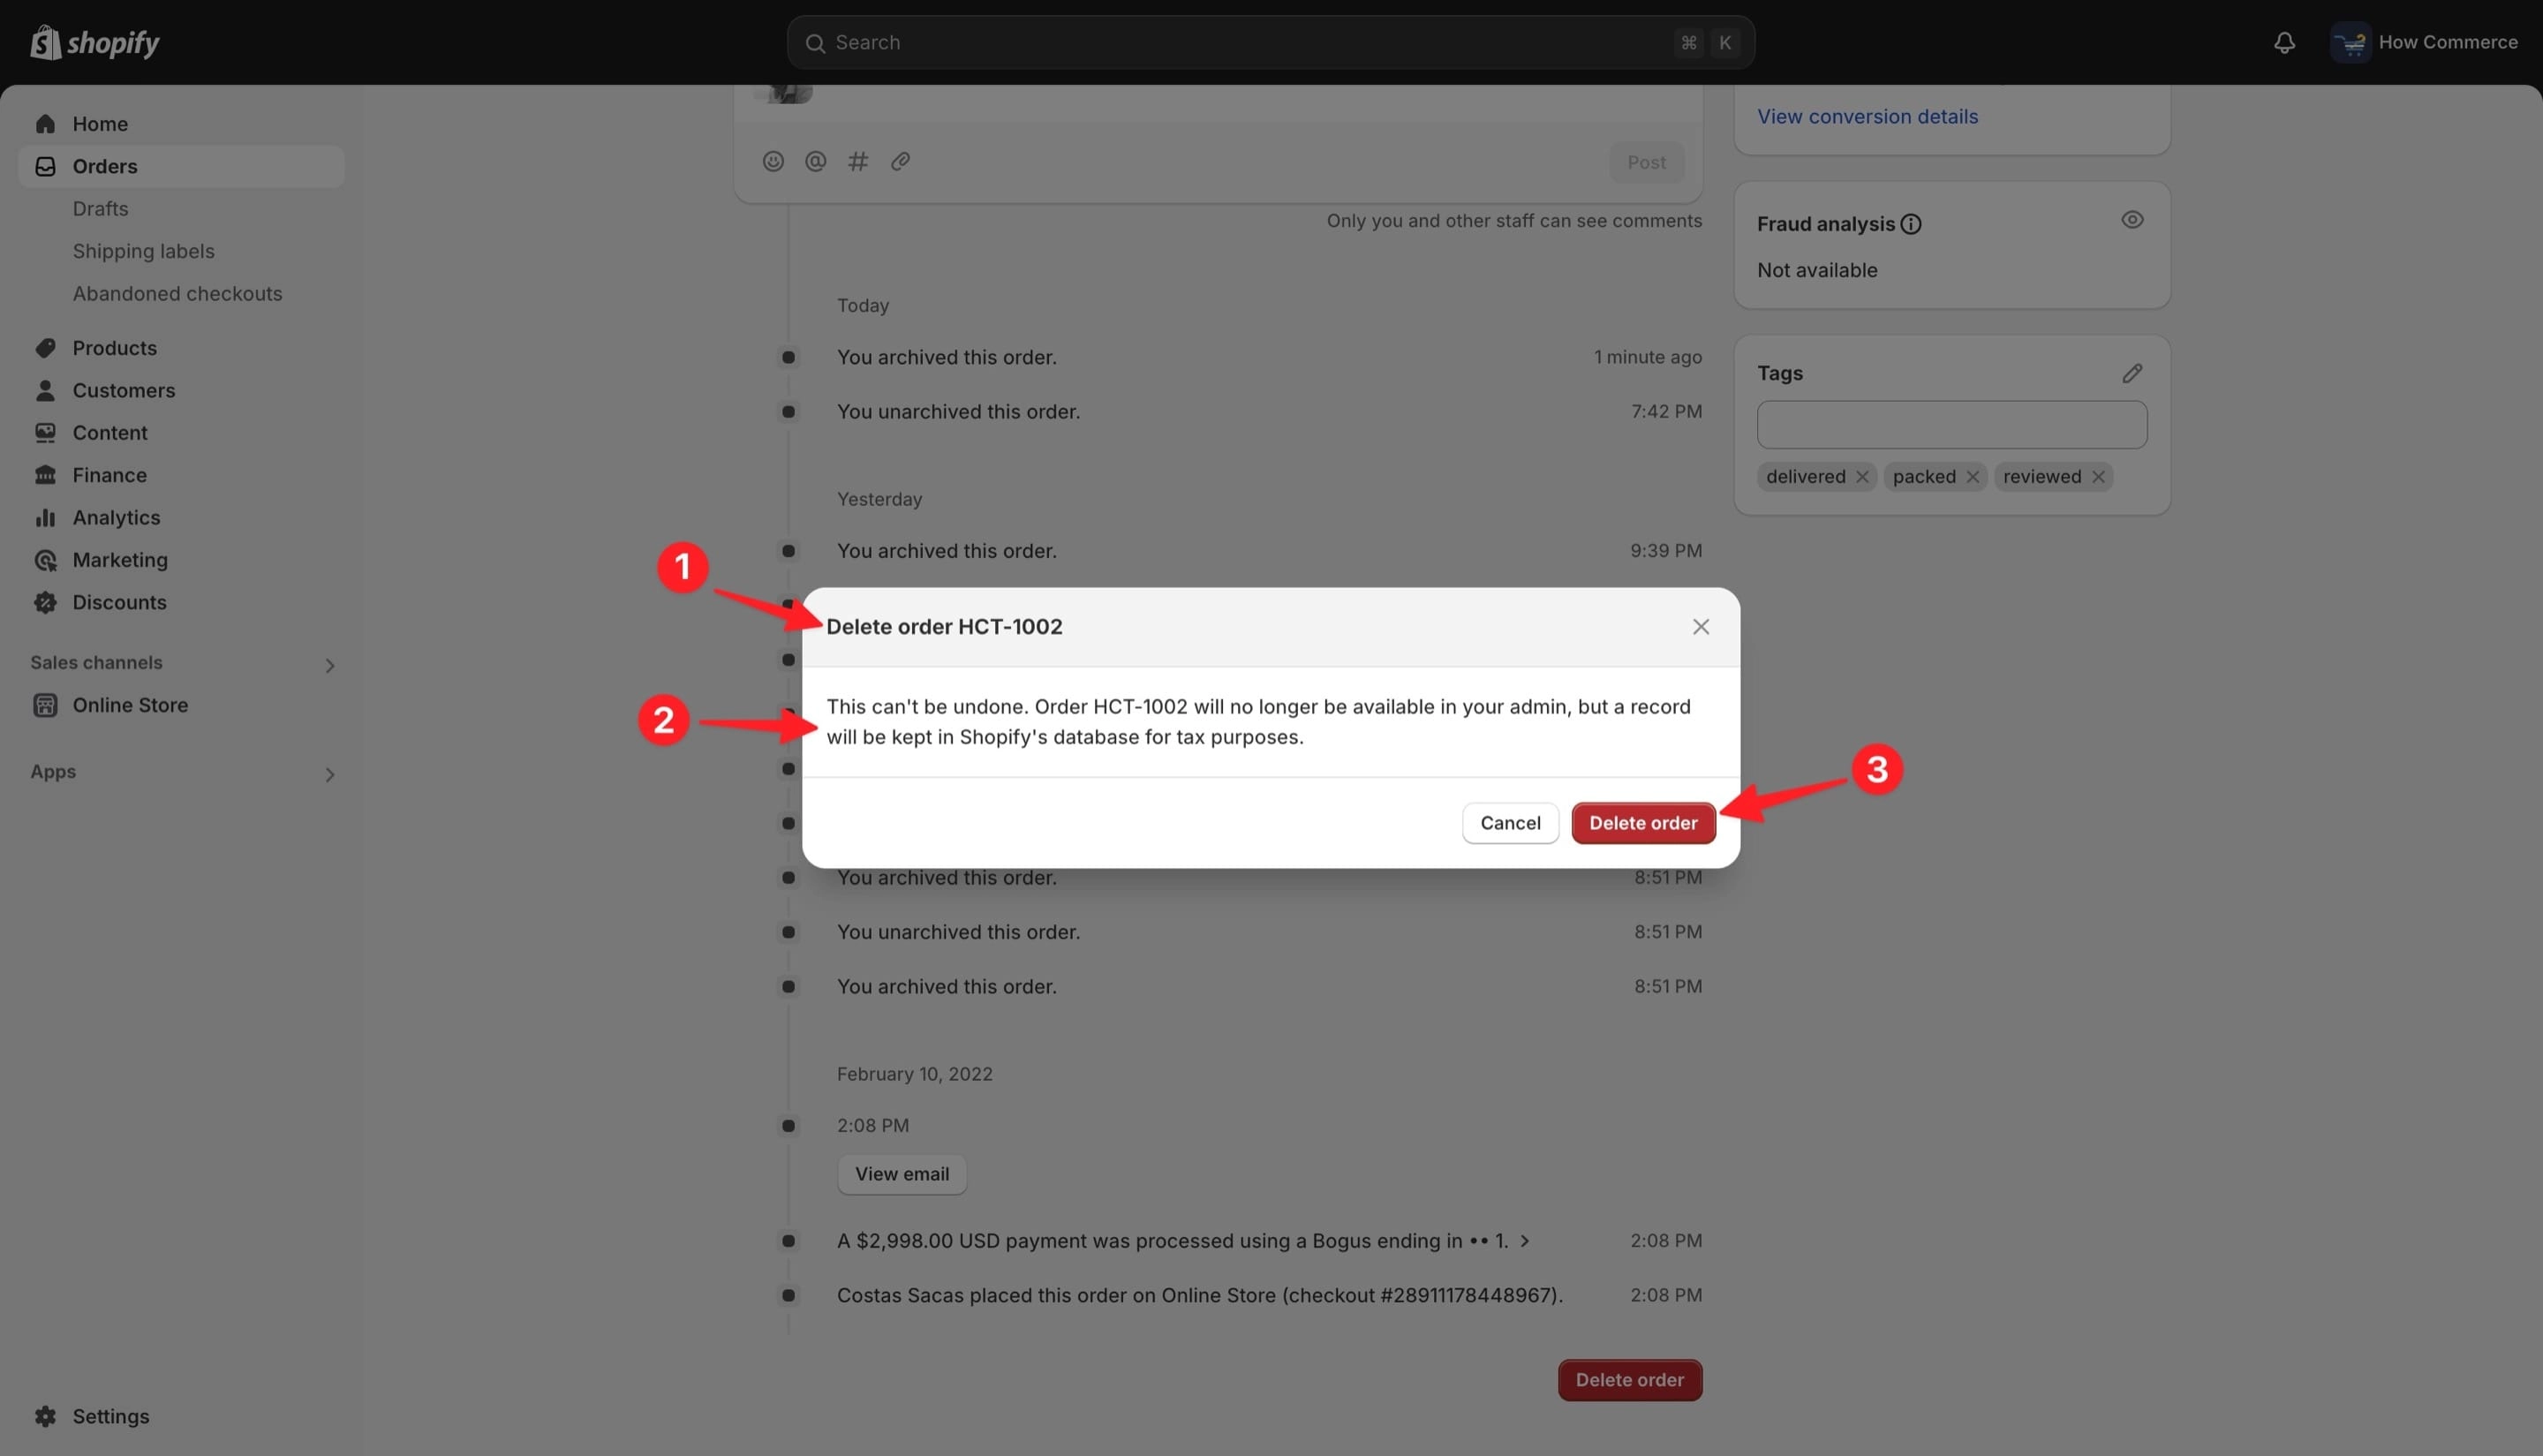
After you click the button a delete order confirmation pop-up will display and warn you that the order with number “AAA-XXXX” will be removed from the store and that this action can’t be undone.
Once you confirm, the order will be permanently deleted from your Shopify store.
If you are sure you want to delete the order click the “Delete order” button (marked with 3 in the image below) and the order will be permanently removed from the store.
Conclusion
That’s it.
Understanding Shopify's order management system is key to maintaining an organized and efficient workflow.
While standard orders cannot be deleted to preserve accurate business records, the ability to delete specific order types like drafts, test orders, and API imports provides flexibility when managing your store.
By leveraging these features effectively, you can streamline your processes while maintaining the integrity of your data.
Always consider your business needs and compliance requirements when handling order deletions.