

Understanding custom CSS in Shopify
Sometimes you have the classical client that is a DIY, and wants to customize the theme himself like he is a pro designer and only he knows what that element should look like and you as a designer/developer don't have a clue. 🙂
Or maybe you just need to style an element quickly and you need to add the CSS somewhere without opening the editor, connecting to the theme via CLI, pushing and pulling files and so on.
Though it is better to do it the proper way and add CSS code in CSS file and more exactly in a CSS custom file – and even better in a SASS file and compile it to a CSS file for better code management – I list this technique for those that want a quick hack or they want to make their DIY client happy and not allow him to change the CSS files inside the theme which could sometimes create a catastrophe.
Even Shopify support confirmed that this CSS box is there to allow store owners to add CSS code without breaking the theme files.
Can you remove the custom CSS box?
I tried to look for a method to remove it completely from the theme, but unfortunately it is not possible. Not even for Shopify Plus.
Shopify support confirmed the removal of the "Custom CSS" box at this time is not possible.
The "Custom CSS" fields in Shopify's Theme Editor are a core feature, designed to give merchants an easy way to add custom styles without editing theme files directly.
This helps prevent accidental modifications to the theme's core code.
At this time, it's not possible to remove or disable the "Custom CSS" fields, as they are a default part of Shopify's theme editor for all online stores.
These fields ensure merchants can make quick styling changes without altering theme code, making them a permanent feature.
Since it is there I thought that it would be useful in some circumstances so in this tutorial I'm going to show you how to use this feature to your own benefit.
Types of custom CSS
There are 2 types of custom CSS boxes:
- one is for adding CSS code for individual sections that will work only on those sections
- and another that allows adding CSS globally with styles that will work anywhere in the store
Before you start, make sure you're logged into your store. If you do not know how, follow how to login into your Shopify store.
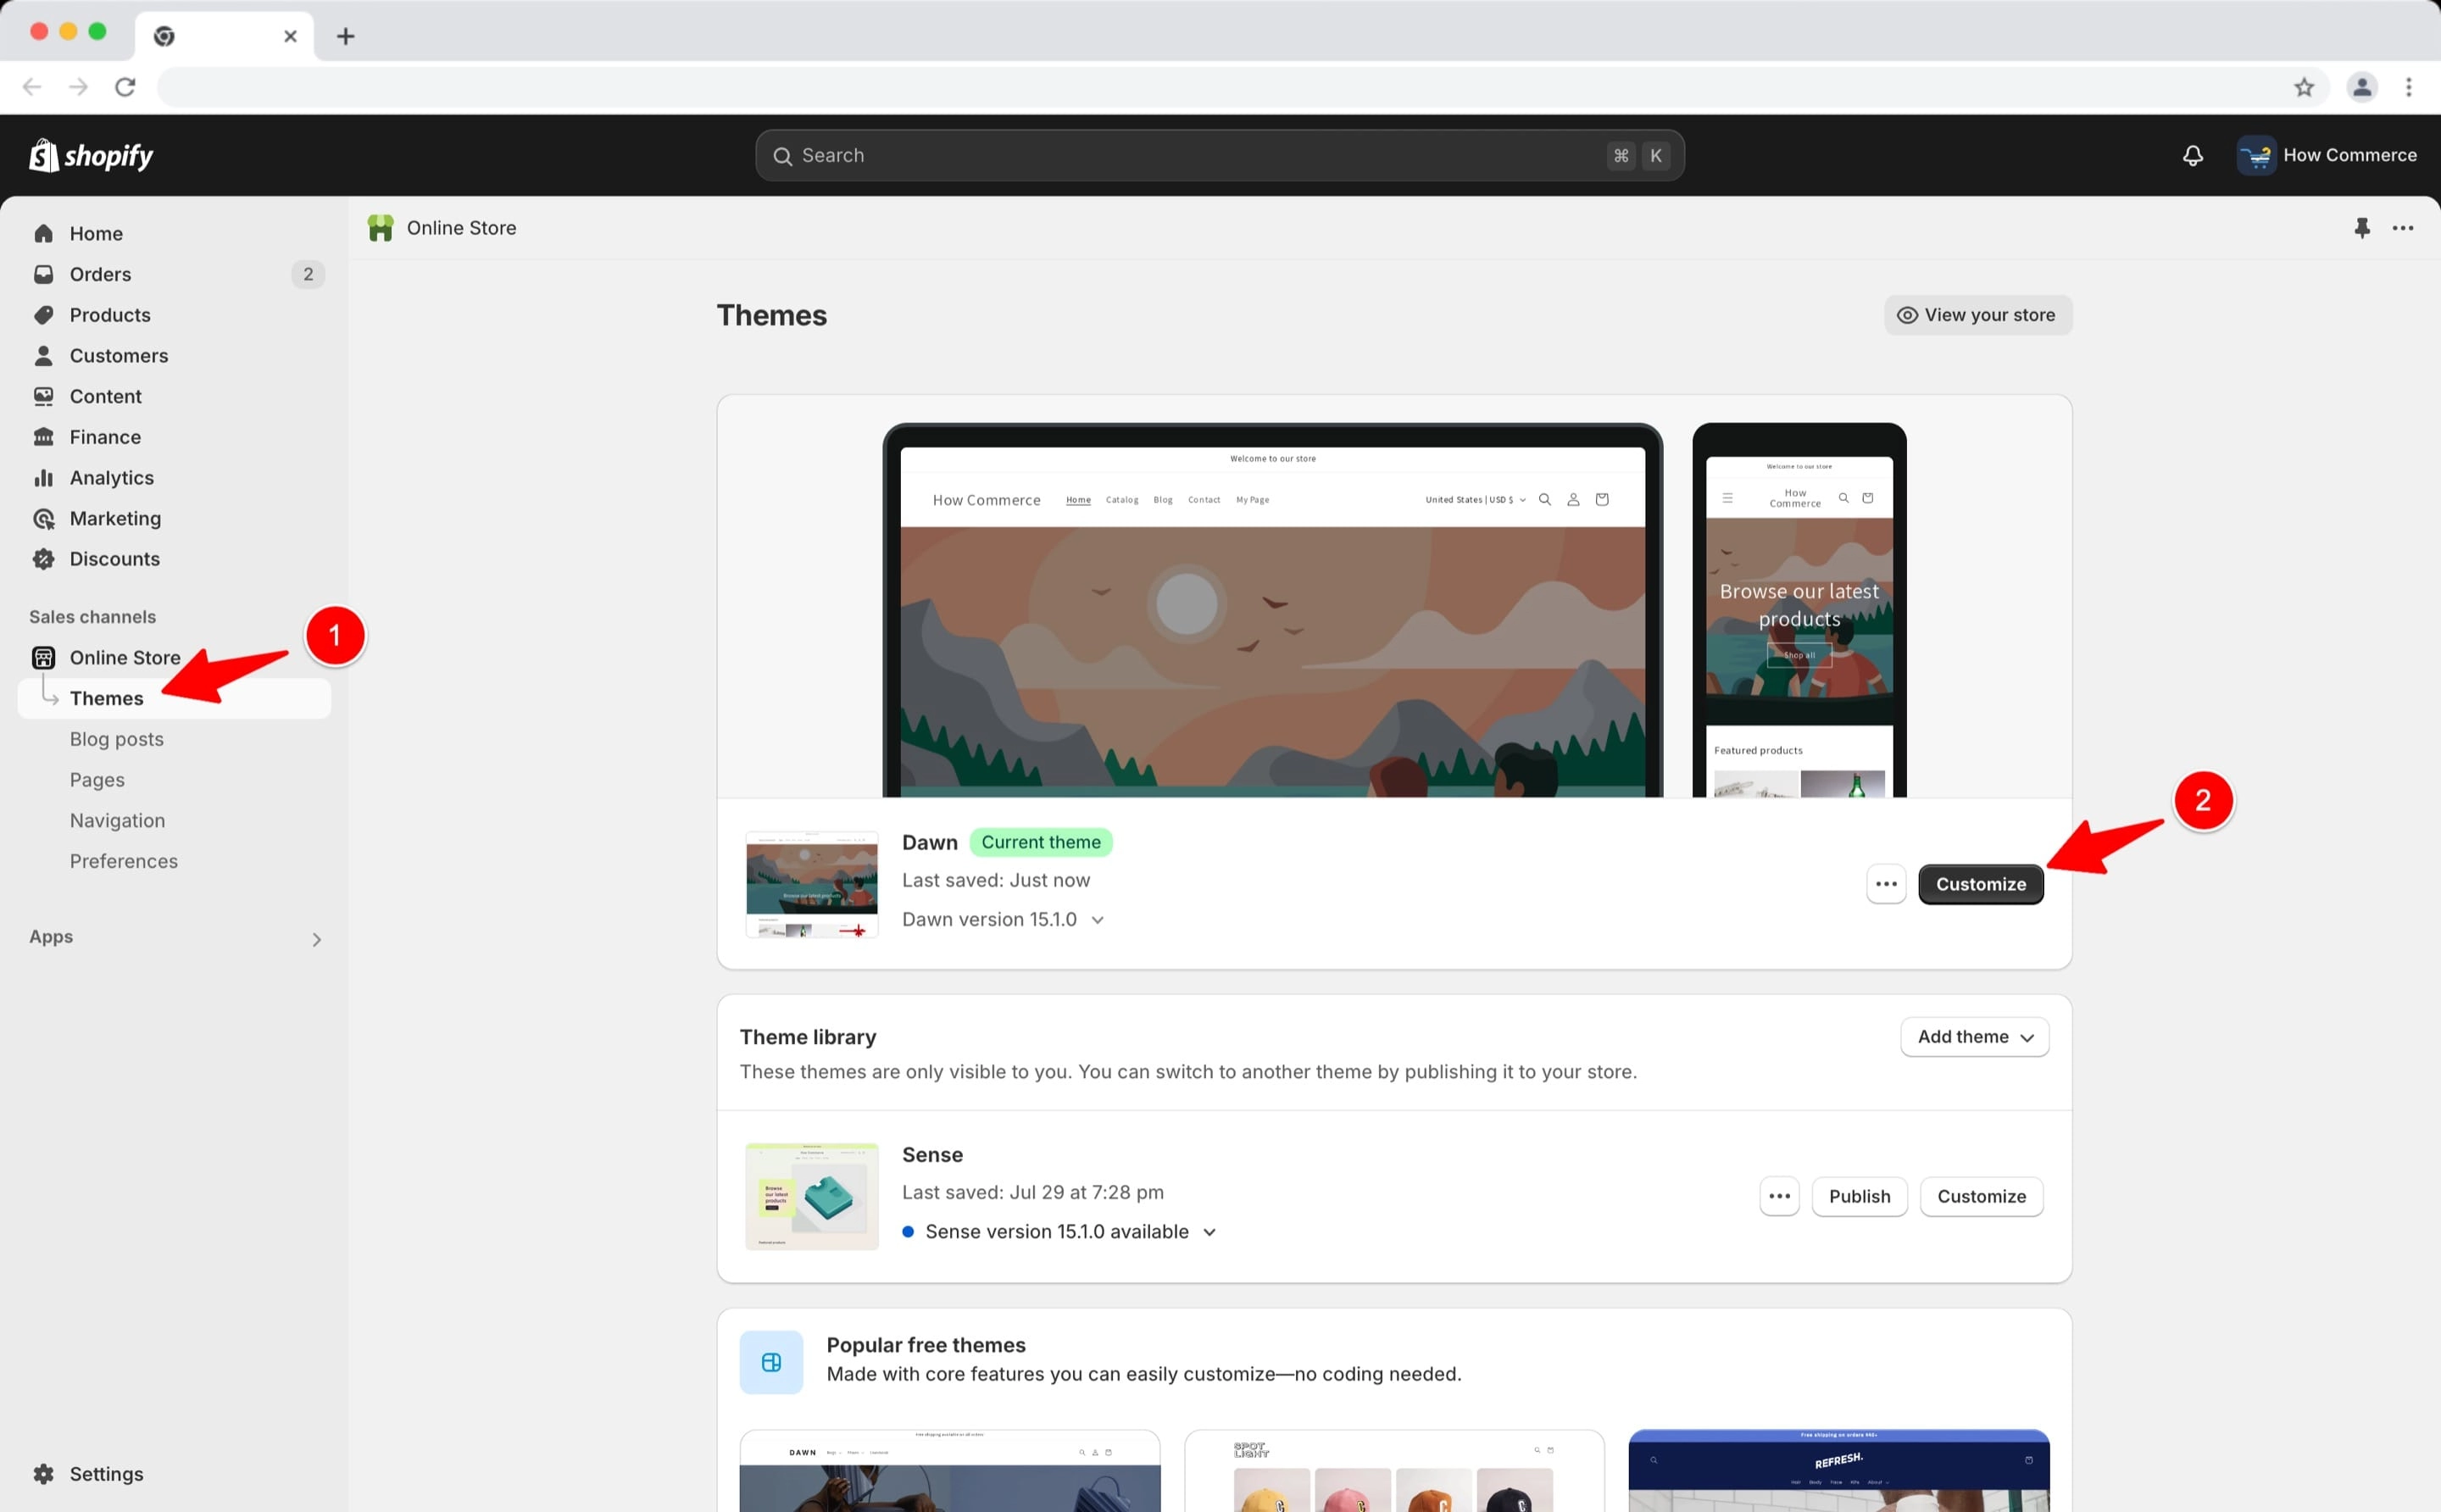
Select the theme
After you are logged inside the store go to the theme that you want to add the CSS code to.
For this tutorial I'll use the Shopify default theme "Dawn".
Add Custom CSS to a section
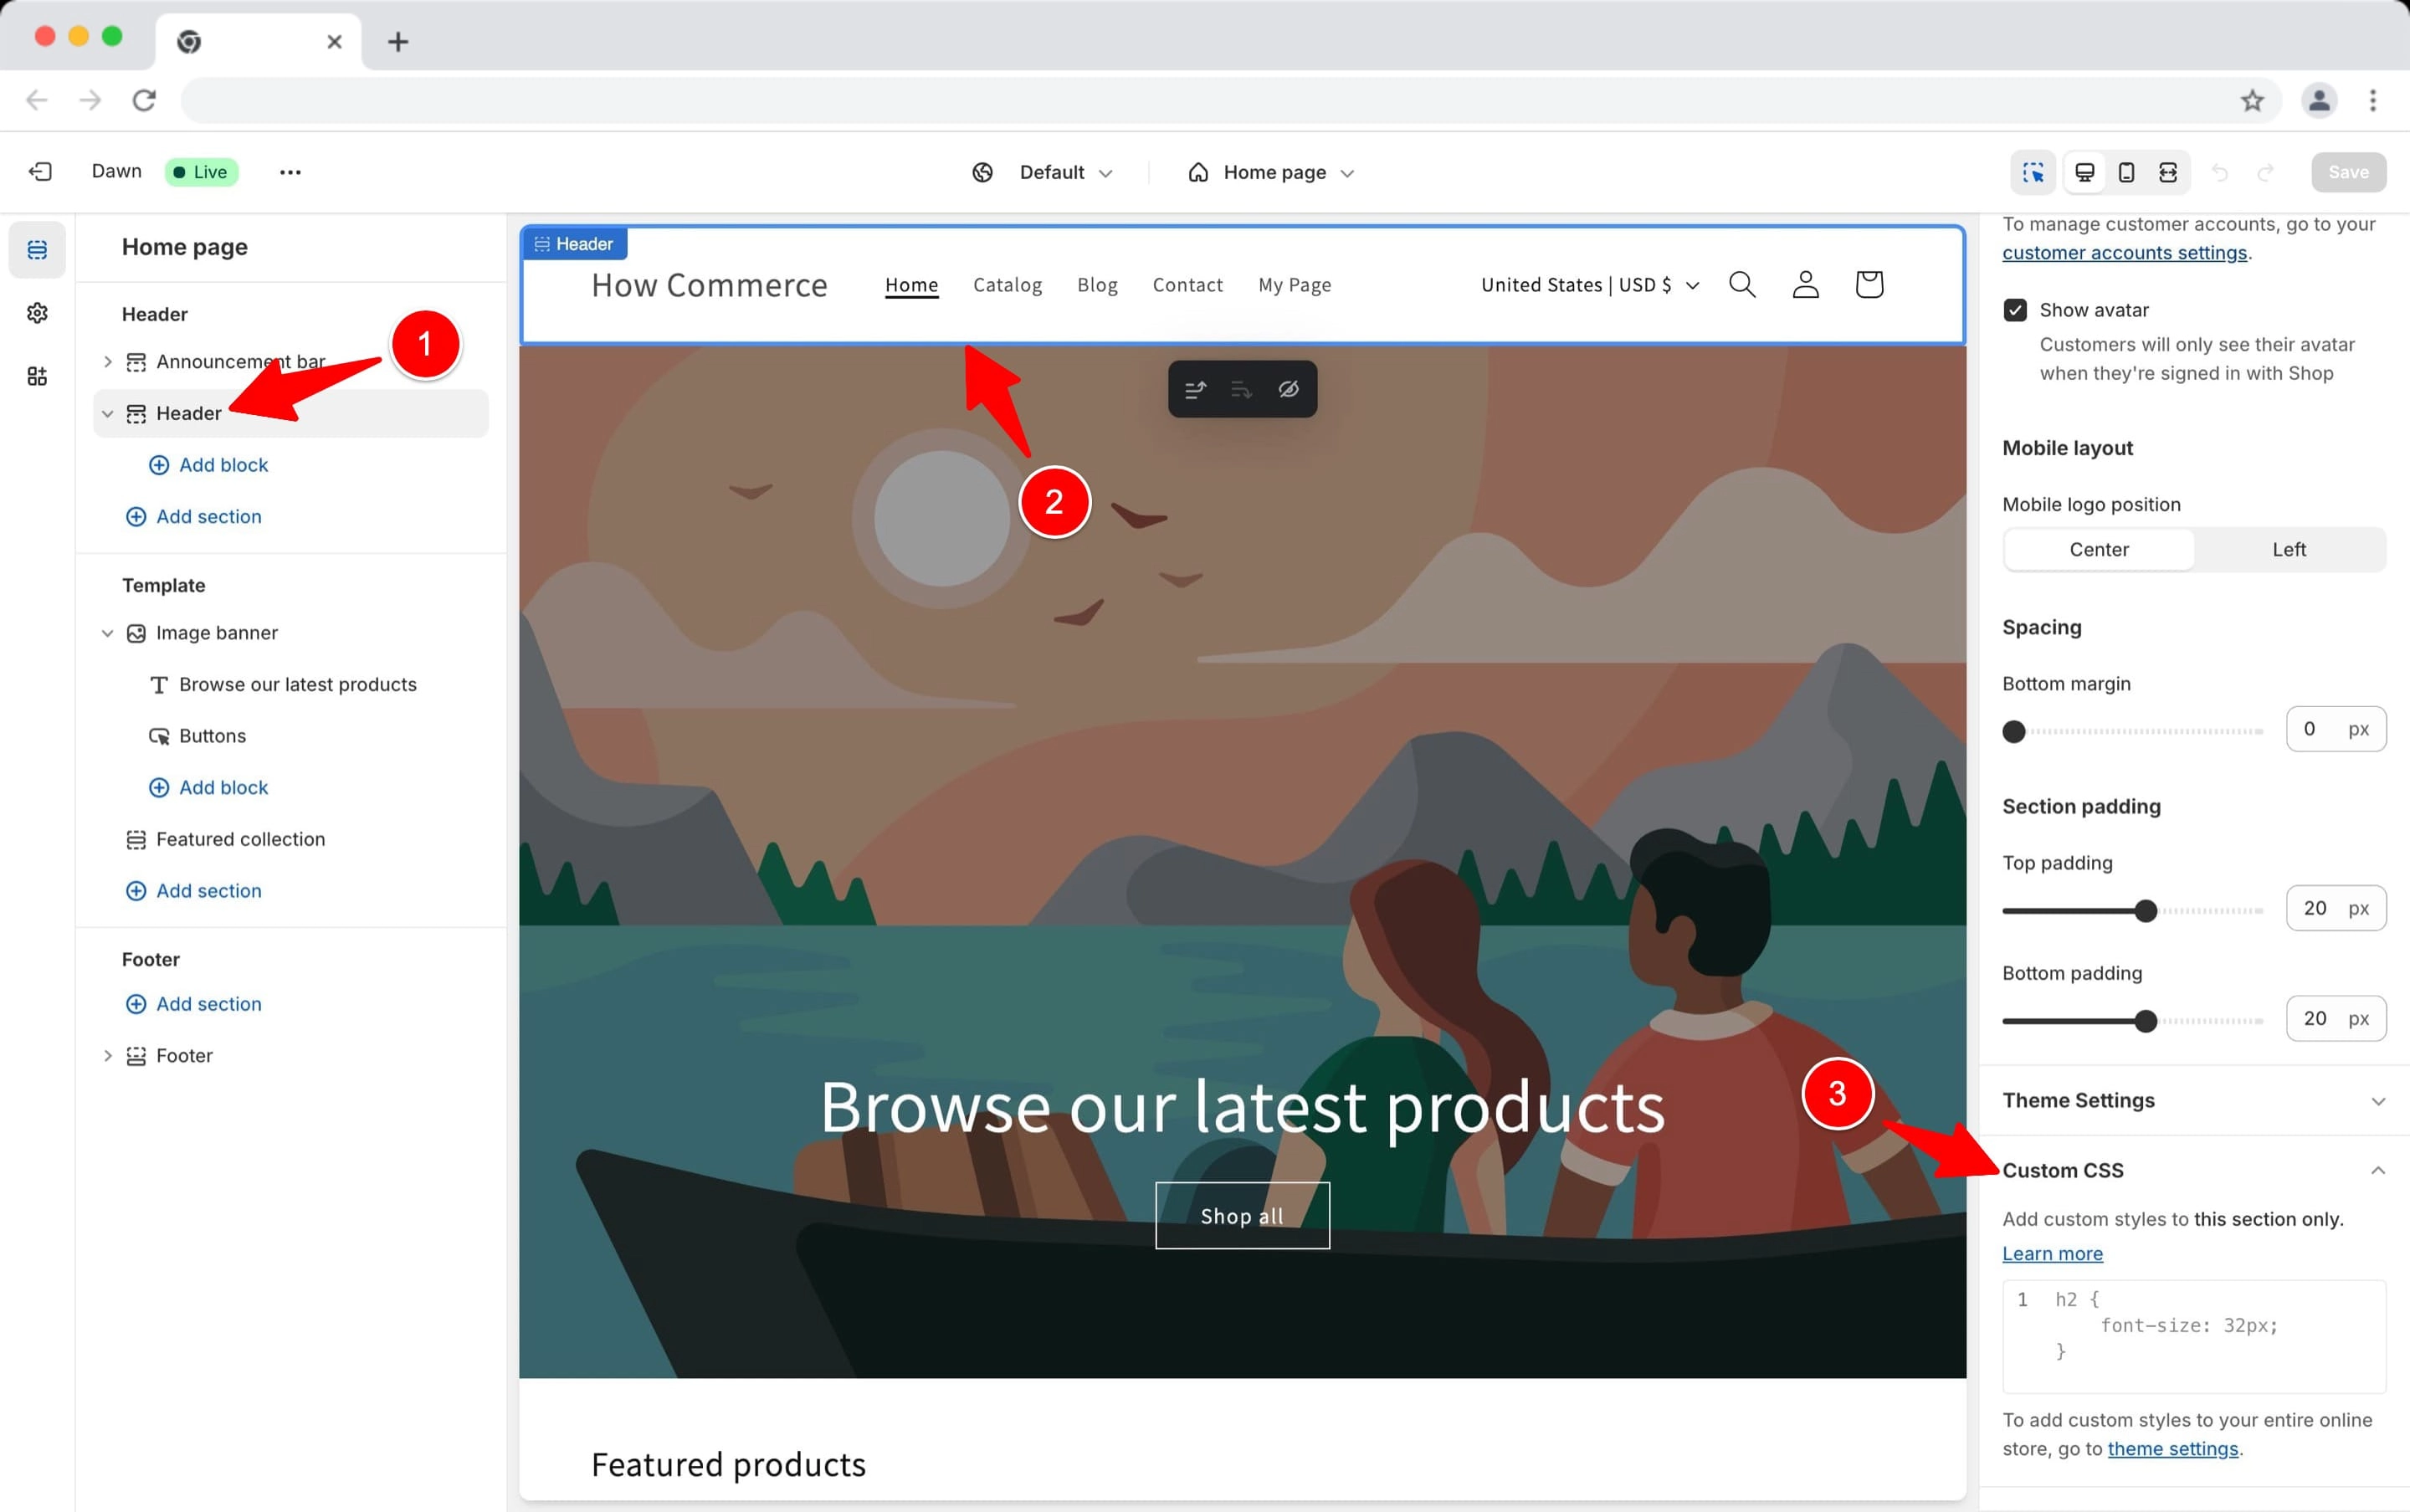
Inside the theme editor select the section that you want to add the CSS code to. In my example I'm going to choose the header section (marked with 1 in the image below) and I'm going to add code to change the background and text colors.
Make sure that the section to which you want to add CSS code is correctly selected in the theme editor to avoid adding CSS code to another section and afterwards the changes will not reflect in the store front.
To make sure that the correct section is selected, check if the section has a border around it inside the theme editor preview (marked with 2 in the image below).
If you see the border, that means that the correct section is selected.
Now go on the right side on the section settings panel until you see the "Custom CSS" code section (marked with 3 in the image below).
The "Custom CSS" code is always the last one in the section settings panel.
Finding the CSS selectors
Now that you have everything in place and you know where to add the code, at this point in time you need to know the CSS selectors that you want to apply styles to.
If you do not know the CSS selectors then you can't style the section.
No worries, I'll explain how to get the CSS selectors. Here it will get a bit techy but is not hard.
To get the CSS selectors that we need to apply styles to, we need to use some developer tools like Chrome developers tools in this case.
Is mostly the same on all other browsers, but since Chrome is the most popular one I’ll show you on this one.
In the theme editor click on the "..." icon (marked with 1 in the image below) and after the "View" (marked with 2 in the image below).
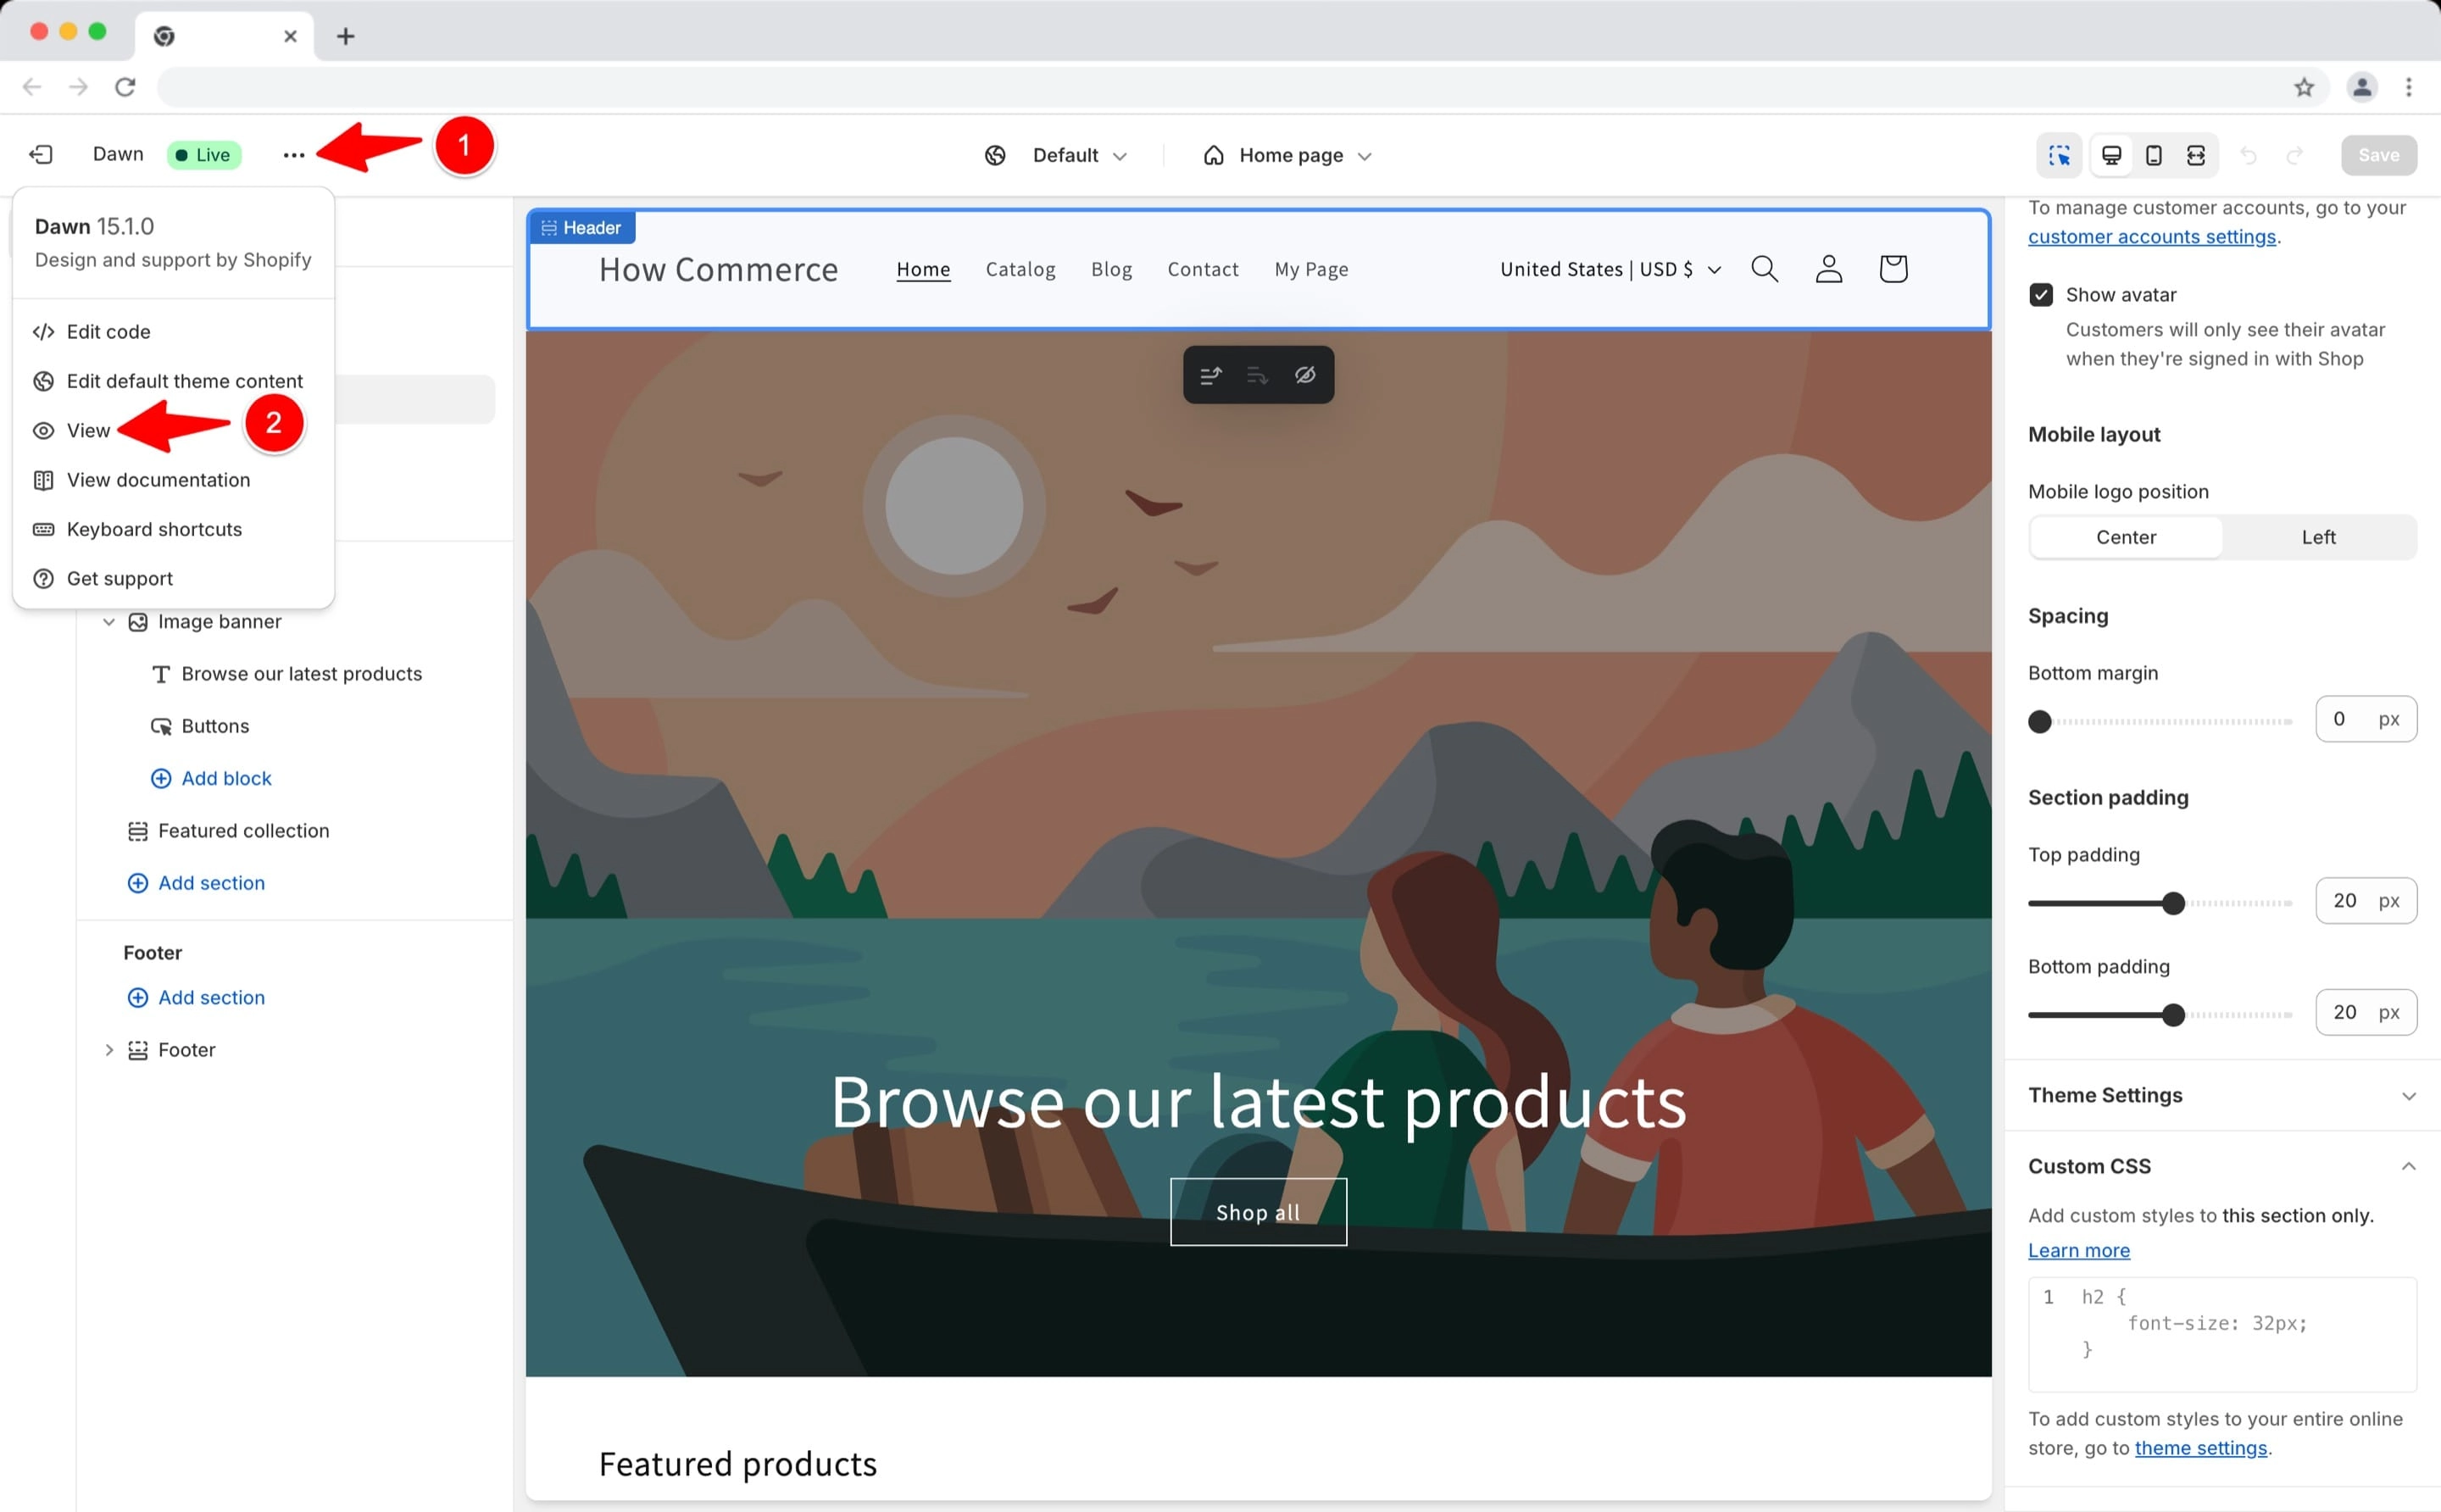
This will take you to the store front where you need to open the "Developer tools". To do that on macOS hit ⌘ + ⌥ + I and Windows/Linux hit Ctrl + ⇧ + I.
This will open the “Developer tools” with the selection tool enabled.
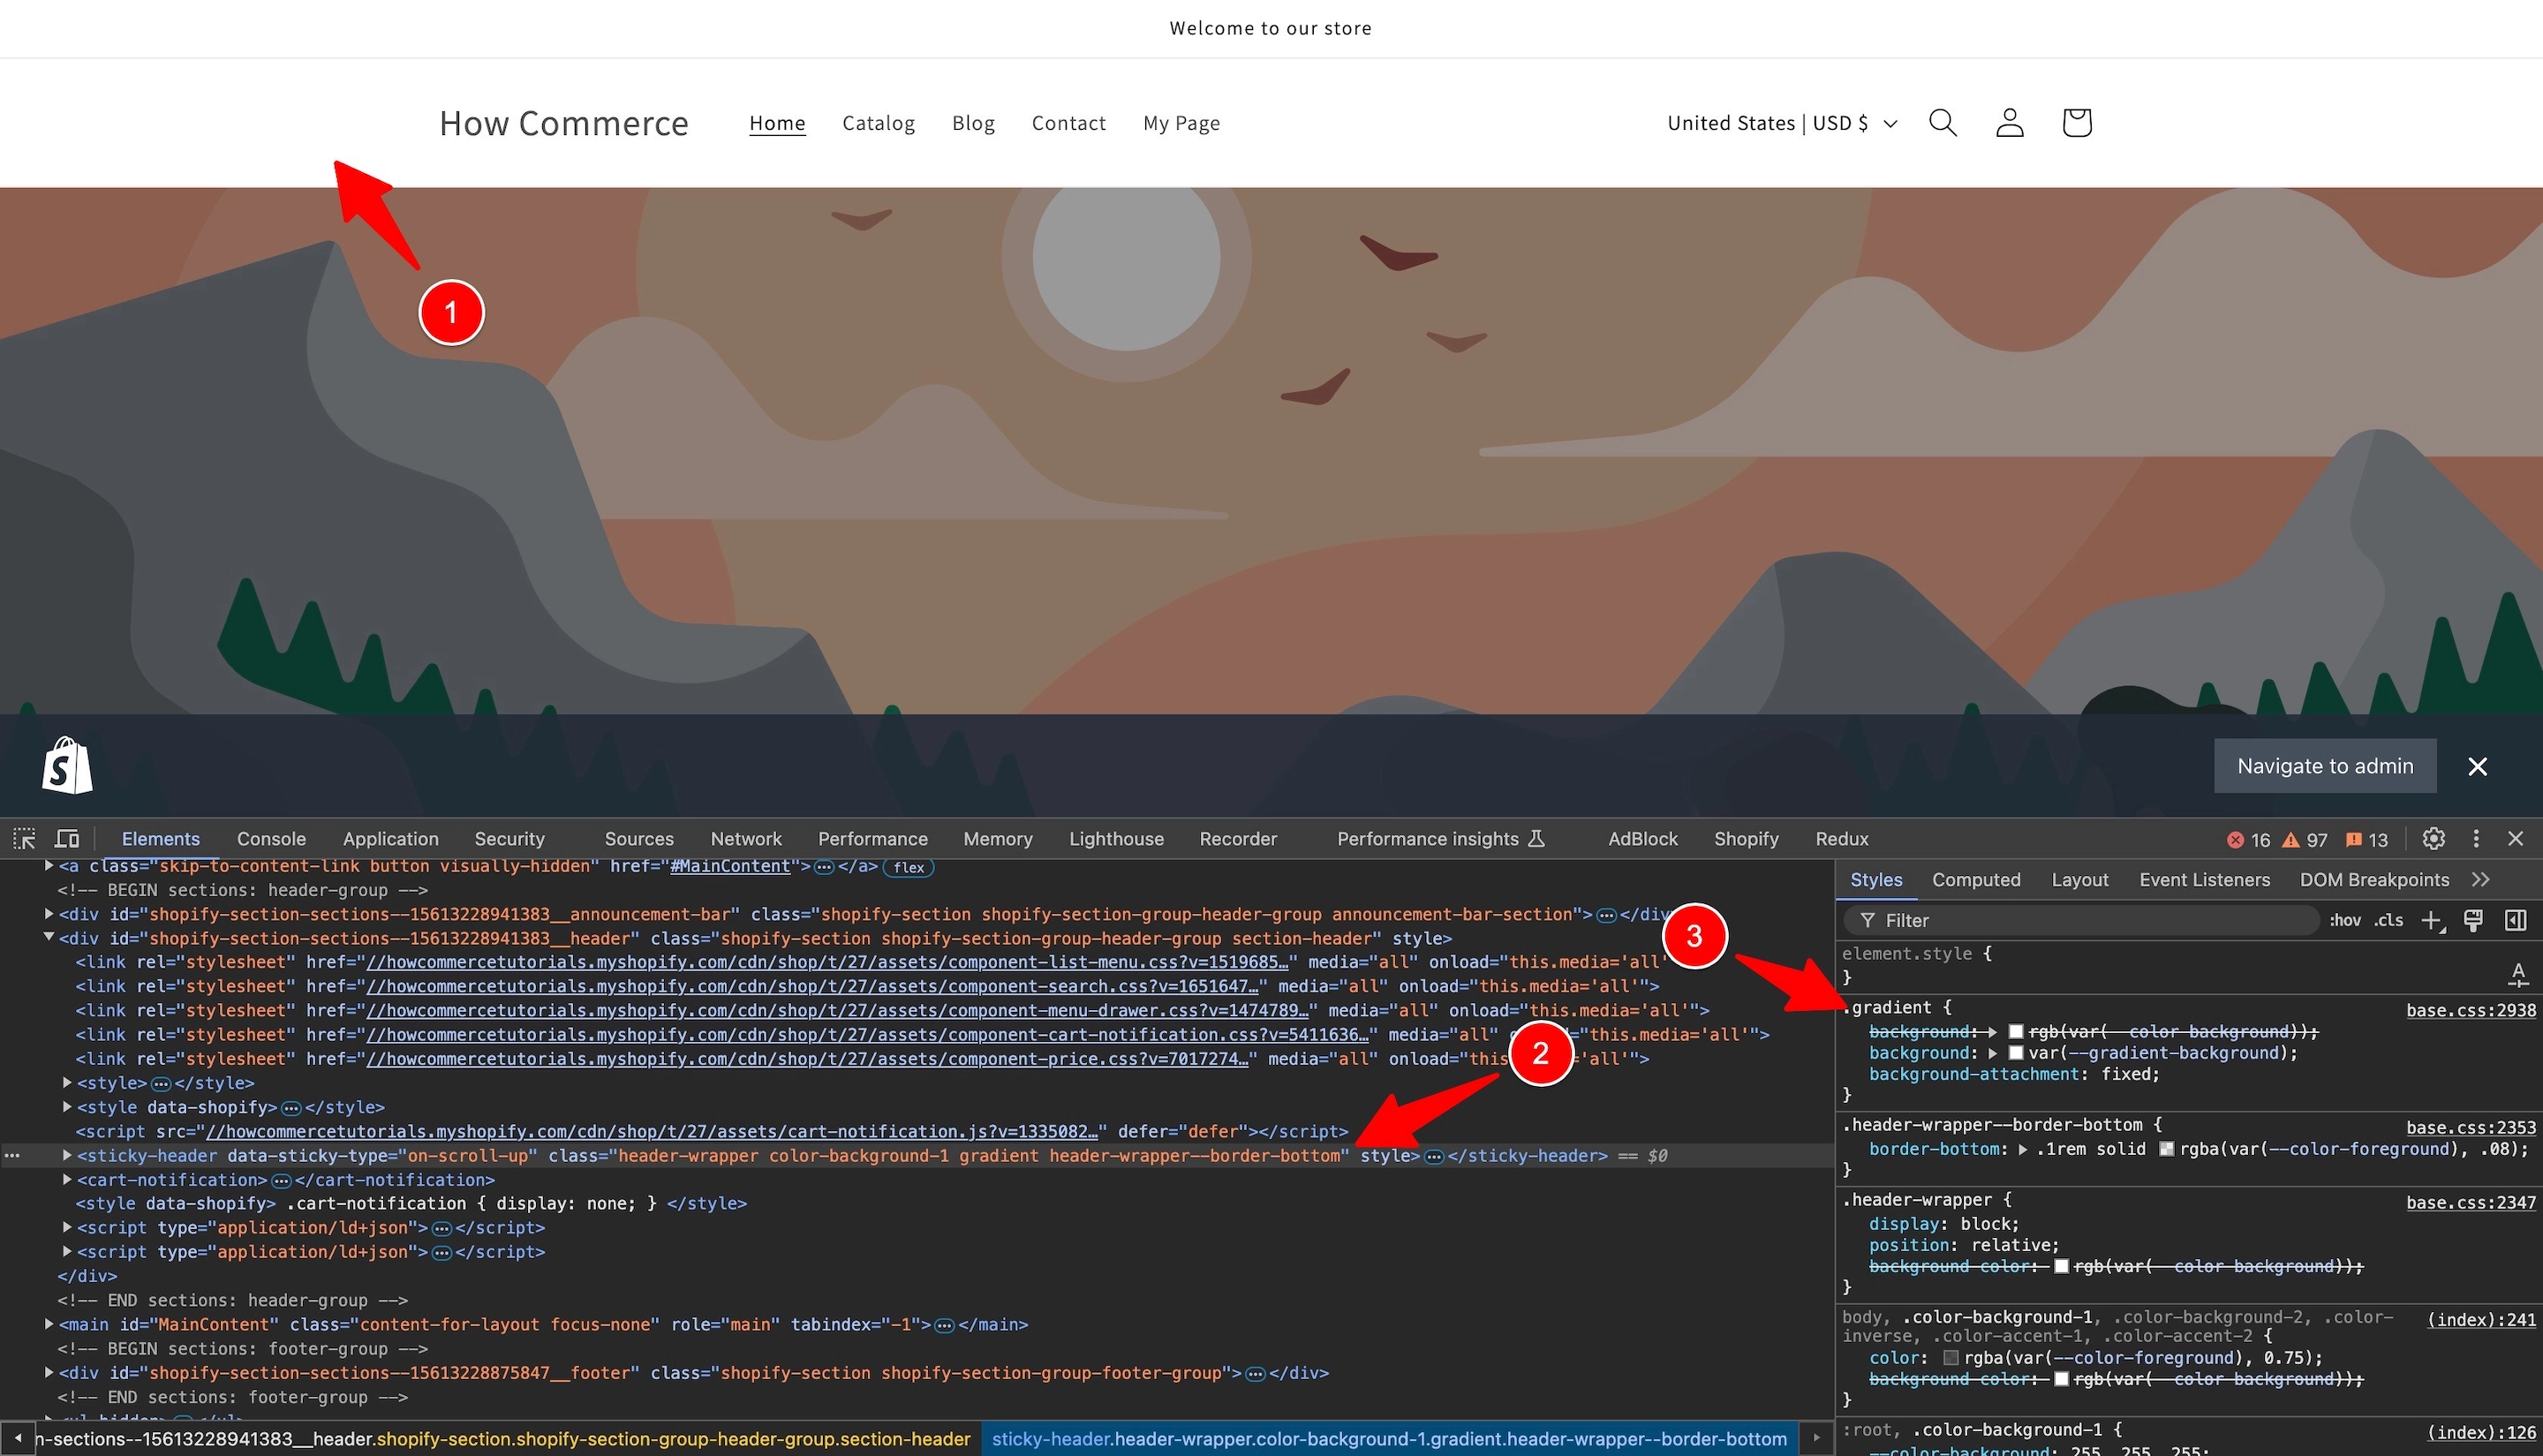
Hover over the element that you want to change the styles (marked with 1 in the image below) and this will automatically select the element in the inspector “Elements” tab.
In my case it is the “header” element (marked with 2 in the image below).
The element styles are listed in the right panel (marked with 3 in the image below).
A theme often has many classes applied to an element, which can make it difficult for someone unfamiliar with CSS, especially CSS specificity, to determine which class to target.
I'll show you the simplest way to handle this.
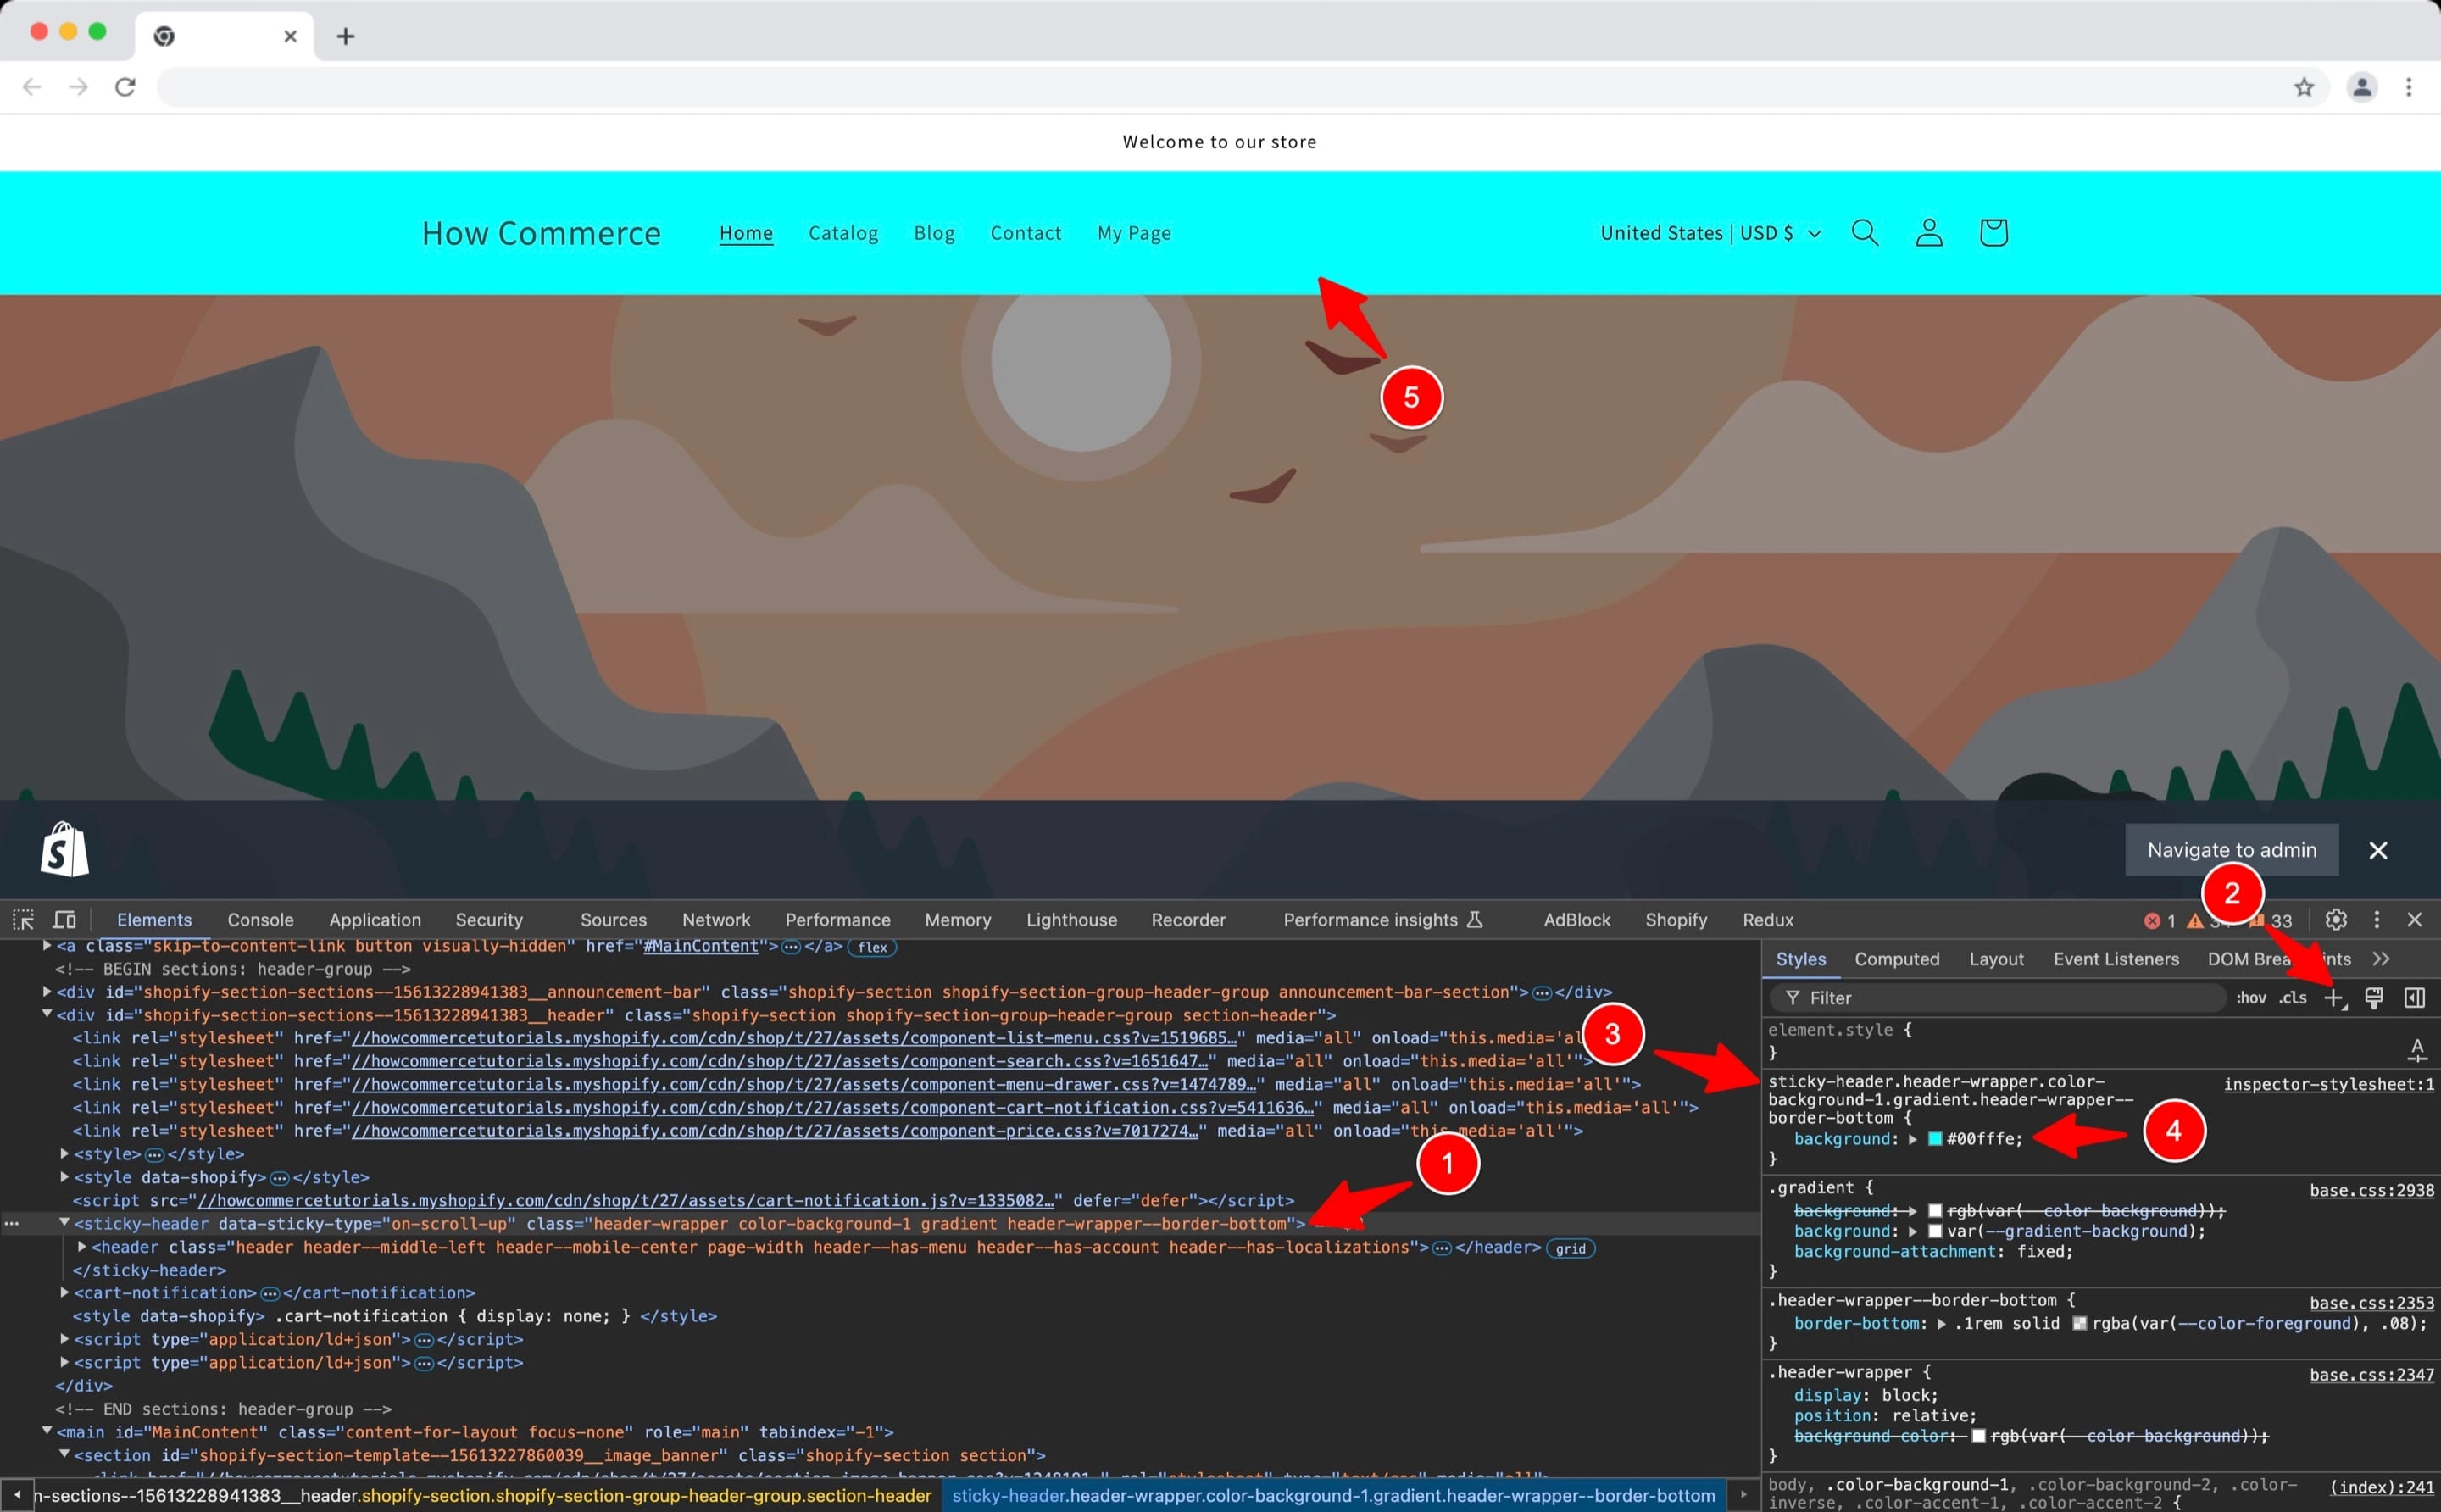
With the element selected in the “Developer Tools” (as shown in 1 in the image below), click the “+” sign (as shown in 2 in the image below).
This action creates a selector with the highest specificity, ensuring it overrides the other classes (as shown in 3 in the image below).
Now add the CSS property that you want to change.
I’ll change the background color for the header element so I’ll add a color for that (marked with 4 in the image below).
If you targeted the correct element and added the correct CSS class you should see the background color change (marked with 5 in the image below).
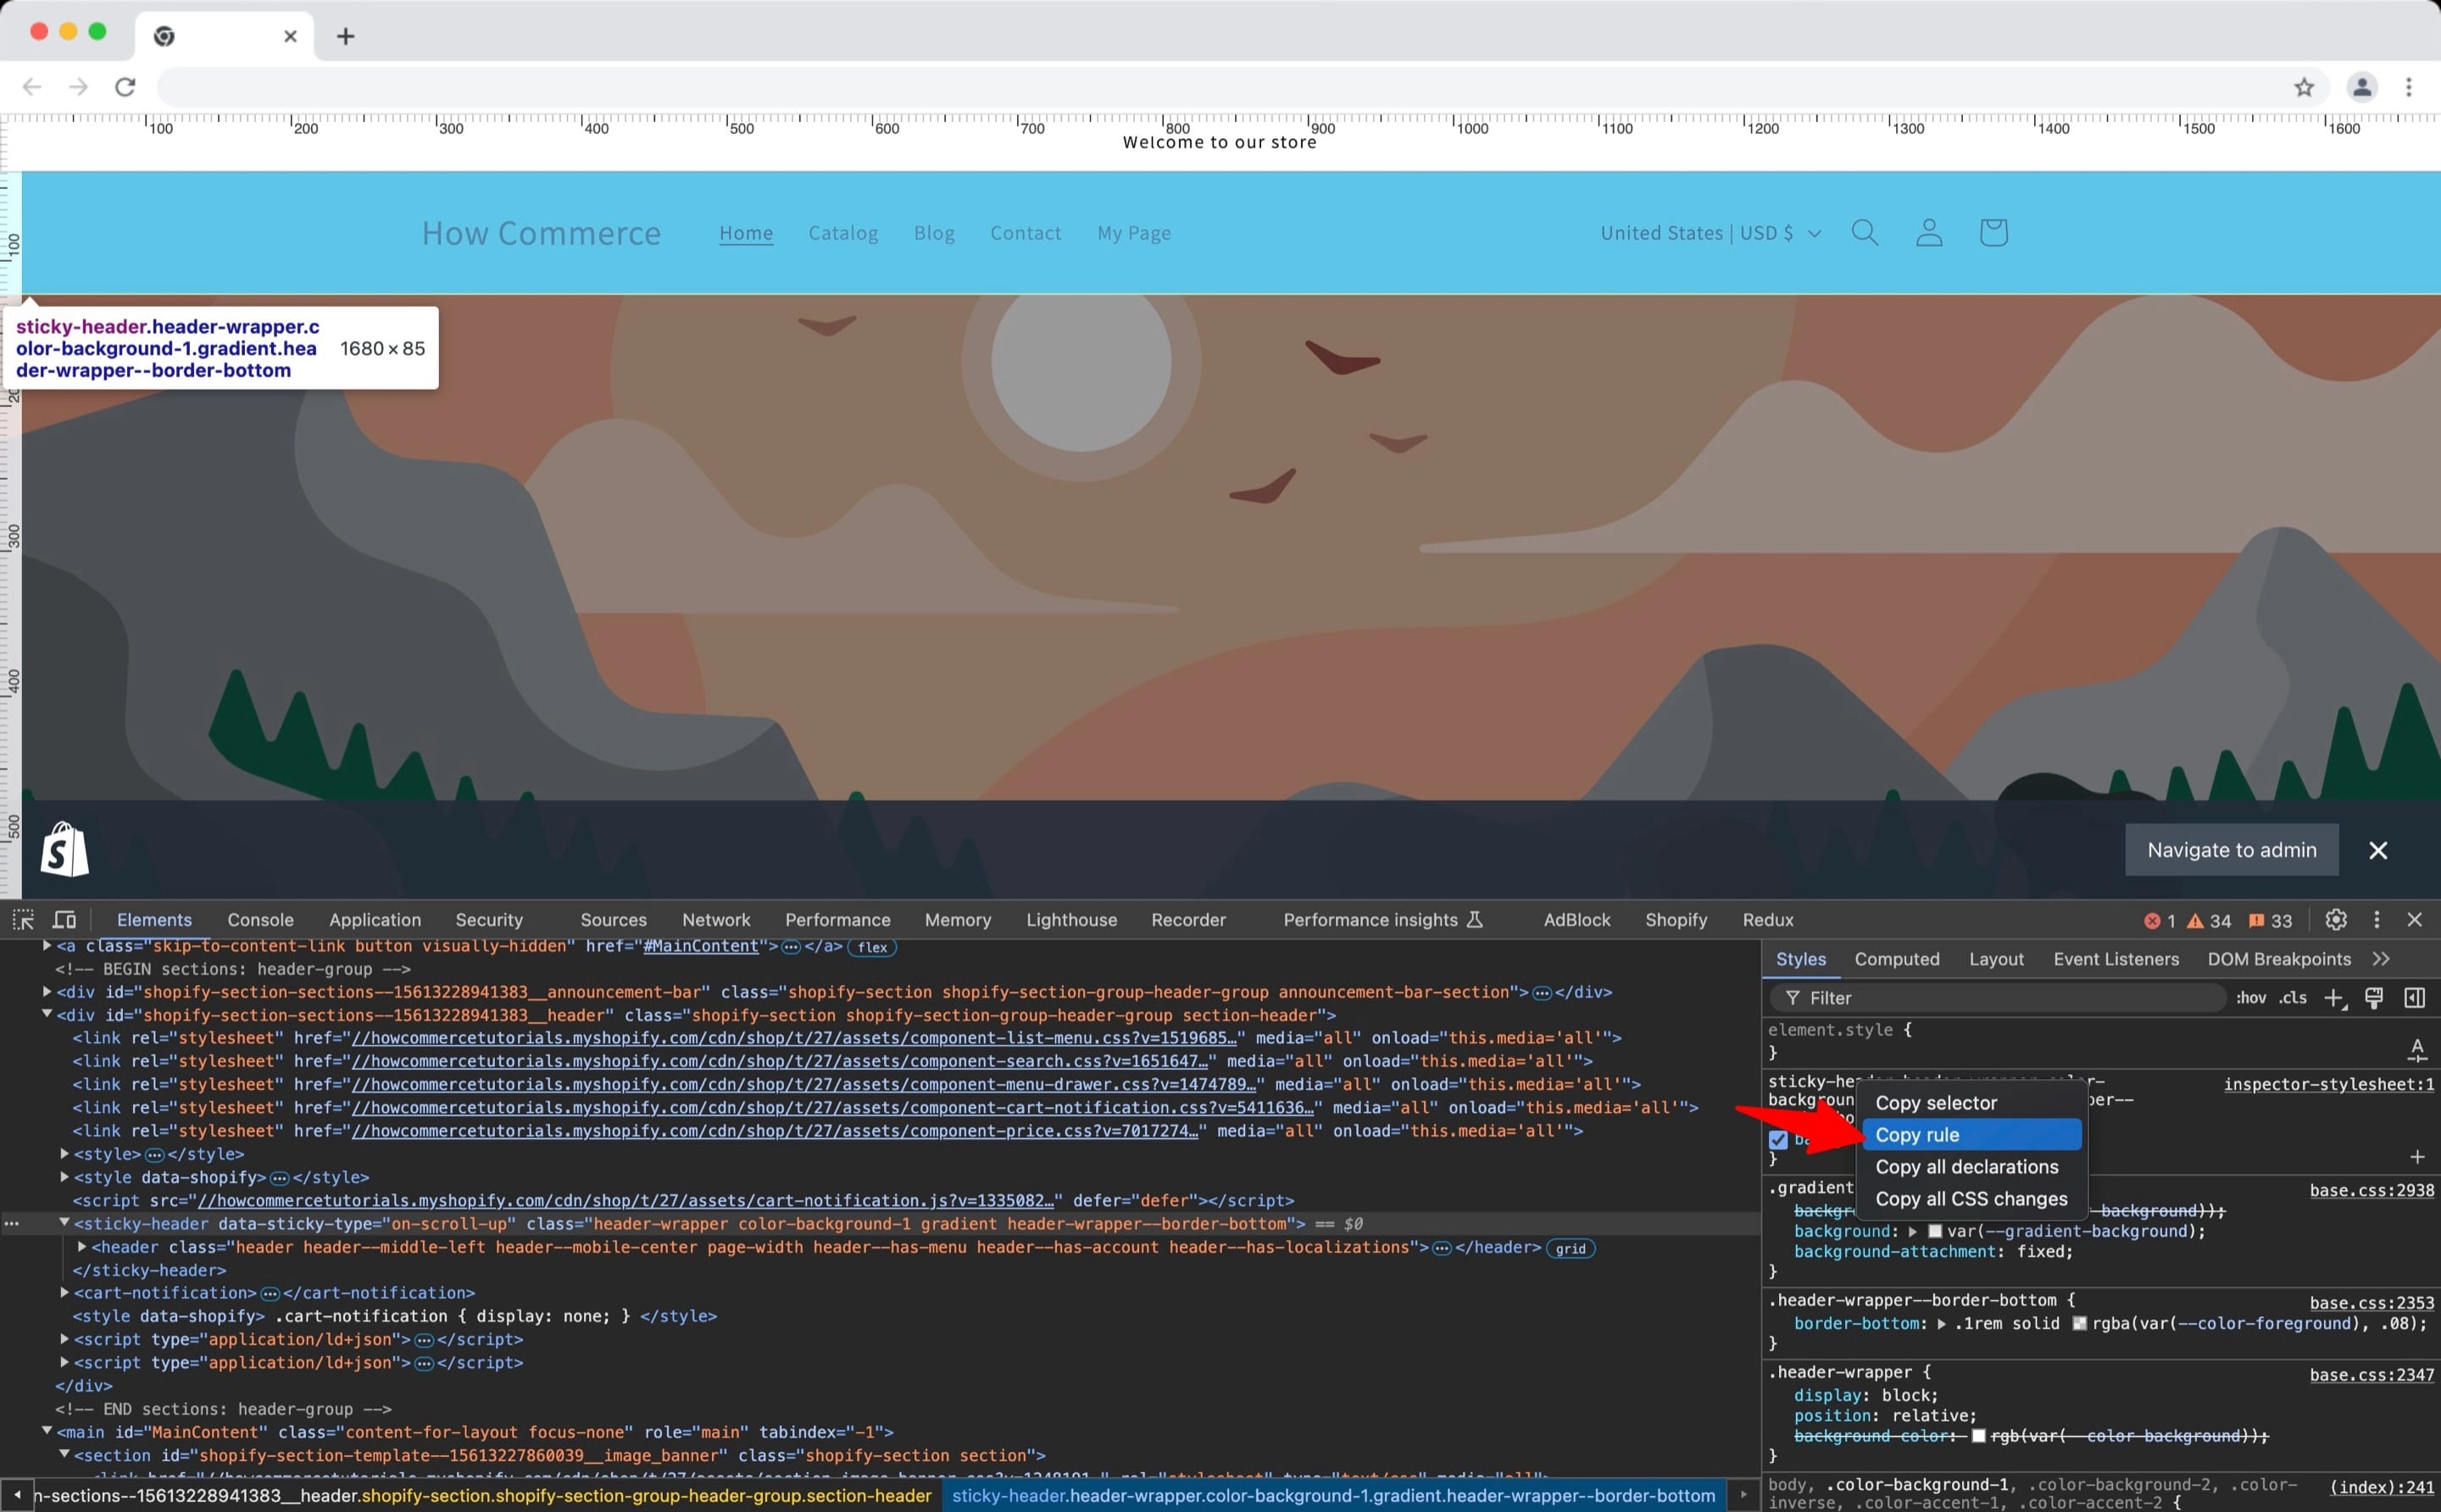
Now that you have the correct CSS code you need to copy it and paste it inside the "Custom CSS" box for that section.
Click right to open the contextual menu and select "Copy rule" like in the image below:
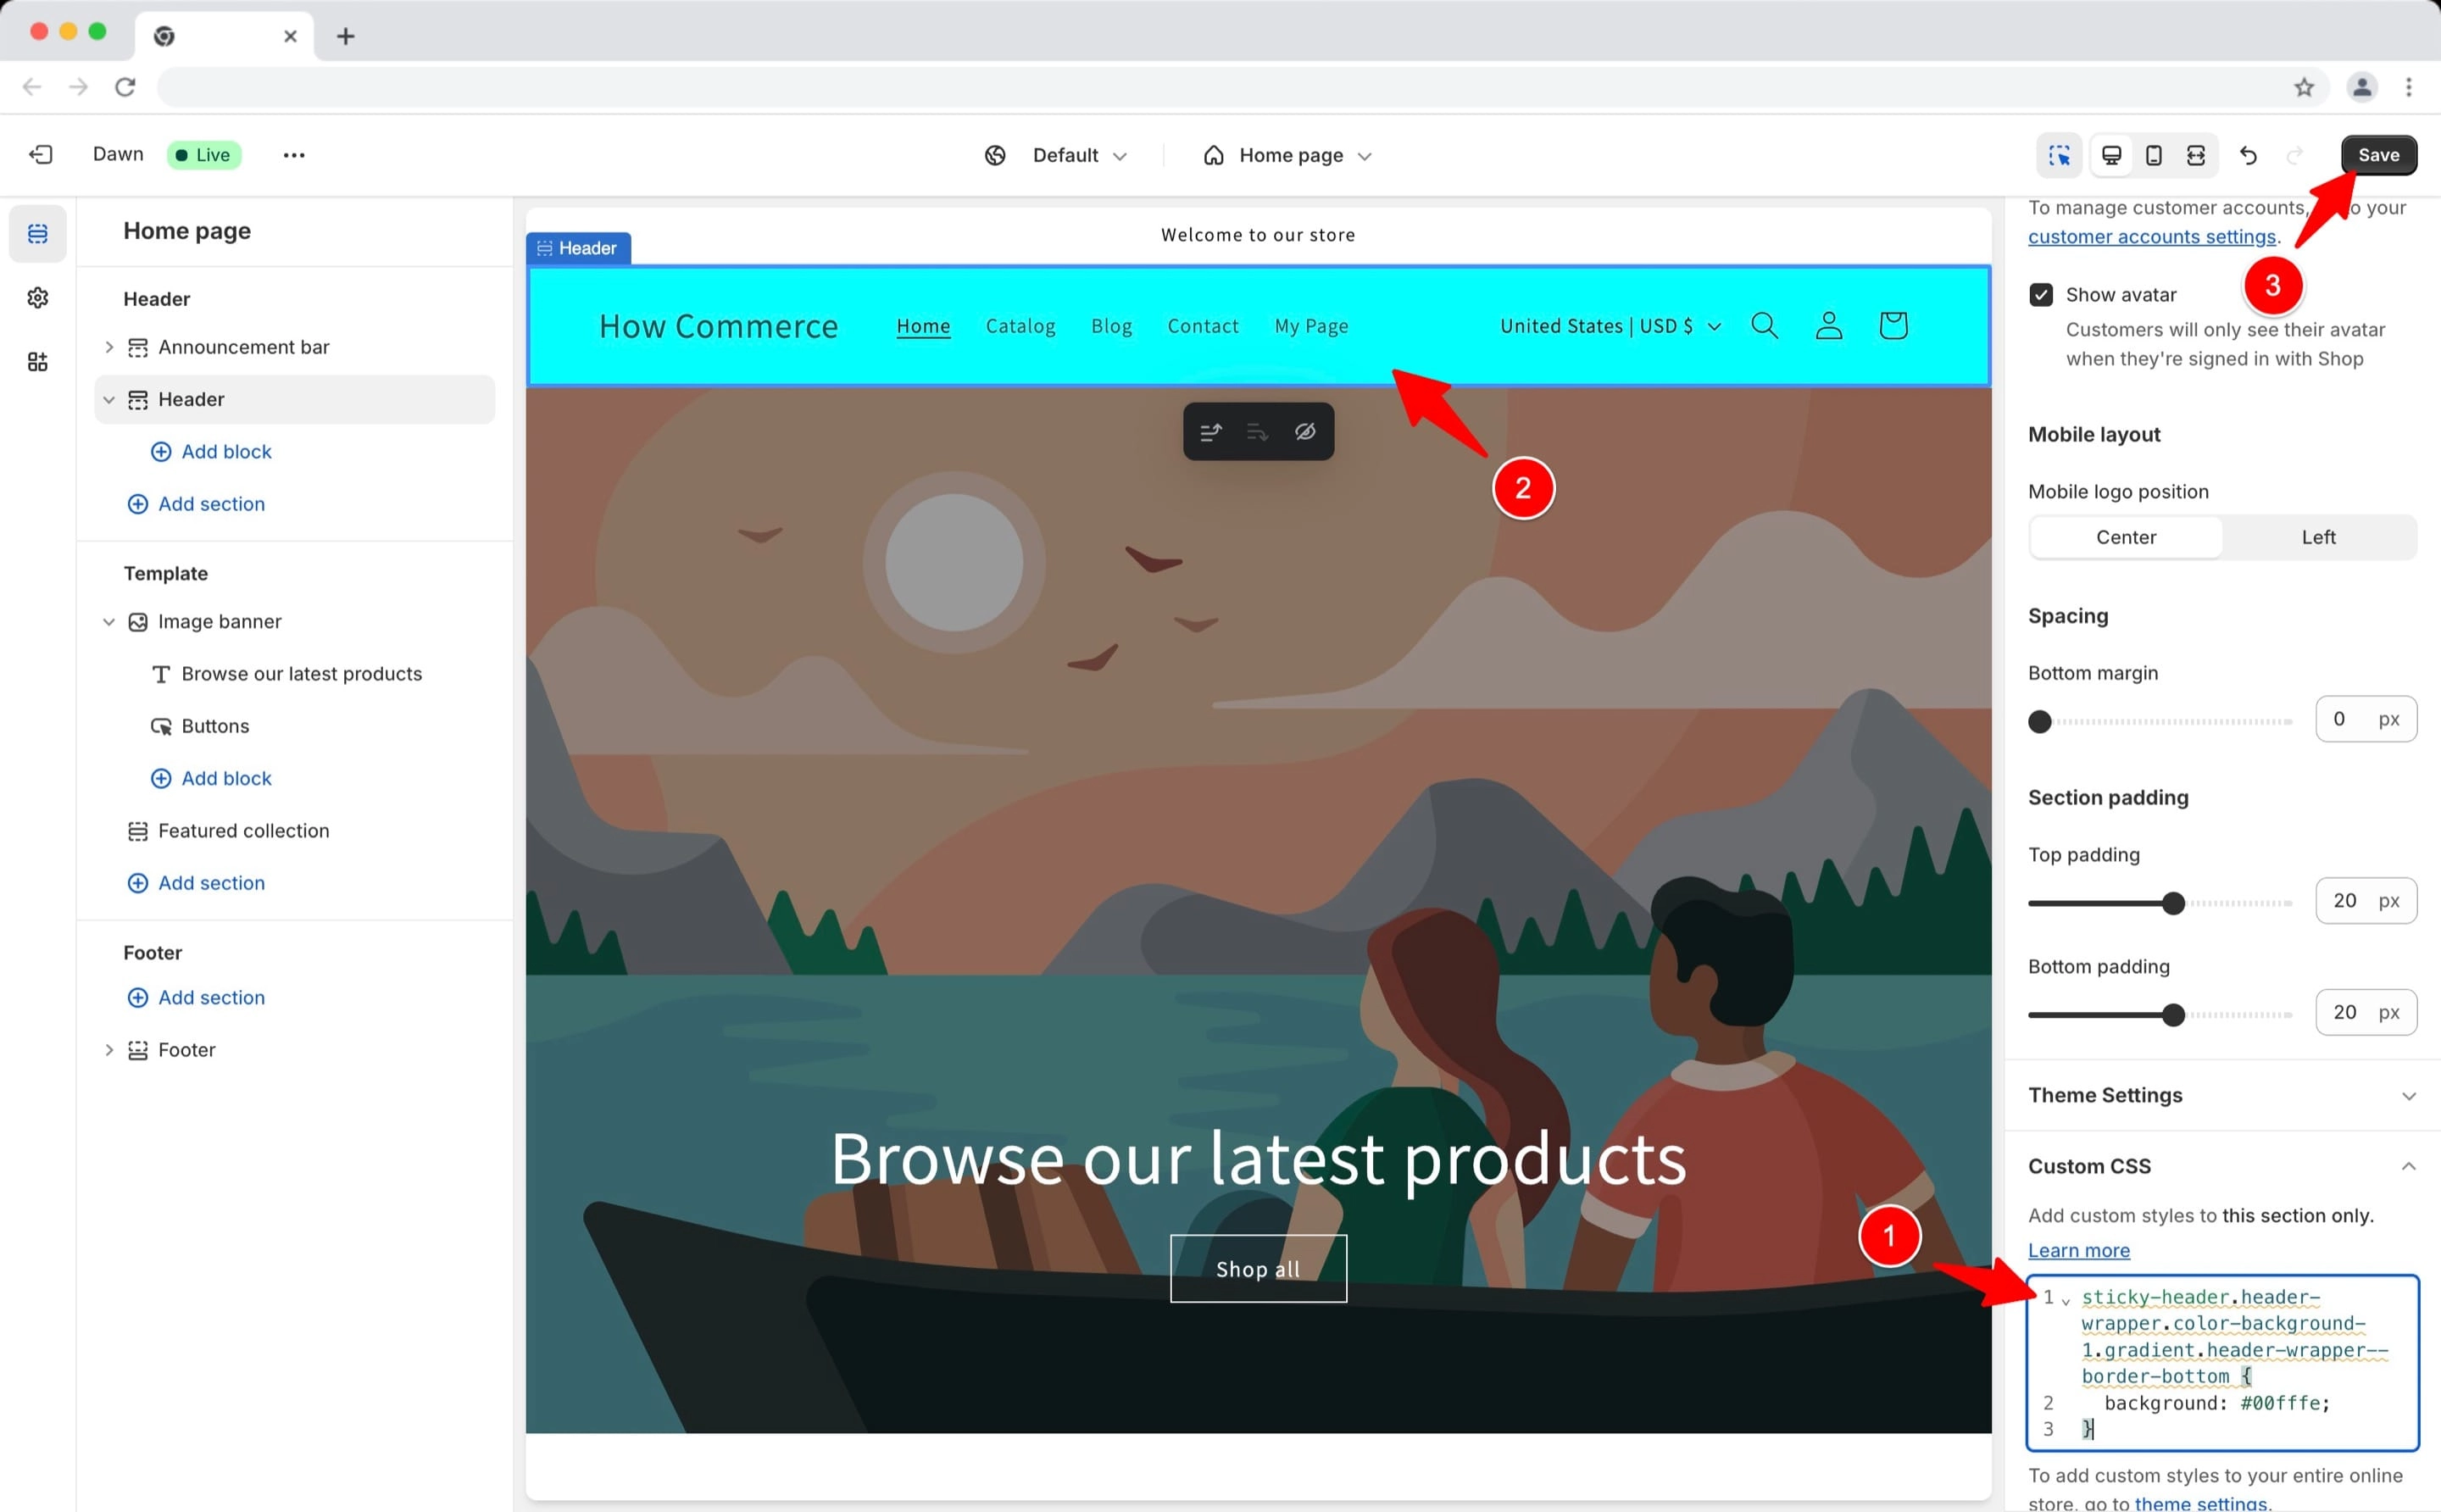
Go to the theme editor and paste this code inside the "Custom CSS" box (marked with 1 in the image below).
As soon as you do that you’ll see the targeted element changing (marked with 2 in the image below). This means that the CSS code is correct.
You can save your changes (marked with 3 in the image below) to add this change permanently to your store front.
The change is now completed.
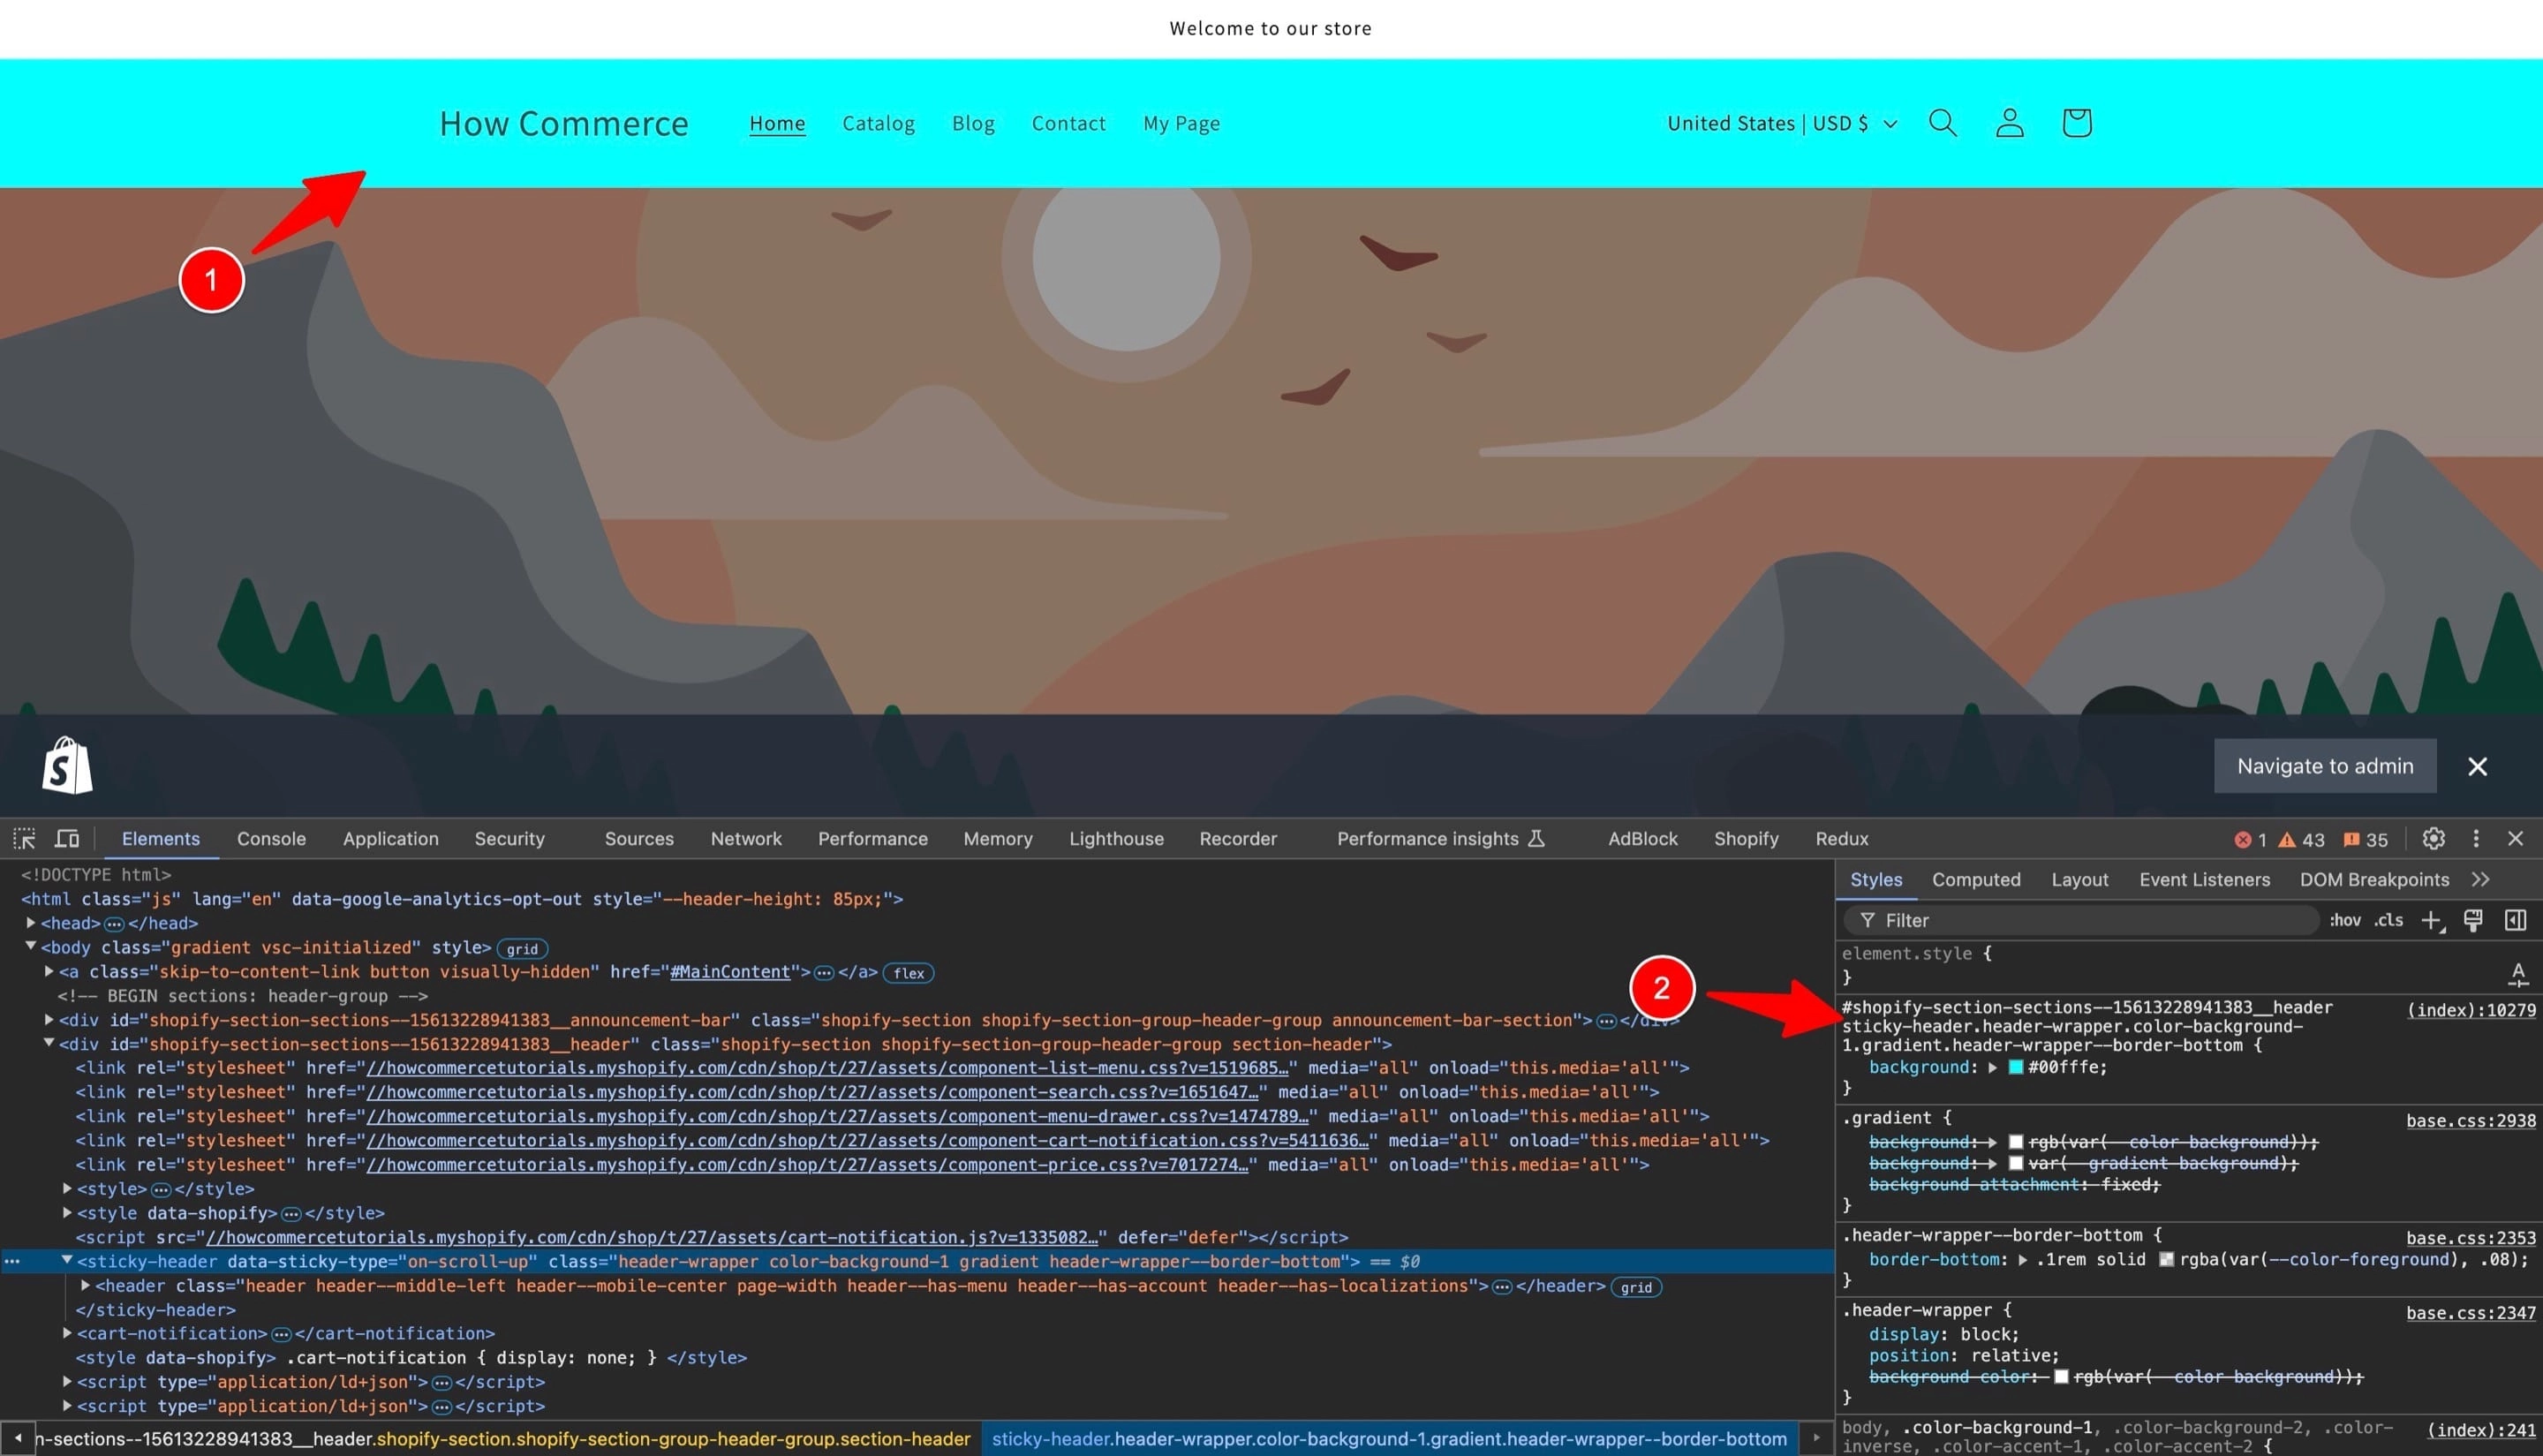
Navigate to the store front again to see your changes.
The header background is changed (marked with 1 in the image below) and if you open the "Developer tools" you can see the new CSS changes that you've added inside the "CSS Custom" box in the theme editor (marked with 2 in the image below).
Add custom CSS globally
If you look closely in the image below after you’ve added the CSS code Shopify adds a CSS ID in front of the selector I’ve added and that means that the CSS added in the section custom box is scoped to this specific section which in my case is the header.
See image below:
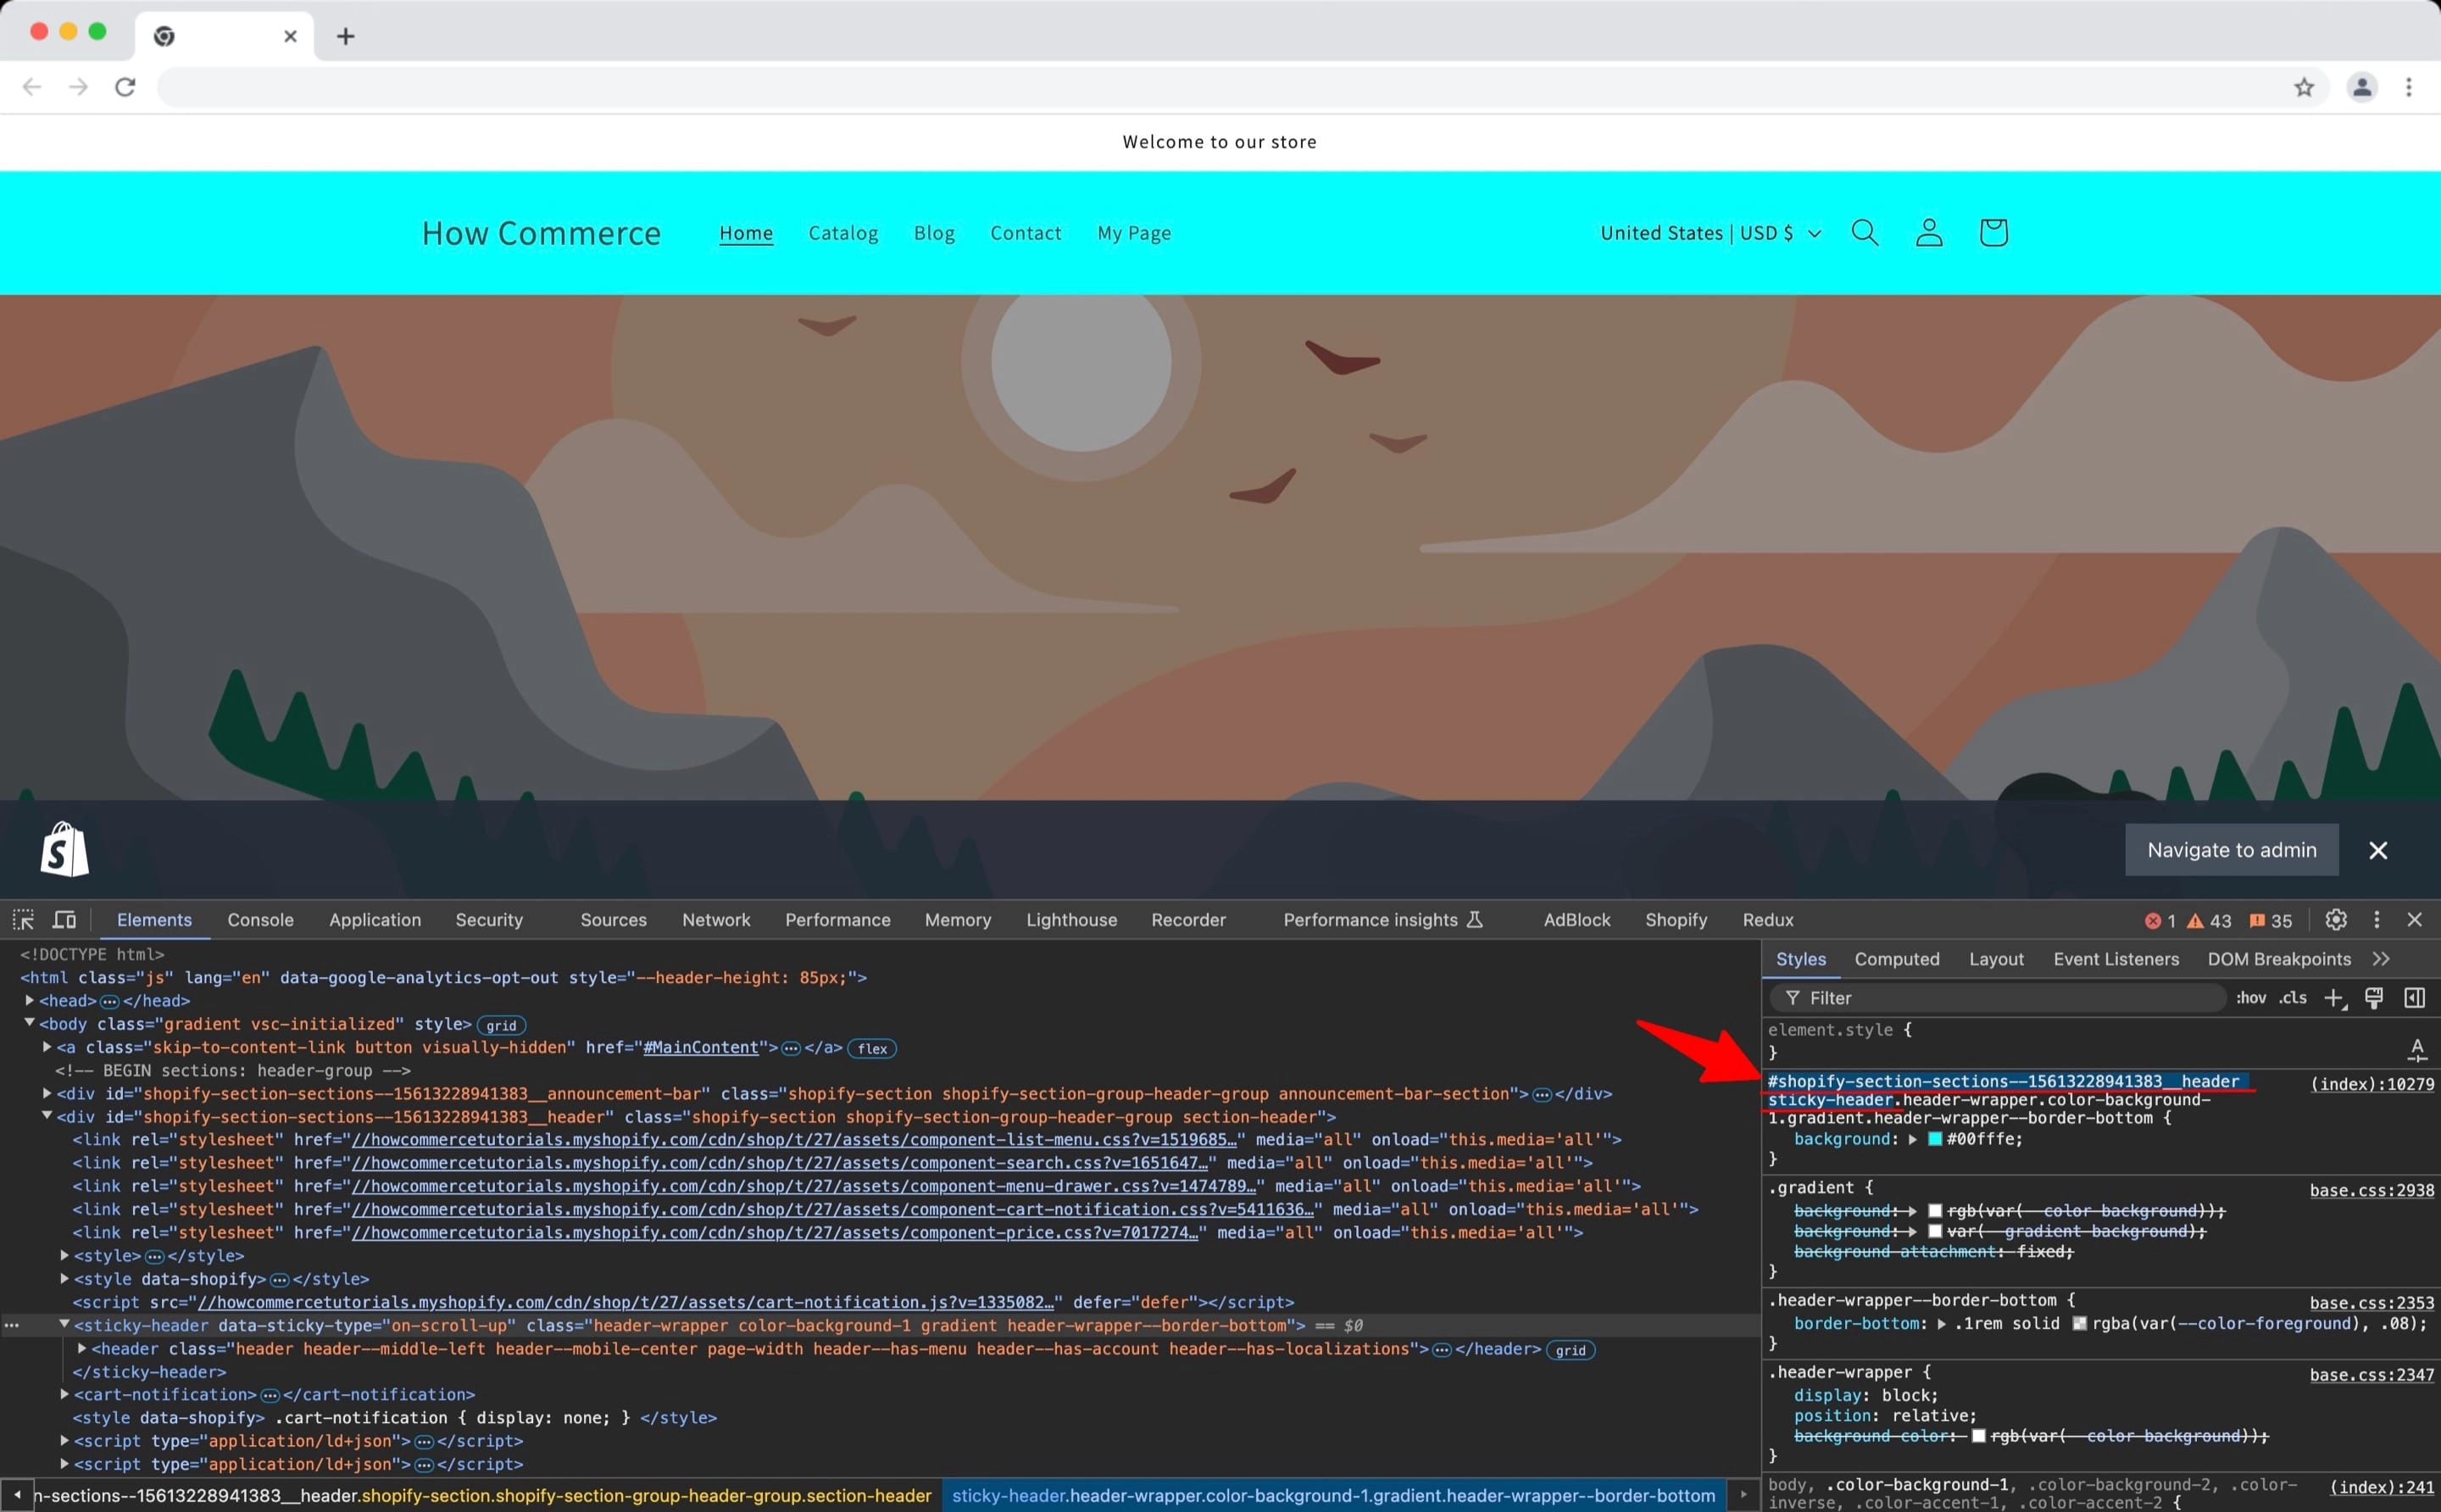
In this specific case it is fine since I'll have only one header in the store but many times this is not OK since there are sections that are repeating on the page and I want to target all of them and not only one specific section.
In this case adding CSS via the "Custom CSS" box in the section will not work and we need to add CSS rules that work globally.
To do that navigate to "Theme settings" (marked with 1 in the image below) or ⌘ + ⌃ + 2 (macOS) and Ctrl + ⇧ + 2 (Windows/Linux).
Scroll down until you see the "Custom CSS" section.
All the CSS code you add inside this box will work globally.
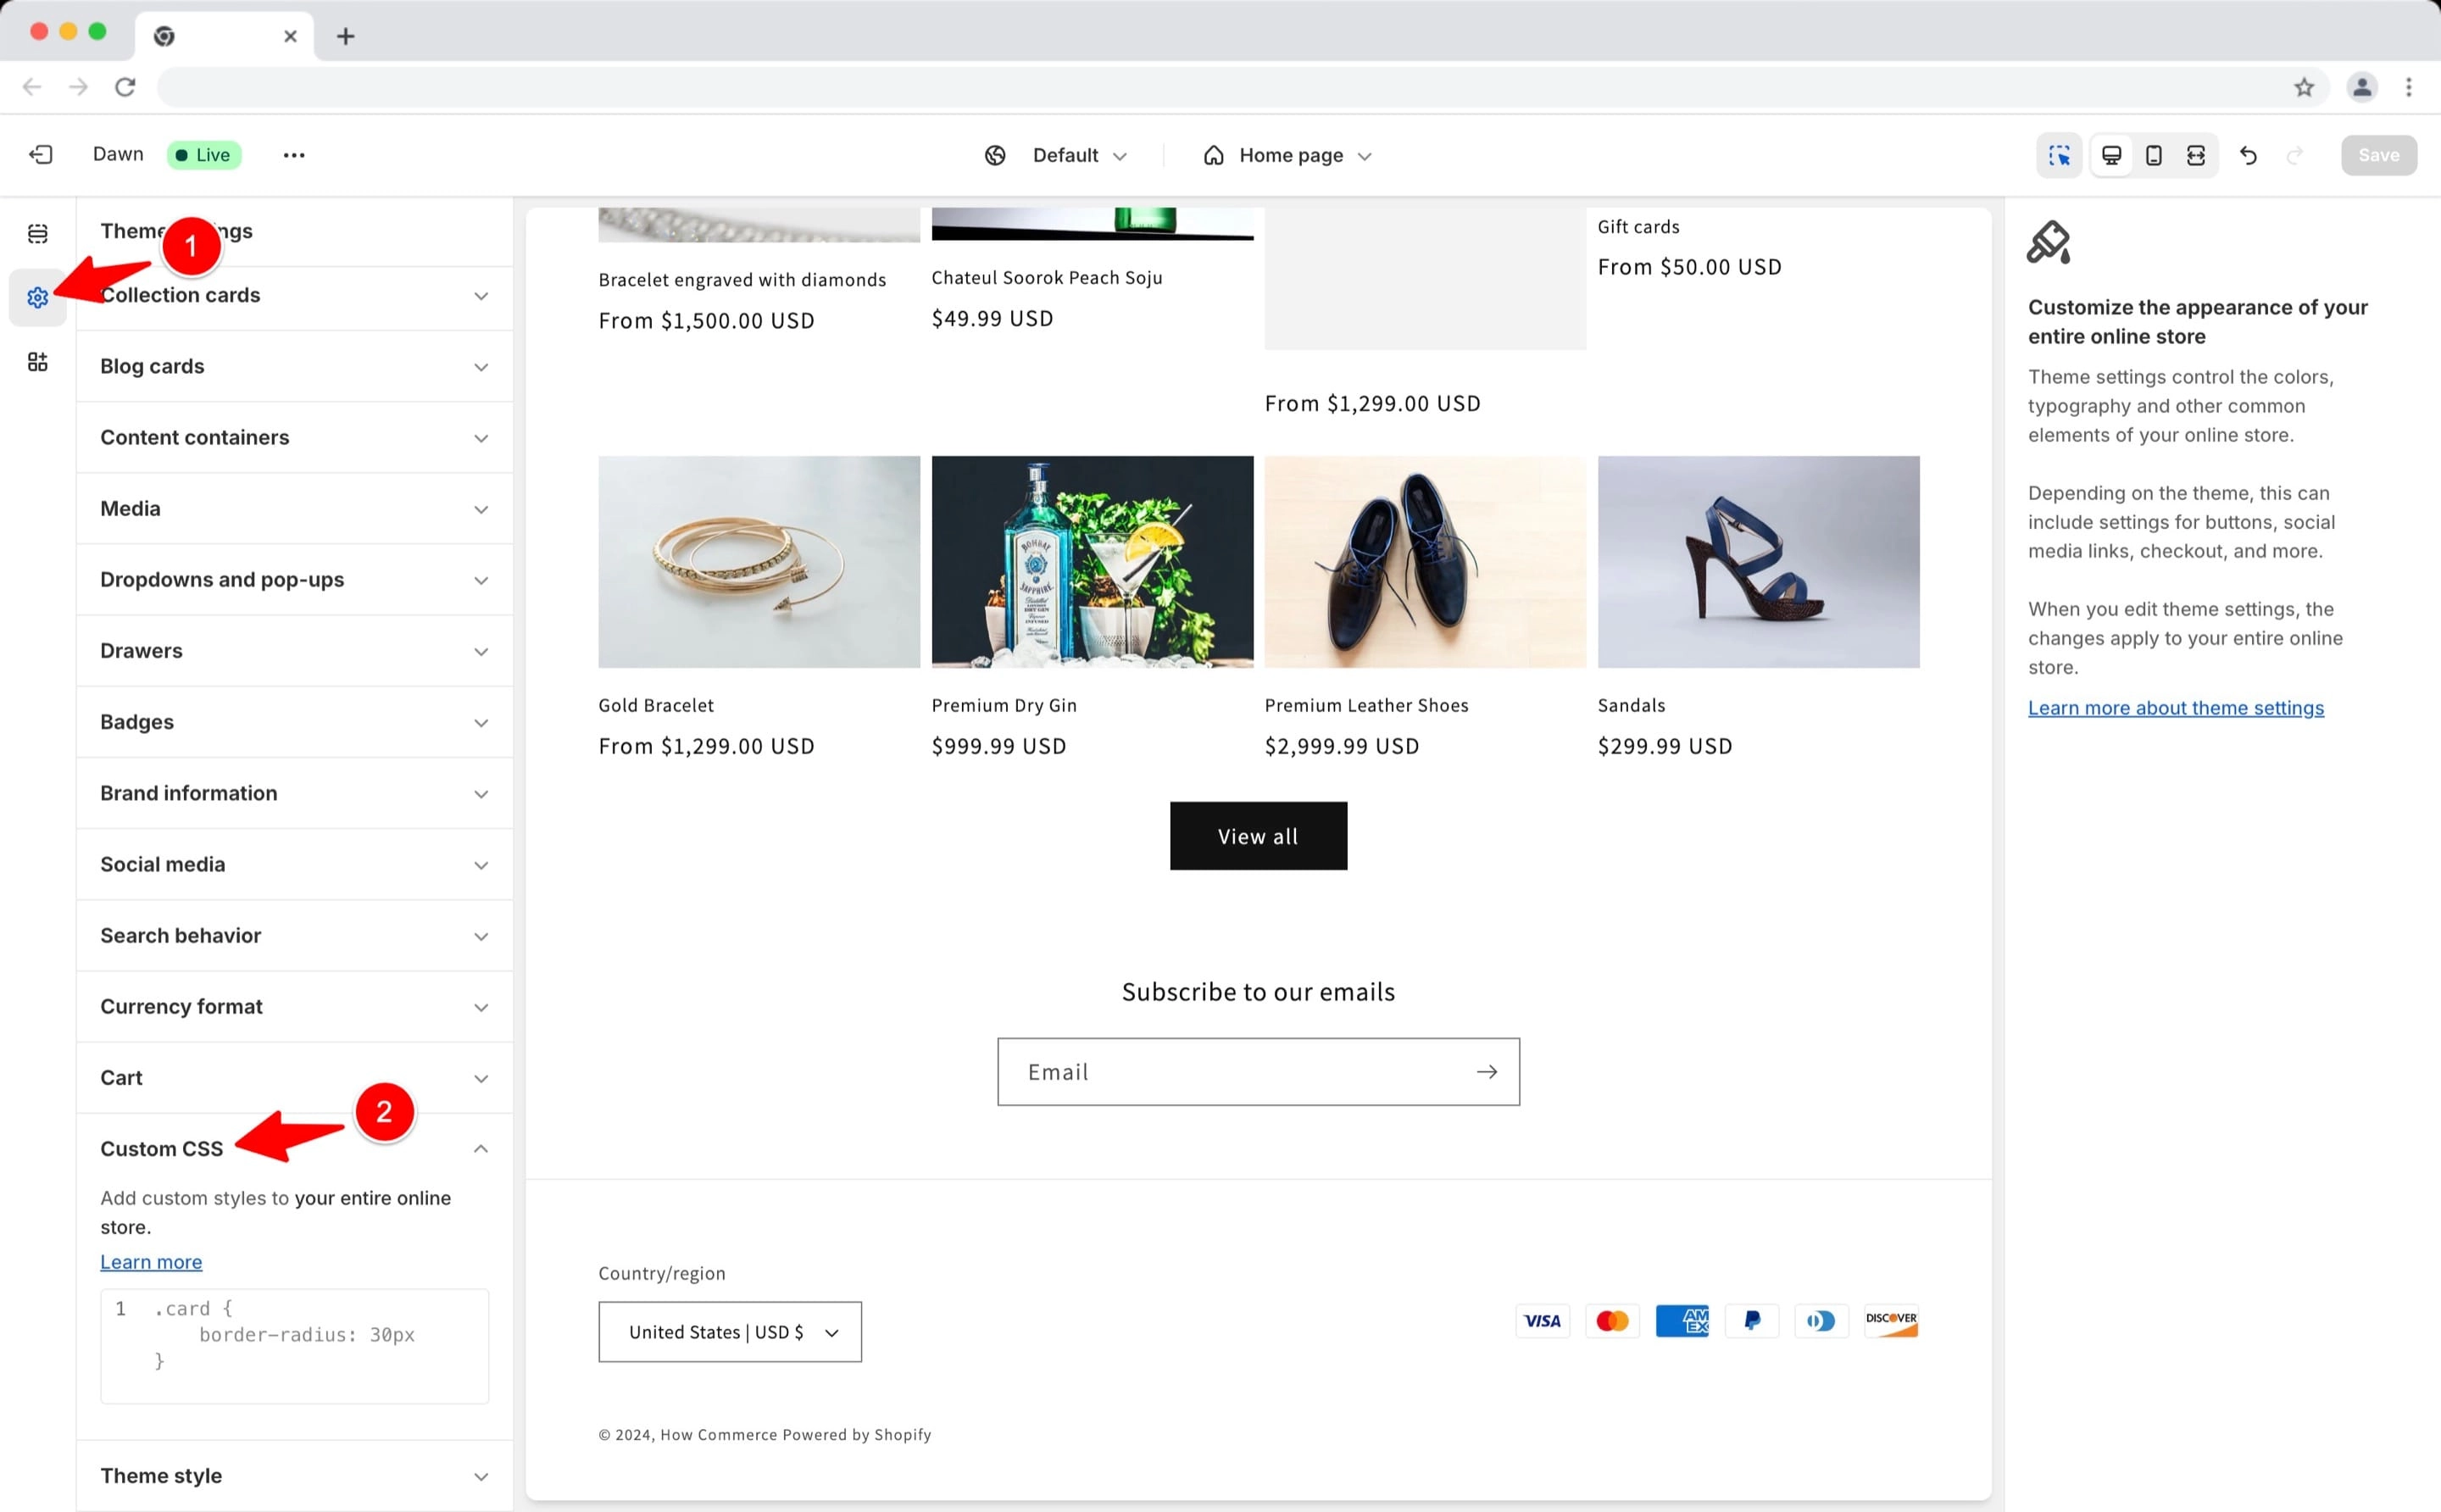
An element that I want to target globally for example is the button.
When I change the color of one button with CSS code I want all the buttons on the store to reflect the same color.
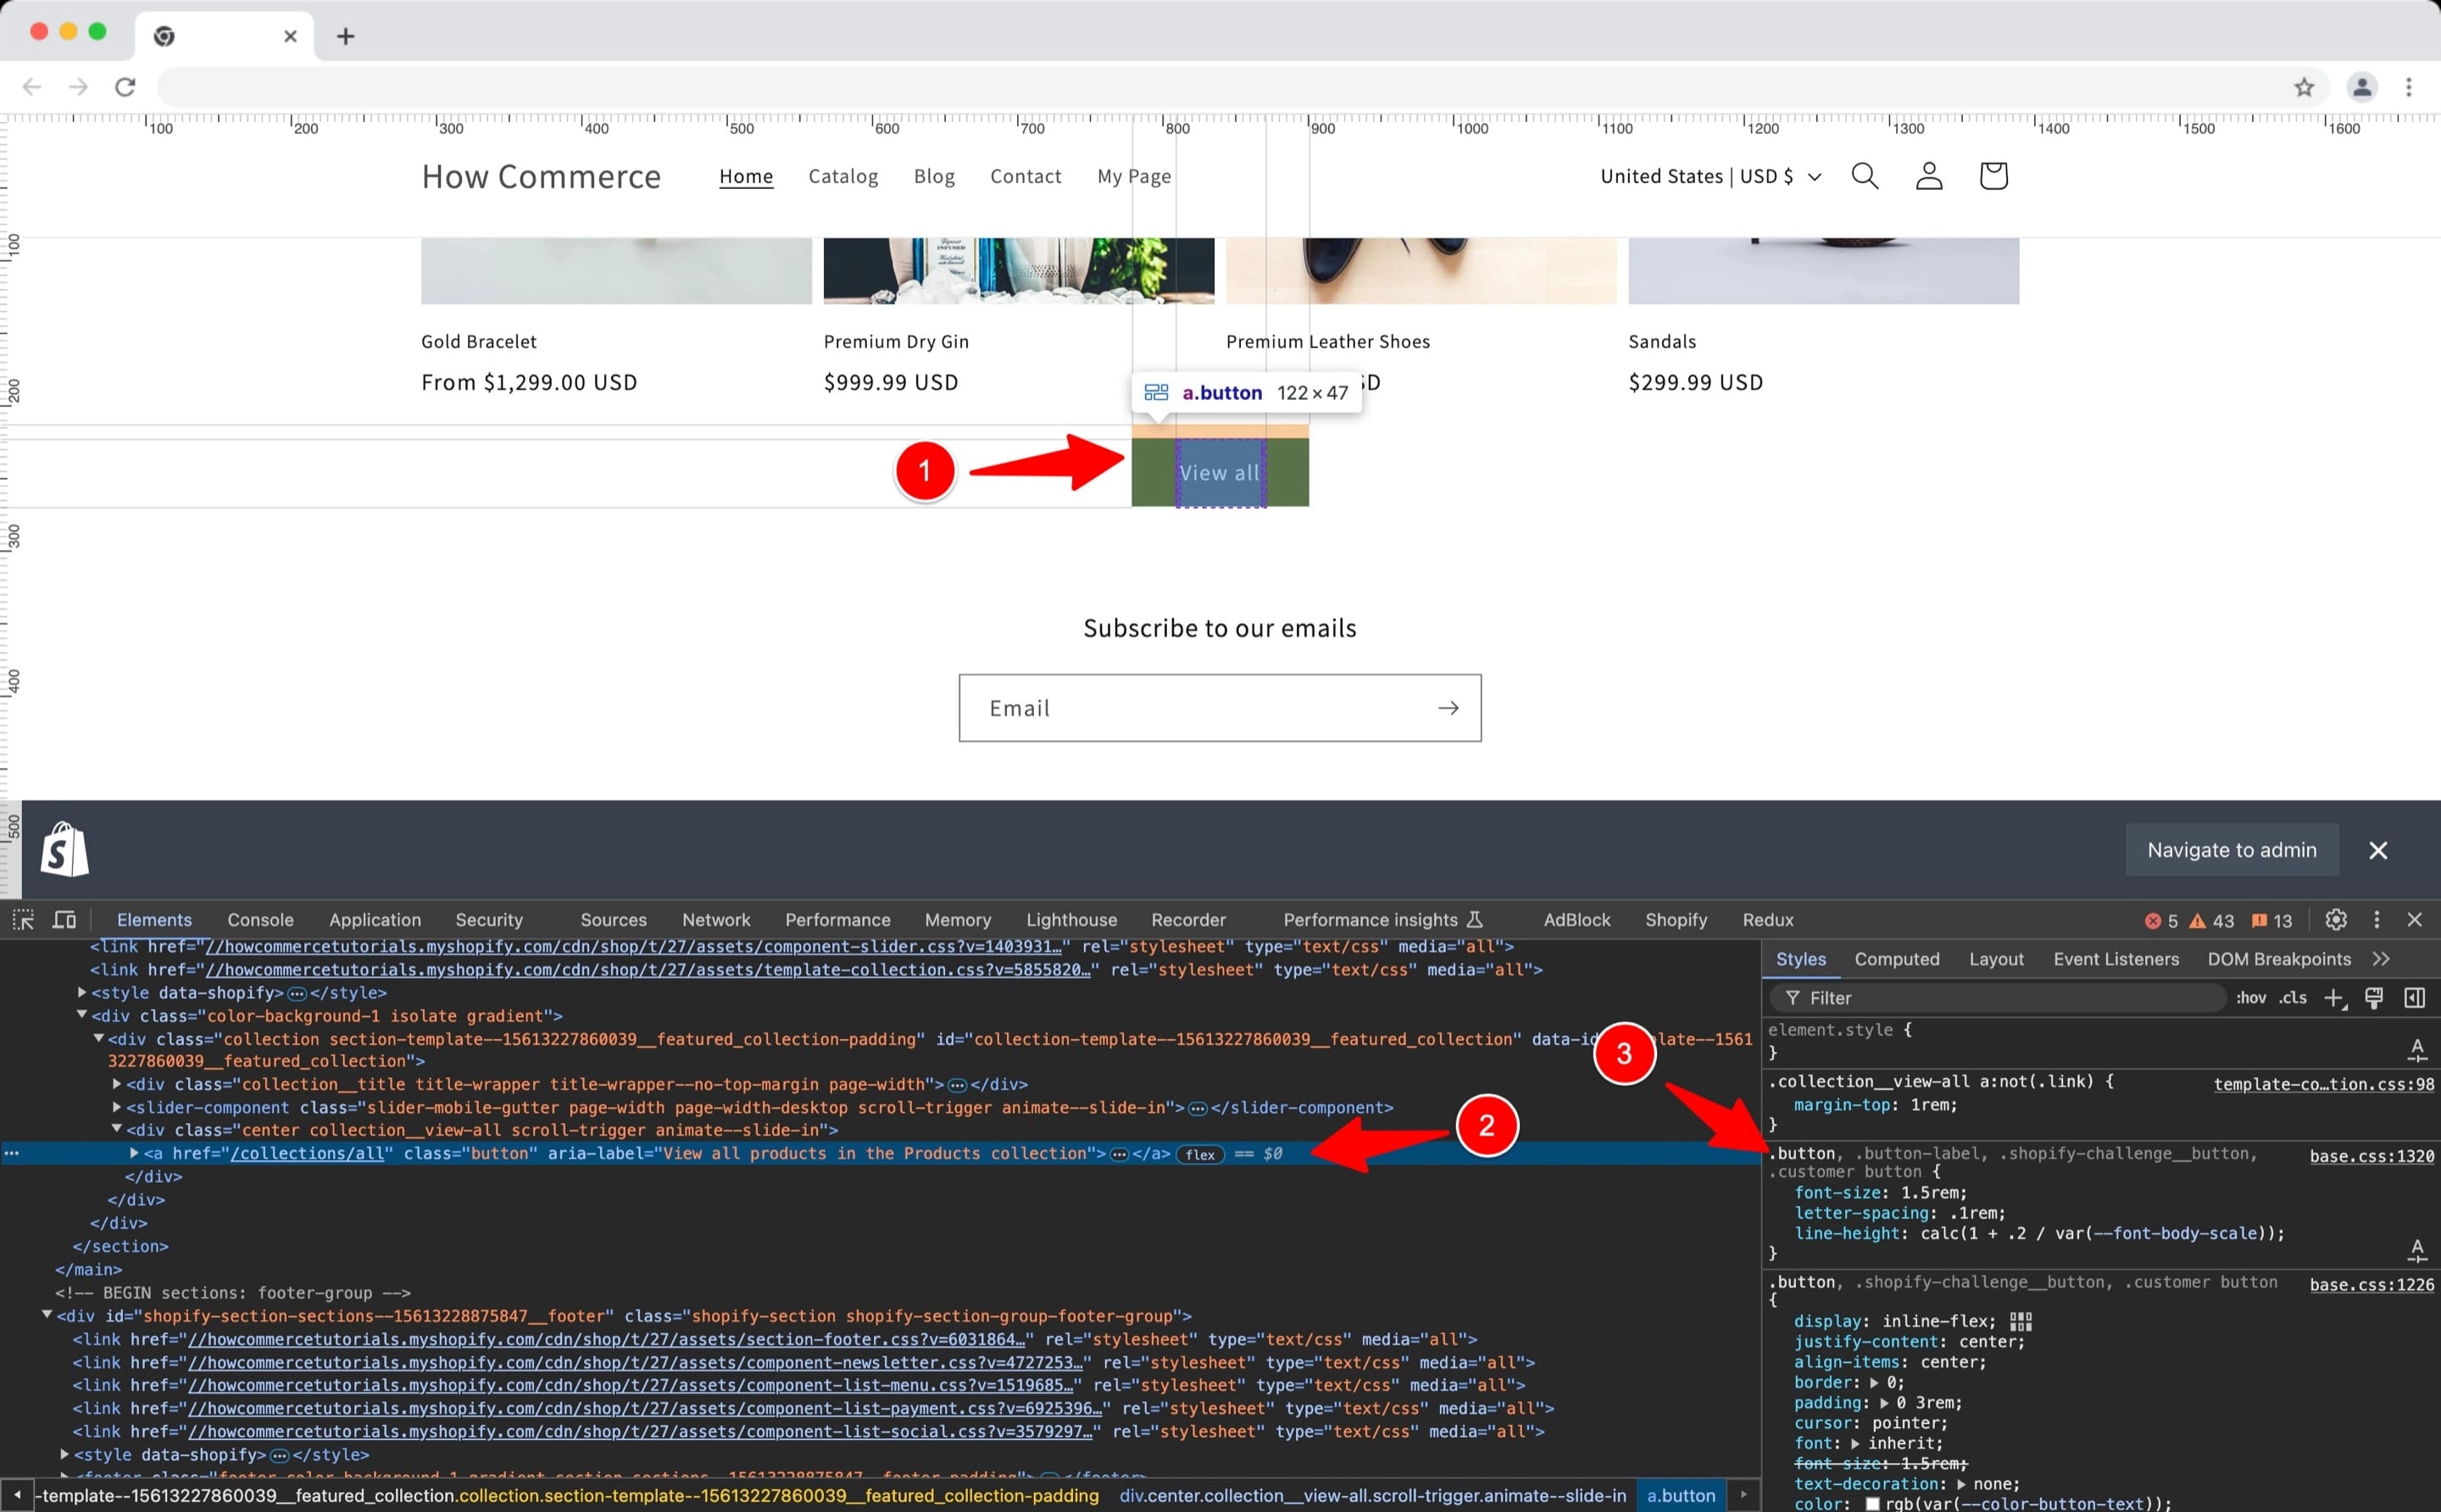
First thing I want to do is to find out which classes are used for the buttons so I know how to target the element.
For that go to the store front and inspect via the “Developer tools” the button.
Hover over the button element (marked with 1 in the image below).
Hovering will highlight the element (marked with 2 in the image below) in the “Elements” tab of the “Developer tools” and on the right side on the “Styles” panel you can see the “button” class as being active.
Now my advice to you is to verify all the buttons all over the store to make sure they all have the same CSS class or else the change will not display on those buttons that have a different CSS class.
Now that you know the CSS class that the buttons use, go back to the "Custom CSS" box and add the CSS code.
For my example I'll add:
 .button {
  background: red;
 }
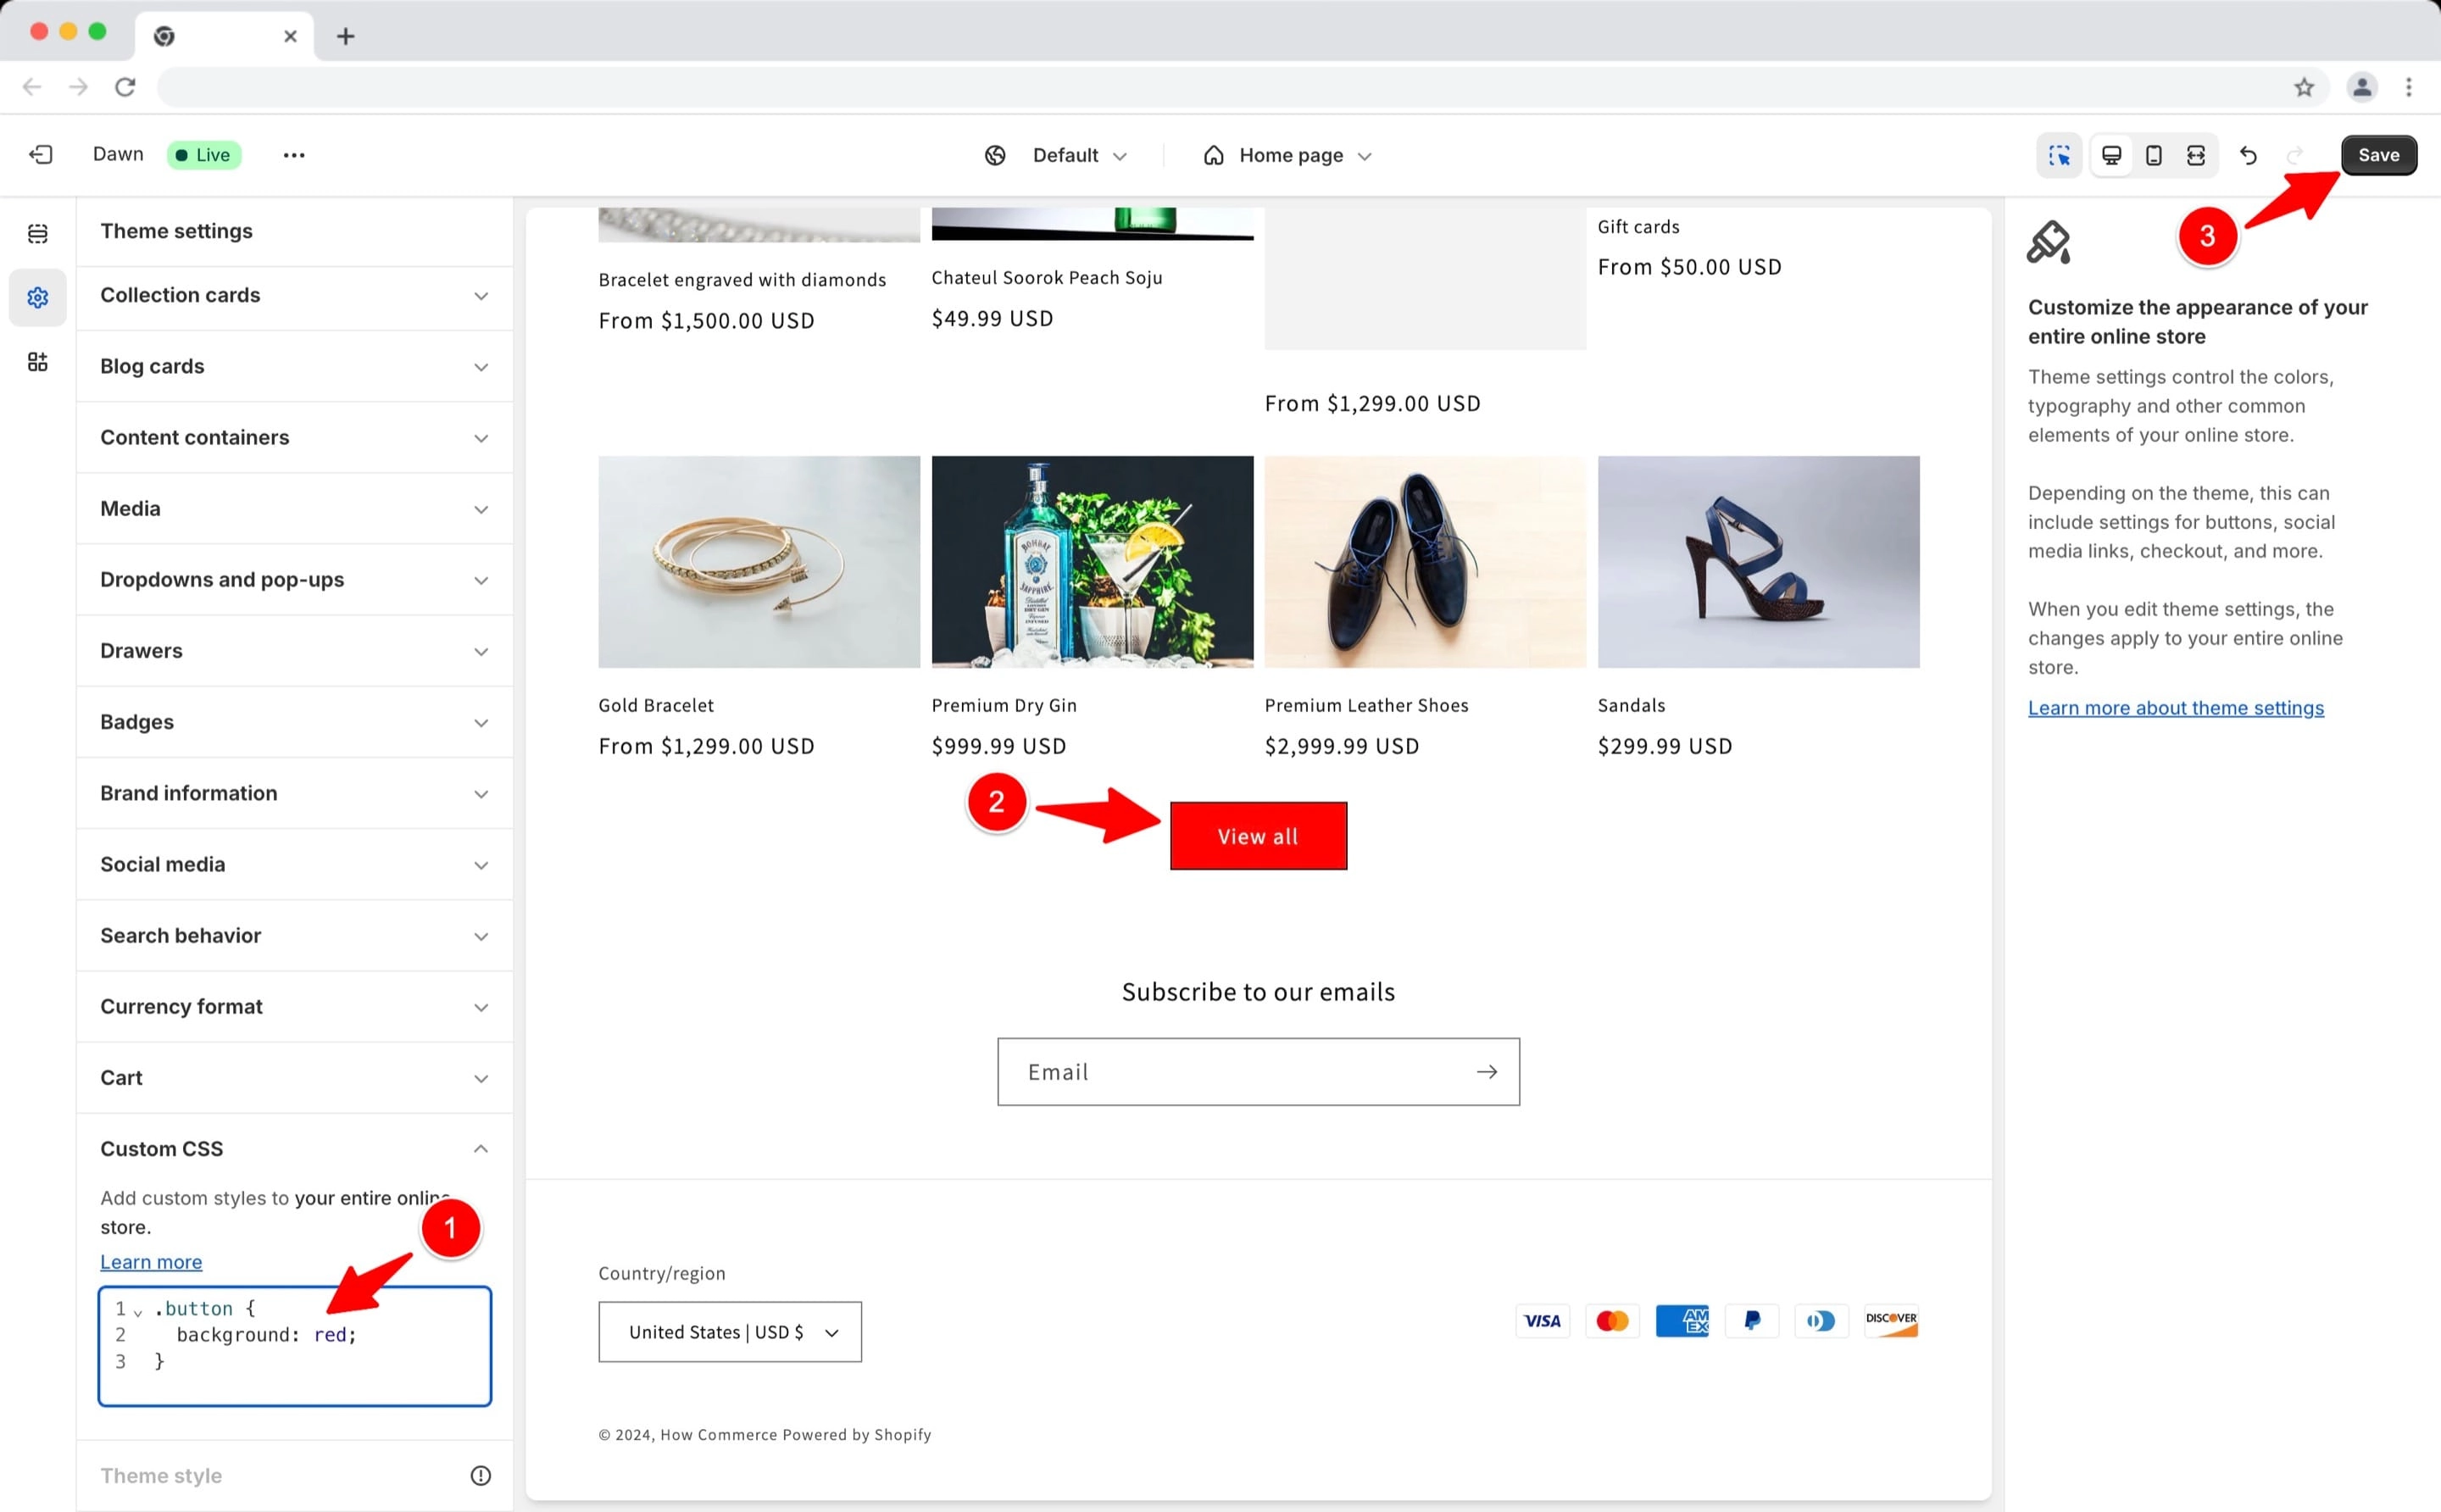
Add the code in the "Custom CSS" box (marked with 1 in the image below).
Once the code is added the theme editor will reload the theme preview and reflect the changes making in my example all buttons on the page red (marked with 2 in the image below).
If the element color changes in the theme preview editor it means that your CSS class that you added in the “Custom CSS” box is correct.
Since all is good you can click on the "Save" button (marked with 3 in the image below) and save your changes to reflect on the store front.
After you save your changes go to the store front and verify all buttons across the store and make sure that all of them are reflecting the new CSS code.
Conclusion
The “Custom CSS” box is more of a quick solution instead of a professional one and could create a mess inside CSS files due to bad overrides and use of “important” statements. I’ve seen it many times.
If you have just a quick CSS change on an element and do not have time to implement it in the CSS files inside the theme add it here, but as soon as you have the time my advice is to implement the code correctly inside the theme files and of course target the code in such a way to use as less selectors as possible.
Every bit counts to create a great experience for your shoppers.