

Overview
If you’re not actively promoting your best-selling products, you’re leaving easy revenue on the table.
Customers naturally gravitate toward products that others are already buying.
Showcasing your top sellers is one of the simplest and most effective ways to increase conversions without additional marketing spend.
In this tutorial, you’ll learn how to create a dedicated Best Sellers page in Shopify that automatically highlights your most popular products.
No apps. No unnecessary complexity. Just a clean, efficient setup that works.
By the end, you’ll have a high-performing page that builds trust, improves product discovery, and drives more sales.
You could create a page and manually assign products based on your order data, updating it as sales change.
You could also reorder products manually to reflect performance.
That approach is inefficient and does not scale.
It quickly becomes a time sink and is not worth the effort.
Instead, the right move is to automate the process and let Shopify dynamically display your best-selling products every time a customer loads the page.
Shopify already provides built-in functionality to handle this.
You just need to set it up correctly.
Create the collection
To build your Best Sellers page, you’ll first need to create a collection.
This collection will dynamically display your top-performing products.
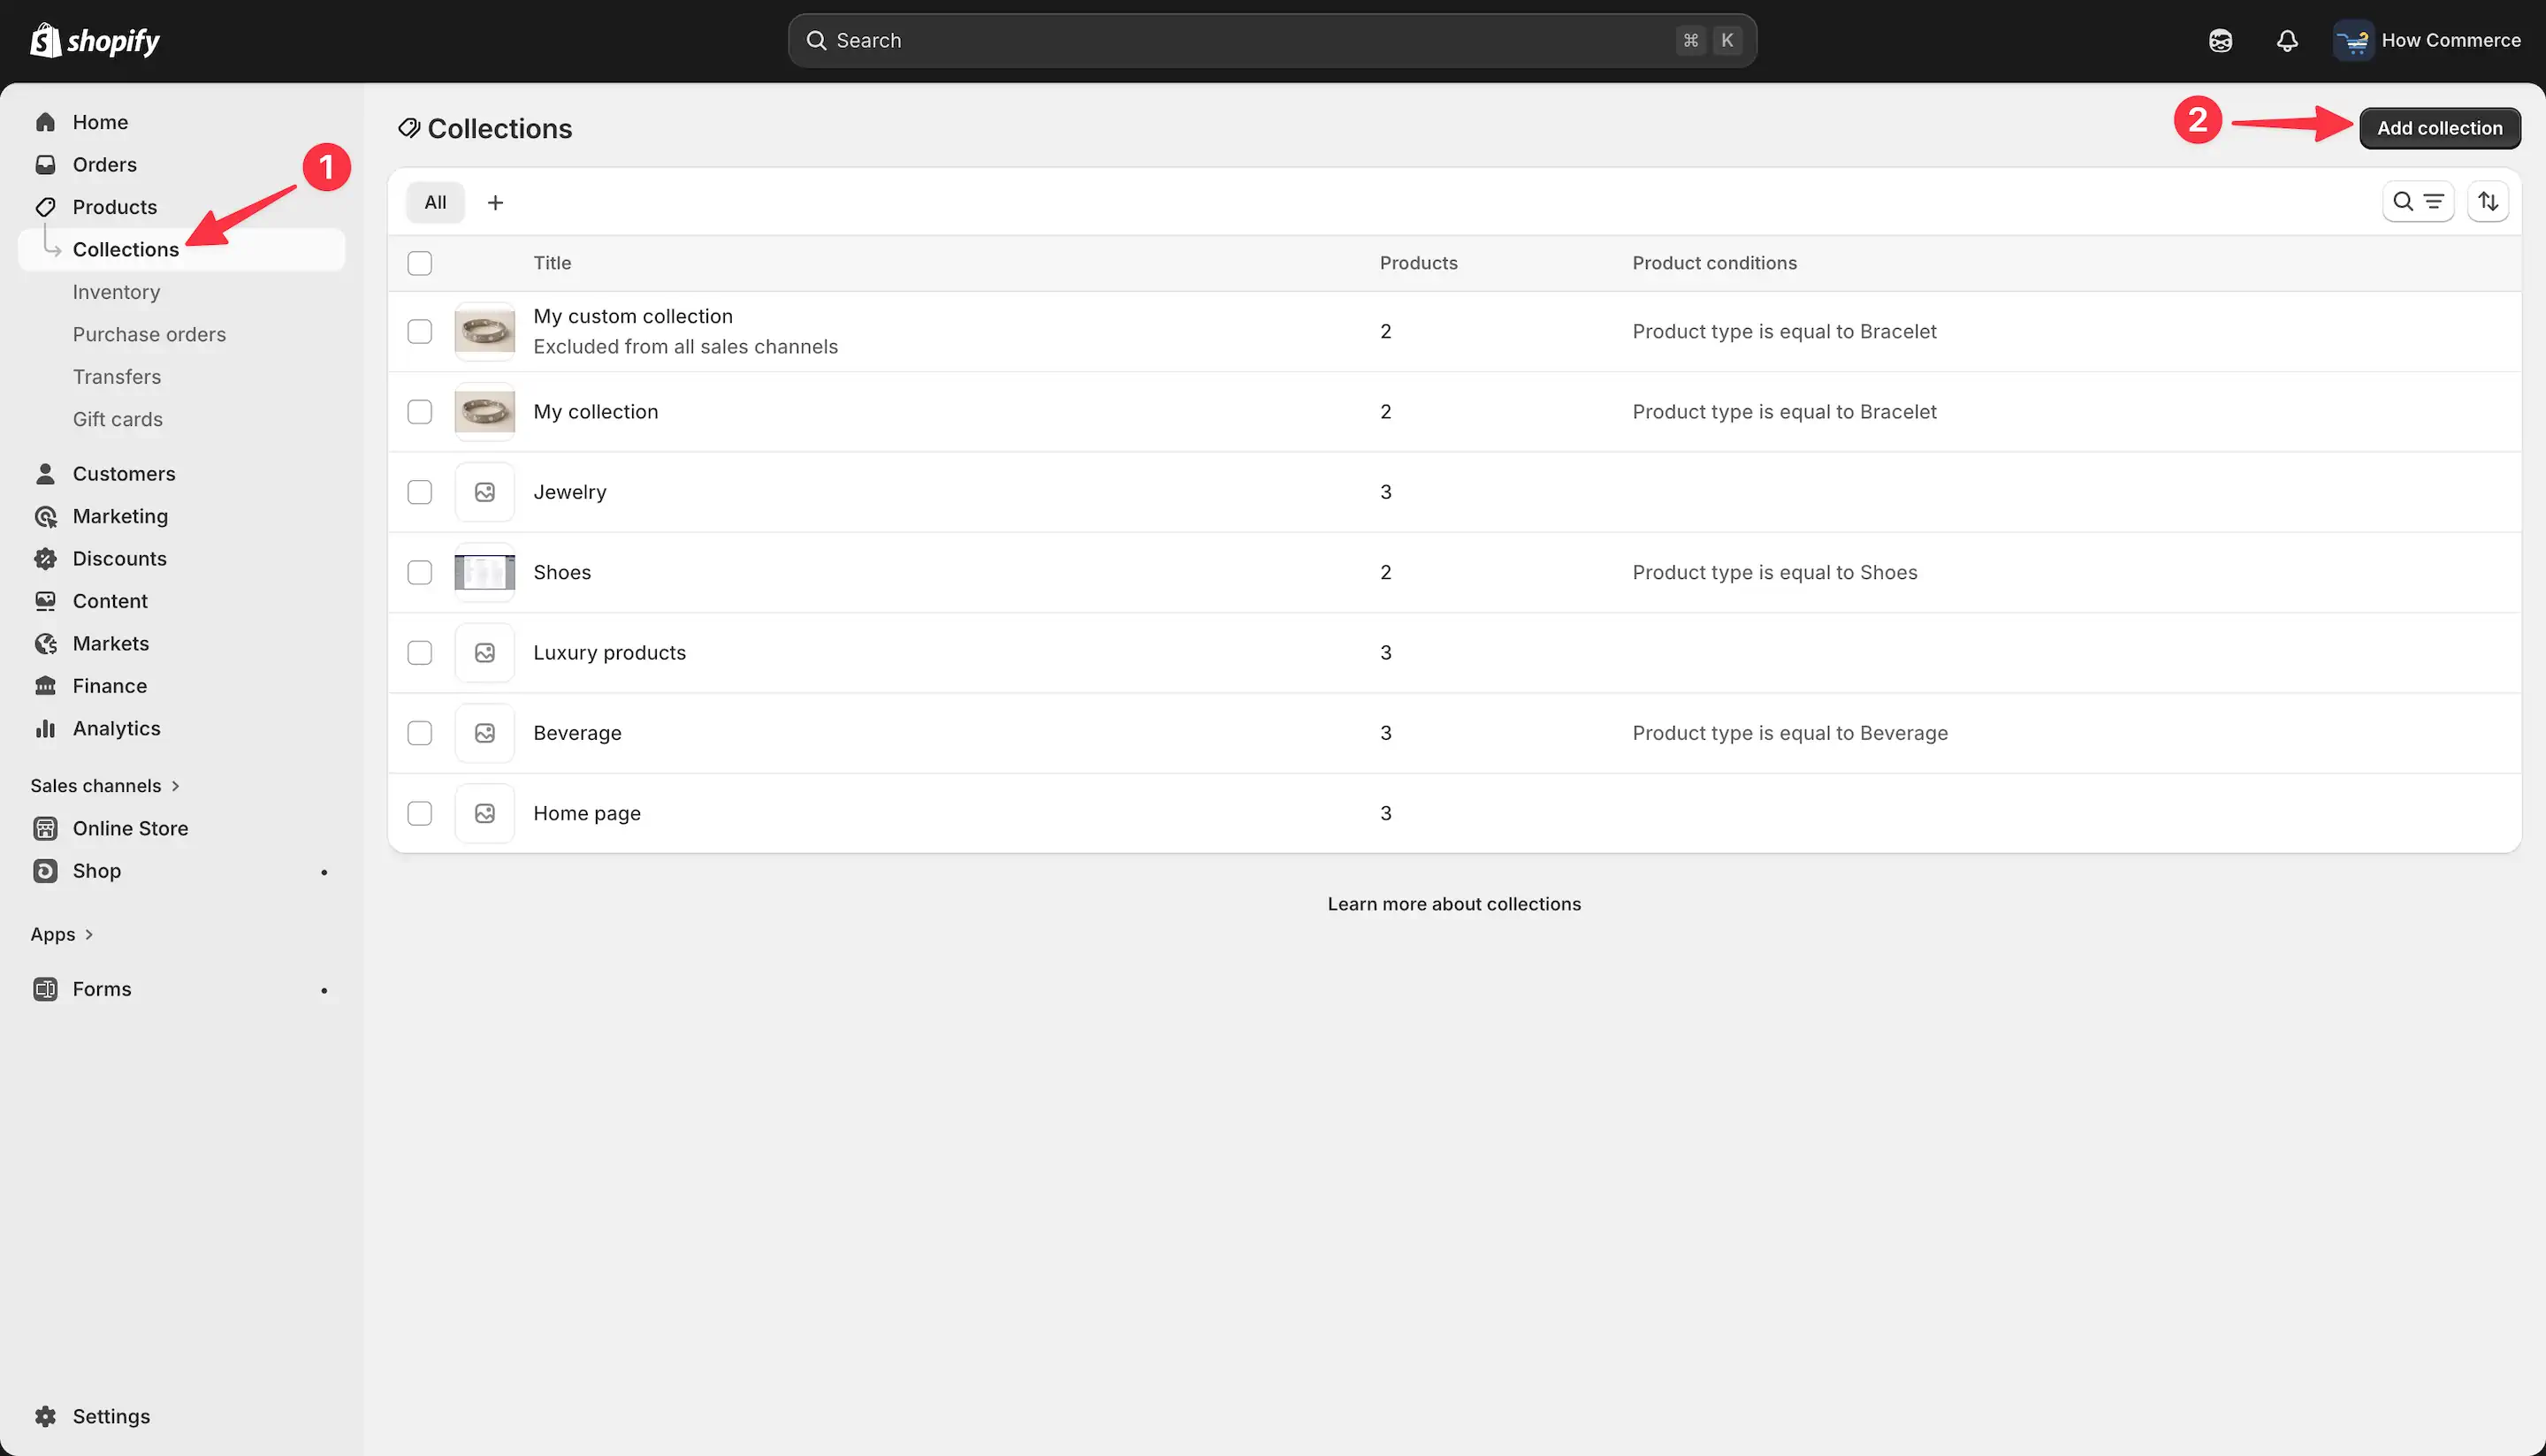
Navigate to Collections (marked as 1 in the image below), then click Add collection (marked as 2 in the image below).
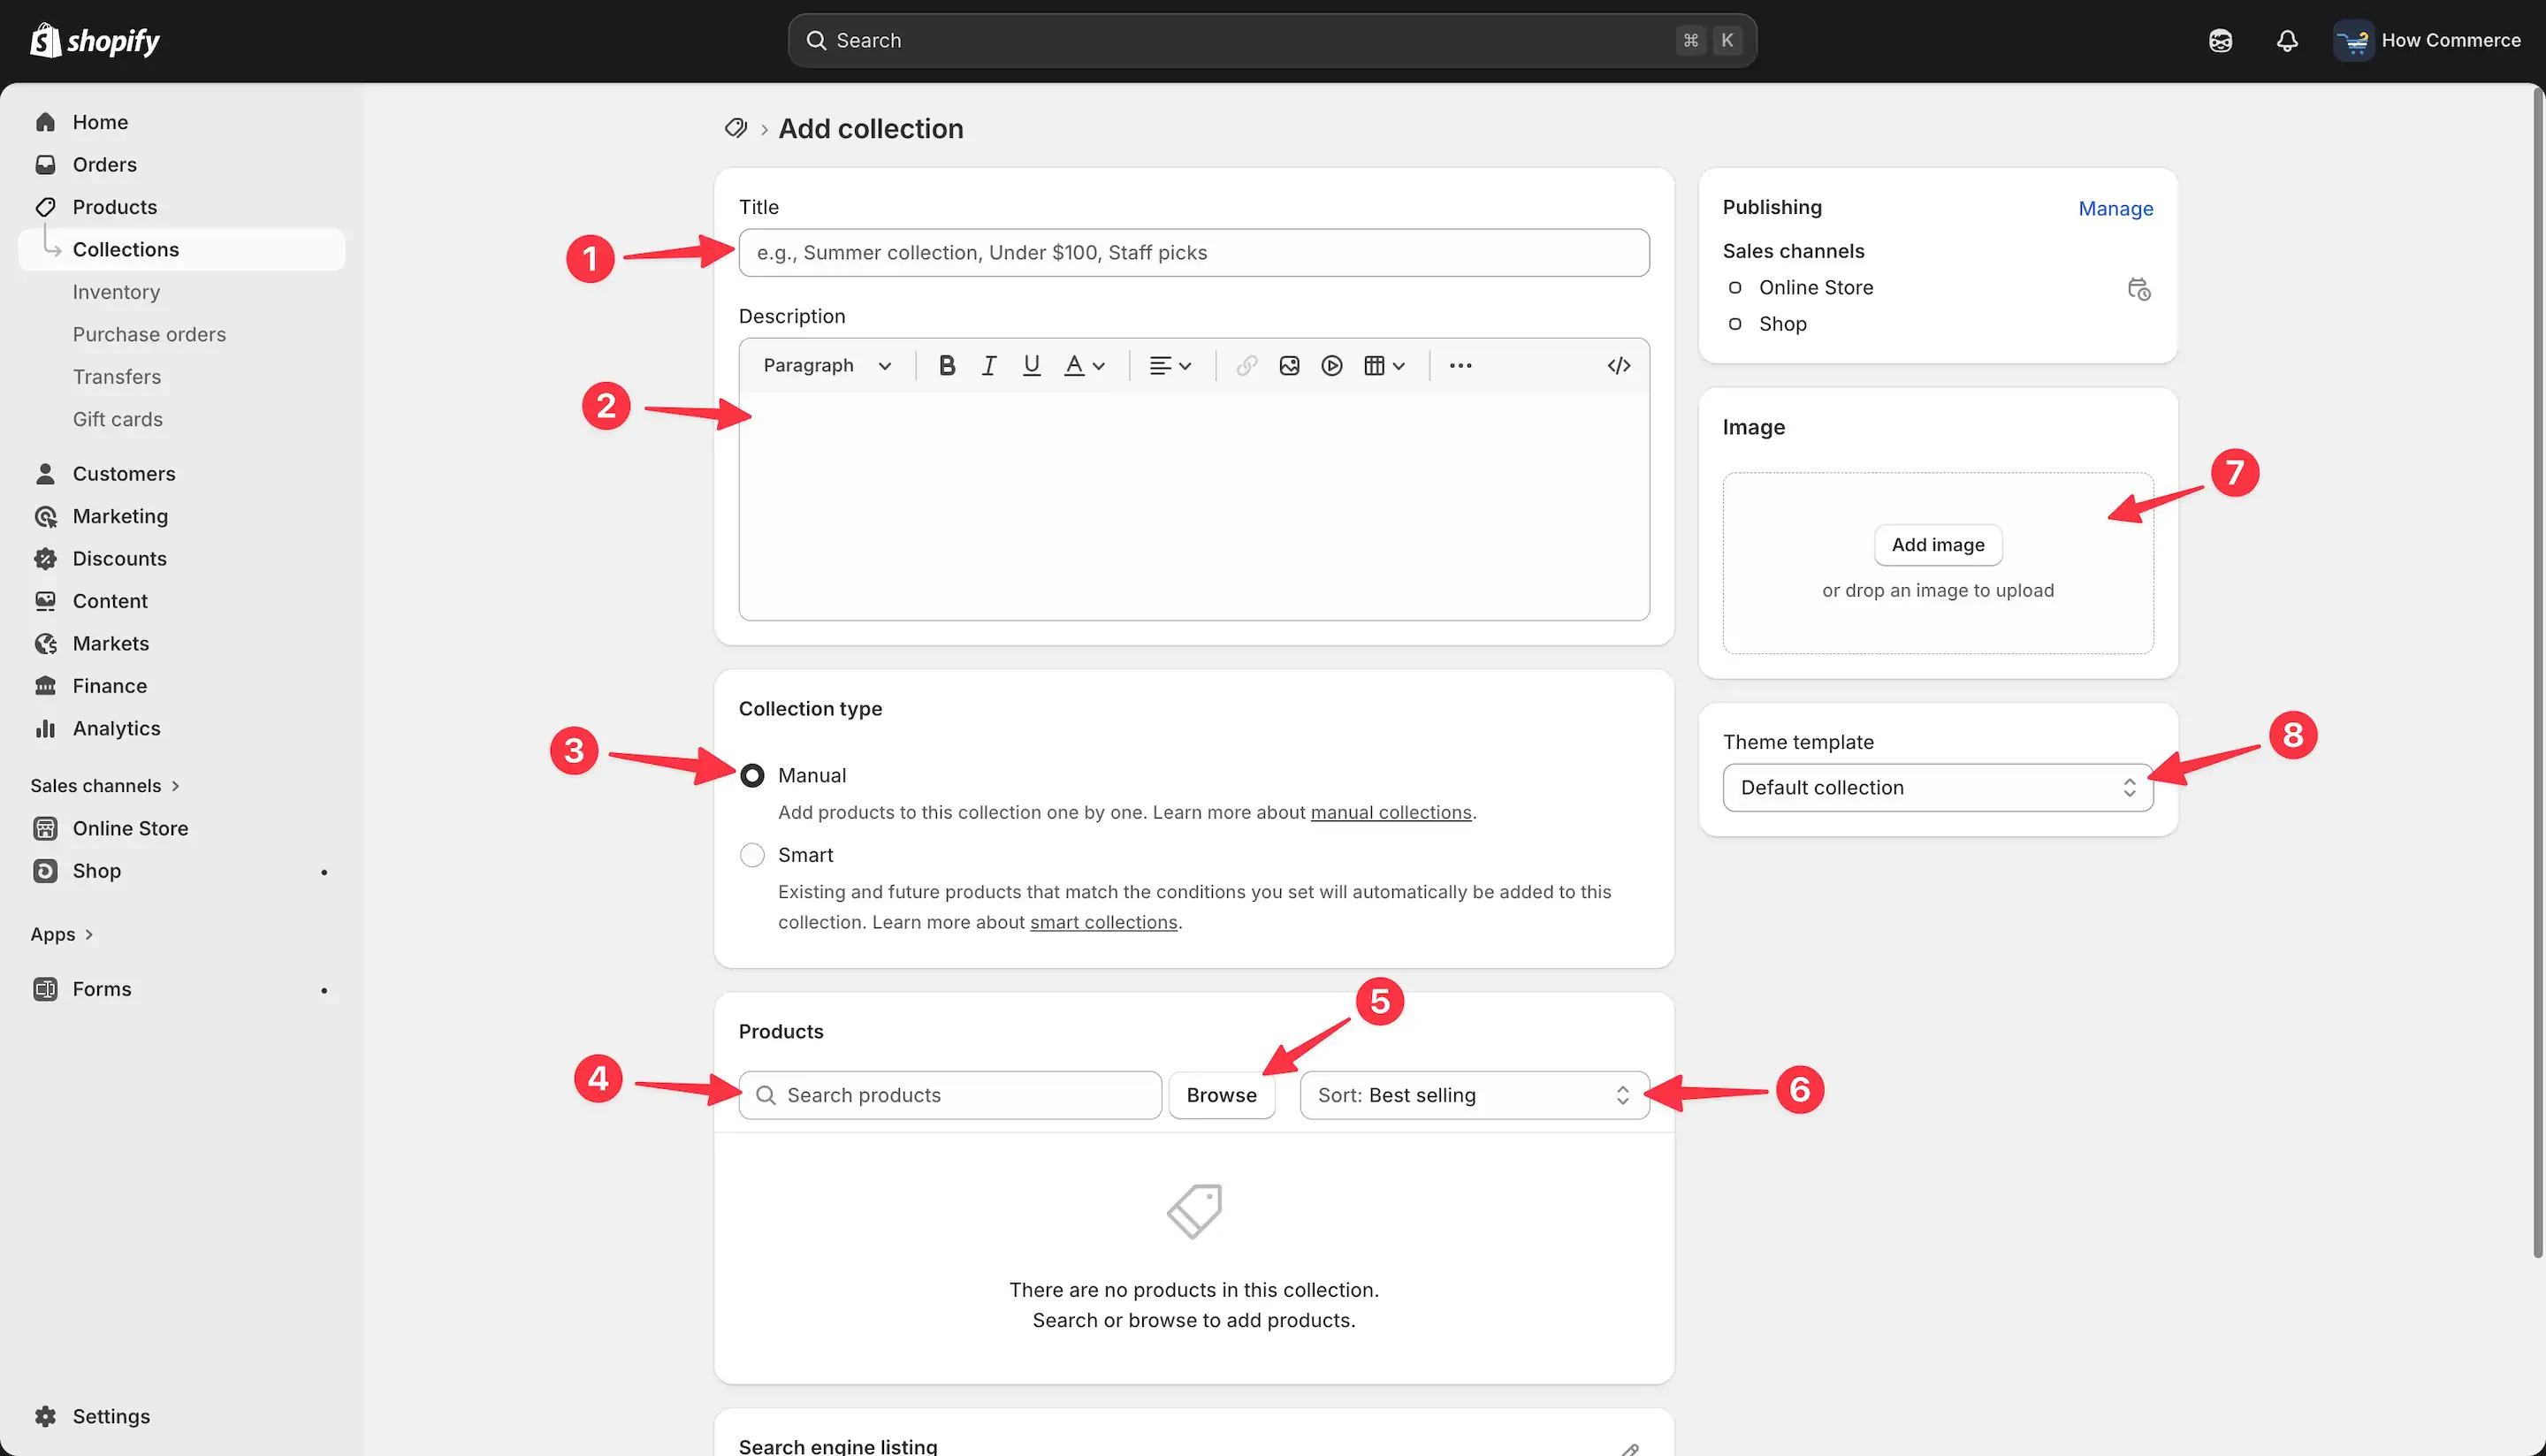
Add the collection title (marked with 1 in the image below). In this case, you can use Best Sellers.
Add a collection description (marked with 2 in the image below).
Under Collection type, select Manual (marked with 3 in the image below).
This is intentional.
A manual collection allows you to control sorting, which is required to display products based on best-selling performance.
Next, manually select the products you want to include on this page (marked with 4 in the image below).
To choose your products, click Browse (marked with 5 in the image below).
This is the critical step. From the sorting dropdown, select Best selling (marked with 6 in the image below).
This ensures that all products in the collection are automatically ordered by sales performance.
For example, the first product (from left to right) will be the highest-selling item, followed by the second, third, and so on.
Add a collection image (marked with 7 in the image below).
This image will appear in the hero section of the Best Sellers page.
The collection image is only displayed if your theme supports it.
If not, it will not be visible.
For example, the theme used in this tutorial does not display the collection image on the collection page.
Finally, select a template for this collection (marked with 8 in the image below).
In most cases, you should leave this as default.
However, some themes include specialized collection templates designed for landing pages.
If available, you can select them here.
Now let’s return to adding the products.
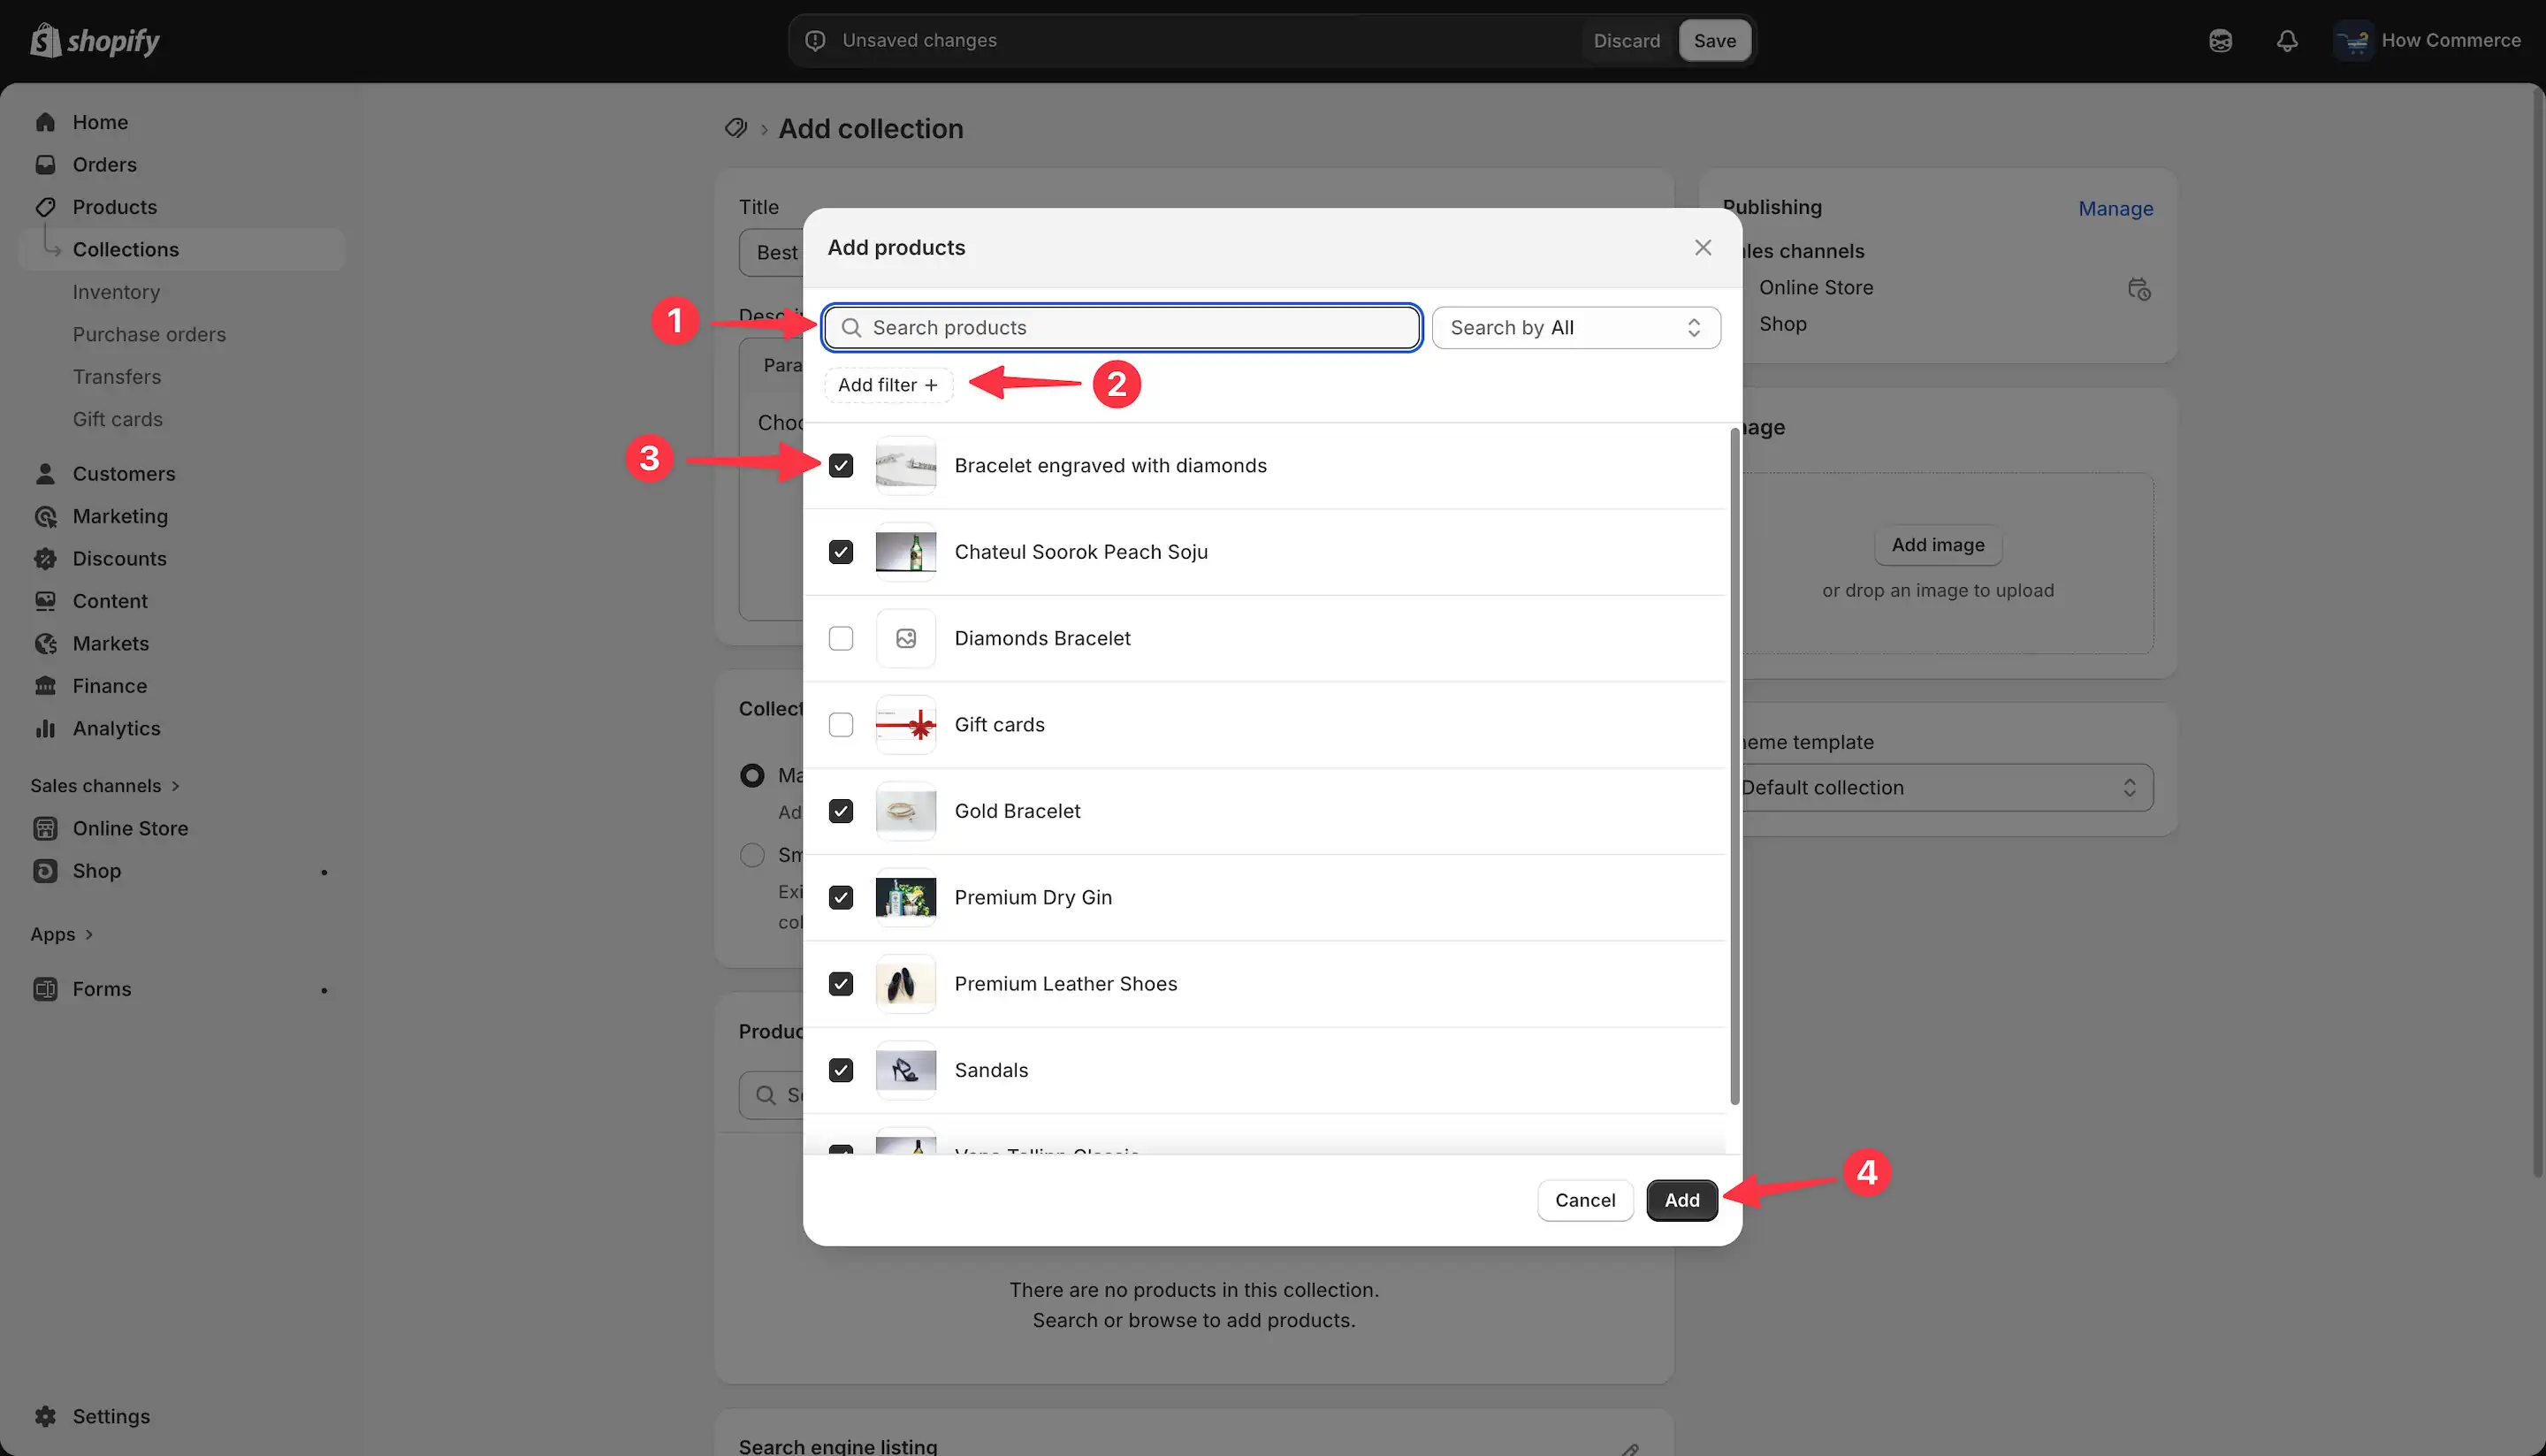
After you click the Browse button (marked with 5 in the image above), a pop-up window will appear, allowing you to select and add products to the collection.
You can search for products (marked with 1 in the image below) or apply filters (marked with 2 in the image below) to narrow down your selection.
Once you've identified the products, select each one (marked with 3 in the image below).
After selecting all the products you need, click the Add button in the pop-up window (marked with 4 in the image below).
This will add all selected products to the collection.
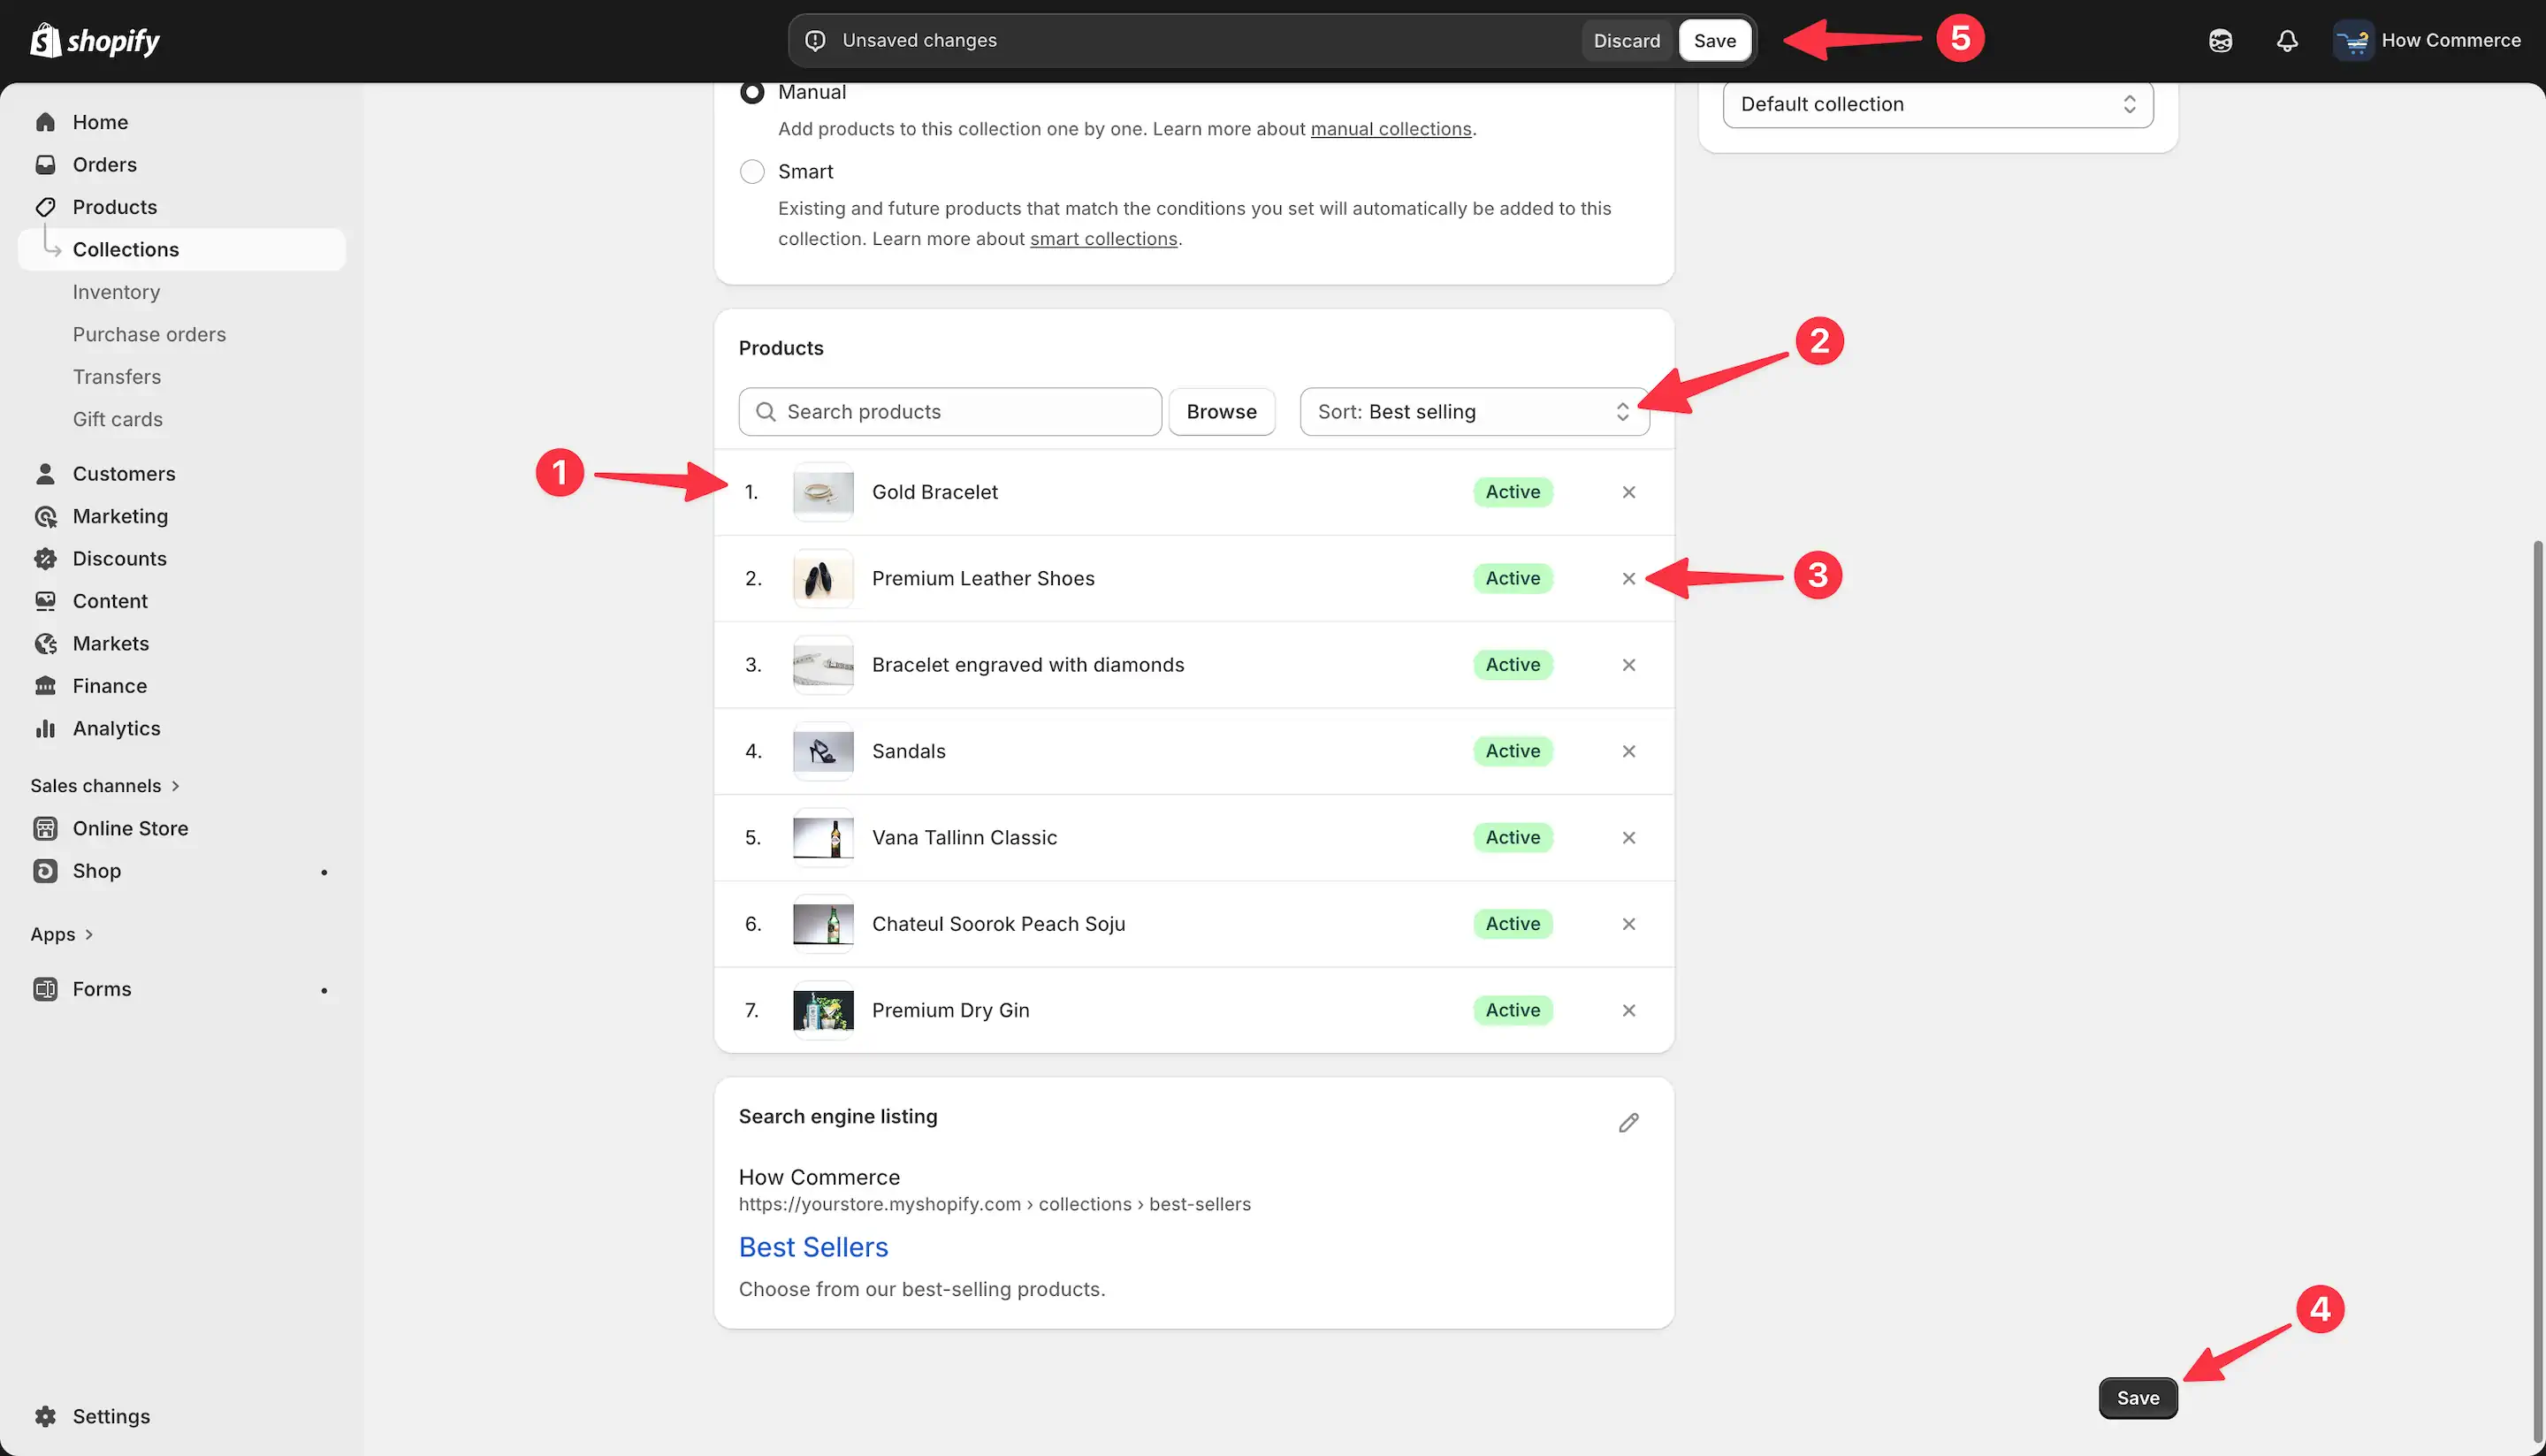
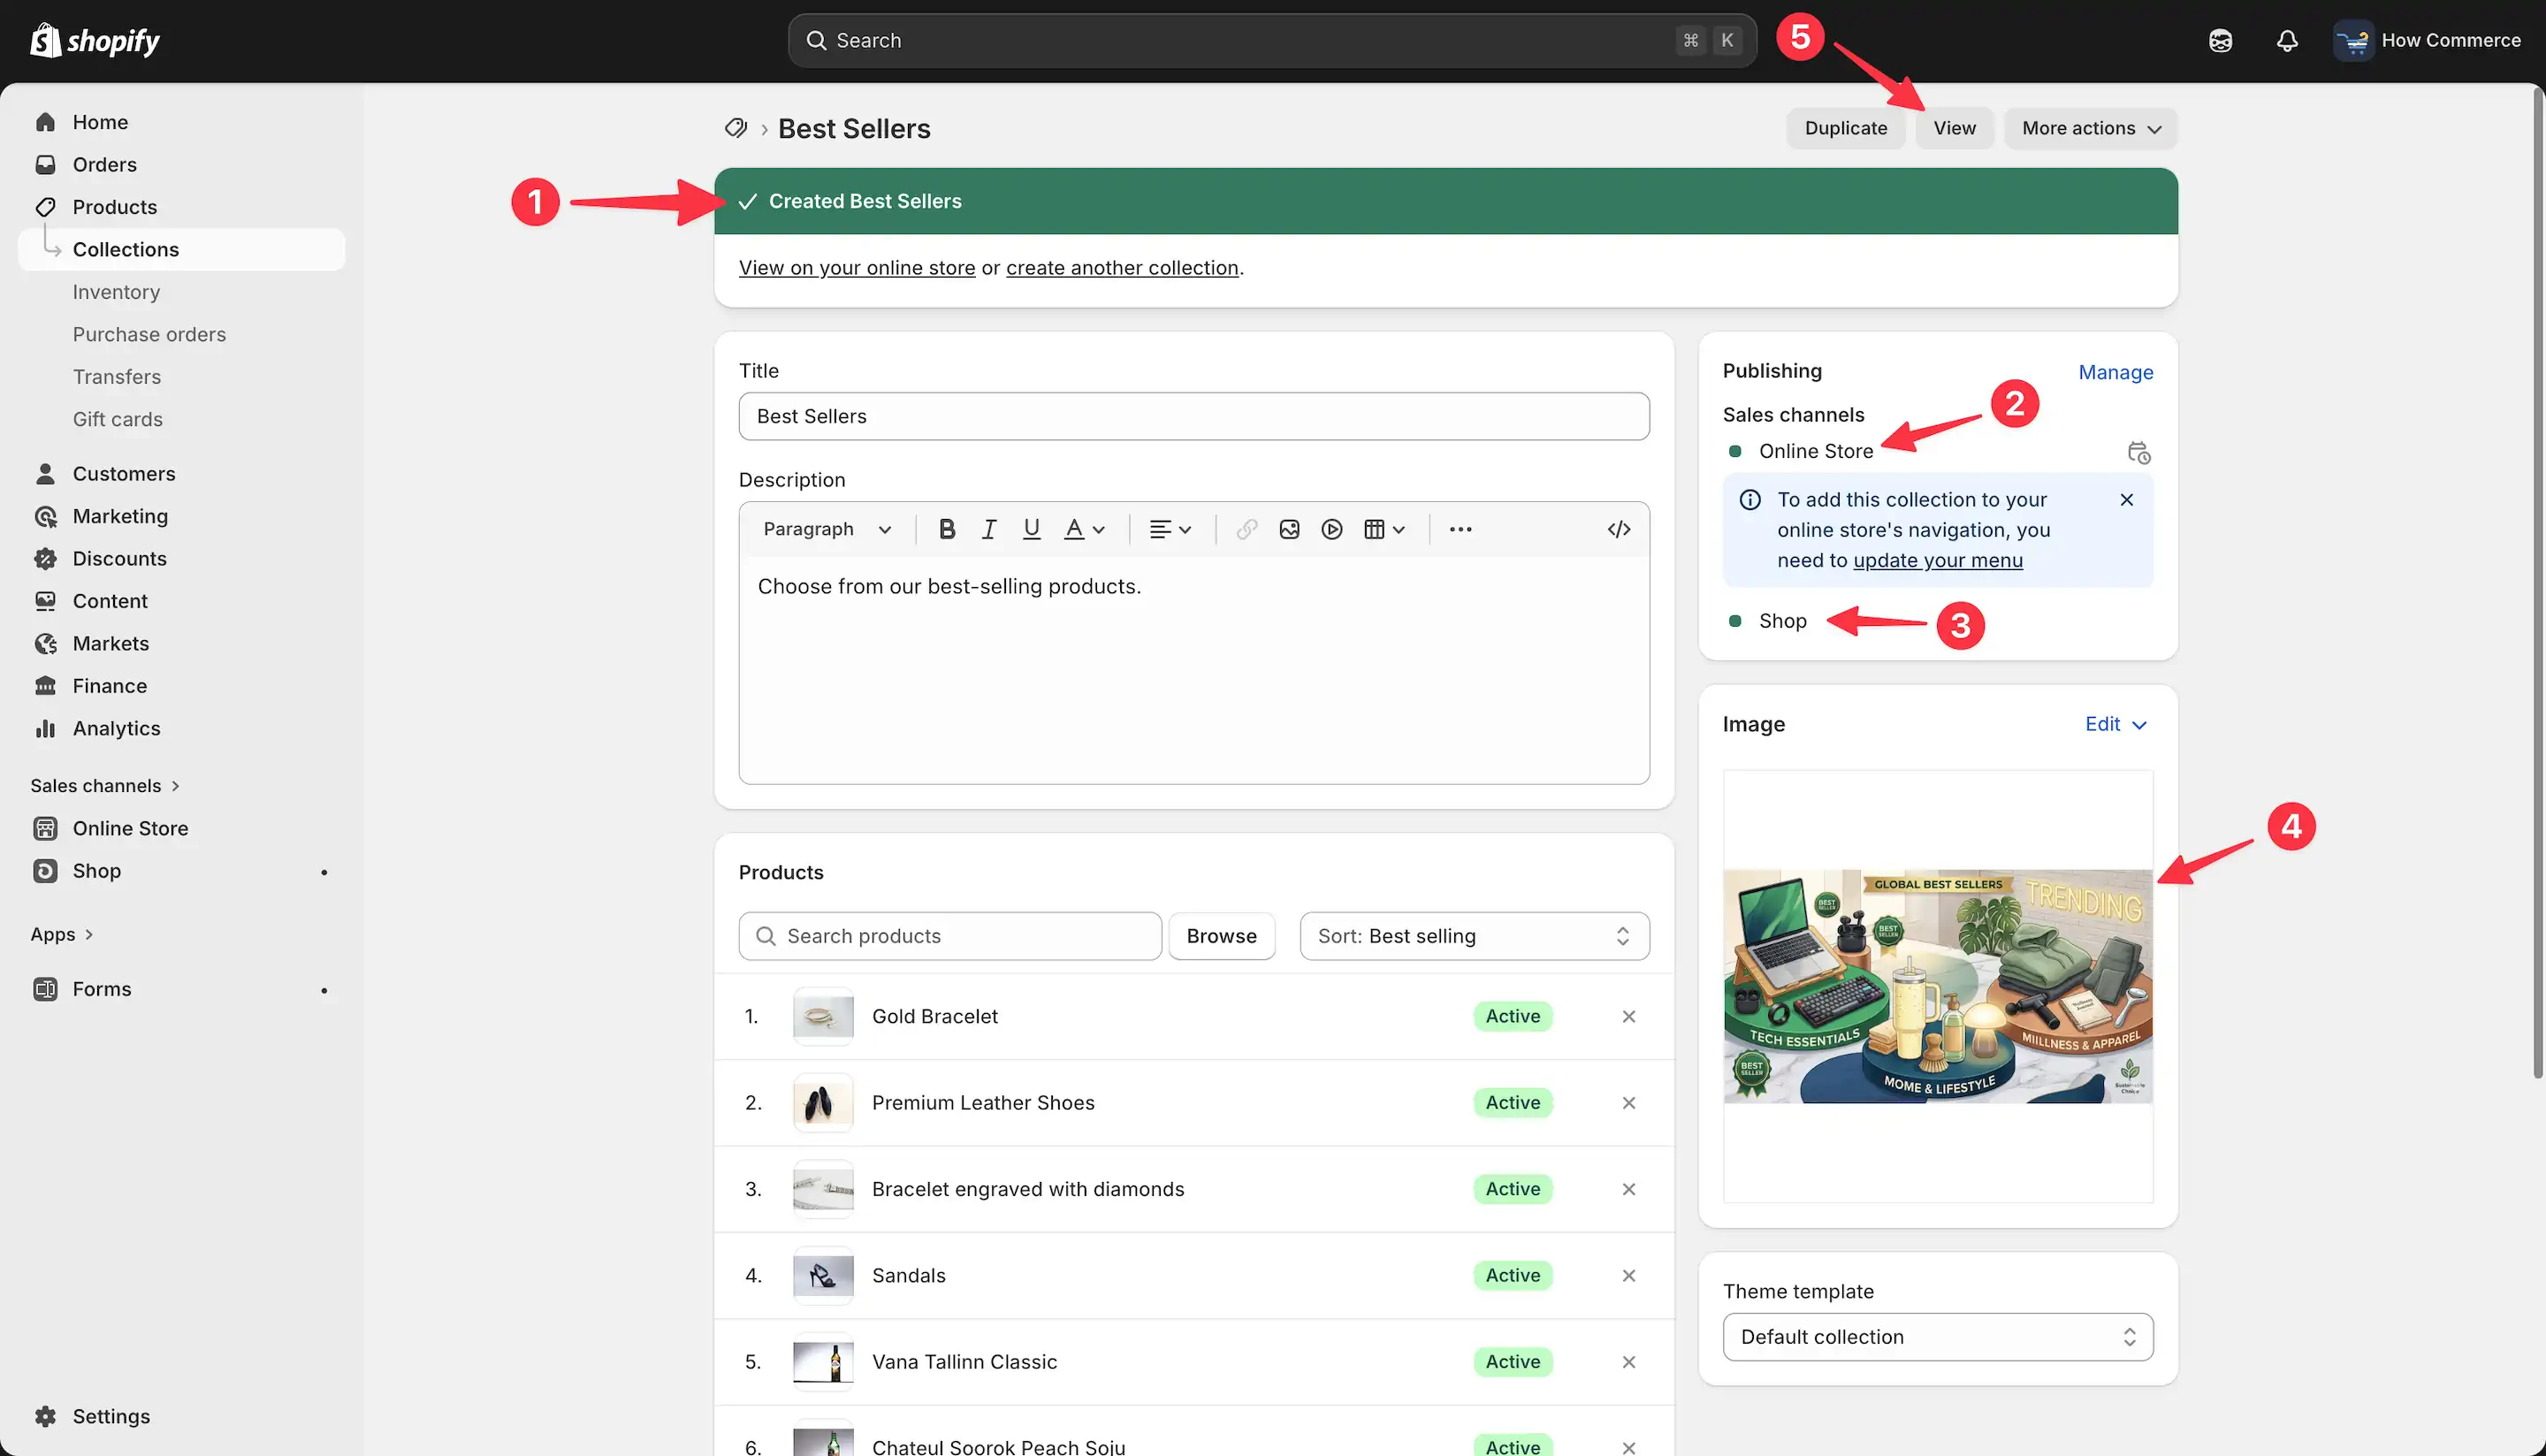
After adding the products, they will appear in the Products section of the collection page (marked with 1 in the image below).
Make sure the sorting is set to Best selling (marked with 2 in the image below).
If you need to remove any products, click the small X next to each item (marked with 3 in the image below).
Products cannot be dragged and dropped to change their order. This is because the list is automatically sorted based on the selected sorting option (marked with 2 in the image below).
Once everything is correctly configured, click the Save button (marked with 4 or 5 in the image below).
And that’s it.
Your new Best Sellers collection is now created and stored in your store database.
You should see a success message (marked with 1 in the image below).
Make sure the collection is published on the Online Store (marked with 2 in the image below) and the Shop channel (marked with 3 in the image below).
A collection image has also been added (marked with 4 in the image below).
Even if your theme does not support displaying this image on the collection page, it is still useful for quickly identifying the collection within the admin.
You can preview the collection on the storefront by clicking the View button (marked with 5 in the image below).
Create the menu Item
At this stage, your collection is created and accessible on the storefront via its direct link.
If you plan to share this link only through newsletters or with a limited audience, adding it to a menu is not necessary and you can stop here.
However, if you want this page to be easily accessible to all store visitors, you should add it to your navigation menu.
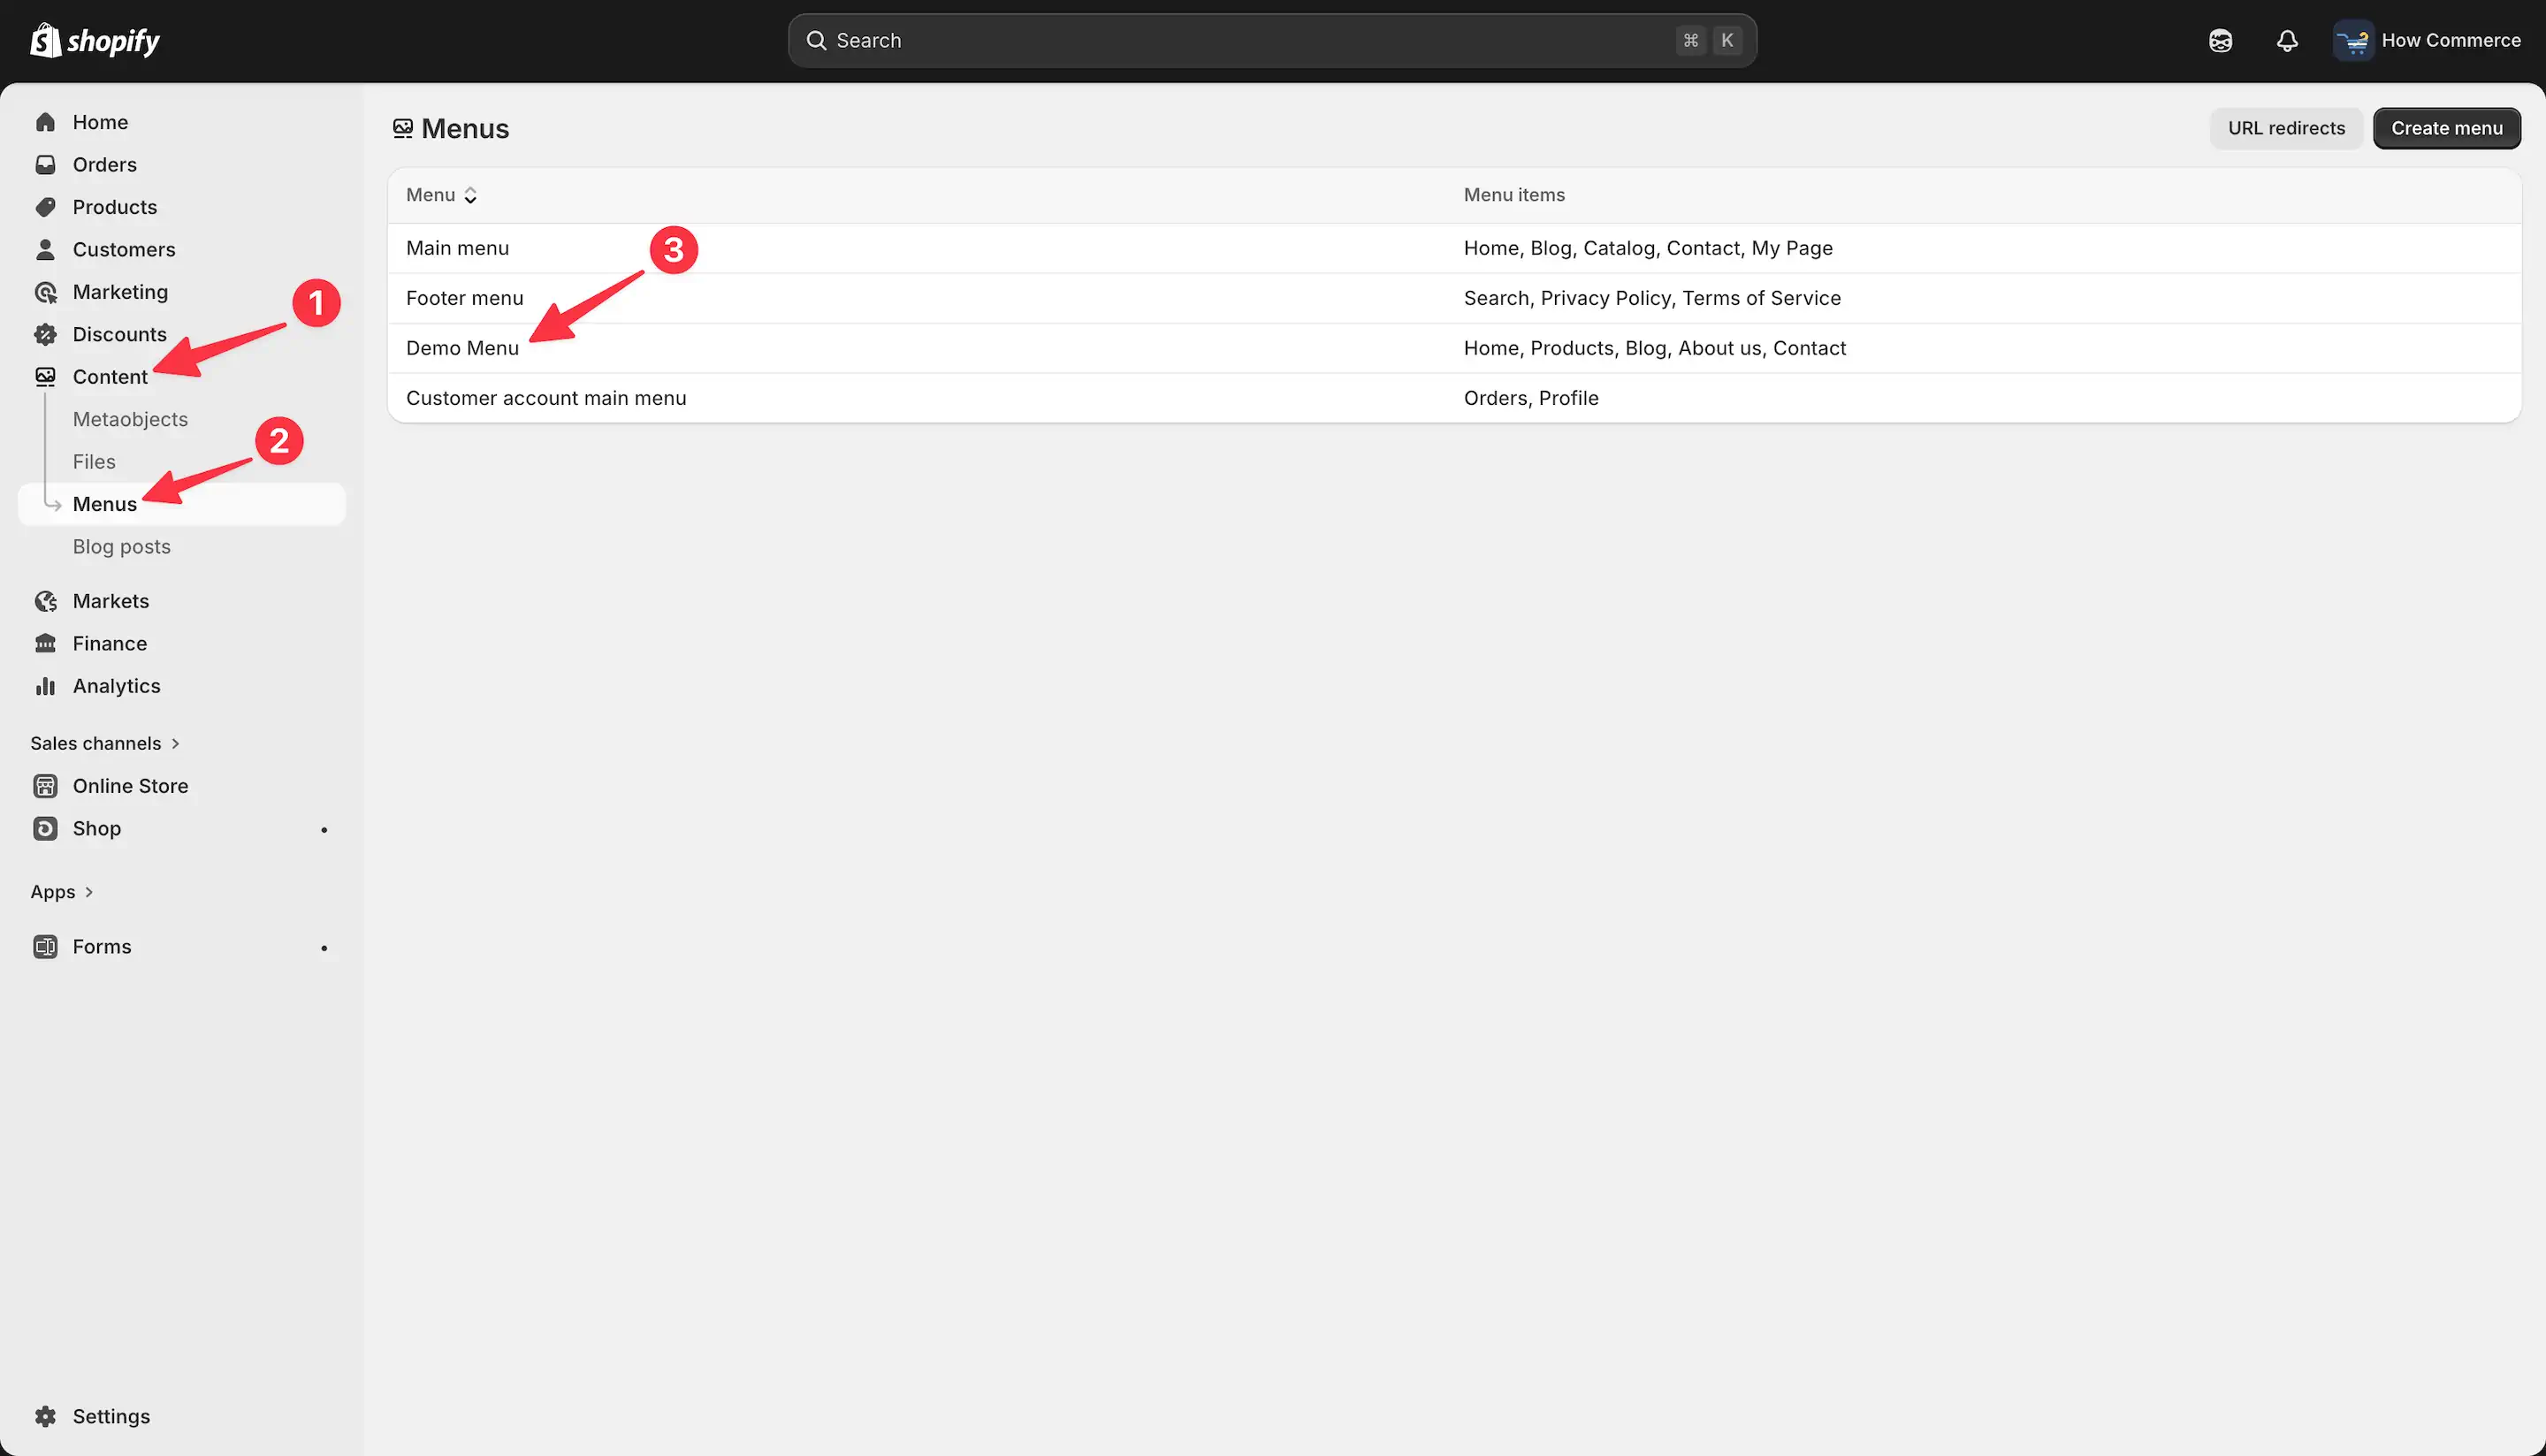
Go to Content (marked with 1 in the image below) and select Menus (marked with 2 in the image below).
You will see a list of all available menus in your store.
You can either add the Best Sellers link to an existing menu or create a new one.
For this tutorial, an existing menu will be used instead of creating a new one.
The selected menu is shown (marked with 3 in the image below).
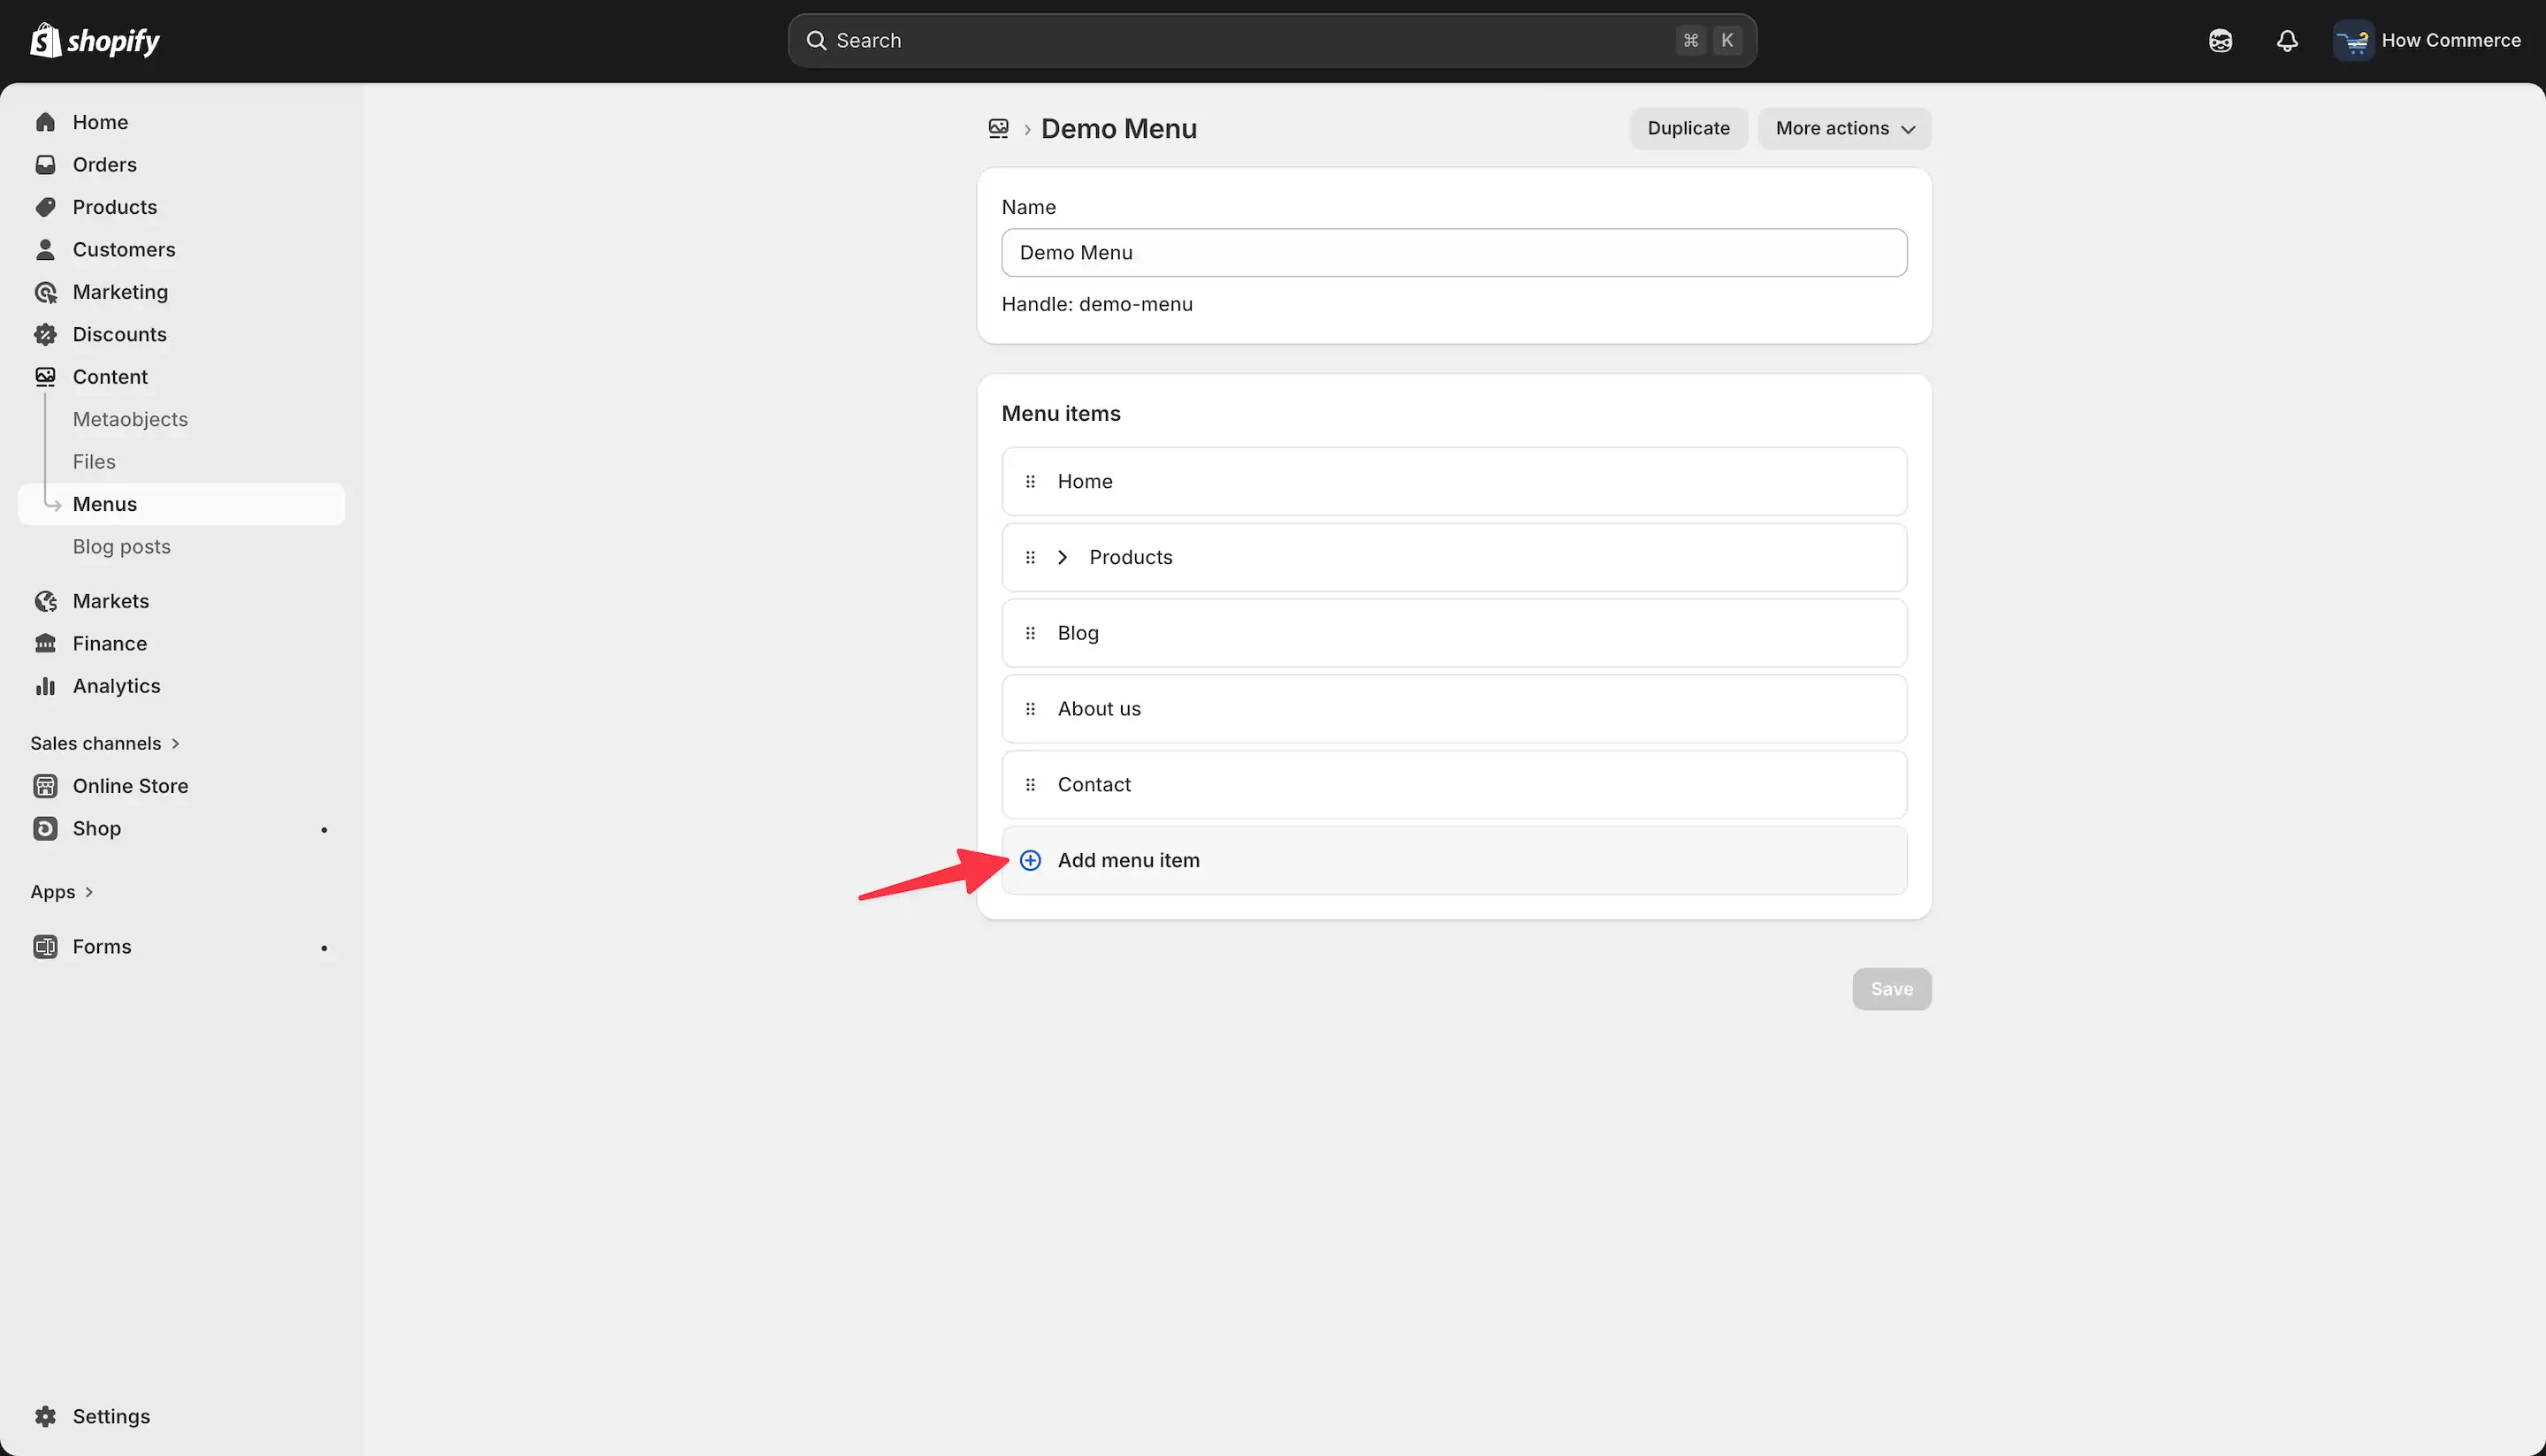
Inside the selected menu, you will see the menu settings along with a list of all existing menu items.
Click the Add menu item button, as shown in the image below.
Assign the collection to the menu item
Now the menu item is created.
Next, you need to link it to the Best Sellers collection you created in the previous steps.
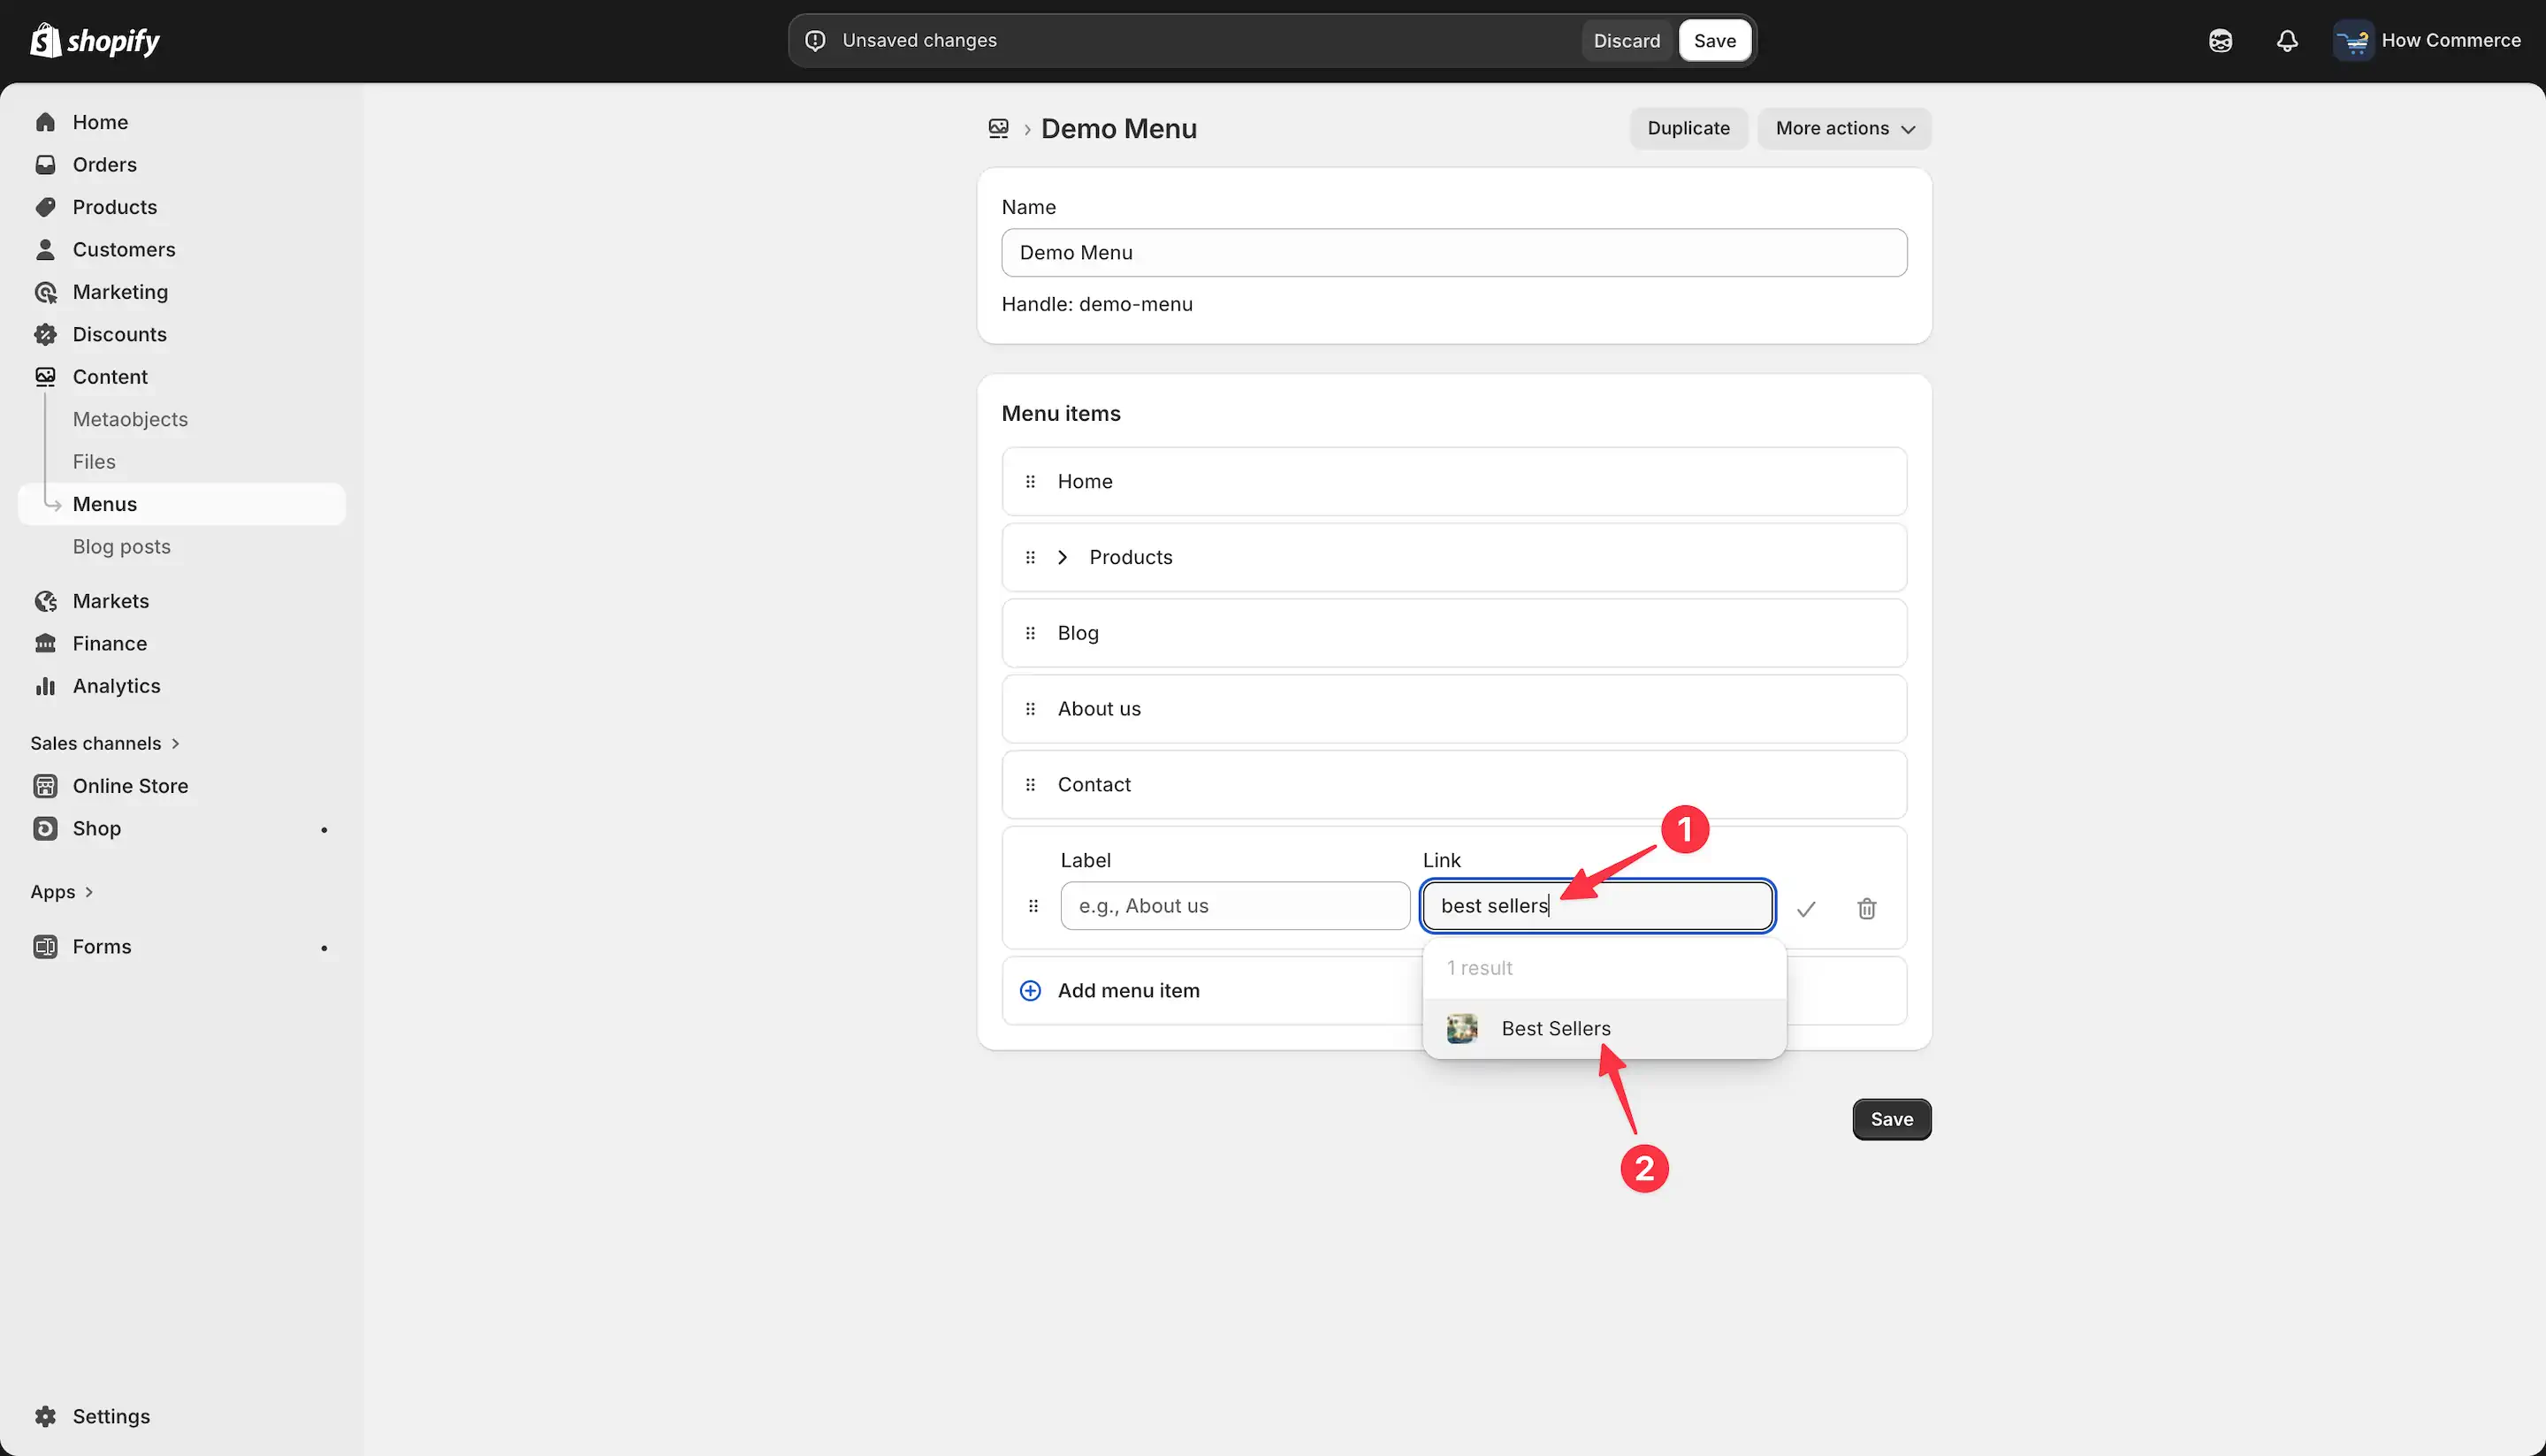
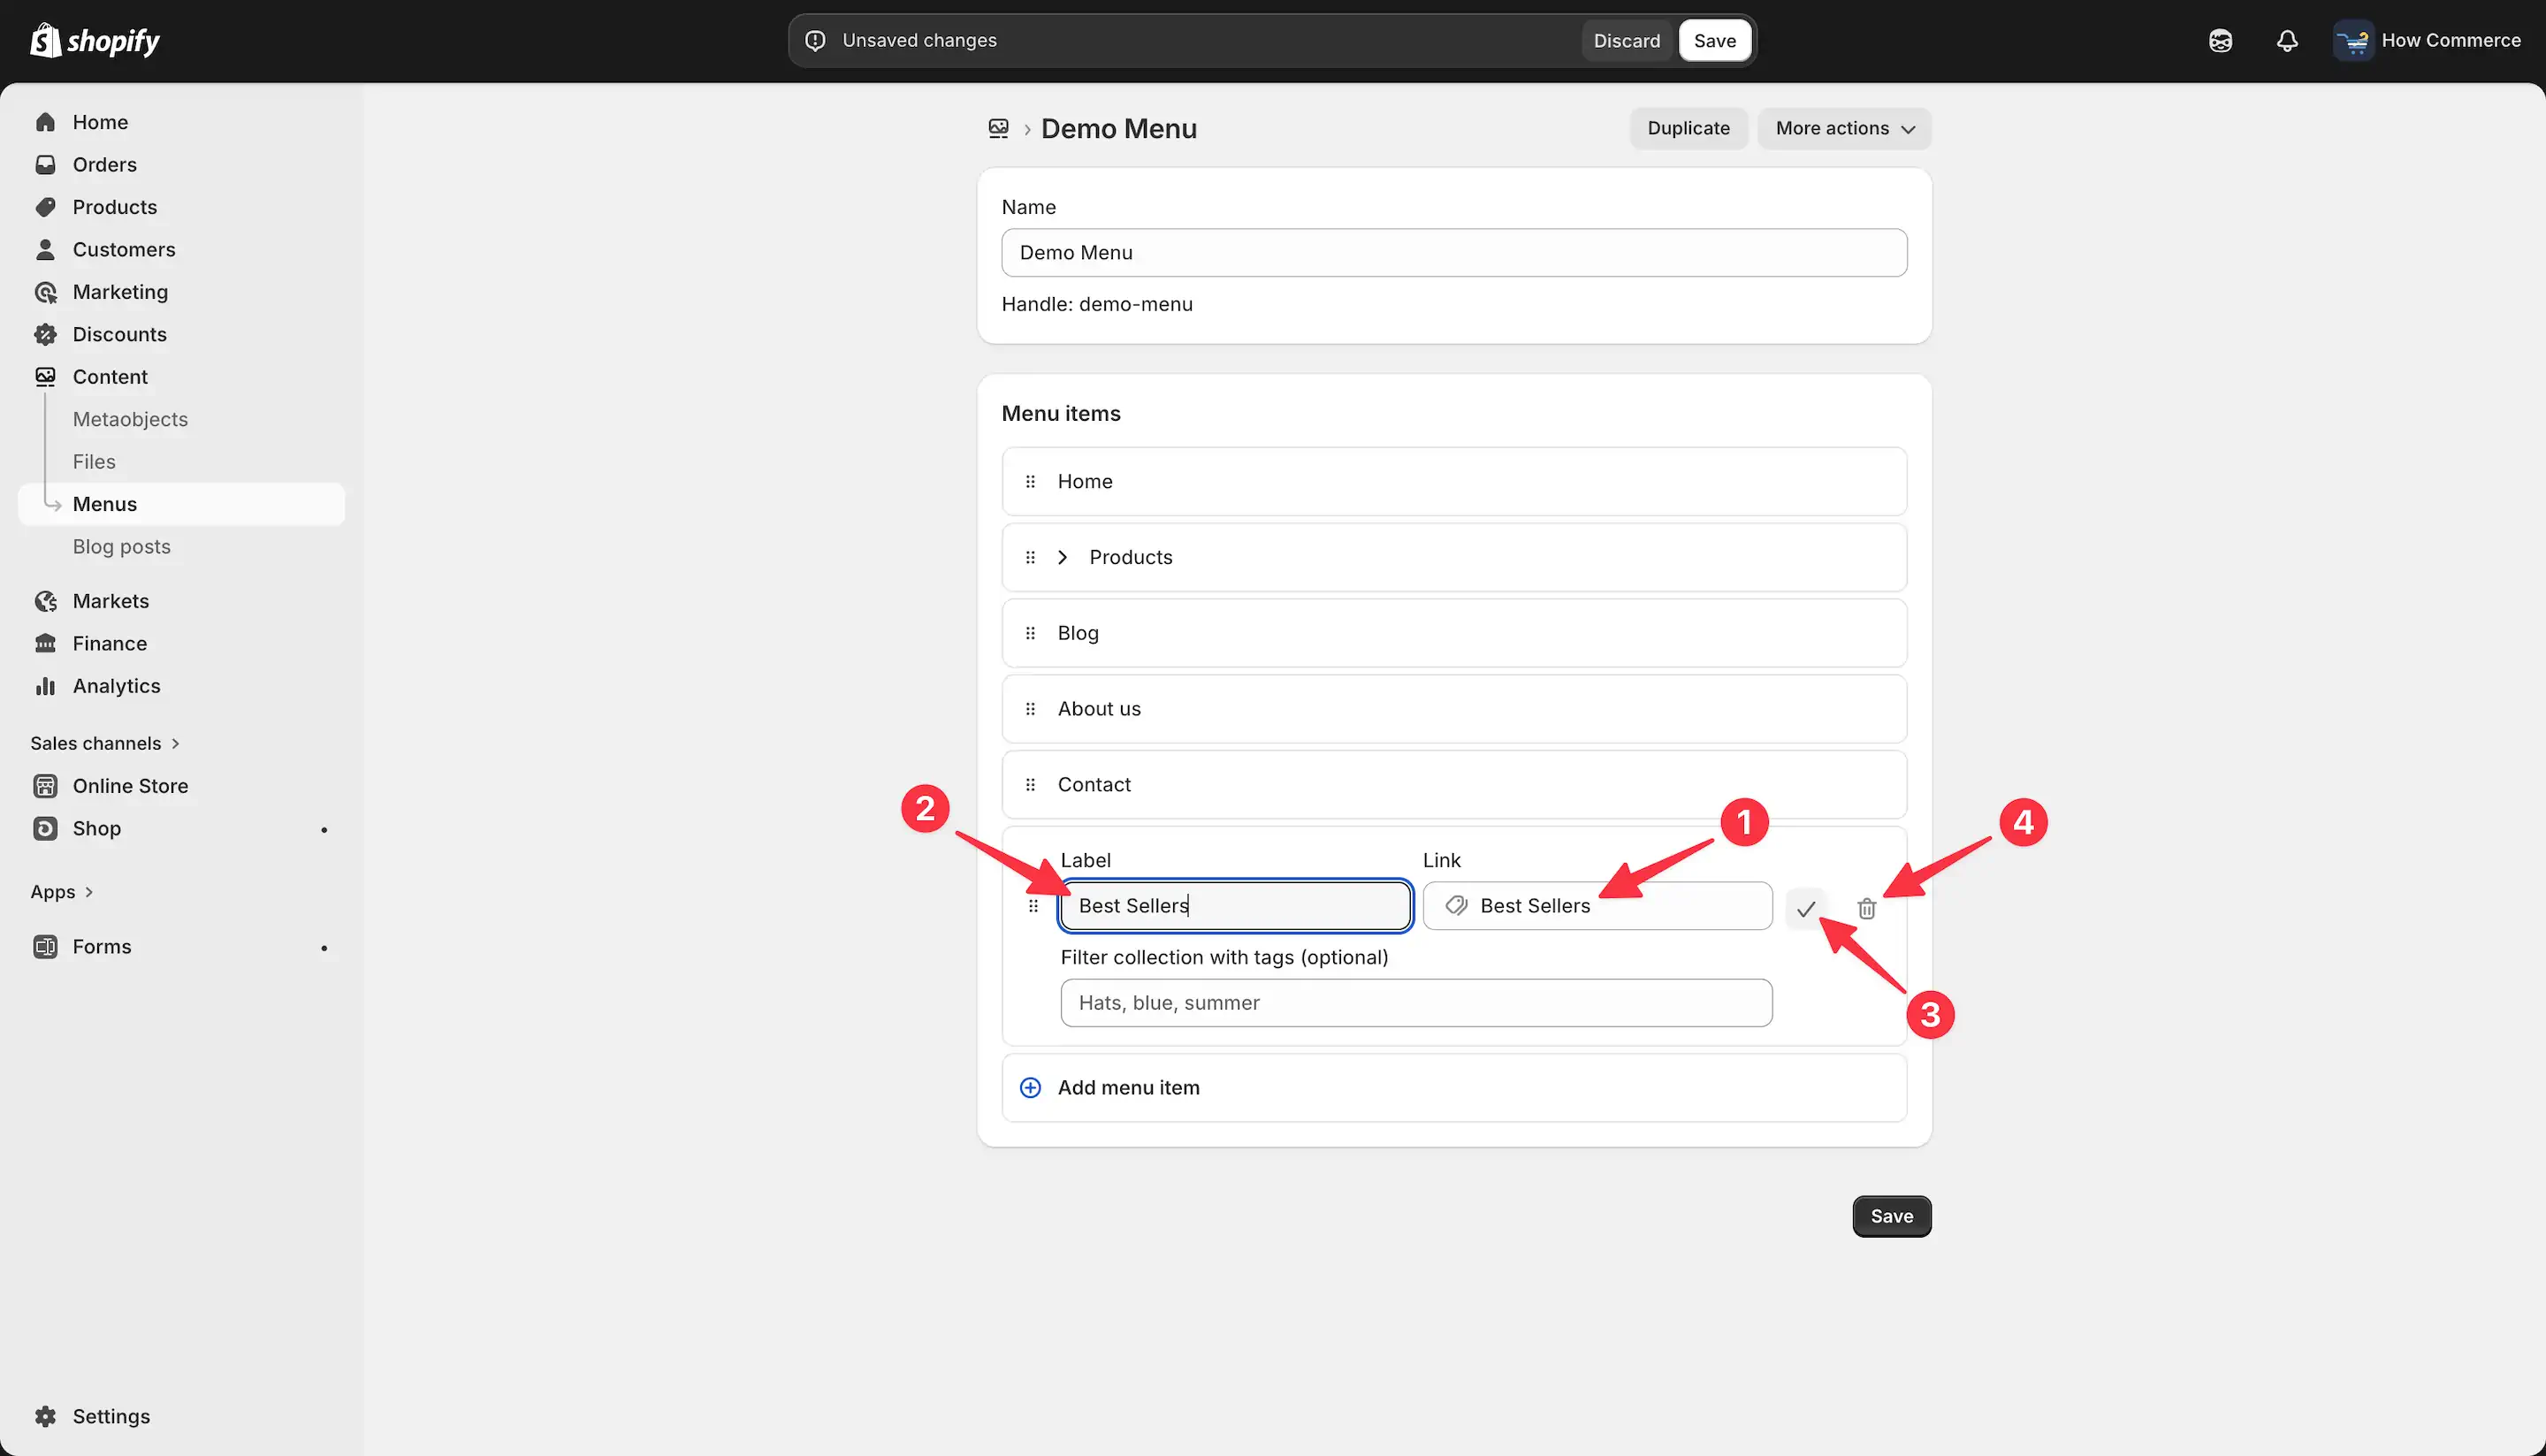
In the Link field (marked with 1 in the image below), type Best Sellers.
The collection will appear in a dropdown list (marked with 2 in the image below).
Click on it to select it.
After completing this step, the Link field (marked with 1 in the image below) will be populated with the collection URL, and the Label field (marked with 2 in the image below) will automatically display the collection name.
If everything is correct, click the button (marked with 3 in the image below) to add the menu item to the menu.
If the menu item is not set up correctly, you can either edit or delete it (marked with 4 in the image below).
Once completed, the menu item should appear in the menu items list (marked with 1 in the image below).
If everything is correct, click the Save button (marked with 2 or 3 in the image below).
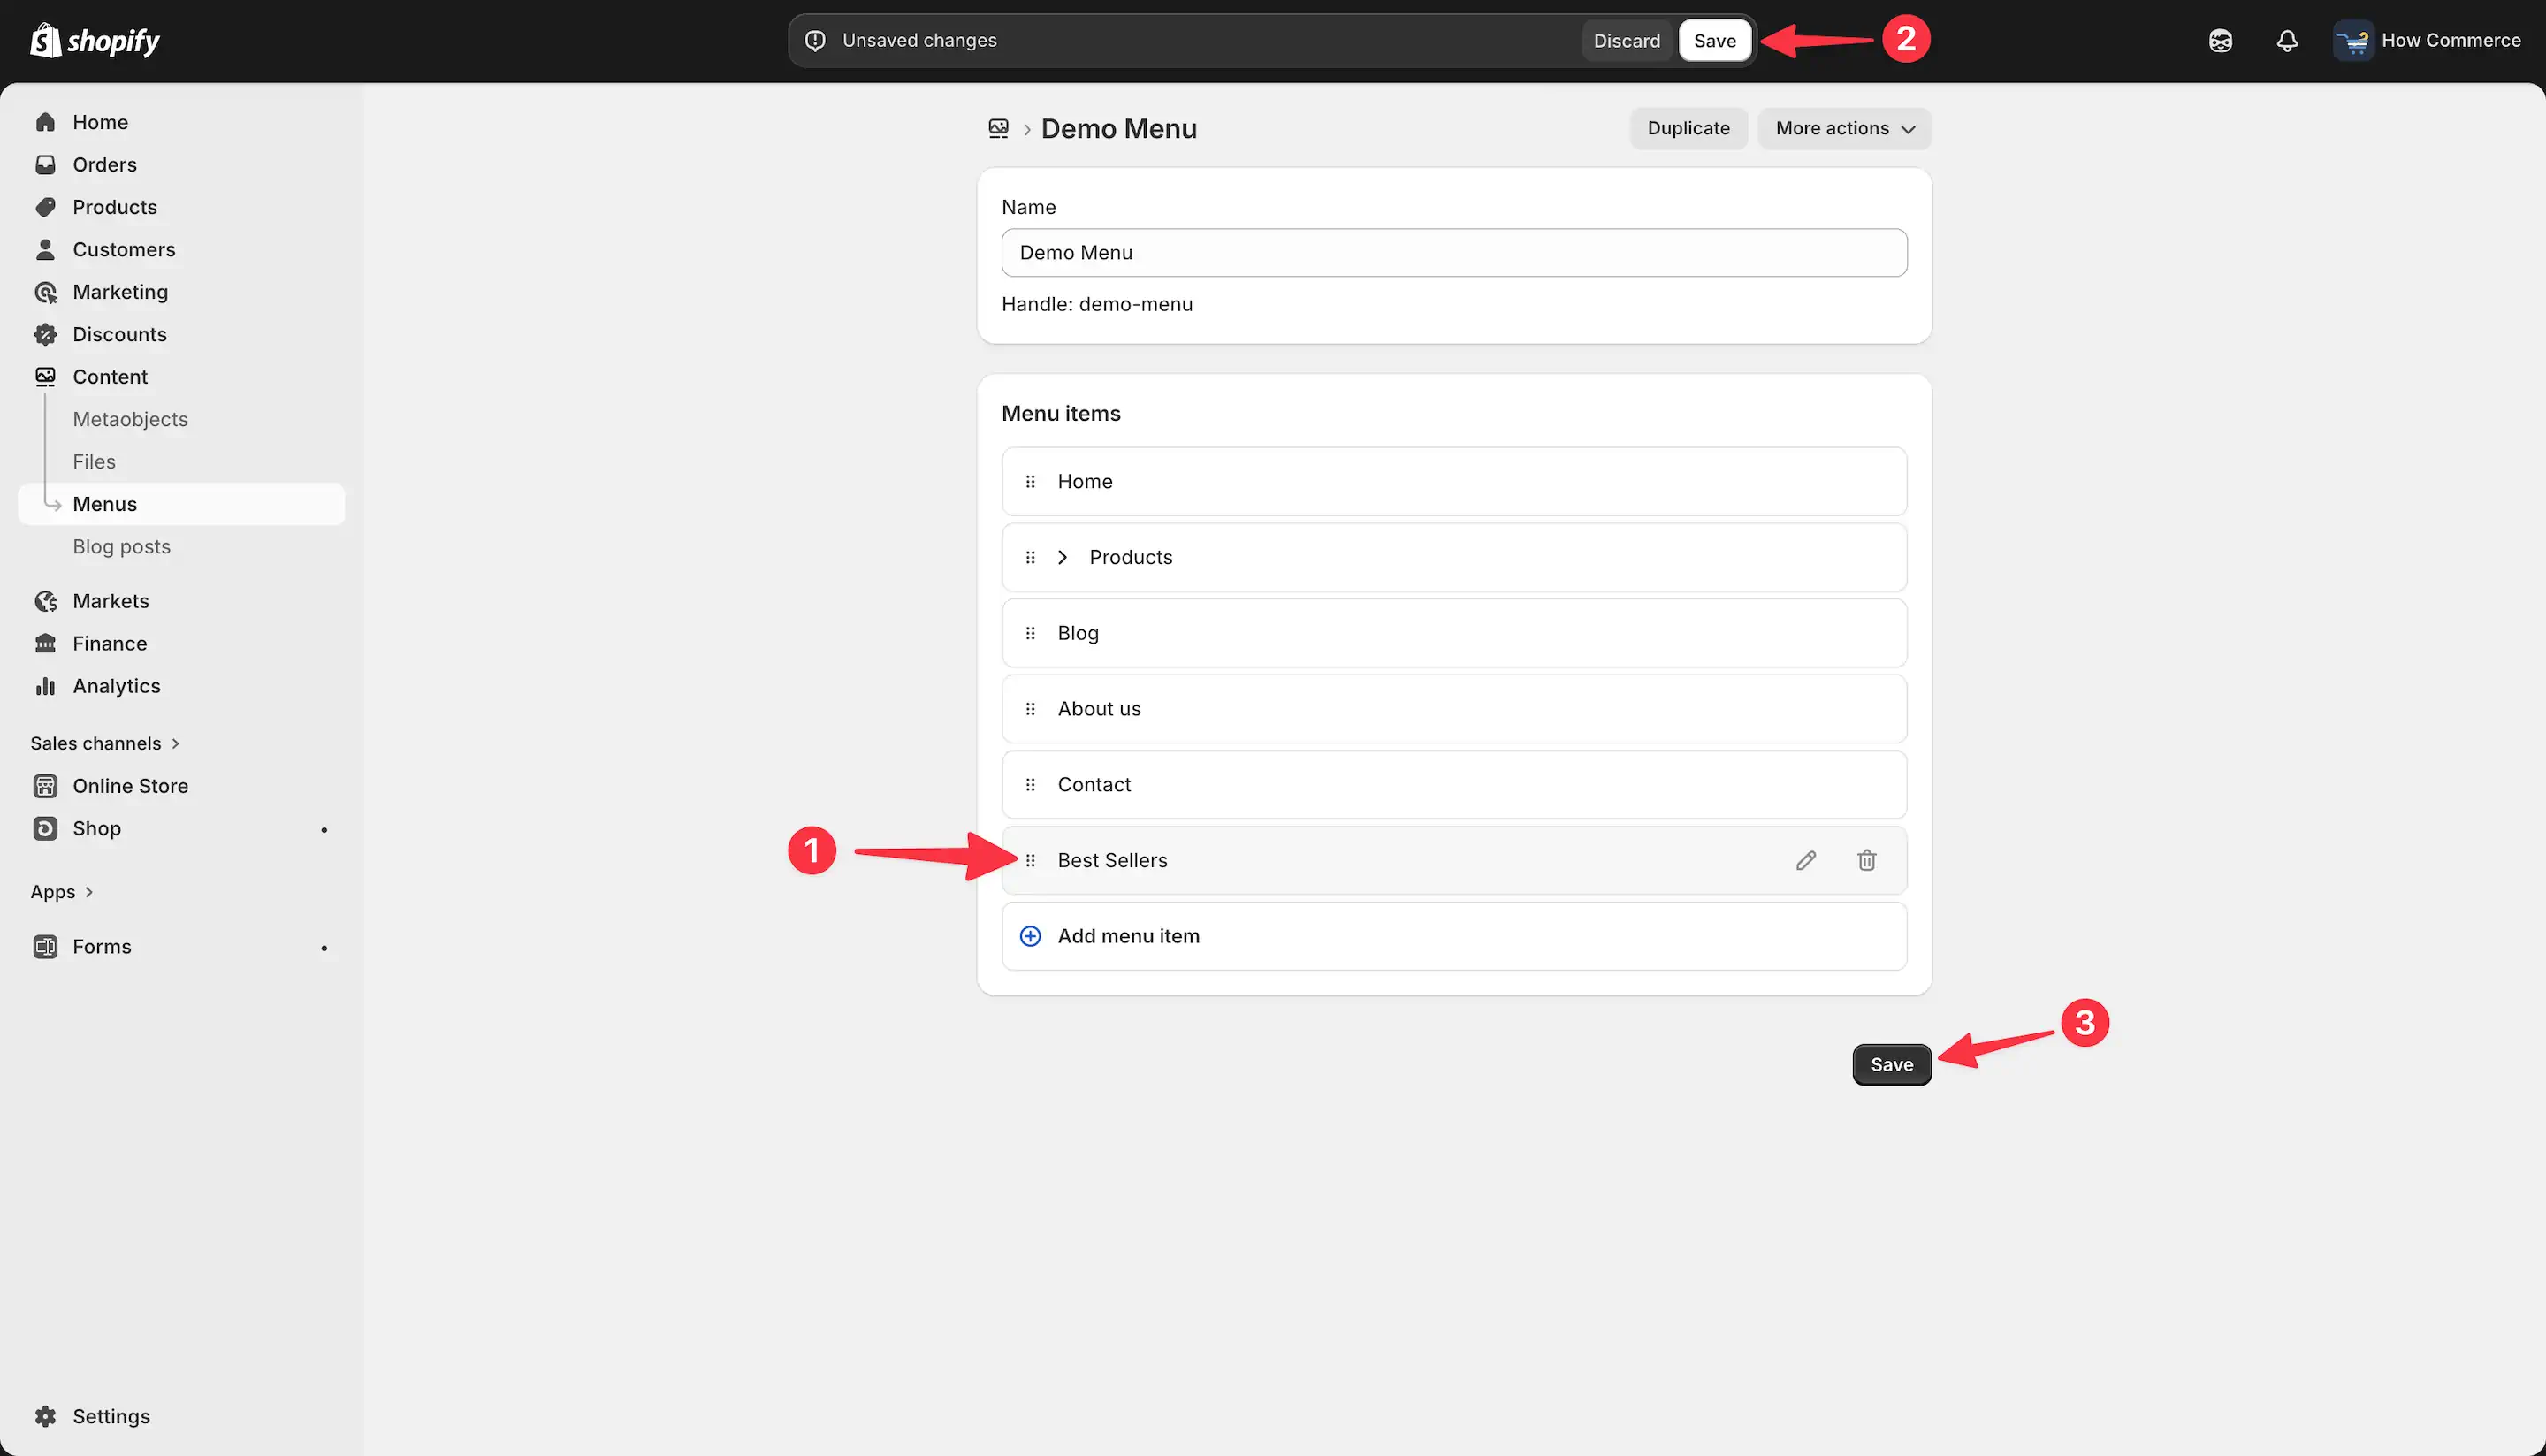
You can drag and drop the menu item to position it exactly where you need within the menu.
This tutorial does not go deeper into menu management. If you want a more advanced setup, refer to the tutorial "How to create a drop-down menu in Shopify?", where the process is covered in detail, including how to properly structure and organize dropdown menus.
Verify that the page is working correctly on the store front
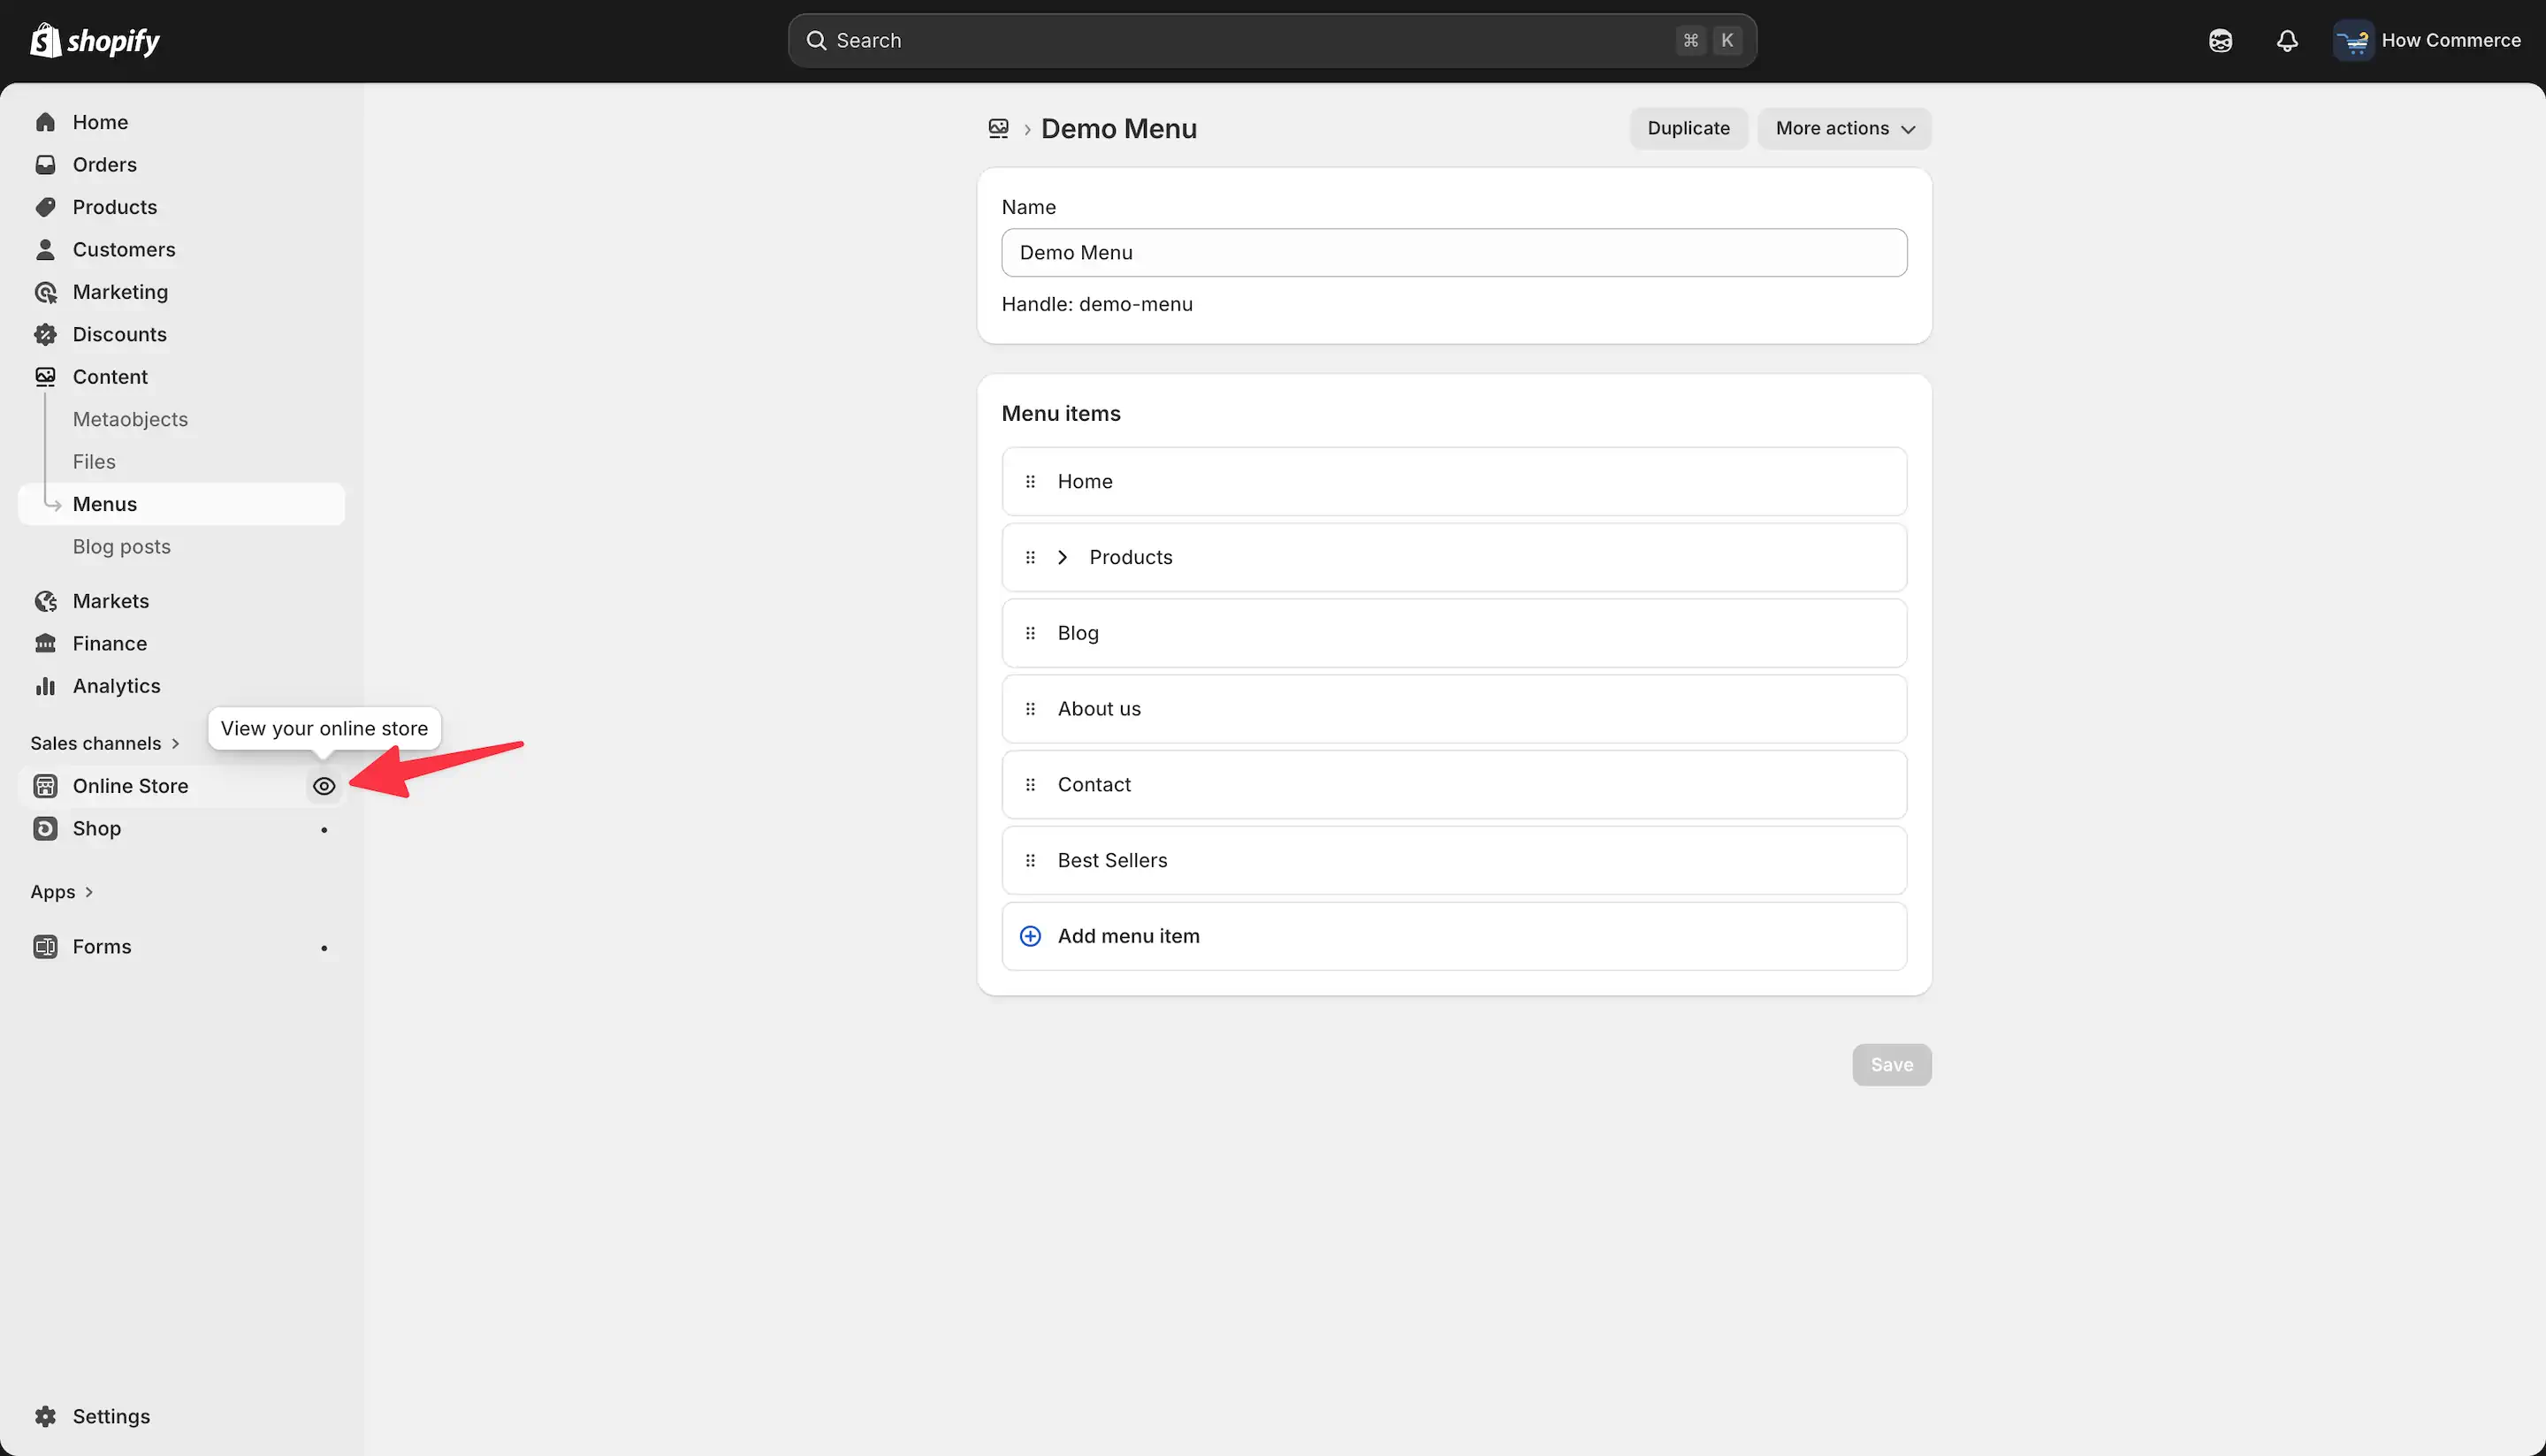
Now that your collection page is created, linked to a menu item, and added to a visible menu, the final step is to verify everything on the storefront.
Click on View your online store, as shown in the image below.
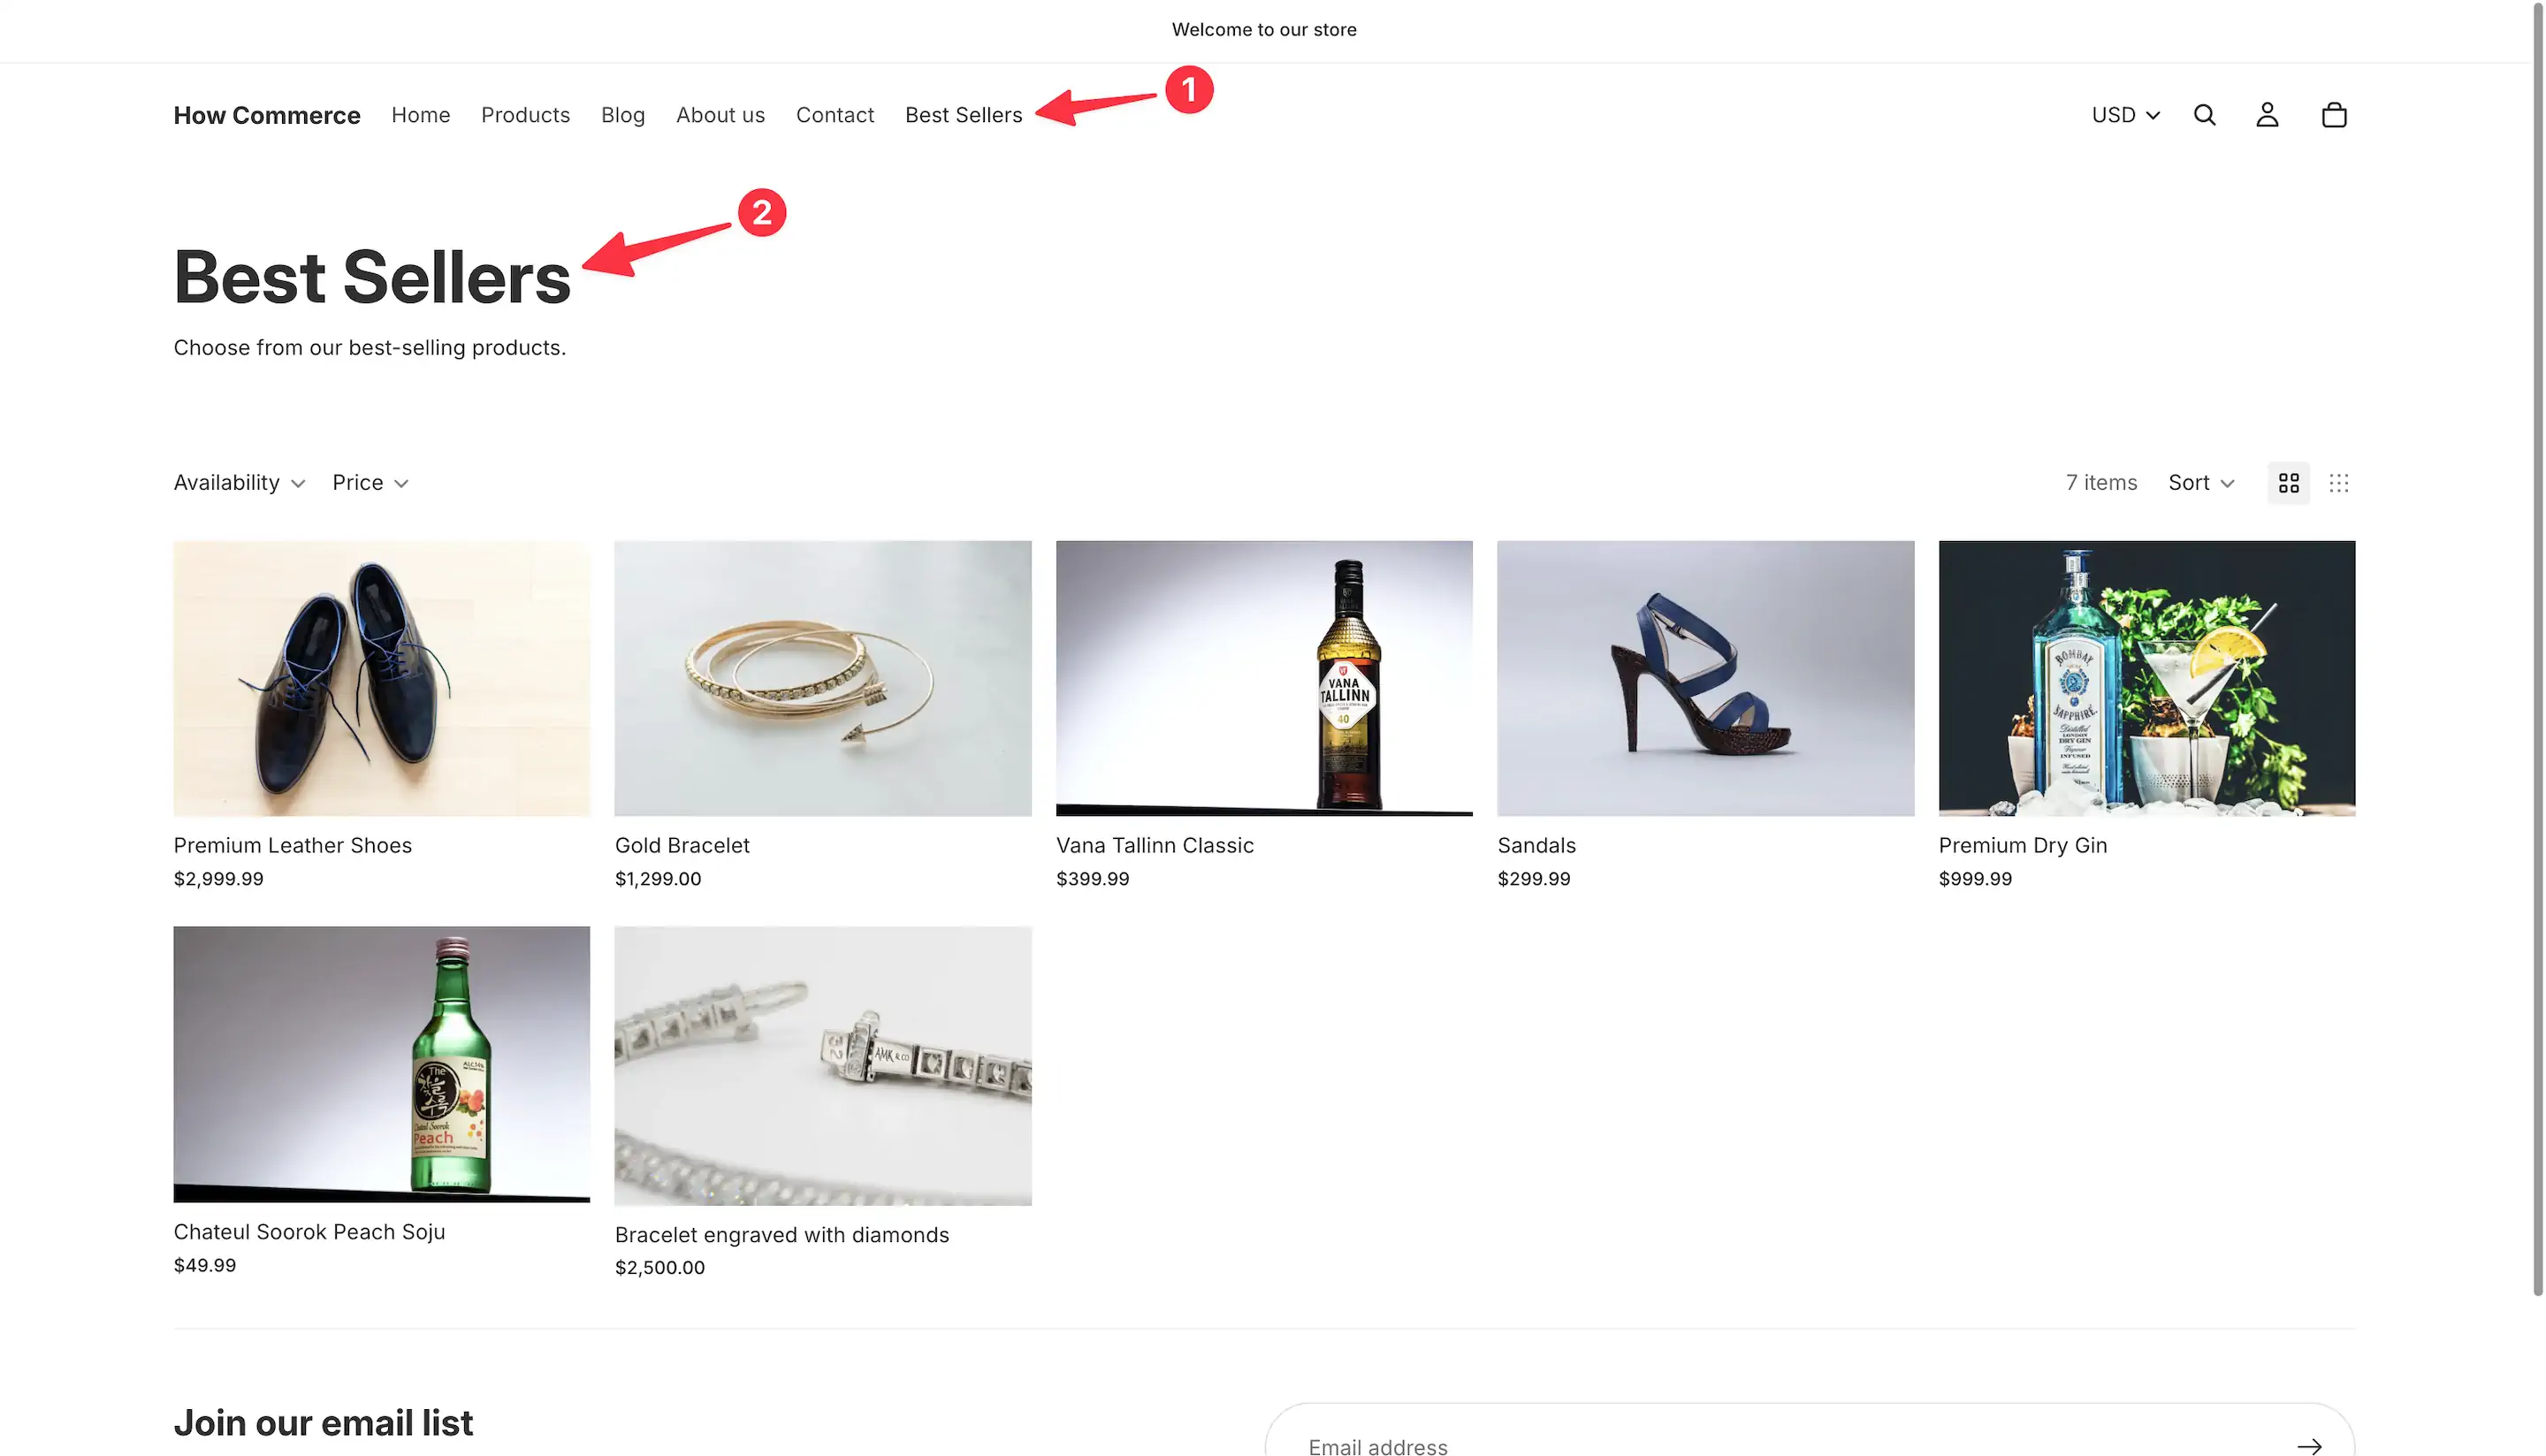
This action will take you to the storefront, where you should see the Best Sellers menu item (marked with 1 in the image below) that you added in the Shopify admin, along with the collection page titled Best Sellers (marked with 2 in the image below).
If your page displays the same type of data as shown below, then everything is set up correctly.
You now have a page that automatically lists your selected products in best-selling order.
Limitations of This Approach
This setup does not automatically pull best-selling products from your entire catalog, regardless of how many products you have in stock.
It only updates and reorders the products that you have manually added to the collection.
If a product outside the collection starts outperforming others in sales, it will not appear on this page unless you manually add it to the collection.
In practical terms, this means the feature is limited to the products assigned to the collection.
If your goal is to automatically identify top-performing products across your entire catalog and display, for example, the top 10 best sellers, that is also possible. However, it requires custom development using Liquid, HTML, and CSS, and will be covered in a separate tutorial.
Final thoughts
This is one of the highest leverage improvements you can make to your Shopify store with minimal effort.
You are using real sales data to guide customer decisions.
That is far more effective than guessing what might convert.
The setup is simple, but the impact is not.
A well placed Best Sellers page builds trust, reduces decision friction, and consistently drives higher conversions.
That said, do not fall into the trap of setting this up once and forgetting about it. If your product catalog evolves, revisit your collection and ensure the right products are included.
If you want full automation across your entire catalog, this approach has clear limitations.
At that point, you are stepping into custom development territory, which requires a different level of implementation.
For most stores, however, this setup is more than enough to get immediate, measurable results.
Implement it properly, and it will quietly become one of your top performing pages.