

Overview
A drop-down menu in Shopify is not a feature that you enable with a switch. It is a navigation structure created inside Shopify’s menu system. Your theme determines how that structure is displayed on the storefront.
If your theme supports nested navigation, it can render the structure as:
- A standard drop-down
- A mega menu
- A collapsible mobile accordion
- A flyout menu
- A fully custom layout defined by the theme
If the theme does not support nested menus, the hierarchy may exist in the admin, but it will not appear visually as a drop-down on the storefront.
The first requirement is simple: your theme must support nested navigation.
Today, most modern Shopify themes support drop-down menus by default due to their widespread use in ecommerce.
Understanding how Shopify menus work
Shopify menus are managed from: Content → Menus
Menus are hierarchical, similar to other content management systems.
They are structured in levels:
- Top-level items
- Child items (second level)
- Grandchild items (third level, depending on theme support)
A drop-down menu is simply a menu item that contains other items beneath it.
There is no dedicated “Enable drop-down” setting inside the Navigation section.
The structure itself creates the drop-down. In some themes, however, the Theme Editor may include options to choose between different menu layouts or styles.
Most Shopify themes support two levels of nested navigation by default.
If you intend to build deeper structures, review your theme documentation or create a test hierarchy to confirm how additional levels are rendered.
When you first install a theme, it typically includes a default menu structure.
Some default menus may be required by the theme and cannot be removed entirely.
Managing and structuring your menus
You can organize your store navigation by adding items to:
- The main menu
- The footer menu
- The customer account menu
- Any additional custom menus created within your theme
Each menu item functions as a link. It can direct visitors to:
- Products
- Collections
- Pages
- Blog articles
- Policy pages
- Customer account sections
- External websites
You have full control to edit, reorder, or remove menu items at any time.
Before linking to a resource, that resource must exist.
For example, you must create a product before you can link it in a menu.
The same applies to collections, pages, blog posts, and other internal content.
Navigation is directly connected to the resources it references.
If you delete a resource that is linked in a menu, Shopify automatically removes the associated menu item.
For example, if you delete a product that appears in a drop-down menu, both the product and its corresponding menu link are removed.
Mobile considerations and customization
On mobile devices, themes often convert drop-down menus into accordion-style or expandable menus.
In some cases, minor CSS adjustments may be necessary to improve spacing, tap targets, or interaction behavior.
If you are not comfortable working with Liquid, CSS, or theme files, avoid editing the code directly. Improper changes can disrupt navigation across devices and impact usability.
Menu limits in Shopify
Shopify allows:
- Up to 10,000 items within a single menu
- Up to 1,000 total menus per store
Additionally, any menu that contains nested items, such as a drop-down with sub-links, is treated as a separate menu and counts toward the overall limit.
Types of resources you can link in menus
Shopify allows you to link menu items to the following resource types:
- Home page – Your store’s homepage
- Search – Your store’s search results page
- Collections – A specific collection or all collections
- Products – A specific product or all products
- Pages – A custom page on your store
- Blogs – A specific blog
- Blog posts – An individual article
- Policies – Store policies such as shipping or returns
- Customer accounts – Pages within the customer account area
- External page – A full URL linking to another website
- Email link – Use the format
mailto:youremail@example.comin the URL field to create a direct email link
This flexibility allows you to design navigation that supports both user experience and conversion strategy.
Understanding menu handles
An in-depth tutorial about menu handles I've written here: What is a Shopify handle and how to work with it?.
This is an important concept to understand, especially if you are wondering why certain menus cannot be deleted in Shopify, particularly those that exist immediately after installing a theme.
Menus in Shopify are connected to the theme through handles.
A handle is a unique identifier assigned to each menu. The theme references this handle in its code to display the menu in specific locations, such as the header or footer.
In many themes, these handles are hard-coded in the Liquid files.
That means the theme expects a menu with a specific handle to exist. If you delete that menu, the theme may lose its navigation output or display errors.
Typically, there are three core menus that cannot be fully removed:
- Main menu
- Footer menu
- Customer account menu (if customer accounts are enabled)
In the examples below, you will see all three of these default menus.
From a practical standpoint, removing certain menus, such as the main menu, would not make sense.
Every store requires primary navigation.
Instead of attempting to delete it, the correct approach is to modify its menu items to fit your store’s structure and strategy.
Creating a basic drop-down menu
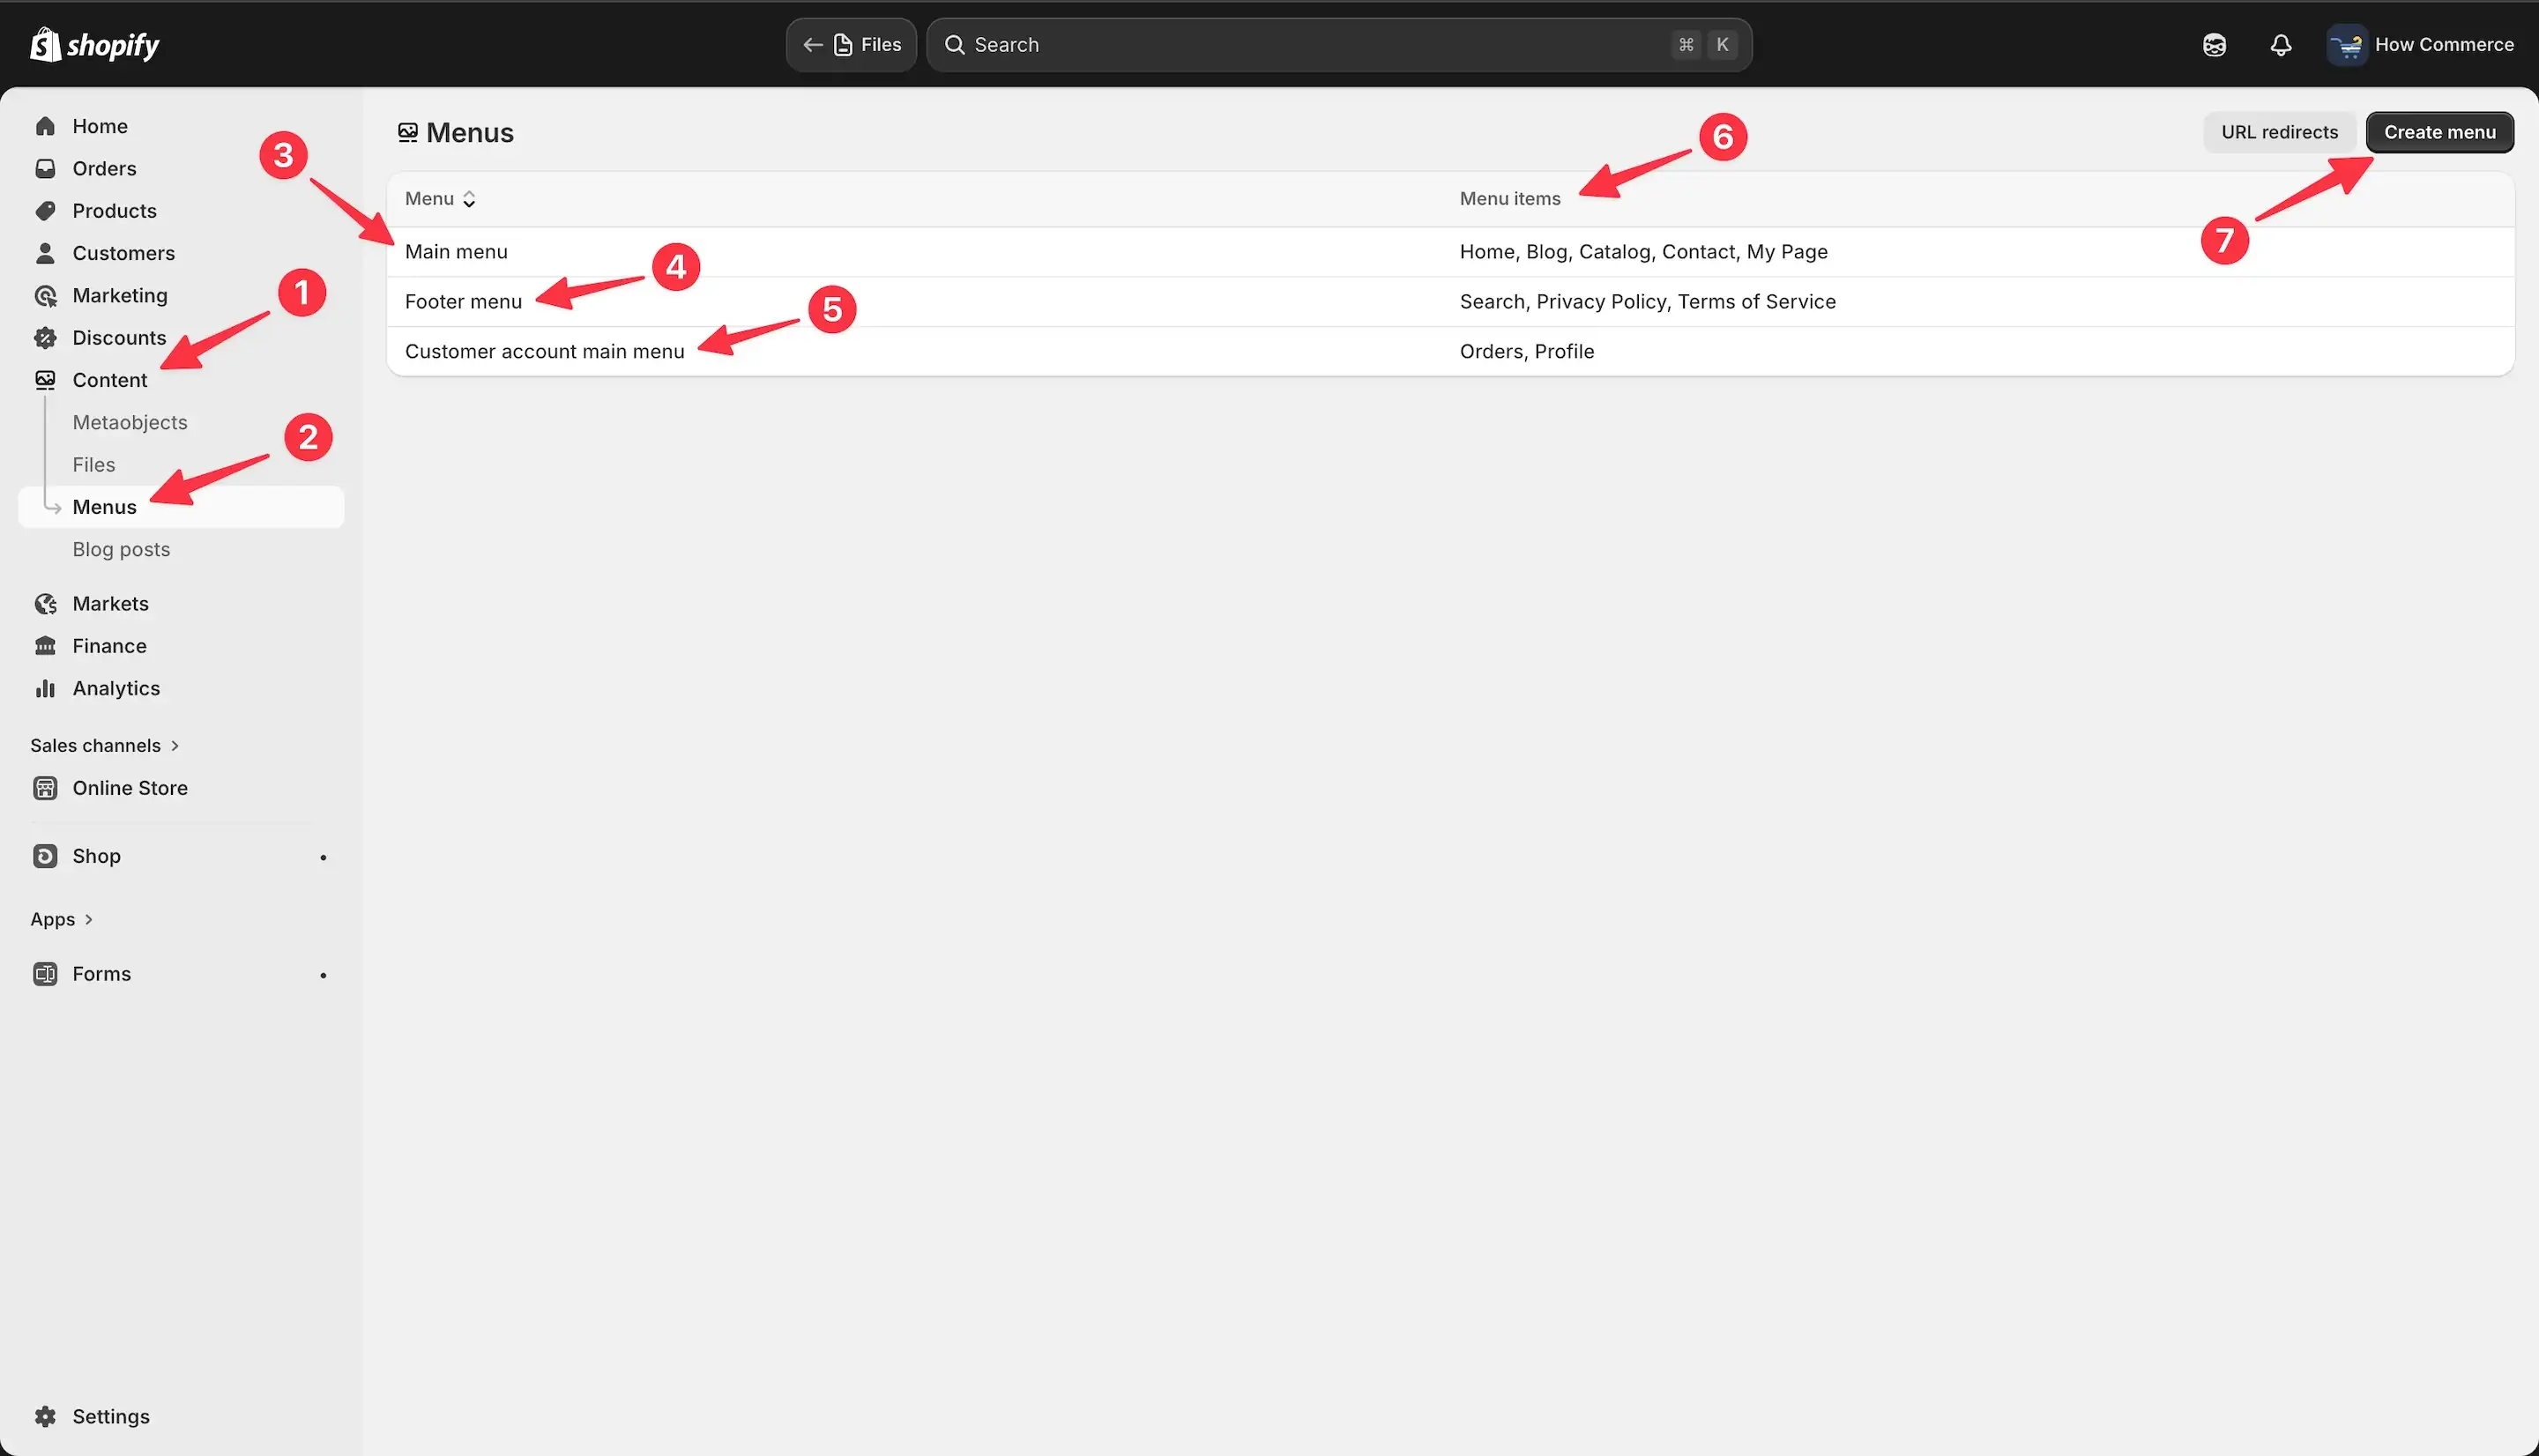
Navigate to Content (marked as 1 in the image below), then click on Menus (marked as 2).
On this page, you will see the three default menus that come with a standard Shopify setup:
Main menu (marked as 3)
Footer menu (marked as 4)
Customer account main menu (marked as 5, visible if customer accounts are enabled)
Under the Menu items column (marked as 6), you can preview the links currently assigned to each menu.
For the purpose of this tutorial, we will not modify any of the default menus. Instead, we will create a new custom menu and assign it to a drop-down layout within the theme.
Understanding the required structure
For a drop-down menu to function correctly in themes that support advanced navigation types, it must follow a clear three-level hierarchy:
- Parent (Level 1) – The main navigation label visible in the header
- Child (Level 2) – The first layer inside the drop-down
- Grandchild (Level 3) – A deeper grouping within the drop-down
While it is technically possible to build deeper navigation structures, doing so often creates unnecessary complexity.
Based on extensive experience building web applications, exceeding three levels typically harms usability and can negatively impact conversions.
In most cases:
- Two levels are ideal for clarity
- Three levels are acceptable for large or complex catalogs
- More than three levels should be avoided
Clear navigation improves user experience.
Overcomplicated navigation drives users away.
Creating the new menu
On the Menus page, locate the Create menu button (marked as 7 in the image below) and click it.
Name the menu
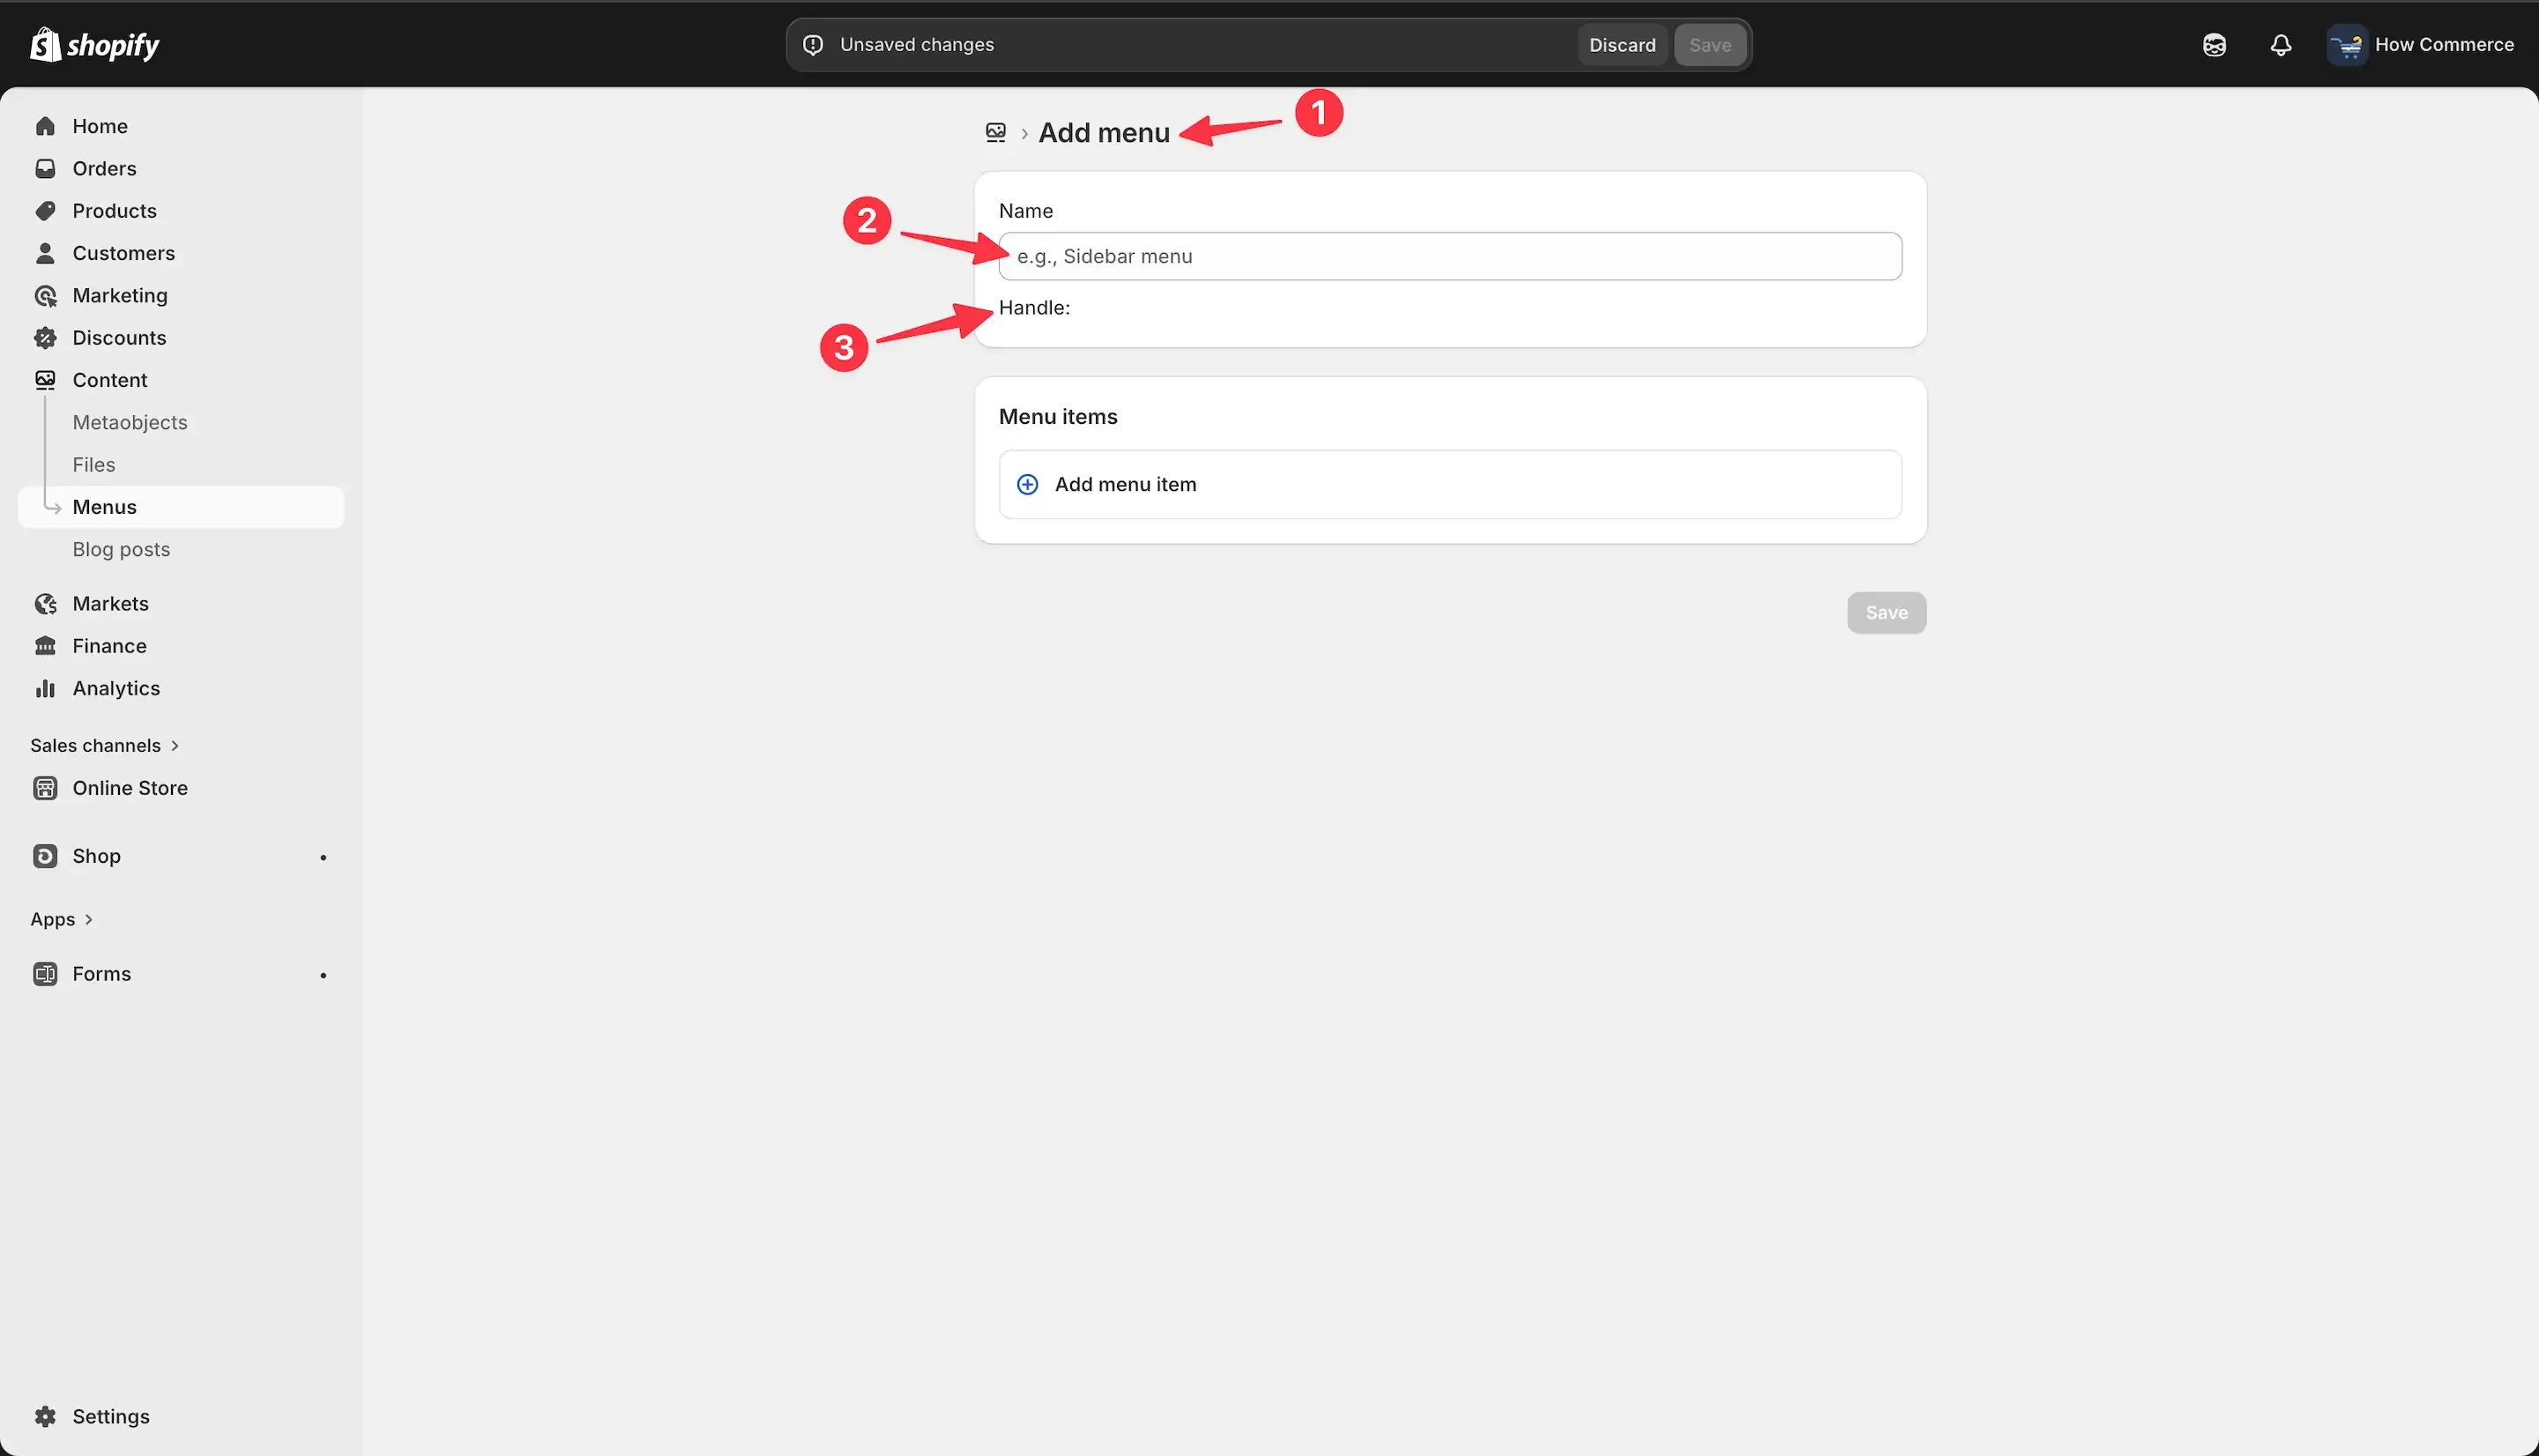
After clicking the Create menu, you will be redirected to the Add menu page (marked as 1 in the image below).
Inside the Title input field (marked as 2), enter the name of your new menu.
Choose a clear and descriptive name, especially if you plan to manage multiple menus later.
As soon as you start typing the menu name, Shopify automatically generates a corresponding handle.
The handle is a unique identifier used internally by the theme to reference and render the menu.
It is typically a lowercase, hyphenated version of the title.
In most cases, you do not need to modify the handle manually unless you are working with custom theme code that references a specific handle.
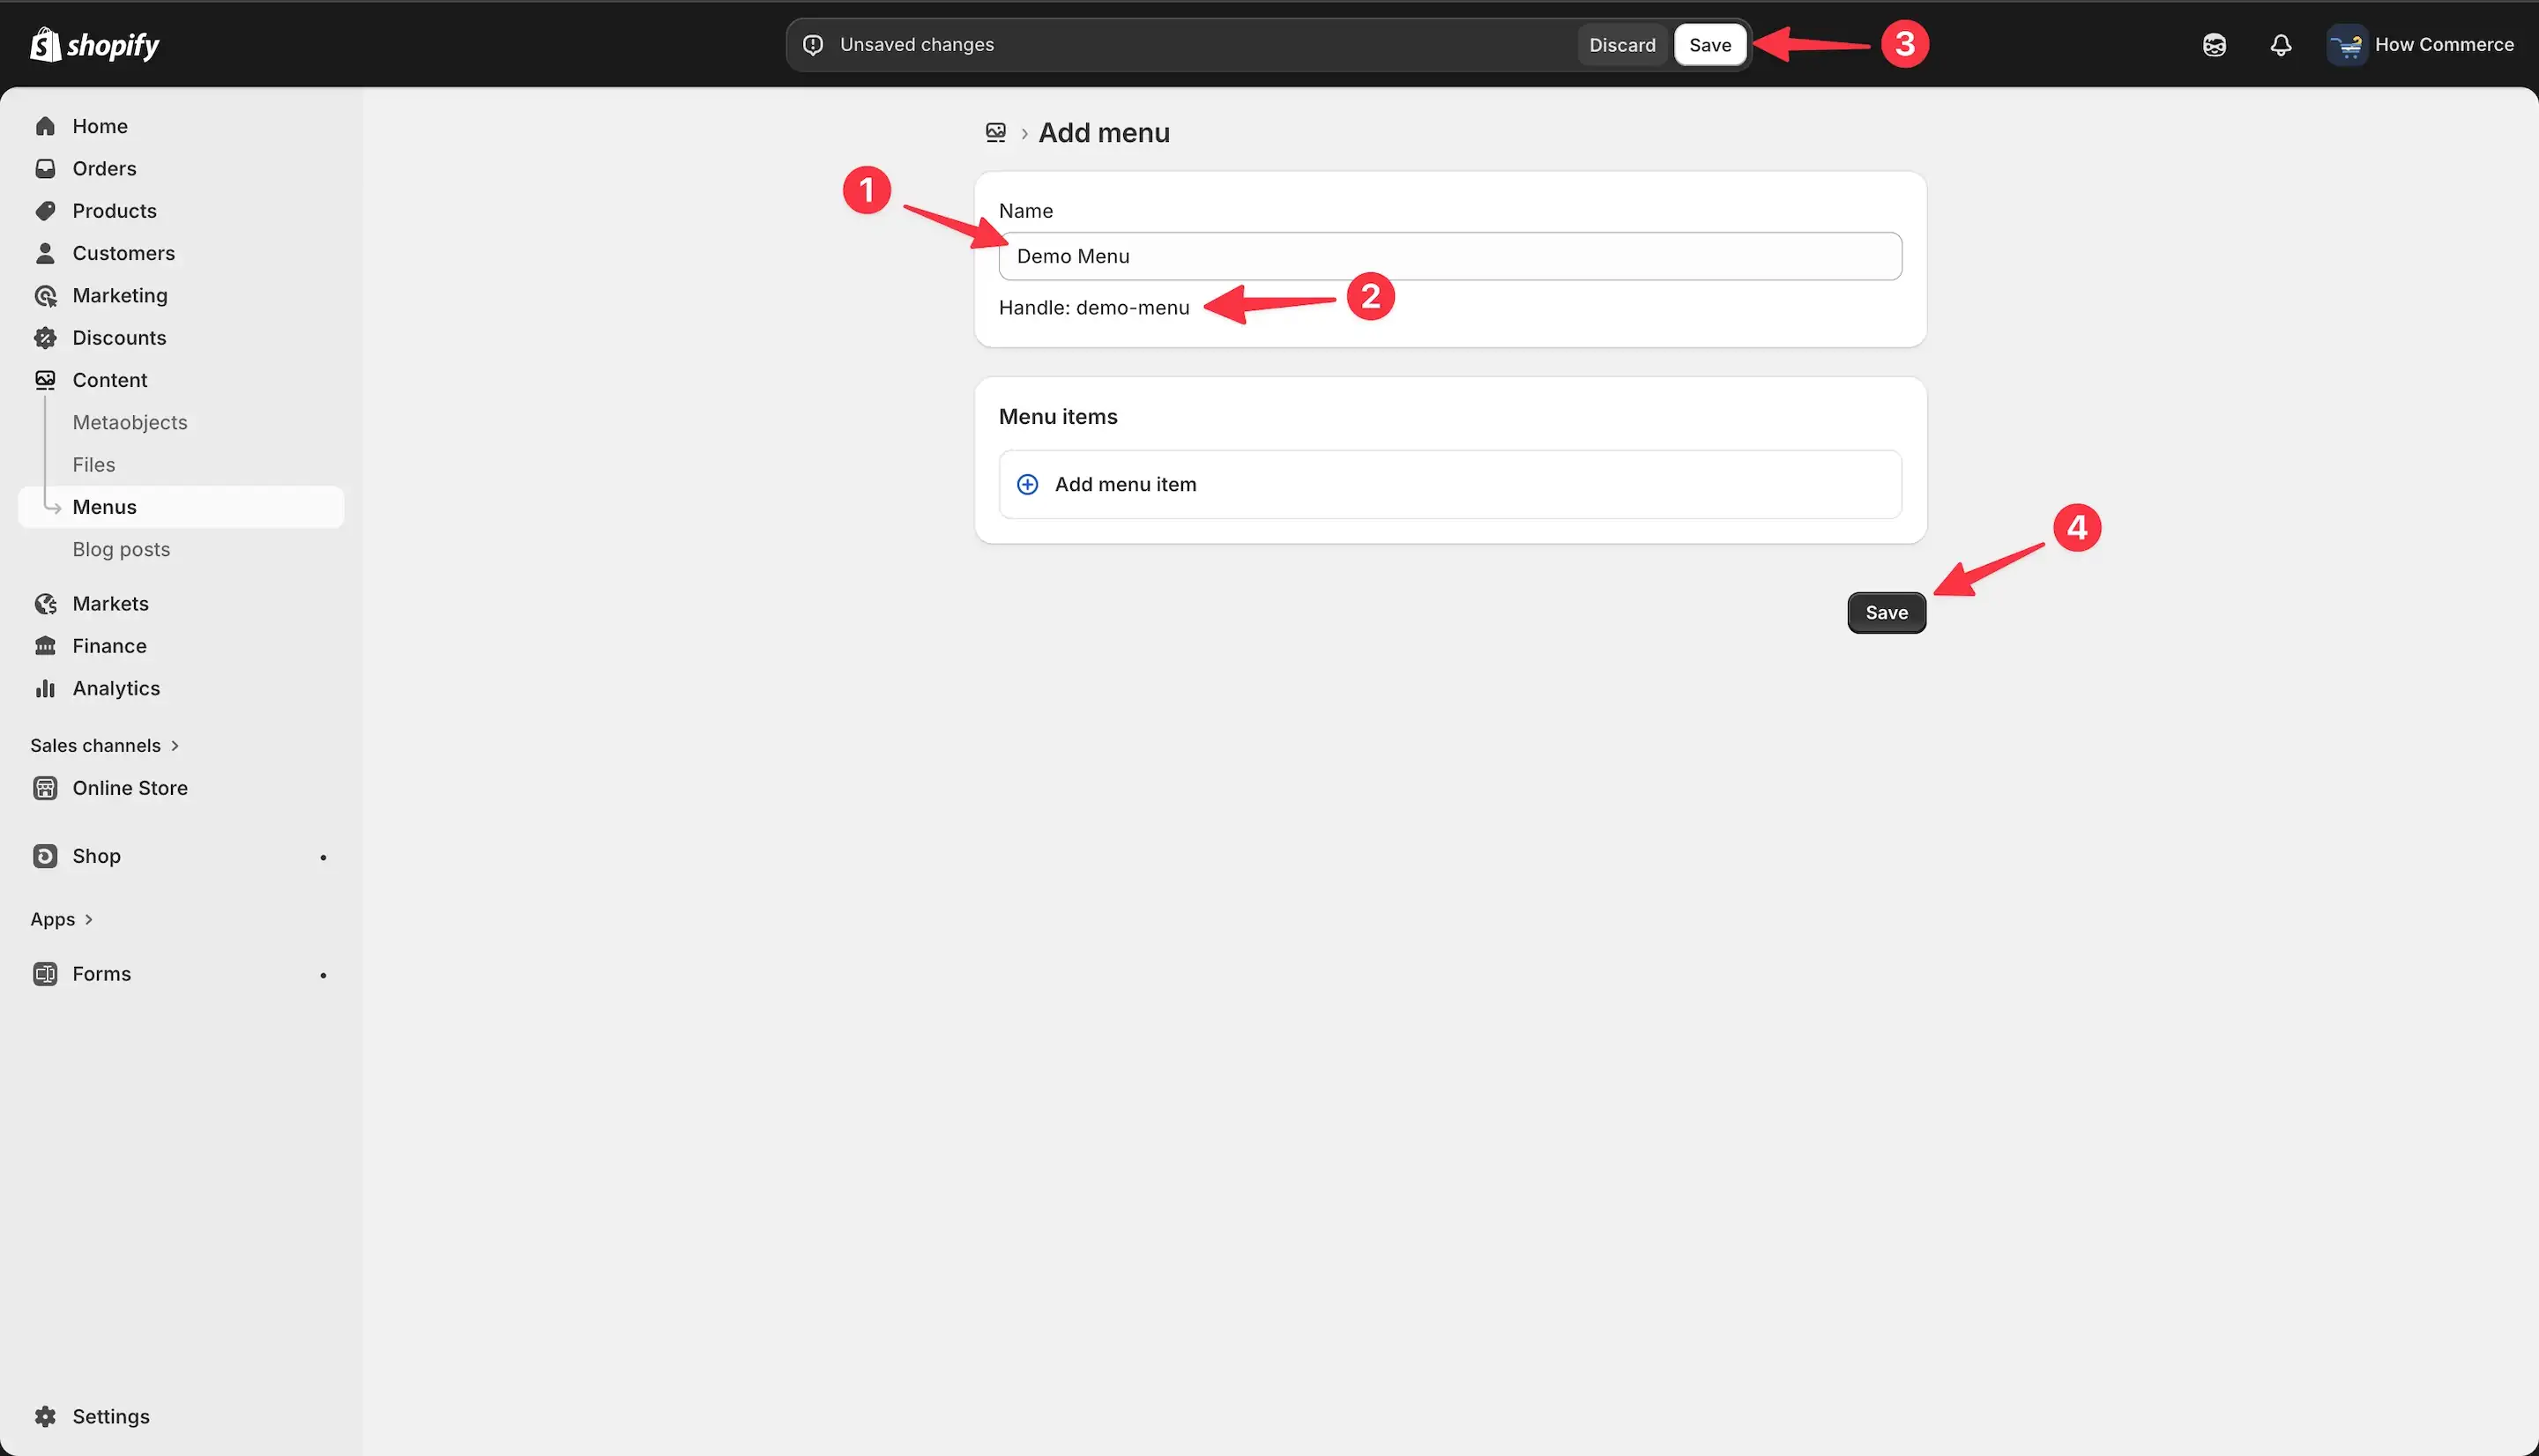
In this example, we will use the name “Demo menu” (marked as 1 in the image below).
Once the name is entered, Shopify automatically generates the corresponding handle (marked as 2). The handle is derived from the menu title and formatted in lowercase, with hyphens separating the words.
For example: “Demo menu” becomes demo-menu.
After entering the name, click the Save button (marked as 3 or 4 in the image below) to create and store the new menu.
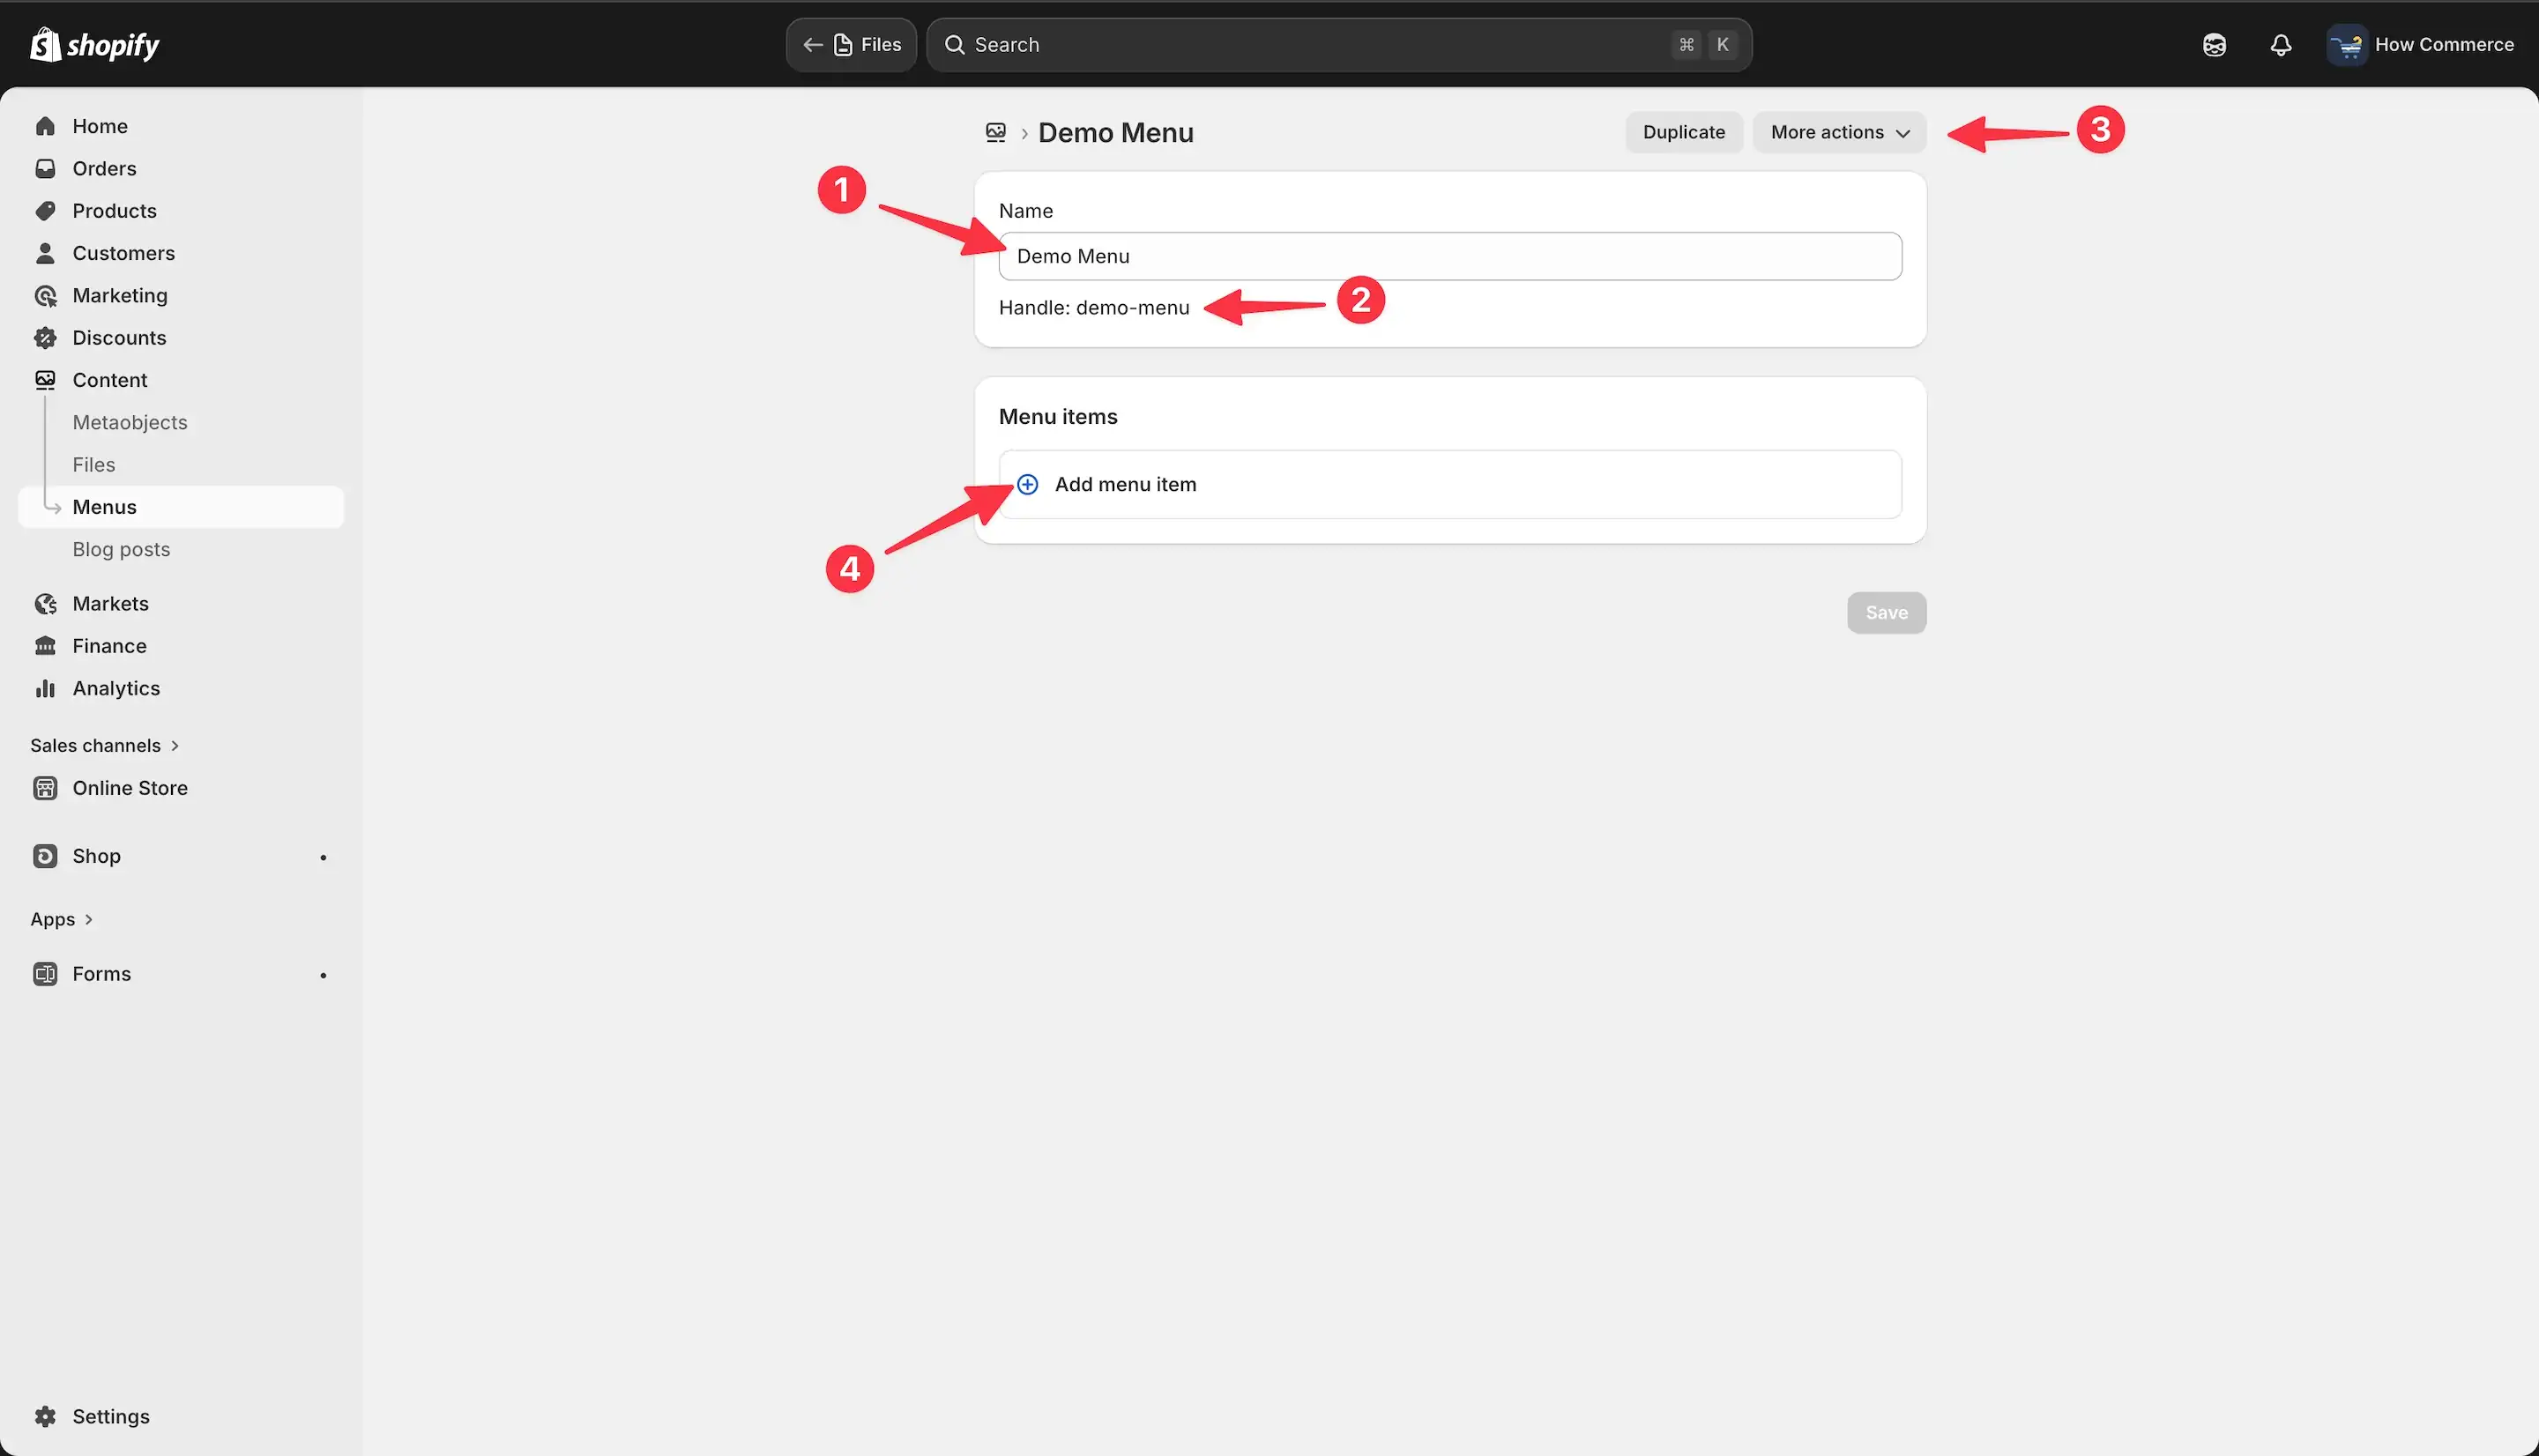
Once the menu has been created and saved, Shopify registers it automatically.
You will now see:
- The new menu name inside the title field (marked as 1 in the image below)
- The generated handle (marked as 2), created from the menu name
- Additional options such as Duplicate and More actions (marked as 3), which appear only after the menu has been saved
At this point, the menu exists but contains no items.
The next step is to populate it with links to the appropriate resource types, such as products, collections, pages, or external URLs.
To begin adding your first parent (Level 1) menu item, click Add menu item (marked as 4 in the image below).
Add a parent (level 1) menu item
For the purpose of this tutorial, I will demonstrate one example of creating a menu item.
The remaining items can be added following the same process.
When you click Add menu item, a panel opens with fields where you can define the menu item details.
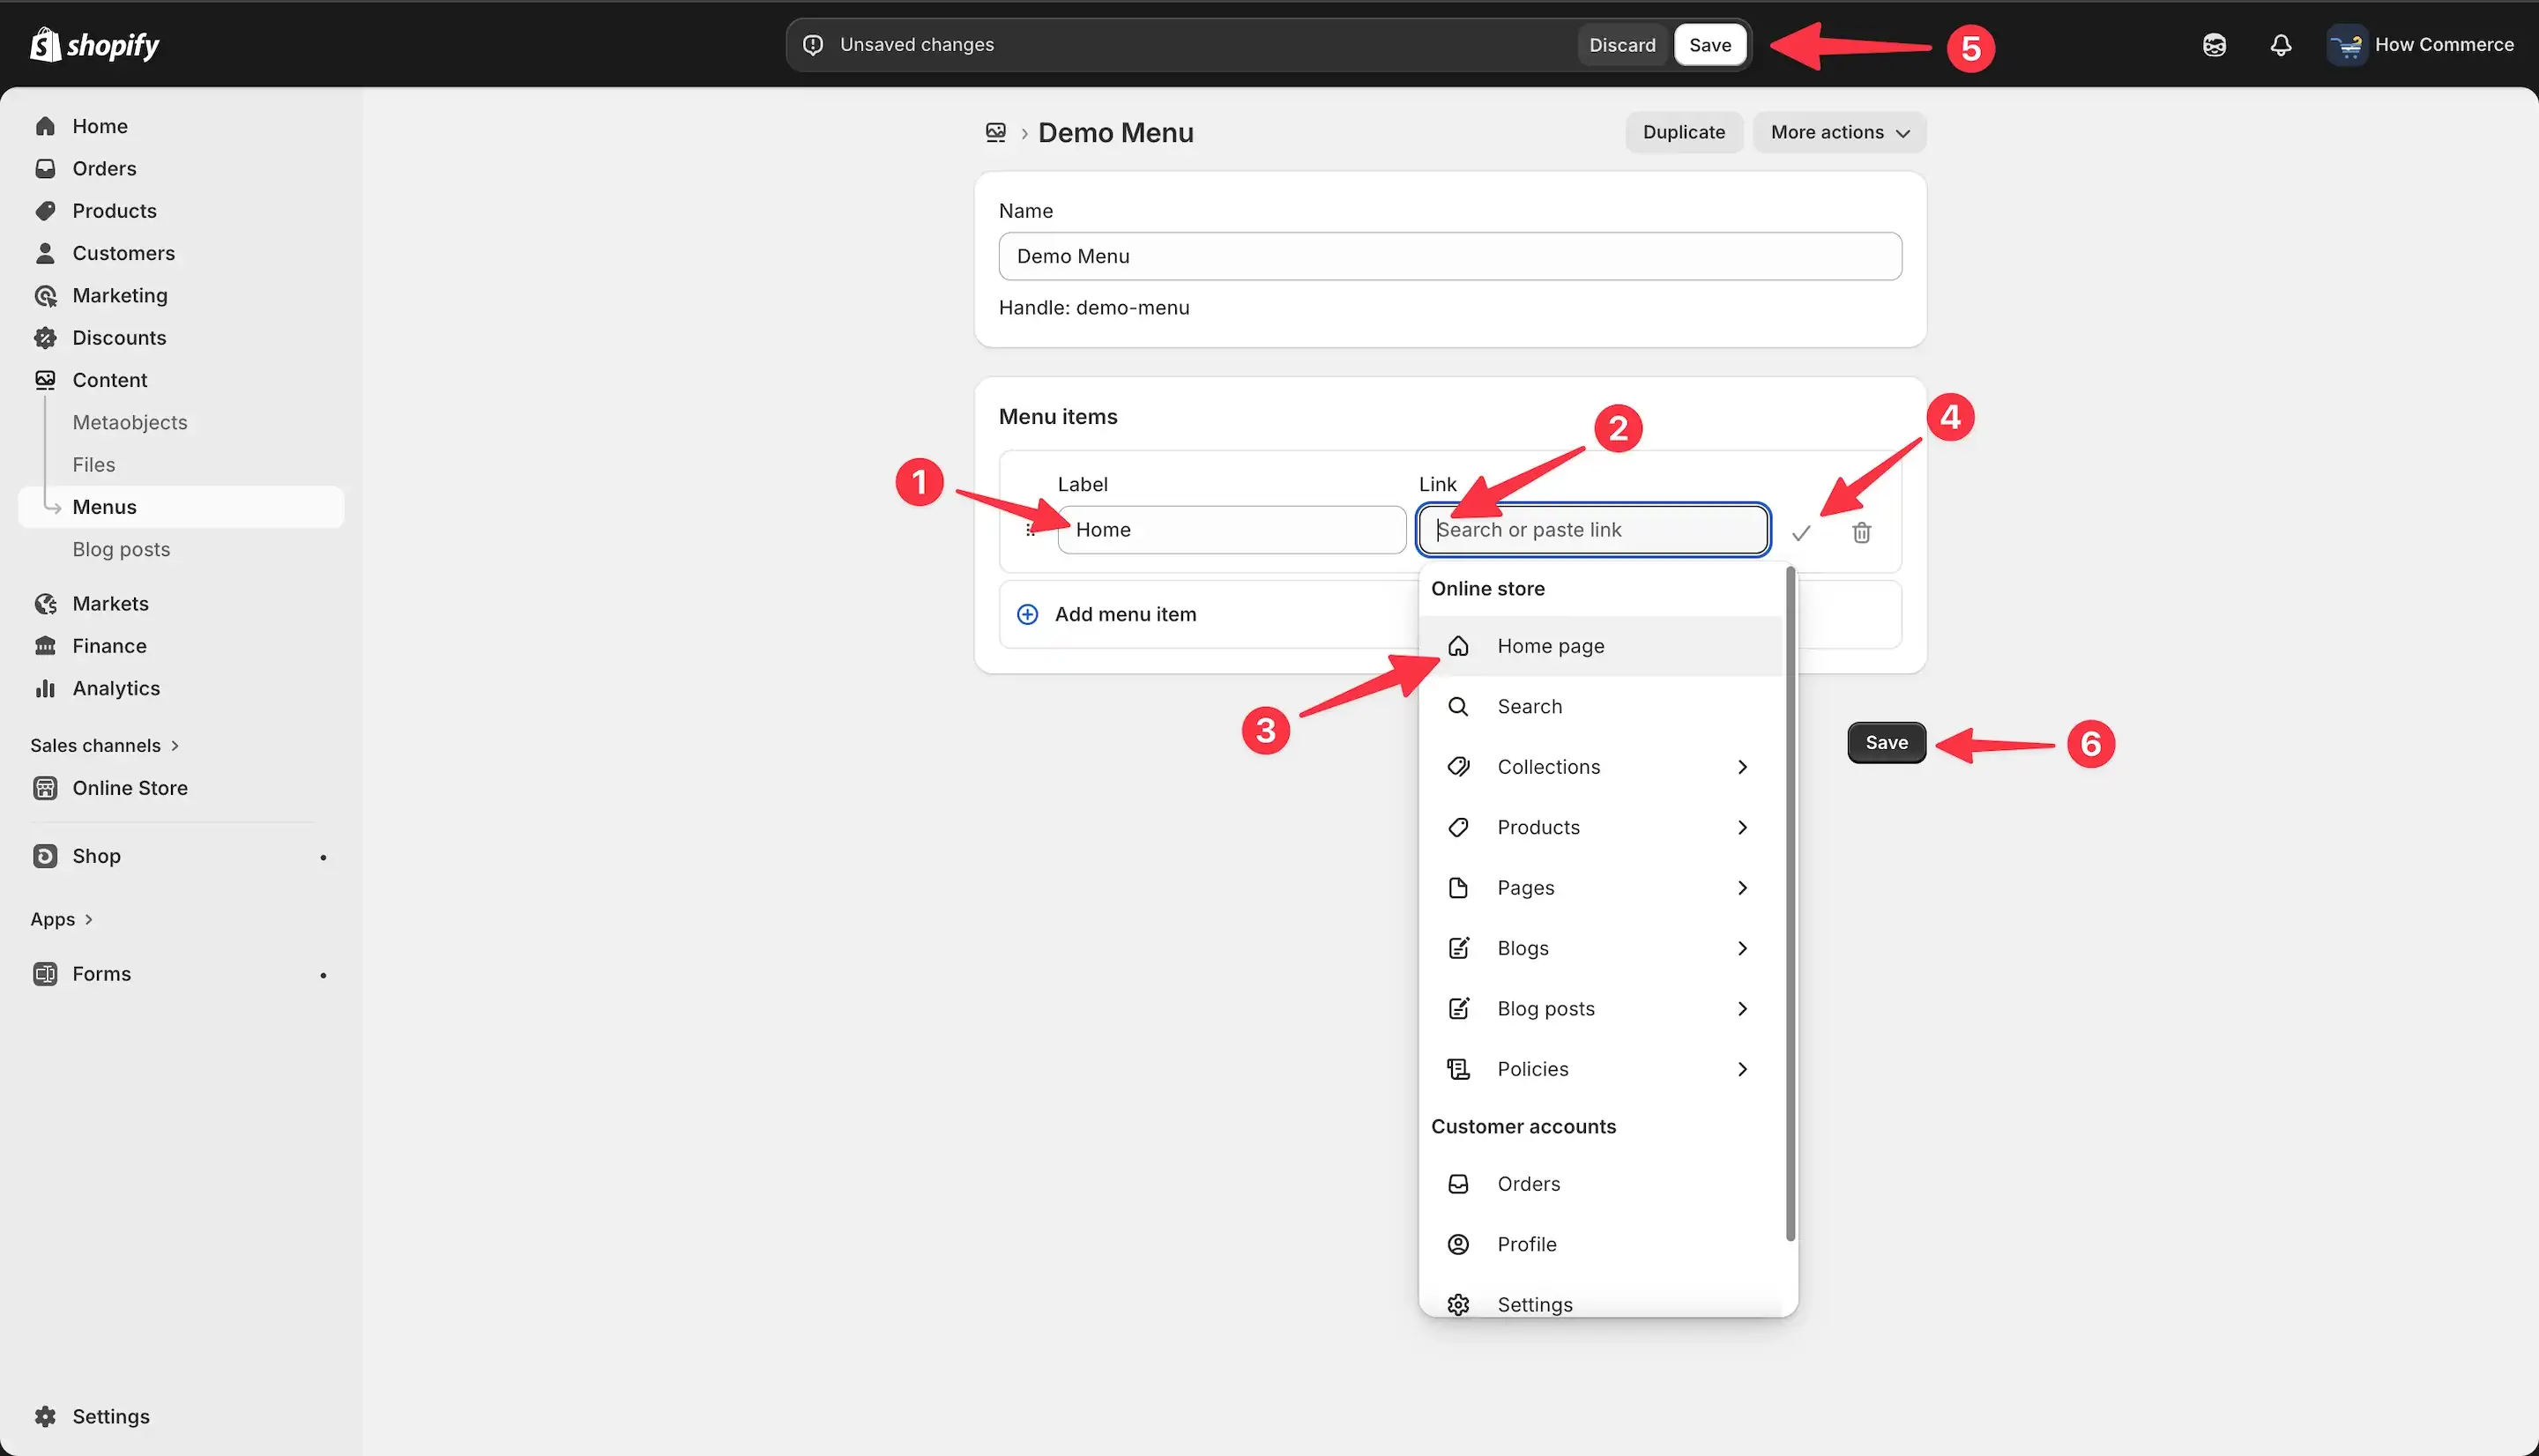
First, enter the menu item name in the Label field (marked as 1 in the image below).
This is the text visitors will see in the navigation.
Next, click inside the Link field (marked as 2) to select the destination.
You can link to any existing Shopify resource, such as a product, collection, page, blog post, or policy.
You may also enter an external URL if needed.
In this example:
- The label will be “Home” (marked as 1)
- The link will point to the Home page (marked as 3)
After selecting the resource, click the check icon (marked as 4) to add the item to the menu structure.
Important: At this stage, the menu item is added to the list but not yet permanently saved.
To register it in Shopify, click the Save button (marked as 5 or 6 in the image below).
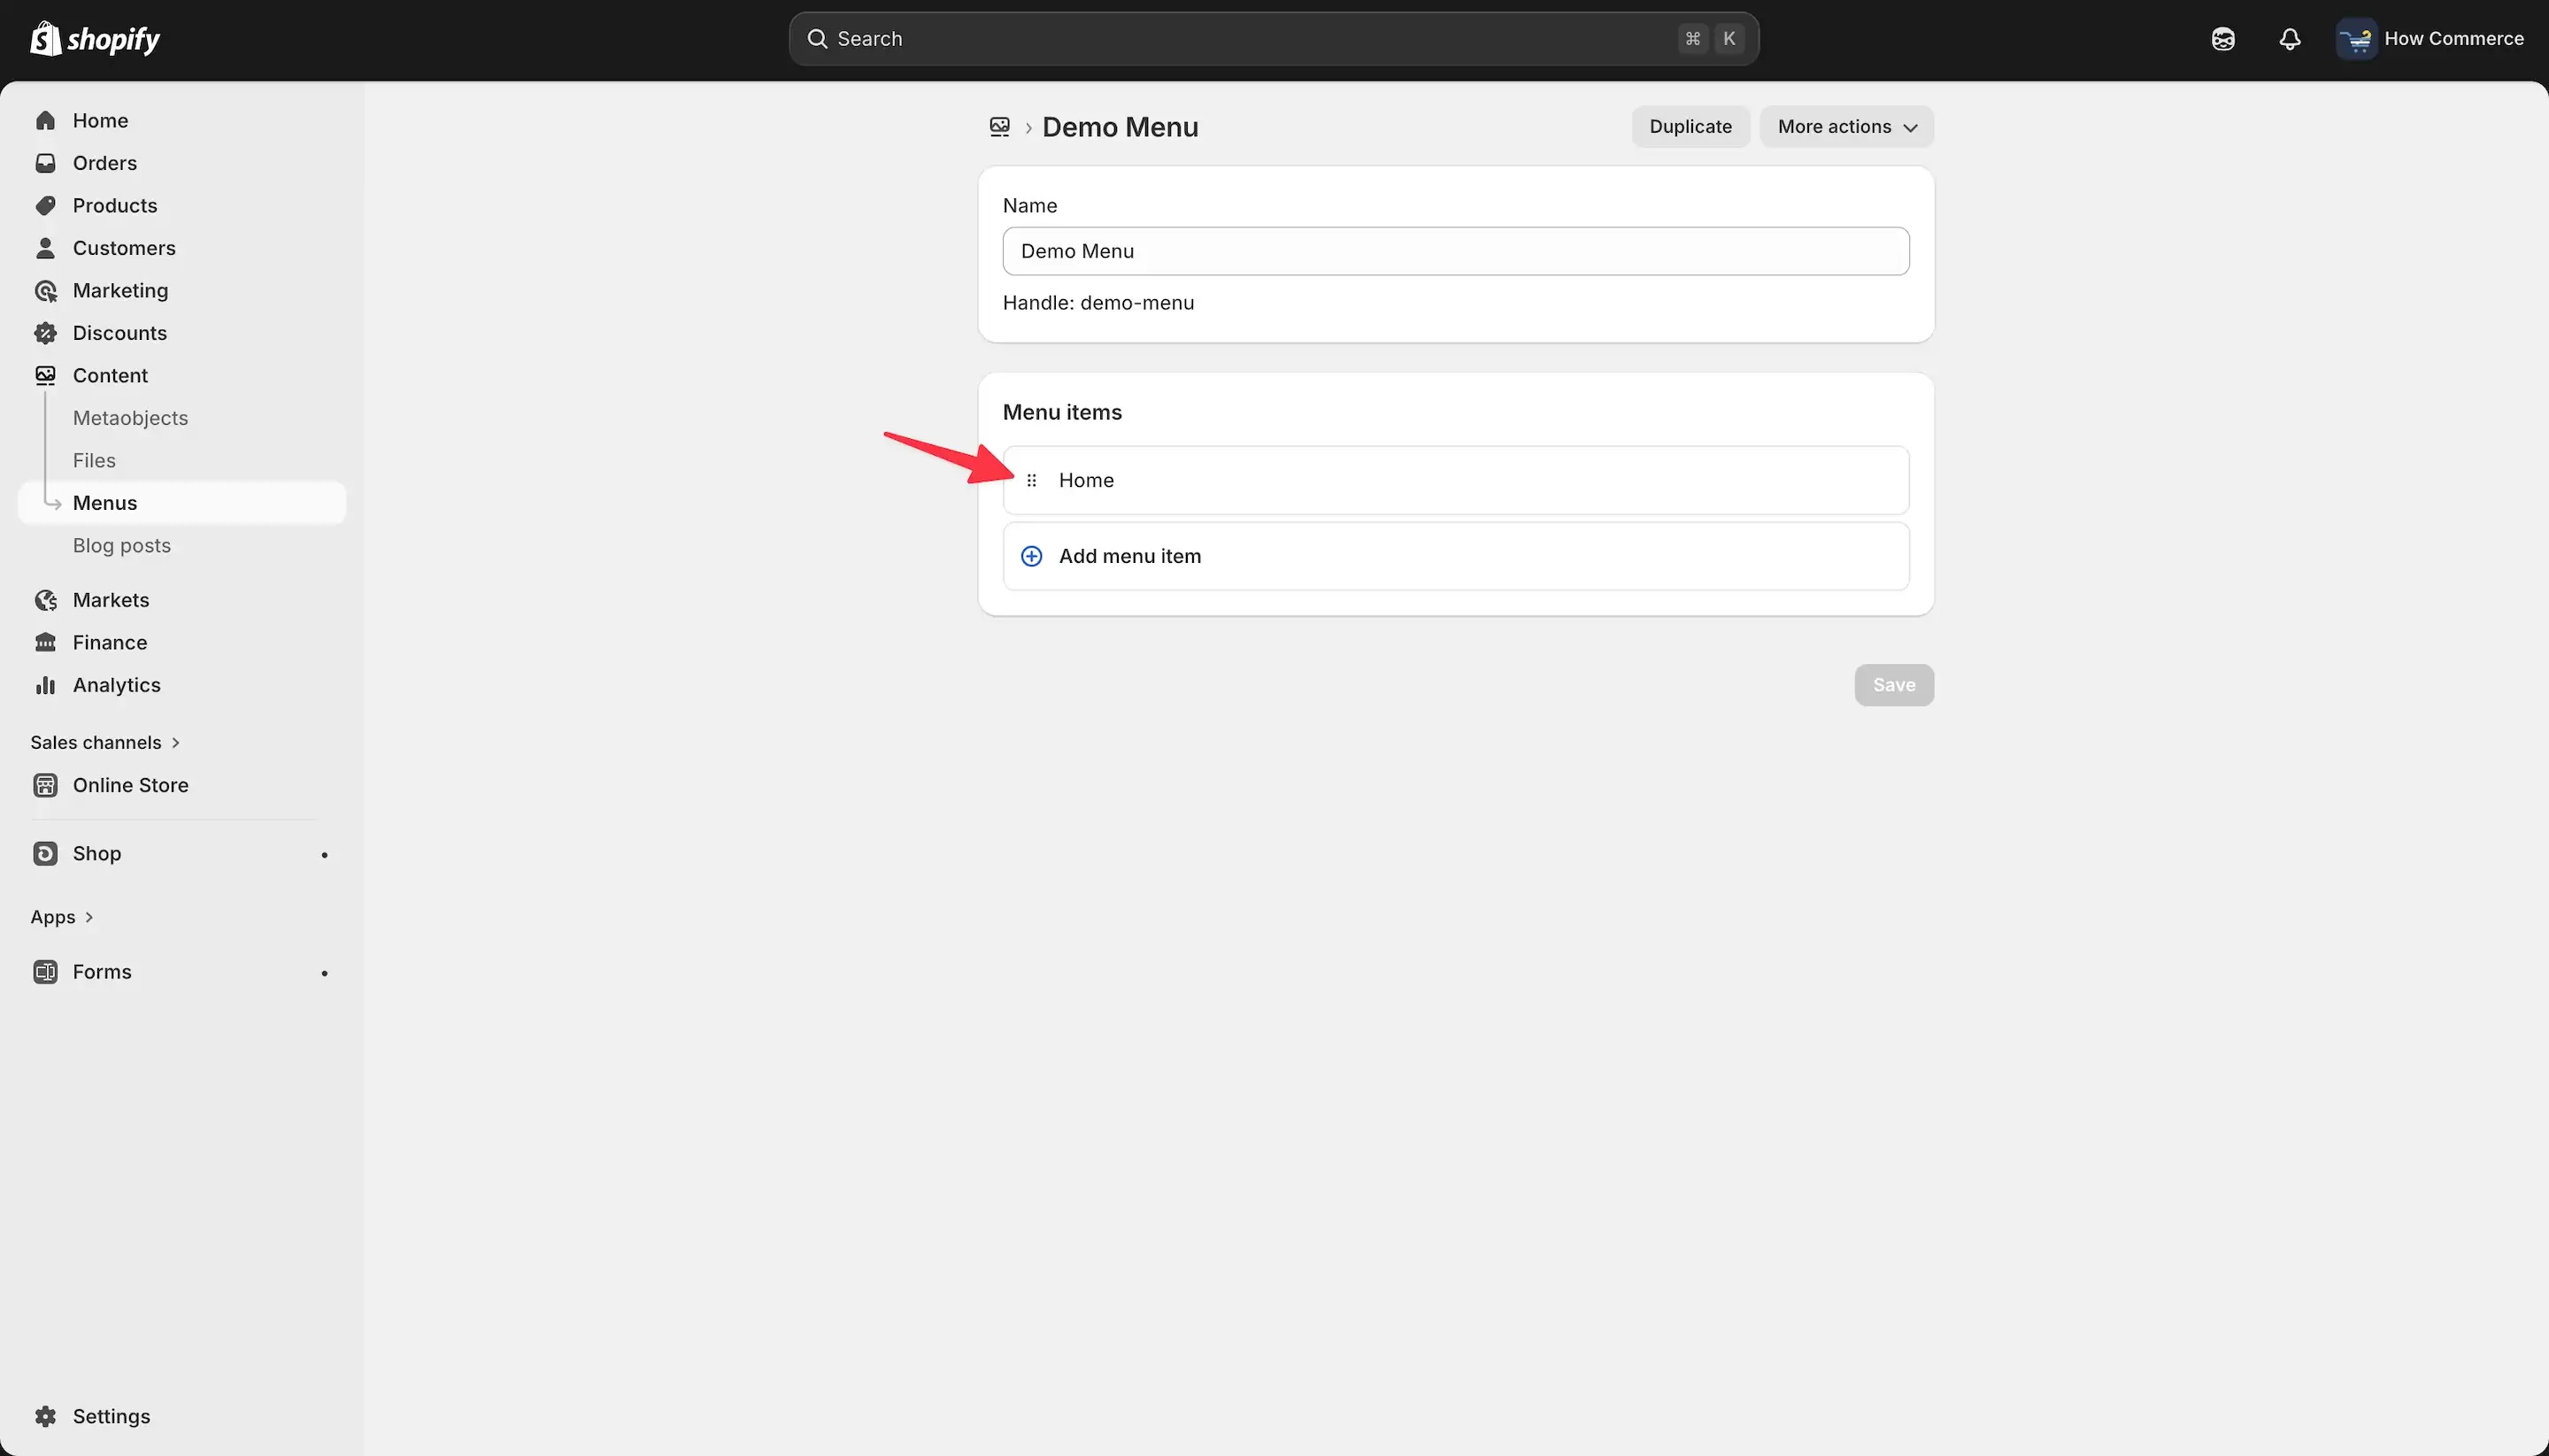
This is how the first menu item appears after being added and saved. See below image.
At this stage, you have successfully created a Level 1 (parent) menu item.
It will now appear as a top-level navigation link wherever this menu is assigned within your theme.
If you add additional Level 1 items, they will appear alongside this one in the same hierarchy.
In the next steps, you can begin adding child (Level 2) items beneath it to transform it into a drop-down structure.
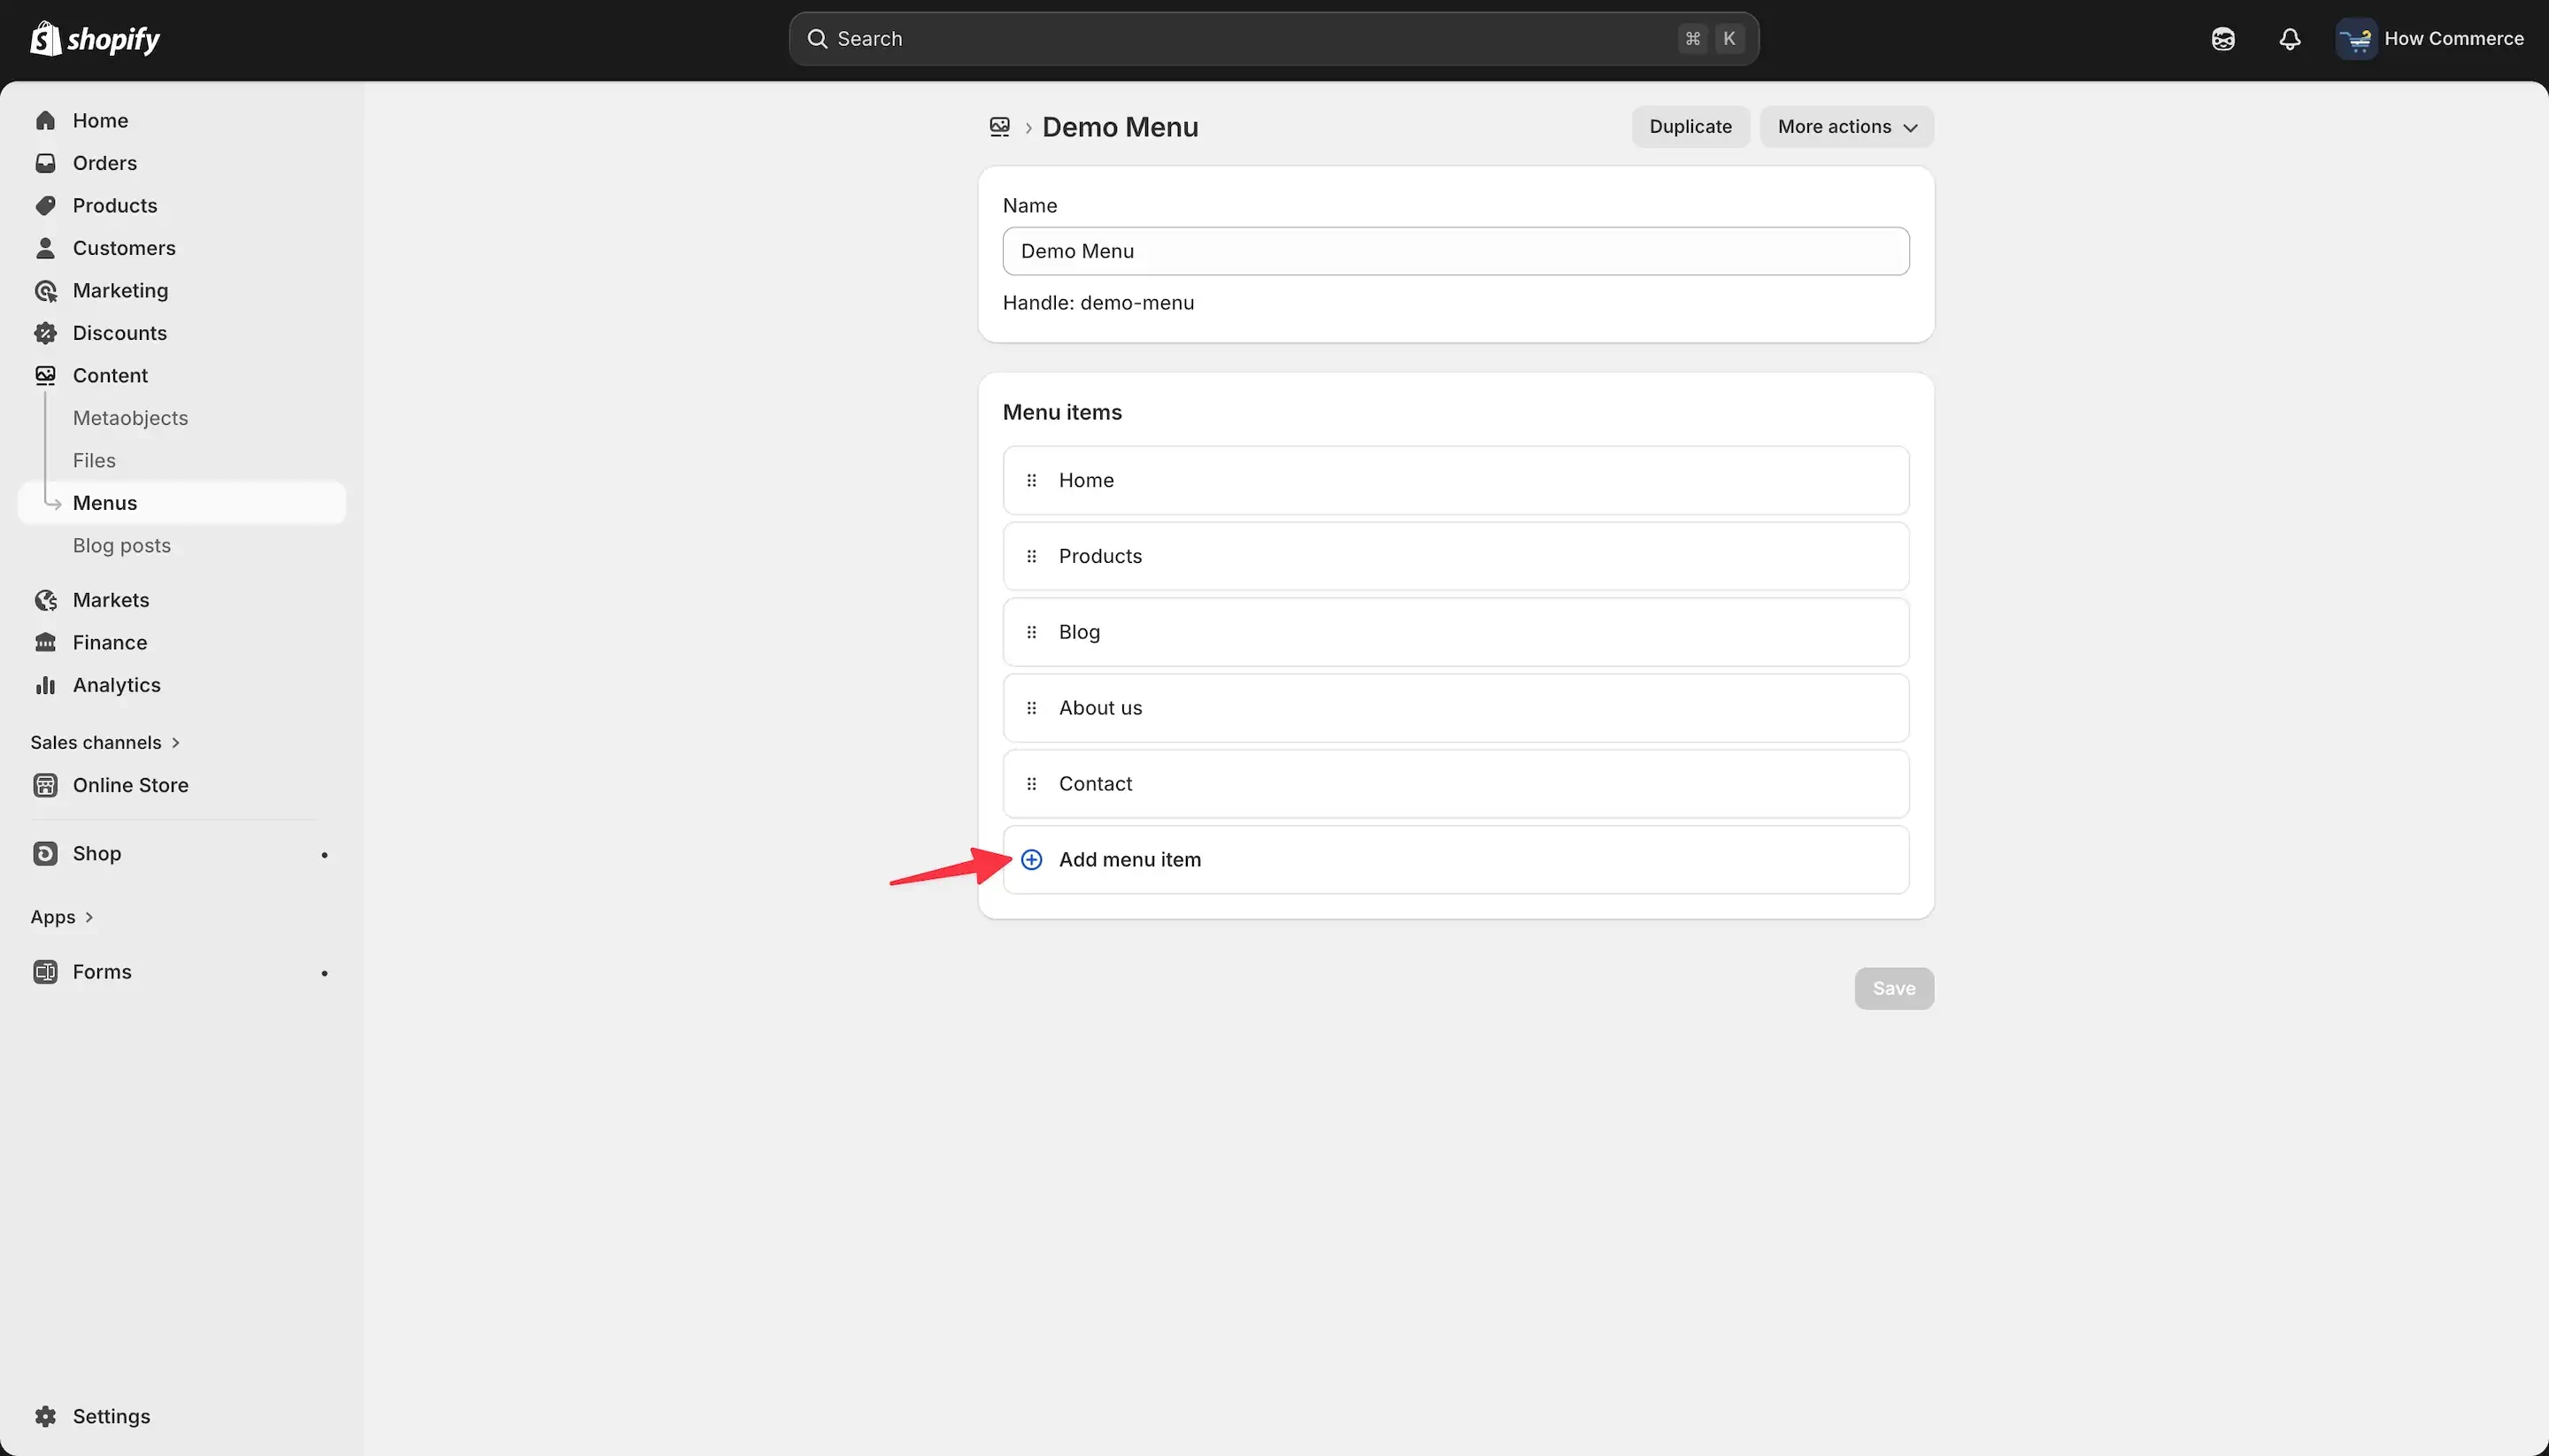
Add all level 1 (parent) menu items
Repeat the same process to add all remaining Level 1 menu items.
At this stage, your menu should contain only top-level items, each sitting on the same hierarchy line without indentation.
Below, you can see the completed structure containing all Level 1 (parent) menu items.
Add children’s or level two menu items to the menu
In its current state, this is still a standard menu.
It will not function as a drop-down, even if the theme supports drop-down navigation.
Why? Because it does not yet contain any child (Level 2) or grandchild (Level 3) items.
For a drop-down menu to work, it must contain at least Level 2 items nested under a parent.
The process for adding child items is exactly the same as adding parent items.
Click Add menu item (as marked in the image below) and create the new item as usual by:
- Entering a label
- Selecting the appropriate link
- Clicking the check icon
- Saving the menu
After adding the new item, the important step will be adjusting its position to make it a Level 2 item.
That indentation step is what transforms it into a child item and enables drop-down behavior.
In this example, we will add child items under the Products parent menu item.
The Products parent item is currently linked to the All products page, which displays every product available in the store.
This is a common setup.
In most stores, you can structure navigation in one of two ways:
- Link to product collections
- Link directly to individual products
Both approaches are valid.
For this demonstration, we will link individual products as Level 2 (child) items under the Products parent.
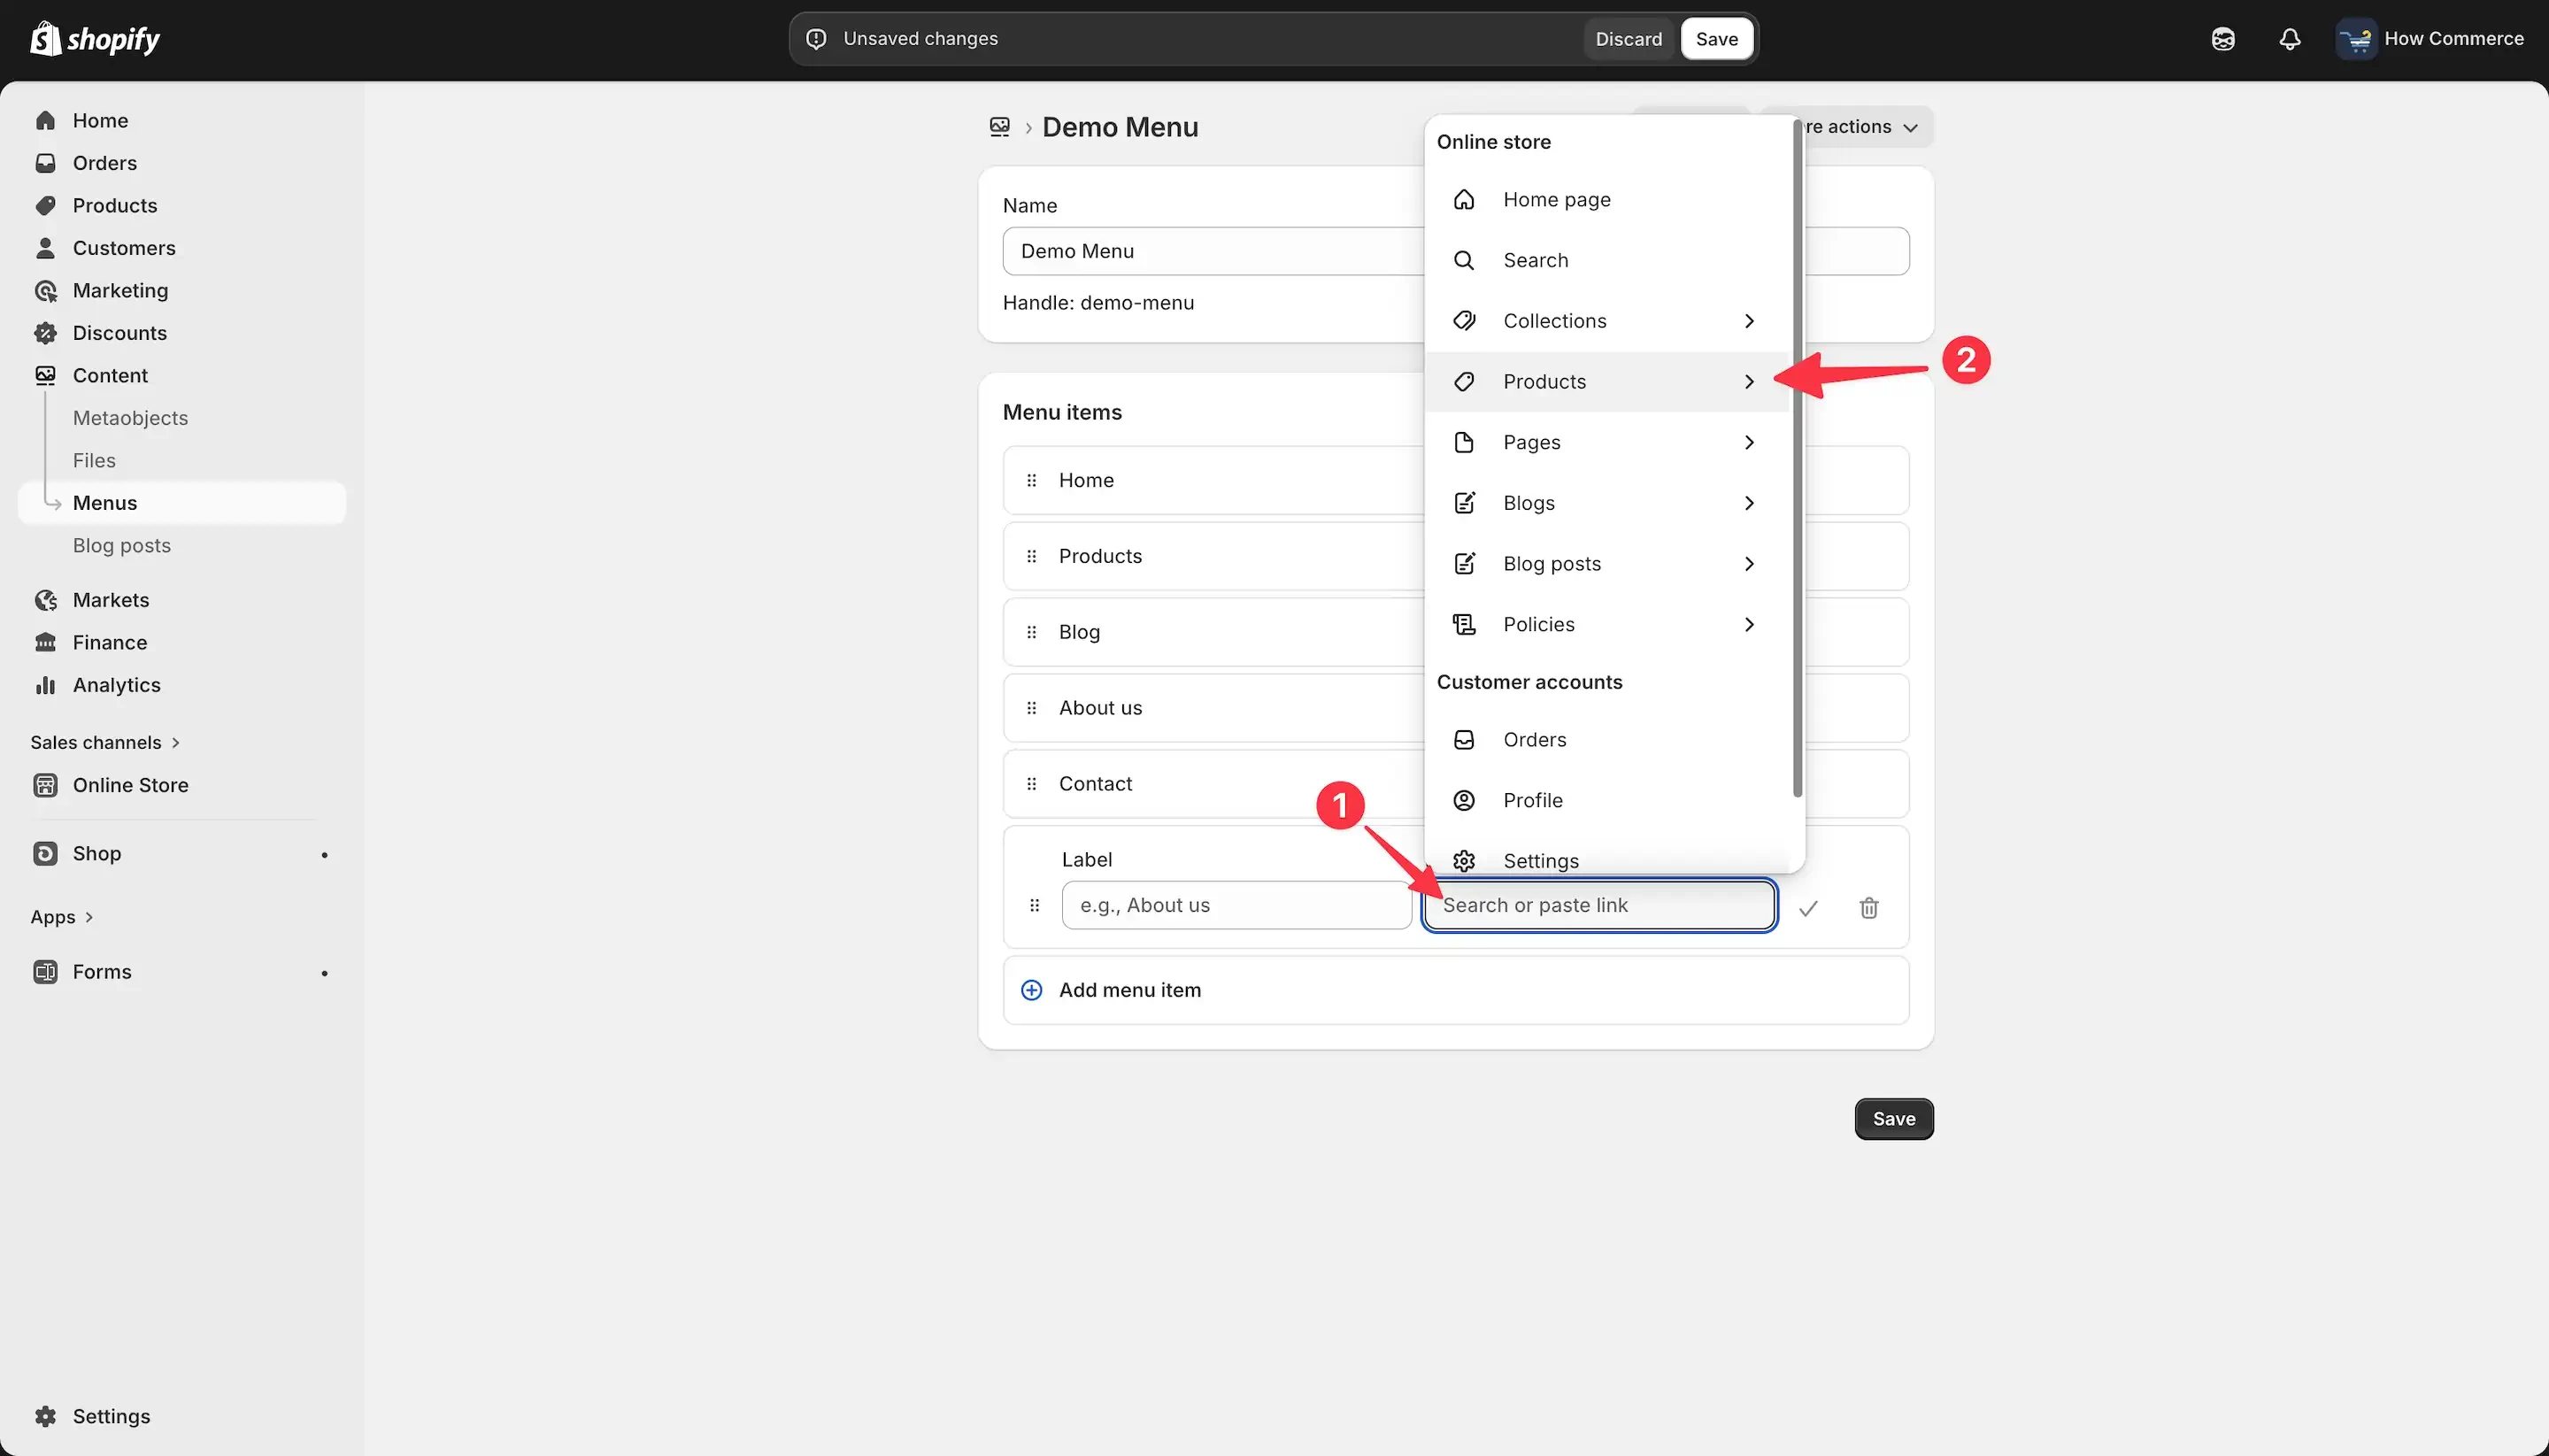
To do this:
- Click Add menu item.
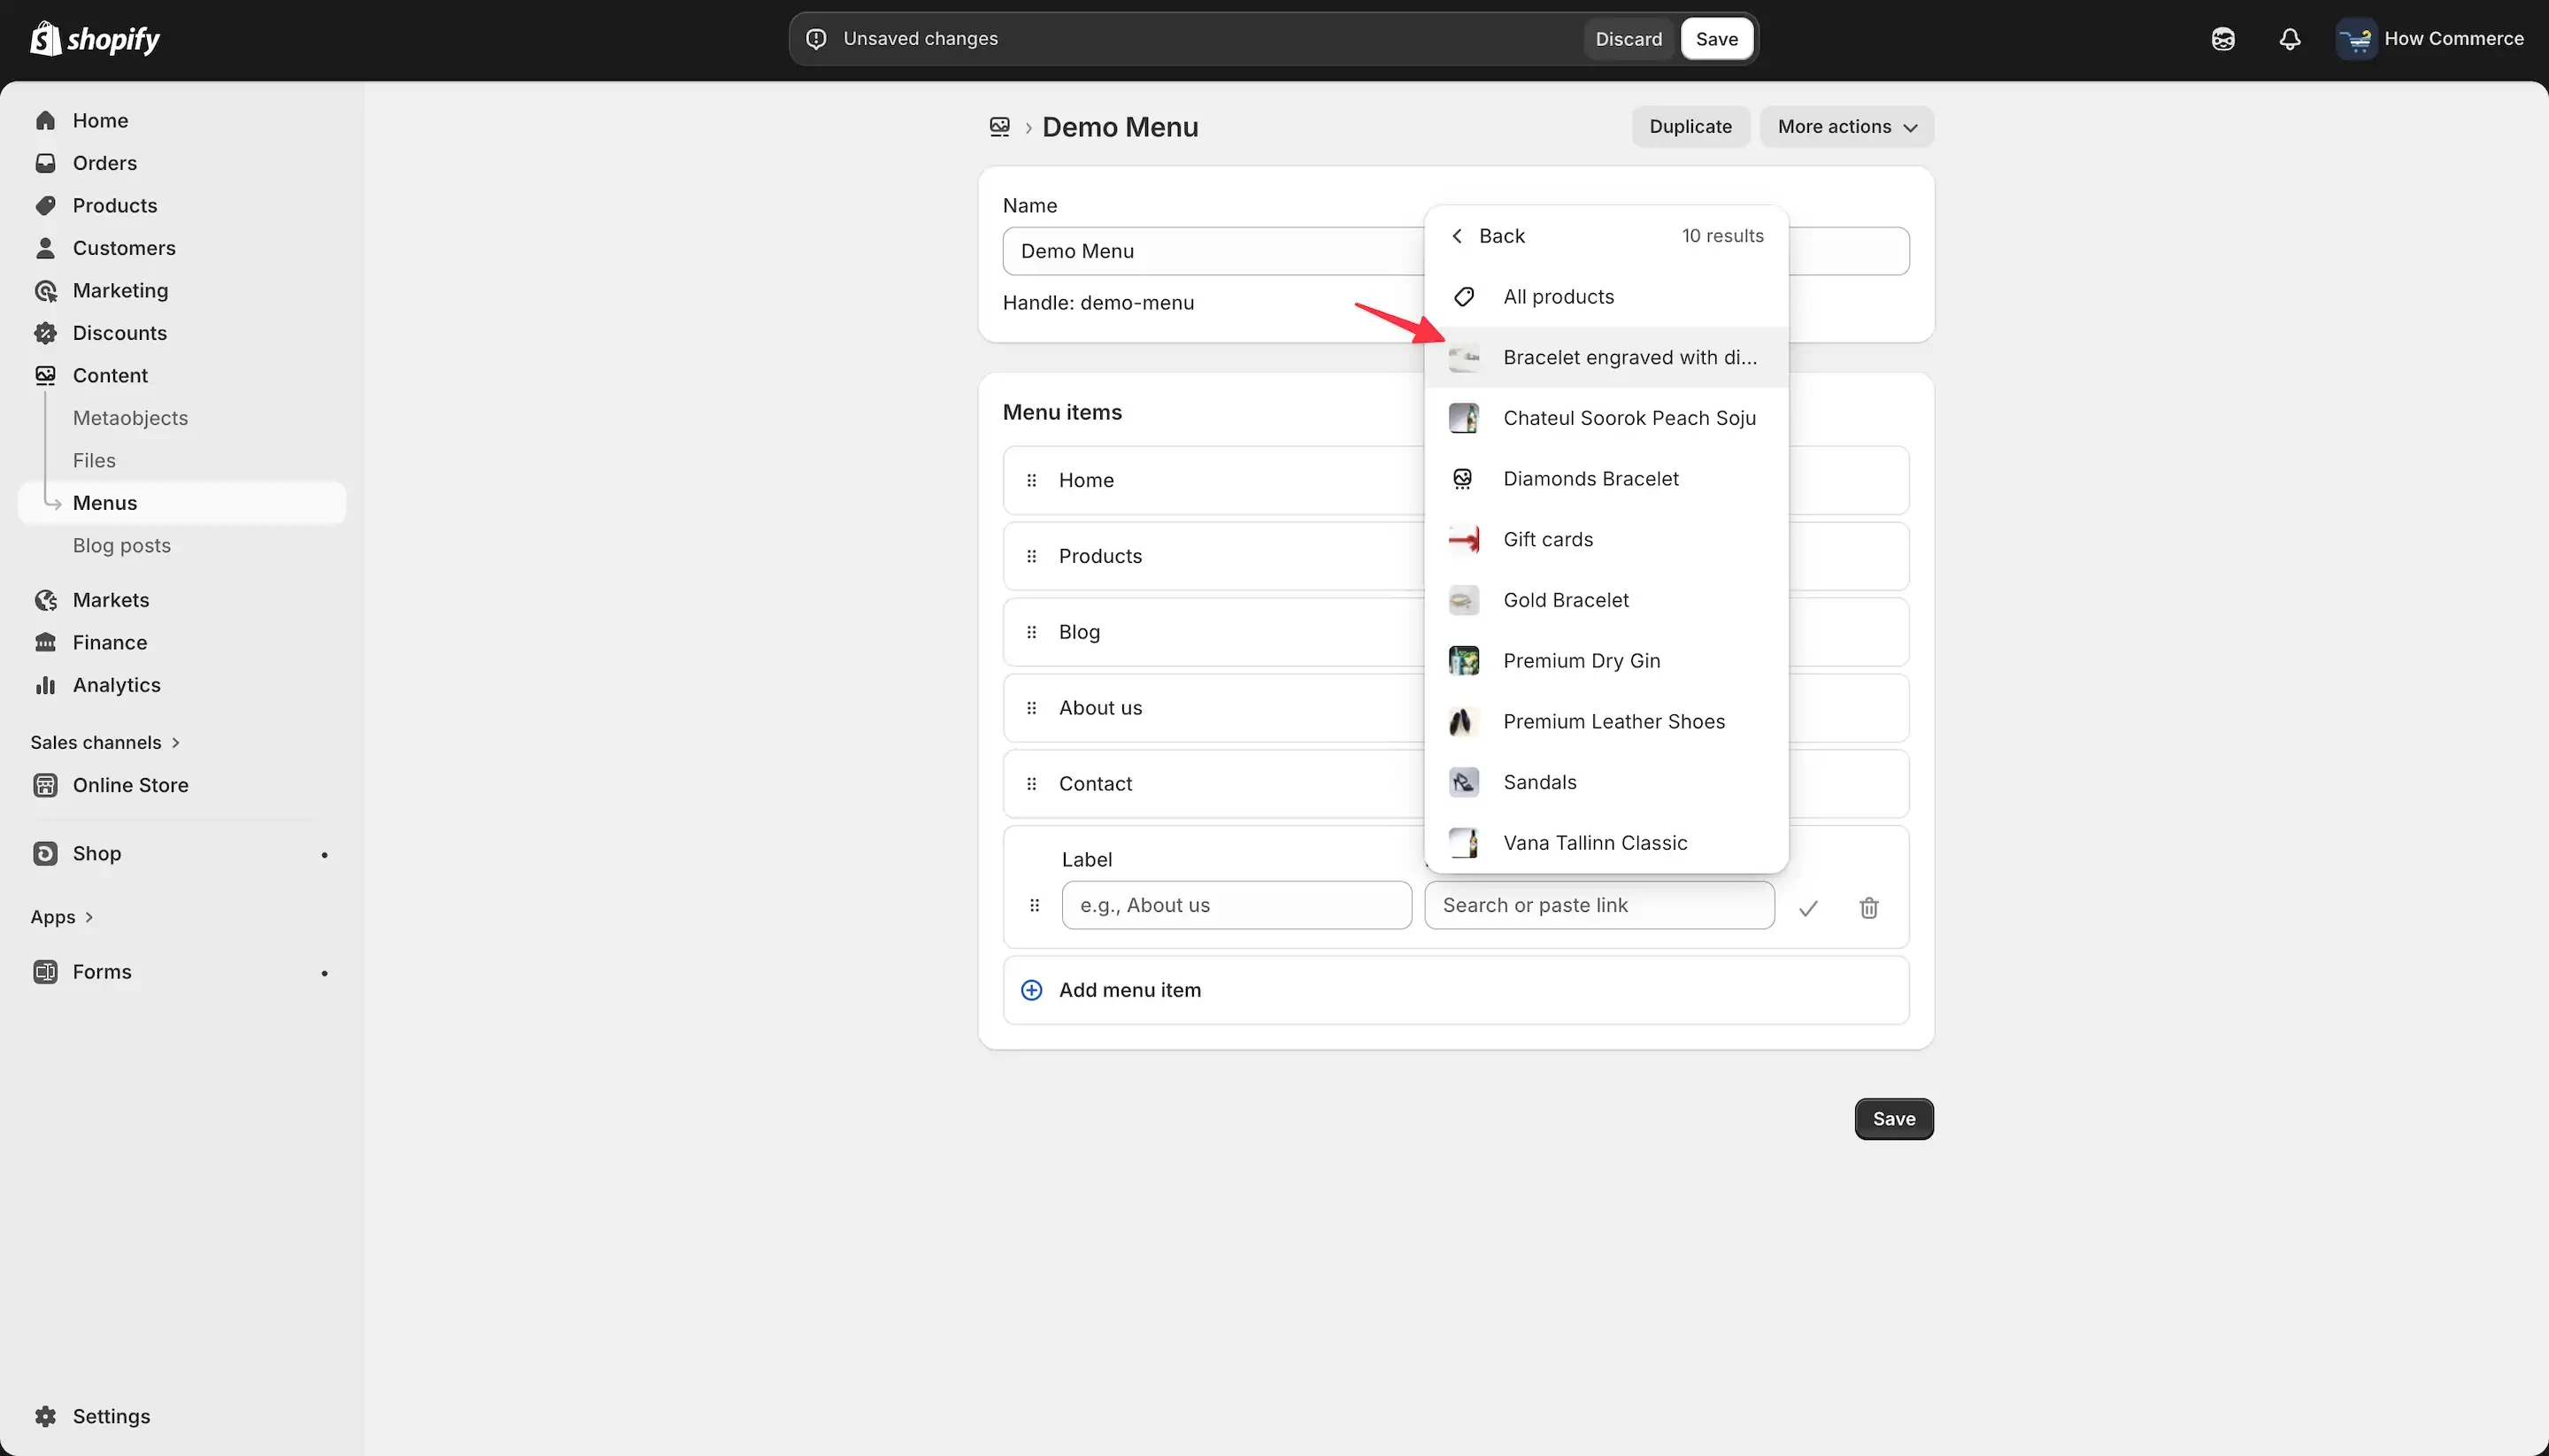
- Inside the Link field (marked as 1 in the image below), click to open the resource selector.
- From the list of resource types, choose Products (marked as 2 in the image below).
You can then select the specific product you want to include as a child item in the drop-down.
After selecting Products as the resource type, Shopify will display a list of all existing products in your store.
Here, you can browse or search through the available products and select the one you want to add to the menu.
Choose the desired product from the list.
Once selected, it will automatically populate the Link field for this menu item.
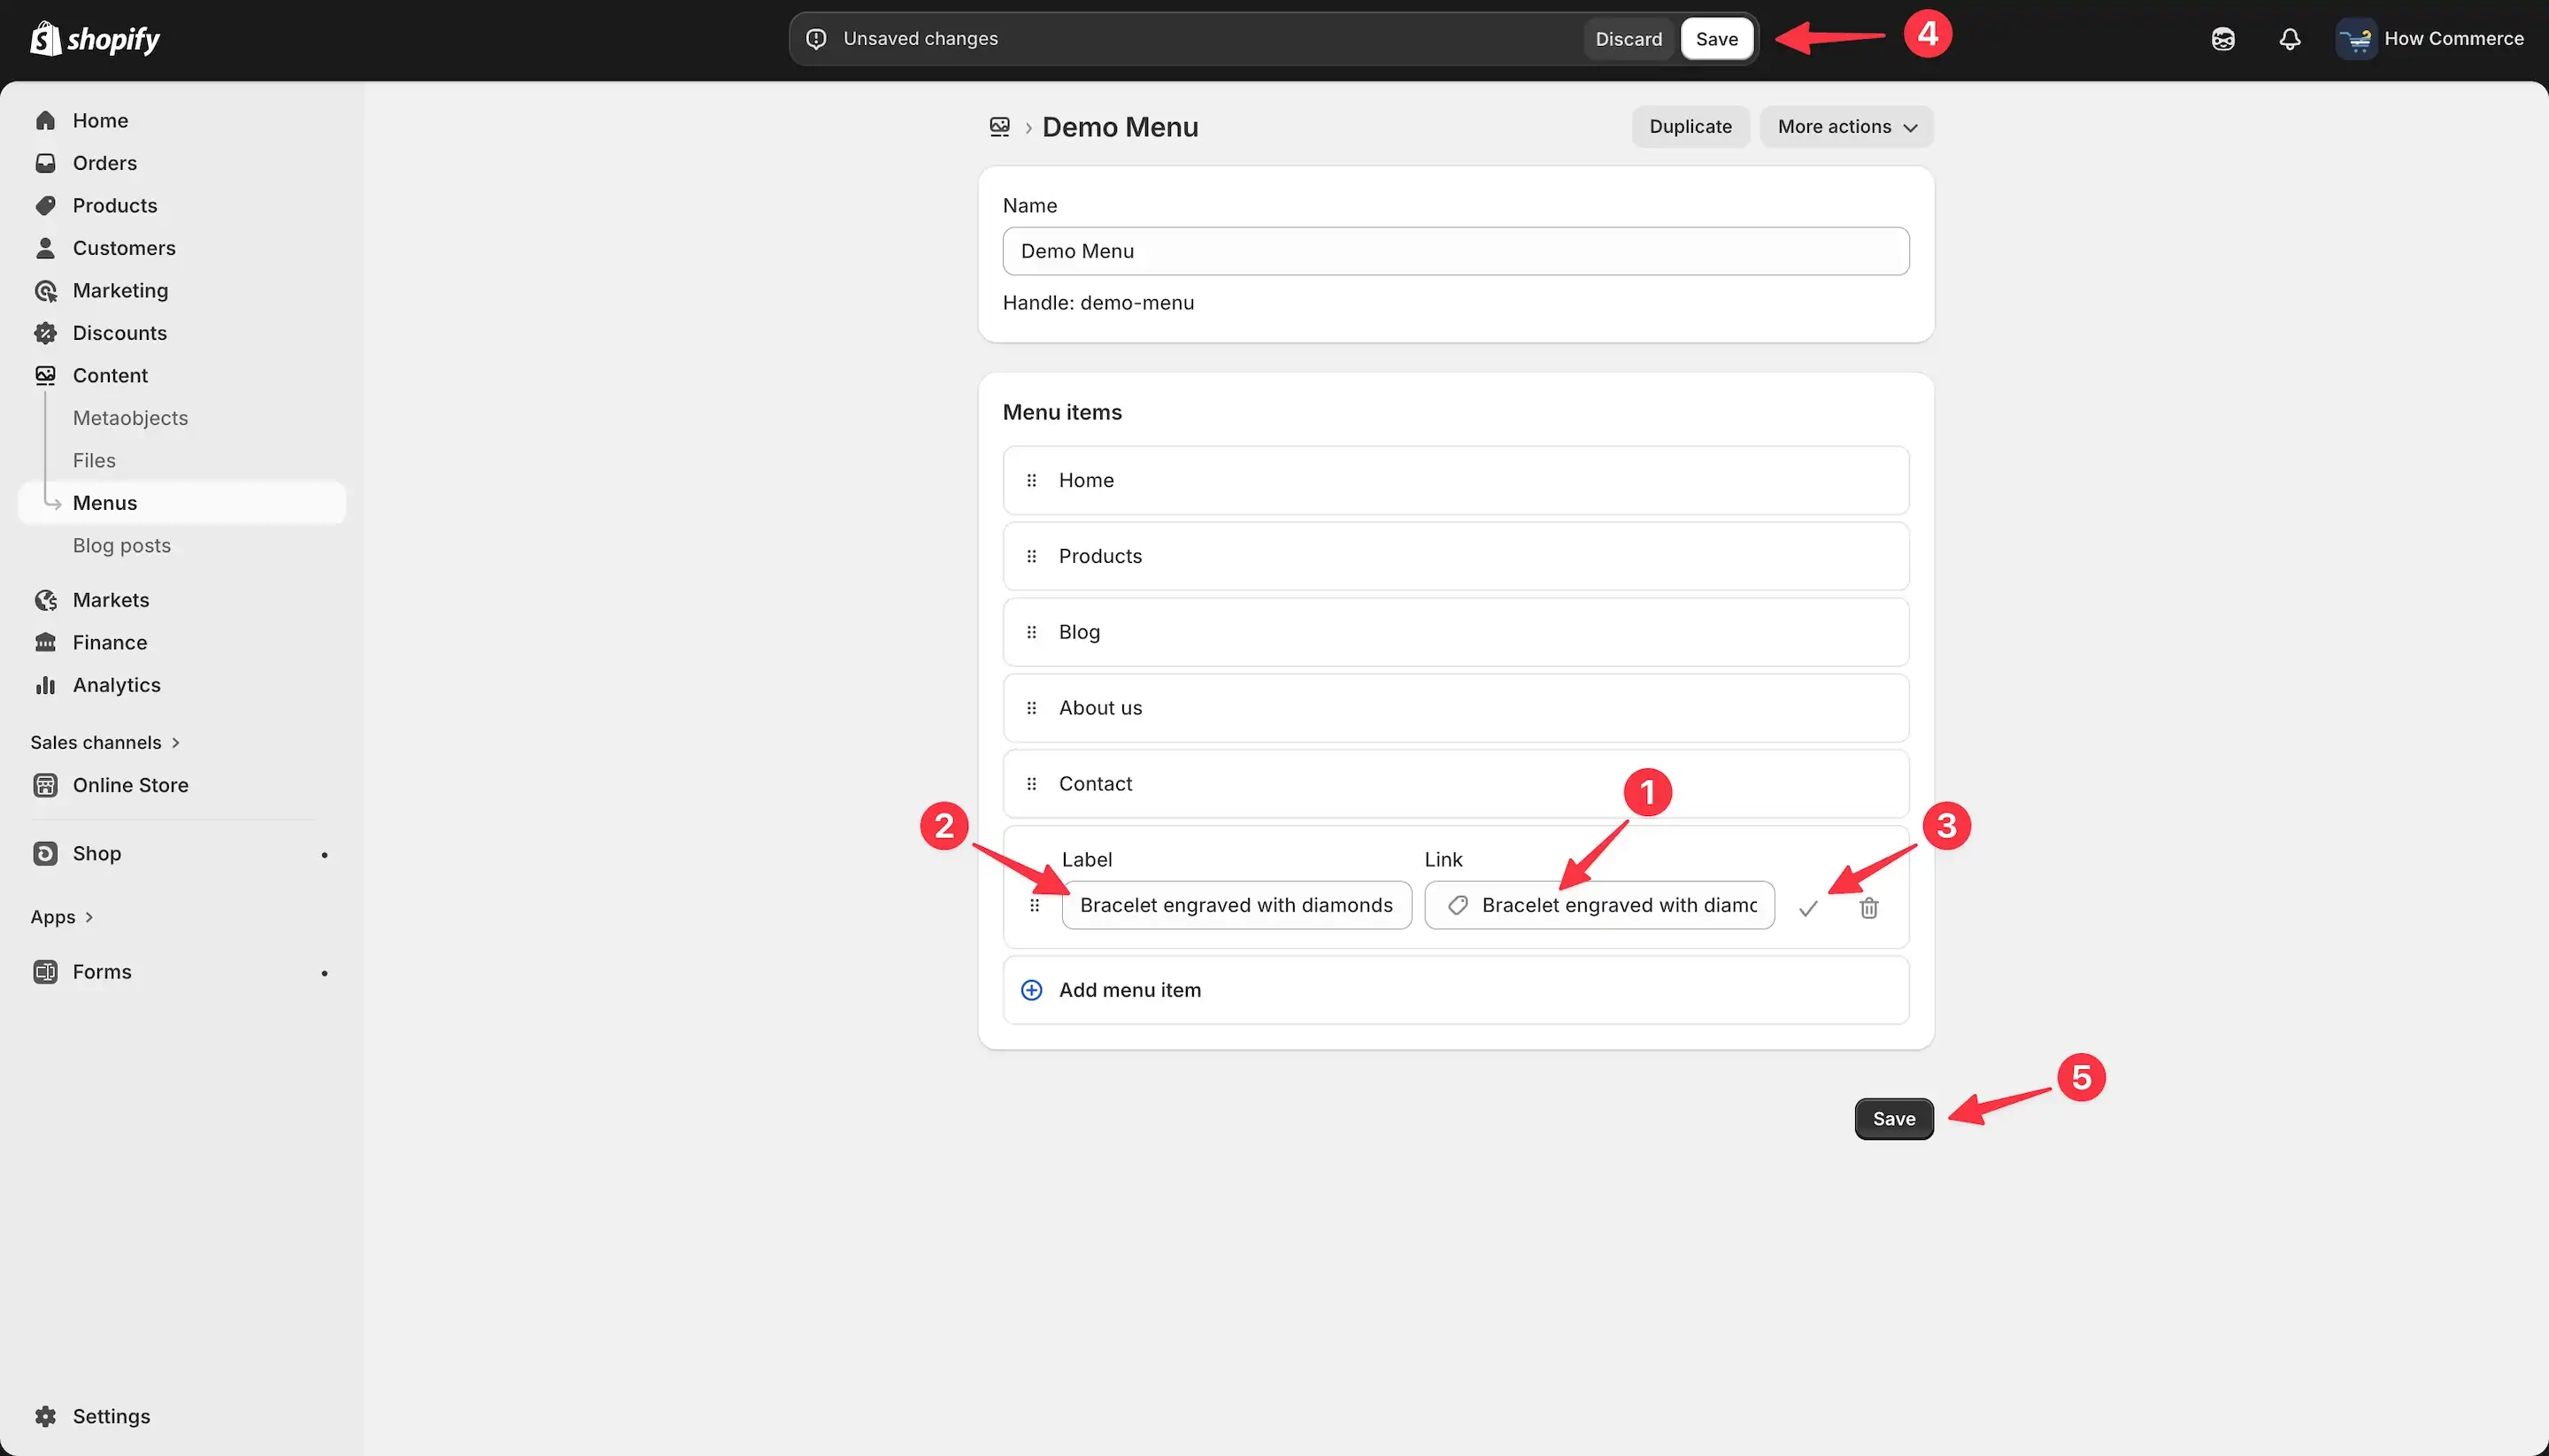
Once you select the product (marked as 1 in the image below), Shopify automatically fills in the Label field (marked as 2 in the image below) using the product’s name.
This speeds up the process and keeps the menu label consistent with the product title.
If needed, you can manually adjust the label.
However, in most cases, leaving it as the product name is the correct approach.
Next, confirm the menu item by clicking the check icon (marked as 3 in the image below). This adds the item to the menu structure.
Finally, to permanently store the changes, click one of the Save buttons (marked as 4 or 5 in the image below).
Until you click Save, the item exists only in the current session and is not yet committed to the database.
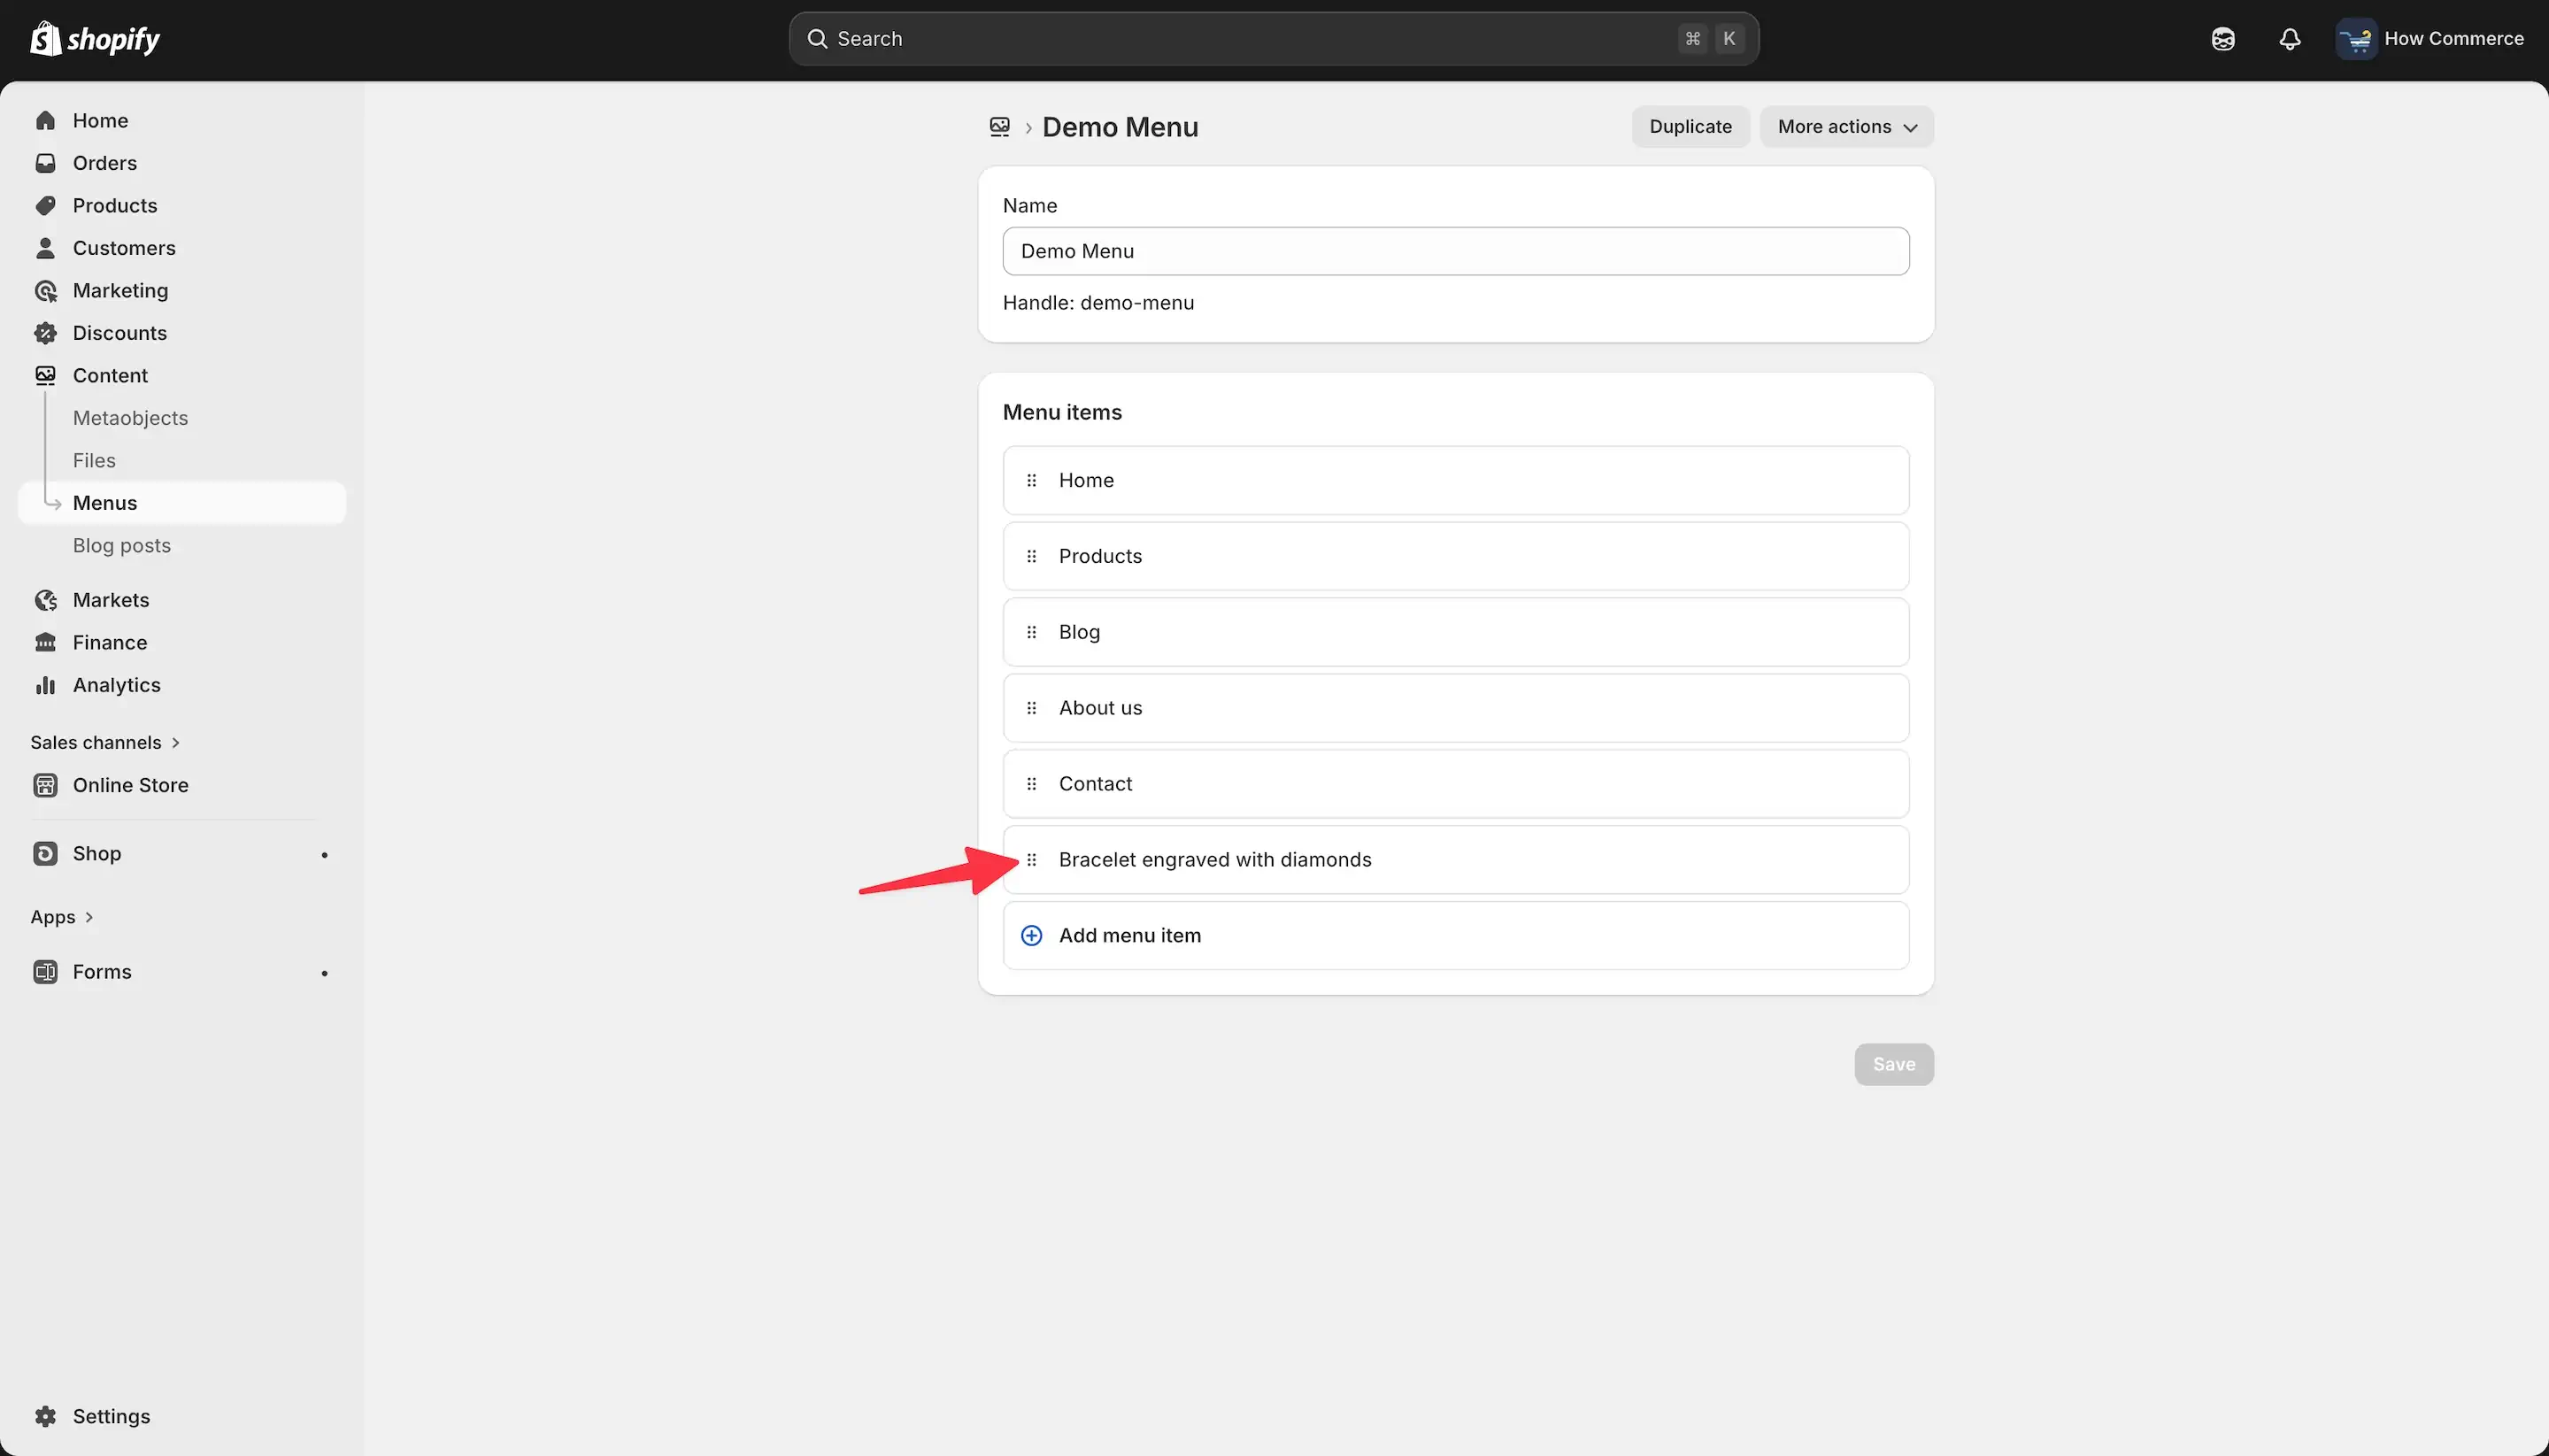
In the image below, you can see how the newly added menu item appears inside the menu structure.
At this point, it is still positioned as a Level 1 (parent) item, just like the other top-level menu items.
It sits on the same alignment level and has not yet been nested under the Products parent.
To convert it into a Level 2 (child) item and enable drop-down behavior, it must be properly indented under the desired parent item.
That structural adjustment is what transforms a standard link into a drop-down entry.
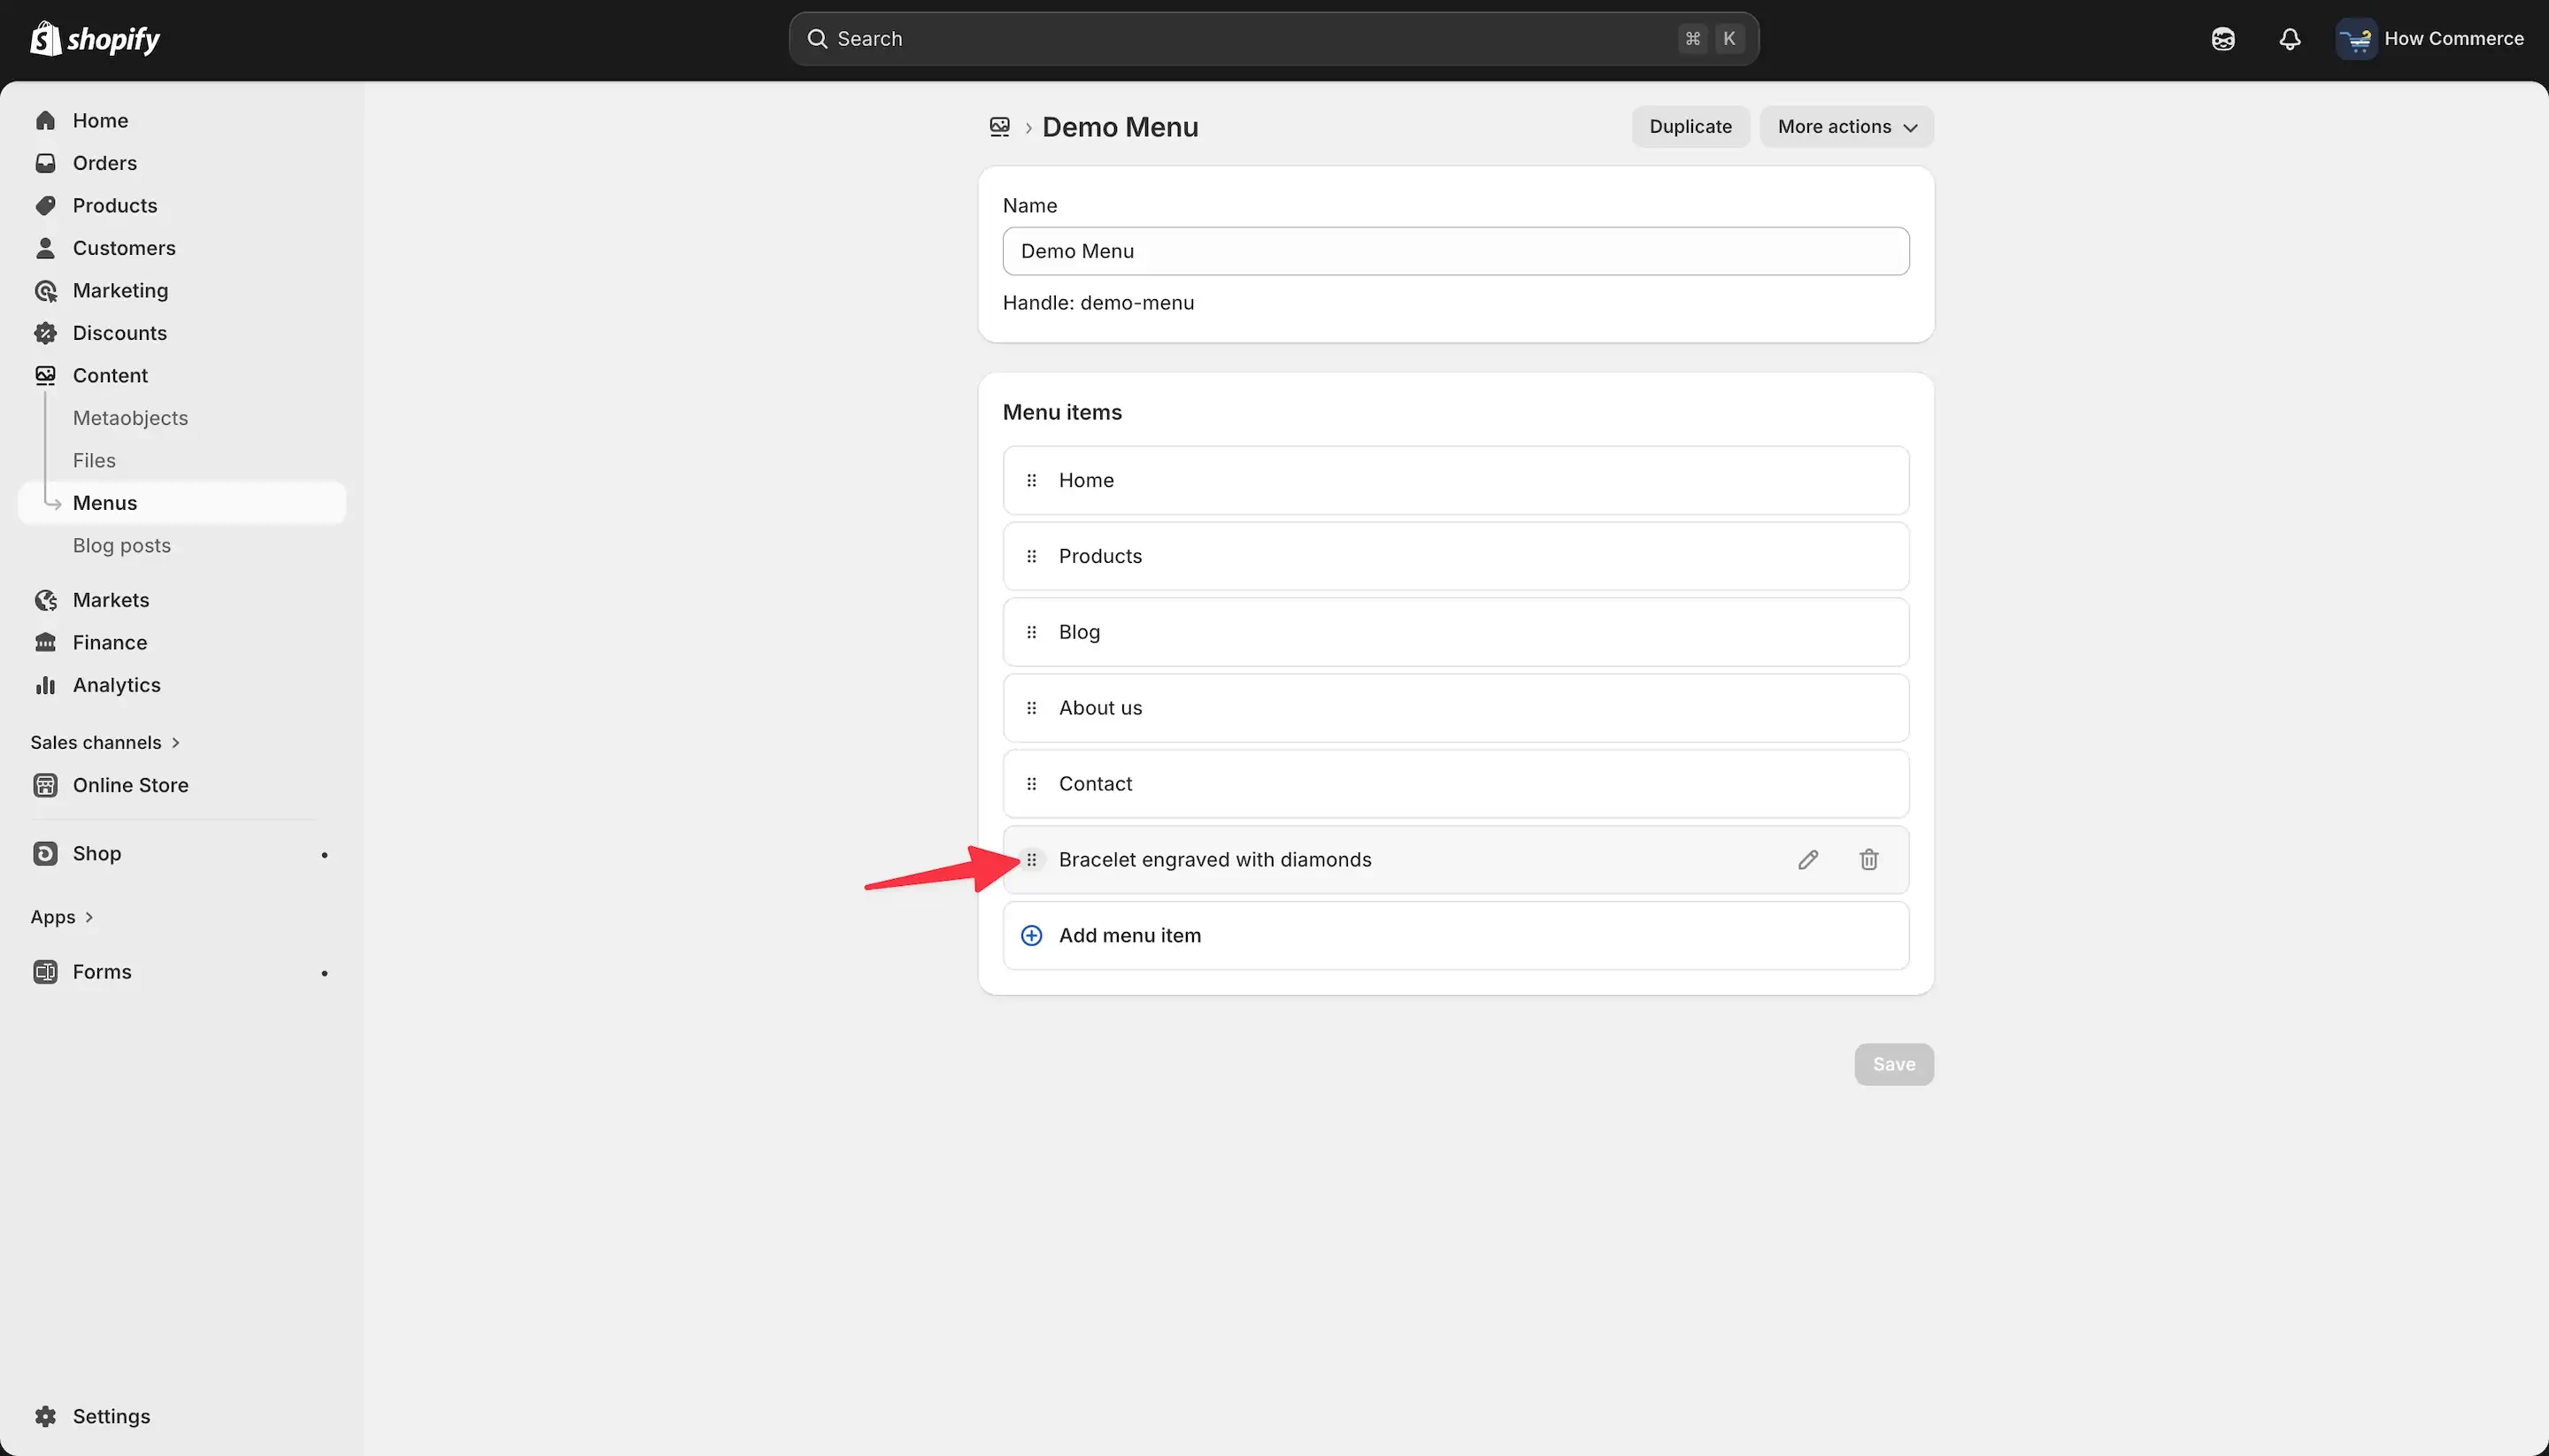
To turn this menu item into a child (Level 2) item, click and hold the drag handle icon (as indicated in the image below).
Keep the mouse button pressed and do not release it yet.
When you click and hold the drag handle, the menu item (marked as 1 in the image below) will detach from its original position.
You will notice a thin blue line with a small circle in front of it (marked as 2 in the image below).
This blue indicator shows where the item will be placed once you release the mouse button.
At this moment, if you release the click, the item will return to its original position because the marker is still aligned at the same hierarchy level.
To make it a child item, you must drag it directly beneath the Products menu item and slightly to the right.
That indentation is what defines it as a Level 2 item and enables the drop-down structure.
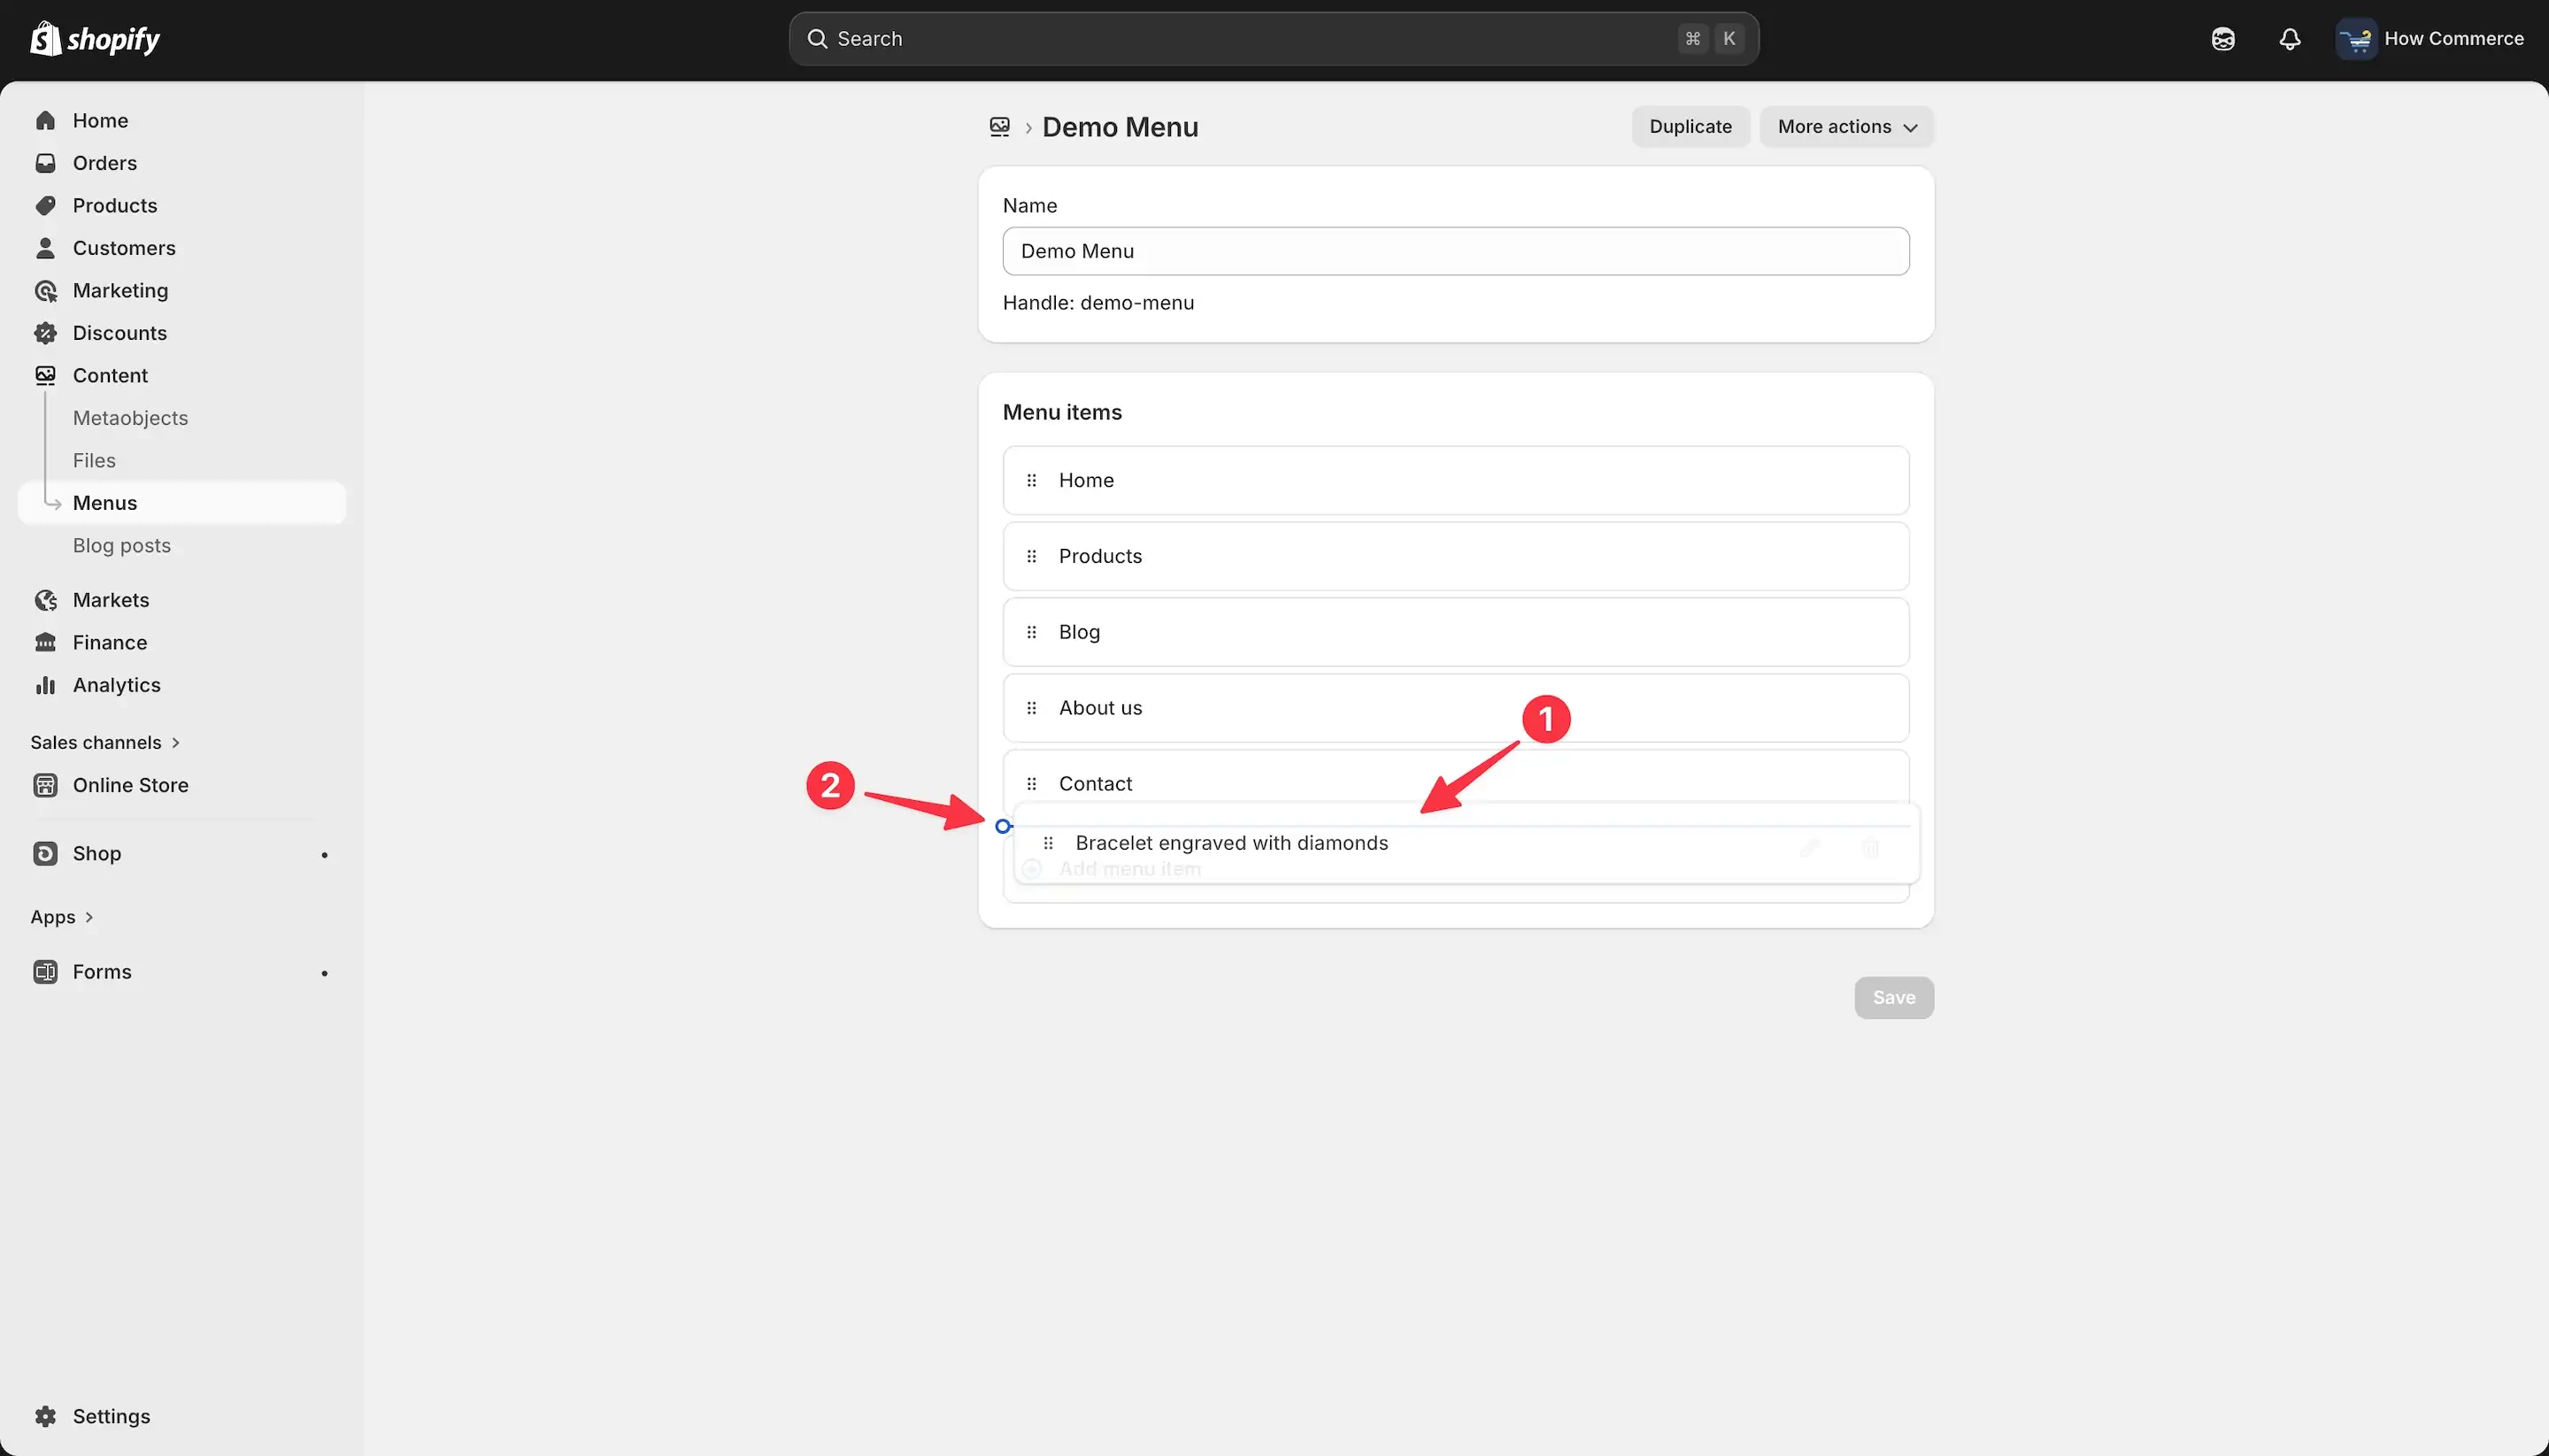
We are now positioning the menu item (marked as 1 in the image below) directly beneath the Products menu item.
The thin blue line with the circle in front (marked as 2 in the image below) indicates the exact placement where the item will be inserted if you release the mouse button.
At this stage, if you release it, the item will be placed below Products, but it will remain a Level 1 (parent) item.
It will simply appear as another top-level menu item positioned after Products, not as a child item.
To convert it into a Level 2 item, you must drag it slightly to the right until it becomes indented under Products.
The horizontal indentation is what defines the hierarchy level, not just the vertical position.
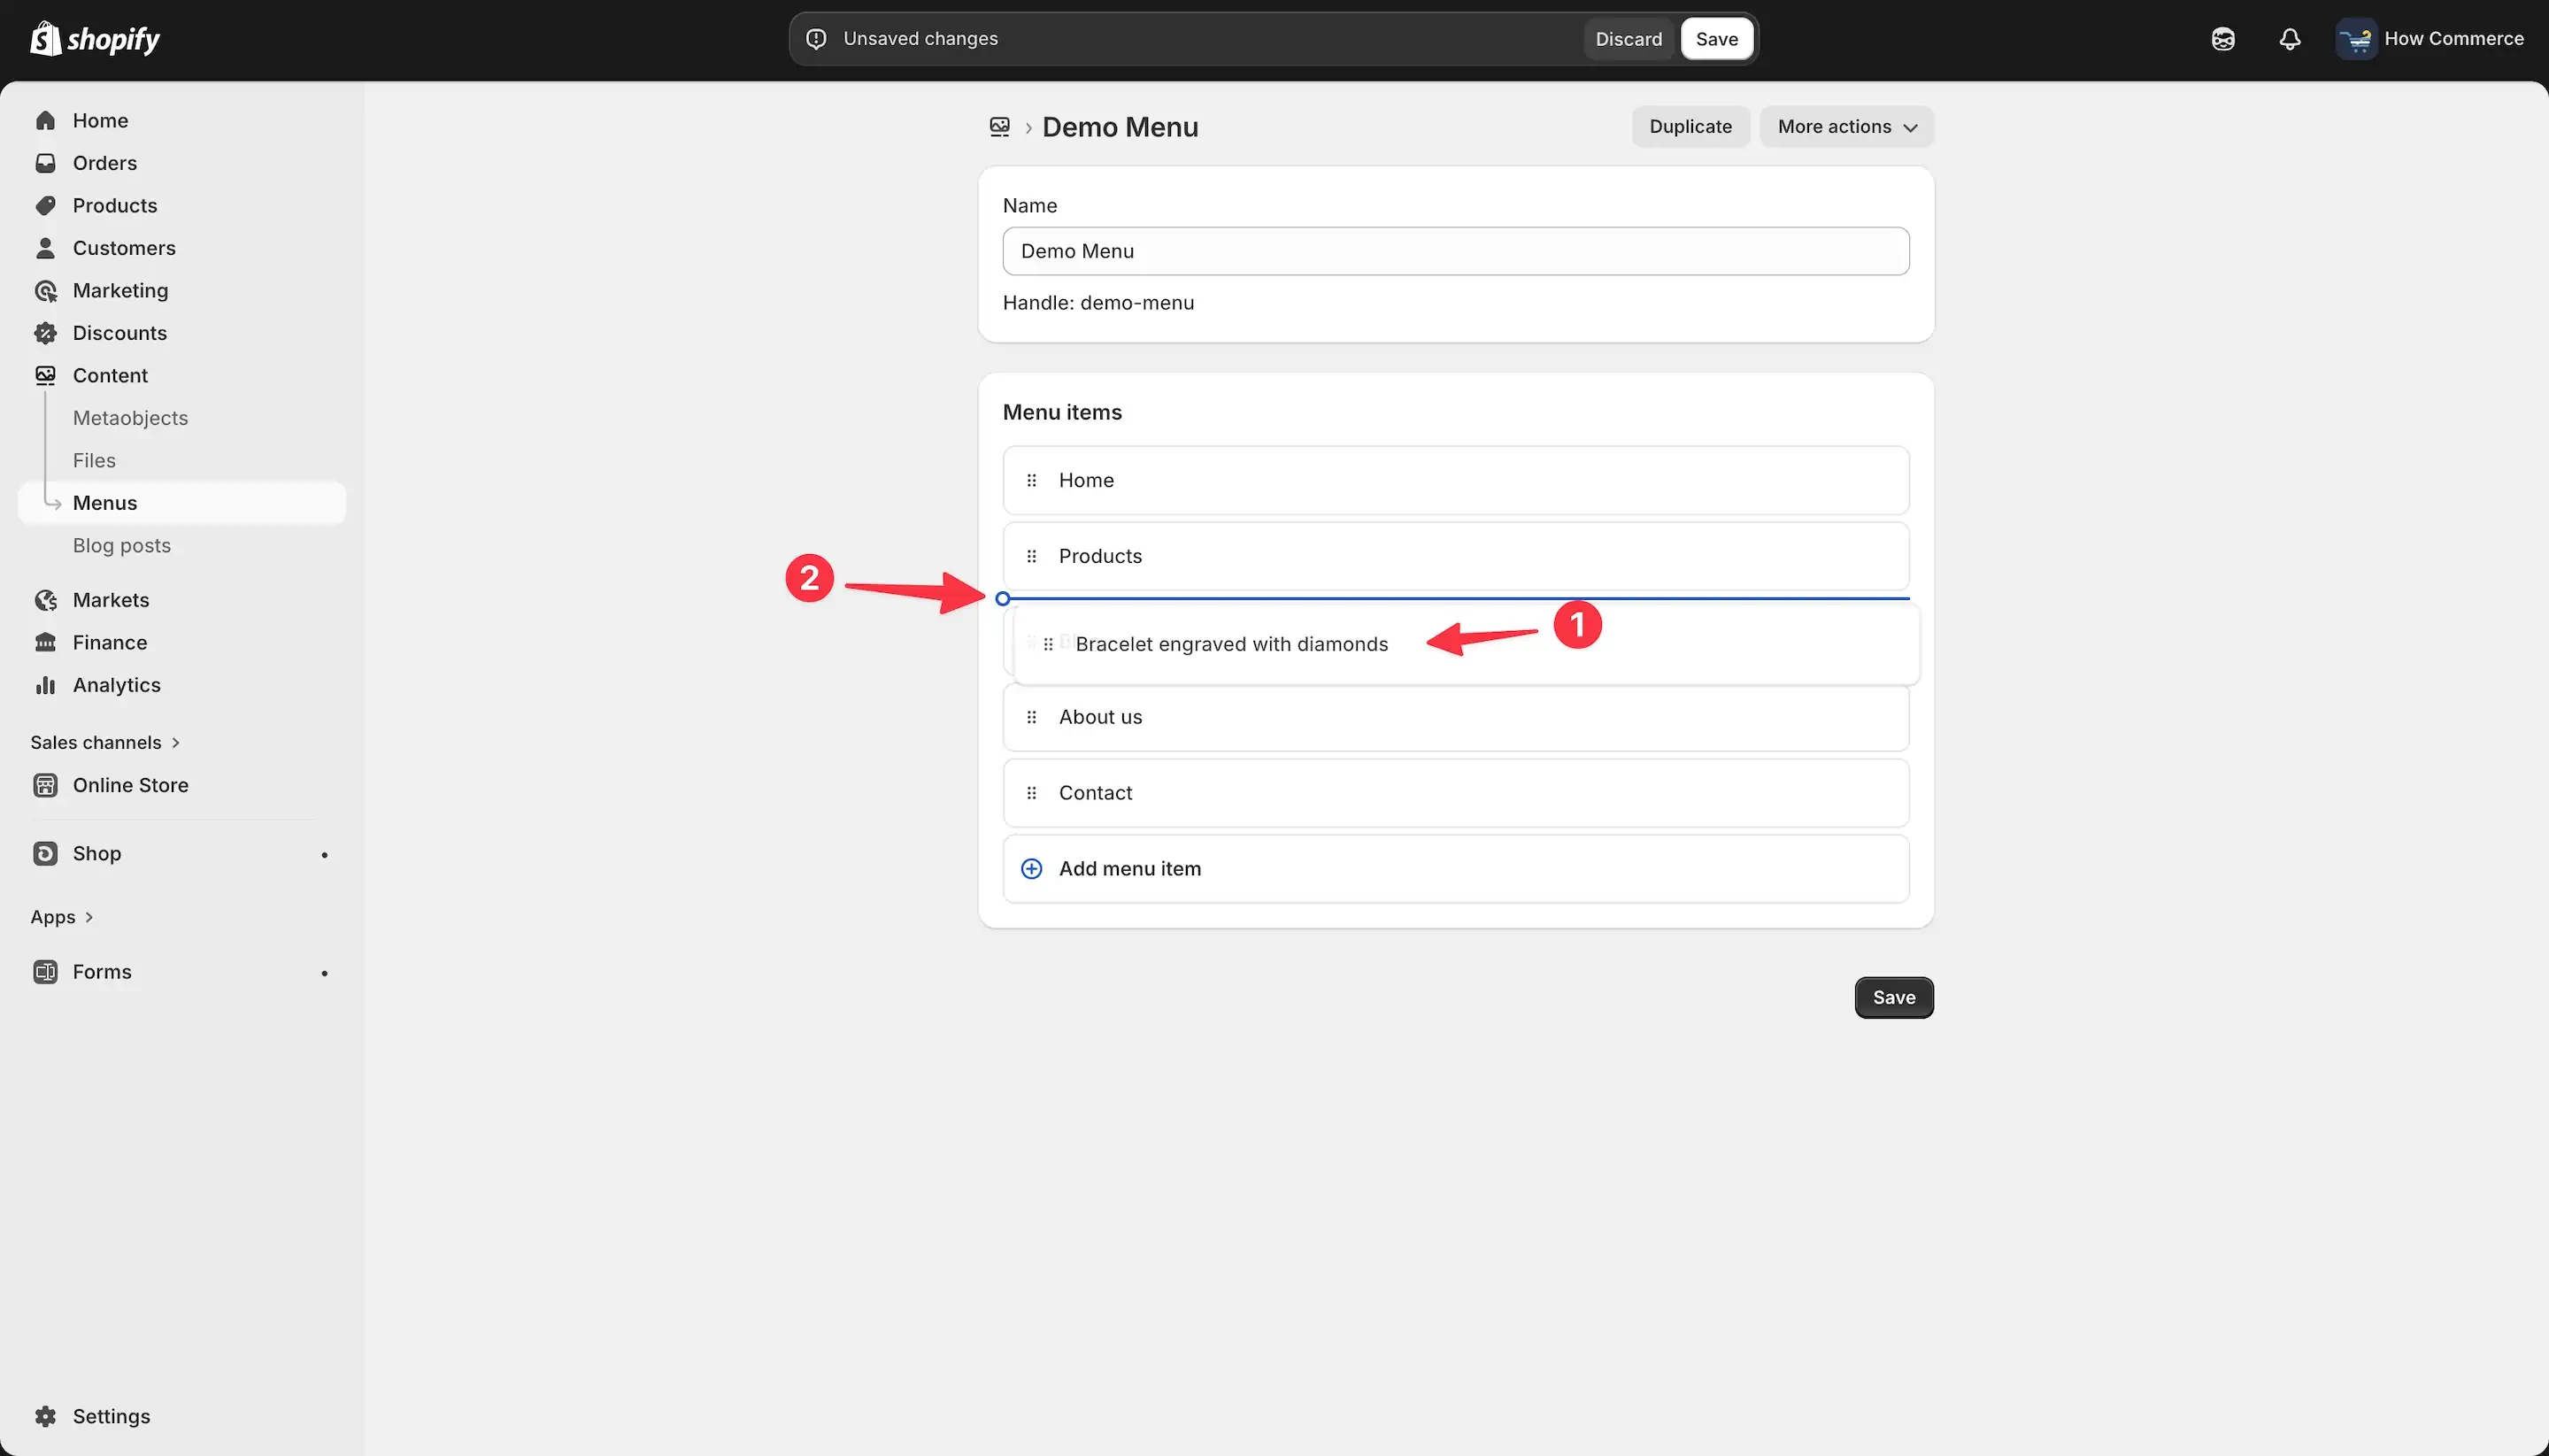
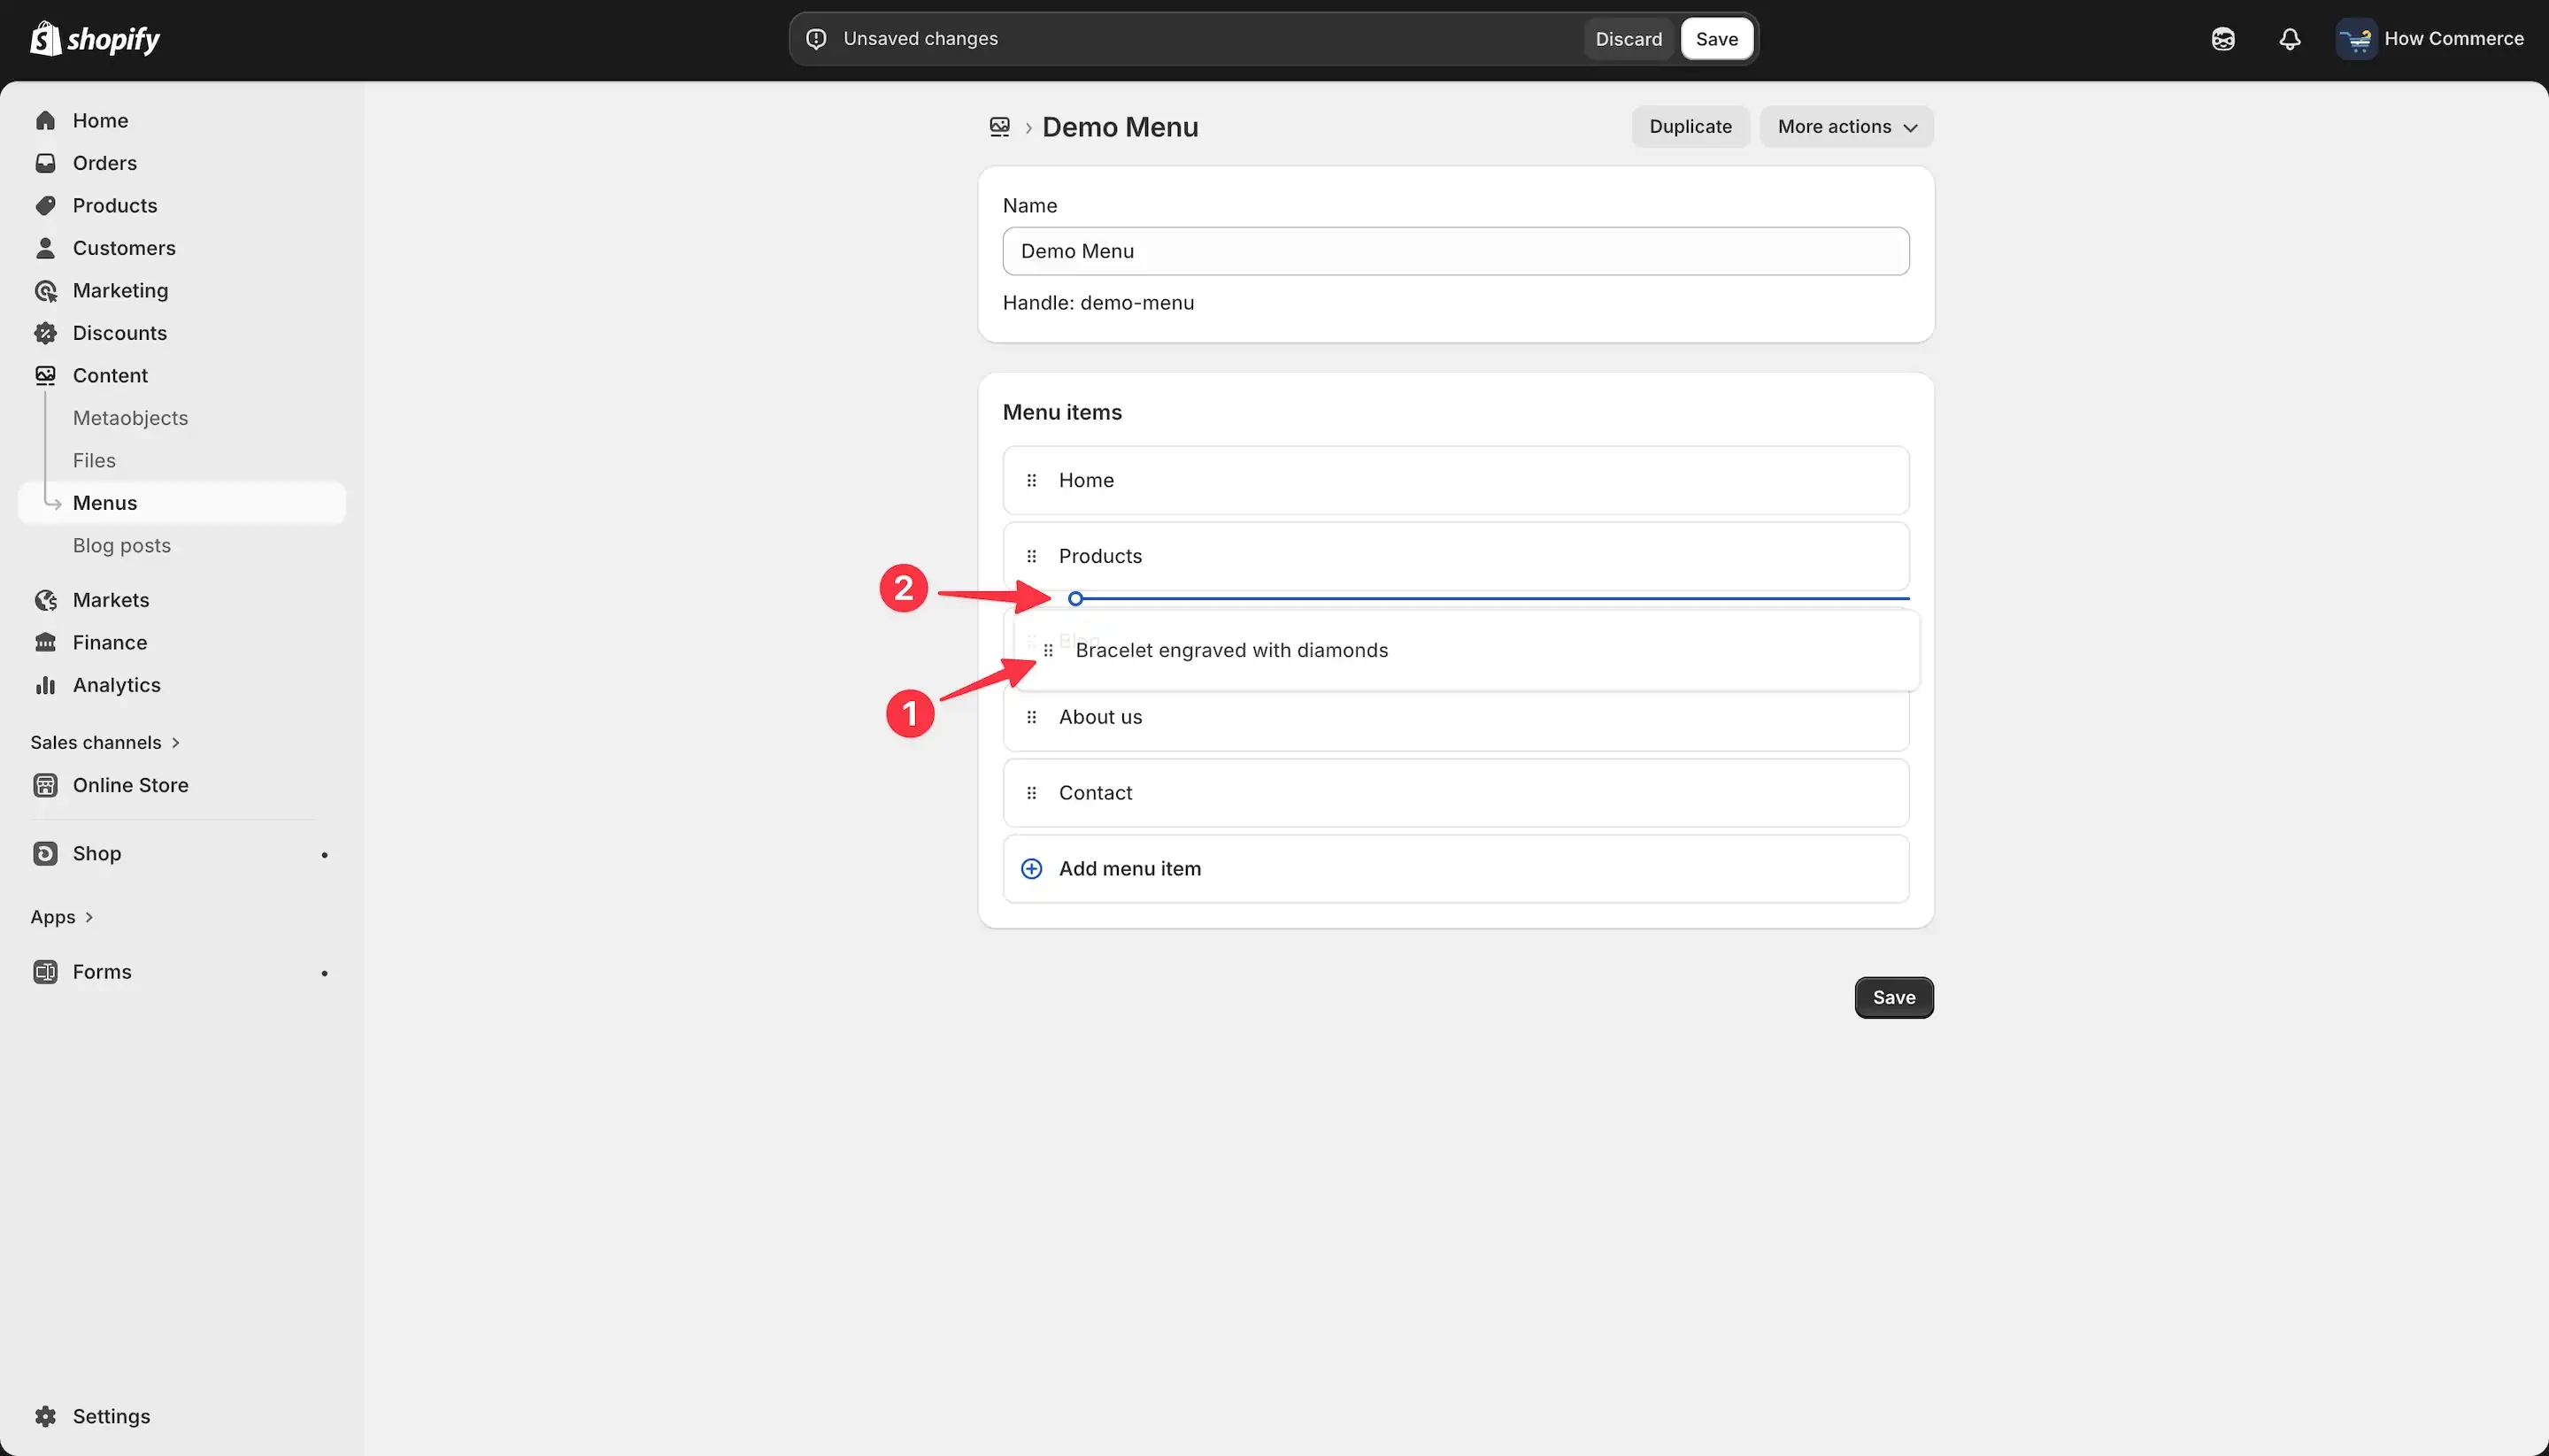
To make it a child or Level 2 item under the Products parent menu item, drag the menu item (marked with 1 in the image below) slightly to the right while keeping it in drag mode.
When the indentation is correct, you will see the small circle in front of the blue line shift slightly to the right (marked with 2 in the image below).
This visual cue confirms that the item will become a nested entry.
At this point, you can release the menu item (marked with 1 in the image below).
It will be placed directly under the Products menu item and converted into a child (Level 2) menu item.
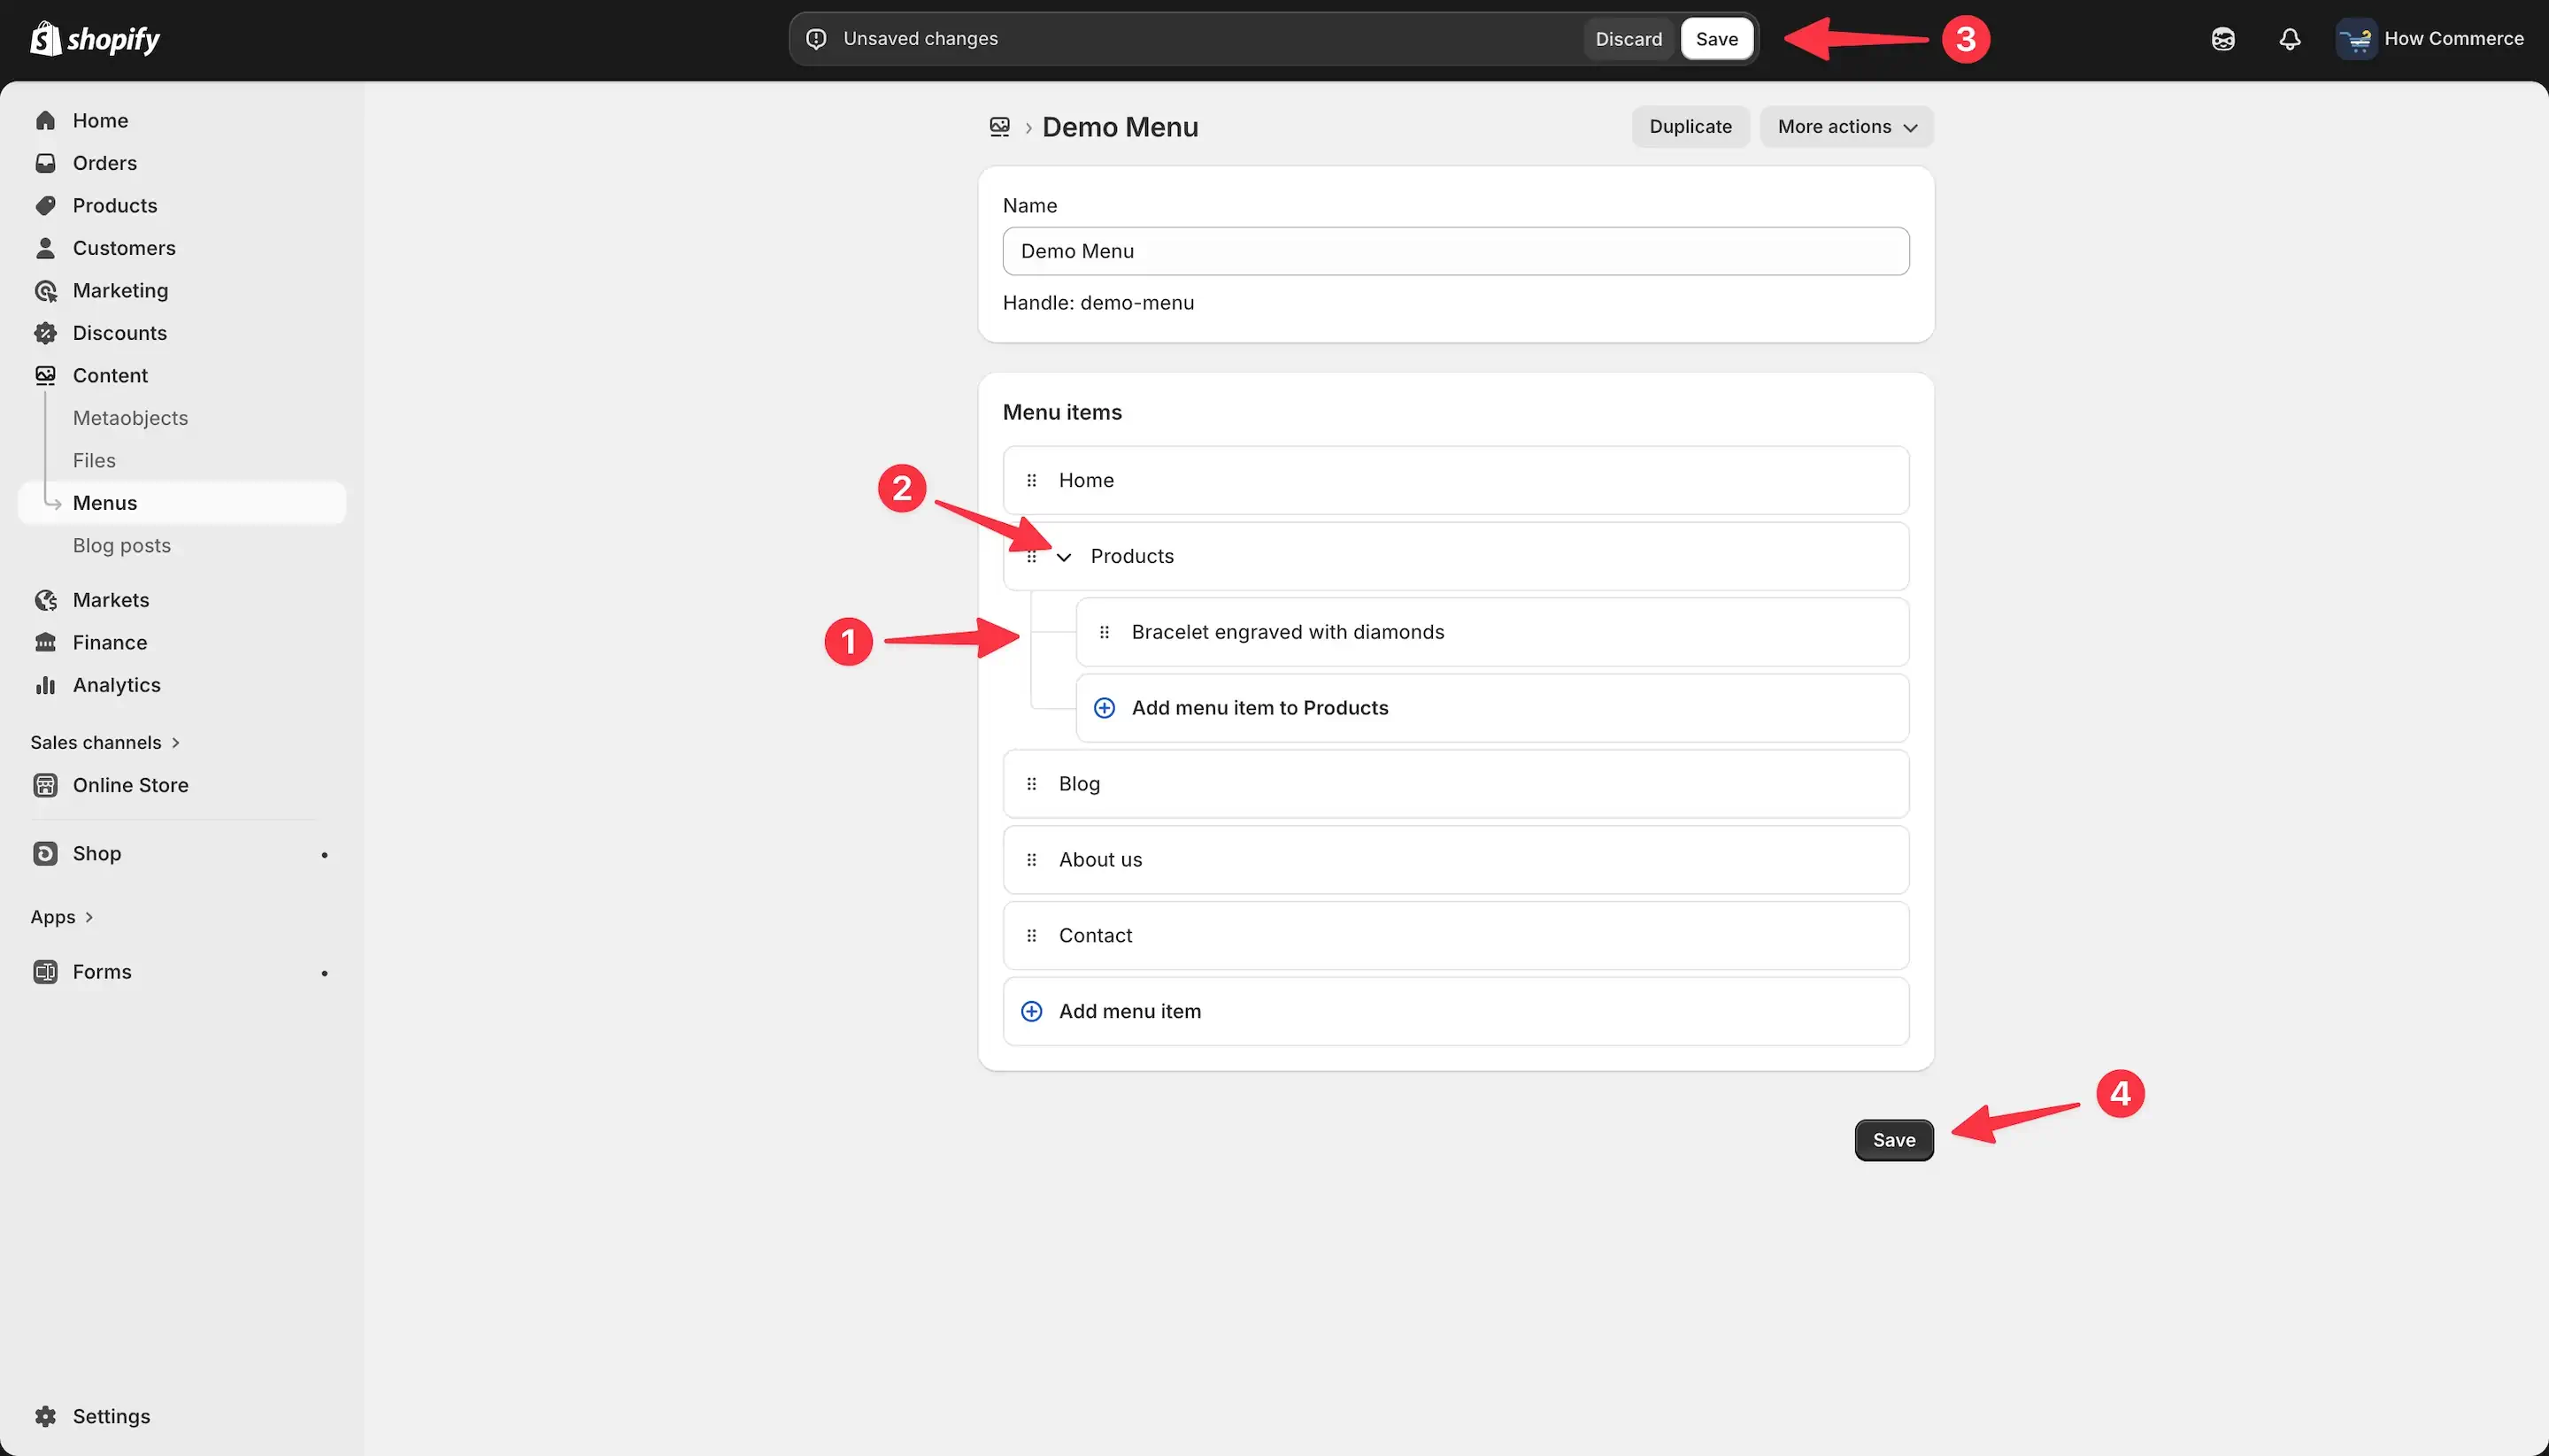
In the image below, you can see the menu item we added (marked with 1 in the image below) now positioned as a child of the Products menu item.
You will also notice that the Products menu item now displays a small downward arrow (marked with 2 in the image below).
This indicator confirms that the item contains nested links and will function as a drop-down in themes that support this structure.
If everything appears correctly and matches what you see in my screenshots, save your updated menu by clicking the Save button (marked with 3 or 4 in the image below).
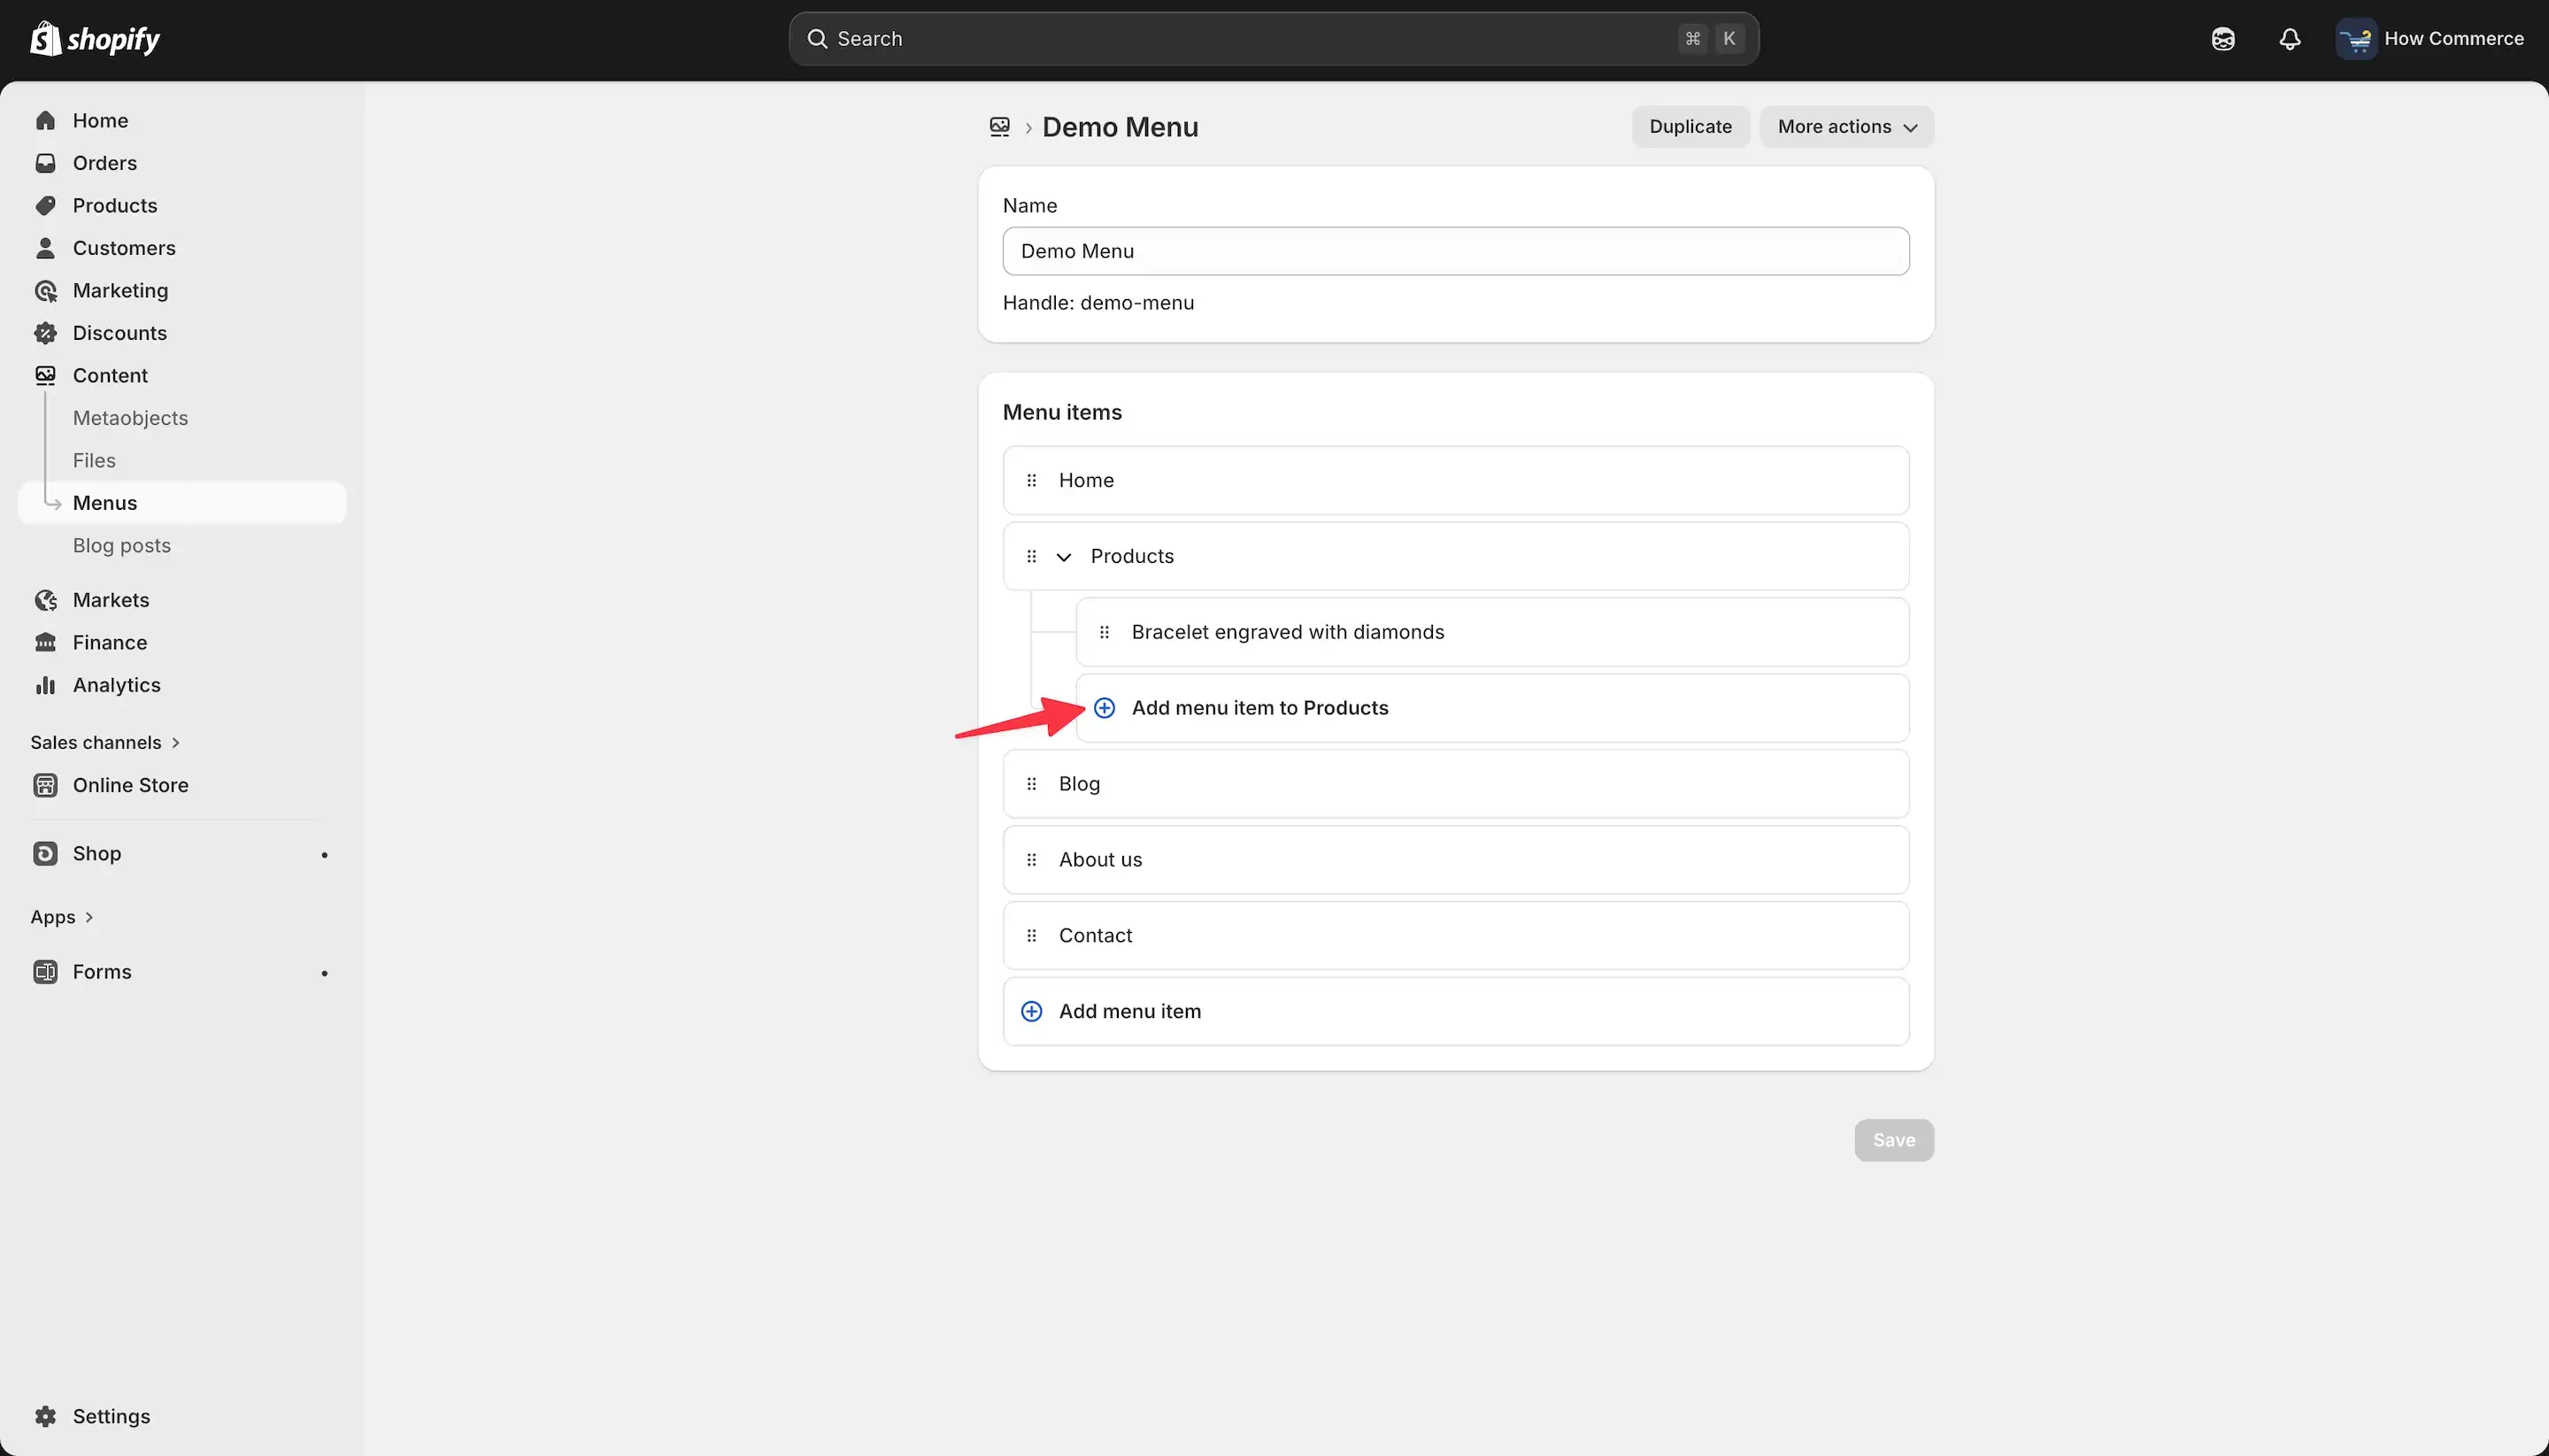
Now continue by adding all remaining child items directly under the parent item using the “Add menu item to …” option as seen in the image below.
When you use this option, Shopify automatically places the new item as a child (Level 2) under the selected parent.
This eliminates the need to manually drag and indent the item afterward.
Simply:
- Click Add menu item to Products (as shown in the image below).
- Enter the label.
- Select the appropriate link.
- Confirm with the check icon.
- Click Save once all items are added.
Repeat this process until all desired Level 2 items are properly nested under the parent menu item.
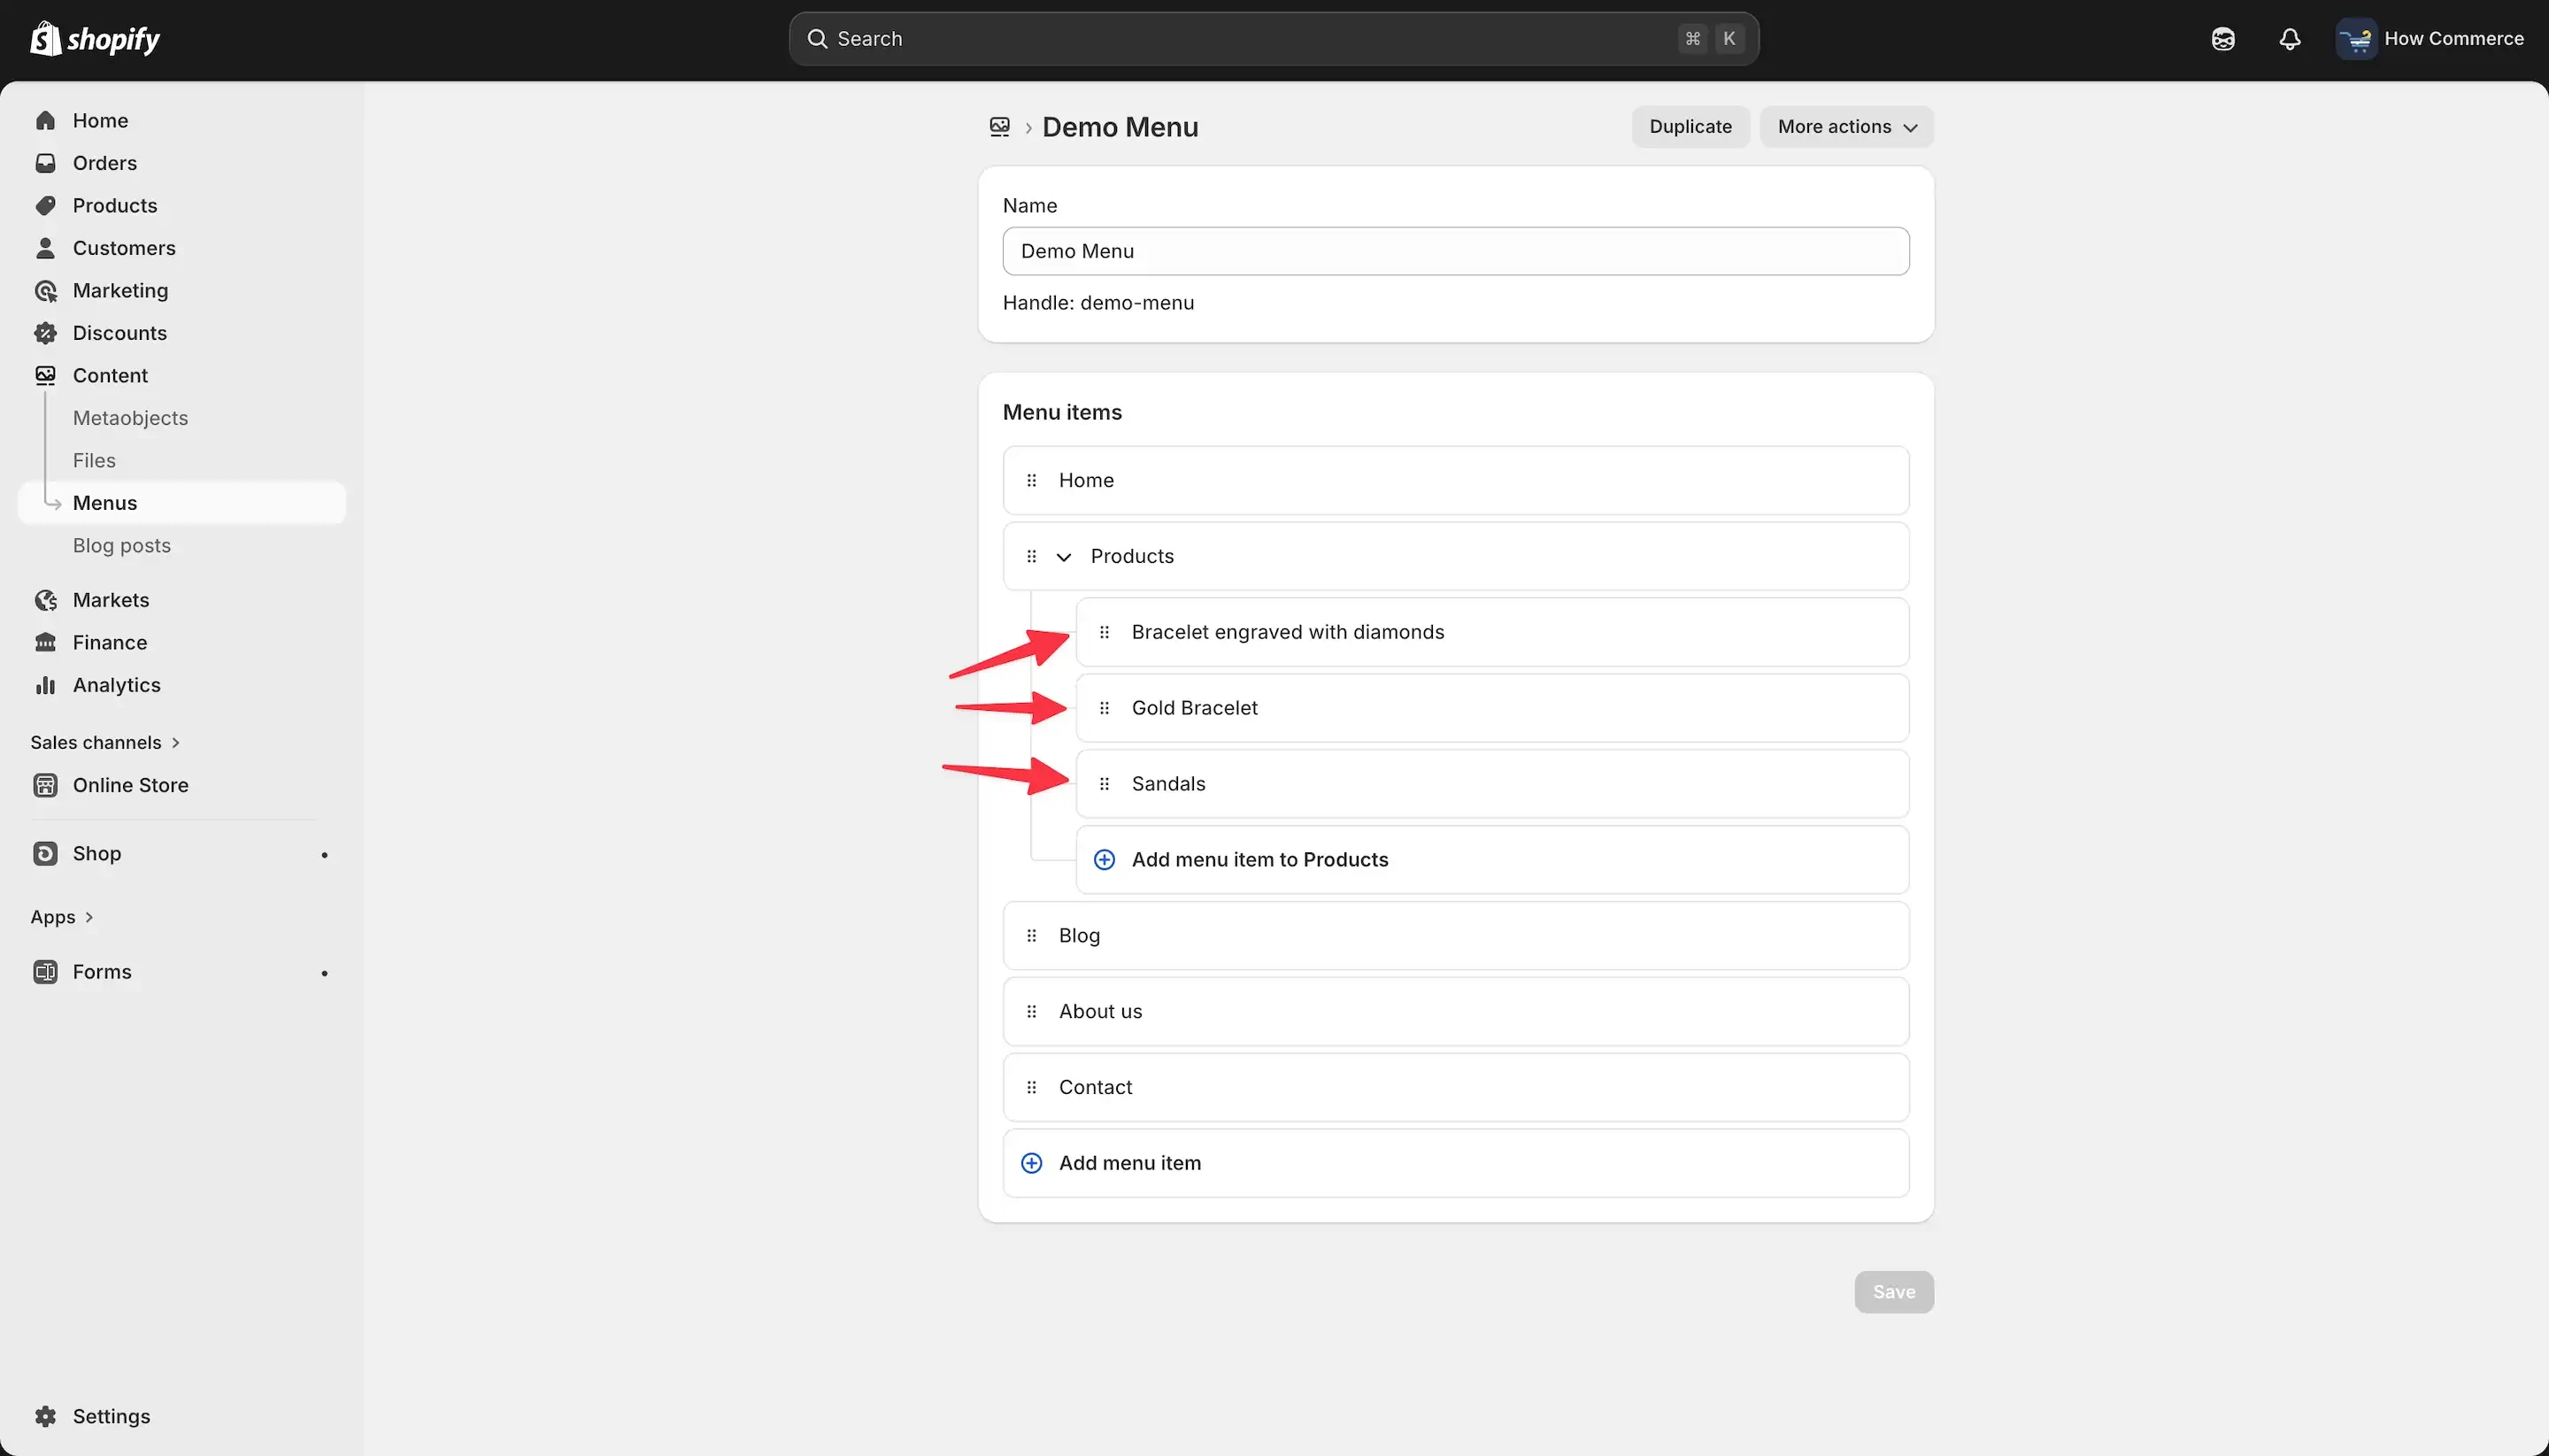
In the image below, you can see that I have added three child items under the Products parent item as an example.
Each of these items is properly indented, indicating that they are Level 2 entries.
The downward arrow next to Products confirms that it now contains nested links and will function as a drop-down in supported themes.
At this stage, the structure is correct for a basic drop-down menu.
If needed, you can continue expanding the hierarchy by adding Level 3 (grandchild) items under any of these Level 2 entries.
Shopify’s Navigation interface is entirely based on drag-and-drop functionality.
This applies both to creating hierarchy levels and to rearranging existing items.
If you are not satisfied with the order of your menu items, there is no need to delete and recreate them.
Simply drag and drop each item to the desired position.
You can:
- Move a Level 2 item back to Level 1
- Convert a Level 1 item into a Level 2 item
- Reorder items within the same level
- Change the structure at any time
The hierarchy is controlled entirely by vertical placement and horizontal indentation.
In this example, I will not create Level 3 (grandchild) items, as the process is identical to what we have already demonstrated.
The same drag-and-indent method applies.
I will leave the menu structure as it is and move on to the next step.
Creating the menu structure in Shopify Admin is only half of the process.
Now, we must assign this menu to a location within the theme that supports drop-down functionality.
If you assign the menu to a theme position that does not support drop-down behavior:
- The menu may appear unstyled or “raw”
- Level 2 items may not be displayed at all
- Only the parent (Level 1) items may be visible on the storefront
The theme controls how navigation is rendered. Structure alone does not guarantee drop-down functionality.
Assign the menu to a drop-down position in the theme
To display your newly created menu as a drop-down on the storefront, you must assign it to a theme location that supports drop-down navigation.
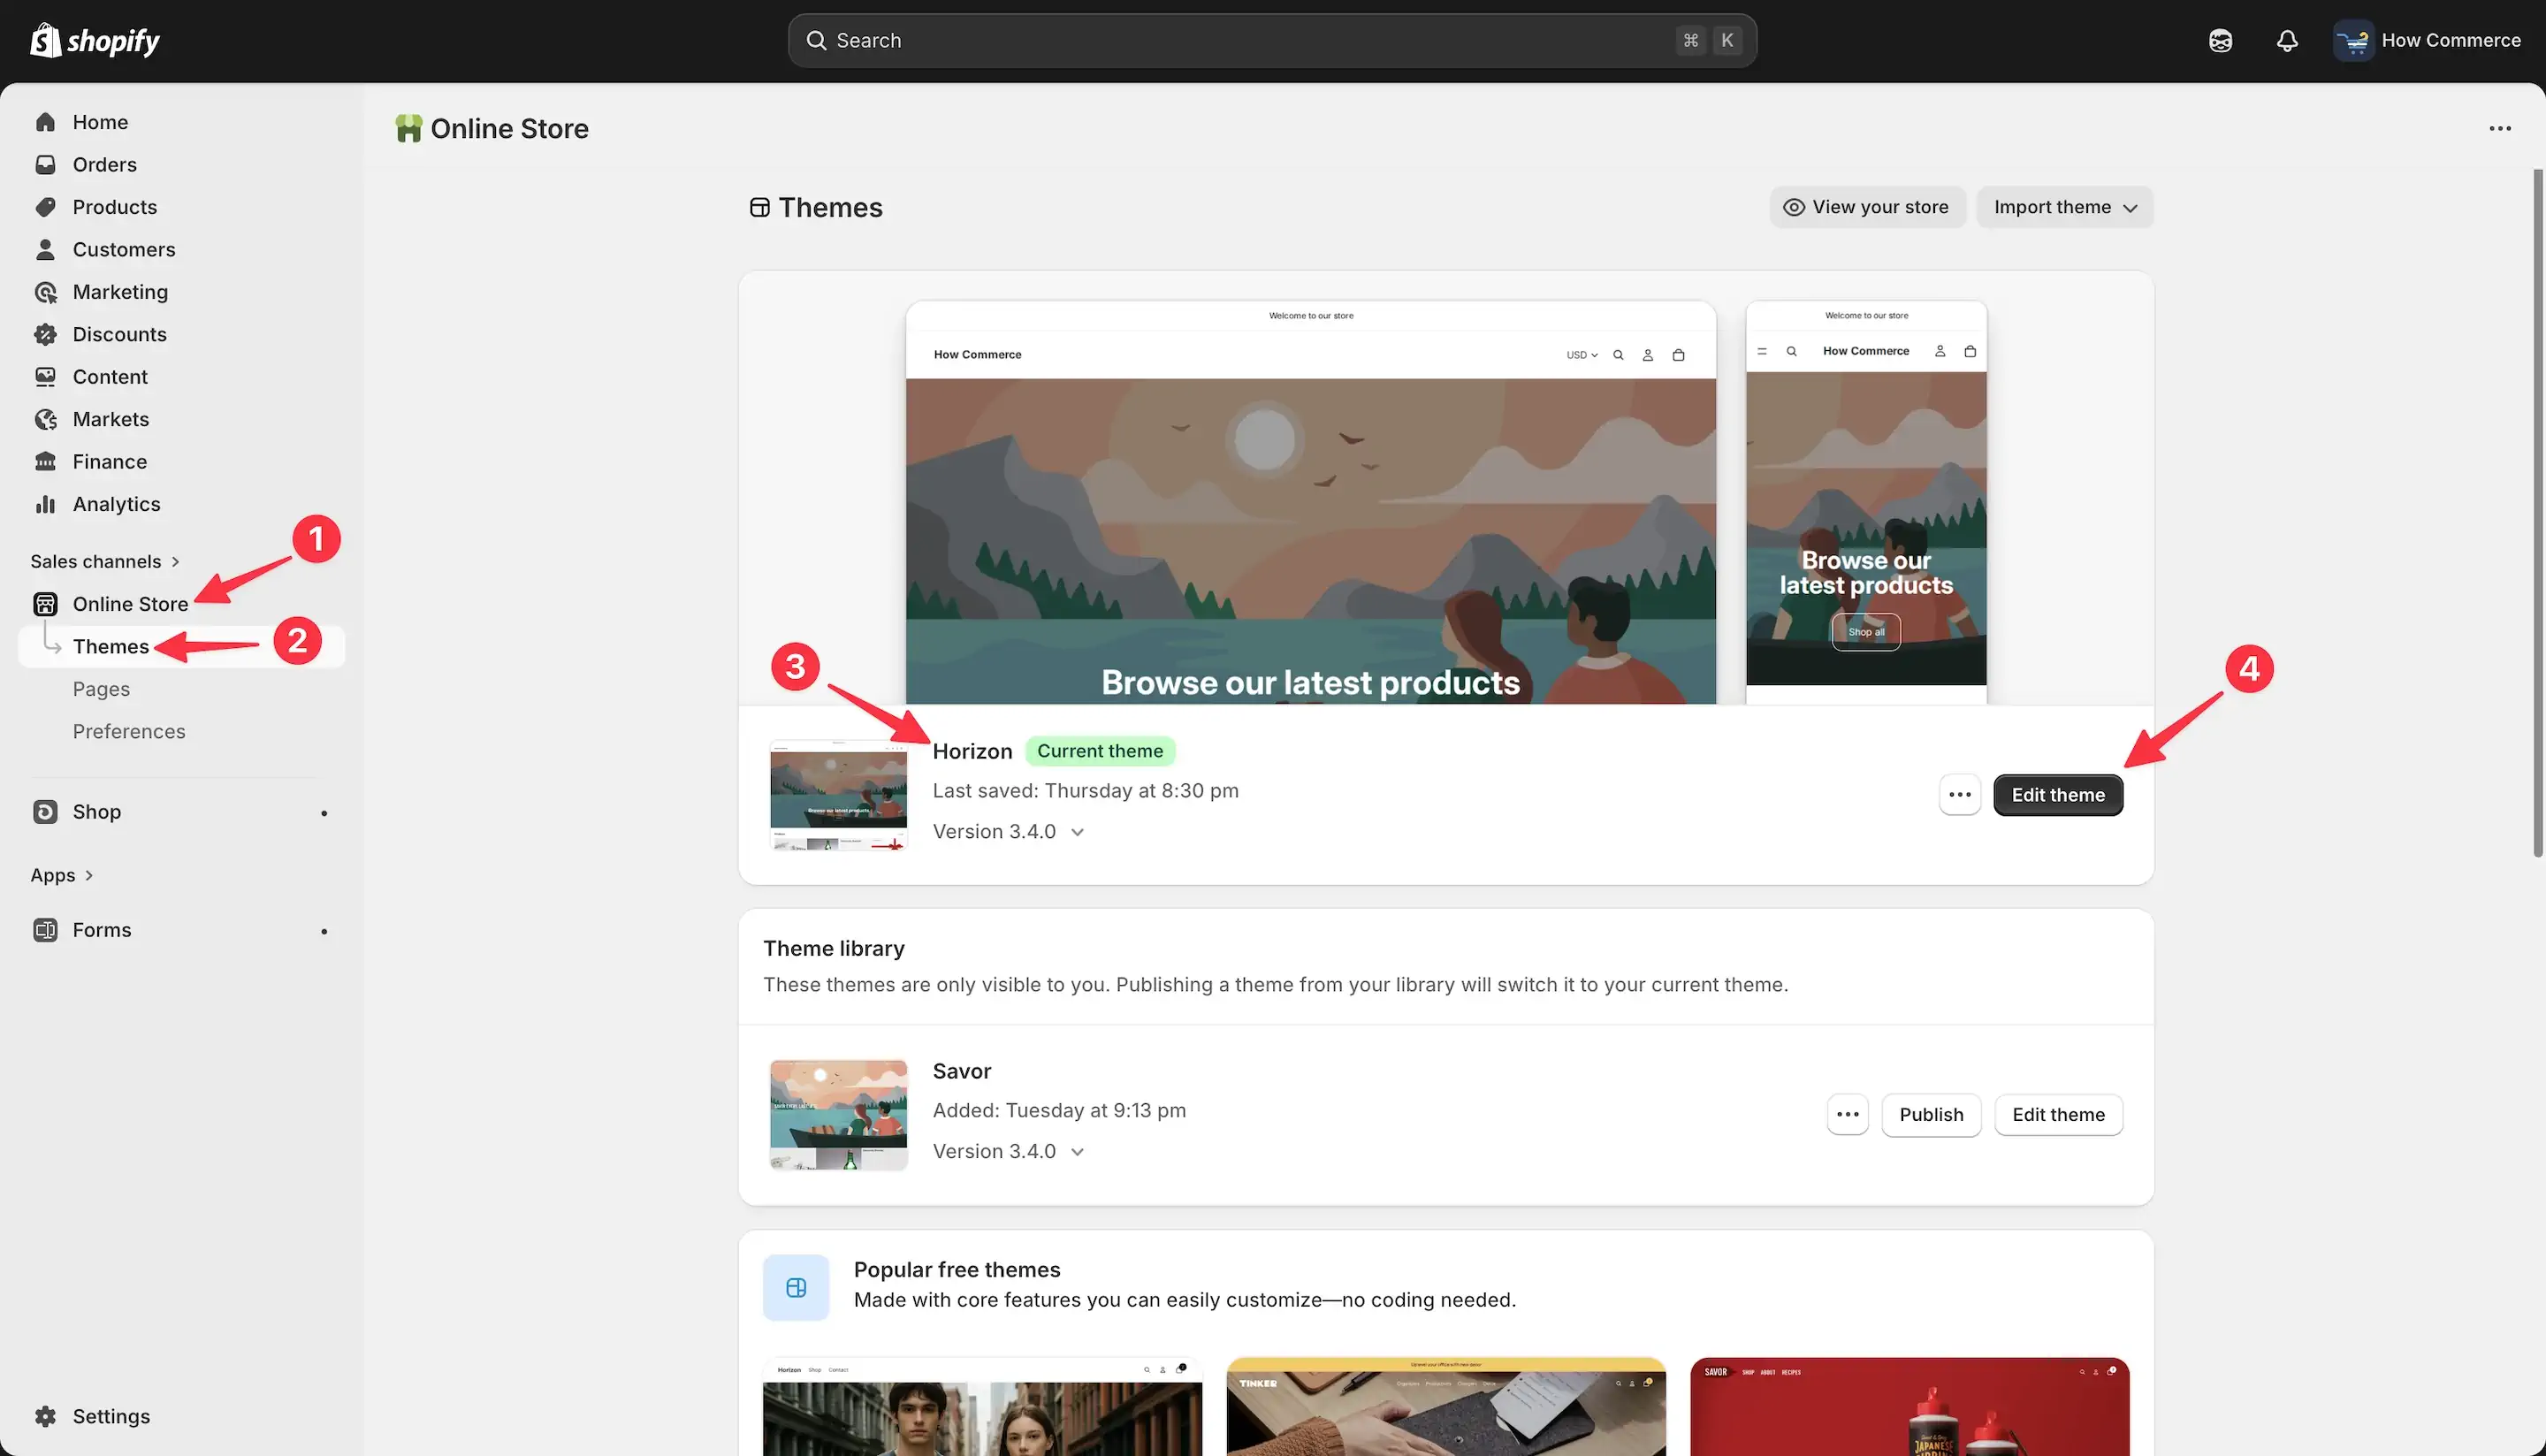
First, navigate to the theme listing page:
Go to Online Store (marked with 1 in the image below) → Themes (marked with 2 in the image below).
In my example, I am using the Horison theme (marked with 3 in the image below).
However, the process is similar across most modern Shopify themes, as drop-down menu settings are generally handled in the same way.
Next, click Customize or Edit theme (marked with 4 in the image below), depending on your interface version.
This will open the Theme Editor, where you can assign your menu to the header or another navigation area that supports drop-down functionality.
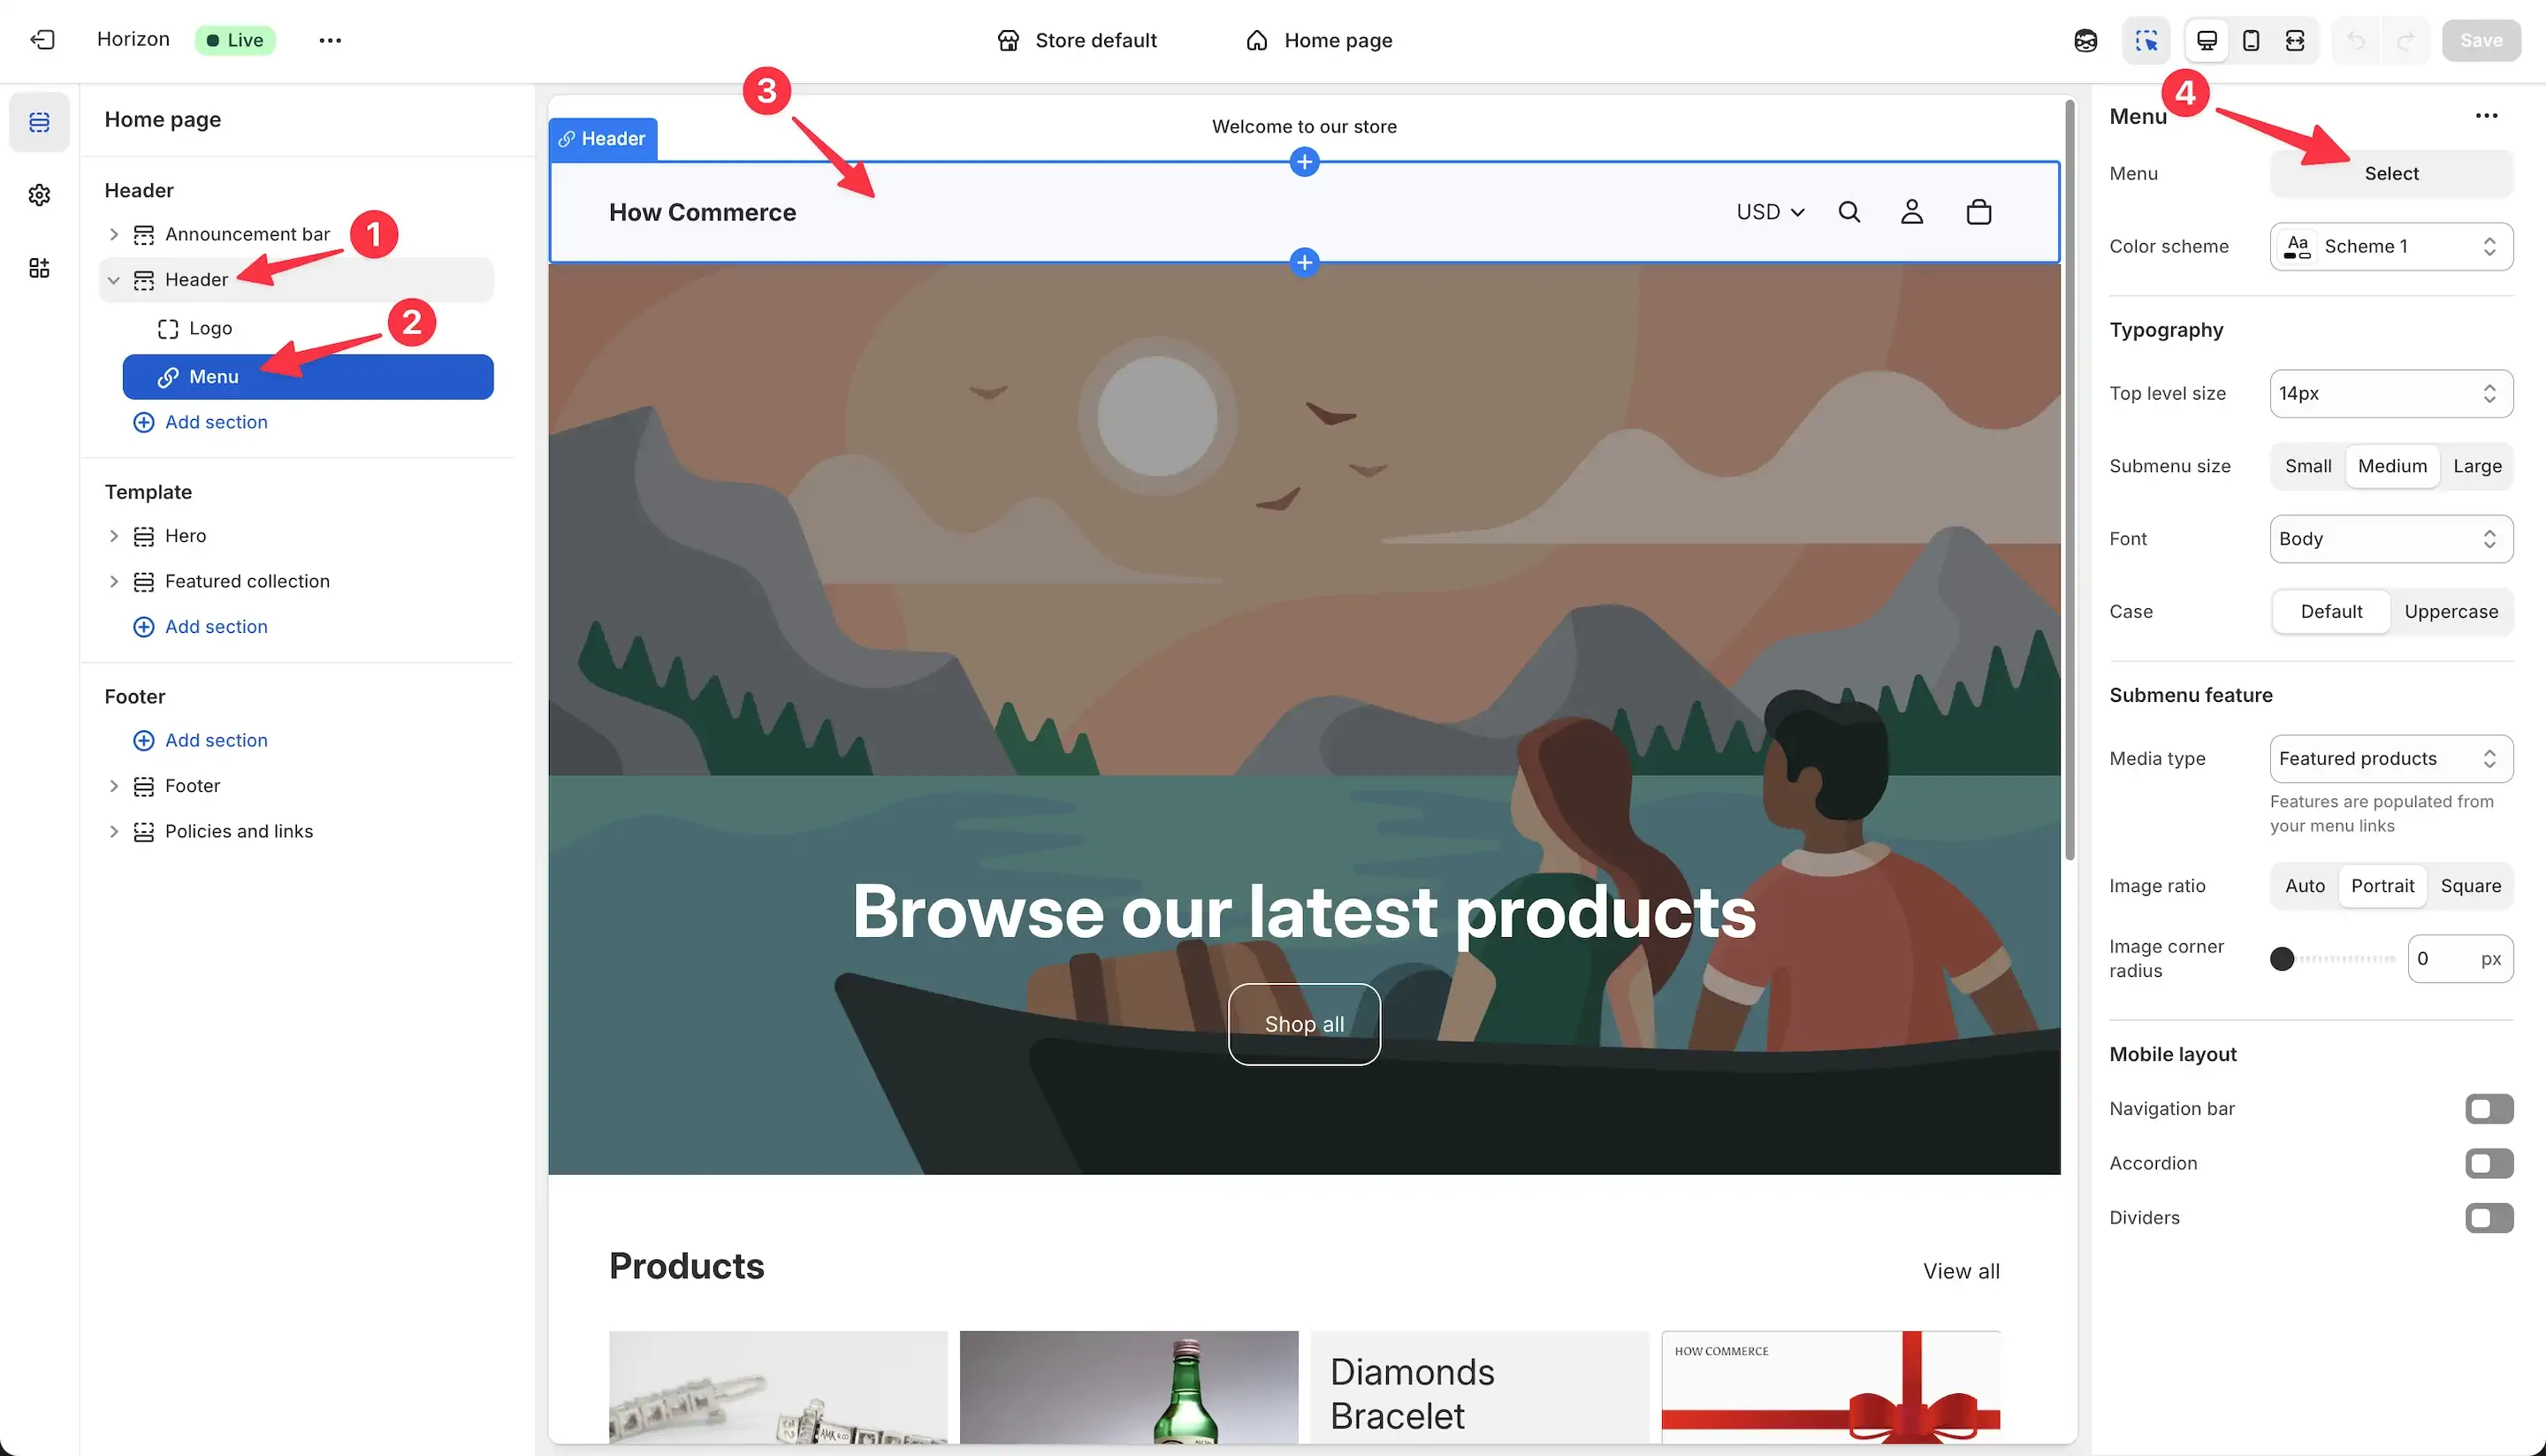
In Shopify’s Theme Editor, navigation elements are added through blocks, and blocks always exist inside sections.
Since we want the drop-down menu to appear in the main site navigation, we need to locate the appropriate block inside the Header section (marked with 1 in the image below).
Open the Header section (marked with 1 in the image below).
In my example, the Menu block is already present (marked with 2 in the image below).
If the Menu block is not listed, you will need to add it manually:
- Click Add block
- Select Menu
Once the Menu block is added and a menu is assigned to it, it will appear in the navigation area next to the logo (marked with 3 in the image below).
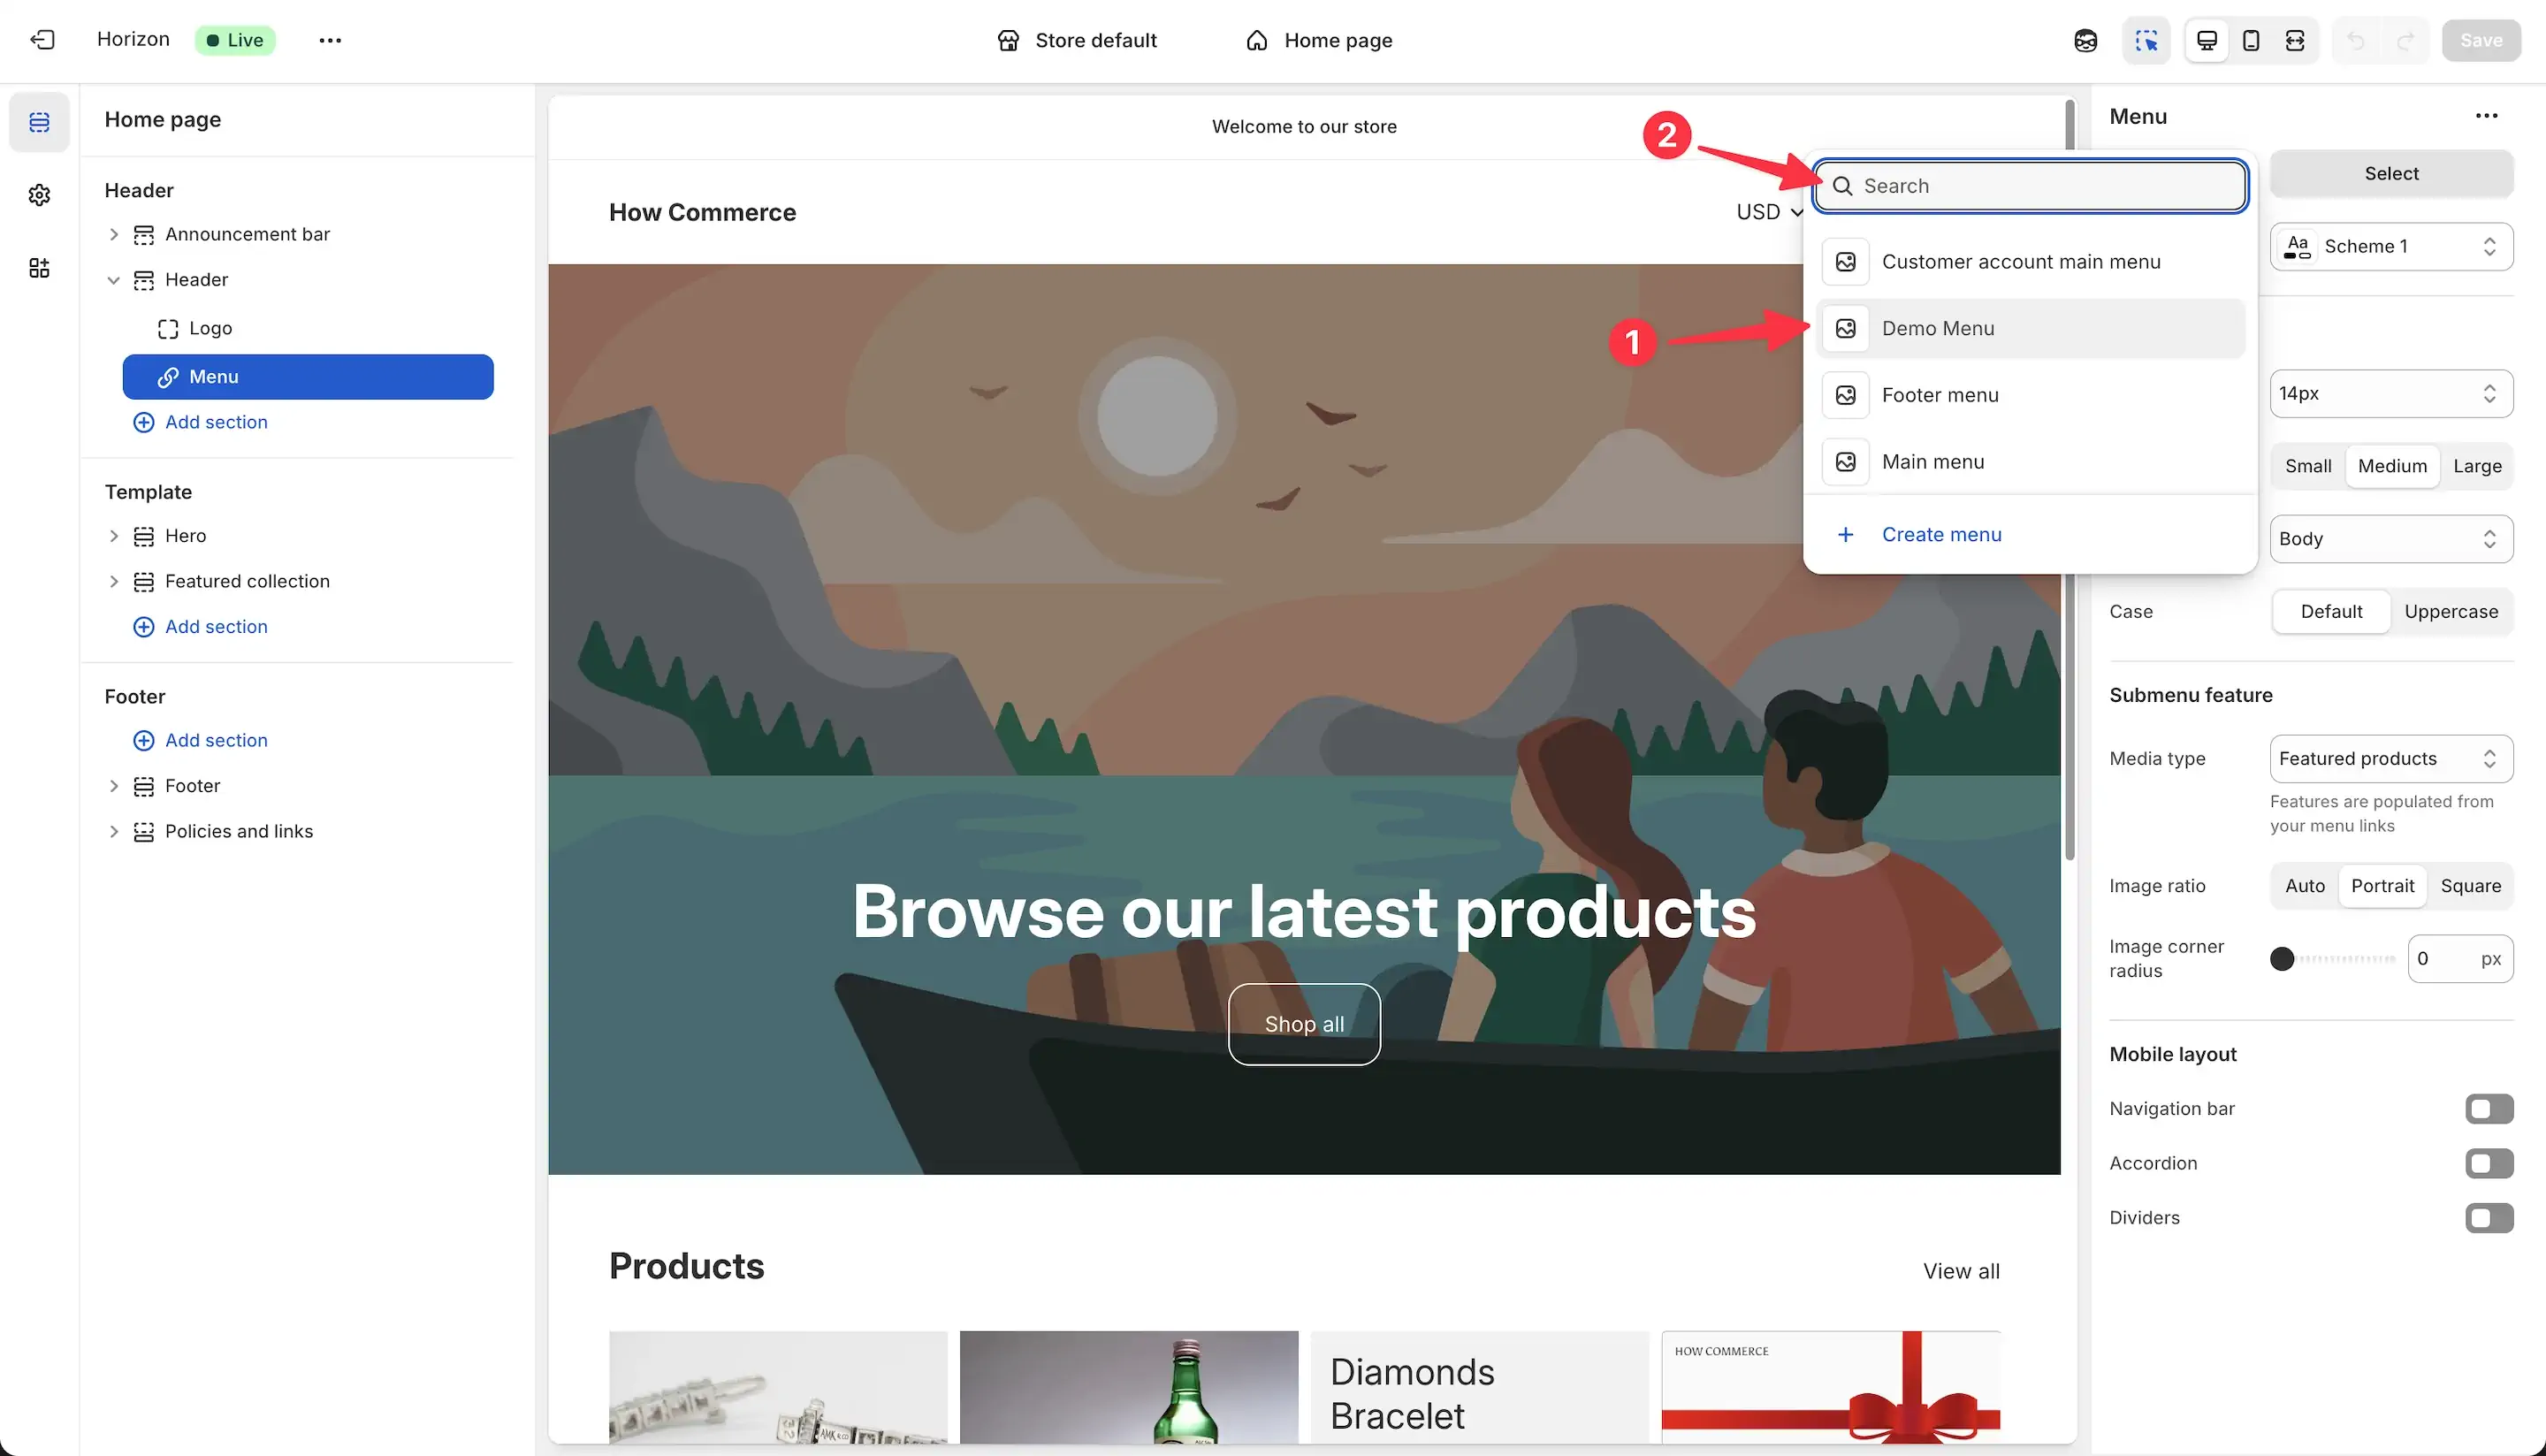
Next, open the Menu block settings and locate the Select input field (marked with 4 in the image below). Click on it to open the list of available menus.
From there, choose the menu we created earlier.
A drop-down panel with a search field will display all existing menus available in your Shopify store.
In this example, I will select the Demo Menu (marked with 1 in the image below), which we created earlier.
Click on it to assign it to the Menu block.
If your store contains many menus, you can use the Search field (marked with 2 in the image below) to quickly locate the correct menu by name.
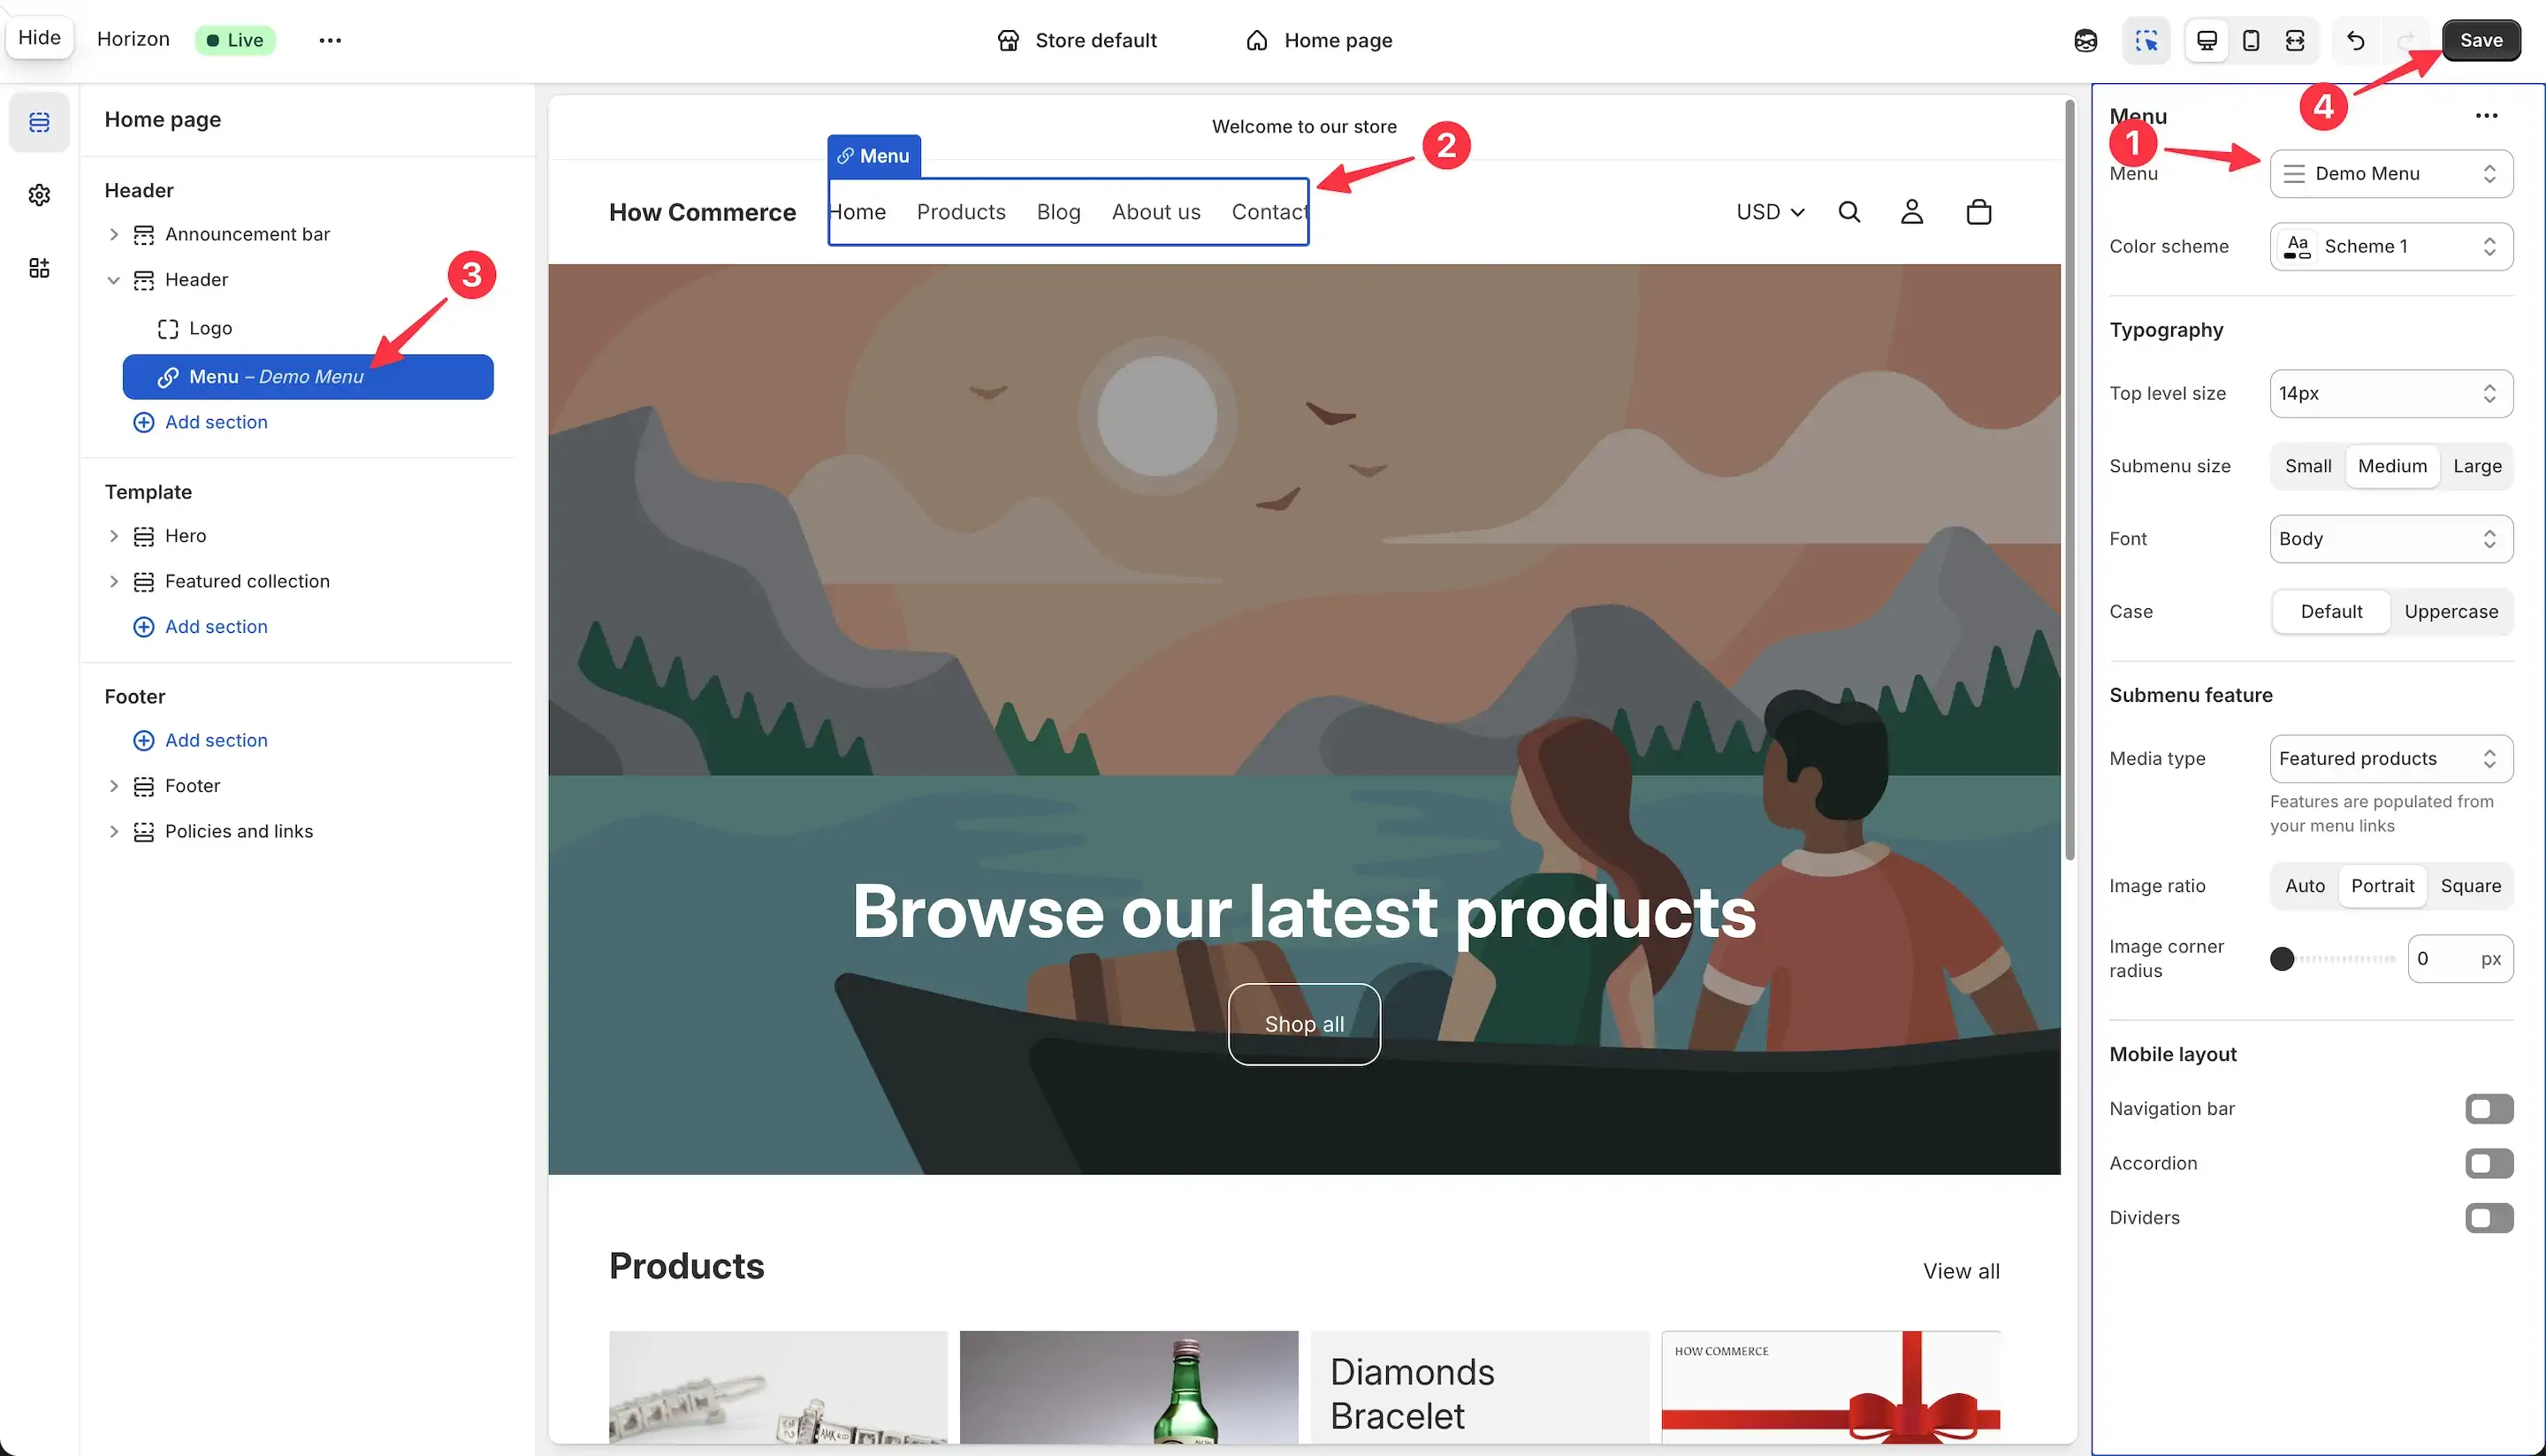
Select the menu (marked with 1 in the image below).
After selecting it, the newly assigned drop-down menu will appear in the preview area (marked with 2 in the image below), reflecting the structure you created in Navigation.
You will also notice that the selected menu name is displayed inside the Menu block title (marked with 3 in the image below).
This confirms that the correct menu is now linked to the Header section.
Once everything is configured correctly, click the Save button (marked with 4 in the image below) to apply and publish your changes.
Preview the drop-down menu on the storefront
Now let’s verify that the menu is working correctly on the storefront.
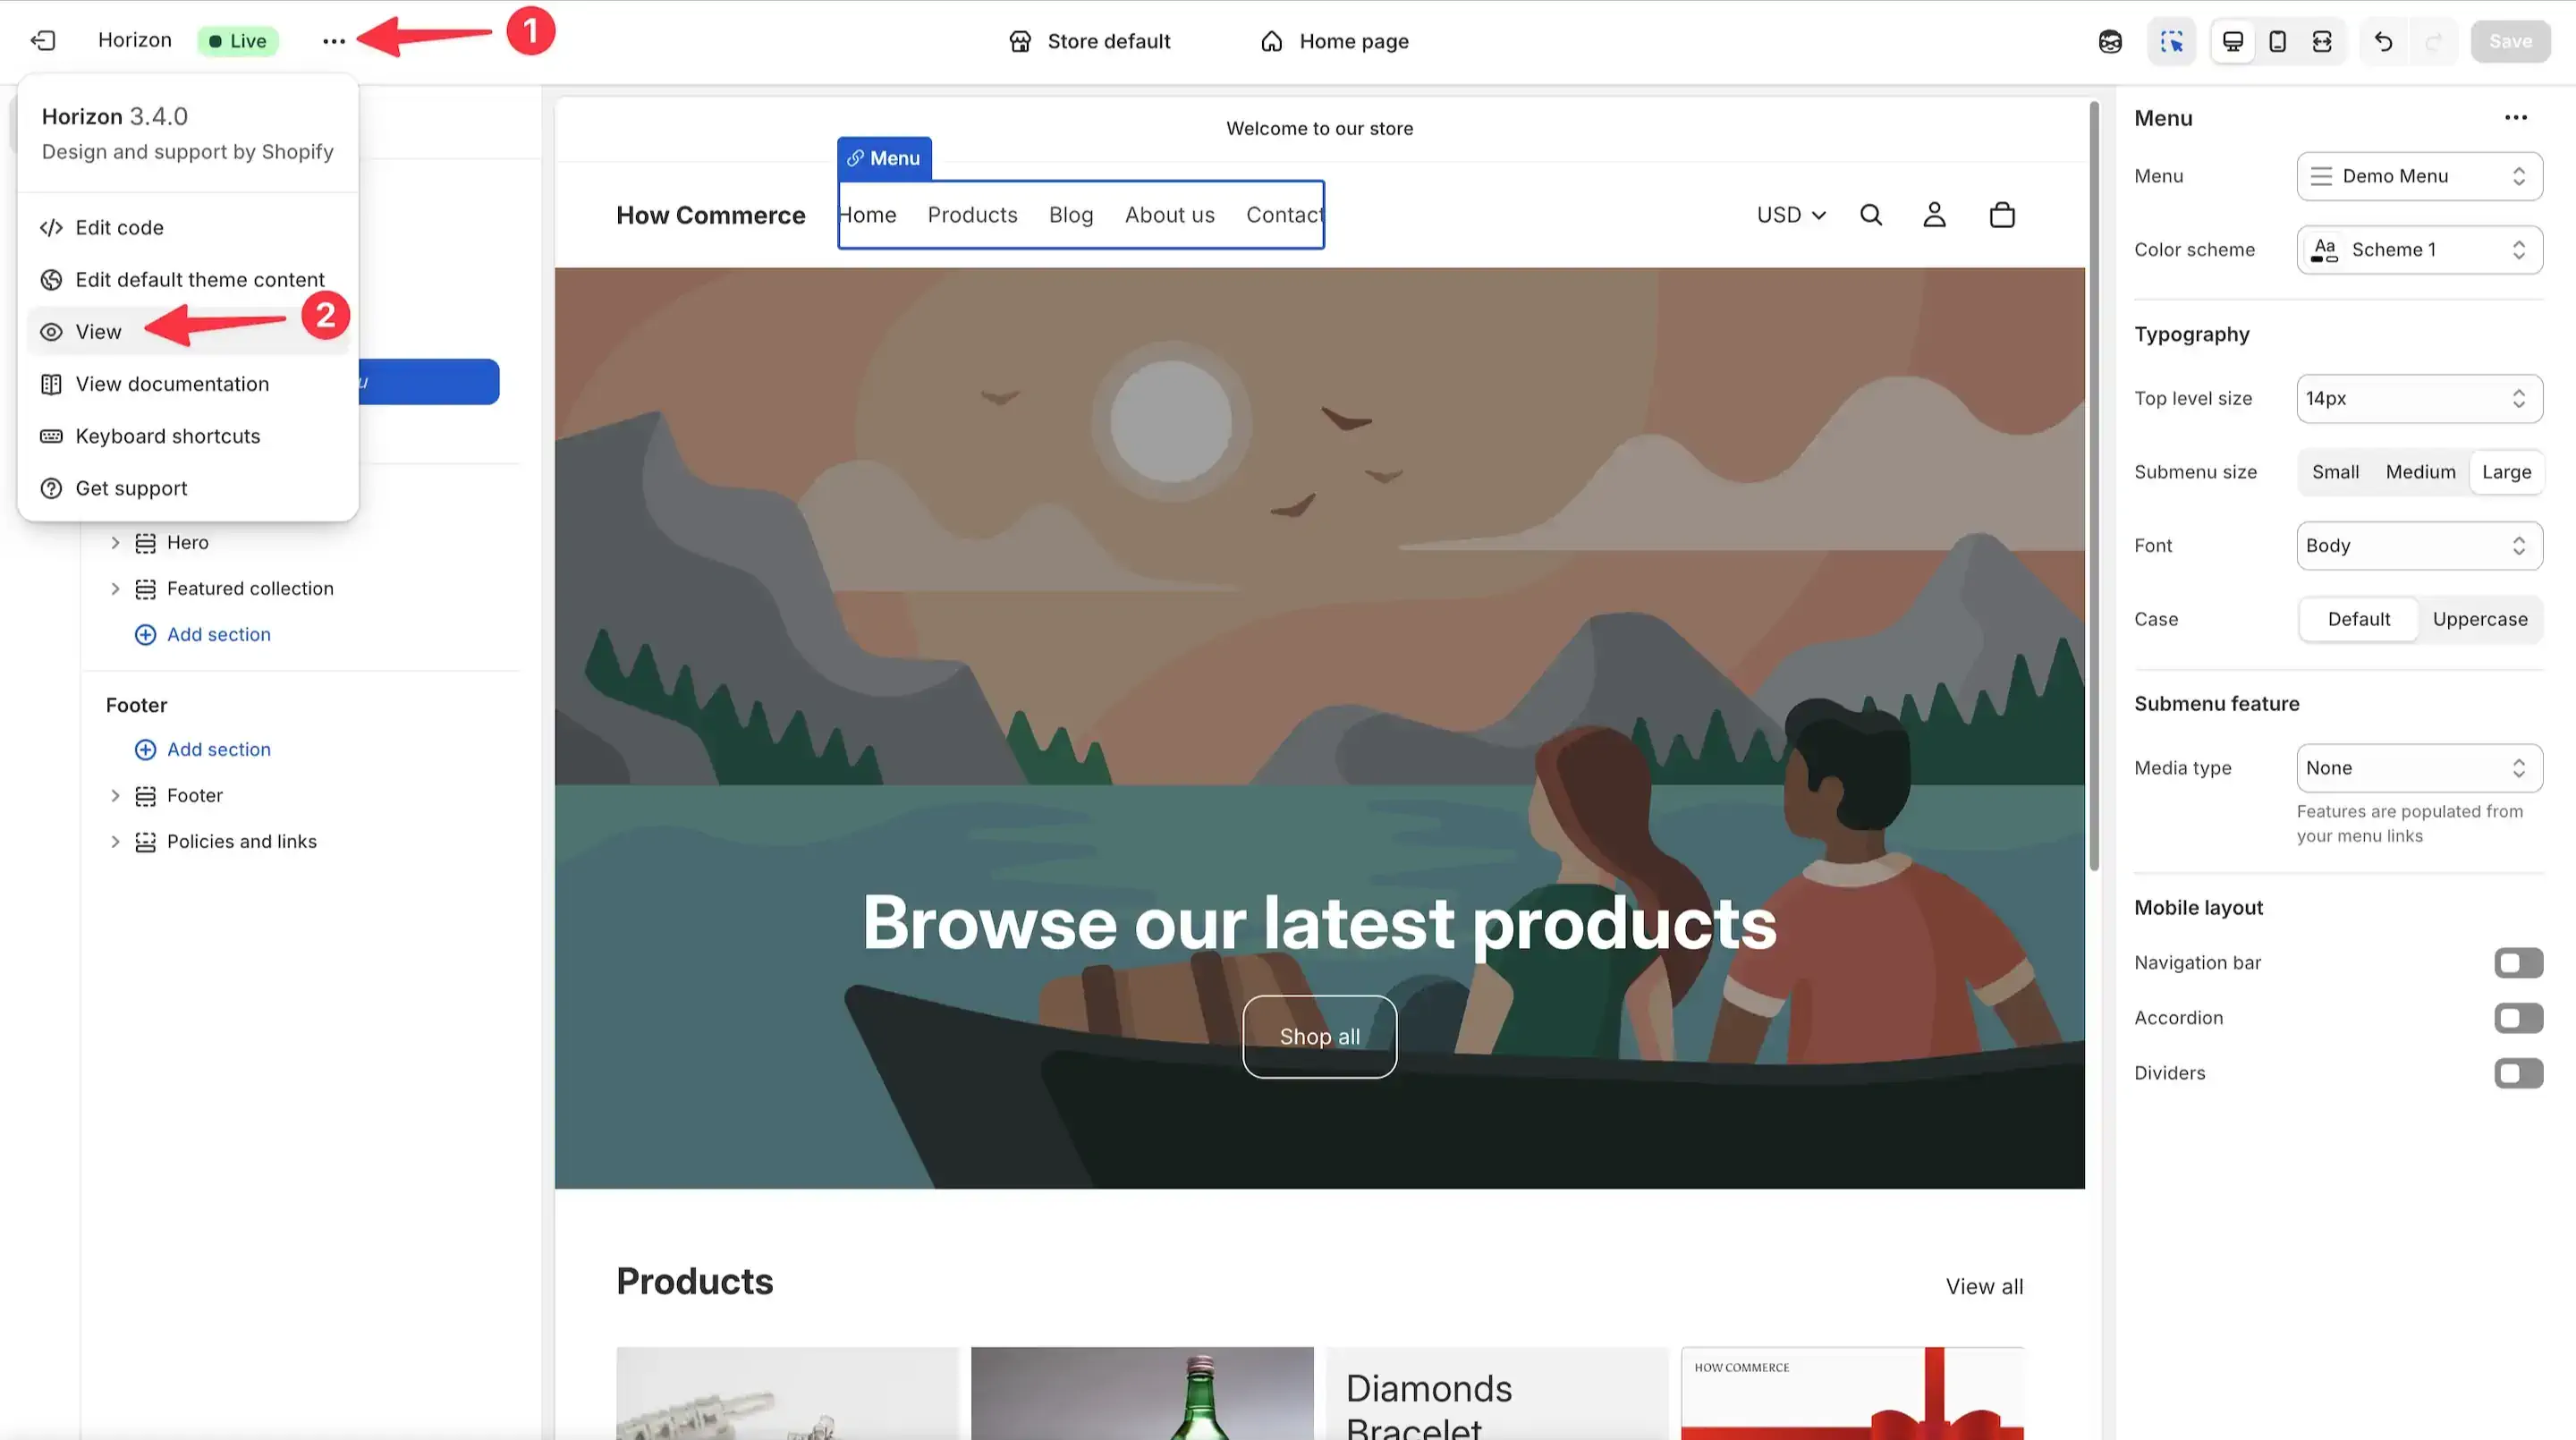
Click on the “...” menu (marked with 1 in the image below), then select View from the modal (marked with 2 in the image below).
This action will open your storefront in a new browser tab, allowing you to see the newly assigned drop-down menu in action.
Hover over or click the parent menu item to confirm that:
- The Level 2 items appear correctly
- The structure matches what you configured in Navigation
- The drop-down behaves properly on both desktop and mobile
If everything displays as expected, your drop-down menu is successfully implemented.
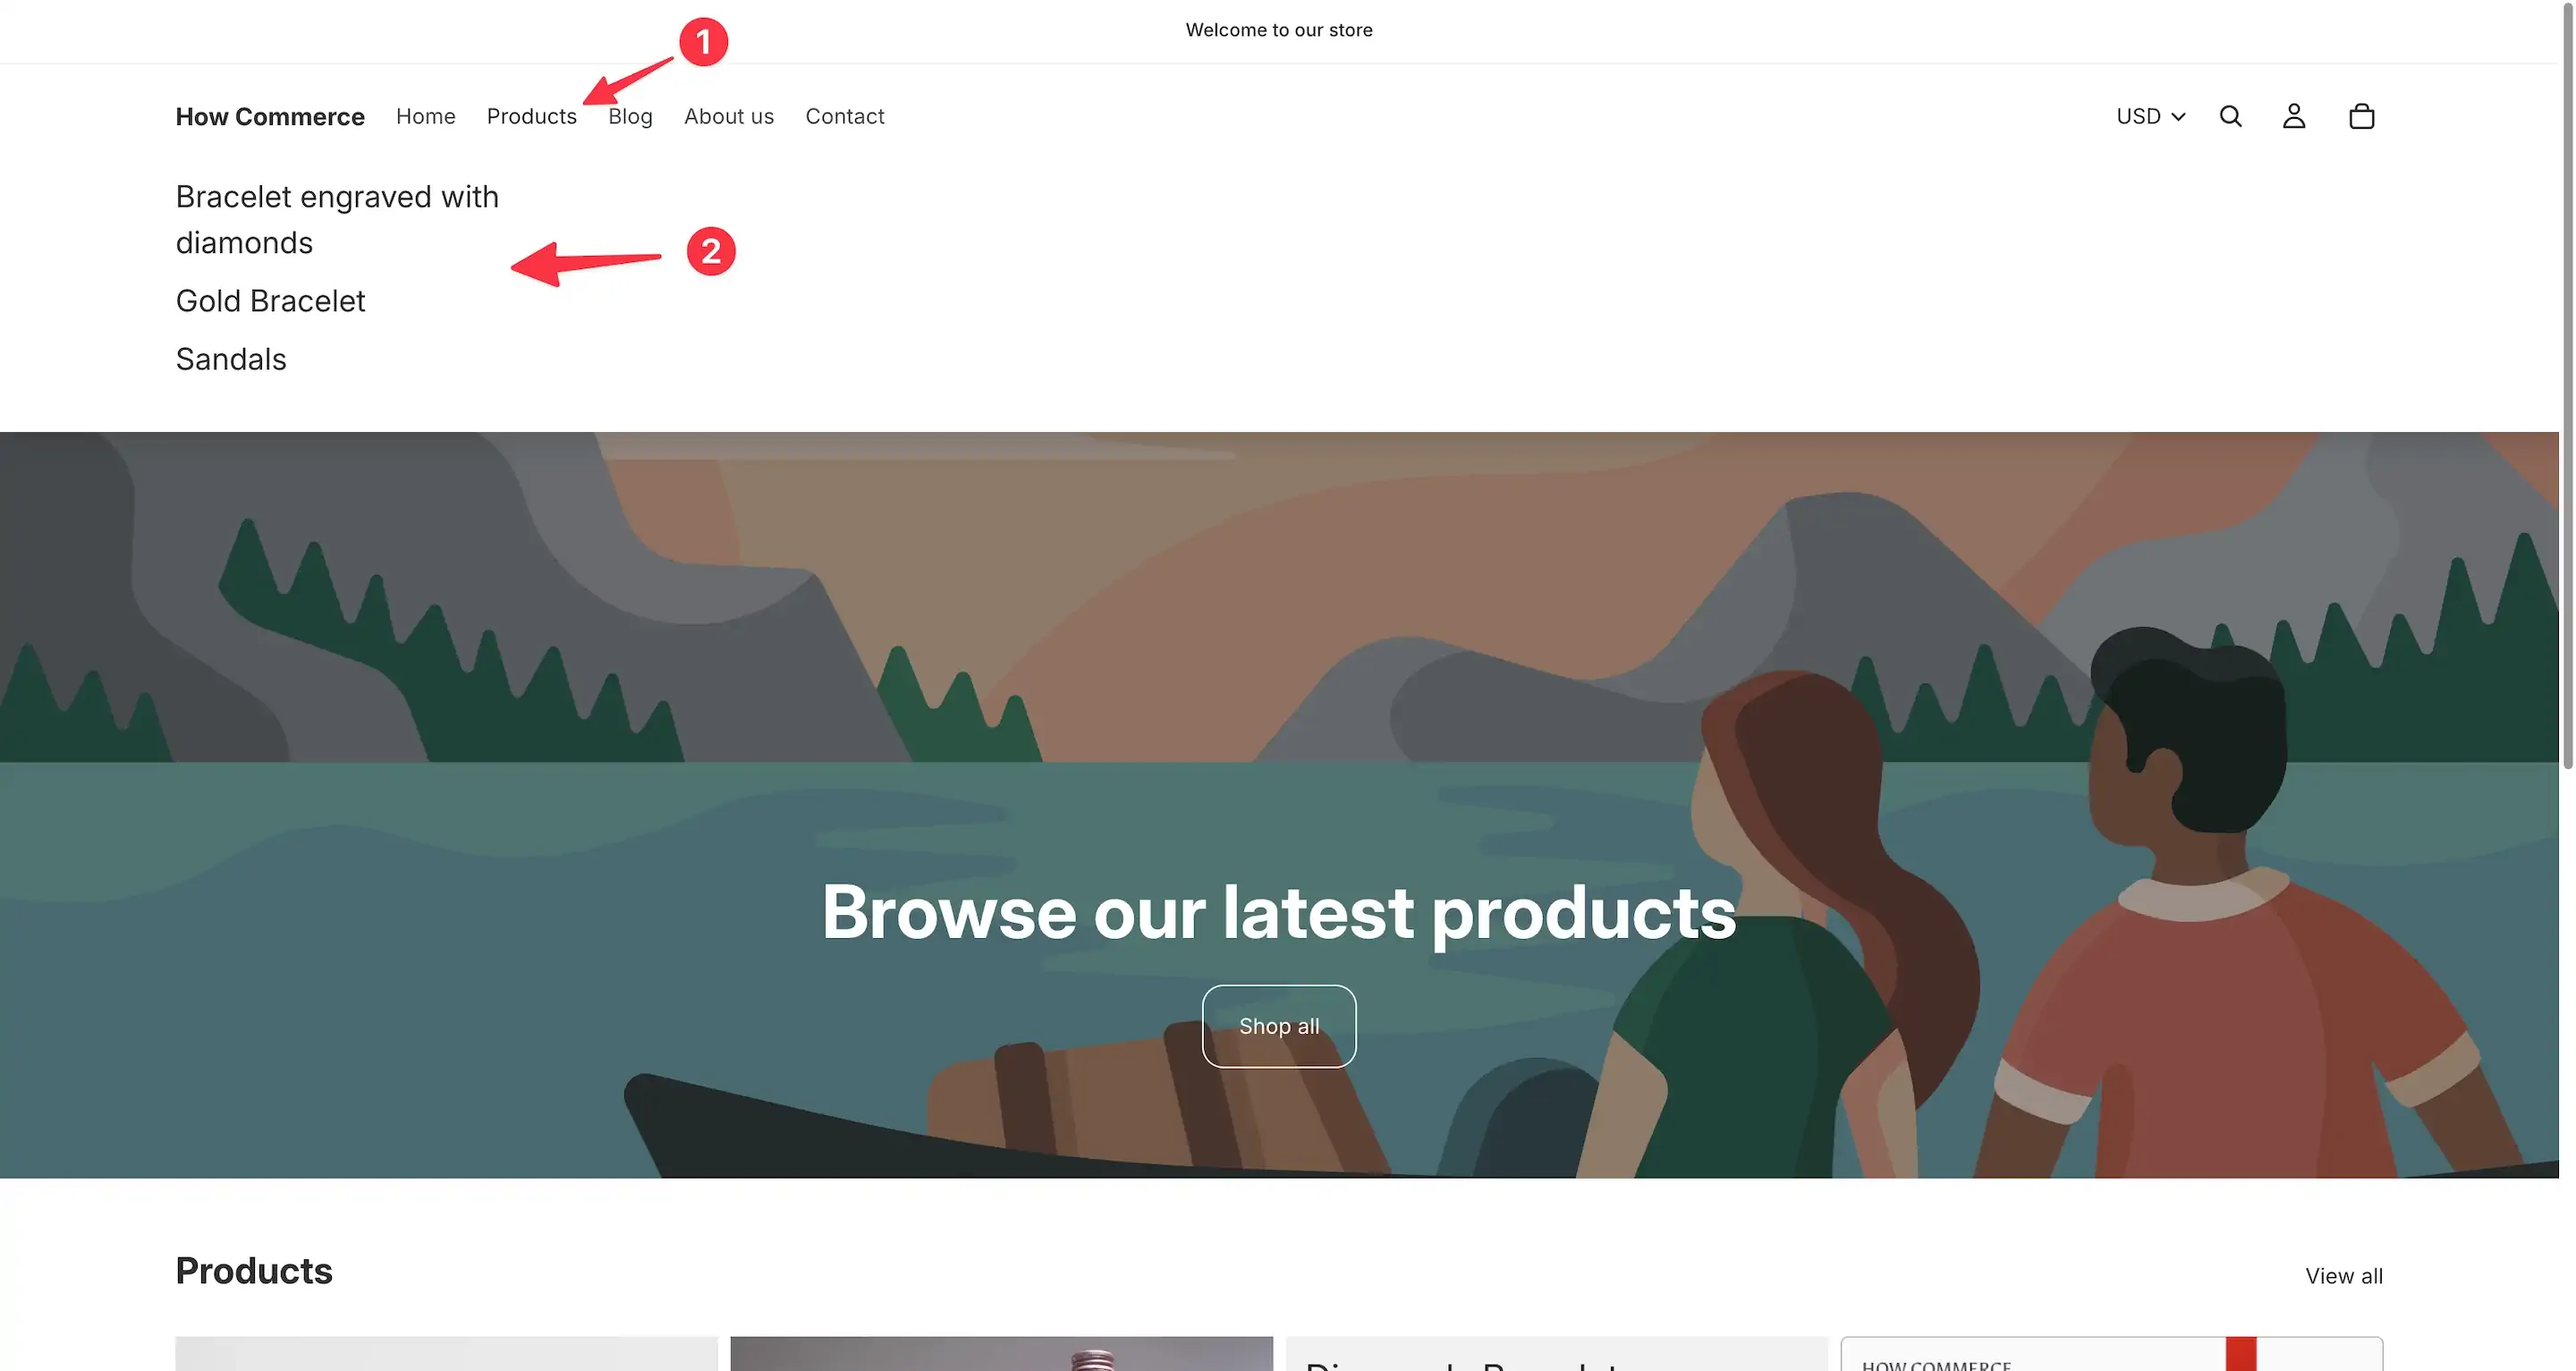
Hover over any parent menu item that contains child links, and you will see the drop-down appear.
The children, or Level 2 menu items, will be displayed beneath the parent item (marked with 2 in the image below), confirming that the hierarchy has been implemented correctly.
If the structure was built properly in Navigation and the theme supports drop-down functionality, the menu will now behave exactly as intended on the storefront.
Common mistakes to avoid
Assuming the issue is a bug before checking configuration
In most cases, menu problems are configuration errors, not platform defects. Always validate setup before escalating.
-
Using the wrong link type
Linking to the wrong resource type or misconfiguring a submenu link is a frequent cause of broken navigation. If a submenu behaves incorrectly, review nesting and link type first. -
Over-nesting menu items
Deep nesting creates structural conflicts, especially if the theme does not support multi-level dropdowns. Keep hierarchy intentional and minimal. -
Ignoring theme limitations
Not all themes support complex menu structures. Attempting to force a multi-level dropdown into a theme that only supports single-level navigation will fail. Verify theme capabilities before designing structure. -
Linking the wrong menu in theme settings
It is common to configure a menu correctly but forget to assign it in theme settings. Always confirm the correct menu is selected in the header or navigation configuration. -
Leaving conflicting custom code in place
Custom Liquid, JavaScript, or CSS can override default navigation behavior. If issues persist, temporarily roll back custom code to isolate the problem. -
Overlooking app interference
Some apps inject or replace navigation elements. If the issue appeared after installing or updating an app, test with the app disabled. -
Testing only in one environment
Failing to test across devices and browsers can hide structural issues. Navigation must function consistently everywhere.
Final Thoughts
Menu issues are rarely isolated or accidental.
They are usually the result of structural decisions, configuration oversights, or compatibility gaps between theme, custom code, and third-party apps.
The real mistake is treating navigation as a minor UI detail.
It is infrastructure.
If it is unstable, everything built on top of it suffers: usability, discoverability, conversion rates, and overall user trust.
The right approach is disciplined and systematic.
Verify configuration before assuming defects.
Confirm theme capabilities before implementing complexity.
Minimize unnecessary nesting.
Be cautious with custom code.
Audit app interference regularly.
Test changes in a controlled manner.
Do not rely on assumptions. Validate every layer.
Strong navigation architecture is intentional.
It balances clarity, technical compatibility, and long-term maintainability.
When built correctly, it becomes invisible to users.
When built poorly, it becomes the source of constant friction.
Treat your menu as a strategic asset.
Design it carefully, maintain it deliberately, and simplify whenever possible.