

Overview
Running a store on Shopify involves constant change.
Products are removed, collections are reorganized, and URLs are refined. That is expected.
What is not acceptable is allowing those changes to break your site.
Every time a URL changes without a proper redirect, you create a dead end. Customers land on 404 pages, search engines lose track of your content, rankings decline, and revenue follows.
URL redirects exist to prevent this.
They seamlessly guide both users and search engines from outdated URLs to the correct pages.
When implemented correctly, they preserve SEO value, protect your traffic, and keep your store operating as a structured, reliable system rather than a fragile one.
This is not optional maintenance. It is a fundamental part of running a serious store.
What are URL redirects in Shopify
On other CMS platforms or self-hosted environments, you typically have direct access to server-level configuration files such as .htaccess, where redirects can be defined manually.
In platforms like WordPress, redirects are often managed through SEO plugins that write rules to the database or modify server configurations.
In Shopify, this level of control is not available. Redirect management is simplified and intentionally restricted.
A URL redirect is a rule that forwards one URL to another. When a user attempts to access an outdated or incorrect link, they are automatically sent to the correct destination.
In Shopify, redirects are permanent by default. These are 301 redirects, which signal to search engines that a page has permanently moved.
Why this matters:
- SEO value is transferred to the new URL
- Search engines update their indexes accordingly
- Users are seamlessly redirected without encountering errors
There are two types of redirects you will work with:
- Automatic redirects, created when you modify certain URLs, with your confirmation
- Manual redirects, which you define explicitly
Relying solely on automatic redirects is a mistake. Control and oversight are essential.
When you should use URL redirects
You should create redirects whenever a URL becomes invalid or changes. There are no exceptions.
Common scenarios include:
- Deleting a product or collection
- Changing a product, collection, or page handle
- Migrating from another platform to Shopify
- Fixing outdated or incorrect URLs
- Merging or consolidating pages
Here is the reality:
If a URL has ever existed and received traffic, backlinks, or has been indexed by search engines, it must be redirected.
Ignoring this is one of the fastest ways to damage your SEO performance.
How Shopify handles automatic redirects
When you change the handle of a product, collection, or page in Shopify, you are given the option to automatically create a redirect from the old URL to the new one.
Shopify generates this redirect for you and allows you to decide whether to keep it or discard it.
Product
To change a product URL:
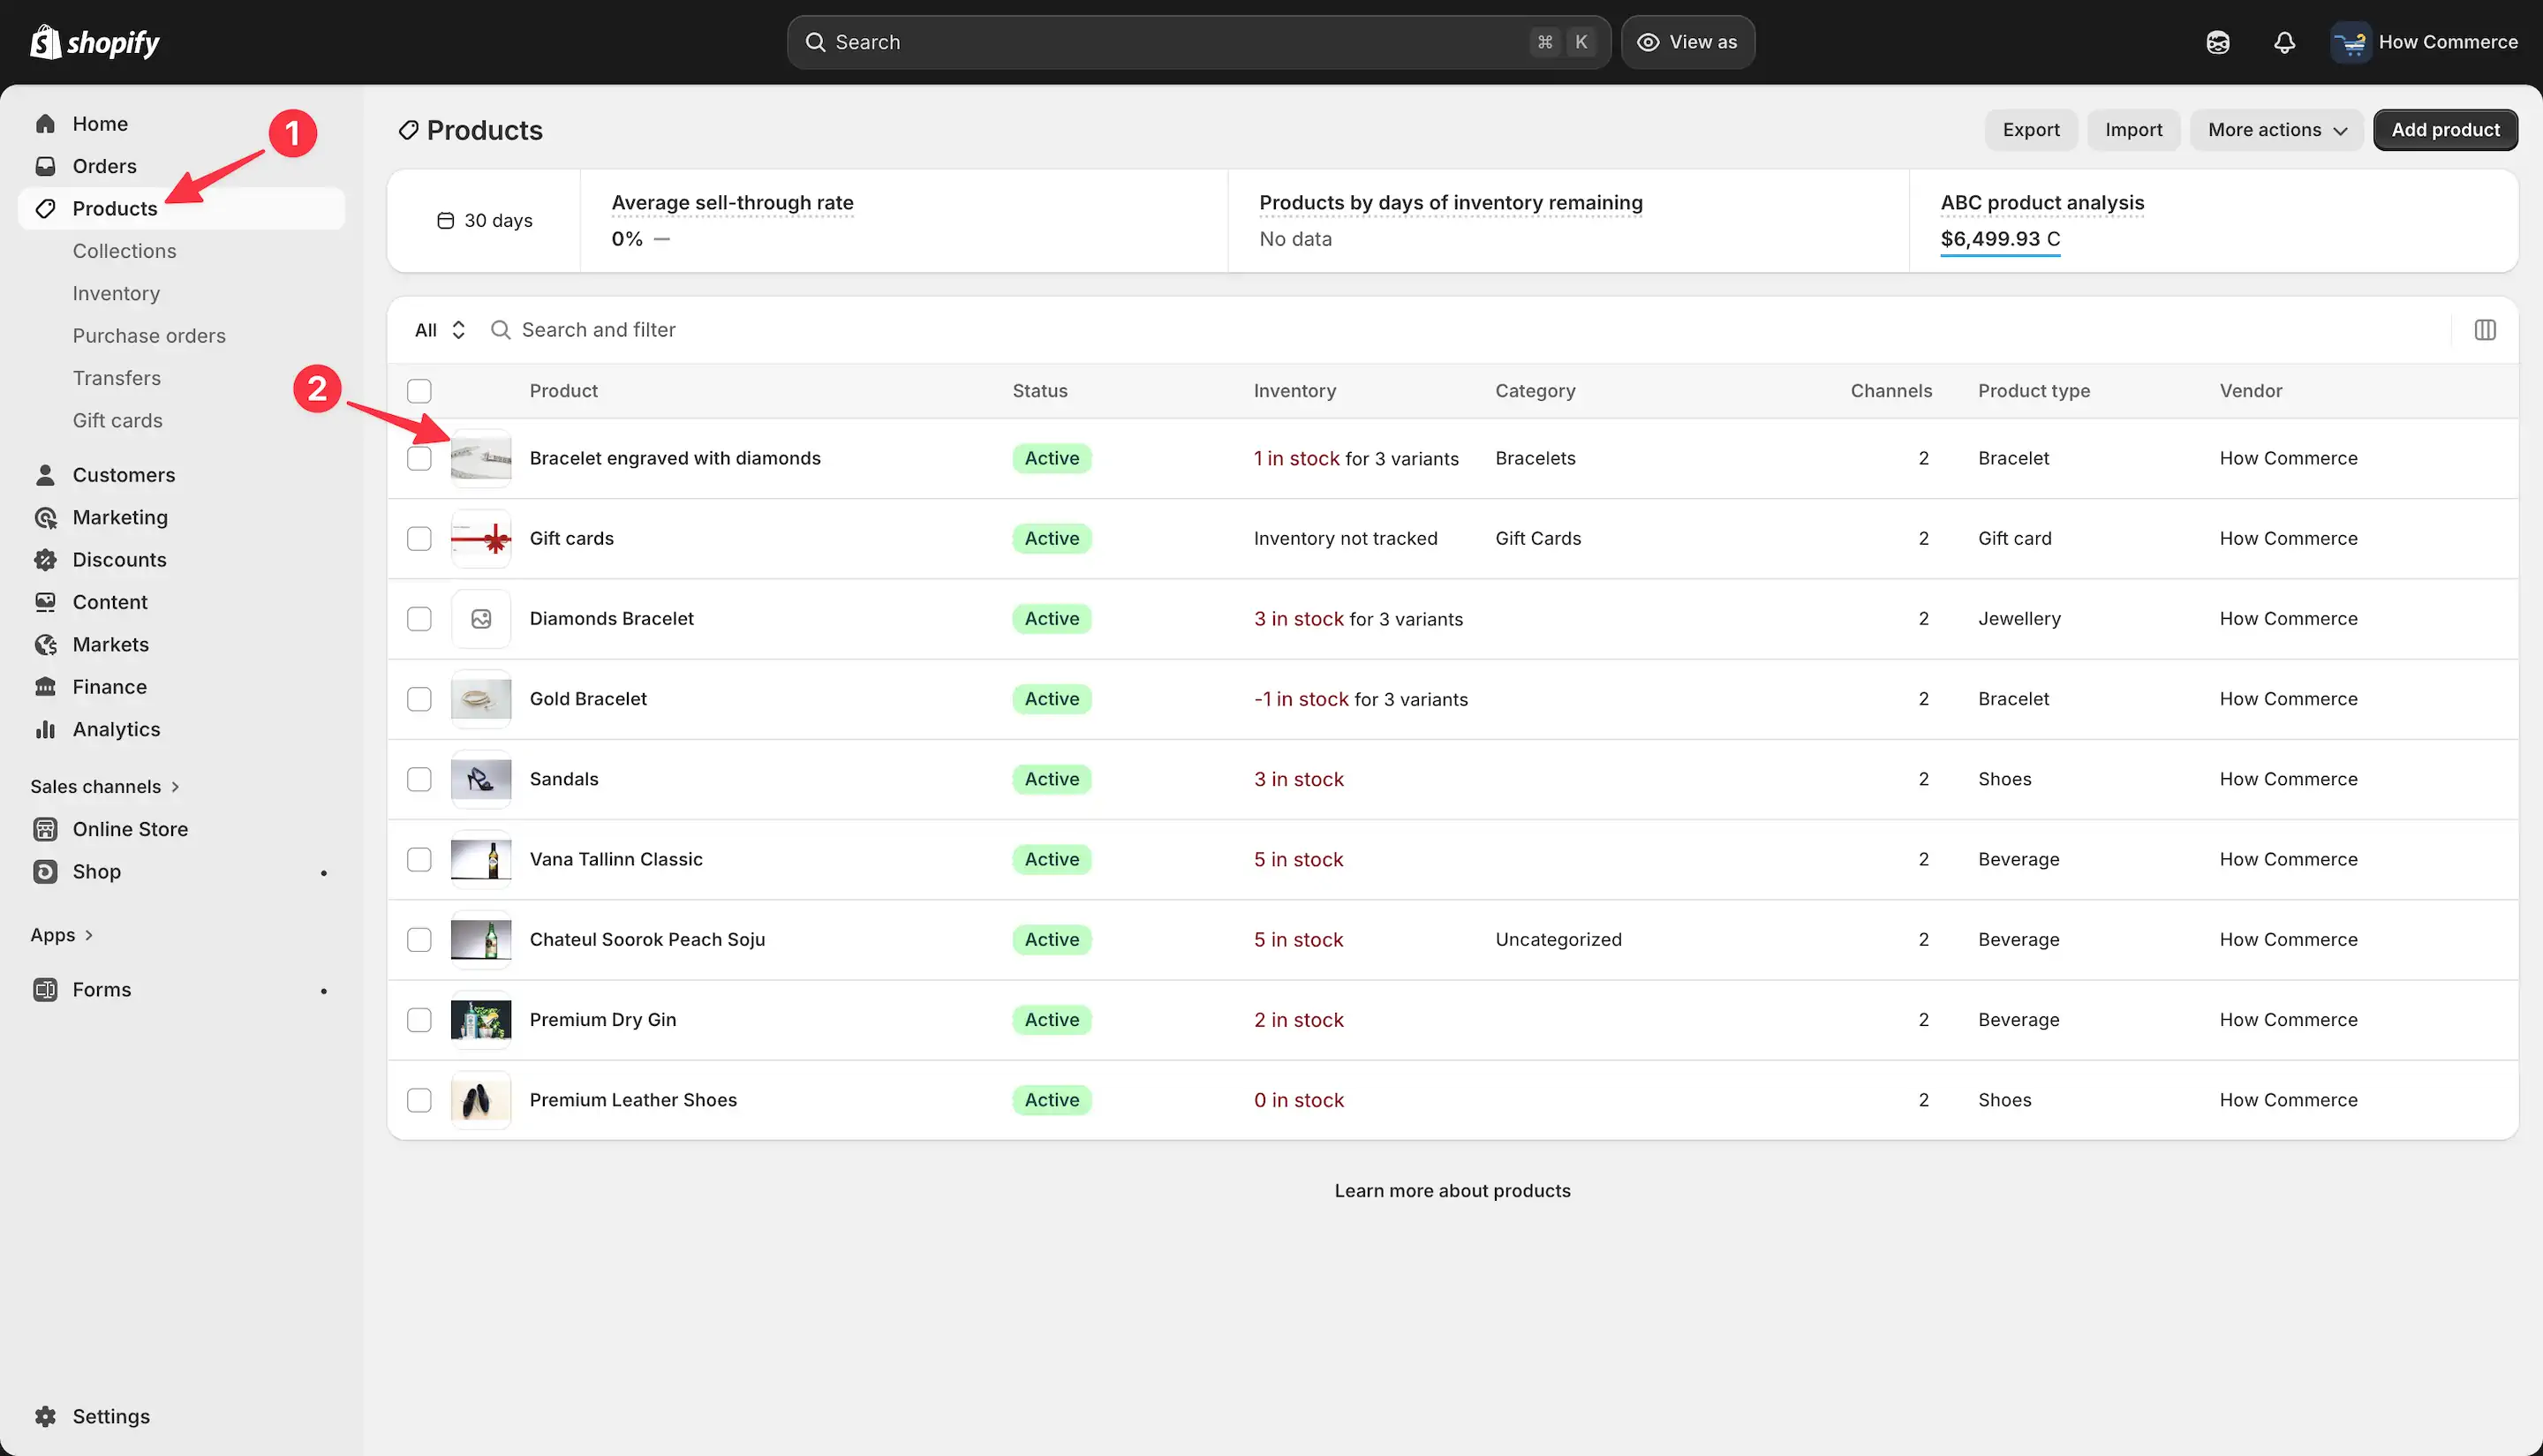
Go to Products (marked with 1 in the image below) and select a product (marked with 2 in the image below).
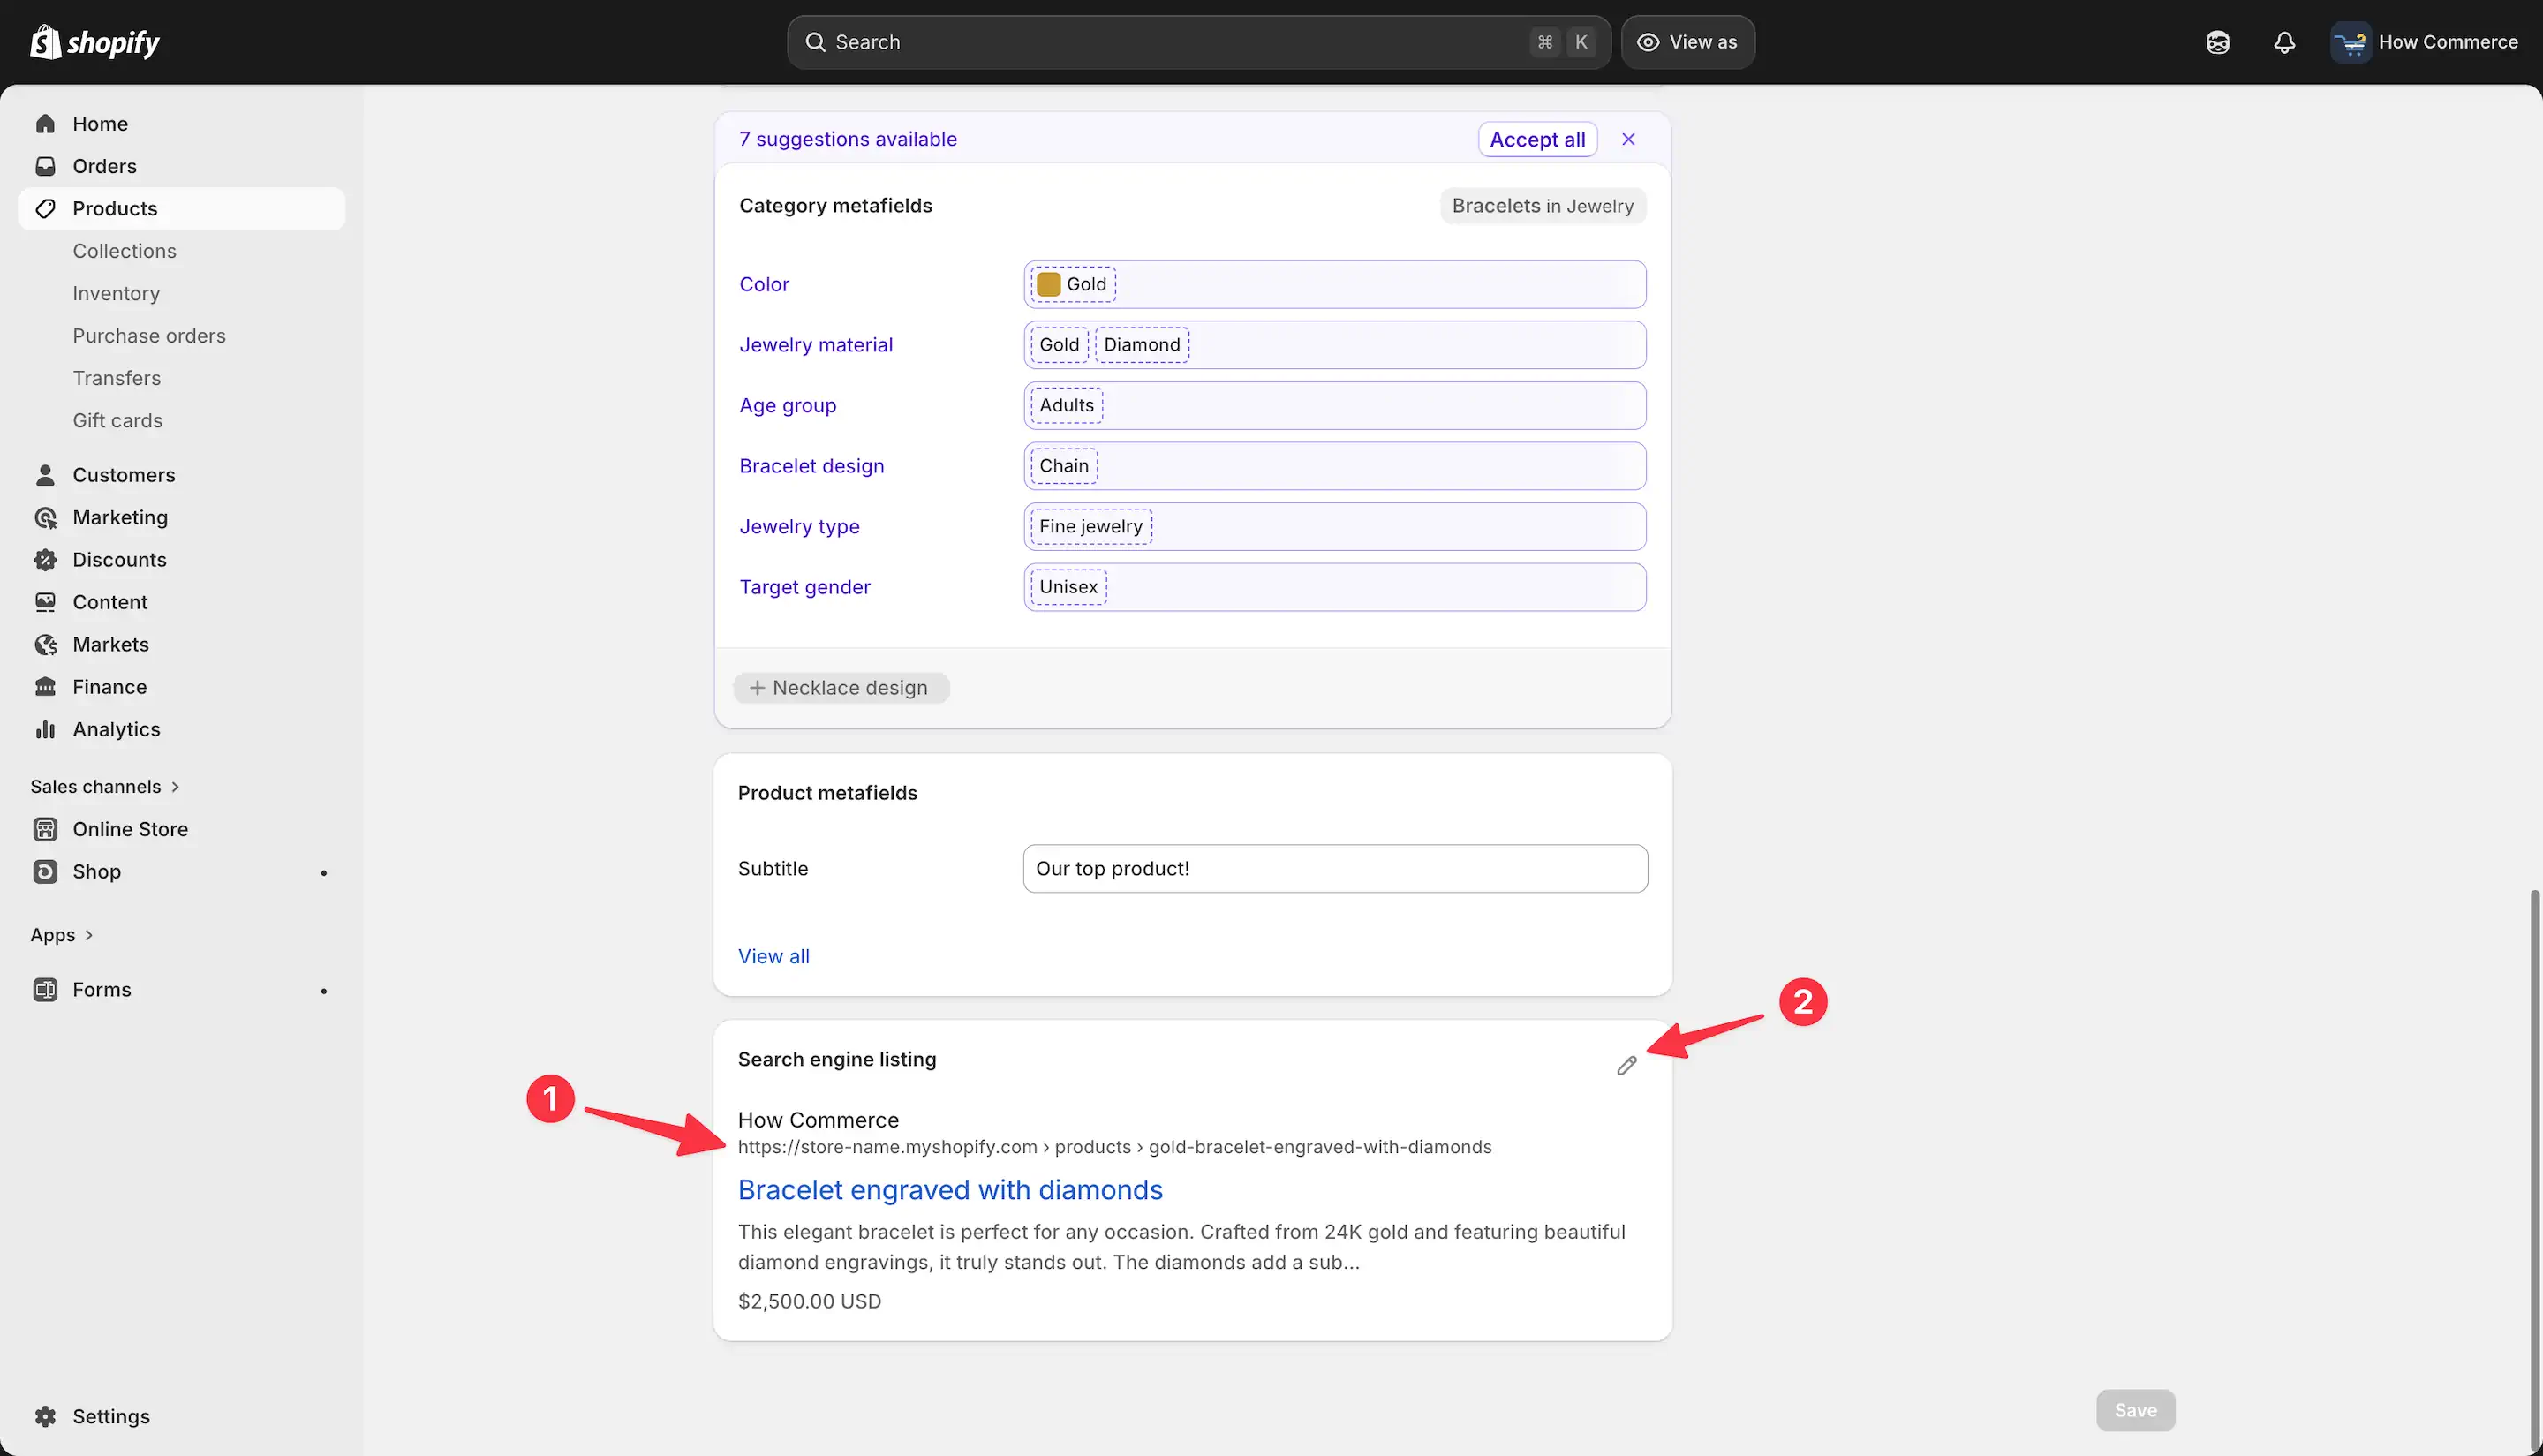
Scroll to the bottom of the product editing page, where you will find the Search engine listing section.
In this section, the product URL is displayed (marked with 1 in the image below).
Click the pencil icon (marked with 2 in the image below) to open the editing panel and modify the URL.
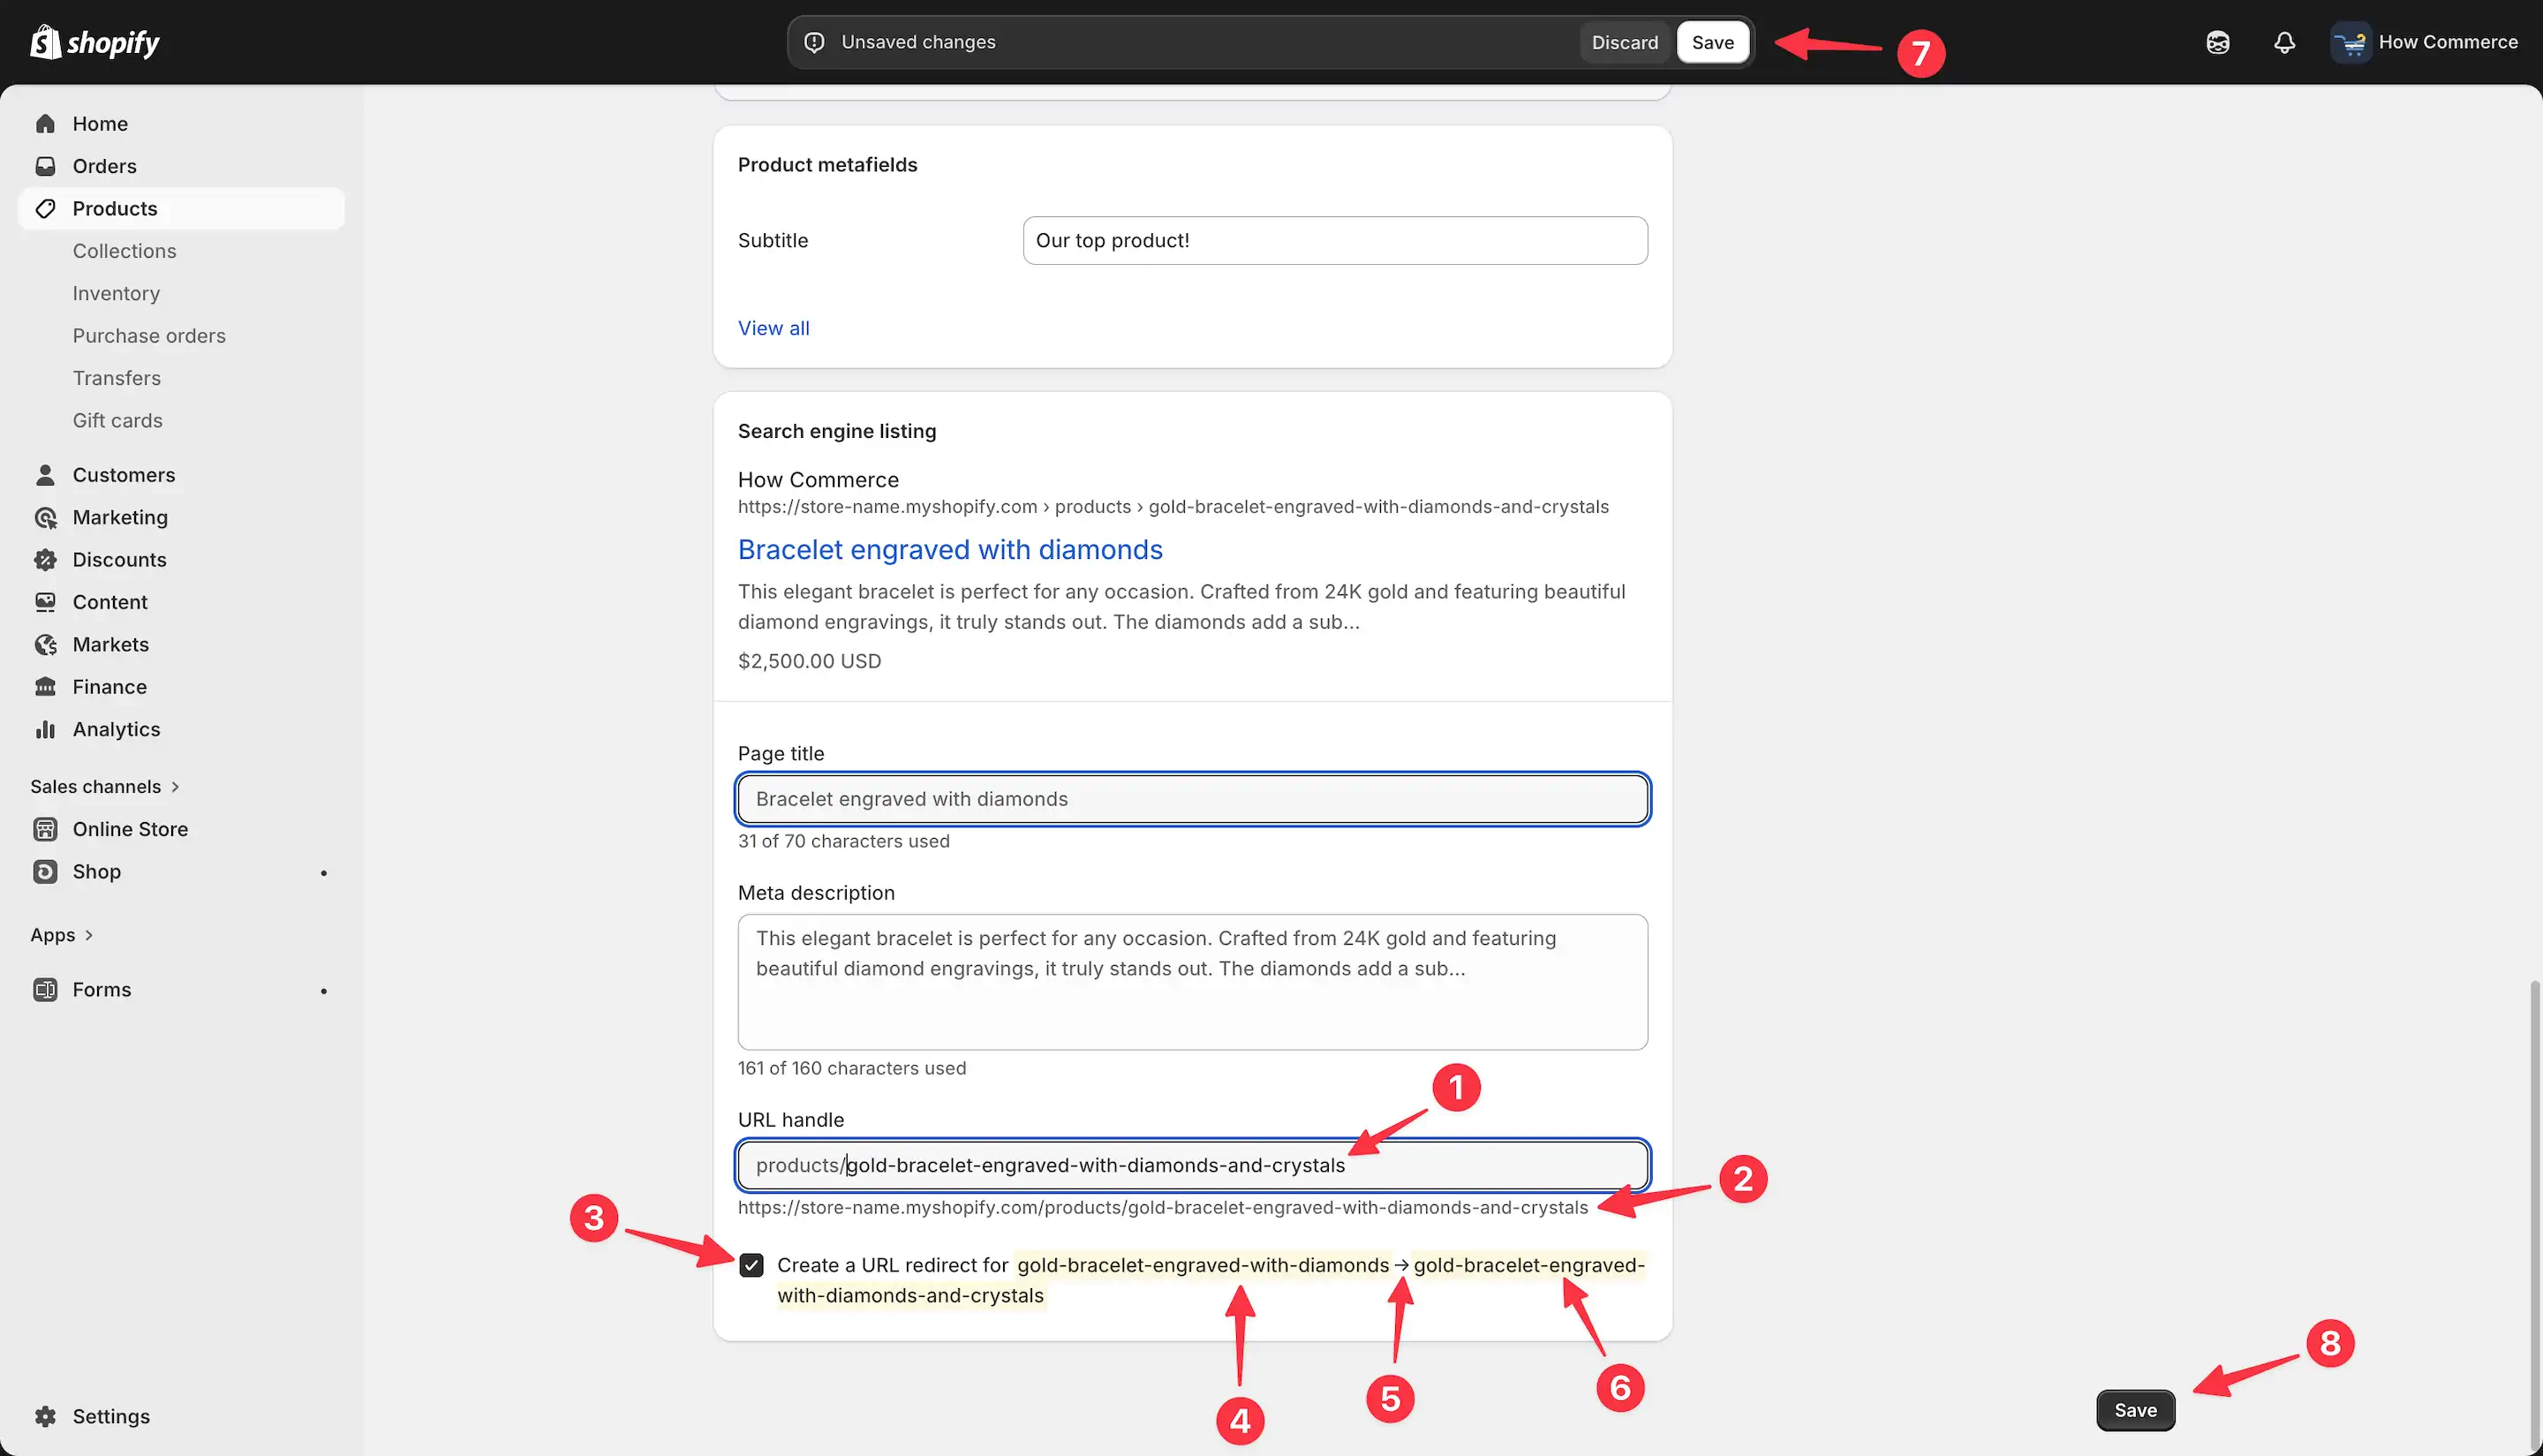
In the input field (marked with 1 in the image below), modify the URL.
The updated URL will be displayed below the input field (marked with 2 in the image below). As you type, it will automatically update to reflect your changes.
Note:
Only the last part of the URL, also known as the handle, can be changed.
For example, product pages in Shopify follow a strict URL structure. Certain parts of the URL are enforced and cannot be modified.
You cannot create additional path levels by adding extra “/” (slashes). This is not supported.
For product pages, the enforced URL format is:
https://store-name.com/products/product-name
You can only modify the “product-name” portion of the URL.
Once you make a change, a checkbox will appear (marked with 3 in the image below).
This option allows you to create a redirect from the old URL (marked with 4) to the new one (marked with 6).
Between the old and new URLs, you will see a → symbol (marked with 5), clearly indicating the direction of the redirect, from the old URL on the left to the new one on the right.
After confirming everything is correct, click any of the Save buttons (marked with 7 or 8 in the image below) to apply the new URL structure.
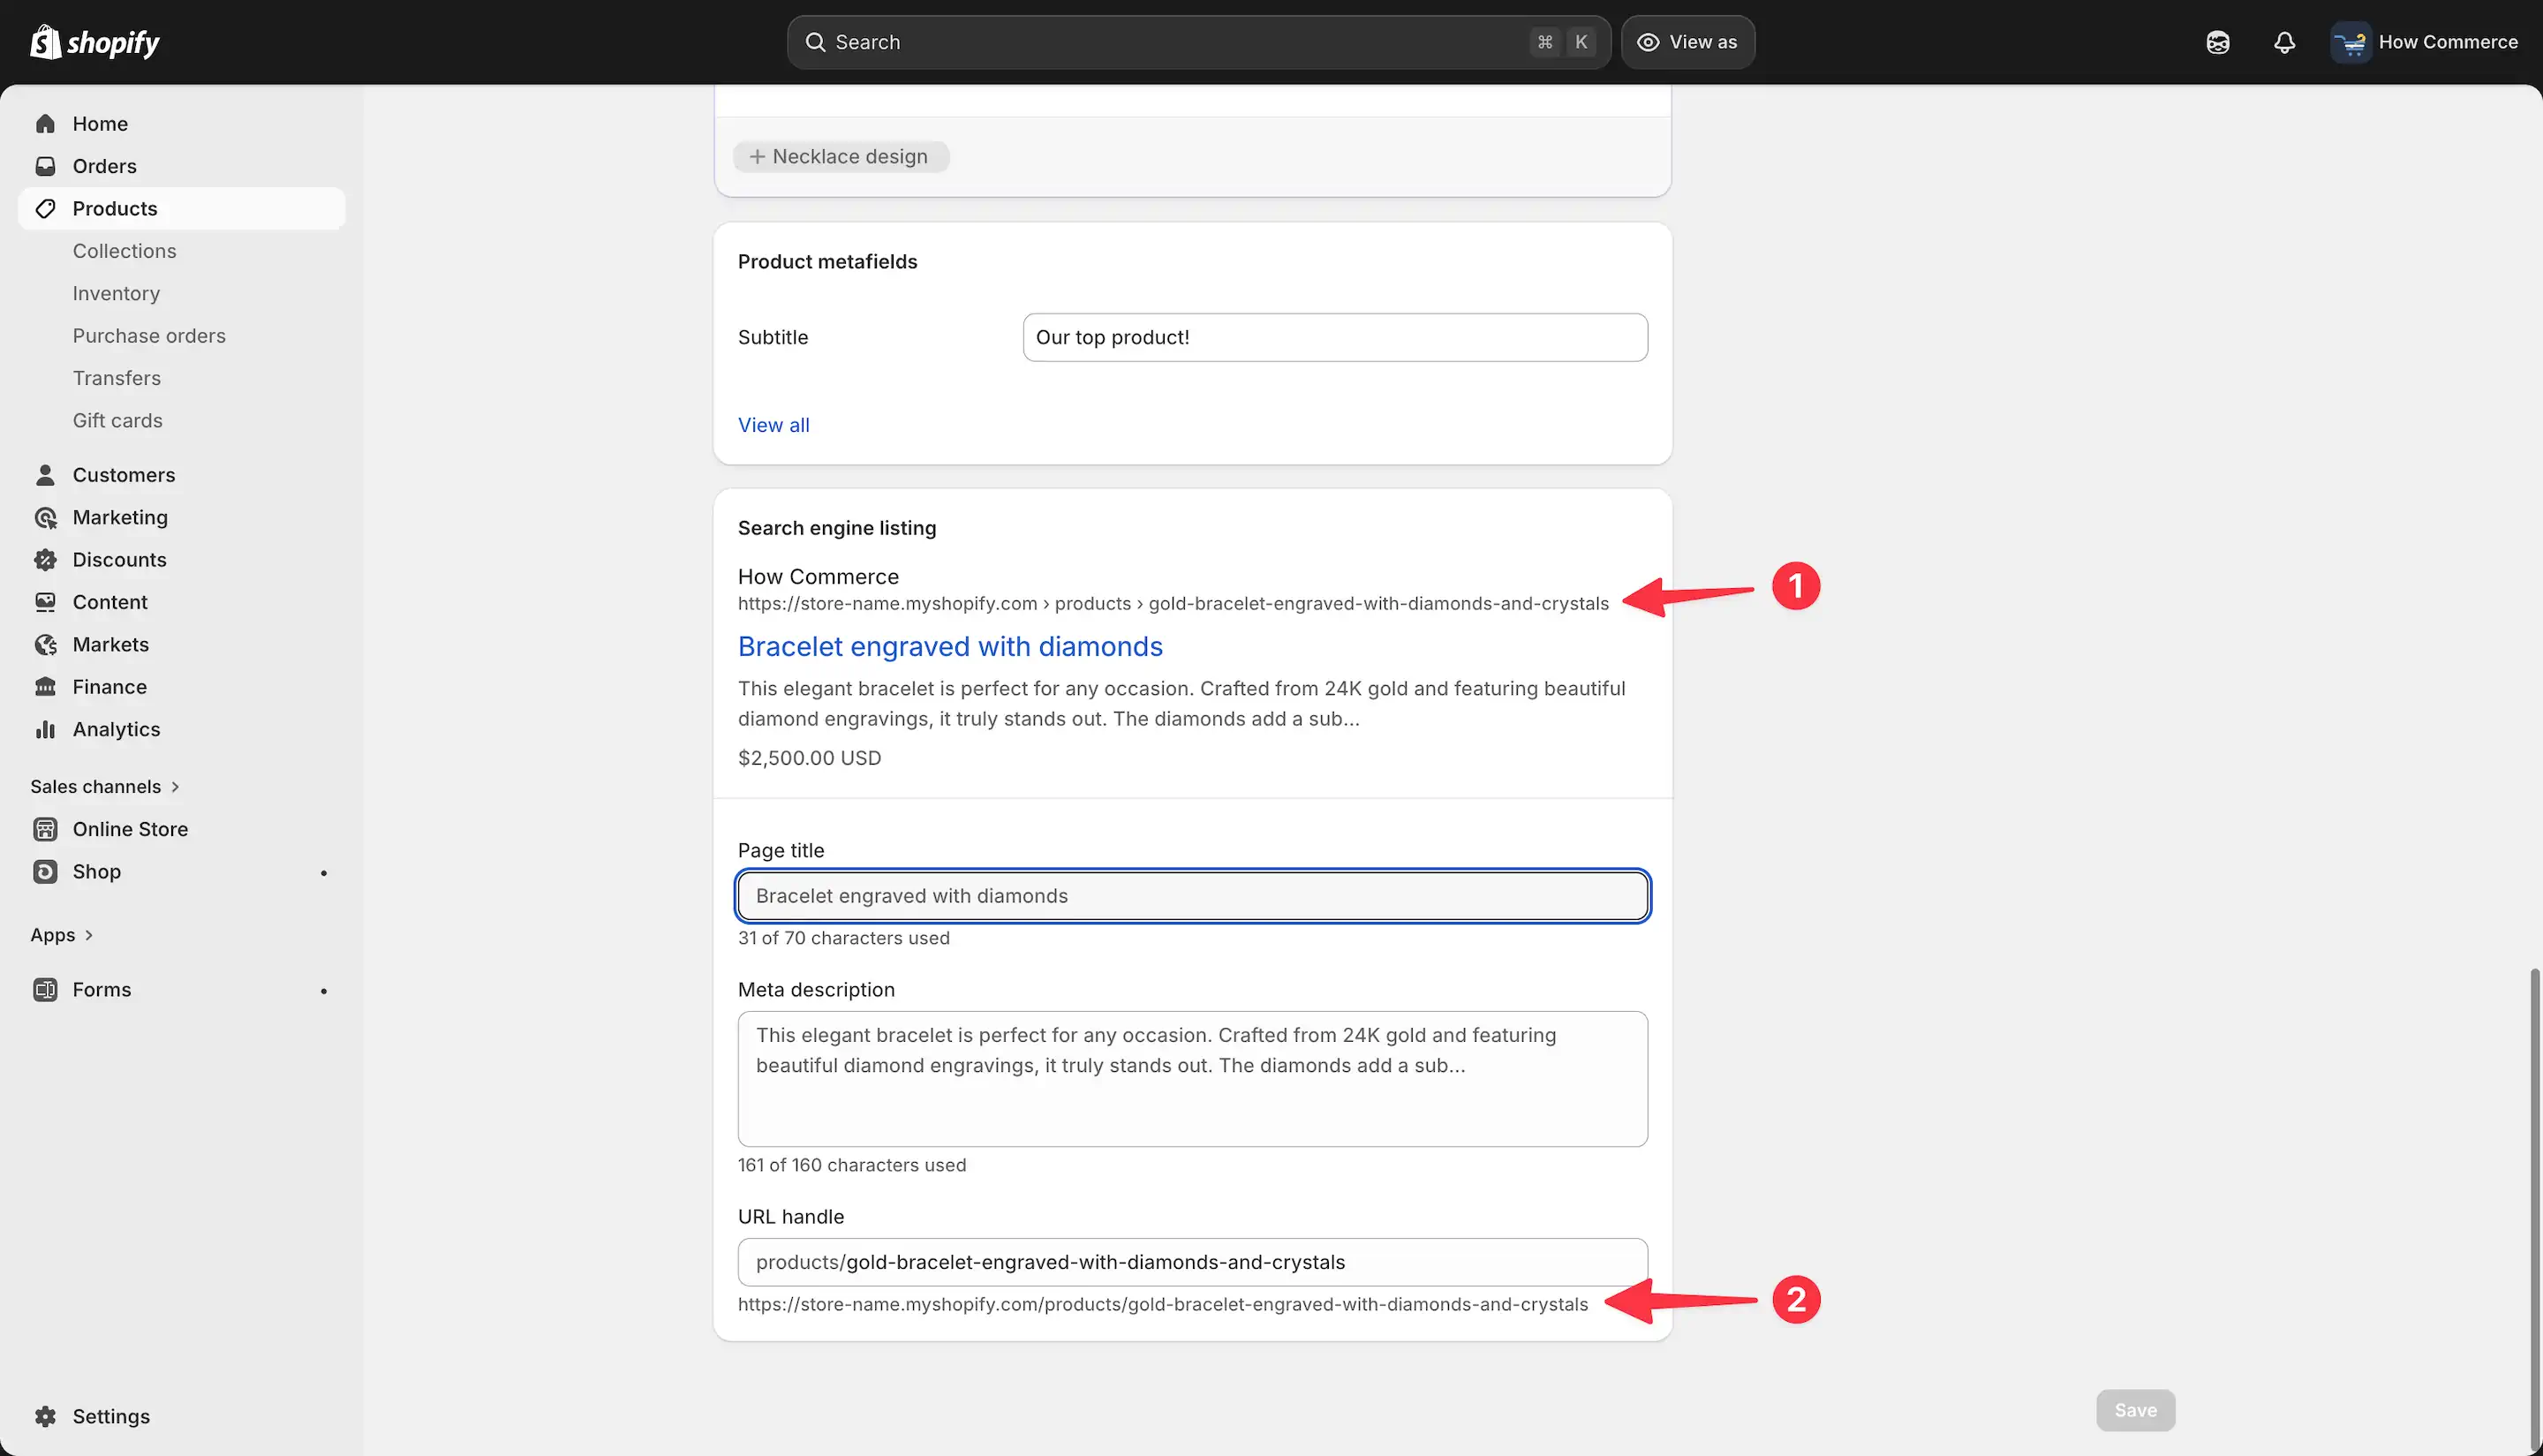
After saving the new URL, the redirect will be created and listed, as shown in the image below.
Your newly created redirect will be listed on the URL redirects page.
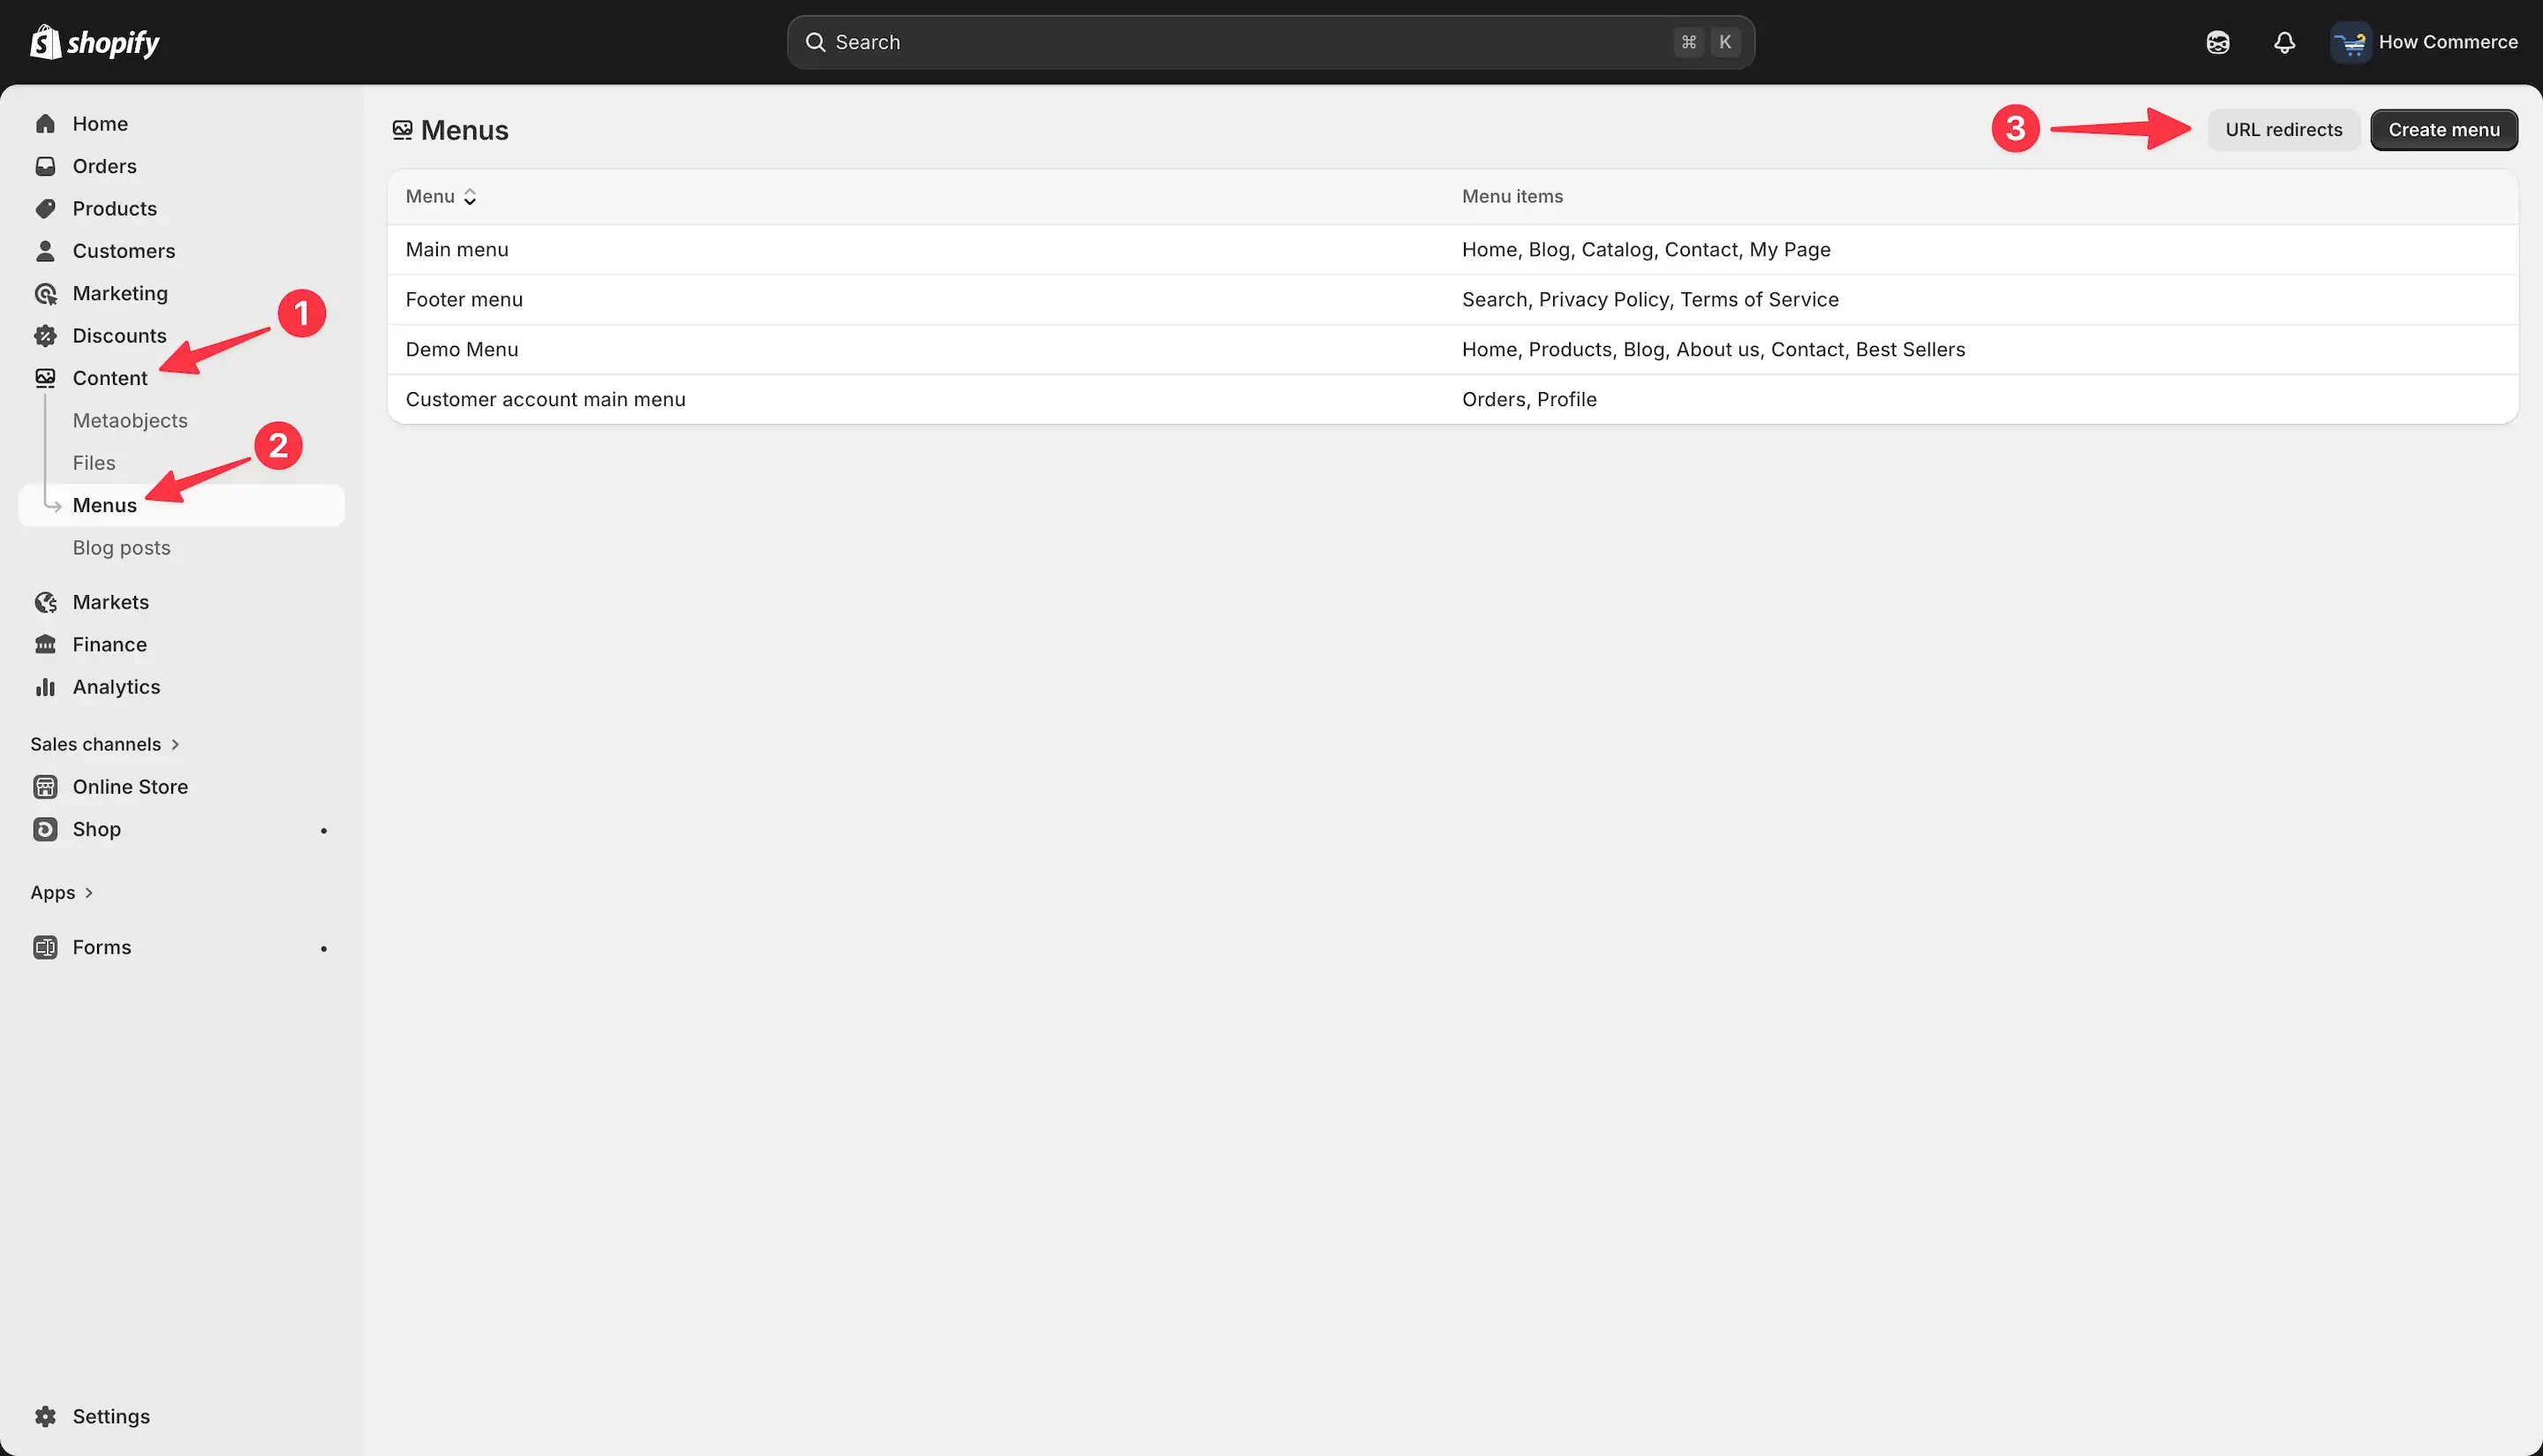
To view it, go to Content (marked with 1 in the image below), click on Menus (marked with 2), and then, on the right side, select URL redirects (marked with 3).
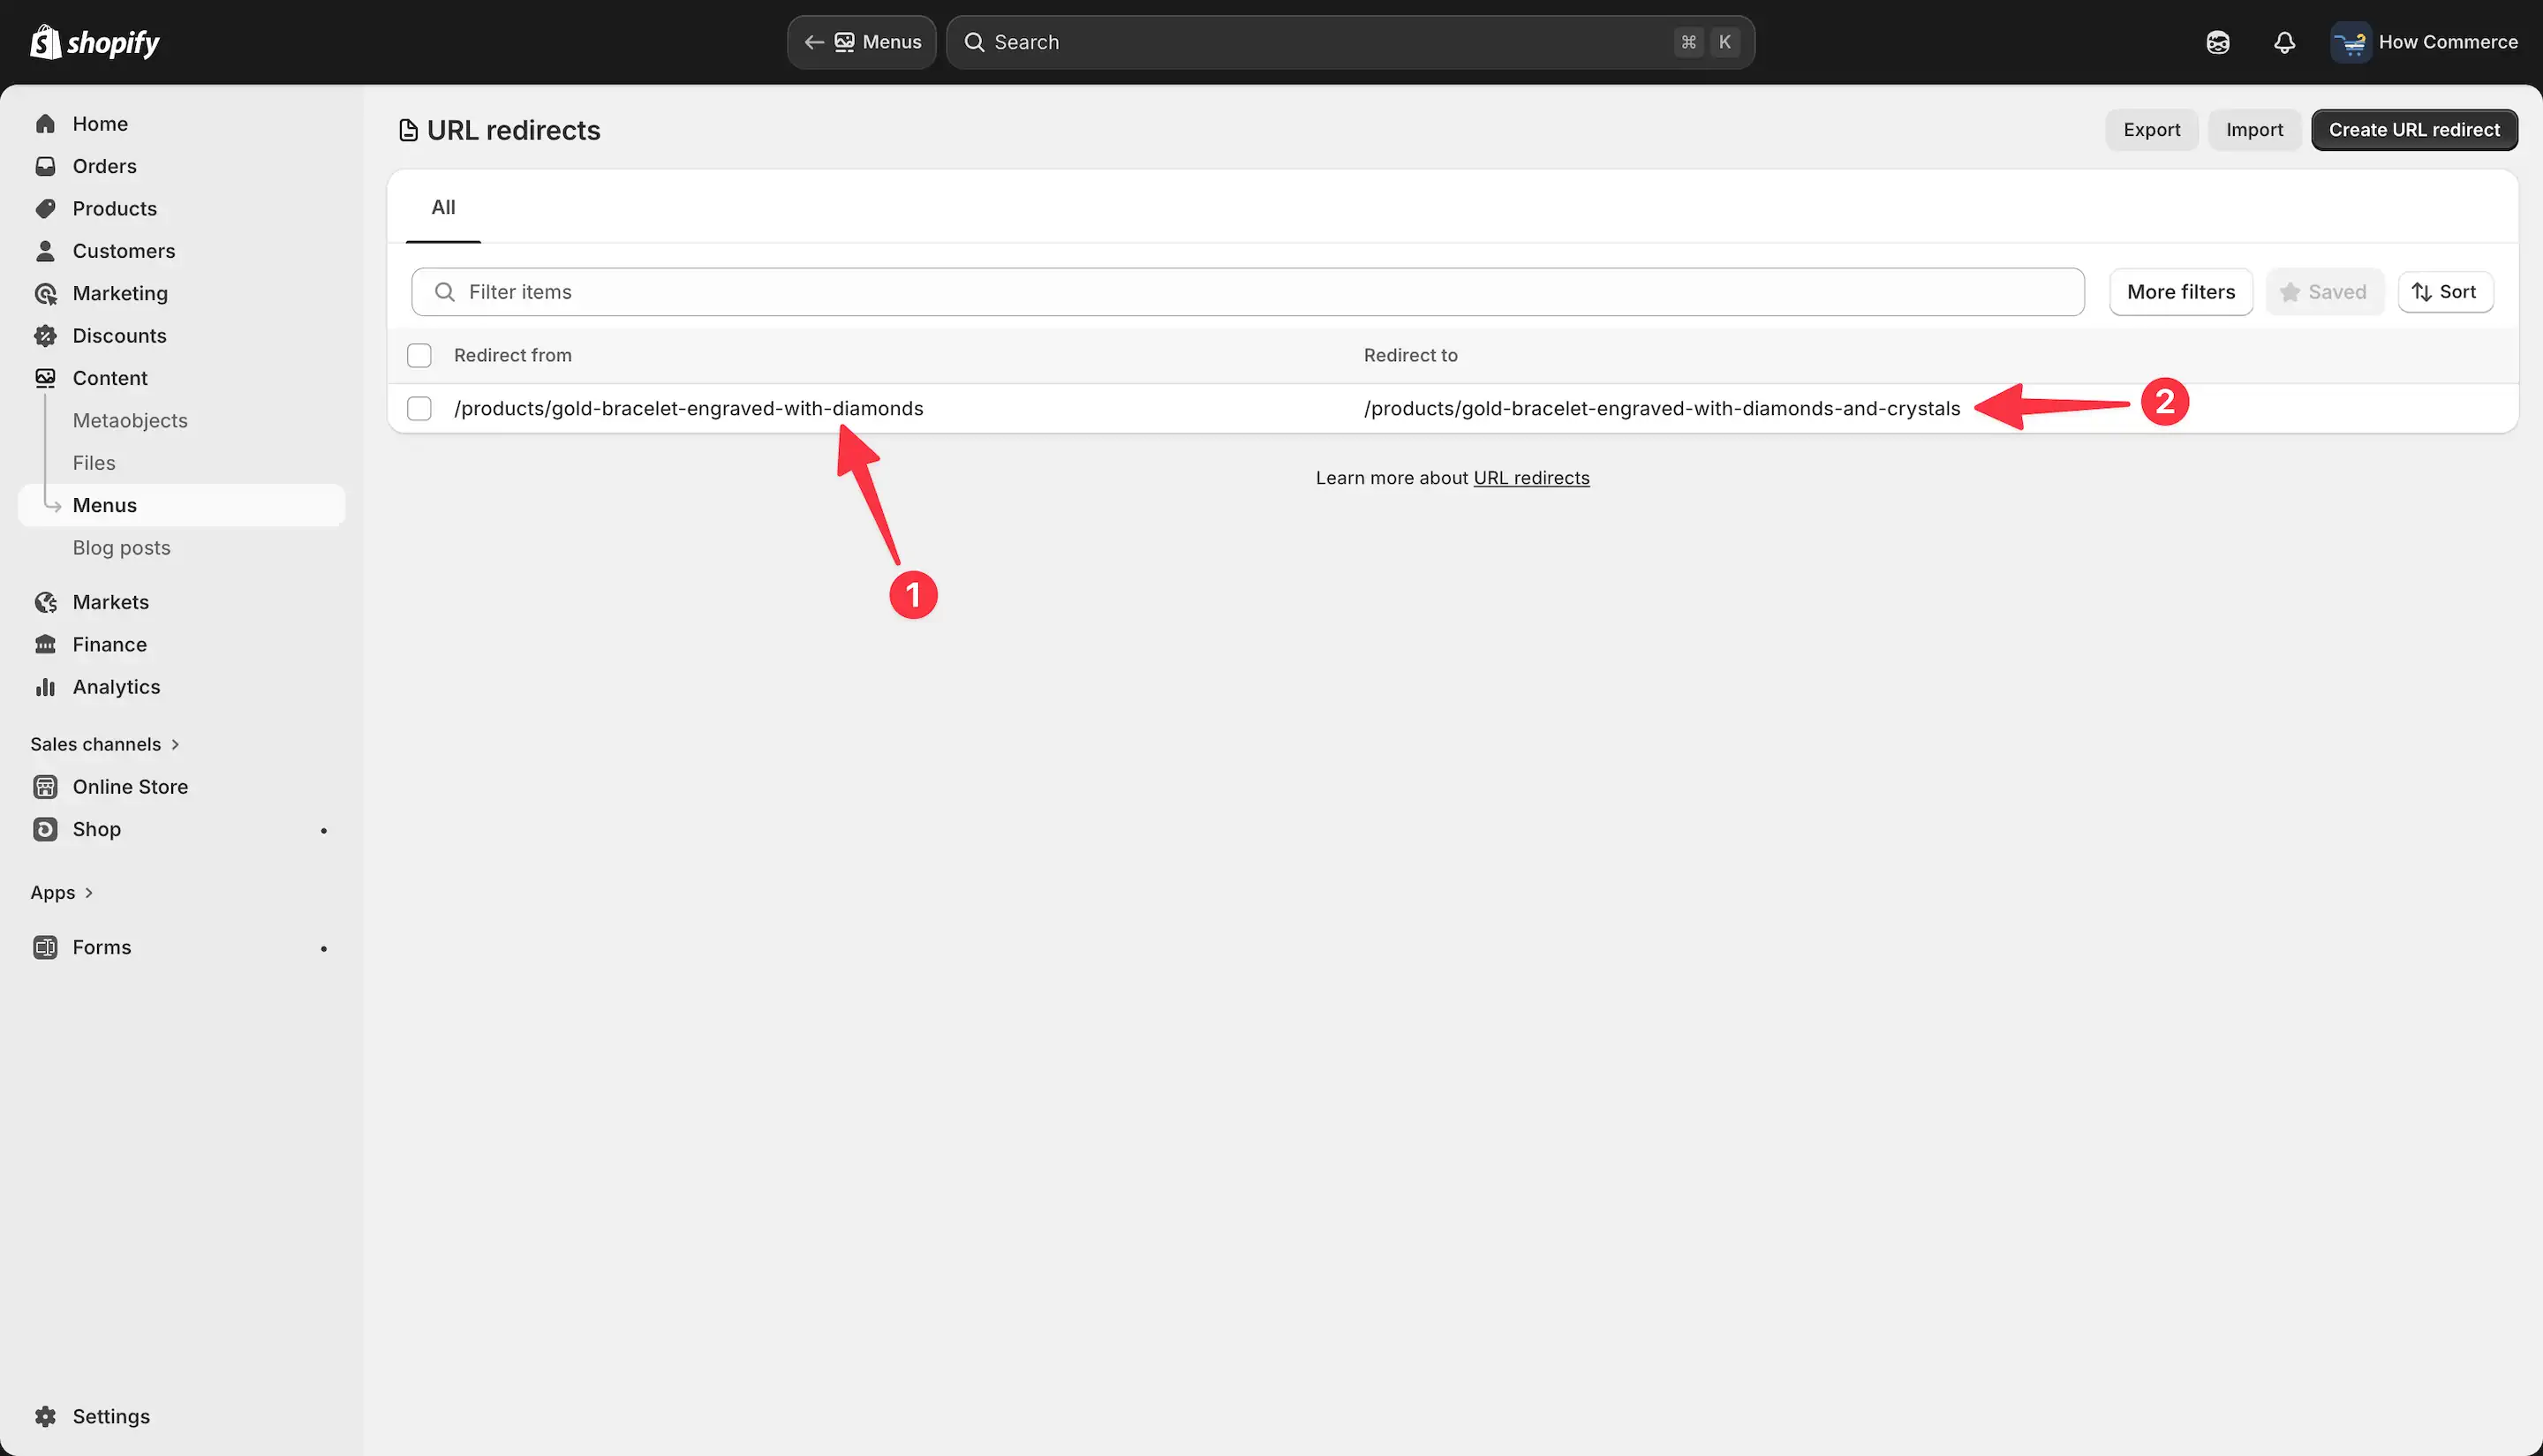
On the URL redirects page, you can see the old URL (marked with 1 in the image below) and the new URL (marked with 2).
Collection
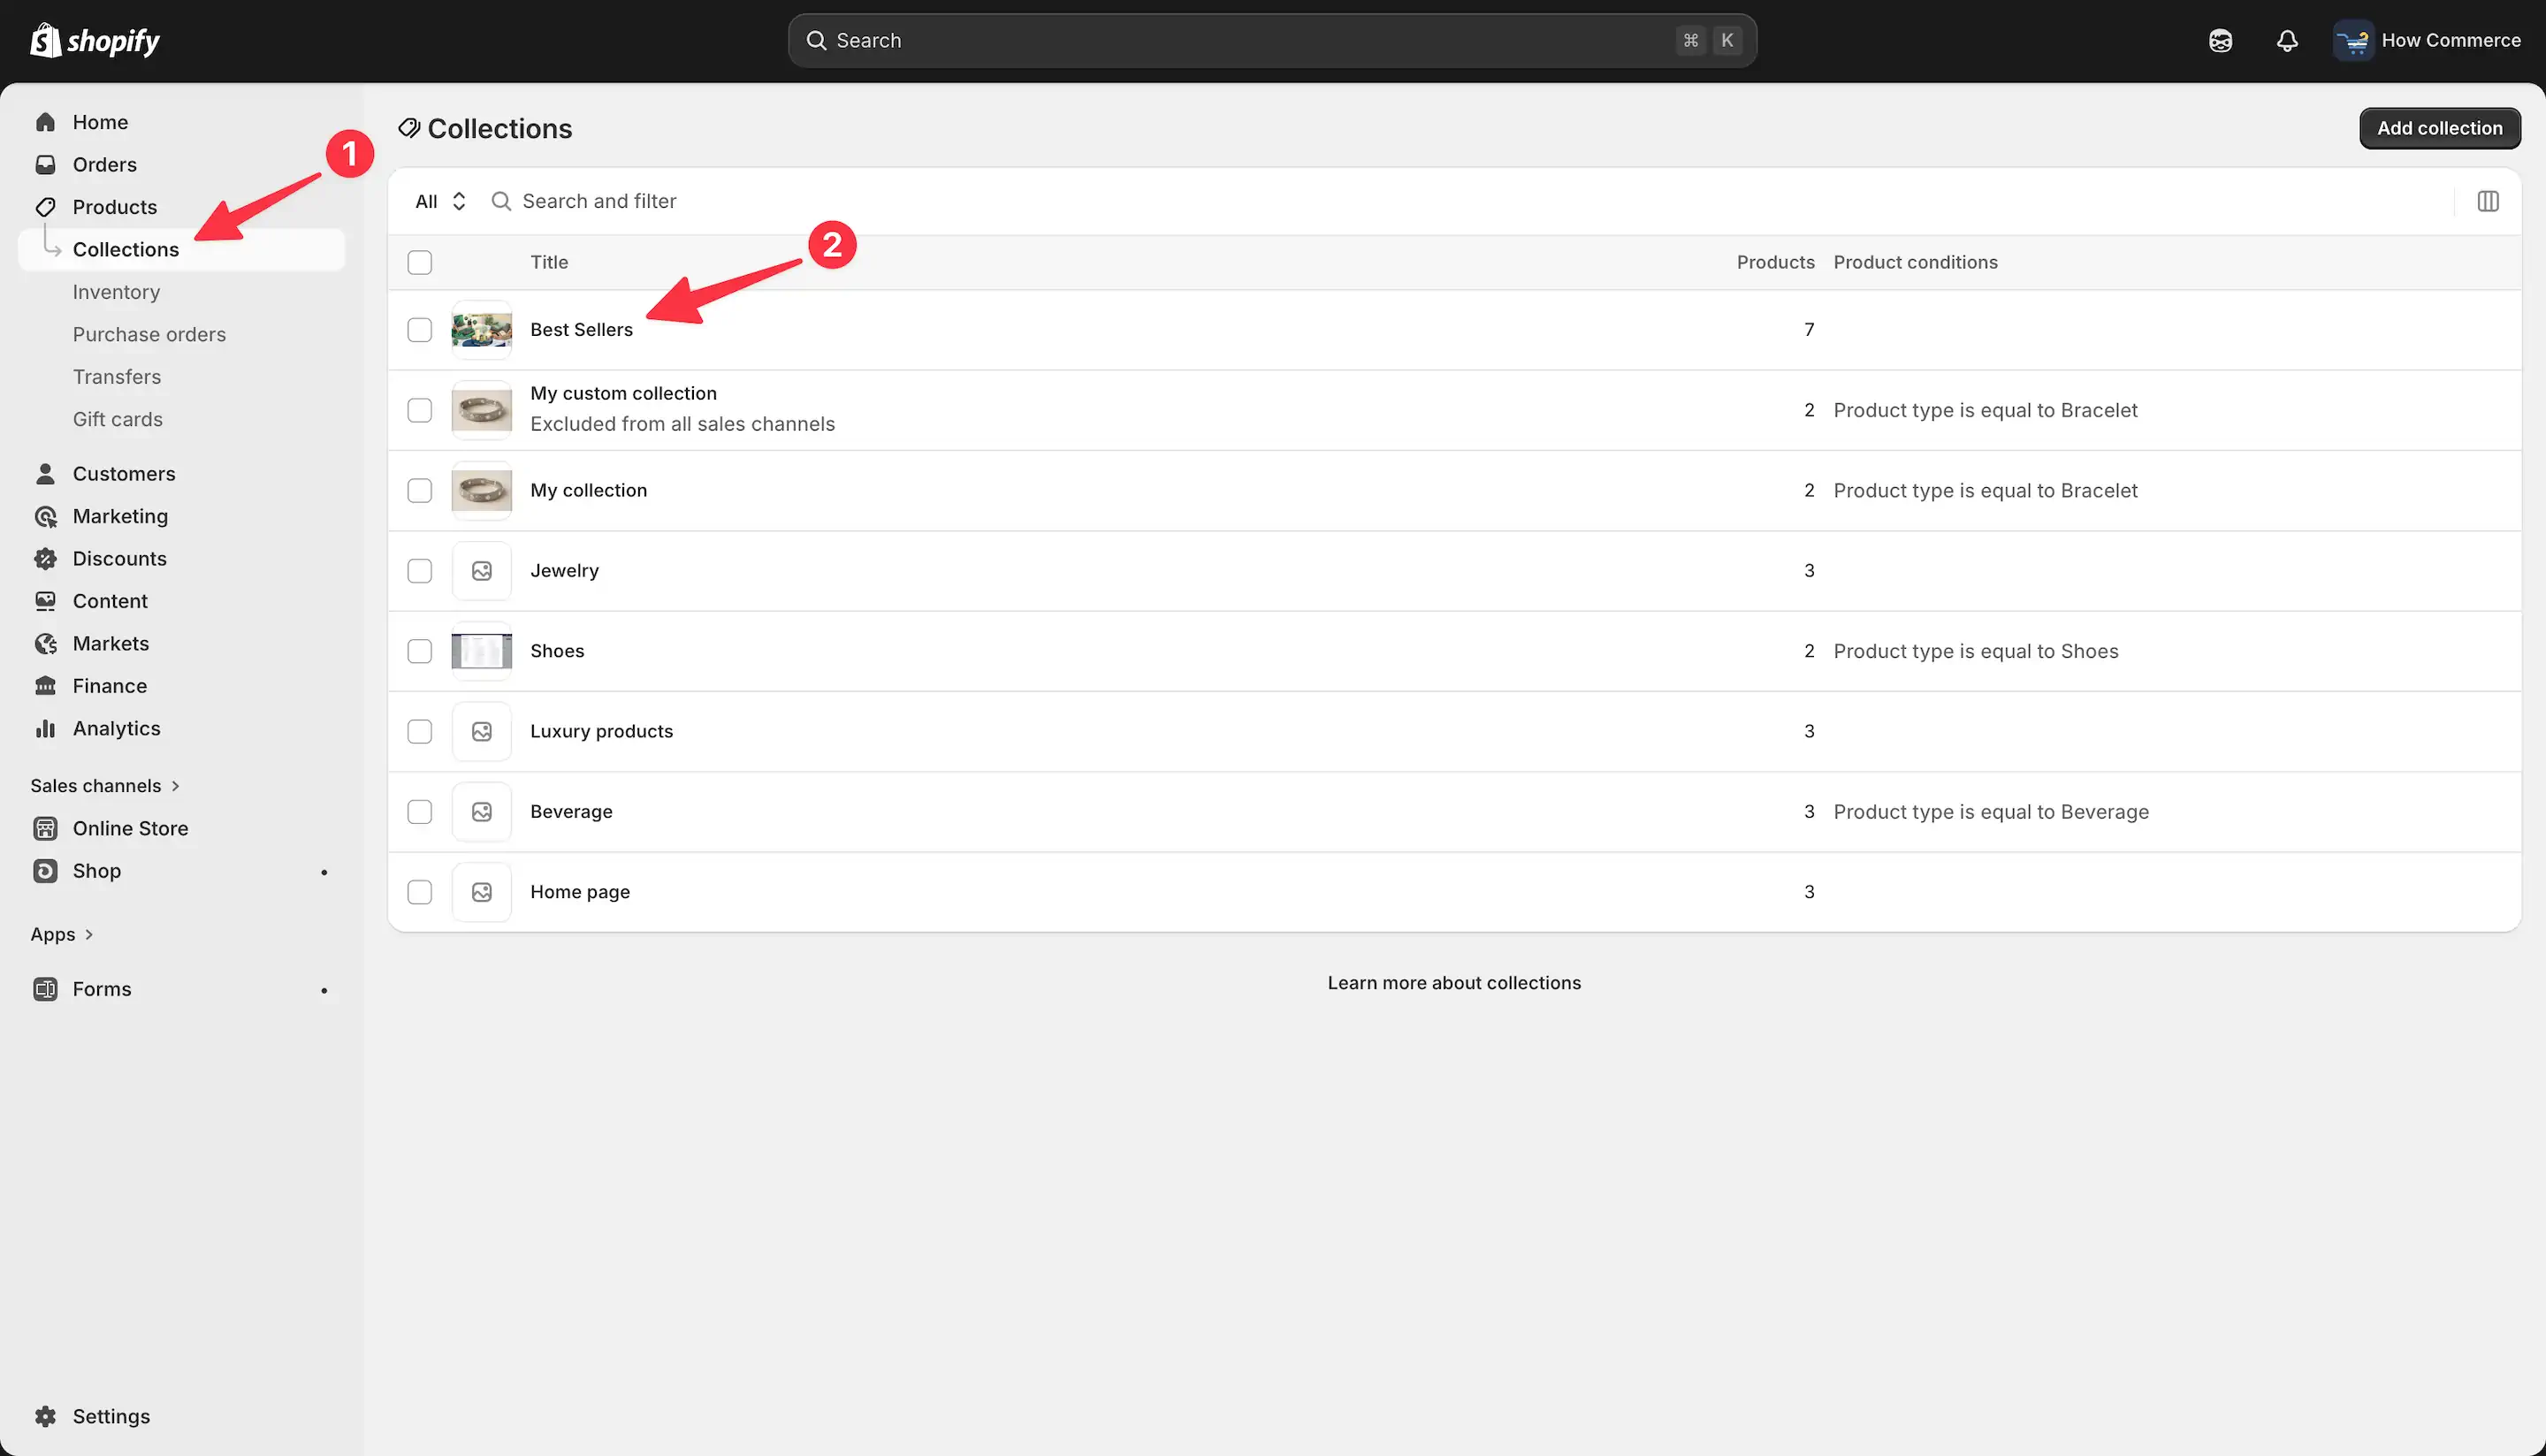
To create an automatic redirect for a collection URL, go to Collections (marked with 1 in the image below) and select a collection (marked with 2 in the image below).
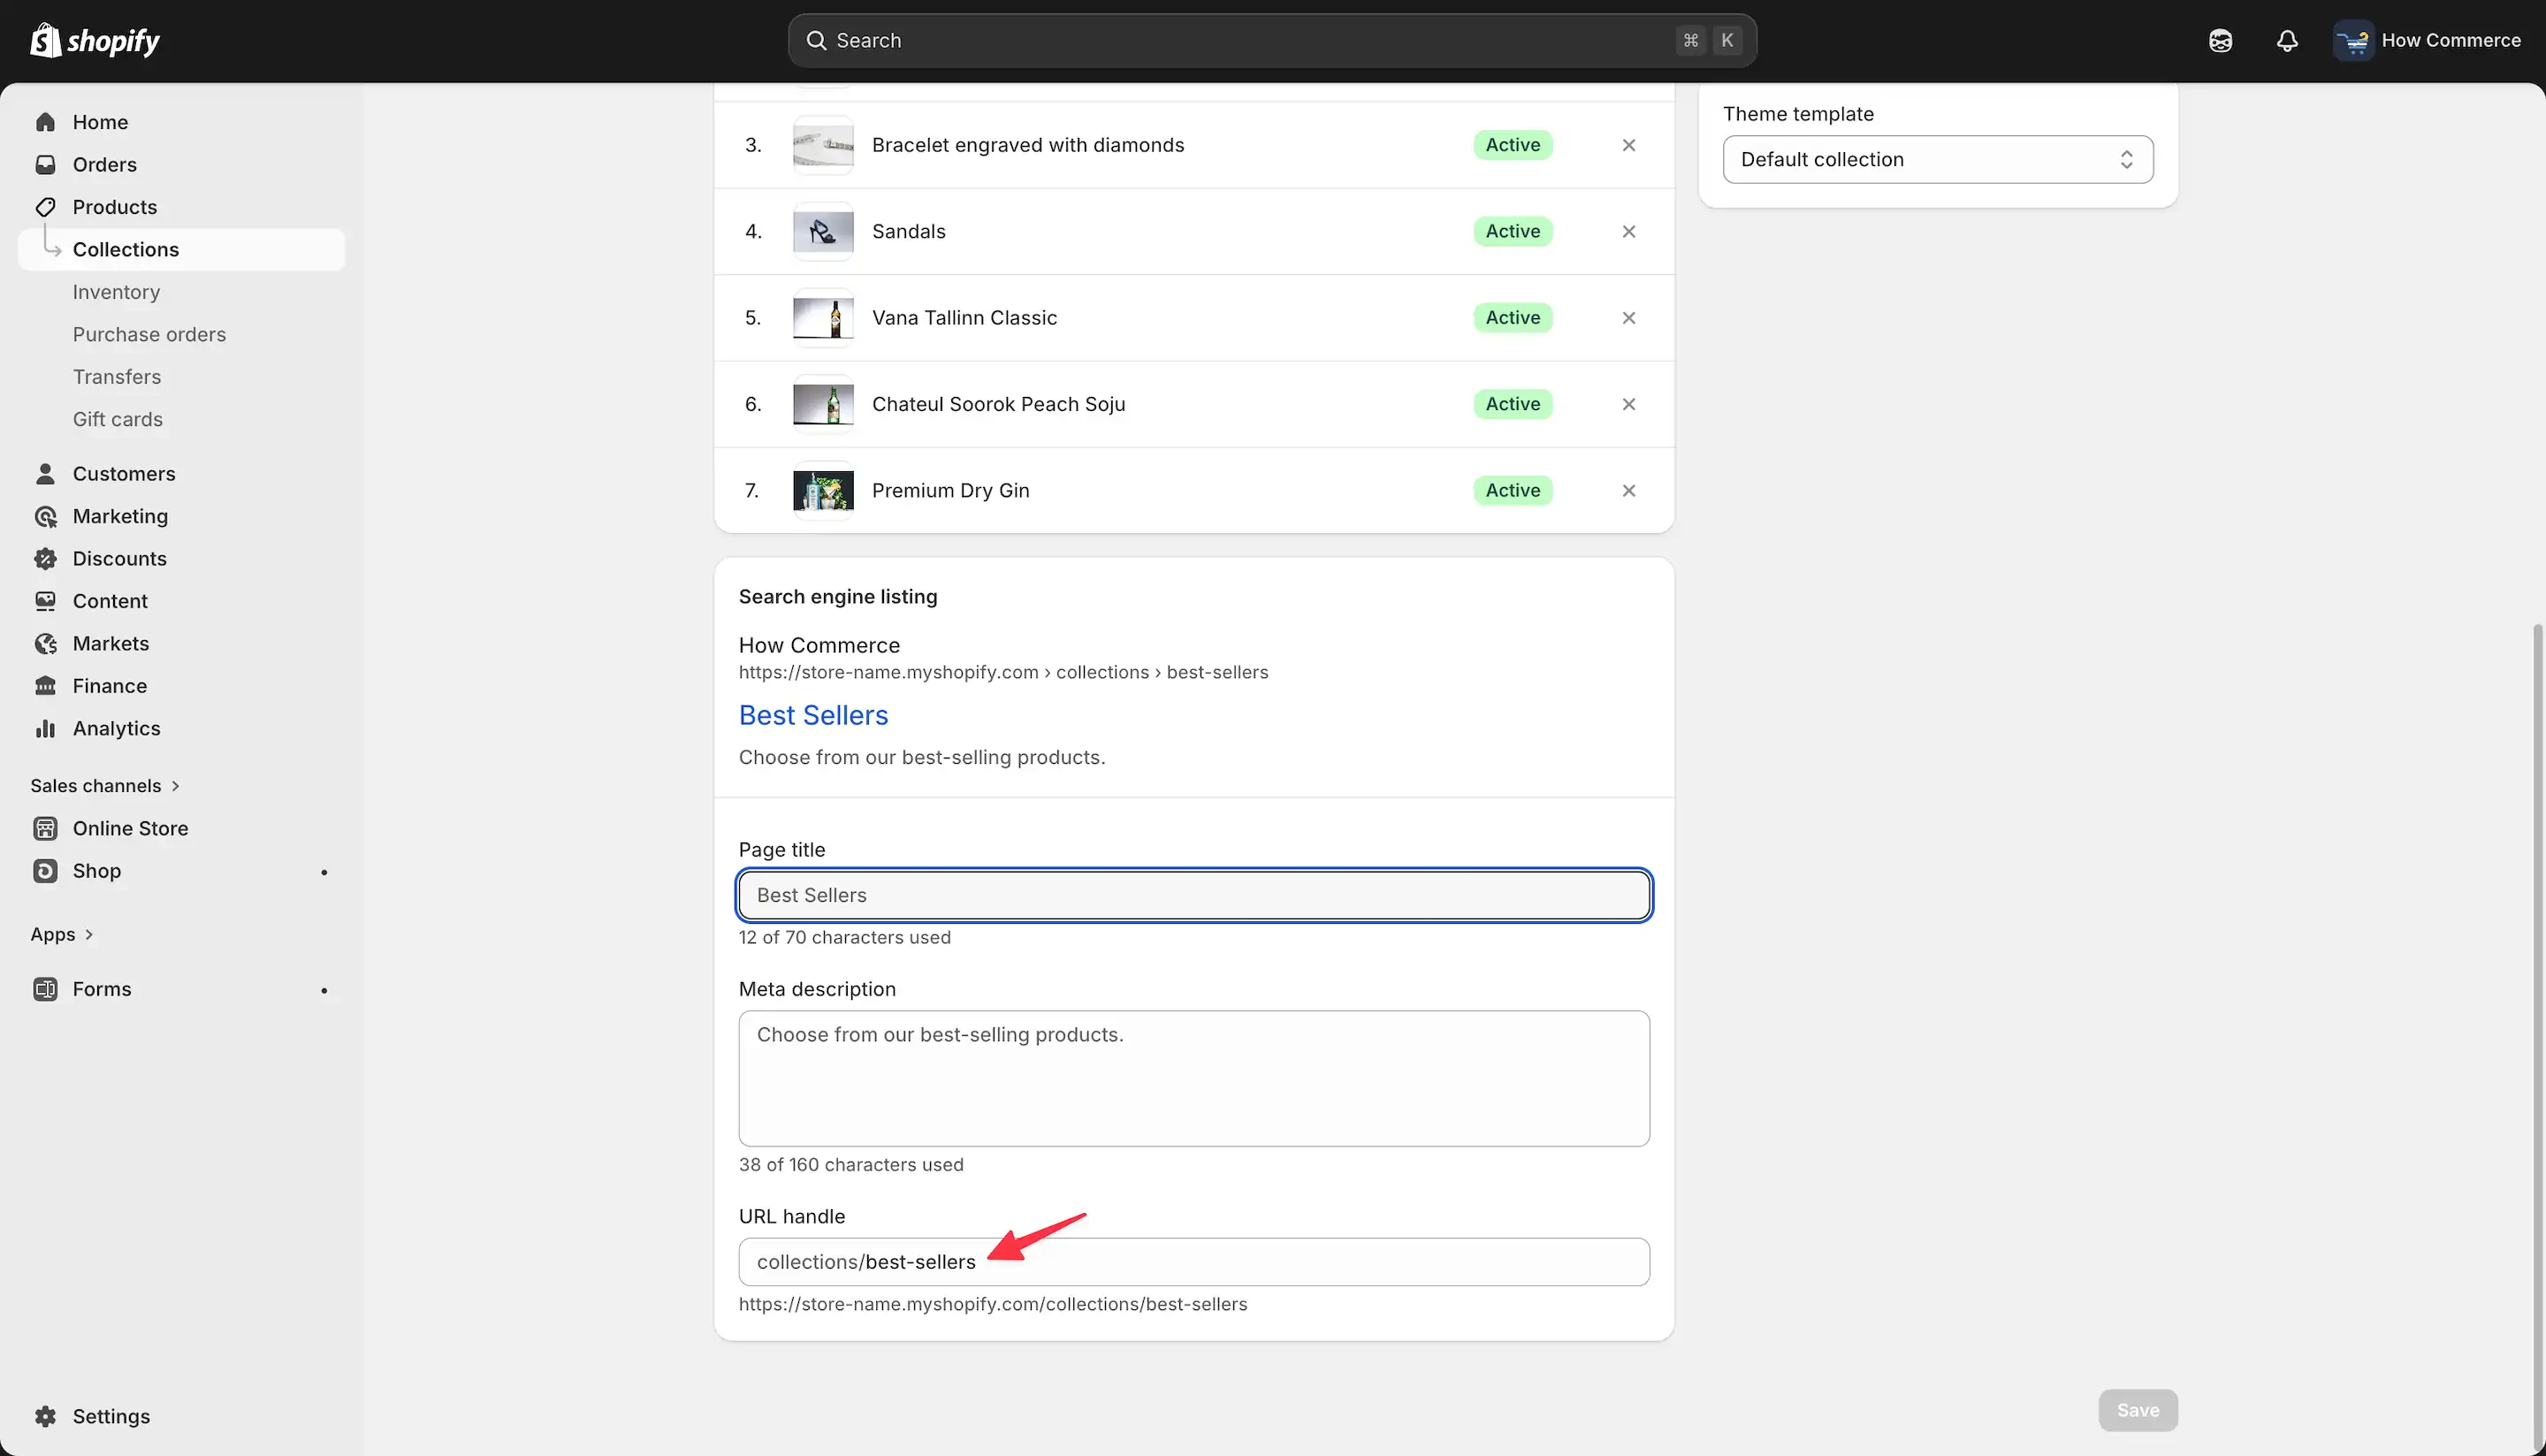
At the bottom of the page, you will find the URL handle, as shown in the image below.
Modify it as needed, and a redirect will be automatically created by Shopify, similar to the product URL process described above.
Page
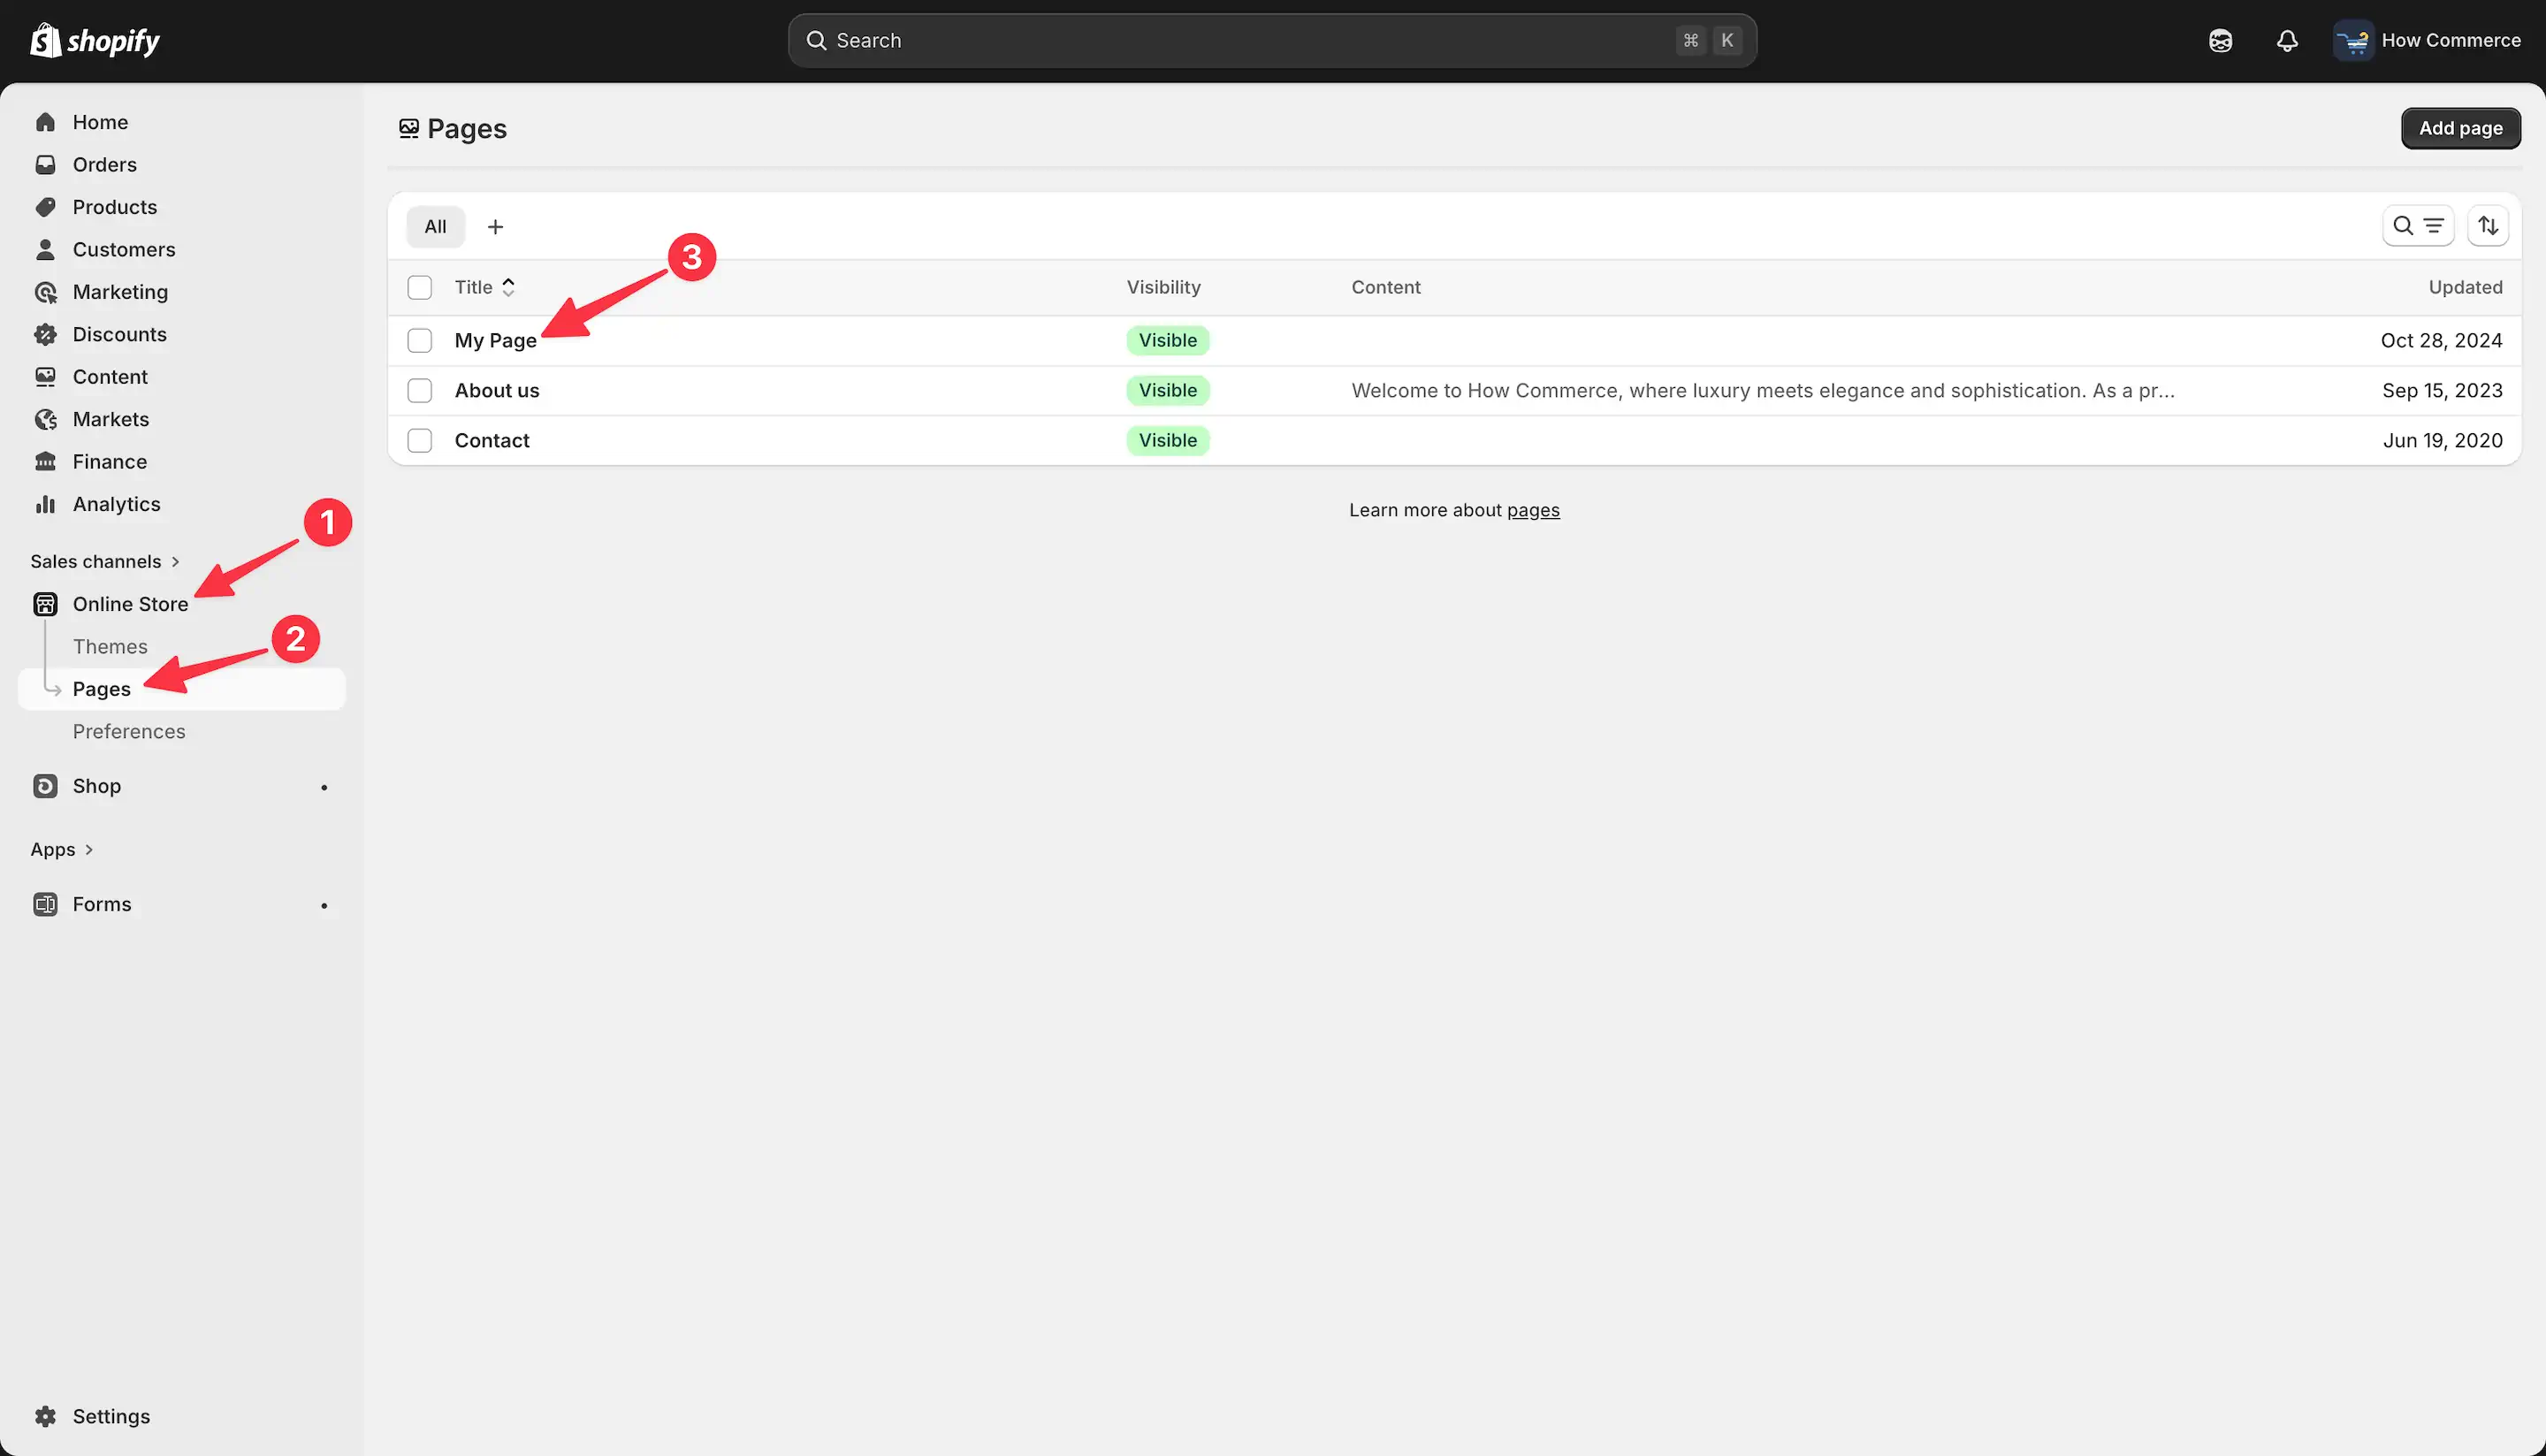
Go to the Online Store (marked with 1 in the image below), select Pages (marked with 2 in the image below), and then choose a page (marked with 3 in the image below).
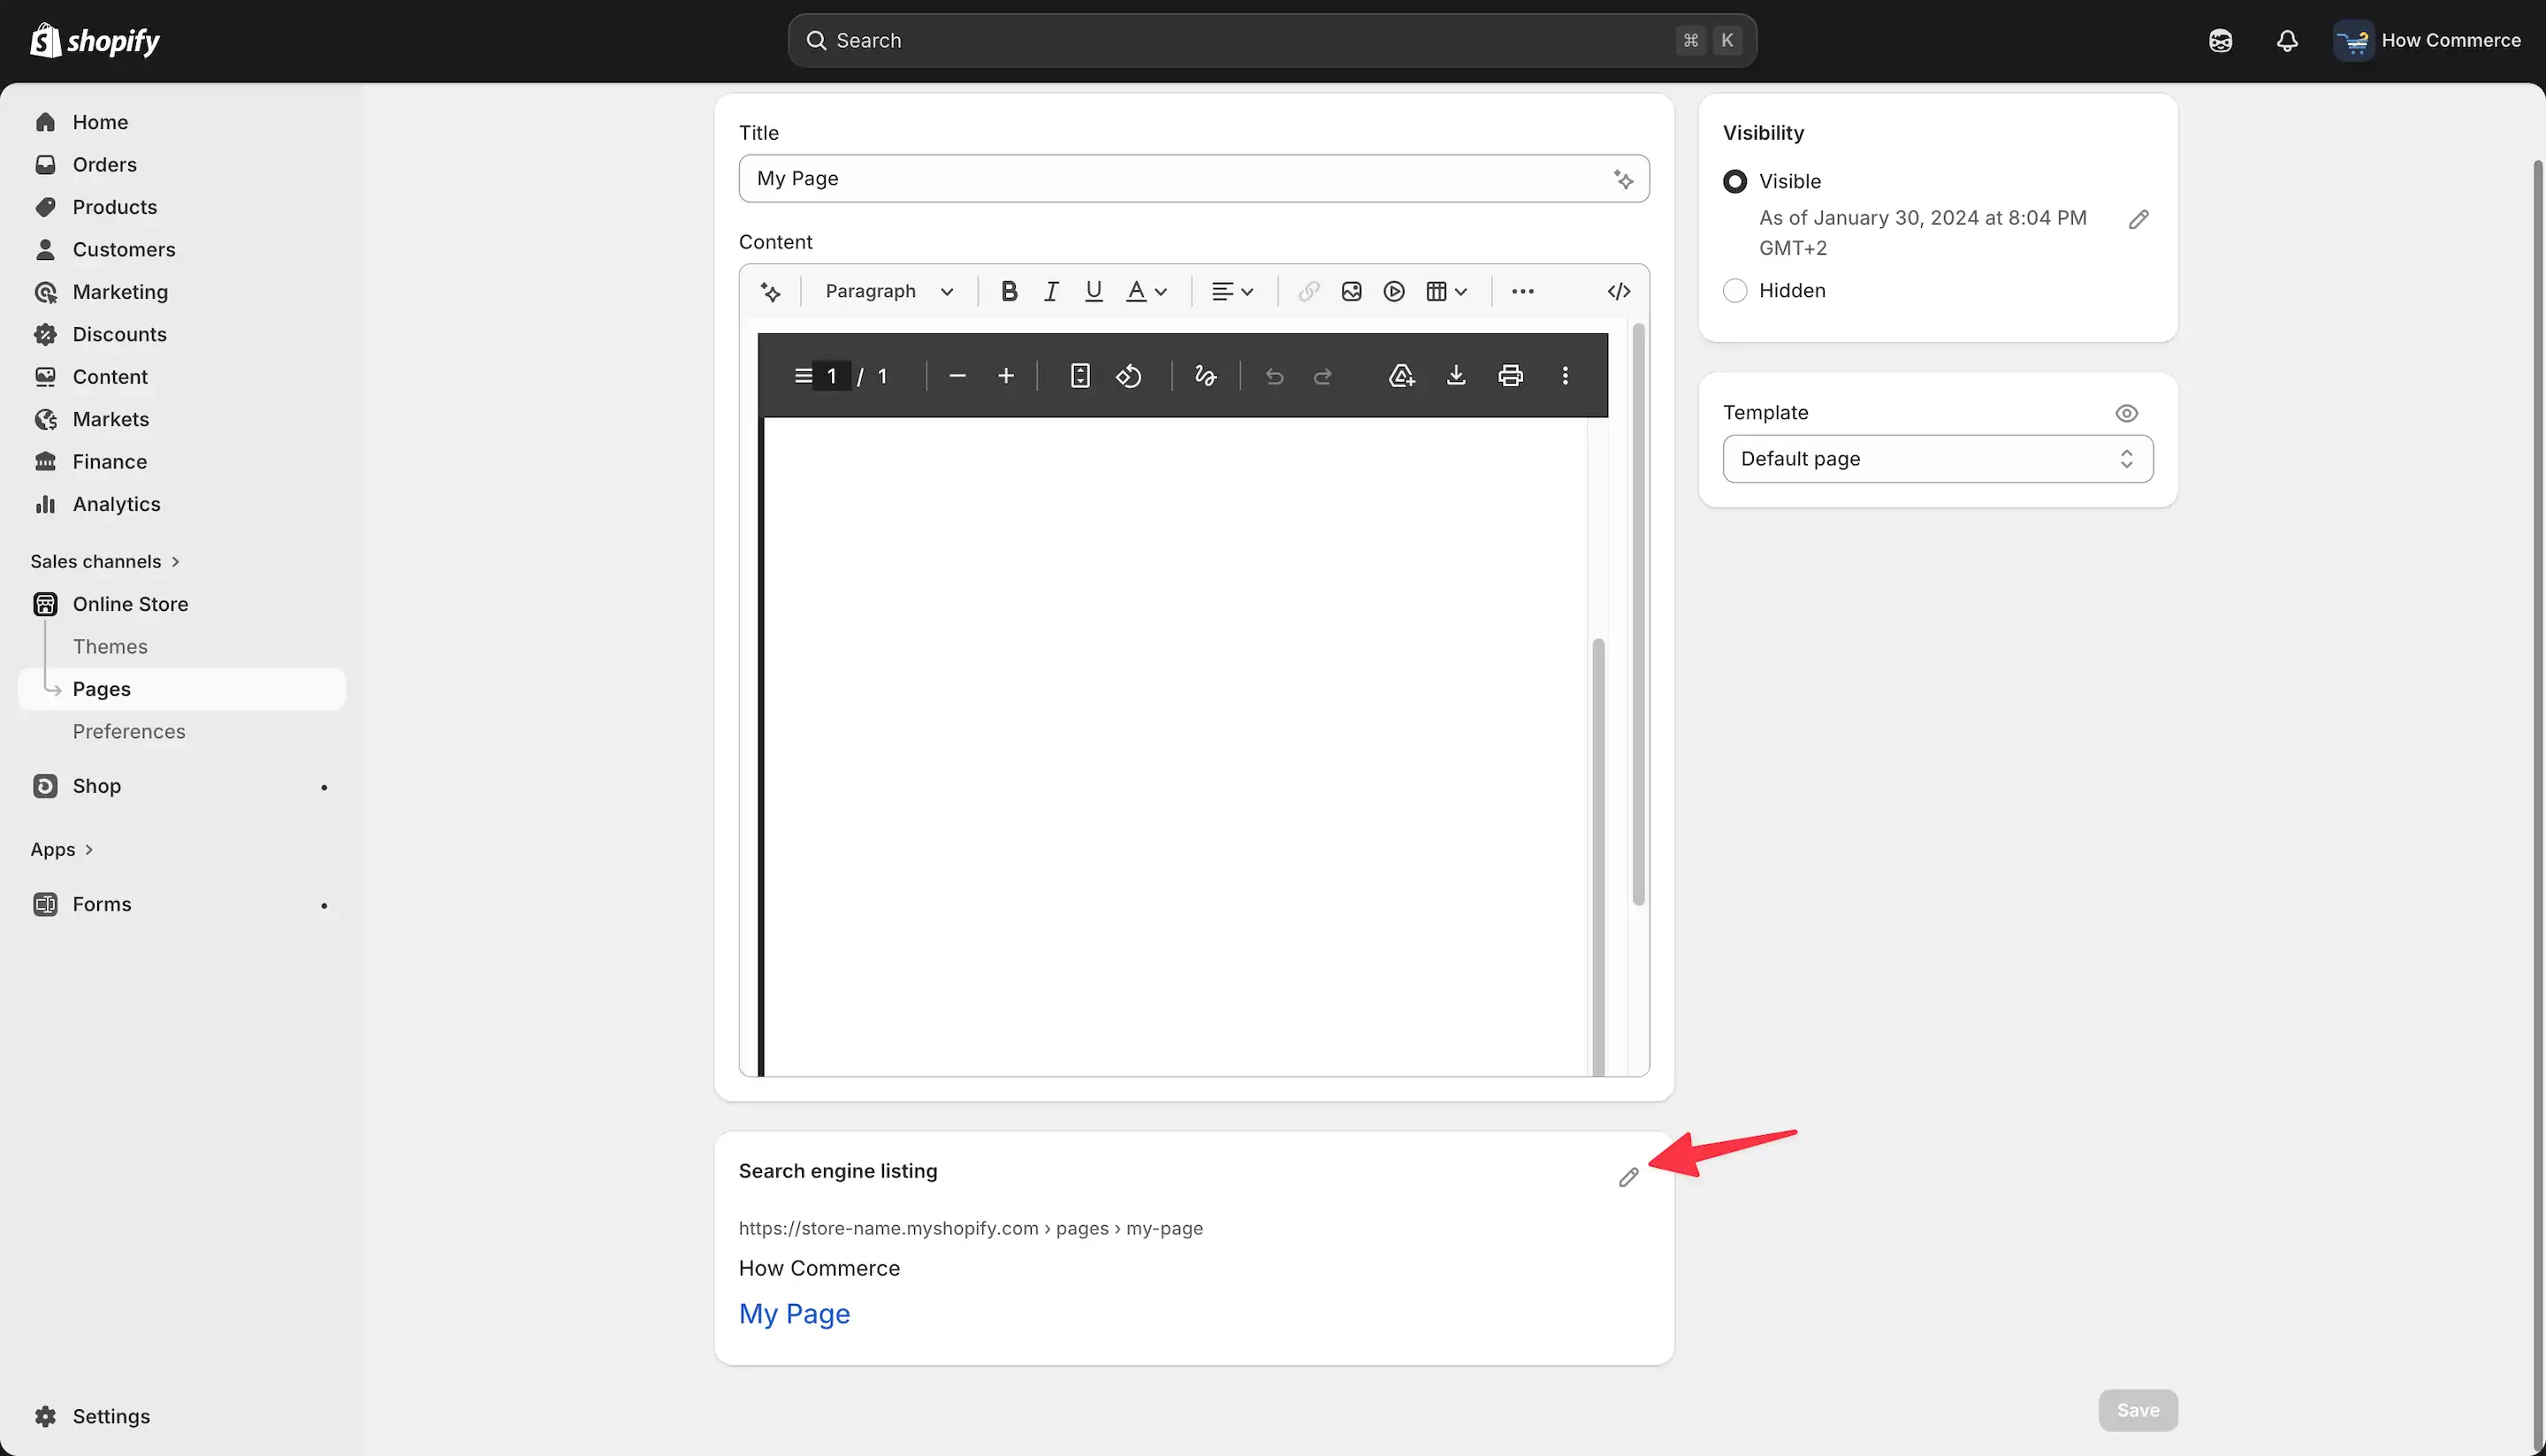
At the bottom of the page, you can see the URL handle edit icon, as shown in the image below.
Click it to open the URL handle editing panel.
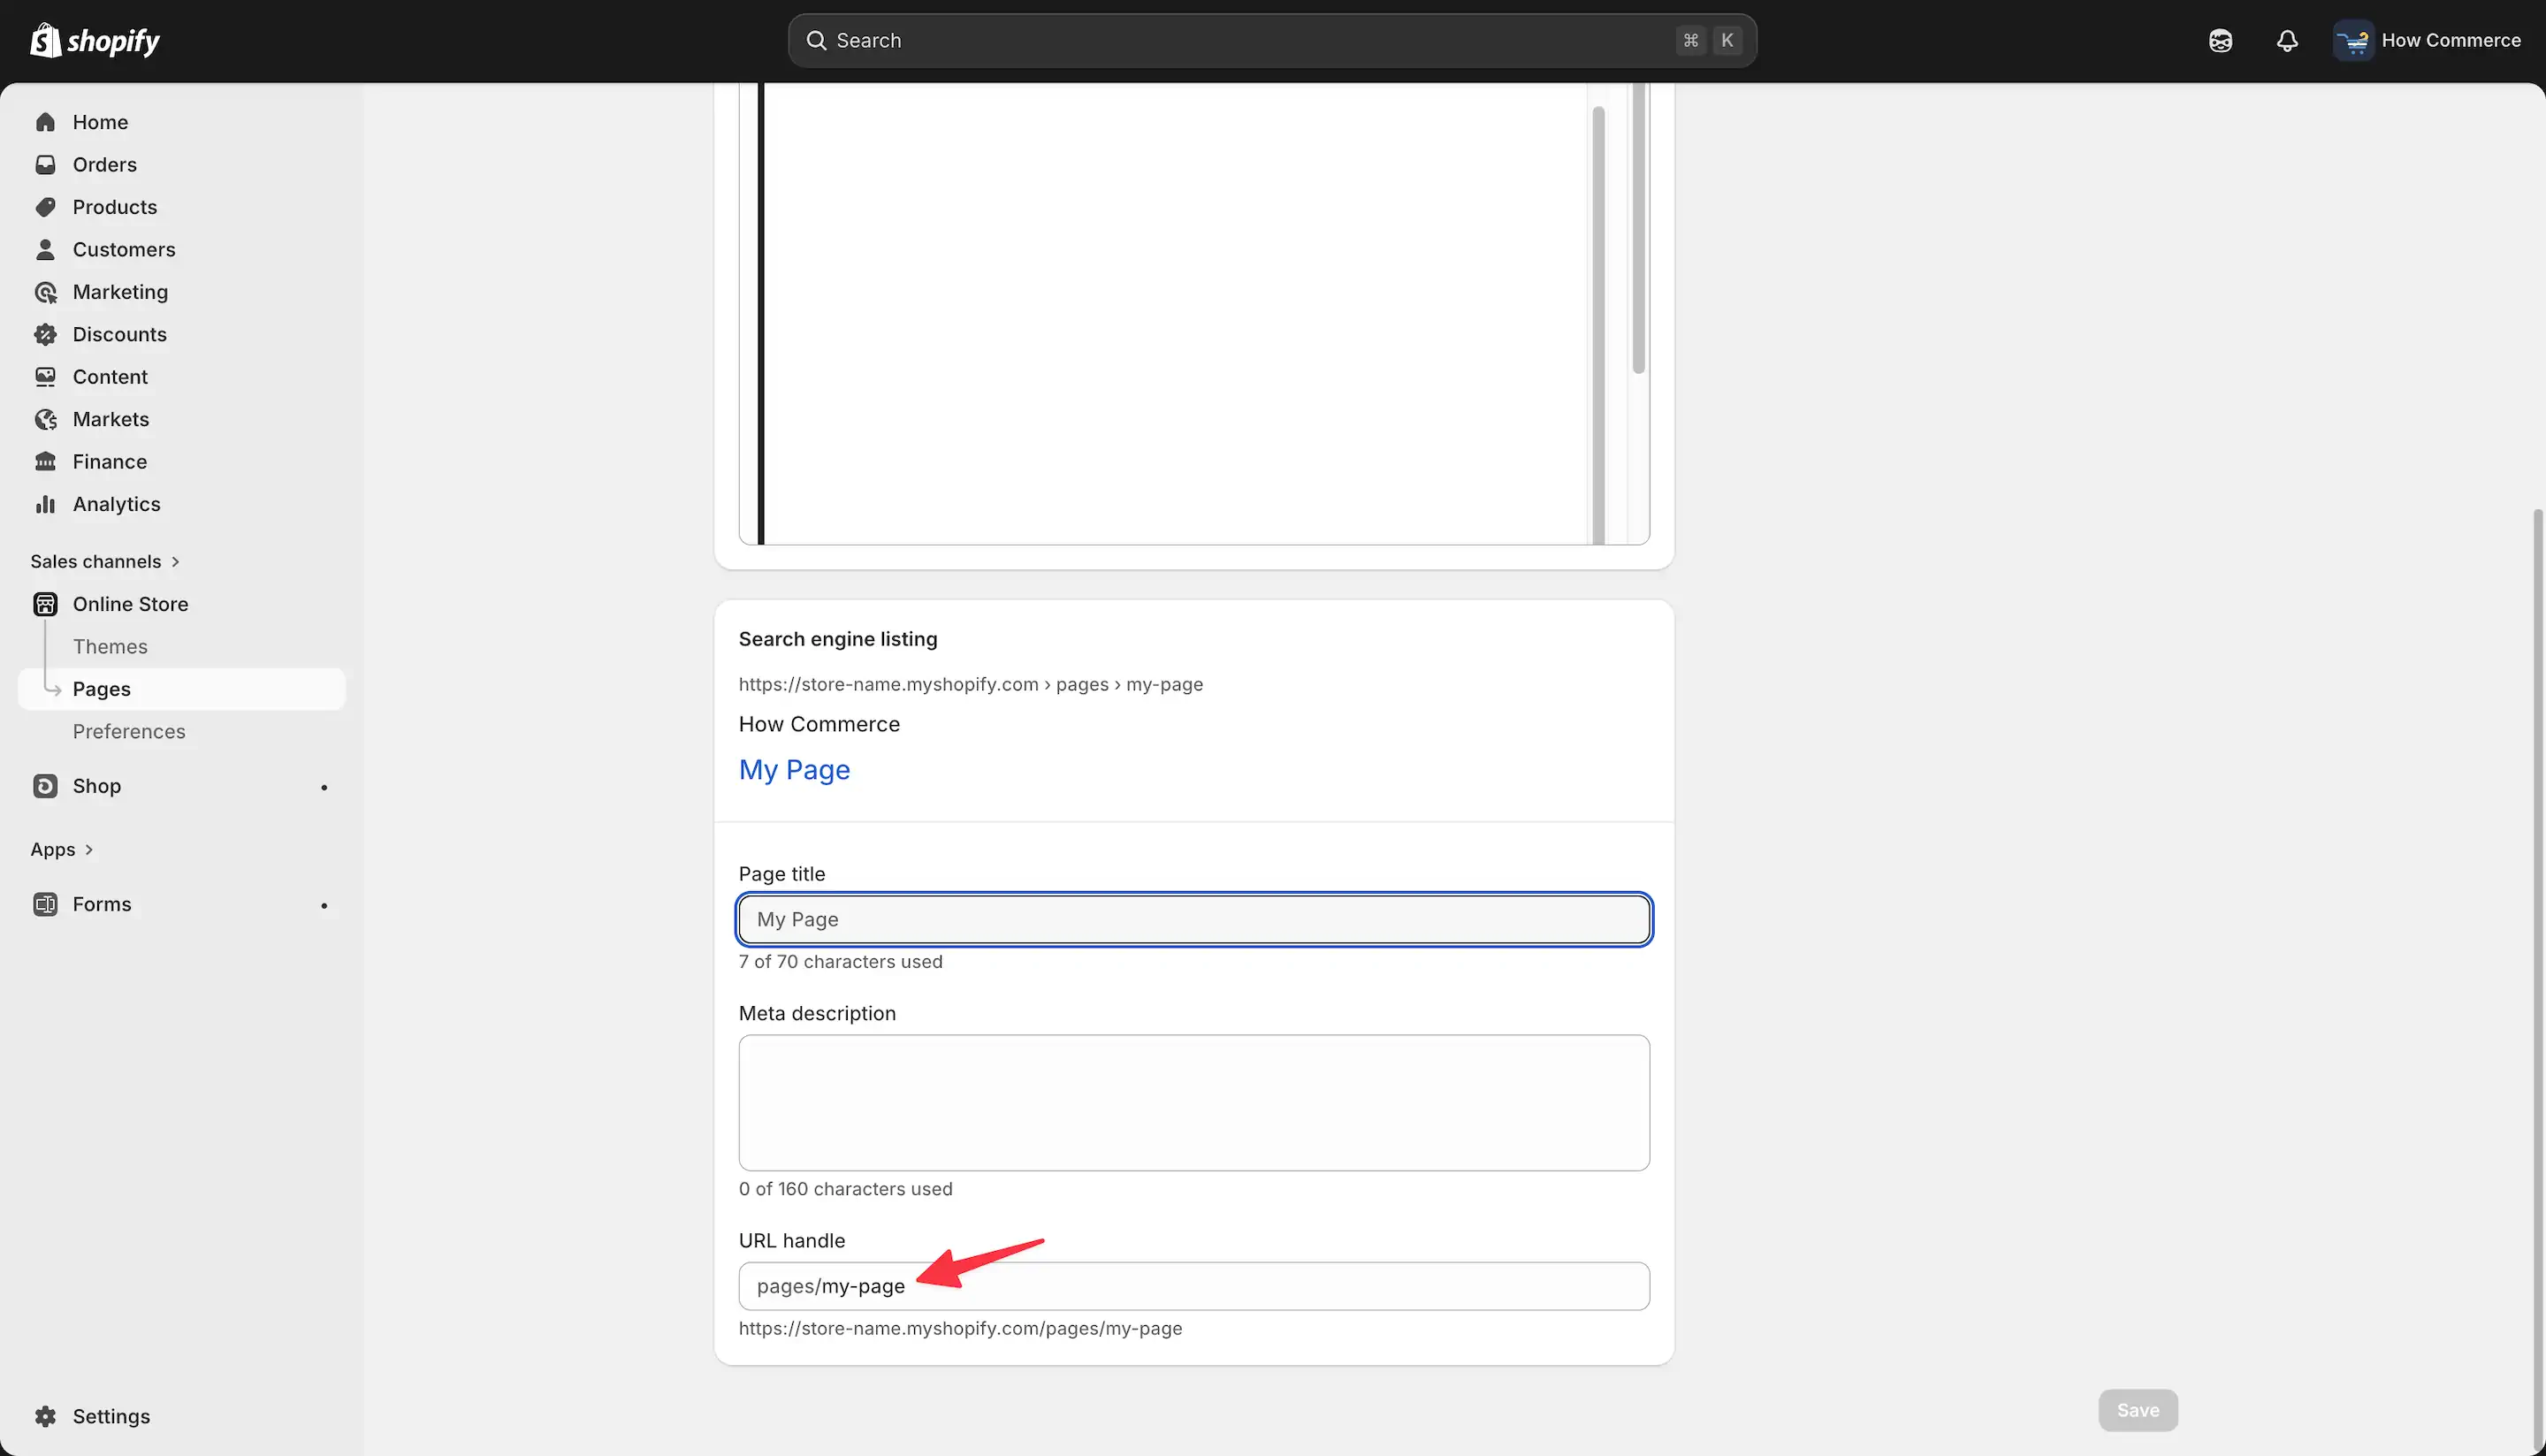
Modify it as needed, and a redirect will be automatically created by Shopify, similar to the product URL process described above.
That is everything required to create an automatic redirect.
As you have seen, redirects in Shopify are limited in flexibility.
If you need full control over URL structures and the ability to define custom paths from start to finish, you will need to adopt a headless Shopify approach. All standard Shopify plans enforce the same URL structure limitations.
How to create a manual URL redirect
Although the automatic method is recommended and generally safer when modifying existing URLs, there are cases where you need a different approach.
Specifically, when you already know the old URL and want to manually redirect it to a new destination.
To access this feature, go to Content (marked with 1 in the image below), click on Menus (marked with 2 in the image below), and then select URL redirects on the right side (marked with 3 in the image below).
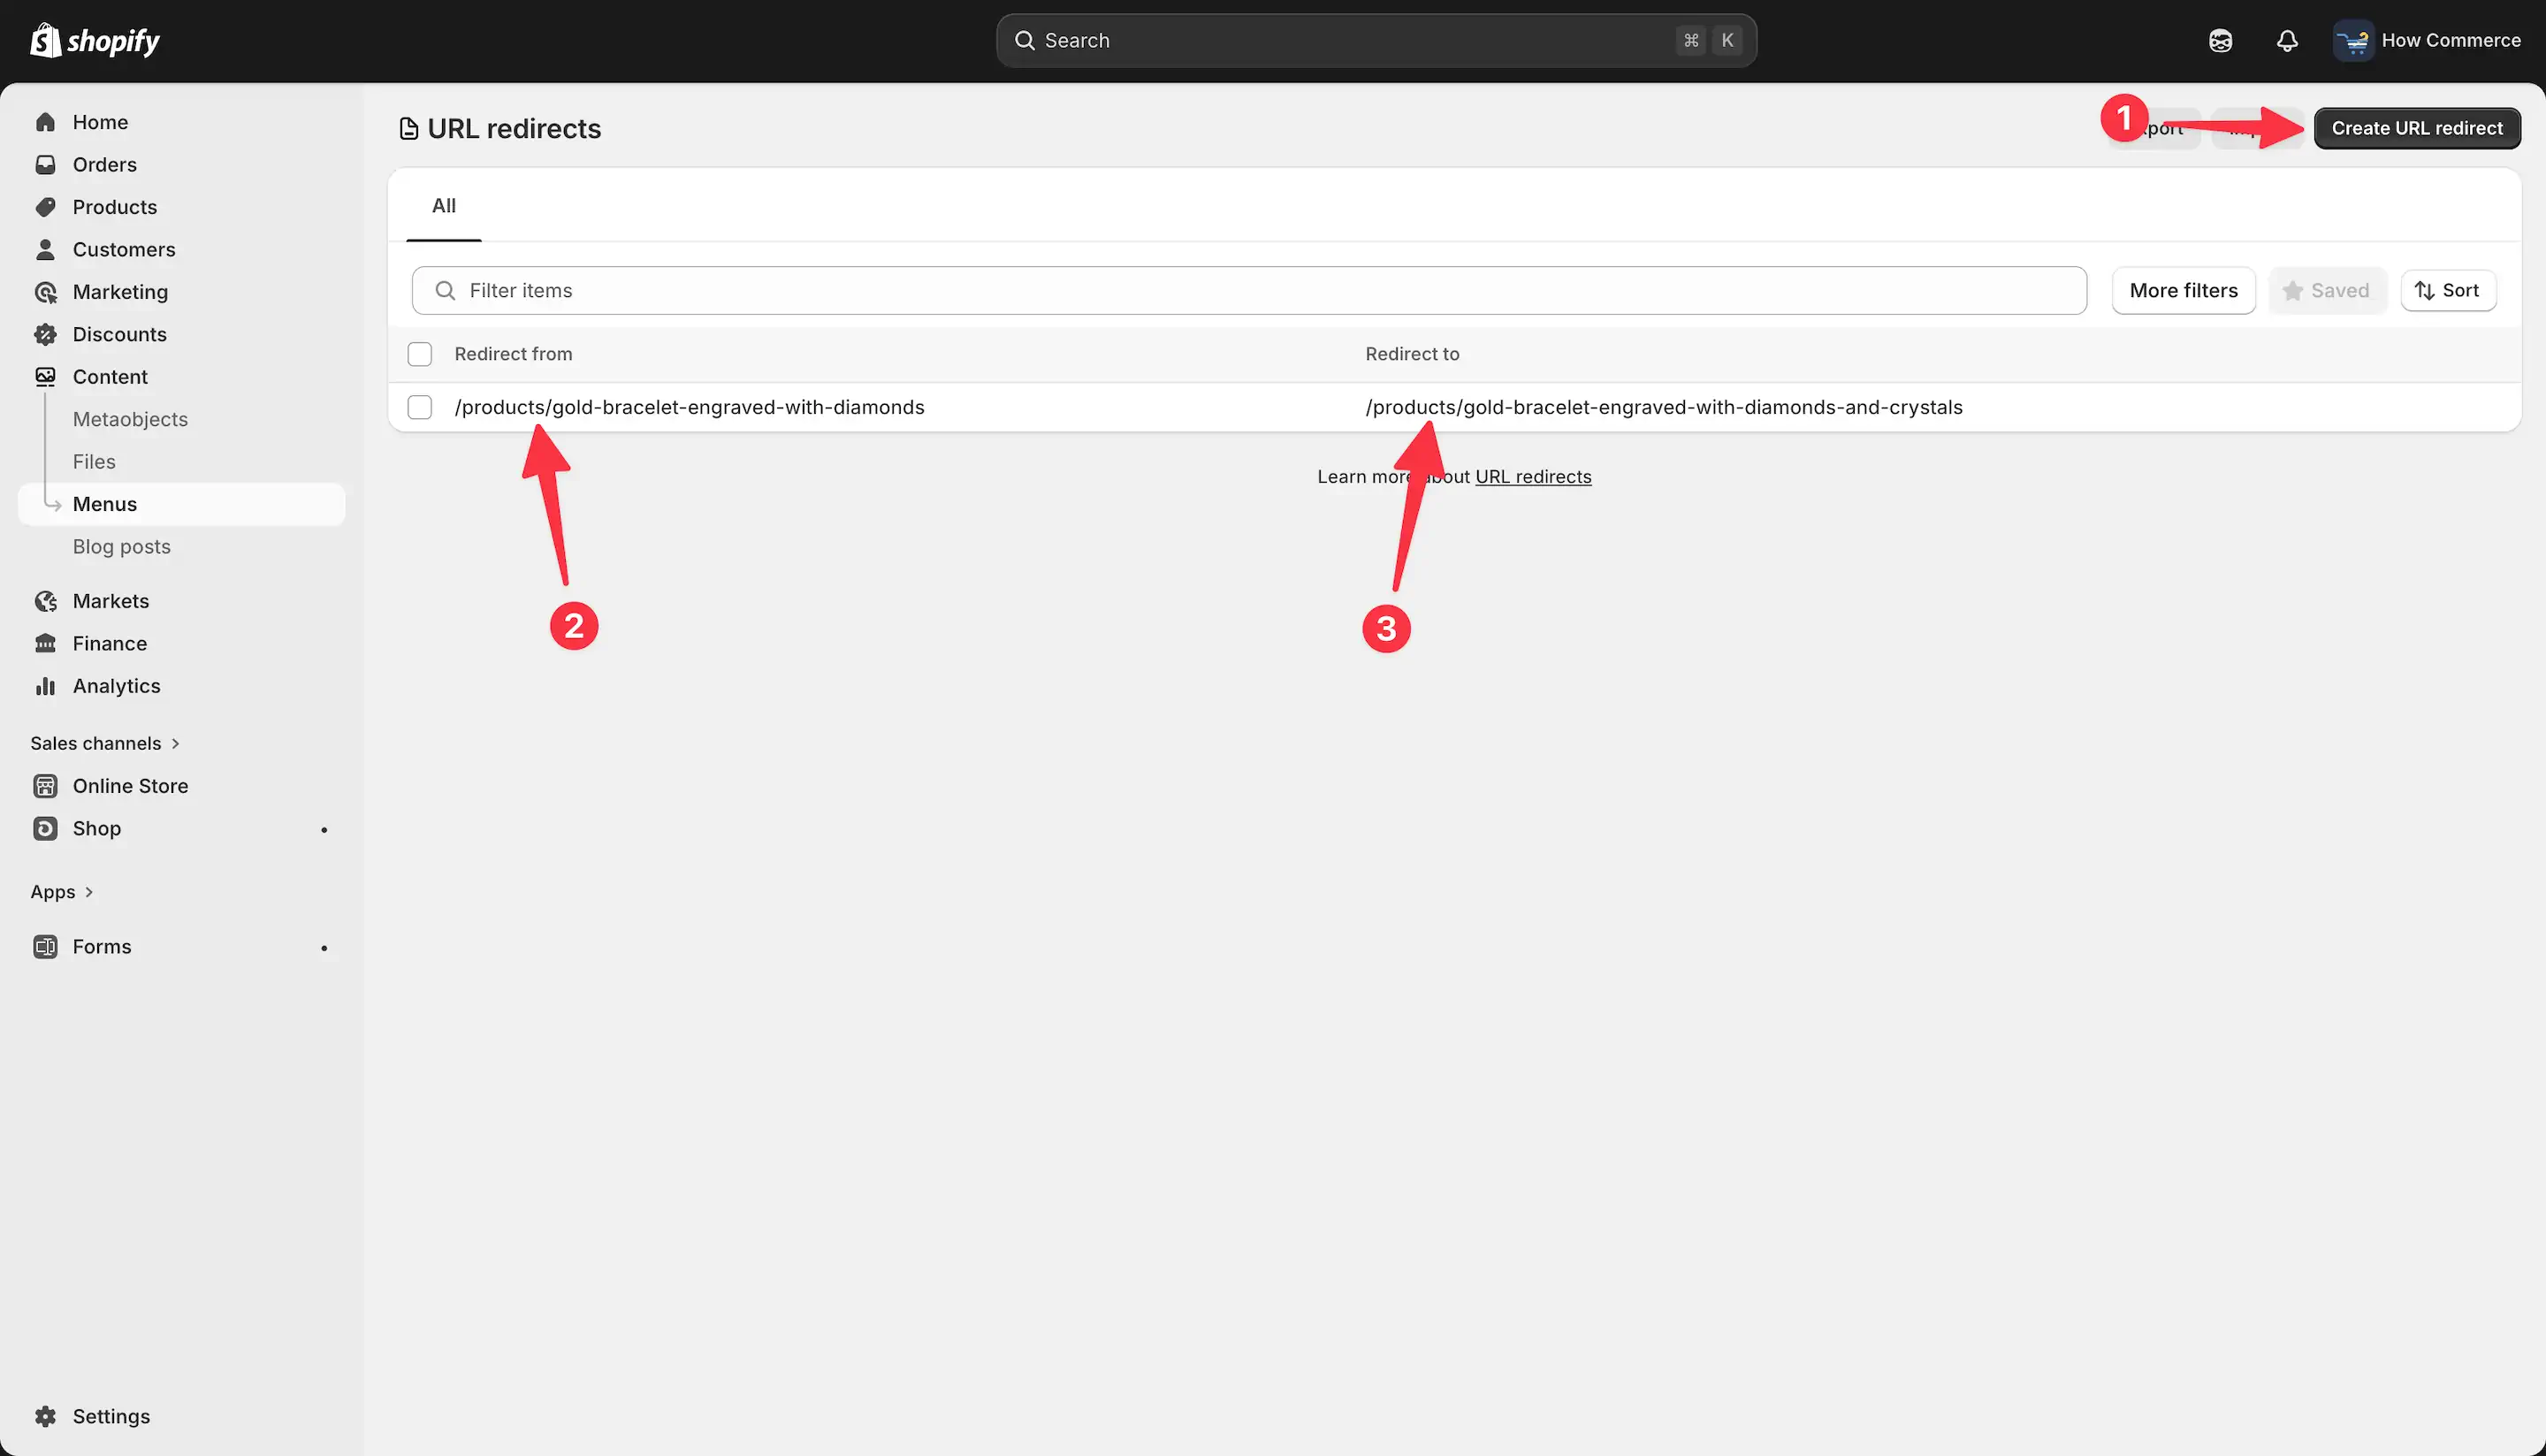
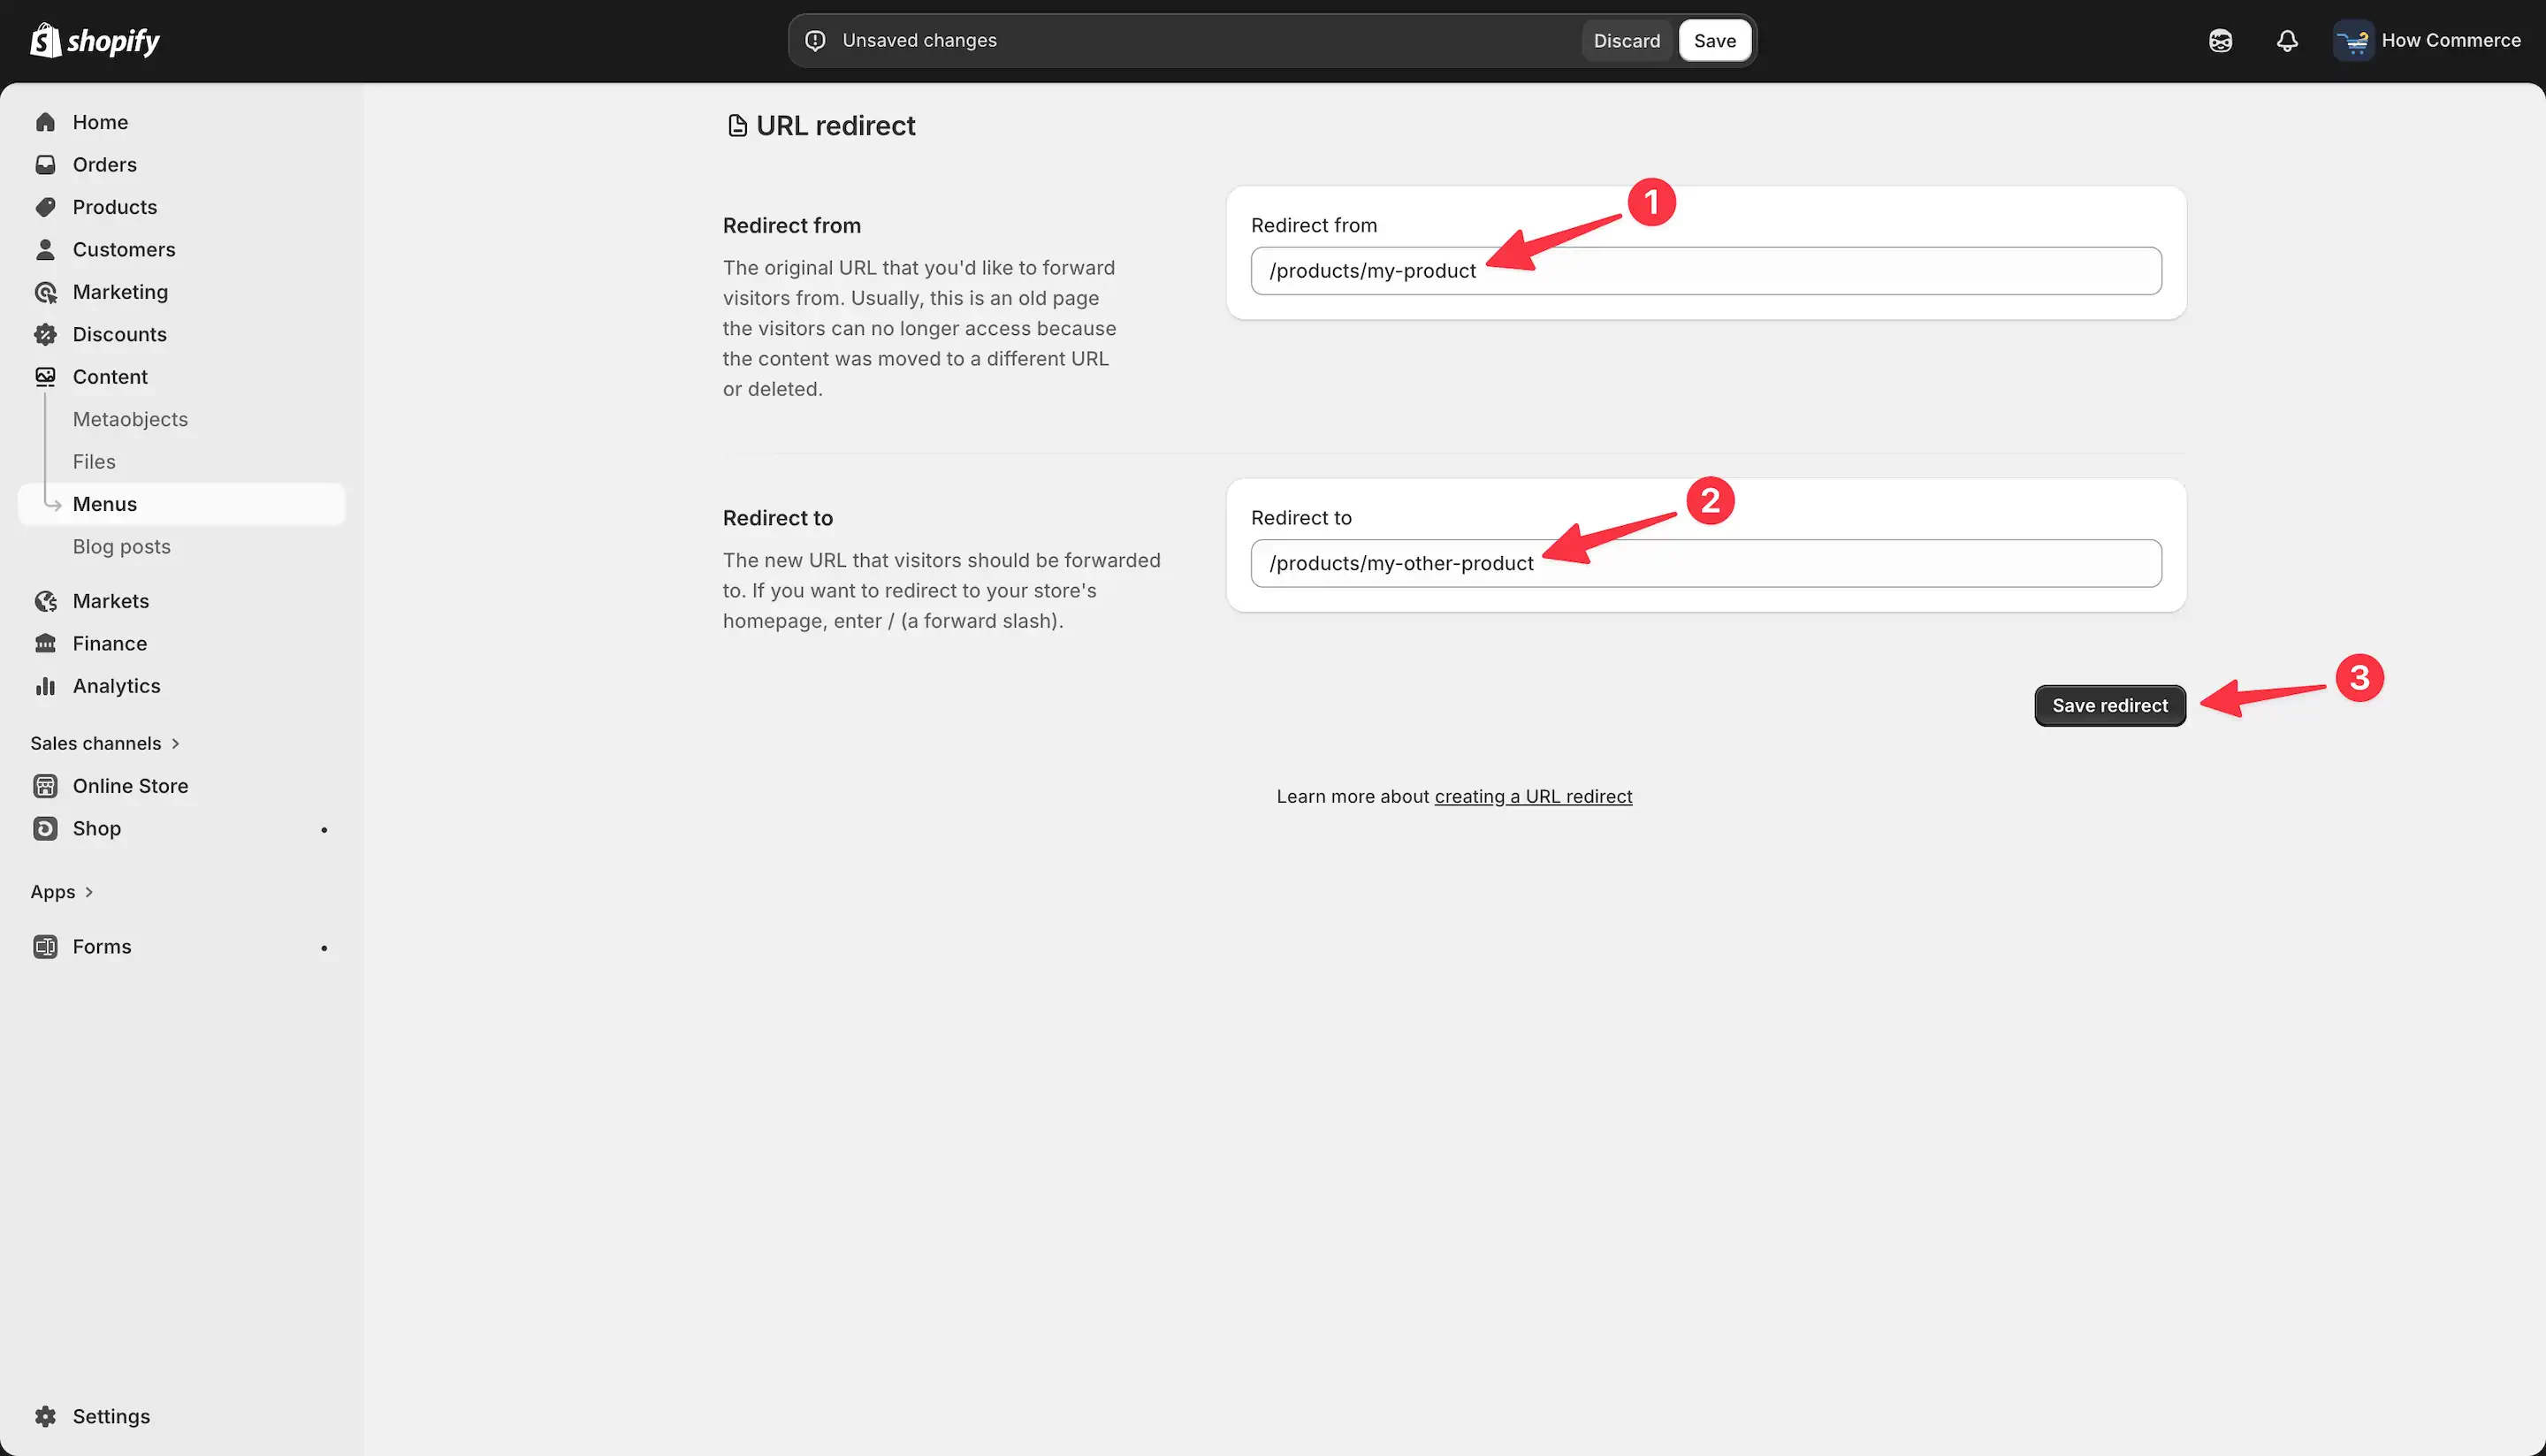
Click on Create URL redirect (marked with 1 in the image below).
You will notice two fields: Redirect from (marked with 2 in the image below) and Redirect to (marked with 3 in the image below).
This is the required structure for manually created redirects.
In the first input field, Redirect from, enter the old product URL (marked with 1 in the image below). In the second field, Redirect to, enter the new product URL (marked with 2 in the image below).
Click Save (marked with 3 in the image below) to apply the changes.
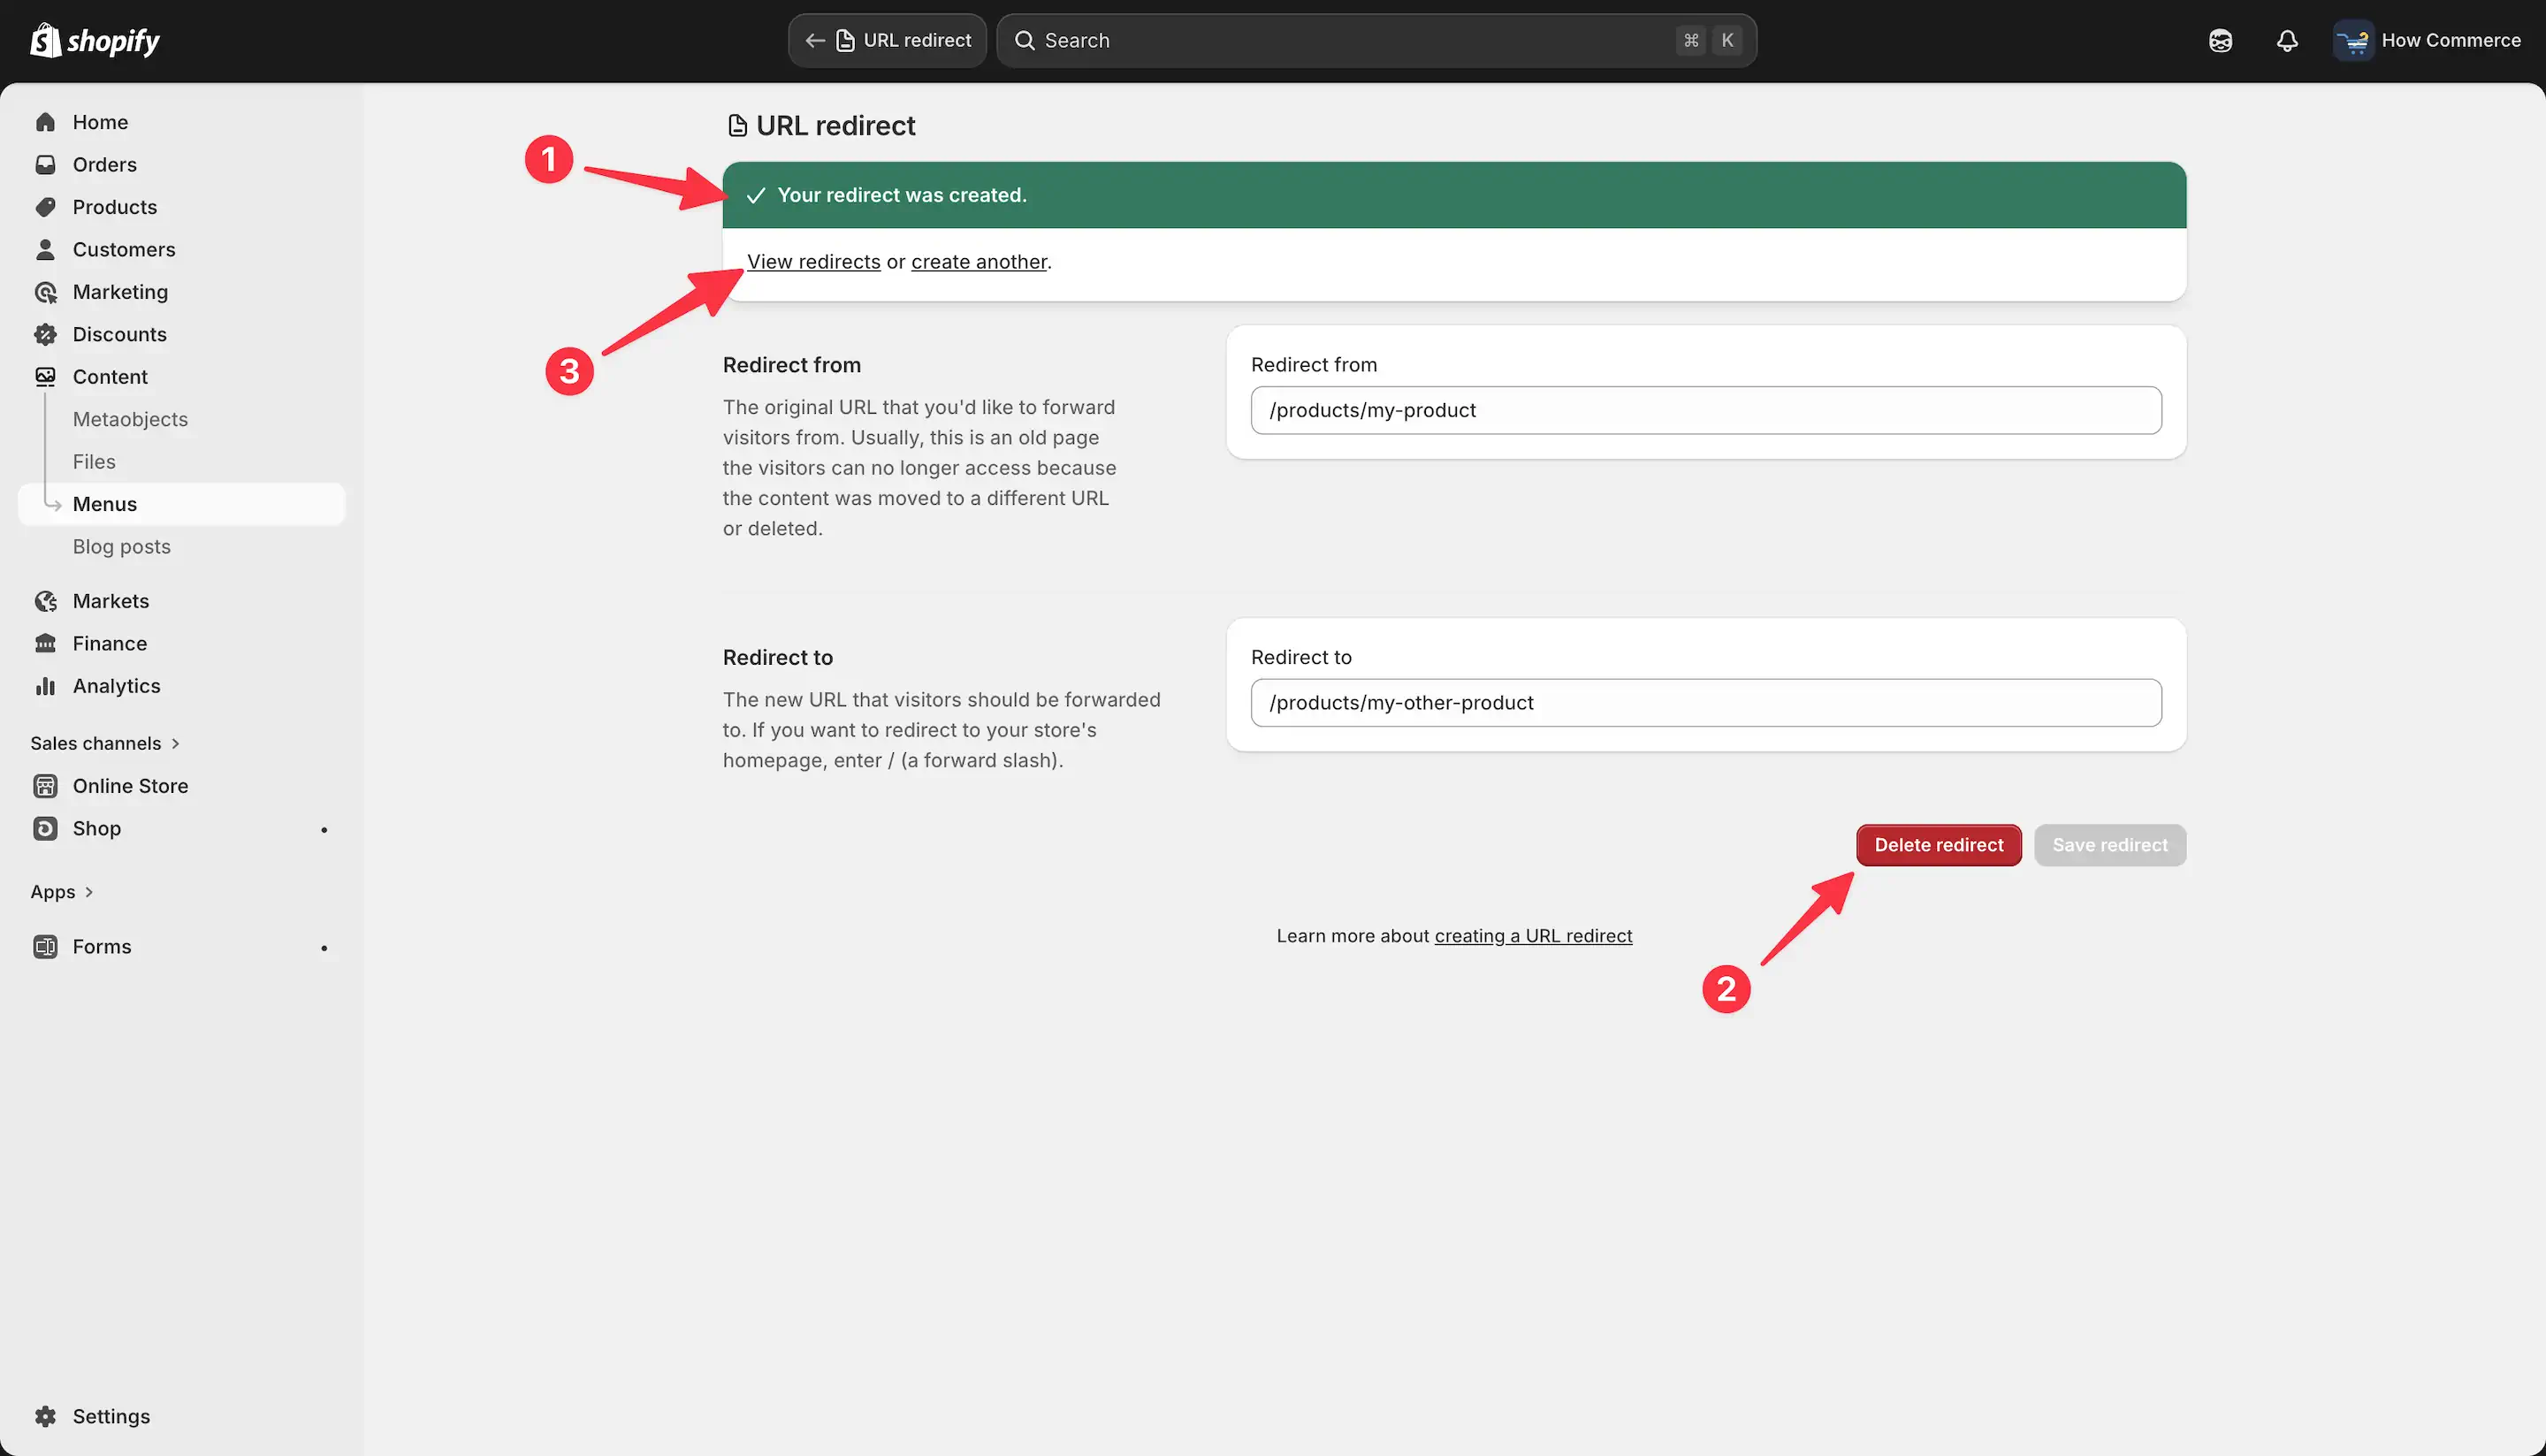
Once the redirect is successfully created, Shopify will display a confirmation message (marked with 1 in the image below).
You also have the option to Delete redirect (marked with 2 in the image below).
To review your newly created redirect, click on View redirects (marked with 3 in the image below).
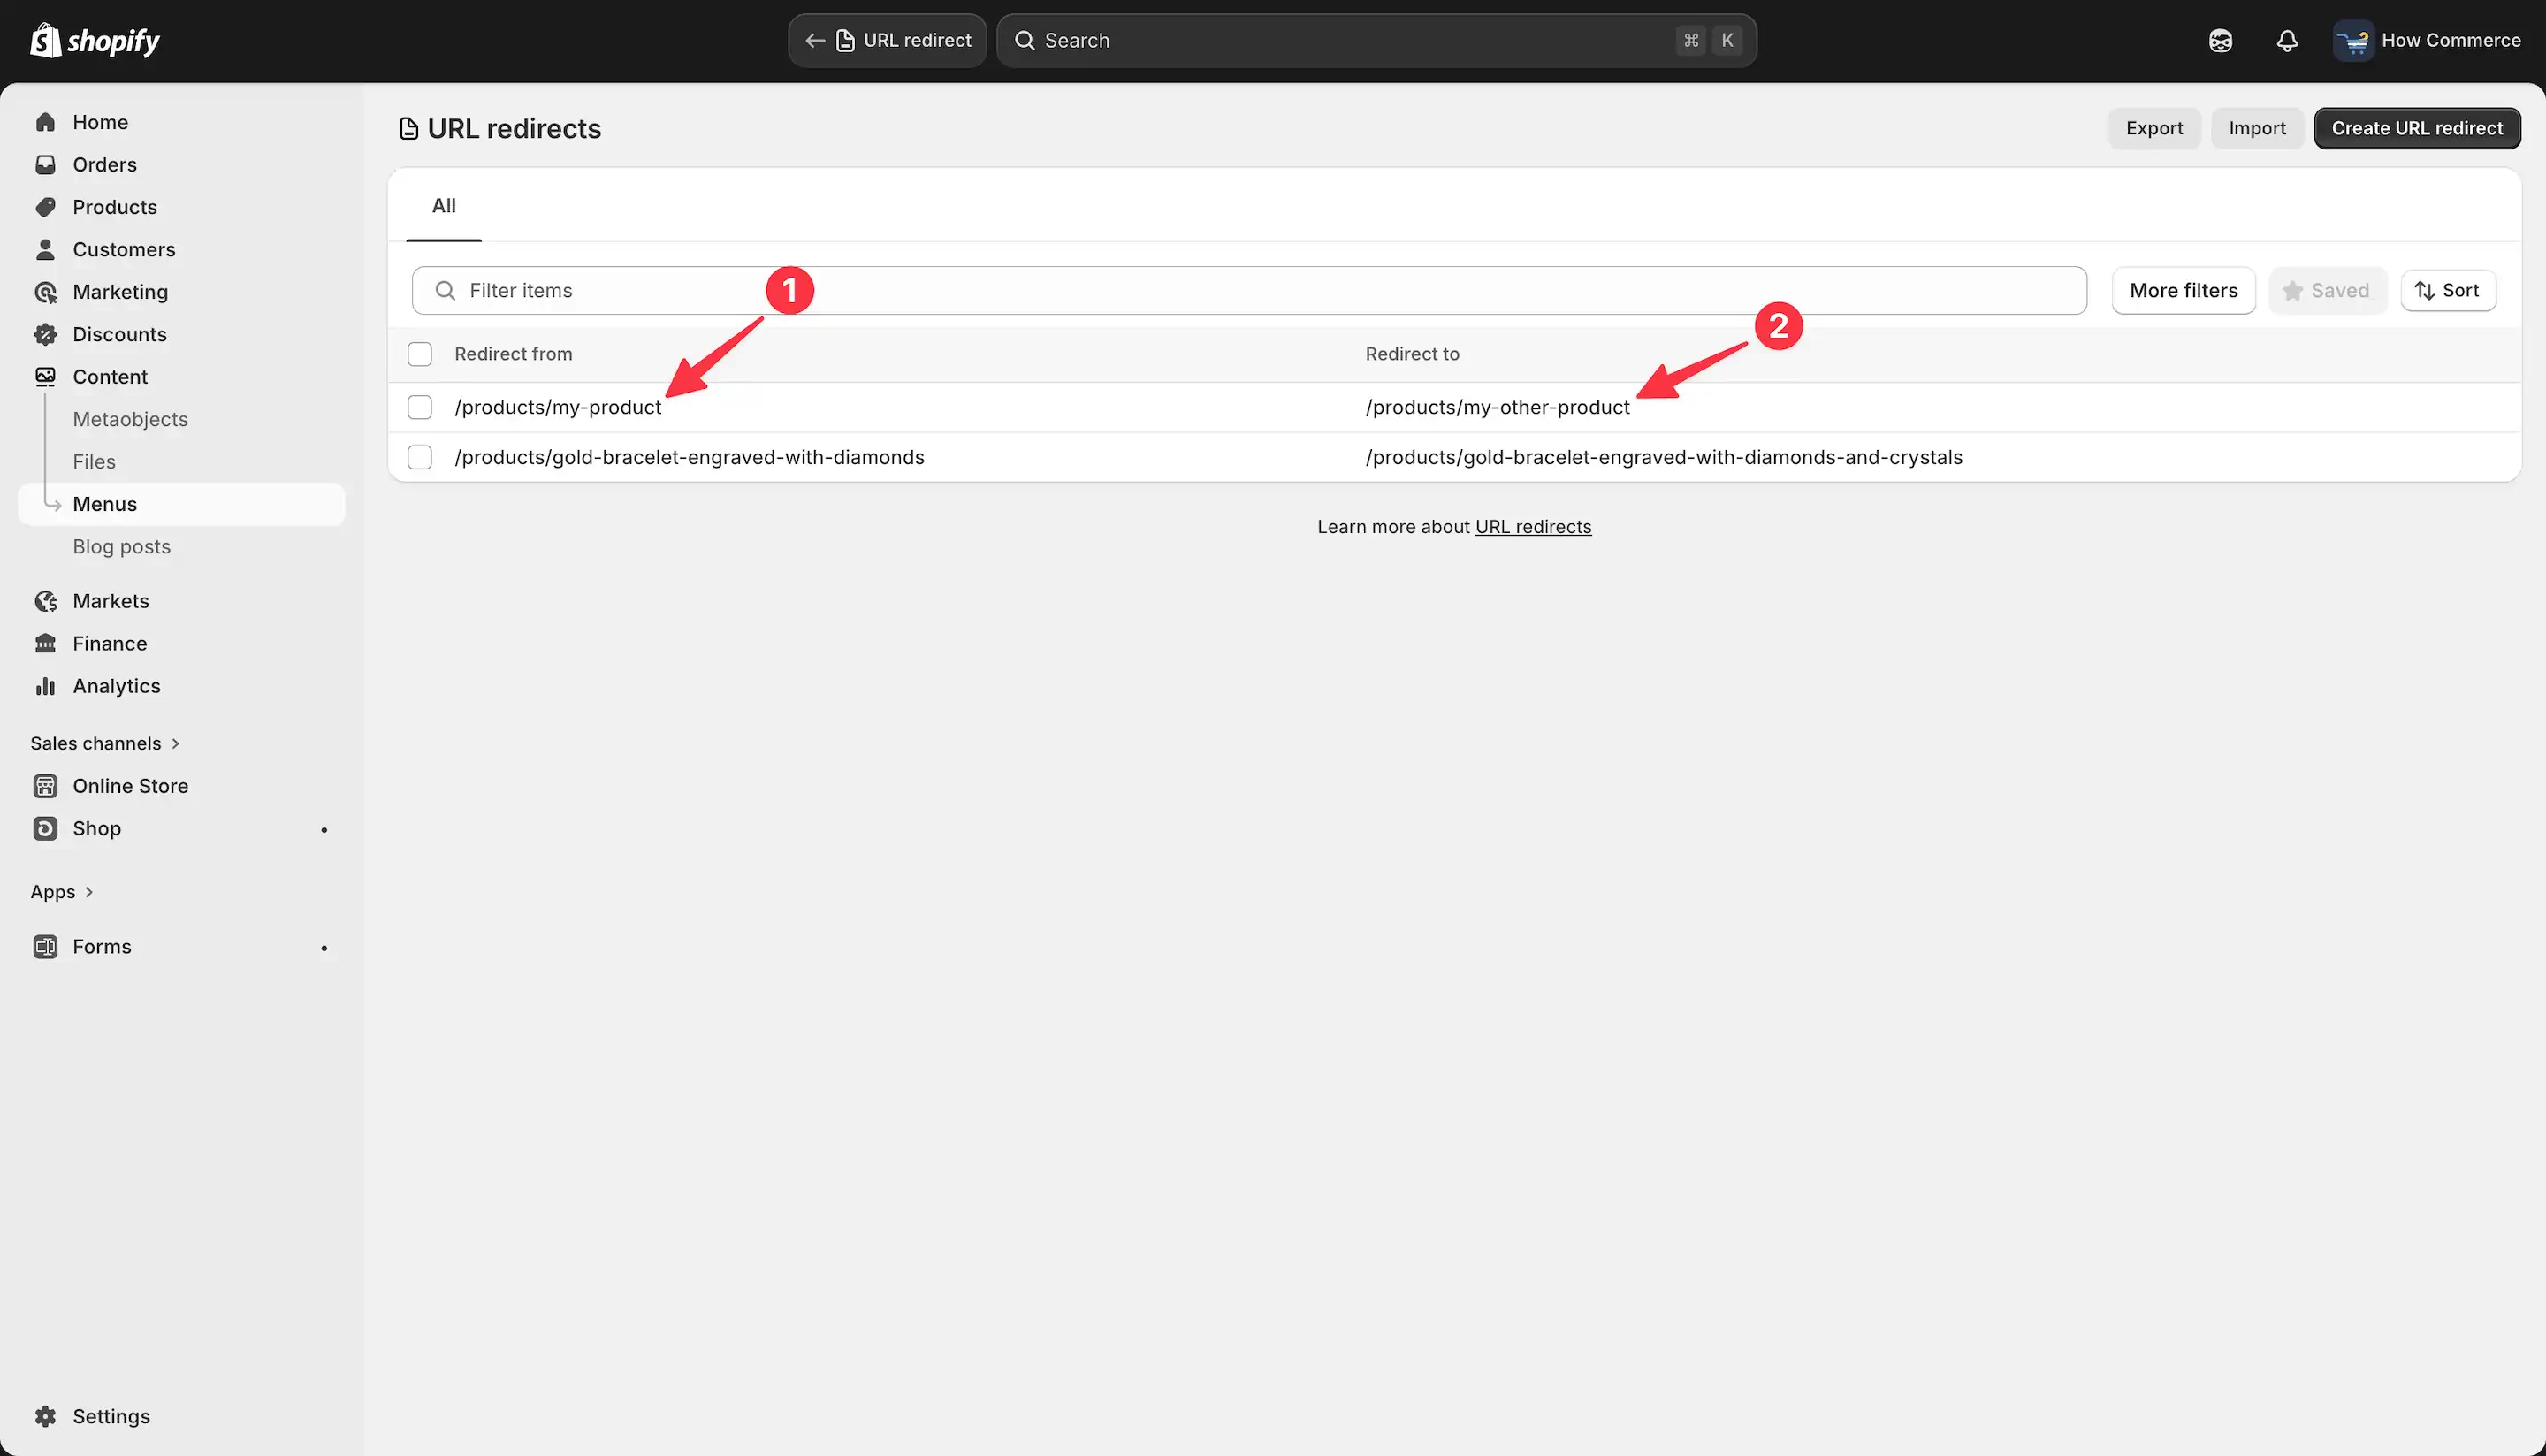
On the URL redirects page, you can see the newly created manual redirect displayed as follows:
The URL /products/my-product (marked with 1 in the image below) is redirected to /products/my-other-product (marked with 2 in the image below).
How to import URL redirects in bulk
If you are migrating a store or restructuring at scale, manual entry is a waste of time.
Shopify allows bulk import using a CSV file.
Managing and editing existing redirects
Redirects are not “set and forget.” They require maintenance.
Inside Shopify you can:
- View all existing redirects
- Edit incorrect ones
- Delete outdated or unnecessary entries
A bloated redirect list slows down management and increases the chance of errors.
Keep it clean.
Periodically review and remove anything that no longer serves a purpose.
Best practices for URL redirects
This is where most stores fail.
Poor redirect management creates long-term structural problems, and in many cases, the damage is not immediately visible.
Follow these rules and you will be ahead of the vast majority of stores:
- Redirect to the most relevant page, not just any page
- Avoid redirect chains (A → B → C). Always redirect directly (A → C). Shopify generally encourages this by allowing you to define direct mappings between resources
- Test every important redirect after creation
Redirects are a safety net, not a substitute for poor planning.
Common mistakes to avoid
These mistakes are widespread, and they have a direct impact on revenue and SEO performance.
- Redirecting everything to the homepage → This destroys relevance and SEO value
- Ignoring redirects after deleting products → Leads to 404 errors and lost traffic
- Creating duplicate redirects → Causes conflicts and unpredictable behavior
- Using incorrect path formats → Breaks the redirect entirely
- Overusing redirects instead of fixing the underlying structure → Creates long-term technical debt
If your redirect strategy is poorly managed, your store structure is already compromised.
Testing and verifying redirects
Do not assume anything works. Test everything.
Basic method:
- Paste the old URL into your browser
- Confirm that it redirects instantly to the correct destination
What to check:
- No delay
- No intermediate URLs
- Correct final page
For deeper validation, use browser developer tools or SEO tools to confirm that the redirect is a proper 301, as implemented by Shopify.