

In today’s busy world we want to save as much time as possible since time is the most scarce resource we have.
We all love productivity tools because they make our work easier by helping us save time and do more of what we love.
In this tutorial I’ll teach you how to work with a couple of Shopify tools to help you manage your store better and to increase your productivity.
- Admin search
- Bulk actions
- Bulk editing
- Duplicate products
- Future publishing
- Keyboard shortcuts
- Tags
- Timeline
Admin search
This type of search will allow you to search your entire store from the website administration area.
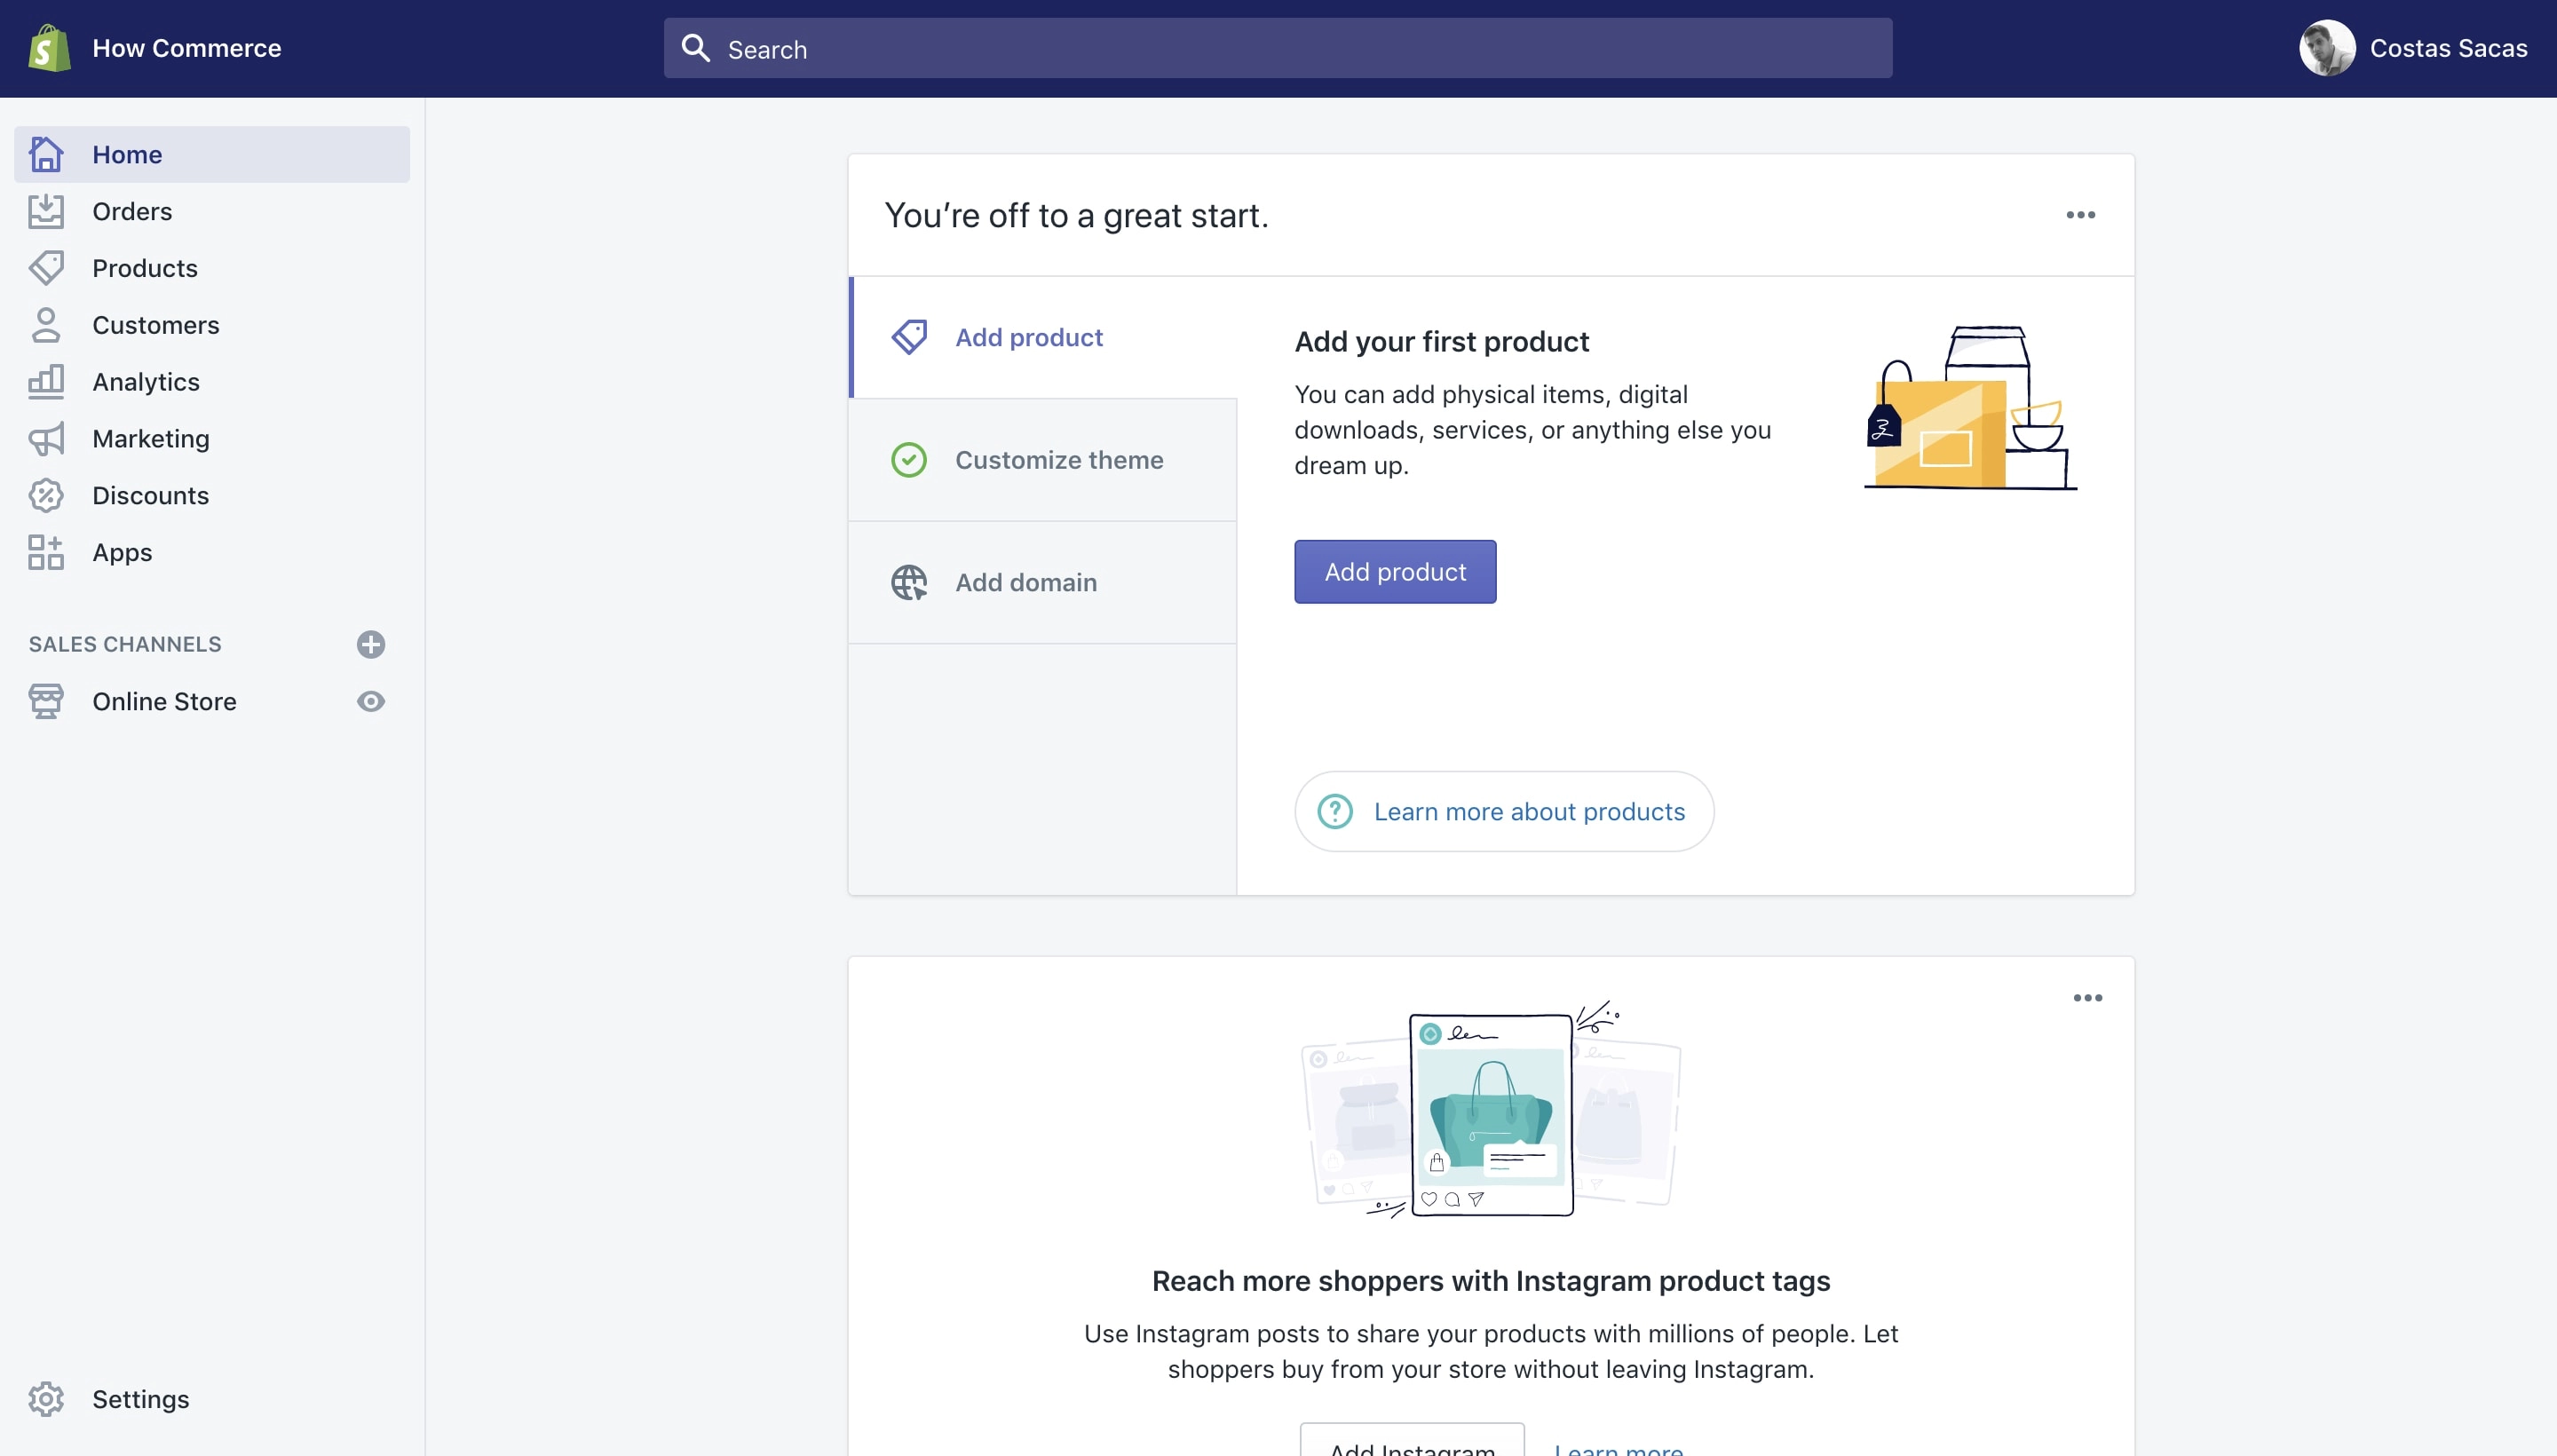
To do that you need to be logged inside your Shopify website and on the administration section:
Search shortcut
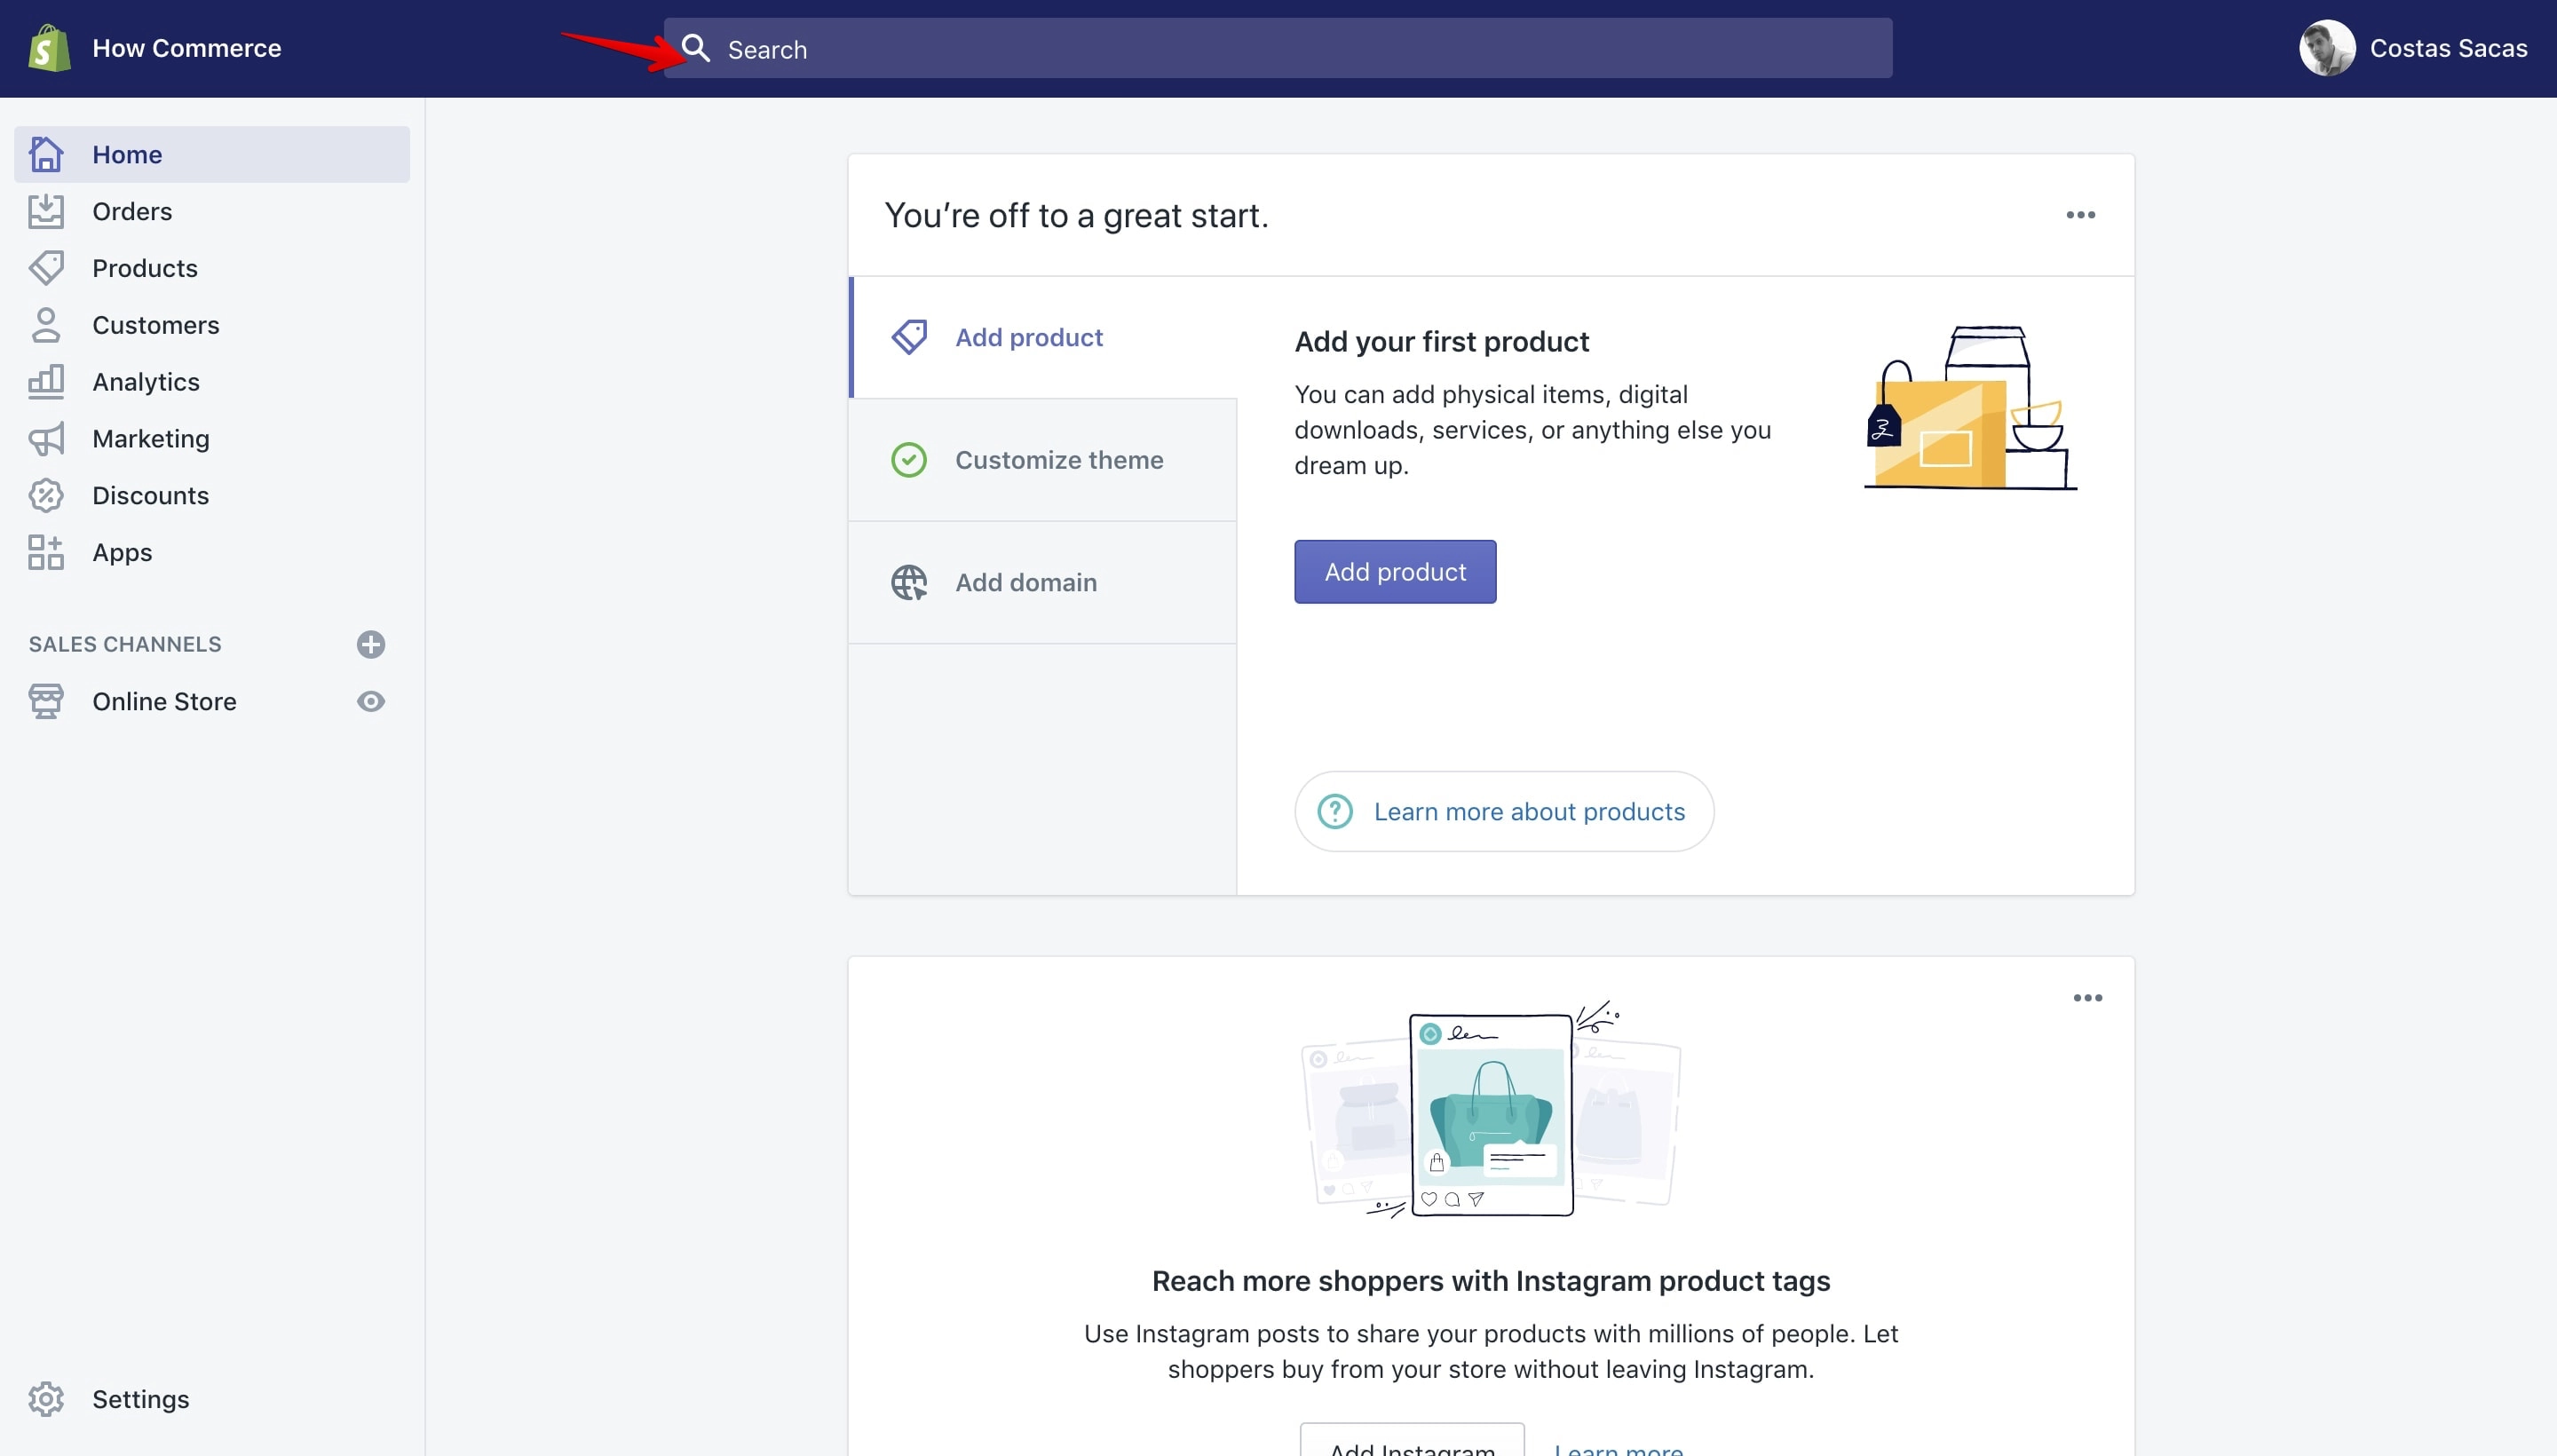
To start you can click inside the “Search” input box at the top of the page or you can press the S key on your keyboard:
Once you’ve selected the Search box a pop-up will display:
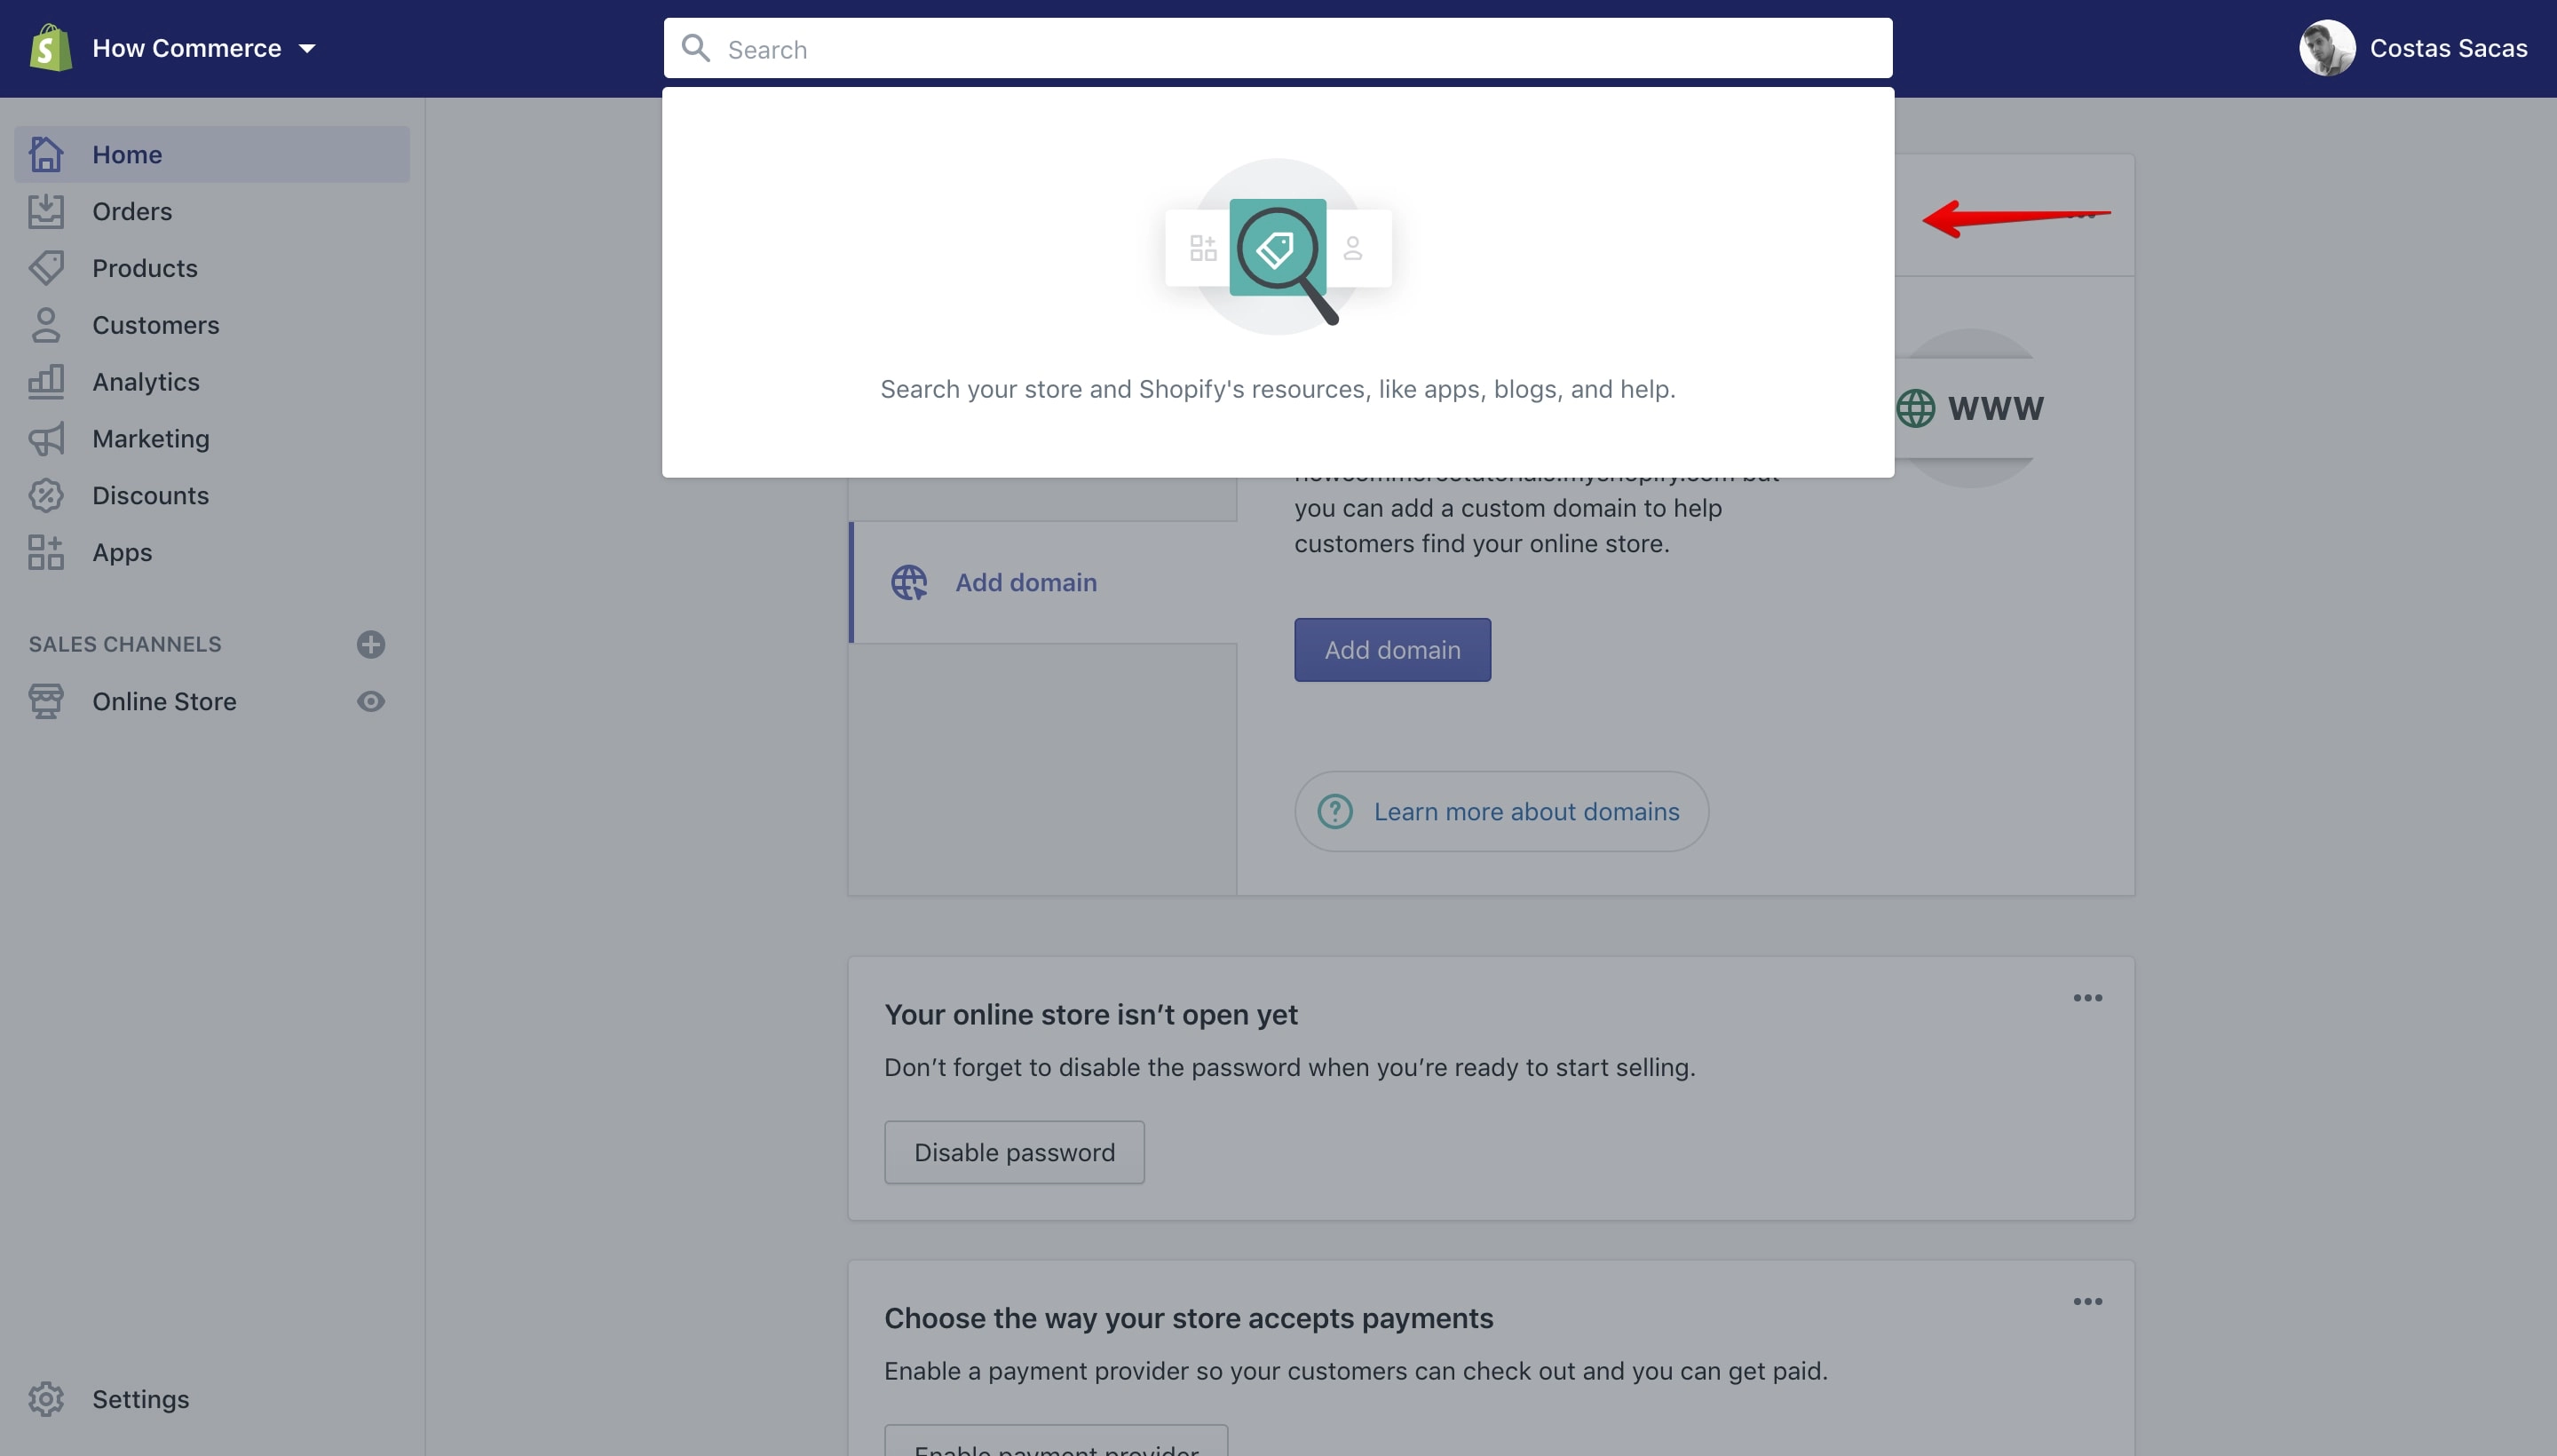
You can use the admin search to find products, orders, categories, customers and everything related to your store.
I’ll search now in my store for all products that start with the word “premium”:
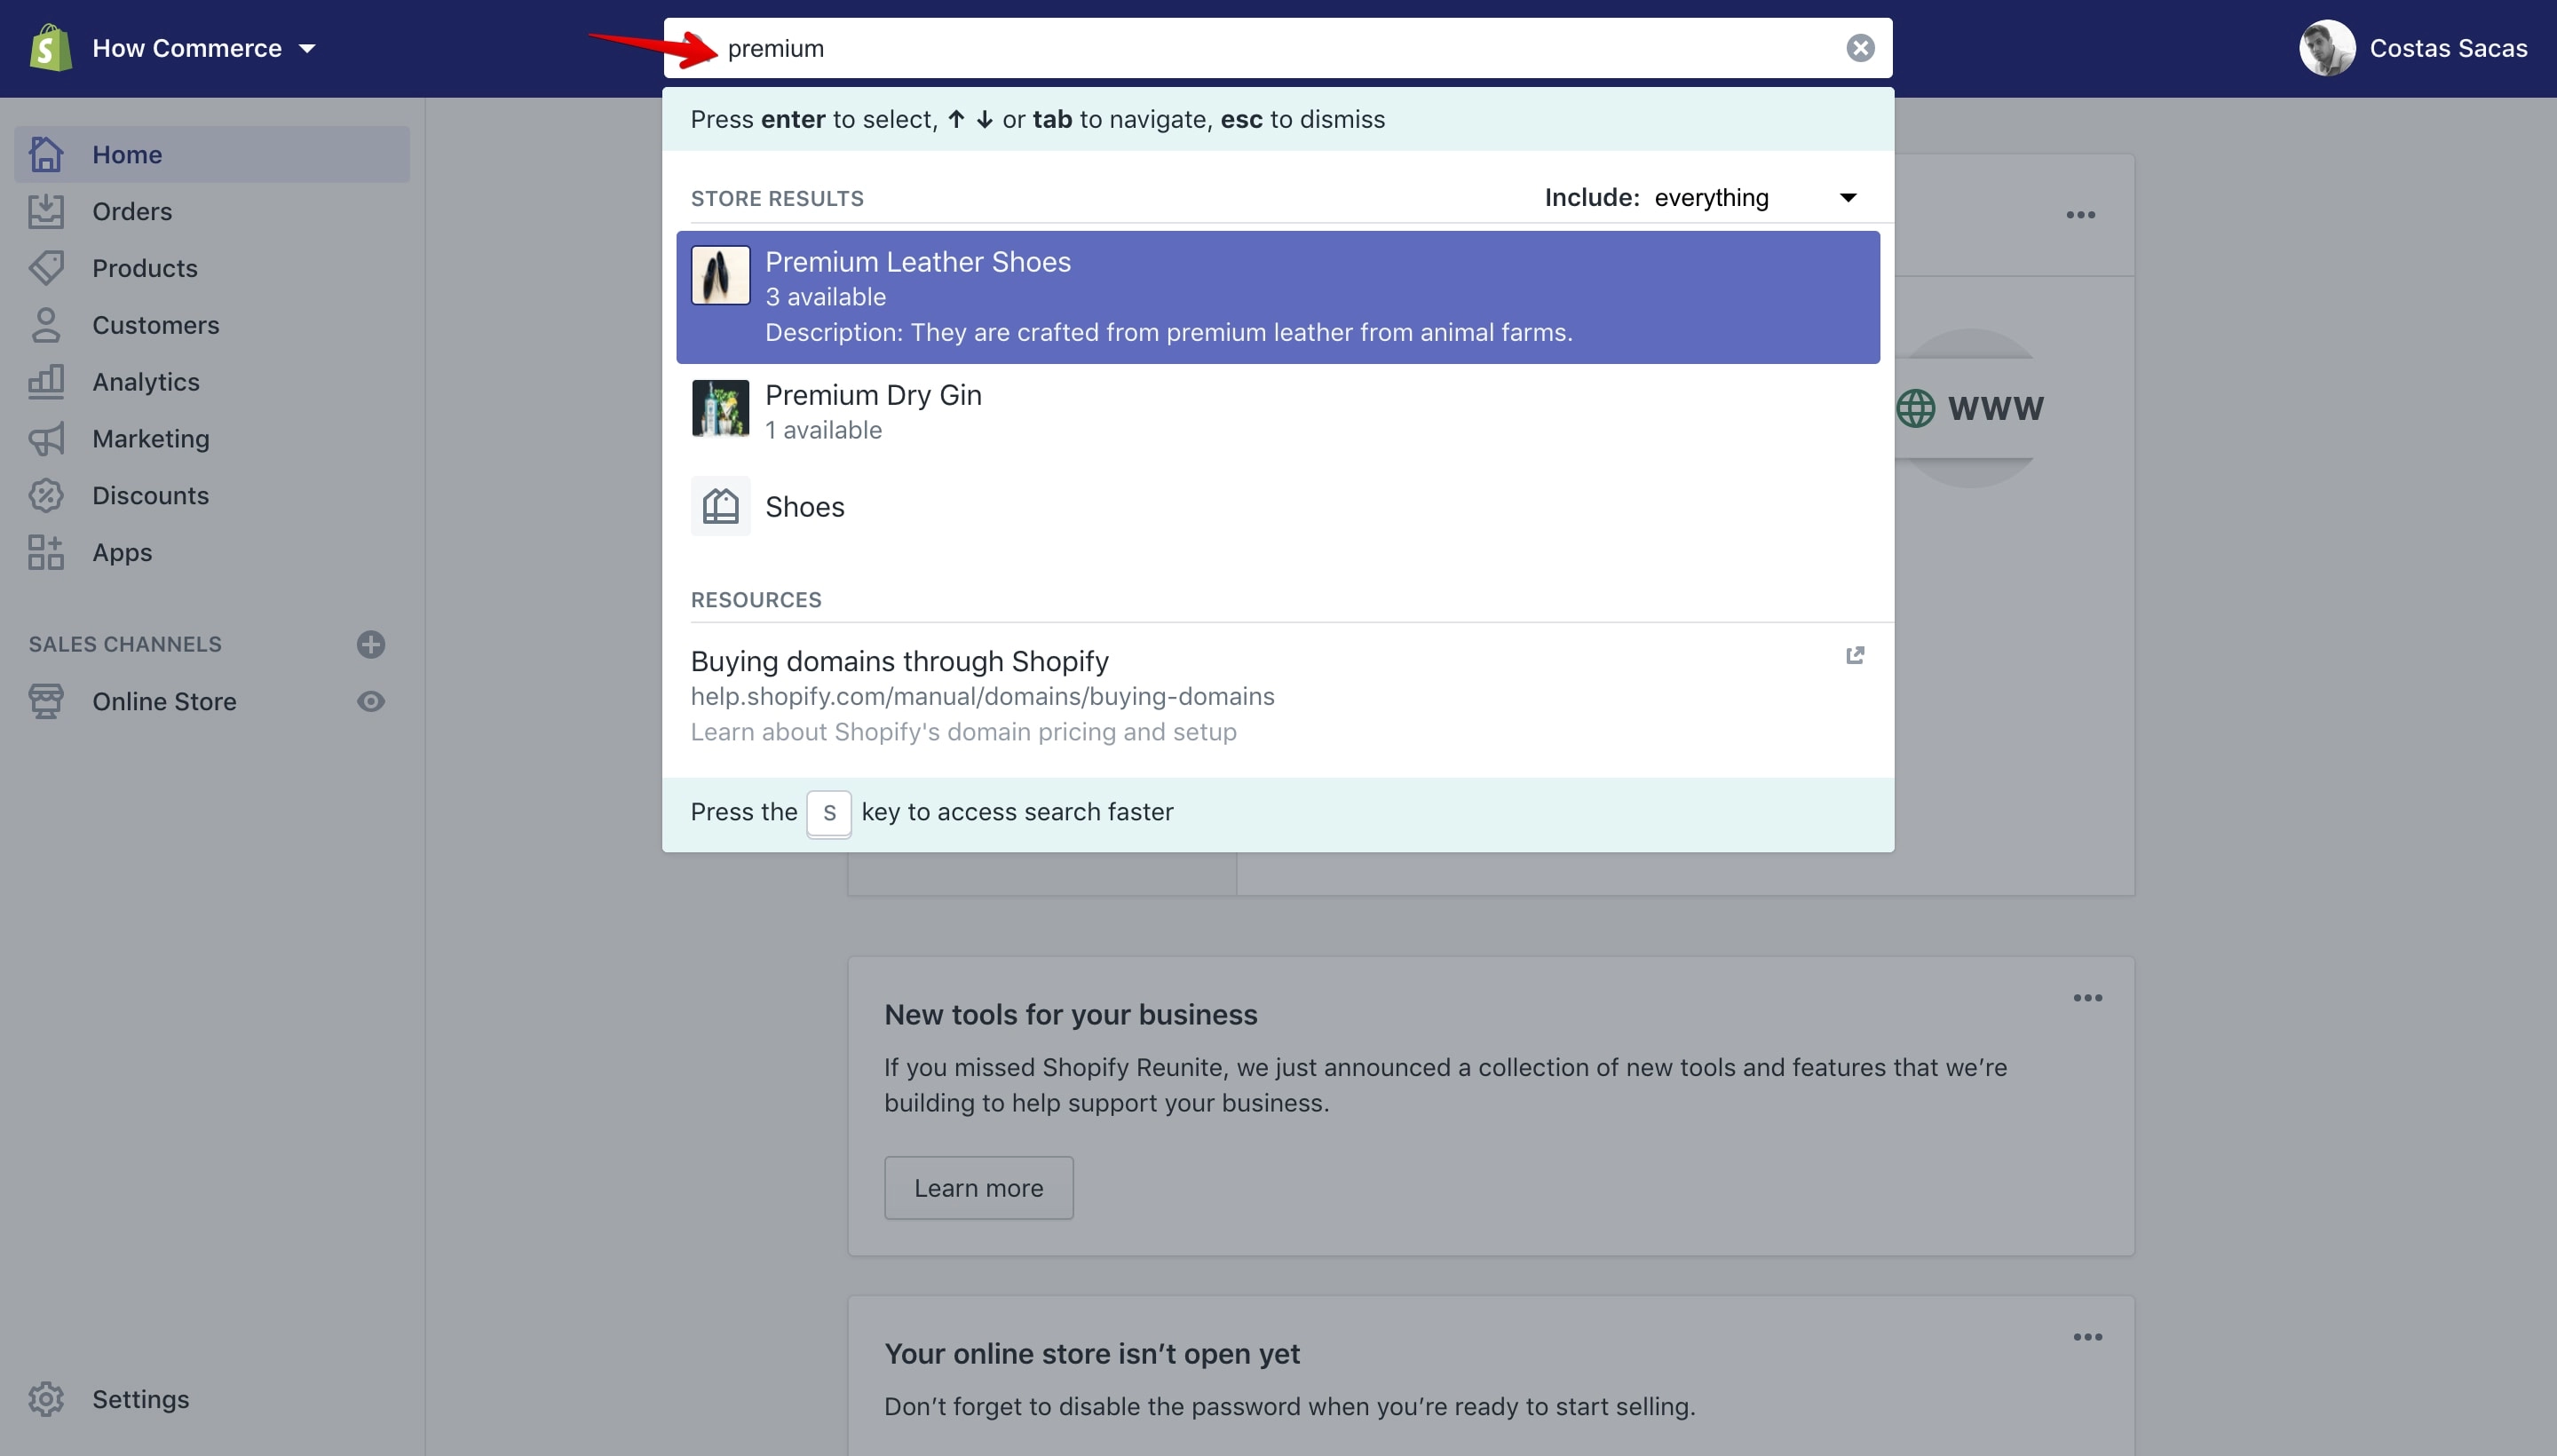
As you see in the image above all products that contain the word “premium” are listed. The first item has also listed the description.
You can also see the inventory for each one of the products listed.
On the search pop-up there are listed other resources like a category (marked with 1 in the image below) that contains products with the searched term and also a link to some resources (marked with 2 in the image below).
In our case the link to resources, it does not help, but is nice to have there. For some searches it is more relevant and will help you find documentation and useful links.
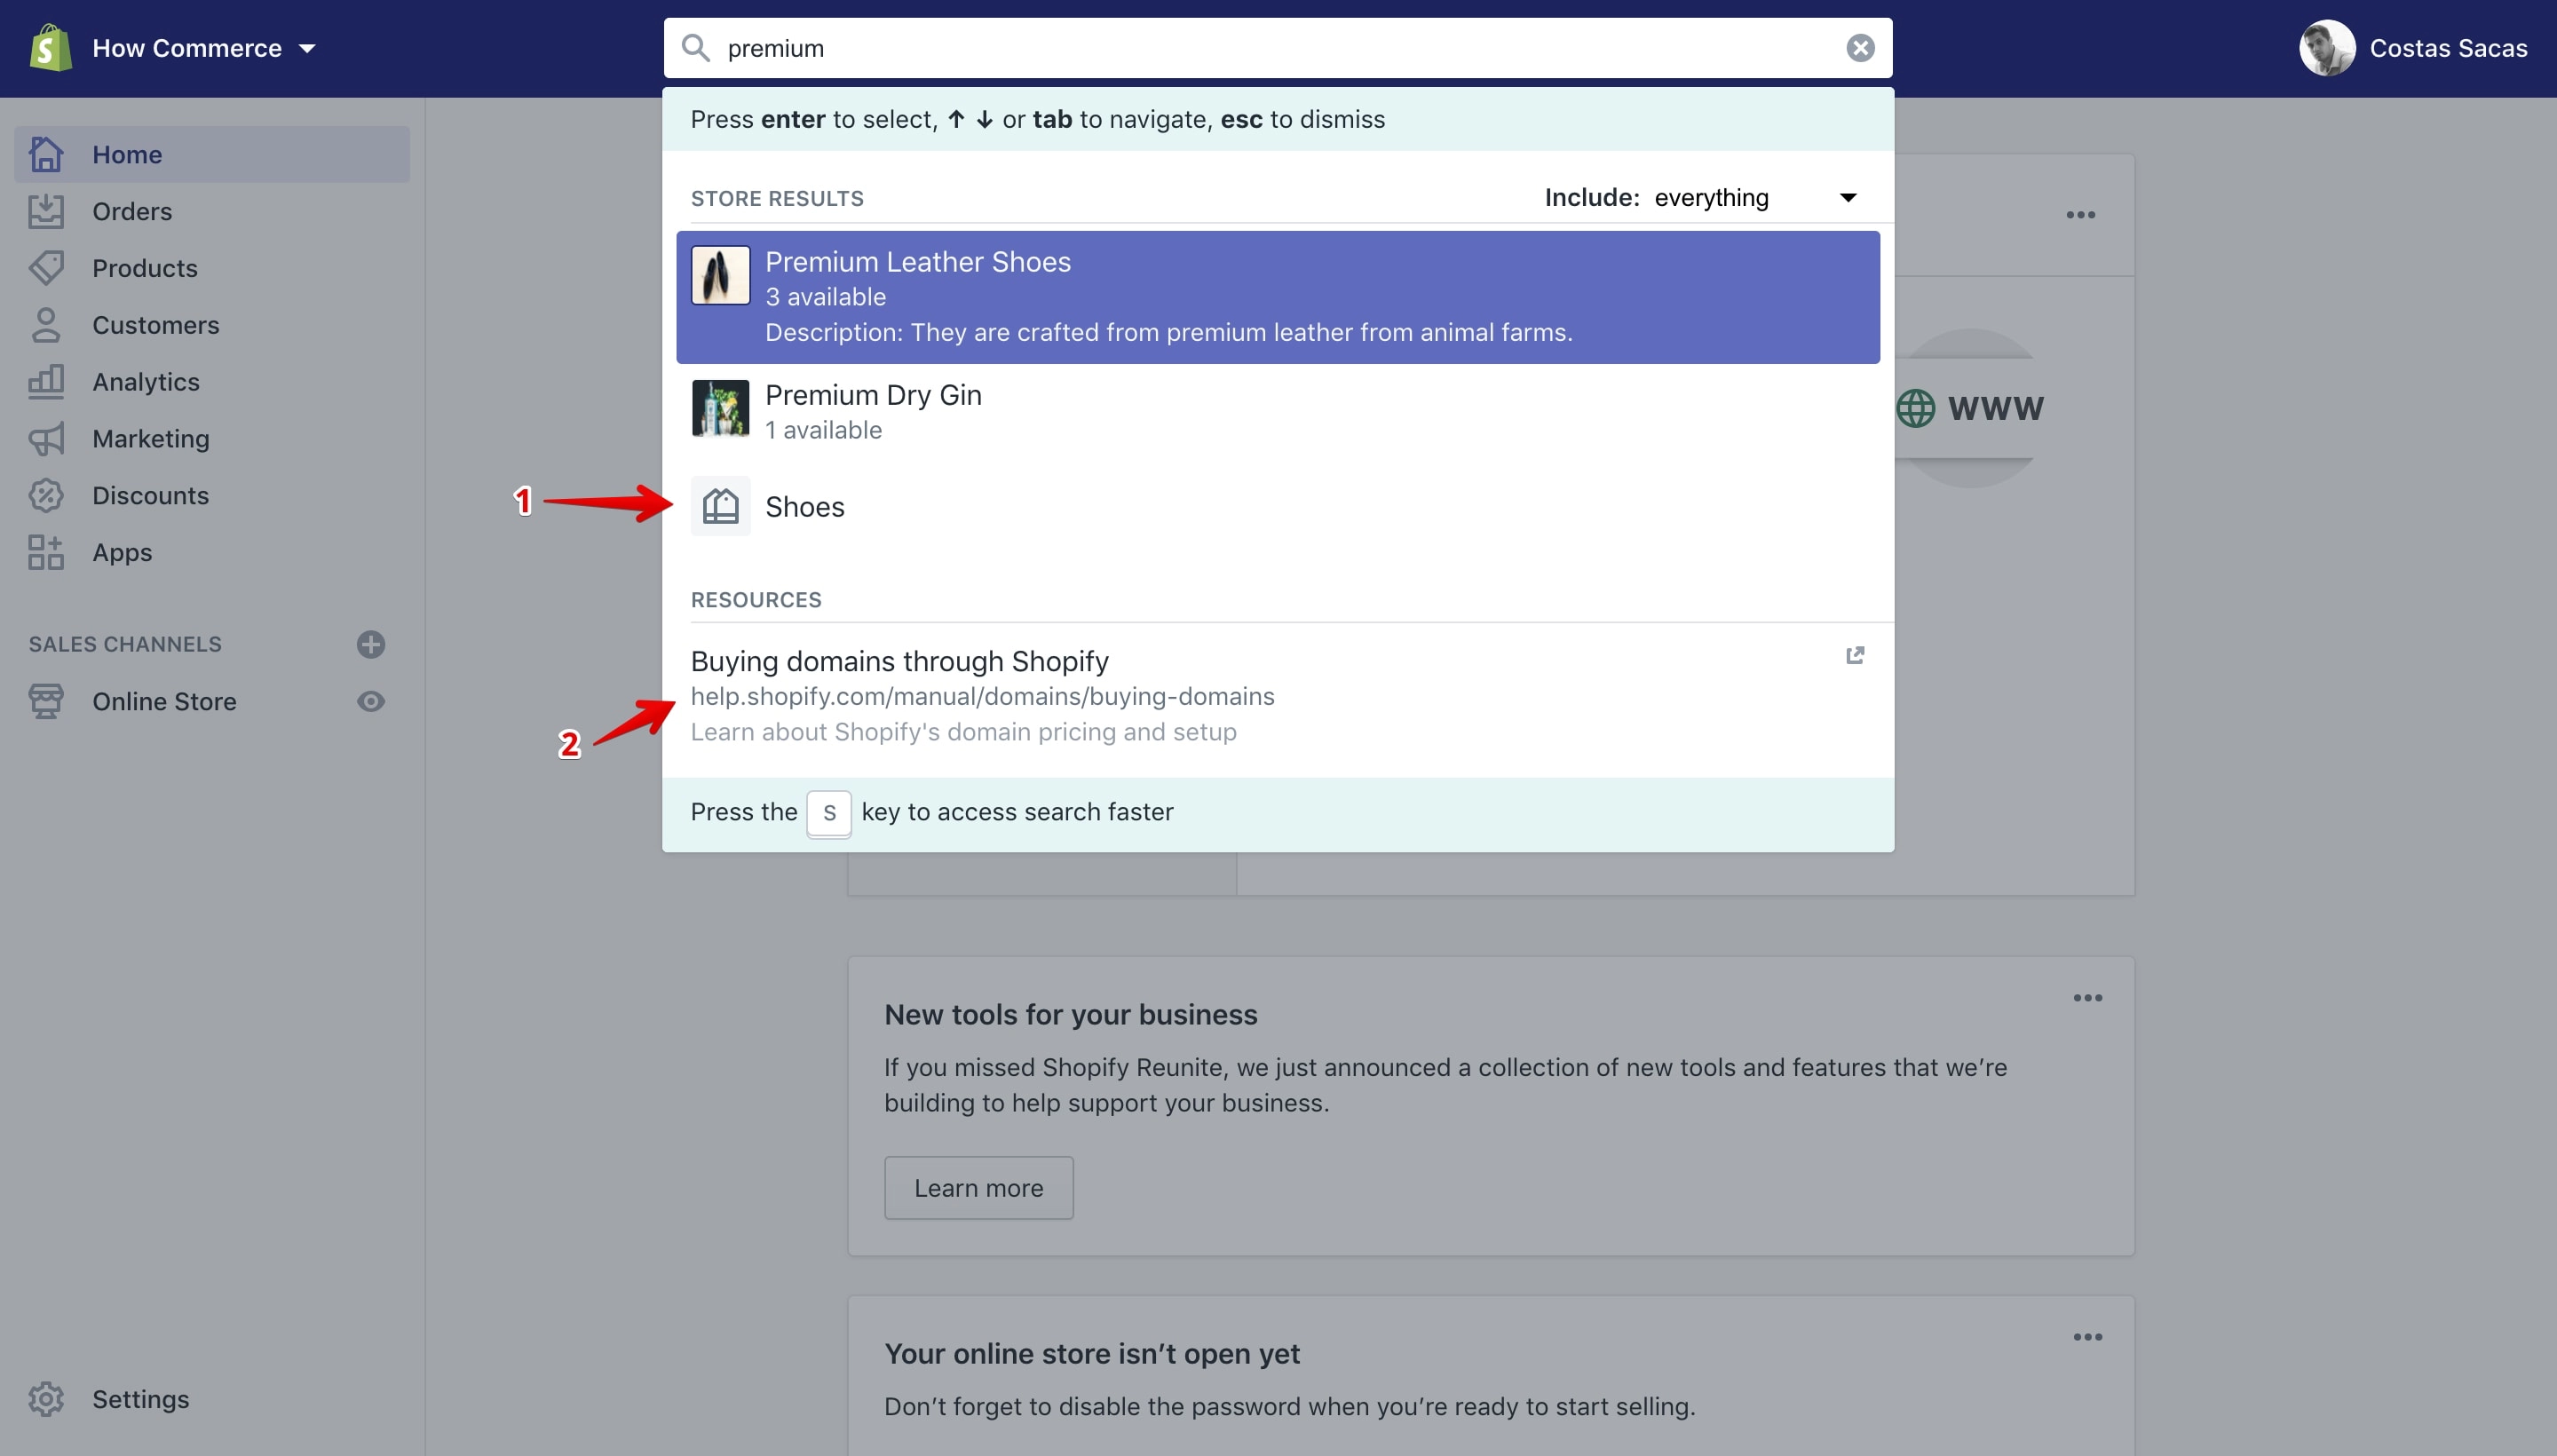
In this state if you press the ↵ (enter) key, the first result it will be selected, in our case “Premium Leather Shoes”.
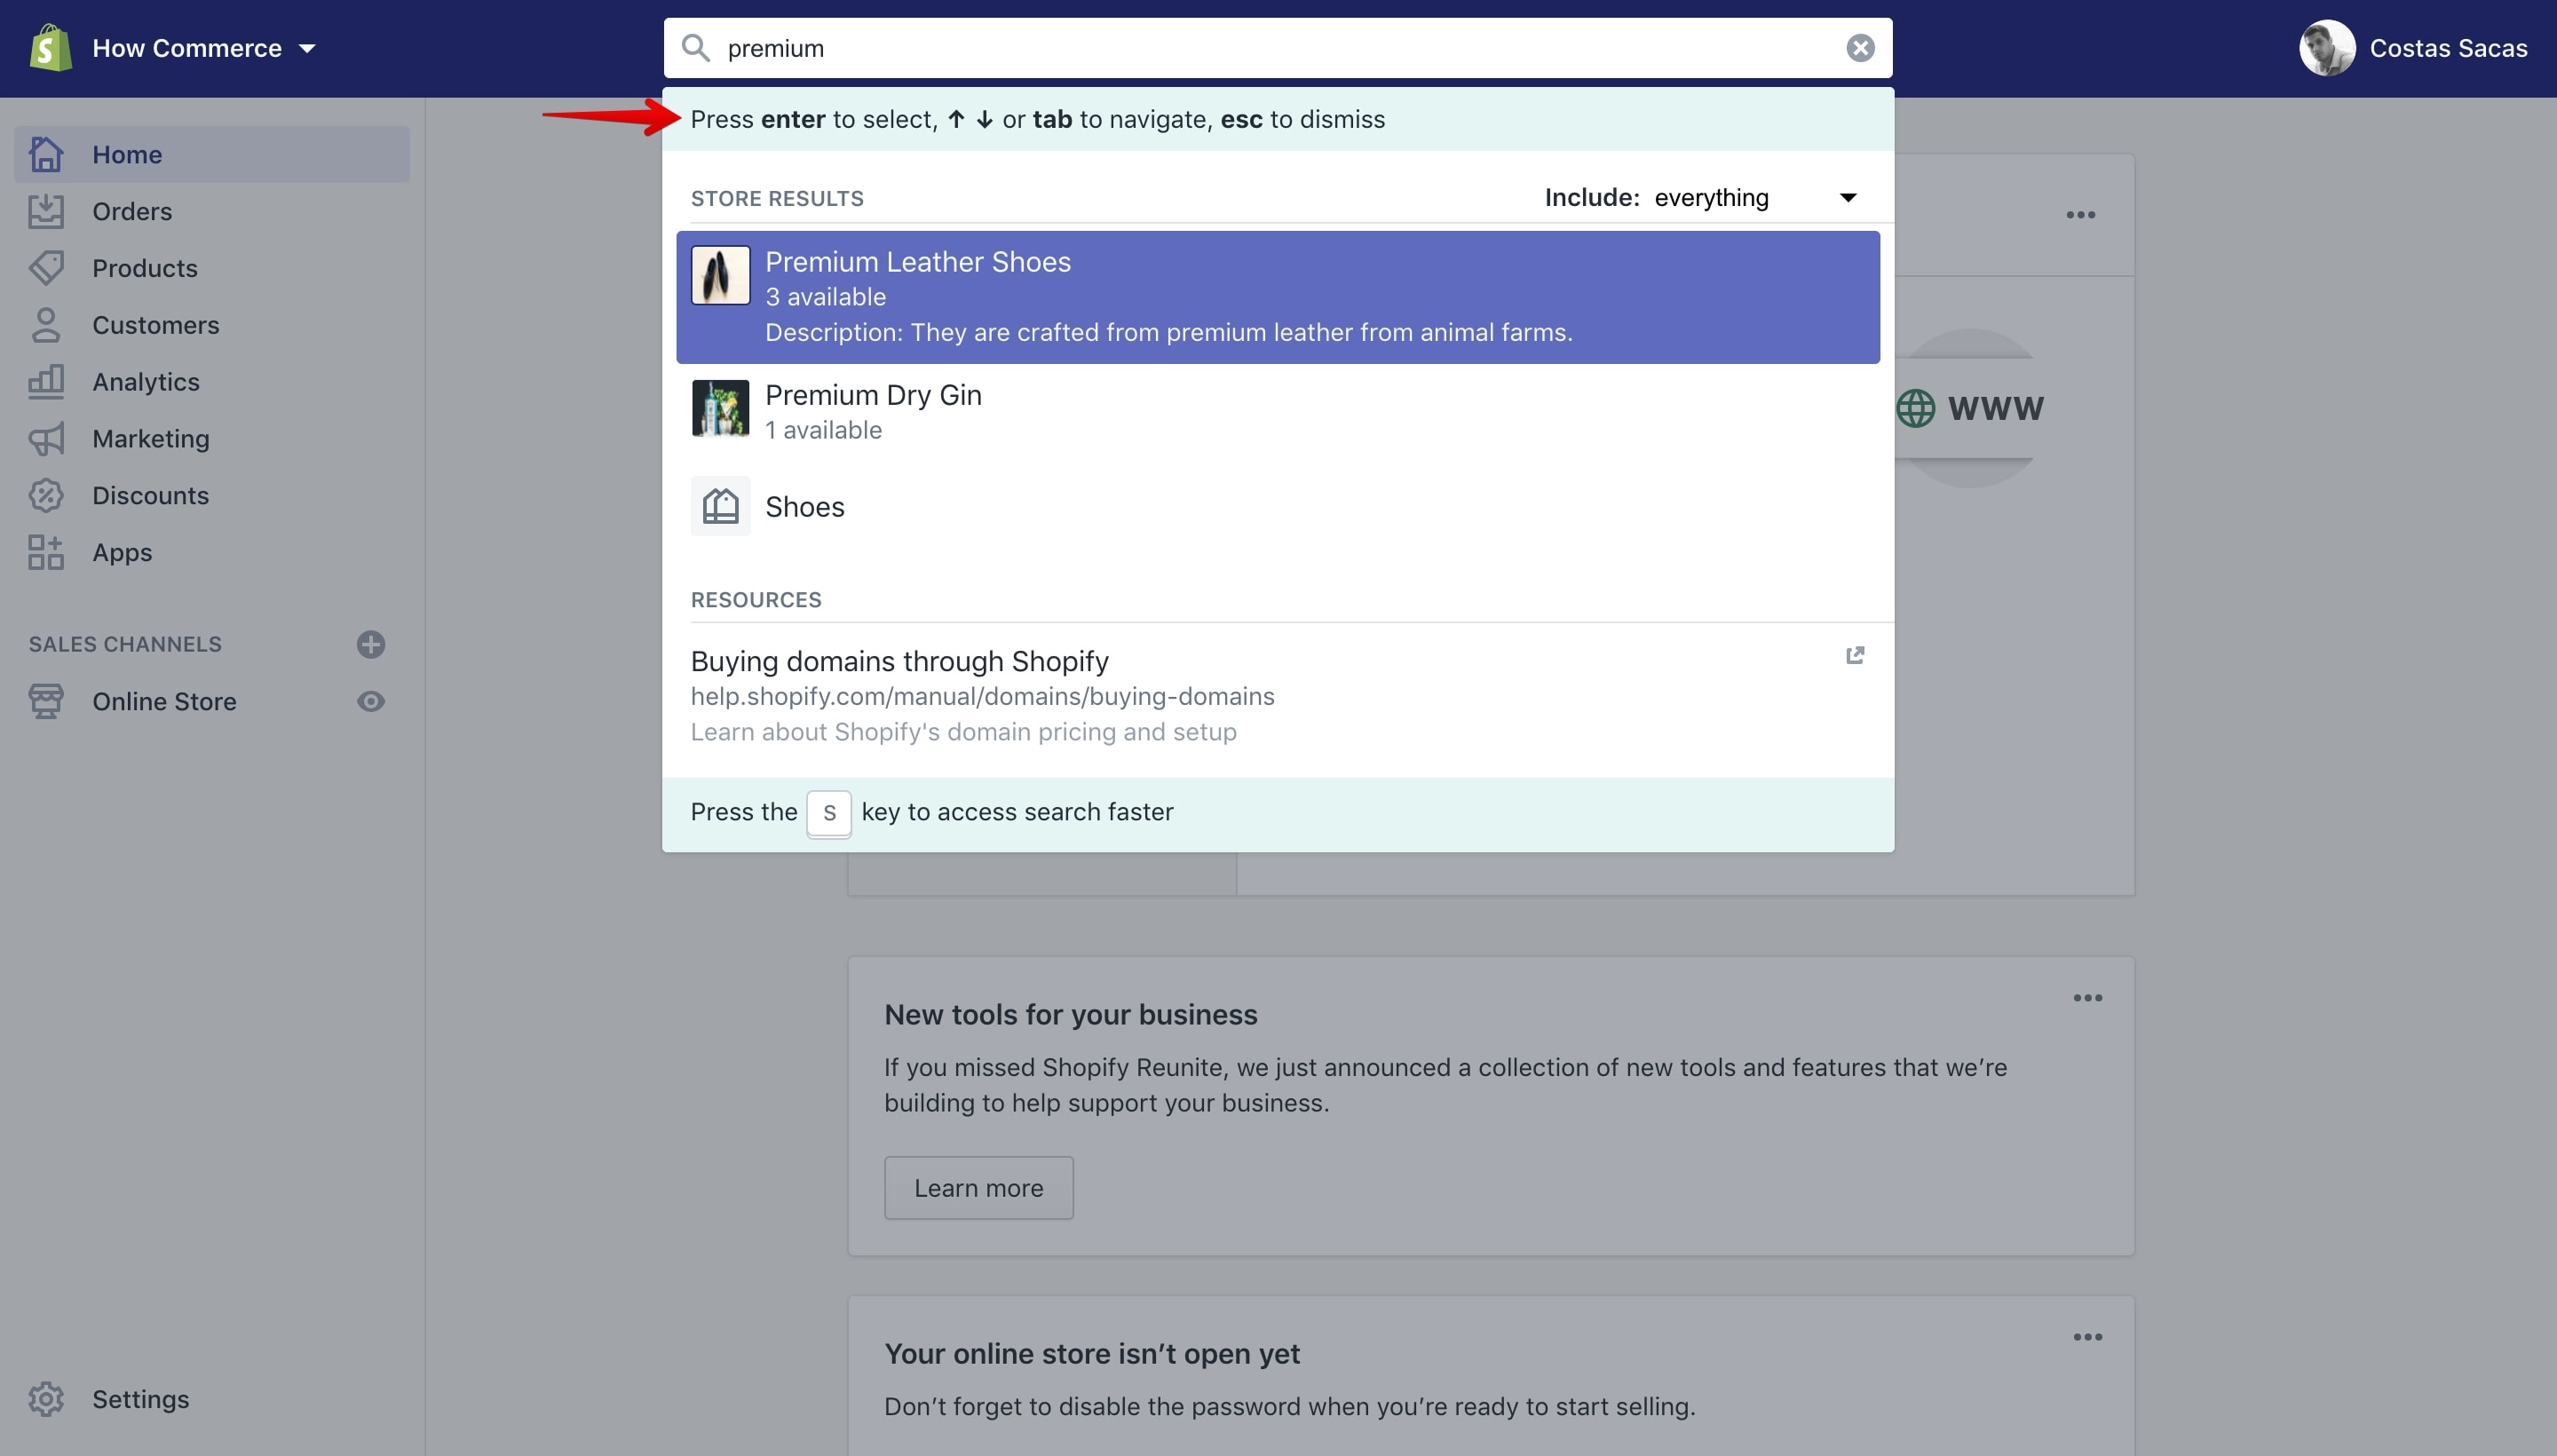
You can use the ⇅ (up and down arrows) to navigate the results. For navigating the results you can also use the ⇥ (tab) key.
If you want to close the search pop-up you can press the ␛ key. All shortcuts explained here are listed in the search pop-up at the top of the search listing:
Filtering
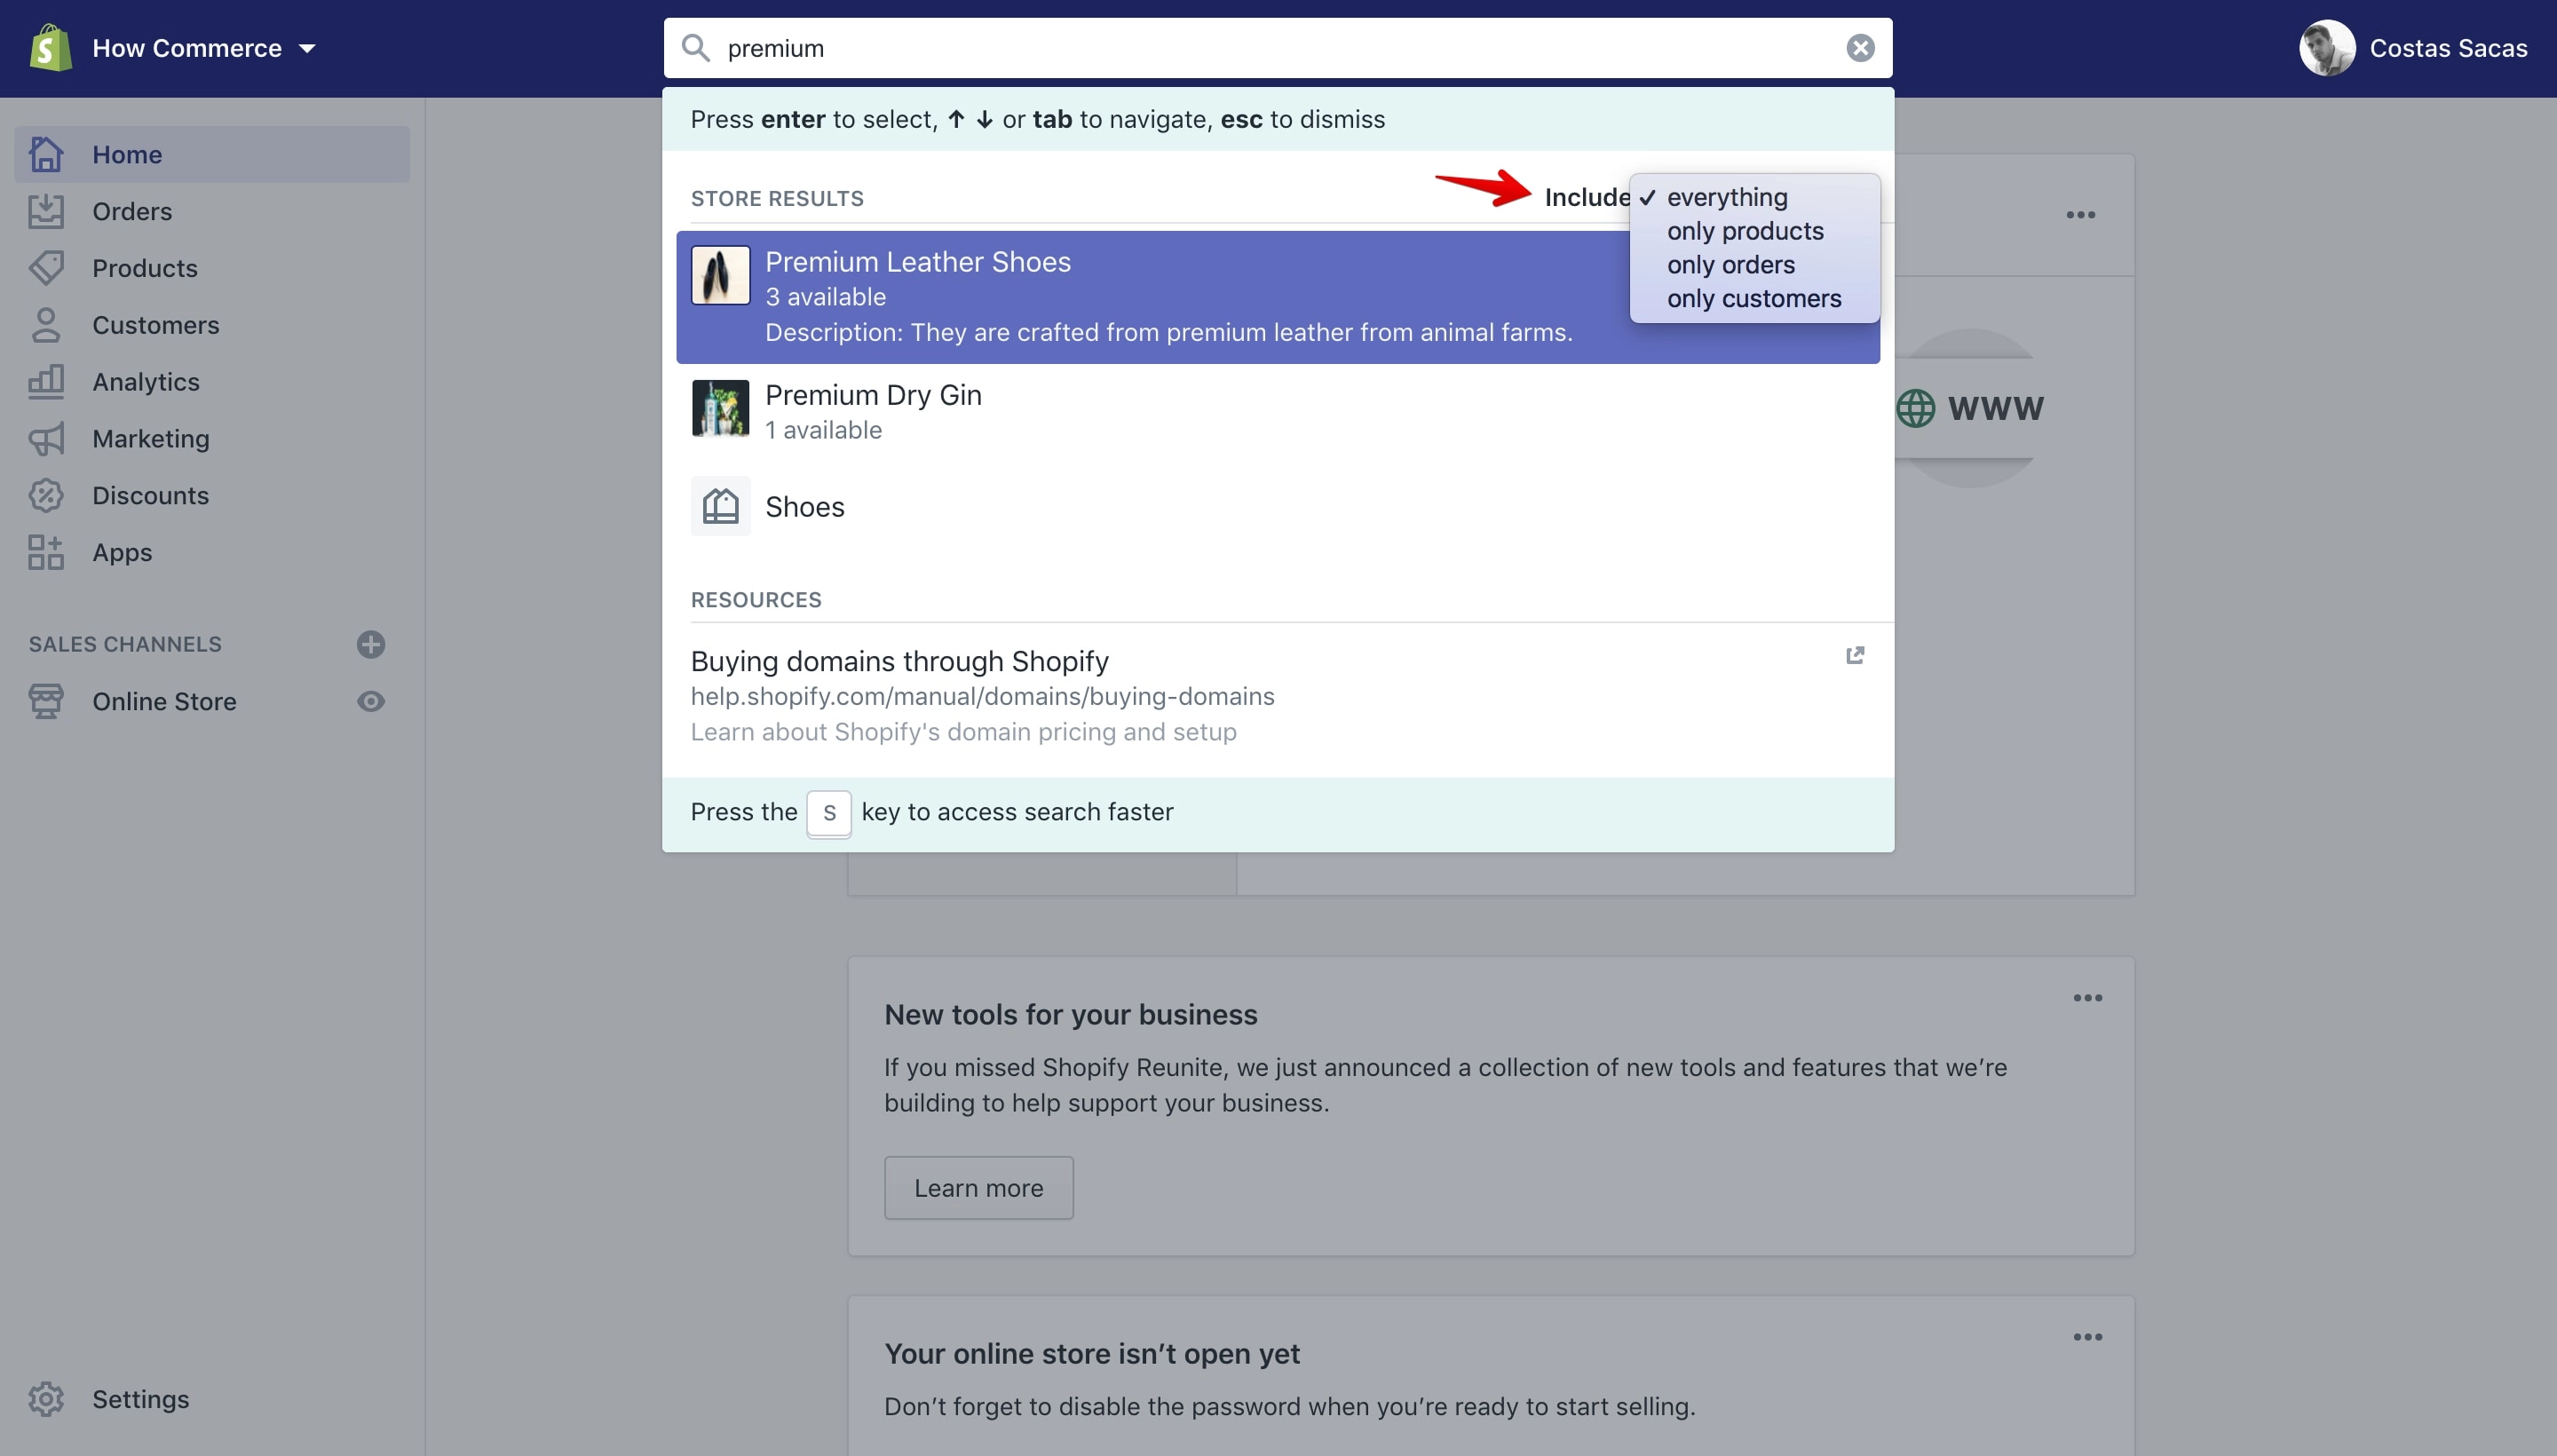
If you want to filter the results from a general search to a more focused one you can use the “Include” filter. You can filter the search results by products, orders and customers:
I’ll select “only products” and that will list only the products containing the term “premium”:
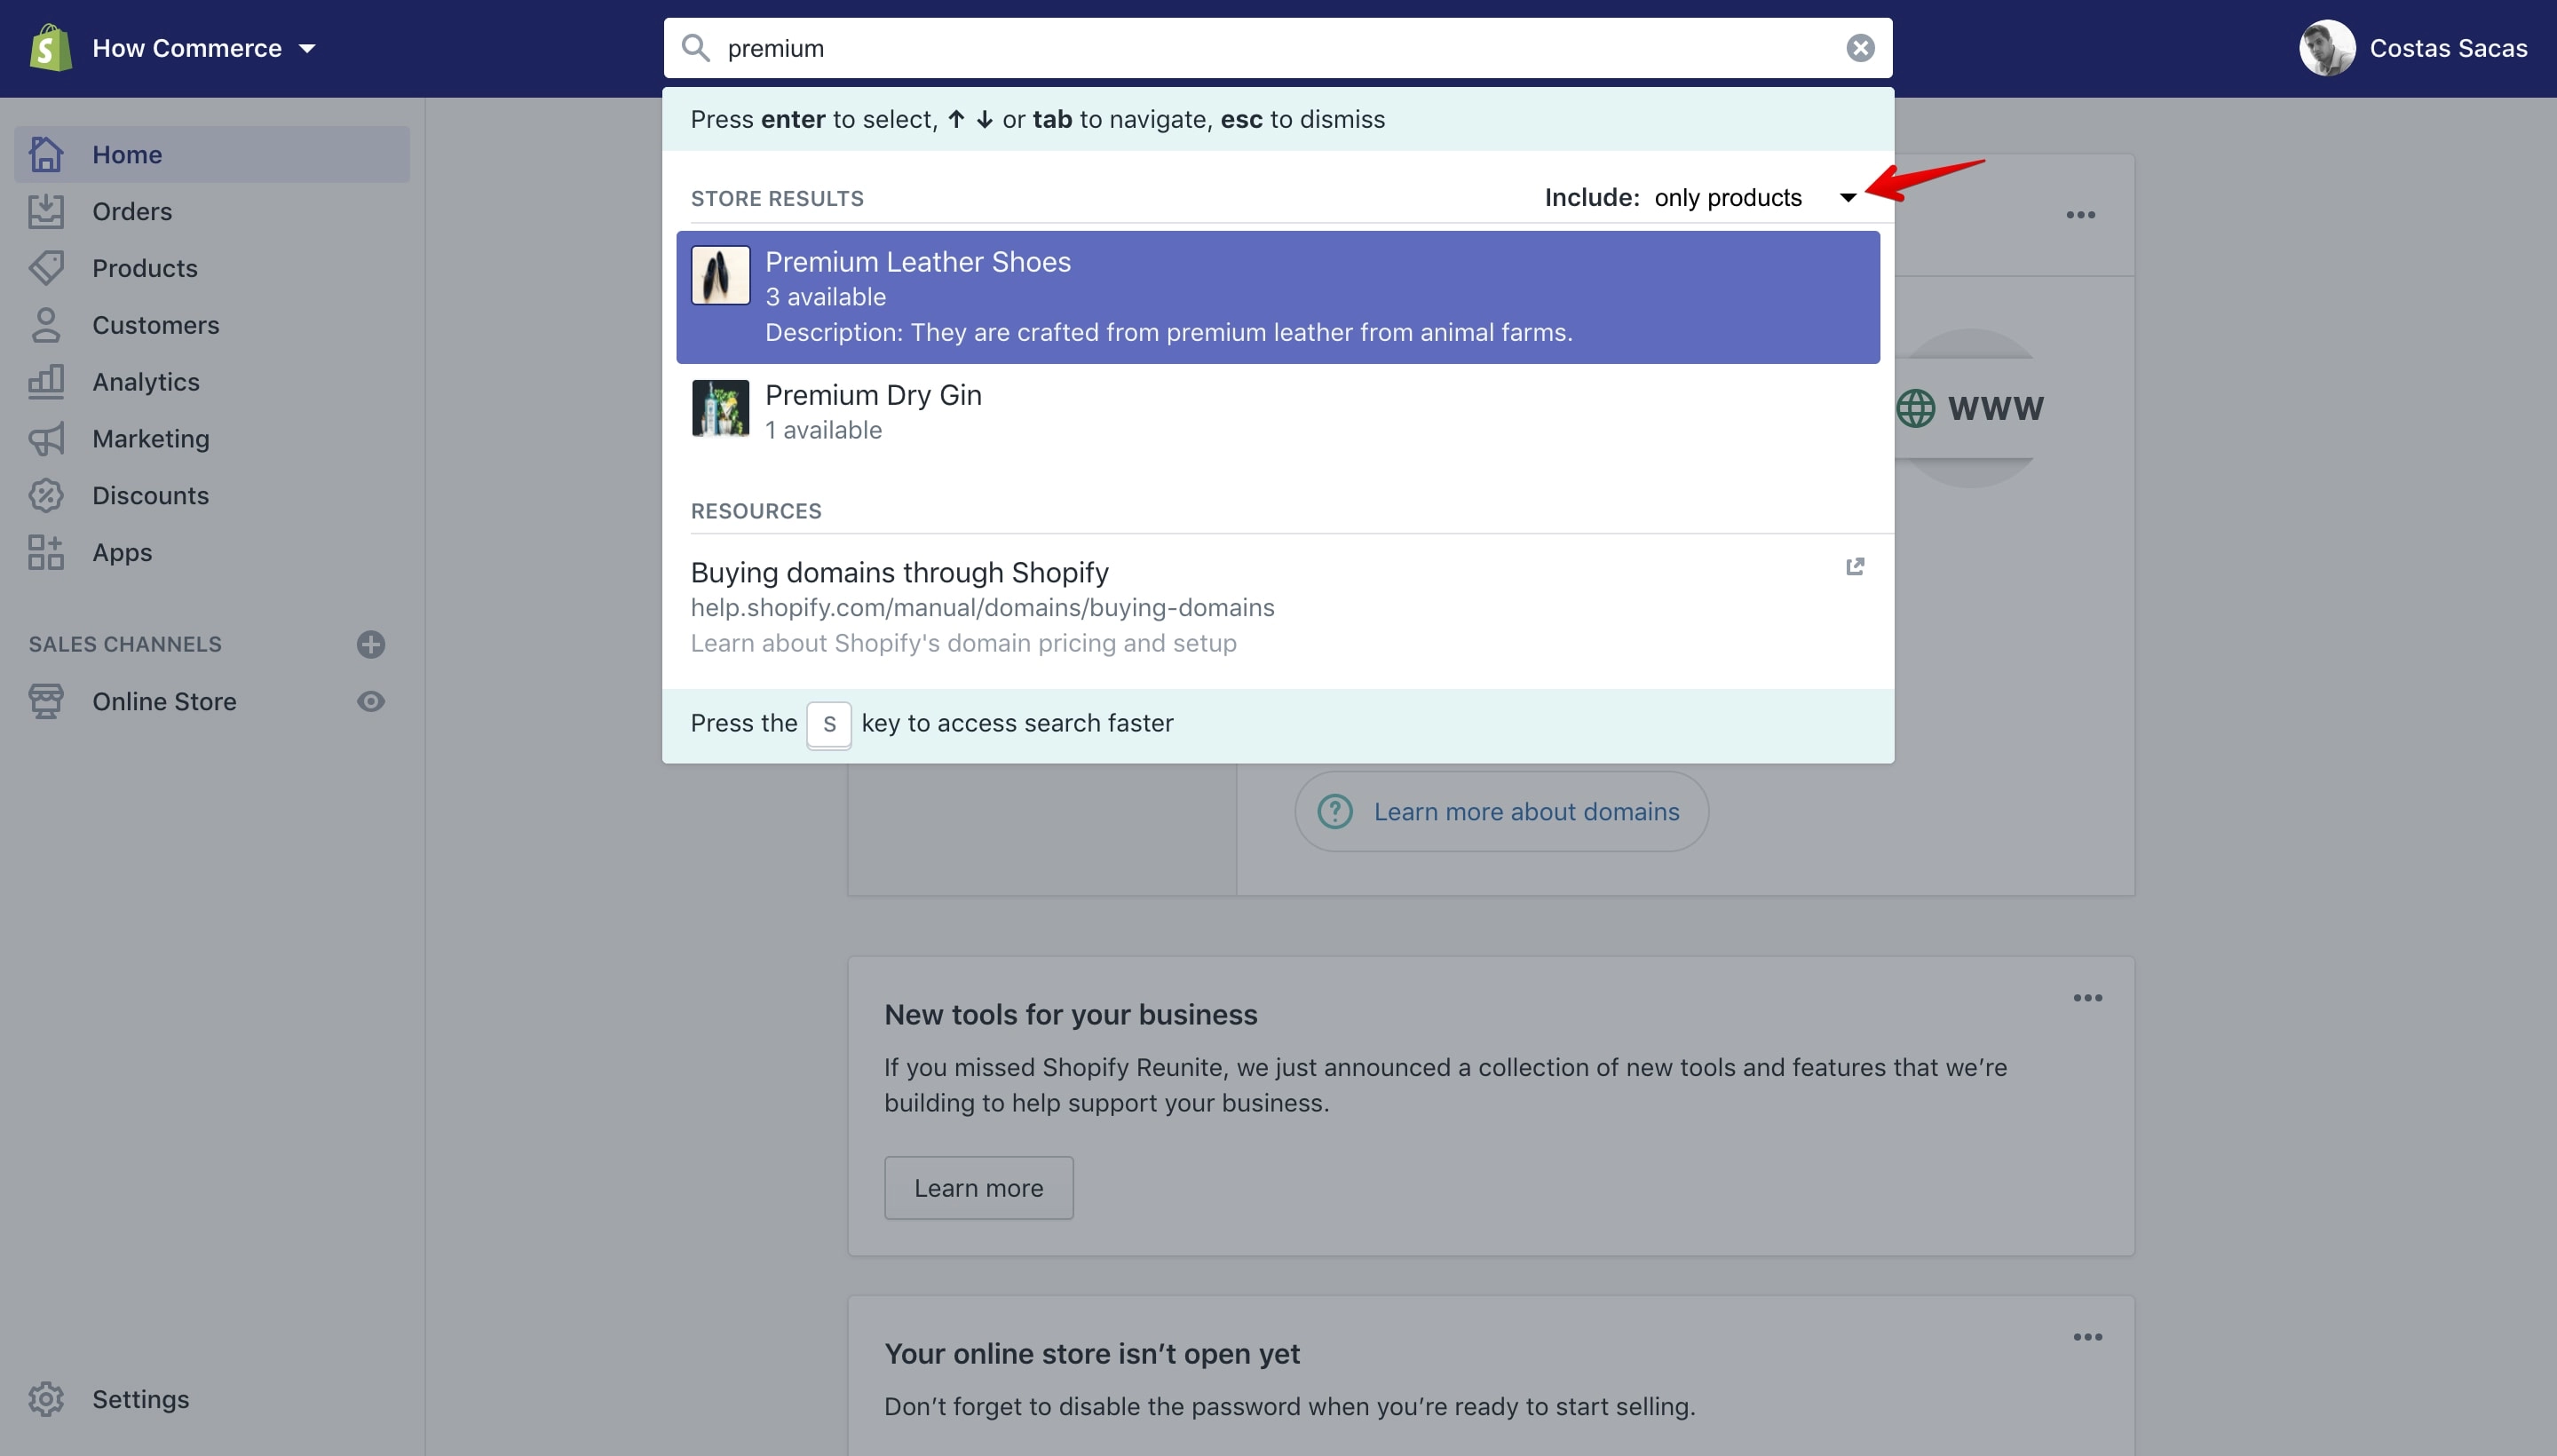
Please note that filtering works only for the “Store Results” section.
Save searches
Searches can’t be saved by you at this moment but they are stored in your “Search History”:
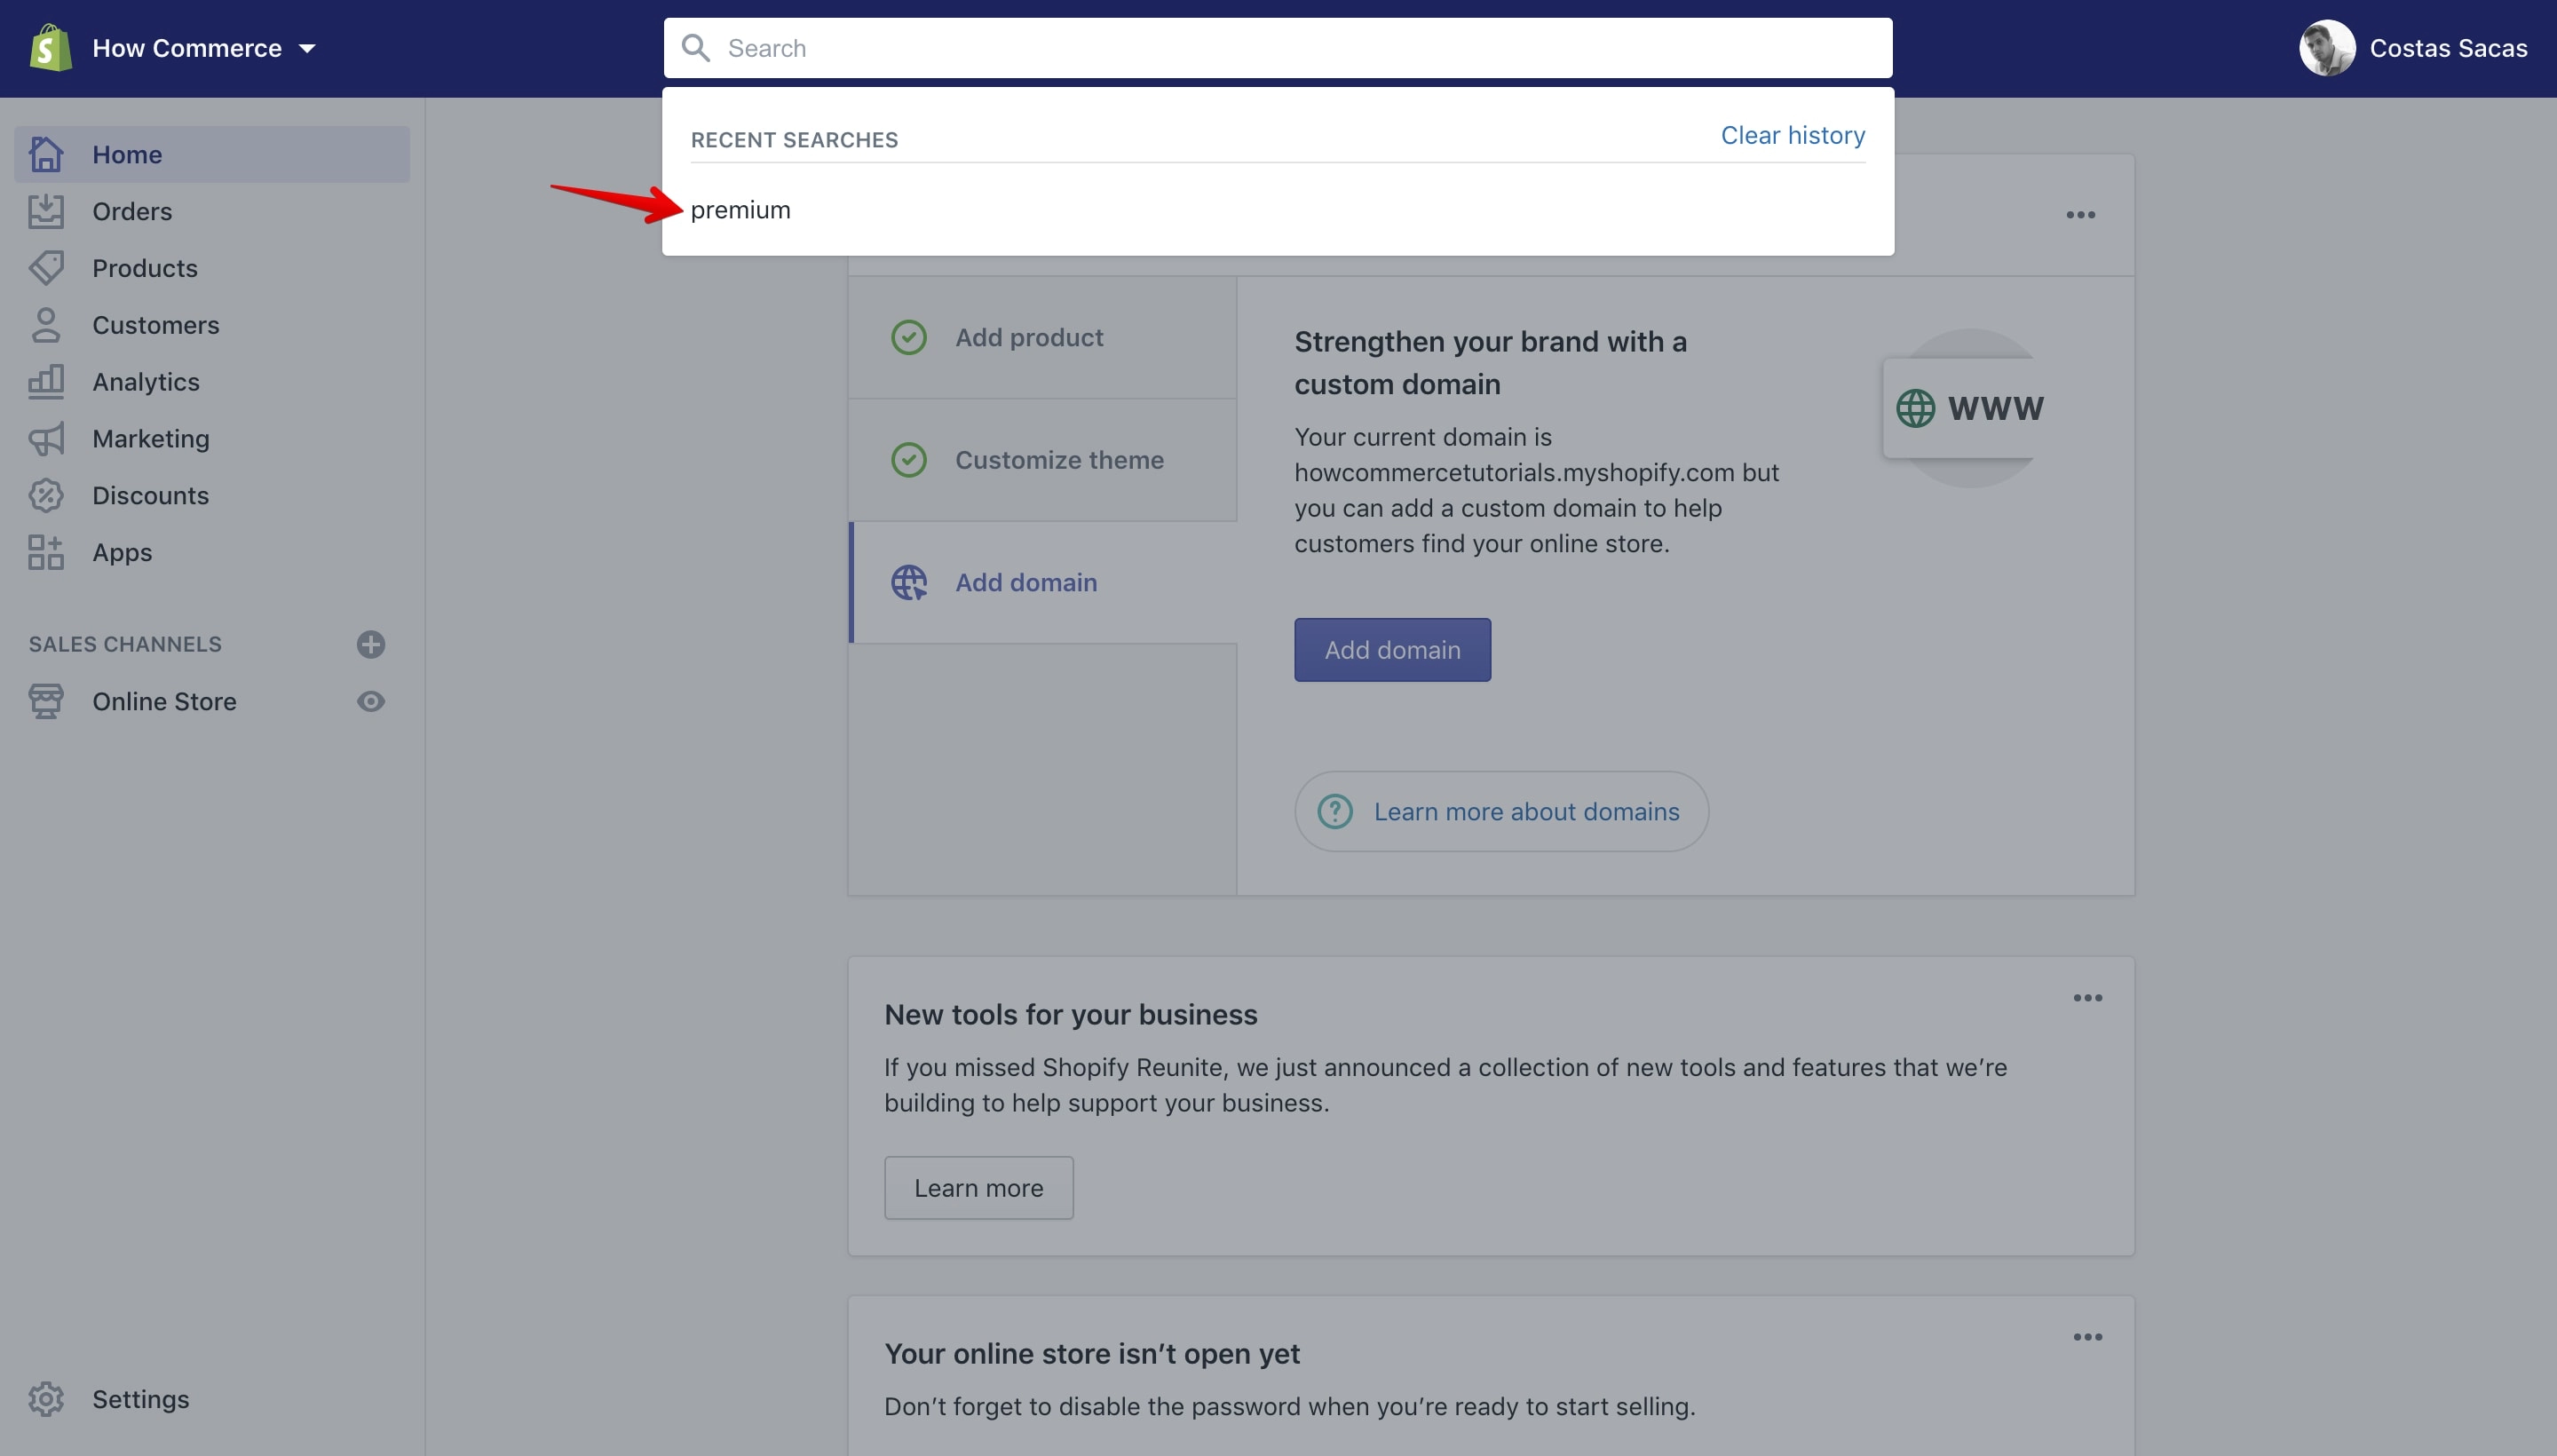
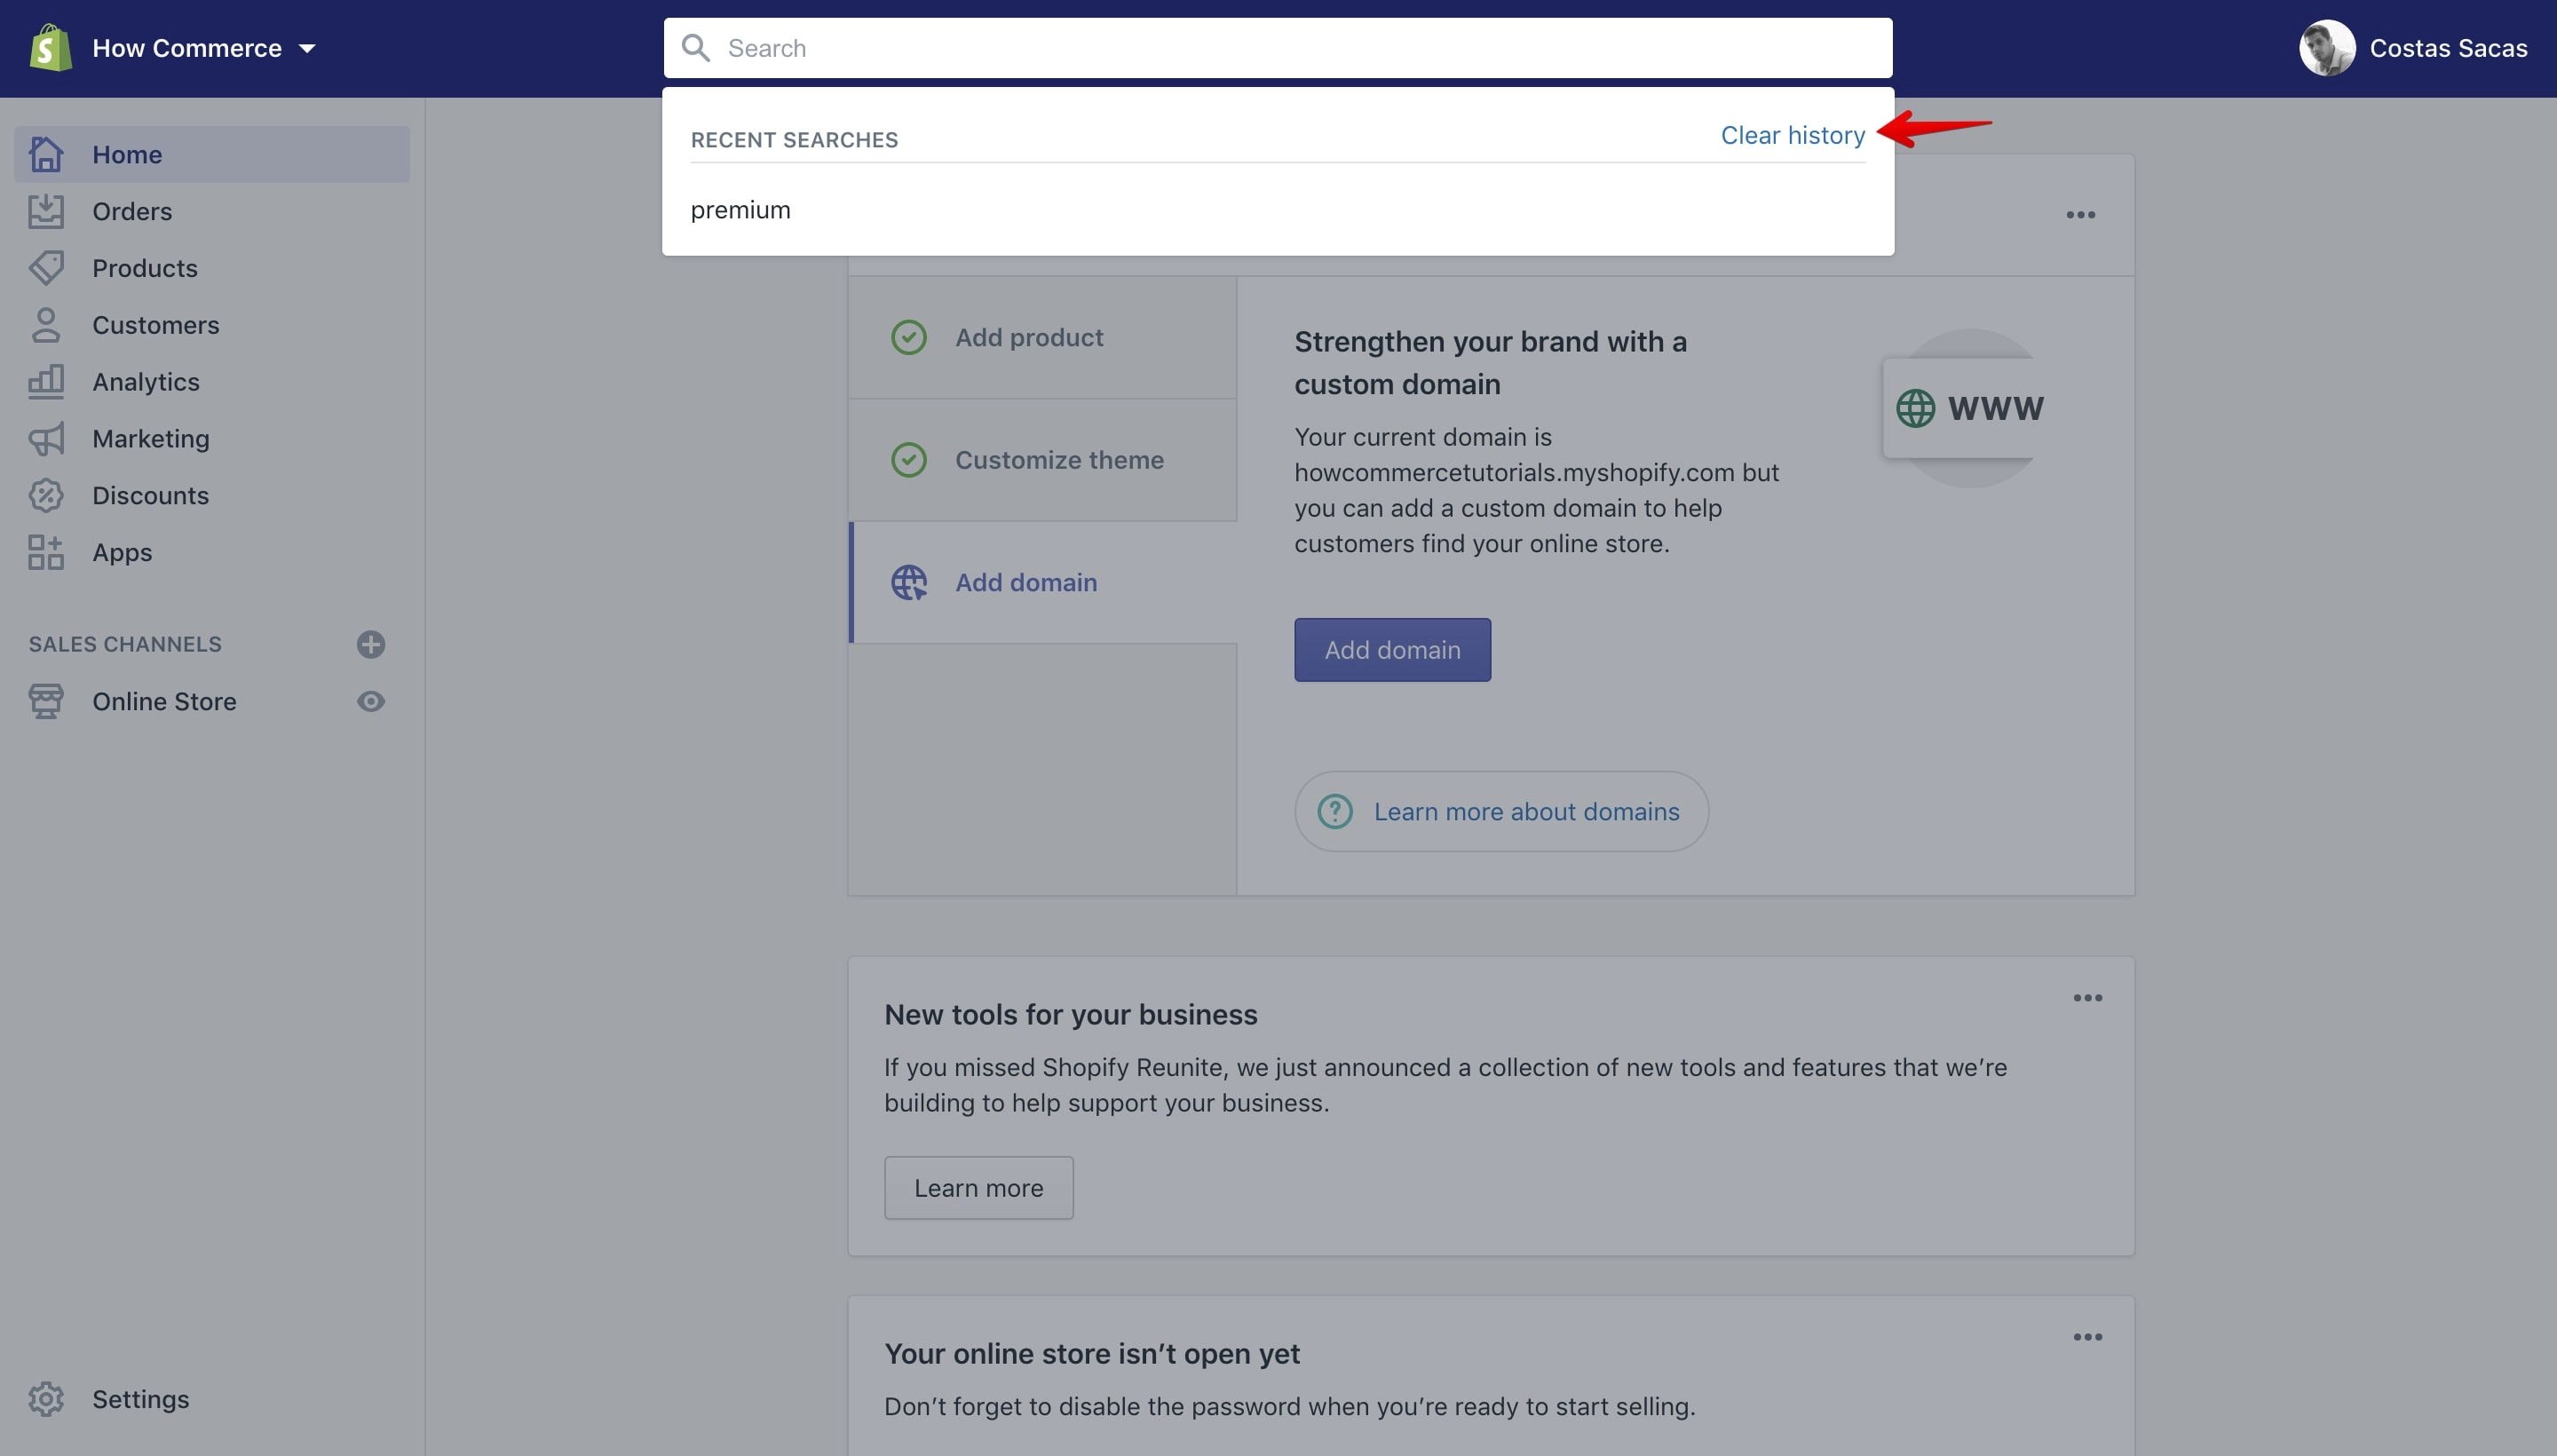
If you want to clear all the recent searches you can do that by clicking the “Clear history” link:
Search queries
You can execute specific searches on Shopify admin using a search query. A search query is a string of text and is composed of terms, connectives, modifiers, and comparators.
Though for the average Shopify store owner this is a bit complex and not easy to work with I’ll list a couple of examples:
List orders that are unfulfilled
fulfillment_status:unfulfilled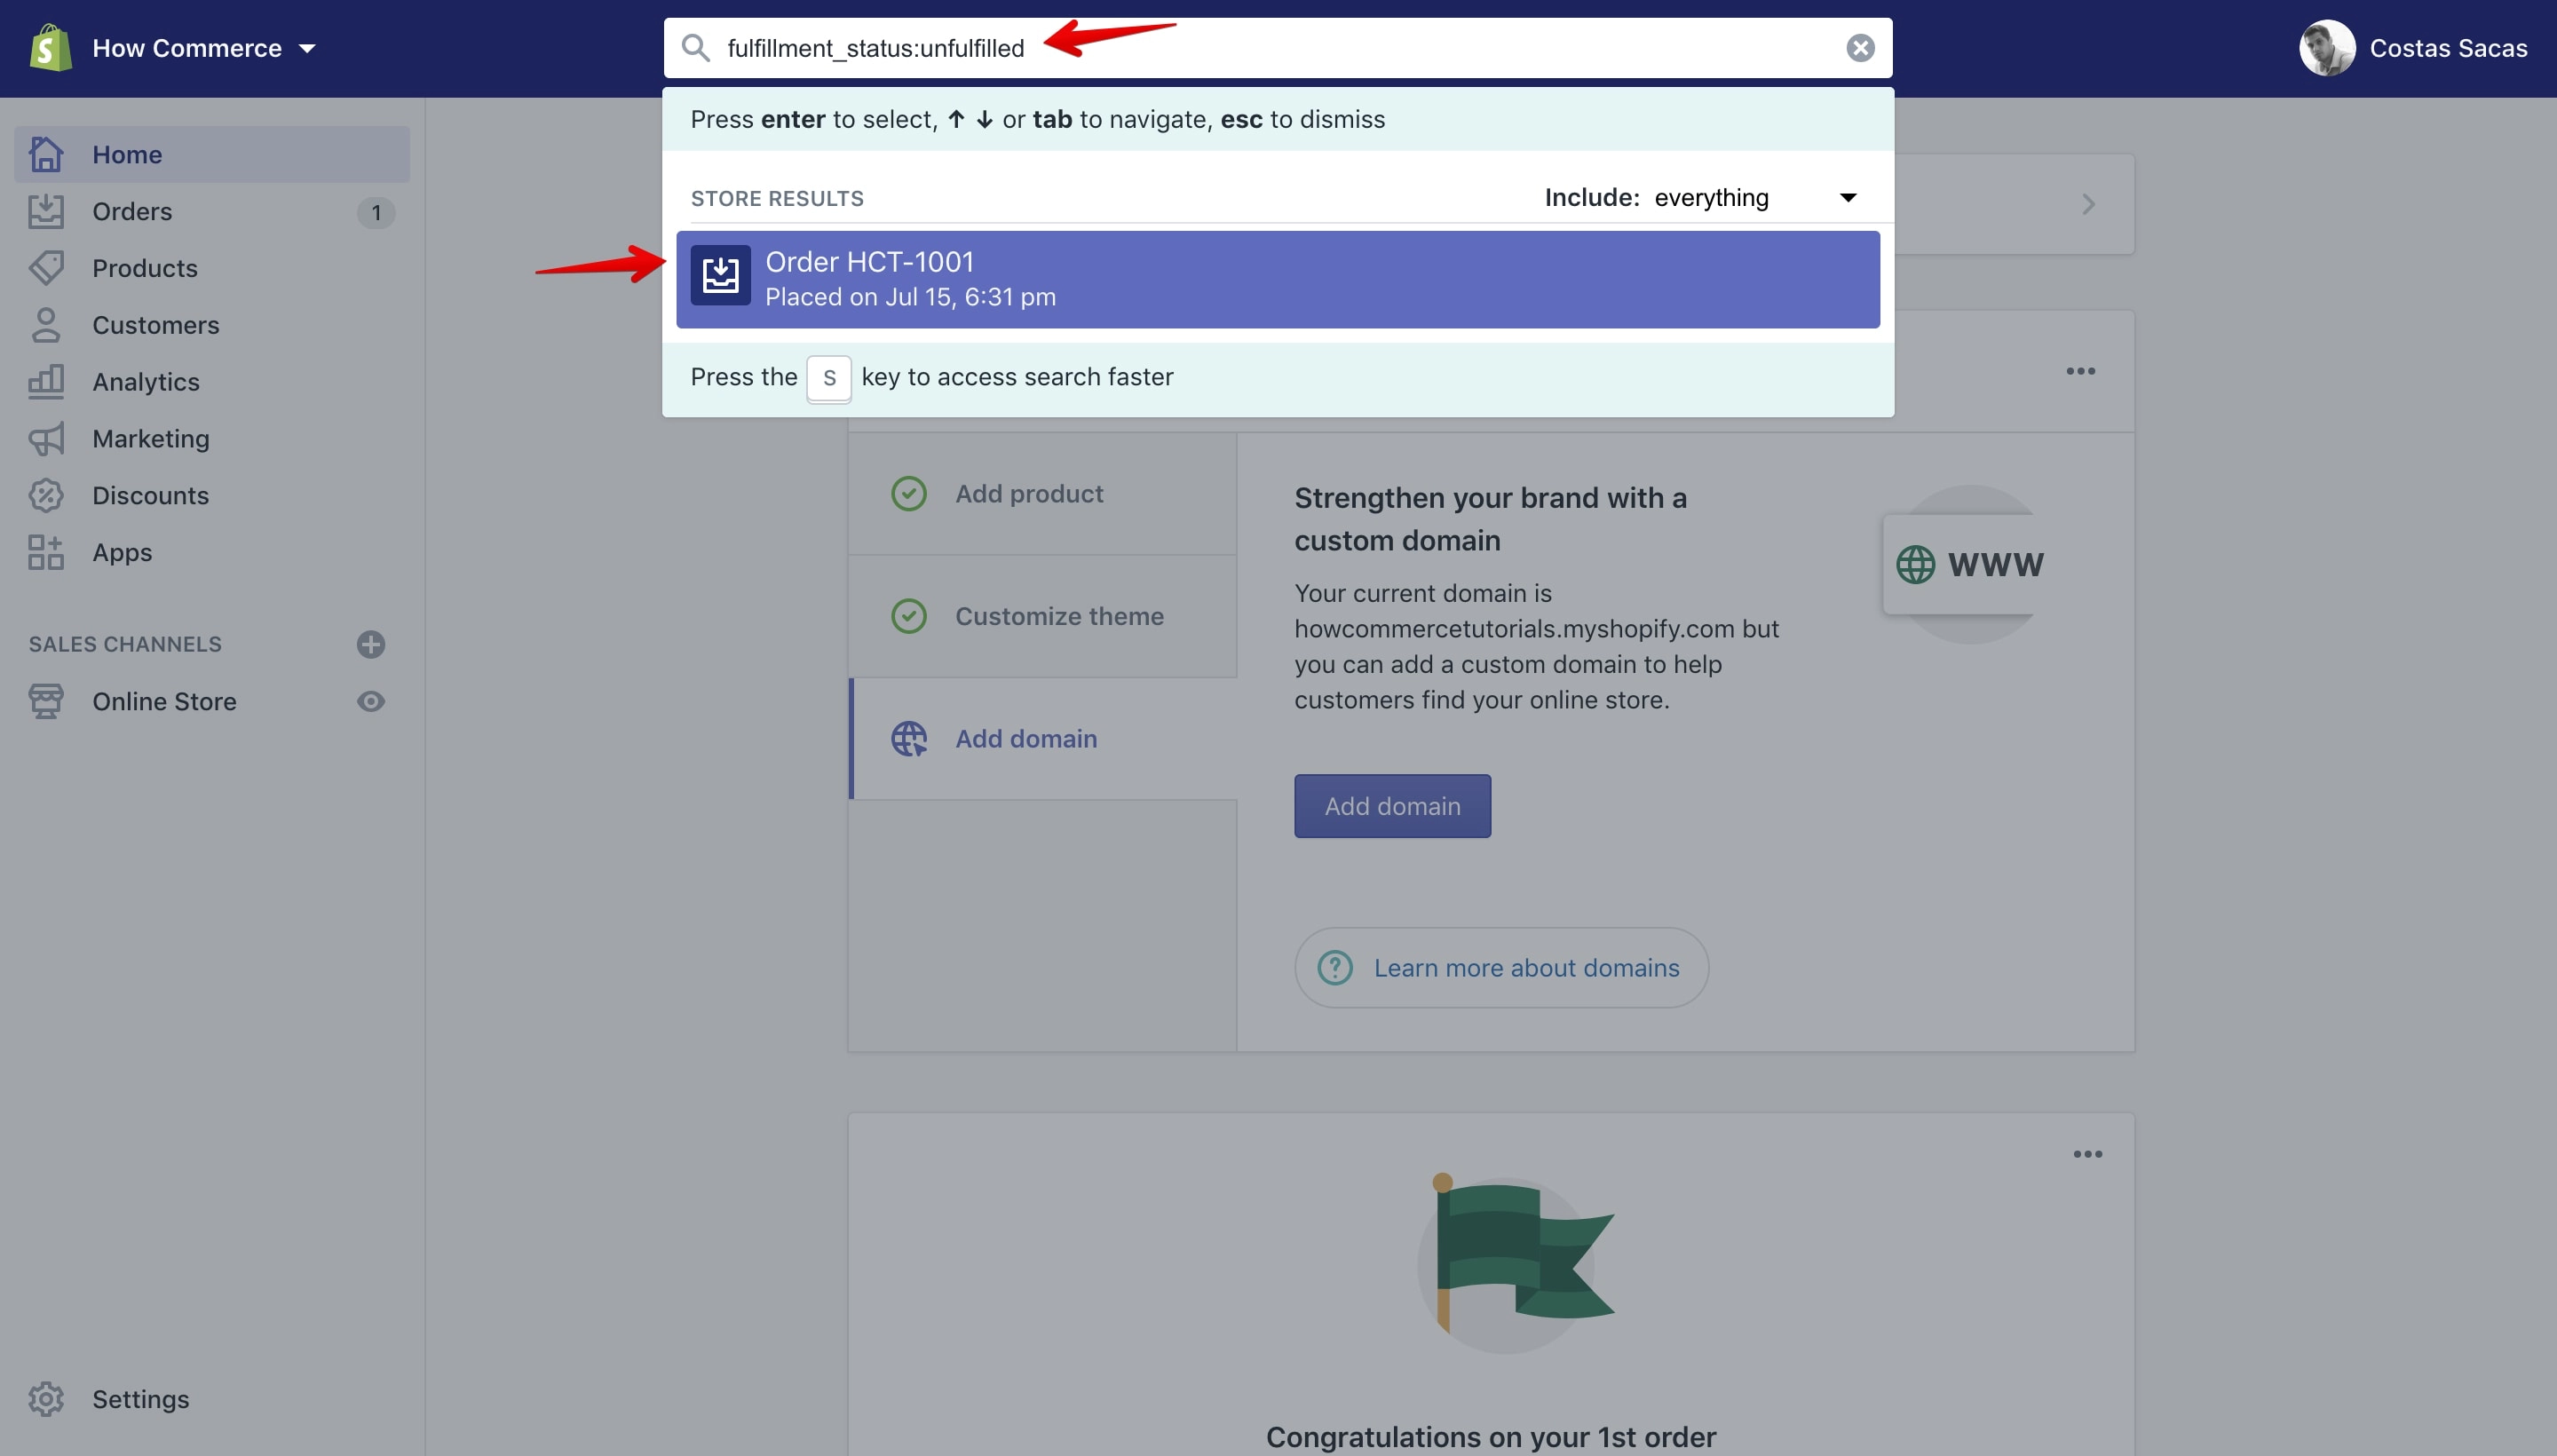
Search for a specific product tag
tag:classic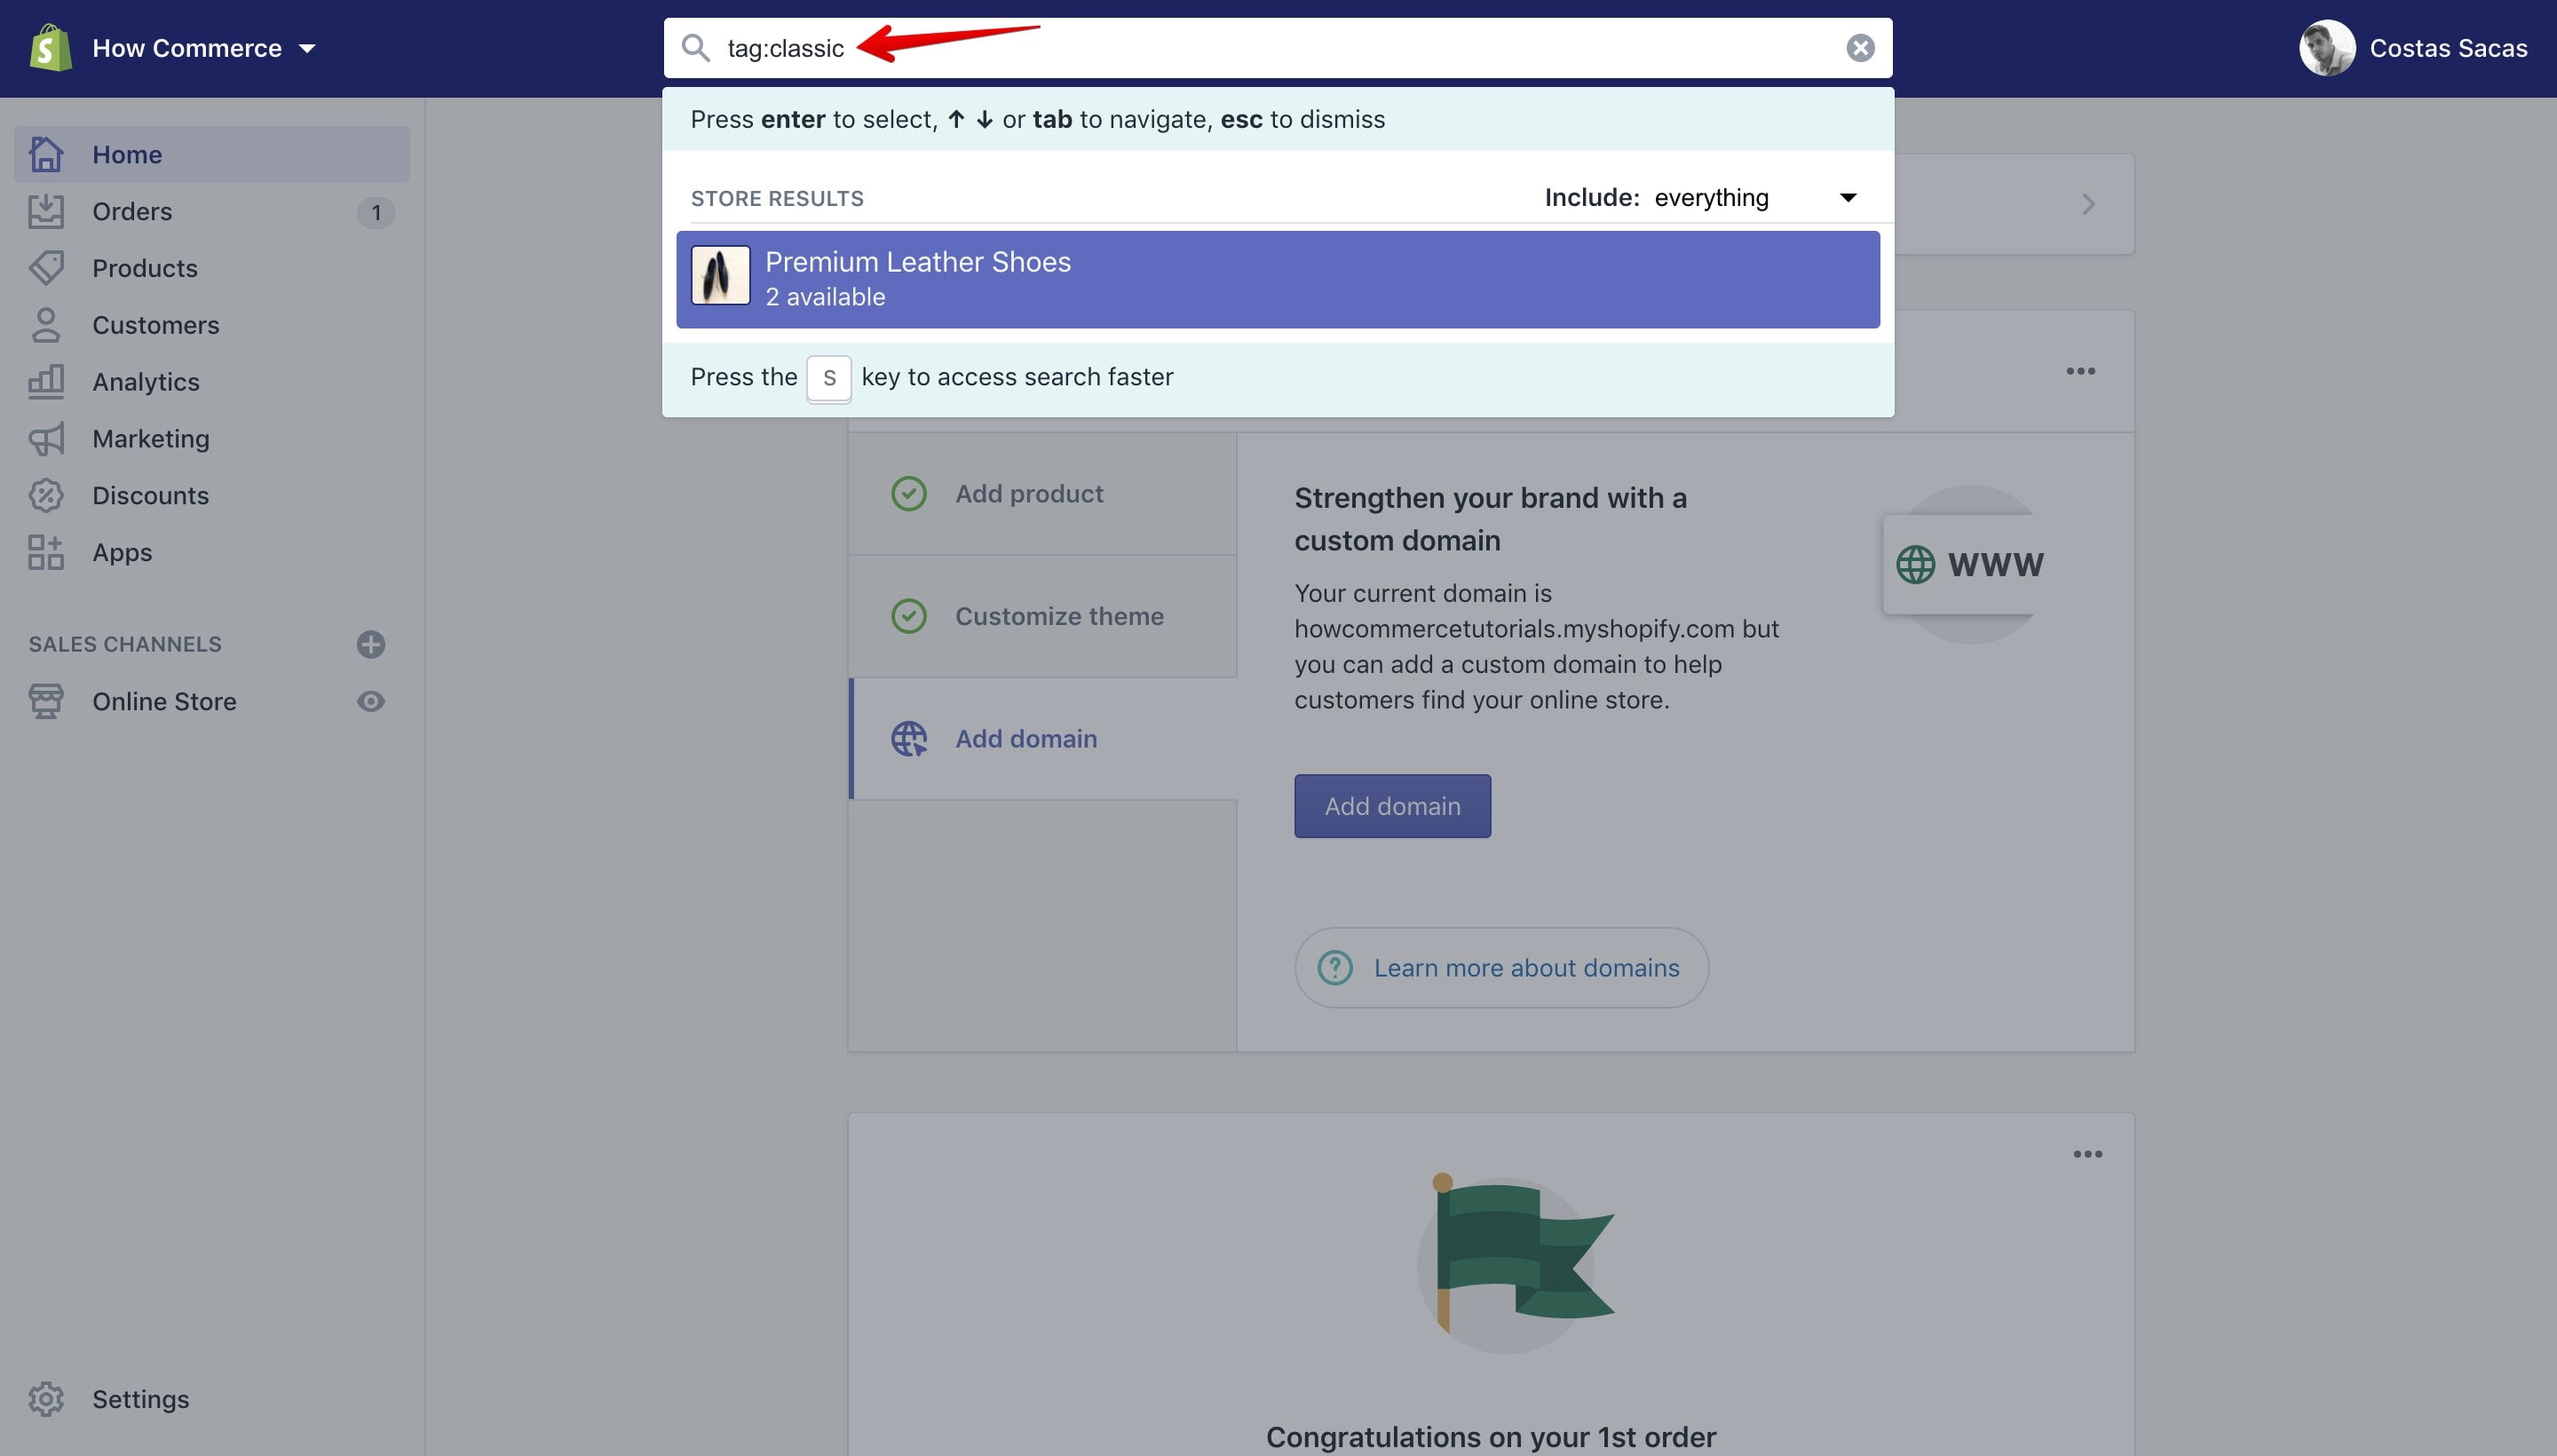
Chain queries
You can chain queries like this:
fulfillment_status:unfulfilled AND NOT financial_status:refundedChaining is good when you want to use logic to exclude stuff that you do not want in your search results.
For example, let's say you search for the tag “black” to see all the products that have this tag attached but you know that you also have more specific tags like “black shoes” and you do not want the products attached to this tag to display in your search.
Let’s search for the “black” tag:
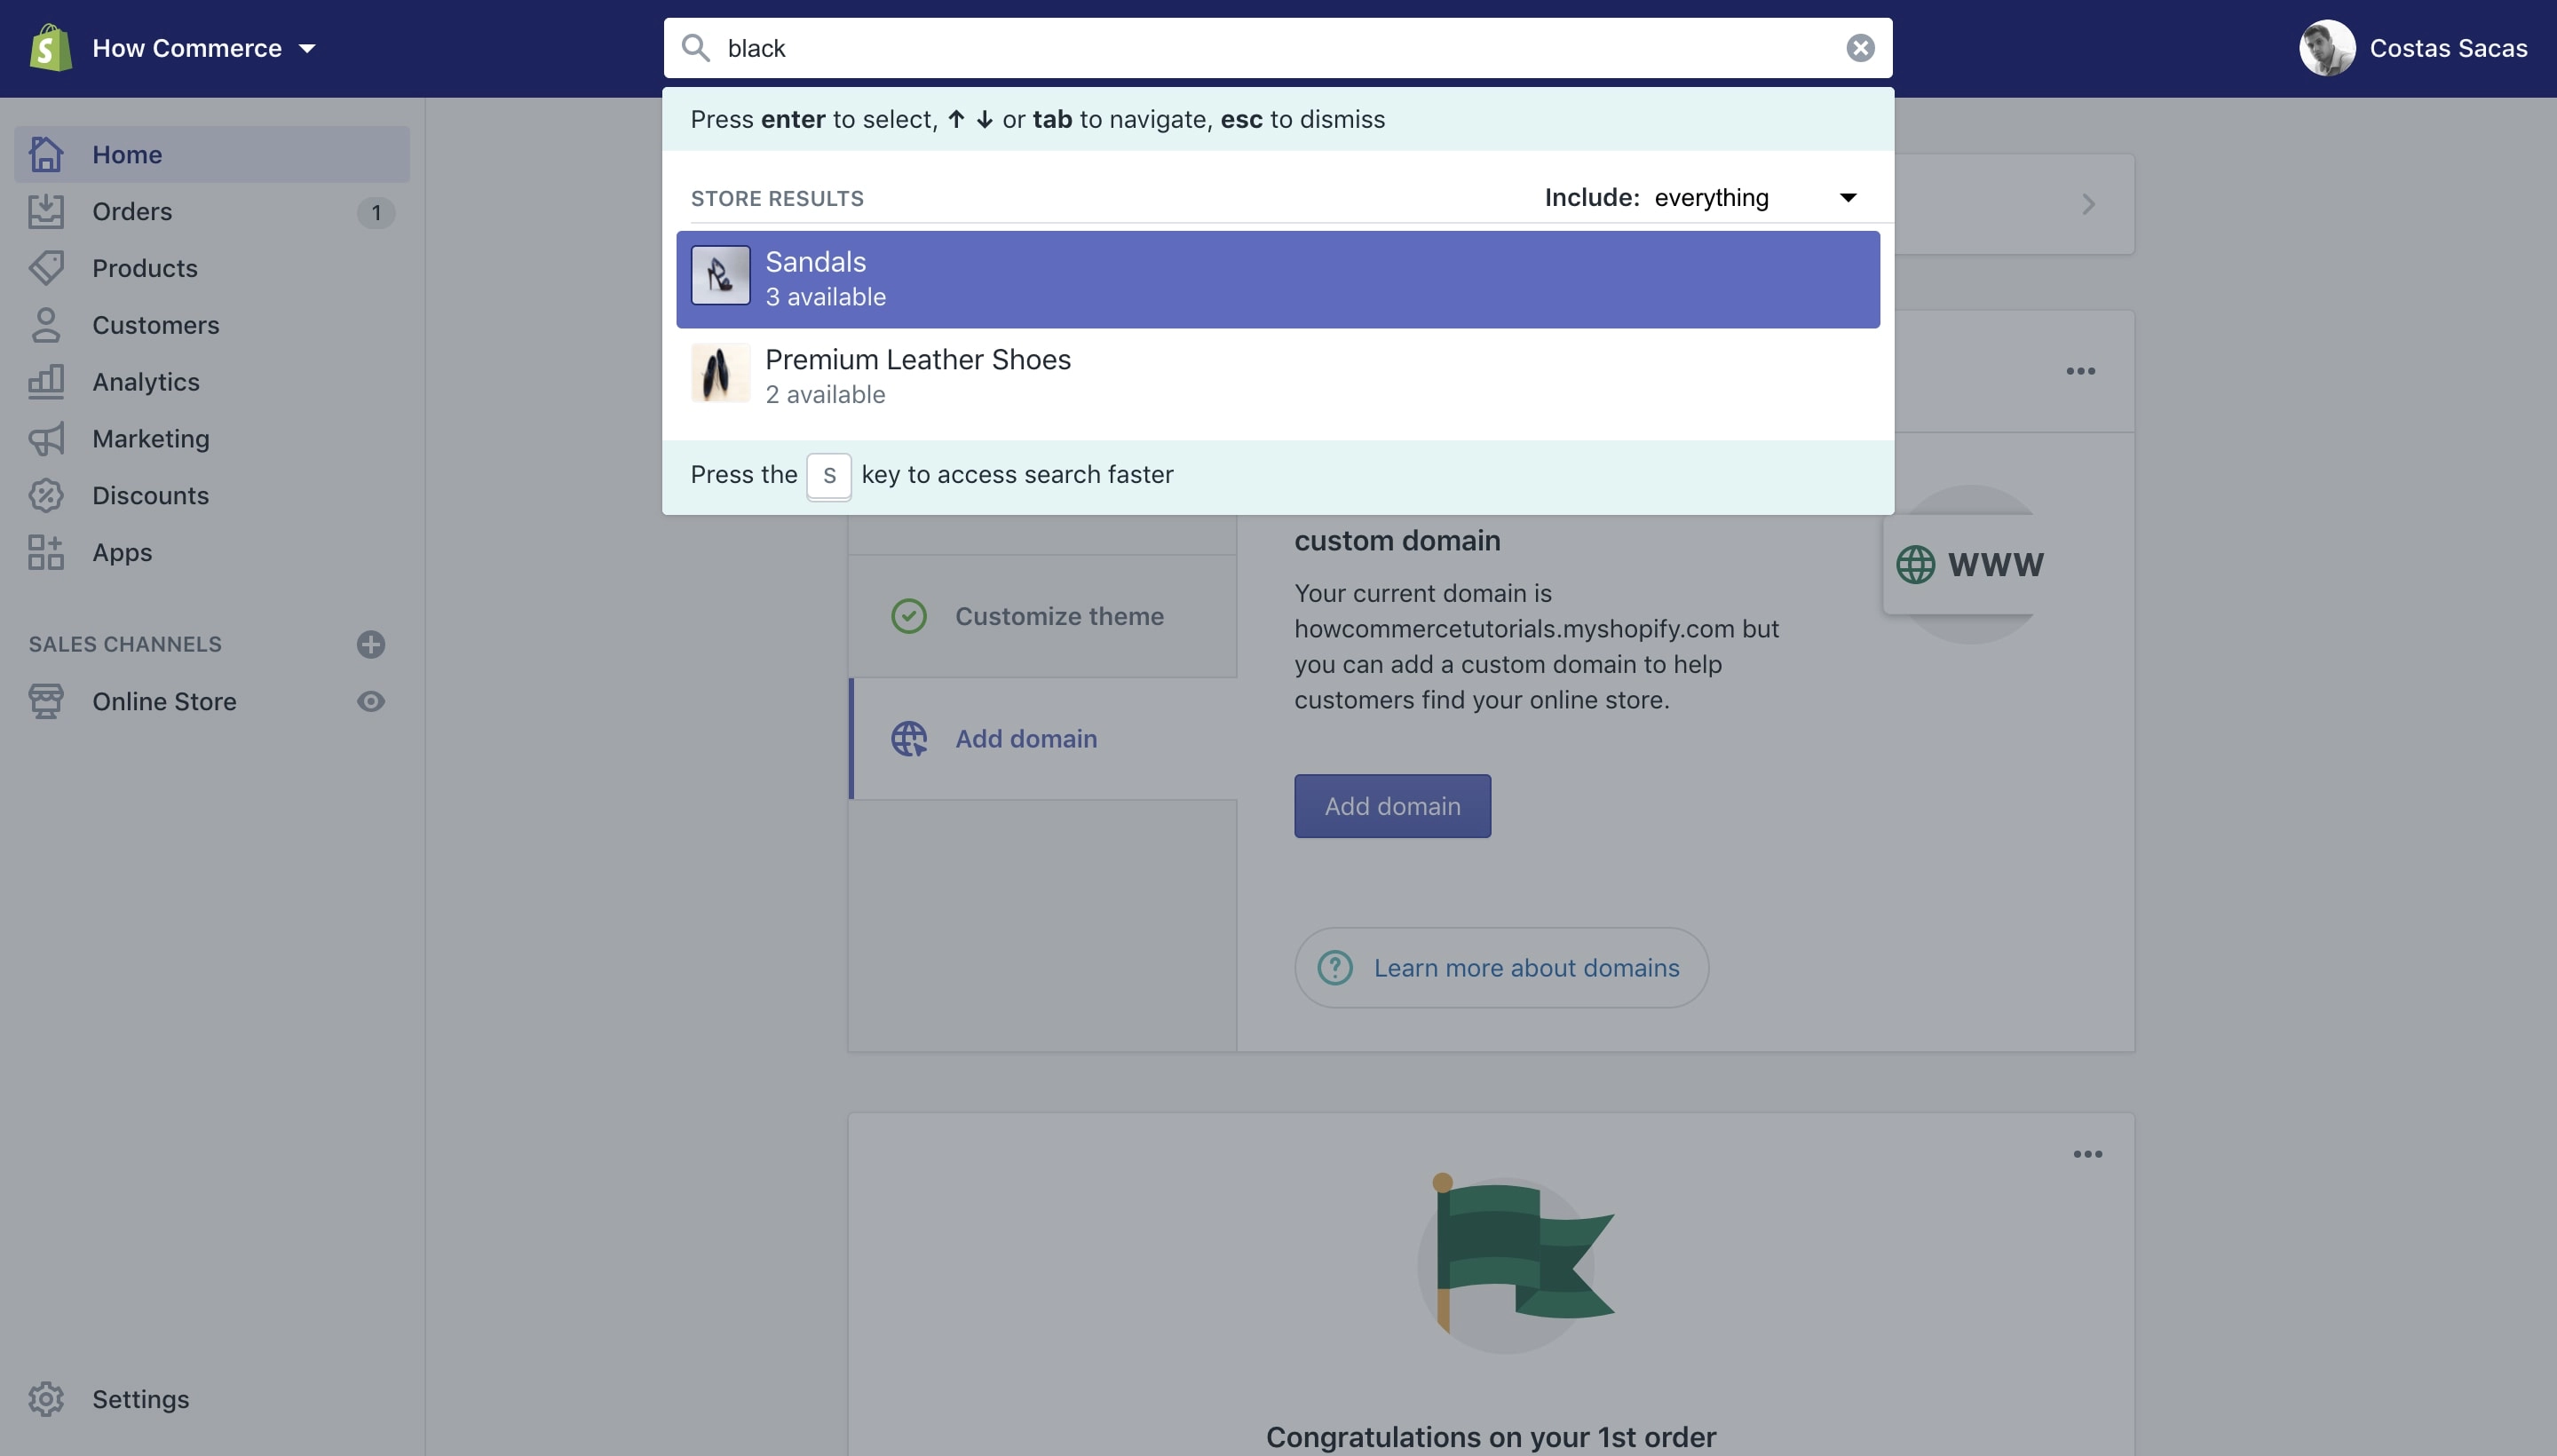
The first product “Sandals” has a tag named “black shoes” and the second one “Premium Leather Shoes” has a tag named “black”.
Since both products contain the word “black” in the tag, Shopify will list them both. To avoid that we need to do a bit of chaining. So to get only the products with the tag “black” we need to do a query like this:
tag:black AND NOT tag:"black shoes"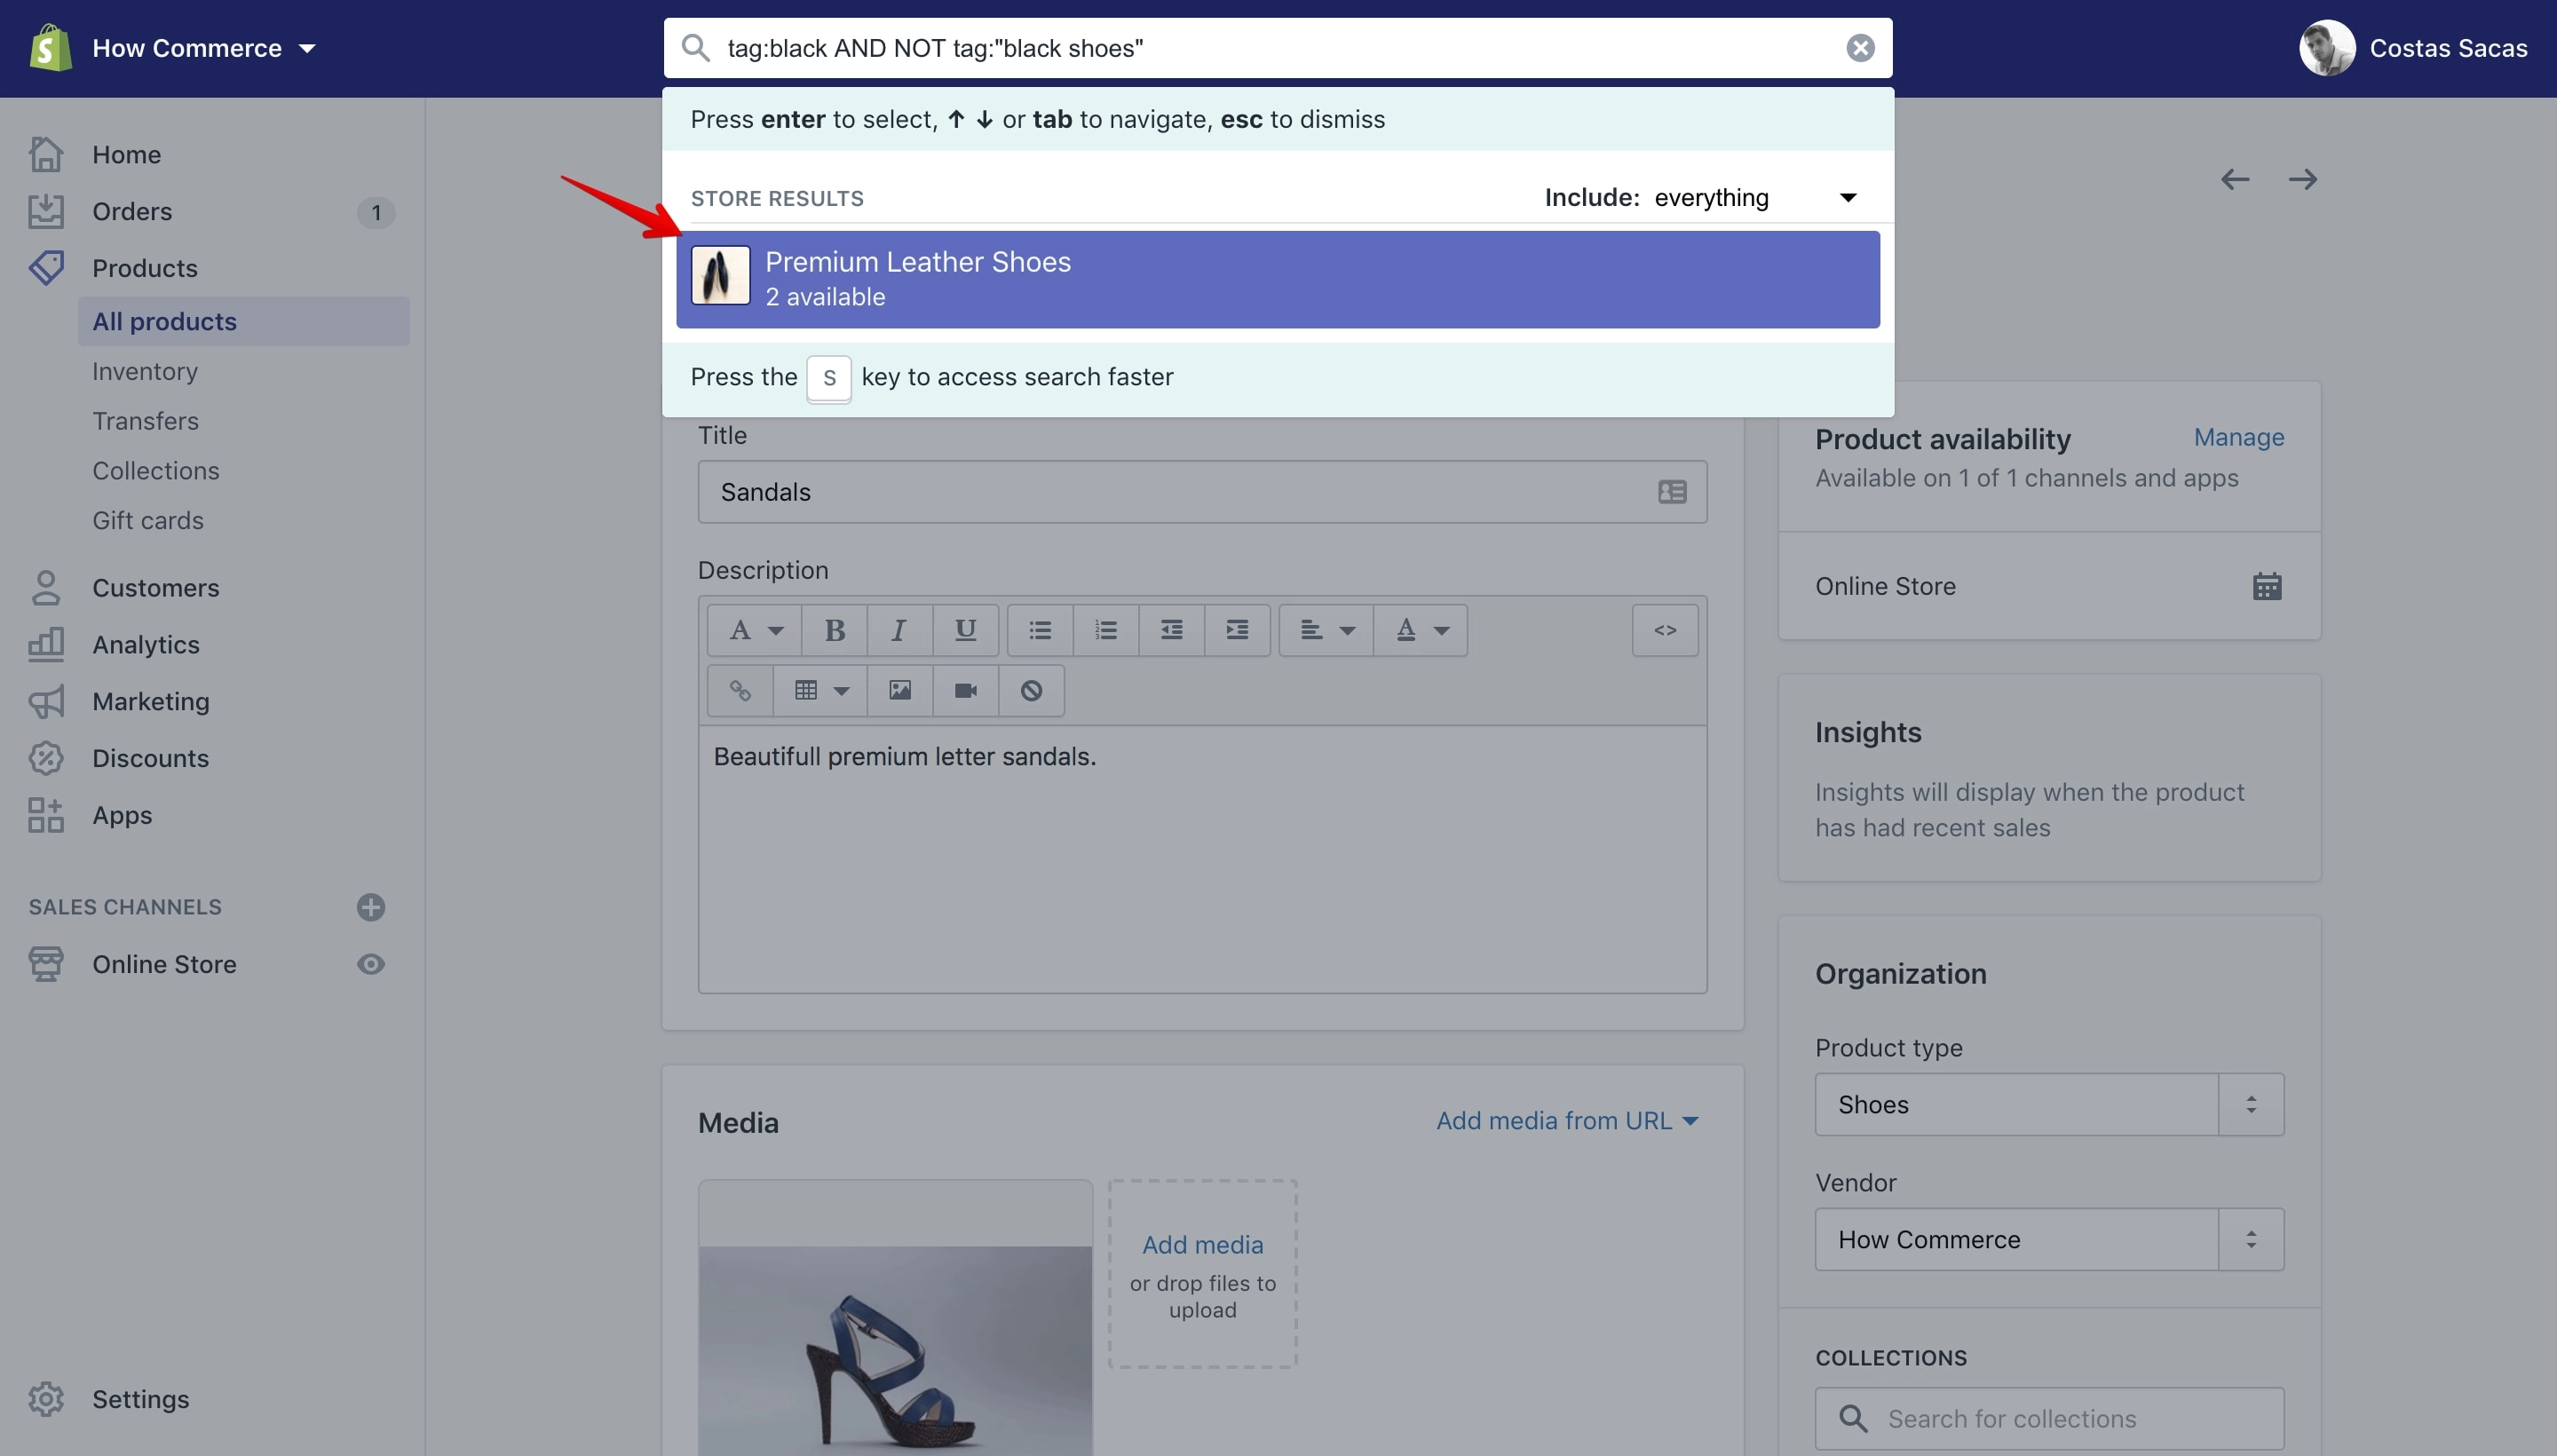
As you see now only the “Premium Leather Shoes” are listed in the search results since only they have the “black” tag attached.
Search for a product type
In my example I’ll search for “beverage” product types:
product_type:beverage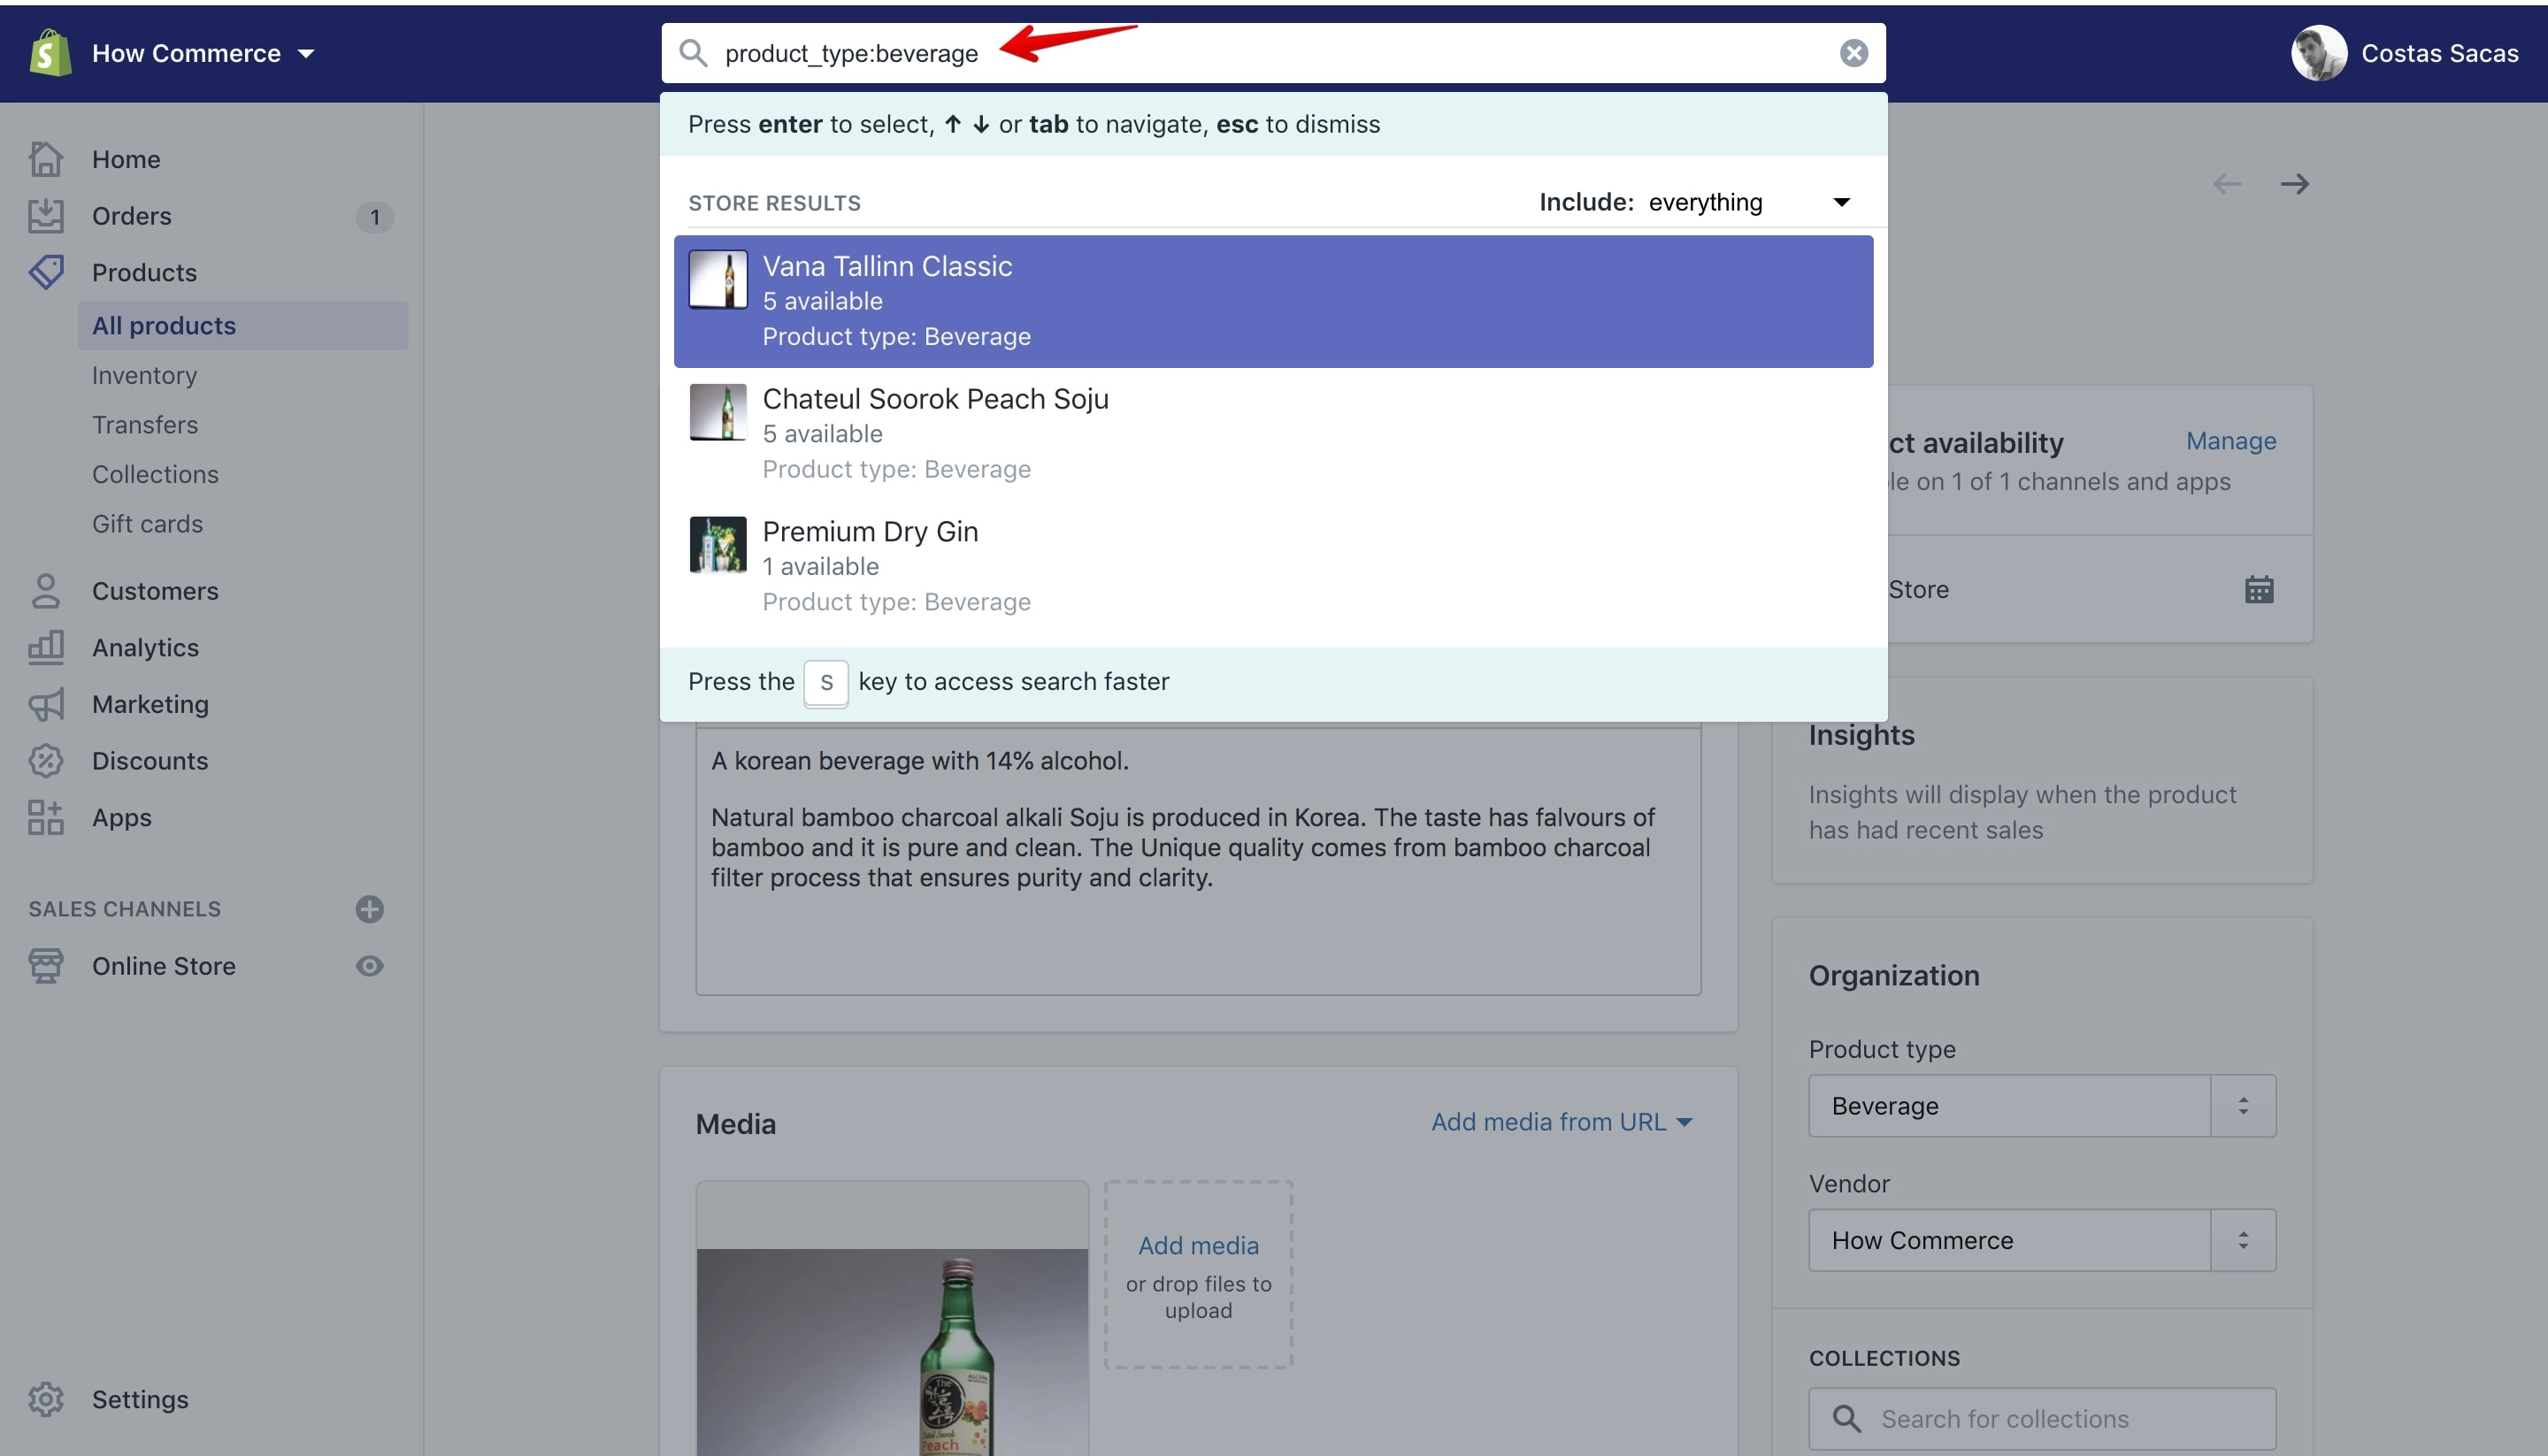
Please make sure you type the search queries as it is or else they’ll not work and you’ll get an error.
For the average store owner these advanced searches are not needed since you have filters for every Shopify section in part and you can filter from there to your needs.
This will come in hand for more advanced users like developers.
Bulk actions
With bulk actions you can perform actions on items in bulk.
Examples of this type are: add tags to multiple products at the same time, publish/unpublish or delete multiple products, add tags or collections to multiple products, delete multiple files and so on.
Selecting items
In order to perform actions in bulk you need to select more than one item. You can select items in 4 ways:
- Select the listed items one by one
- Select a range of listed items
- Select all list items listed on a page
- Select all items in the store(e.g. All products in your store).
Select the listed items one by one
To do that click on the checkbox (marked with 1 in the image below) in front of the items that you want to select:
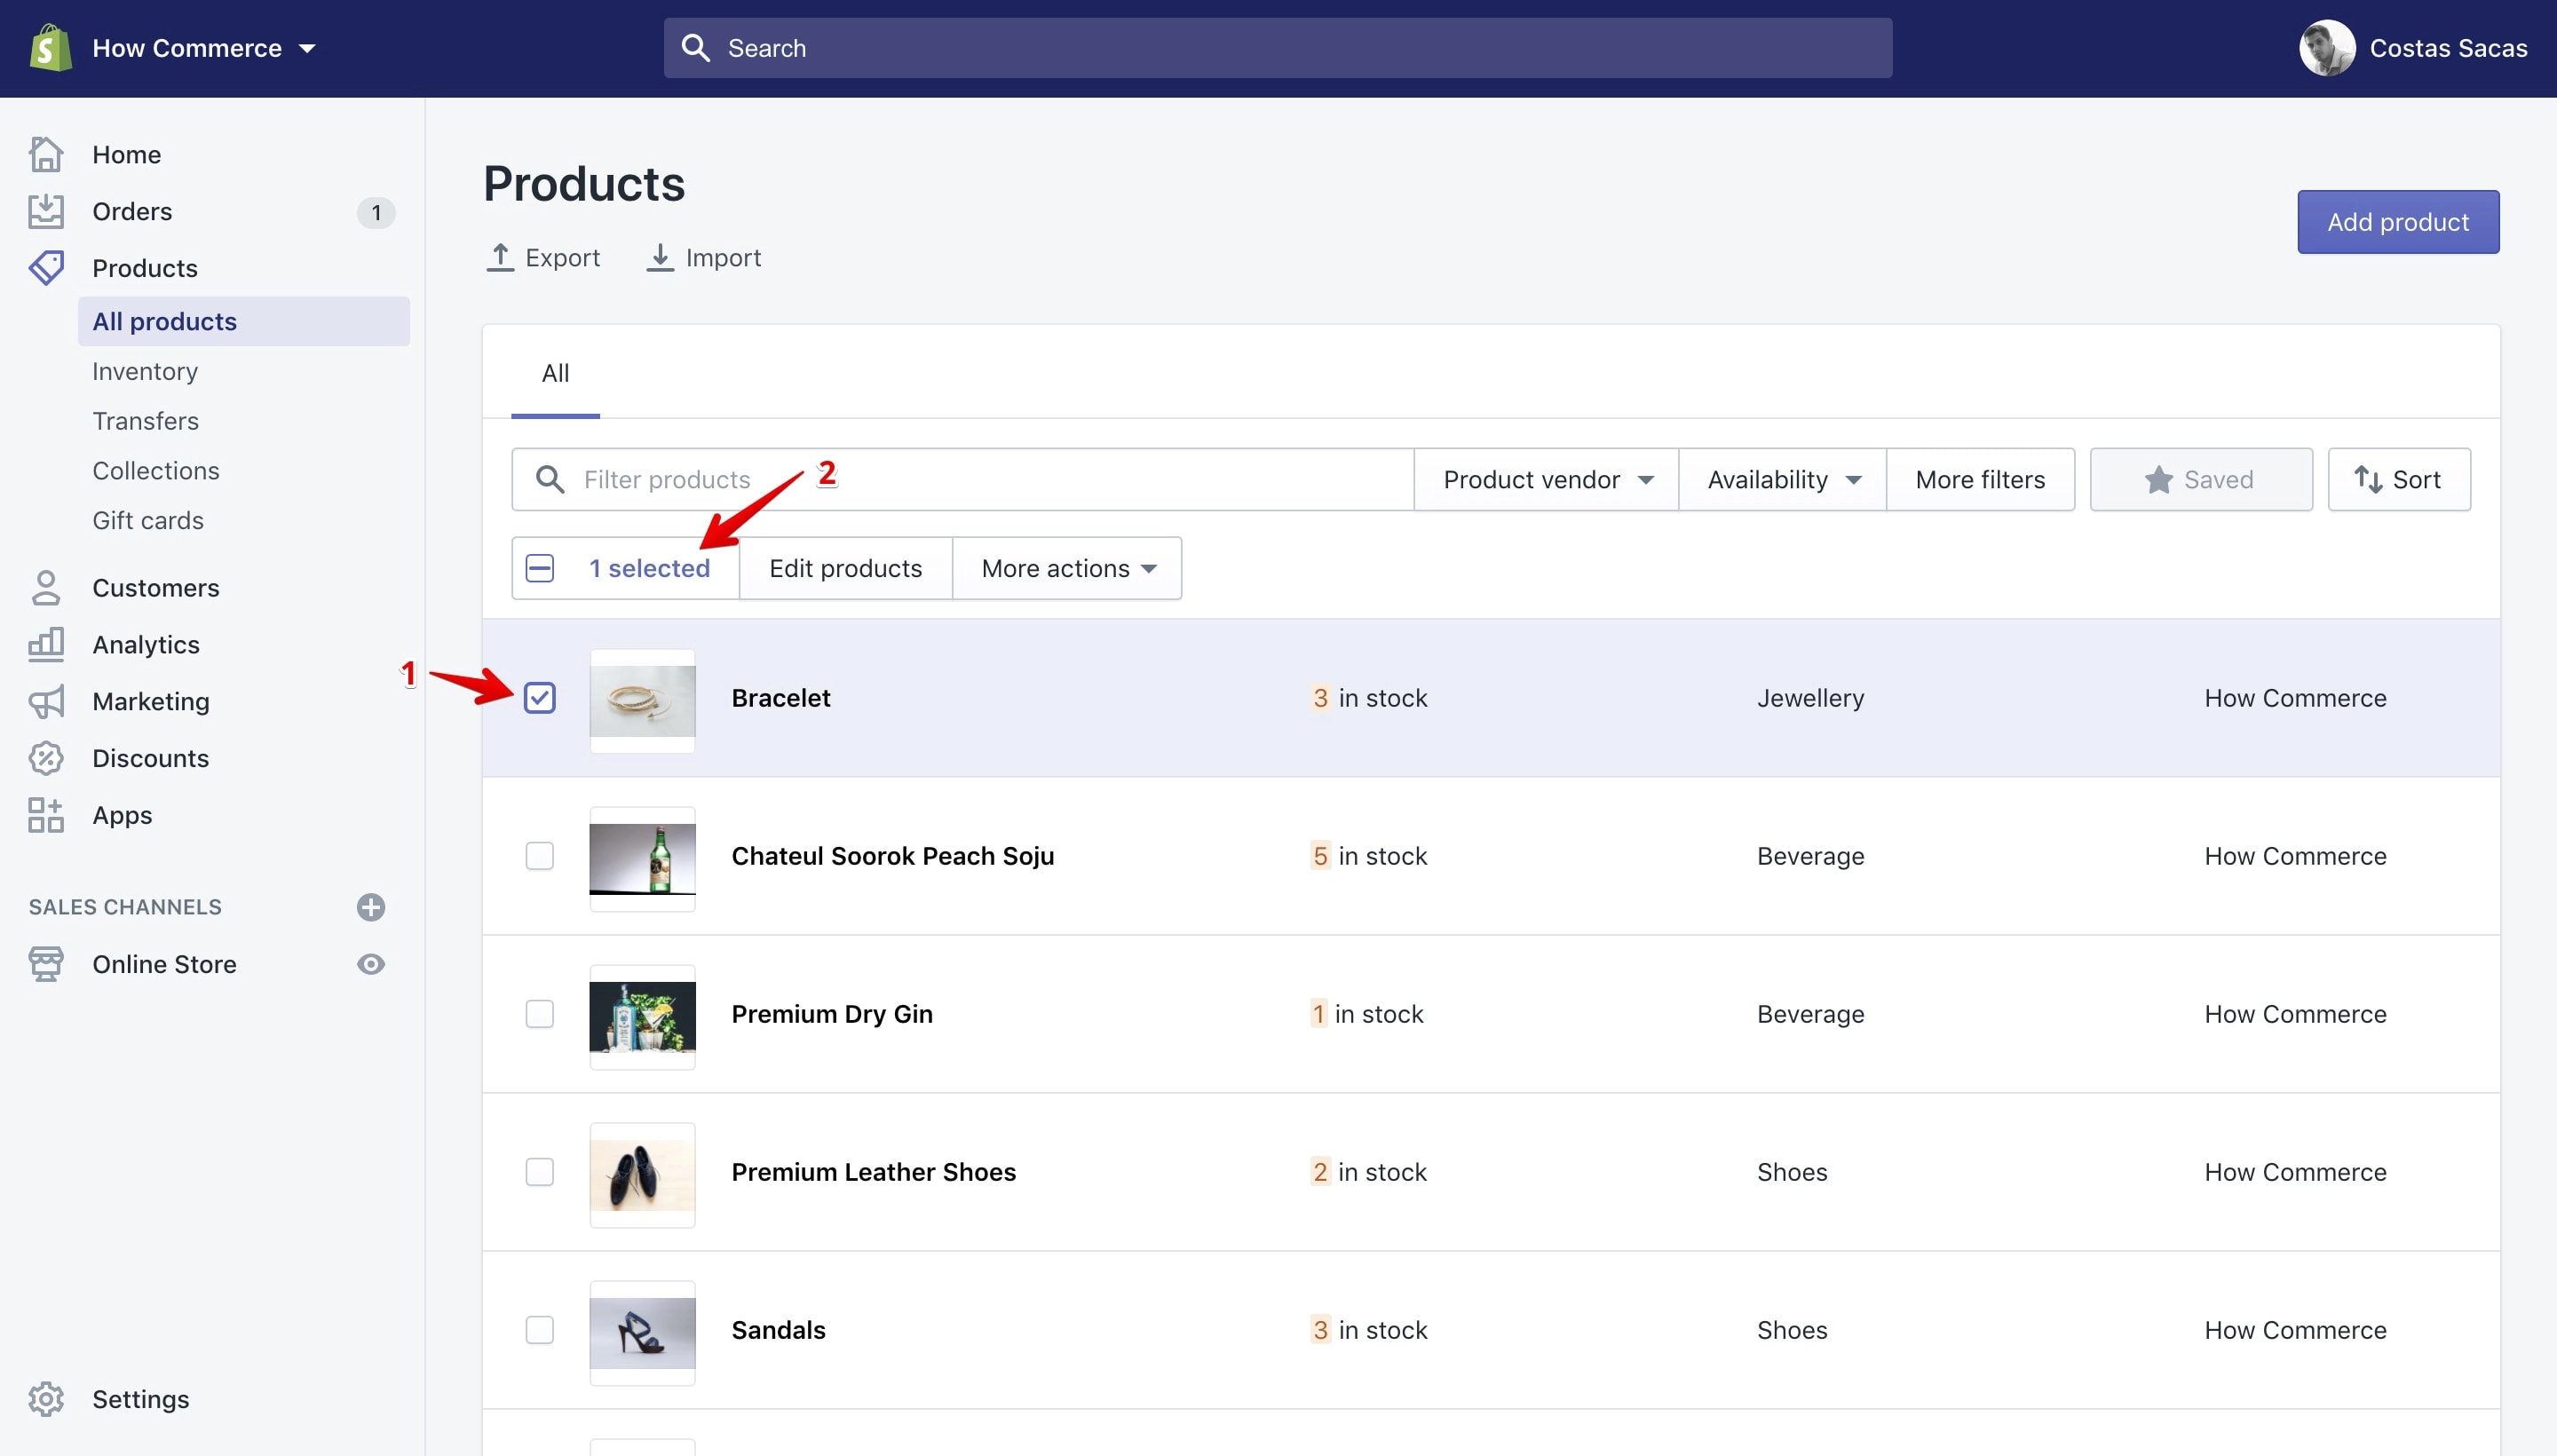
Once you select an item, Shopify will show you how many are selected in the “Selection” field (marked with 2 in the image above).
Select a range of listed items
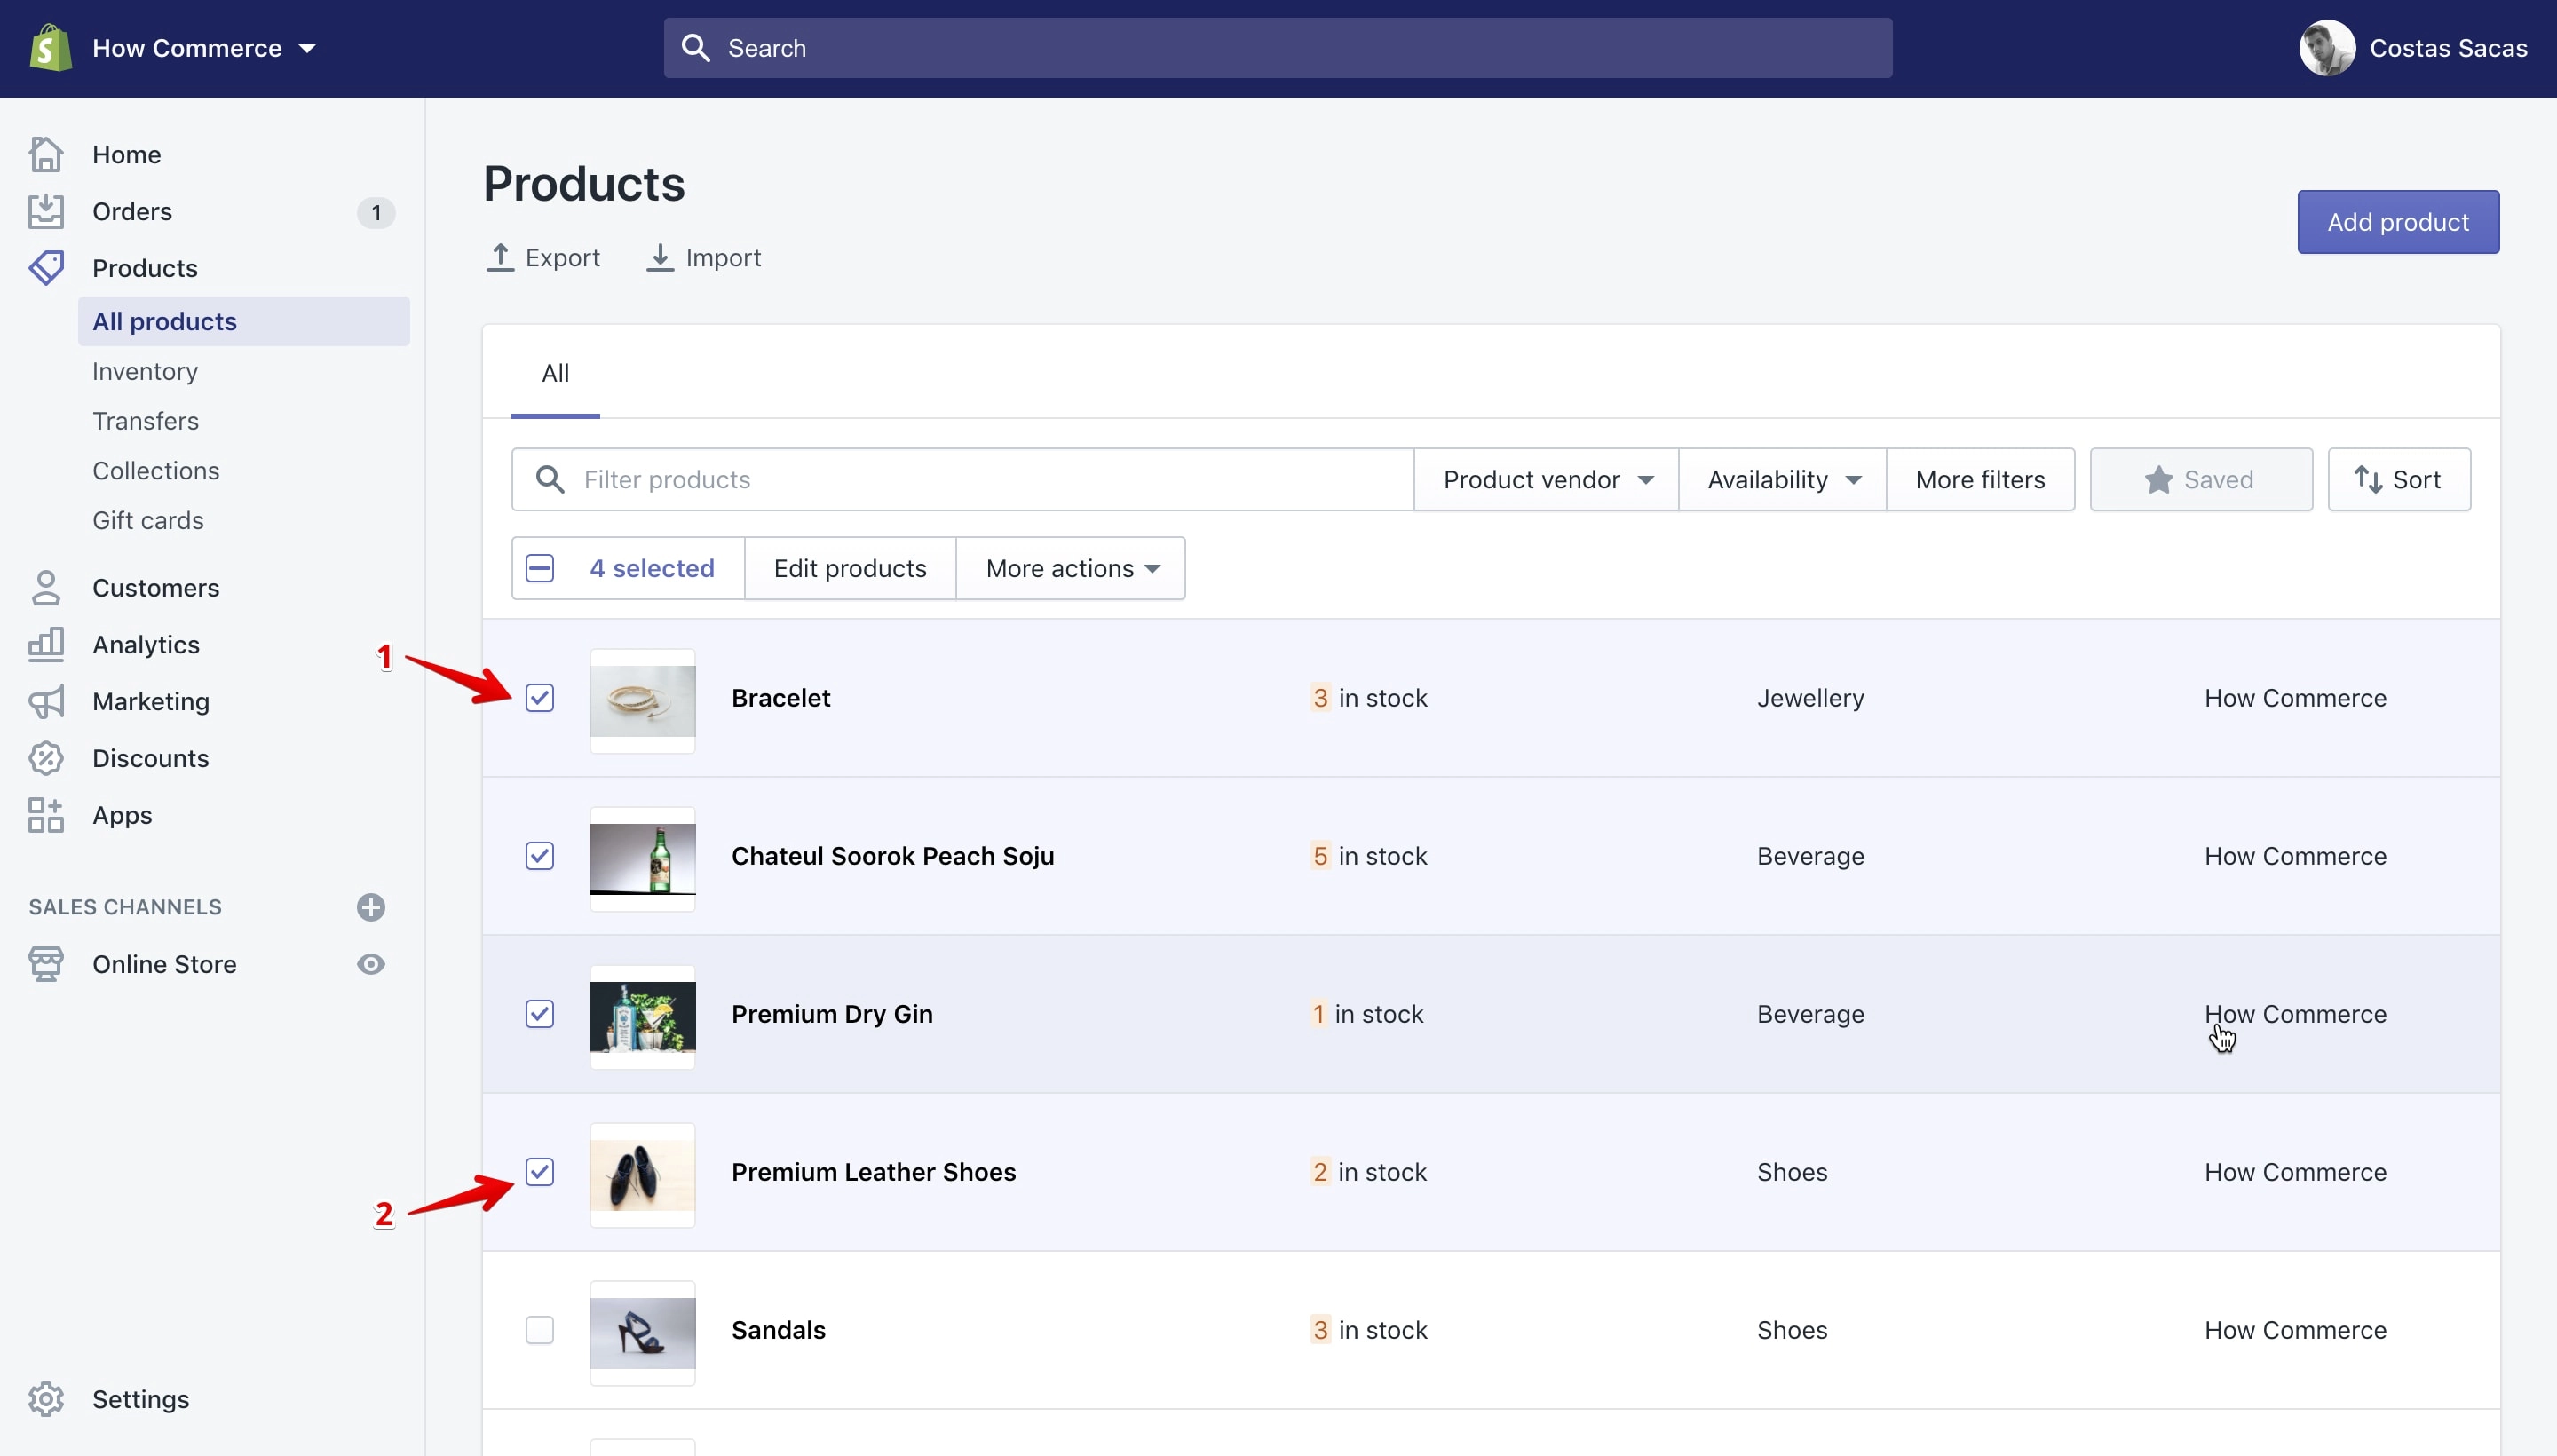
To select a range of items you need to select the first item (marked with 1 in the image below), then hold the ⇧ (on MAC/Windows) and select the last item where you want to limit the range of items (marked with 2 in the image below).
In my following example I’ve selected 4 items:
Select all list items listed on a page
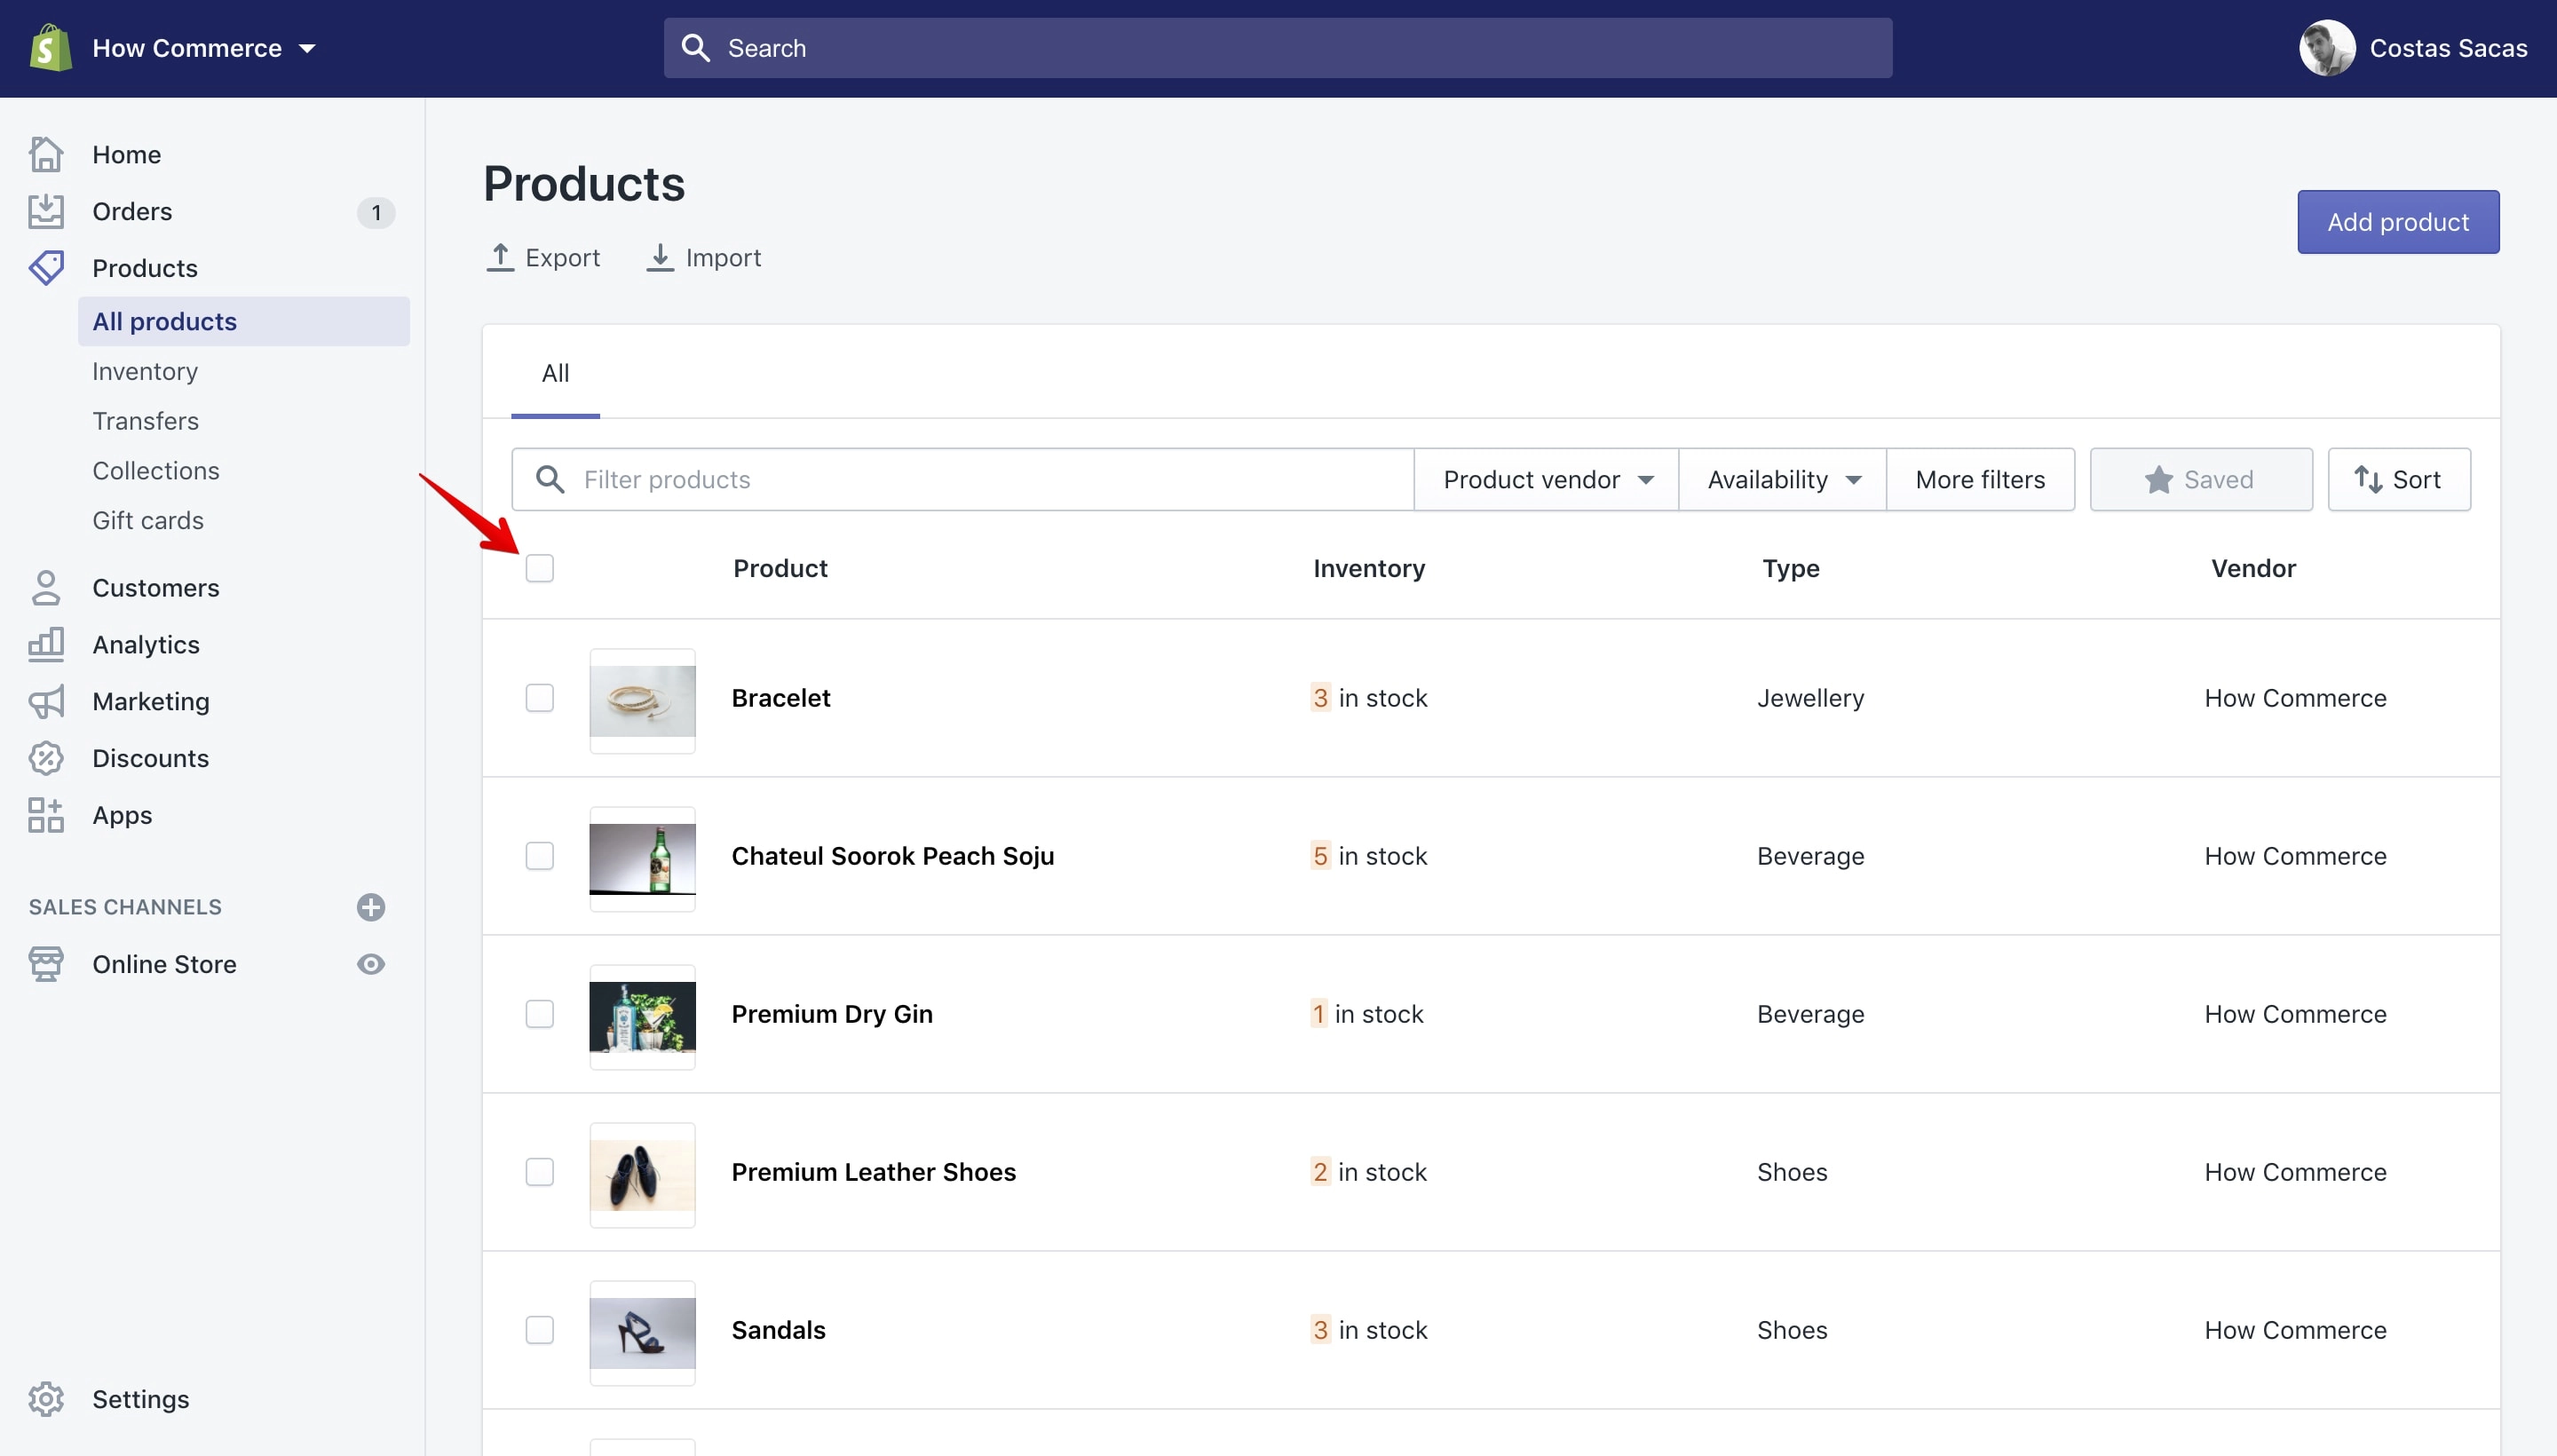
To select all items listed on the page you need to click the master checkbox:
Select all items in the store
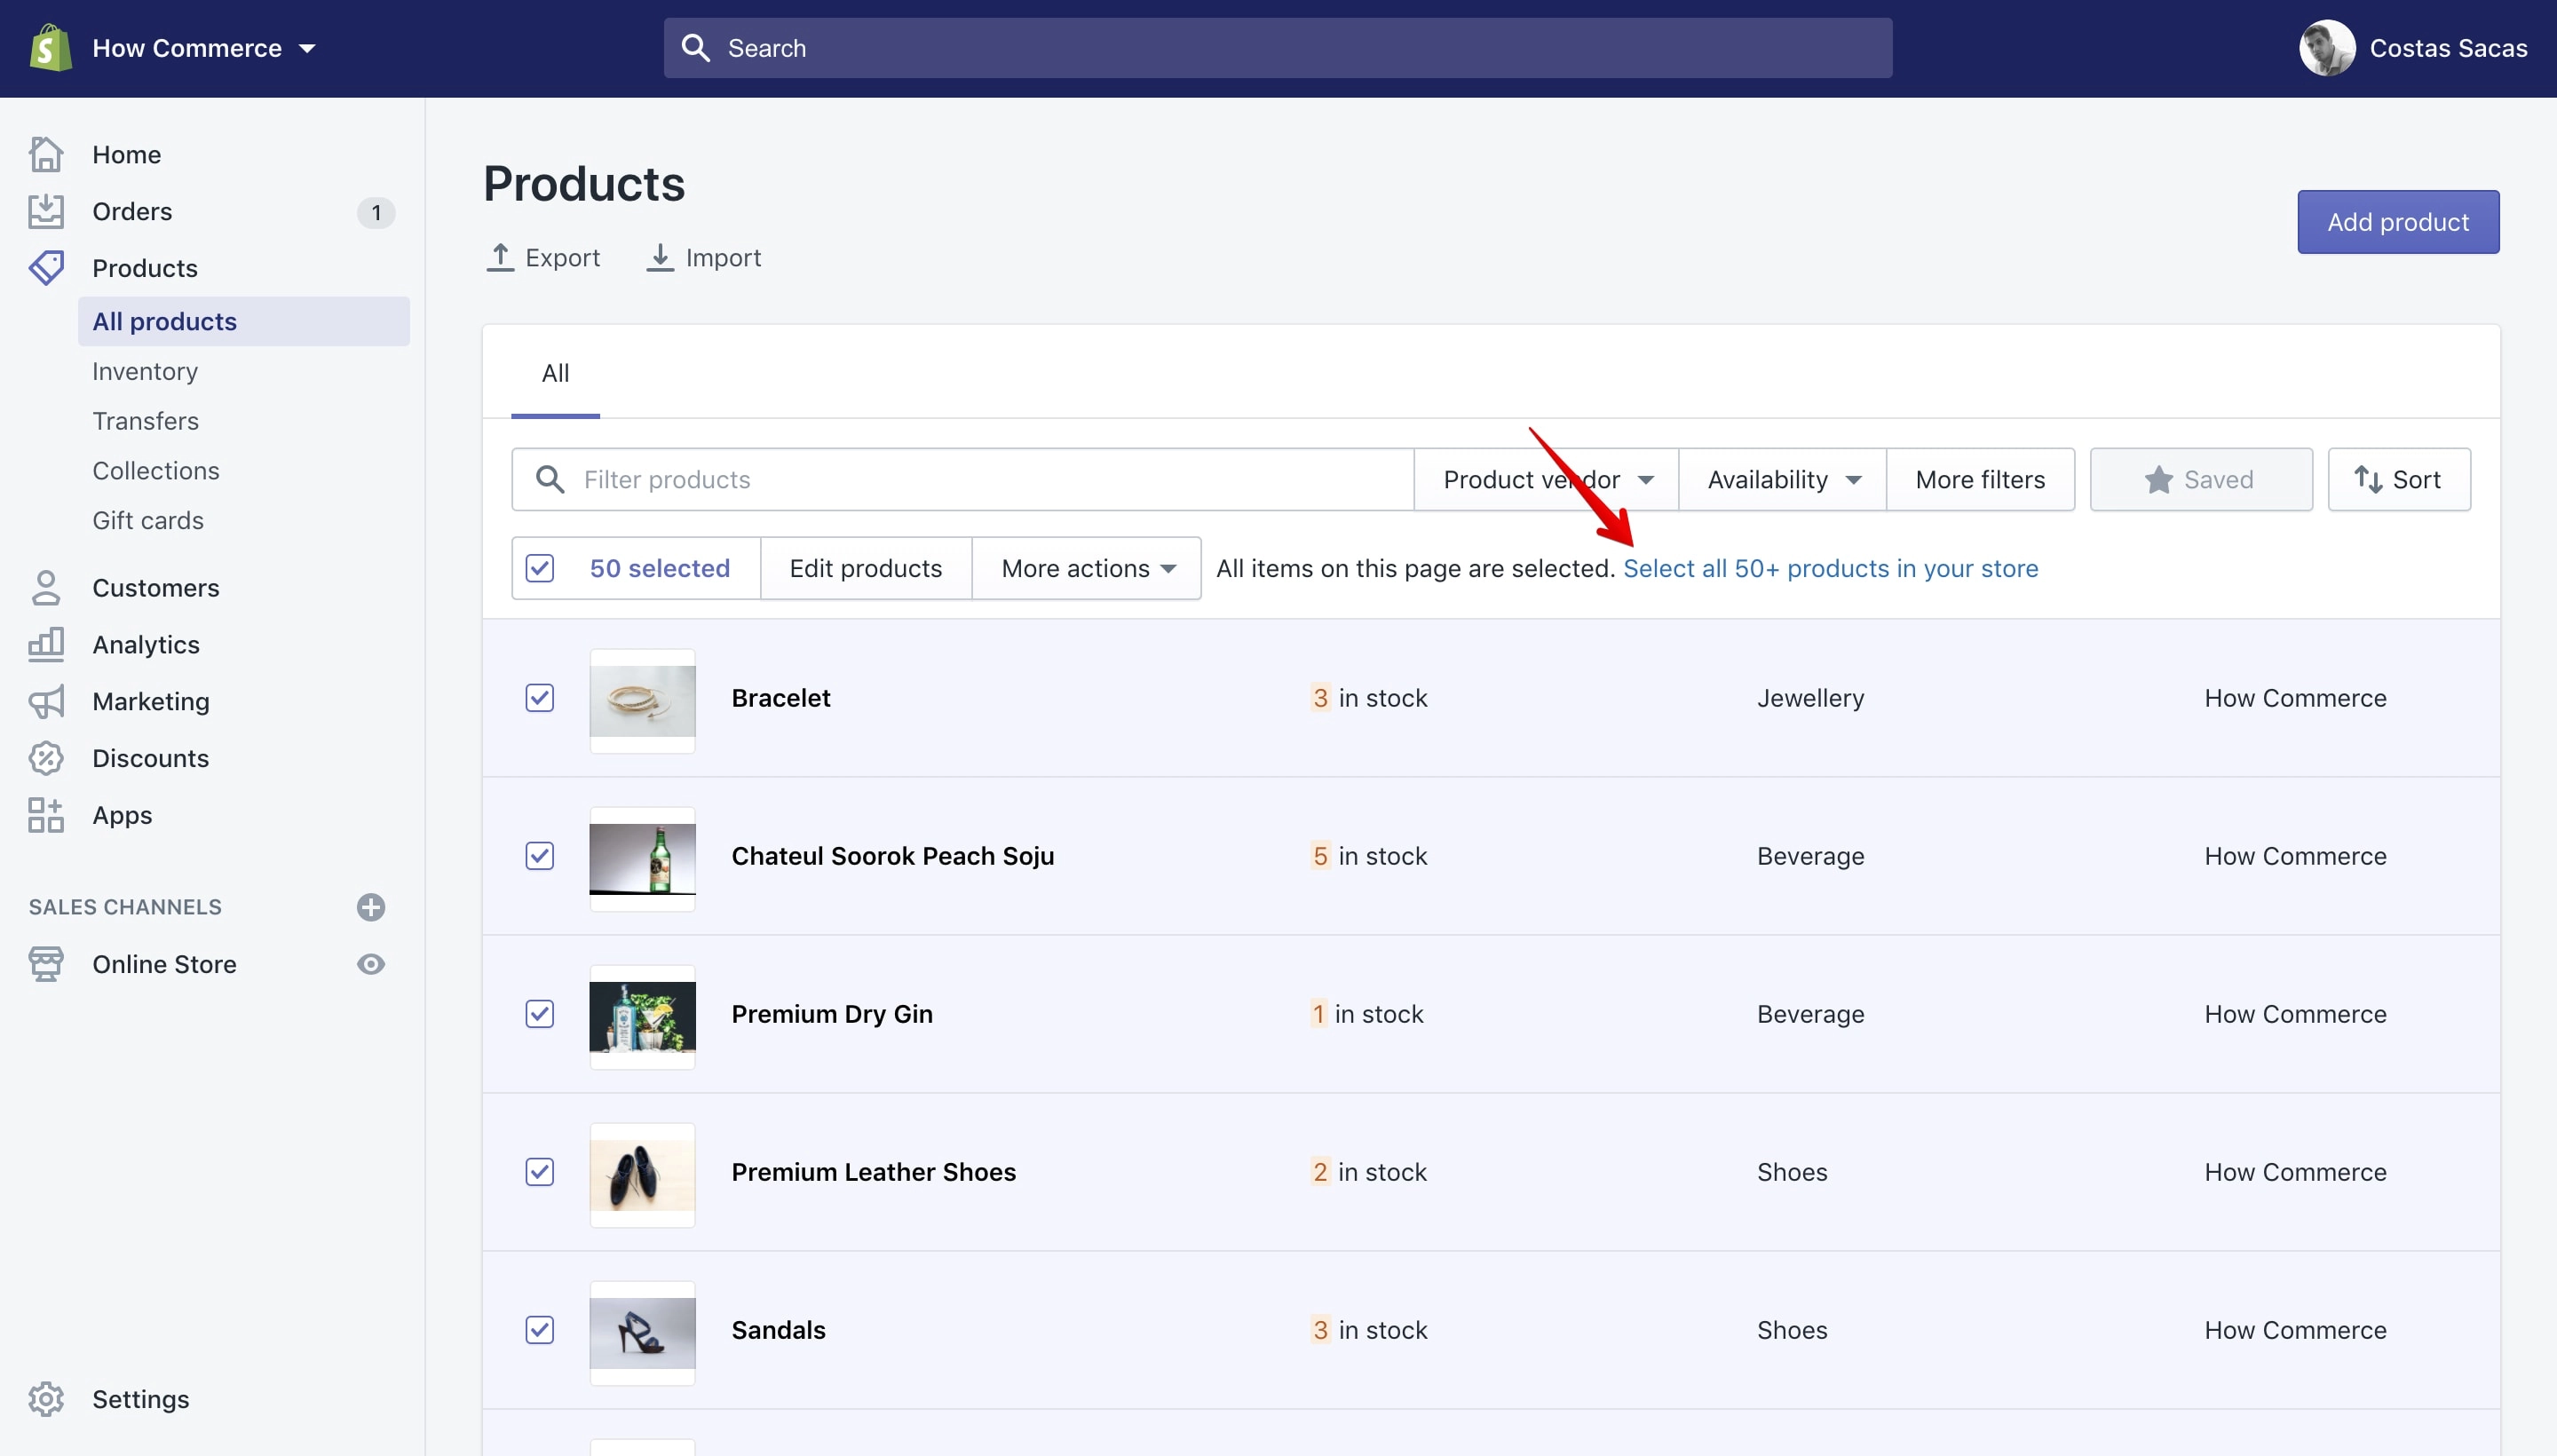
When you click the master checkbox and you have more than 50 products on the store a new selecting option will display to allow you to select items beyond the page listed:
Note:
When you perform a bulk action for all your items in the store you probably need to wait for a couple of minutes for the operation to complete since the selection depends on how many items you have on the store.
Performing the bulk action
Once you have the items selected you can perform the bulk action:
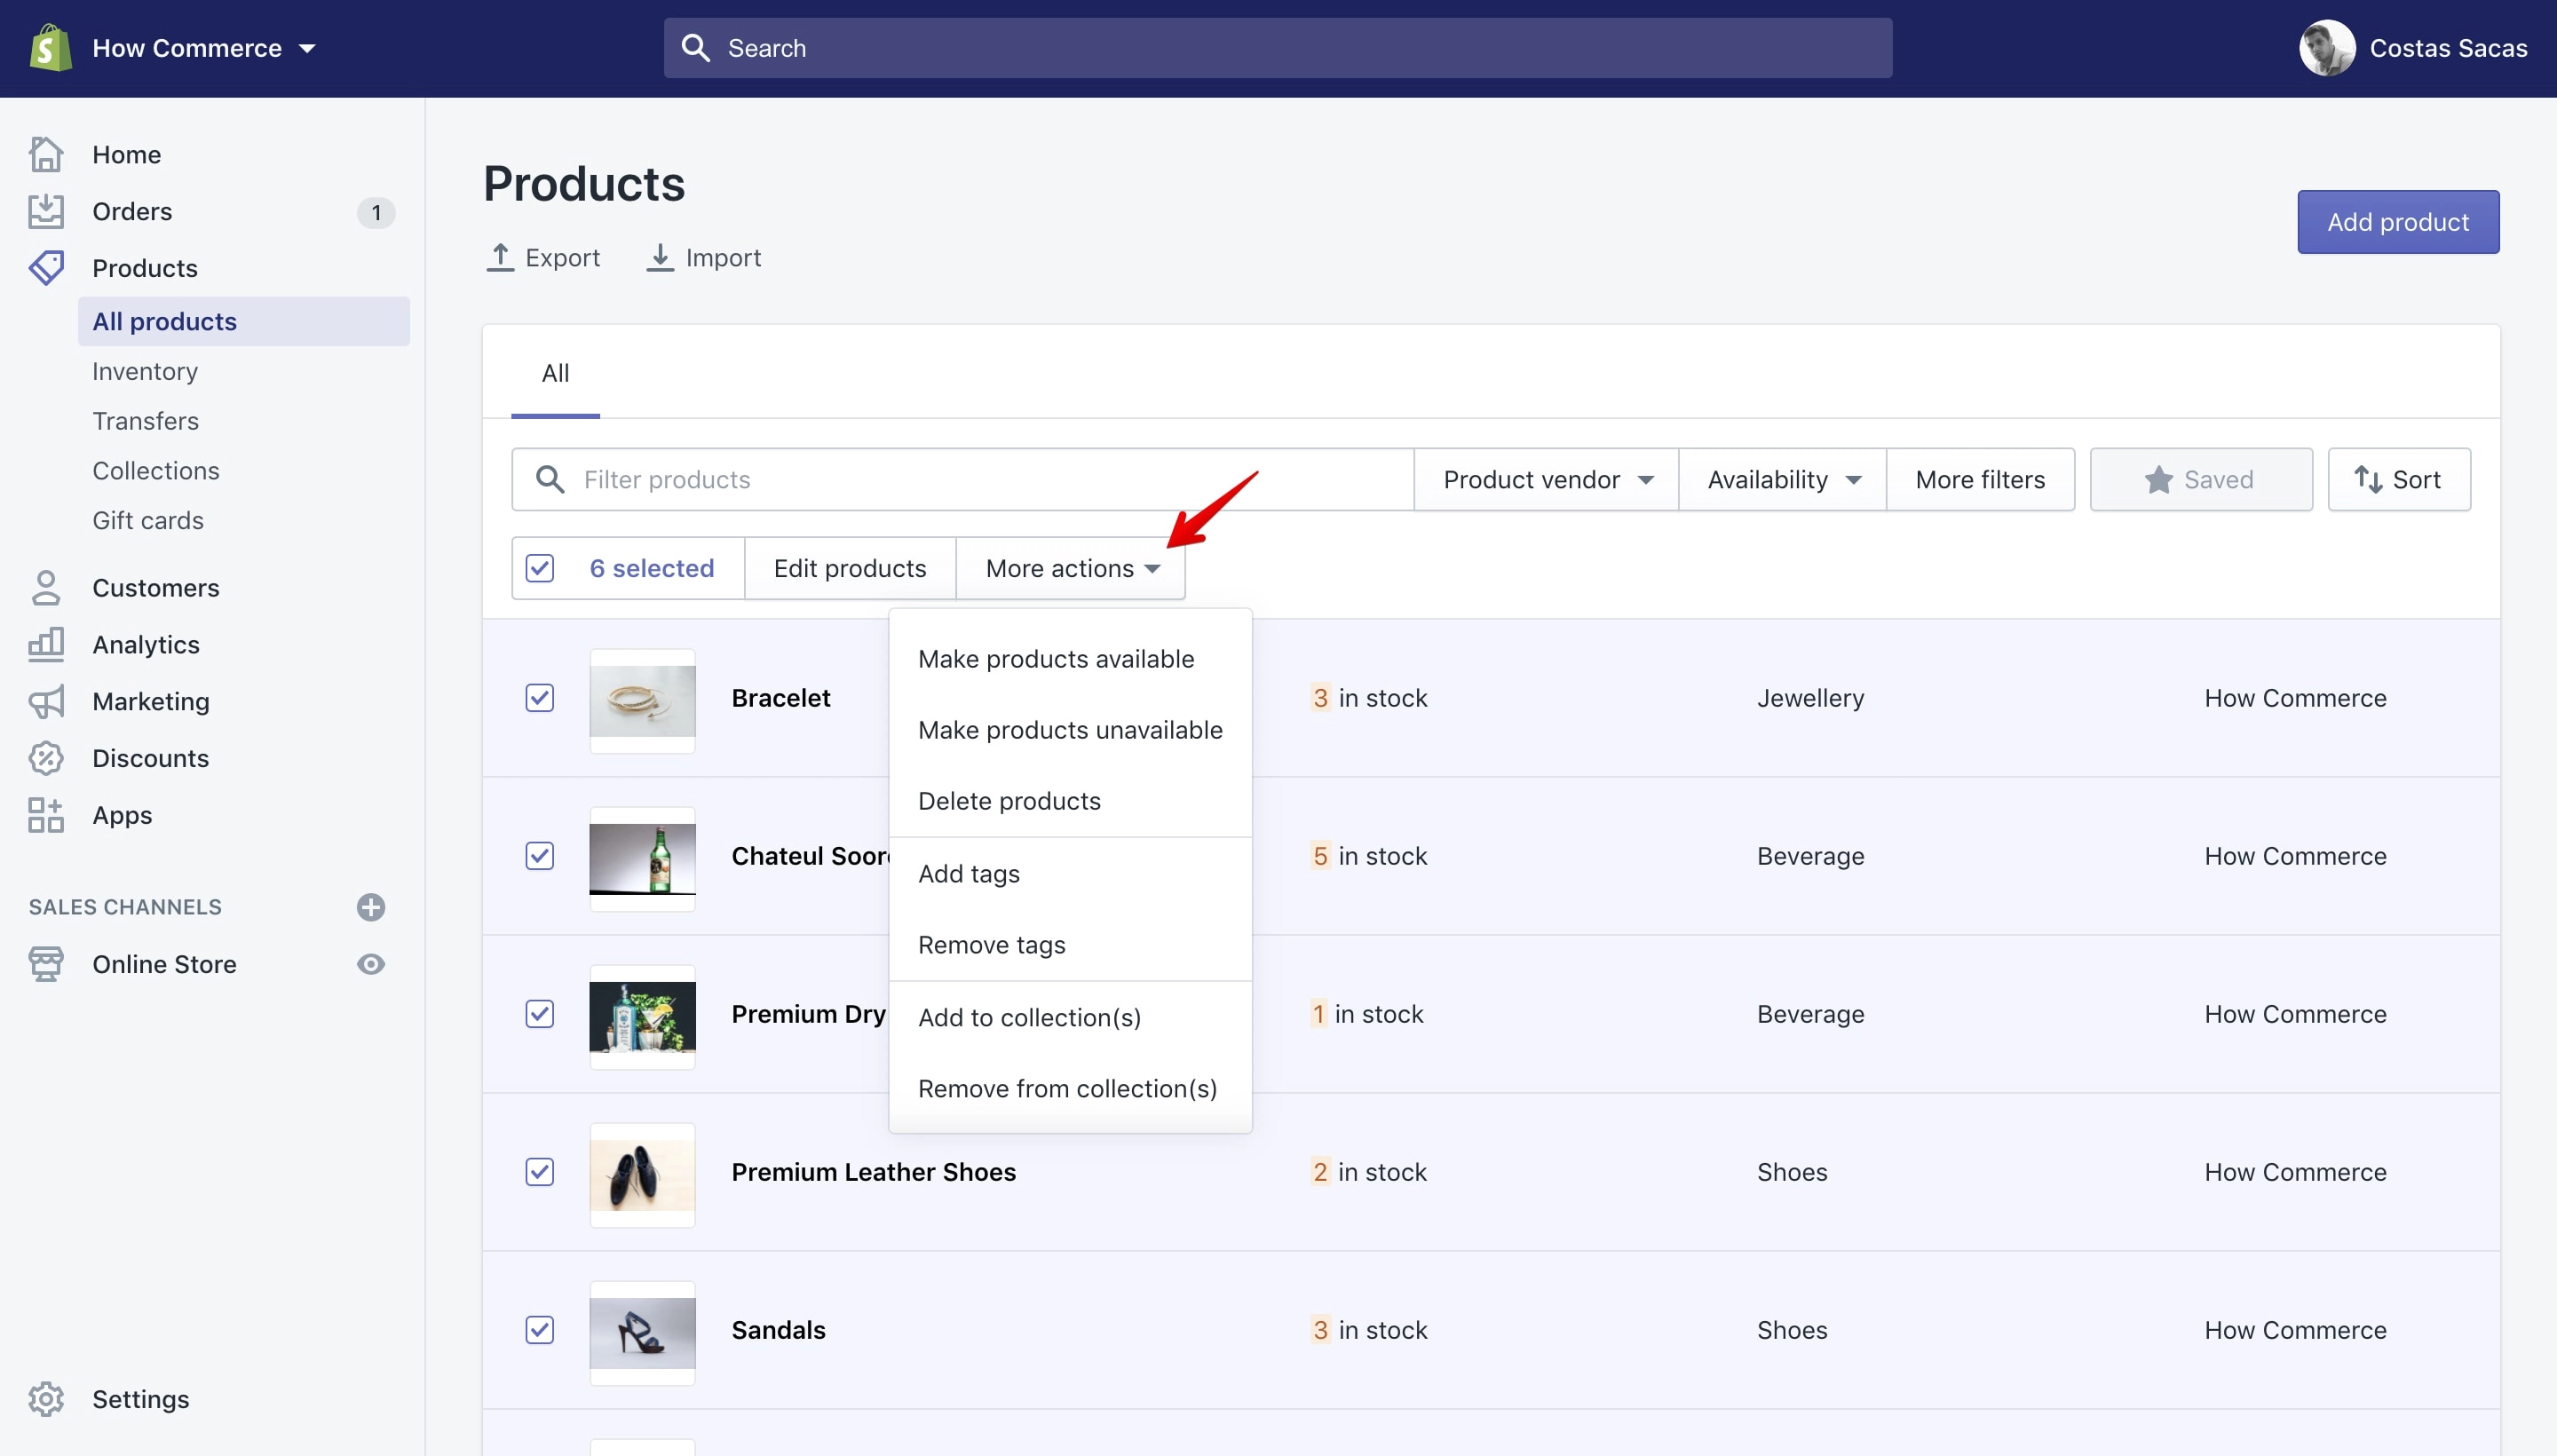
On the products page you have the following “Bulk Actions”:
- Make products available
- Make products unavailable
- Delete selected products
- Add tags
- Remove tags
- Add to collection
- Remove from collection
- App functions (depending on installed apps)
Make products available
It will publish all selected products on the shop making them visible to your customers.
Make products unavailable
It will unpublish all products on the shop making them inaccessible to your customers.
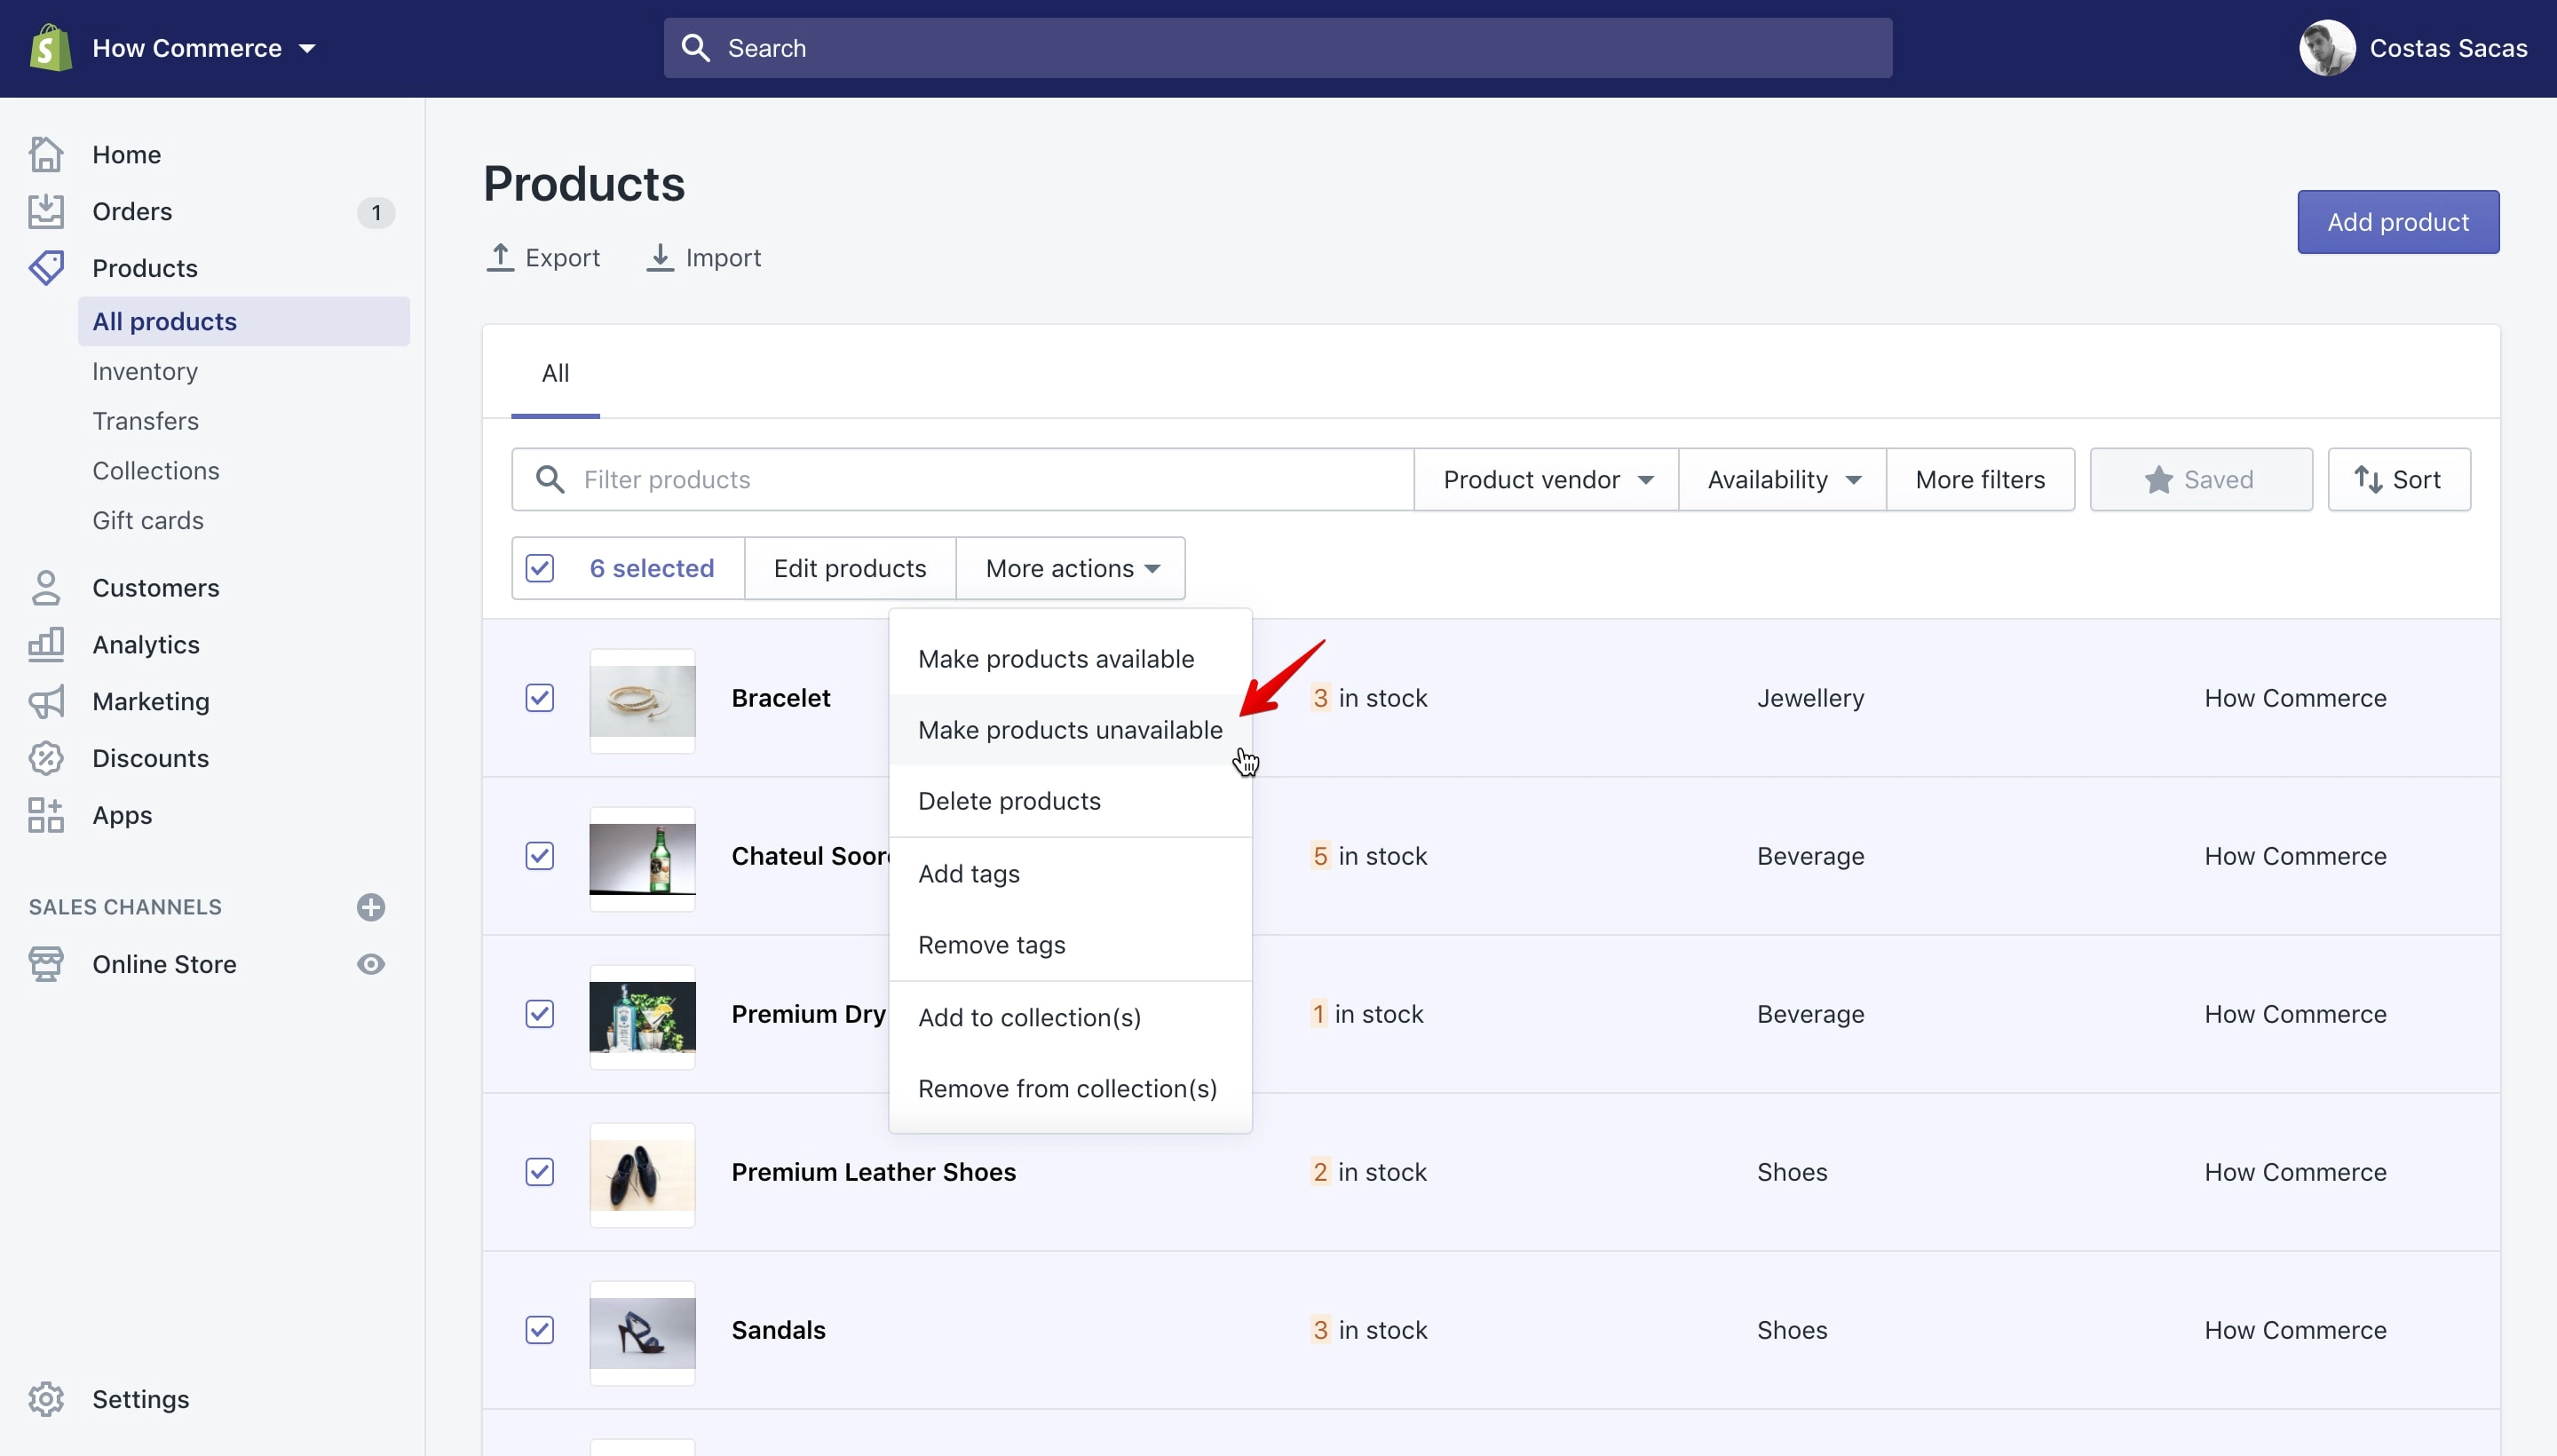
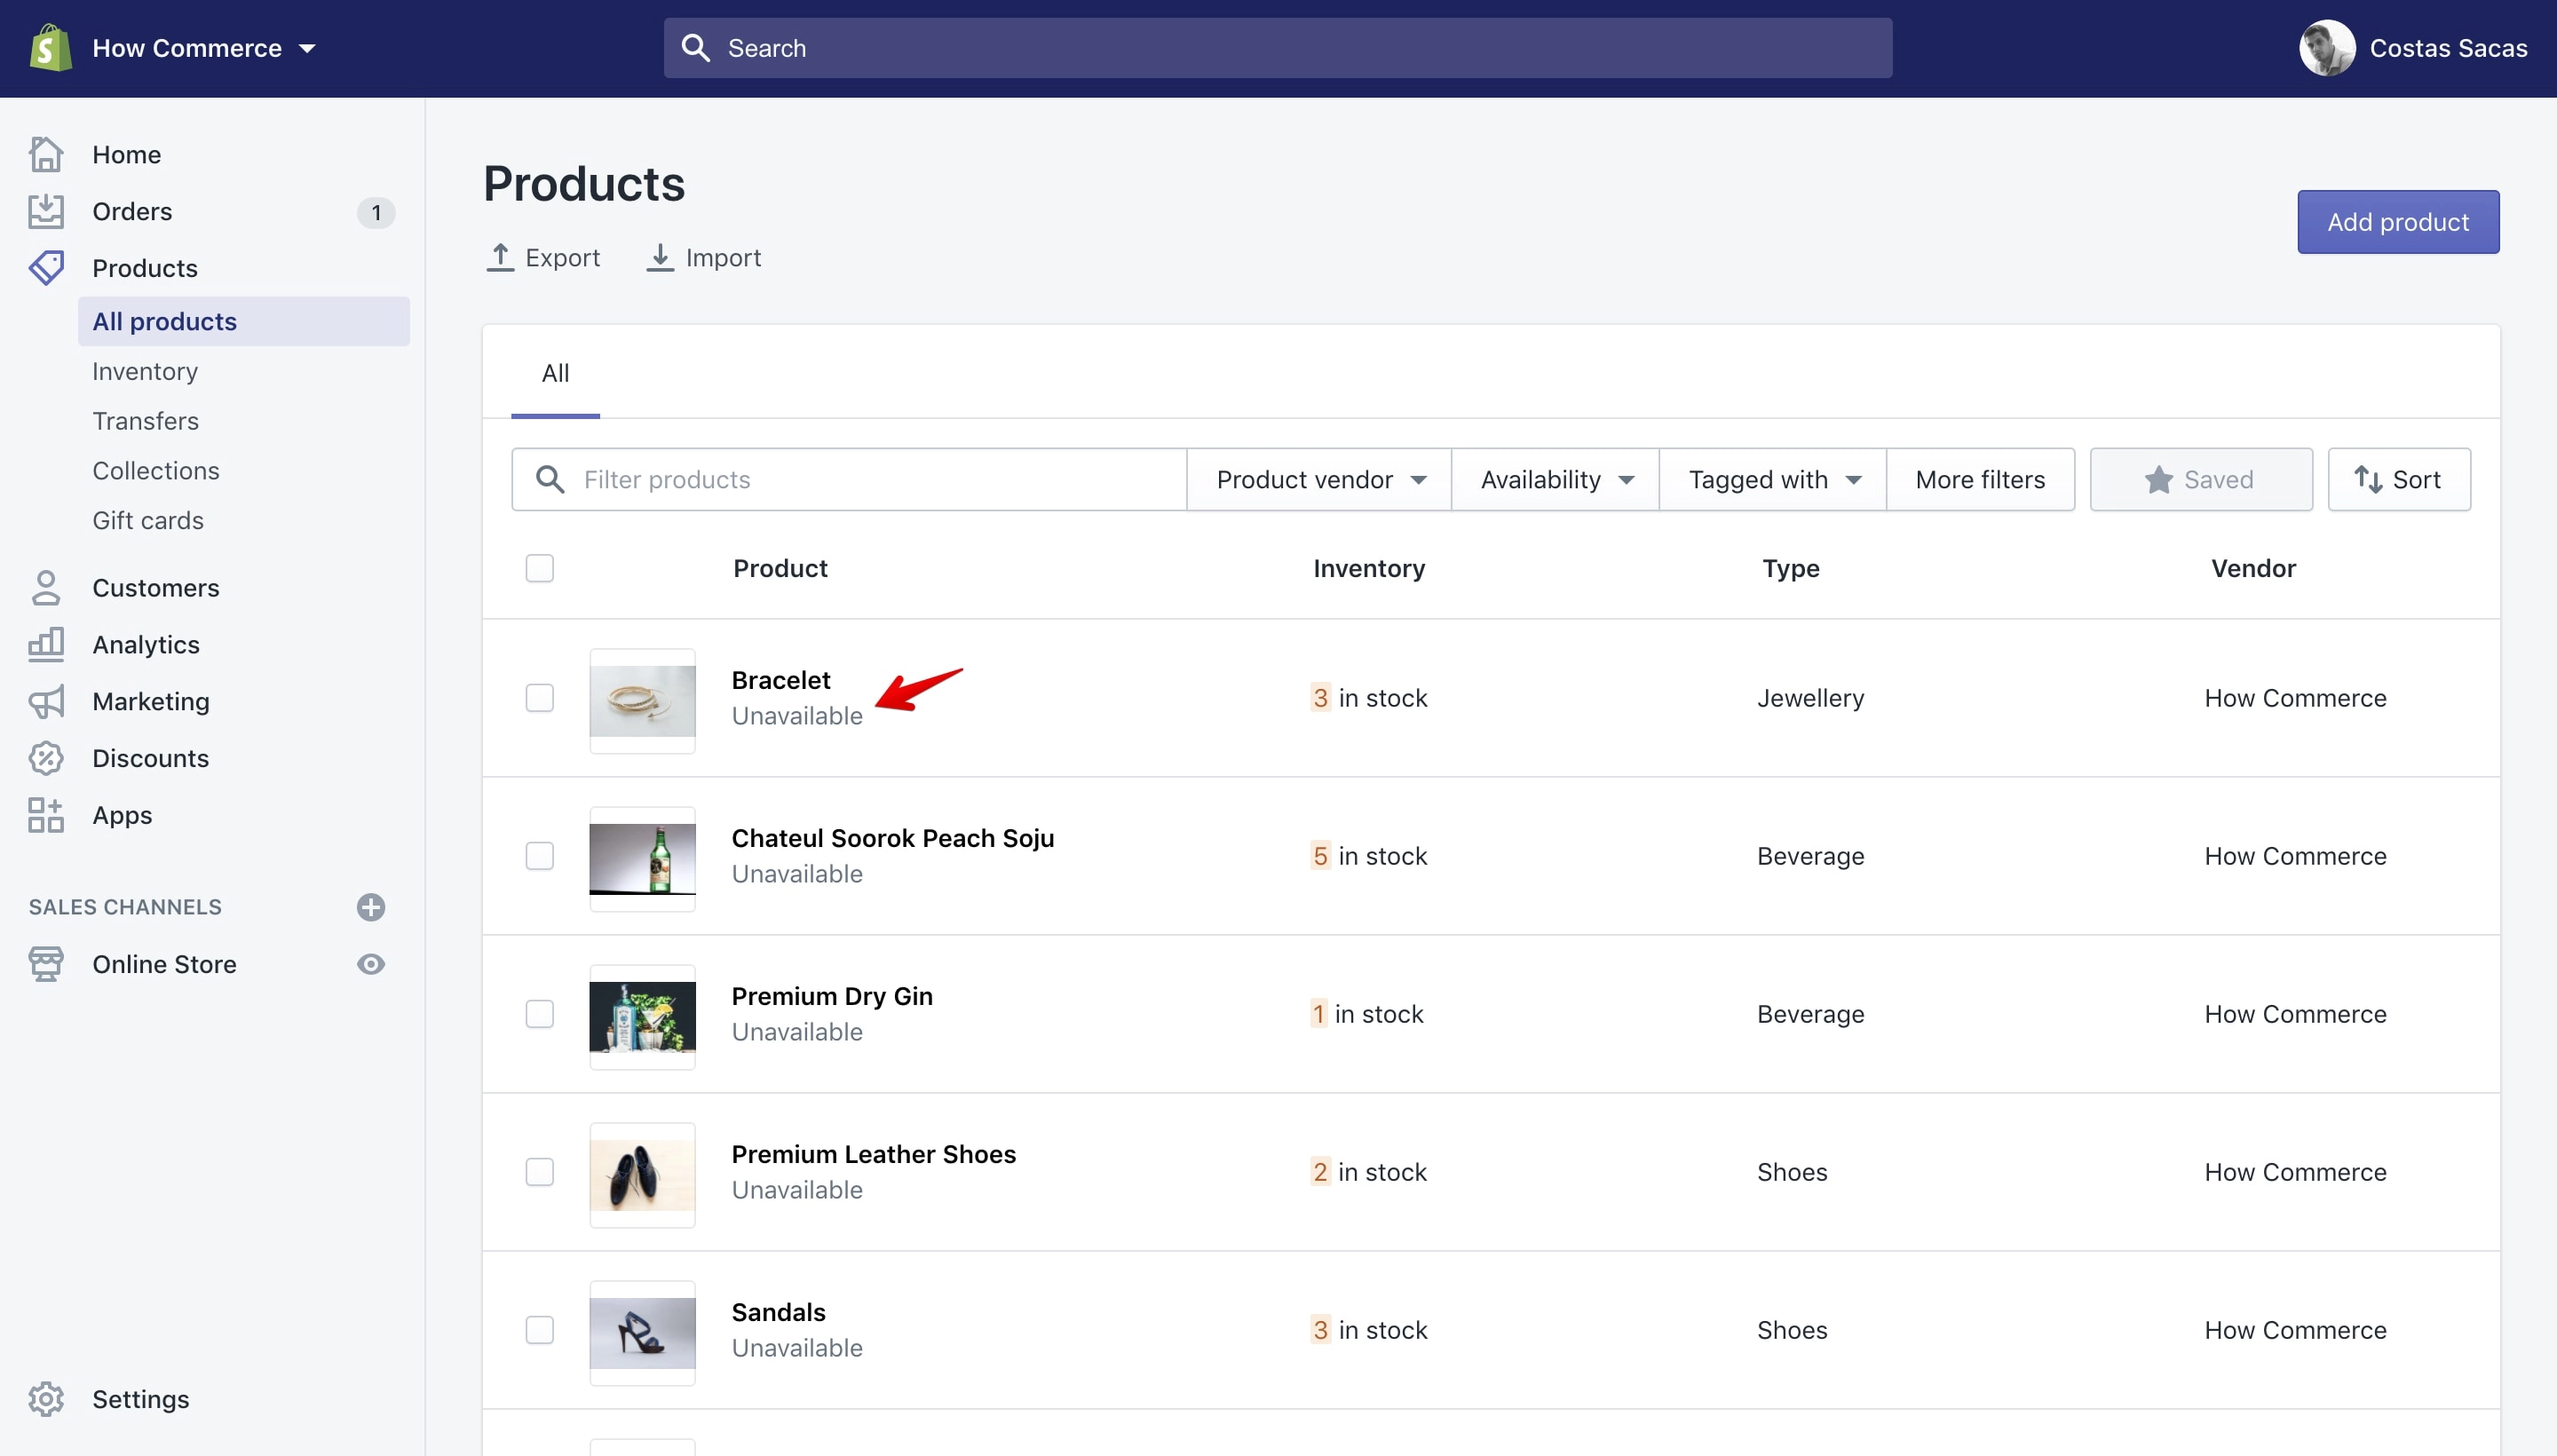
Once you select “Make products unavailable” the word “unavailable” will be listed below the product title. This will help you identify what products are published on the shop and which ones are not:
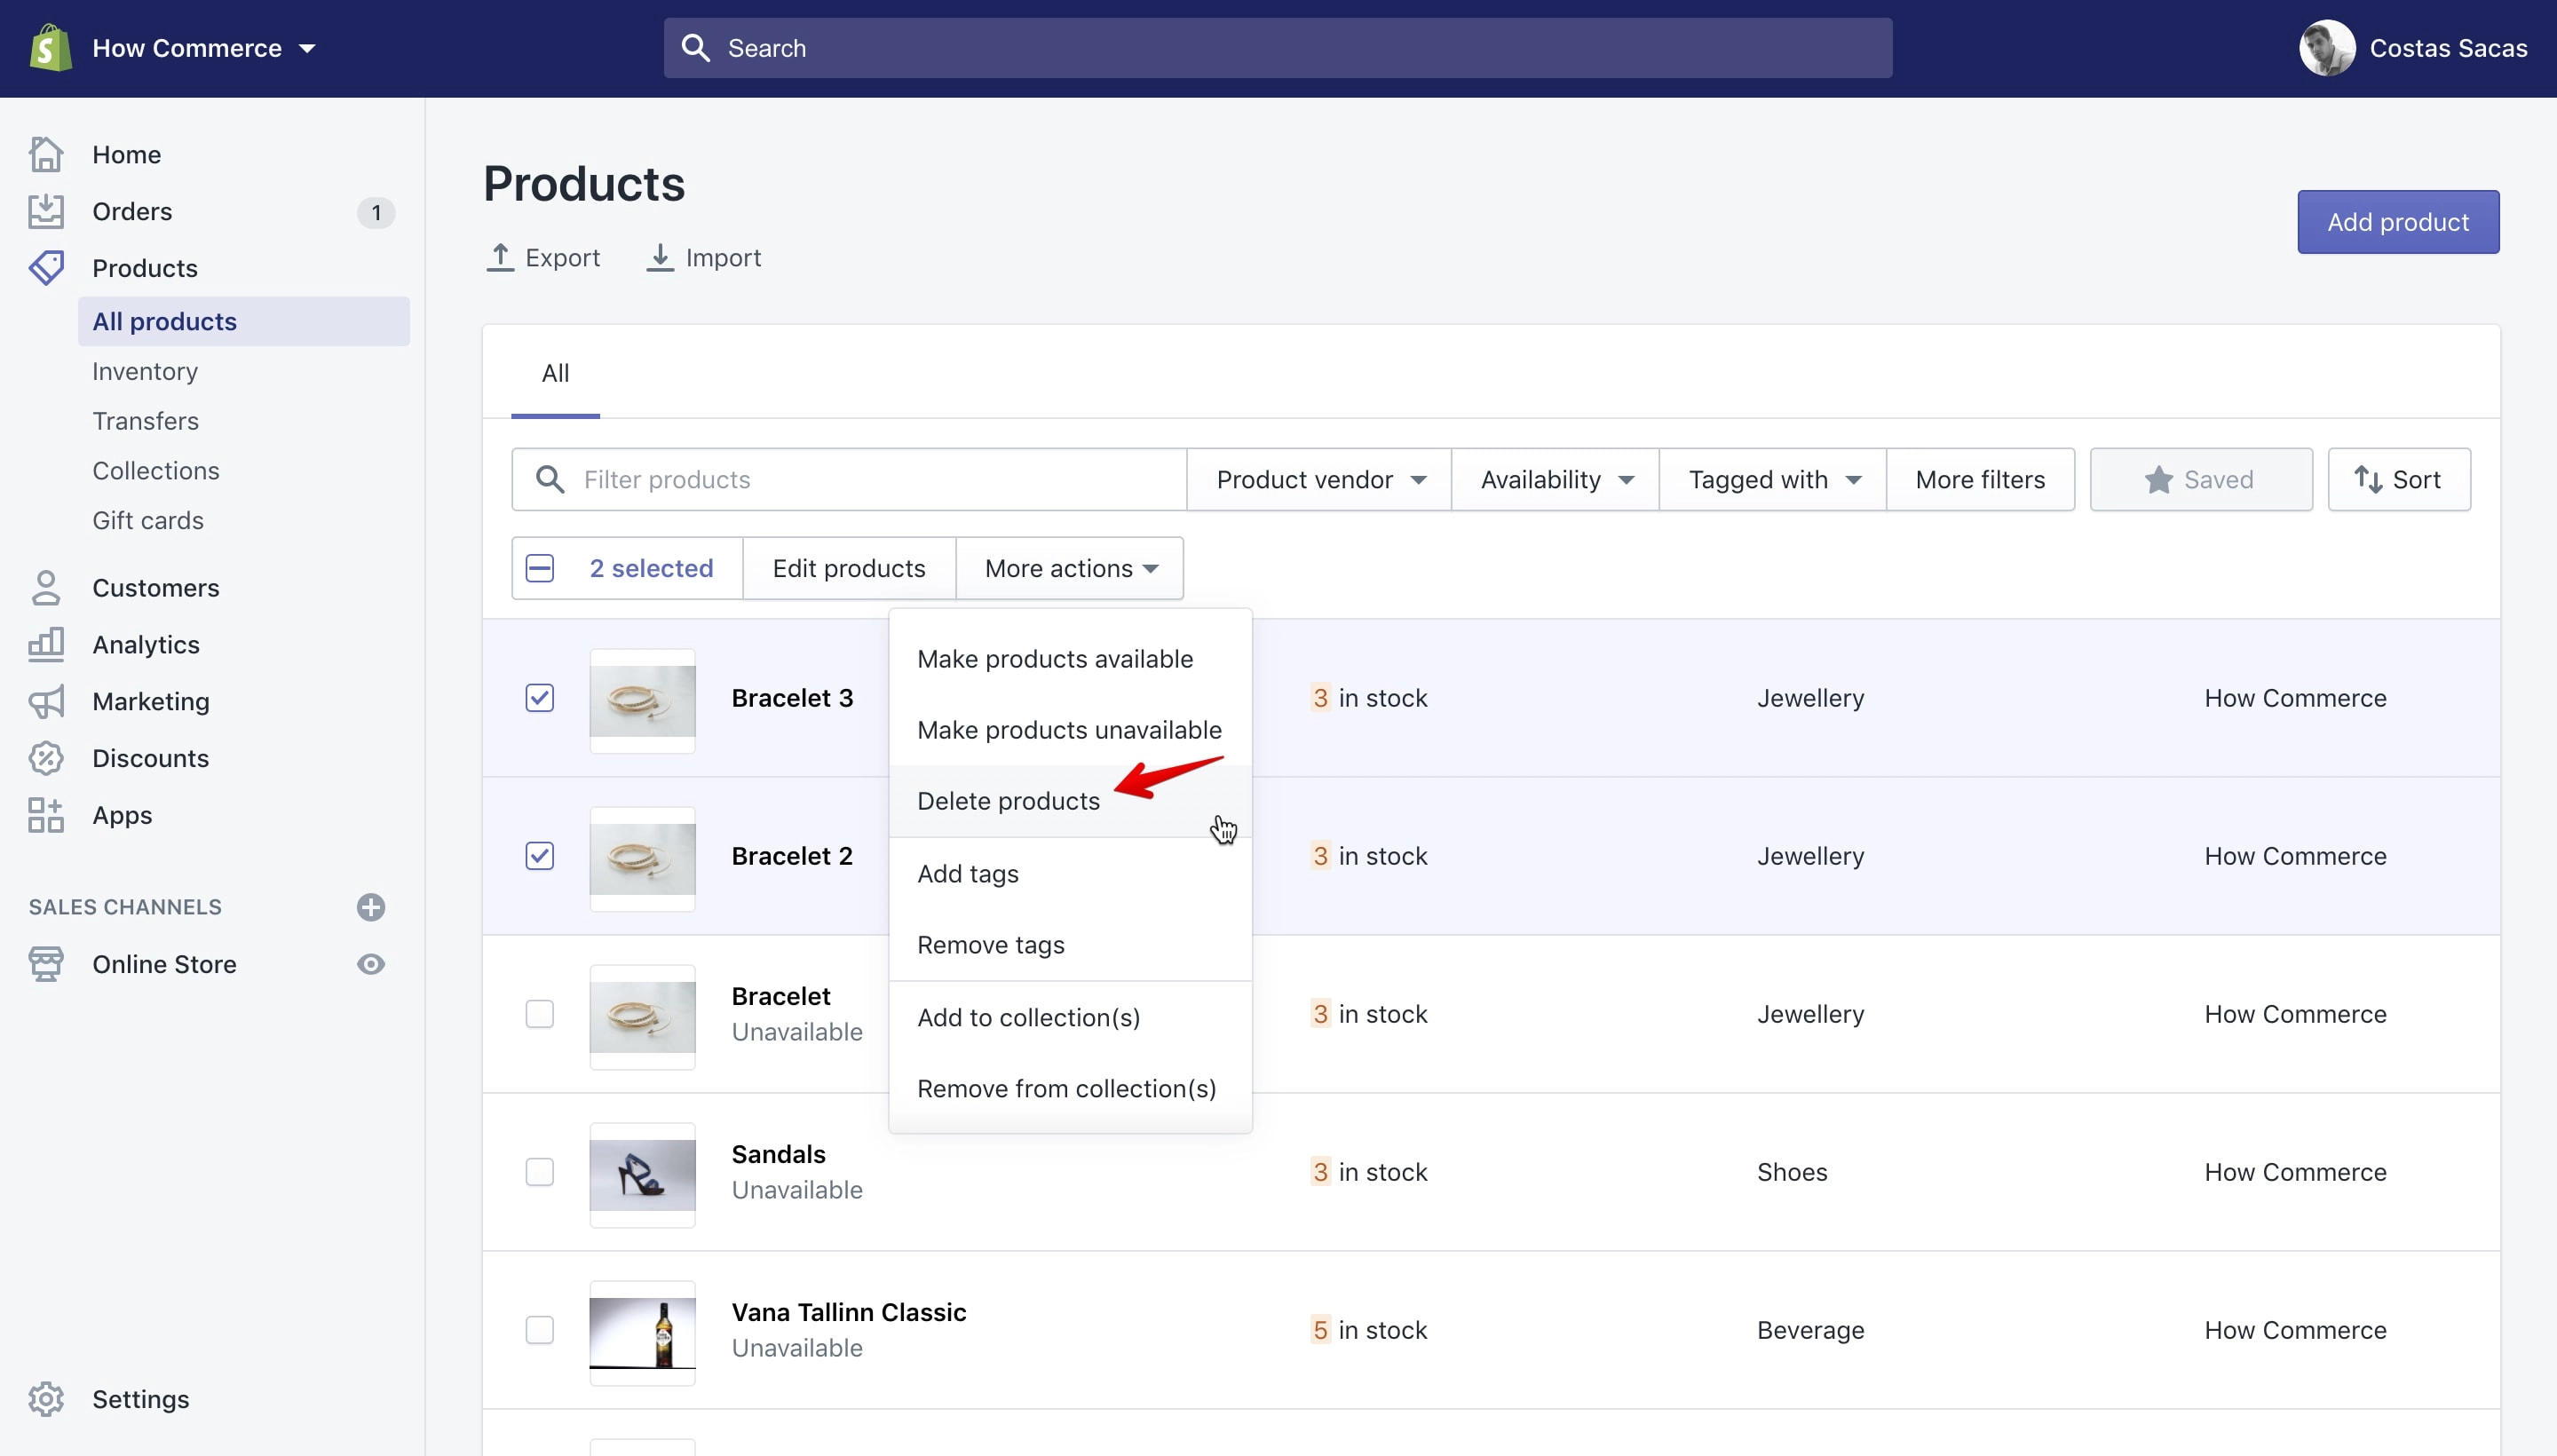
Delete selected products
To delete multiple products select the “Delete Products” option.
Please note that this process is irreversible!
Once you select the “Delete products” option a pop-up will open with a notification saying that this process is irreversible:
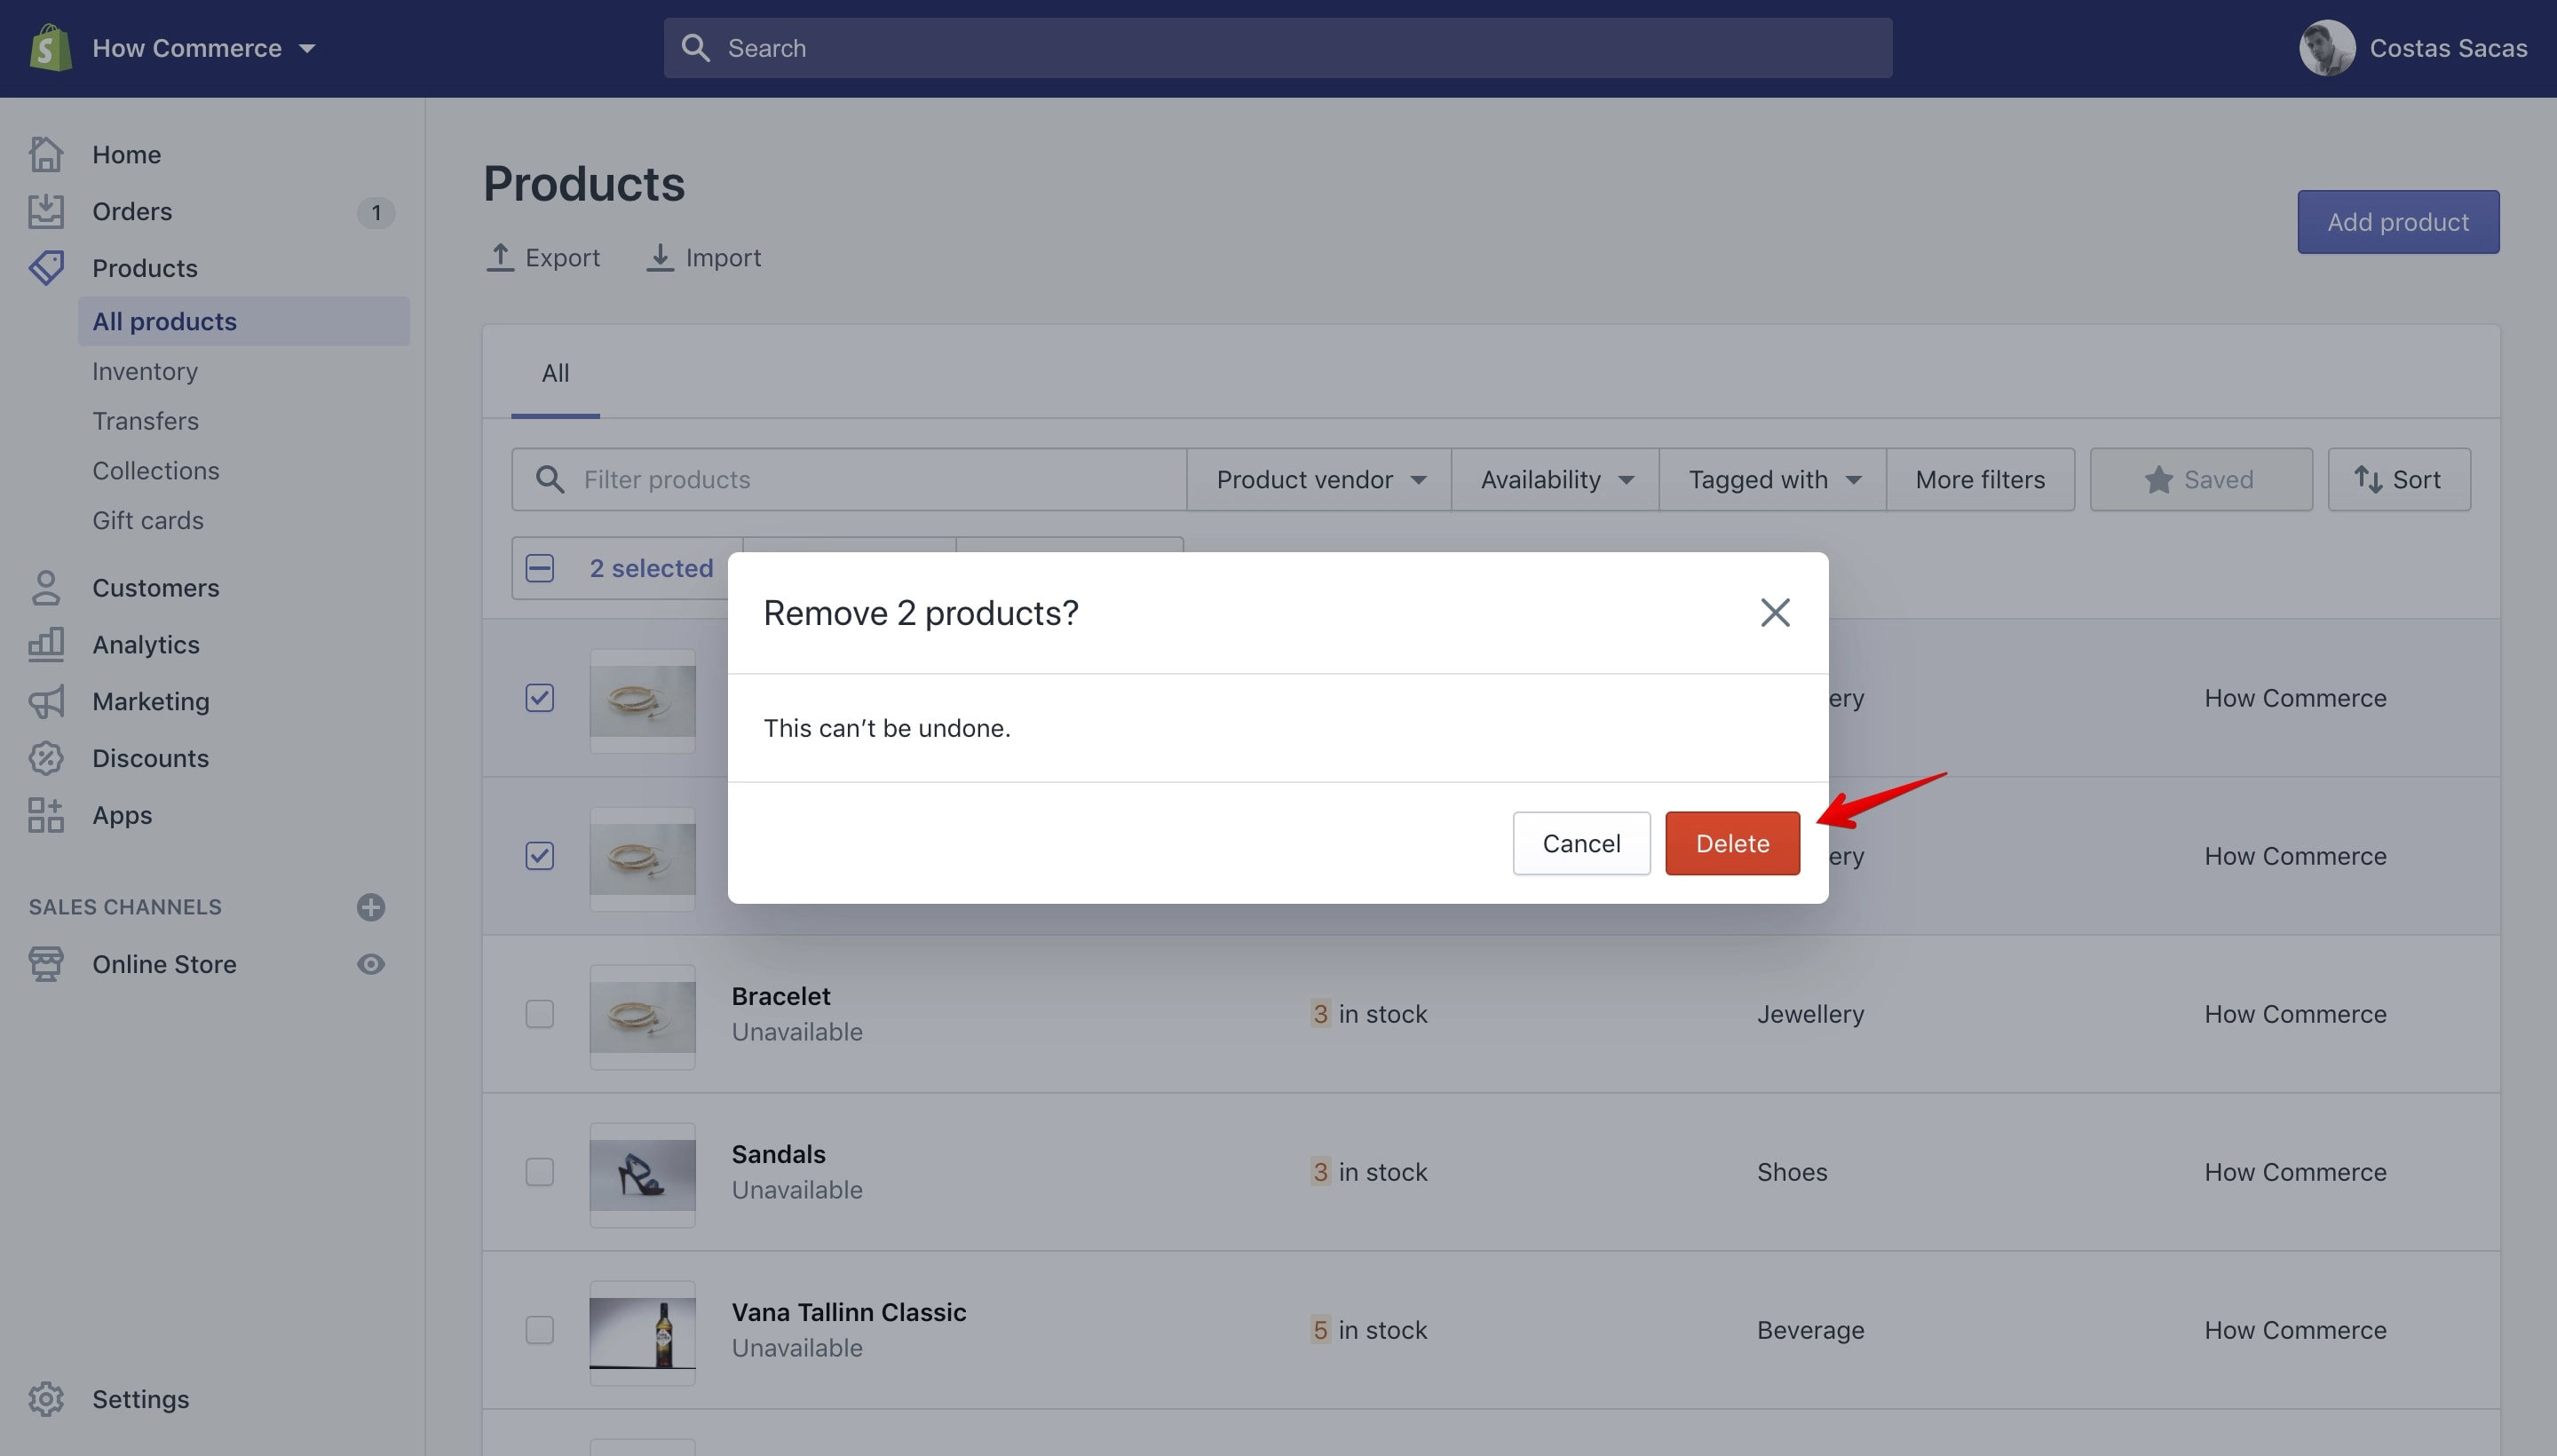
Click on the red “Delete” button and your selected products will be removed from the shop.
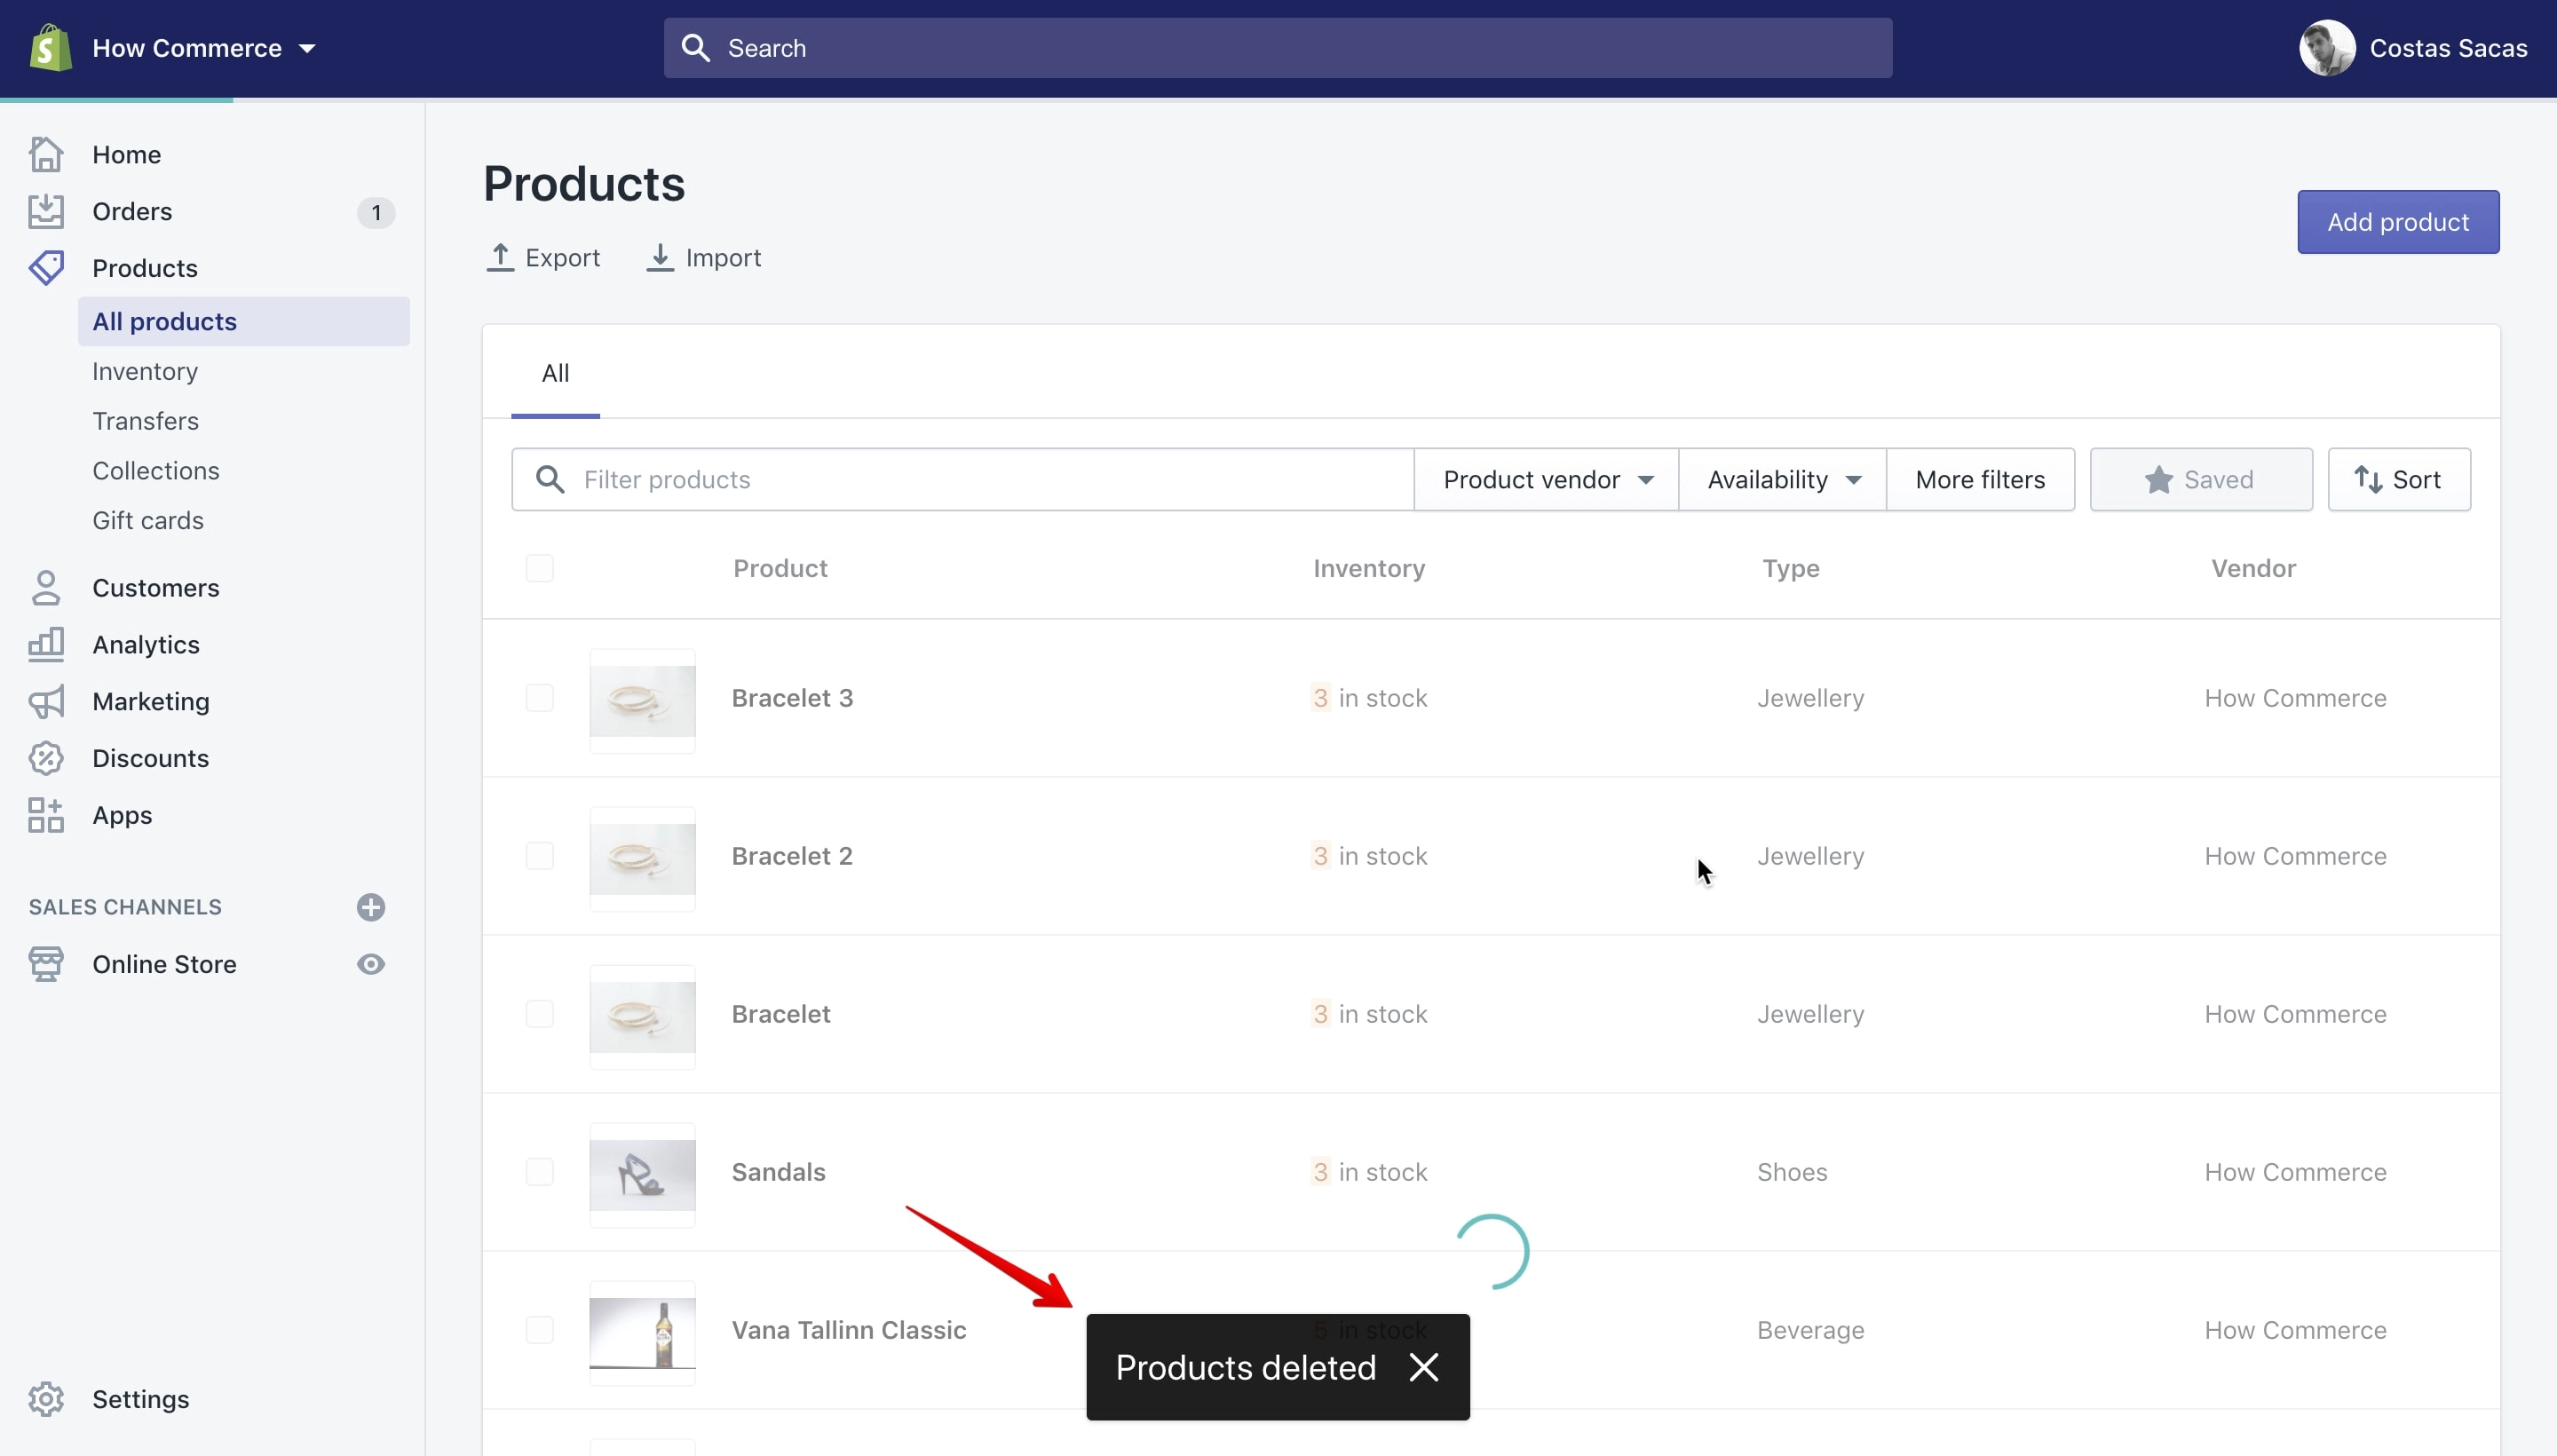
As Shopify is deleting the products you’ll receive a message like “Deleting products” and once the deletion is completed you’ll receive a message like “Products deleted”:
Add tags
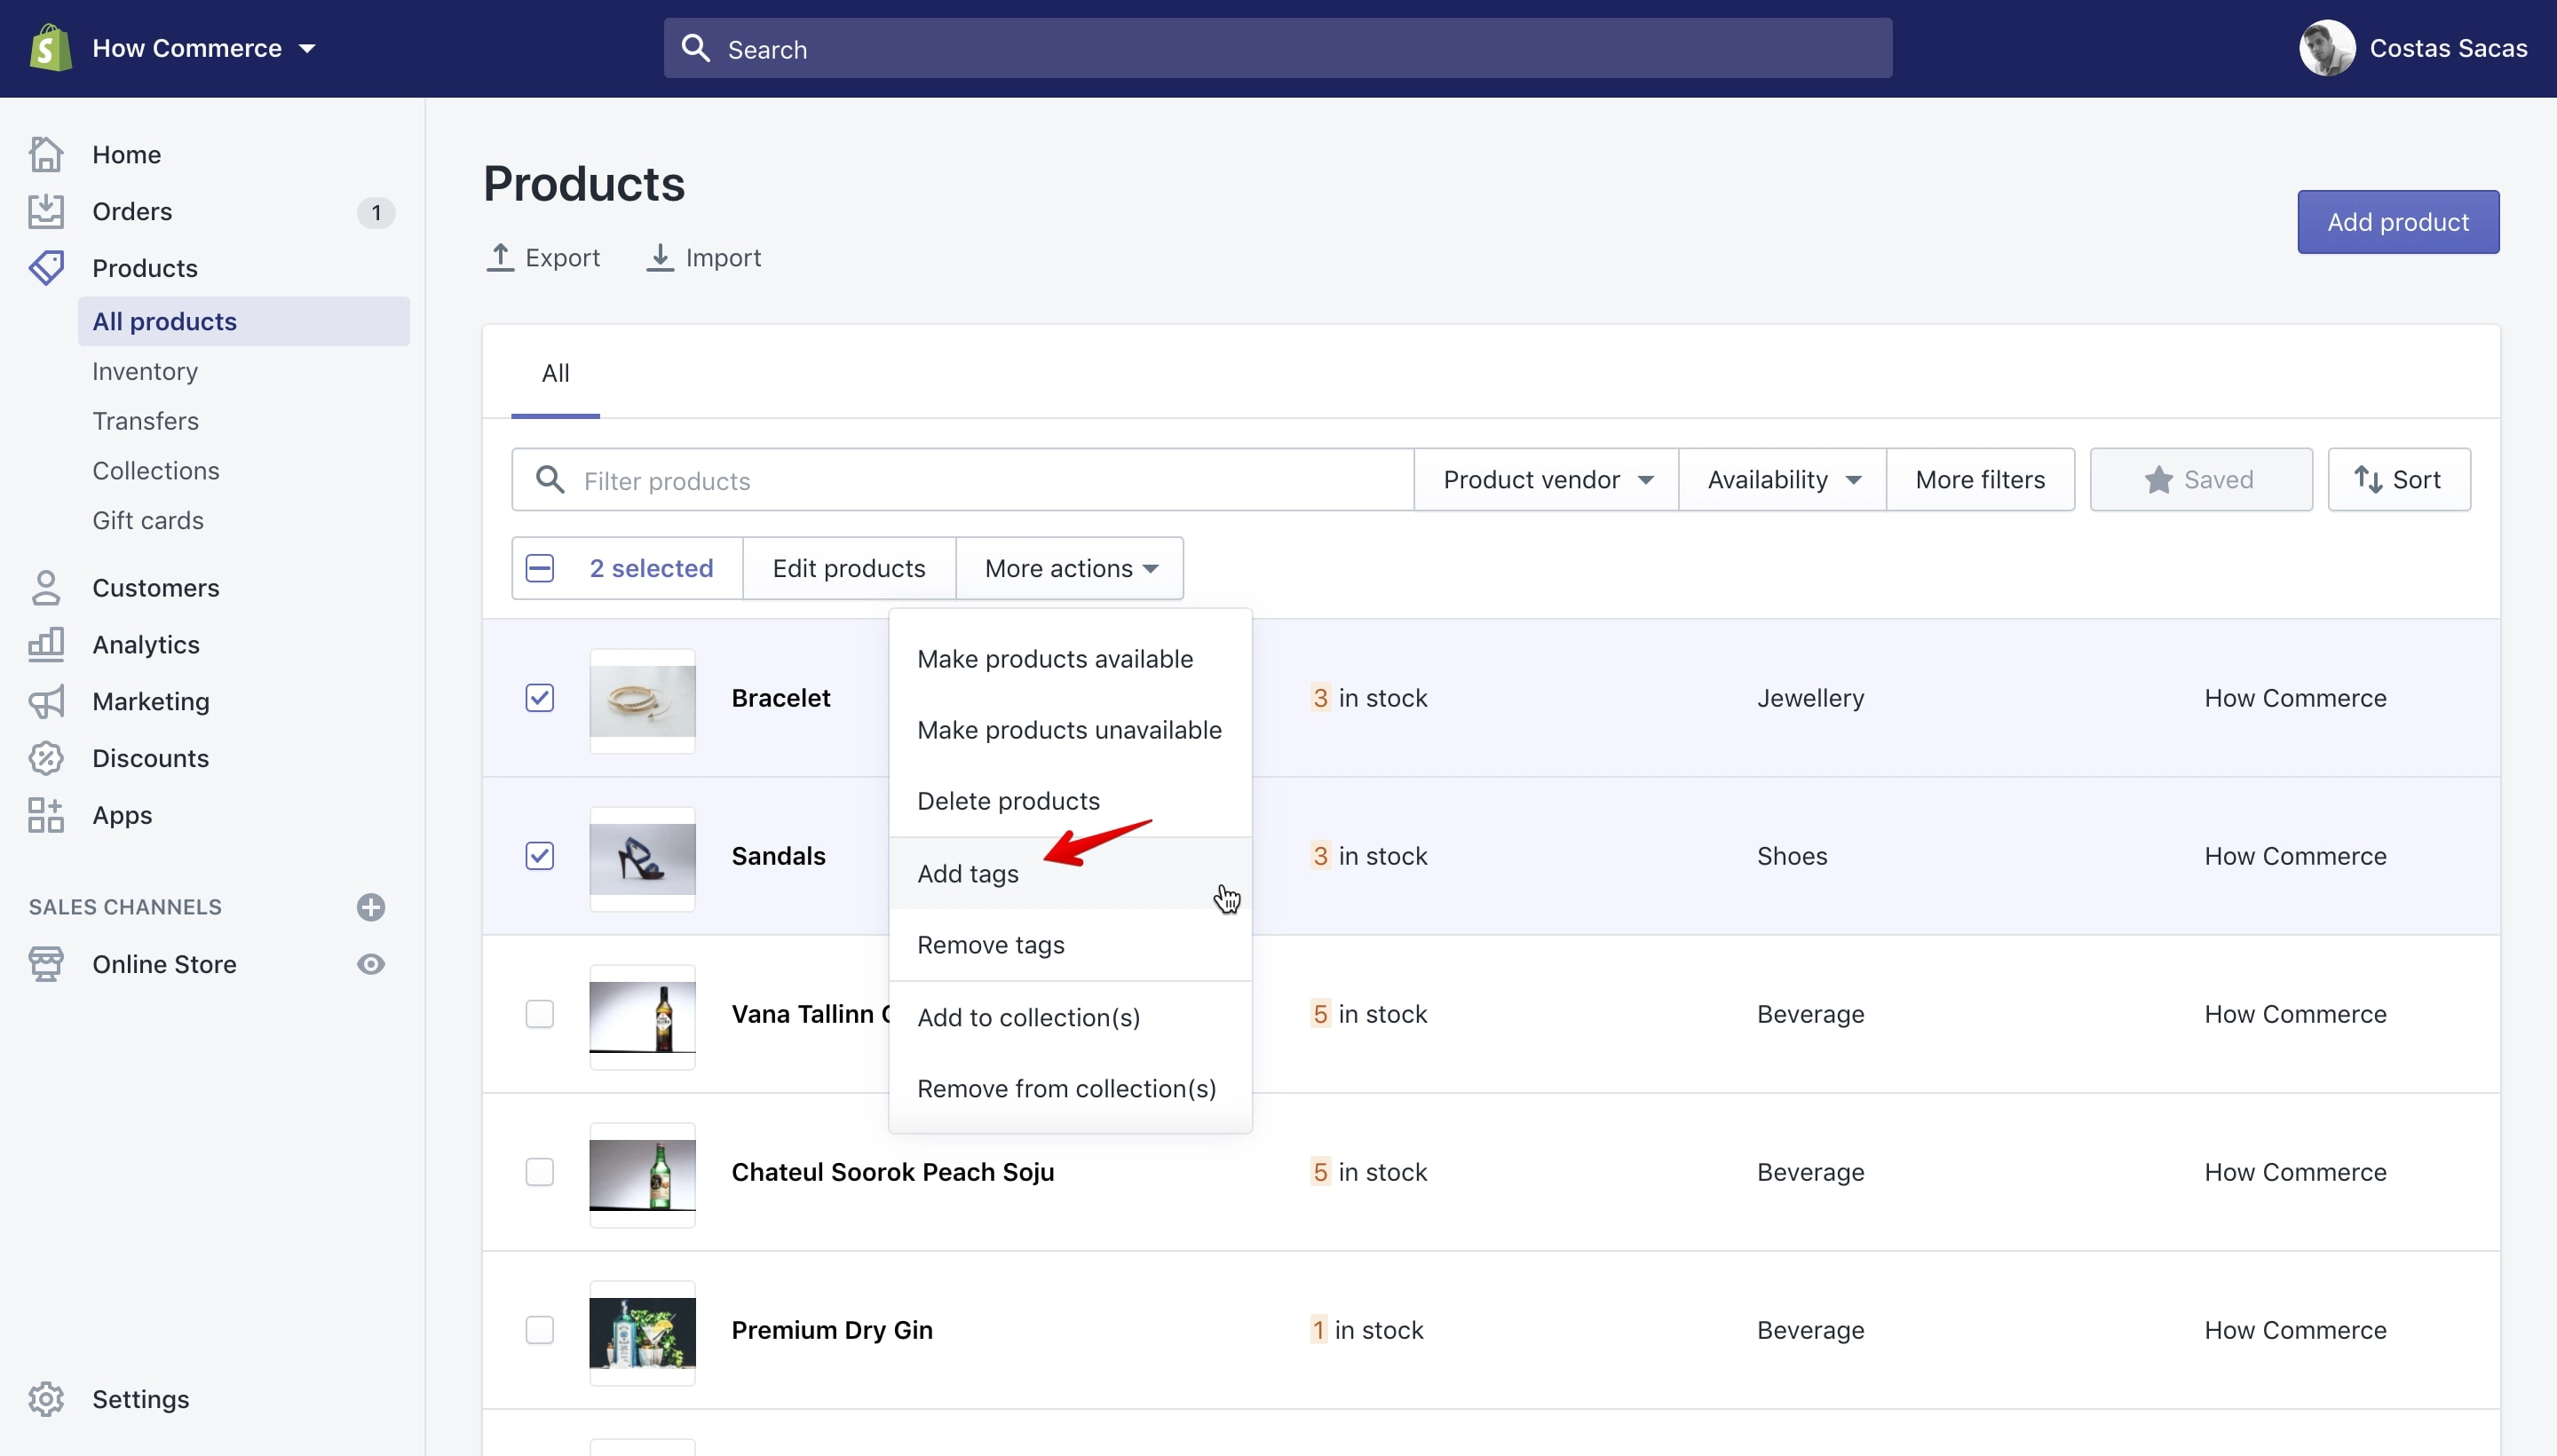
You can add multiple tags to multiple products. You do that by selecting the “Add tags” bulk action:
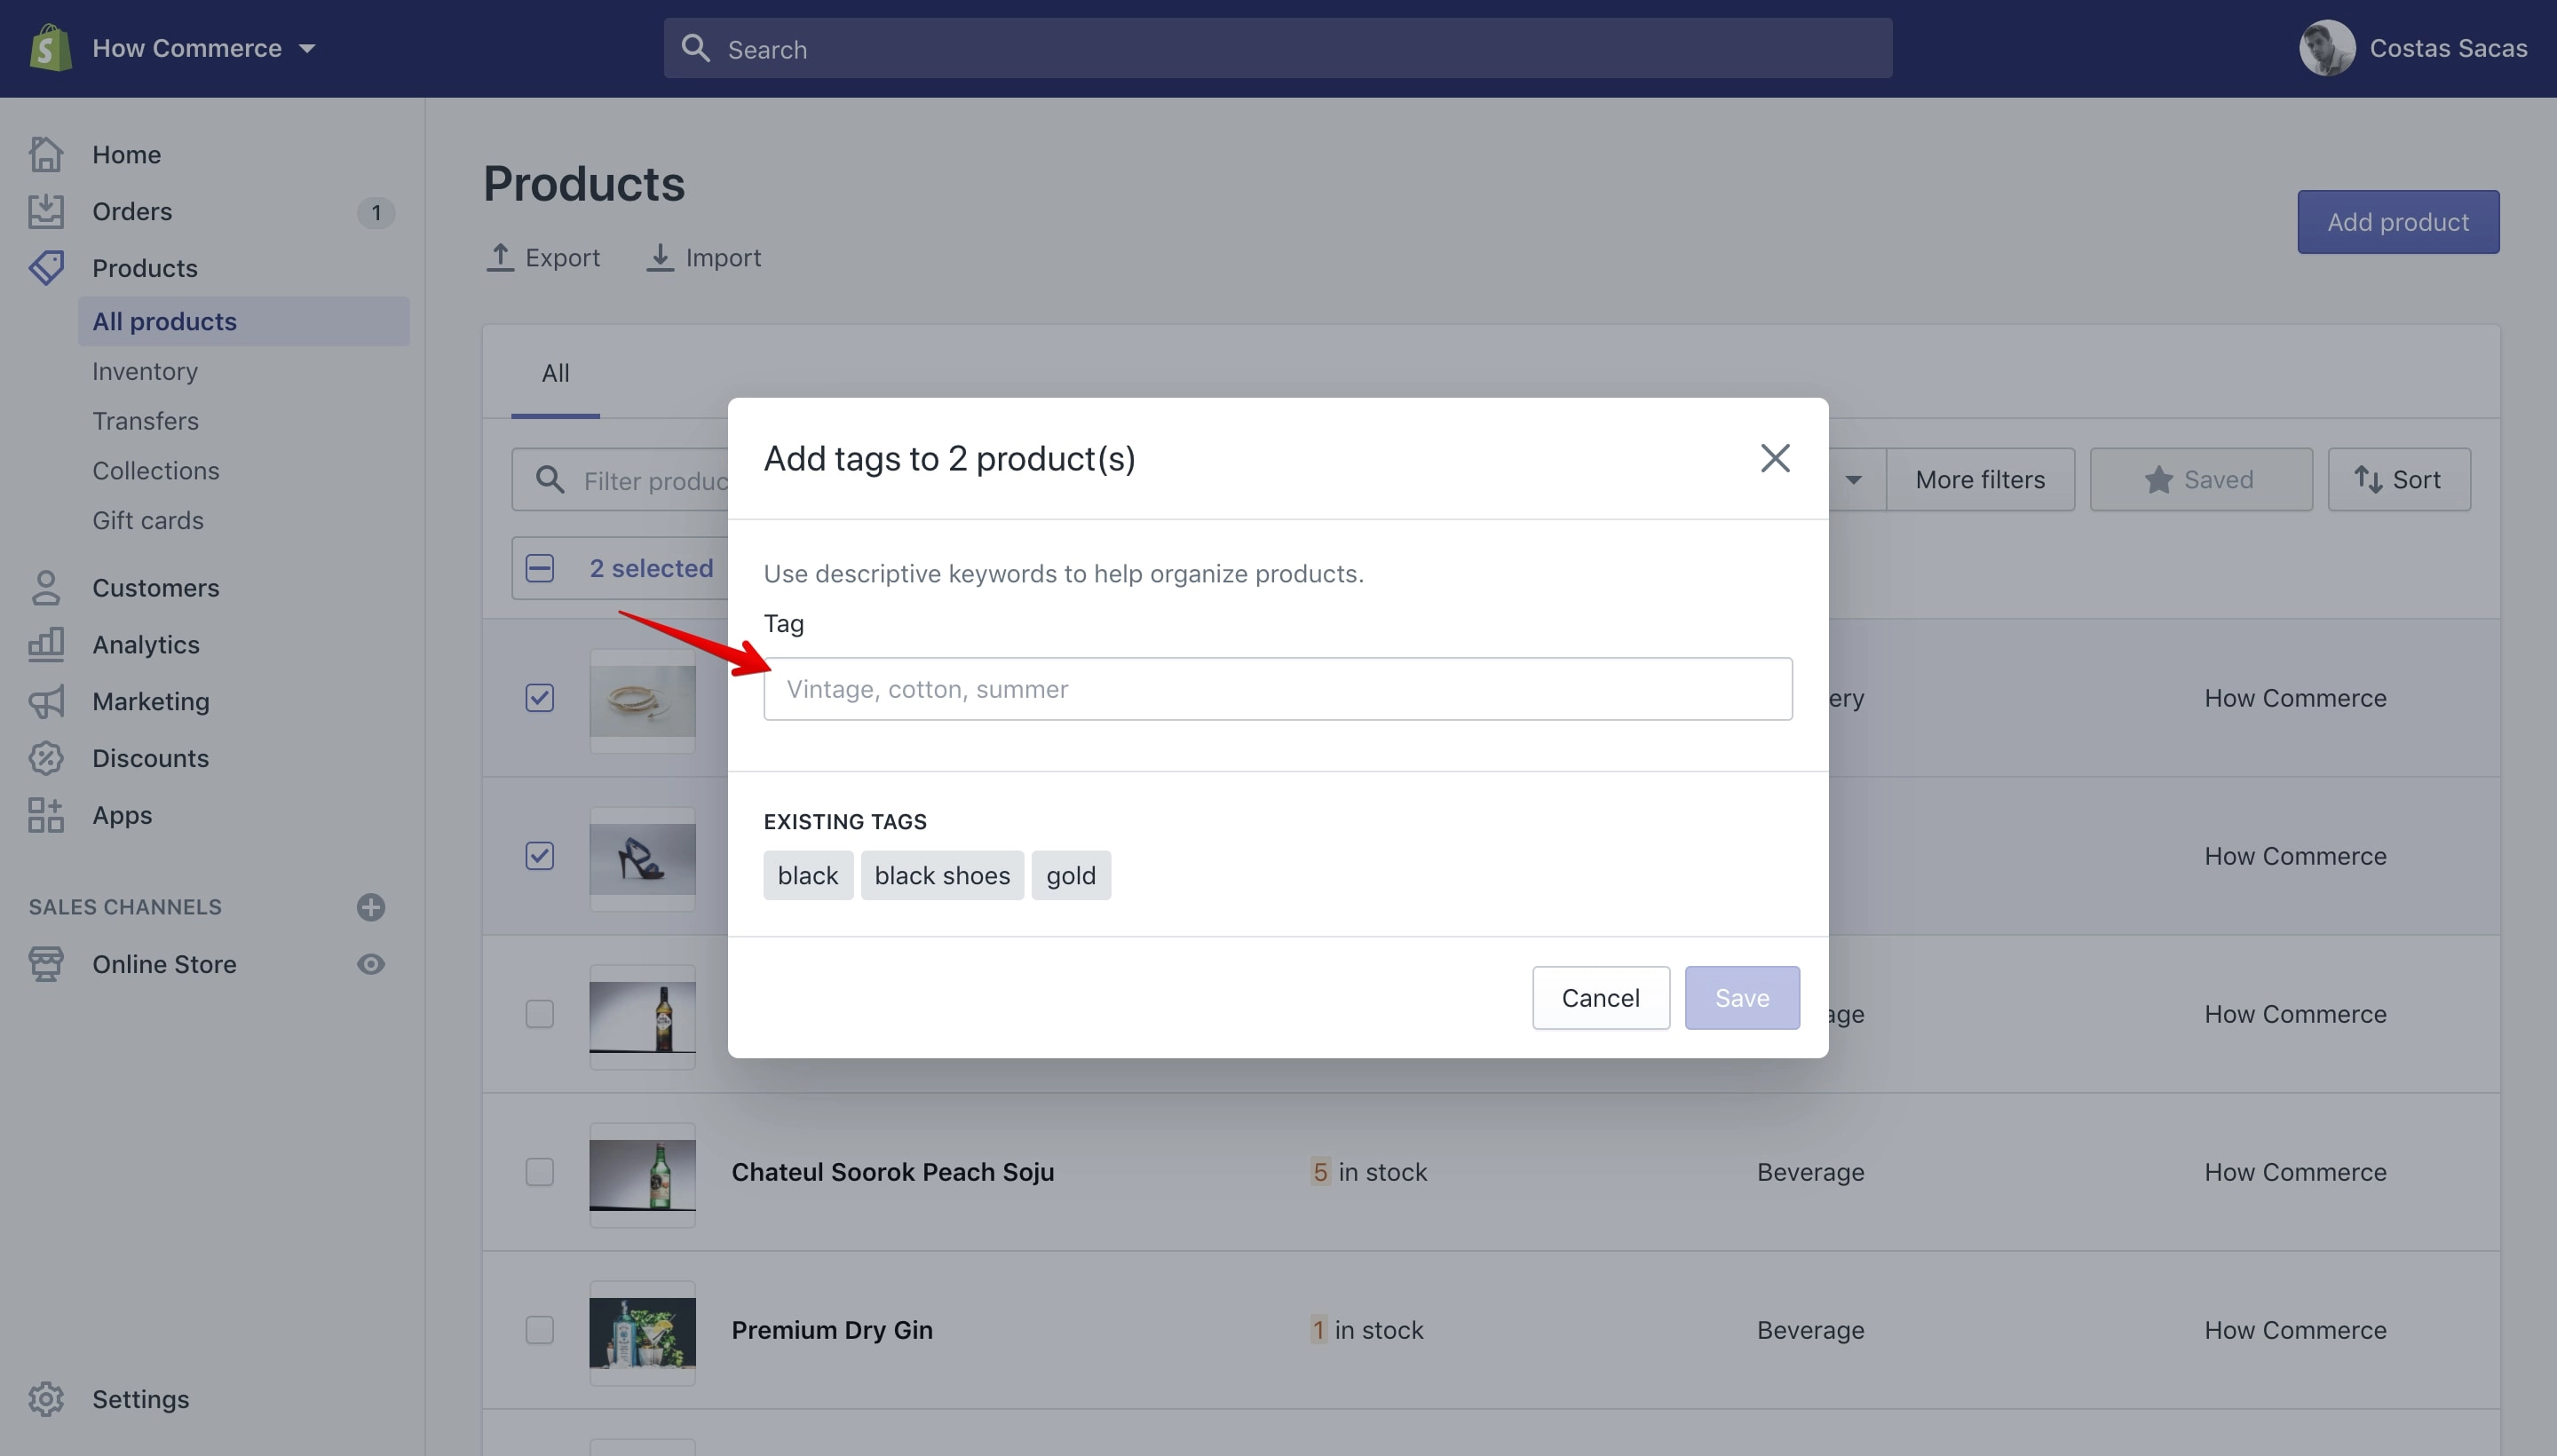
Once you select the “Add tags” option a pop-up will open allowing you to add the product tags.
You should see something like this:
You can add the tags separated by a comma or by pressing the enter key. I’ll add 3 tags: fashion, premium and luxury.
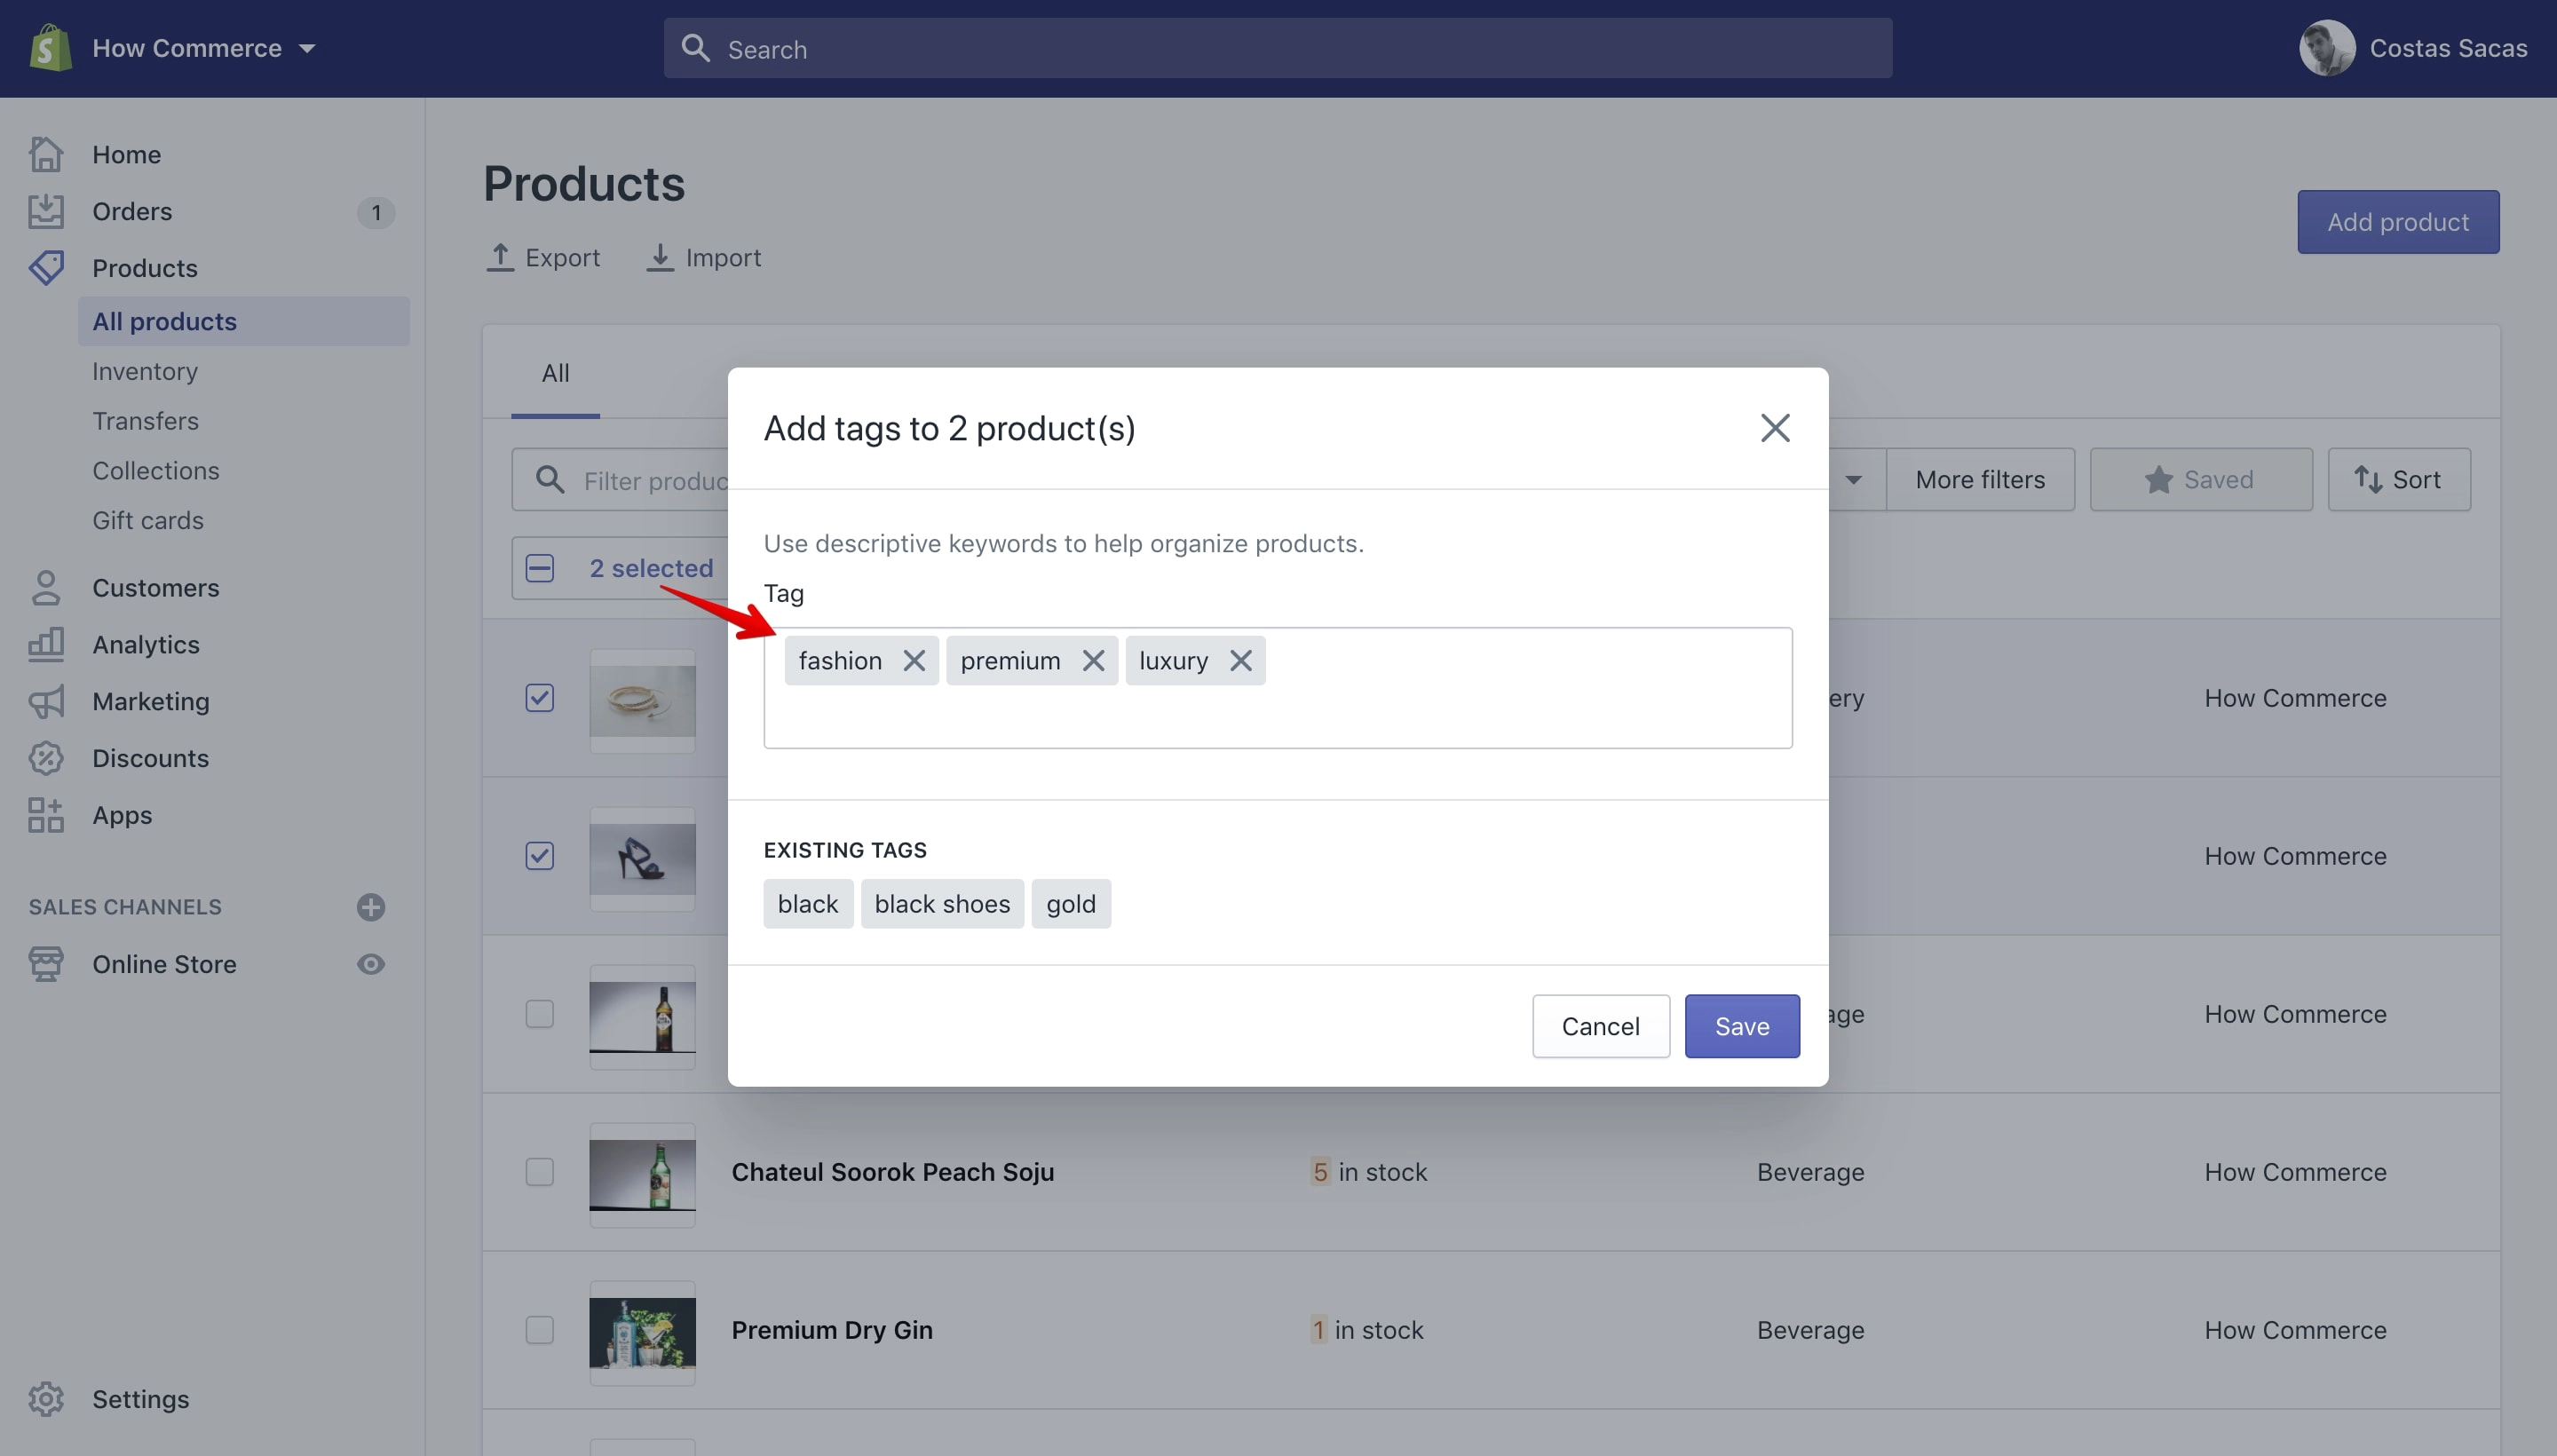
Once you have the tags that you want to add in place click the “Save” button.
As the tags are progressively added you will see a blue progress bar at the top of the page (marked with 1 in the image below), and once the tags are attached to the products you’ll see at the bottom of the page a confirmation message (marked with 2 in the image below) saying that the tags are added to your selected products:
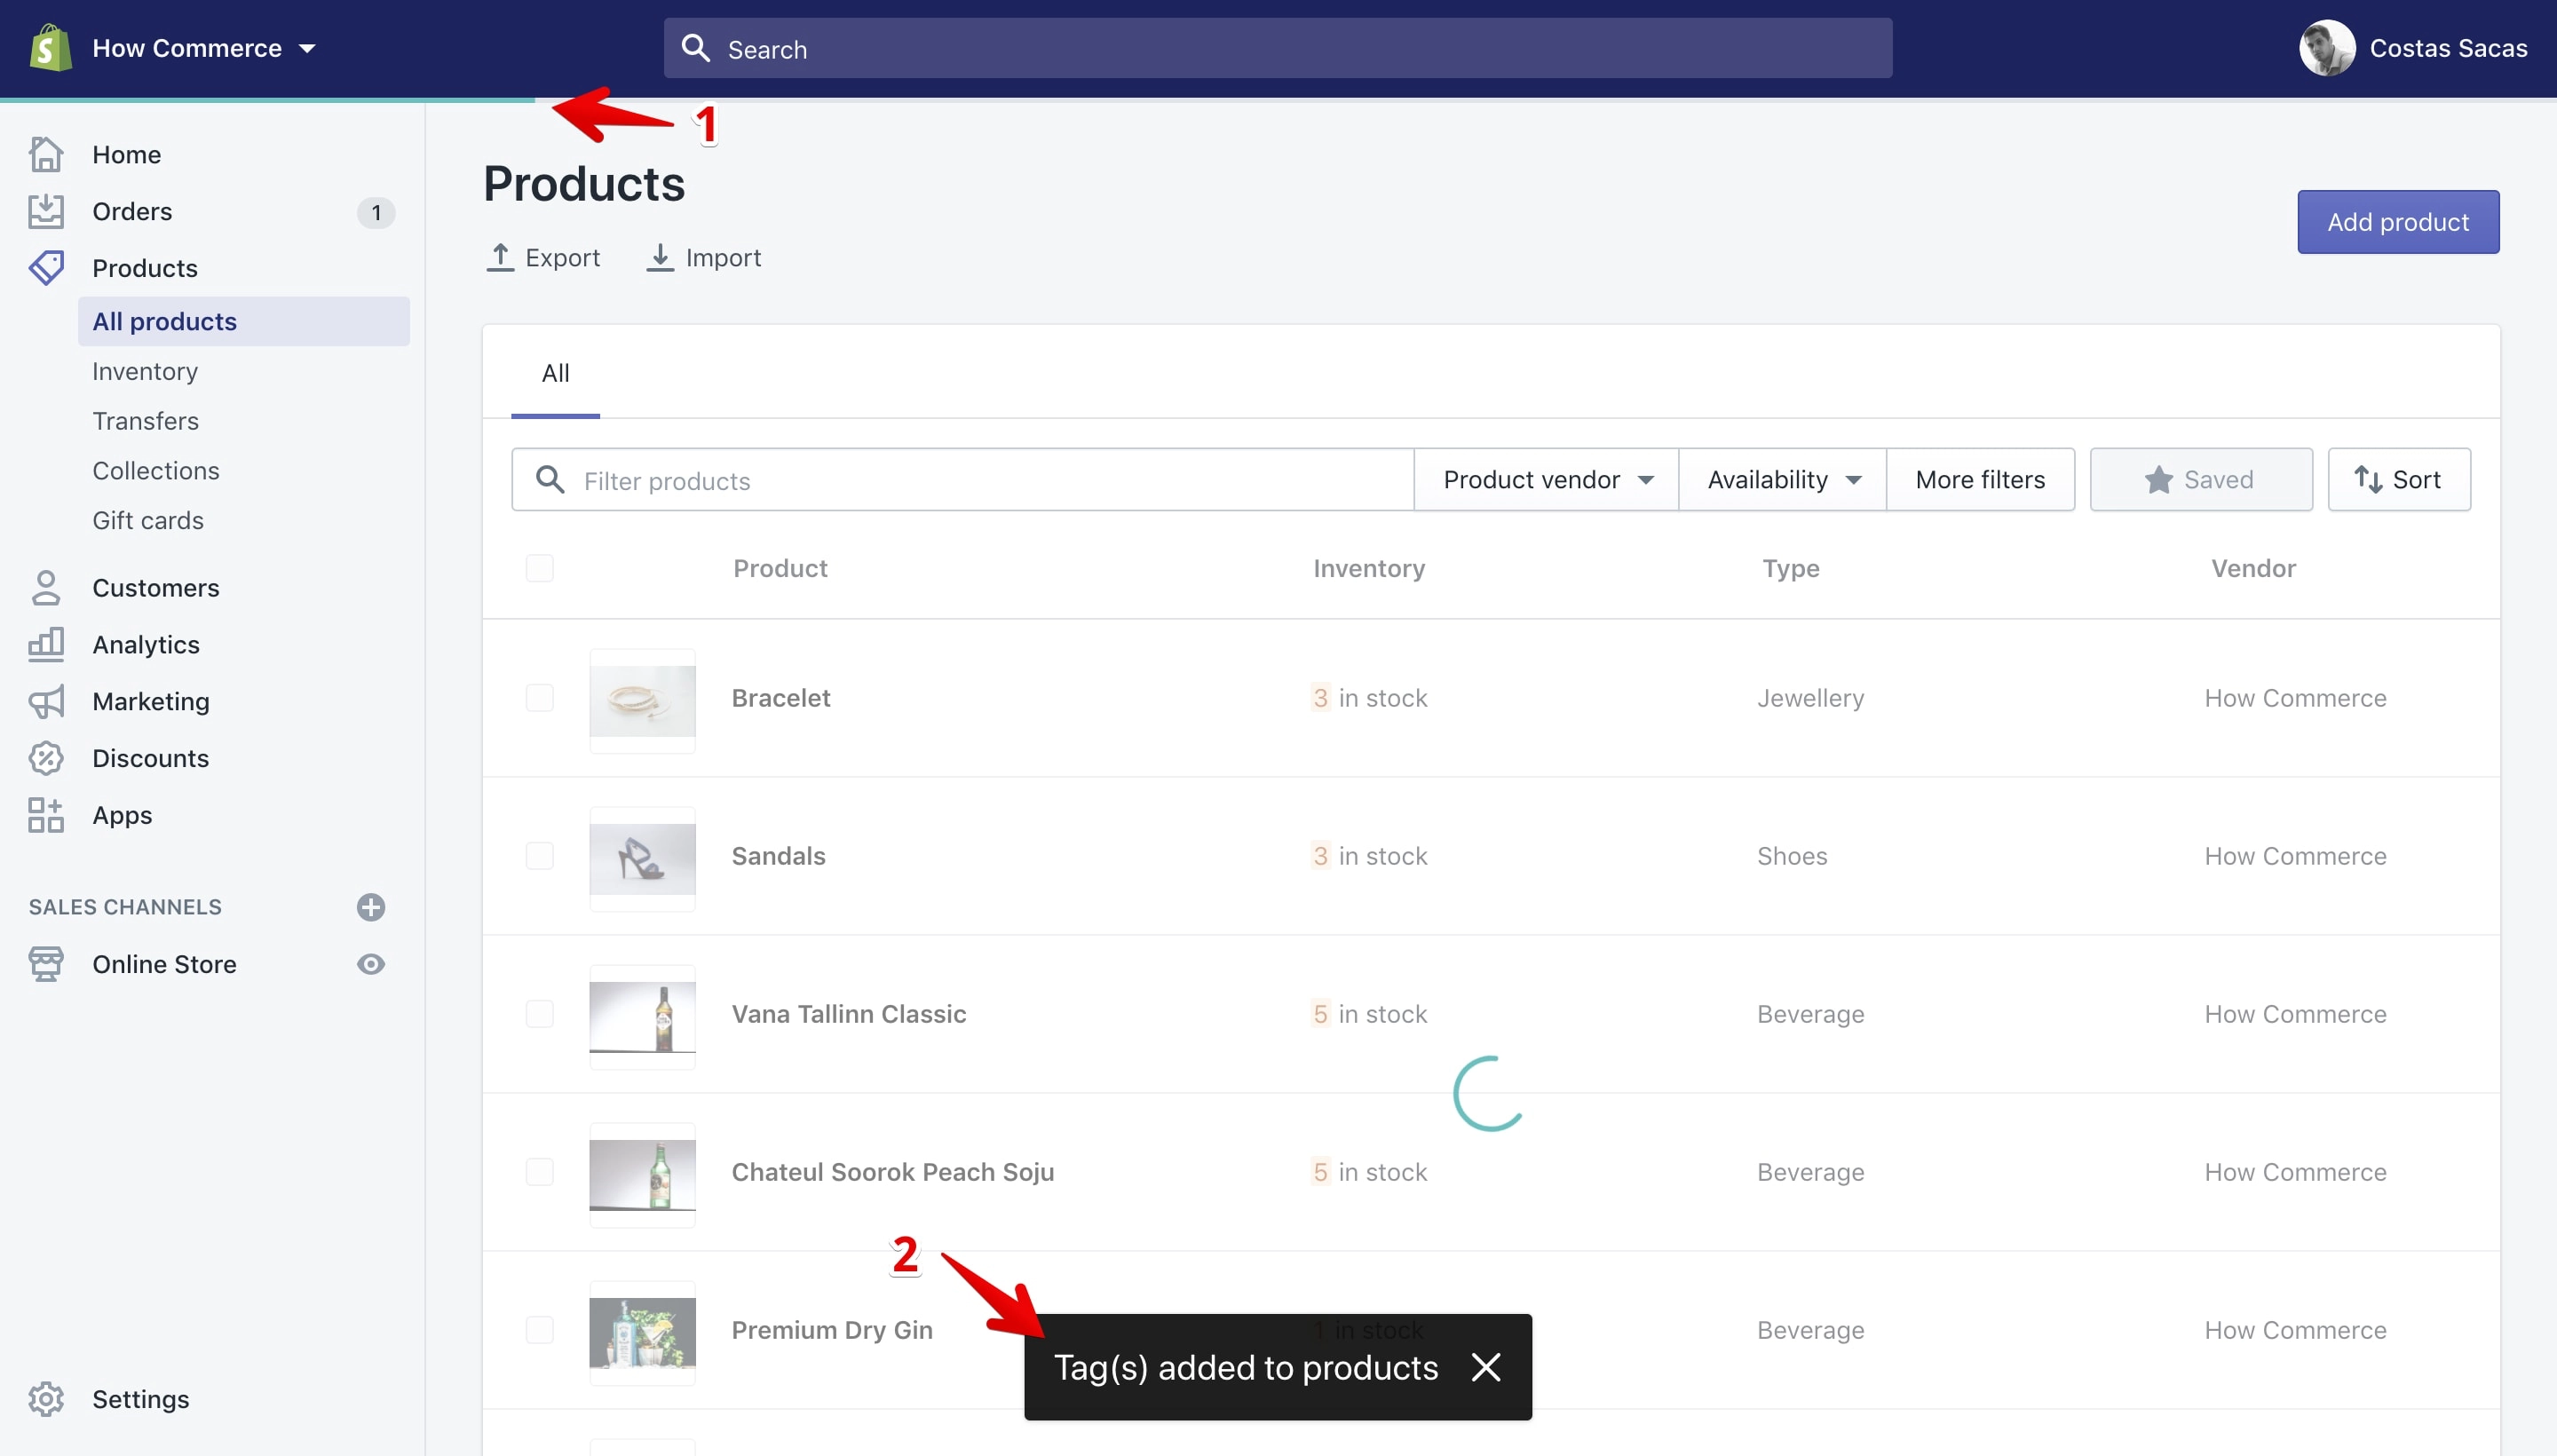
To check if the tags were correctly added to the products you can do it in 2 ways: one by using the filtering options and another by checking the product page.
Filtering
Go to “More filters” and click on it:
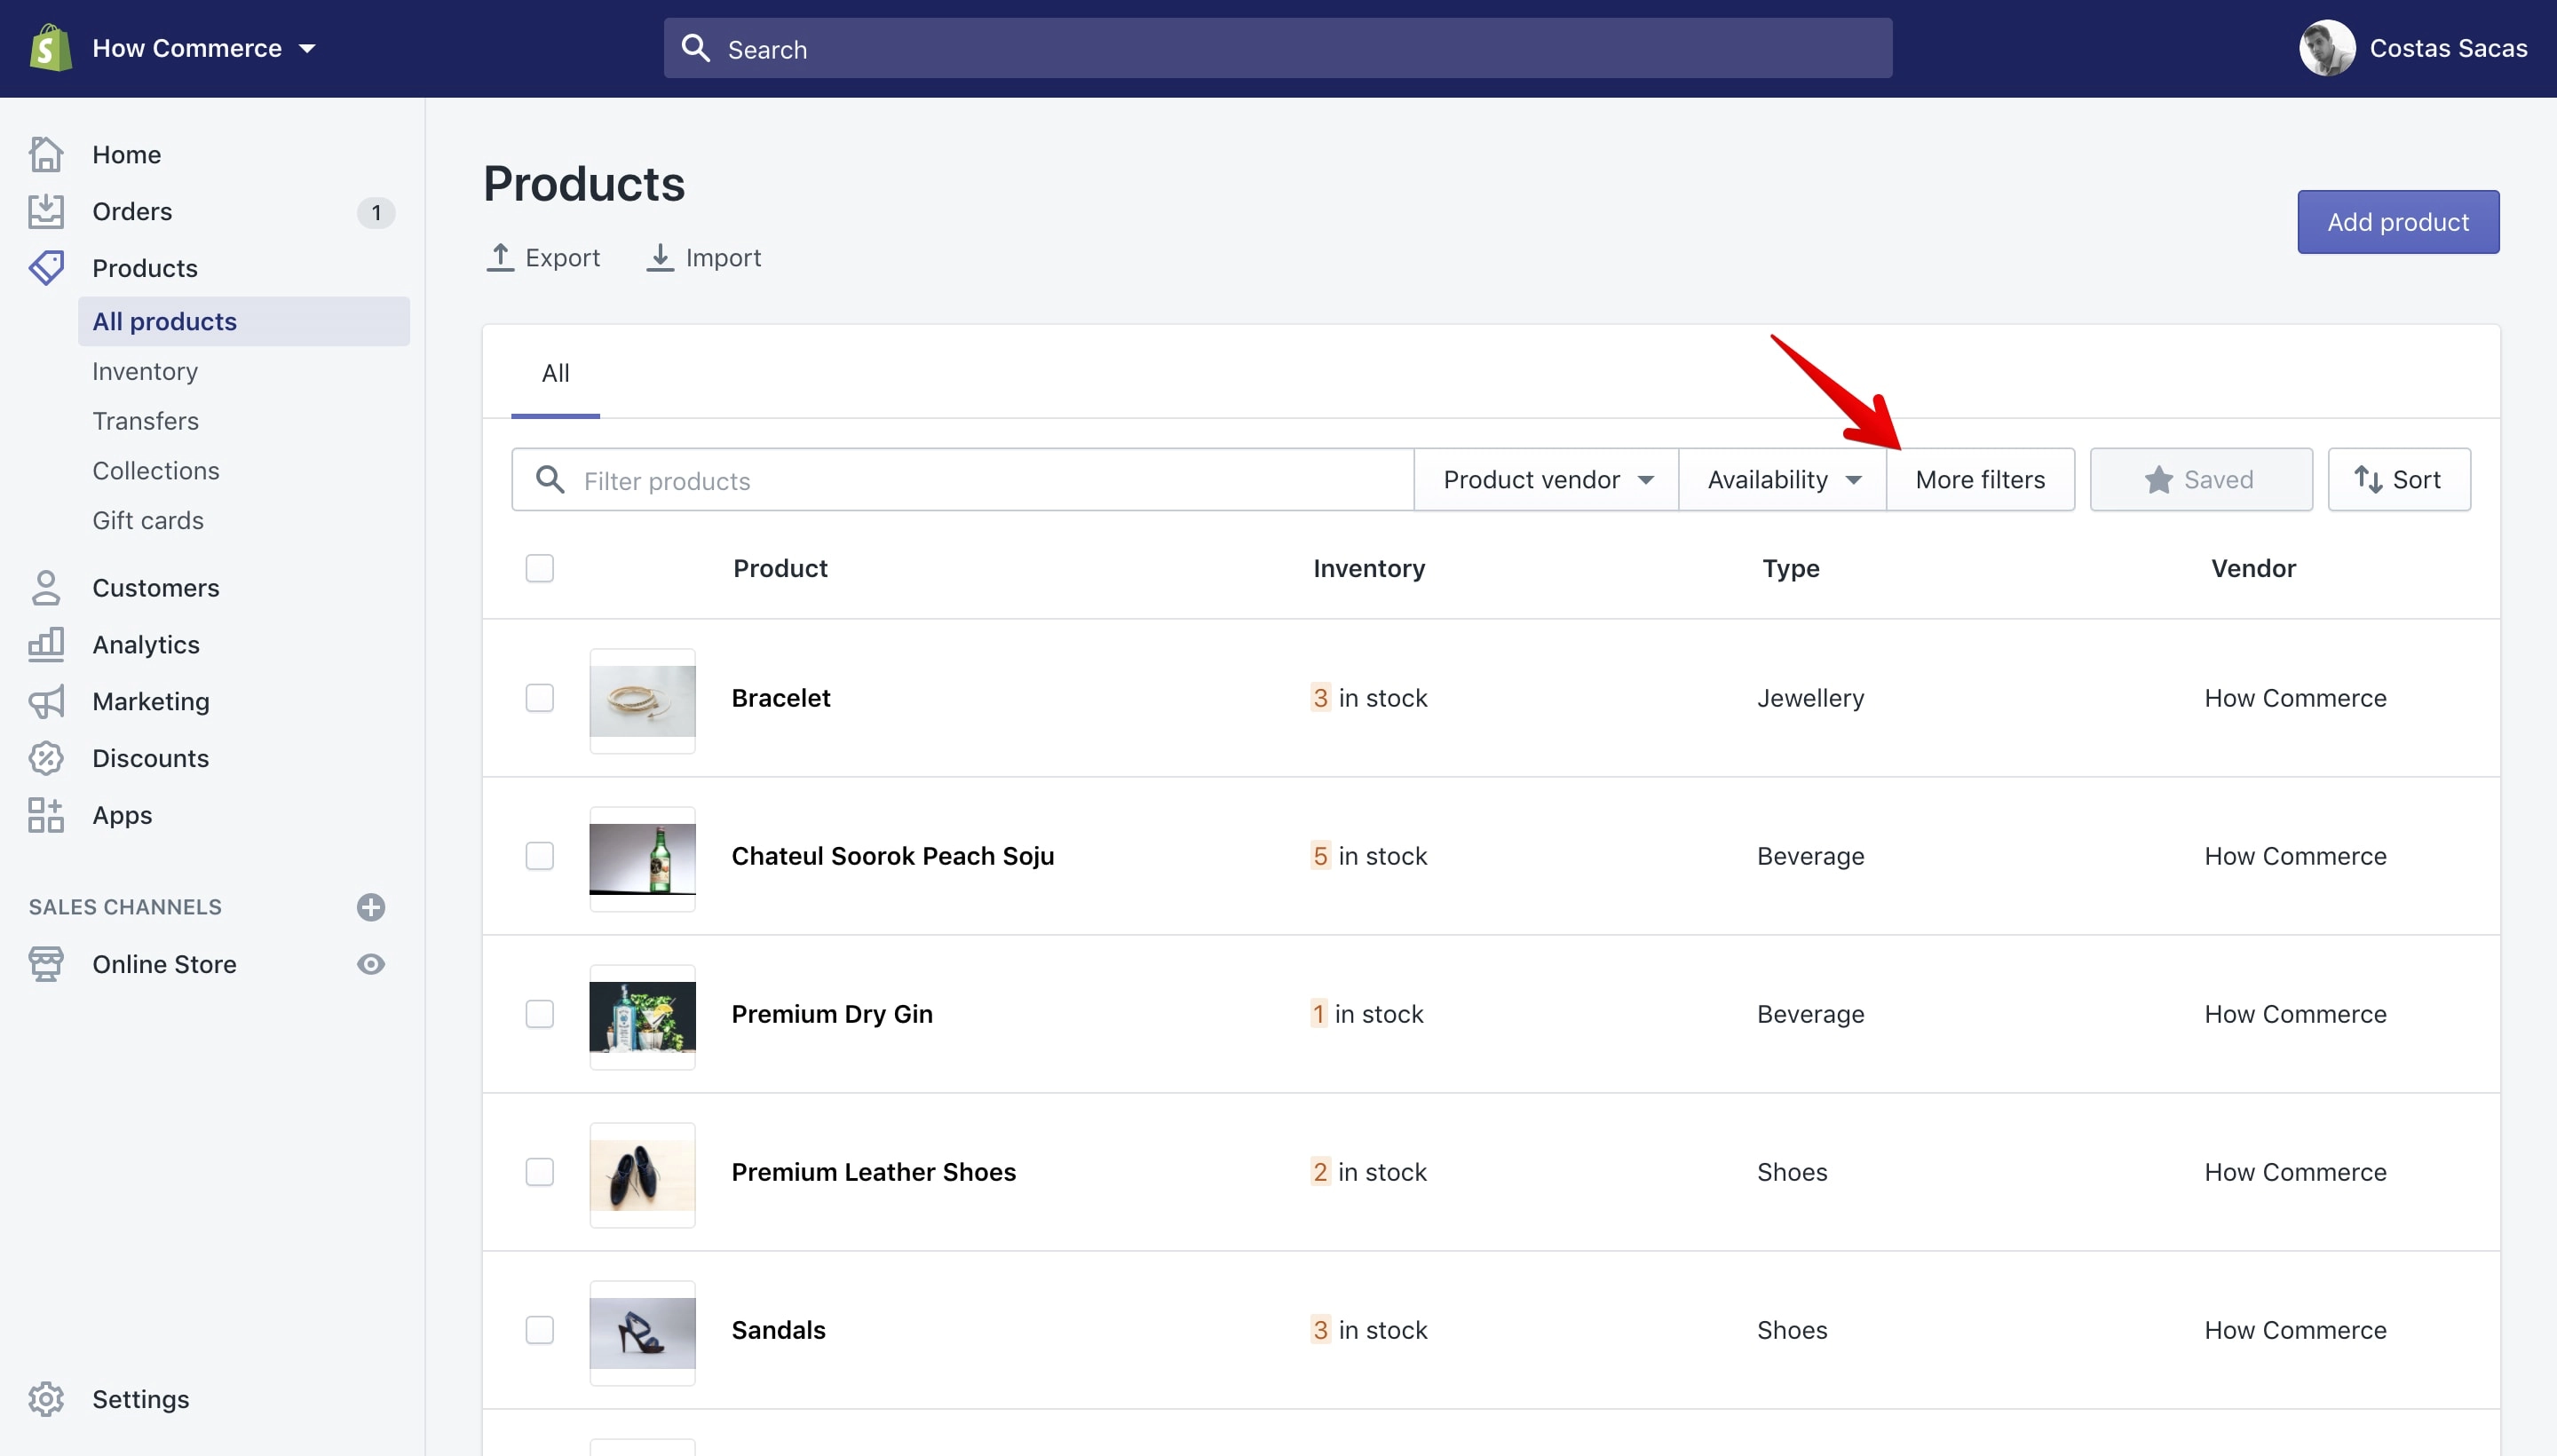
From the right side of the page a pop-up will open. Look for the “Tagged with” option and click on it.
Inside the input box type the tag name for which you want to verify.
Since we’ve added this 3 tags: fashion, premium and luxury I’ll filter for the “fashion” one as an example:
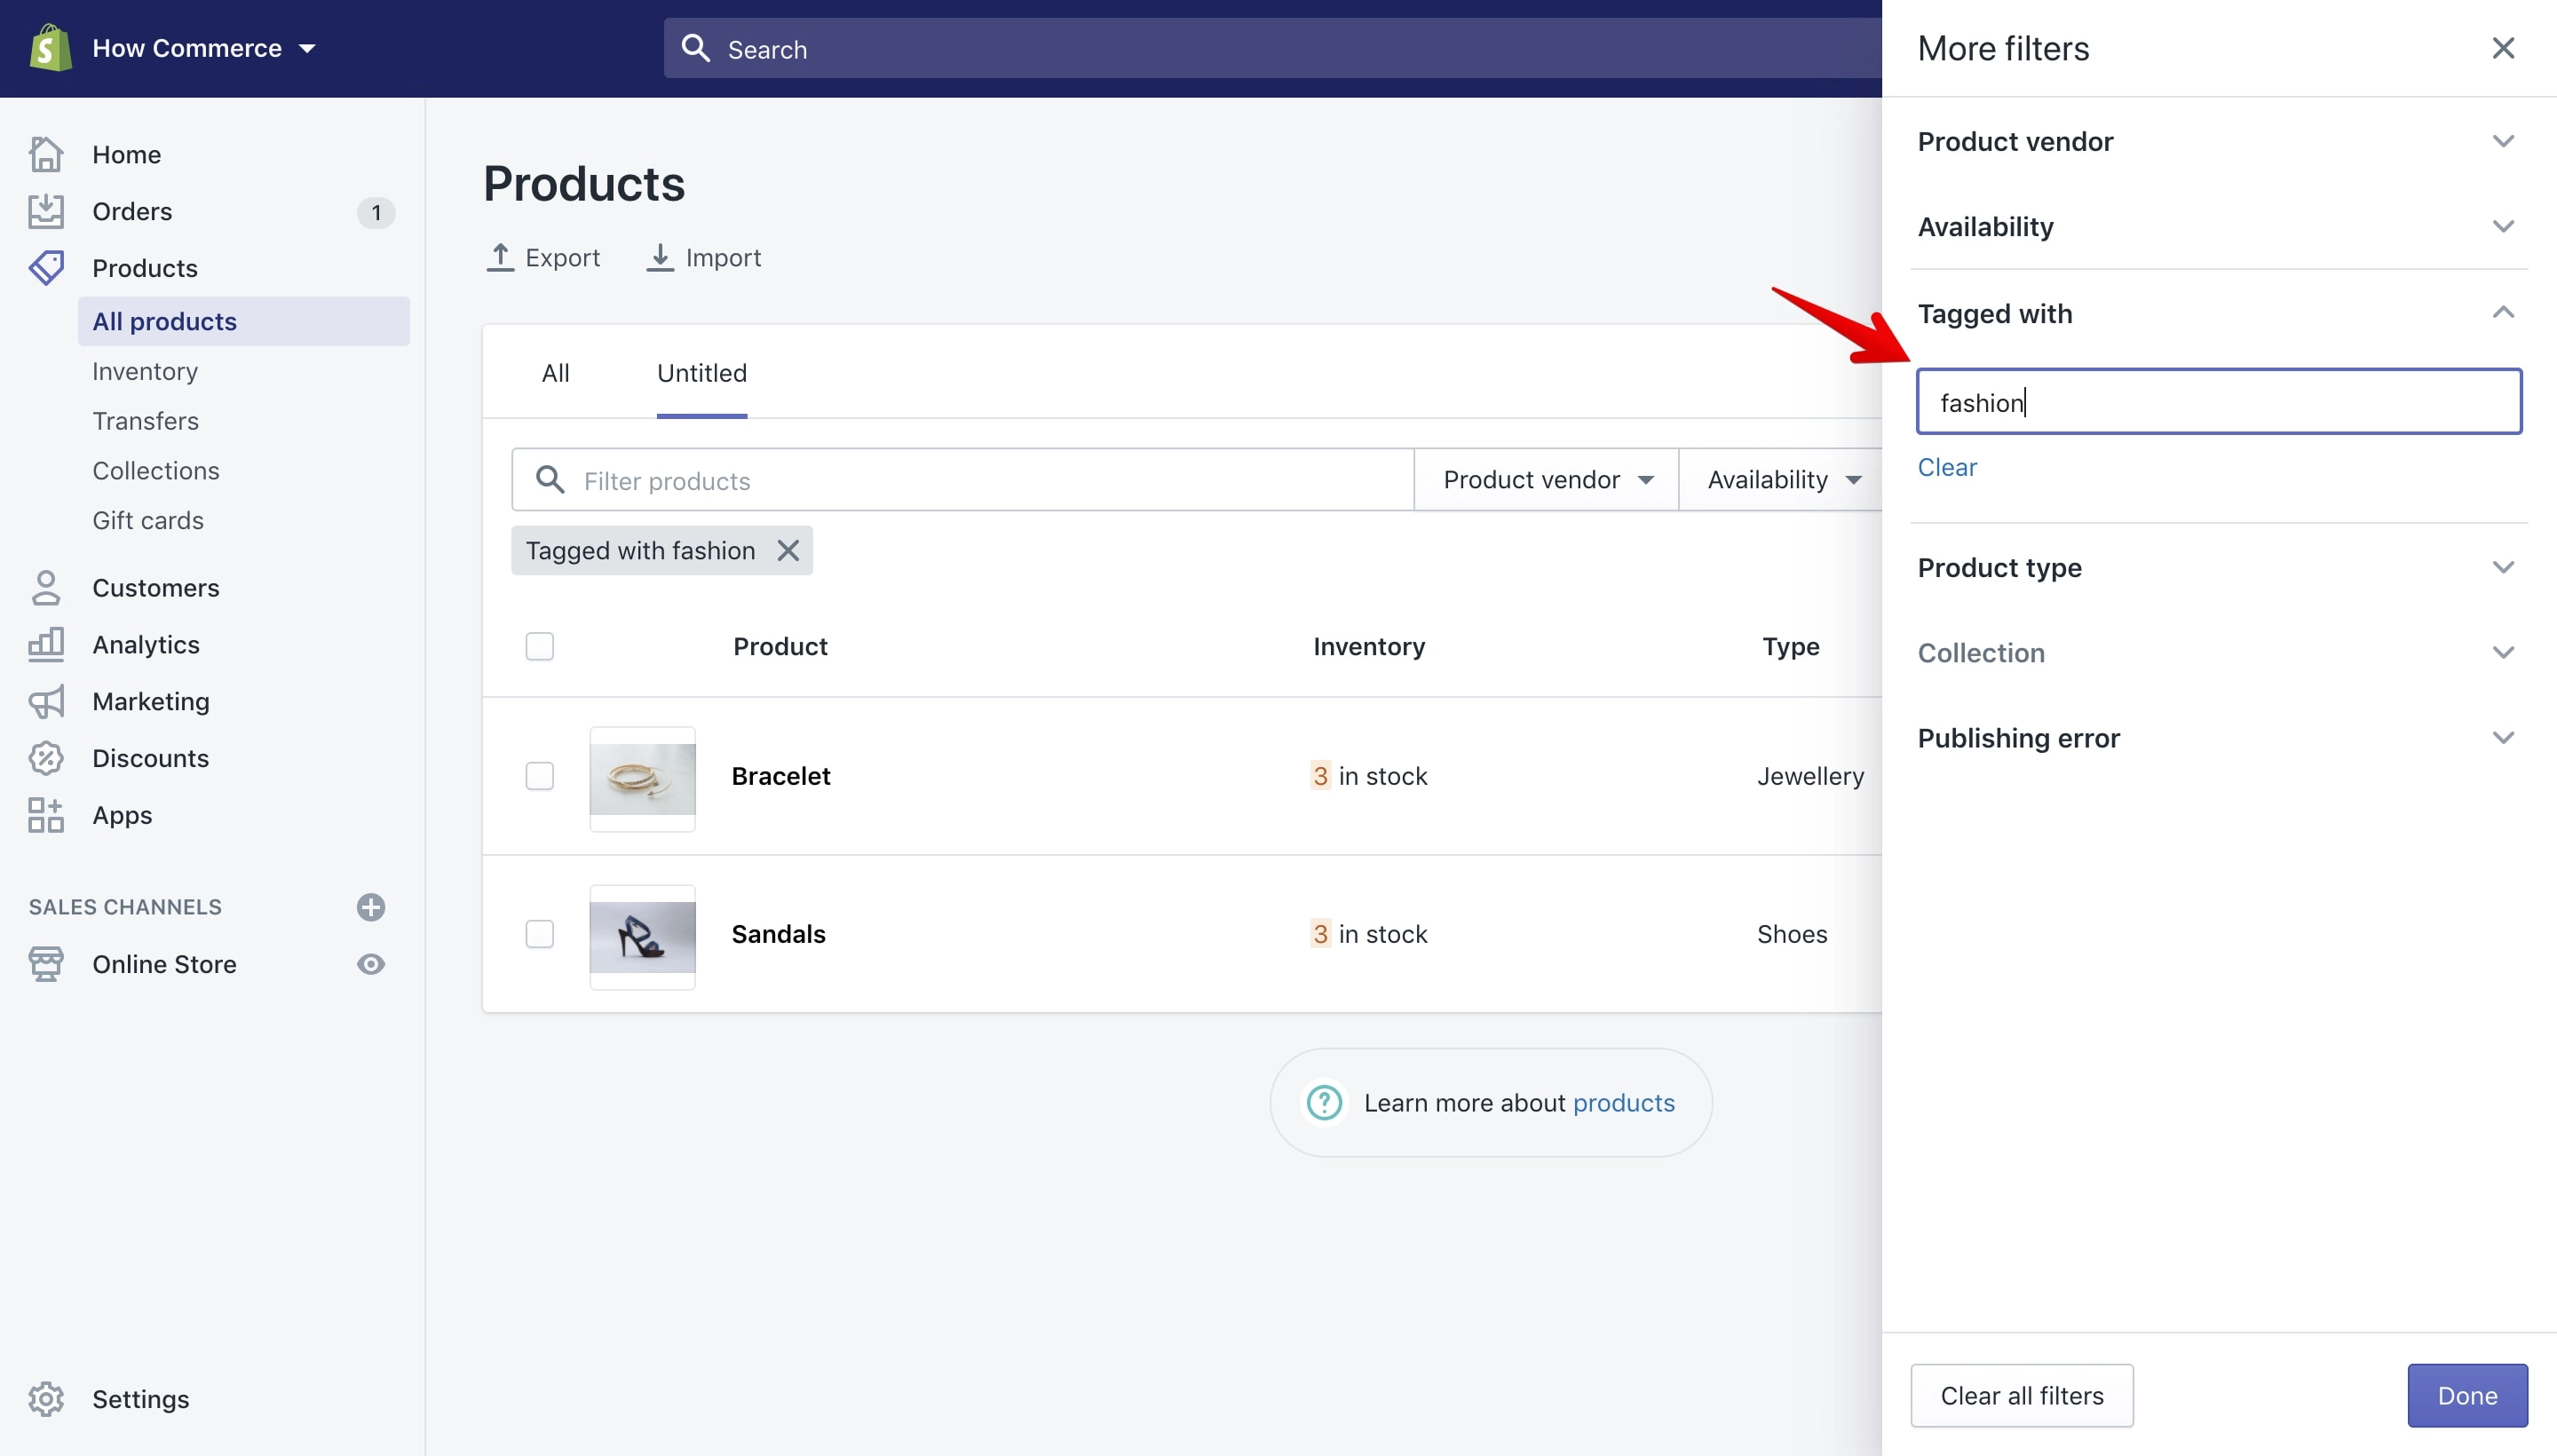
Once you do that, Shopify will list on the fly the products that have the “fashion” tag assigned. You can repeat the tag filtering for all three tags.
As you can see the tag was added correctly.
Product page
You can check if the product tags were added to the products by checking the product page:
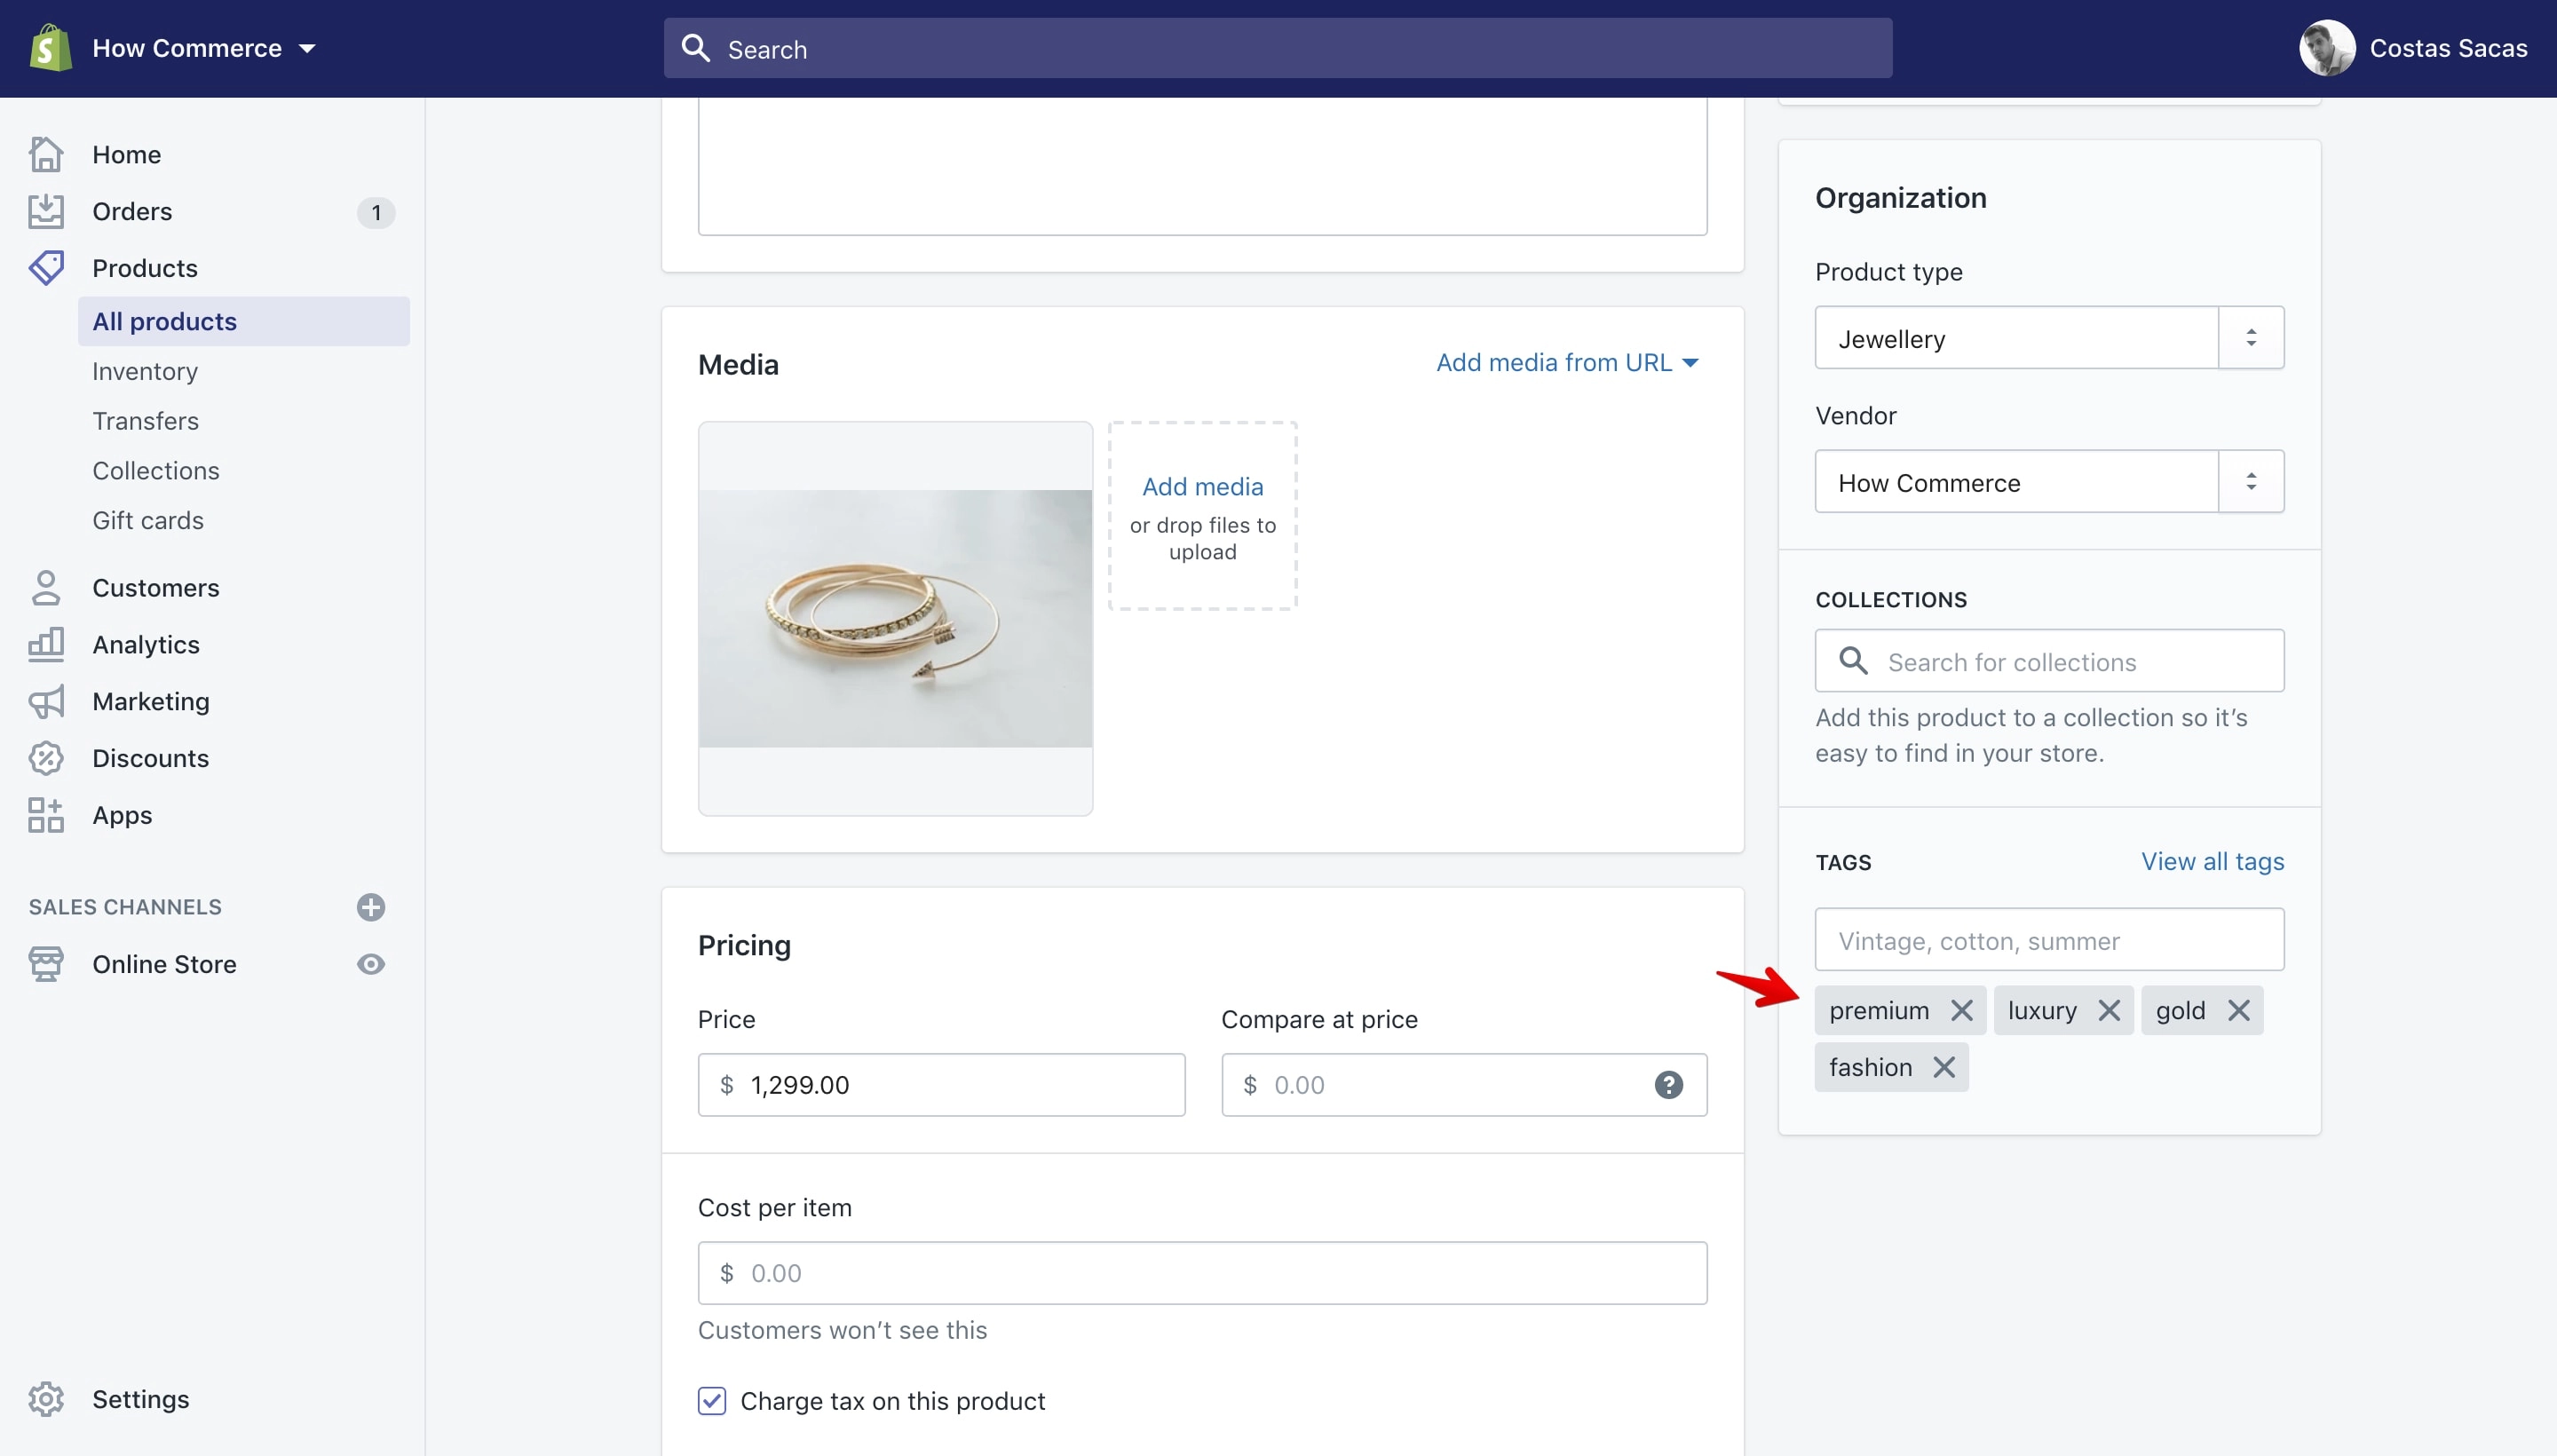
Remove tags
You can remove multiple tags from multiple products. You do that by selecting the “Remove tags” bulk action:
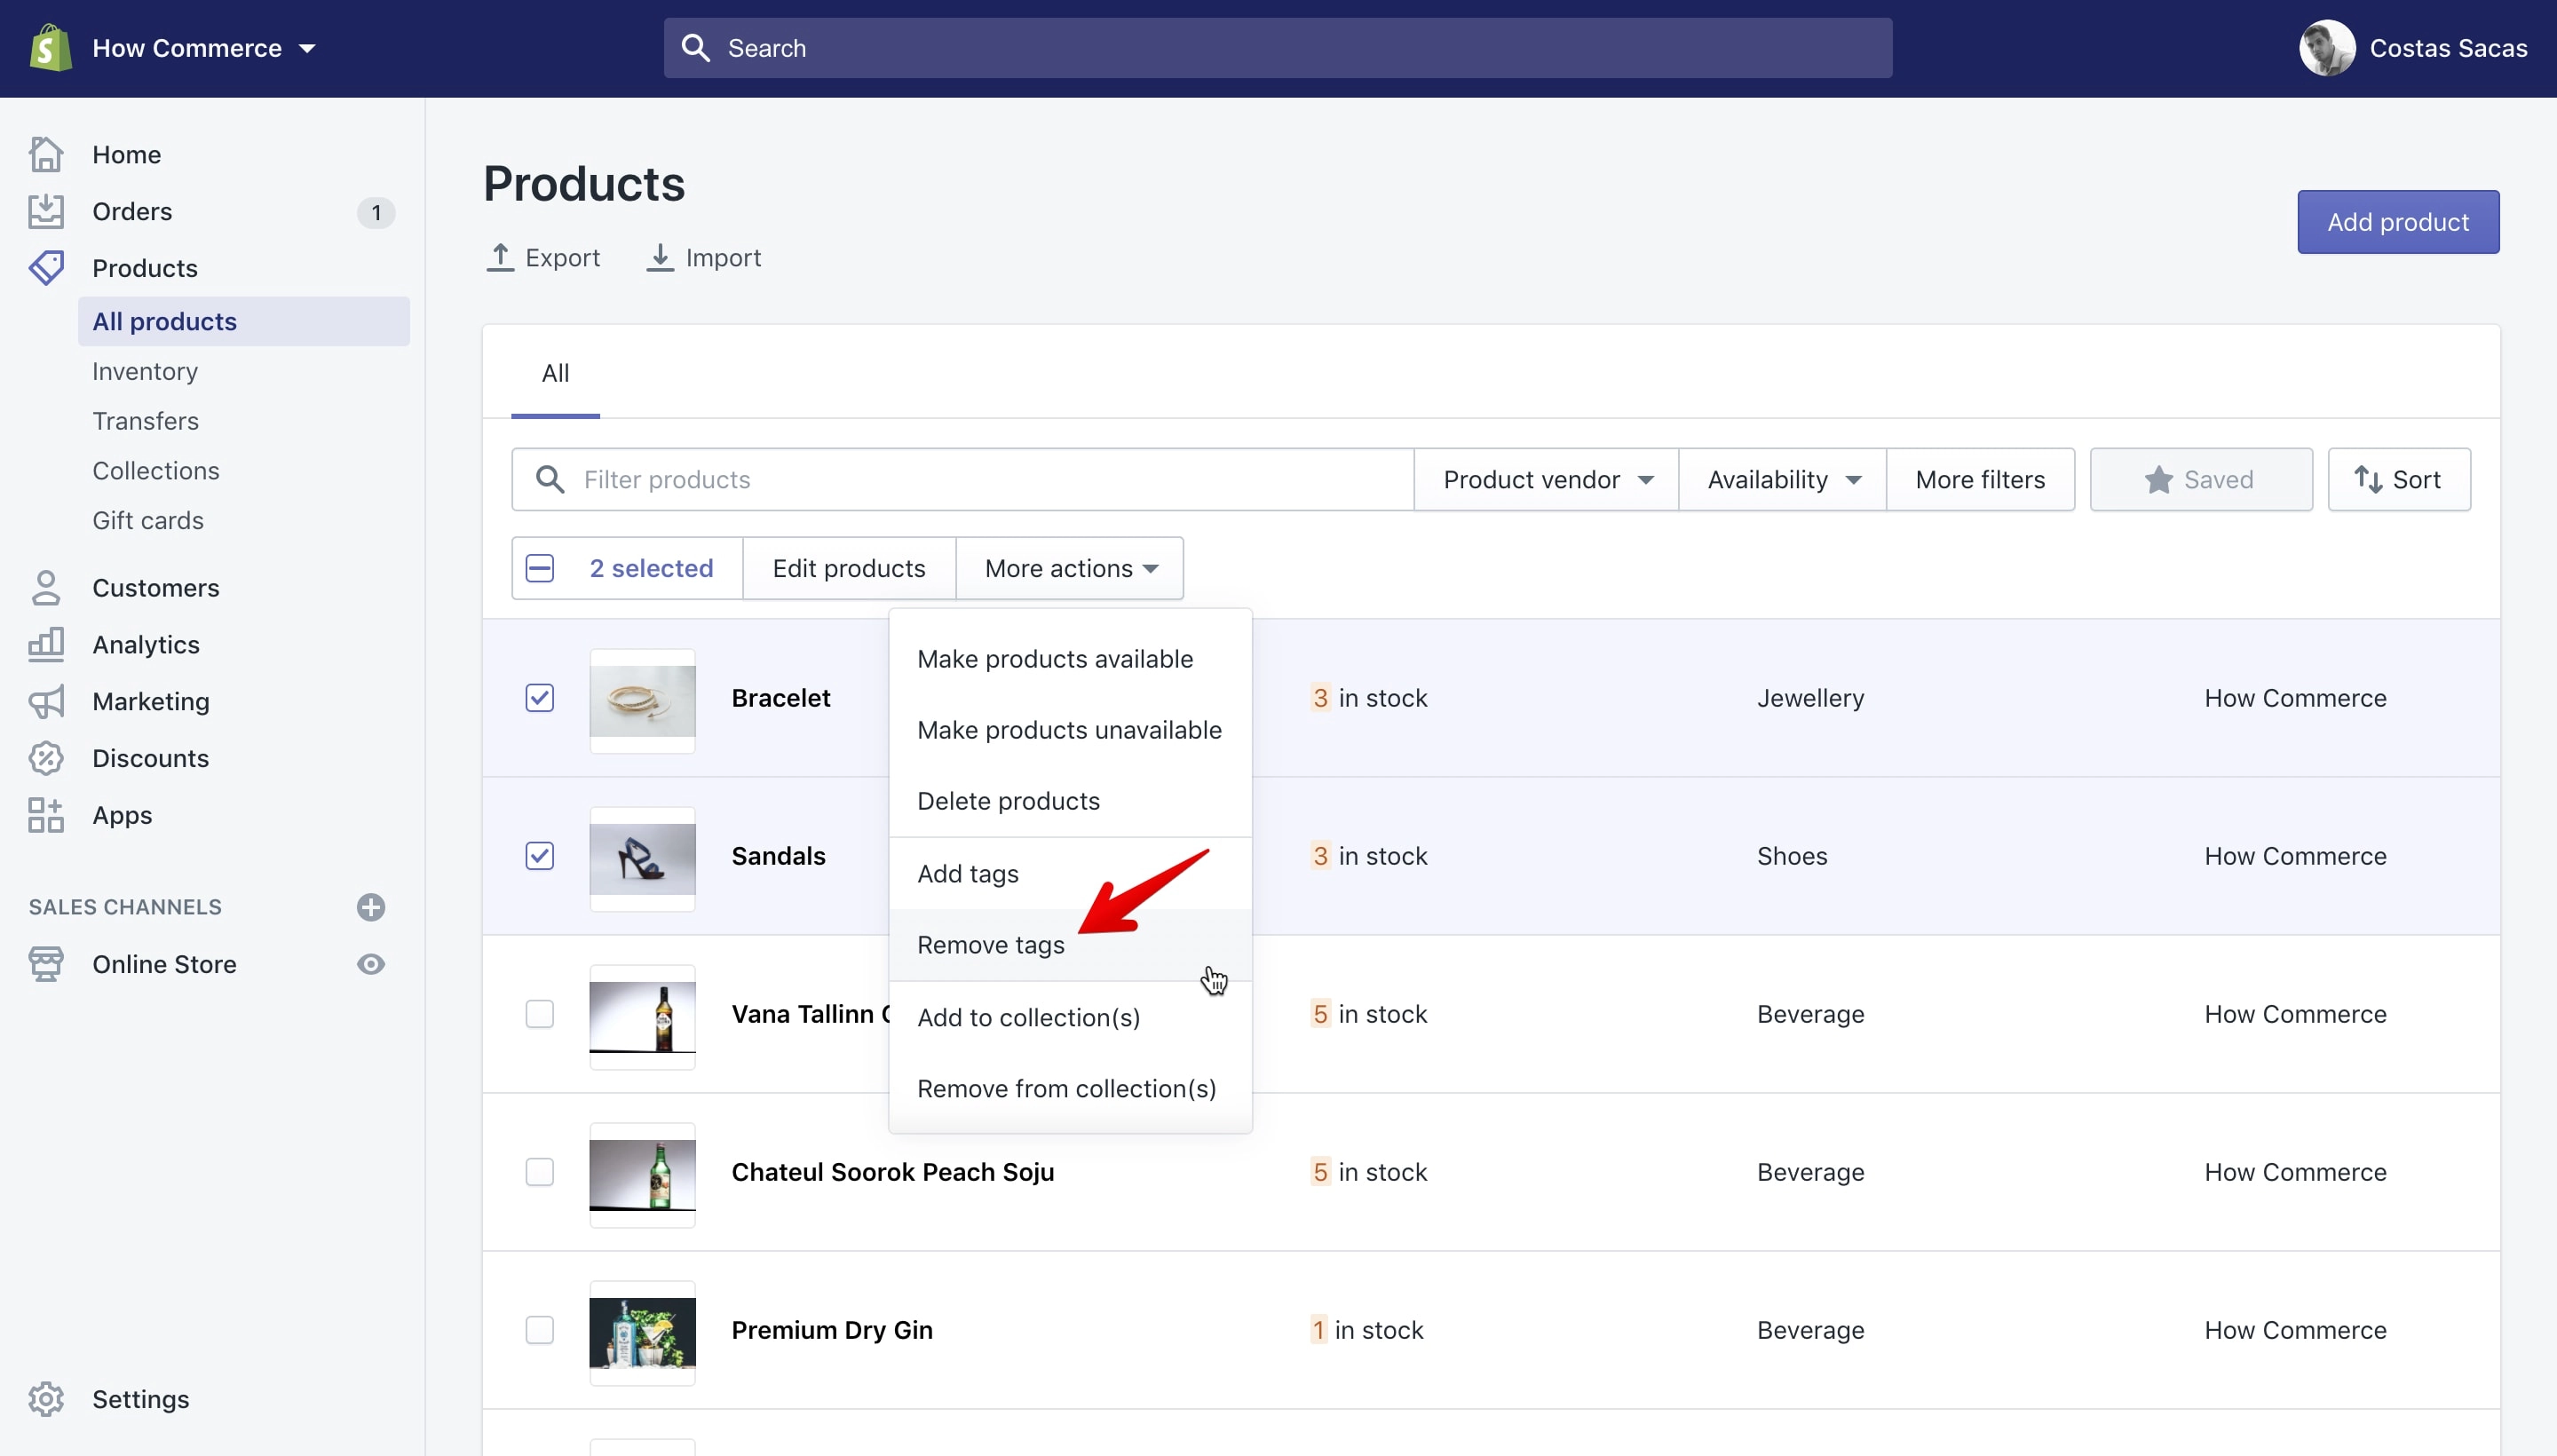
Once you select the “Remove tags” option a pop-up will open allowing you to remove the product tags. You should see something like this:
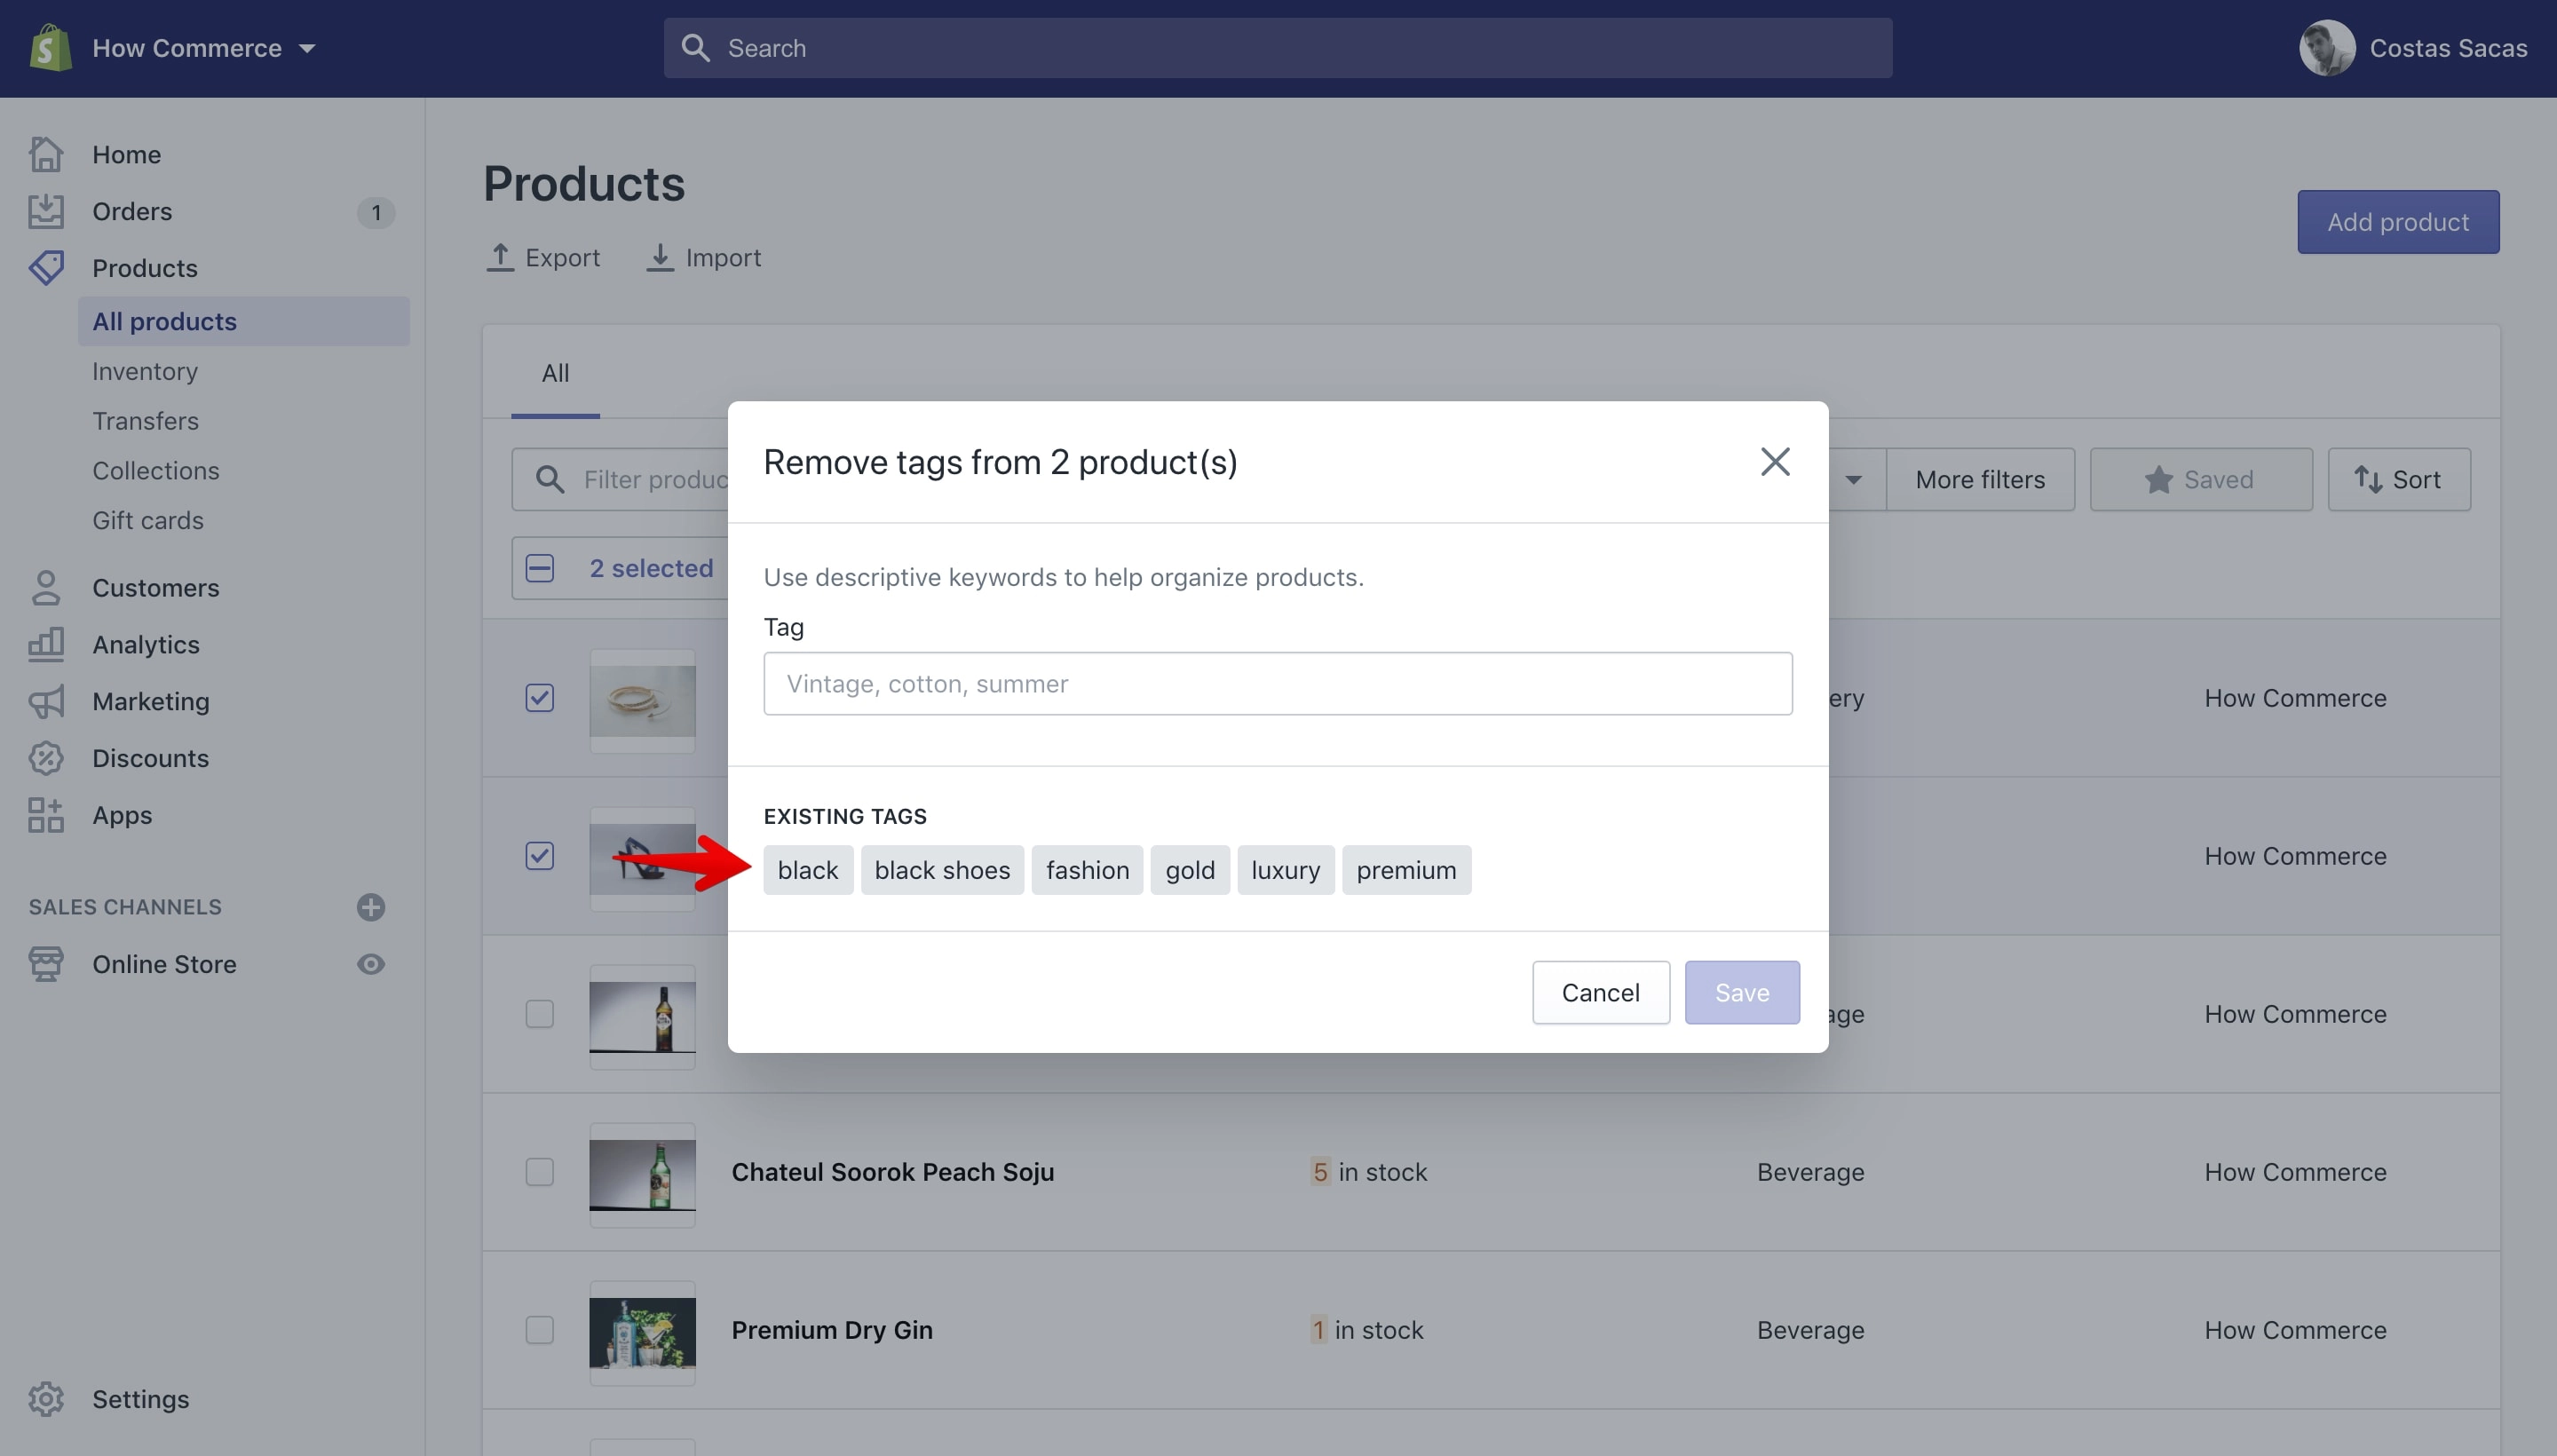
Please note that all the existing tags that you see listed on the pop-up are all the product tags that exist on your store in the products section and not all the tags assigned to the products that you’ve selected.
This is why you need to know upfront what tags you want to remove from your products.
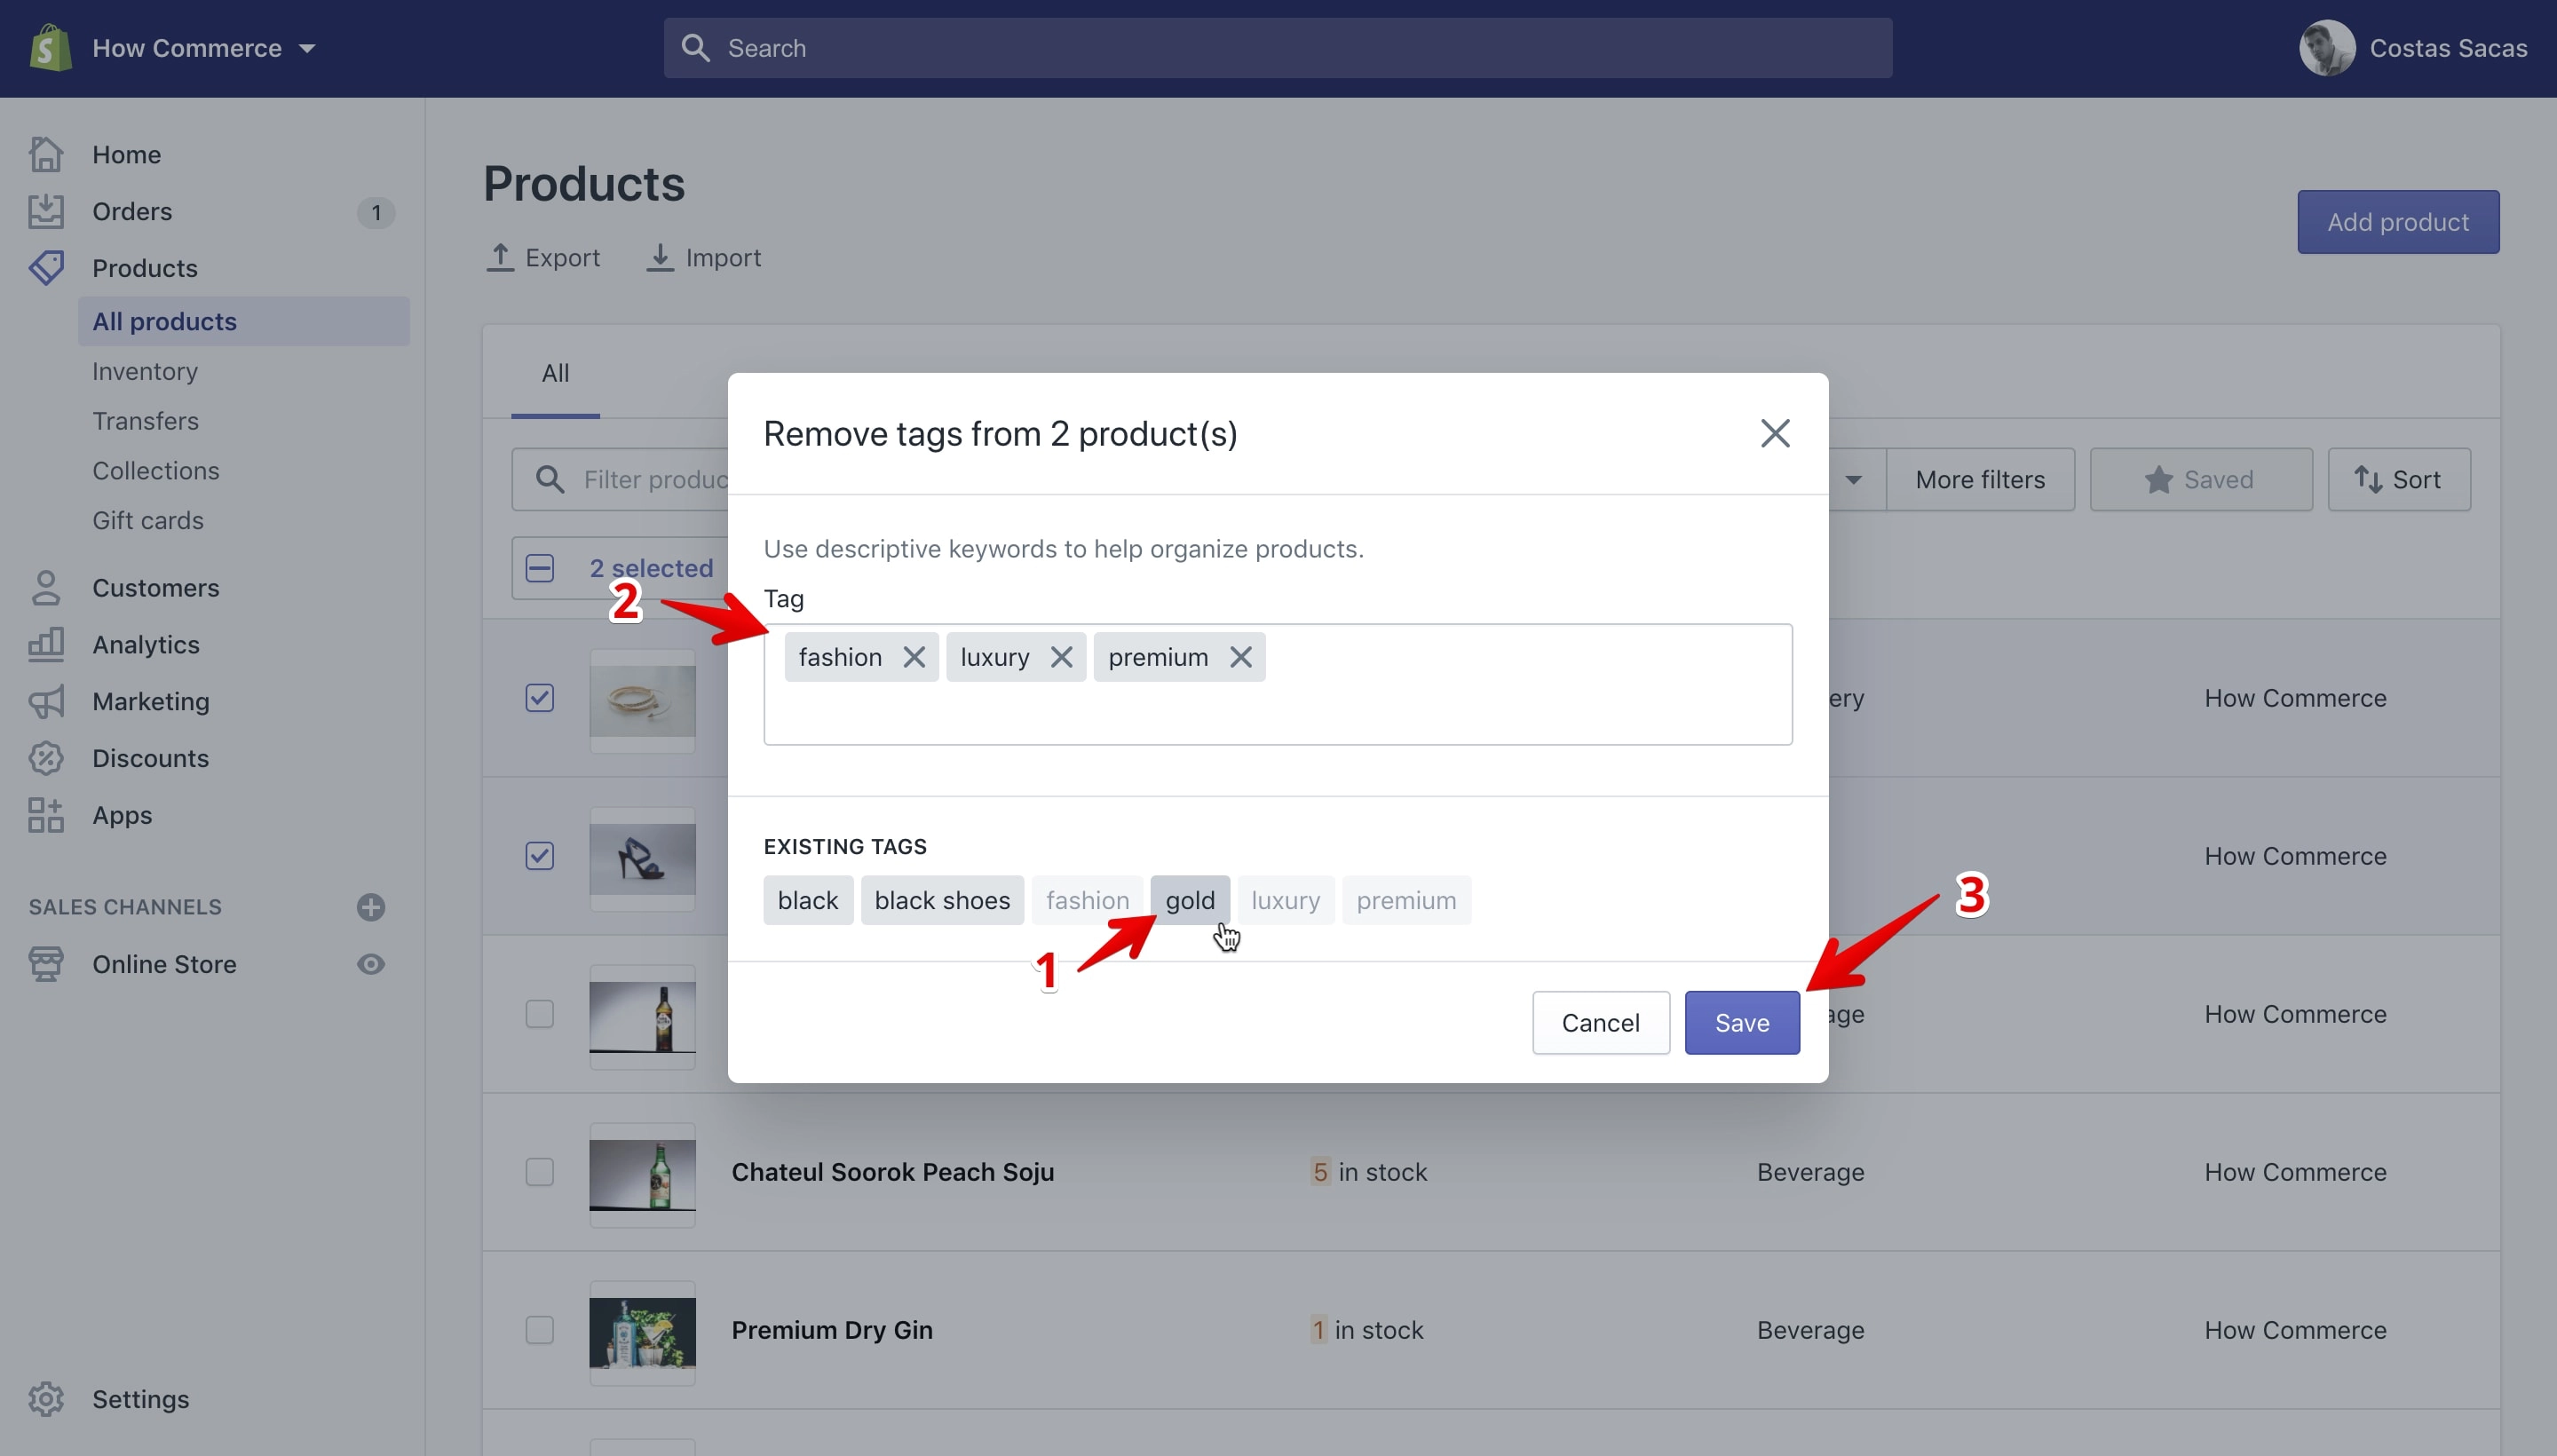
First you need to select the tags that you want to remove. You do that by clicking on the tag that you want to remove (marked with 1 in the image above). Once you click on the tag Shopify will add it to the removal list (marked with 2 in the image above).
I’ve selected 3 tags for removal: fashion, premium and luxury.
After you’ve selected all the tags that you want to remove from the selected products click the “Save” button (marked with 3 in the image above).
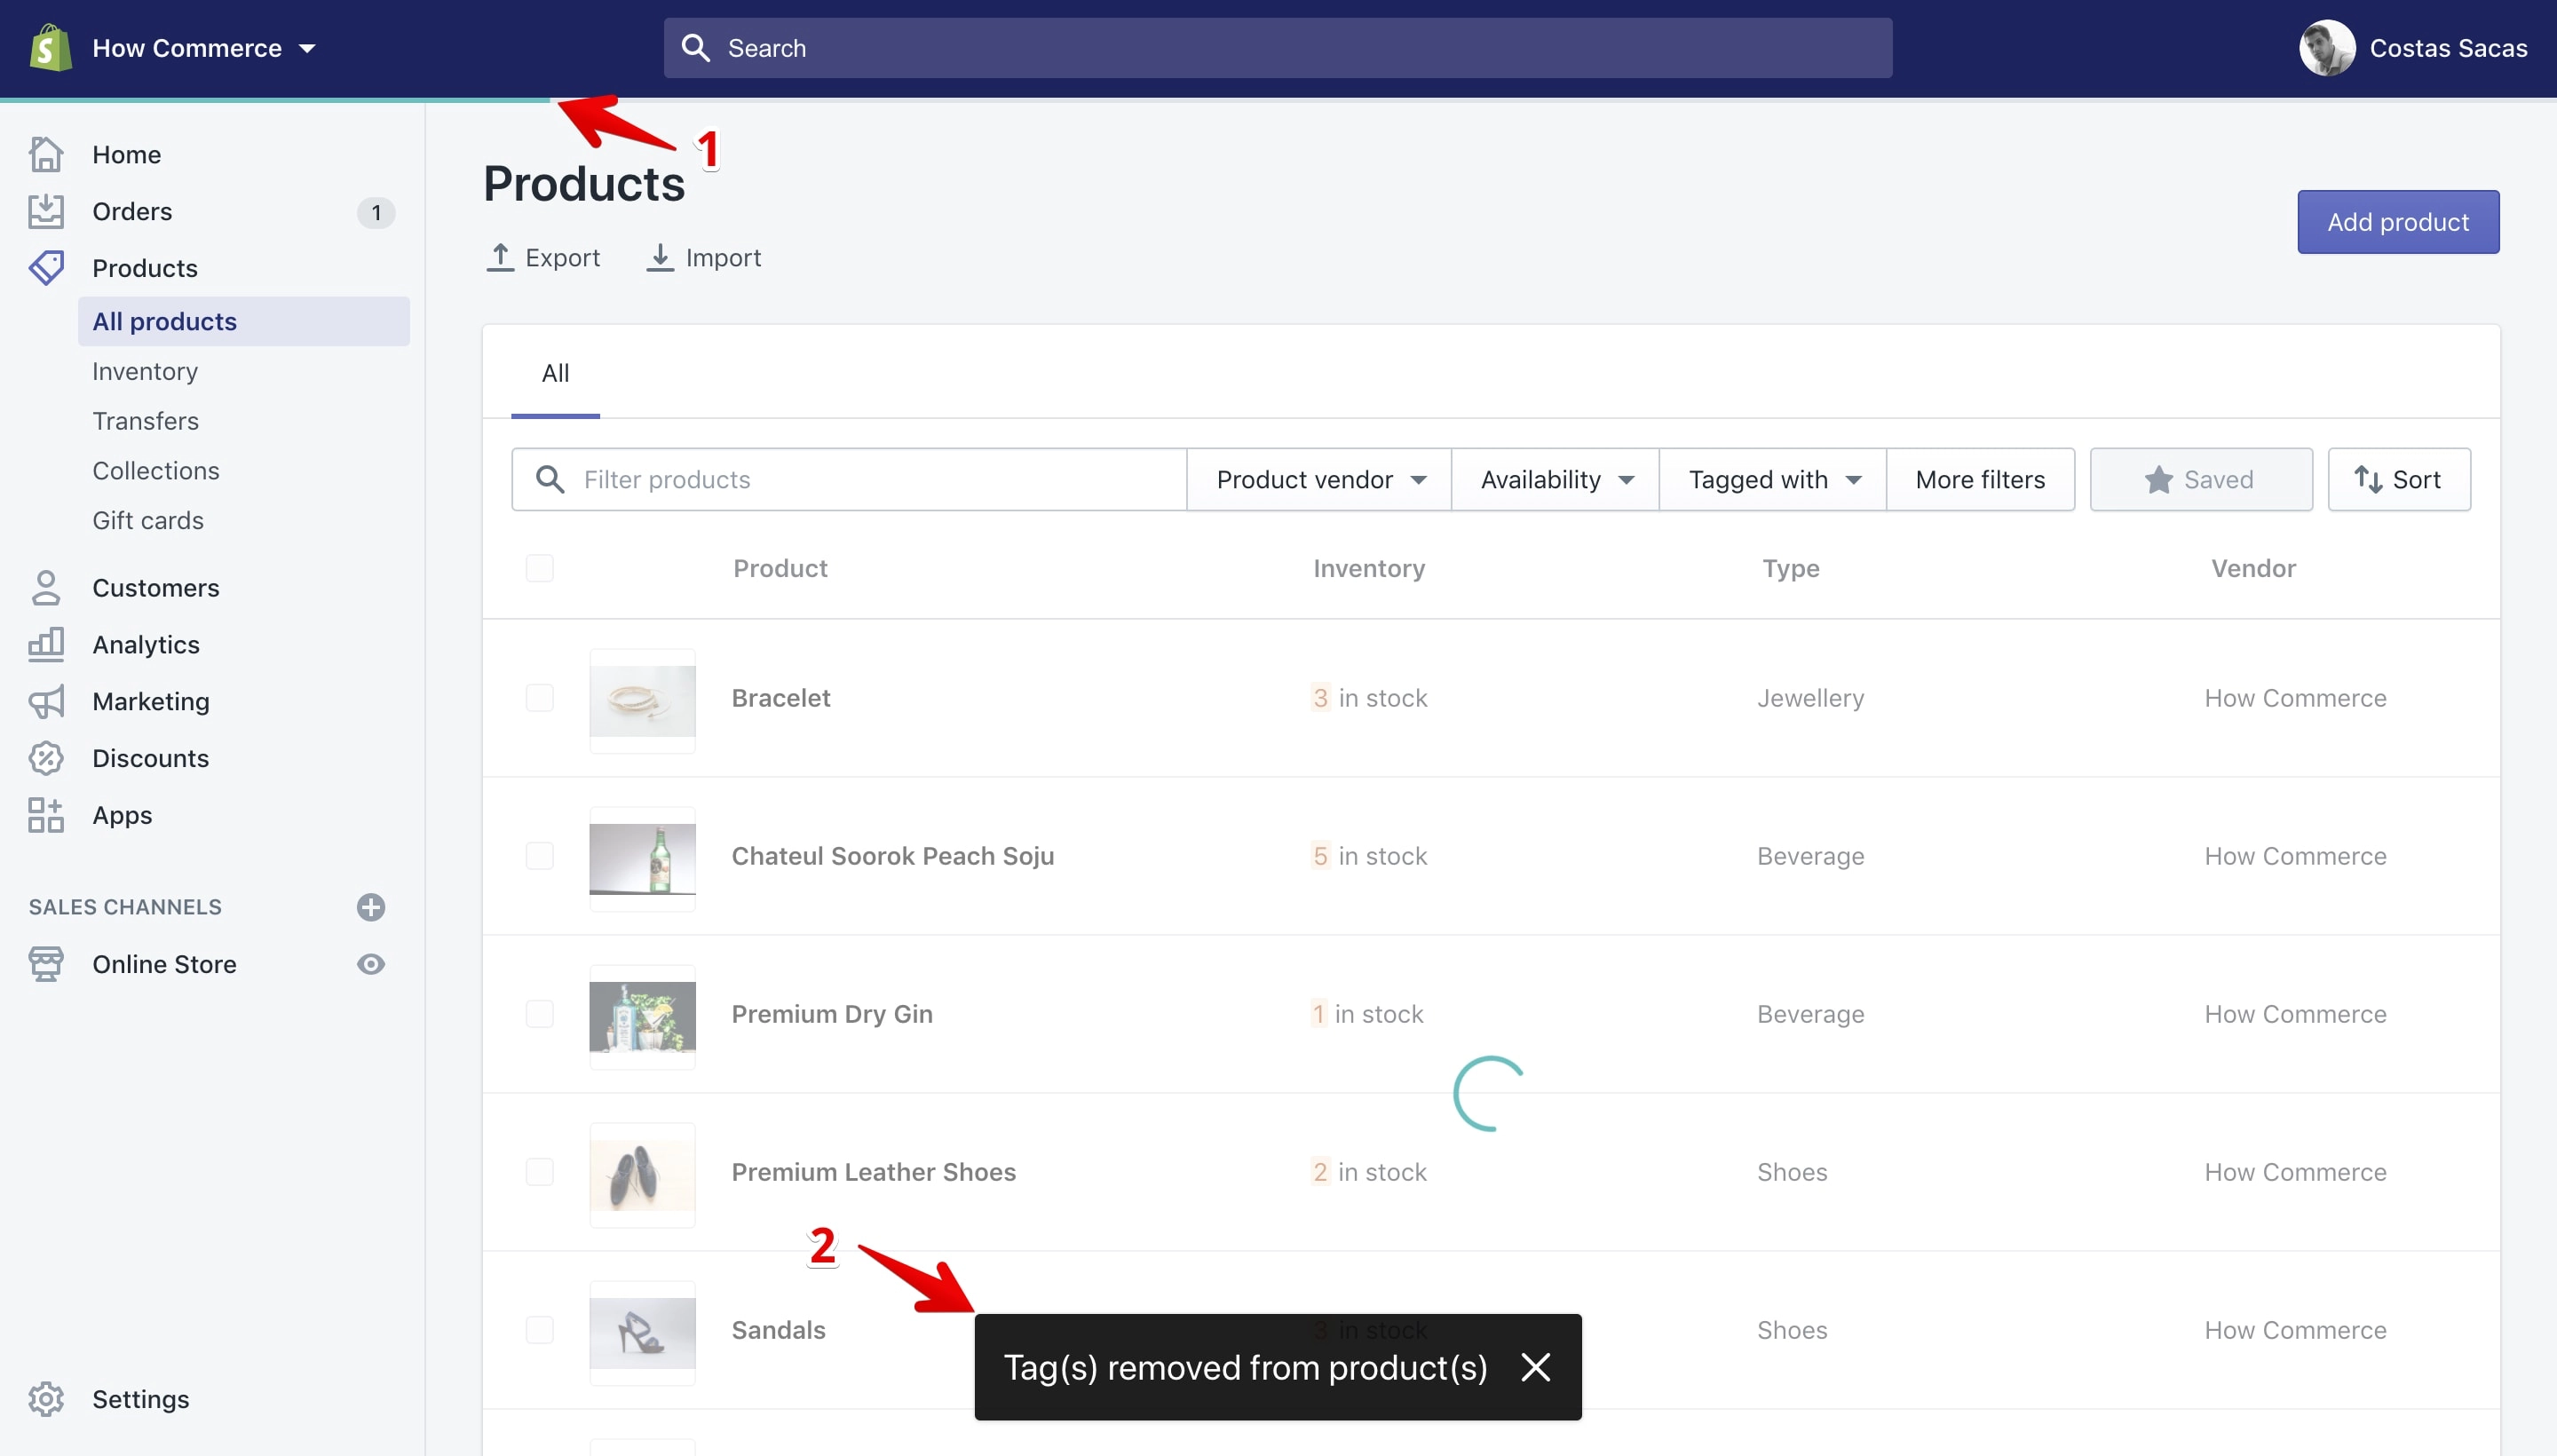
As the tags are removed you will see a blue progress bar at the top of the page (marked with 1 in the image below), and once the tags removal from products is completed you’ll see at the bottom of the page a confirmation message (marked with 2 in the image below) saying that the tags are removed from your selected products:
Add multiple products to one or to multiple collections
With this bulk action you can add multiple products to one collection or to multiple collections. You do that by selecting the “Add to collection(s)” bulk action:
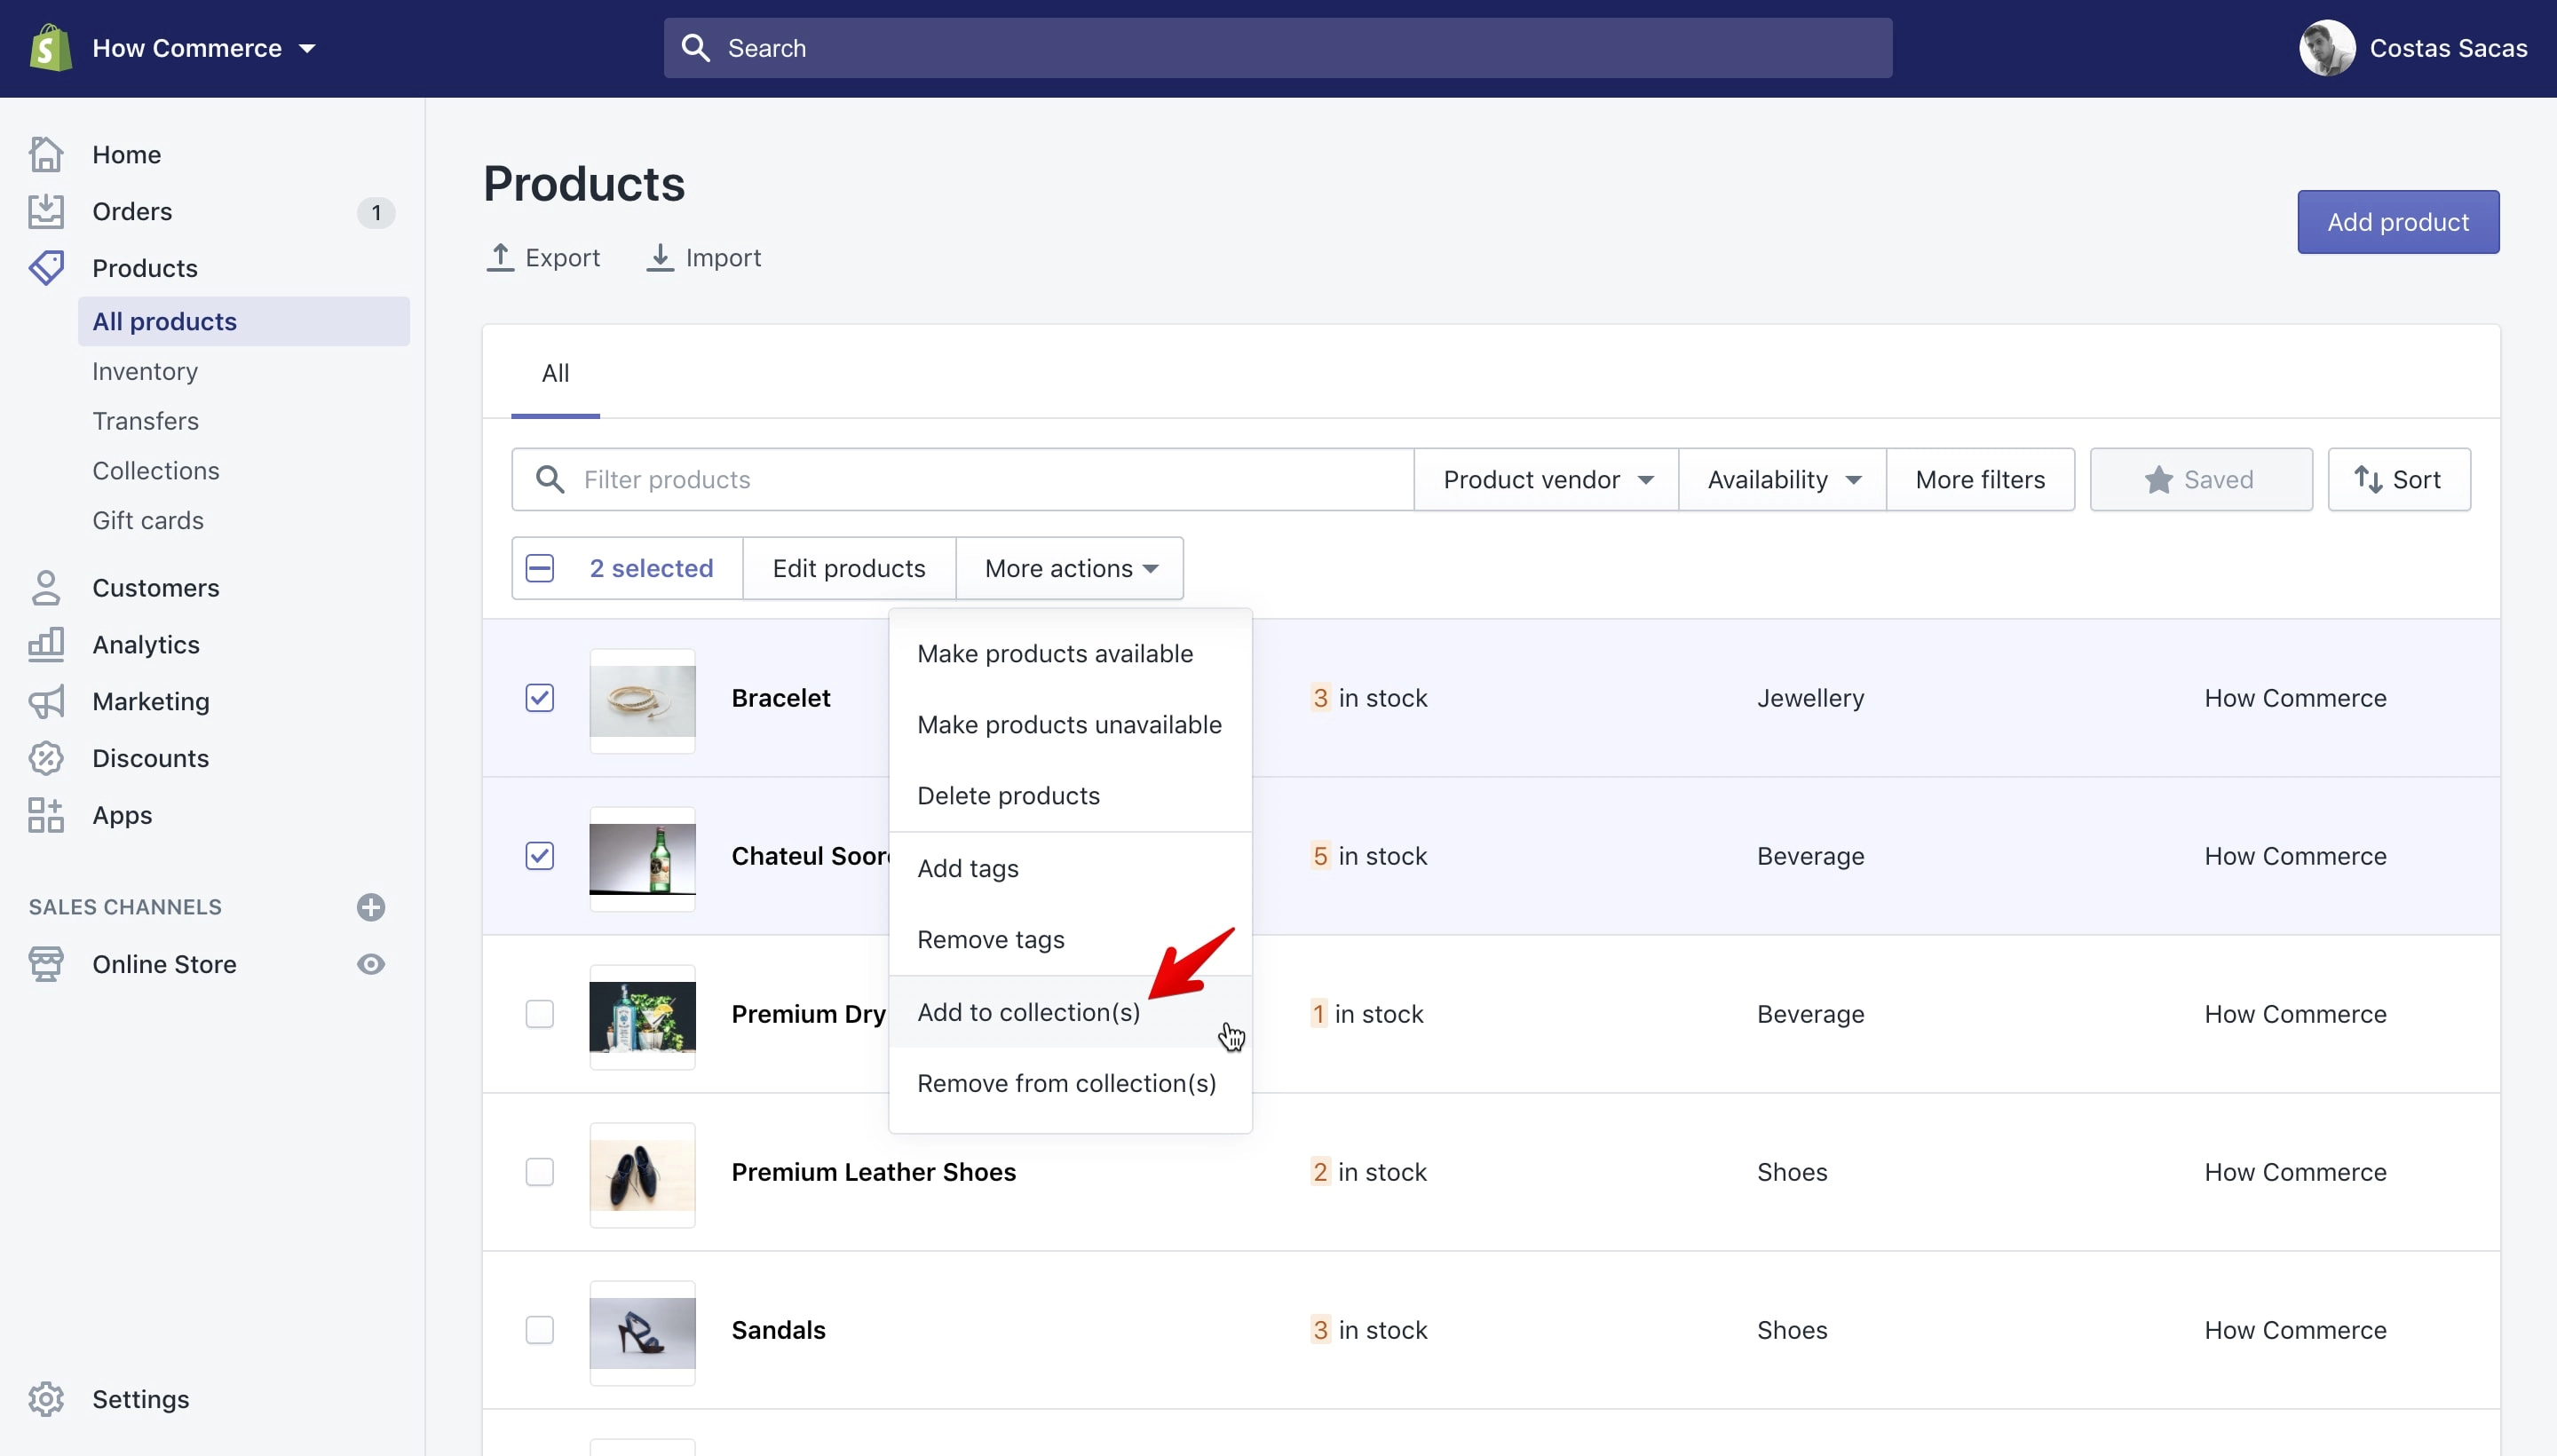
Once you select the “Add to collection(s)” option a pop-up will open listing all the product collections on the shop:
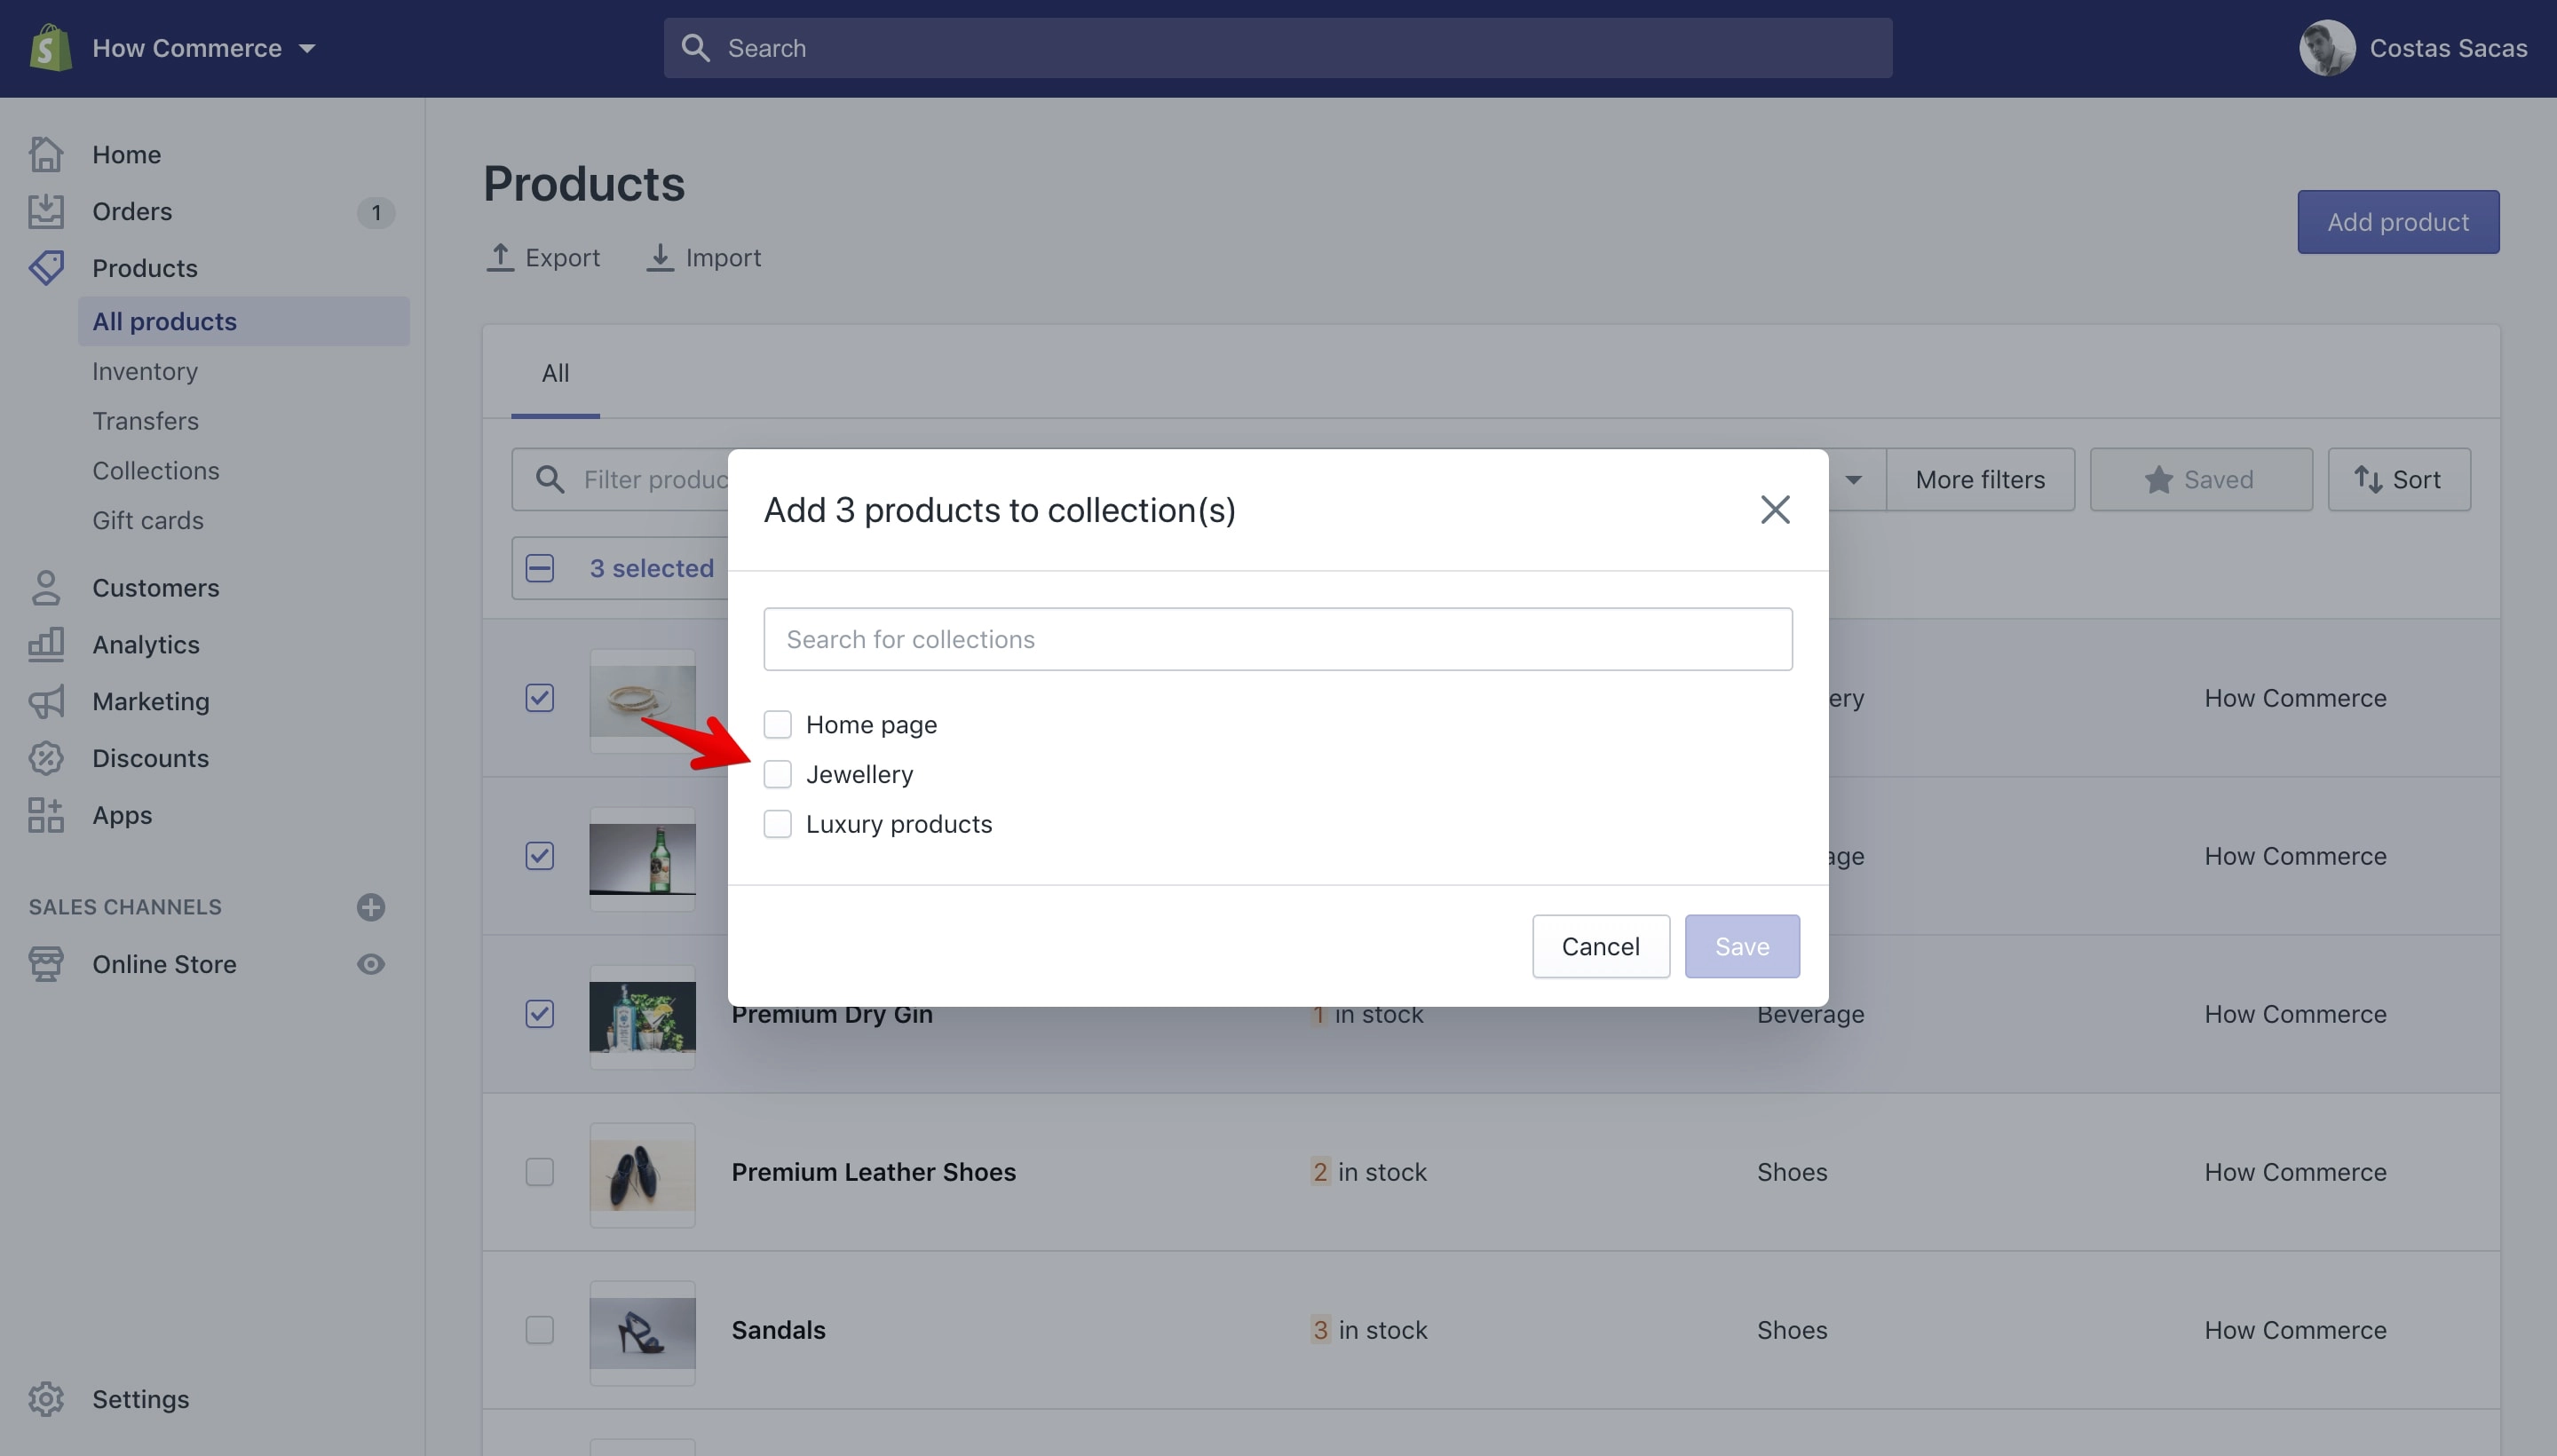
I’ll add the products that I’ve selected to all 3 collections: Home page, Jewellery, Luxury products.
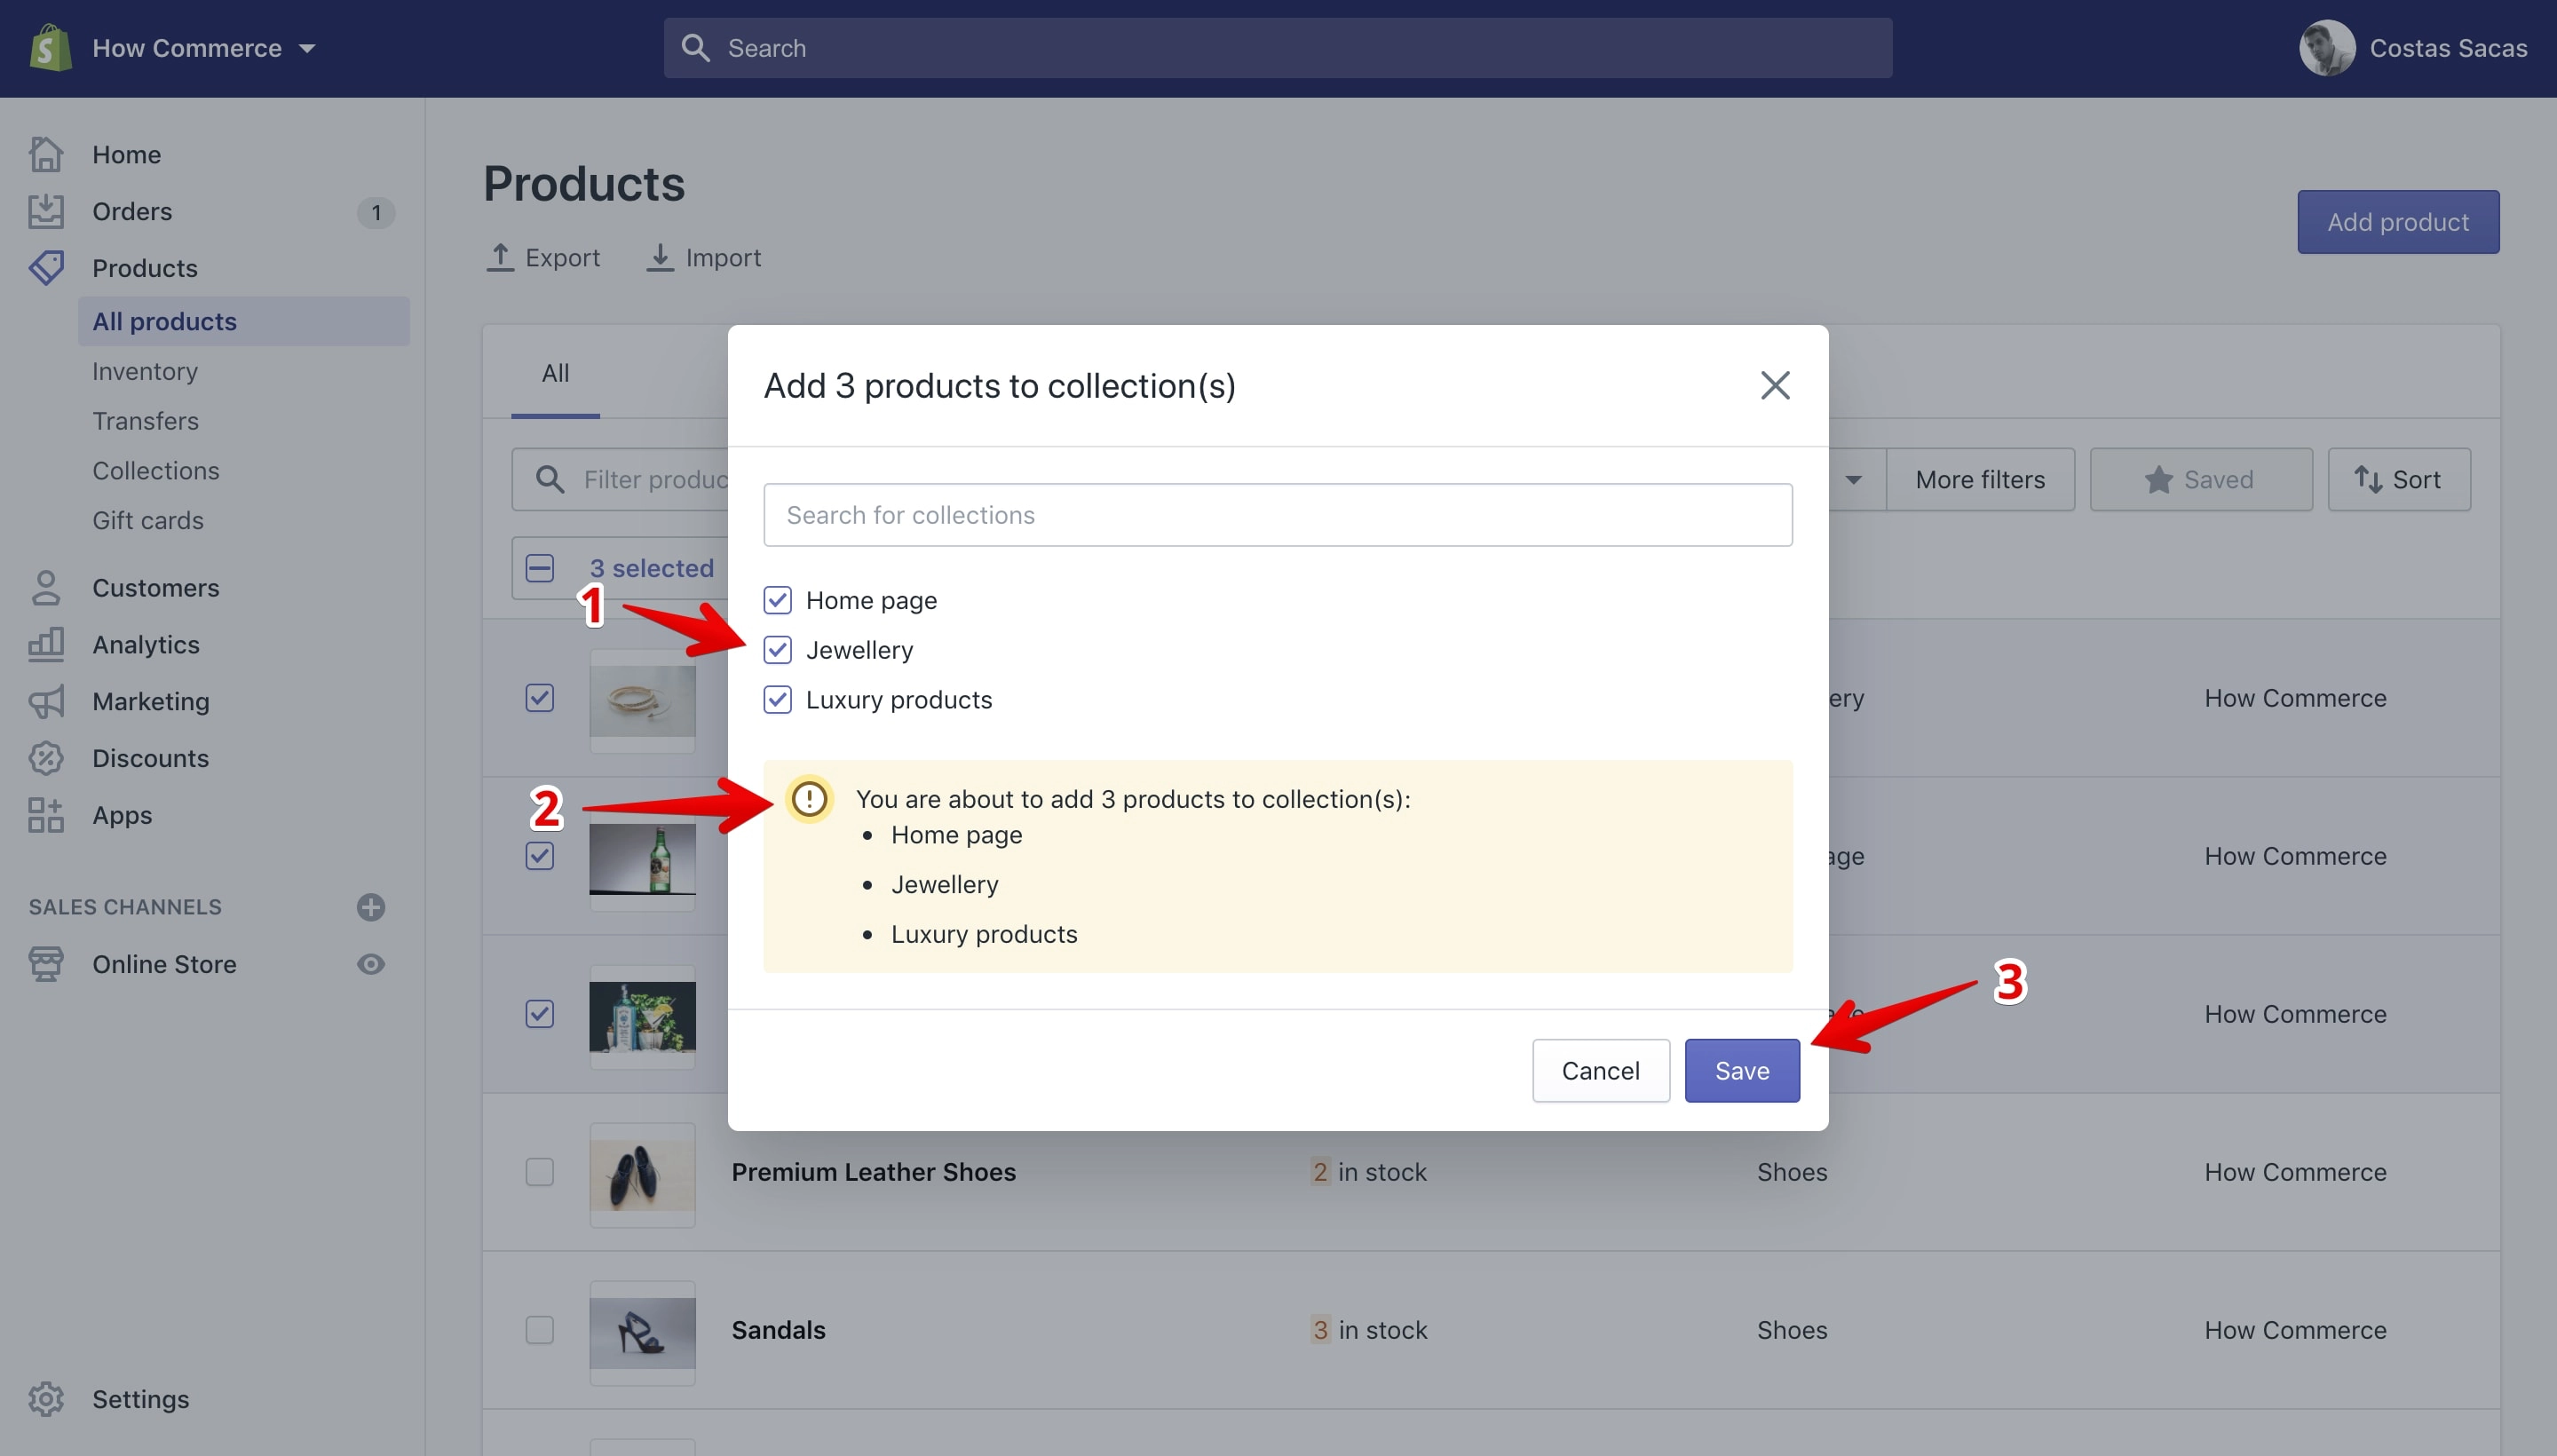
Once you select the collections (marked with 1 in the image below) a notification section will display inside the pop-up warning you about the action that will happen once you click the “Save” button.
Please note that a product can be assigned to multiple collections if you need it.
So select the collections that you want to assign to the selected products (marked with 1), read the warning notification (marked with 2 in the image below) to make sure that everything is OK and after click on the “Save” button (marked with 3 in the image below):
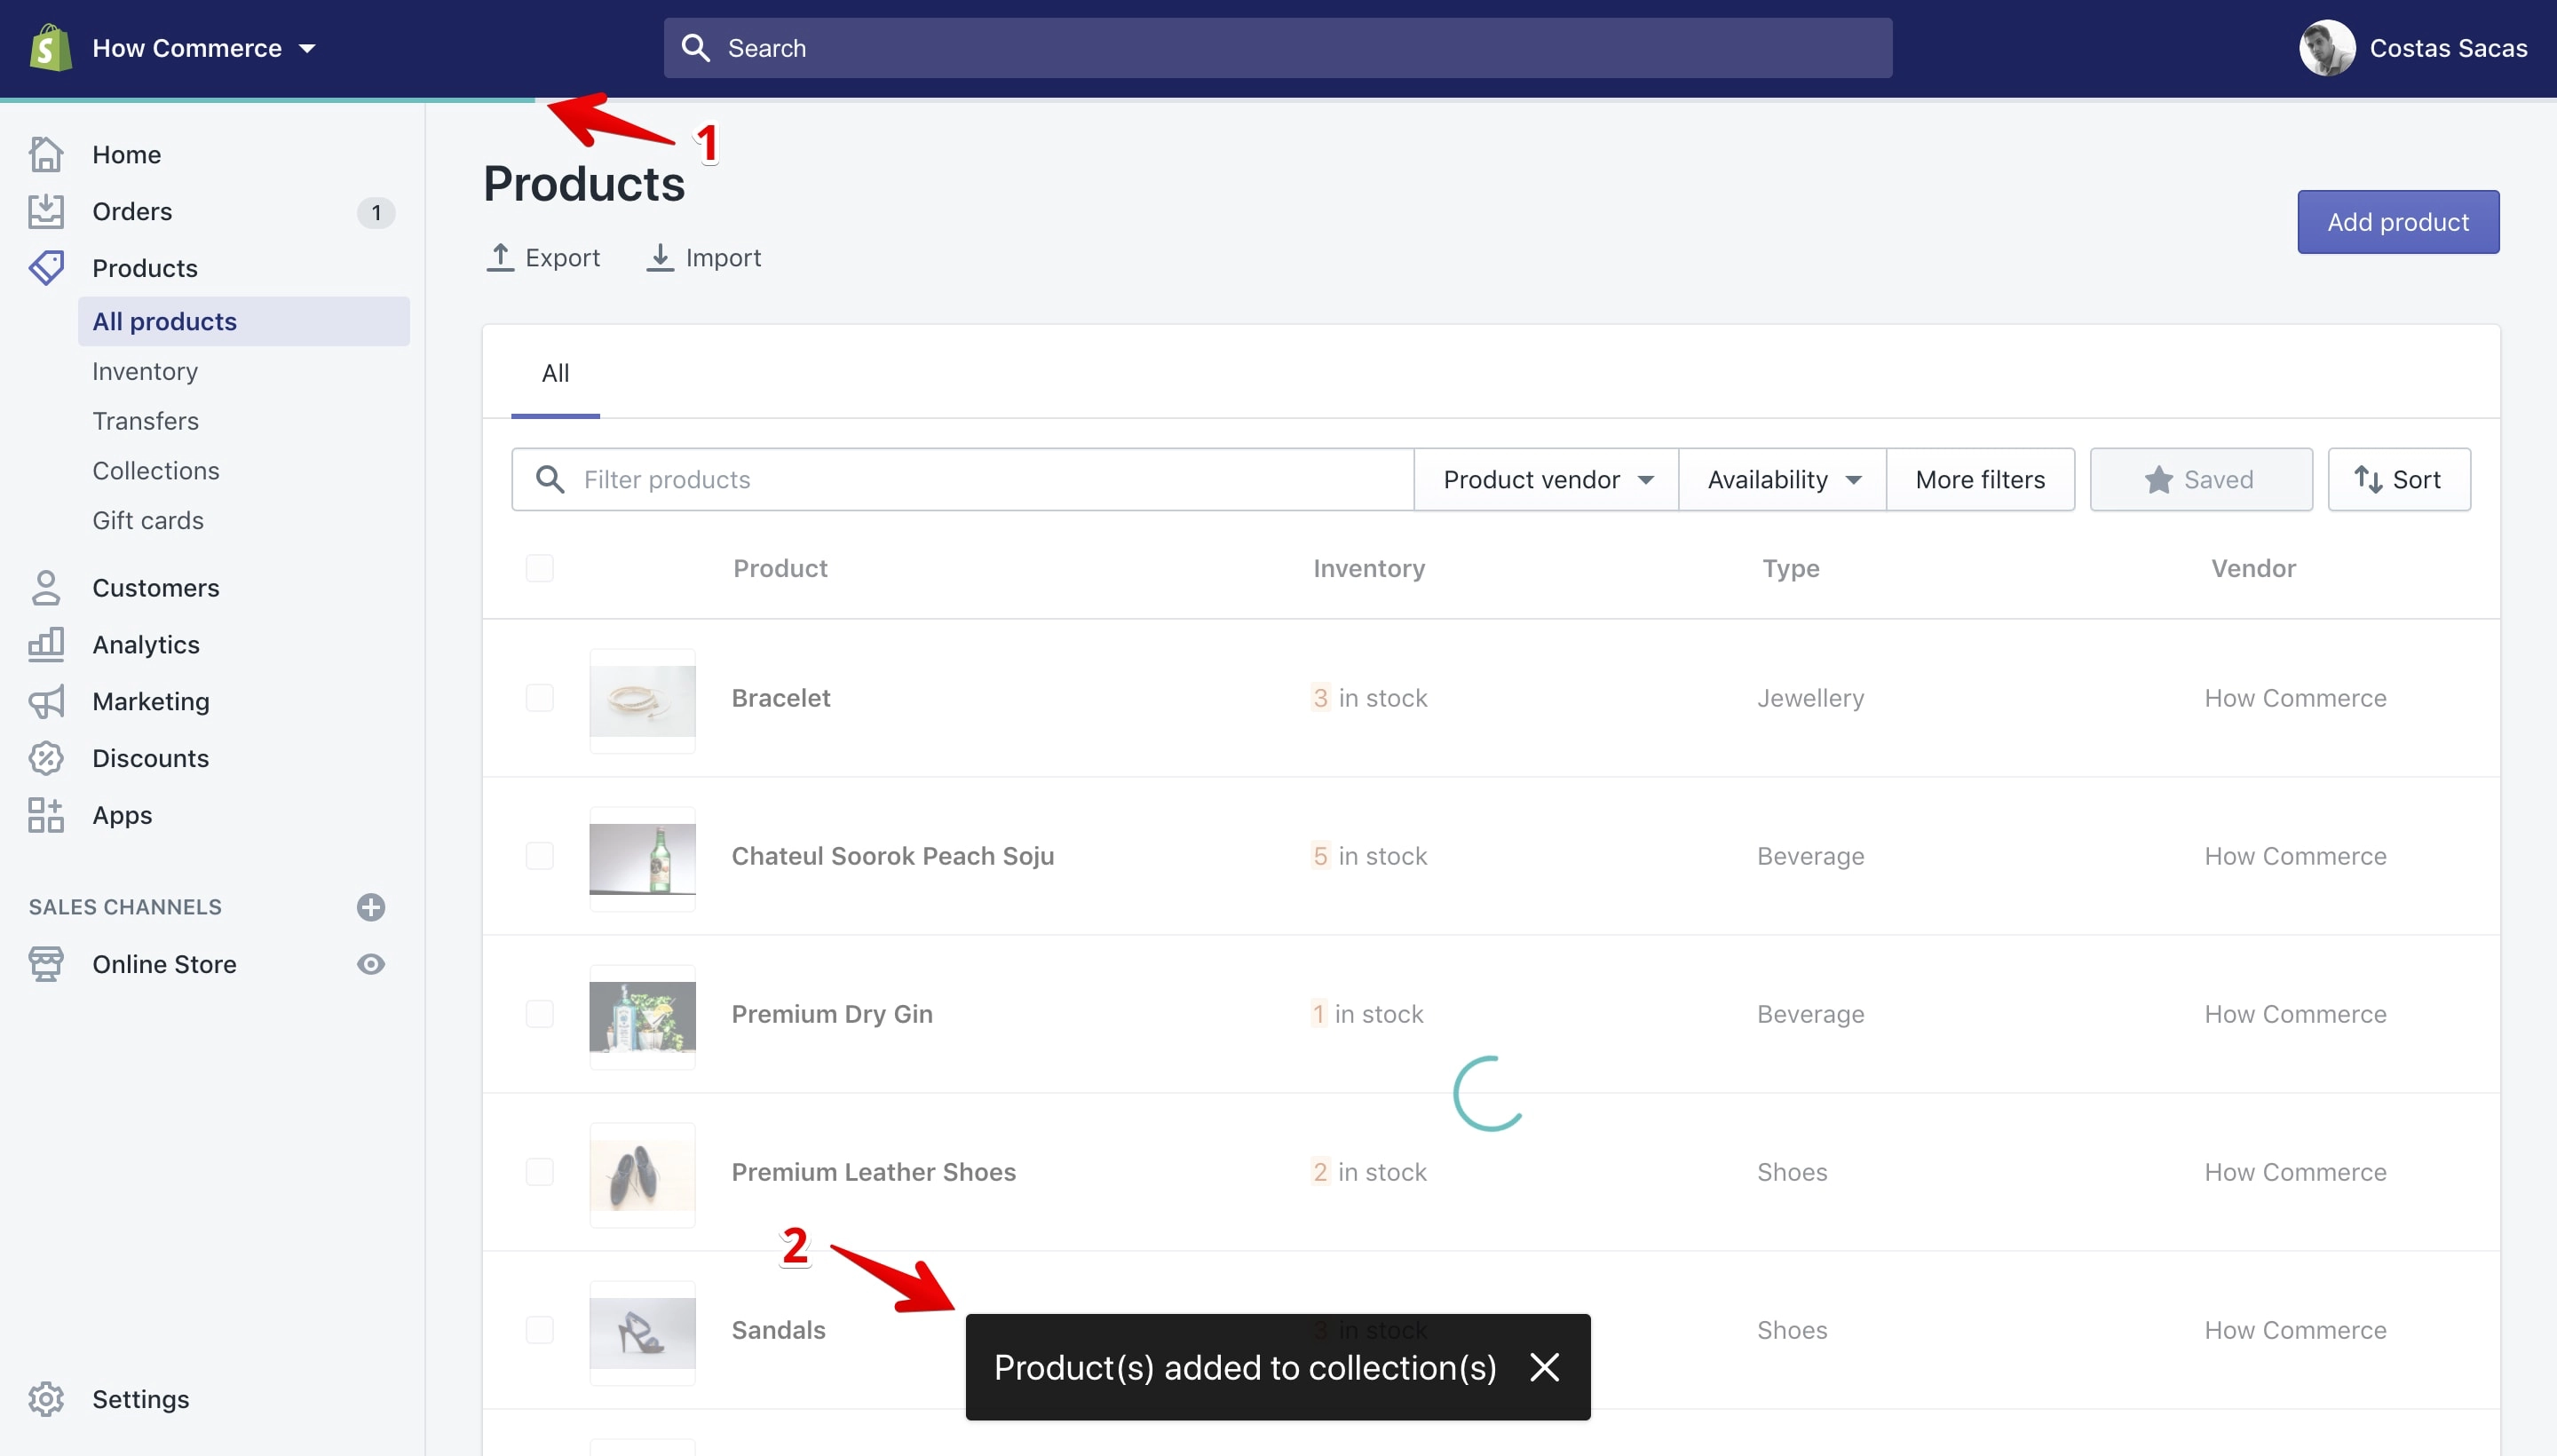
As the products are progressively added to the collections you will see a blue progress bar at the top of the page (marked with 1 in the image below), and once the products are assigned to collections you’ll see at the bottom of the page a confirmation message (marked with 2 in the image below) saying that the products are added to collections:
Remove multiple products from one or multiple collections
With this bulk action you can remove multiple products from one or multiple collections. You do that by selecting the “Remove from collection(s)” bulk action:
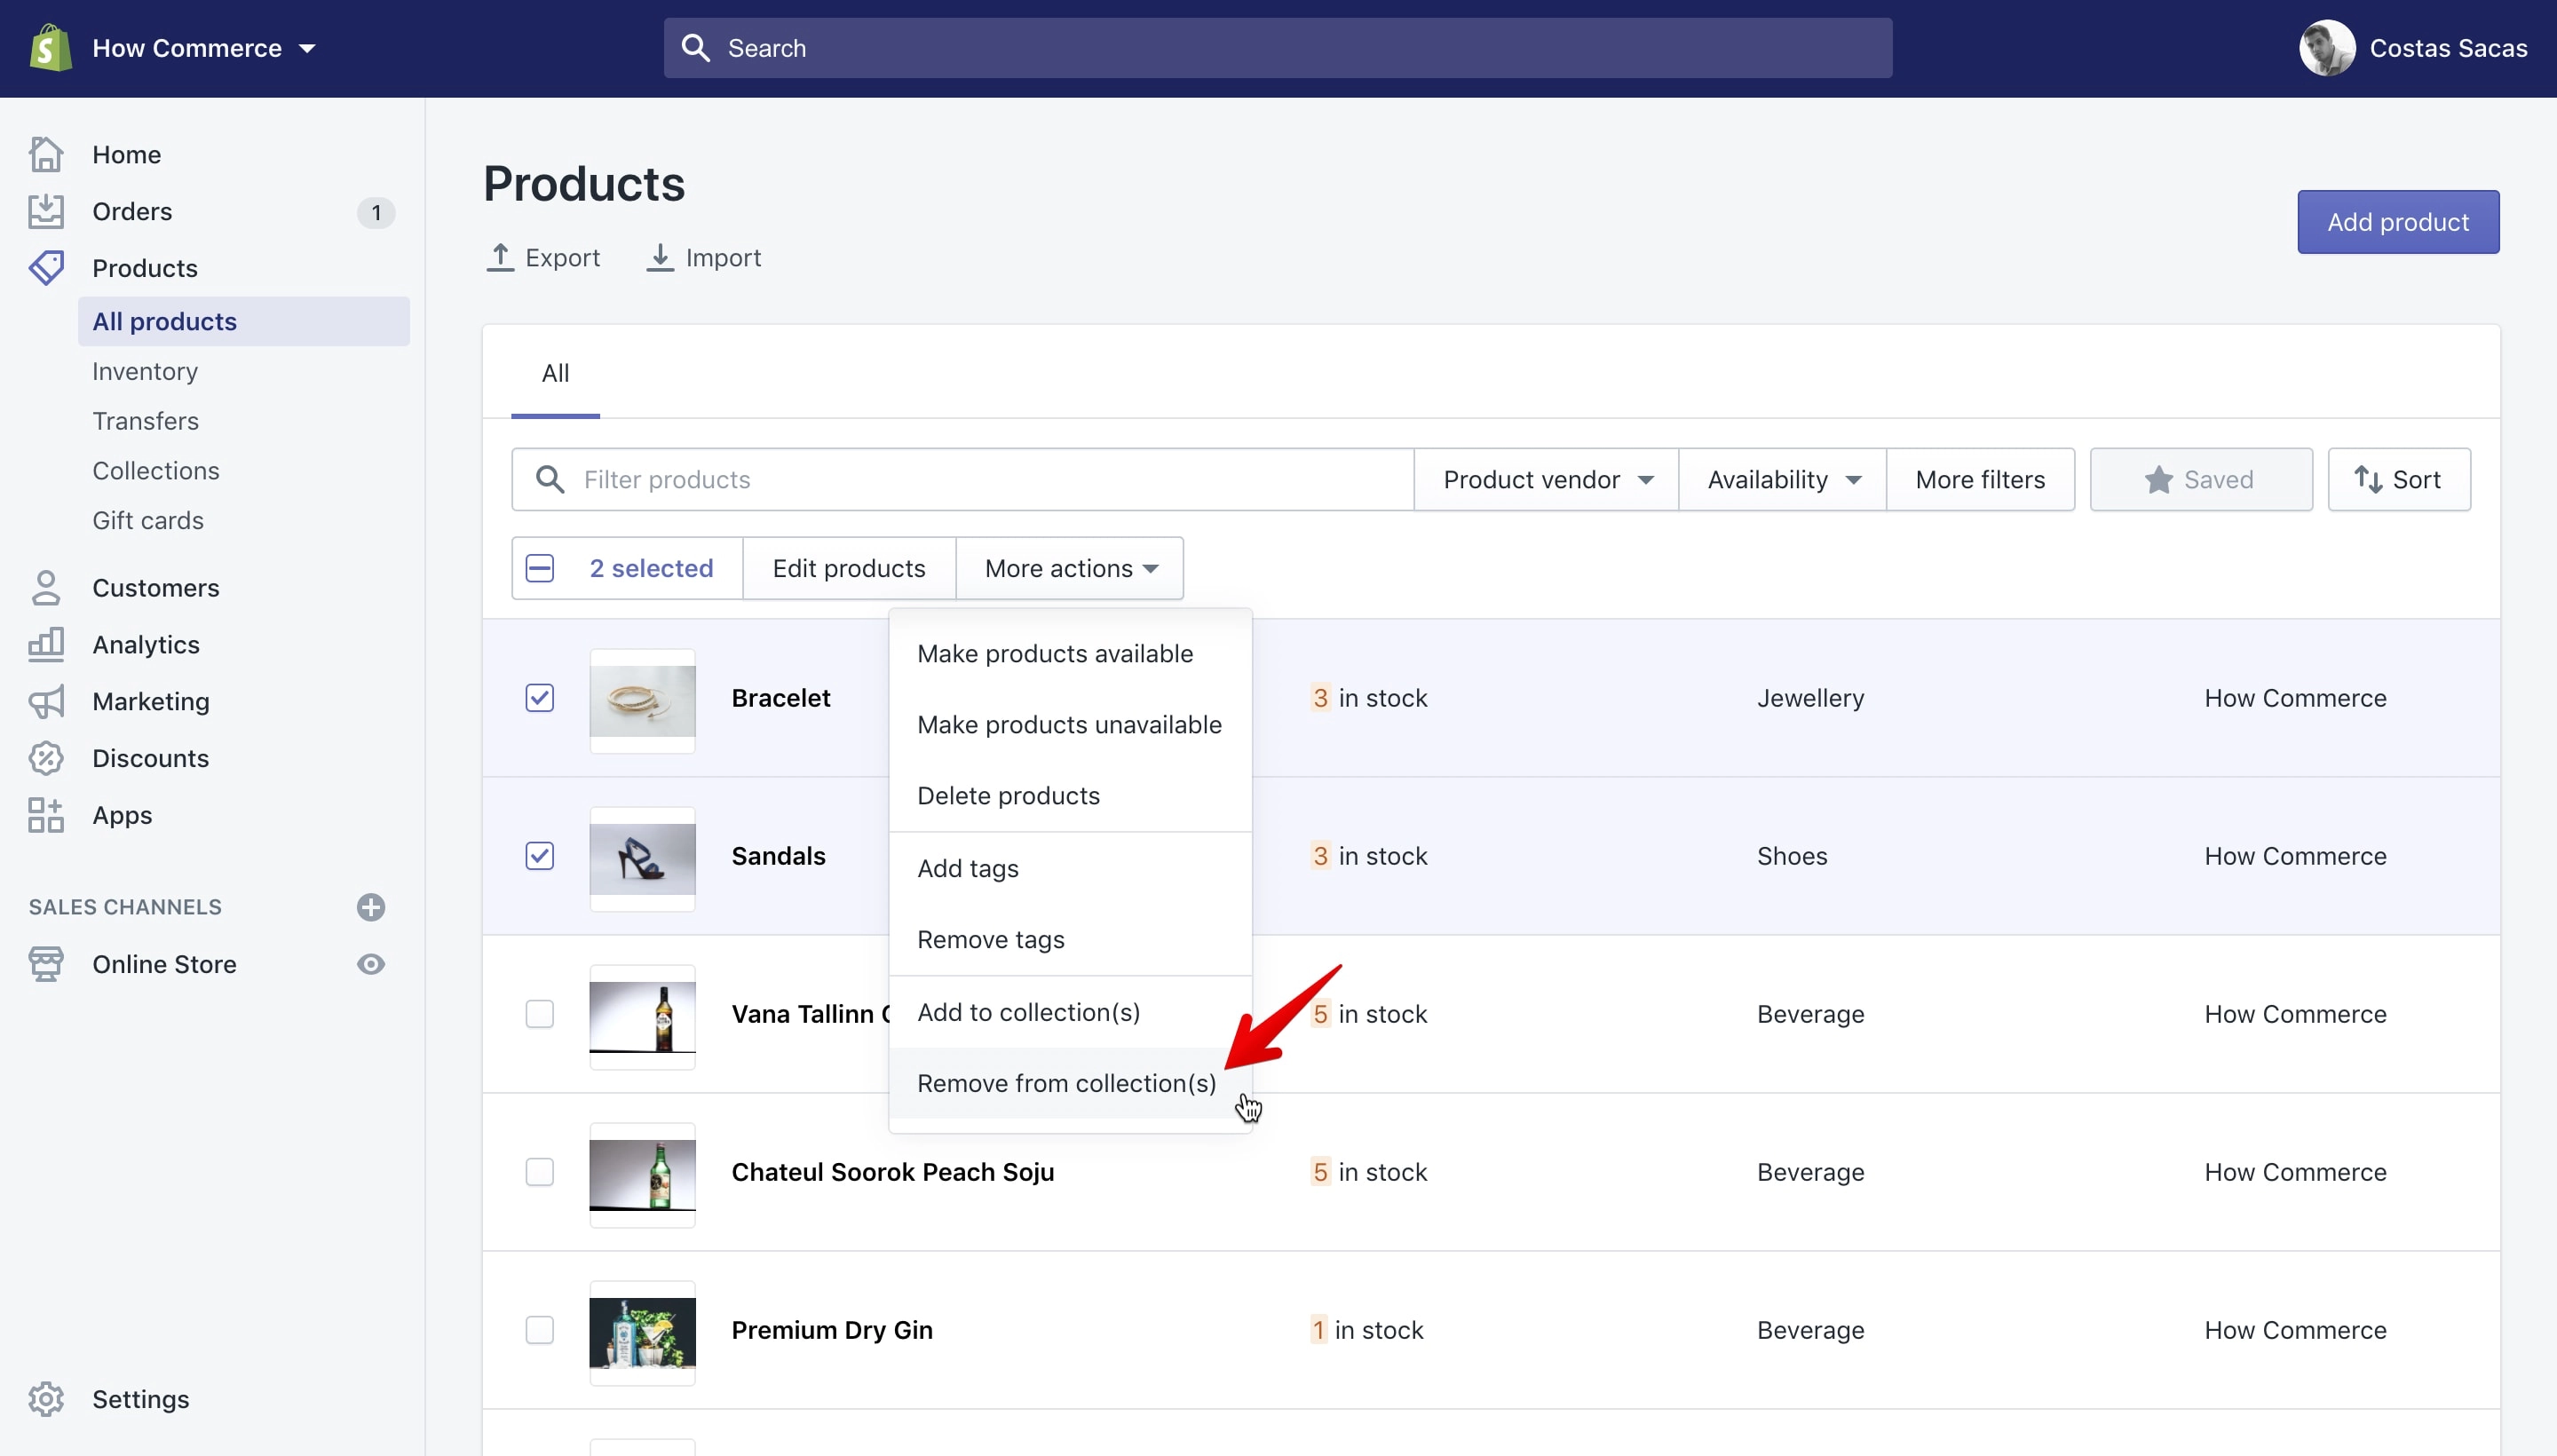
Once you select the “Remove from collection(s)” option a pop-up will open listing all the product collections on the shop:
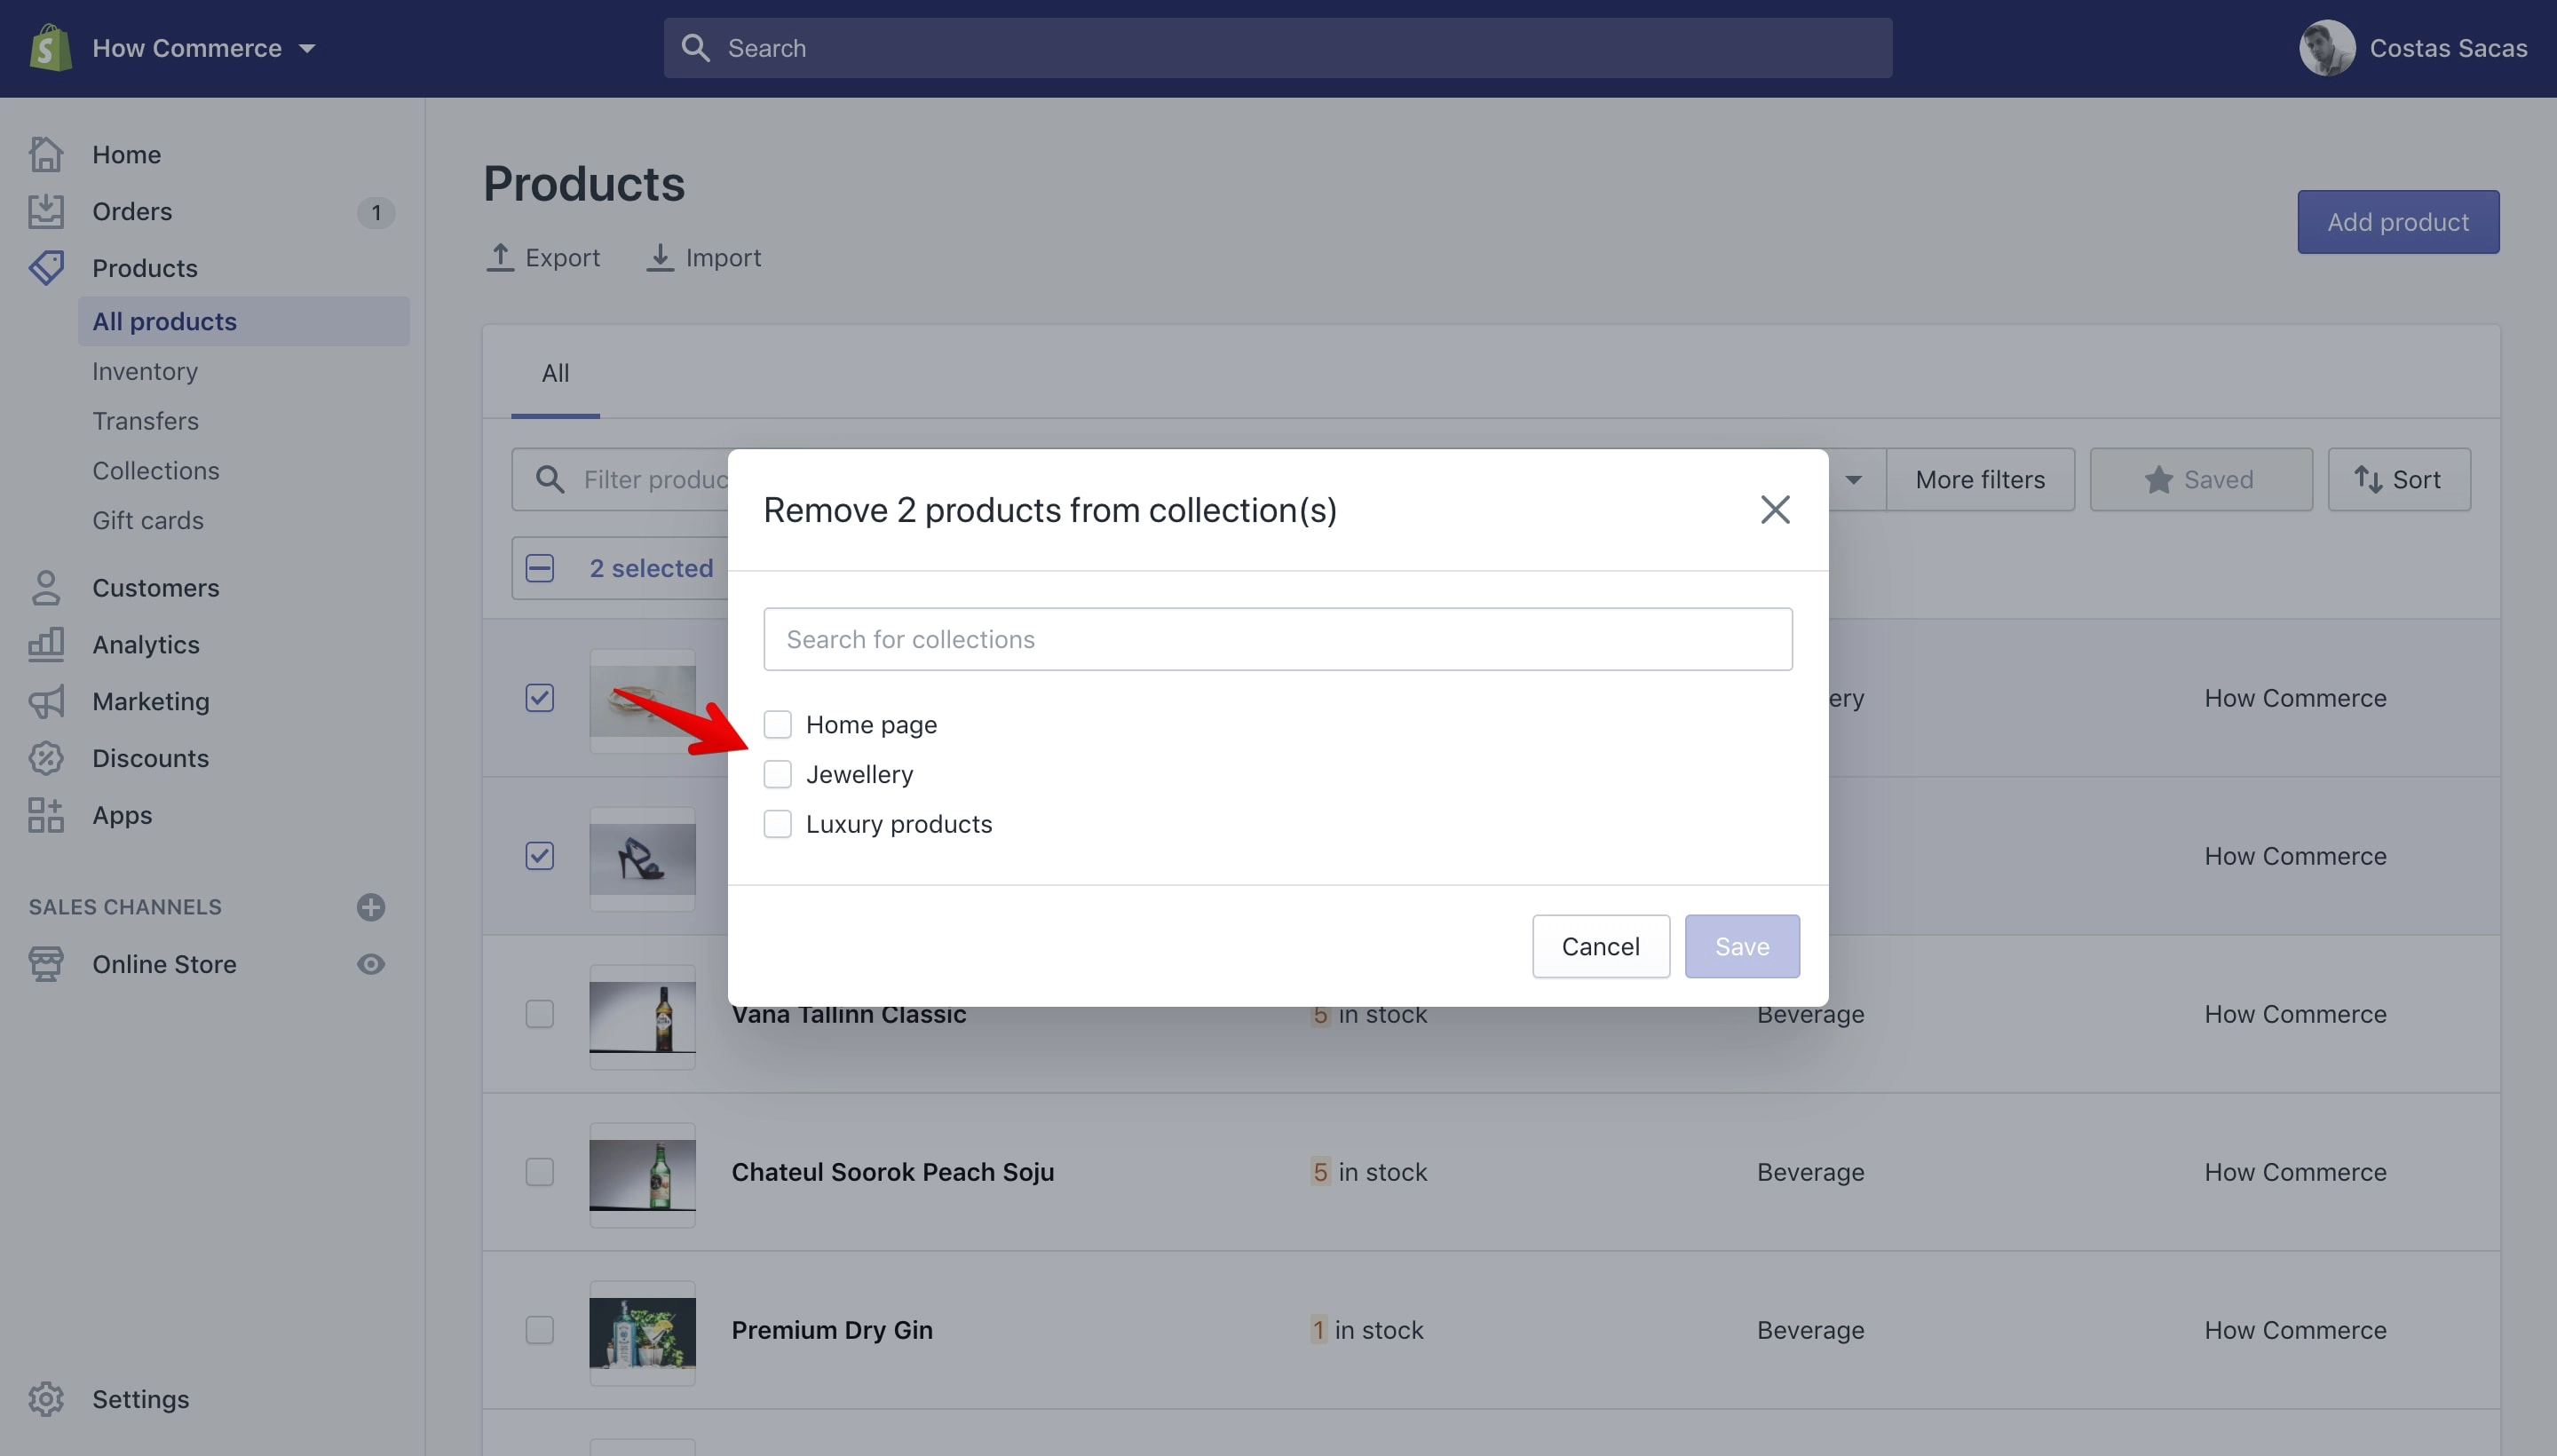
I’ll remove the products that I’ve selected from all 3 collections: Home page, Jewellery, Luxury products.
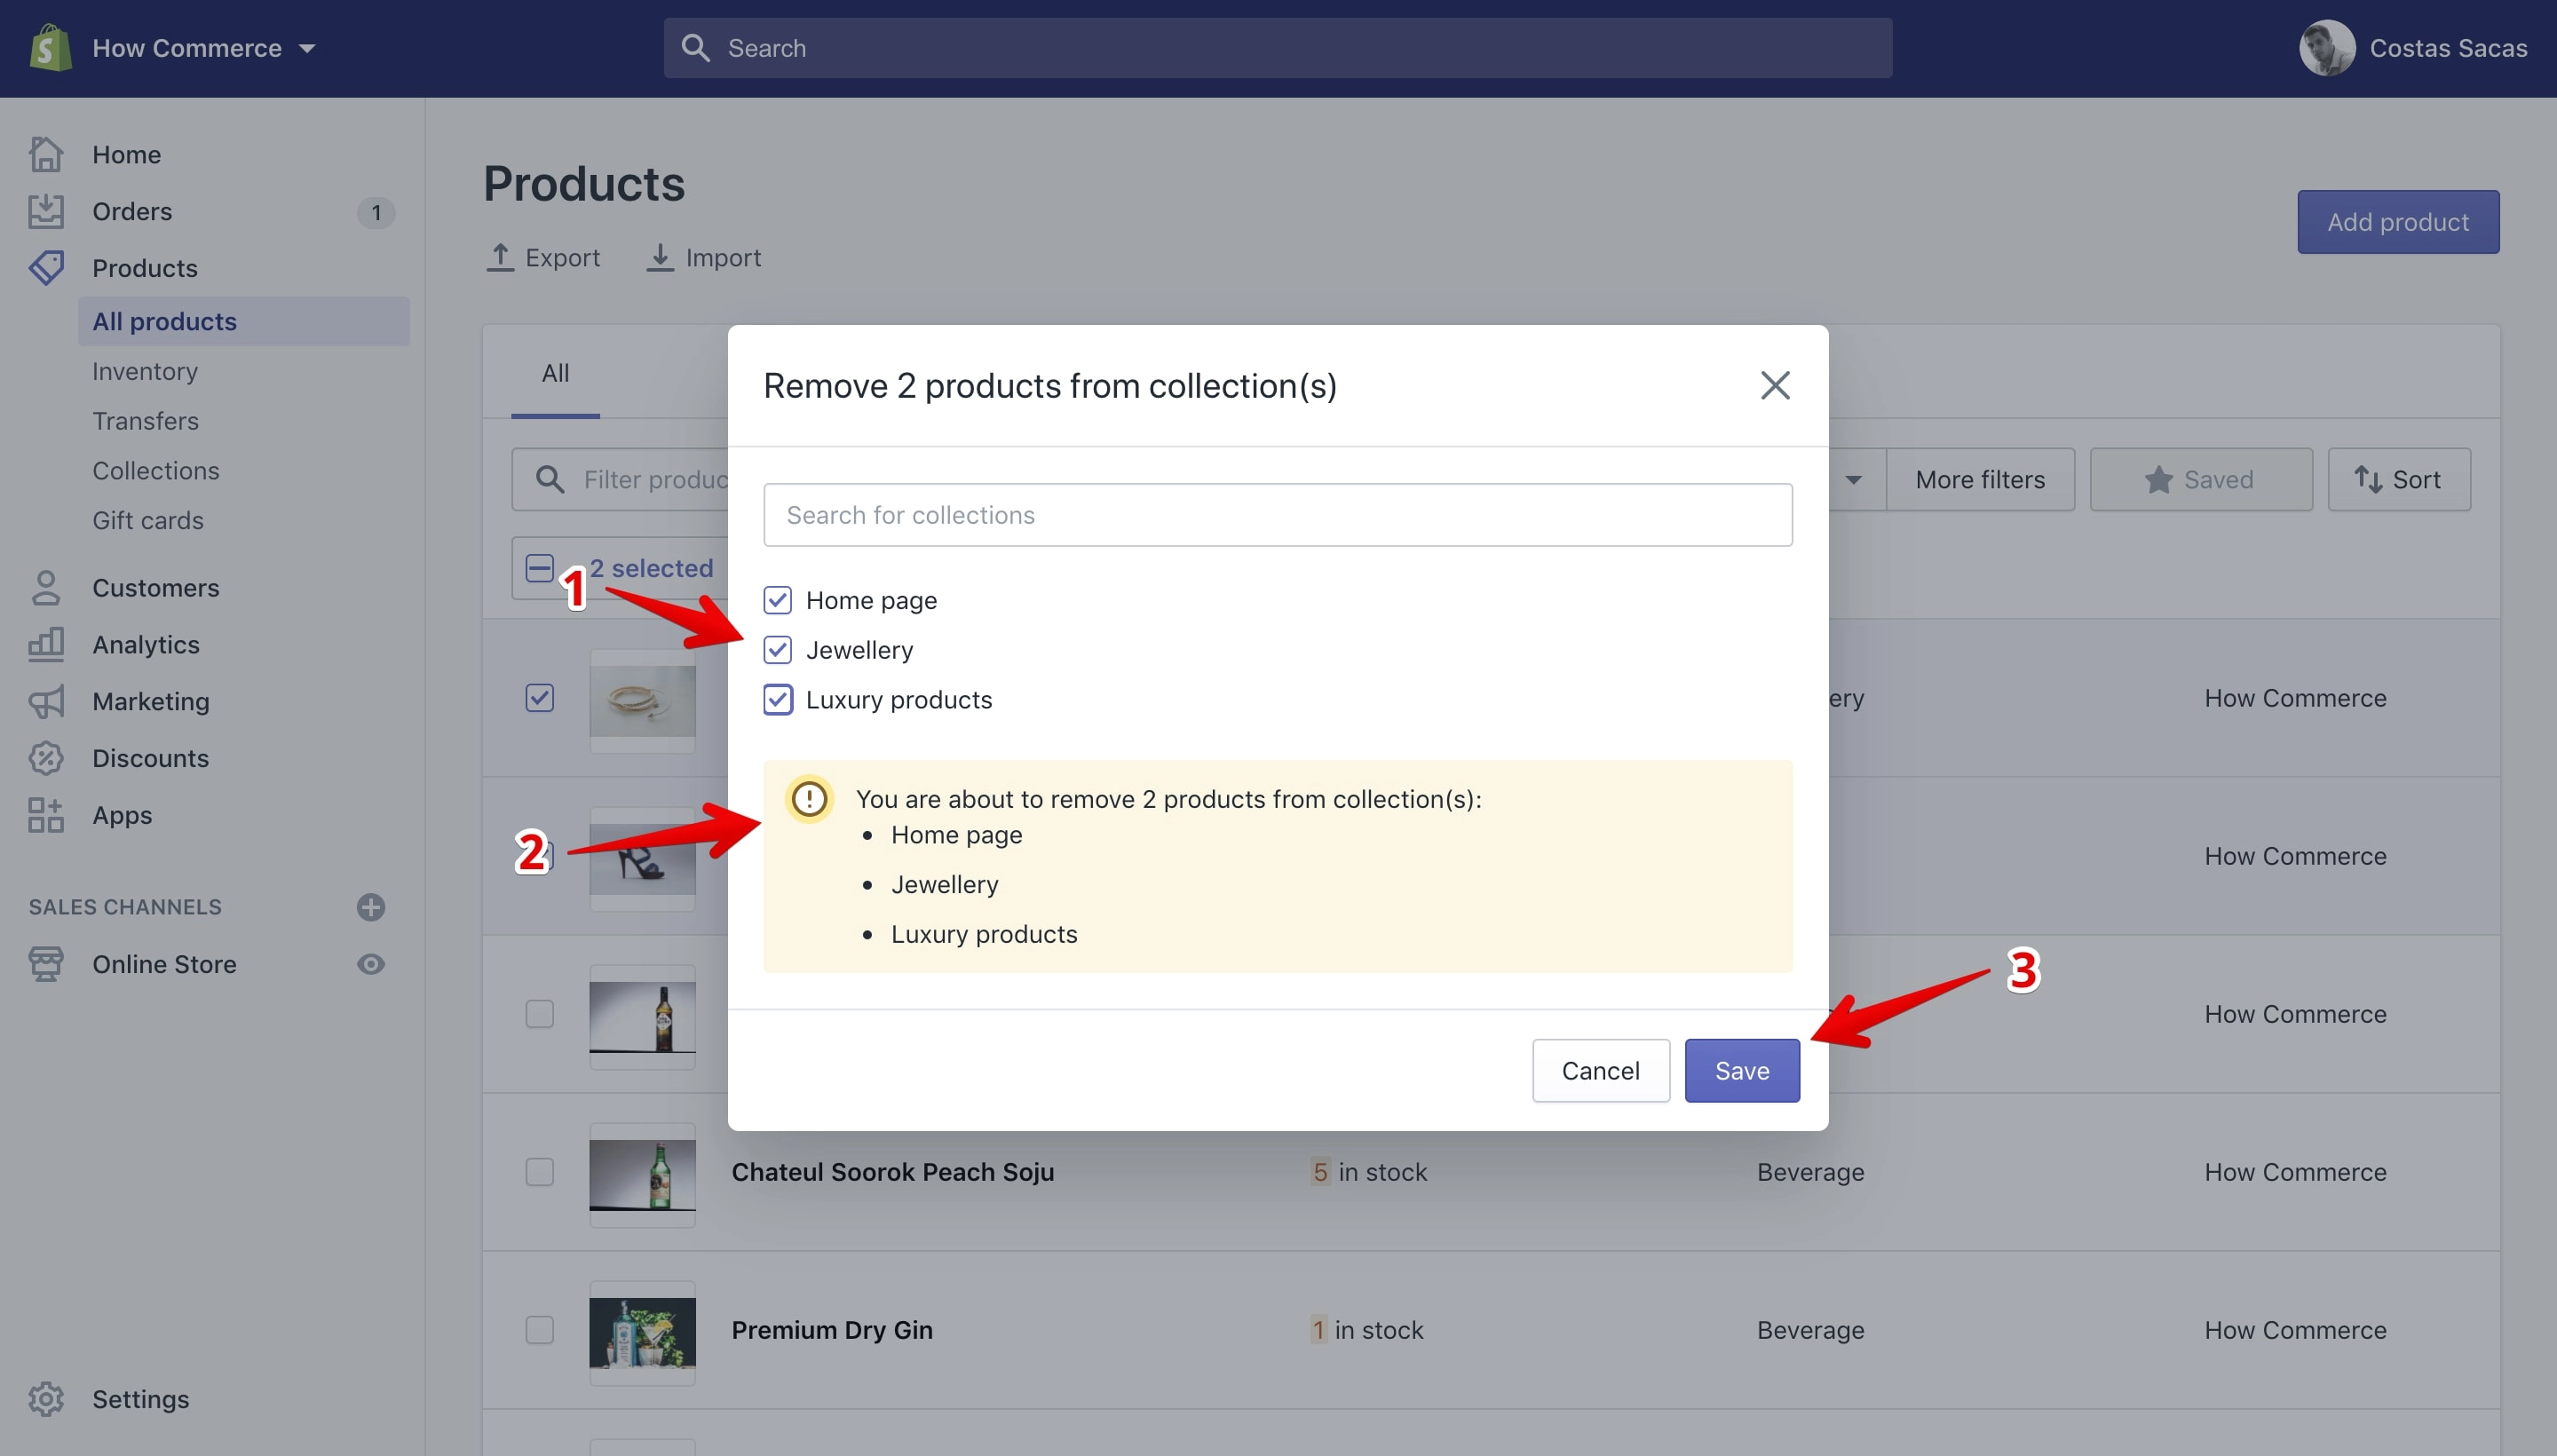
Once you select the collections (marked with 1 in the image below) a notification section will display inside the pop-up warning you about the action that will happen once you click the “Save” button.
Note that a product can be removed from multiple collections if you need it.
So select the collections from which you want to remove the selected products (marked with 1 in the image below), read the warning notification (marked with 2 in the image below) to make sure that everything is OK and after click on the “Save” button (marked with 3 in the image below):
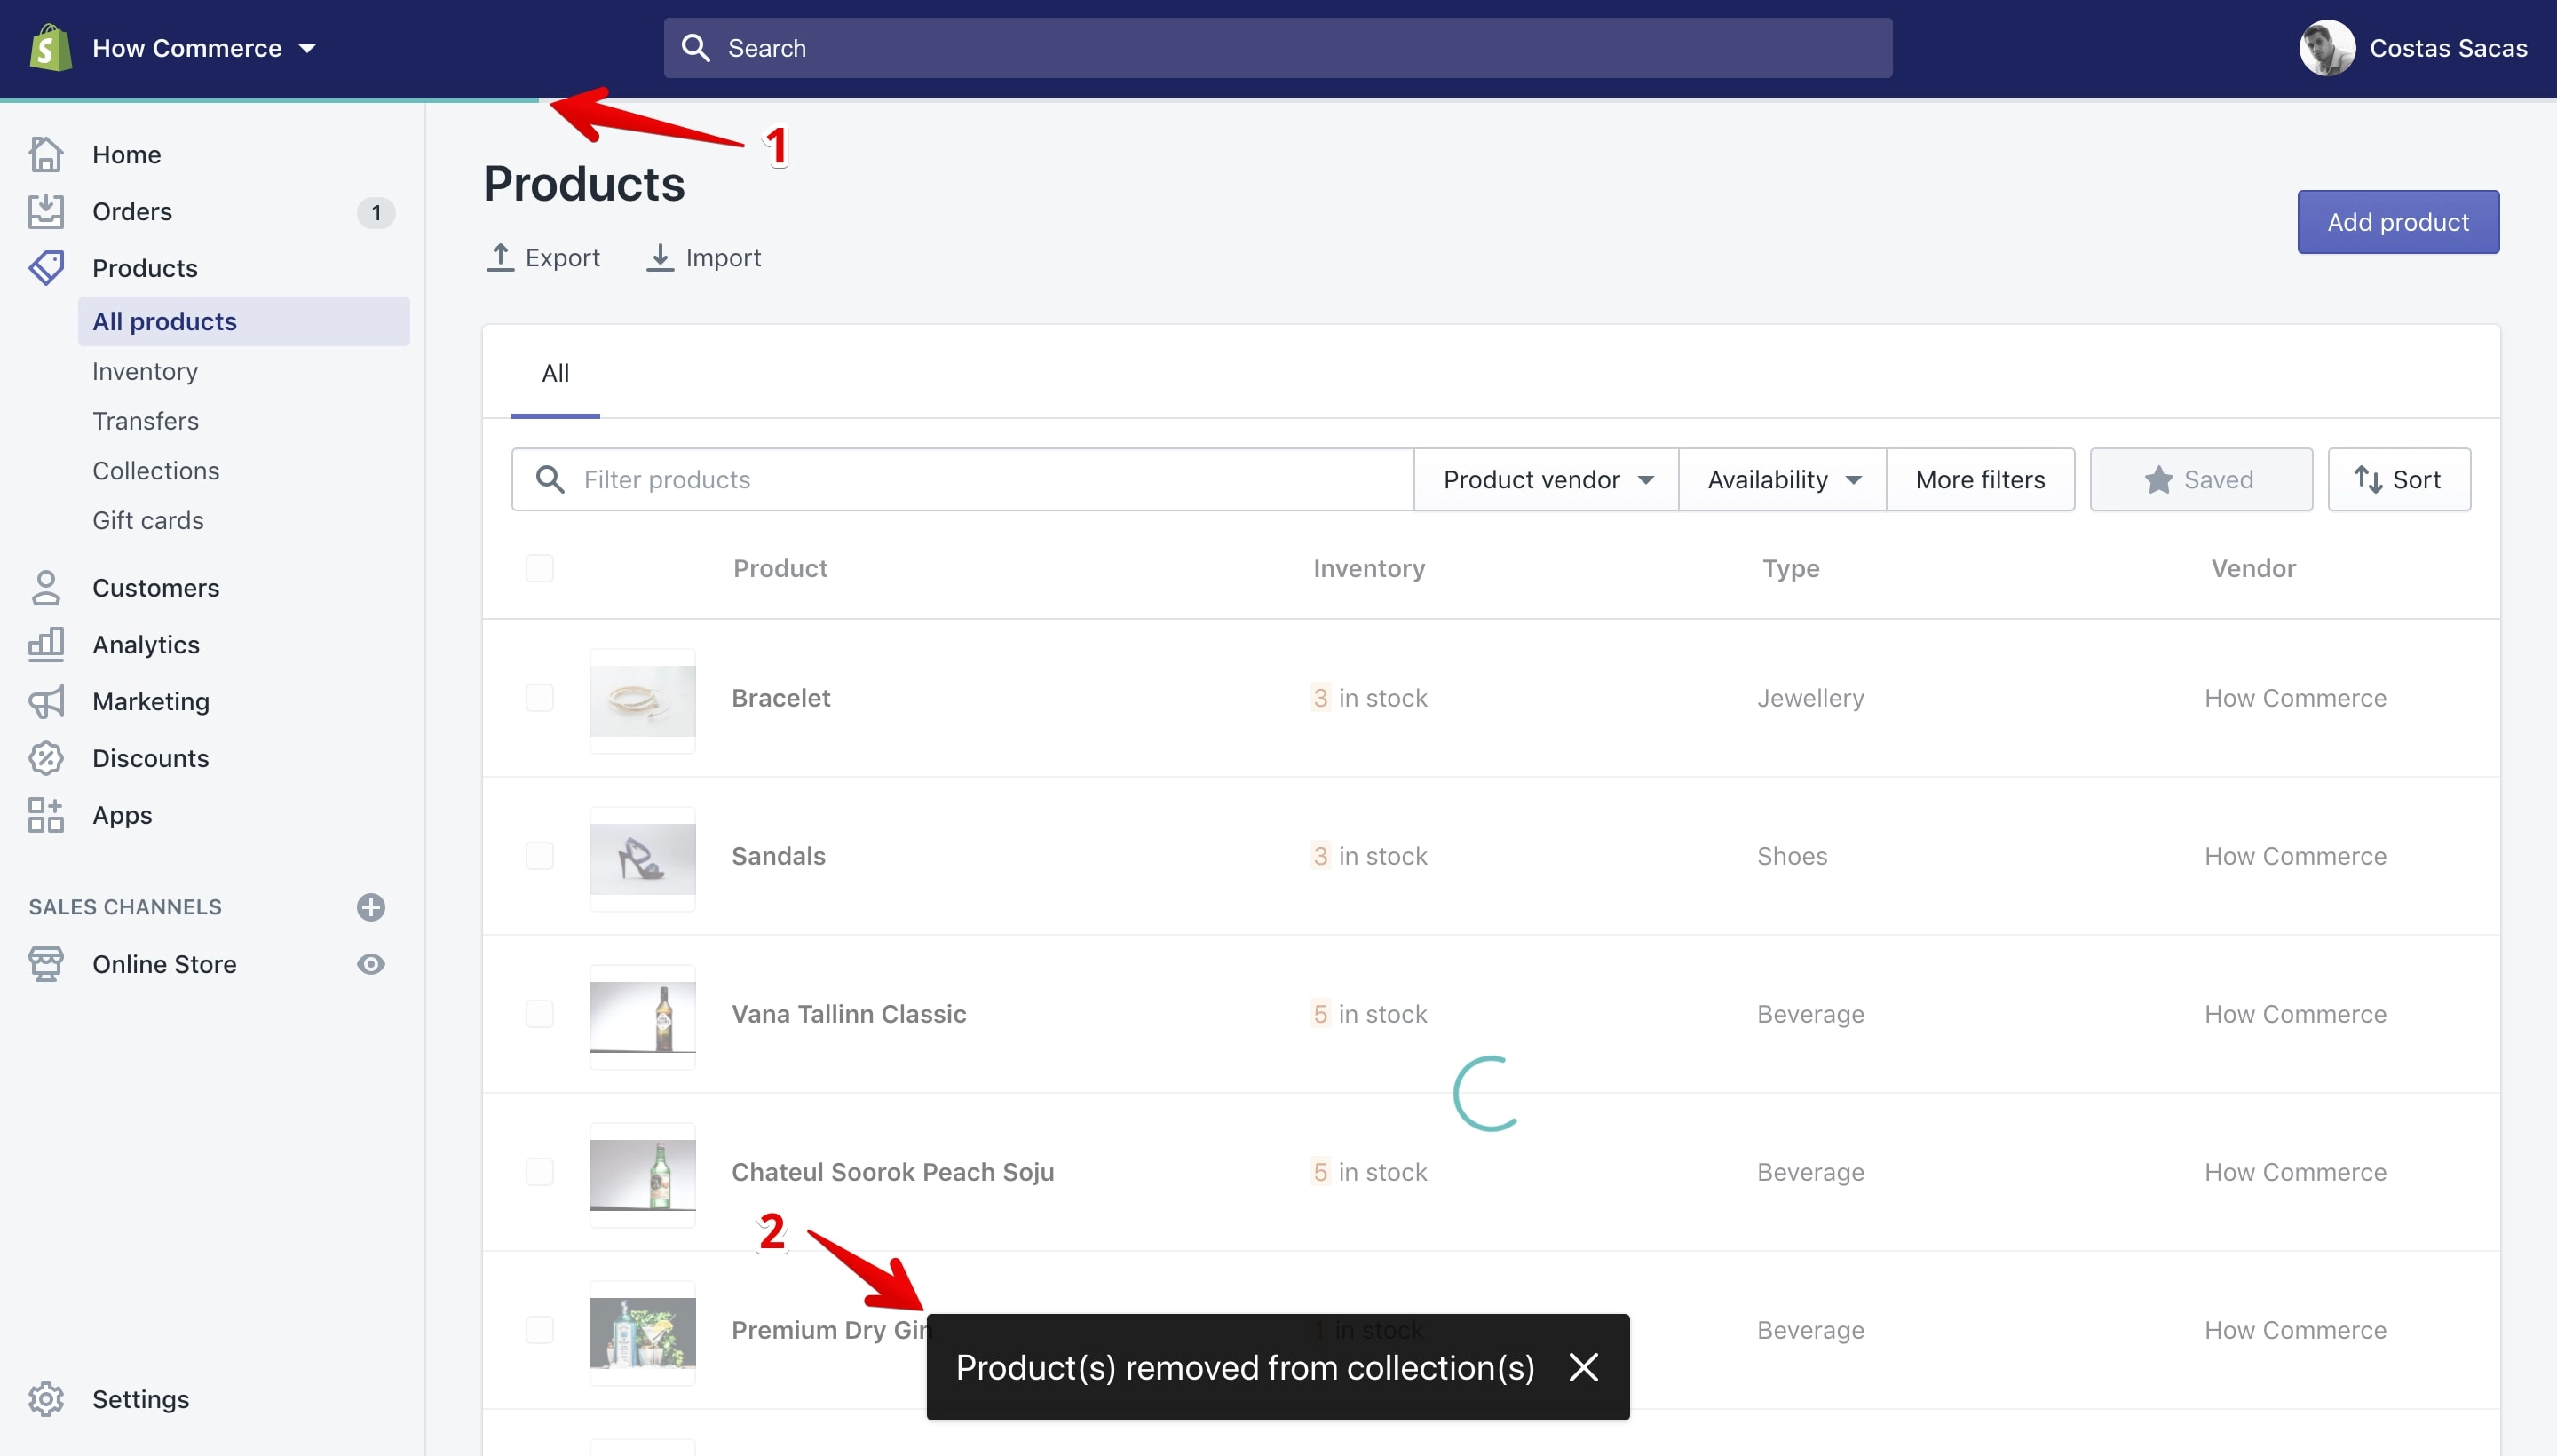
As the products are removed from the collections you will see a blue progress bar at the top of the page (marked with 1 in the image below), and once the removal from collections is completed you’ll see at the bottom of the page a confirmation message (marked with 2 in the image below) saying that the products are removed from collections:
What Bulk Actions are available on Shopify
Every Shopify section has its own bulk actions available. I’ll list all available bulk actions depending on the store section.
I’ve listed the actions in the order they are displayed in Shopify. All “Bulk Actions” listed below work mostly the same as the examples listed above.
Orders
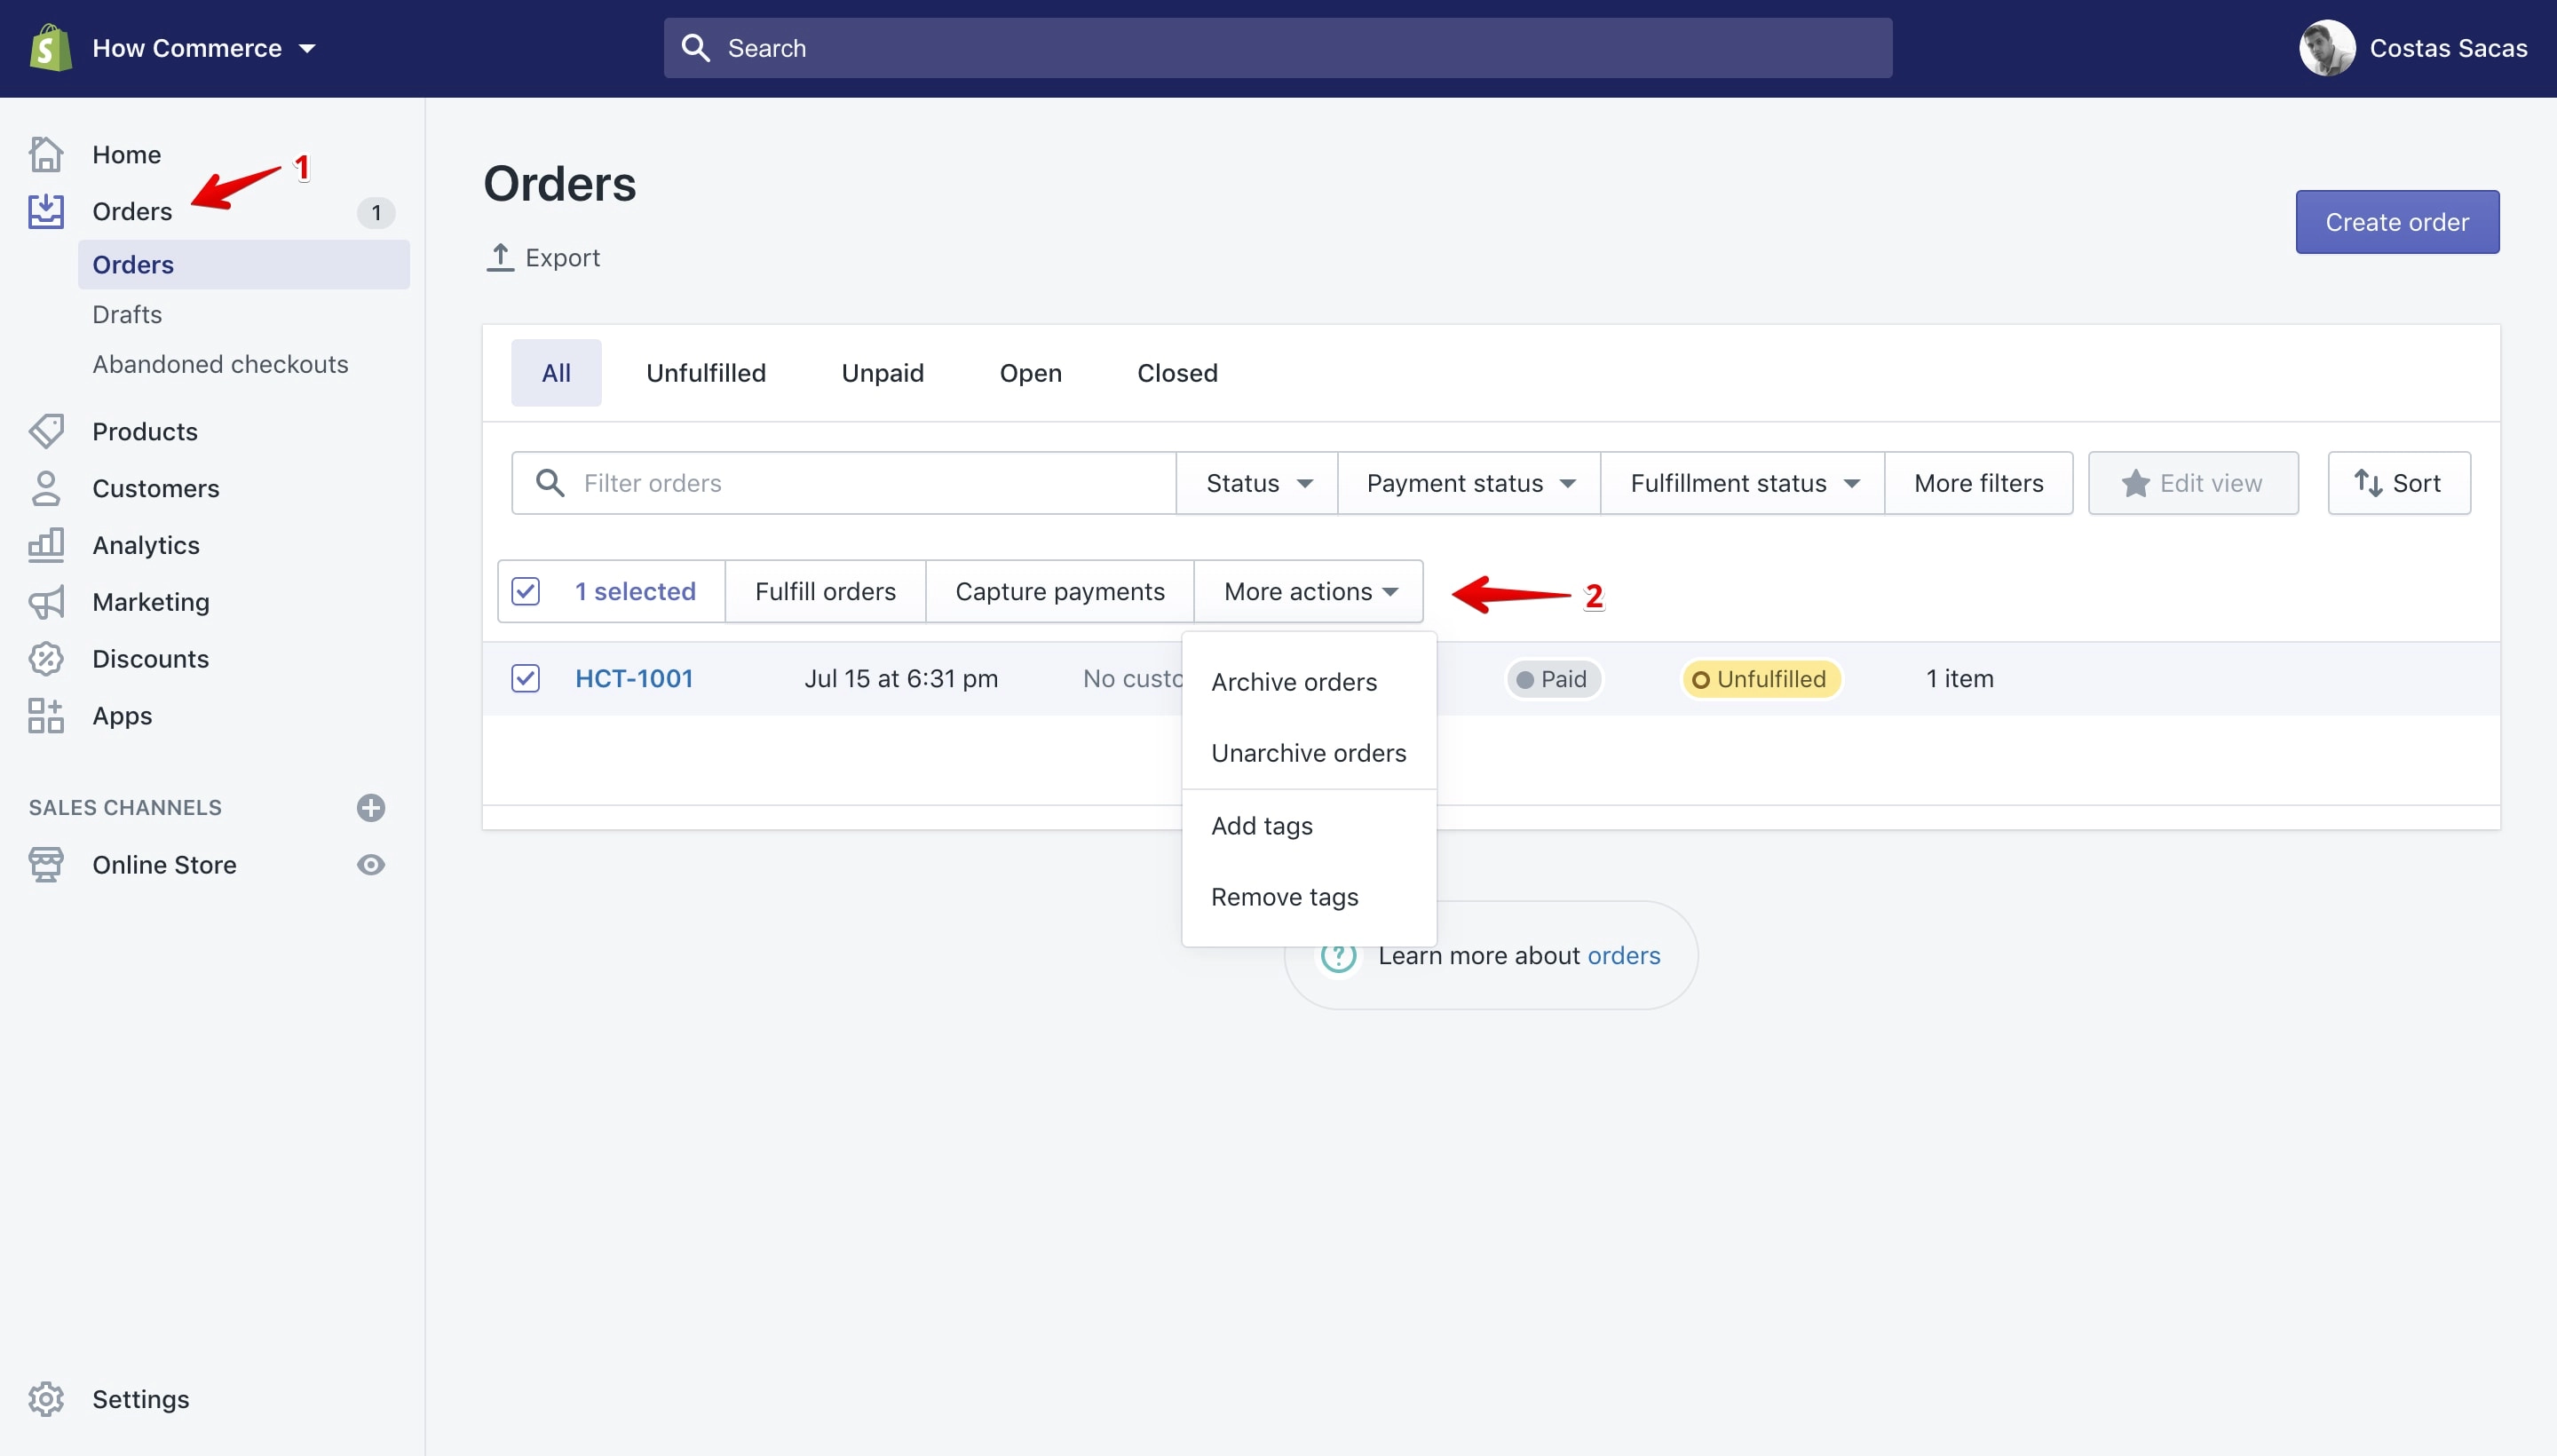
List with all the “Bulk actions” available on the “Orders” page:
- Create shipping labels (requires Shopify Shipping)
- Fulfill orders
- Capture payments
- Archive orders
- Unarchive orders
- Add tags
- Remove tags
- App functions (only if you have installed apps)
Orders → Drafts
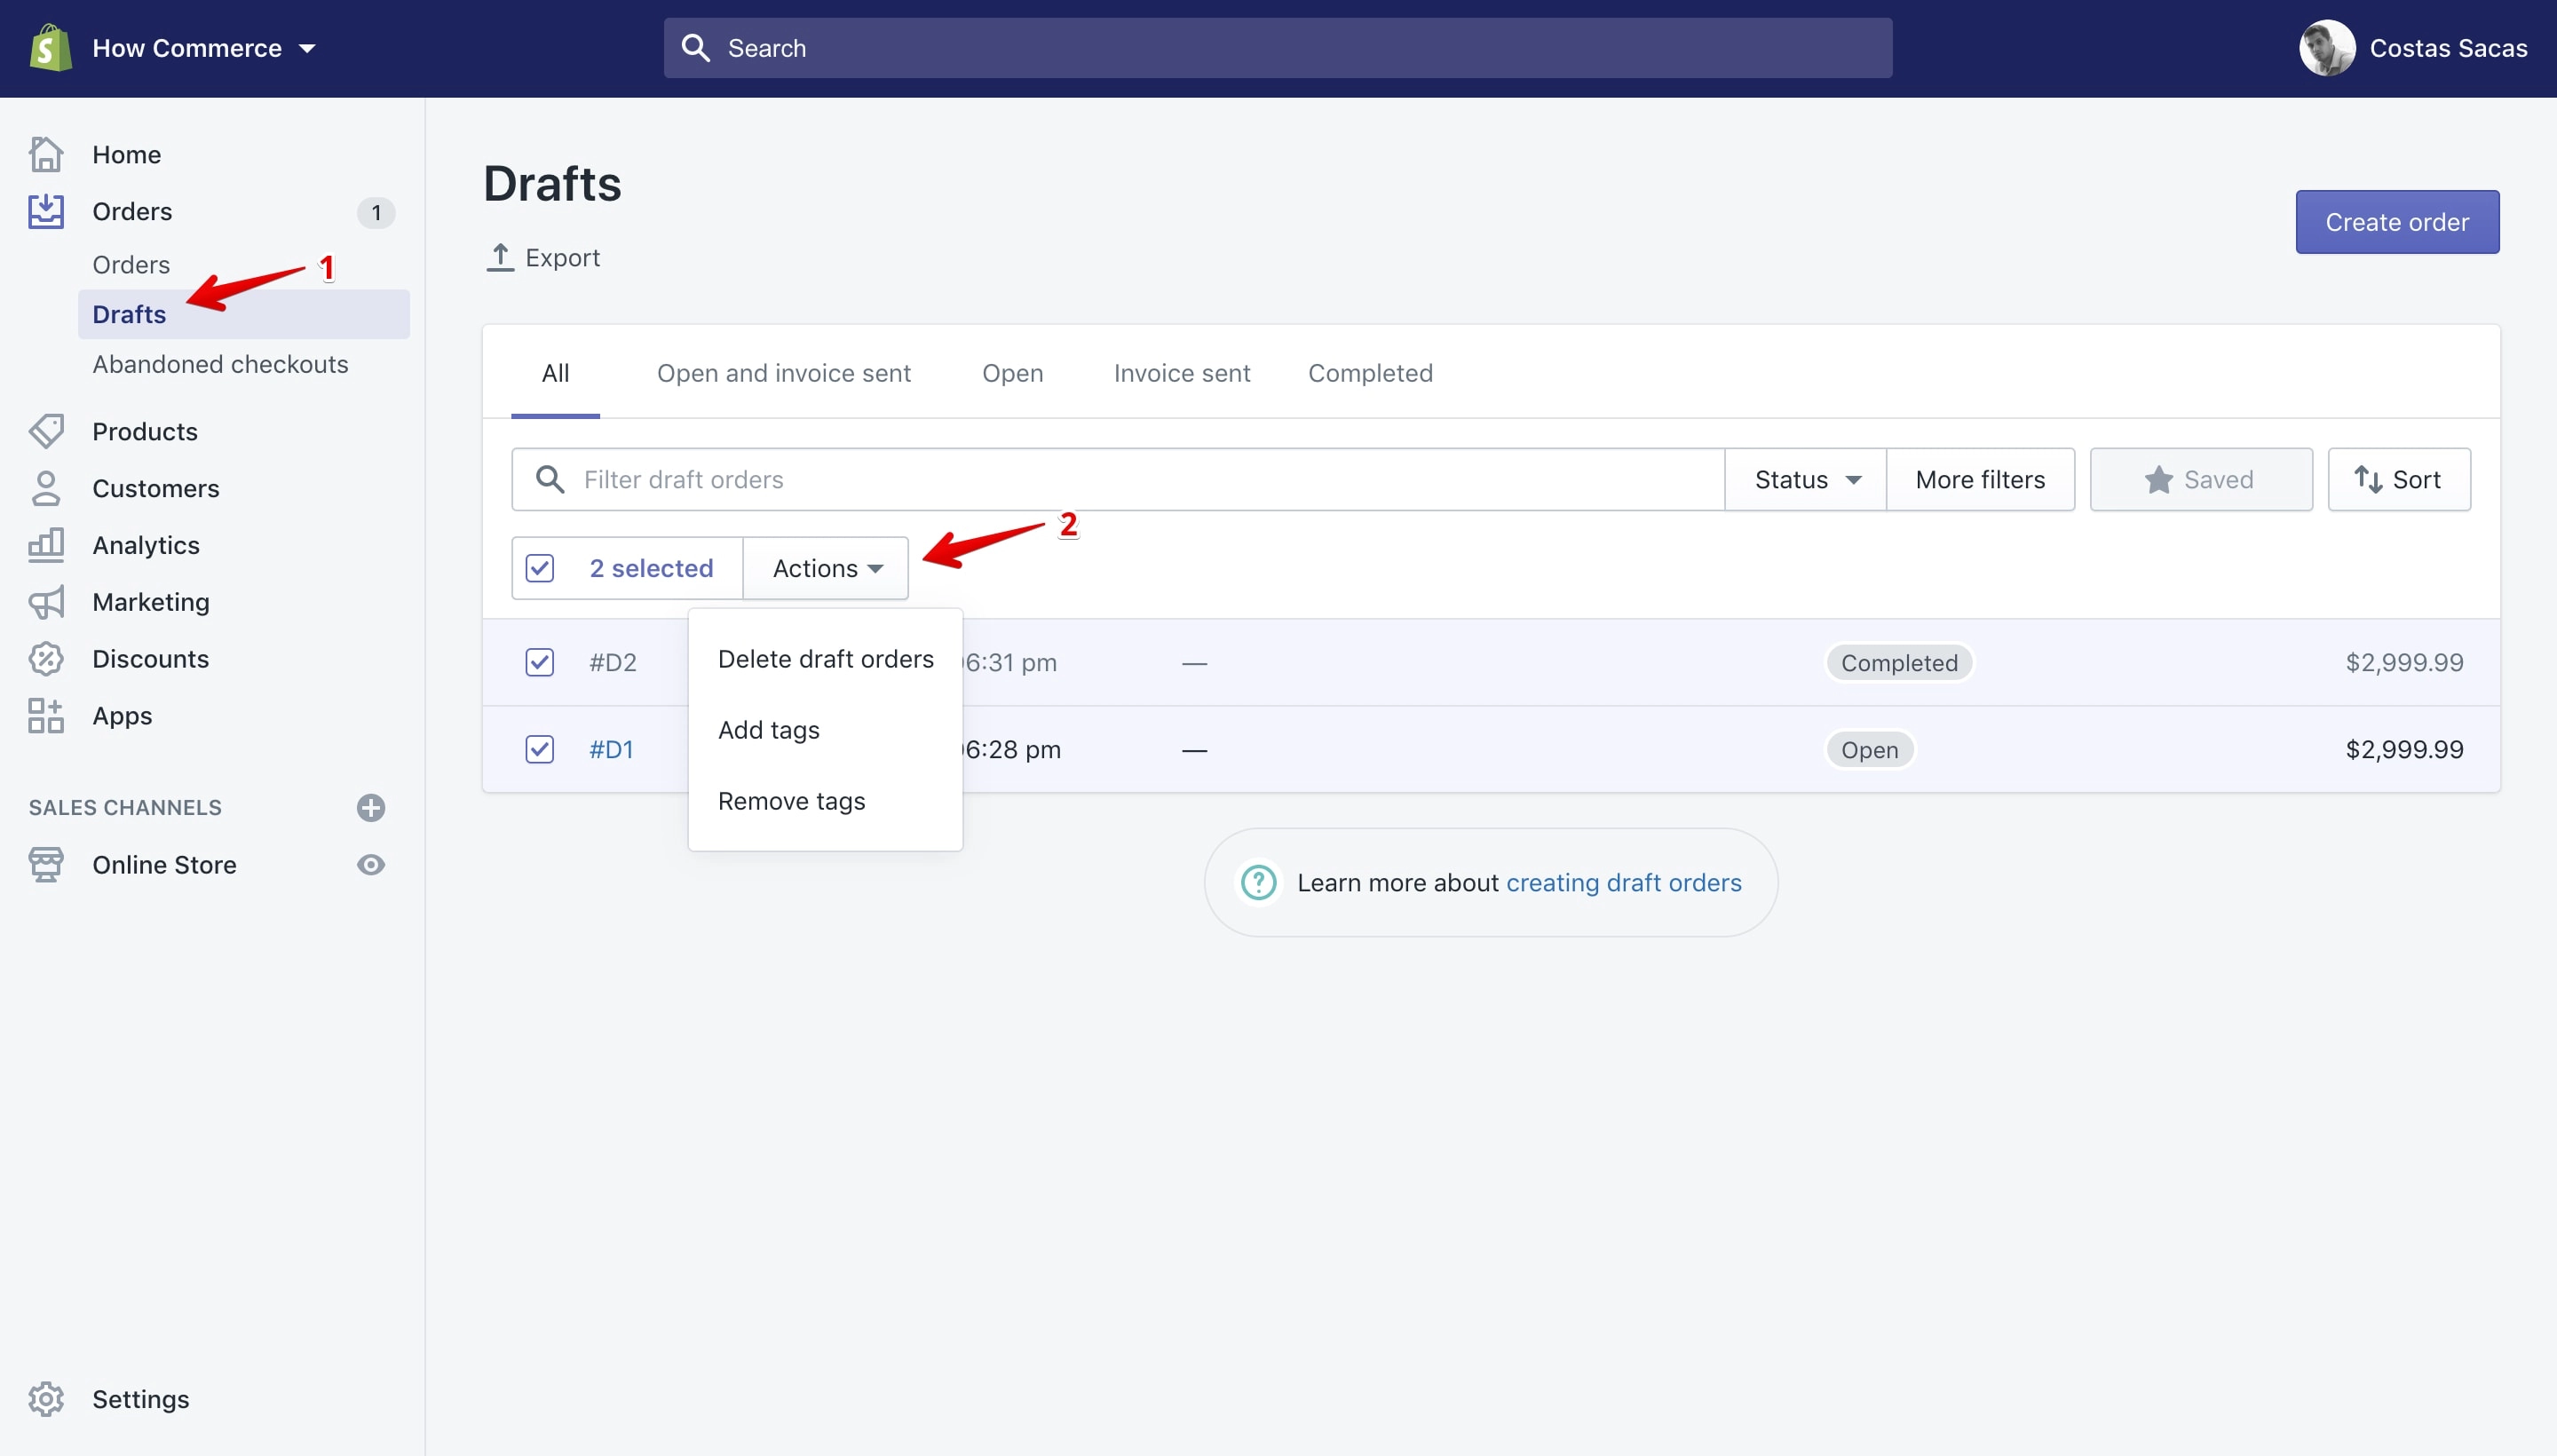
List with all the “Bulk actions” available on the “Orders Drafts” page:
- Delete draft orders
- Add tags
- Remove tags
Orders → Abandoned checkouts
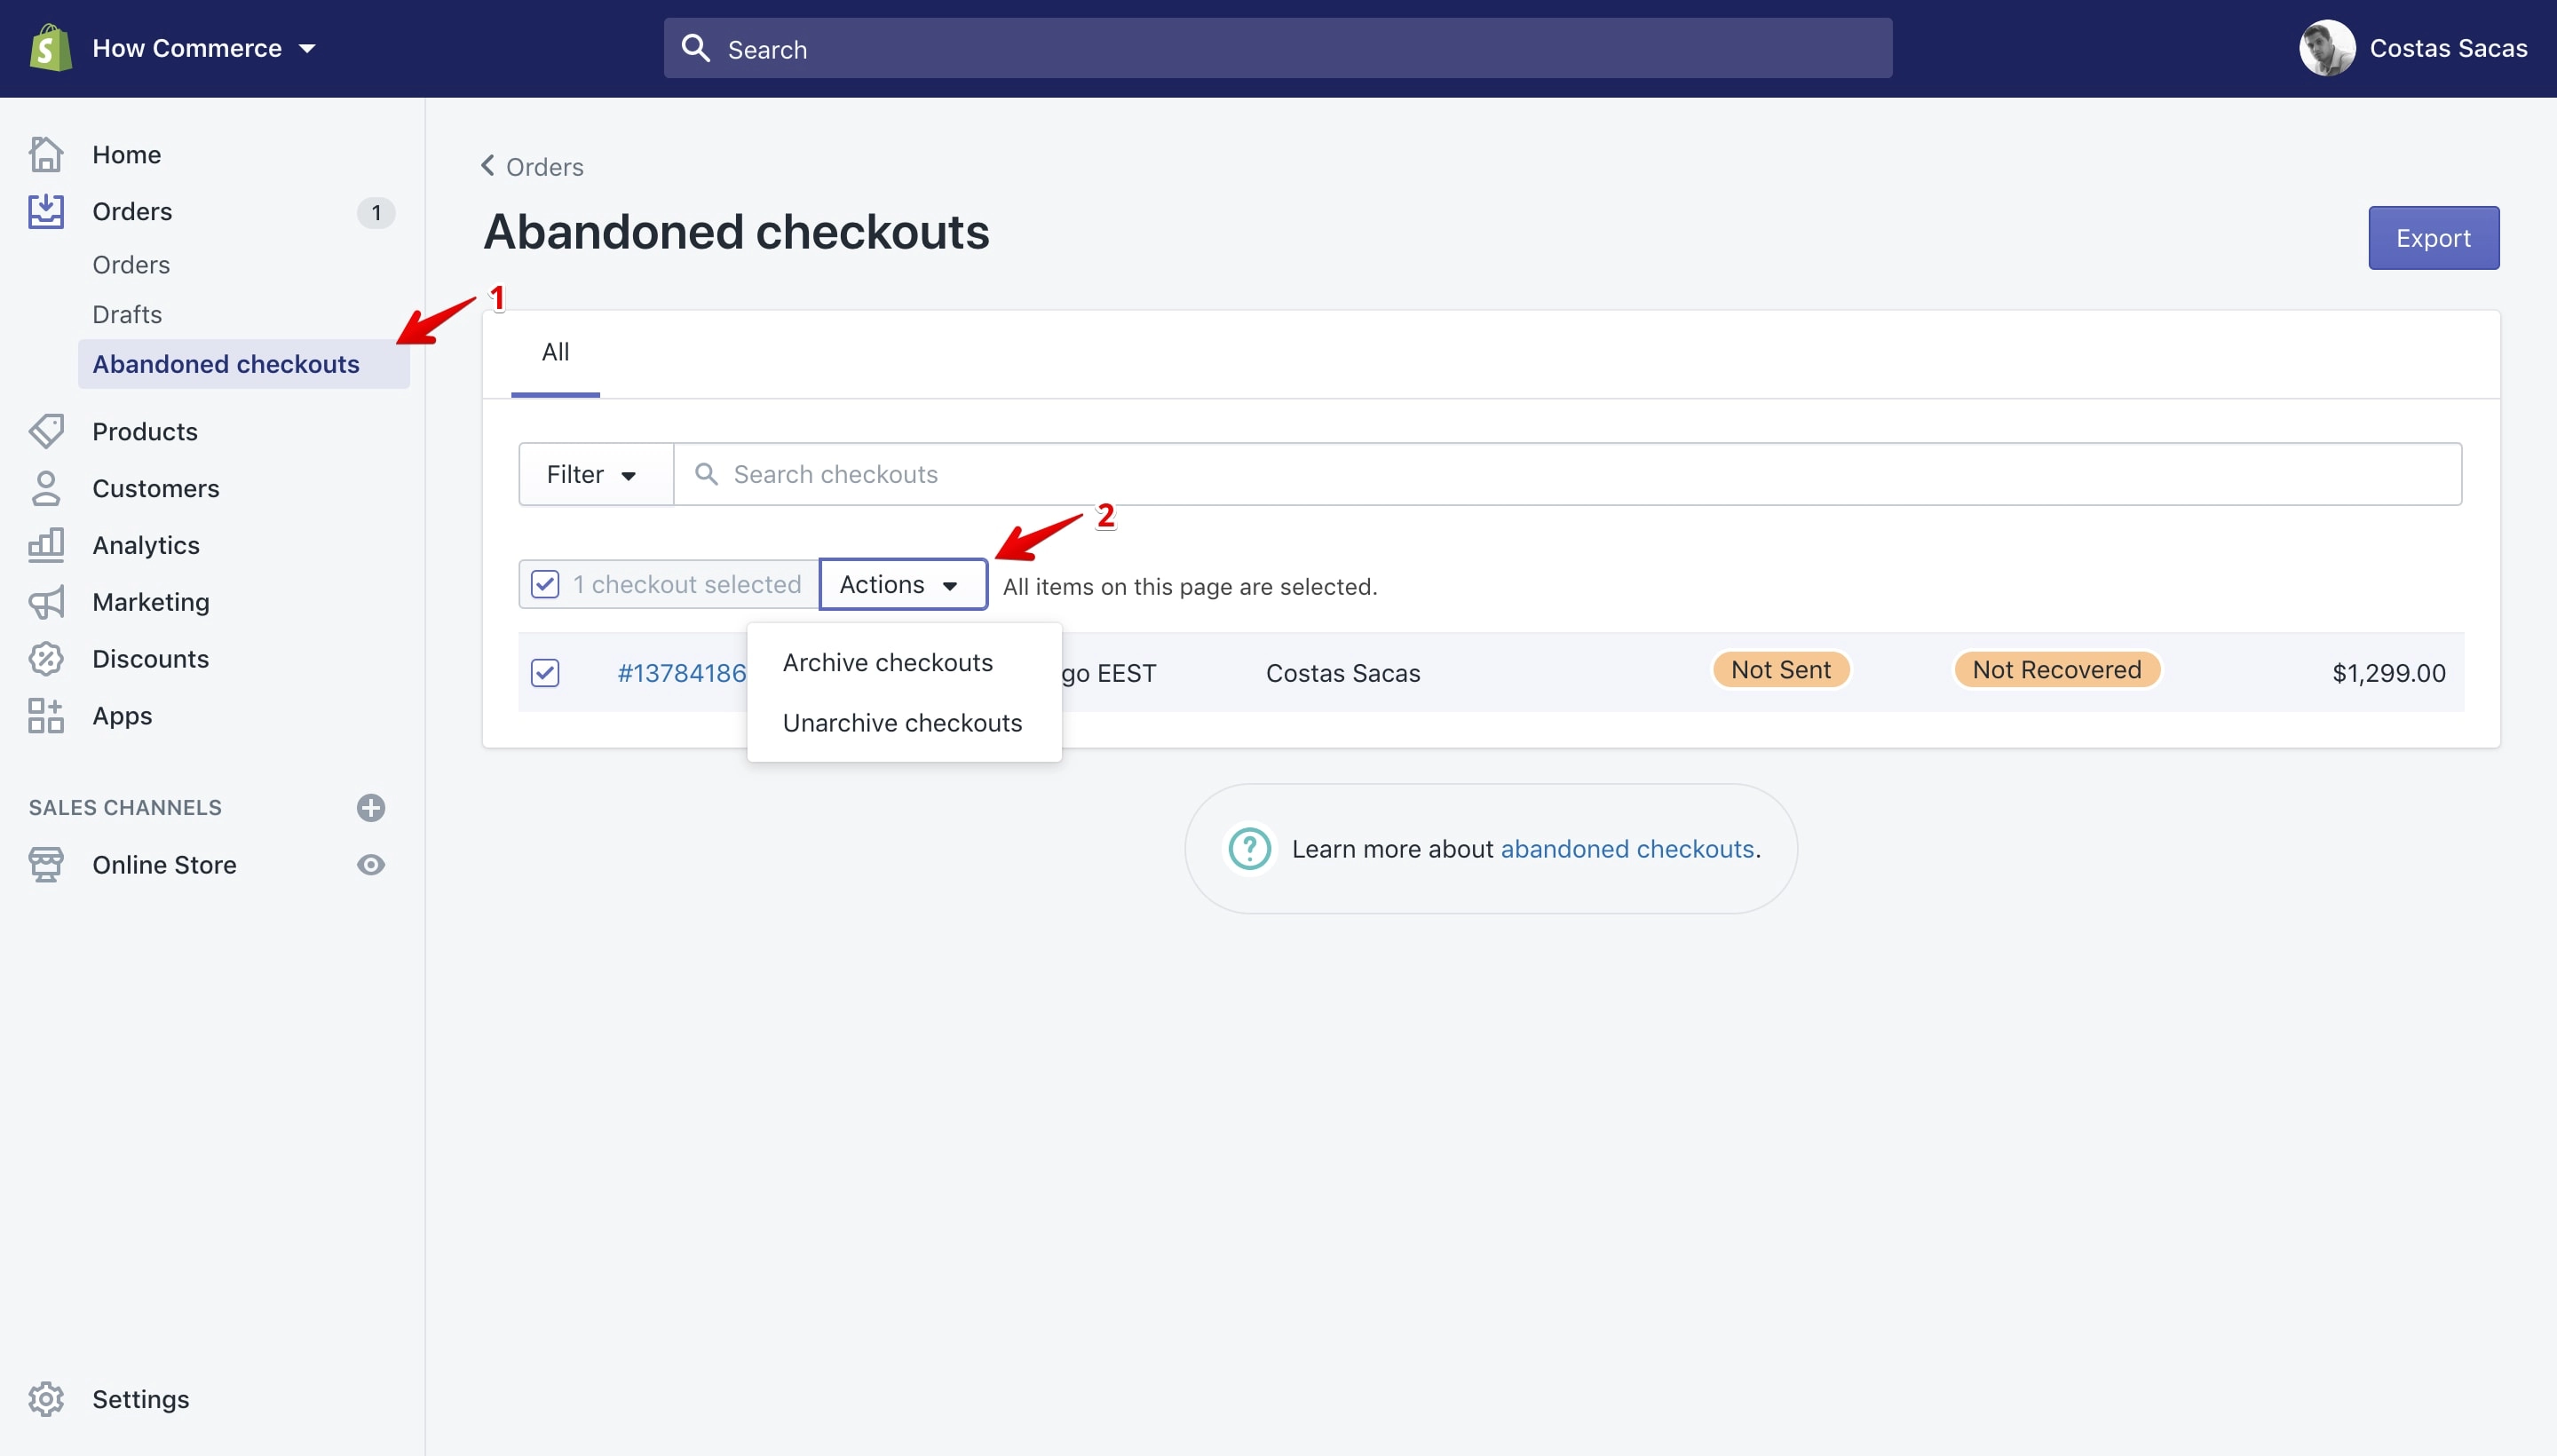
List with all the “Bulk actions” available on the “Abandoned checkouts” page:
- Archive checkouts
- Unarchive checkouts
Products
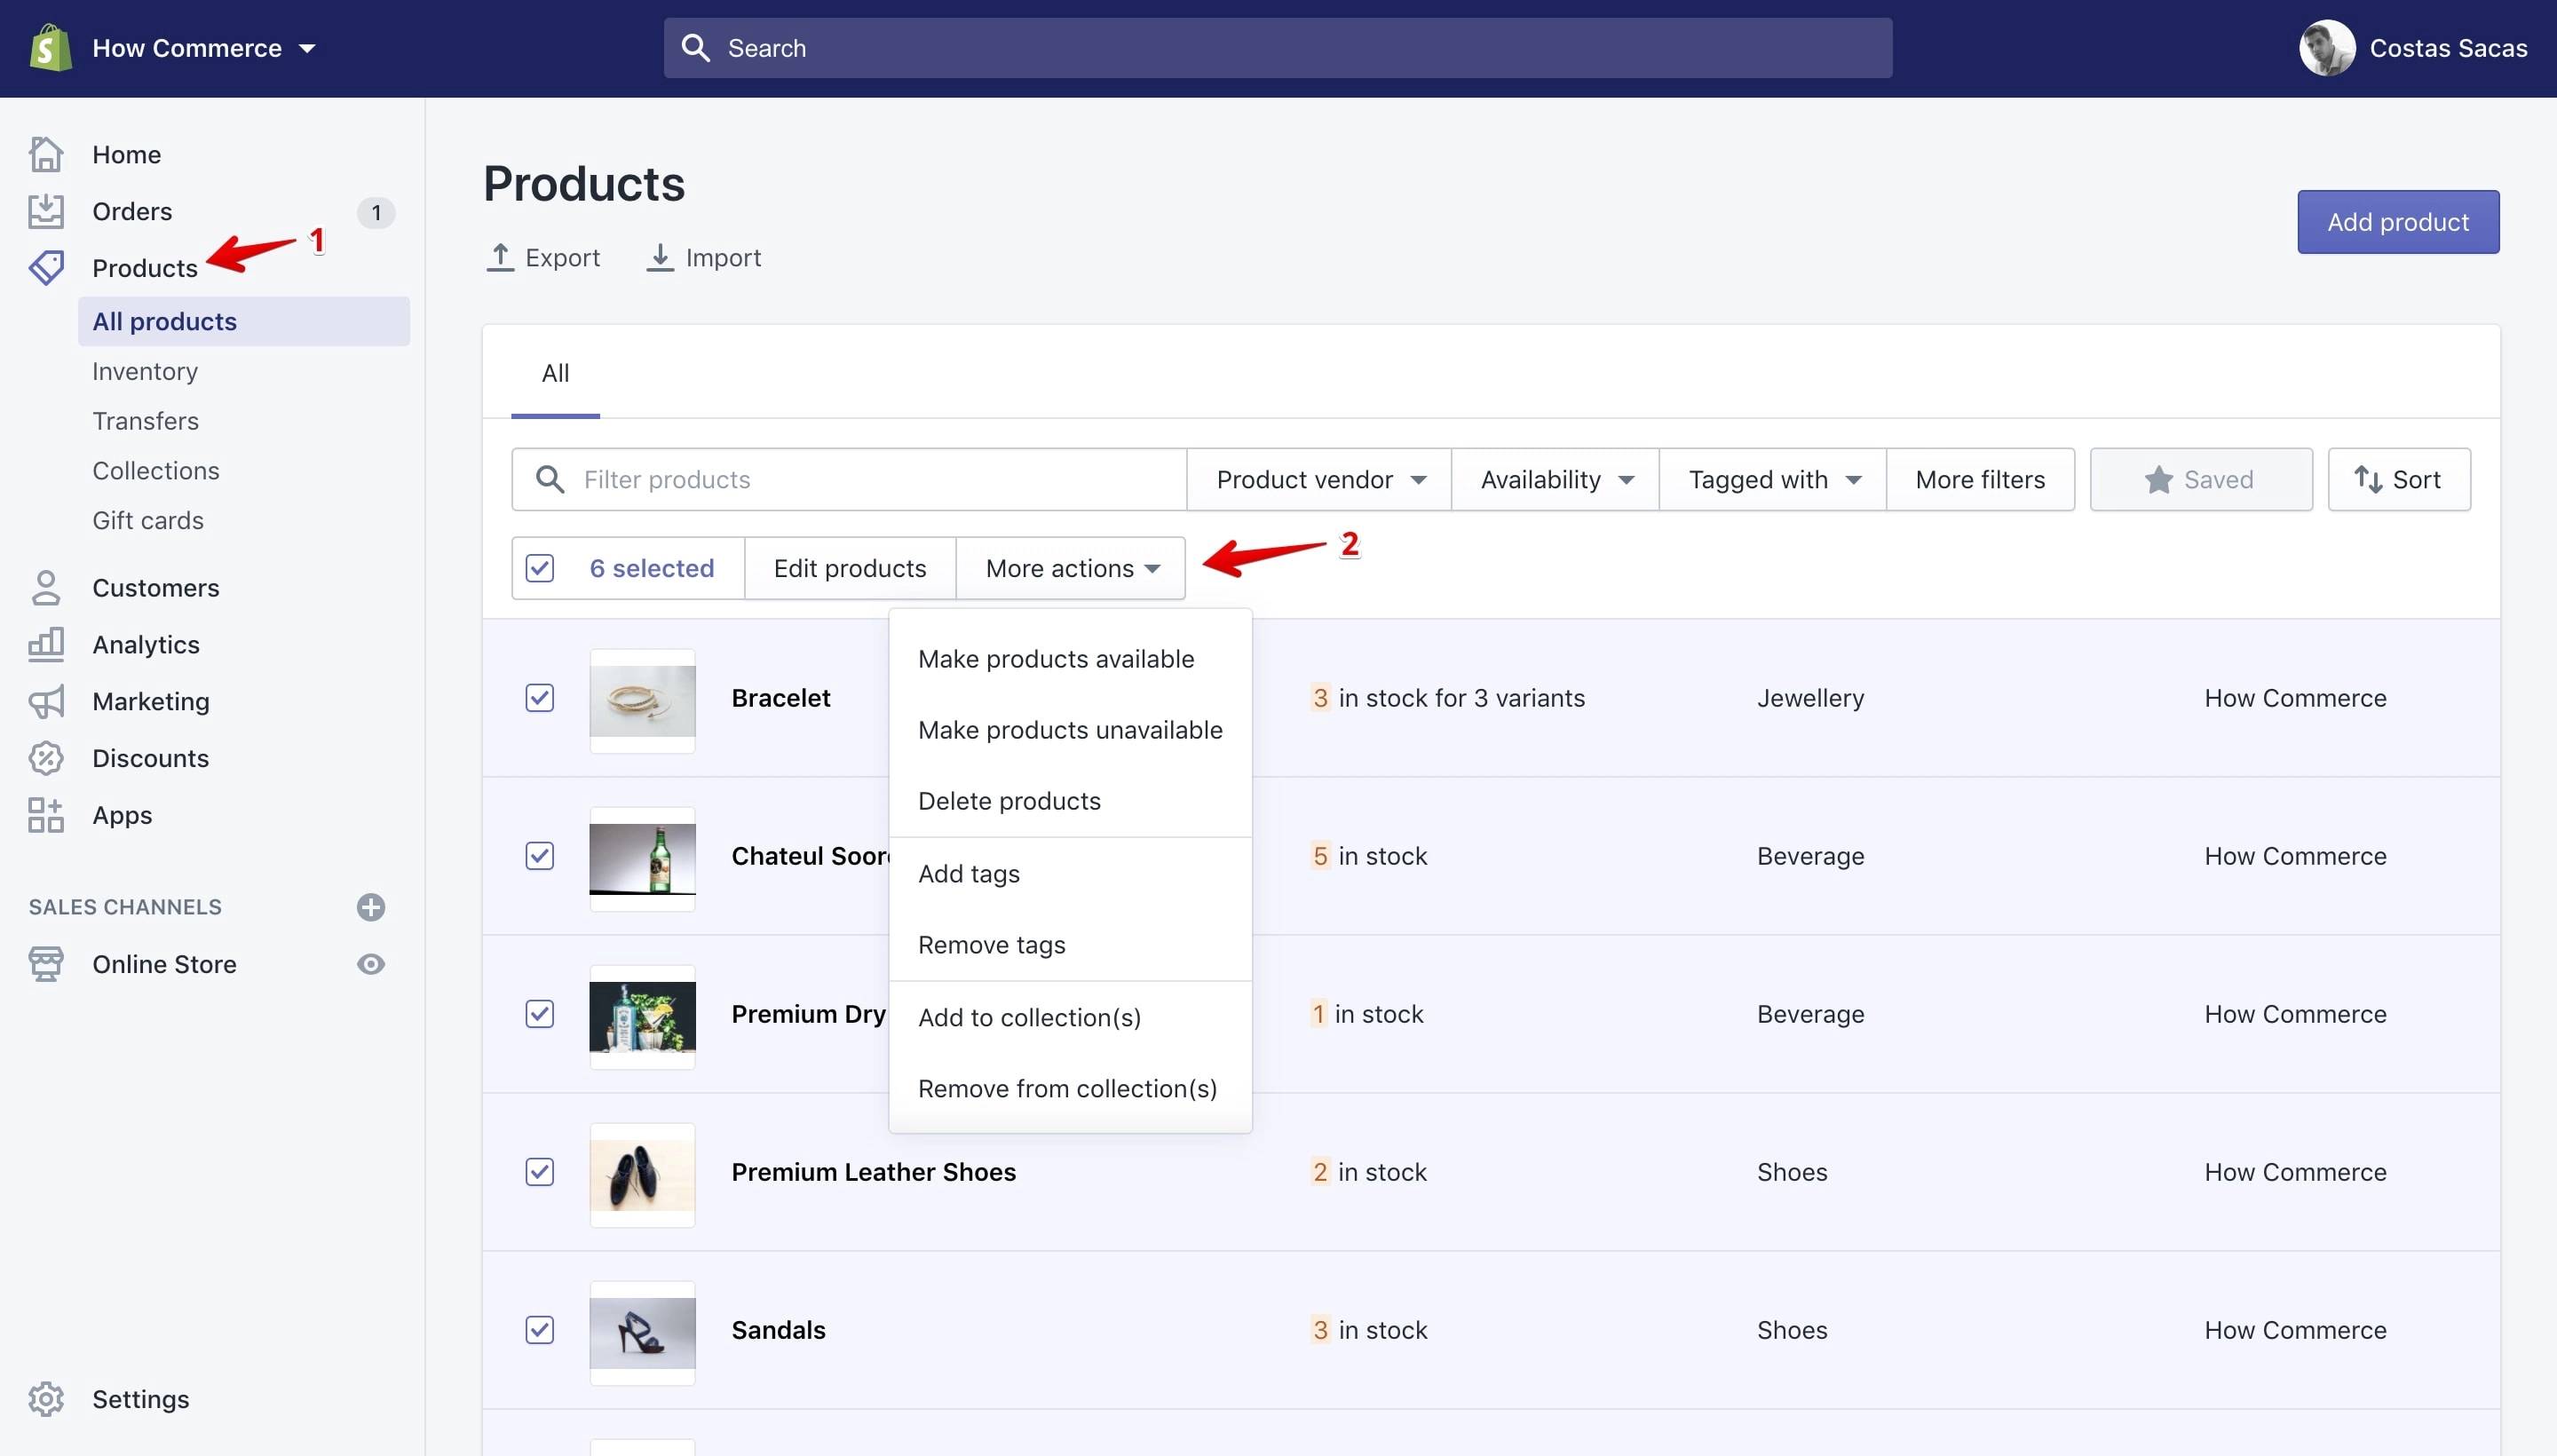
List with all the “Bulk actions” available on the “Products” page:
- Make products available
- Make products unavailable
- Delete products
- Add tags
- Remove tags
- Add to collection
- Remove from collection
- App functions (depending on installed apps)
Products → Inventory
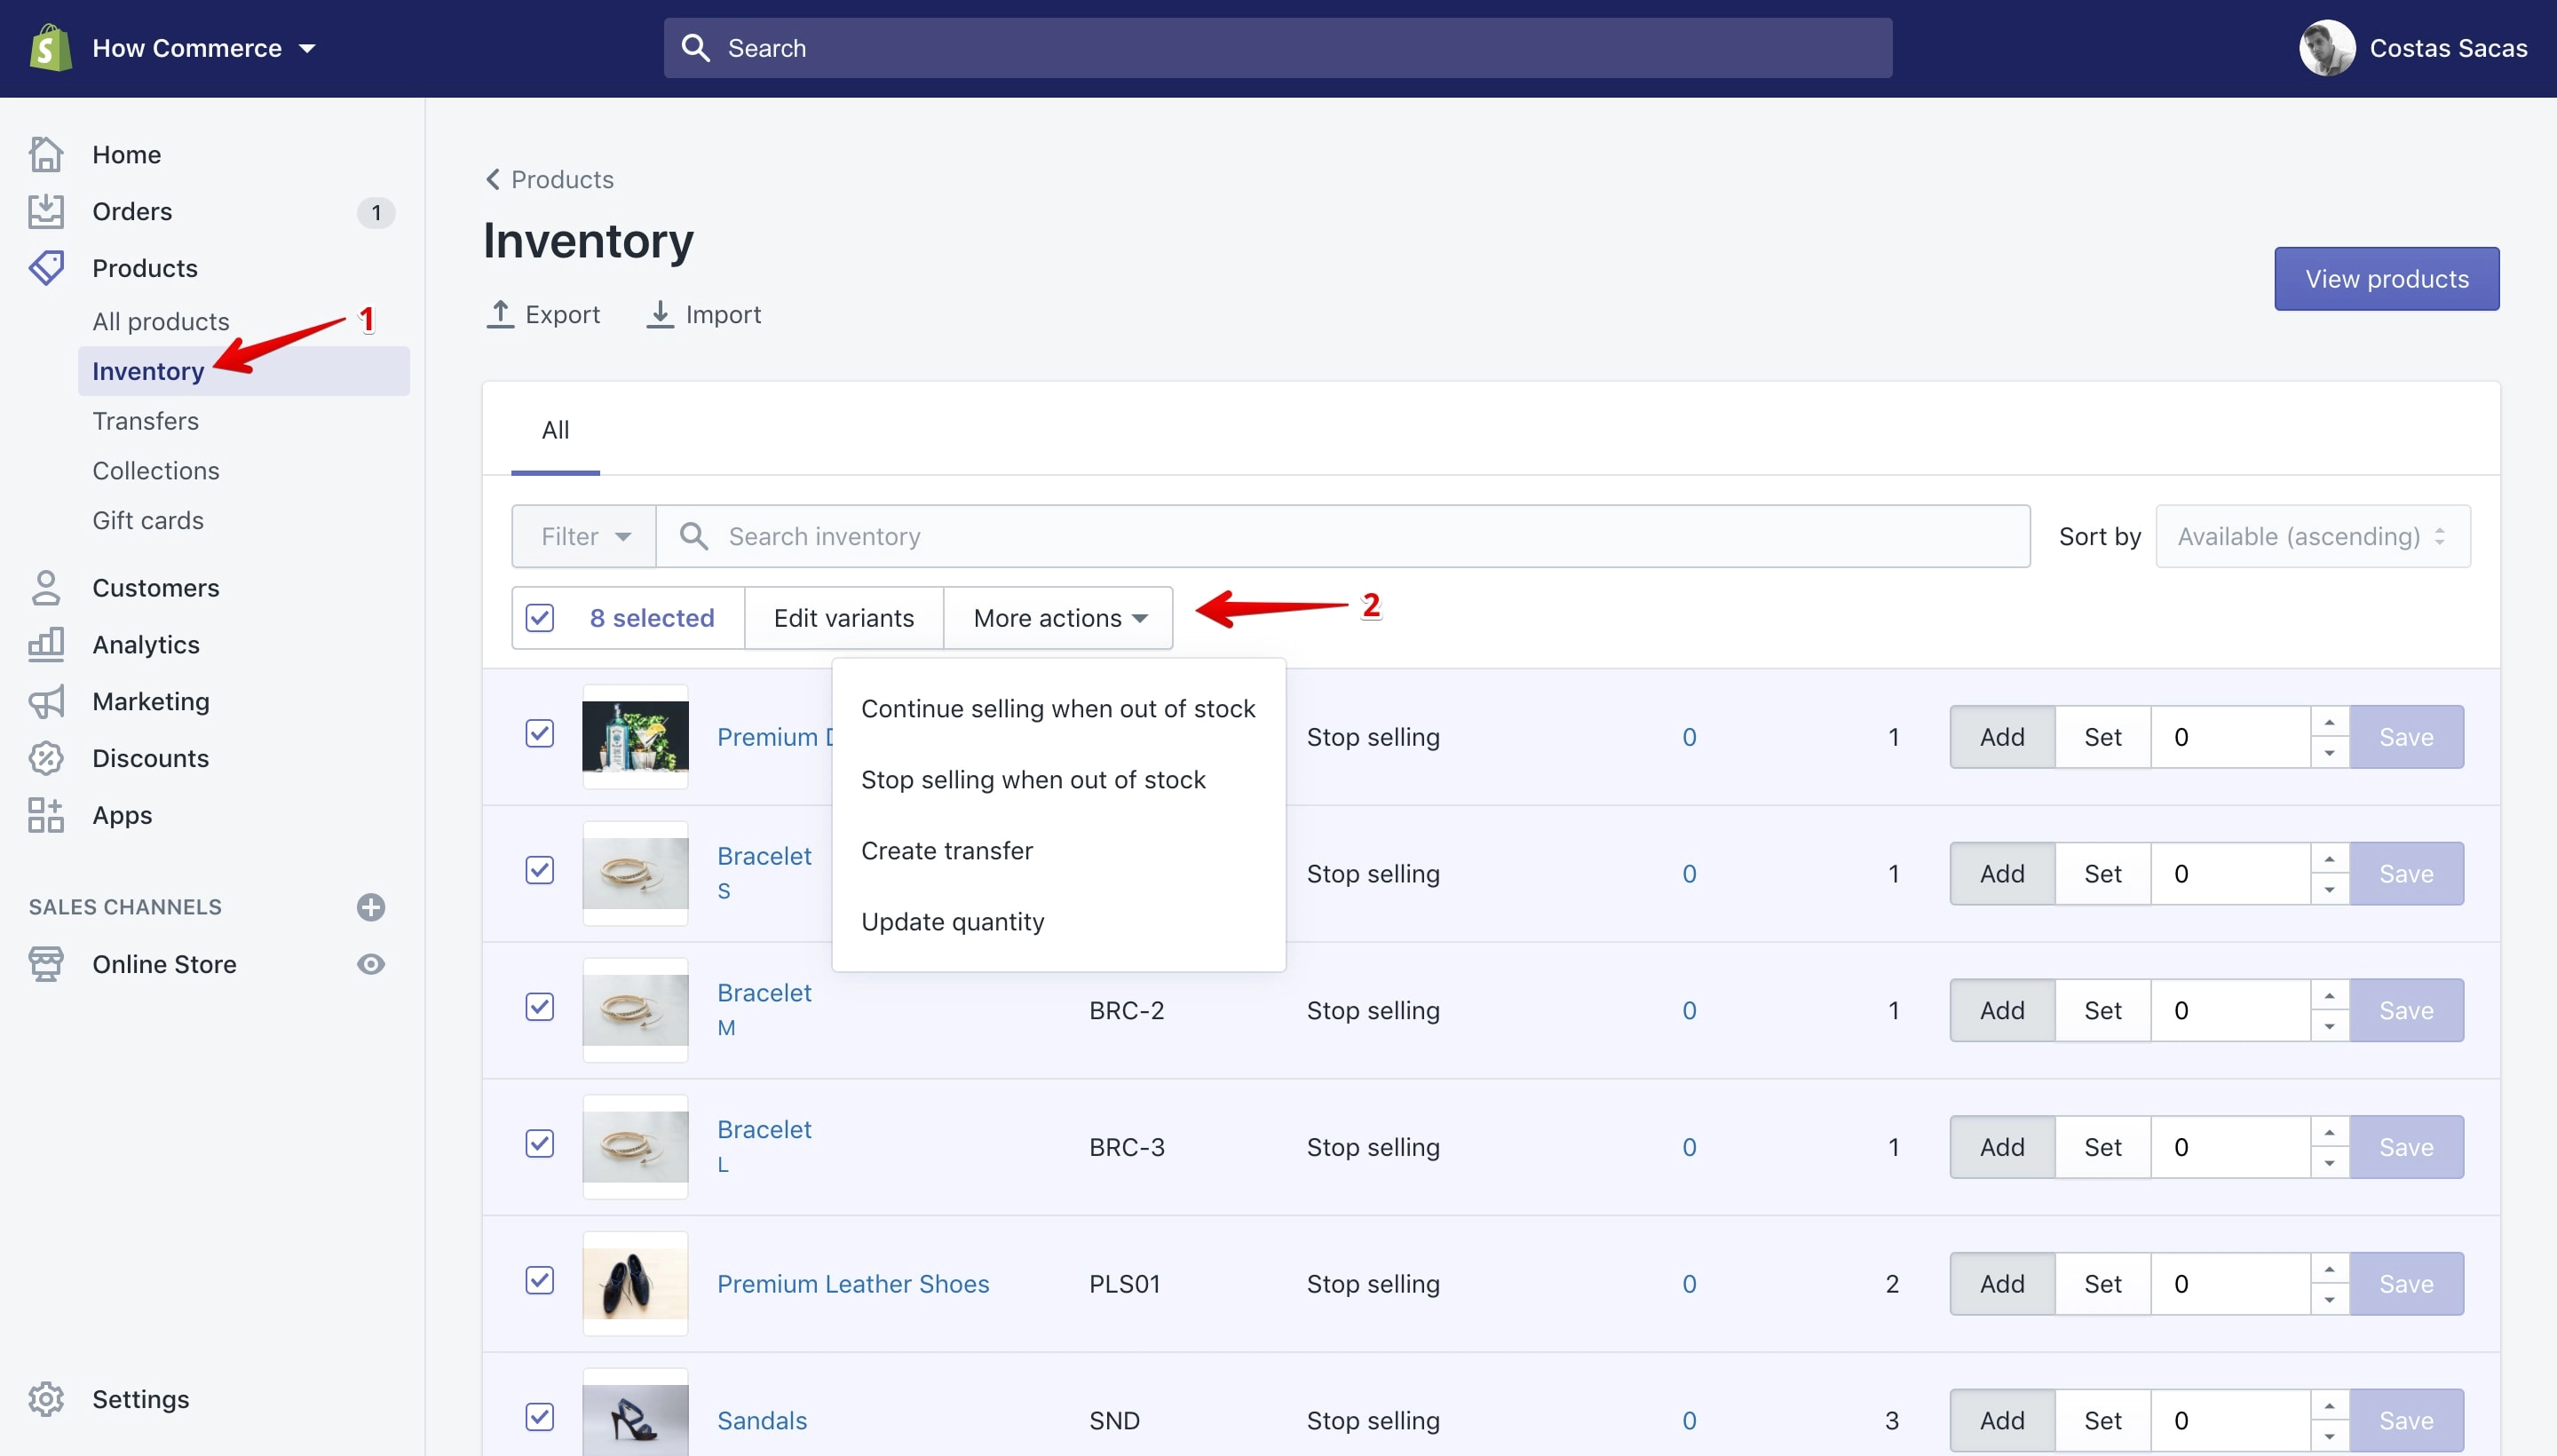
List with all the “Bulk actions” available on the “Products Inventory” page:
- Continue selling when out of stock
- Stop selling when out of stock
- Create transfer
- Update quantity
Products → Transfers
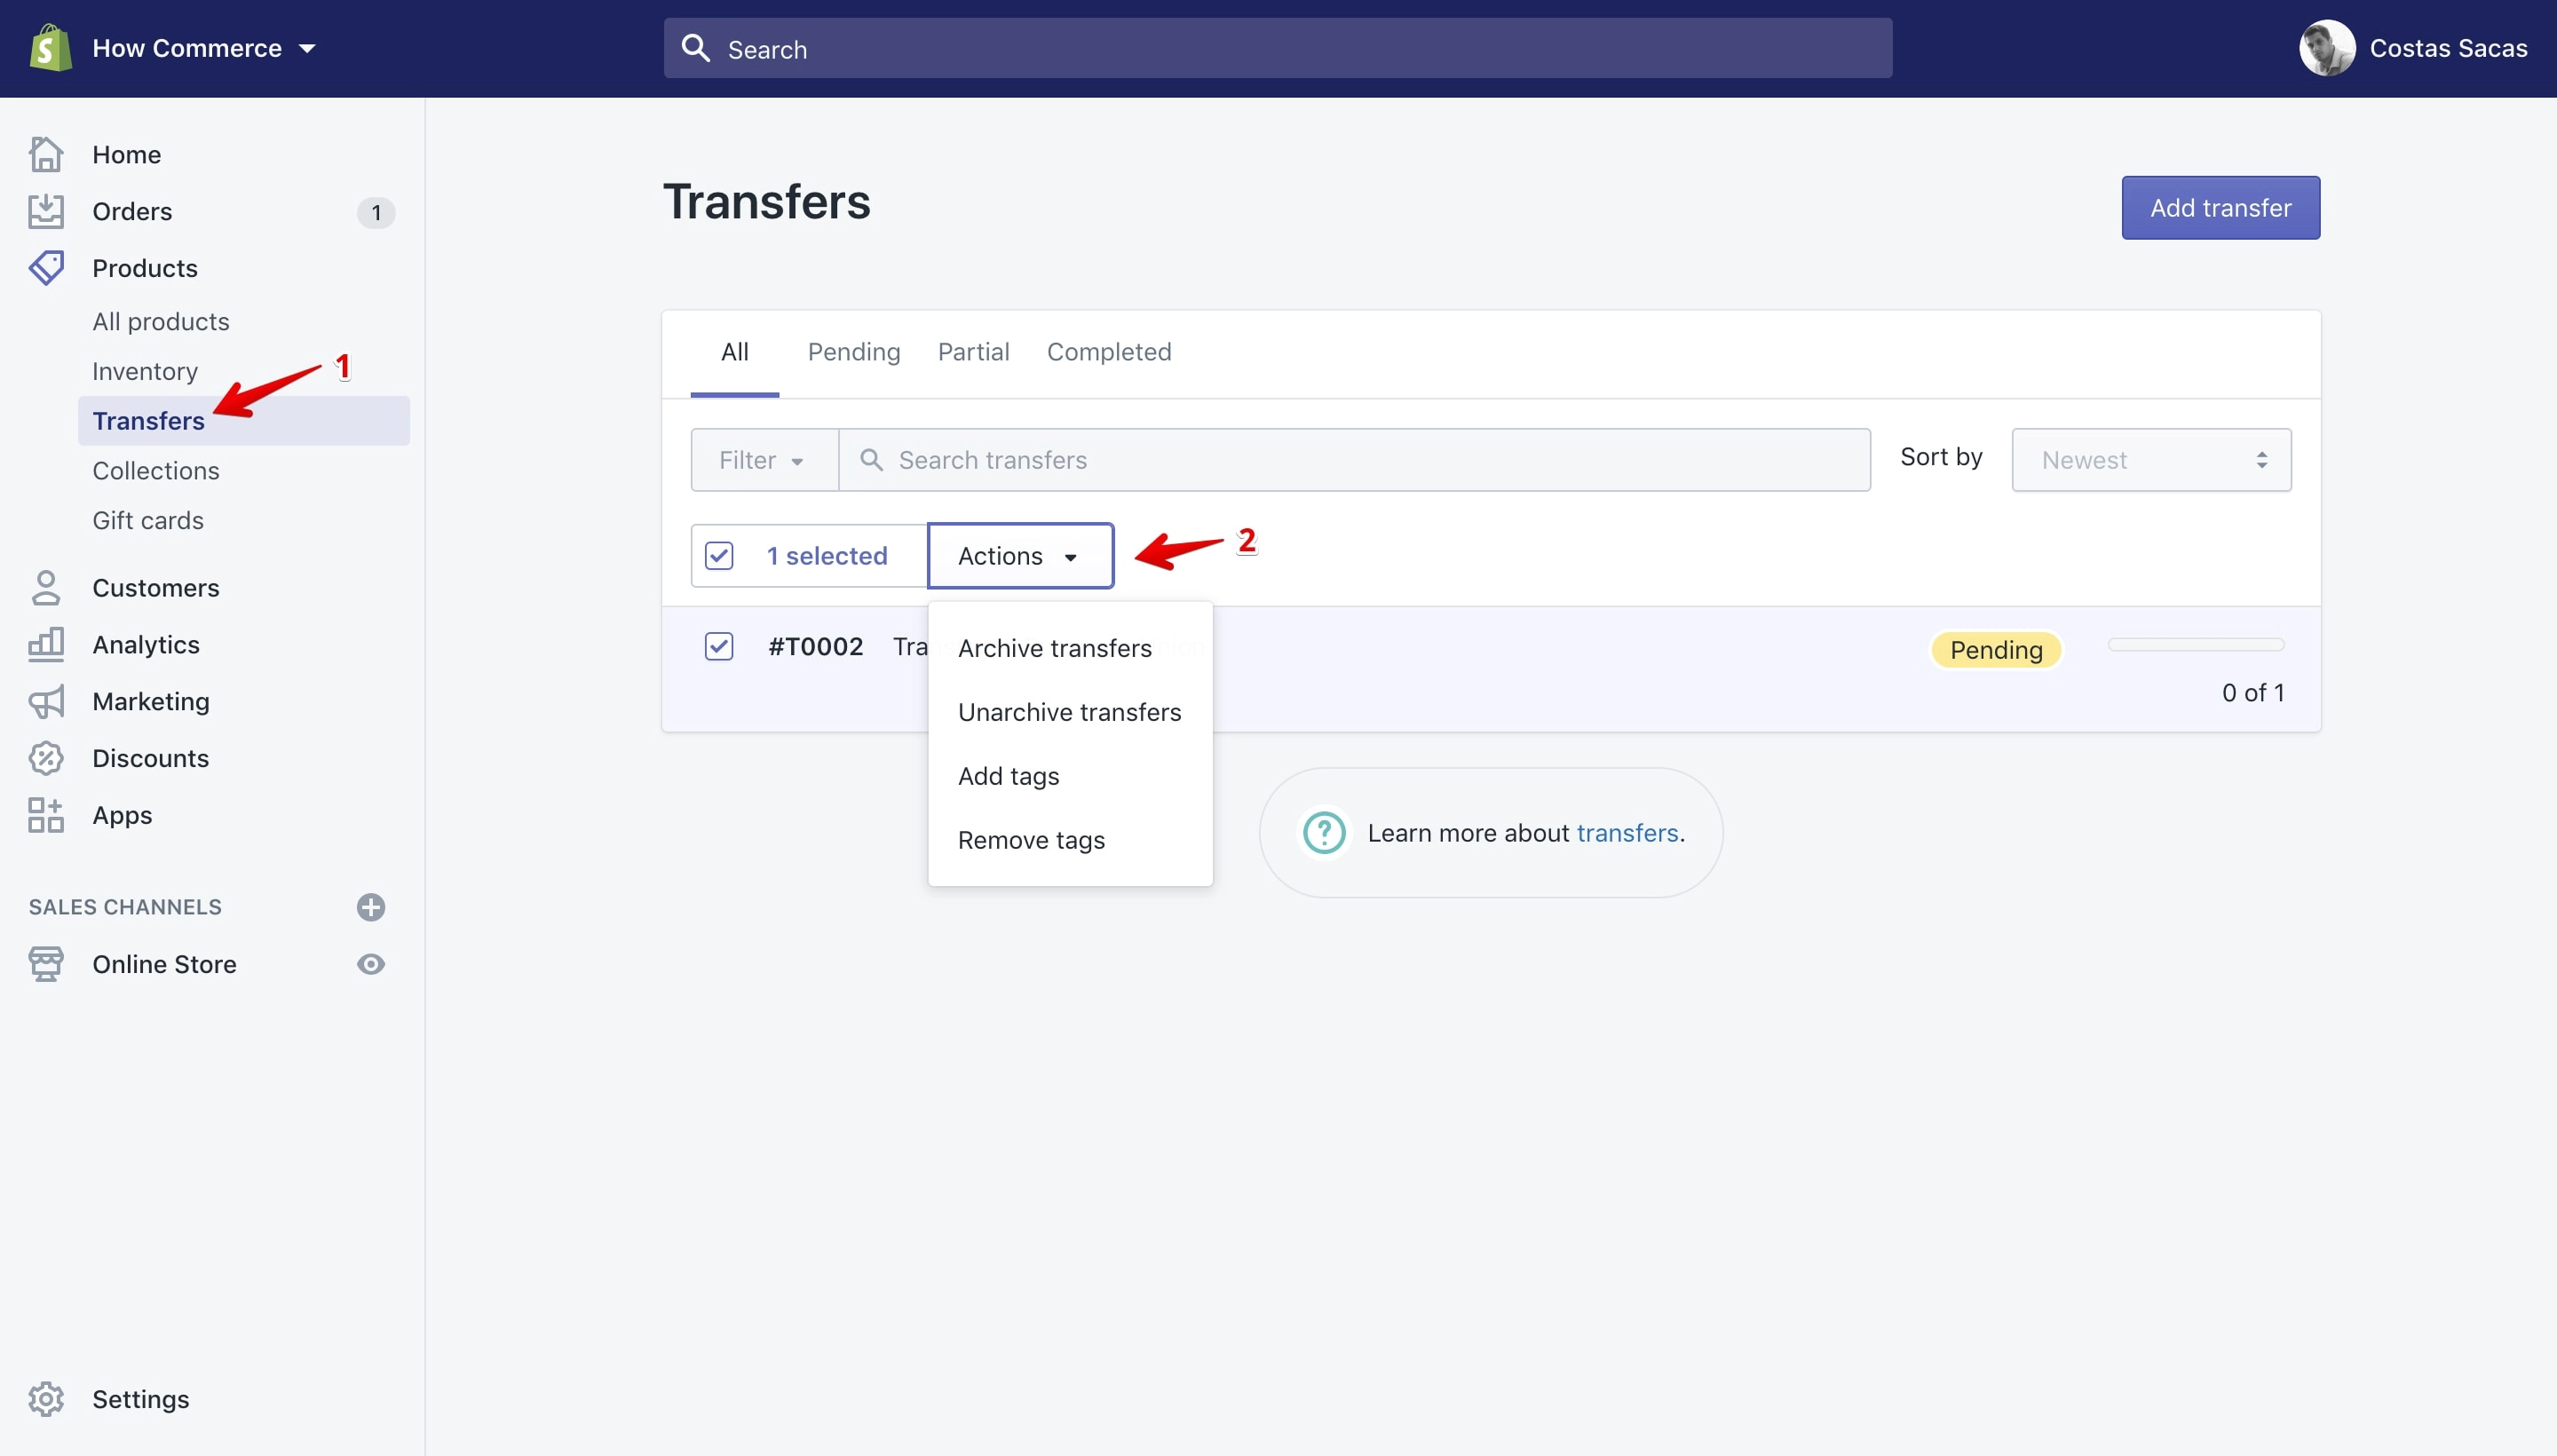
List with all the “Bulk actions” available on the “Products Transfers” page:
- Archive transfers
- Unarchive transfers
- Add tags
- Remove tags
Products → Collections
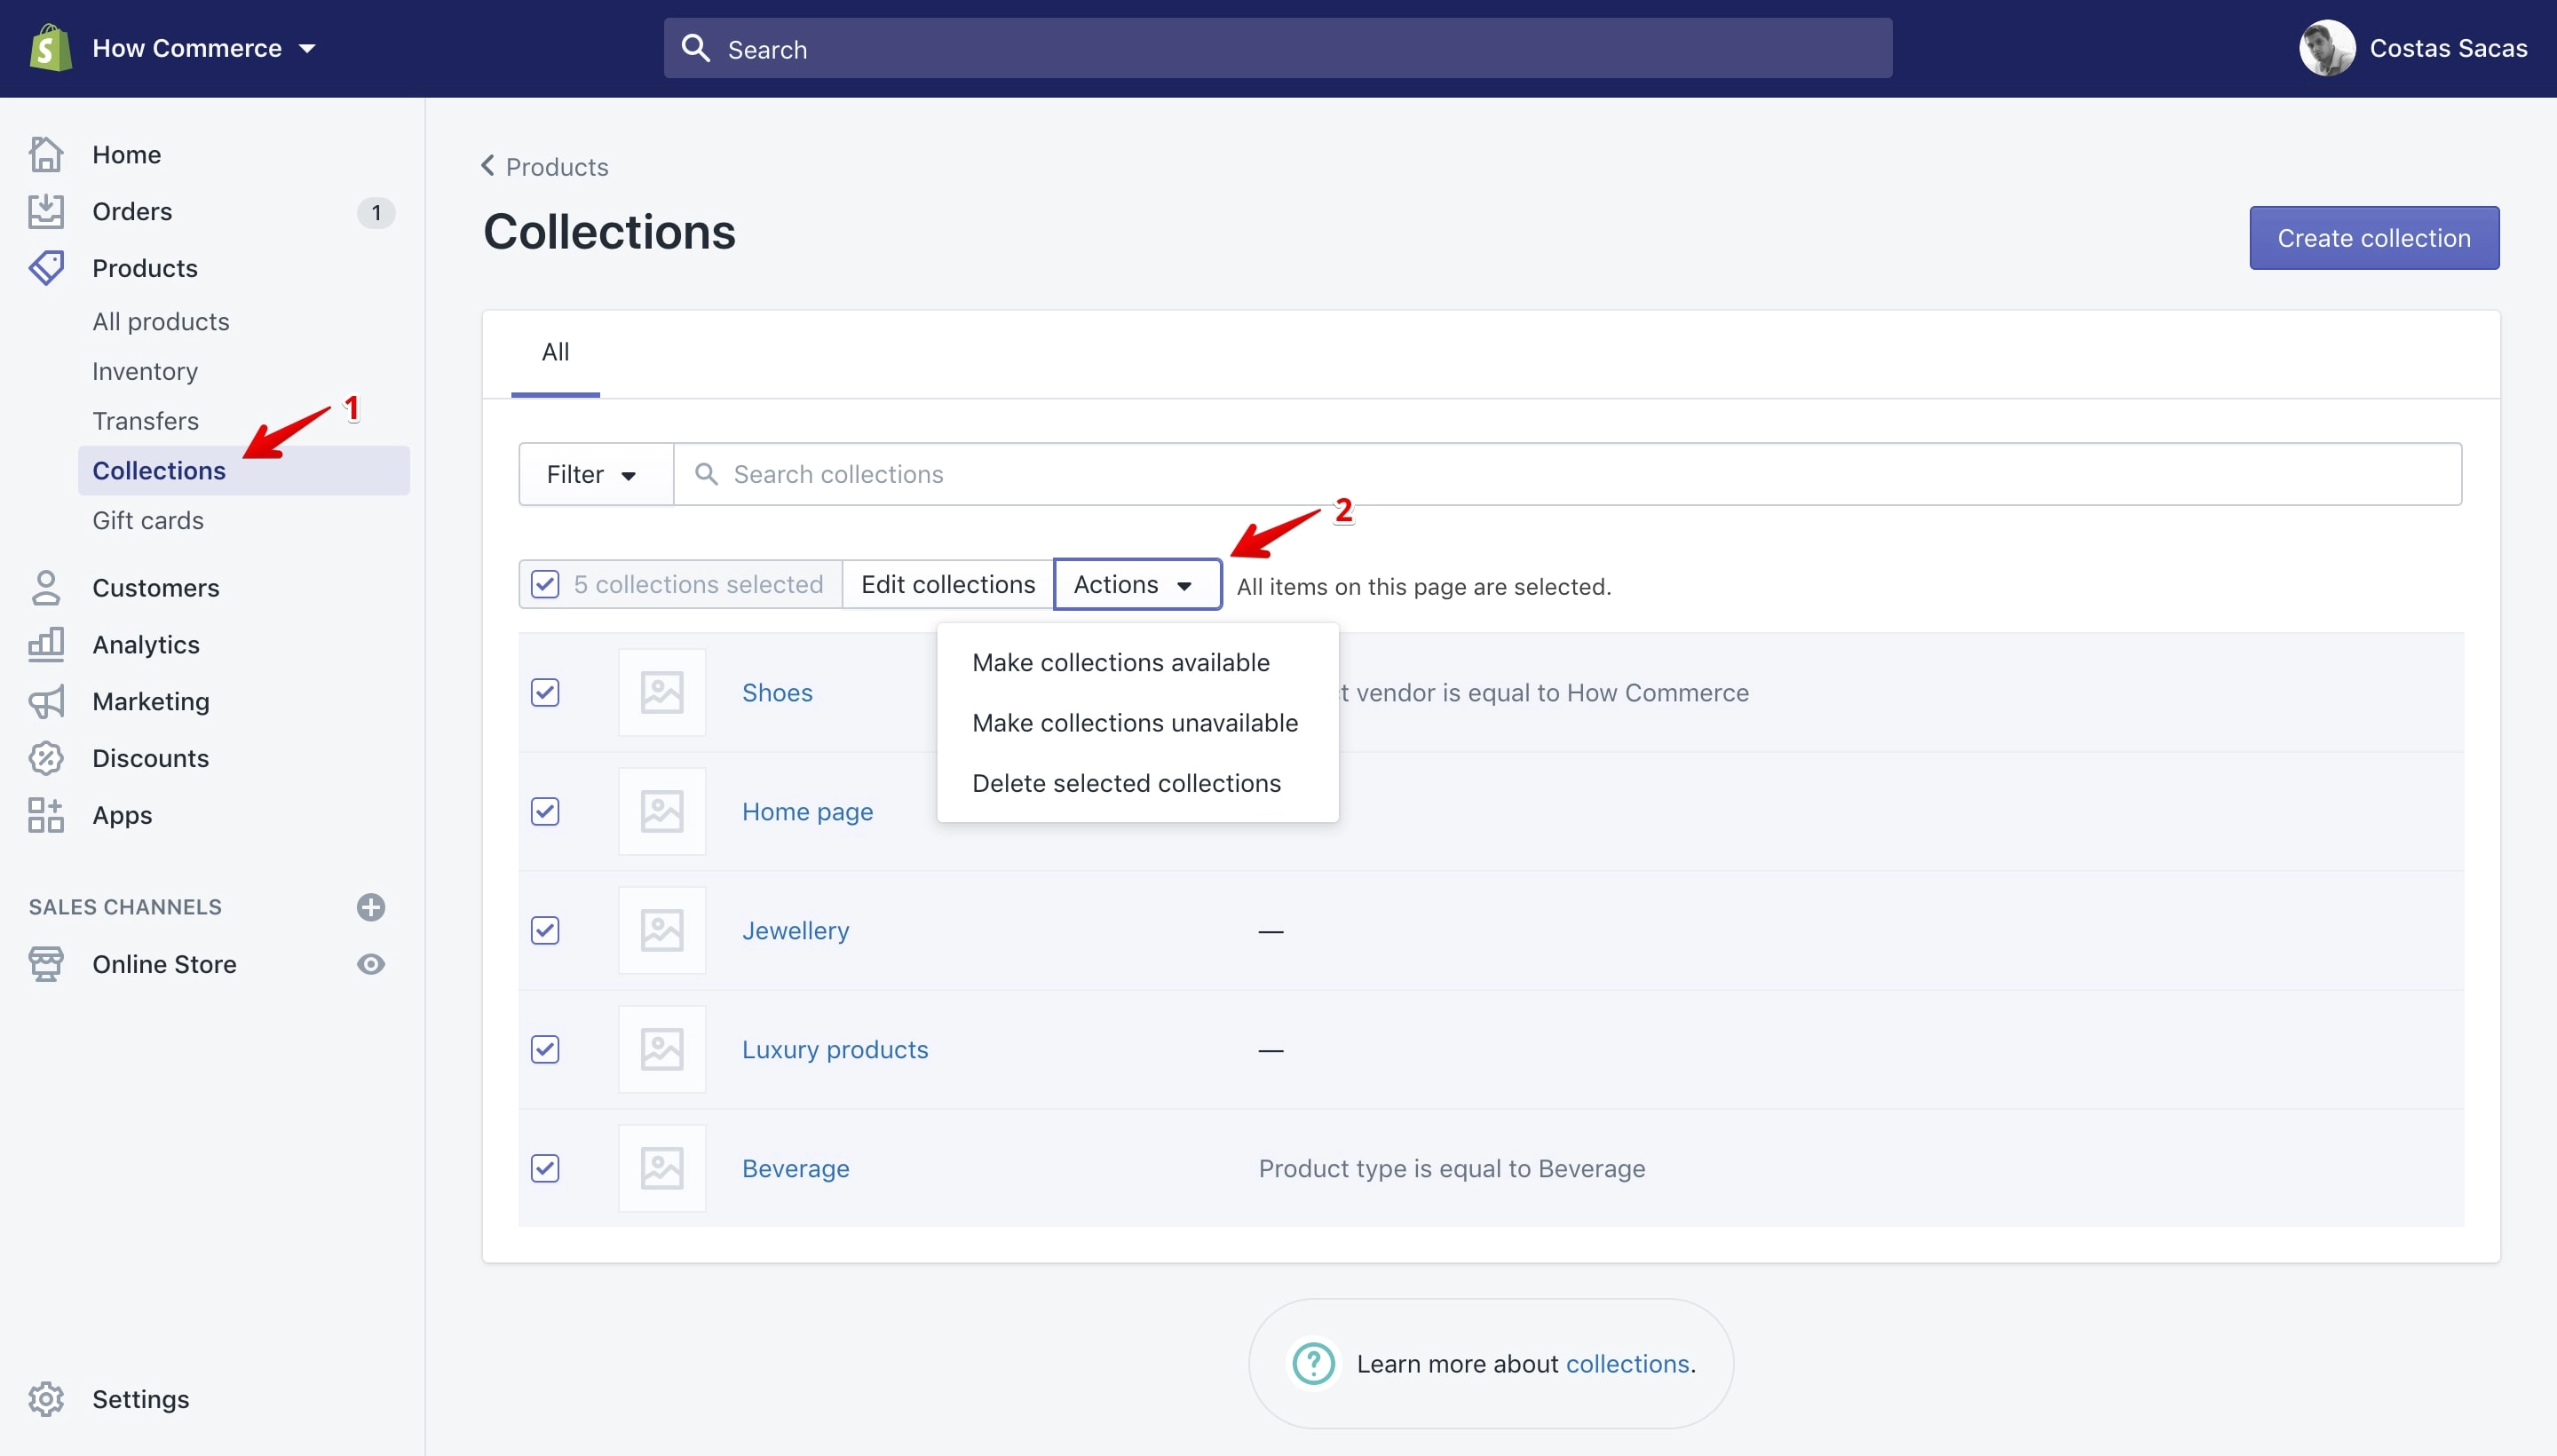
List with all the “Bulk actions” available on the “Products Collections” page:
- Make collections available
- Make collections unavailable
- Delete selected collections
Products → Gift Cards
Here you have 2 types of items: one is the product “Gift Card” that you can sell in your shop like any other regular product and the issued gift cards.
Product gift cards
To reach this page you need to go to Gift cards → Gift card products or directly to the “All Products” page:
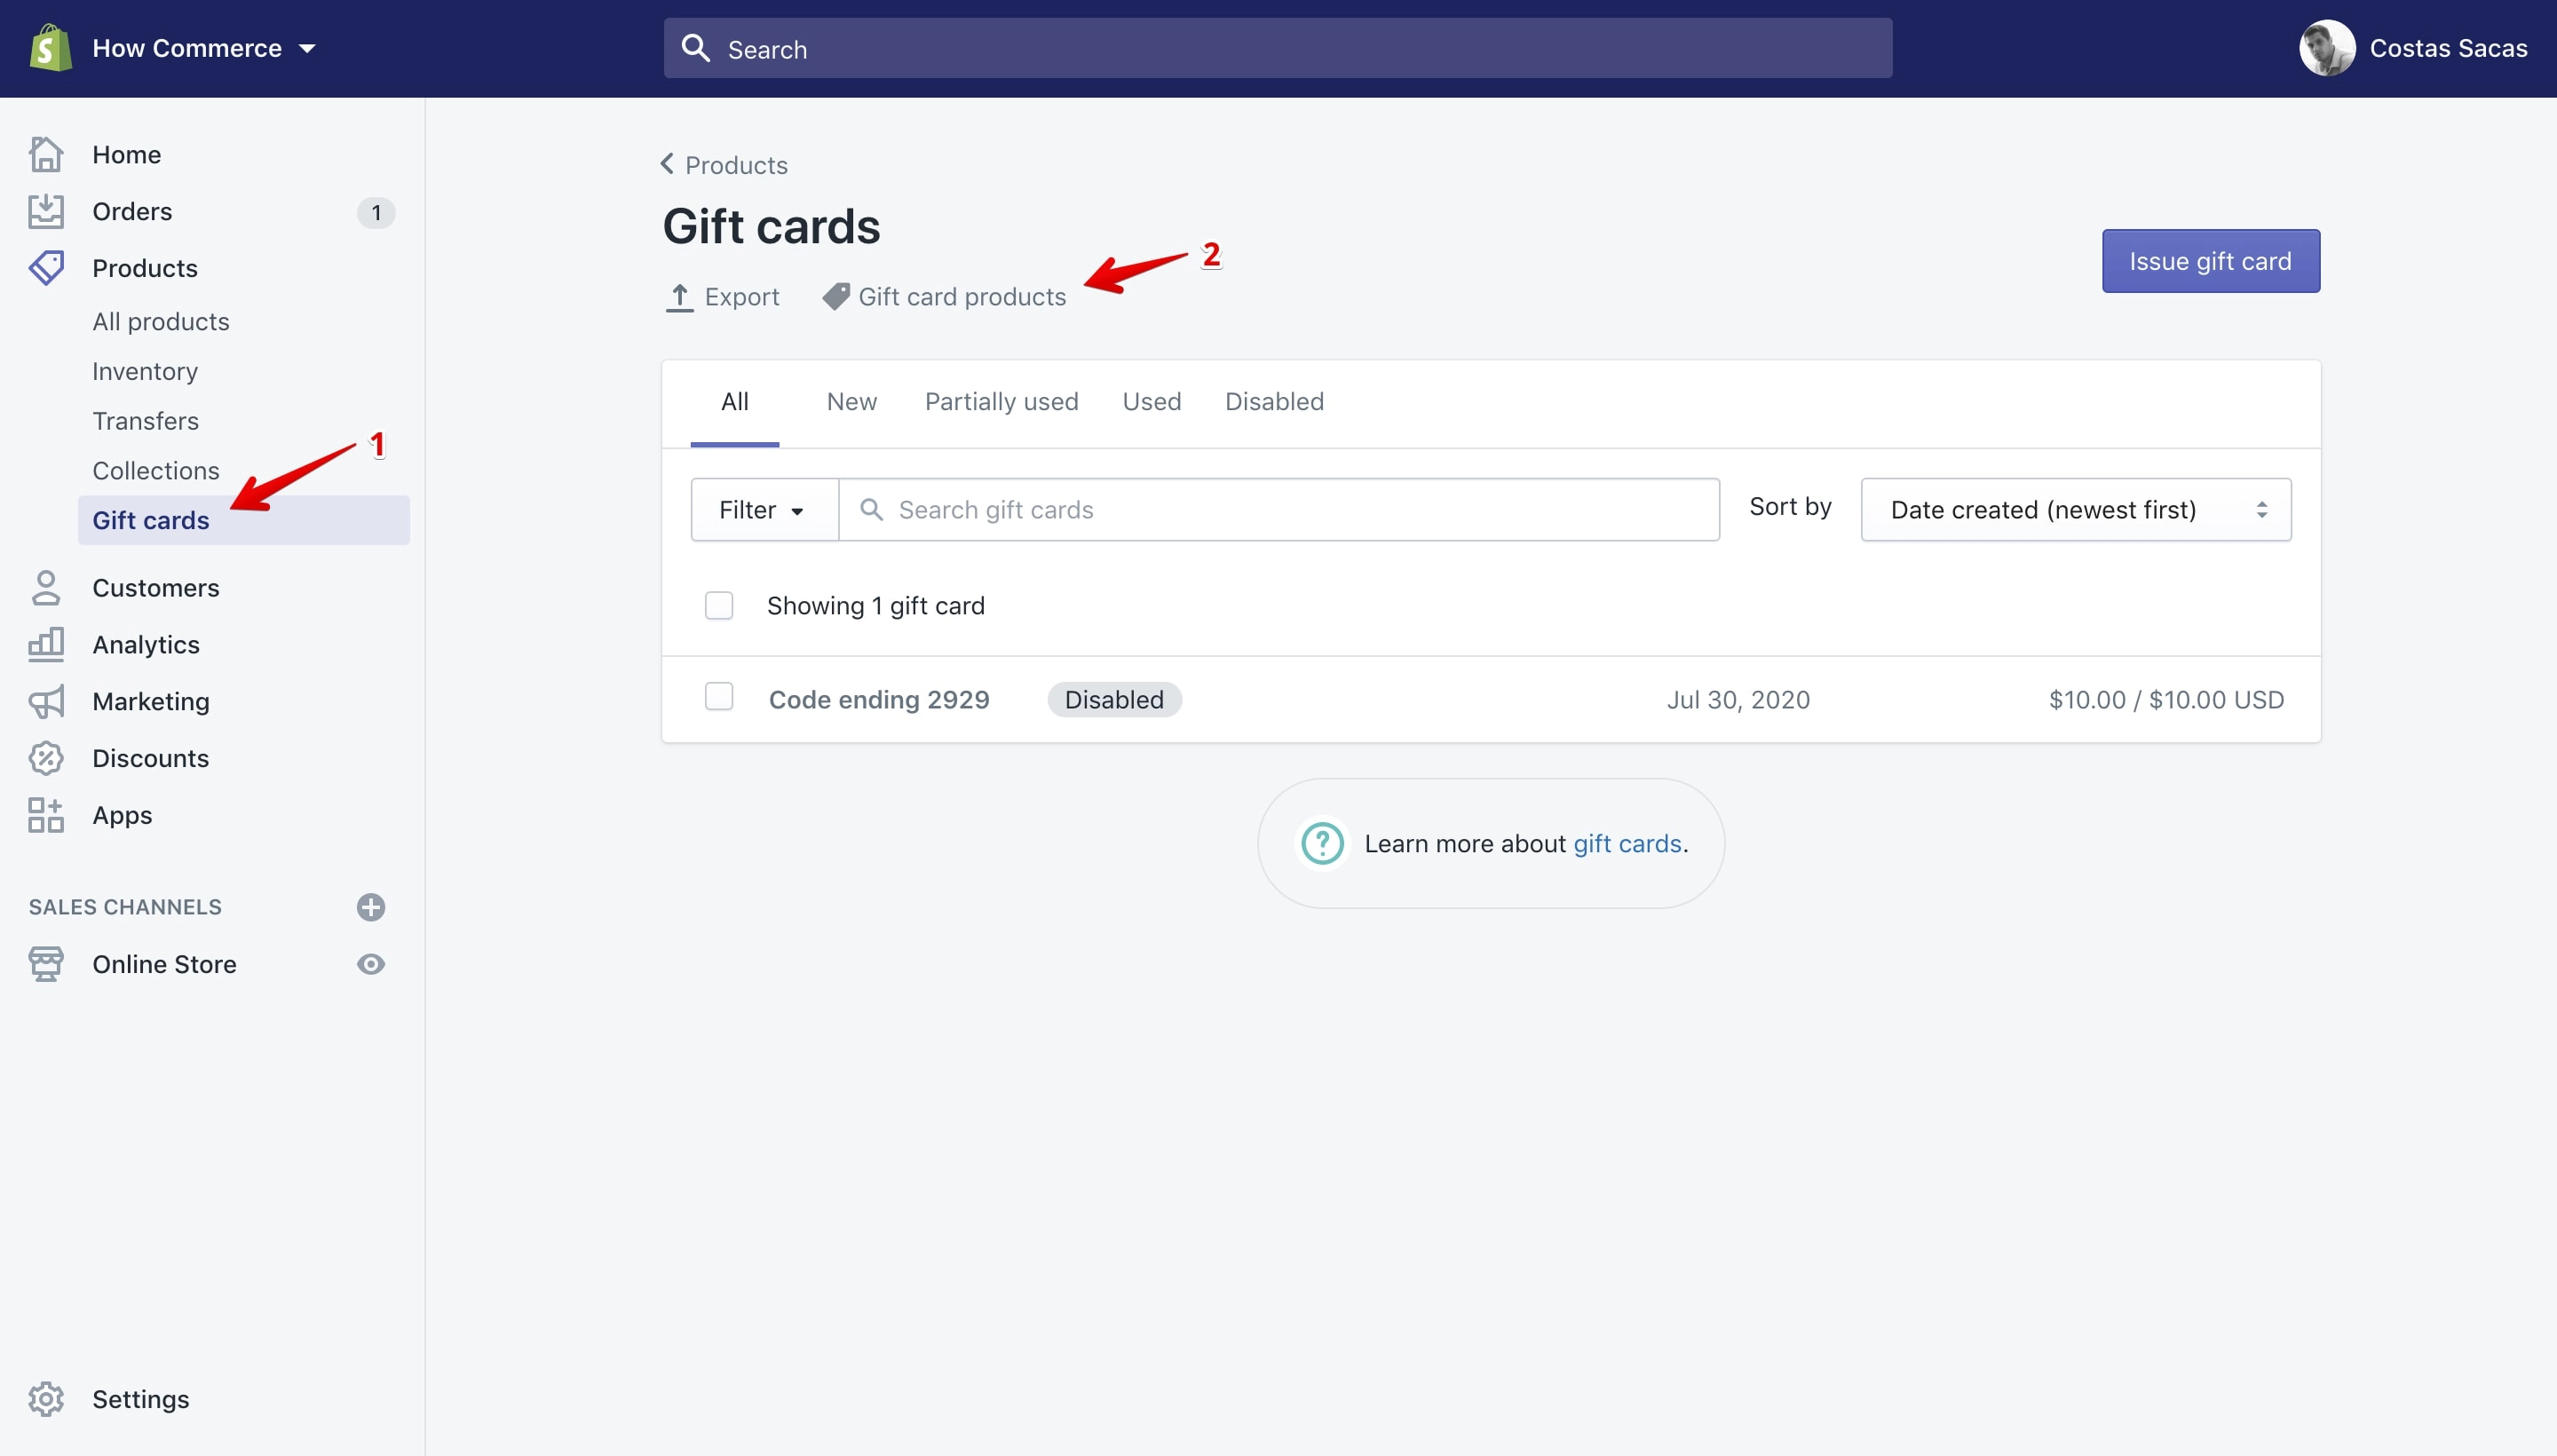
Once on the page you can see them listed if you click the “Actions” button:
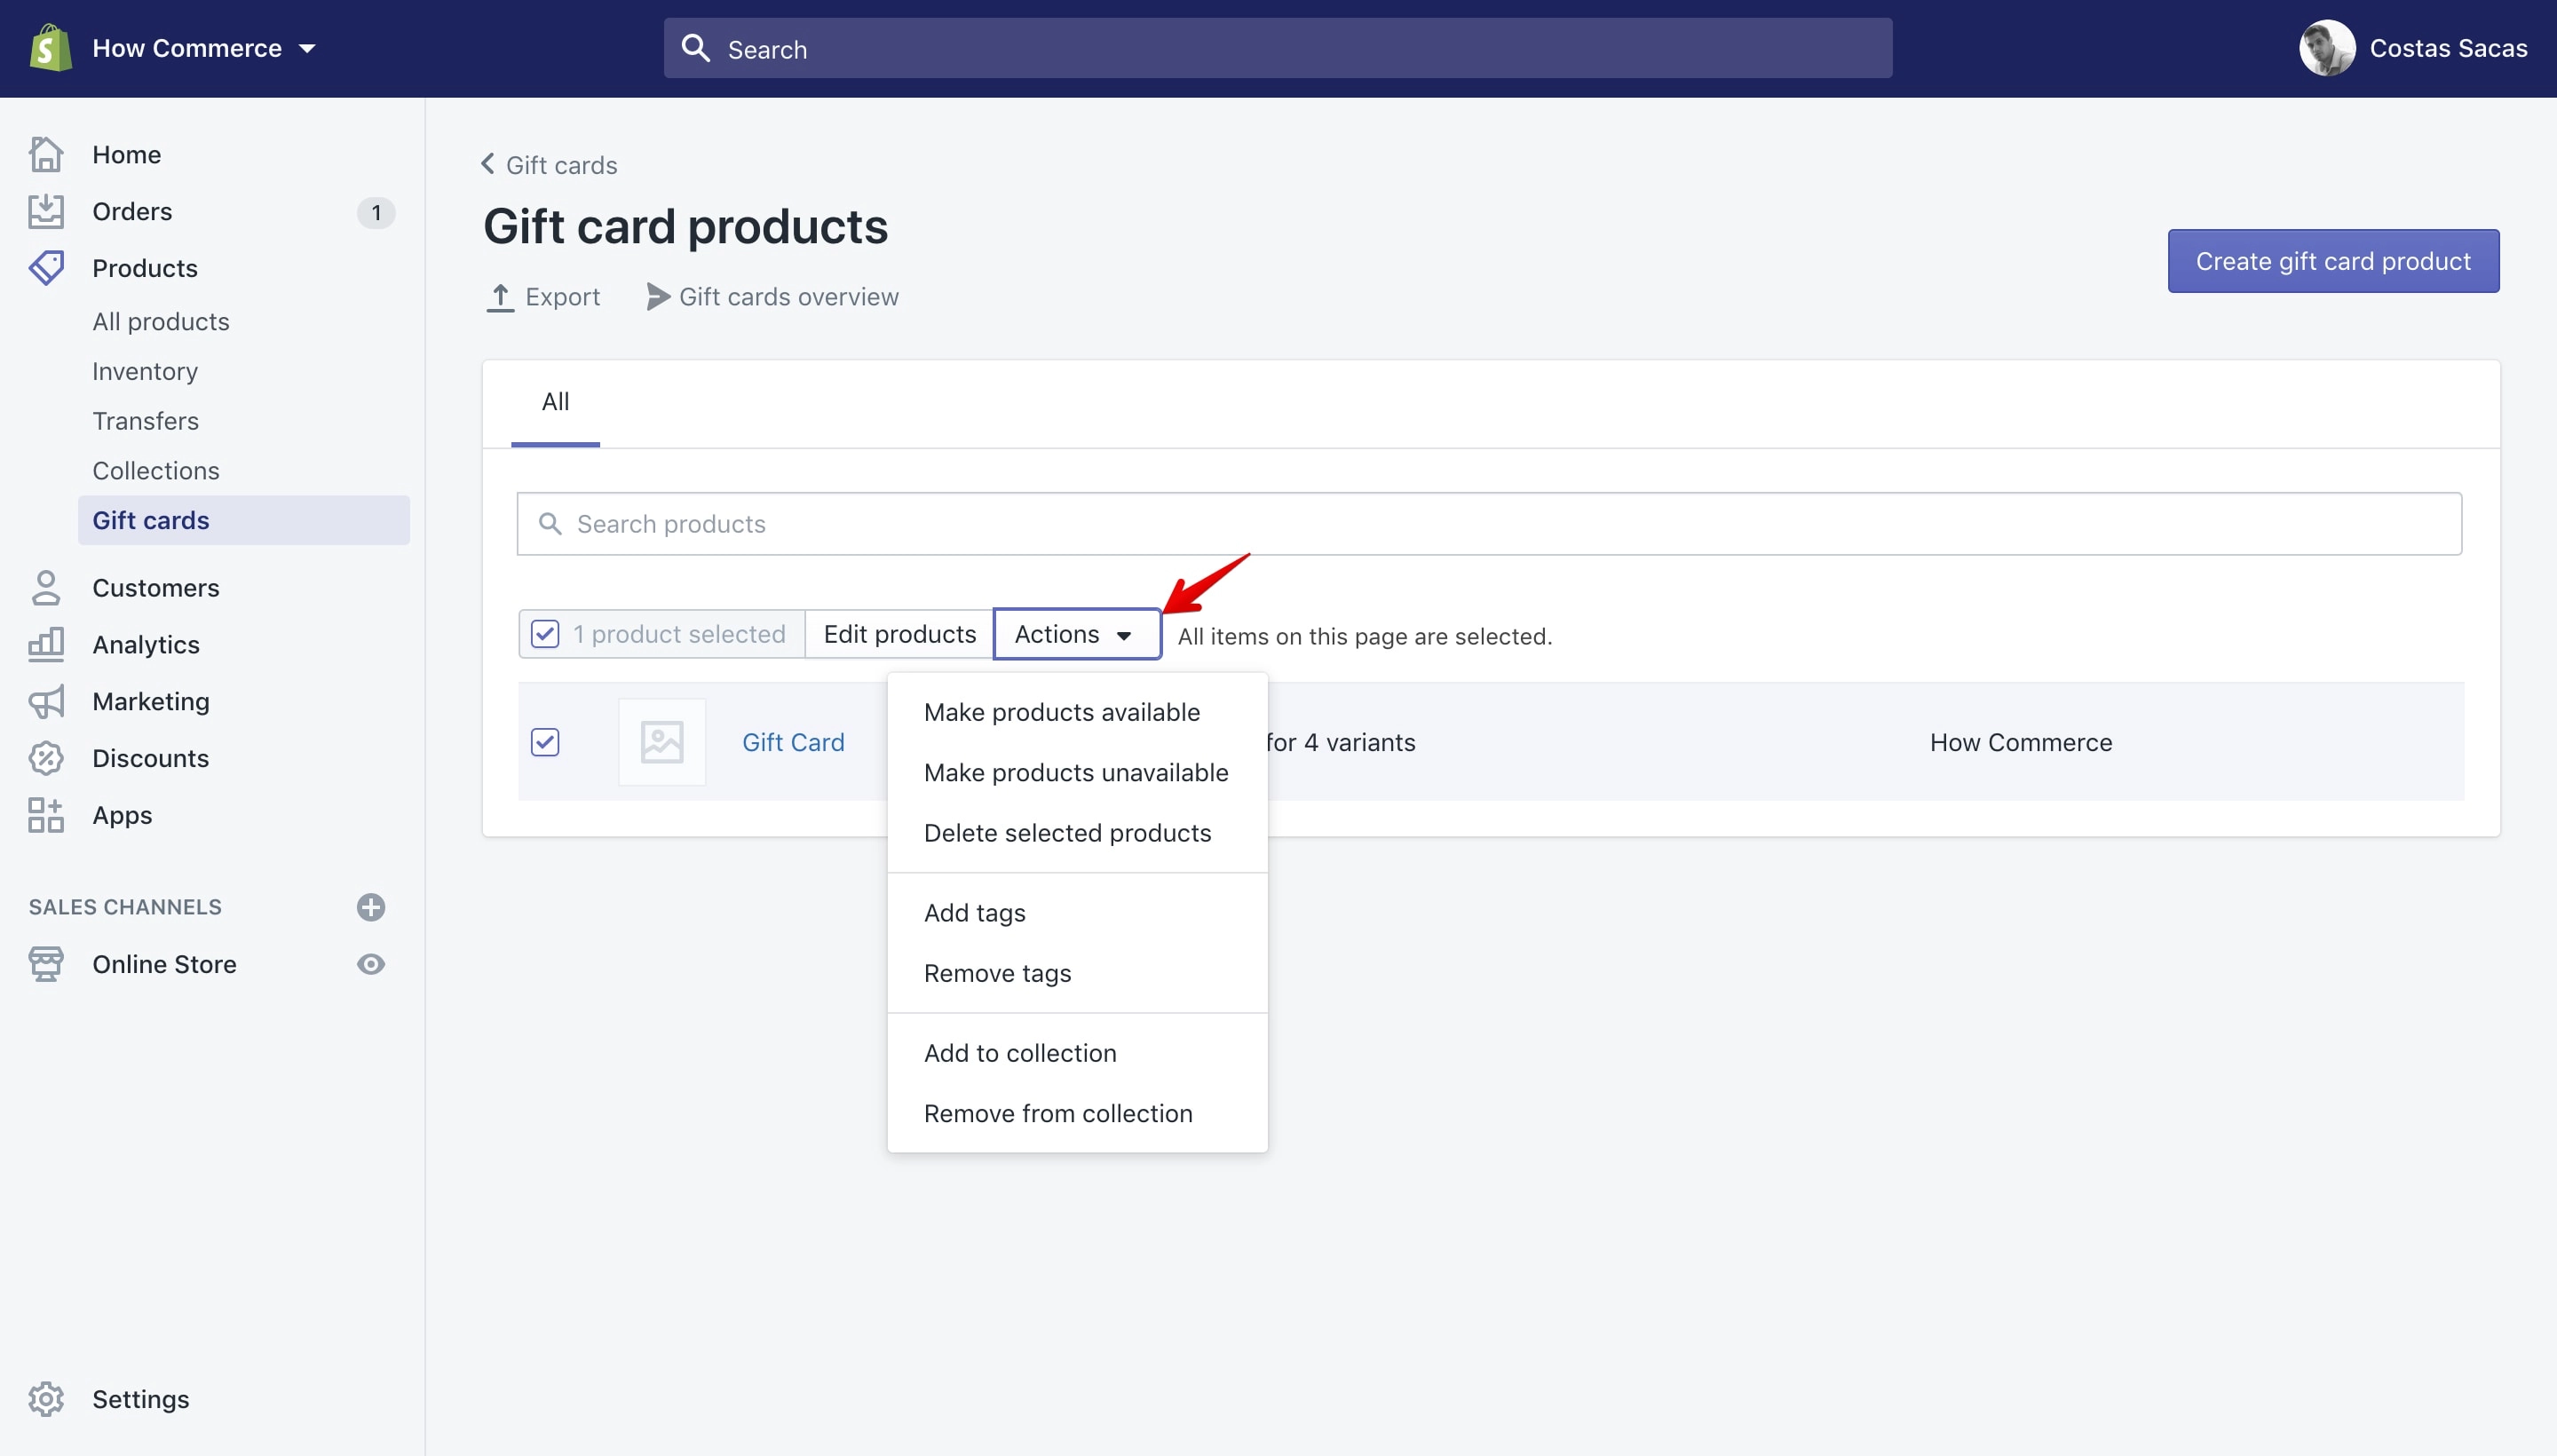
Bulk actions available on the “Gift card products” page.
List with all the “Bulk actions” available on the “Gift card products” page:
- Make products available
- Make products unavailable
- Delete selected products
- Add tags
- Remove tags
- Add to collection
- Remove from collection
- App functions (depending on installed apps)
Issued gift cards
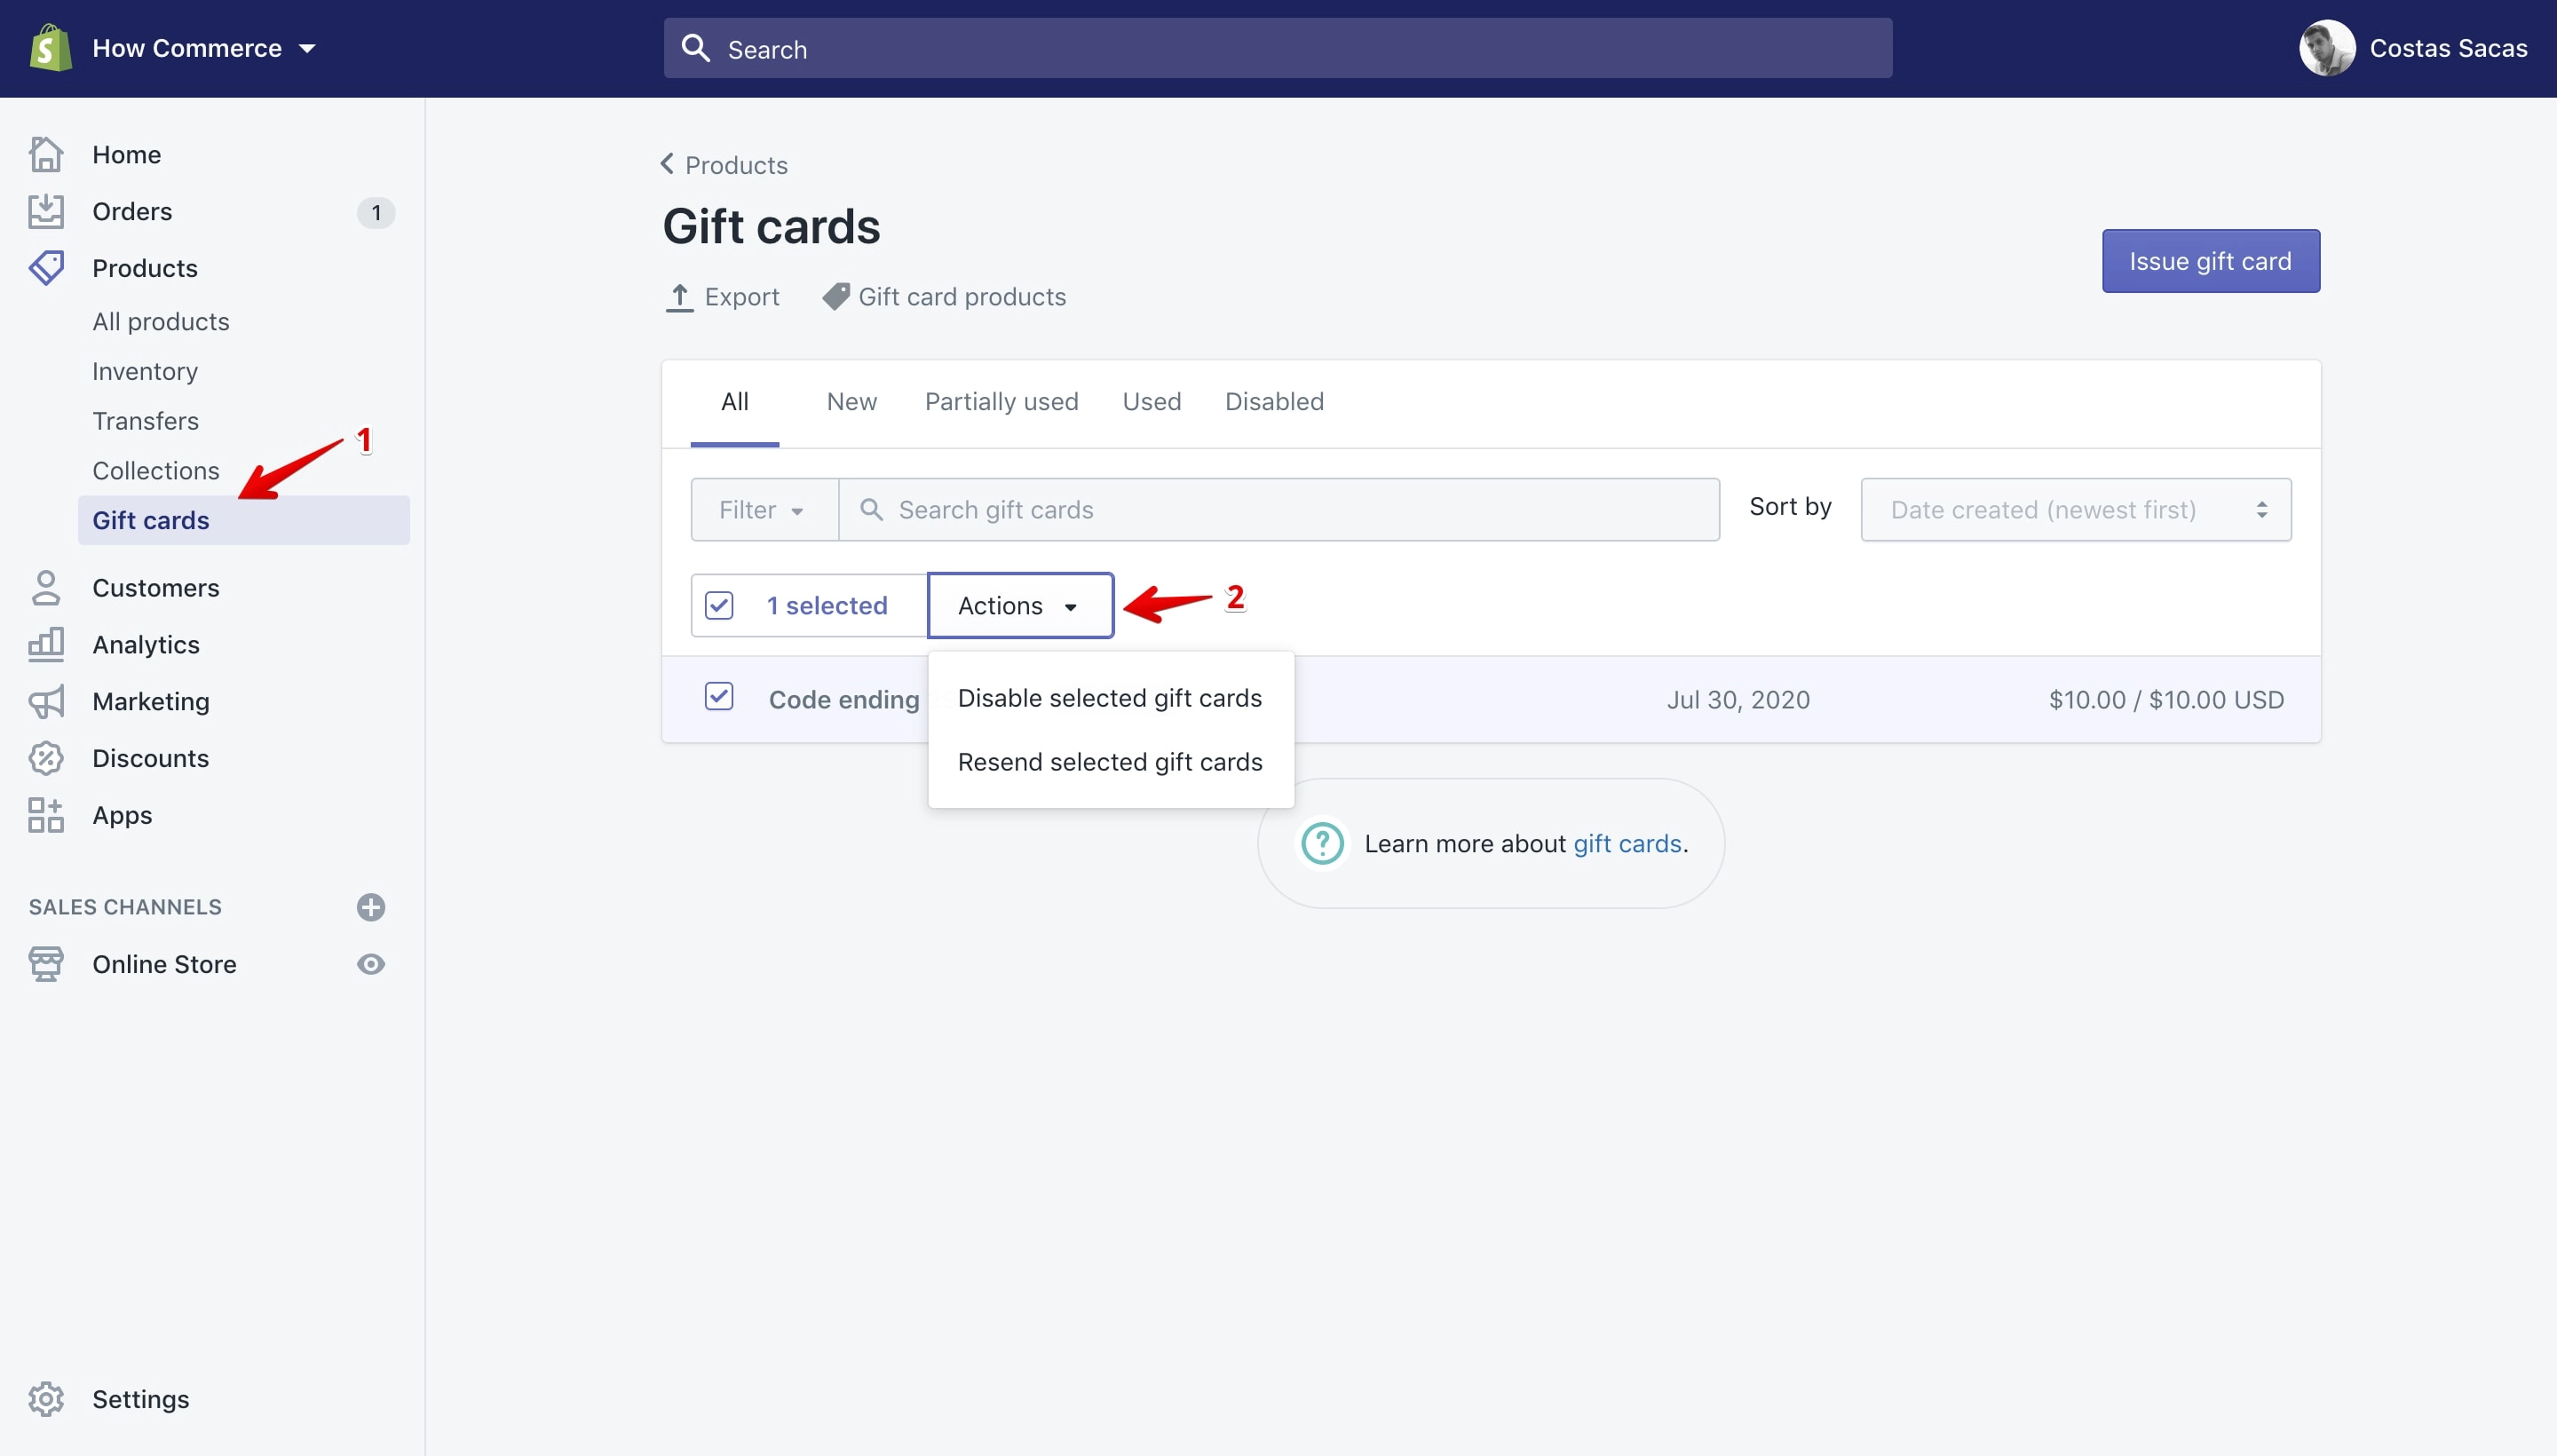
List with all the “Bulk actions” available on the “Issued gift cards” page:
- Disable selected gift cards
- Resend select gift cards
Products → Product → Variants
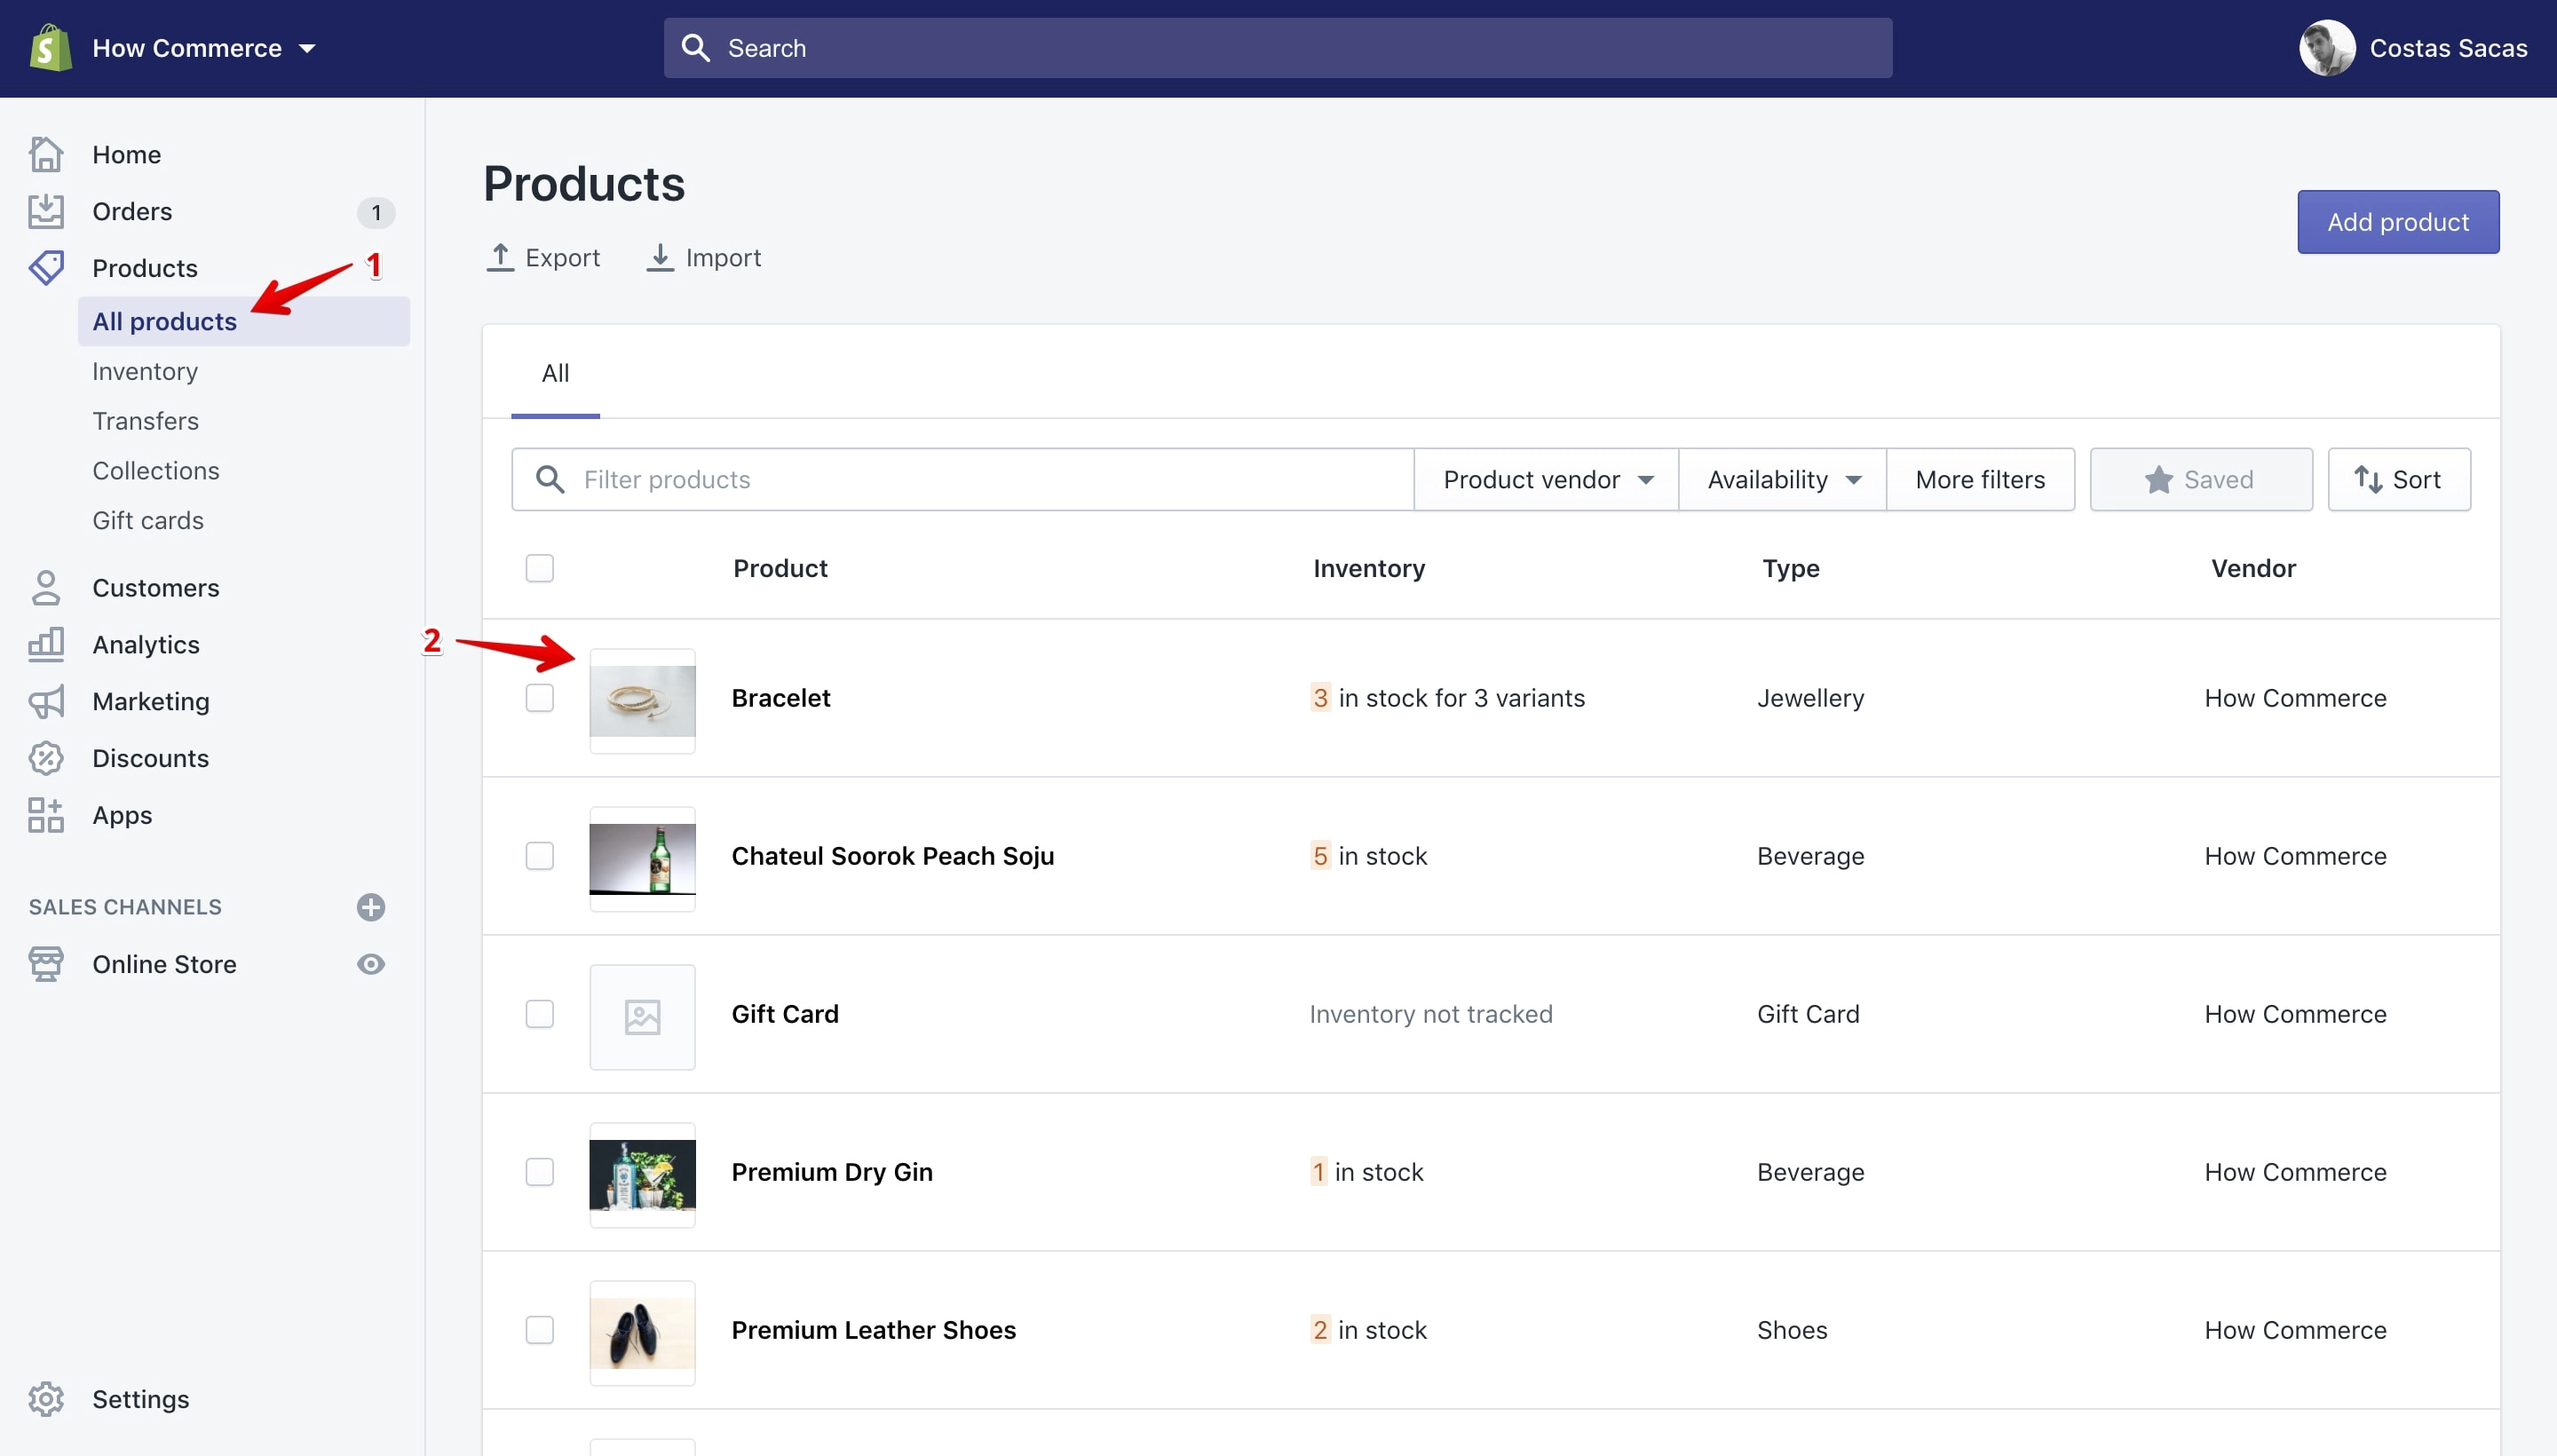
To access “Bulk Actions” for product variants you need to go to “Products” and select a product that has variants from the list. You can see if a product has variants by checking the “Inventory” column:
After you see the product edit page scroll at the bottom of the page select one or more variants and click on the “More actions” button:
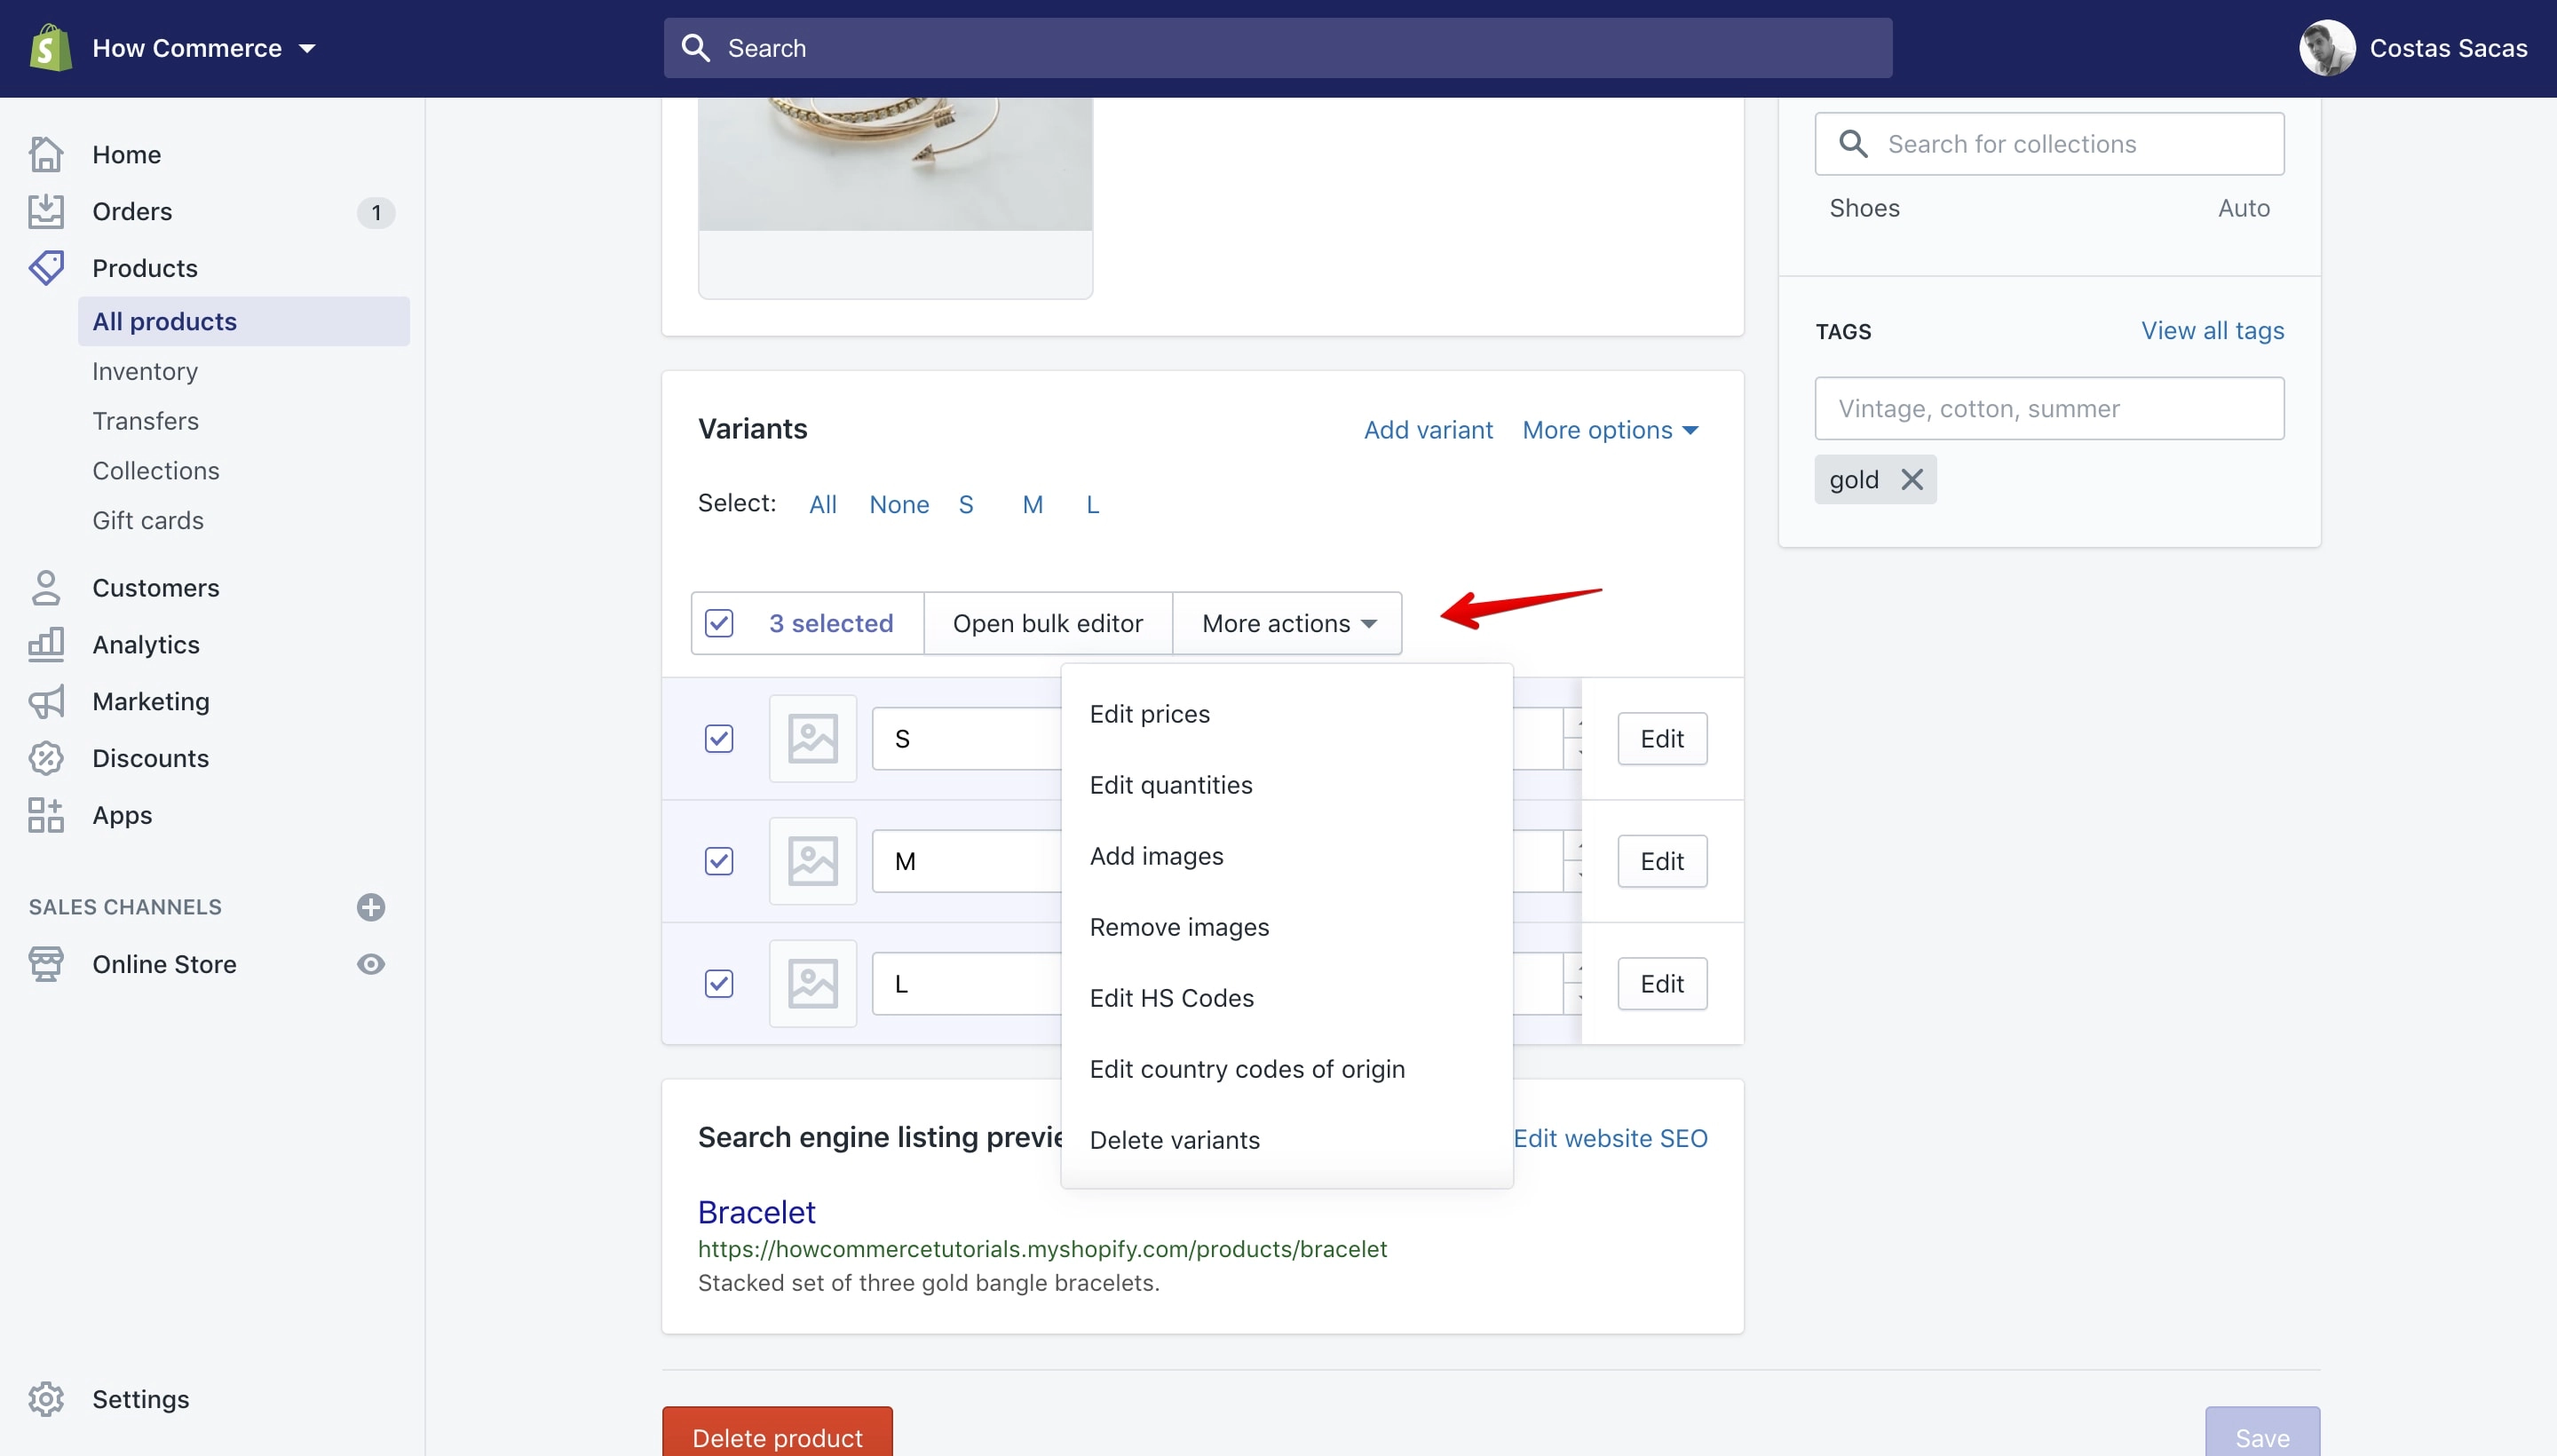
Bulk actions available on the “Products variants” section.
List with all the “Bulk actions” available on the “Product variants” page:
- Edit prices
- Edit quantities
- Add images
- Remove images
- Edit HS codes
- Edit country codes of origin
- Delete Variants
- Continue selling when out of stock
- Stop selling when out of stock
- Duplicate variants - this is disabled if you have more than one variant selected. To use it you need to select only one variant at a time.
Customers
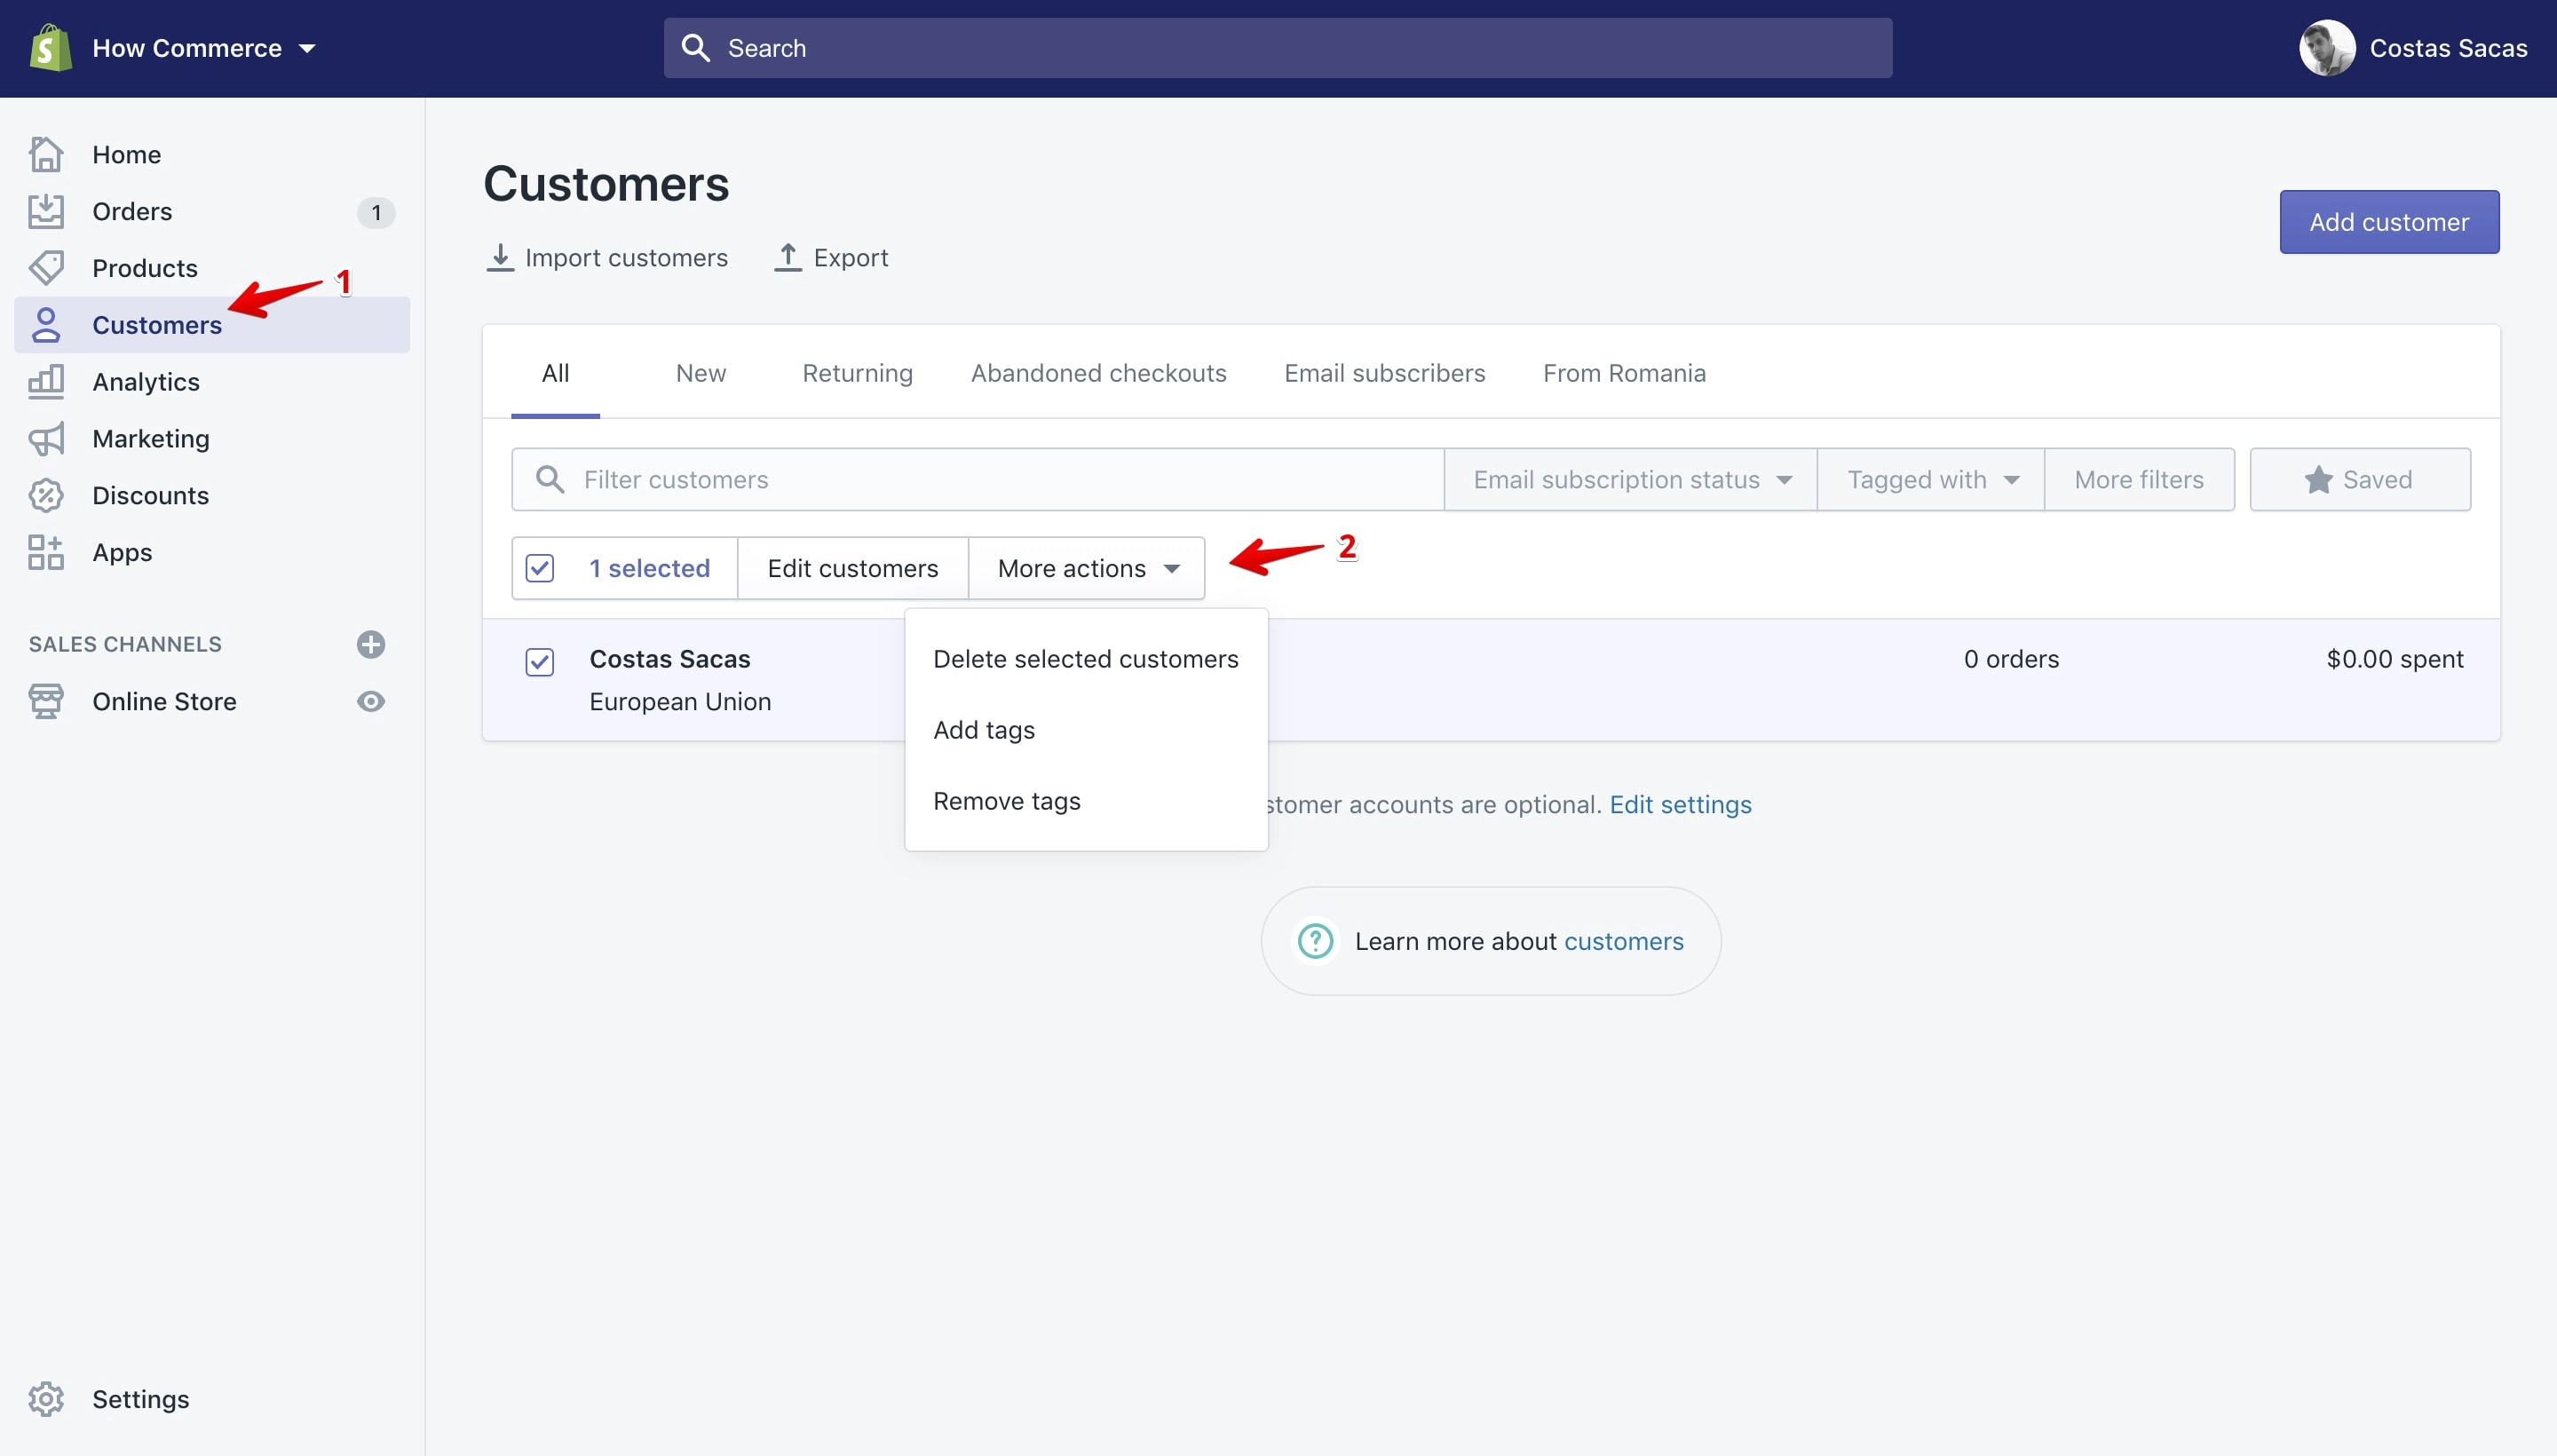
Bulk actions available on the “Customers” section.
List with all the “Bulk actions” available on the “Customers” page:
- Delete selected customers
- Add tags
- Remove tags
Discounts
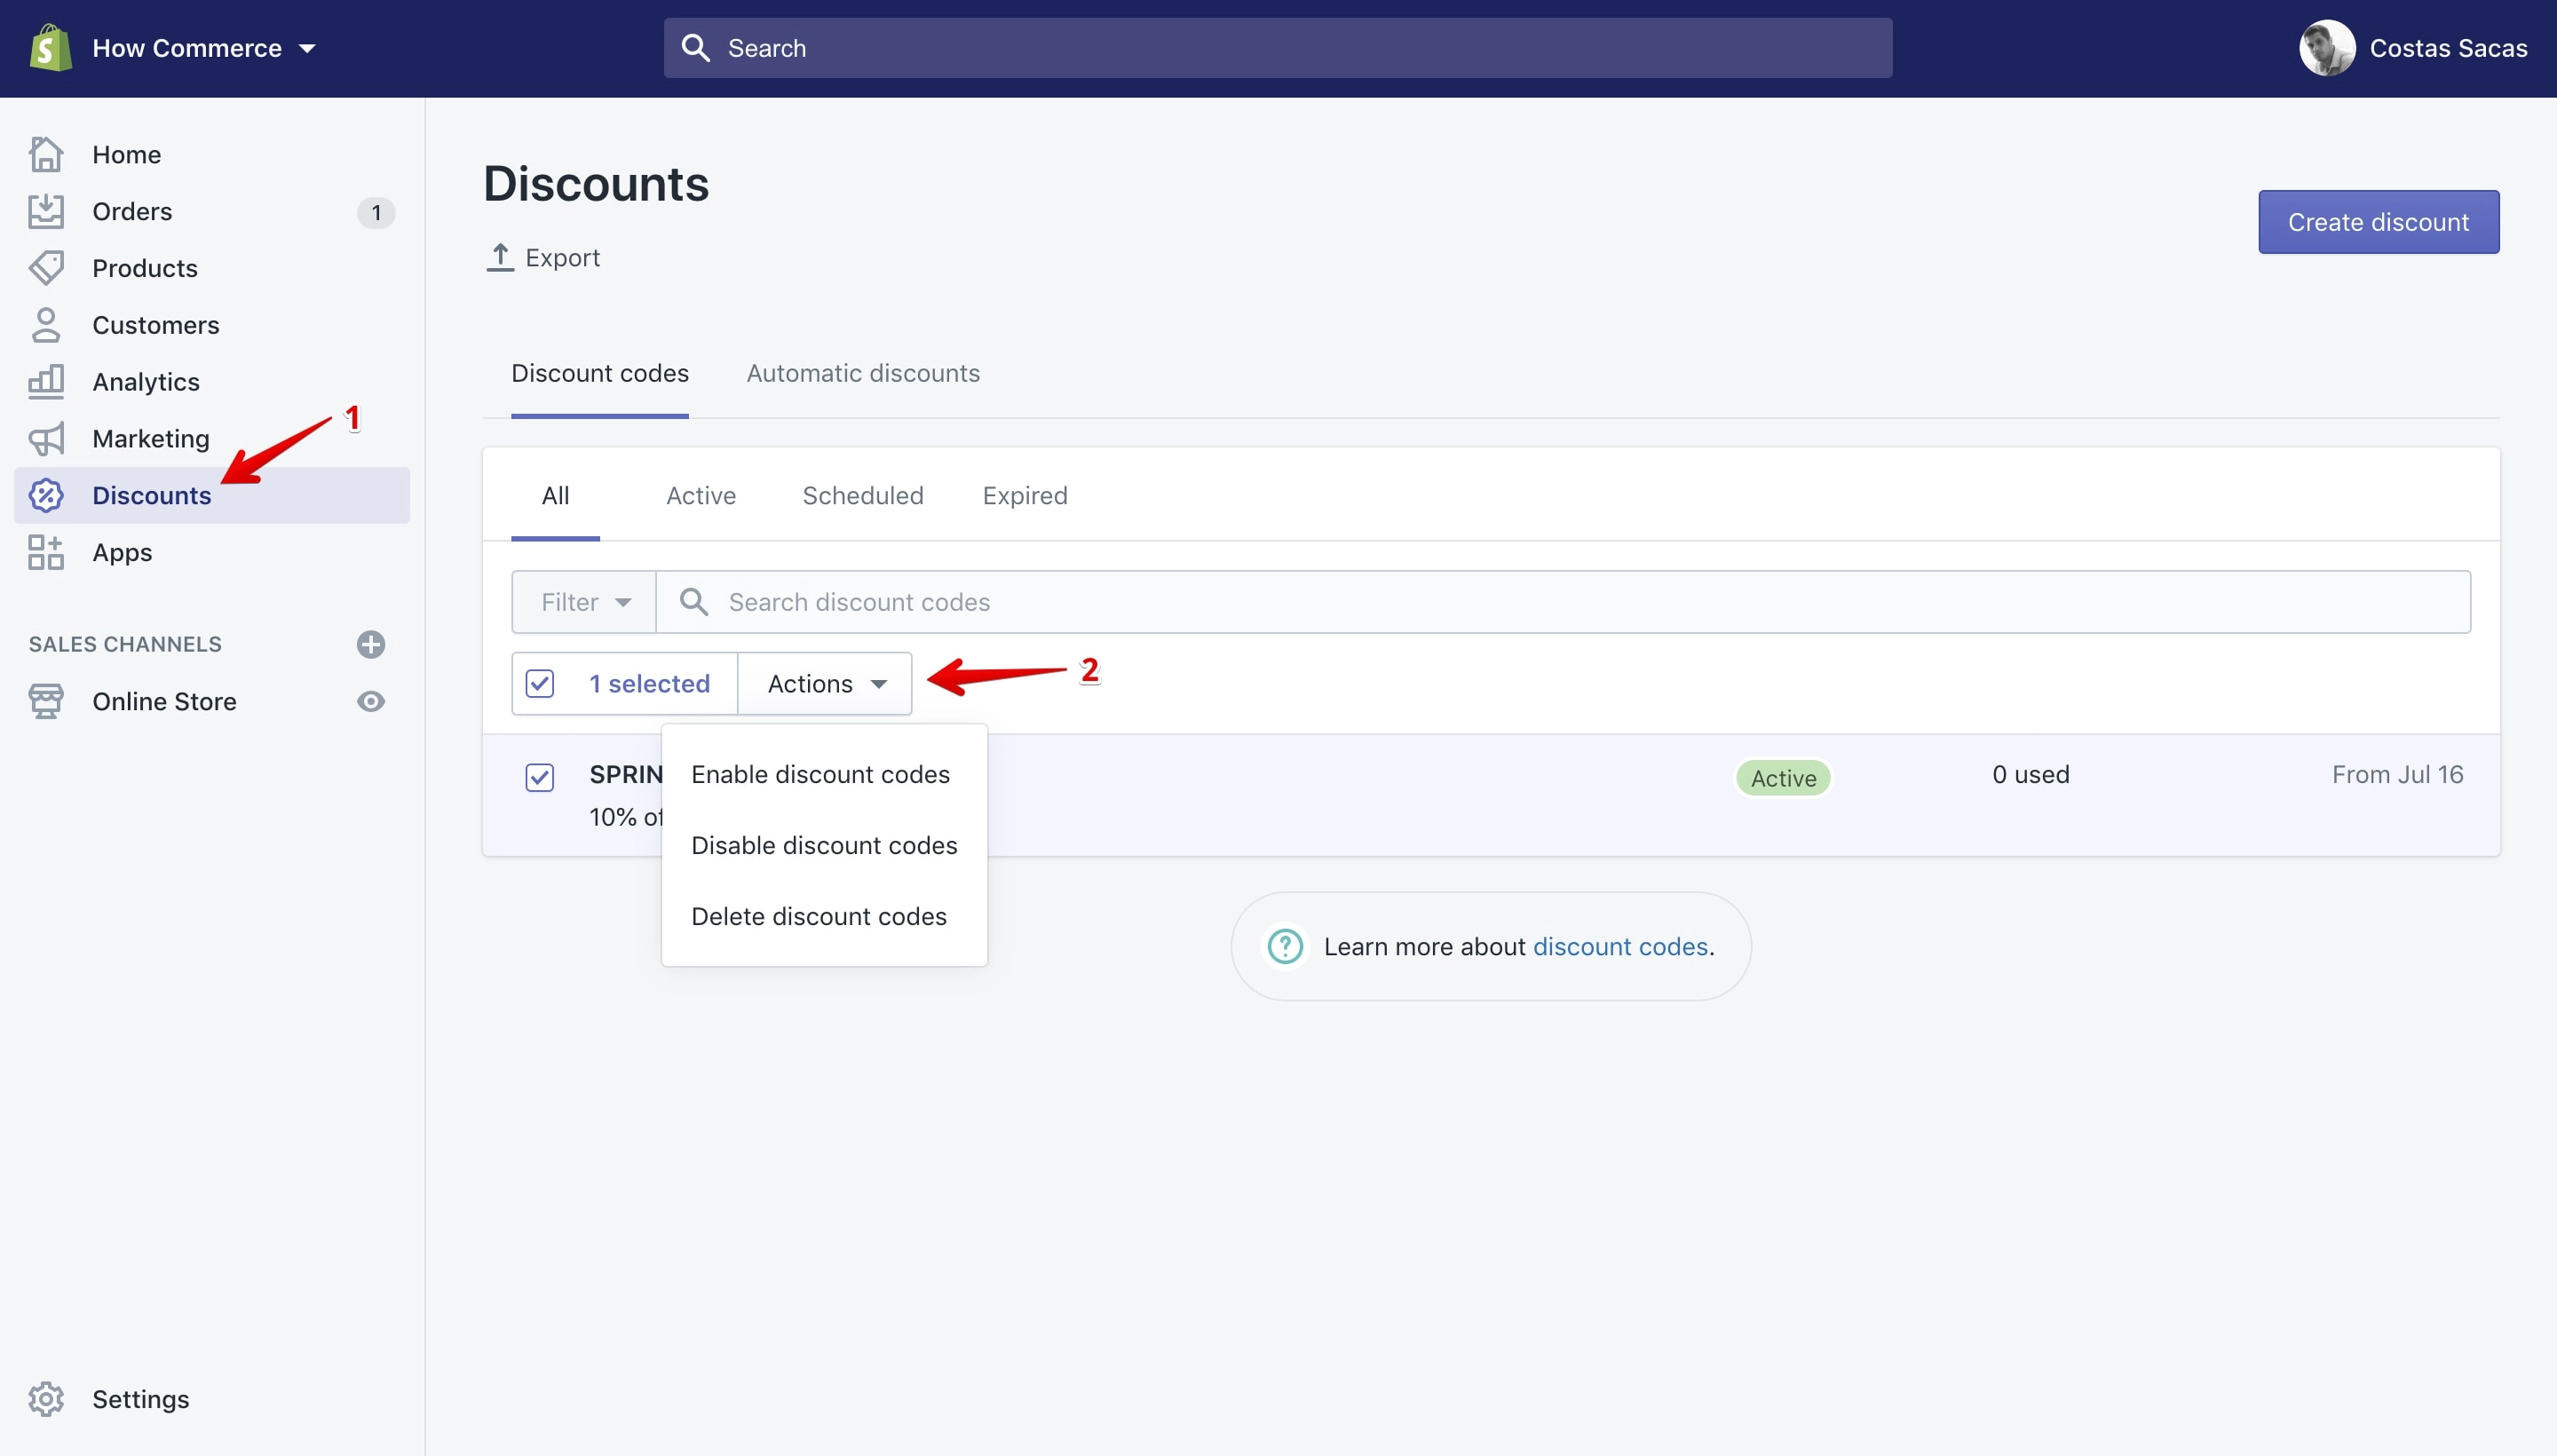
List with all the “Bulk actions” available on the “Discount” page:
- Enable discounts codes
- Disable discounts codes
- Delete discounts codes
Online Store → Blog Posts
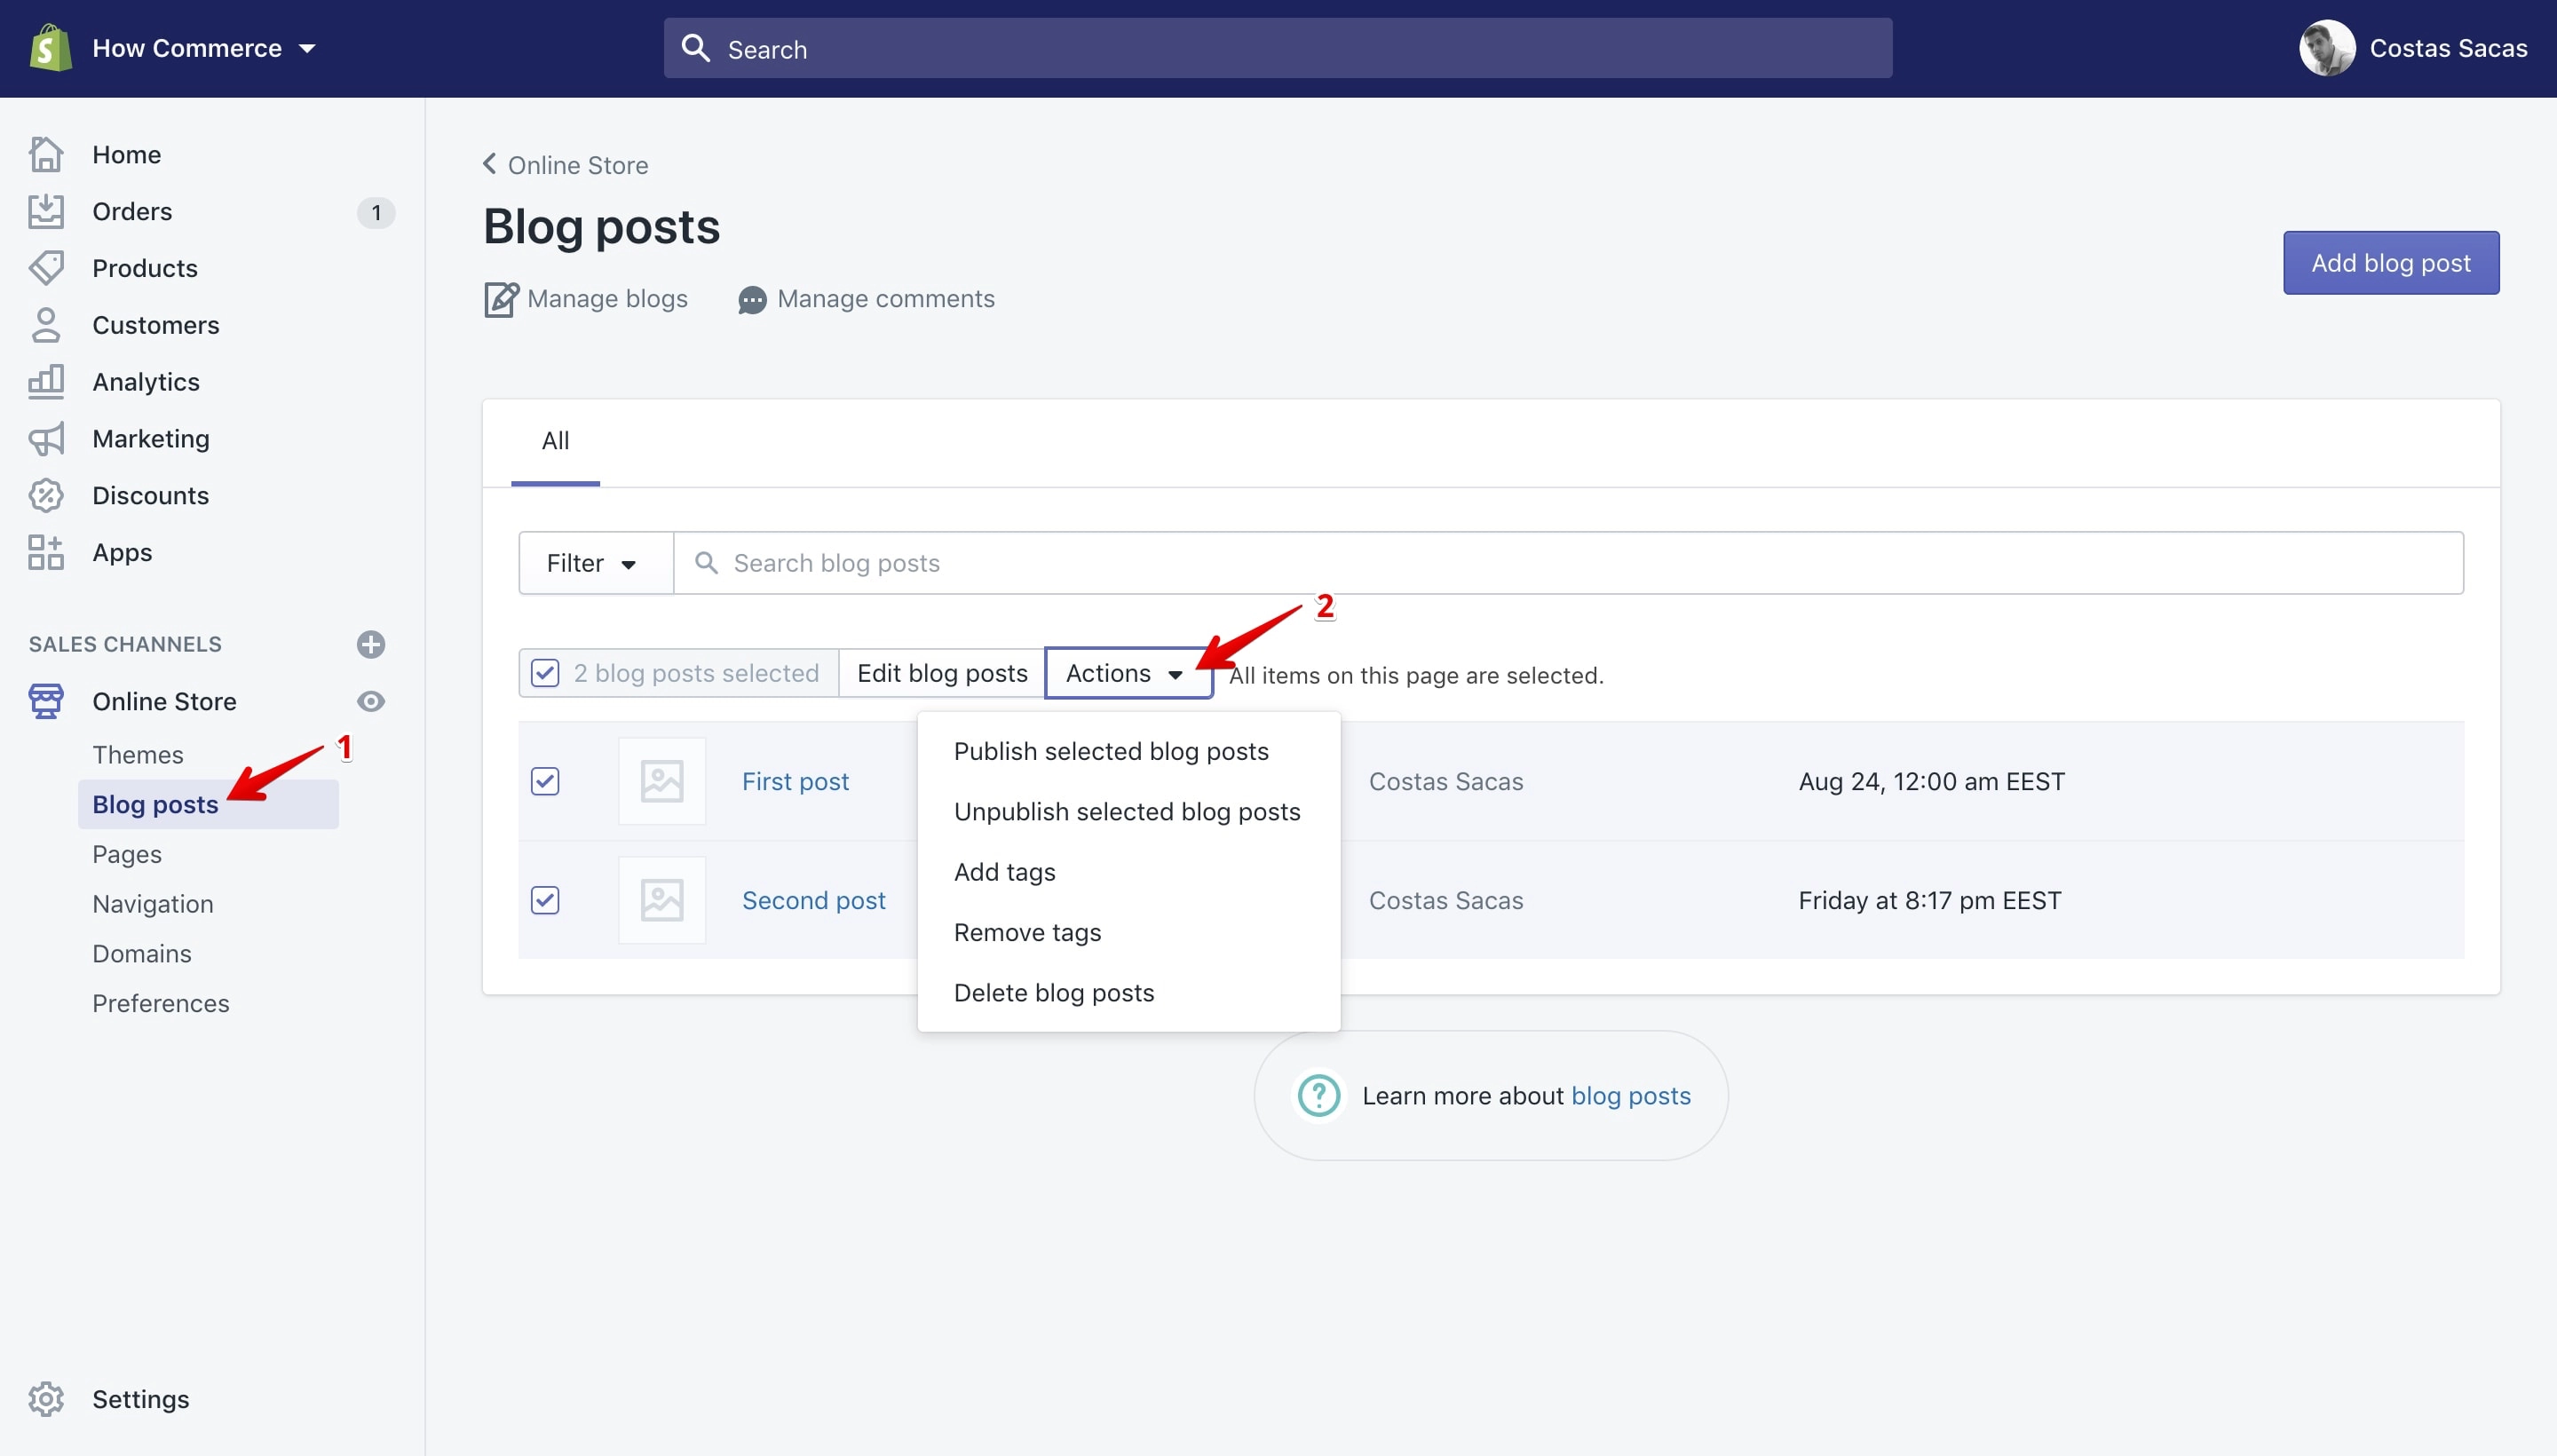
Bulk actions available on the “Blog posts” section.
List with all the “Bulk actions” available on the “Blog Posts” page:
- Publish selected blog posts
- Unpublish selected blog posts
- Add tags
- Remove tags
- Delete blog posts
Online Store → Pages
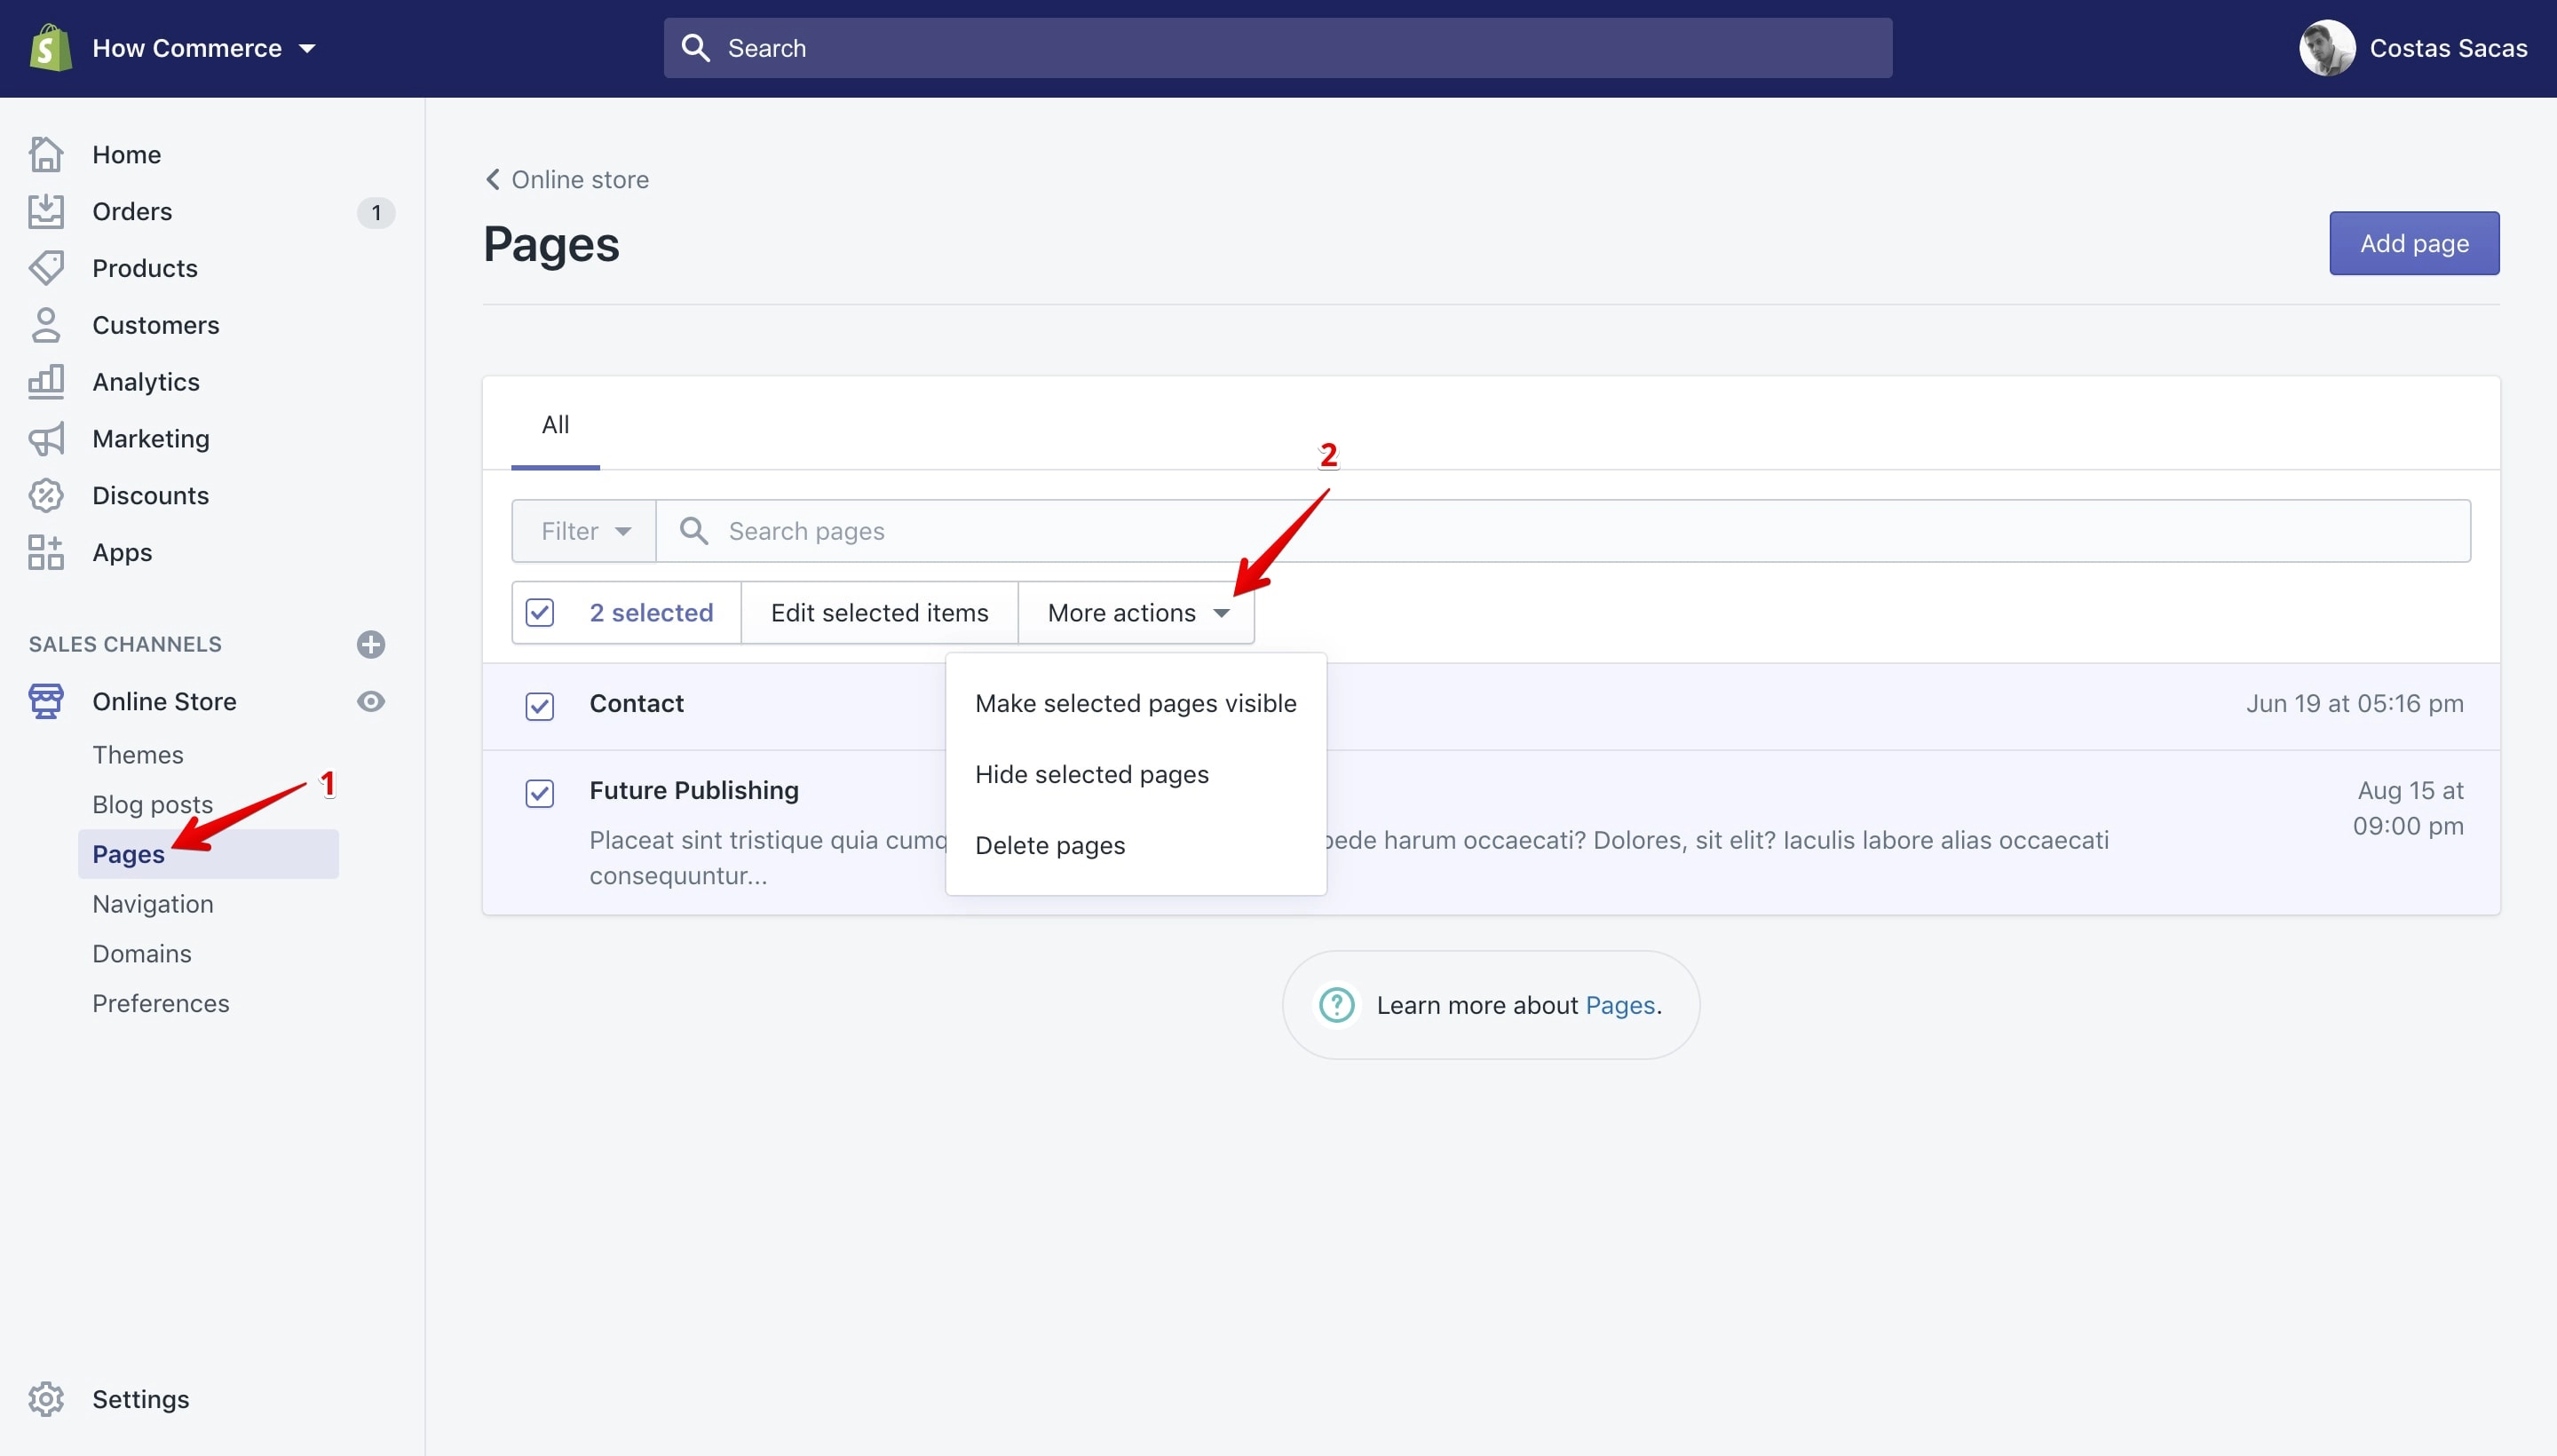
Bulk actions available on the “Pages” section.
List with all the “Bulk actions” available on the “Pages” page:
- Make selected pages visible
- Hide selected pages
- Delete pages
Online Store → Navigation → URL Redirects
To access this section bulk actions you need to click on the “Navigation” link located in the “Online Store” channel and afterwards on the “URL Redirects”:
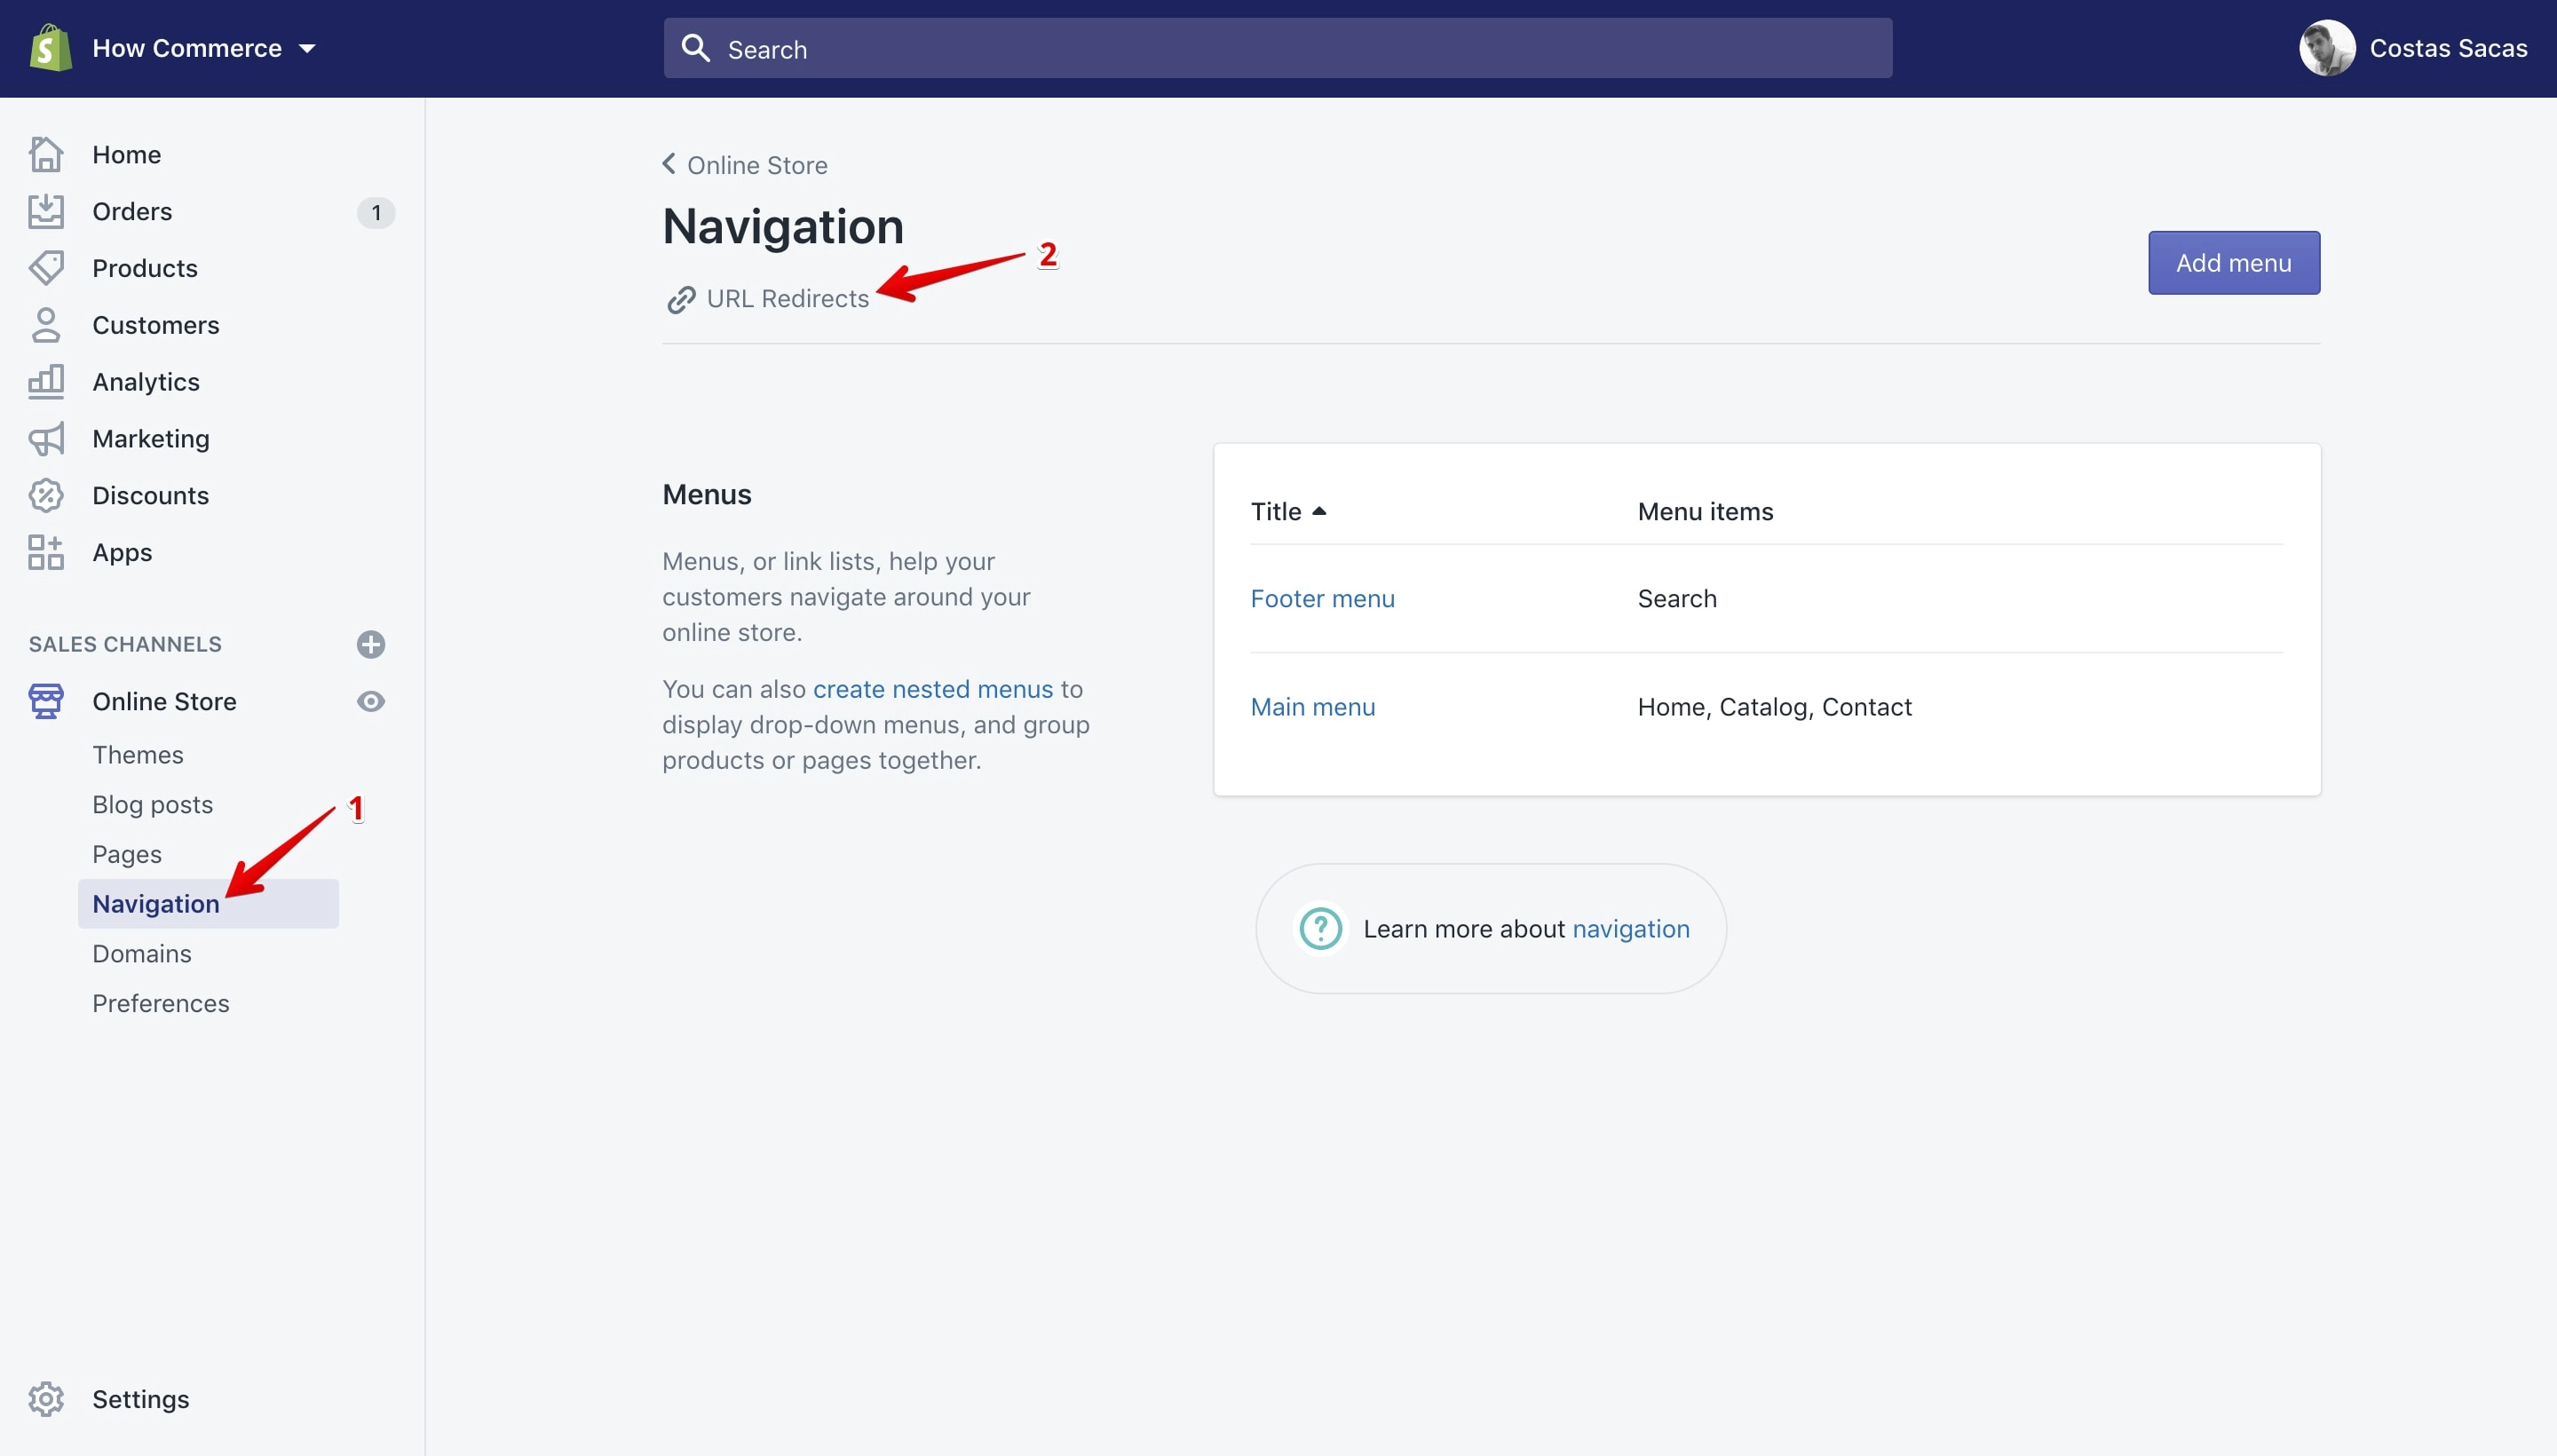
List with all the “Bulk actions” available on the “URL Redirects” page:
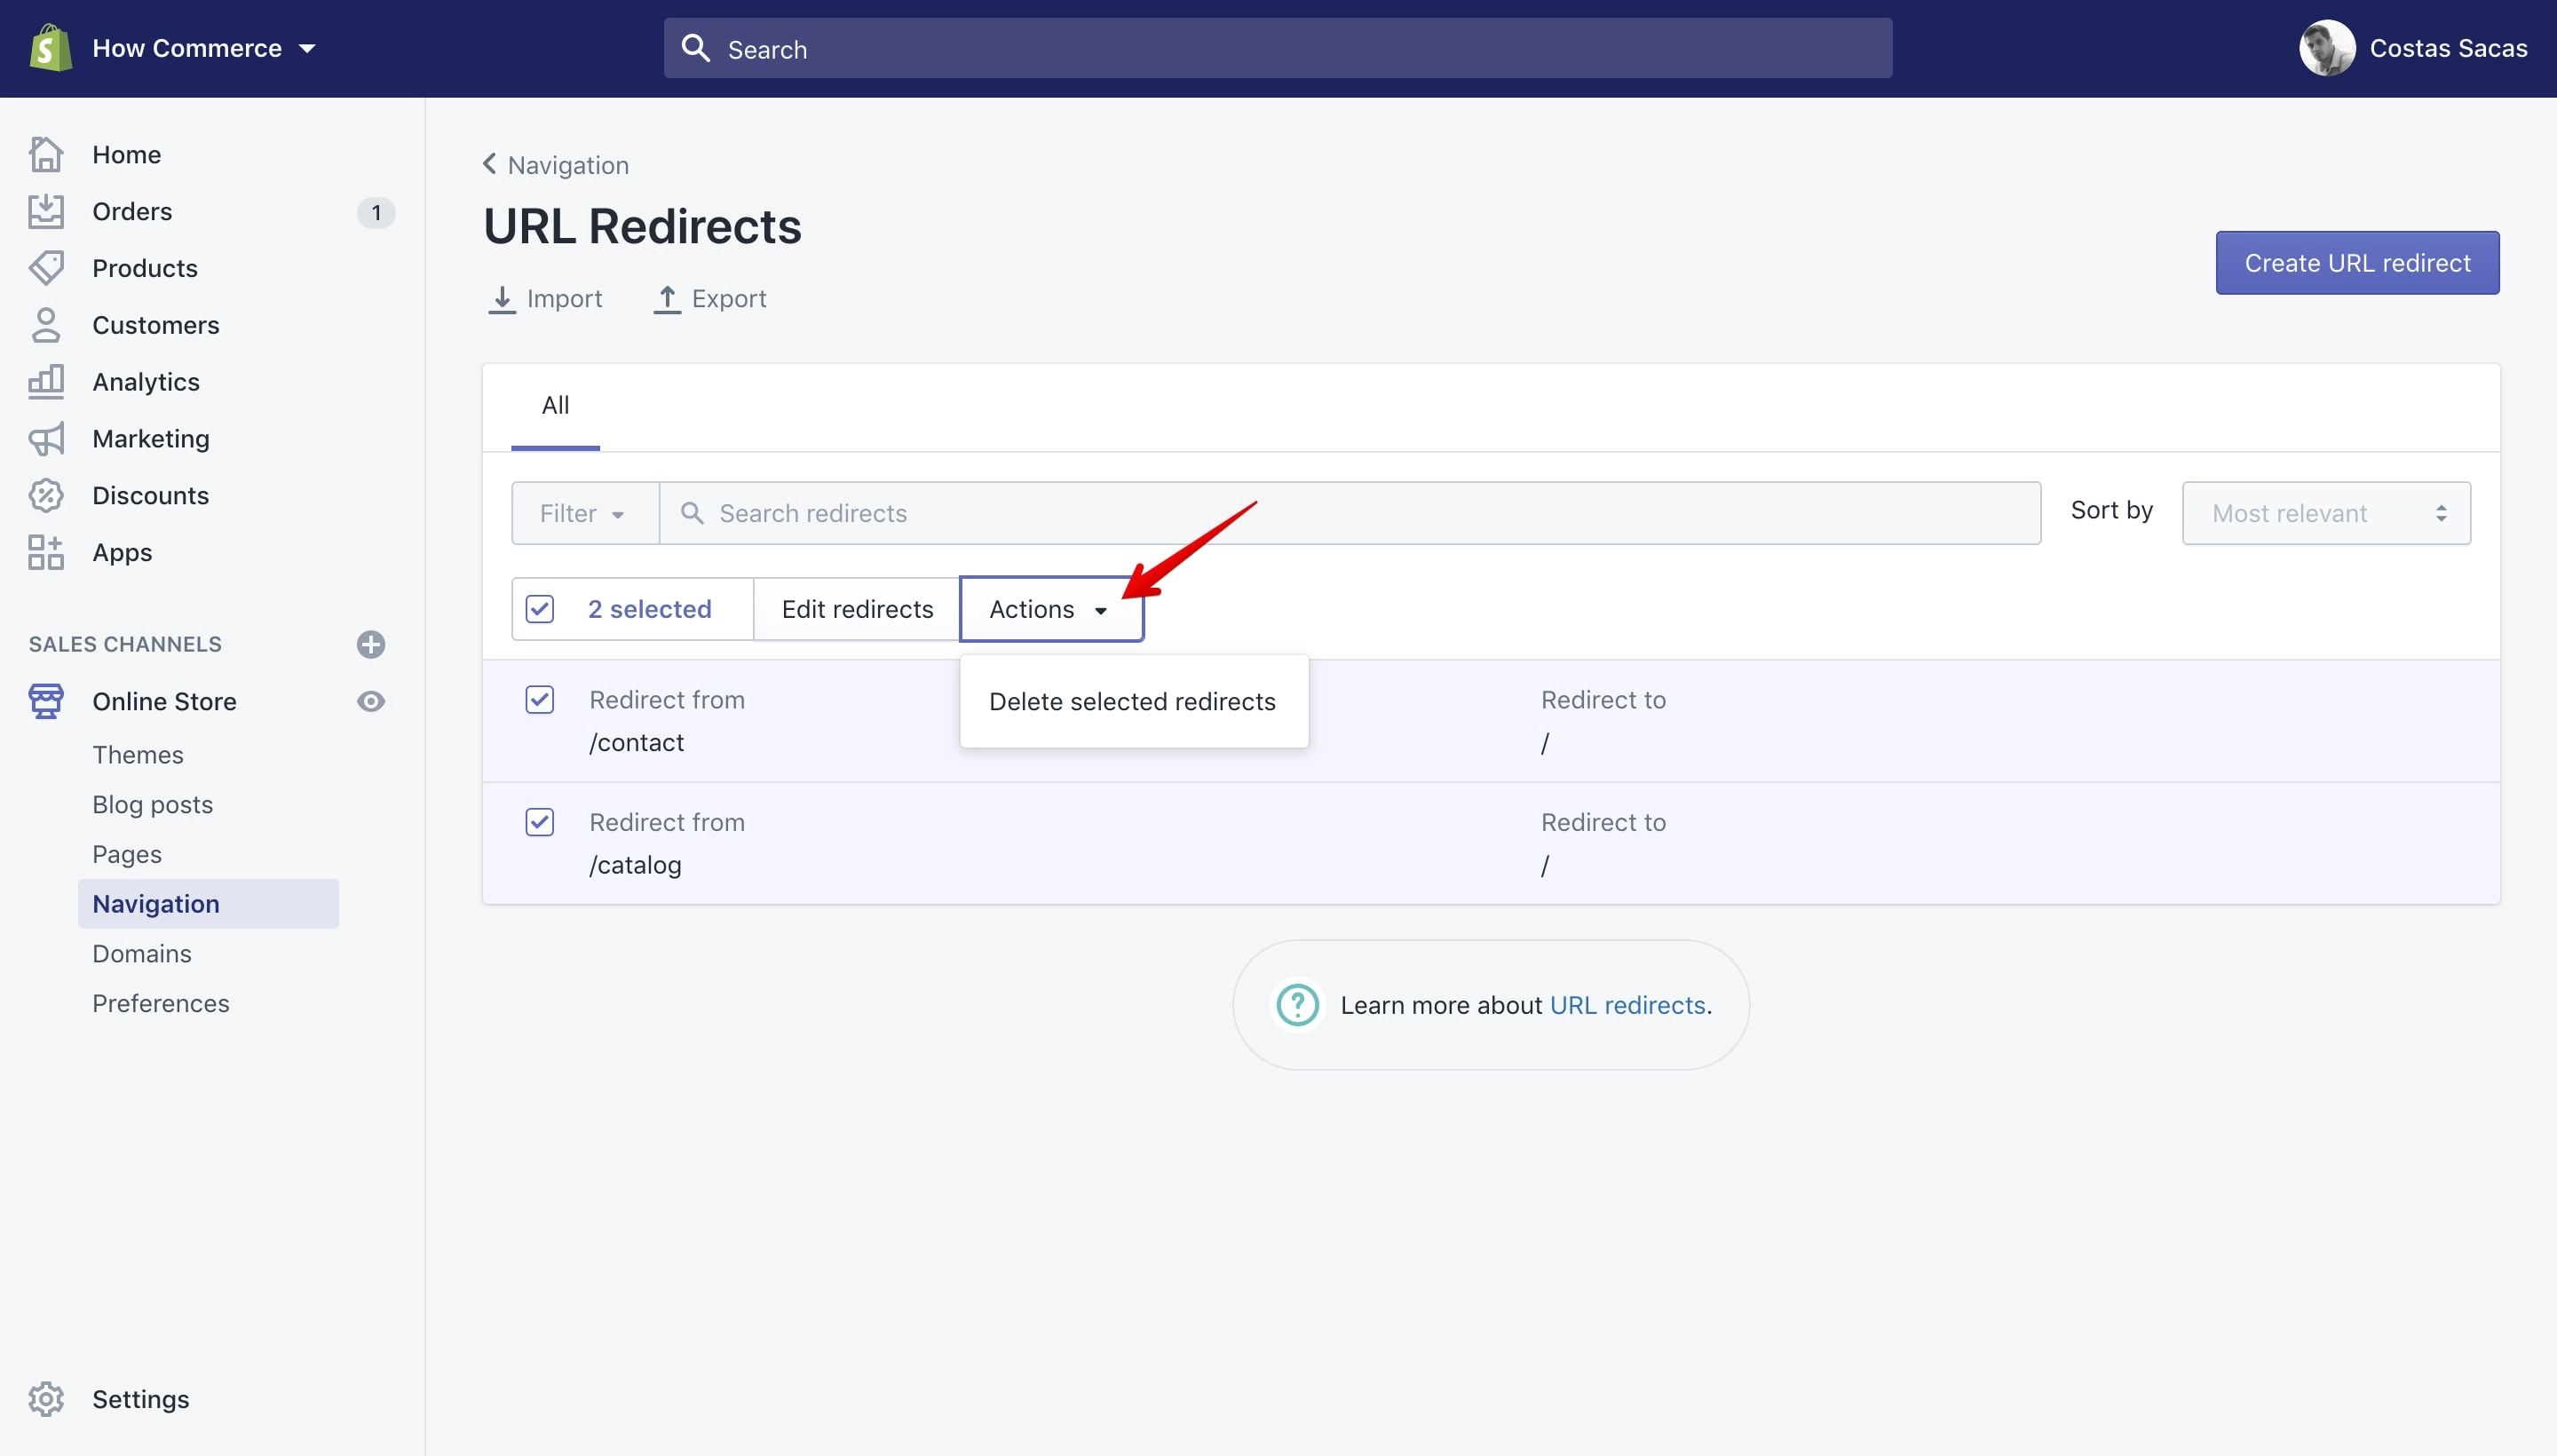
- Delete selected redirects
Settings → Files
To access this section bulk actions you need to click on the “Settings” located at the left bottom of the page and afterwards on the “Files” link:
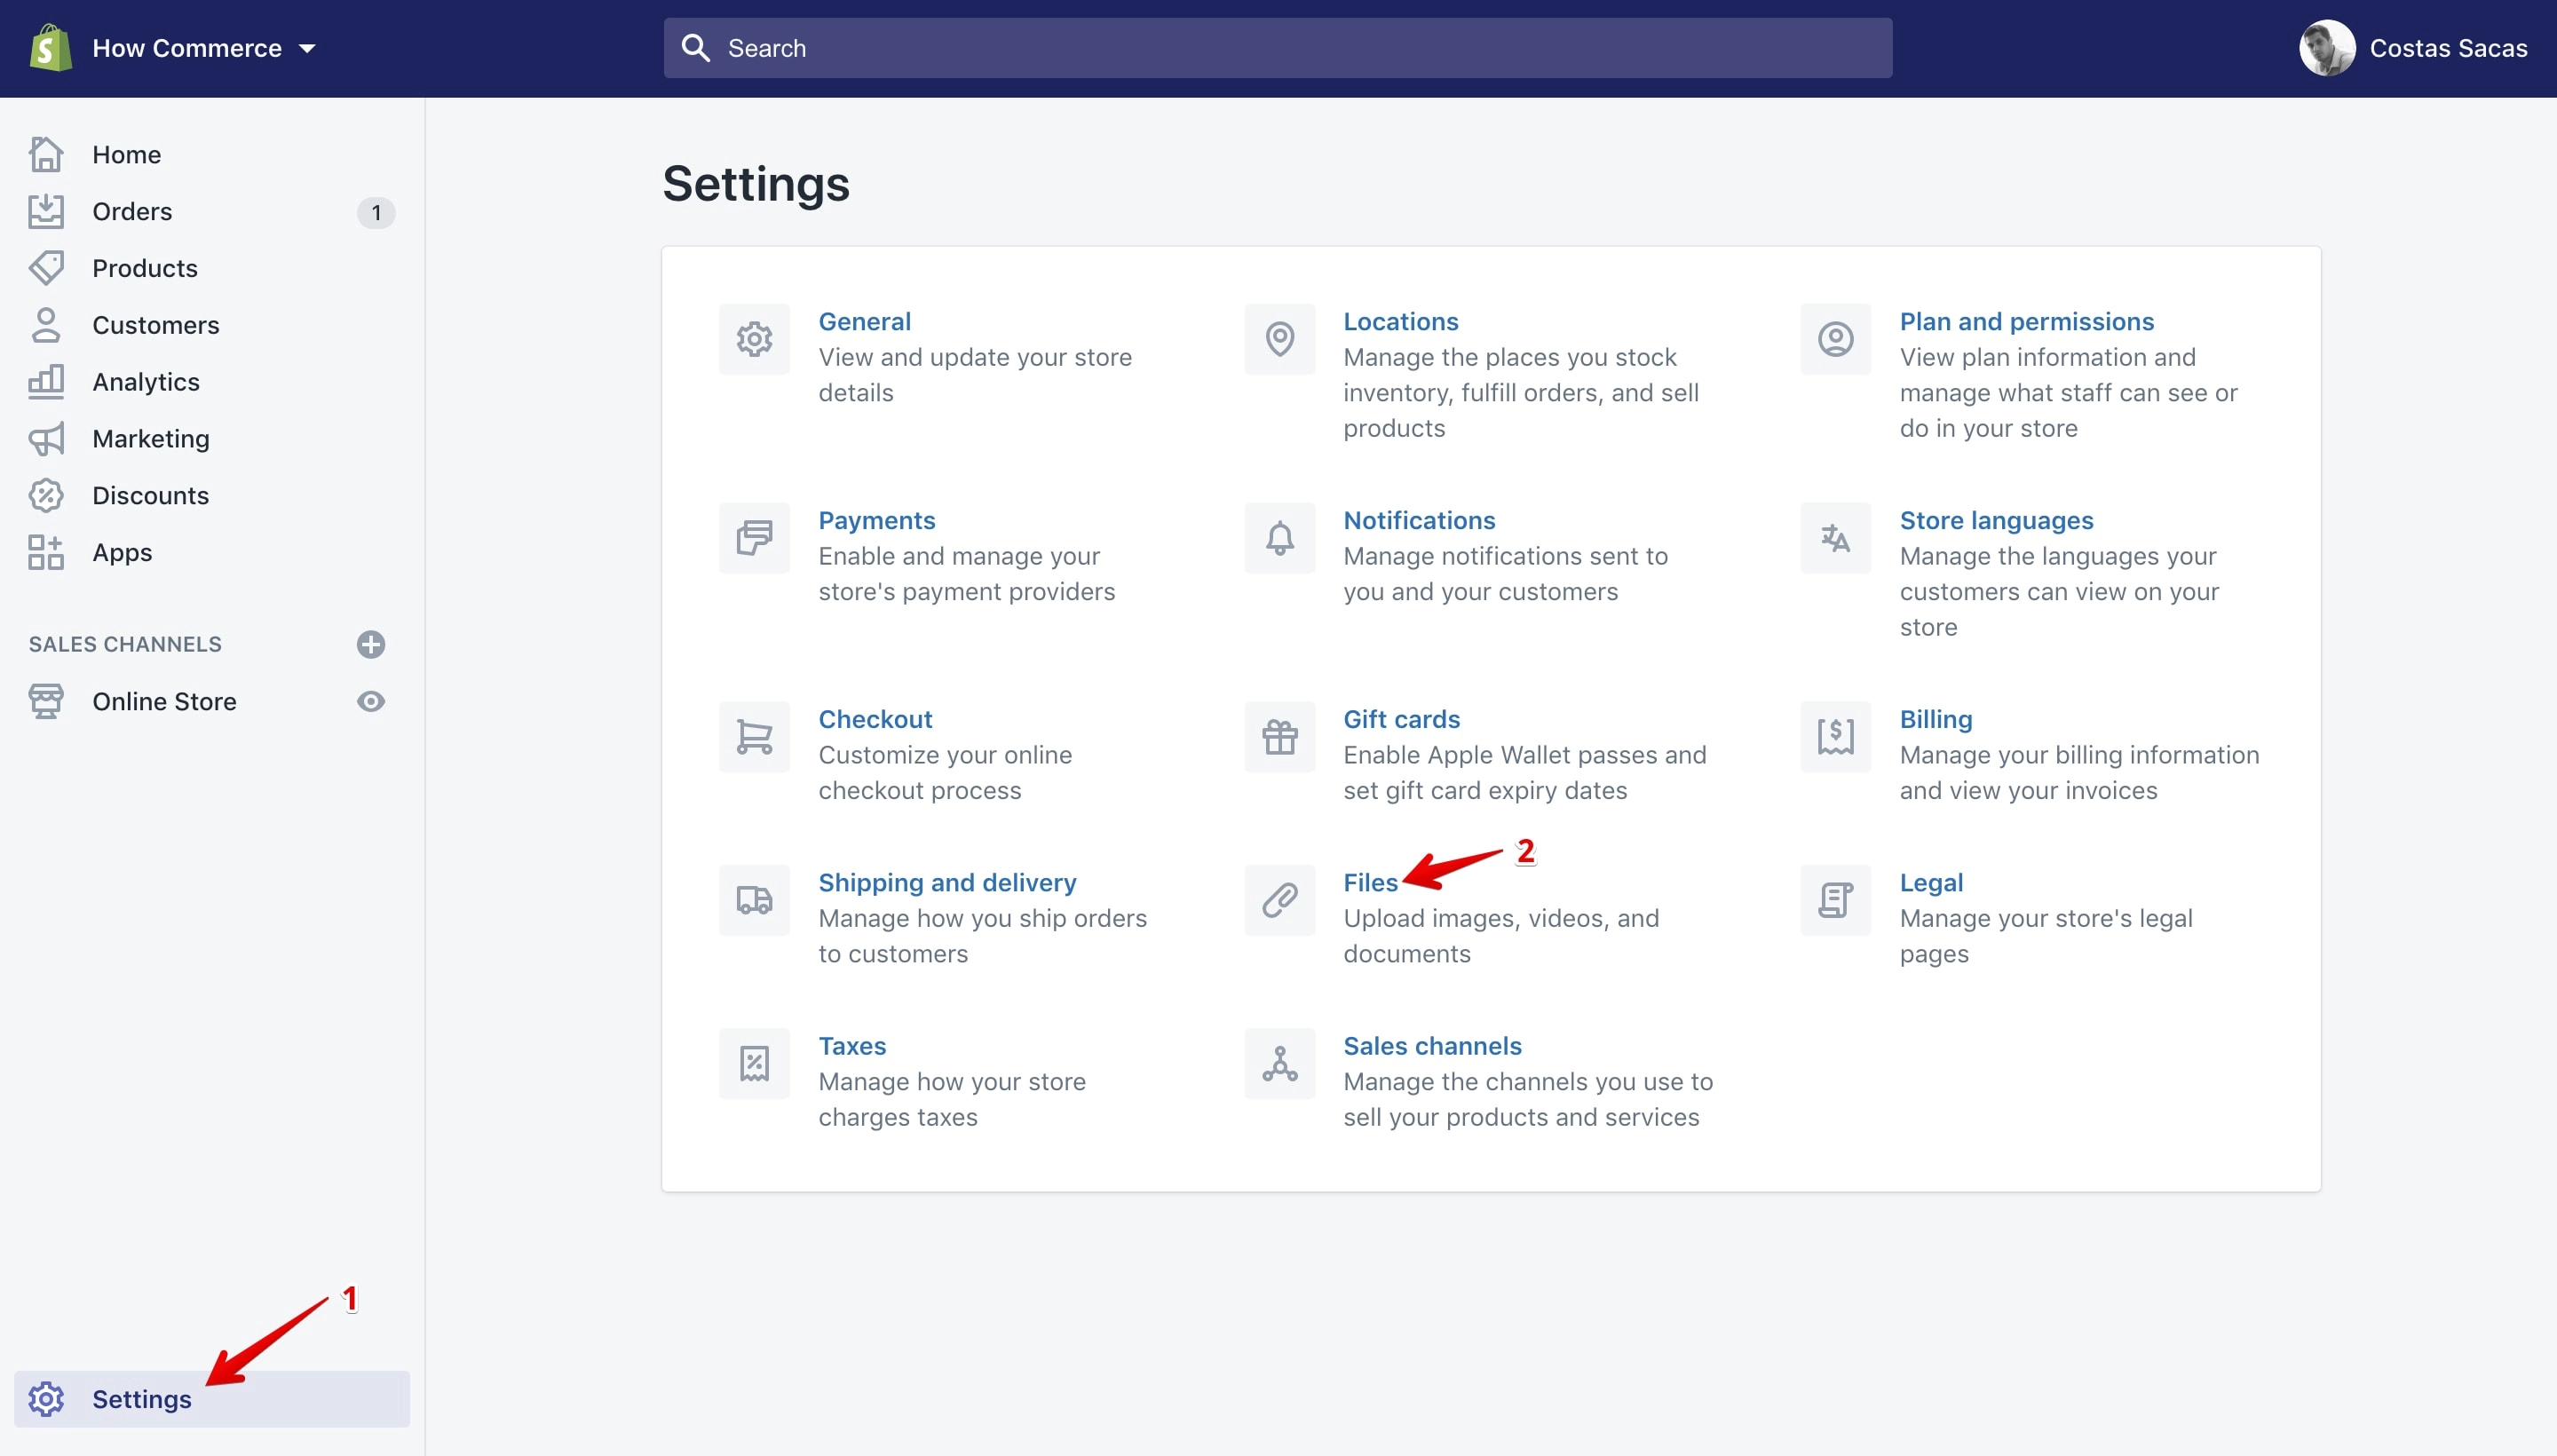
List with all the “Bulk actions” available on the “Files” page:
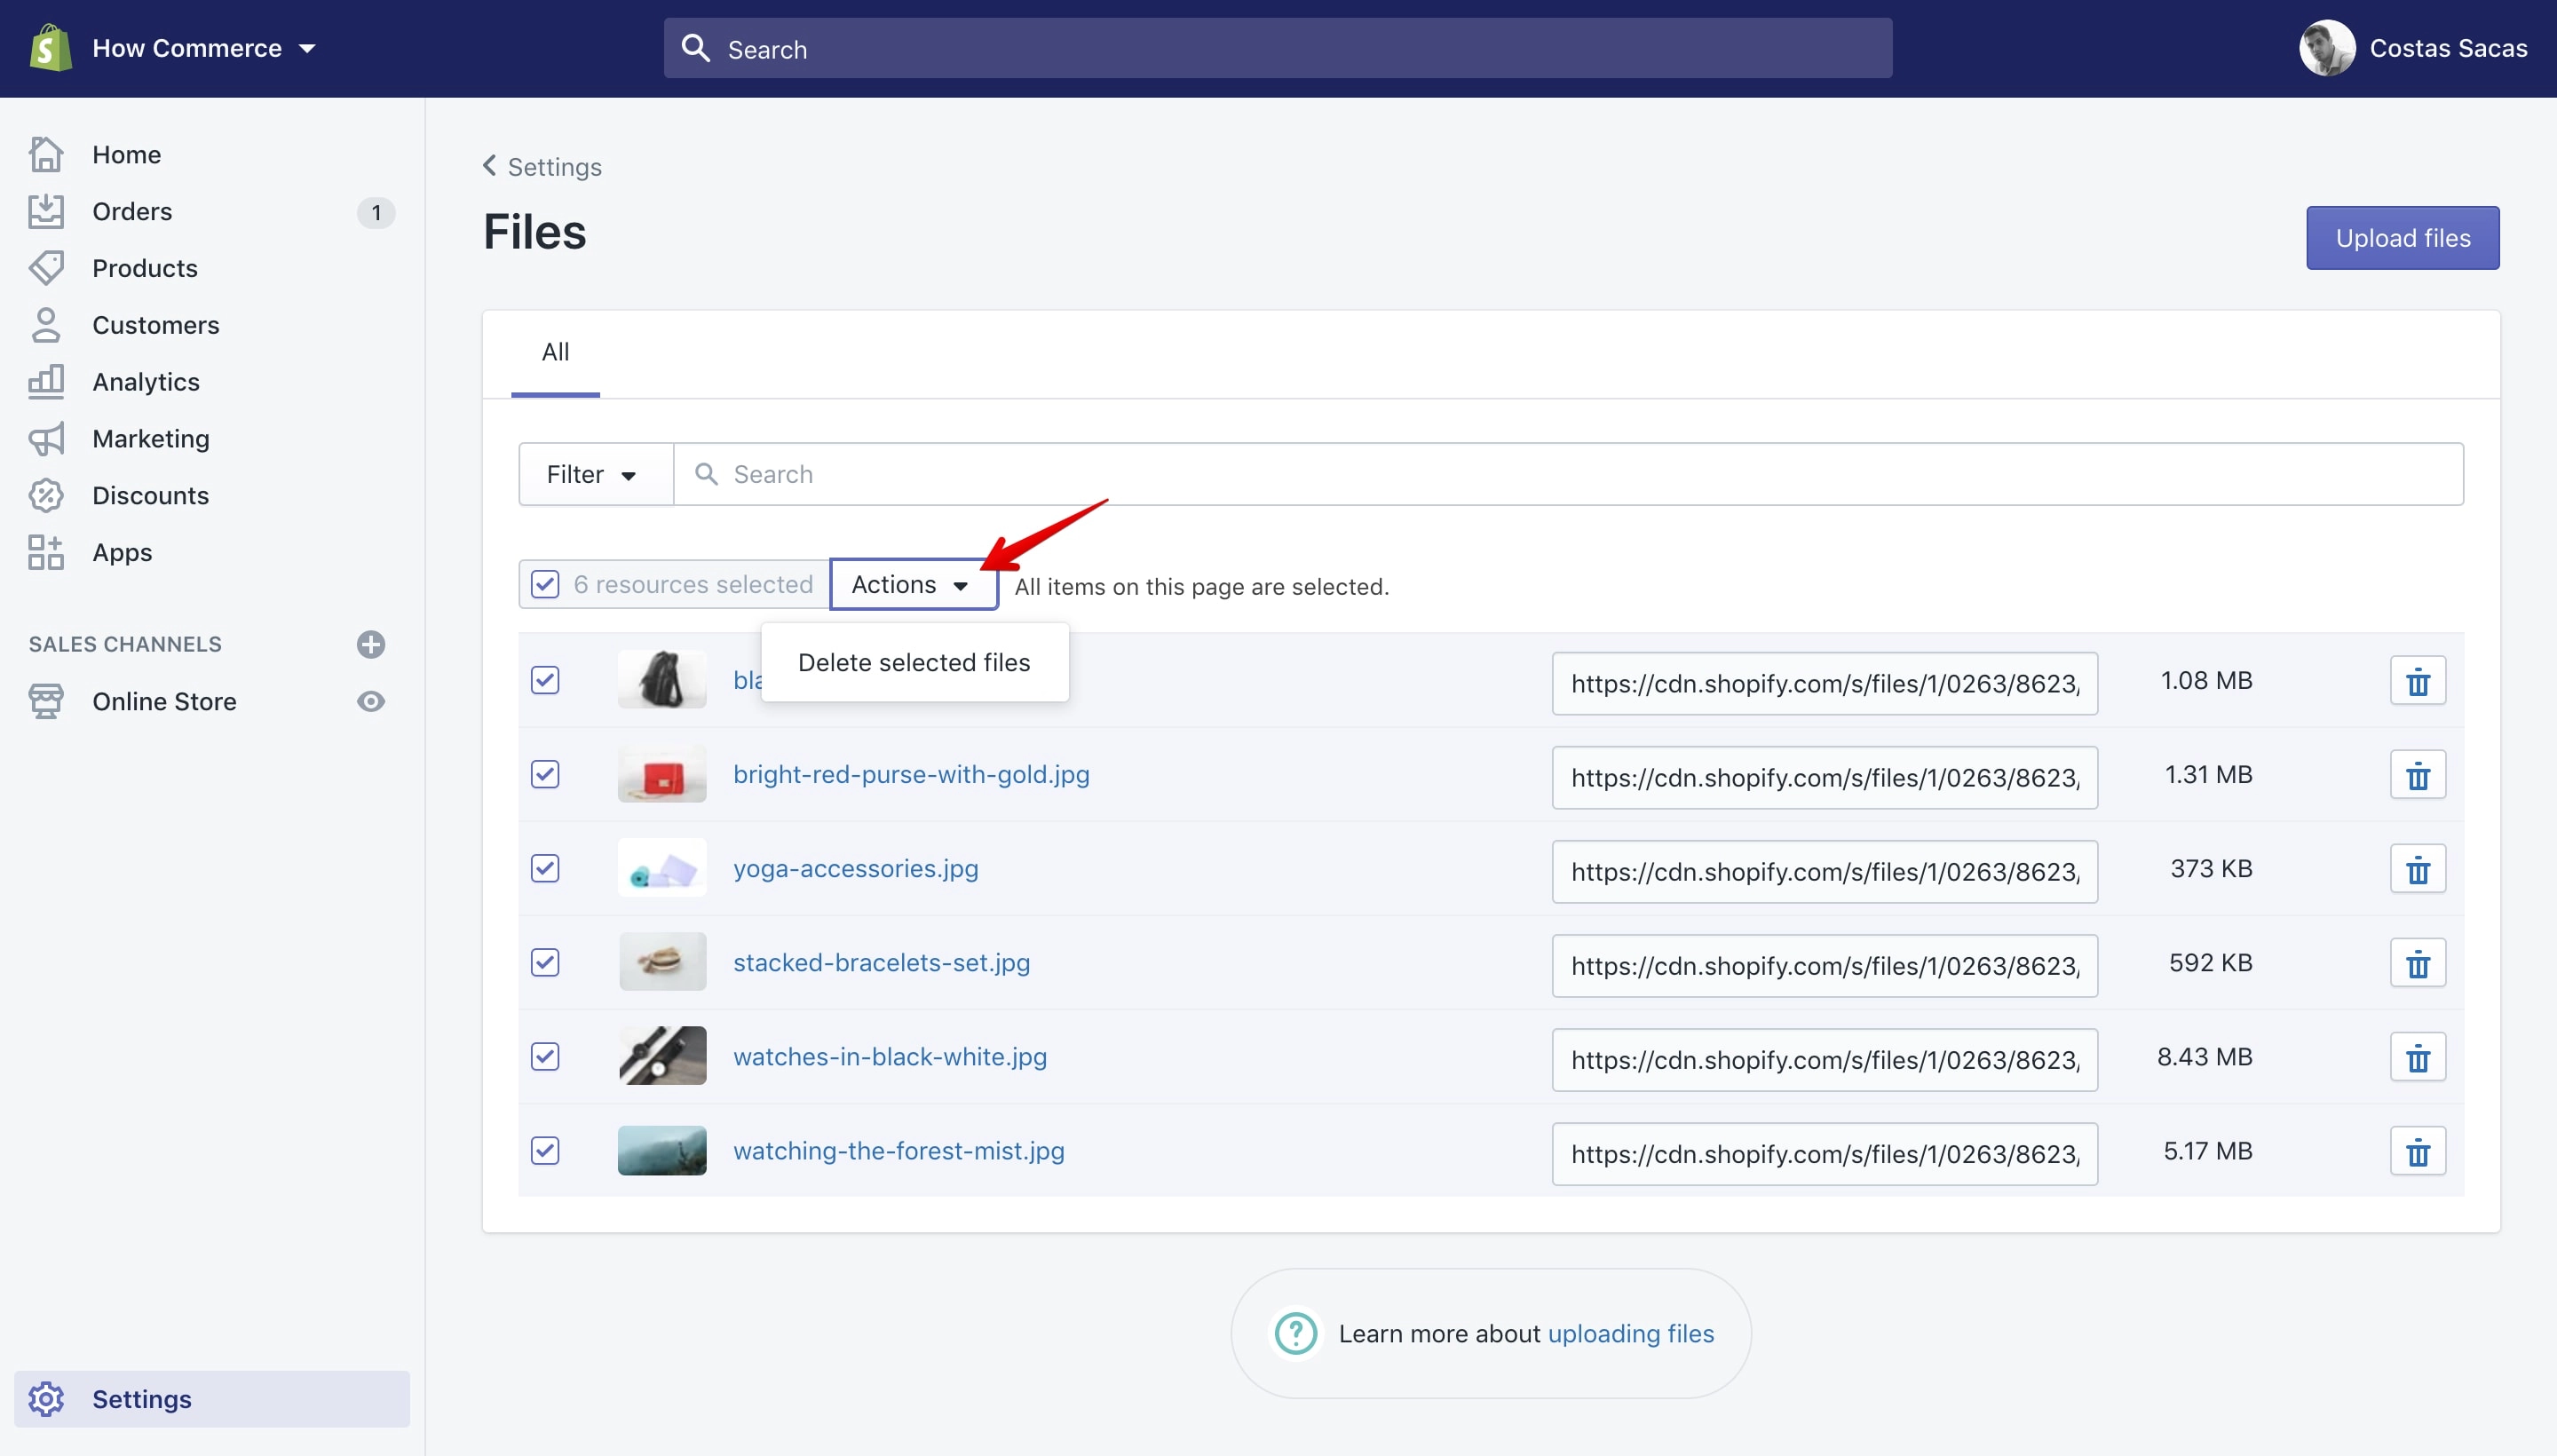
- Delete selected files
Bulk editing
This feature allows you to edit multiple product fields at the same time. This is a fantastic feature that will help you make multiple edits on multiple products in no time.
You can use the bulk editor on products, inventory, customers, collections and online store blog posts and pages.
NOTE:
Please note that the Bulk Editor has issues on IE 11 and below. You can get the most of the editor on the following browsers: Chrome, Safari and Firefox.
Let’s edit some products in bulk. To do that go to the “Products” section in your store:
Selecting items
In order to perform edits in bulk you need to select more than one item. You can select items in 4 ways:
- Select the listed items one by one
- Select a range of listed items
- Select all list items listed on a page
- Select all items in the store (e.g. All products in your store).
Select the listed items one by one
To do that please click/tap on the checkbox (marked with 1 in the image below) in front of the items that you want to select:
Once you select an item, Shopify will show you how many are selected in the “Selection” field (marked with 2 in the image above).
Select a range of listed items
To select a range of items you need to select the first item (marked with 1 in the image below), then hold the ⇧ (on MAC/Windows) and select the last item where you want to limit the range of items (marked with 2 in the image below).
In my following example I’ve selected 4 items:
Select all list items listed on a page
To select all items listed on the page you need to click the master checkbox:
Select all items in the store
When you click the master checkbox and you have more than 50 products on the store a new selecting option will display to allow you to select items beyond the page listed:
Performing the bulk edits
Once you have the items selected you can perform the needed bulk edits by clicking the “Edit Products” button:
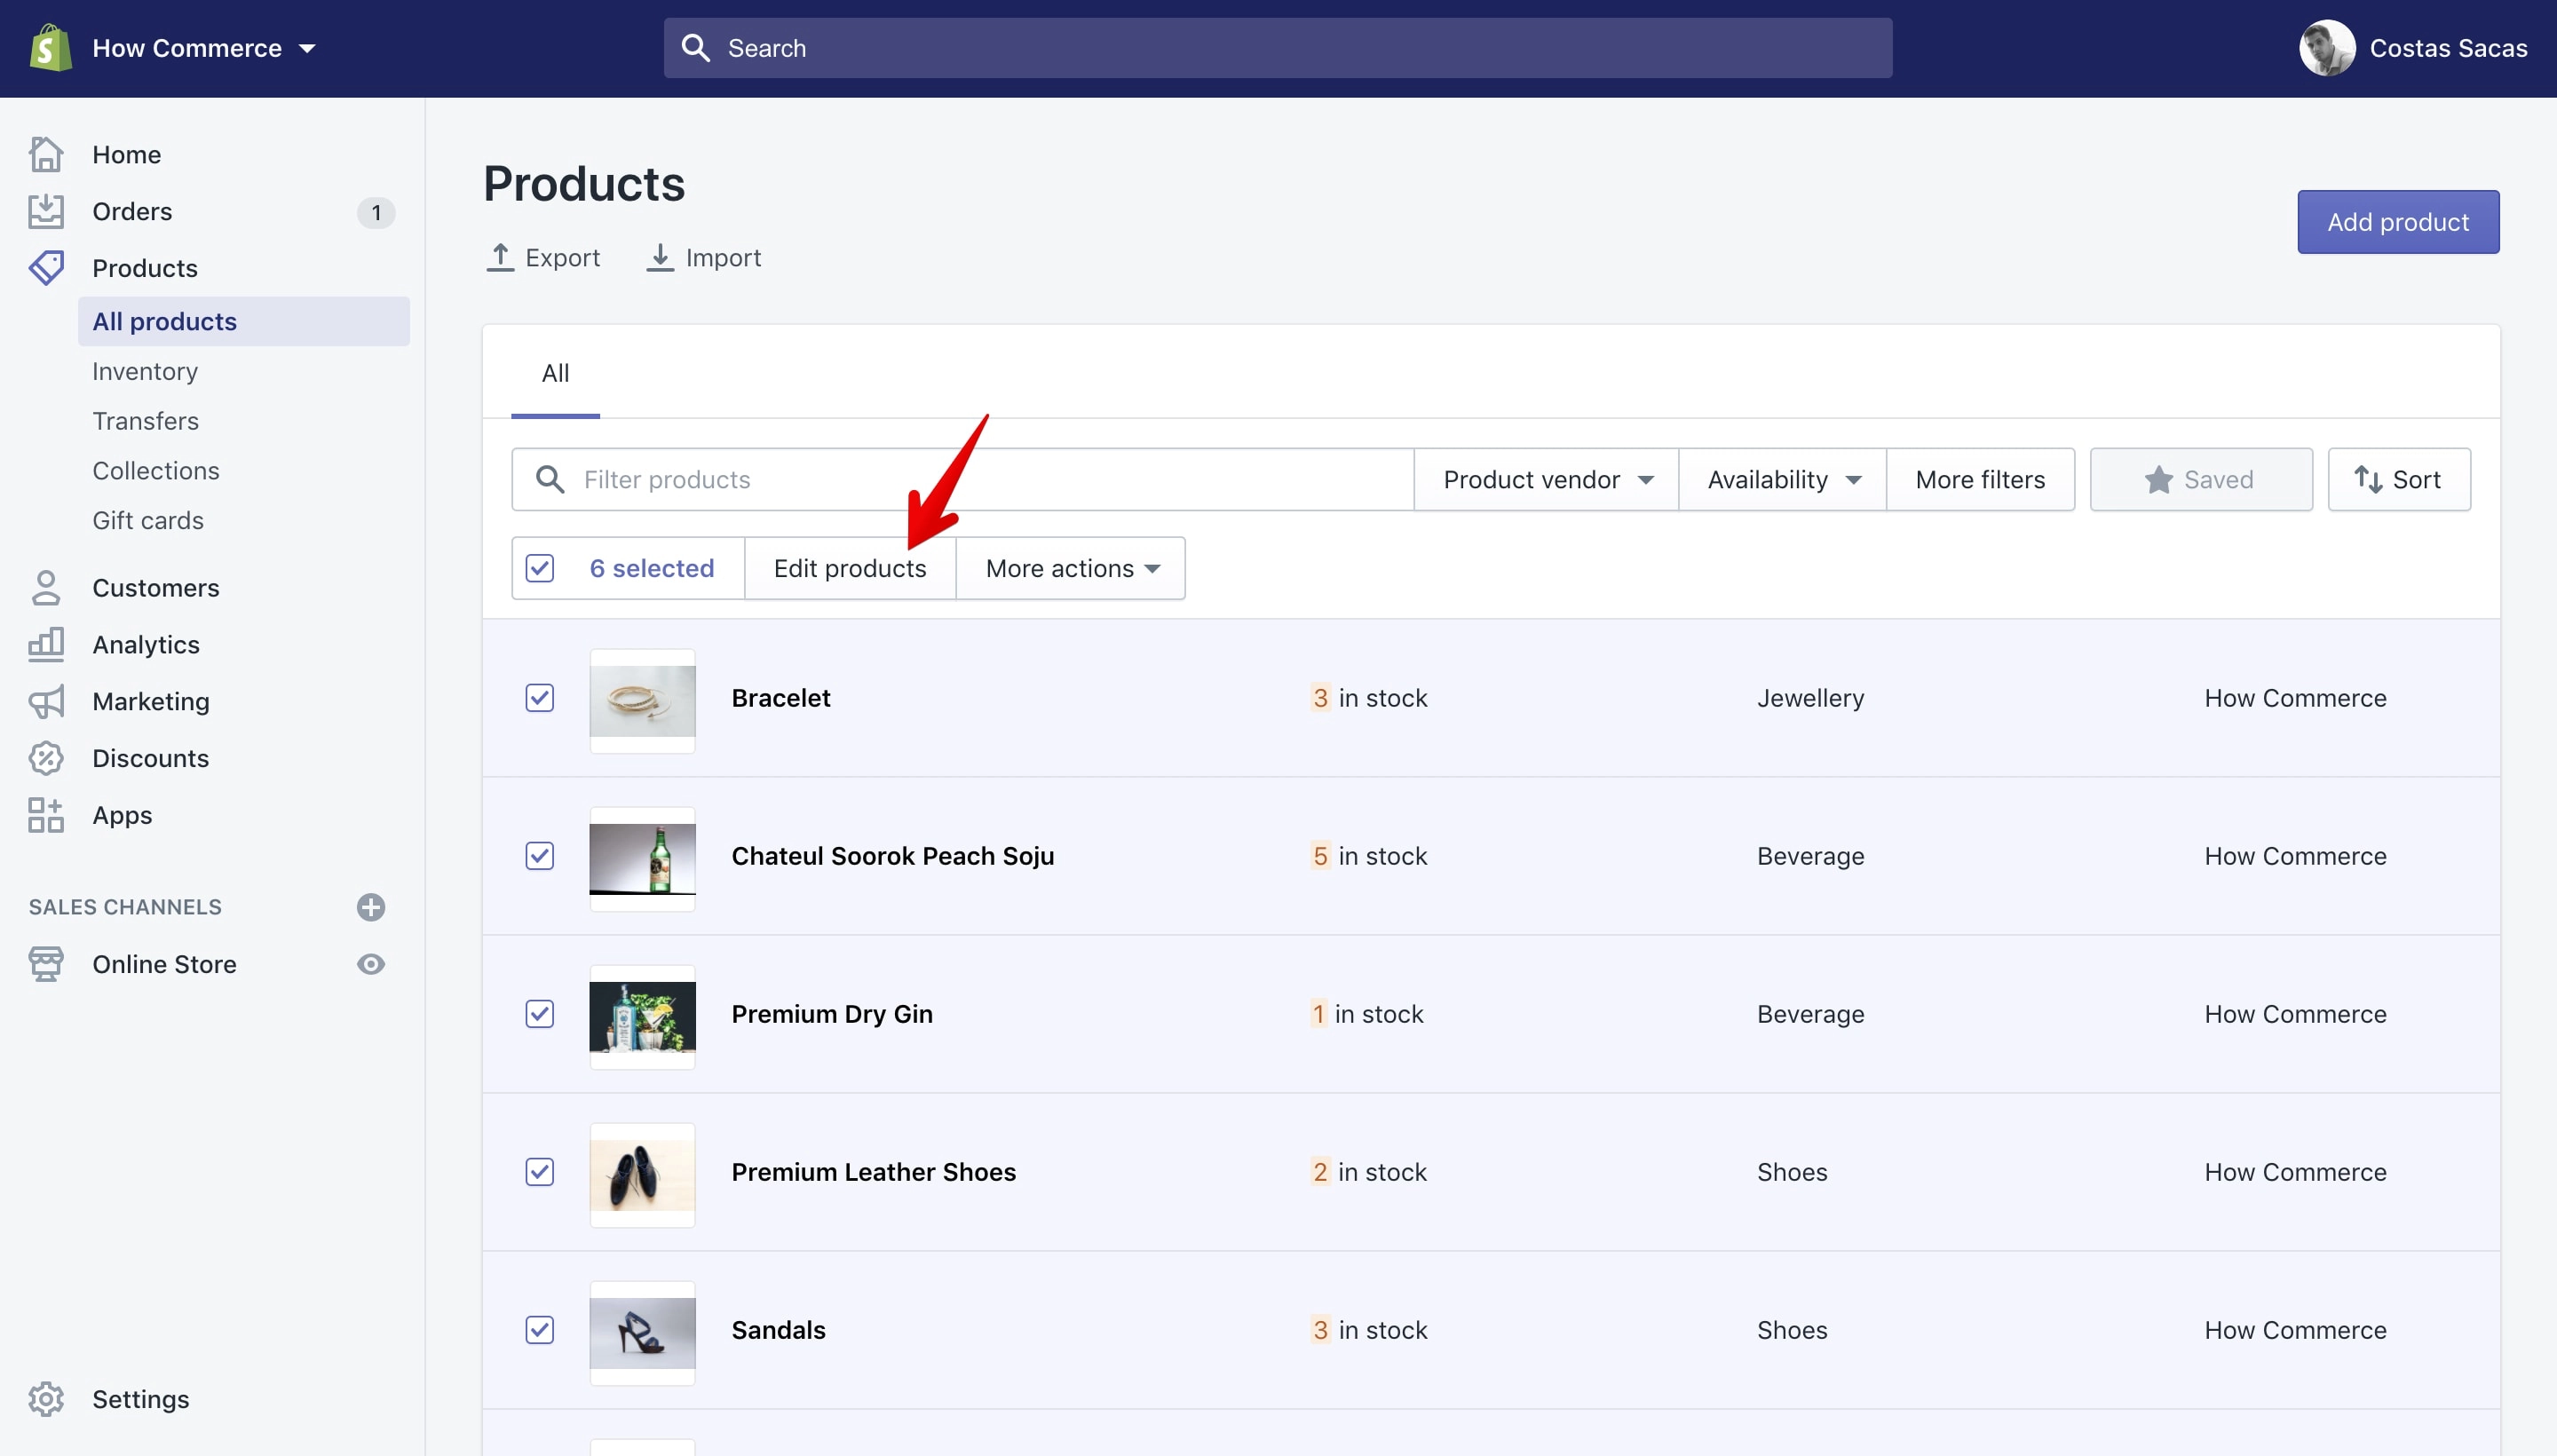
If you want you can edit just one product, not only multiple ones. If you somehow find it easier to edit one product from the “Bulk editor” than I recommend doing it from here.
After clicking on the “Edit Products” button you’ll see this page showcasing the “Bulk editor” with the selected products in the first column called “Title” (marked with 1 in the image listed below) and their properties in the following columns (marked with 2 in the image below):
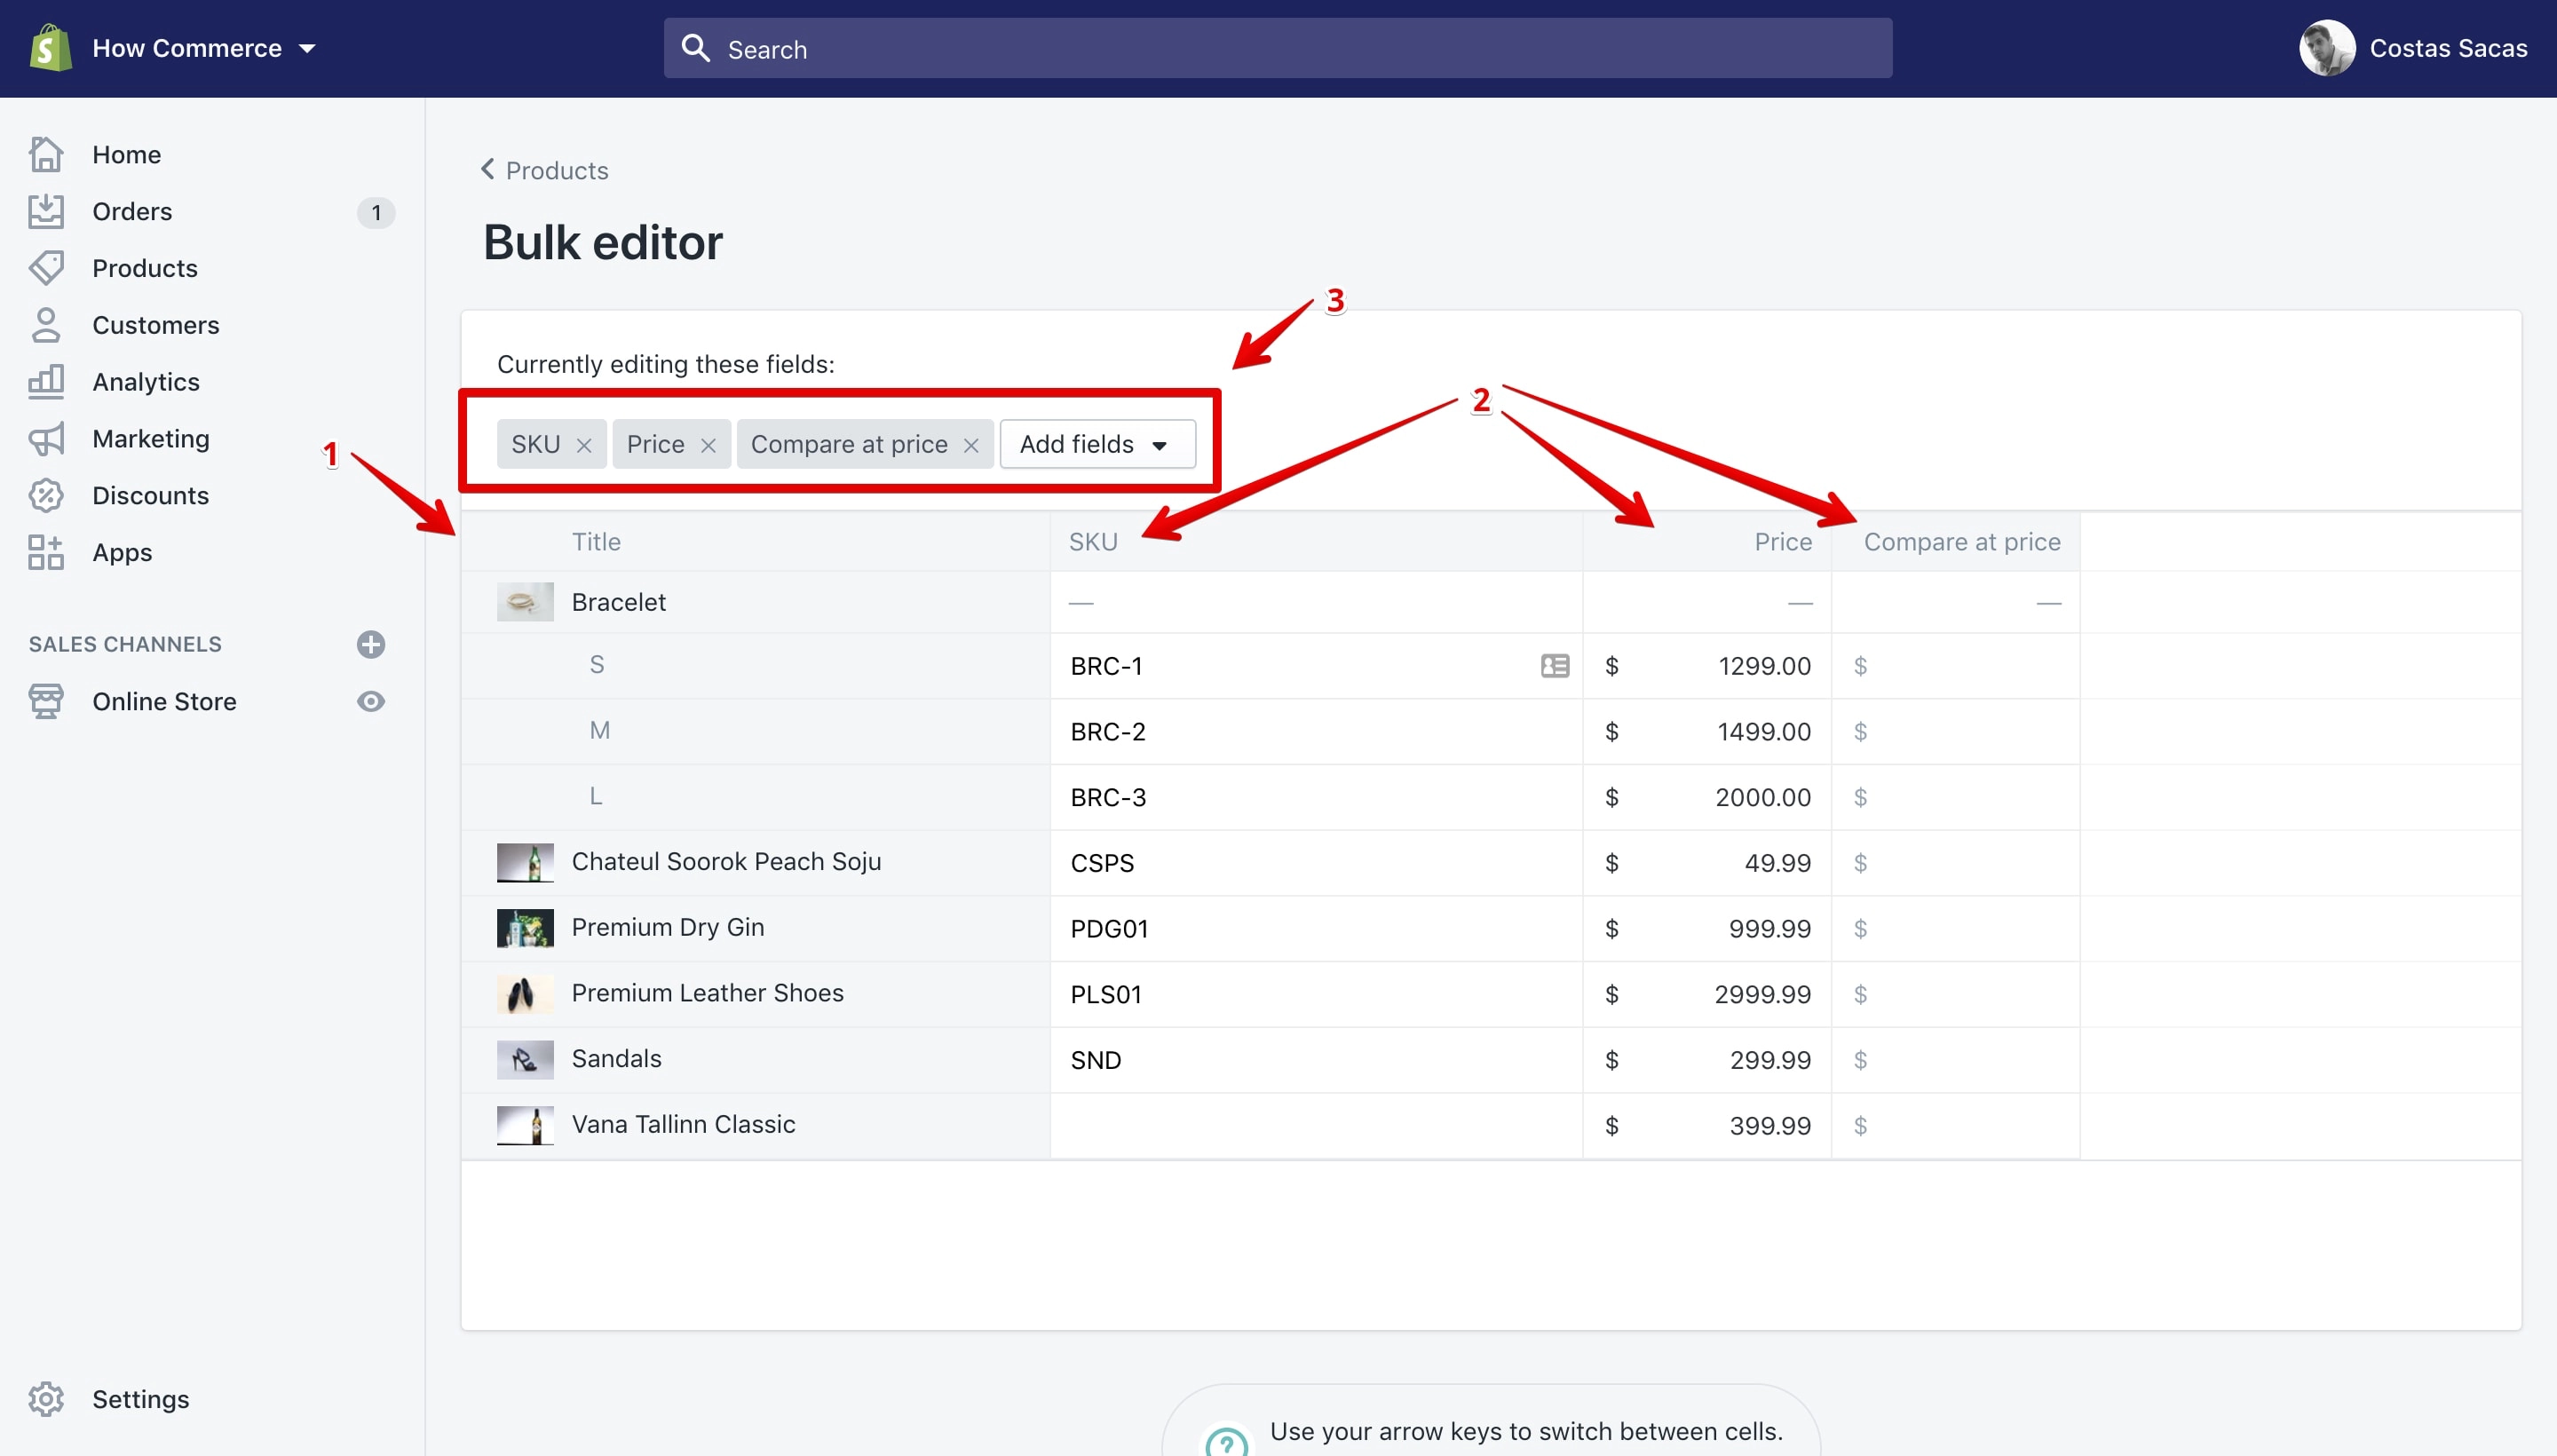
You can add more product properties columns from the option called “Add fields” (marked with 3 in the image above).
Add a new product property column
Click on the “Add fields” button (marked with 1 in the image below):
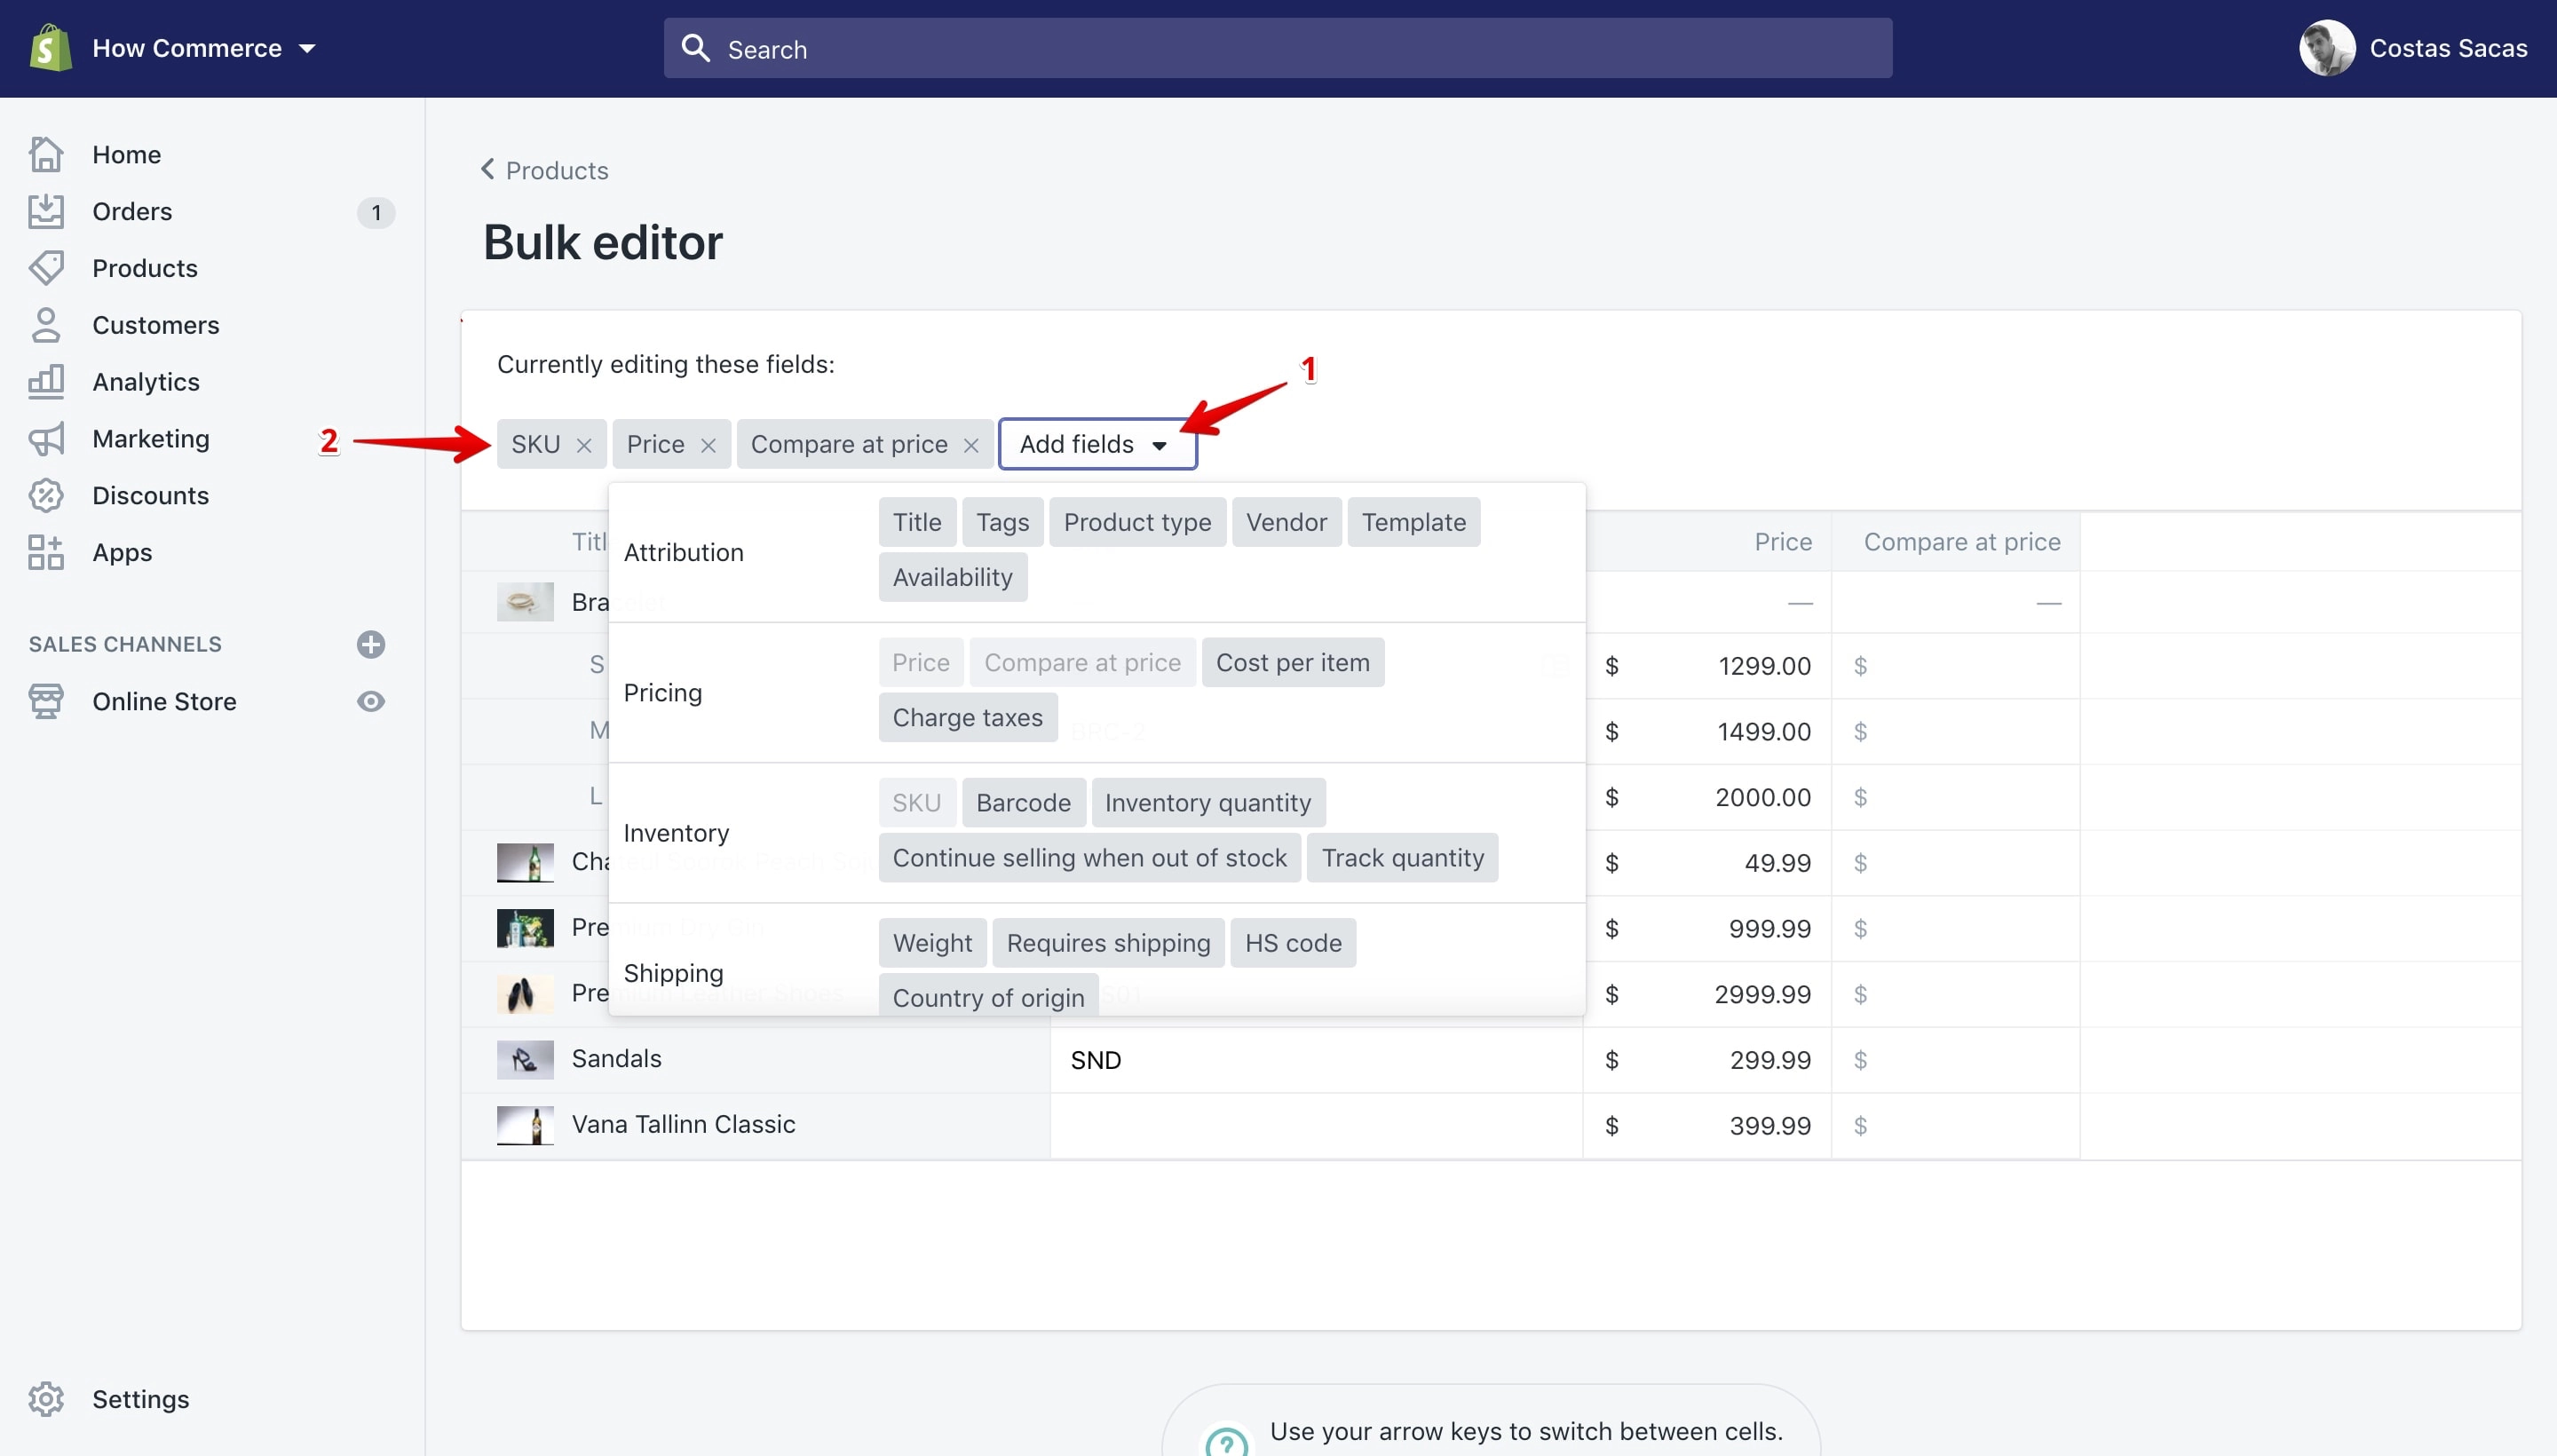
In the drop-down list, you can click on any property you like to add a new property column to the listed products.
The ones that are greyed out are already listed in the column and you can also see them in the “Currently editing these fields” at the top of the product listing table (marked with 2 in the image above).
I’ll select and add the “Tags” product property:
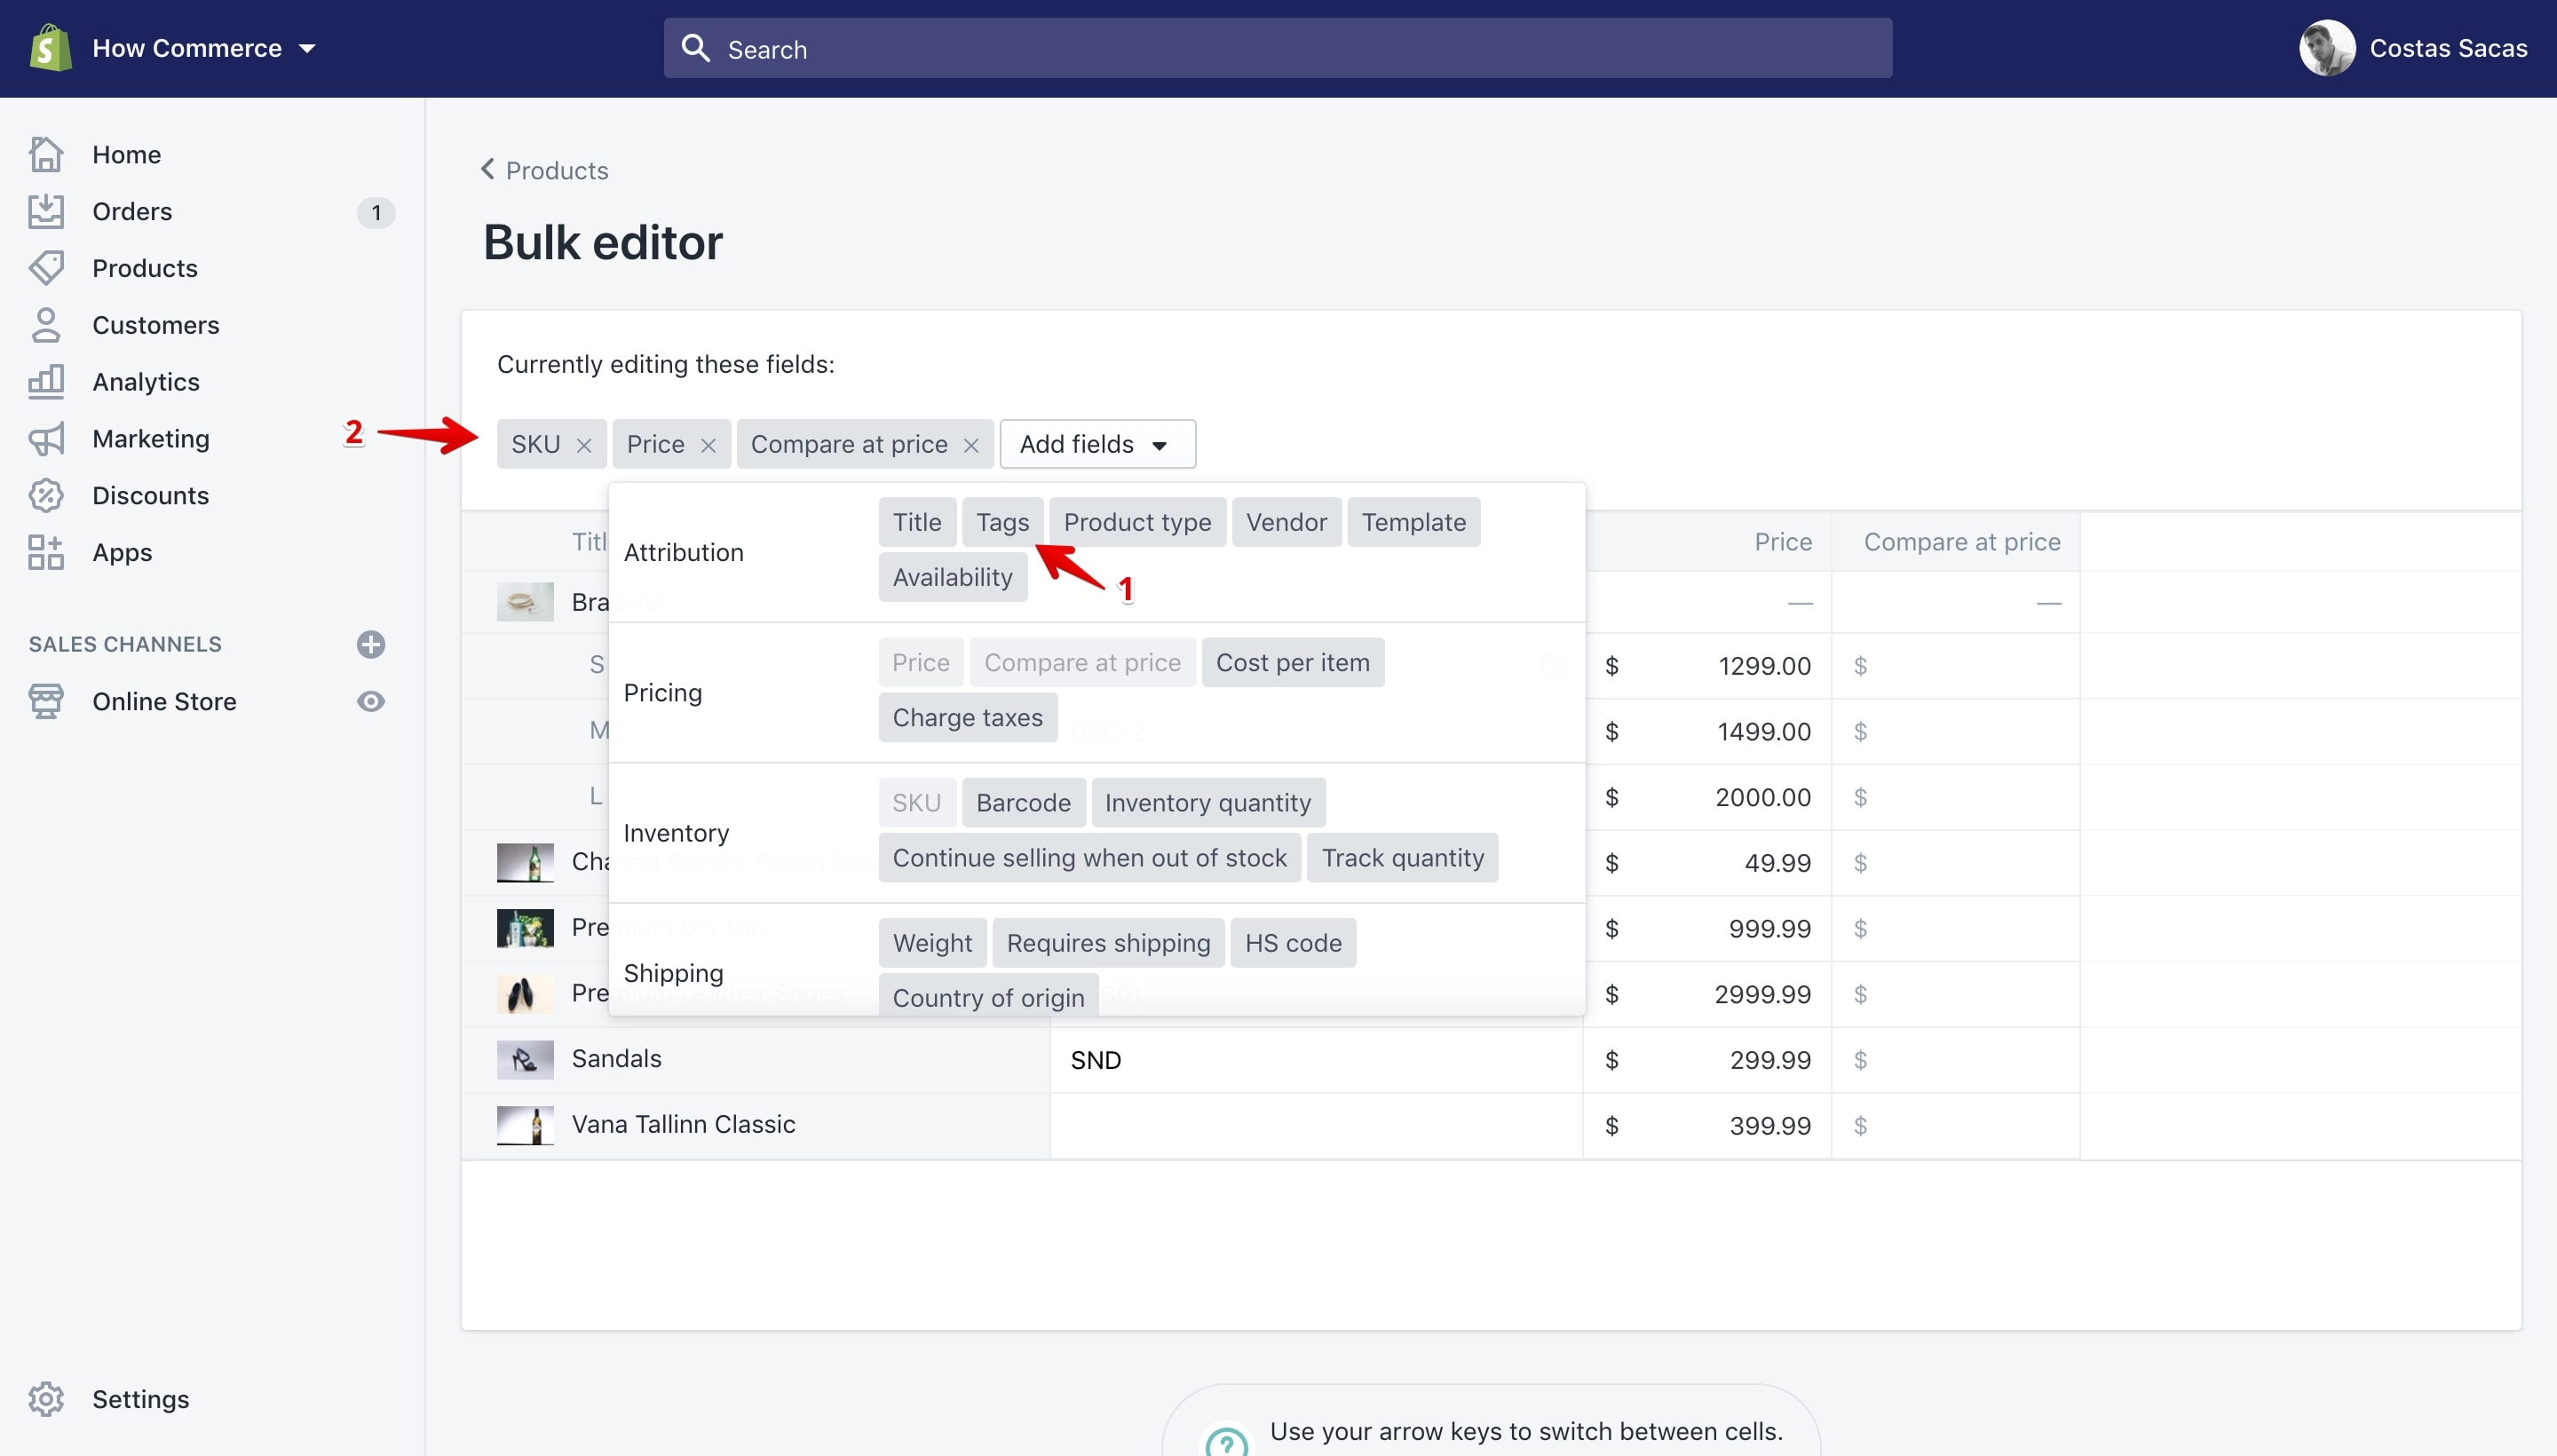
Note that you need to select the product properties one at a time since at this moment Shopify doesn’t allow you to select more than one.
Once the new property is added to the table it will be listed under the “Currently editing these fields” and also visible as a new product property column (marked with 2 in the image below):
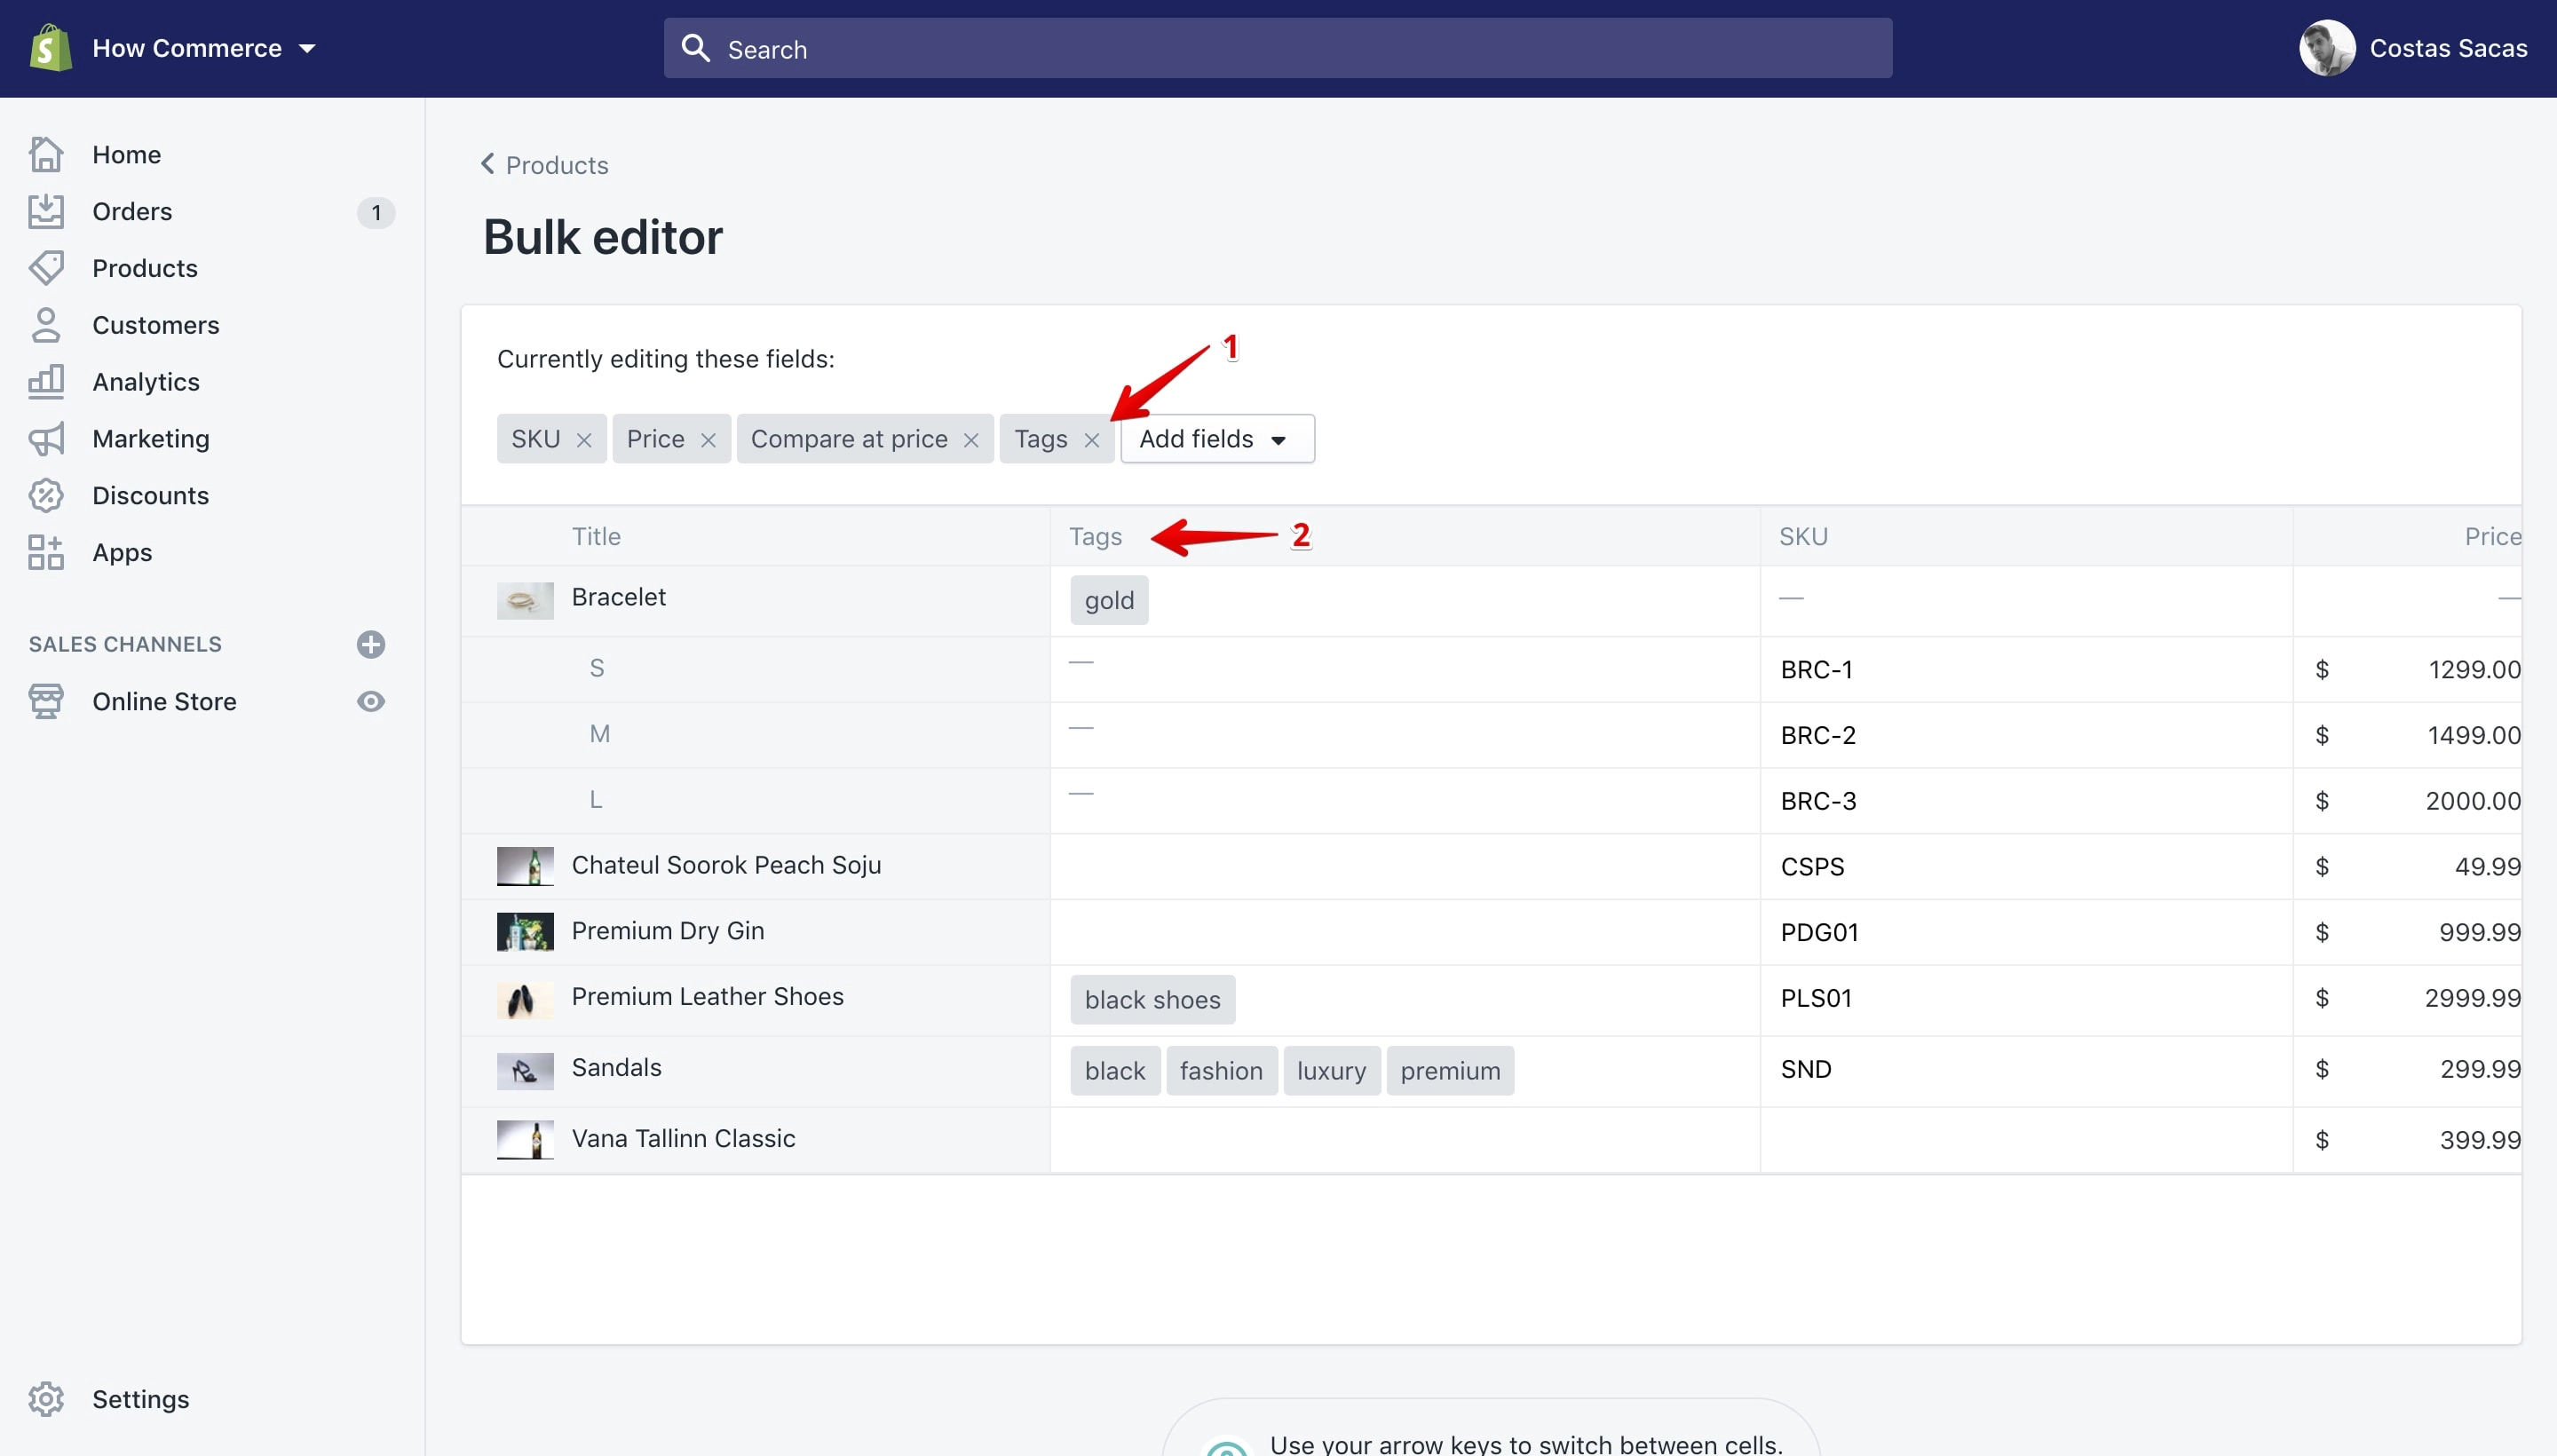
There are a lot of product properties that can be edited in bulk.
When writing the tutorial this was the list:
Attribution
- Title
- Tags
- Product type
- Vendor
- Template
- Availability
Pricing
- Price
- Compare at price
- Cost per item
- Charge taxes
Inventory
- SKU
- Barcode
- Inventory quantity
- Continue selling when out of stock
- Track quantity
Shipping
- Weight
- Requires shipping
- HS code
- Country of origin
SEO
- Page title
- Meta description
- URL and handle
Please note that neither the columns nor the editing fields are draggable at this moment, meaning that you can’t change their position in the table with a simple drag & drop.
My recommendation to Shopify will be to make the properties draggable in the “Currently editing these fields” section and once you change their position this will be reflected in the columns section as well. Simple and clean.
Edit a product property in bulk
Let’s say I want to continue selling some products that I have in my store once there is no stock available.
I’ve selected the product and added the “Continue selling when out of stock” product property:
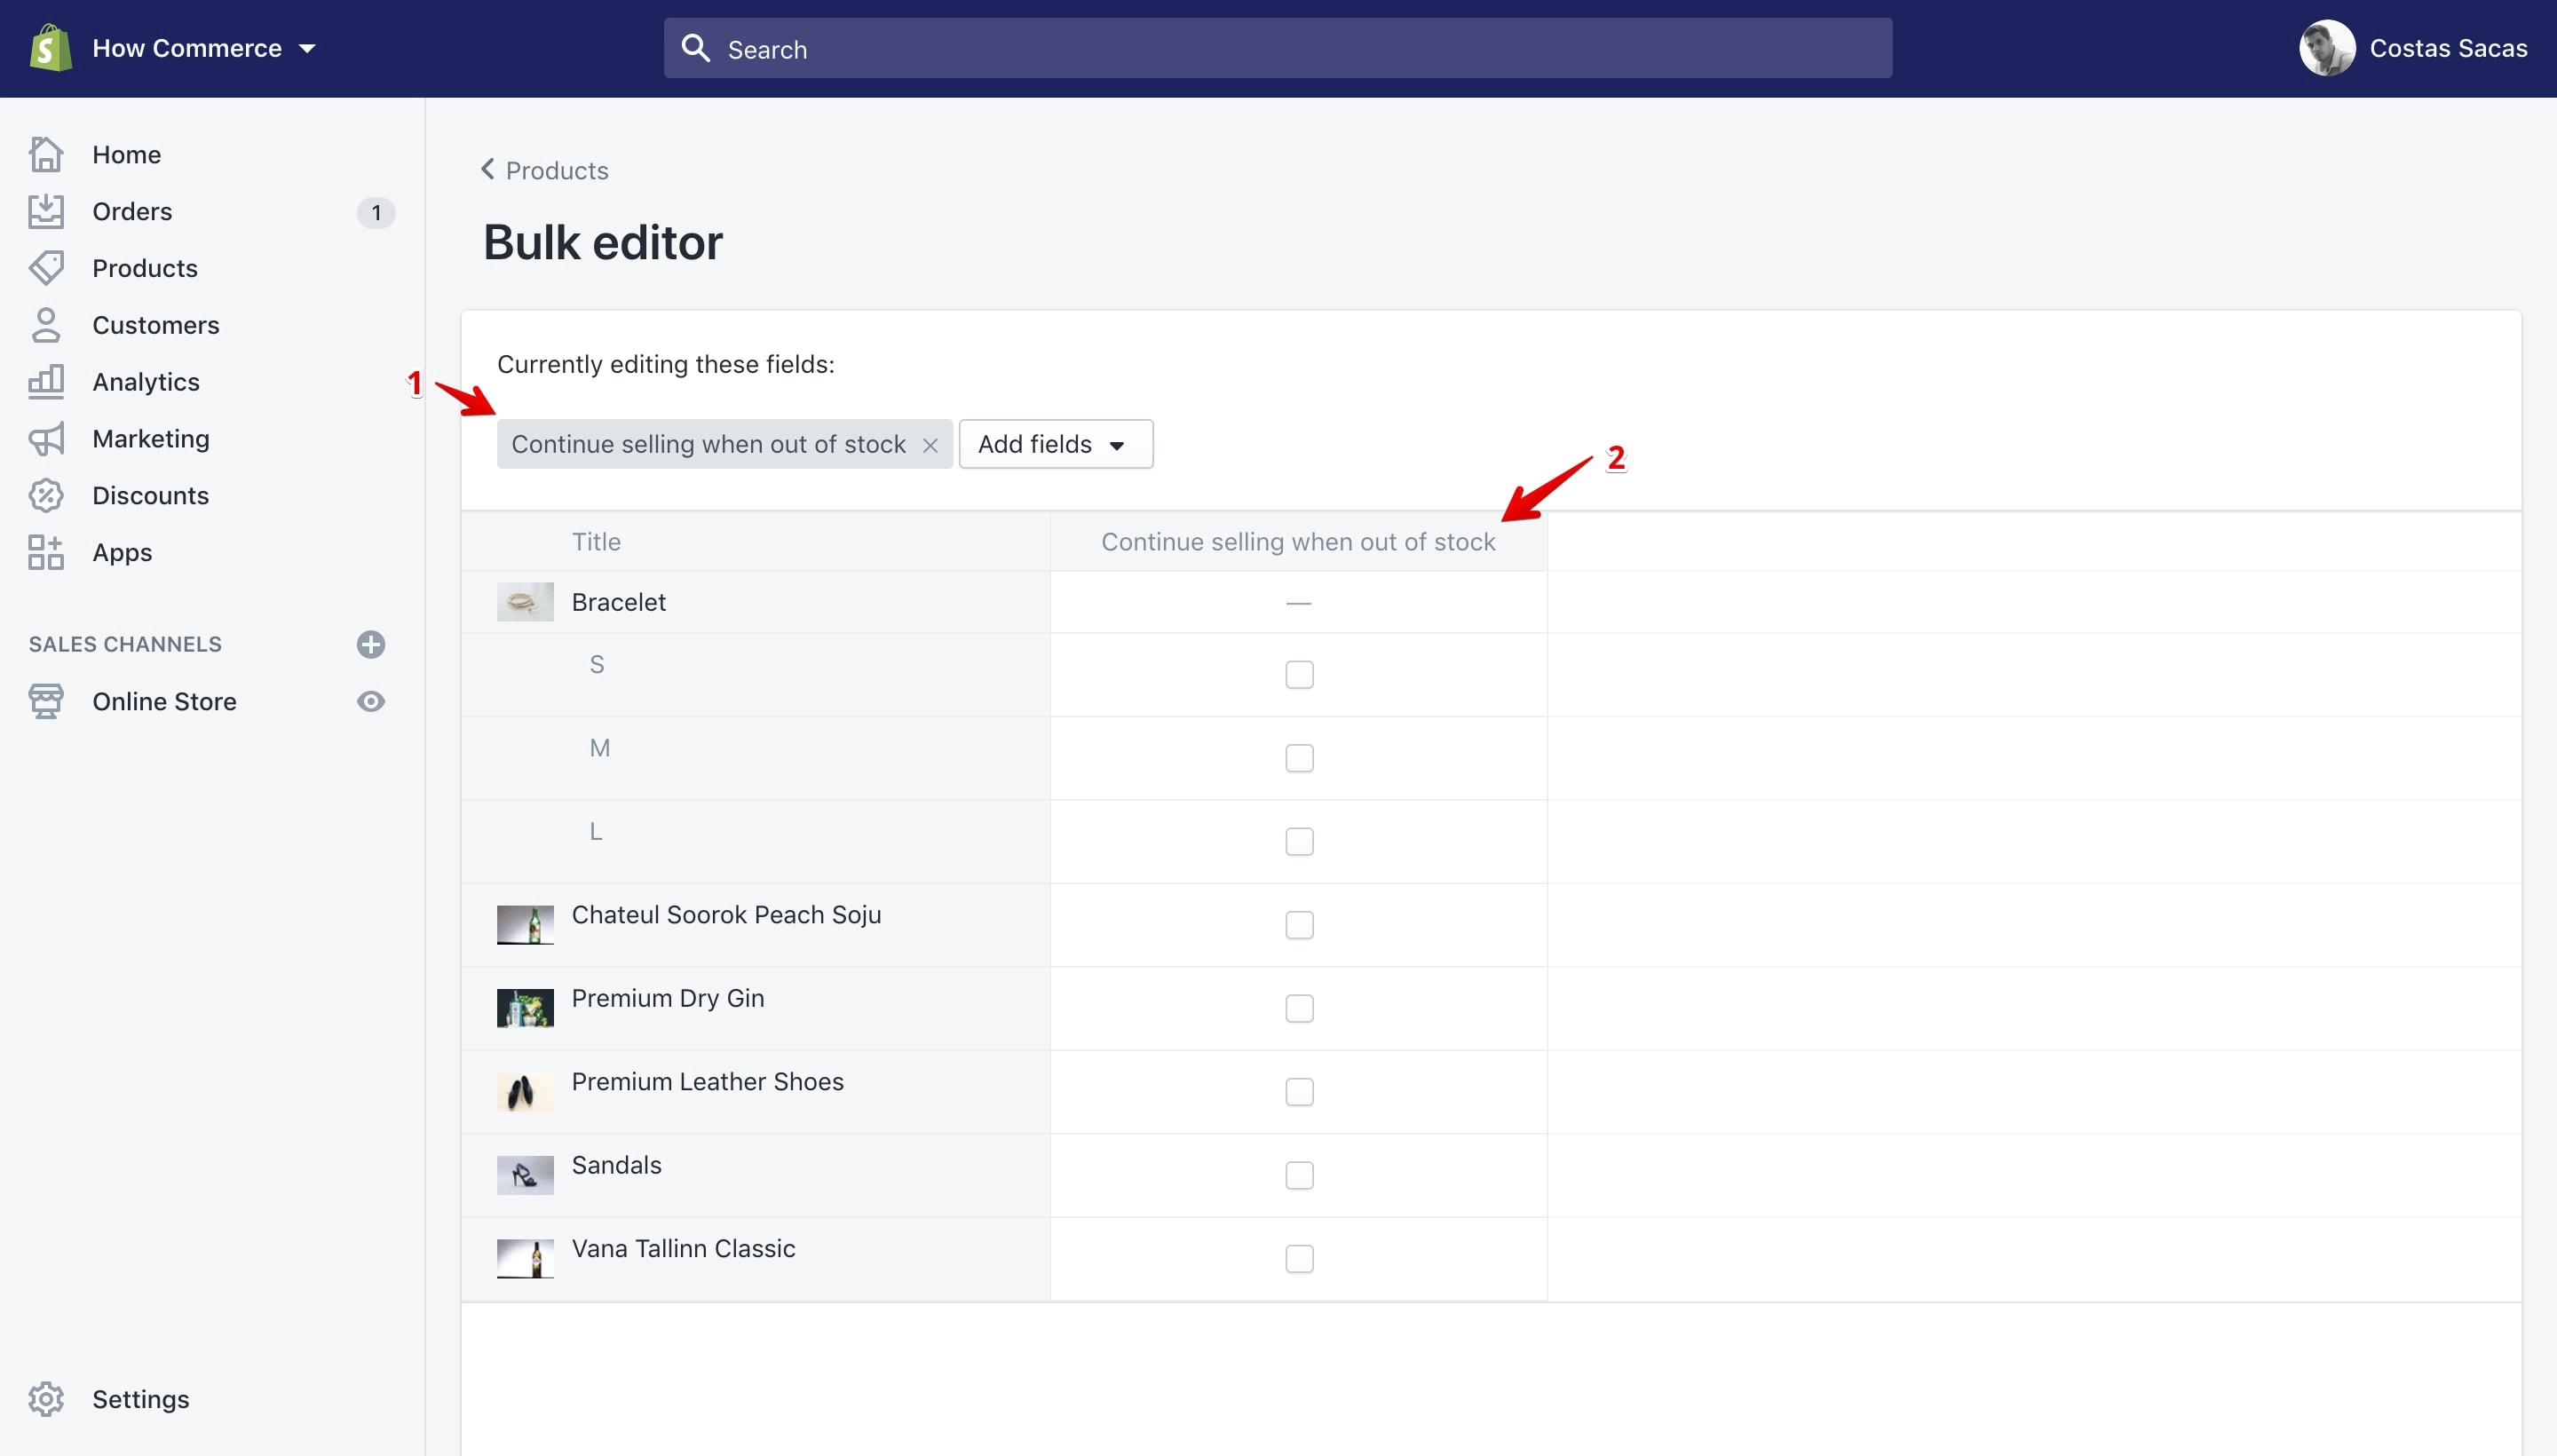
I need to select and check all checkboxes inside the new property column. To do that please select the first product (marked with 1 in the image below) by clicking outside of the empty checkbox wich in my case is a product variant, hold the ⇧ key on Mac / Windows and select the last item in column (marked with 2 in the image below):
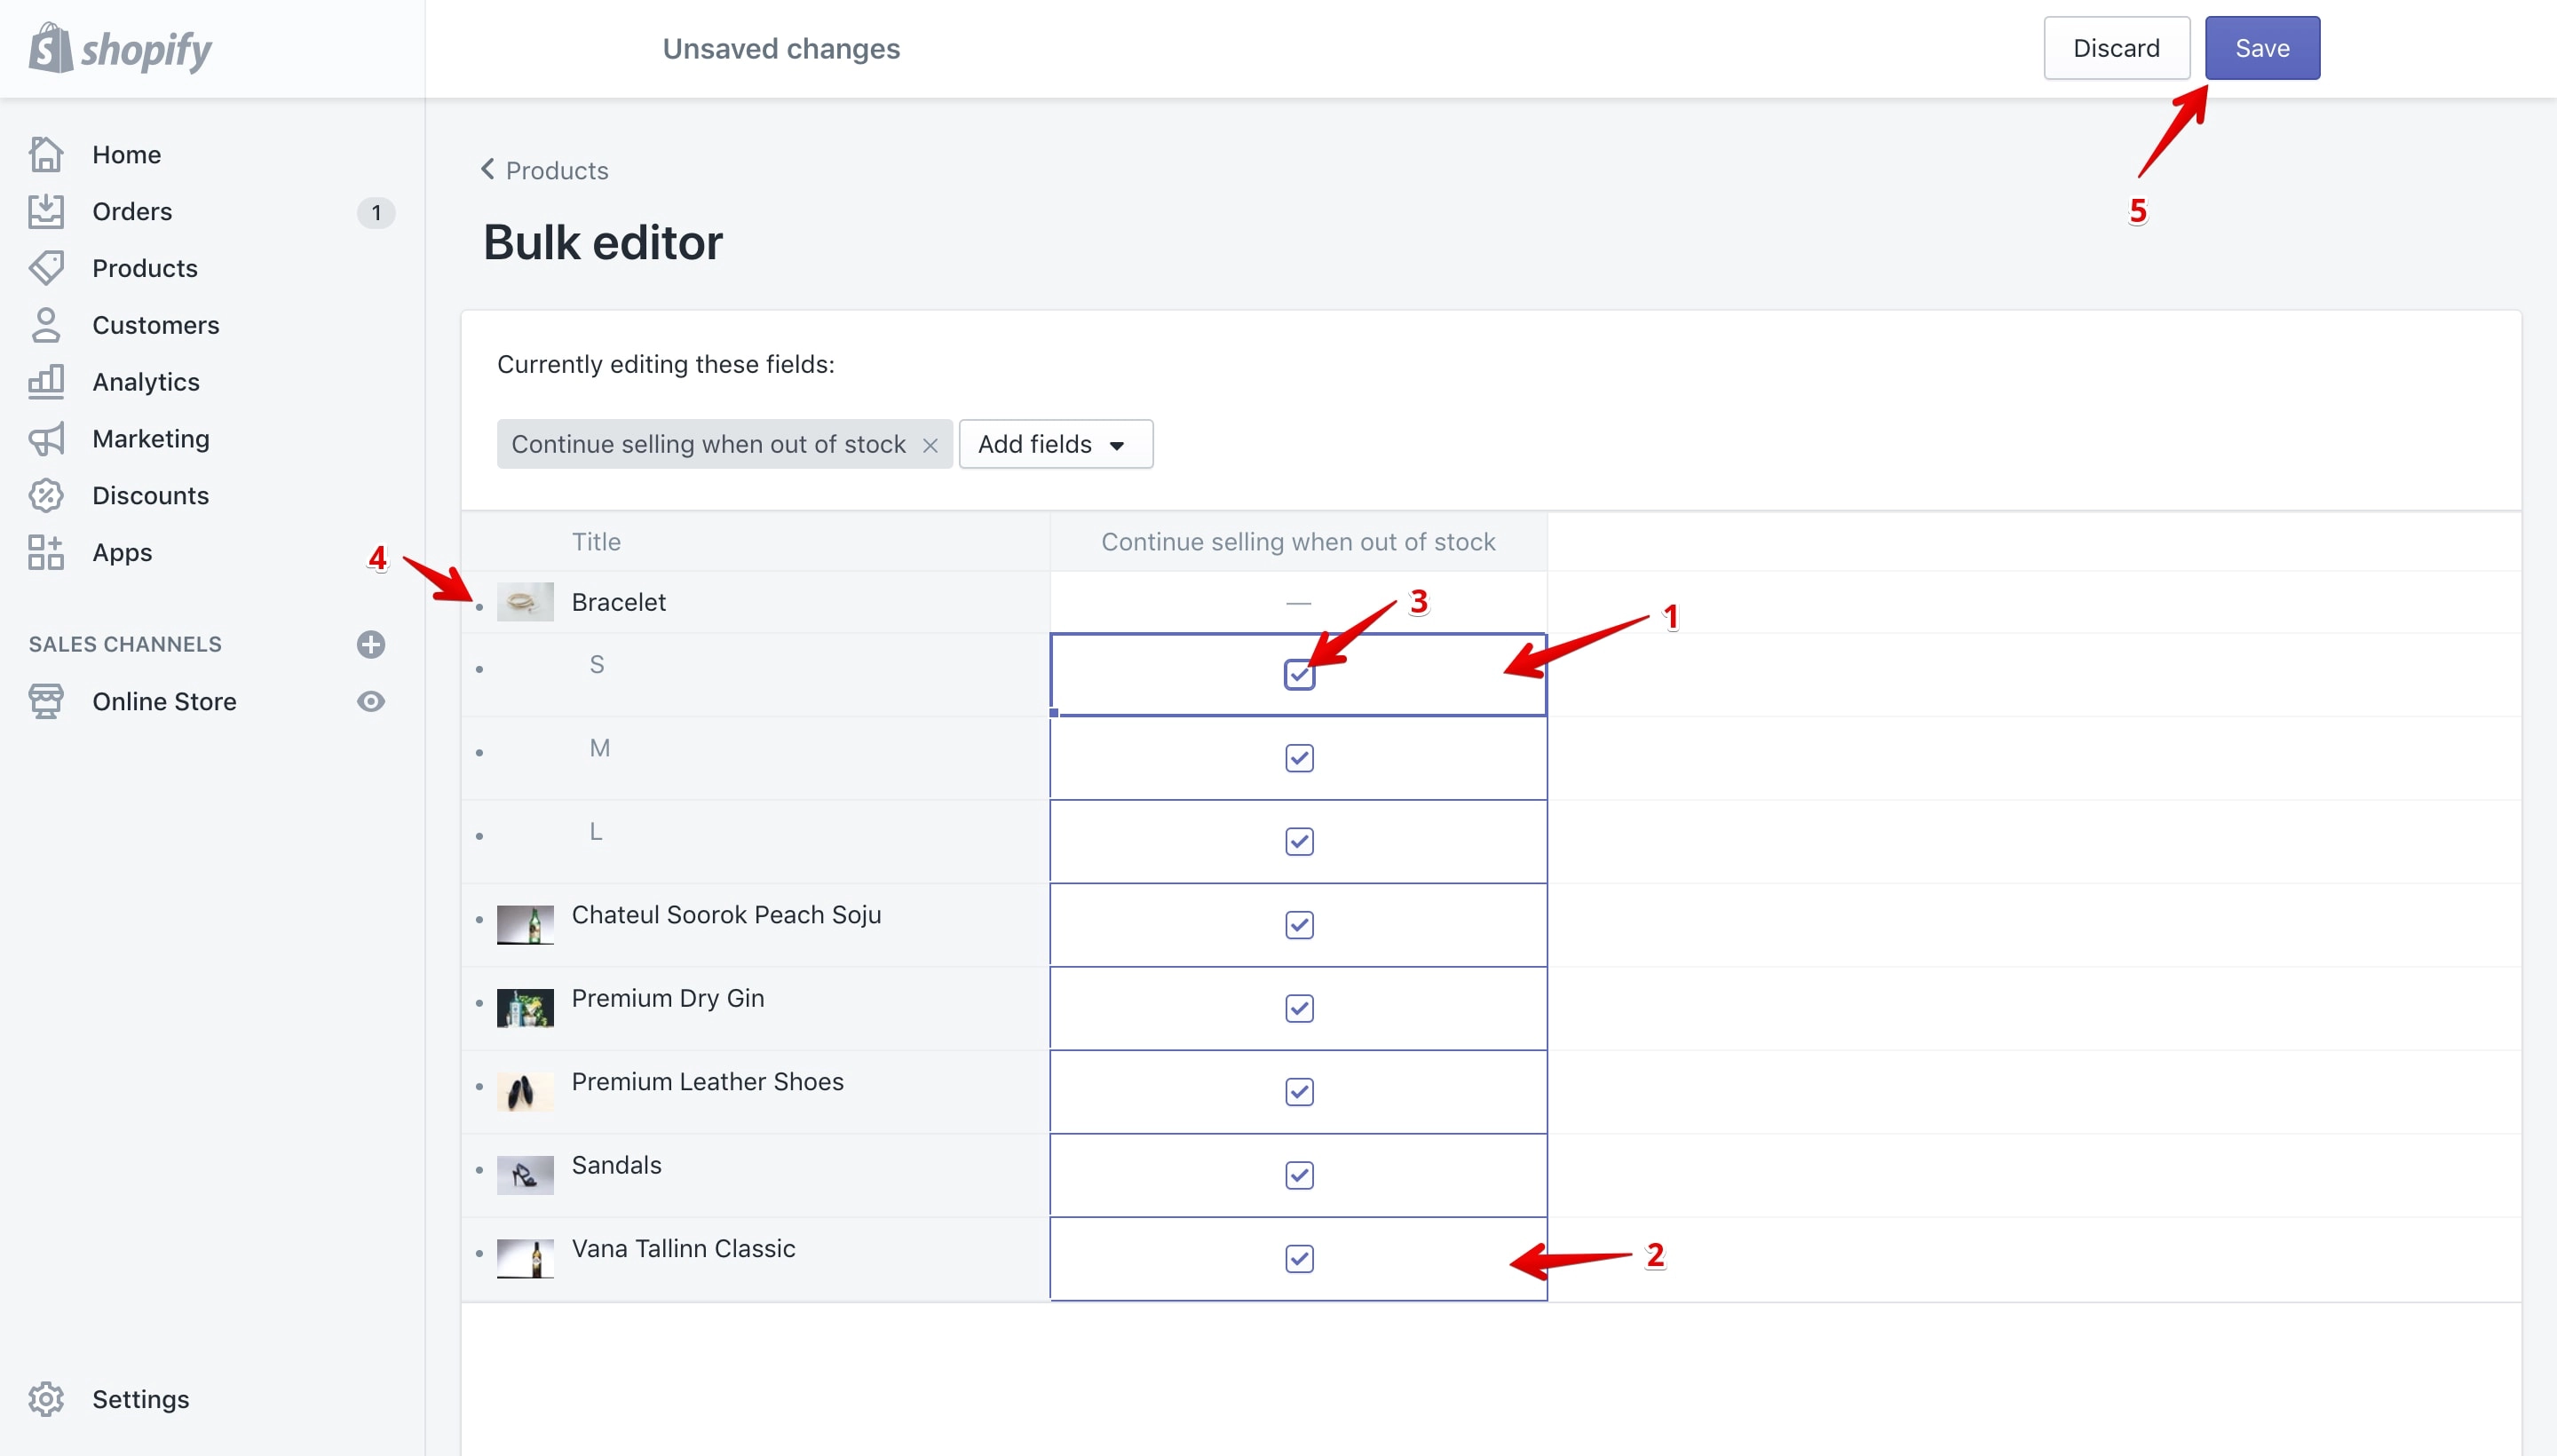
After all the products are selected click the first checkbox (marked with 3 in the image above) and automatically the “Bulk editor” will select for you all the empty checkboxes for the items you selected.
Once a property has changed you’ll see a small “dot” in front of the product (marked with 4 in the image above). This is an alert that the product has new property changes.
After you finish editing you need to save your new changes. To do that click on the “Save” button (marked with 5 in the image above).
As the new changes are applied you can see 3 states:
- Finished changes which is marked with a checkmark (marked with 1 in the image below)
- Changes in the process of saving marked with a spinner (marked with 2 in the image below)
- With changes not saved yet marked with a small “dot” (marked with 3 in the image below)
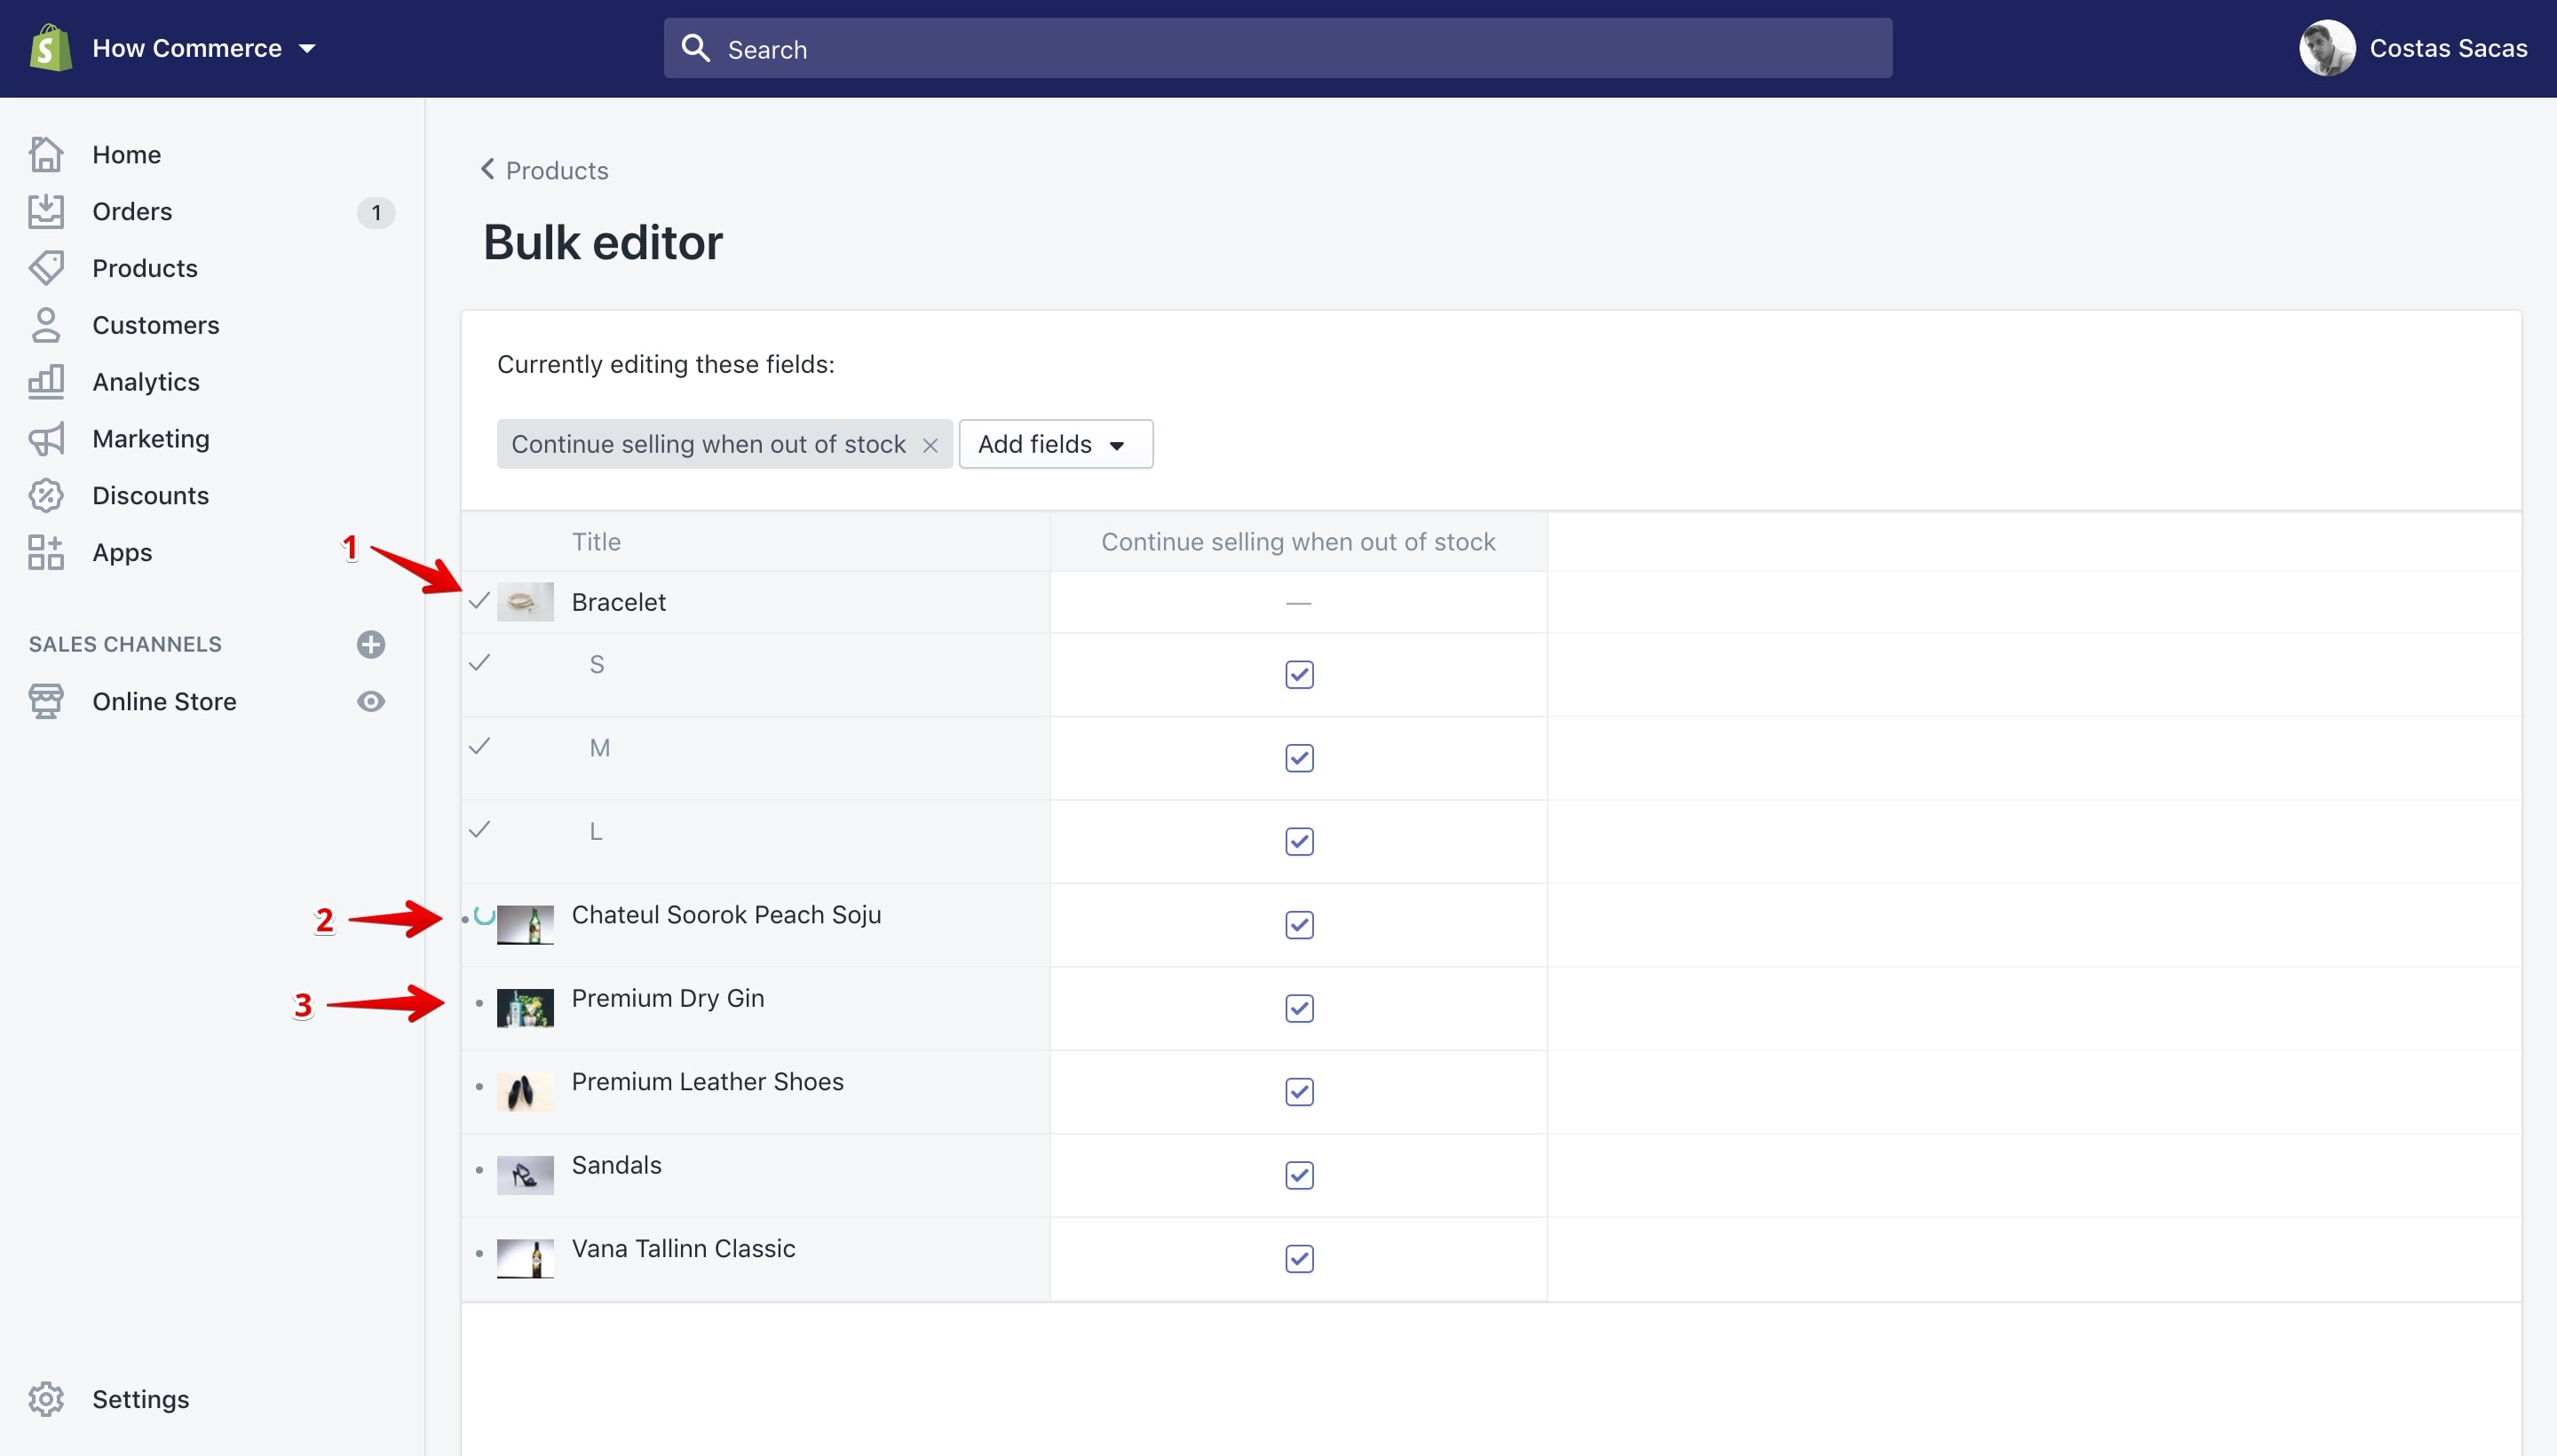
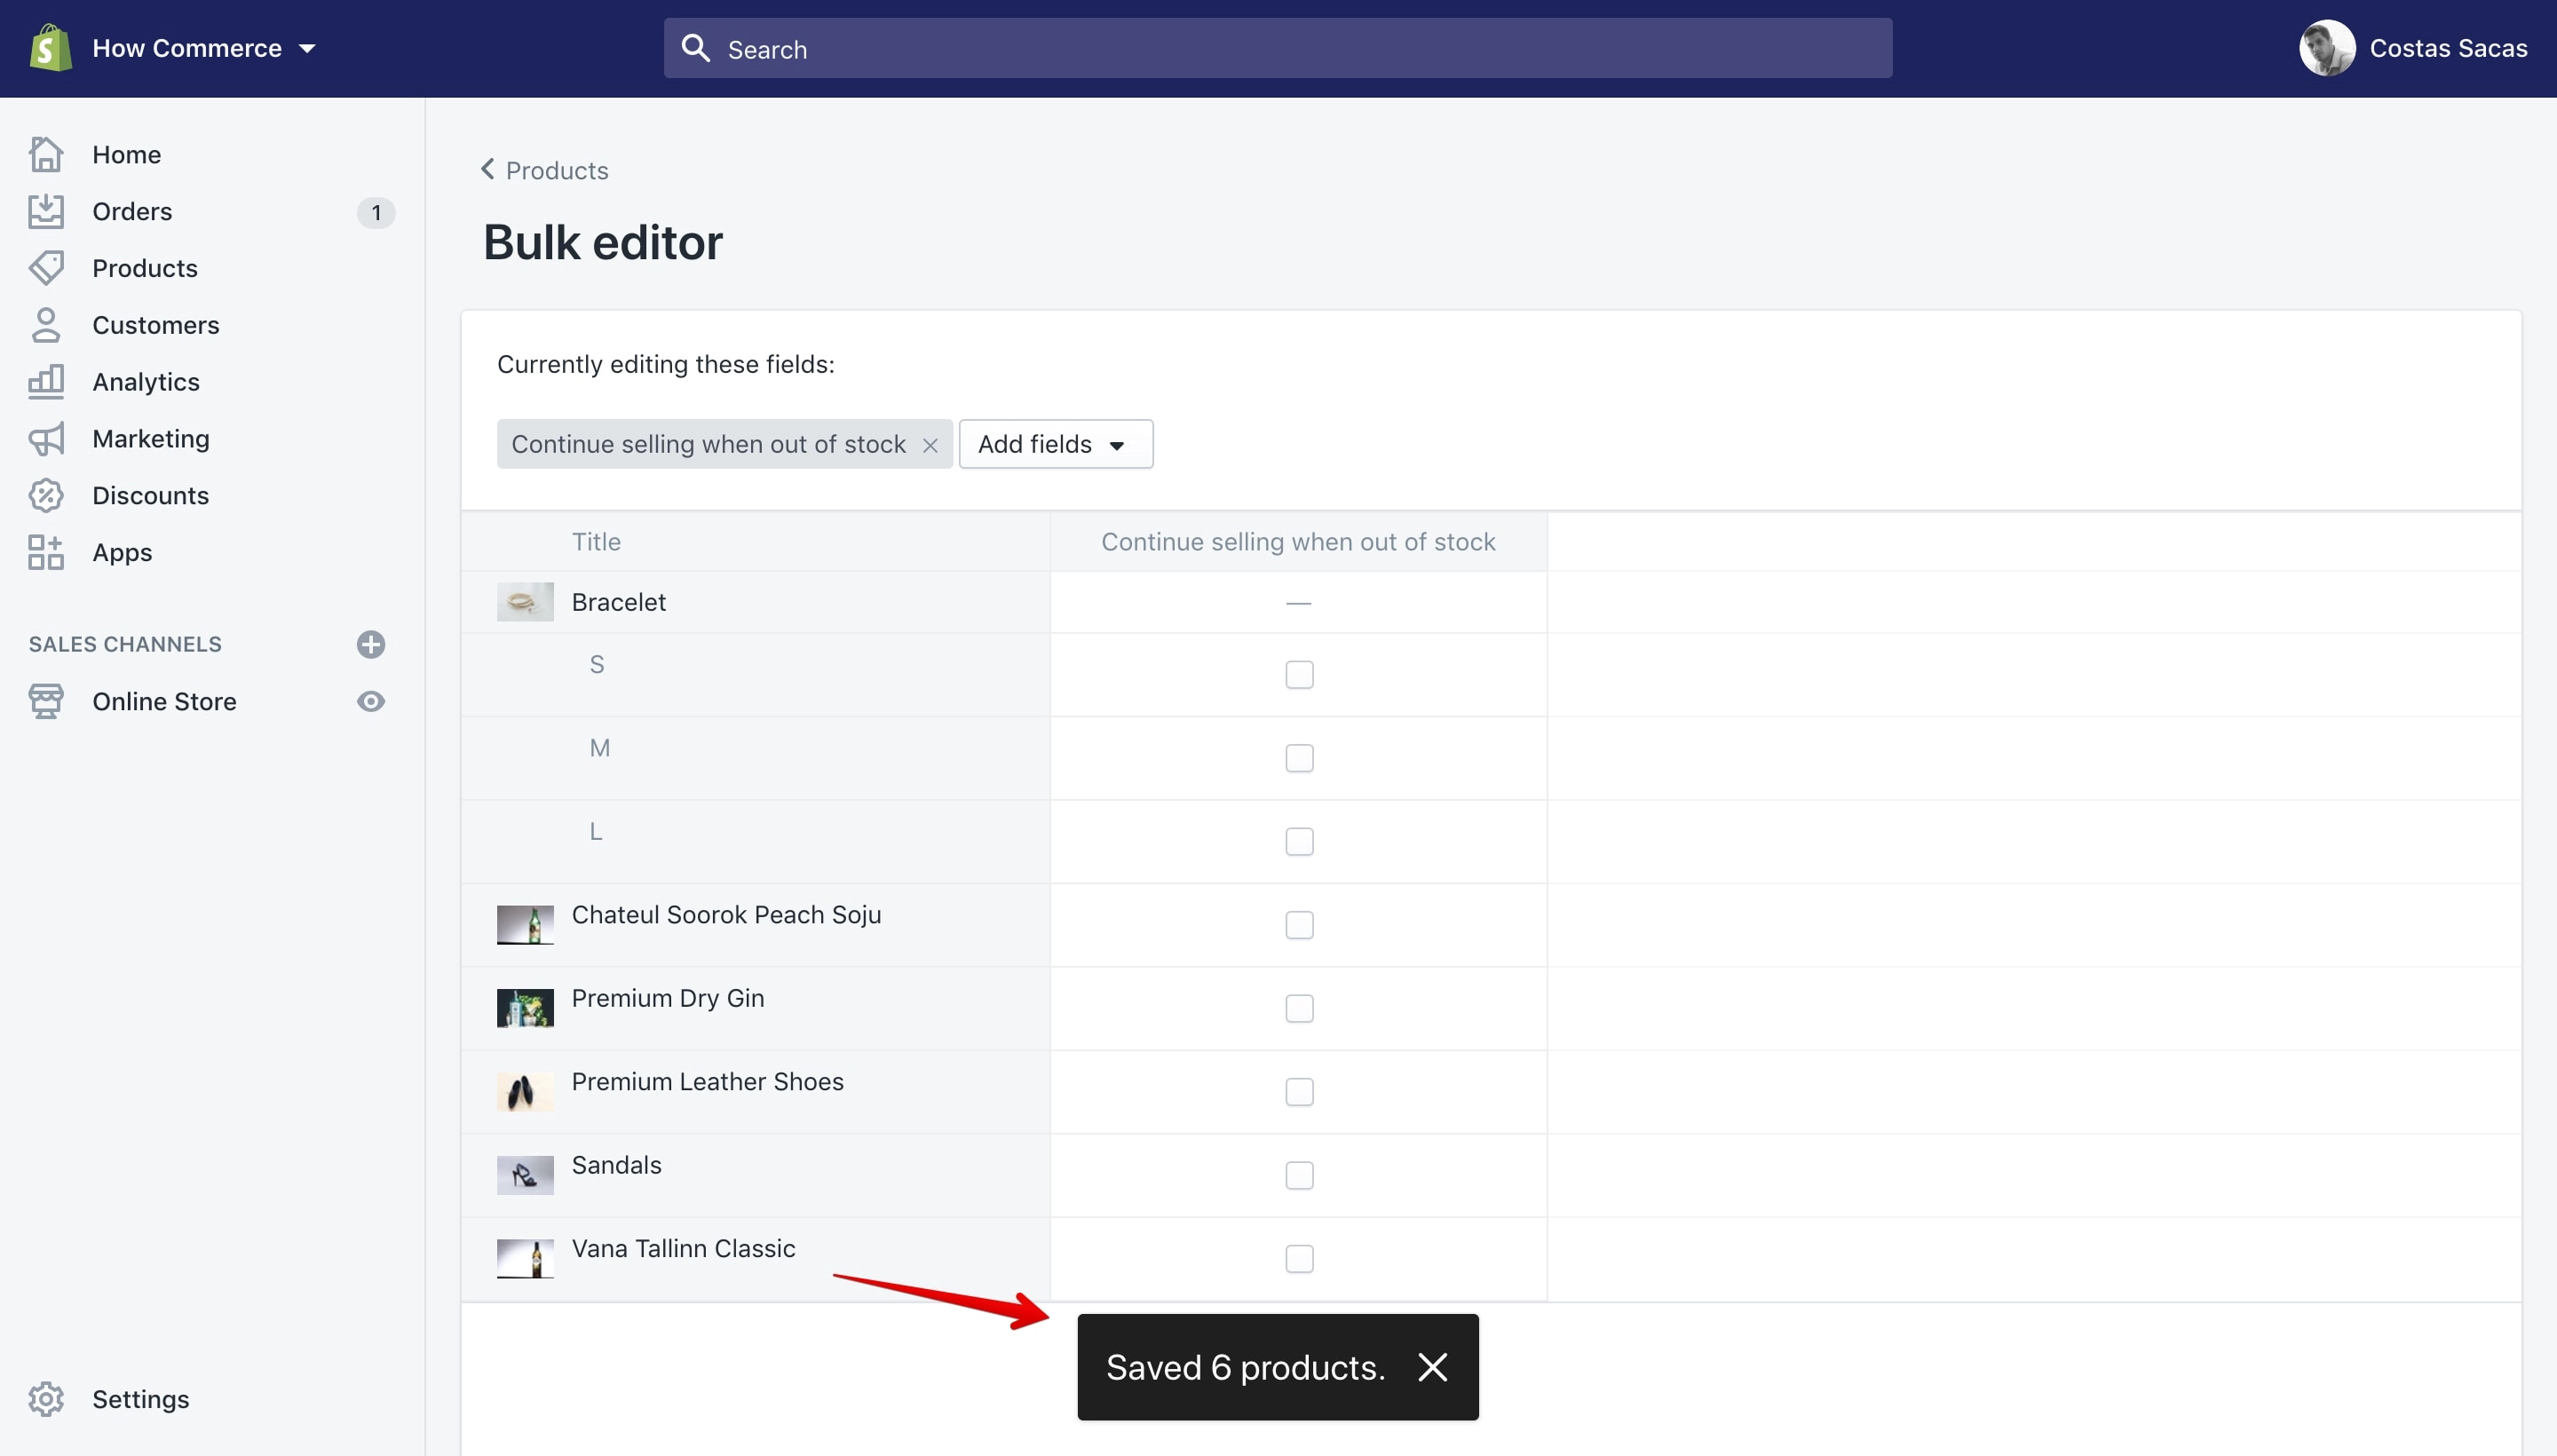
When everything is completed Shopify will display a message like the following:
Remove a product property
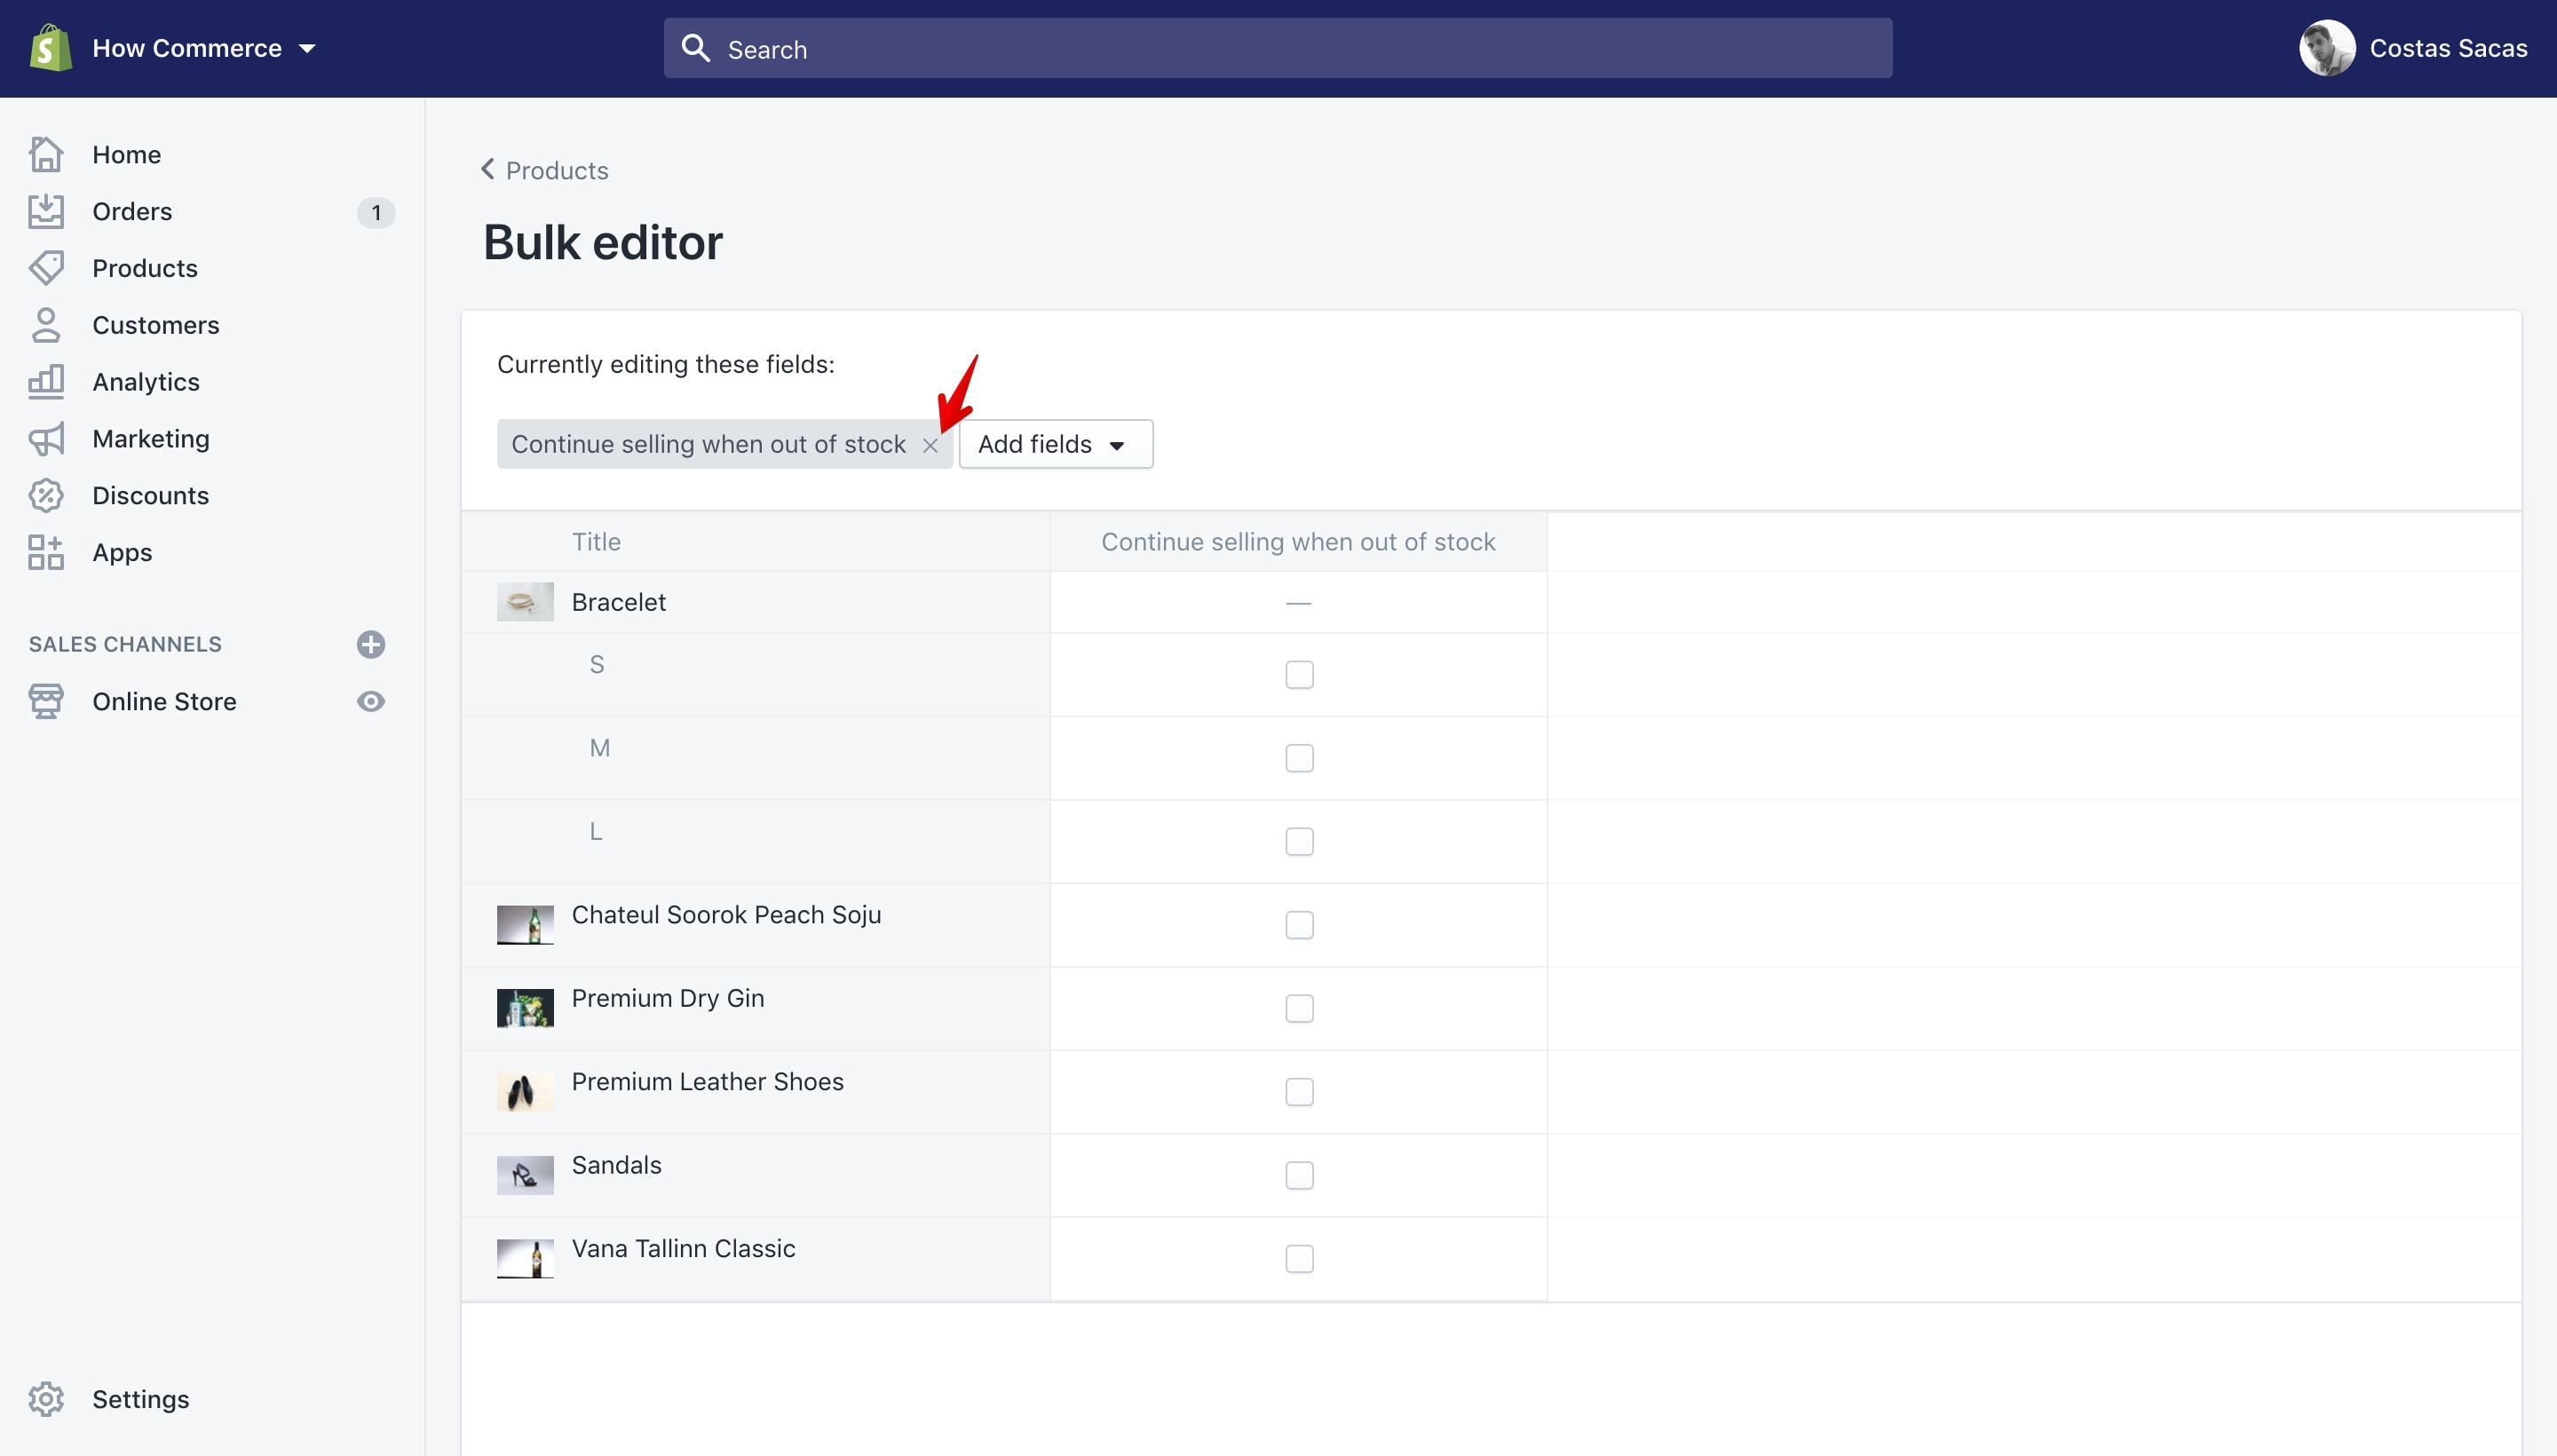
You can remove a product property from the “Bulk editor” table by clicking the “x” on the right of the property name in the “Currently editing these fields” section:
Available Keyboard & Mouse shortcuts in the bulk editor
Move between cells
Navigate table cells with the ← ↑ ↓ → key or the ⇥ key on Mac and Windows.
Select multiple cells with your mouse
Hold the ⌘ key on Mac or Alt on Windows and click different cells to select the desired ones. With this technique you can select cells without them needing to be in proximity to one another.
Select multiple cells with your mouse or keyboard
Select a property cell, then hold the ⇧ key on Mac/Windows and click the last cell in the same column. Now you can apply changes to all the cells between the first and the last one that you selected.
CSV files
The “CSV” file name is an abbreviation of the “comma-separated values”. CSV files are delimited text files that use a comma to separate values. Each line of the file is a data record.
Records can contain one or more fields separated by commas. A CSV file usually stores data like numbers or text.
CSV files can be edited with a spreadsheet program such as Numbers (Mac OS), Microsoft Excel (Windows), OpenOffice Calc, or Google Docs.
I recommend going with Google Docs which is an online editor provided by Google. It is free and you can store as many files you want on it as long as they are in Google Docs format.
On Shopify you can use CSV files to import:
- Products
- Customers
- Inventory
And to export:
- Products
- Customers
- Inventory
- Orders
- Discounts
CSV files are great when you are migrating from another platform because you can export things like products, customers, inventory and import them in Shopify.
You can also export a file with all your products, open the file in a spreadsheet program, edit the data (products name, variants, inventory, tags, image etc.) and after import it back into Shopify.
This will help you edit products faster when you have multiple items and you think you are more familiar with a spreadsheet program than with the Shopify bulk editor.
Duplicate
Duplication allows you to create an exact copy of a product, order, draft order, page, transfer and theme. This will save you a lot of time because you do not have to create the product or the page from scratch.
Duplicate products
This feature saves a lot of time since if you have similar products you don't have to create them from scratch. Instead you duplicate the original product and after make the required changes to it.
Select a product that you want to duplicate:
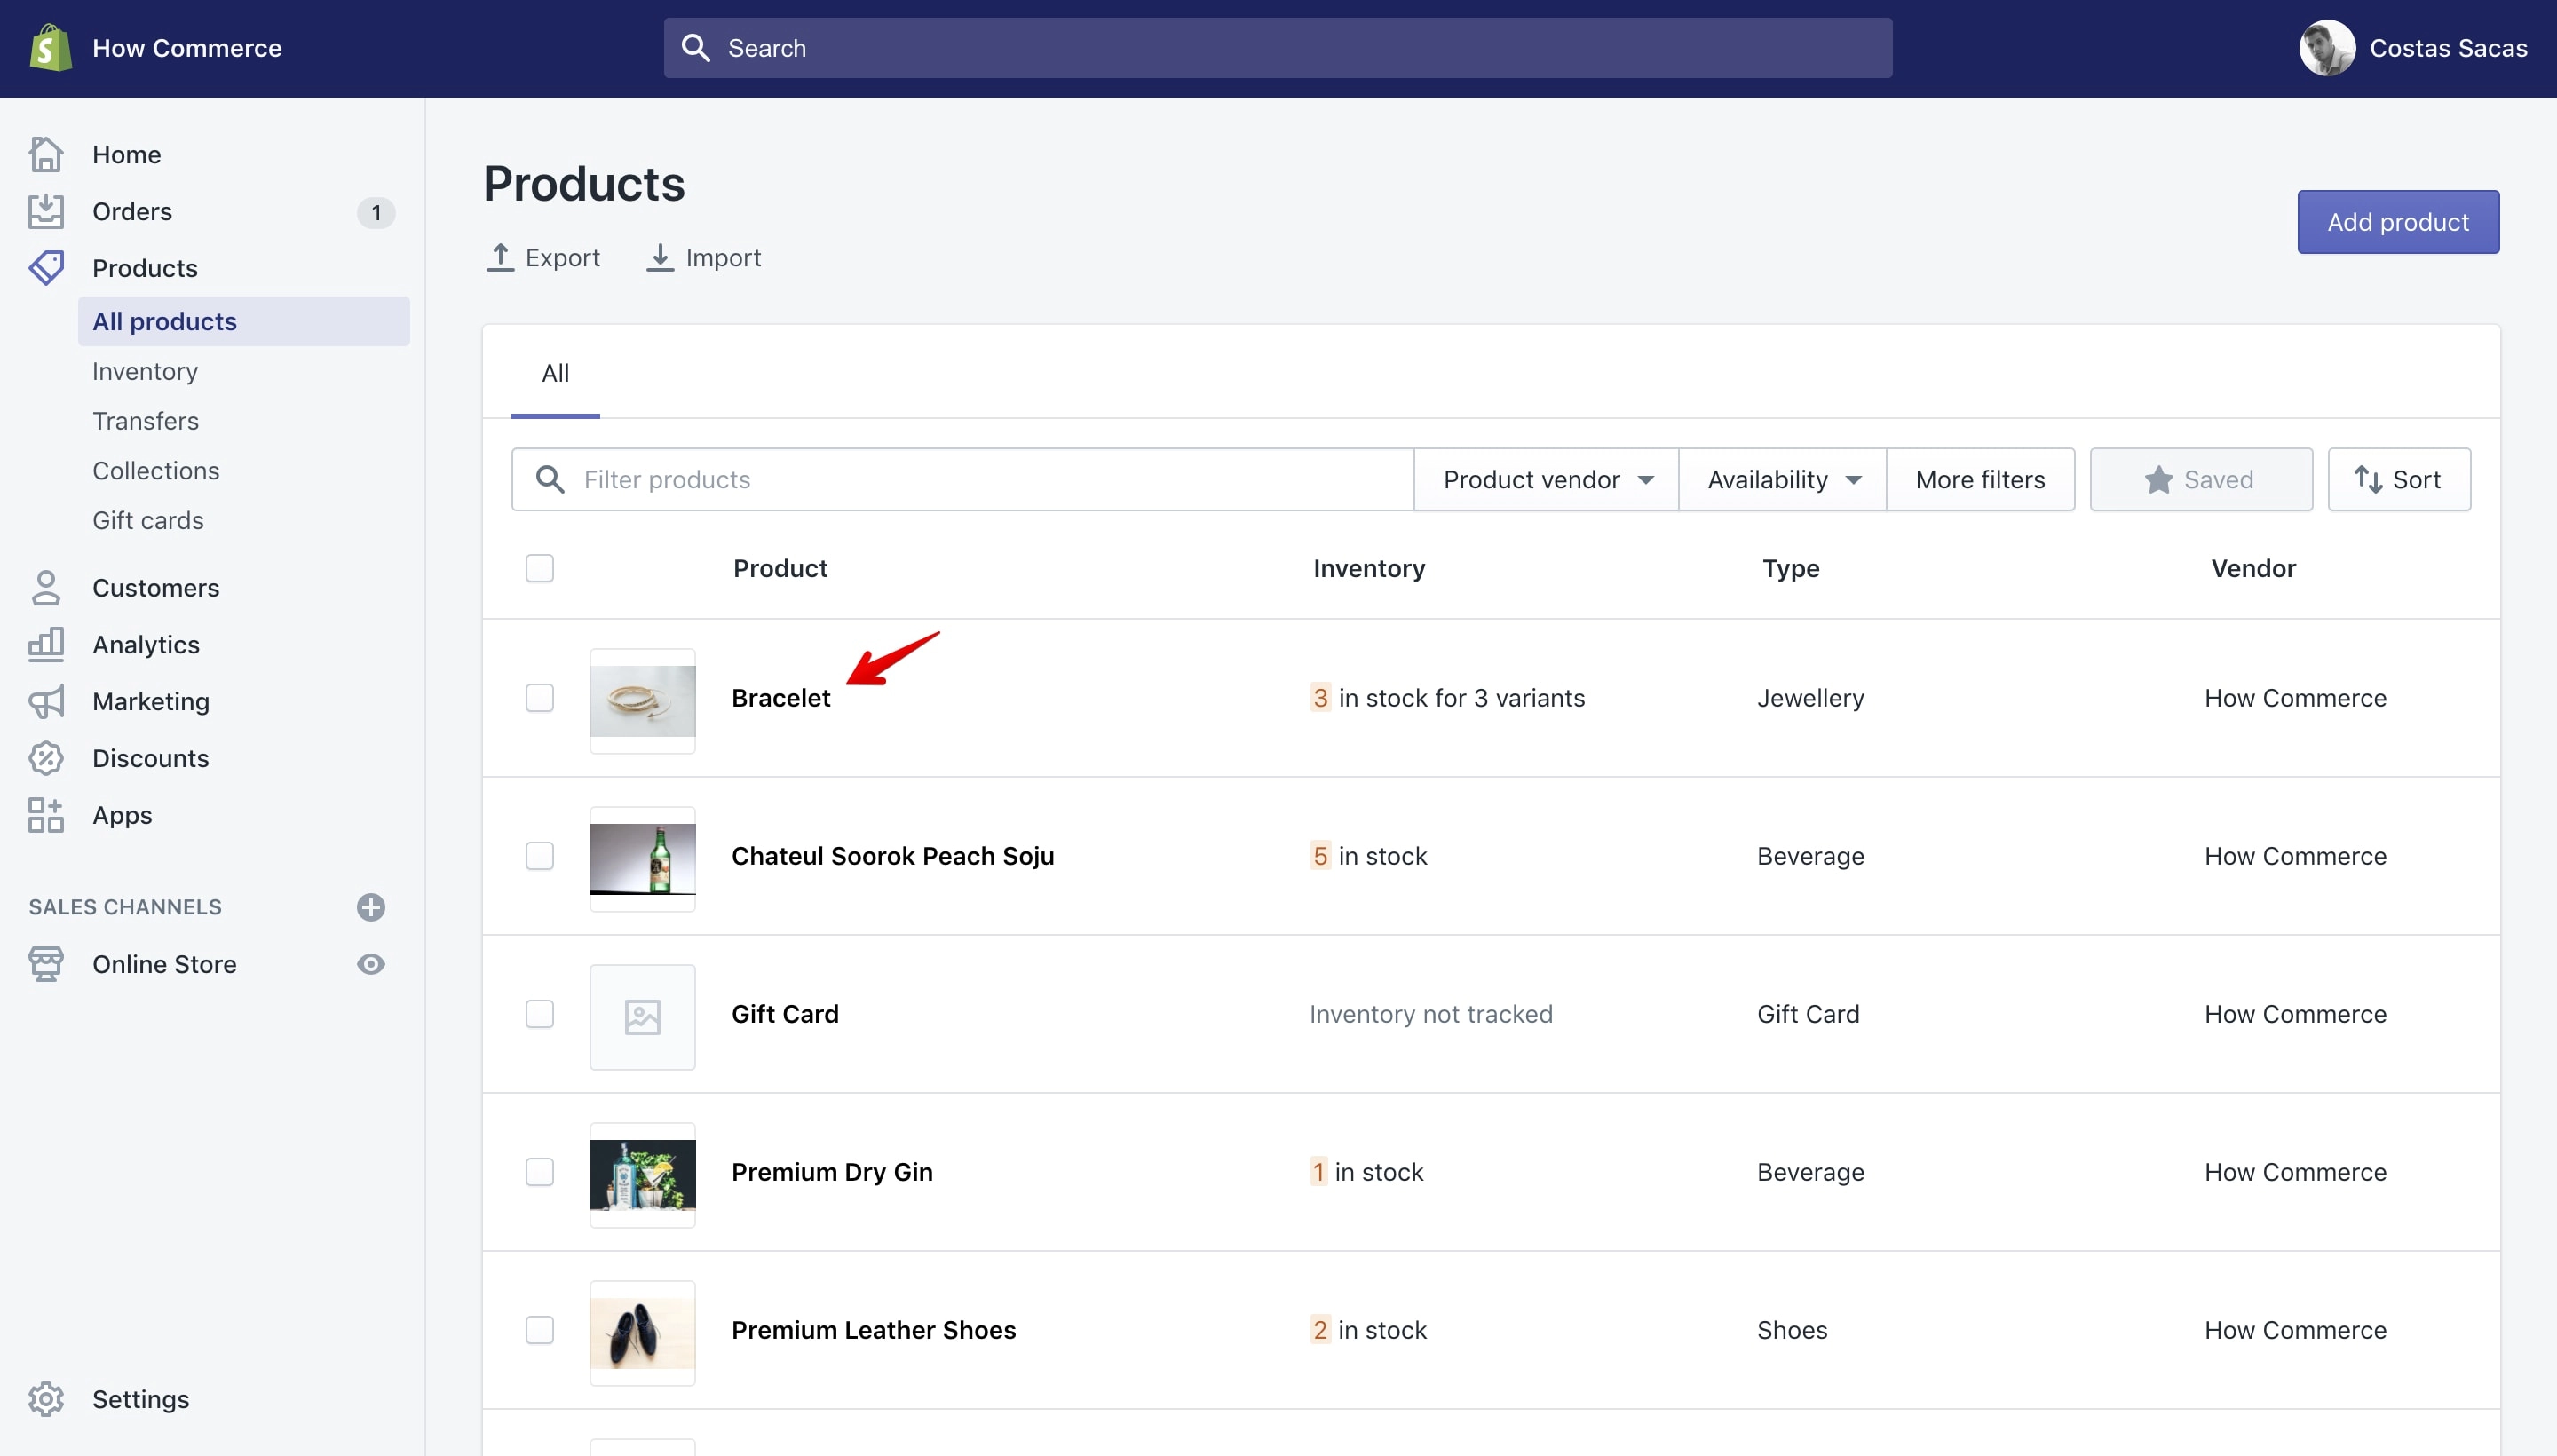
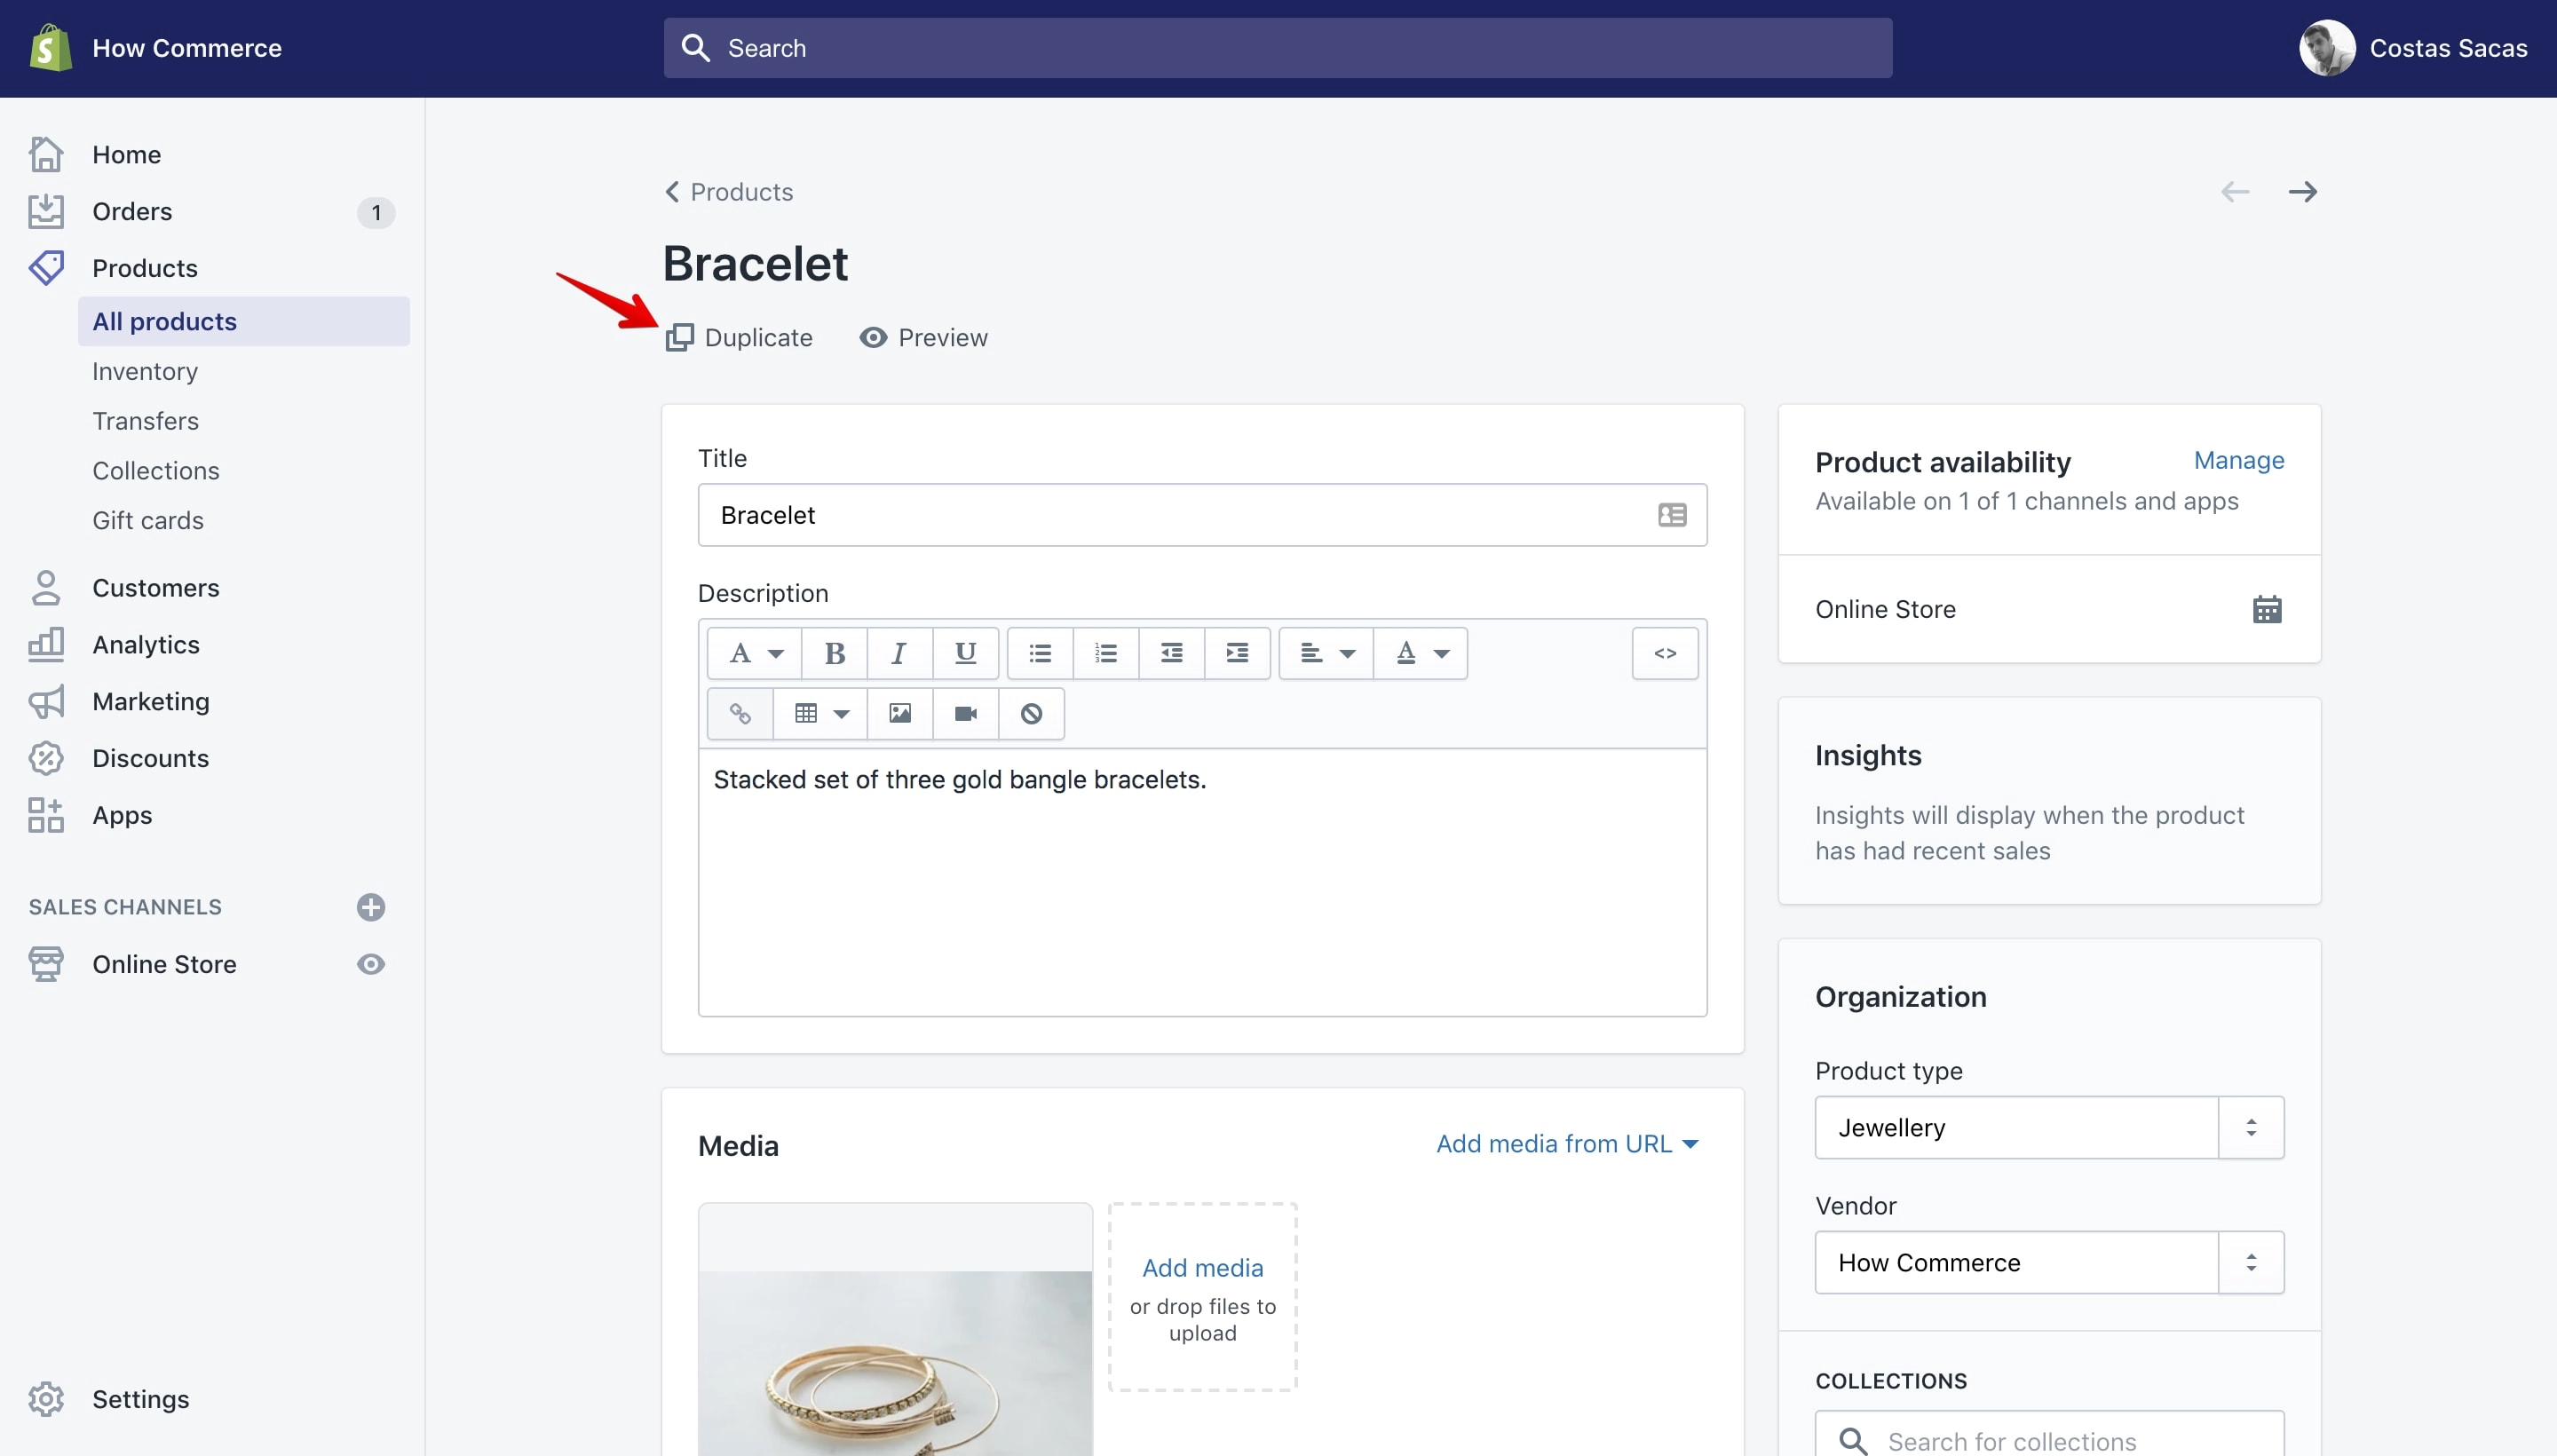
Click on the product to open the edit page. Below the product title click the “Duplicate” icon:
Once you do that a pop-up will open with the new details required to create a new product:
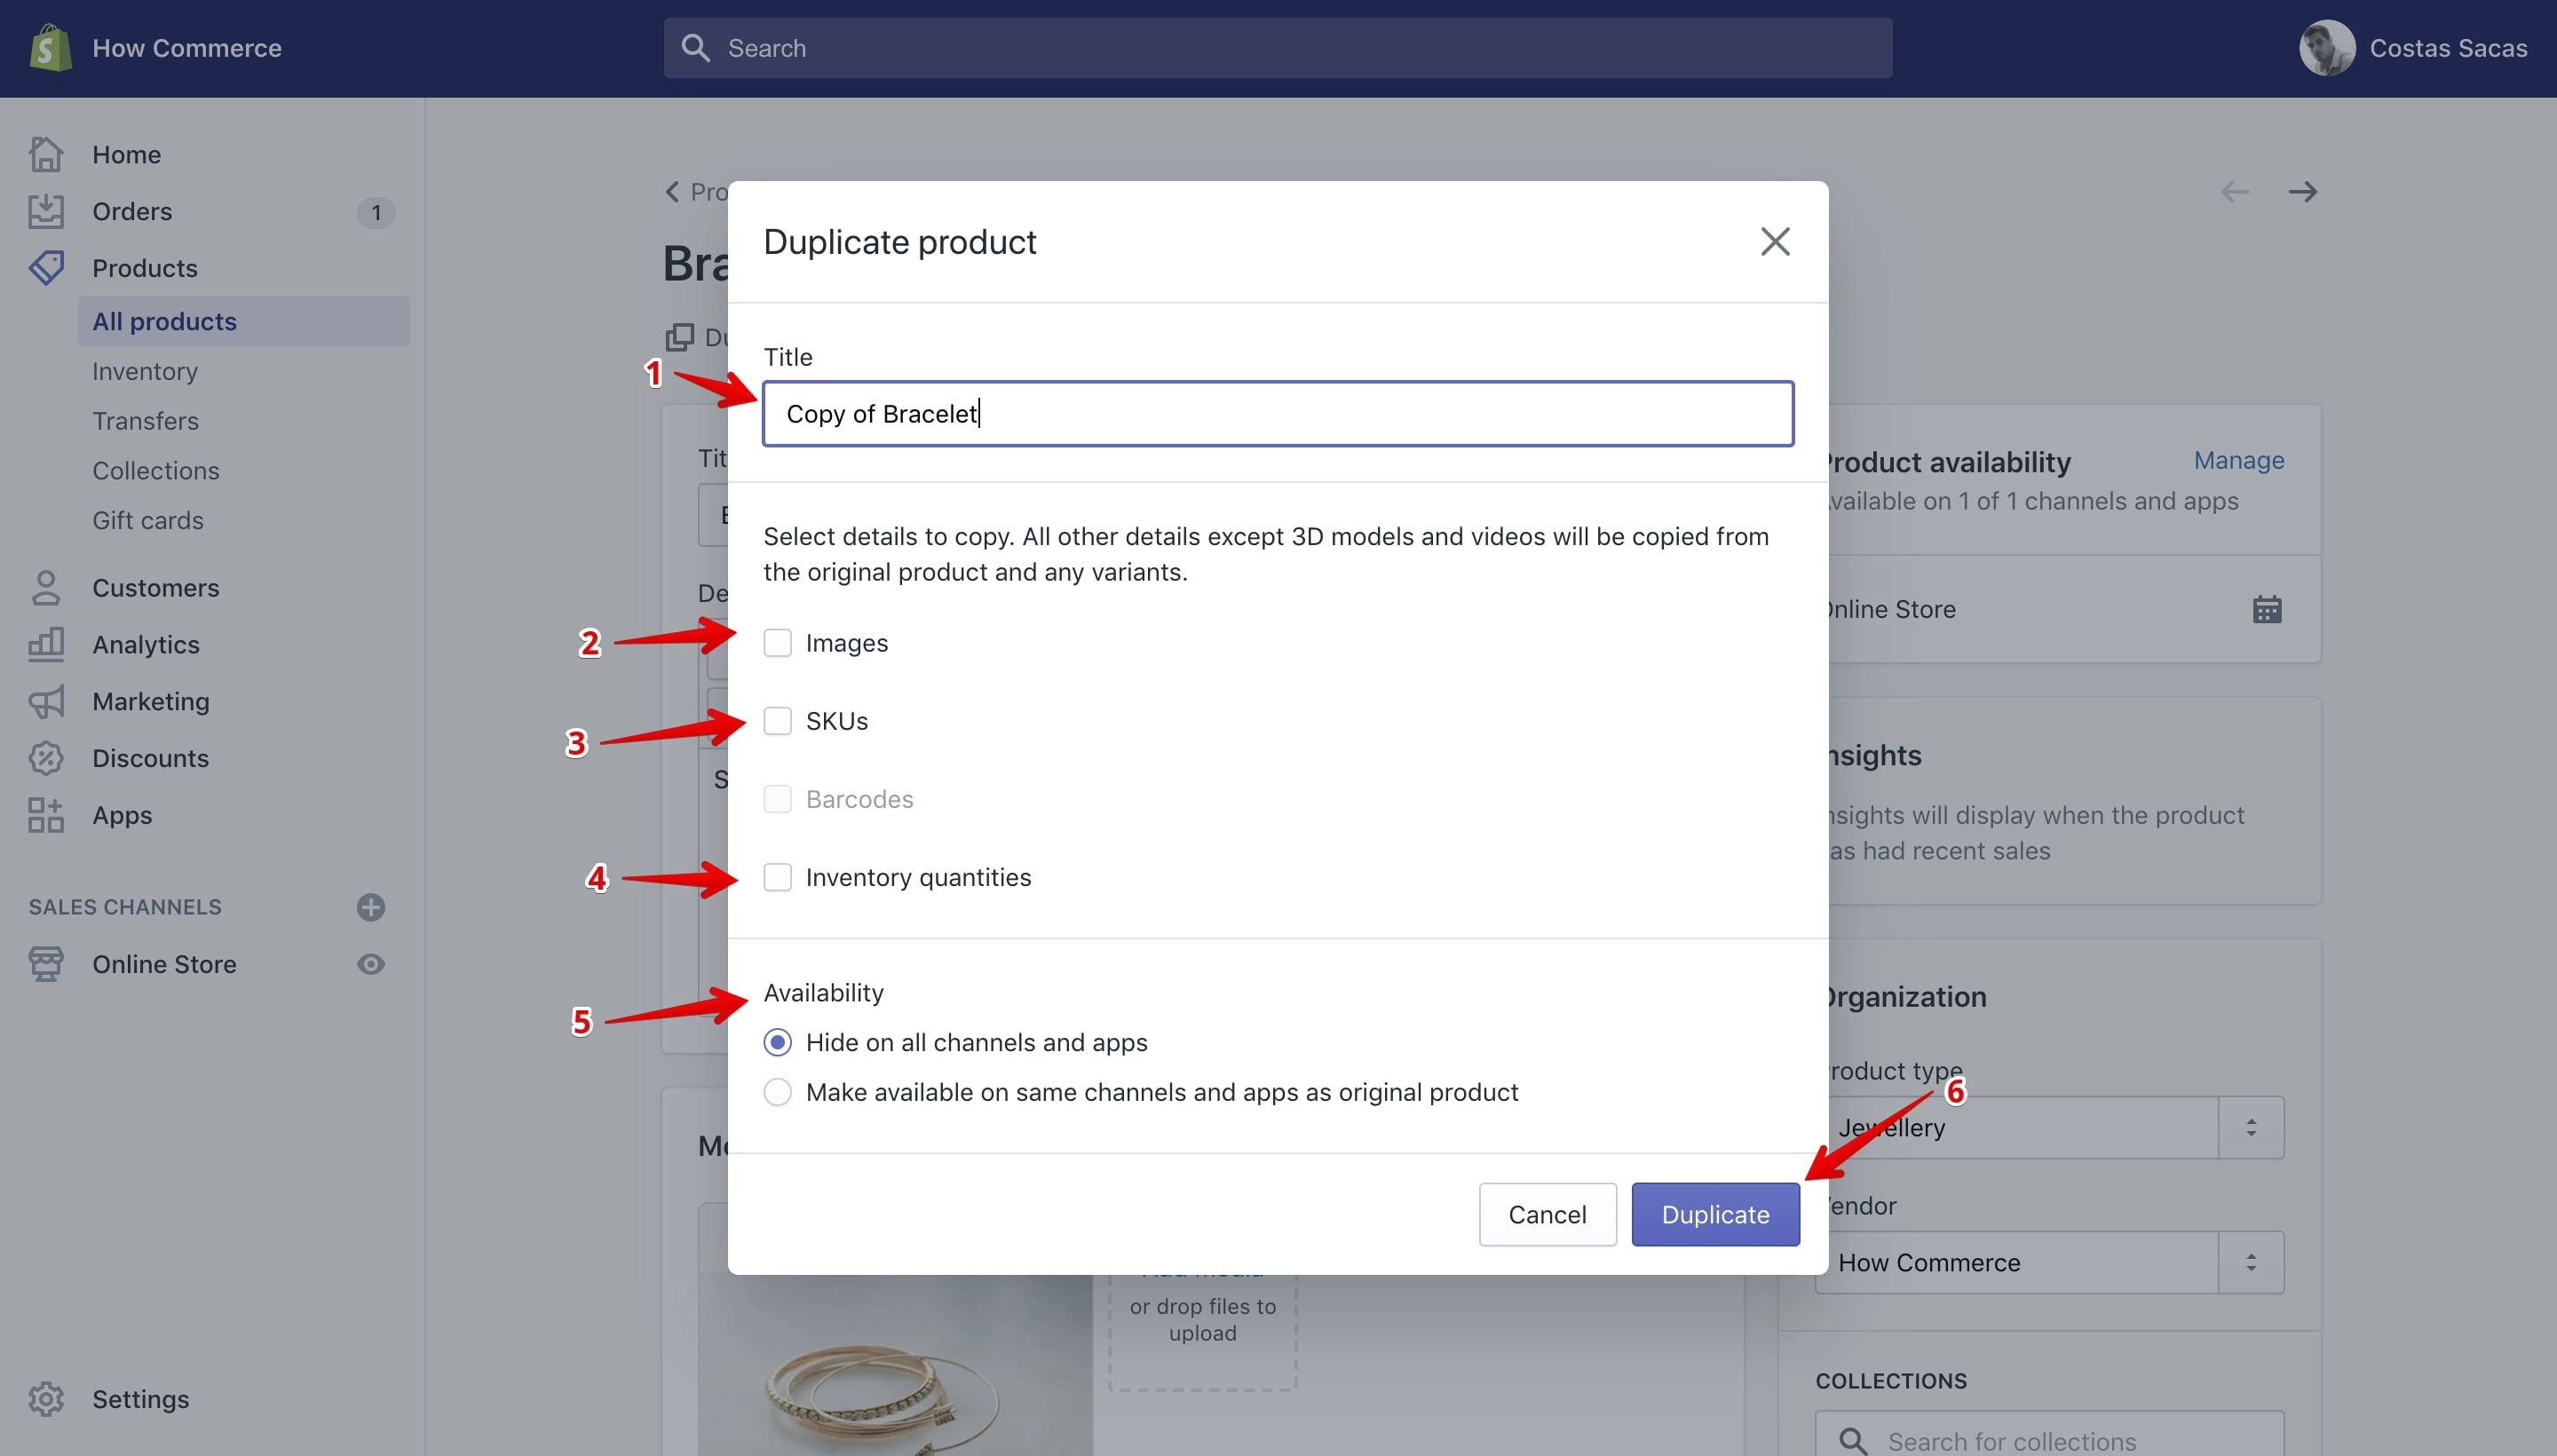
On the newly duplicated product you can choose what you want to duplicate.
You have the option to rename the new product as you want.
By default Shopify leaves the product title that you’ve duplicated and adds the words “Copy of” in front of it (marked with 1 in the image above).
You have the option to duplicate the existing images (marked with 2 in the image above). If you leave this checkbox unchecked you need to add new images to the newly created product.
Another option is to duplicate the SKU (marked with 3 in the image above) for the new product as well. Usually this you’ll not duplicate since it is a unique identifier and you need to add a new one to properly identify the product.
You can copy to the new product the inventory as well (marked with 4 in the image above). If you have the same number of items in stock for the newly created product then it is a good idea to copy this as well, if not leave it empty so you can add the correct number once the product is created.
Next option you have is where you want the new product to be available (marked with 5 in the image above). There are 2 options listed: one is to hide the new product from all channels and apps and second is to make it available on the same channels and apps as the product from which it’s being created.
After you have everything in place click on the “Duplicate” button to create your new product (marked with 6 in the image above). A new copy of the selected product with the specifications you made will be created:
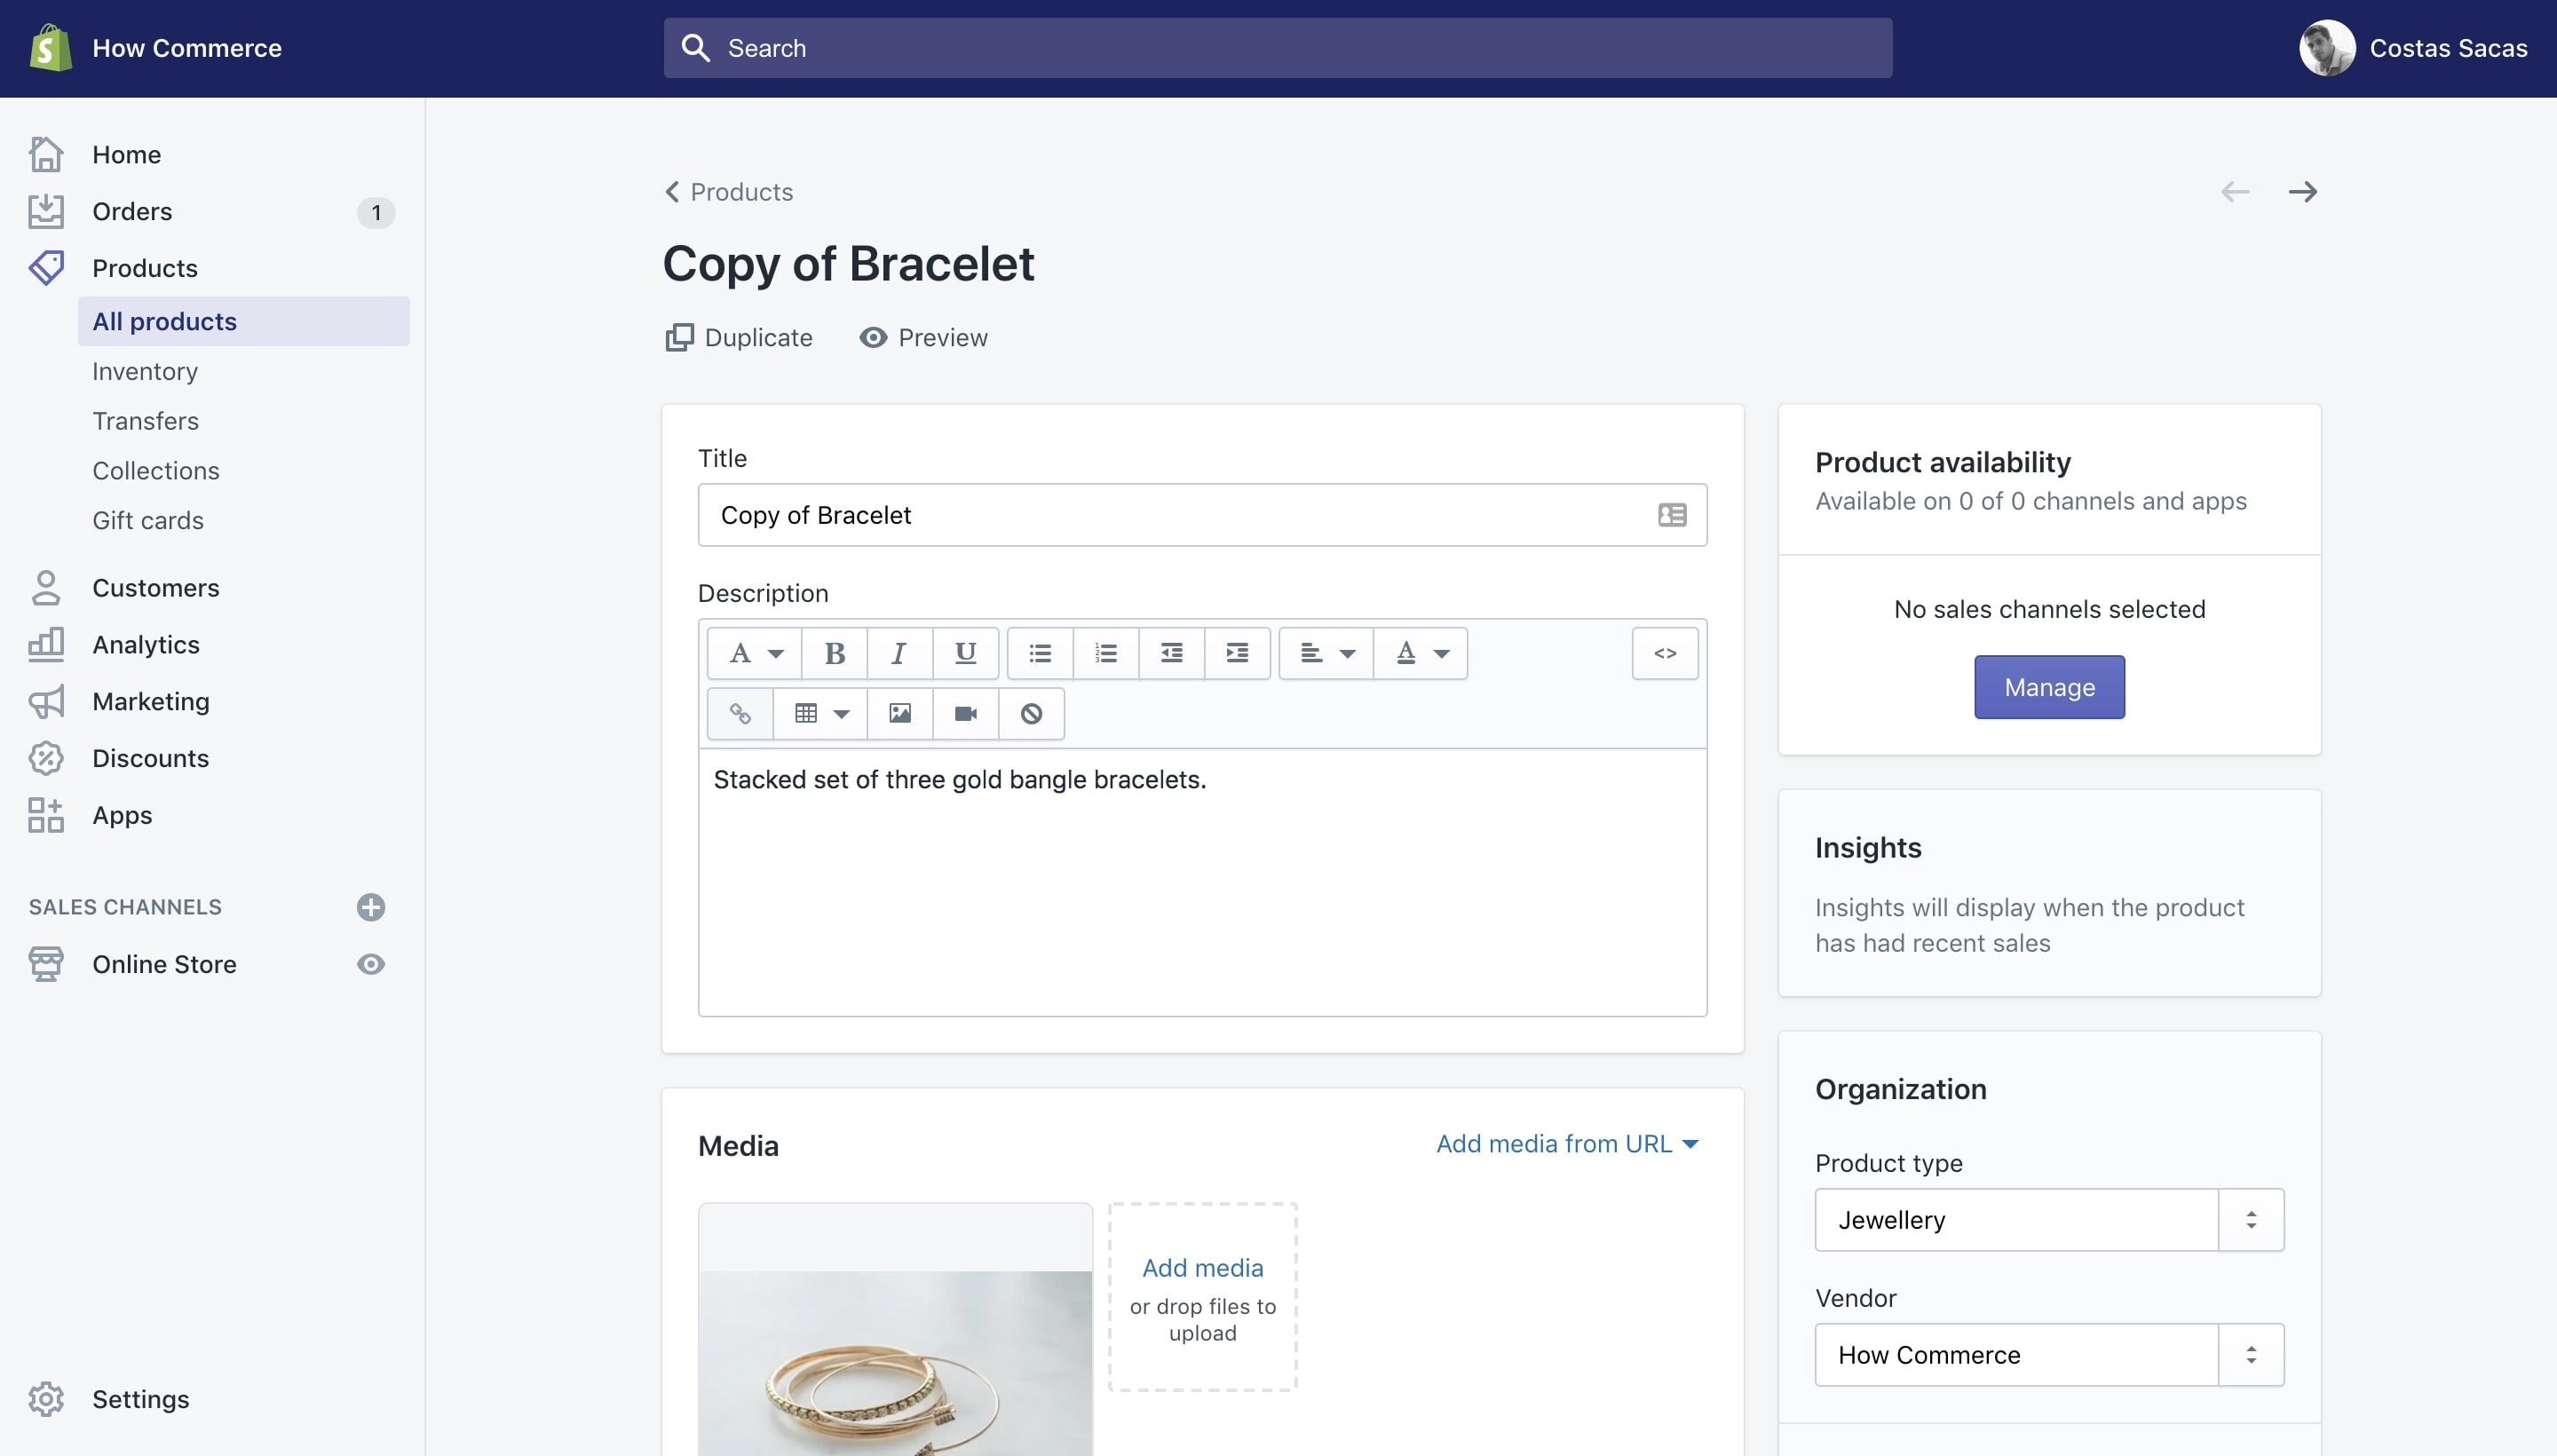
From here you should change the product title, add and remove data as needed.
Duplicate orders
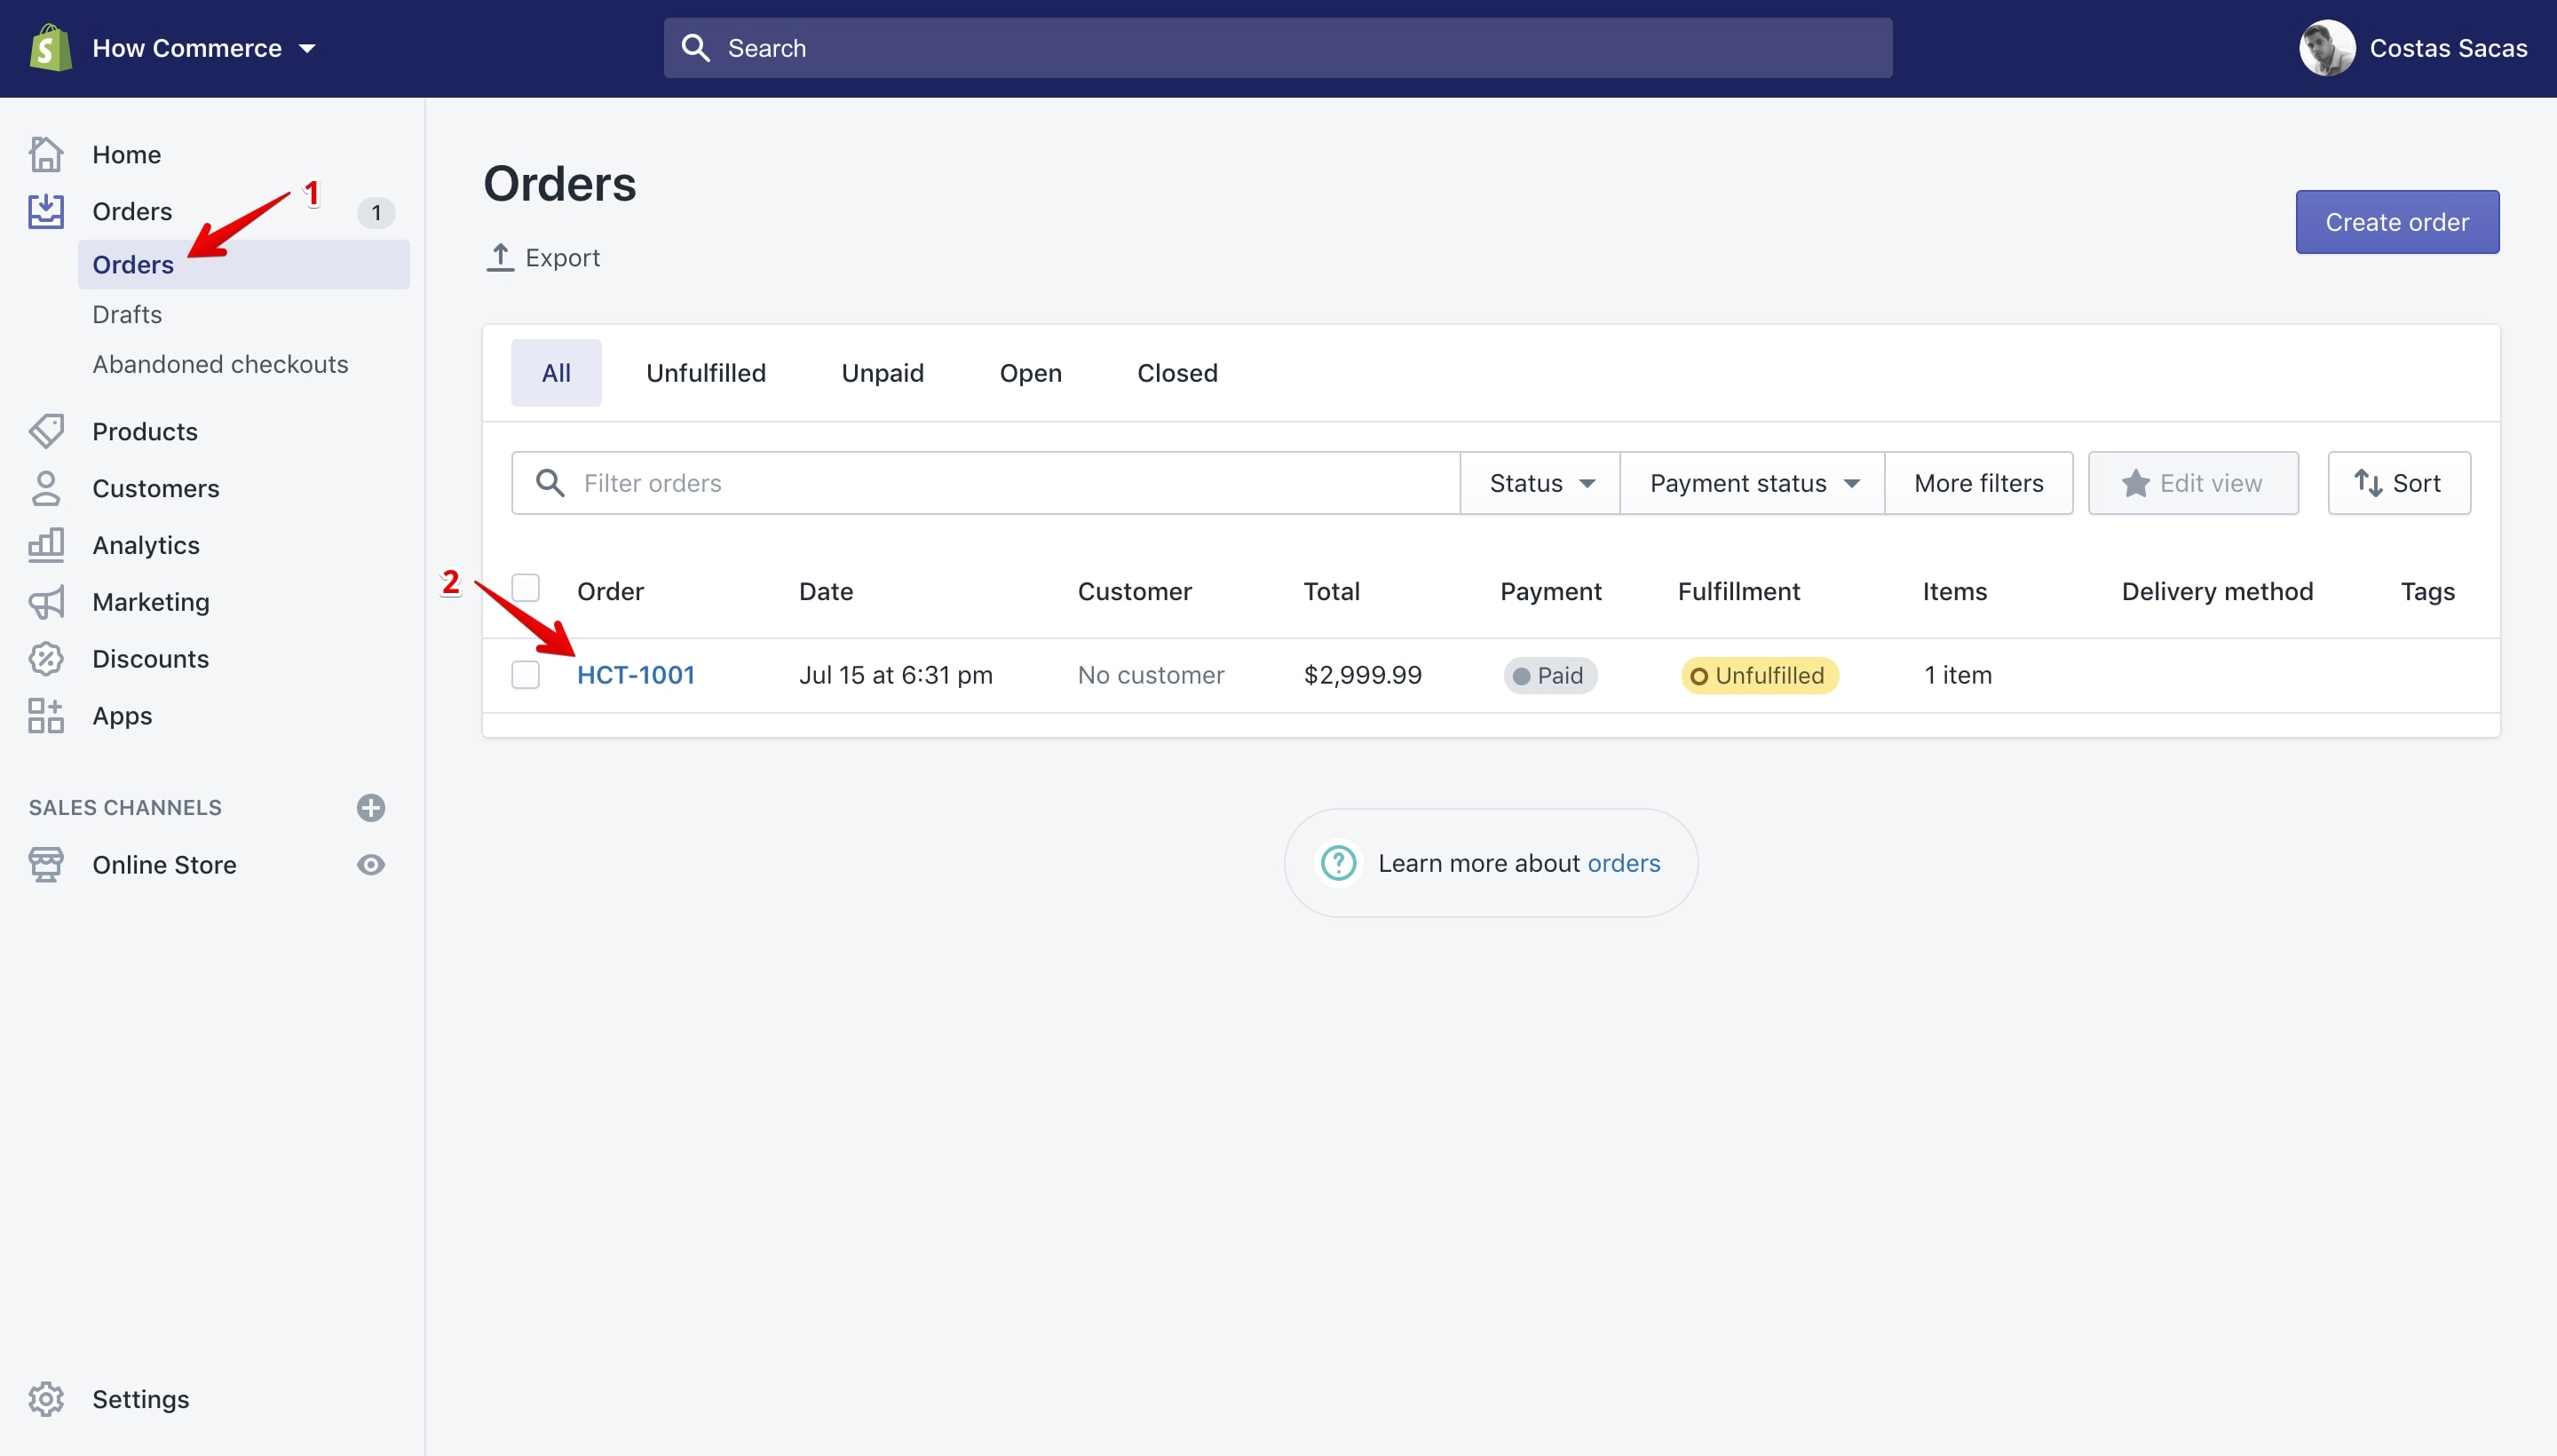
Go to the orders page by clicking on the “Orders” (marked with 1 in the image below) link located in the sidebar and select an order that you want to duplicate (marked with 2 in the image below):
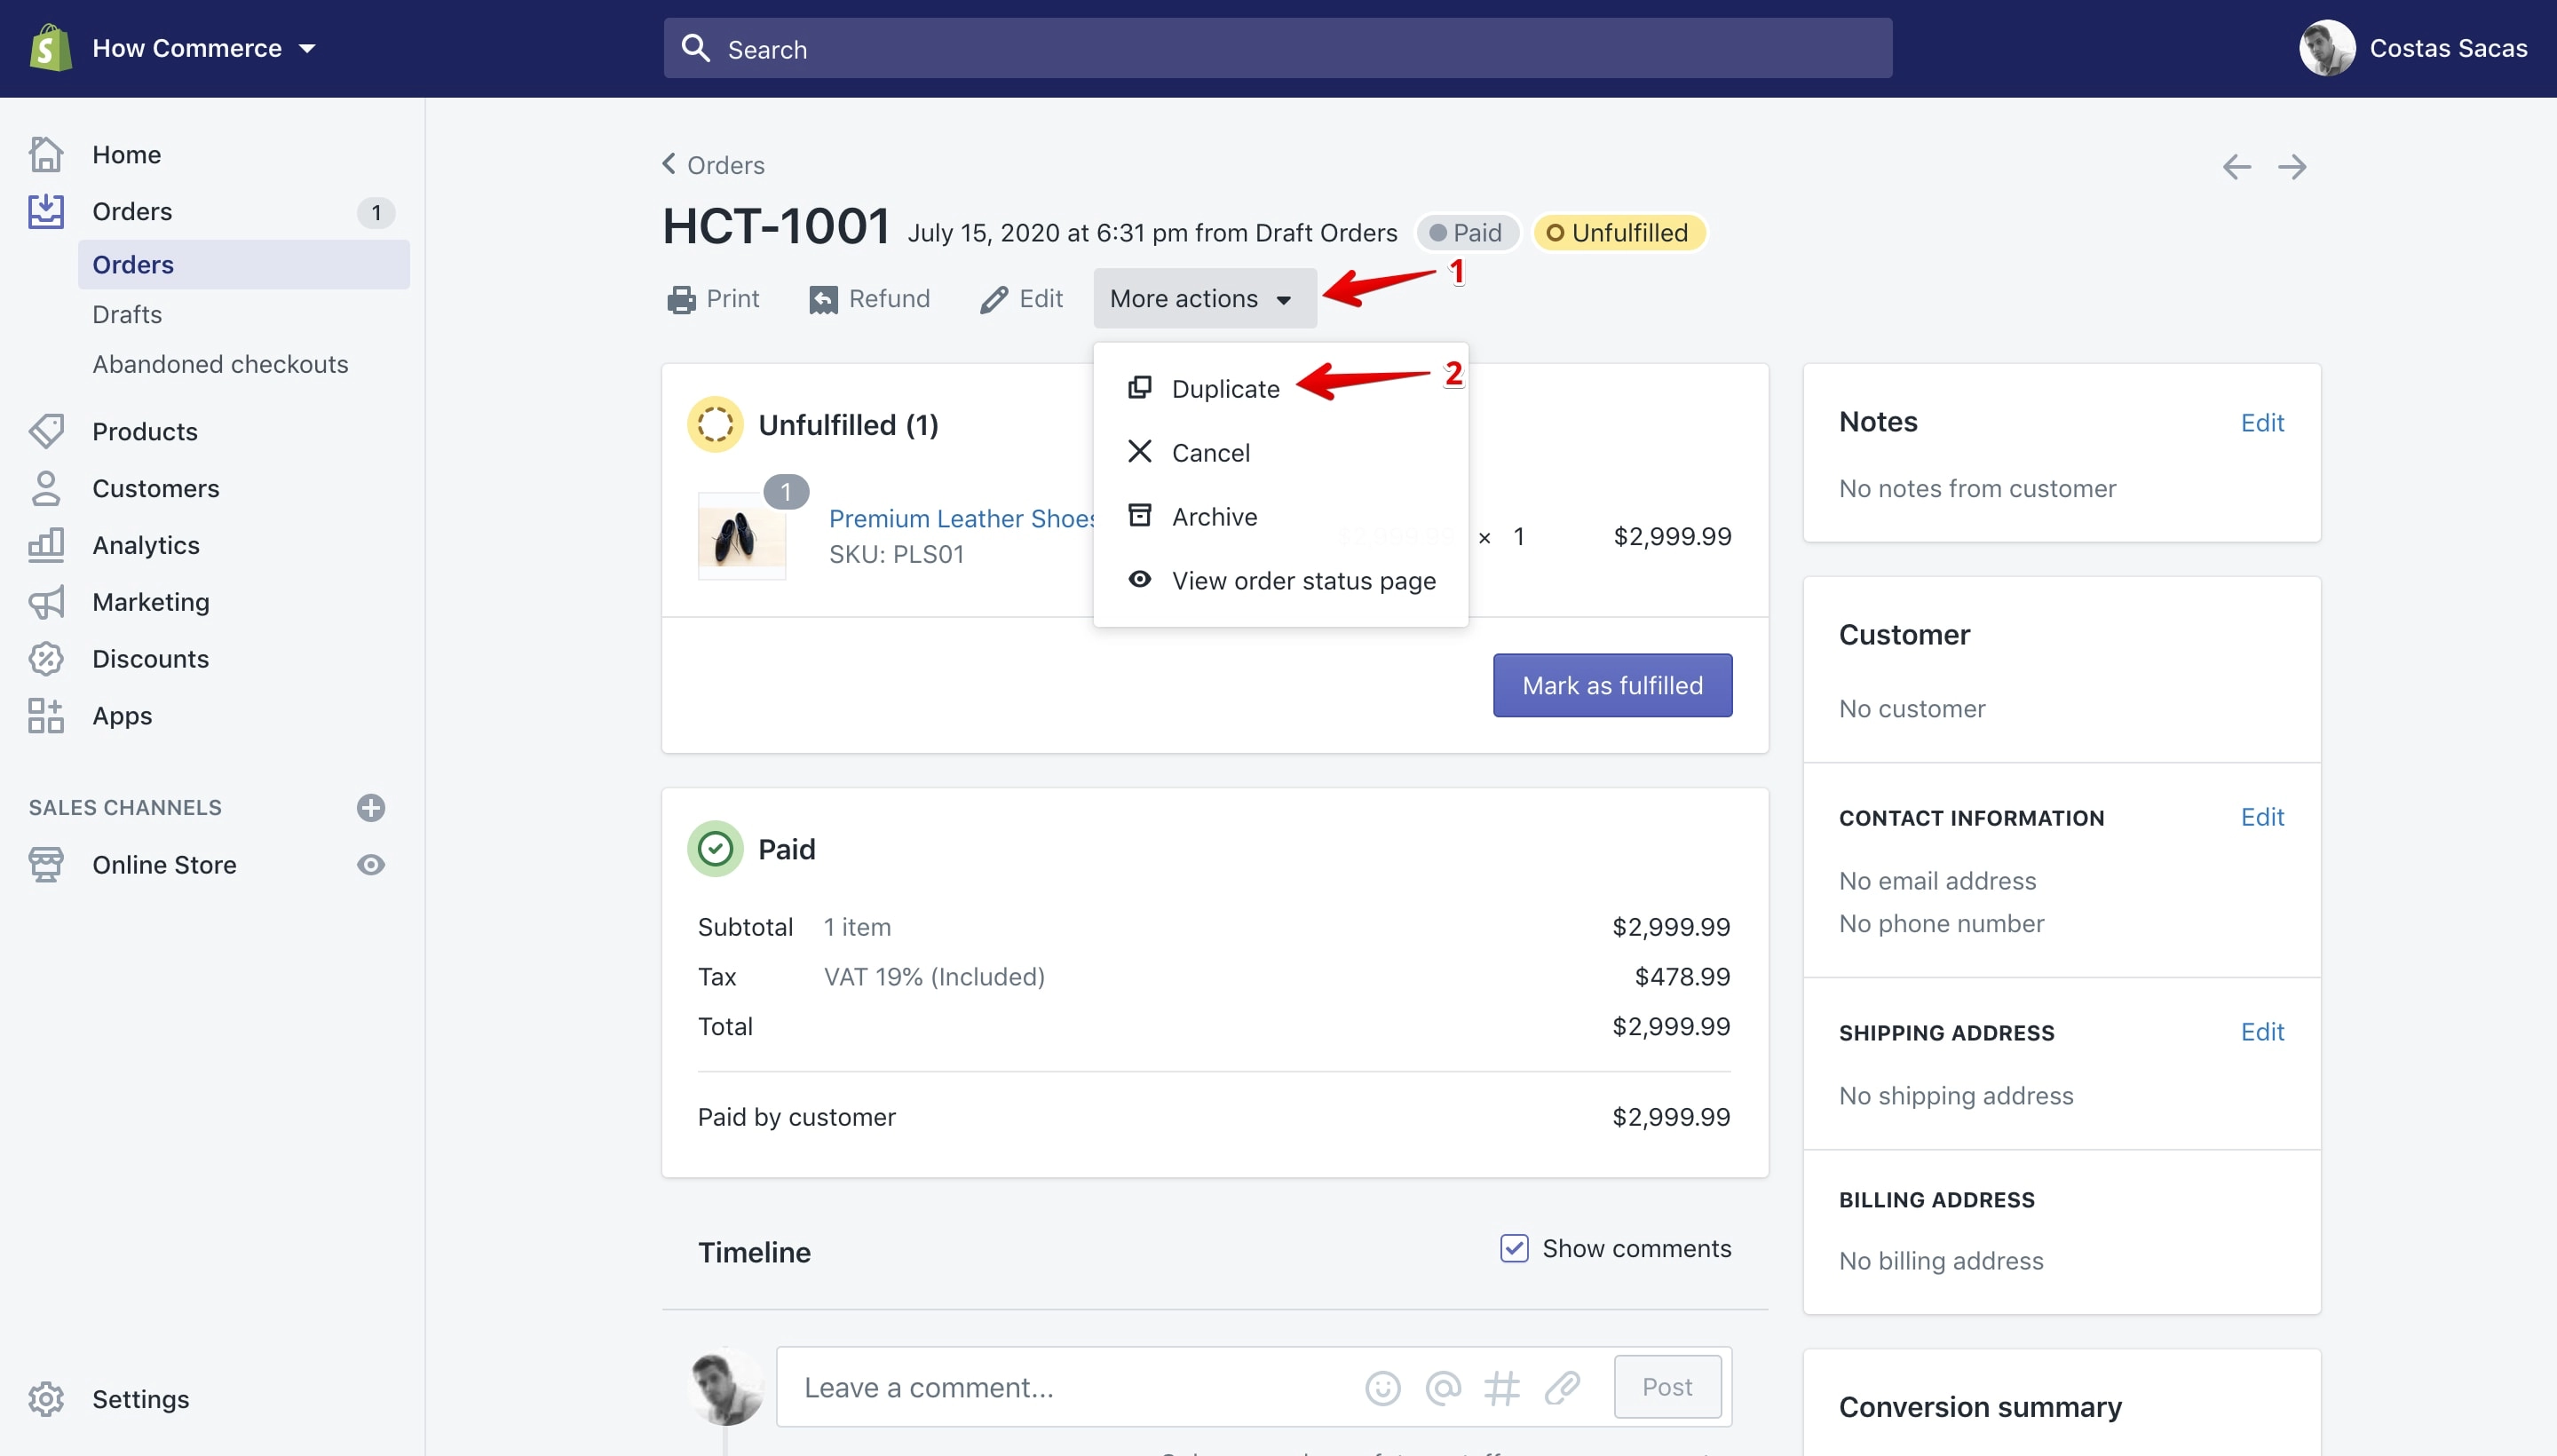
Click on the “More actions” button (marked with 1 in the image below) and a drop-down will open listing a couple of links. To duplicate the order click on the “Duplicate” link (marked with 2 in the image below):
After you click the “Duplicate” link Shopify will duplicate your order.
Until you make some changes you can’t save your newly duplicate order, you can only discard the duplicate. I’ve added a new product to the order (marked with 1 in the image below) and now the copied order is different from the original one.
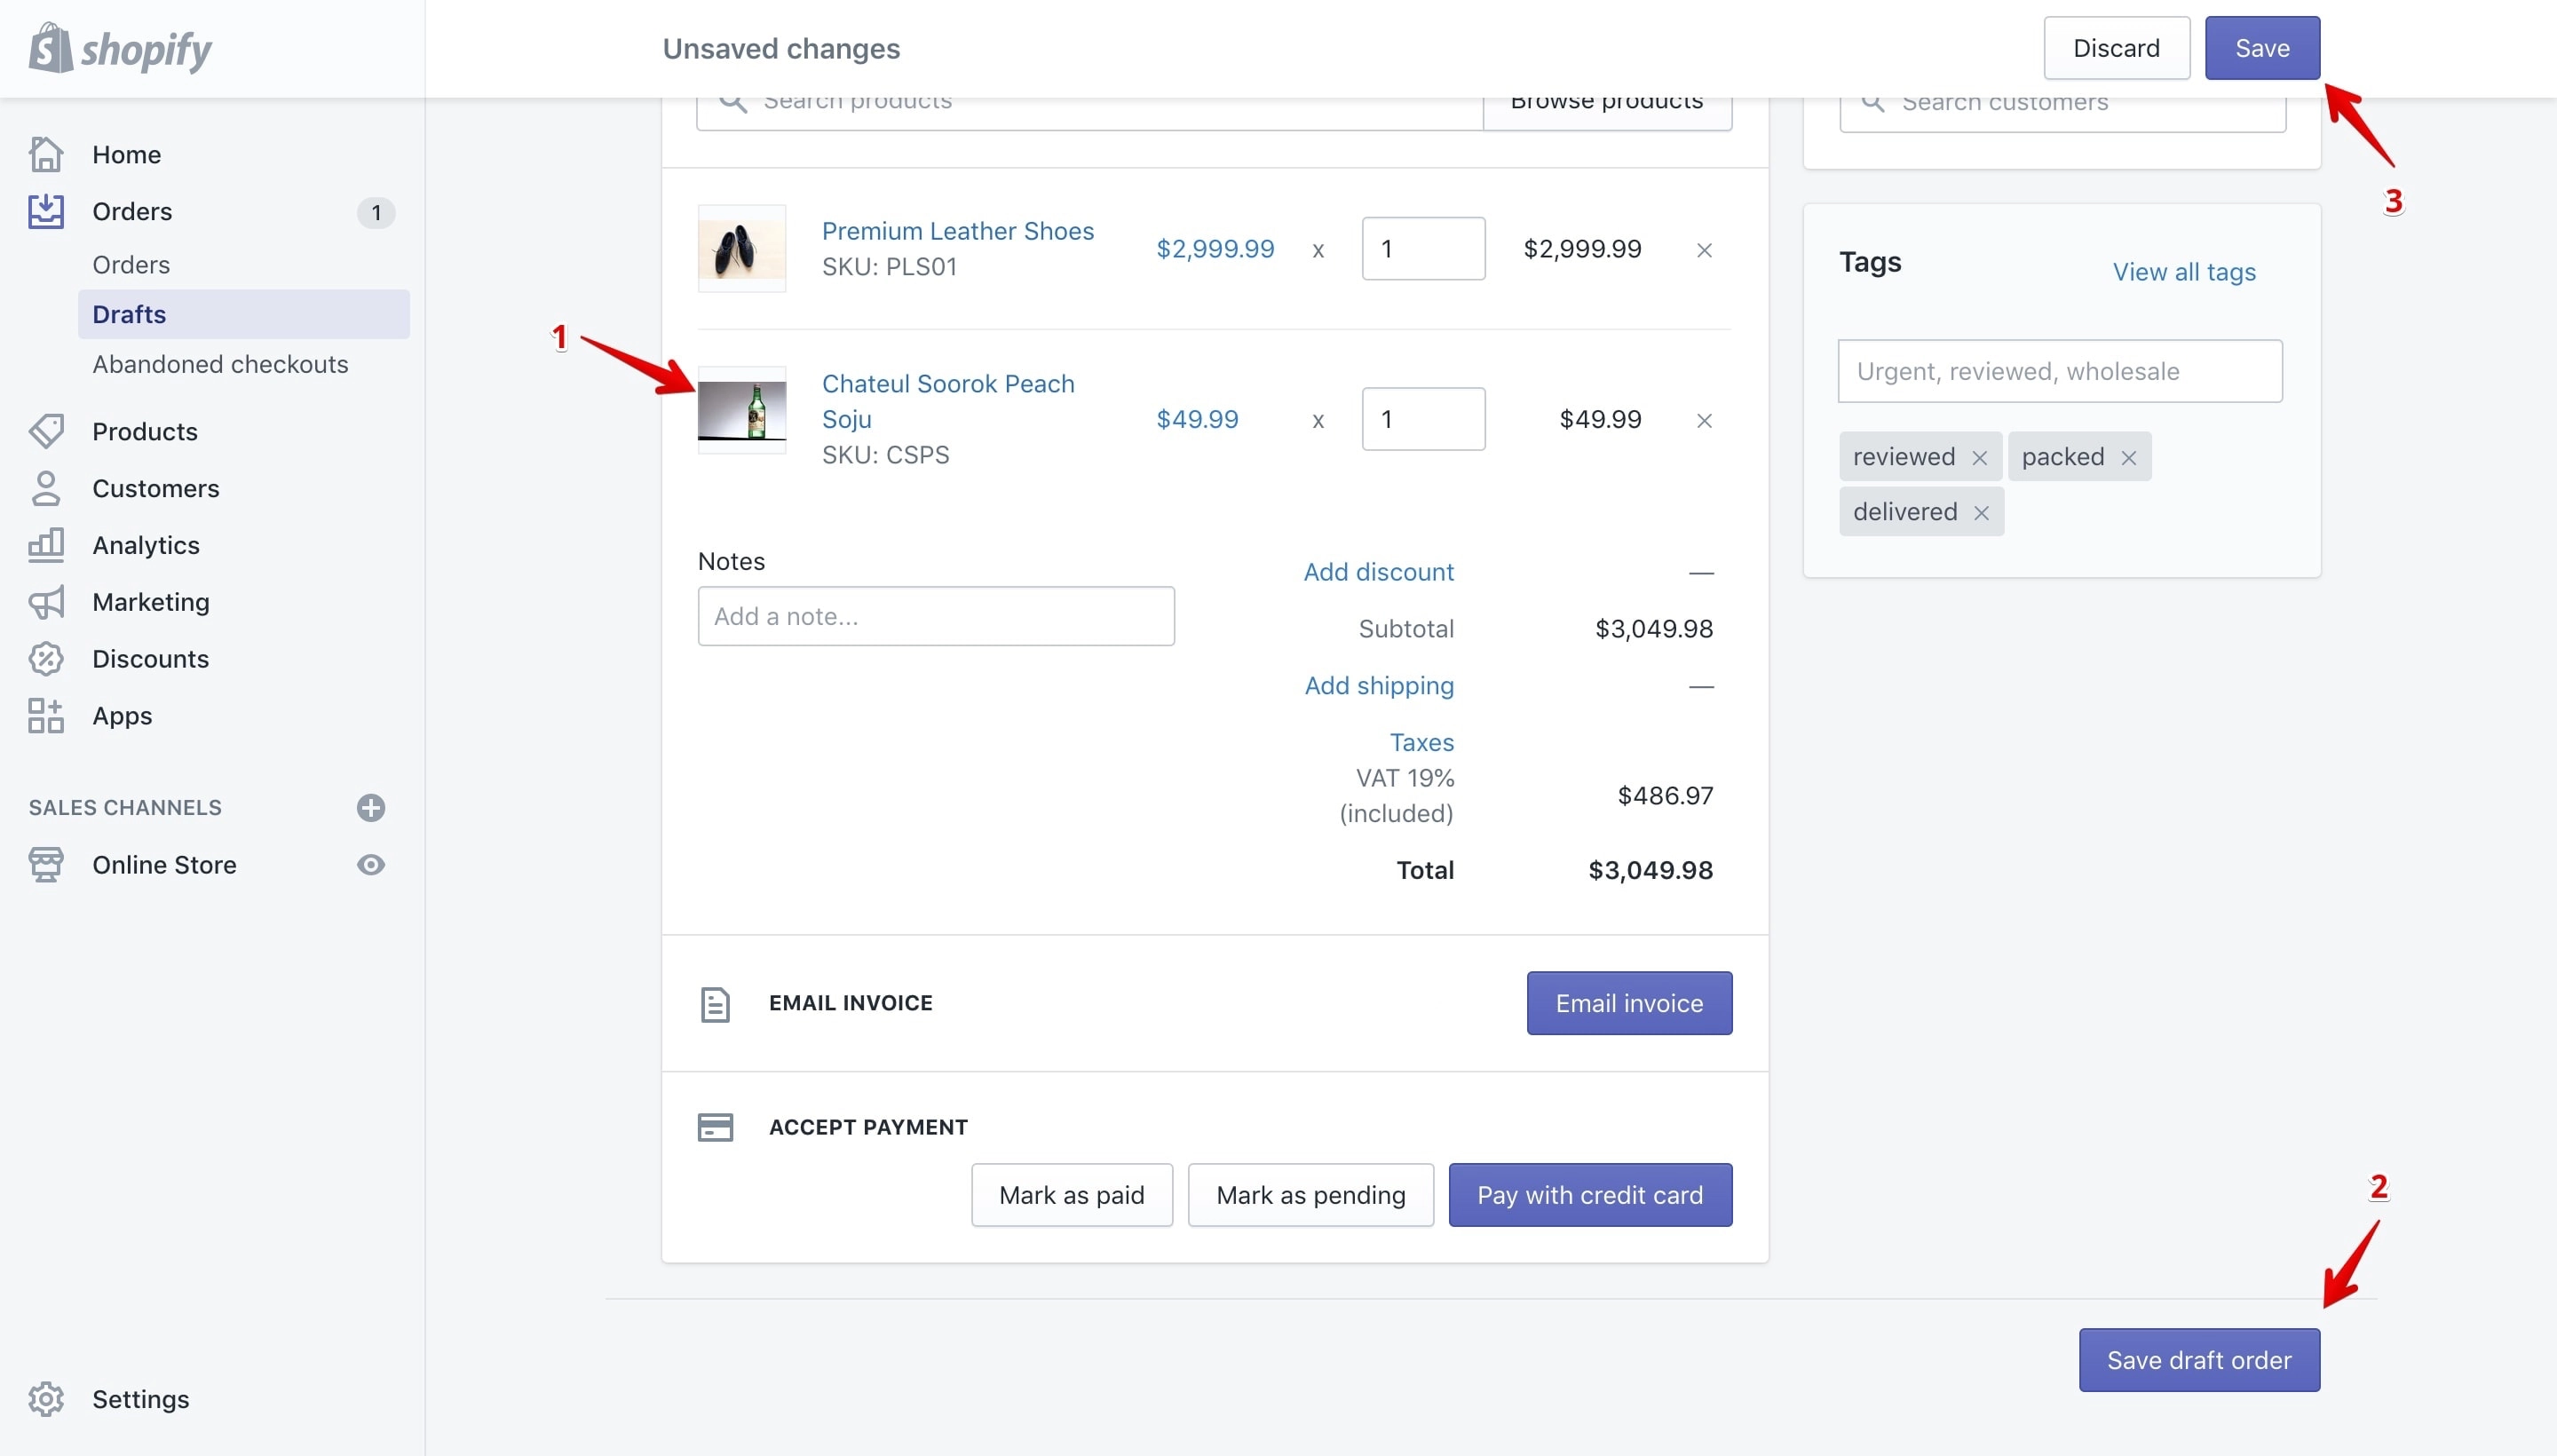
You have two options to save the duplicated order. Save it from the “Save draft order” button (marked with 2 in the image above) or save it by clicking the “Save” button (marked with 3 in the image above).
In both cases the order will be saved as a “Draft order”.
If you want to save it as an order you need to accept a payment or mark it as pending.
Duplicate draft orders
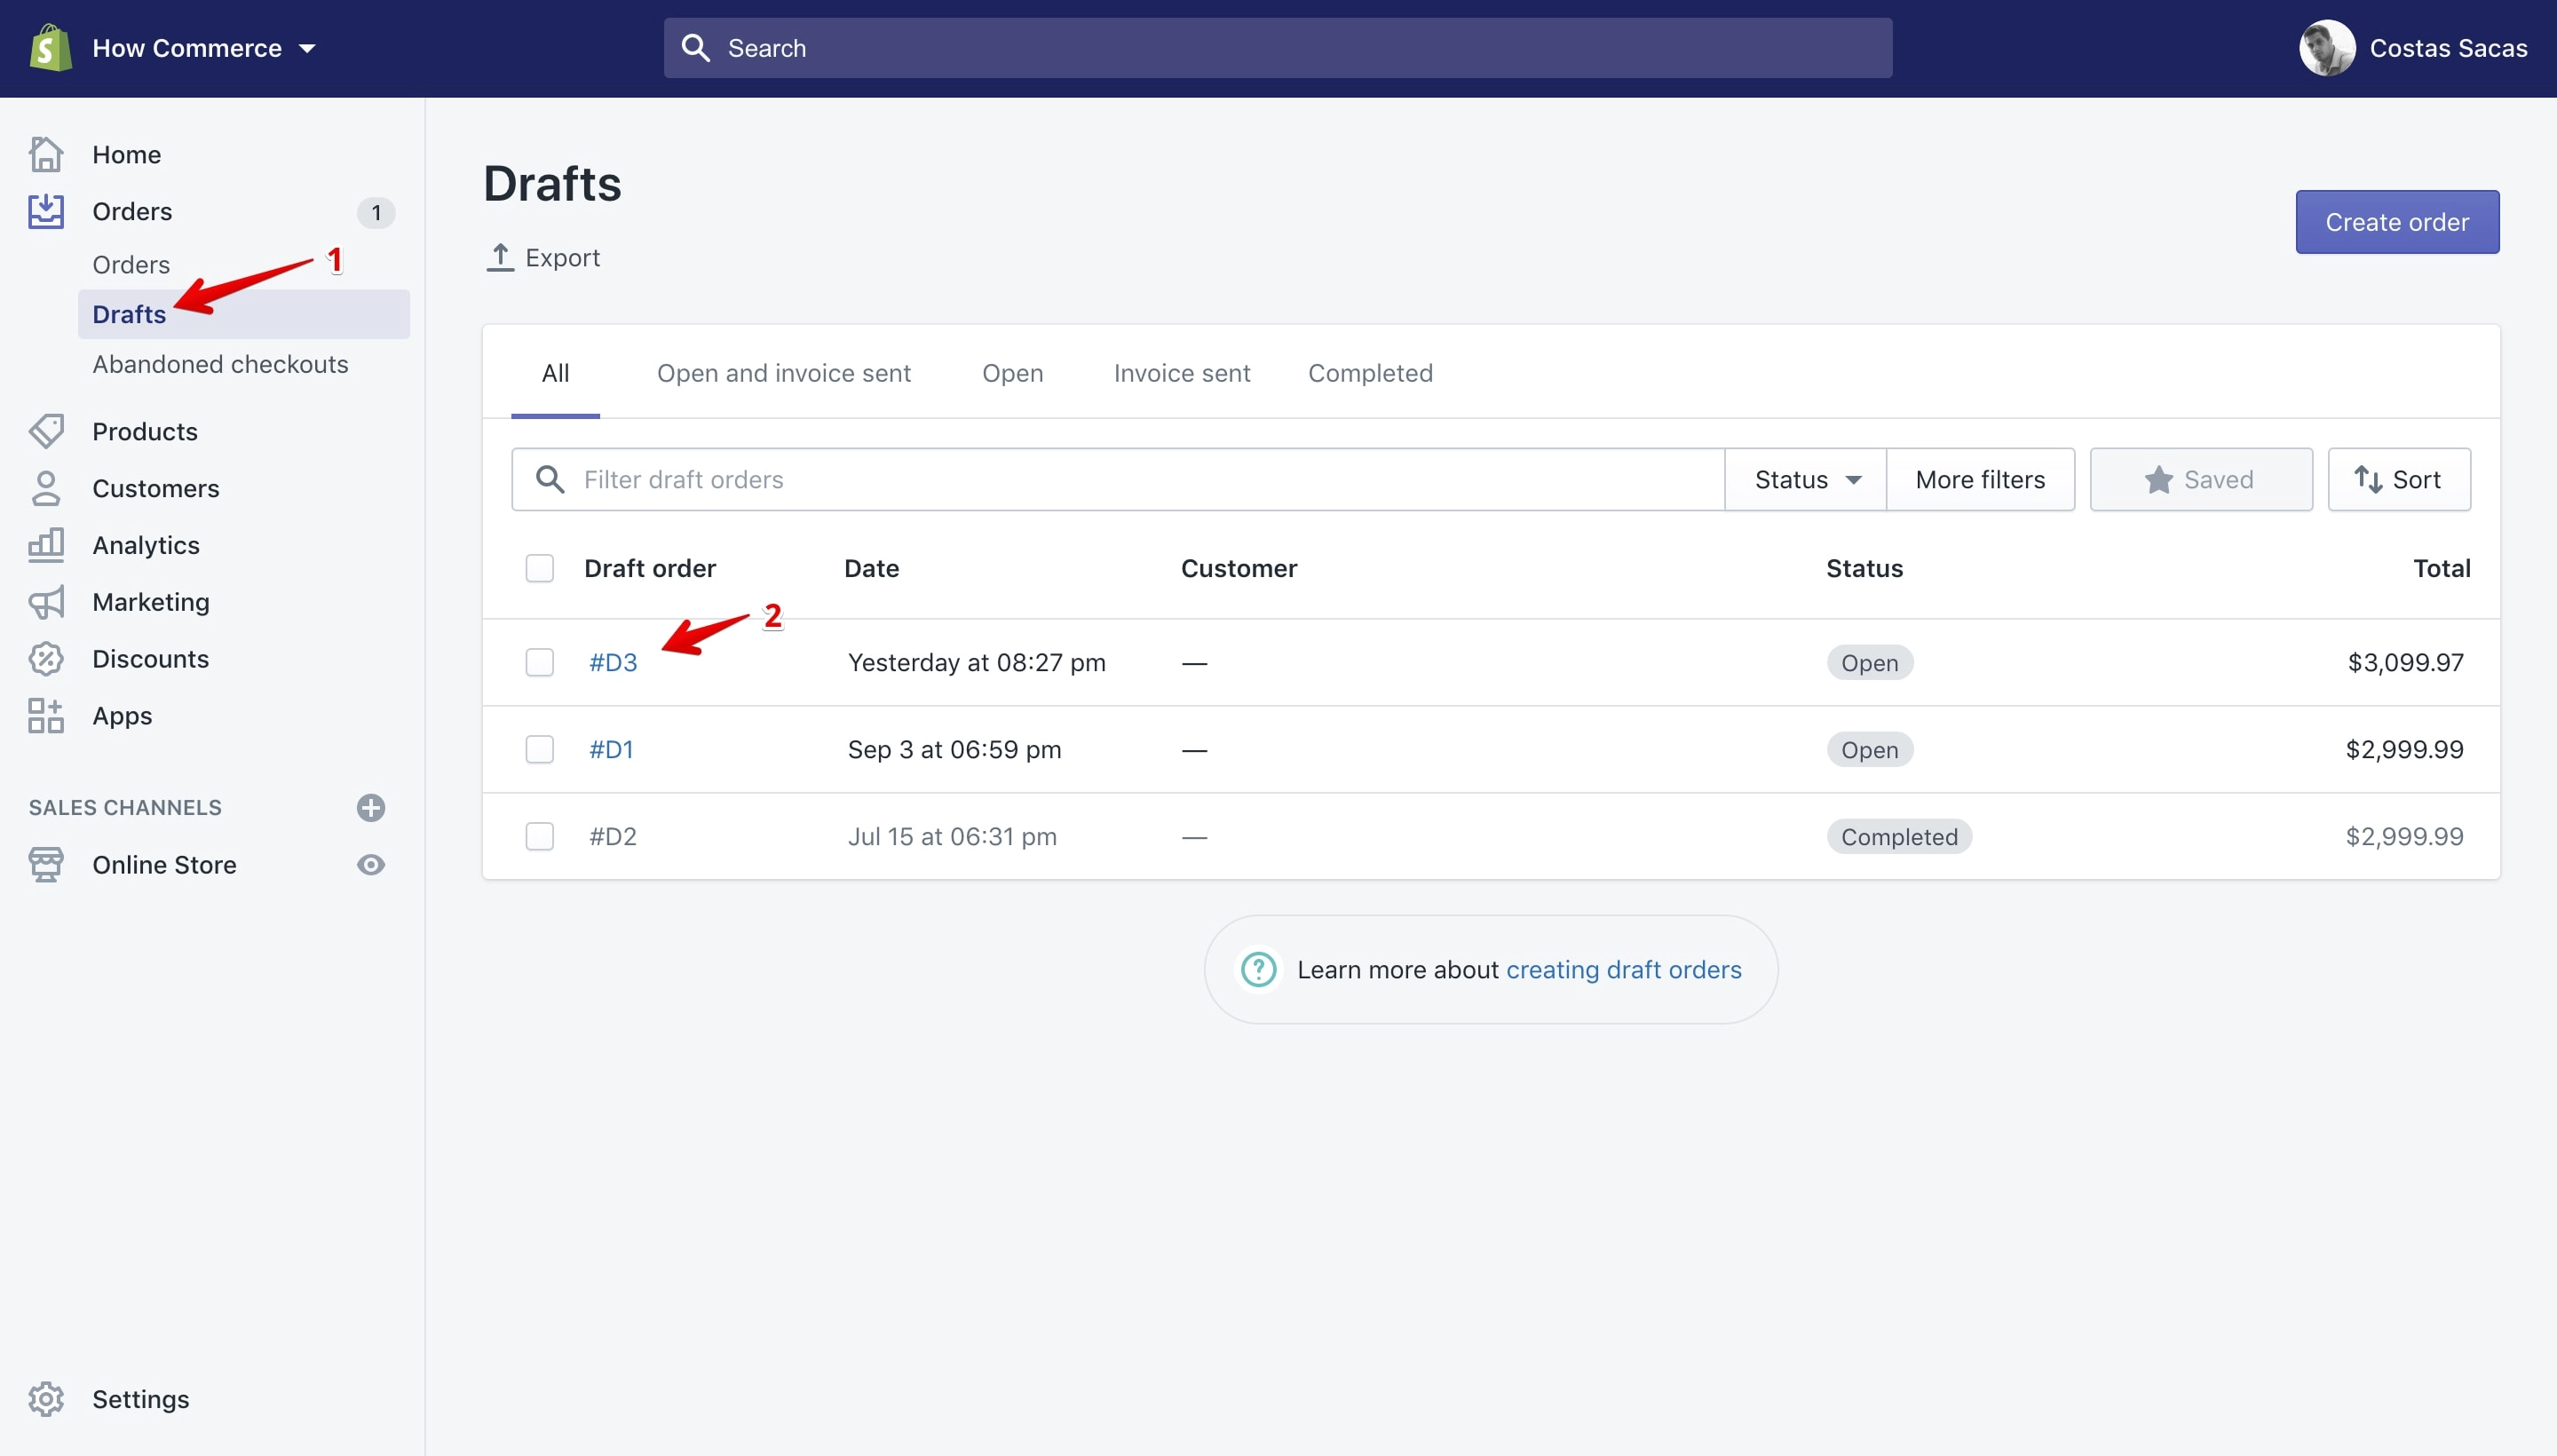
Go to the draft orders page by clicking on the “Drafts” (marked with 1 in the image below) link located in the sidebar and select a draft order that you want to duplicate (marked with 2 in the image below):
To duplicate the draft order click on the “Duplicate” link:
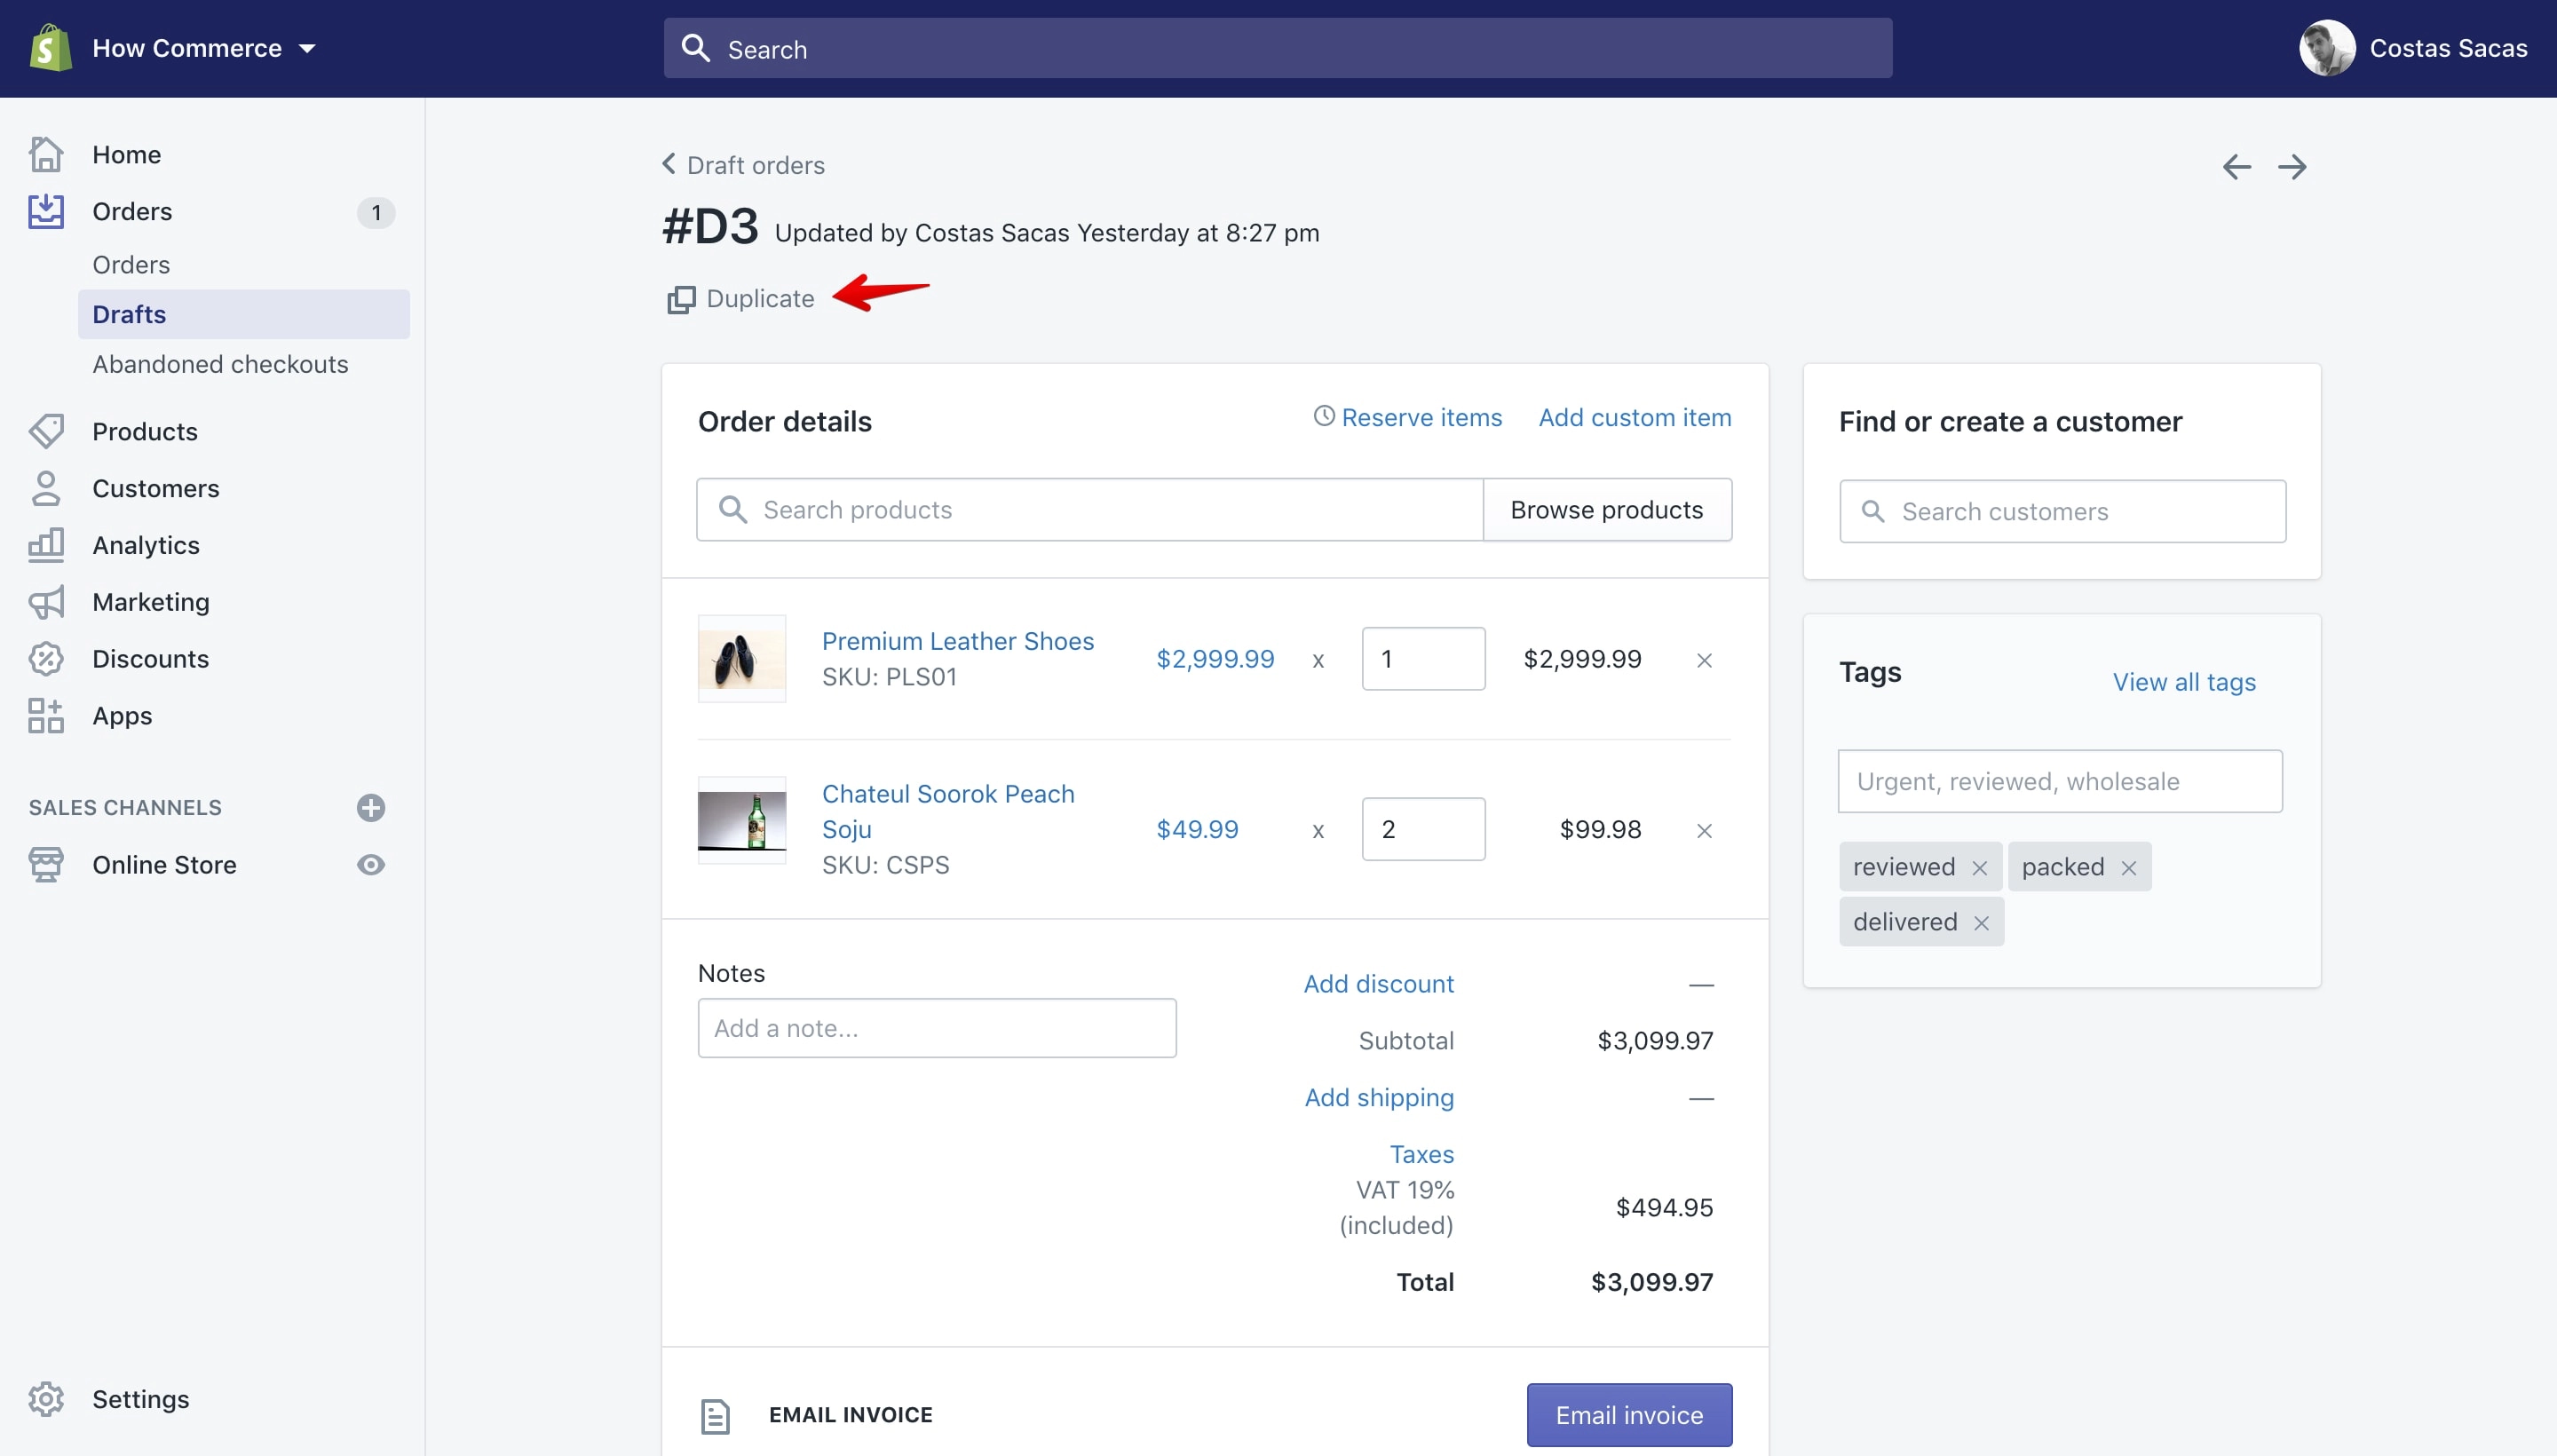
After you click the “Duplicate” link Shopify will duplicate your draft order.
Until you make some changes you can’t save your newly duplicate order, you can only discard the duplicate. I’ve removed a product from the order and now the copied order is different from the original one:
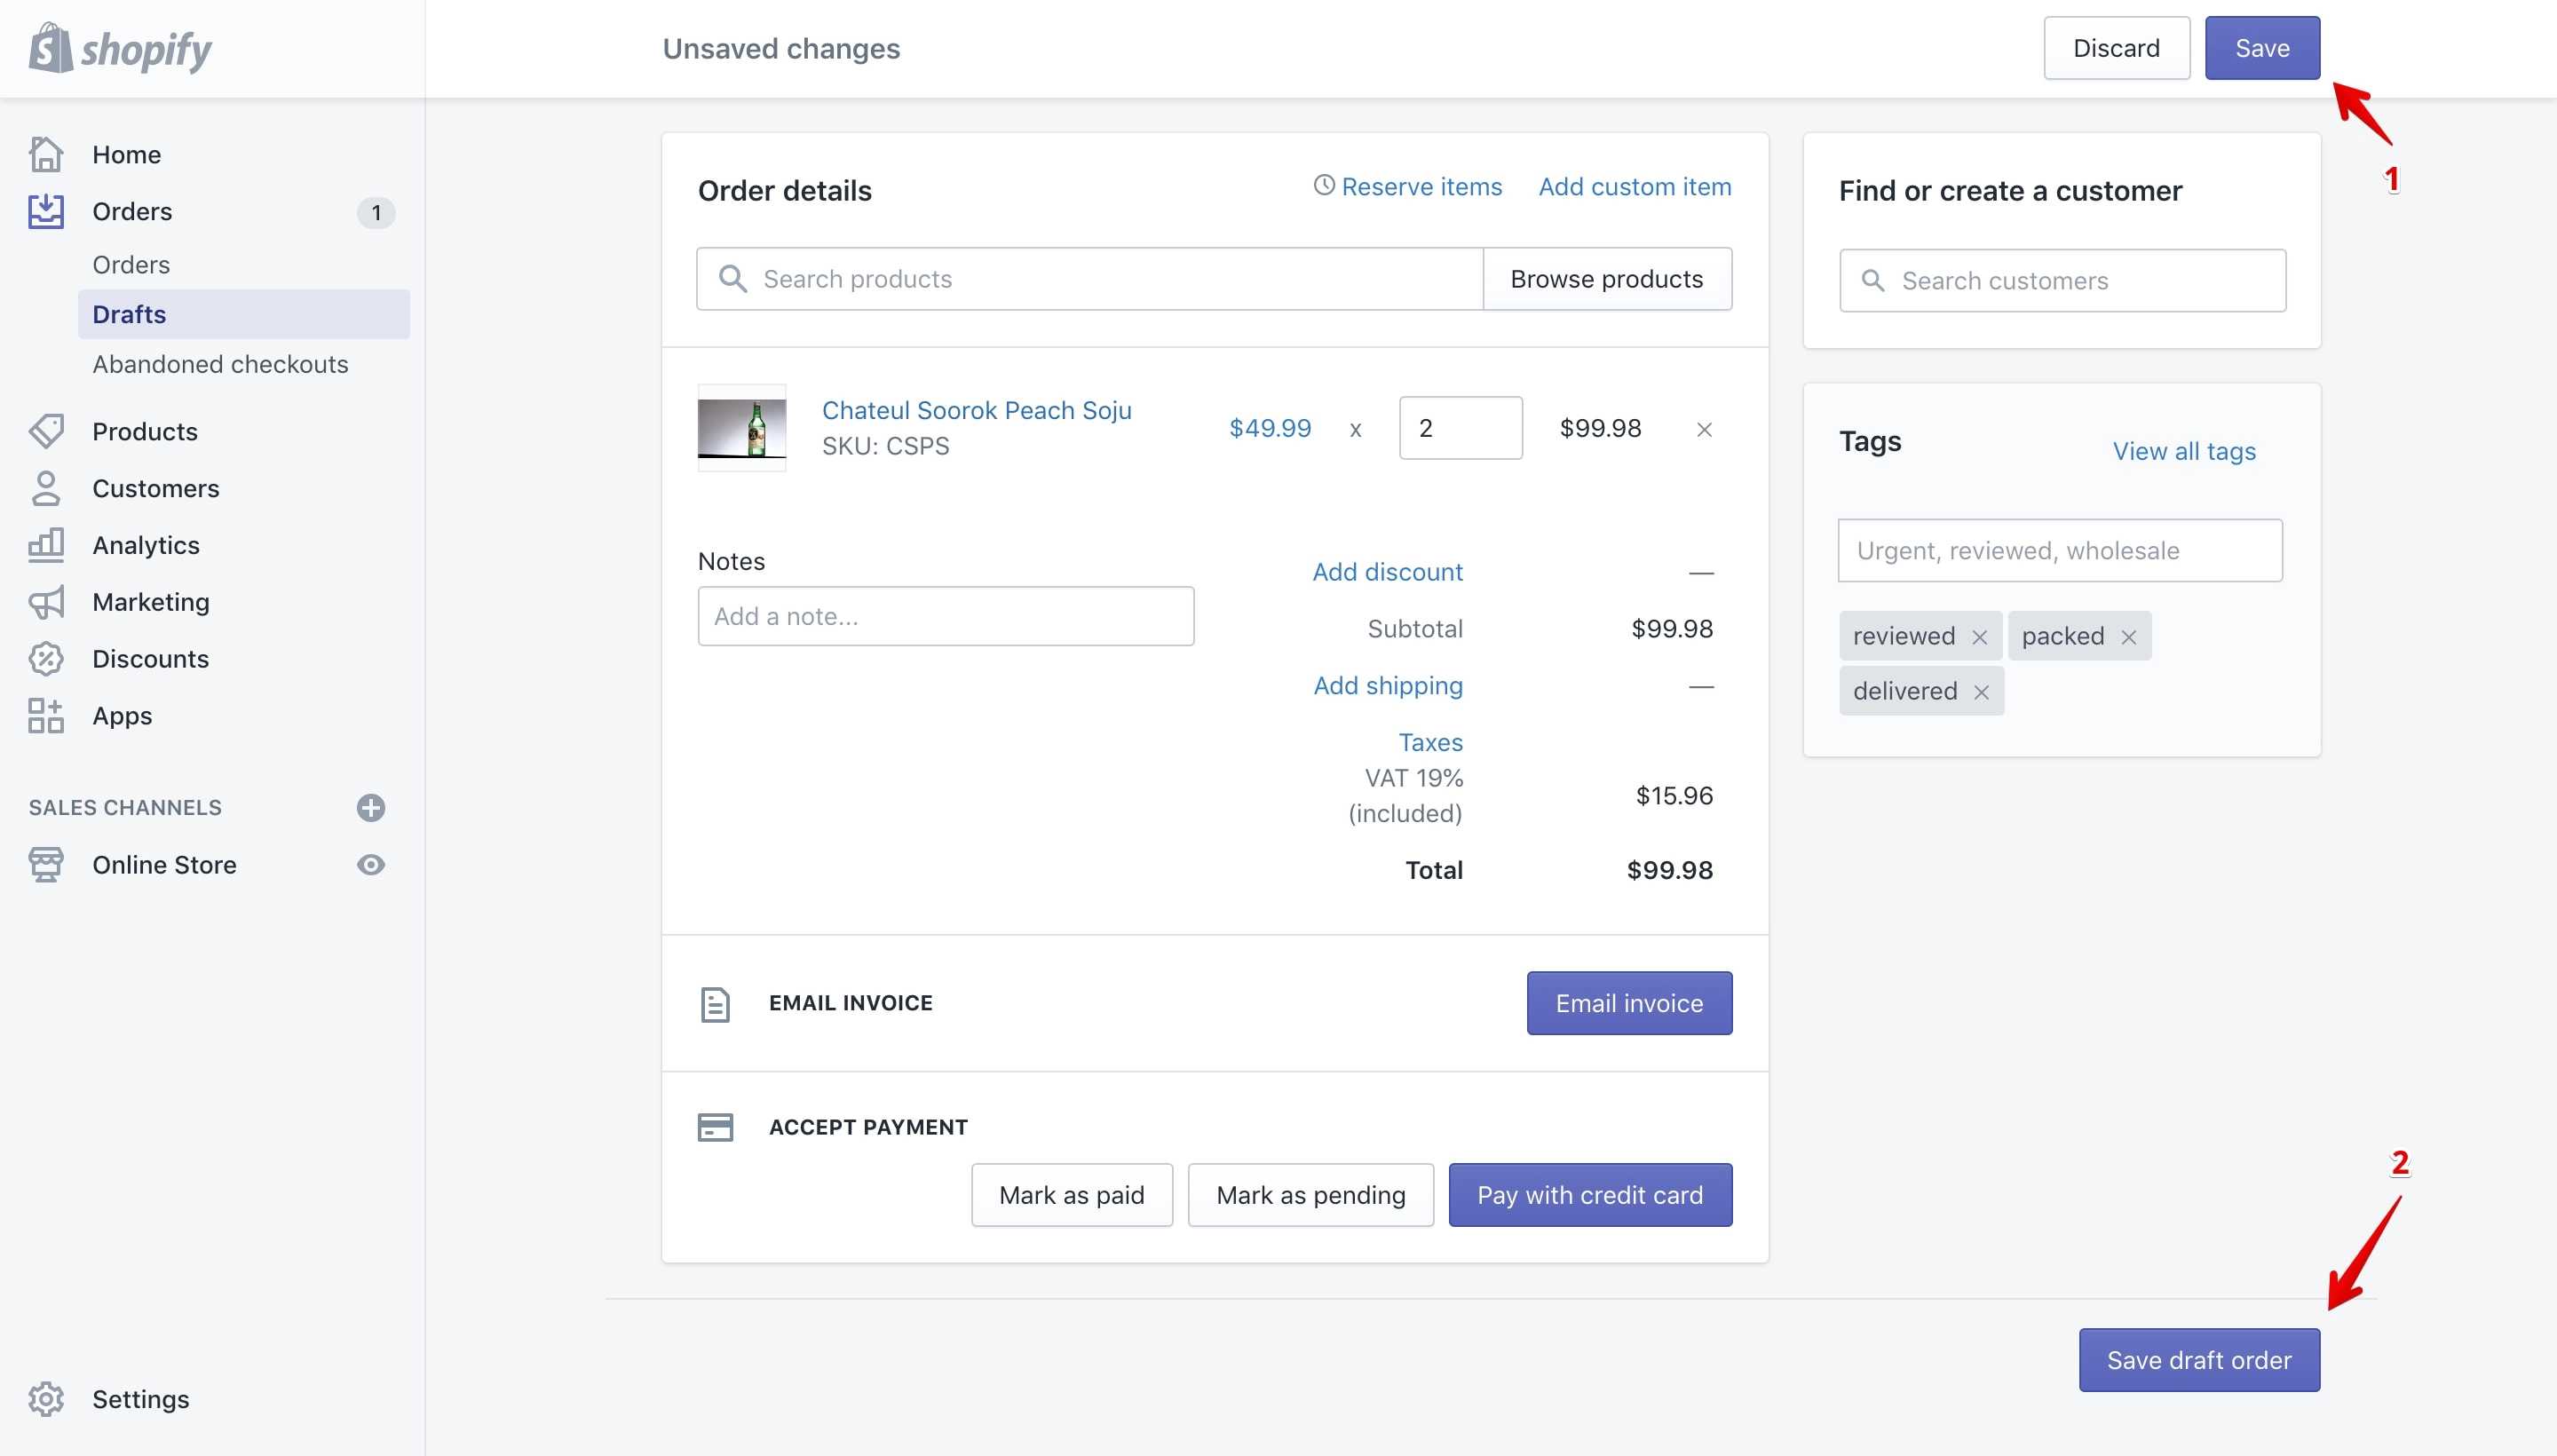
Duplicated draft order saving.
You have two options to save the duplicated order. Save it by clicking the “Save” button (marked with 1 in the image above) or save it from the “Save draft order” button (marked with 2 in the image above).
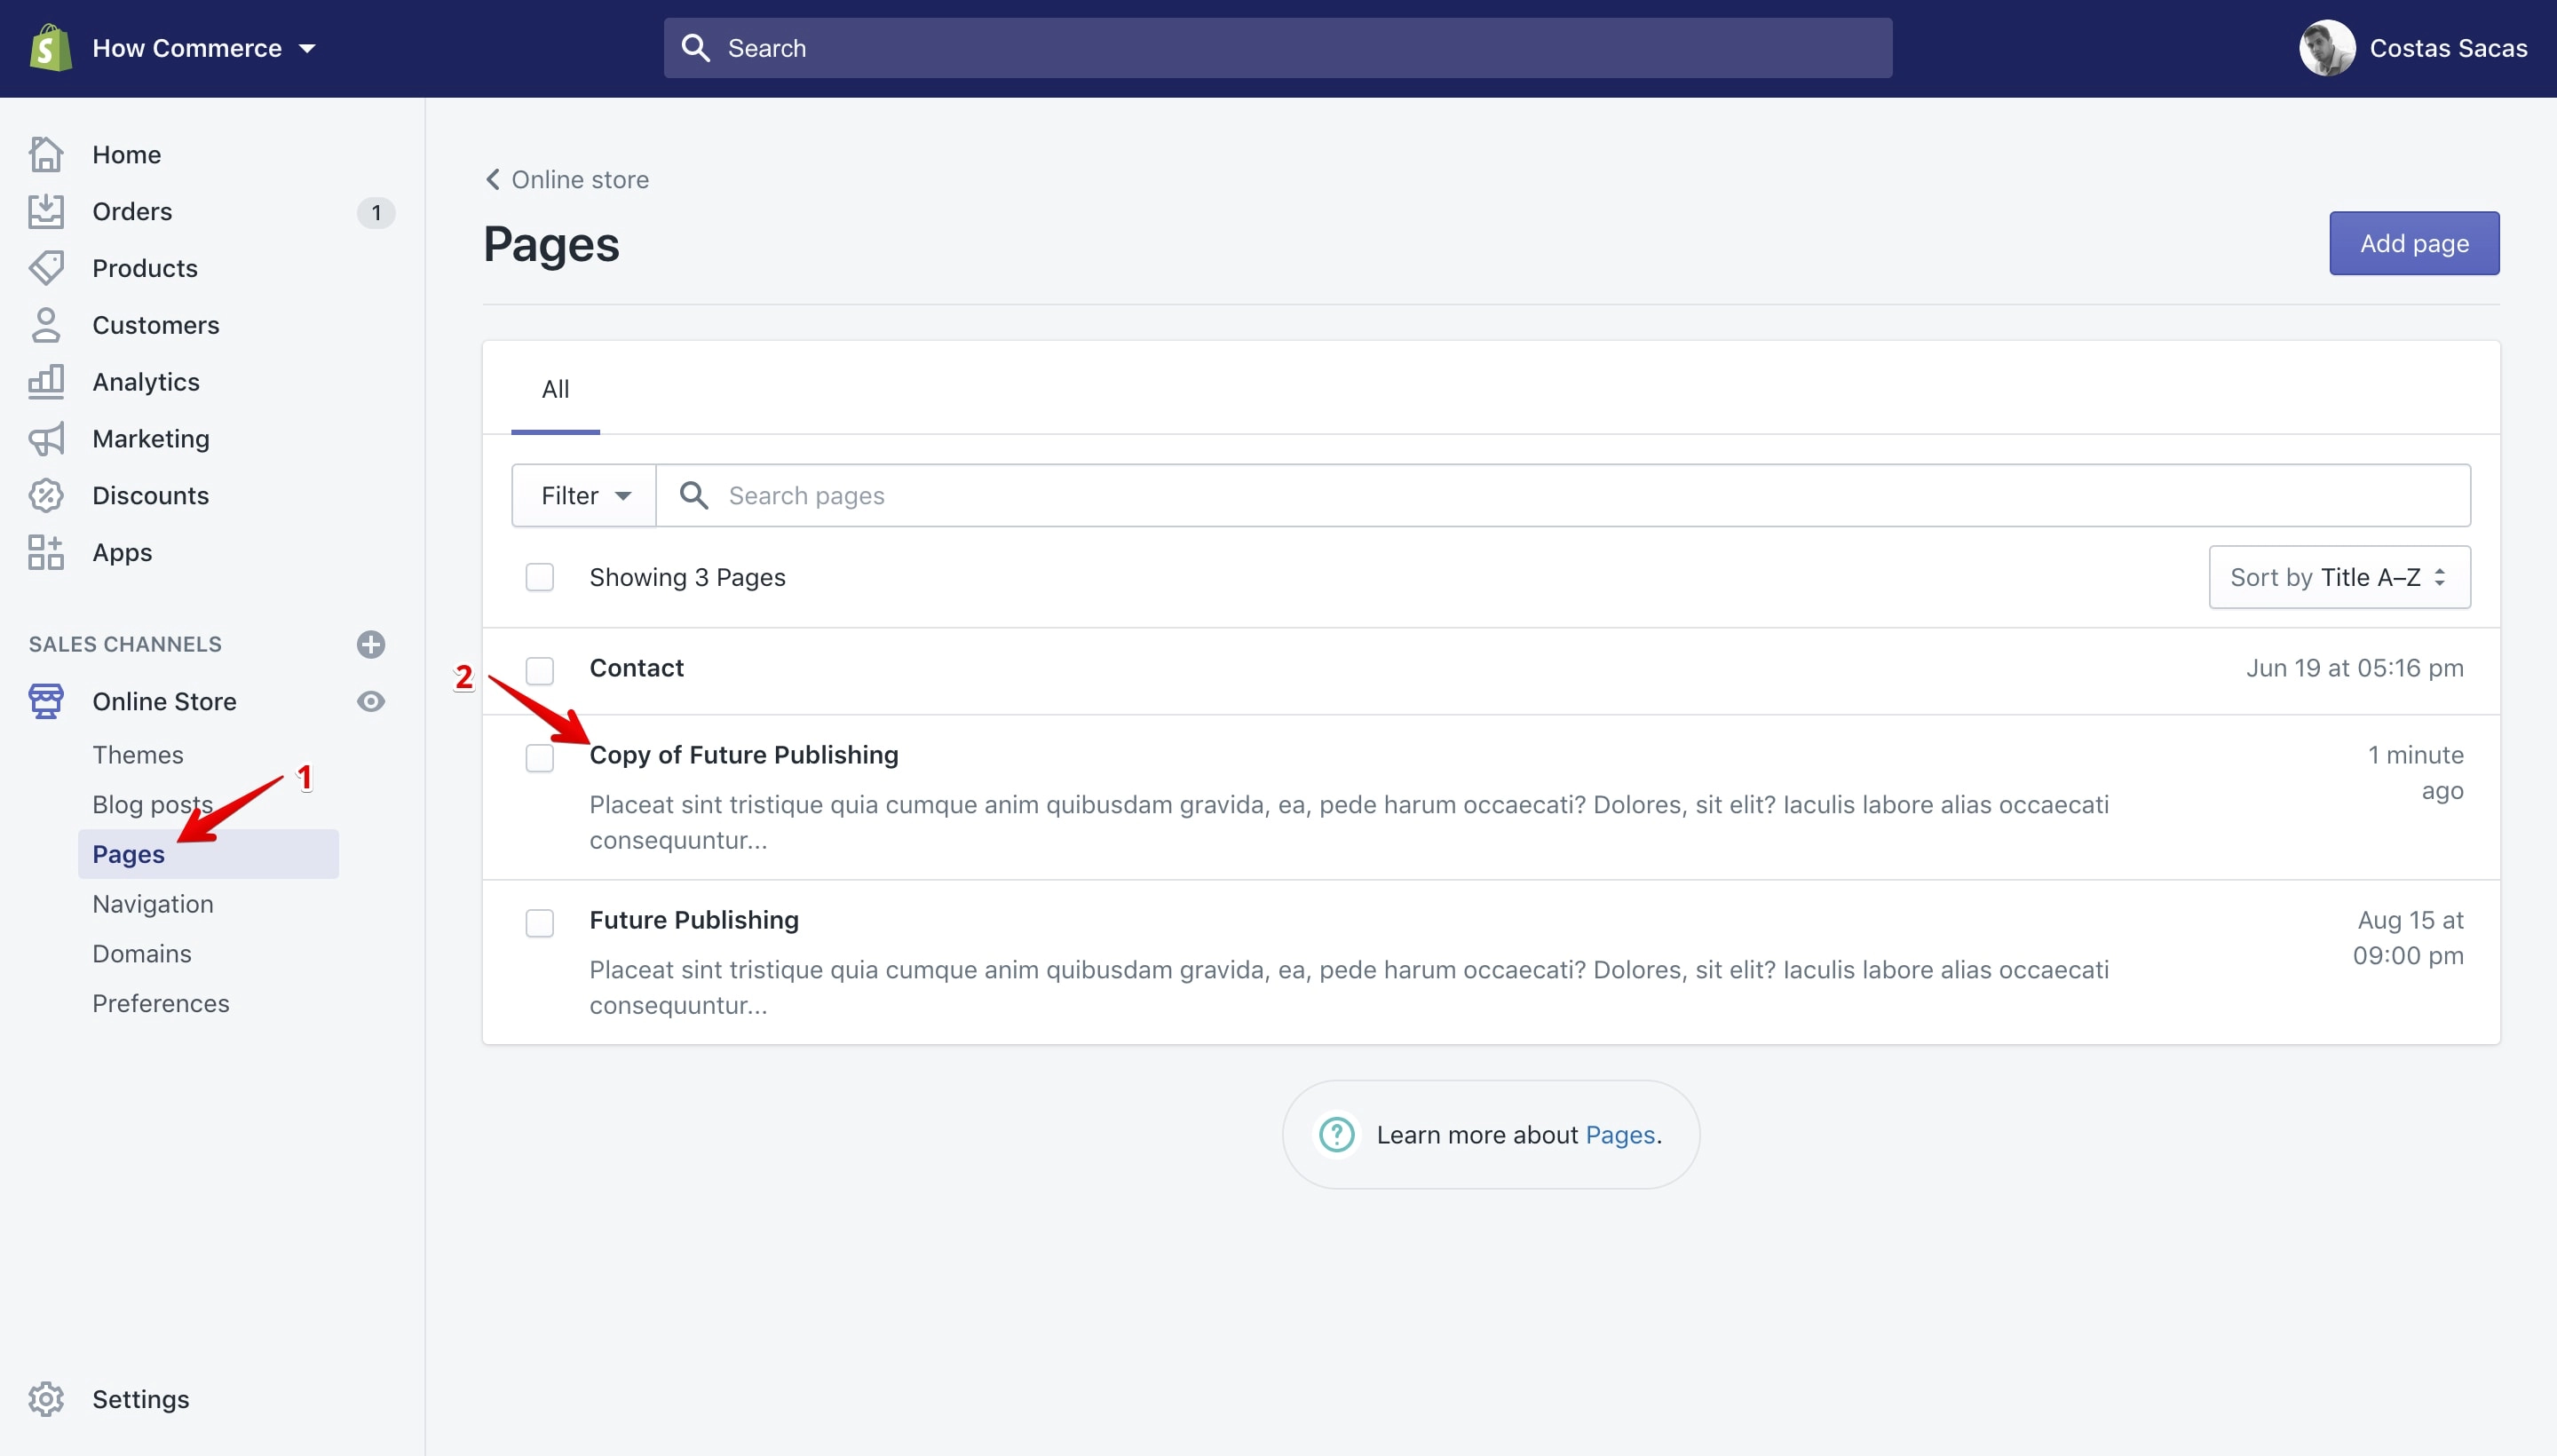
Duplicate pages
Go to the pages listing page by clicking on the “Pages” (marked with 1 in the image below) link located in the sidebar and select a page that you want to duplicate (marked with 2 in the image below):
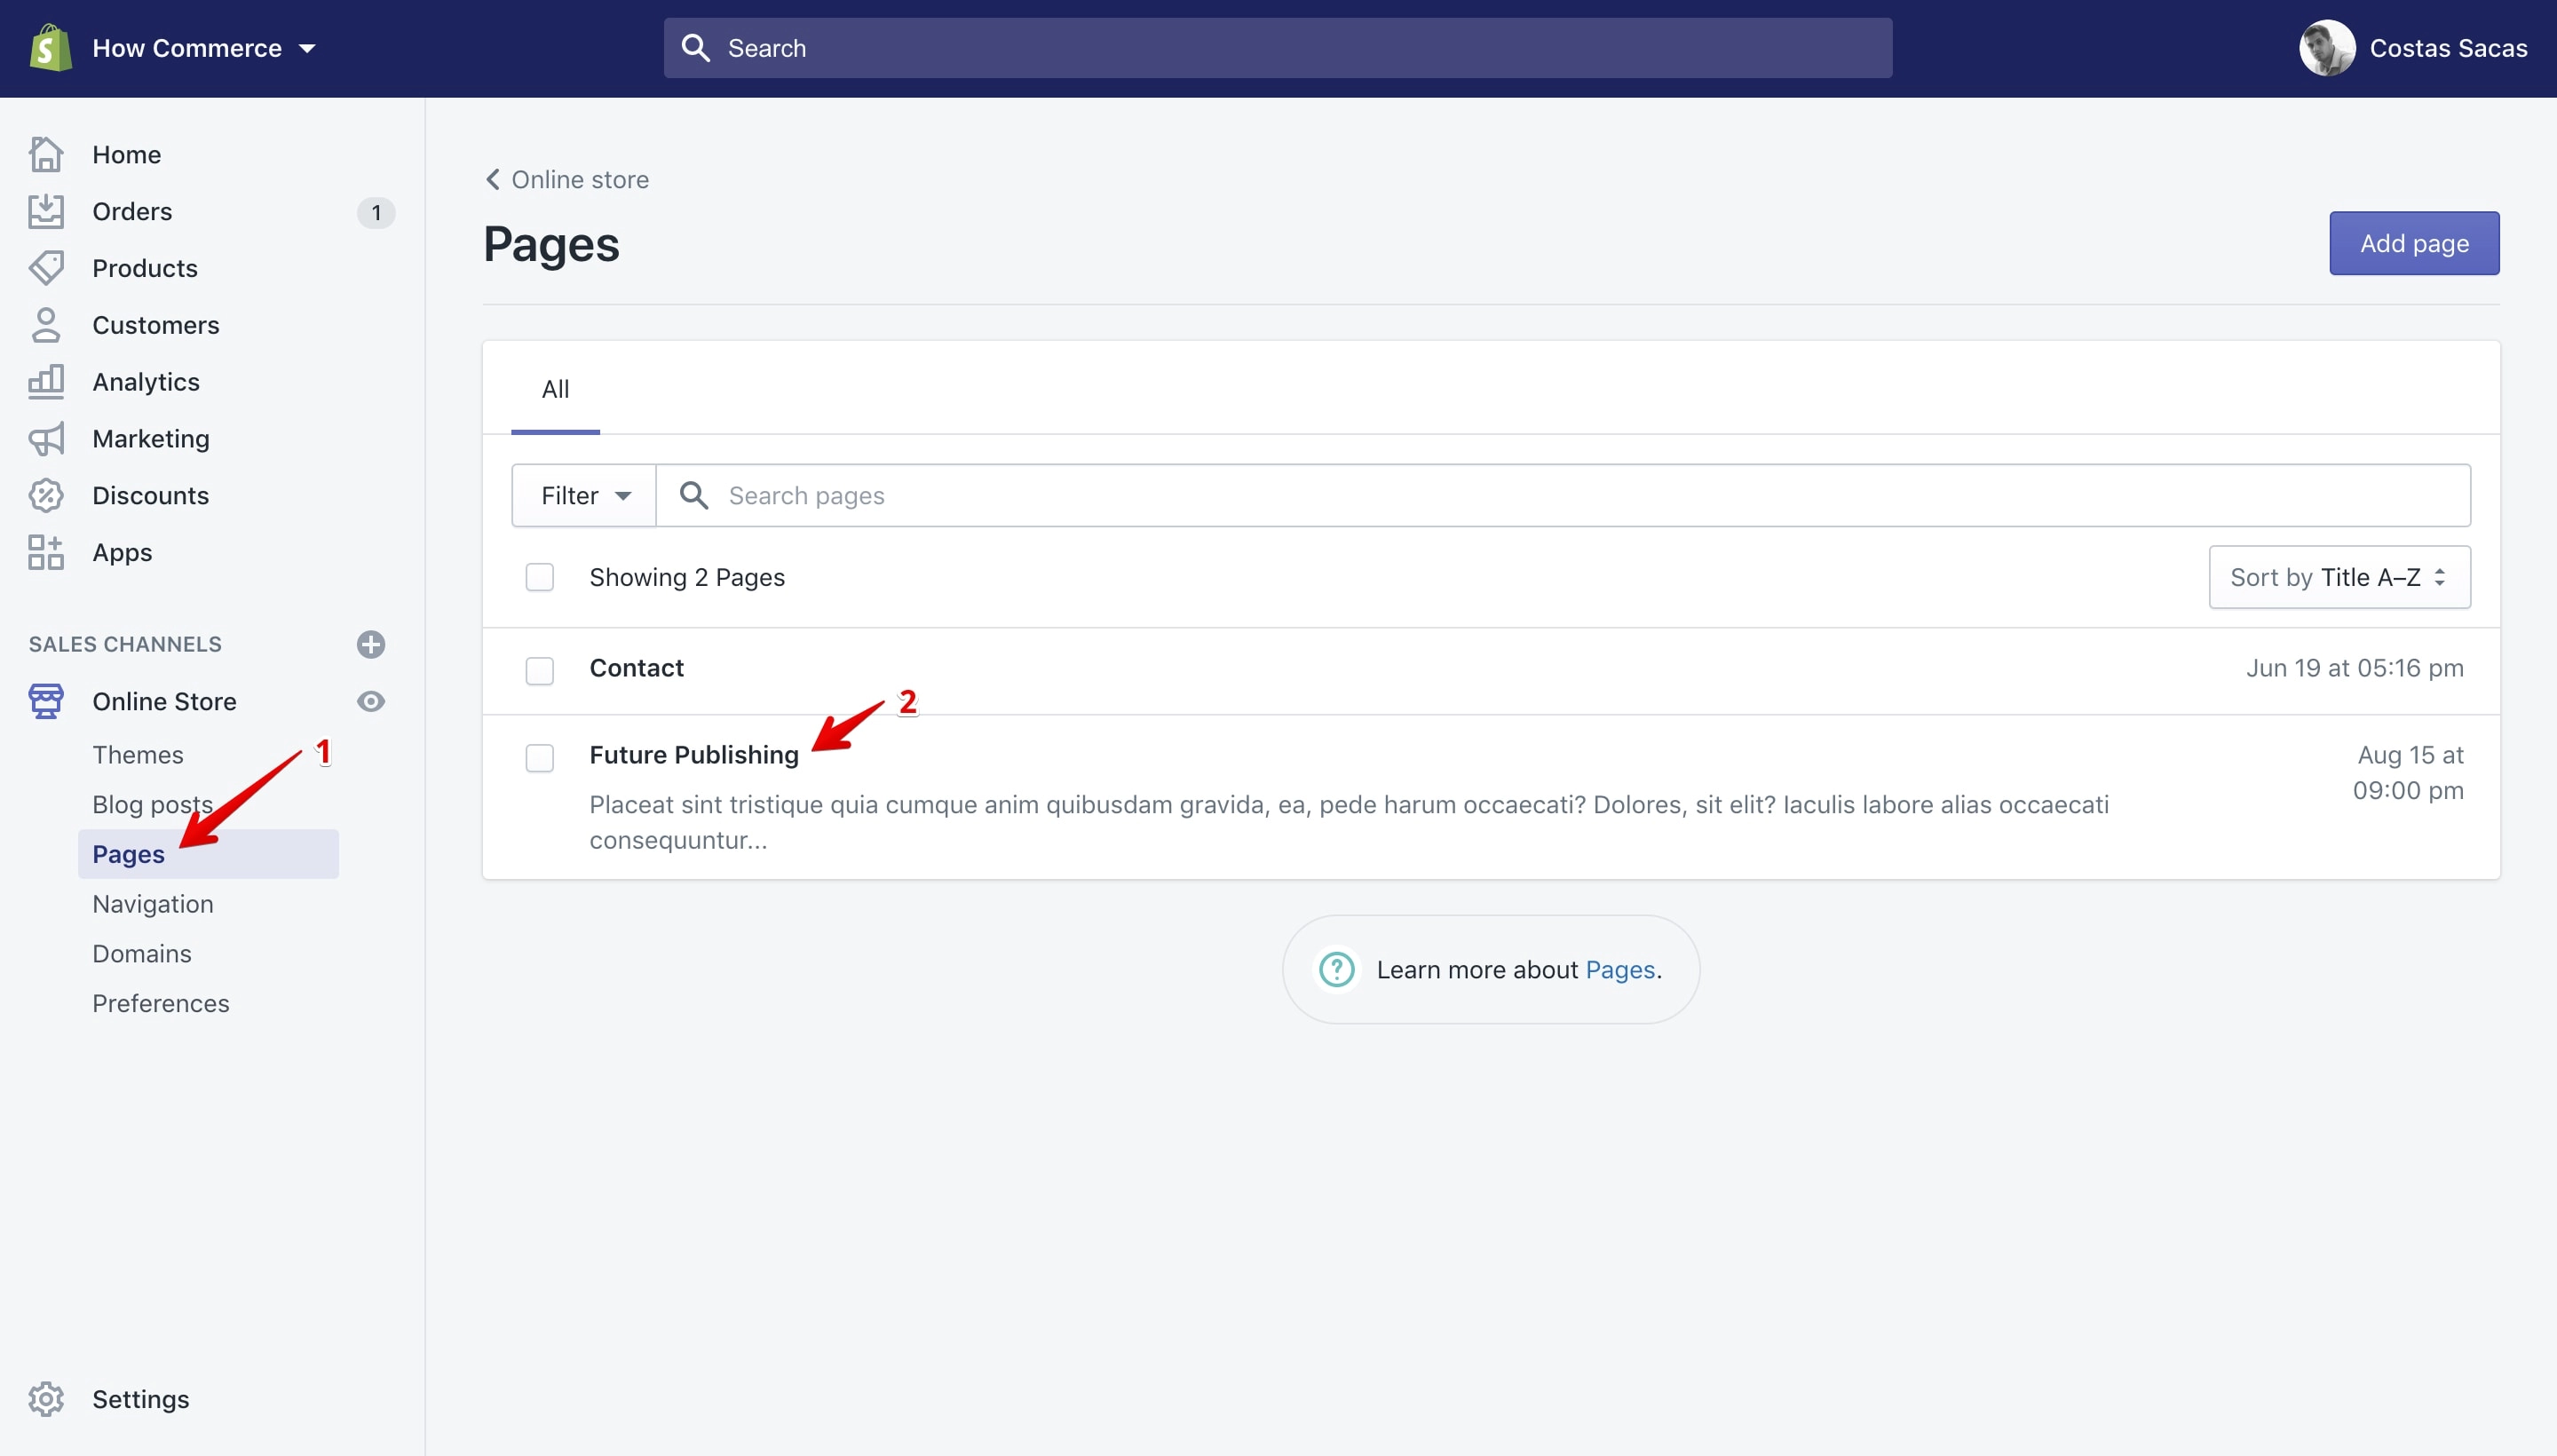
Click on the “Duplicate” link like in the image below:
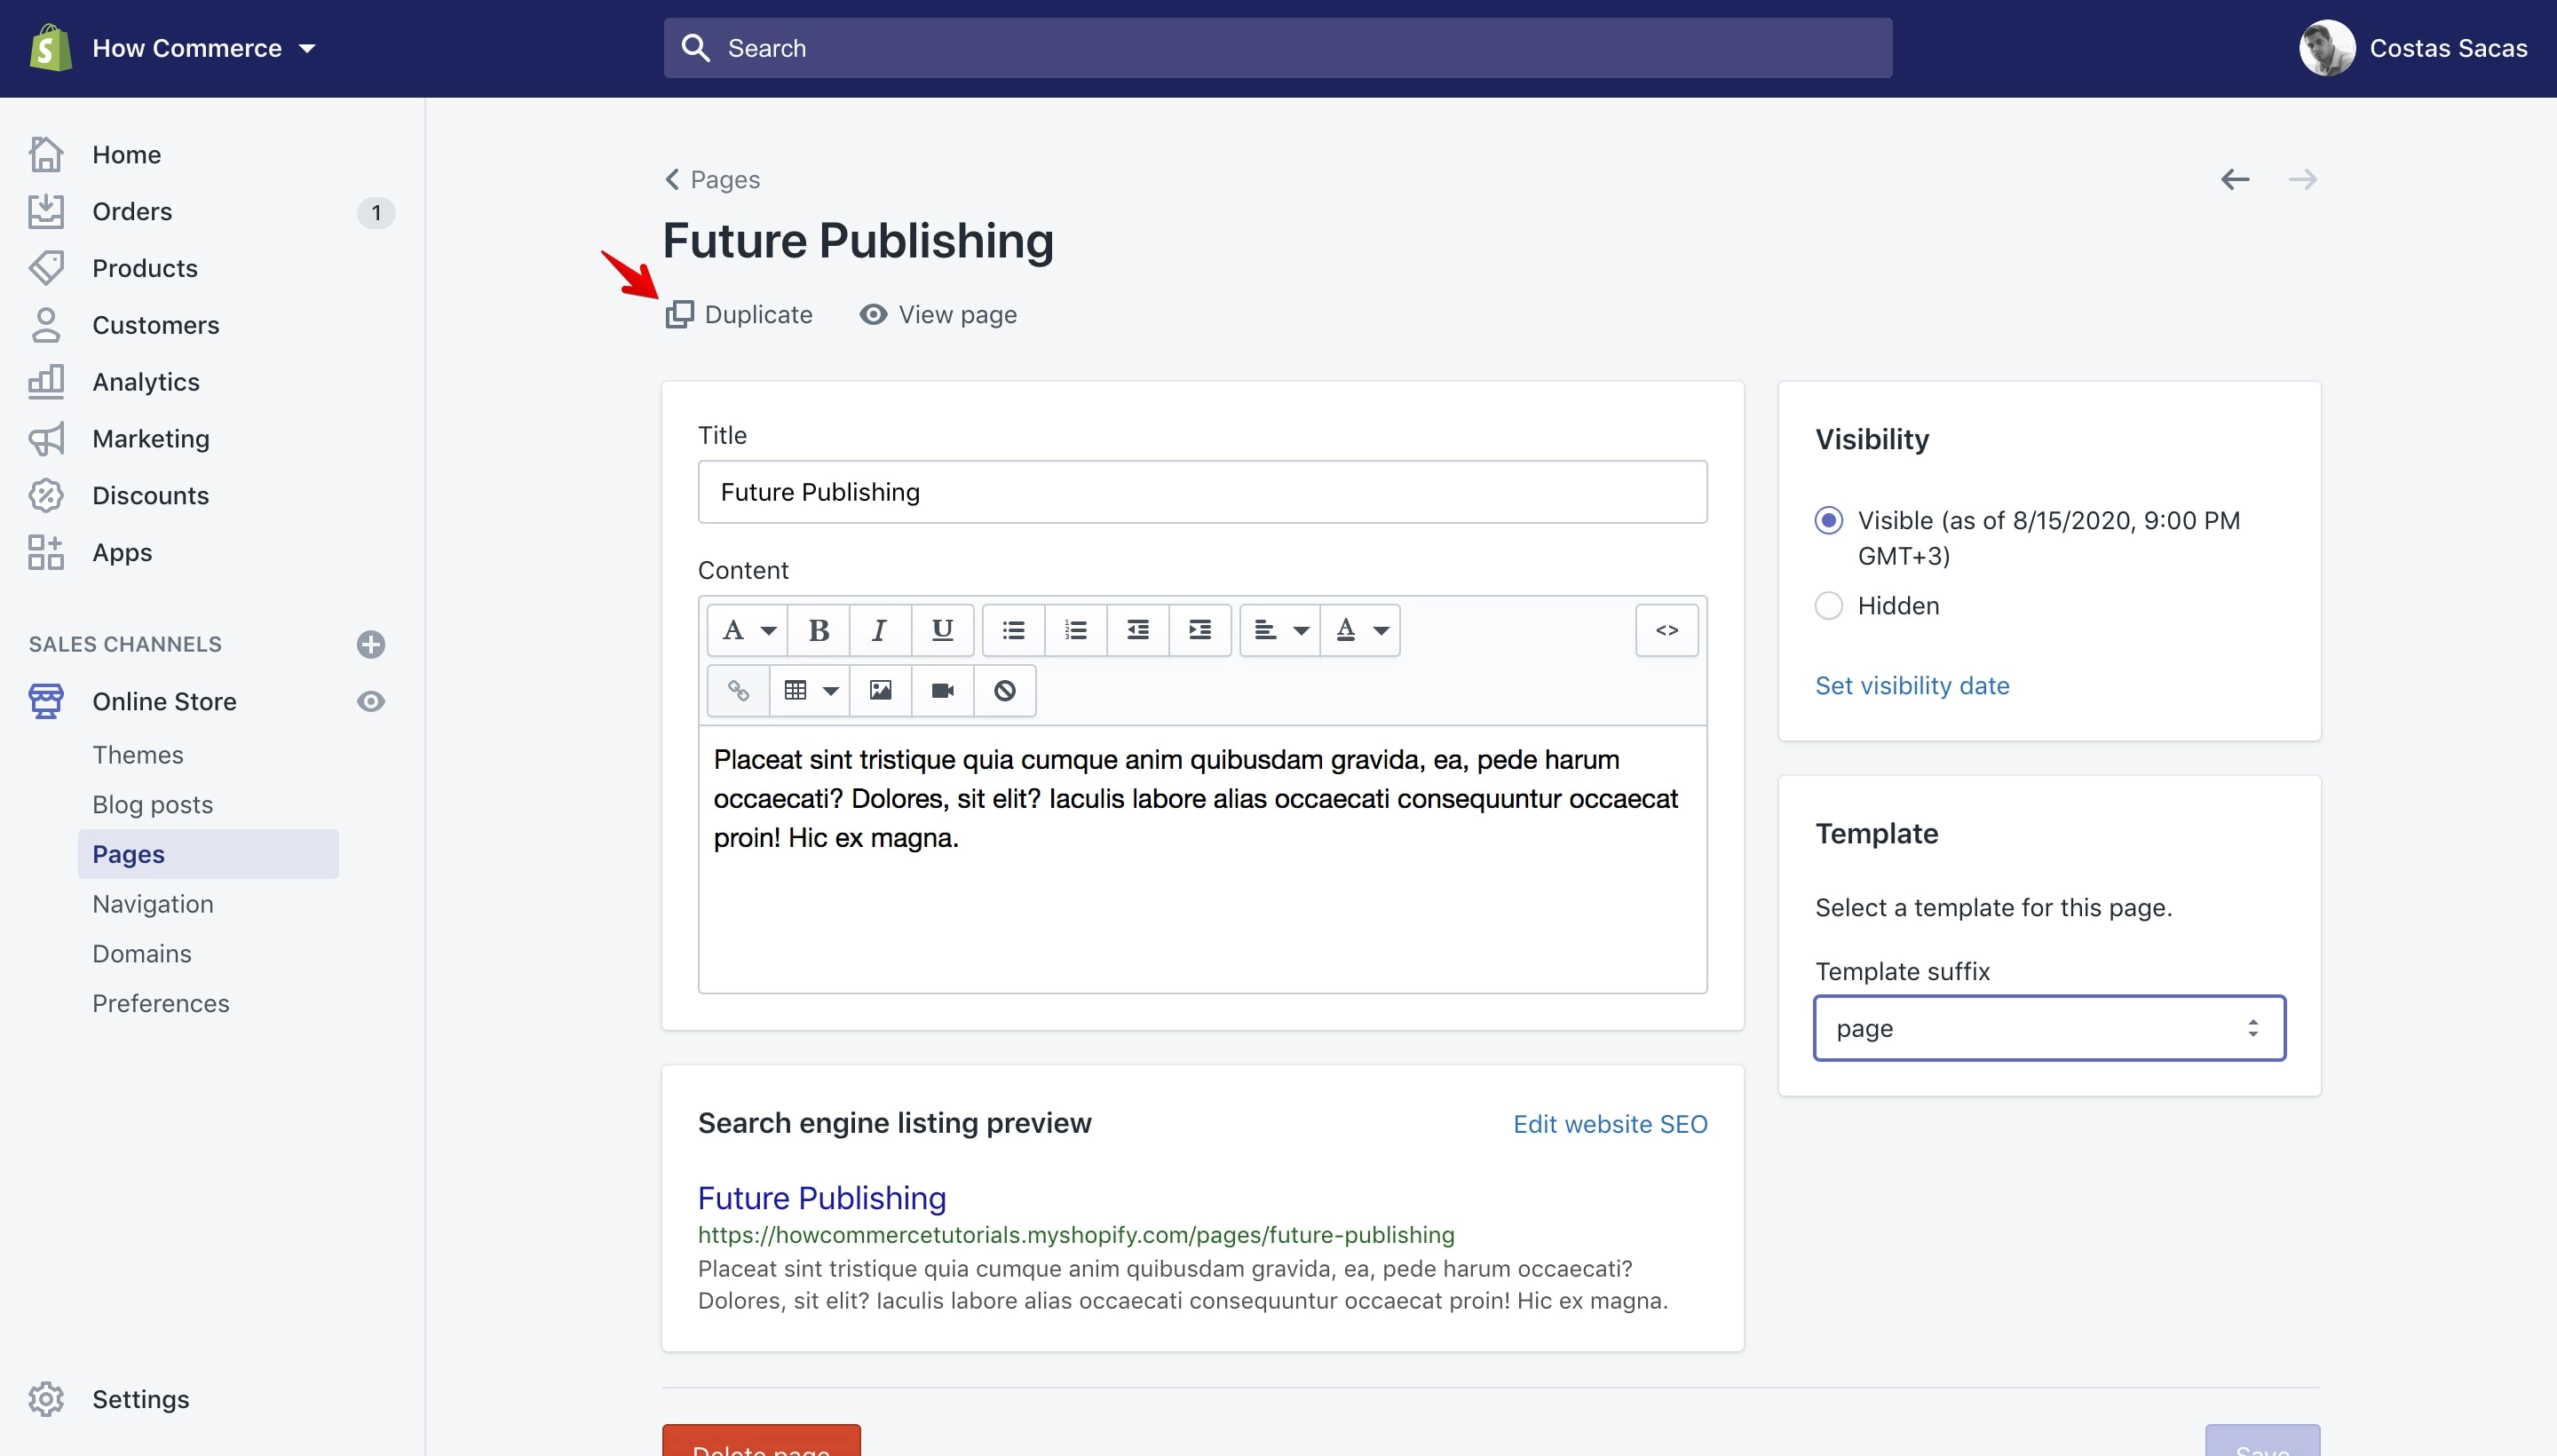
After you click the “Duplicate” link Shopify will list a pop-up with a default title in it allowing you to change it. By default the title generated by Shopify is “Copy of…” followed by the original article title (marked with 1 in the image below).
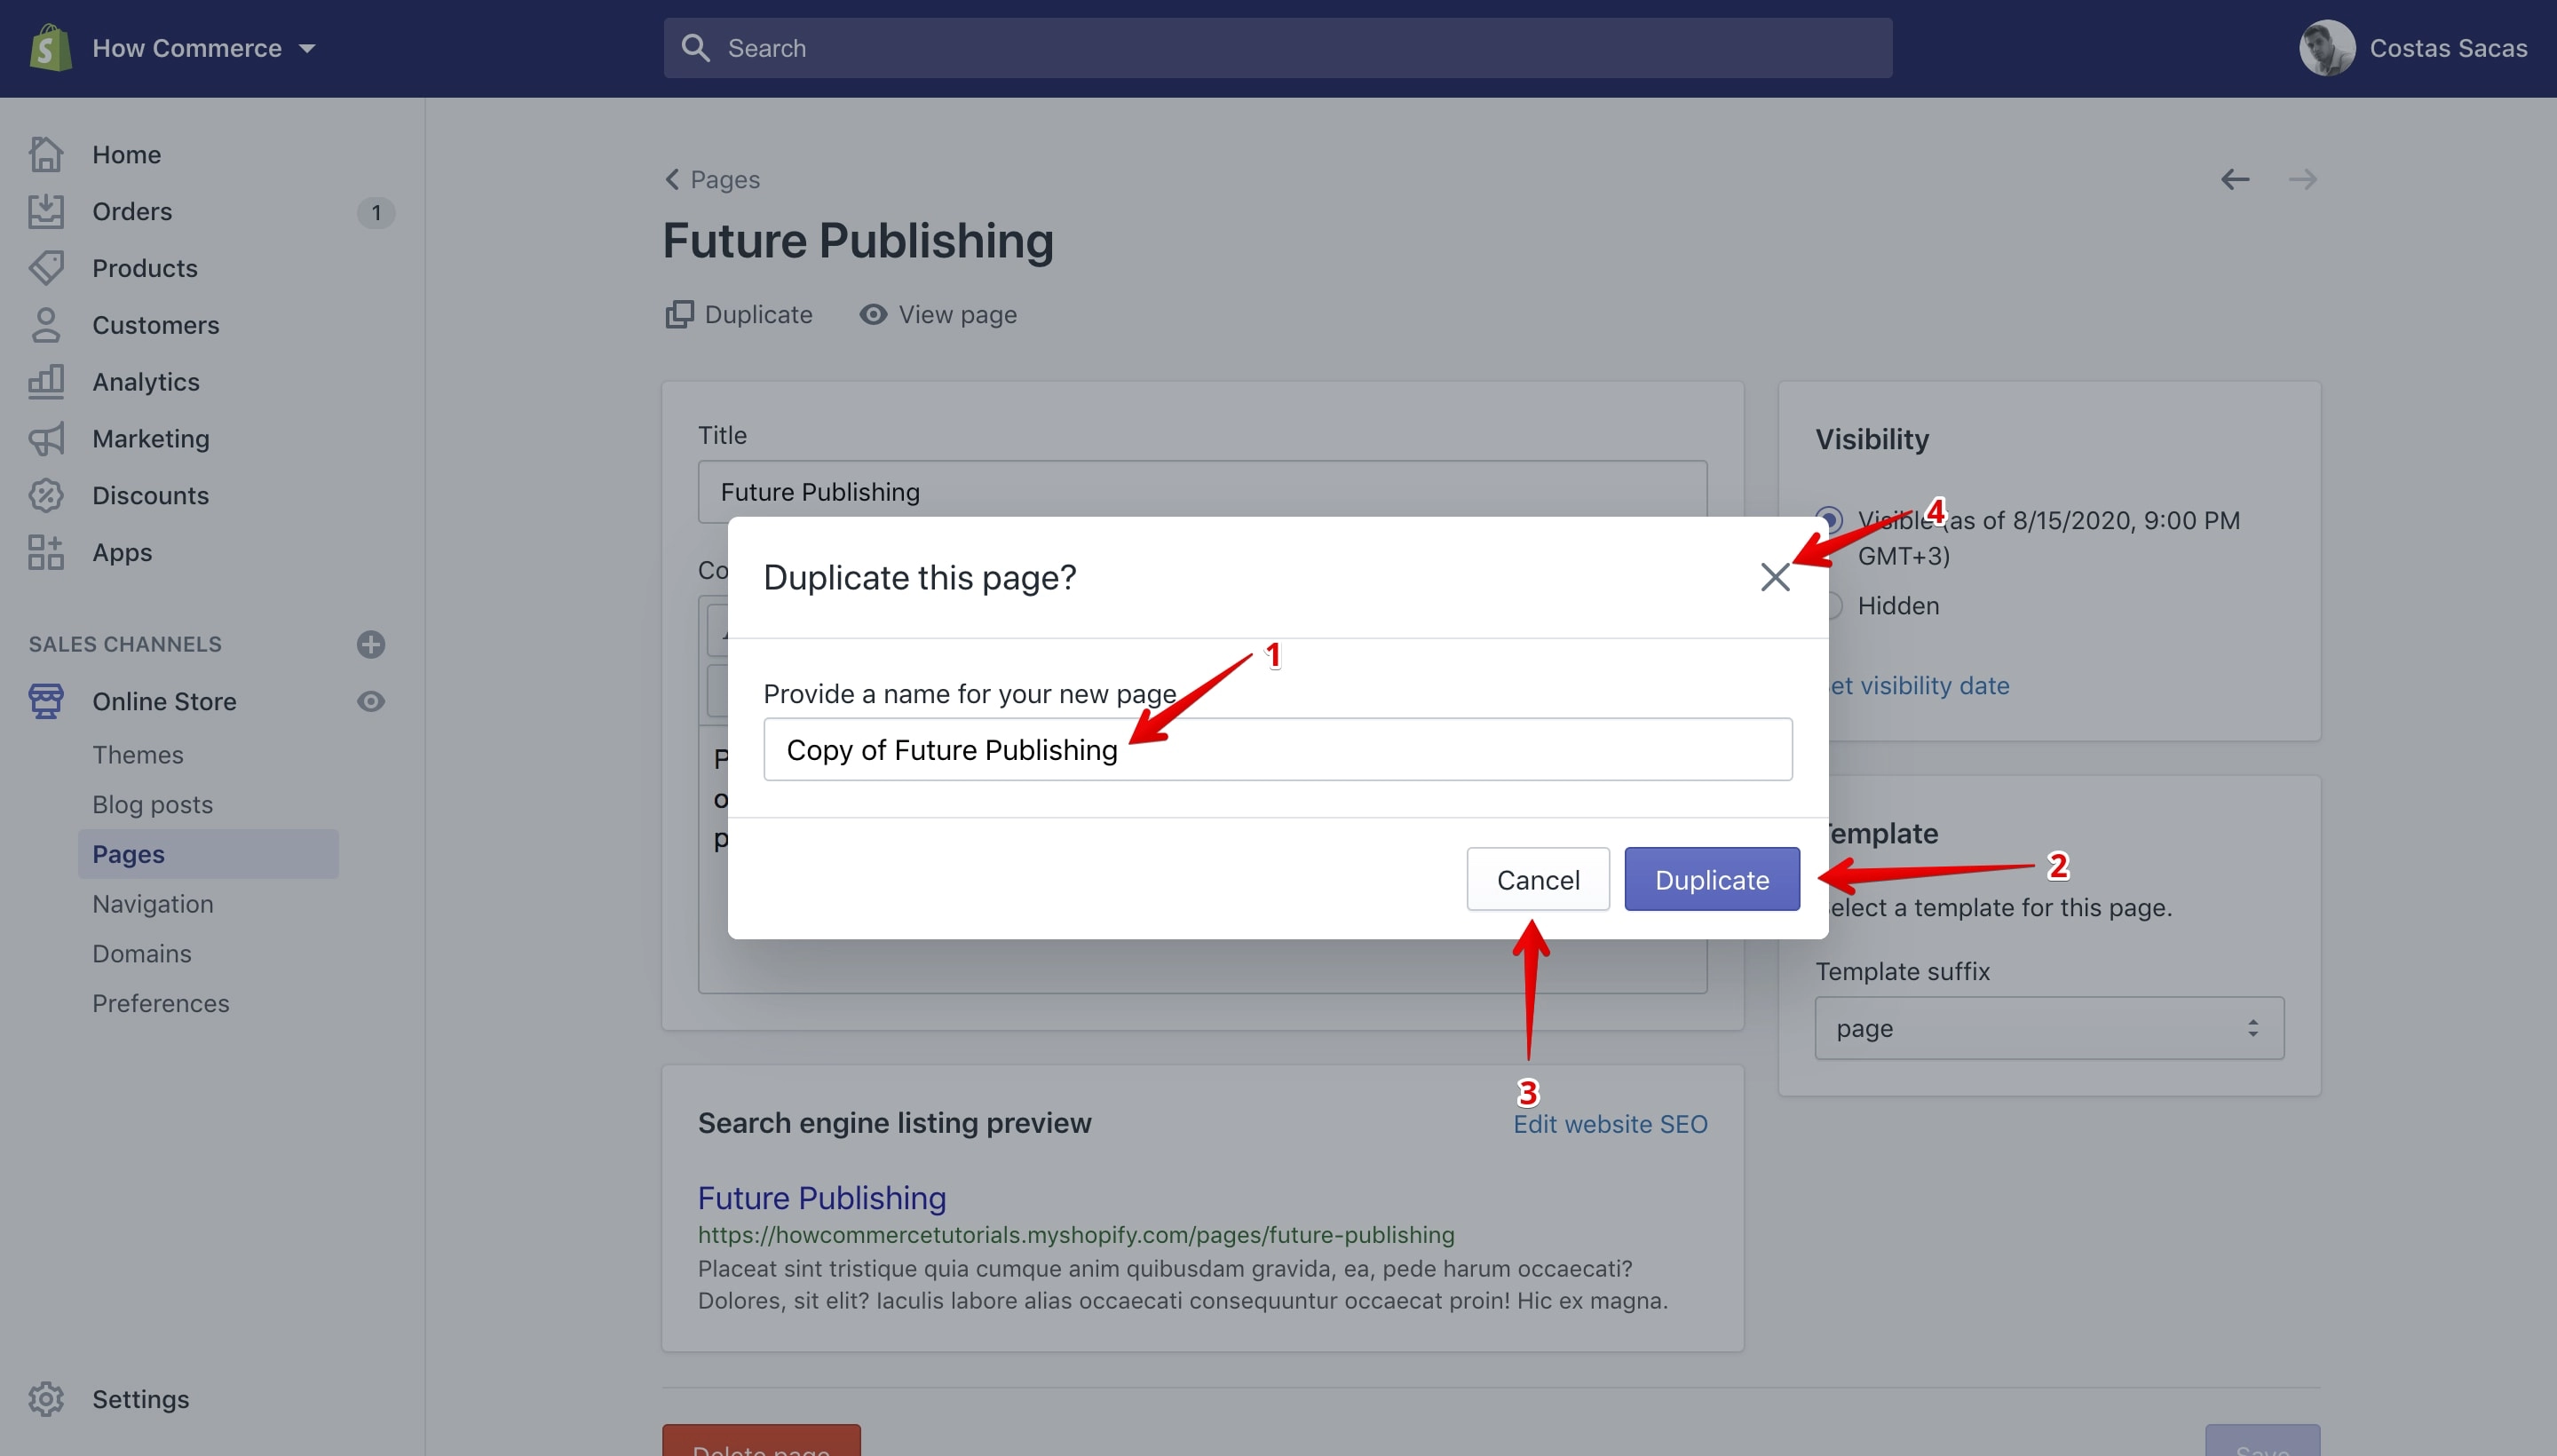
You need to change the default title with the one that represents the page. After you do that click the “Duplicate” button to save your new page.
If you’ve changed your mind and you no longer need a copy of the page you can always cancel the operation by clicking on the “Cancel” button (marked with 3 in the image above) or the small “X” at the top right corner of the pop-up (marked with 4 in the image above).
If Shopify duplicated your page it will list a success message like the one below:
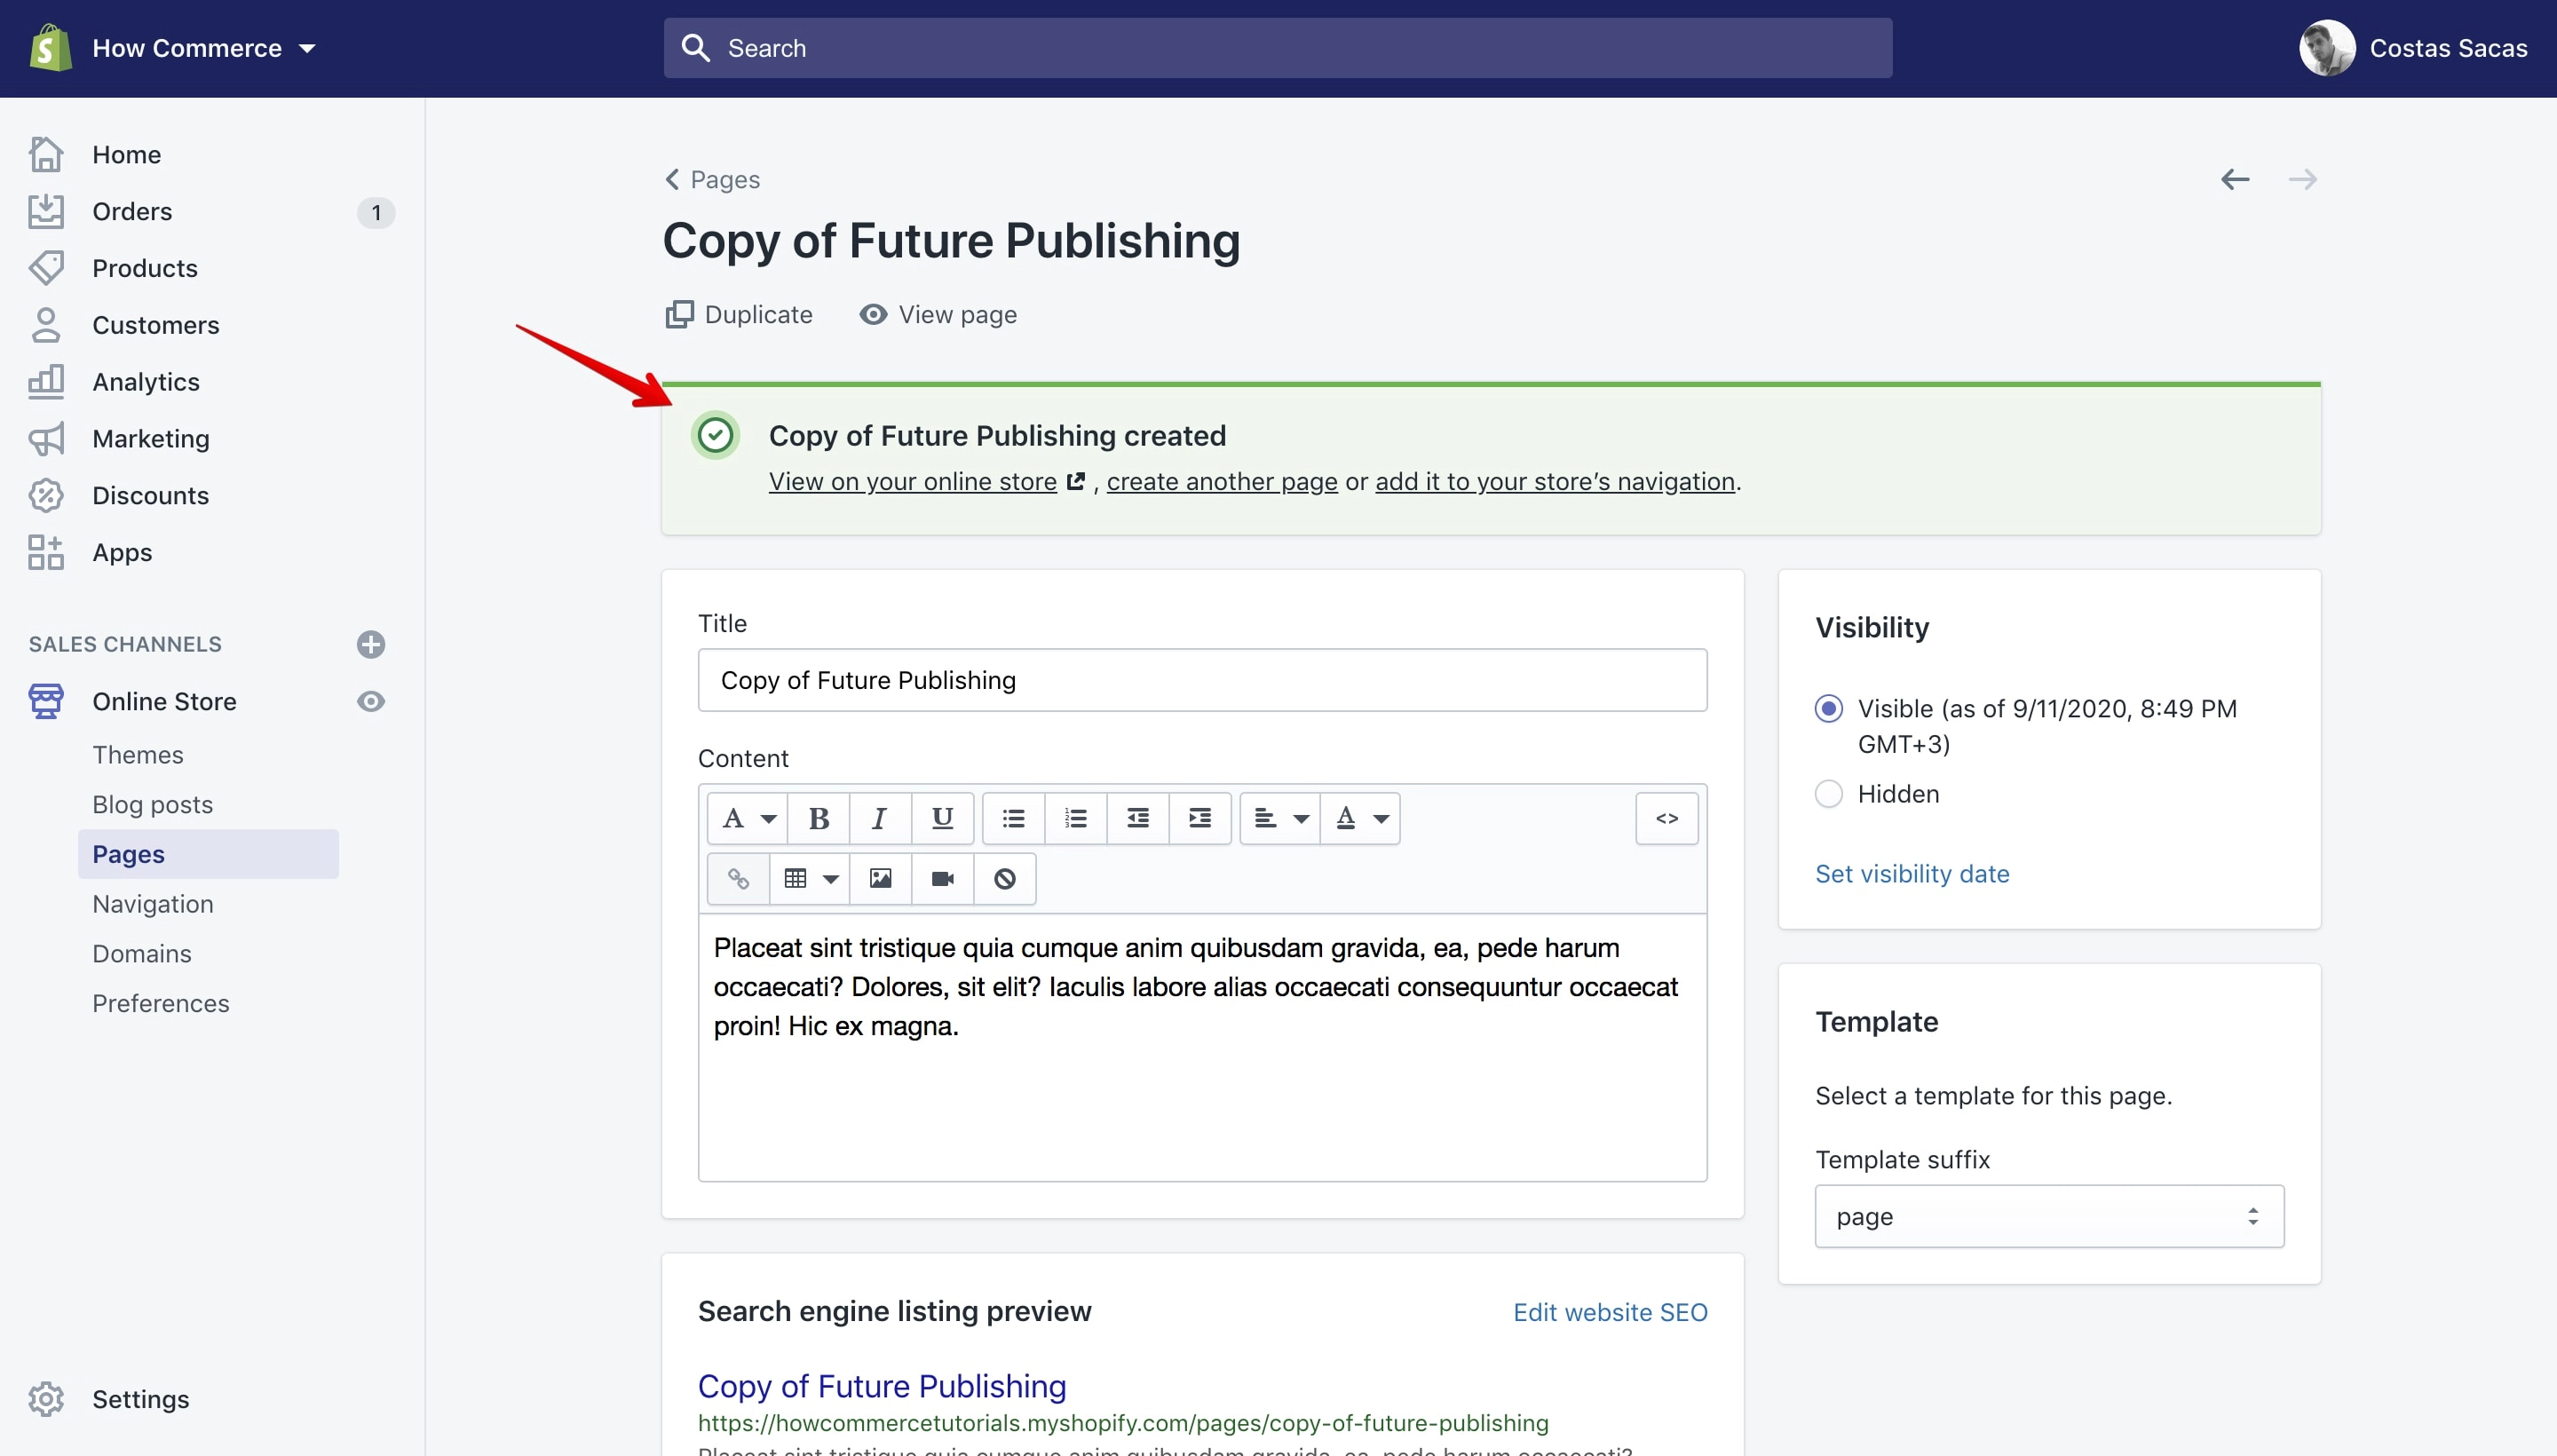
Seeing the message means that everything went correctly and now you have your new duplicated page which you can see also on the pages listing page.
Go again to “Pages” (marked with 1 in the image below) and you should see your newly duplicated page (marked with 2 in the image below):
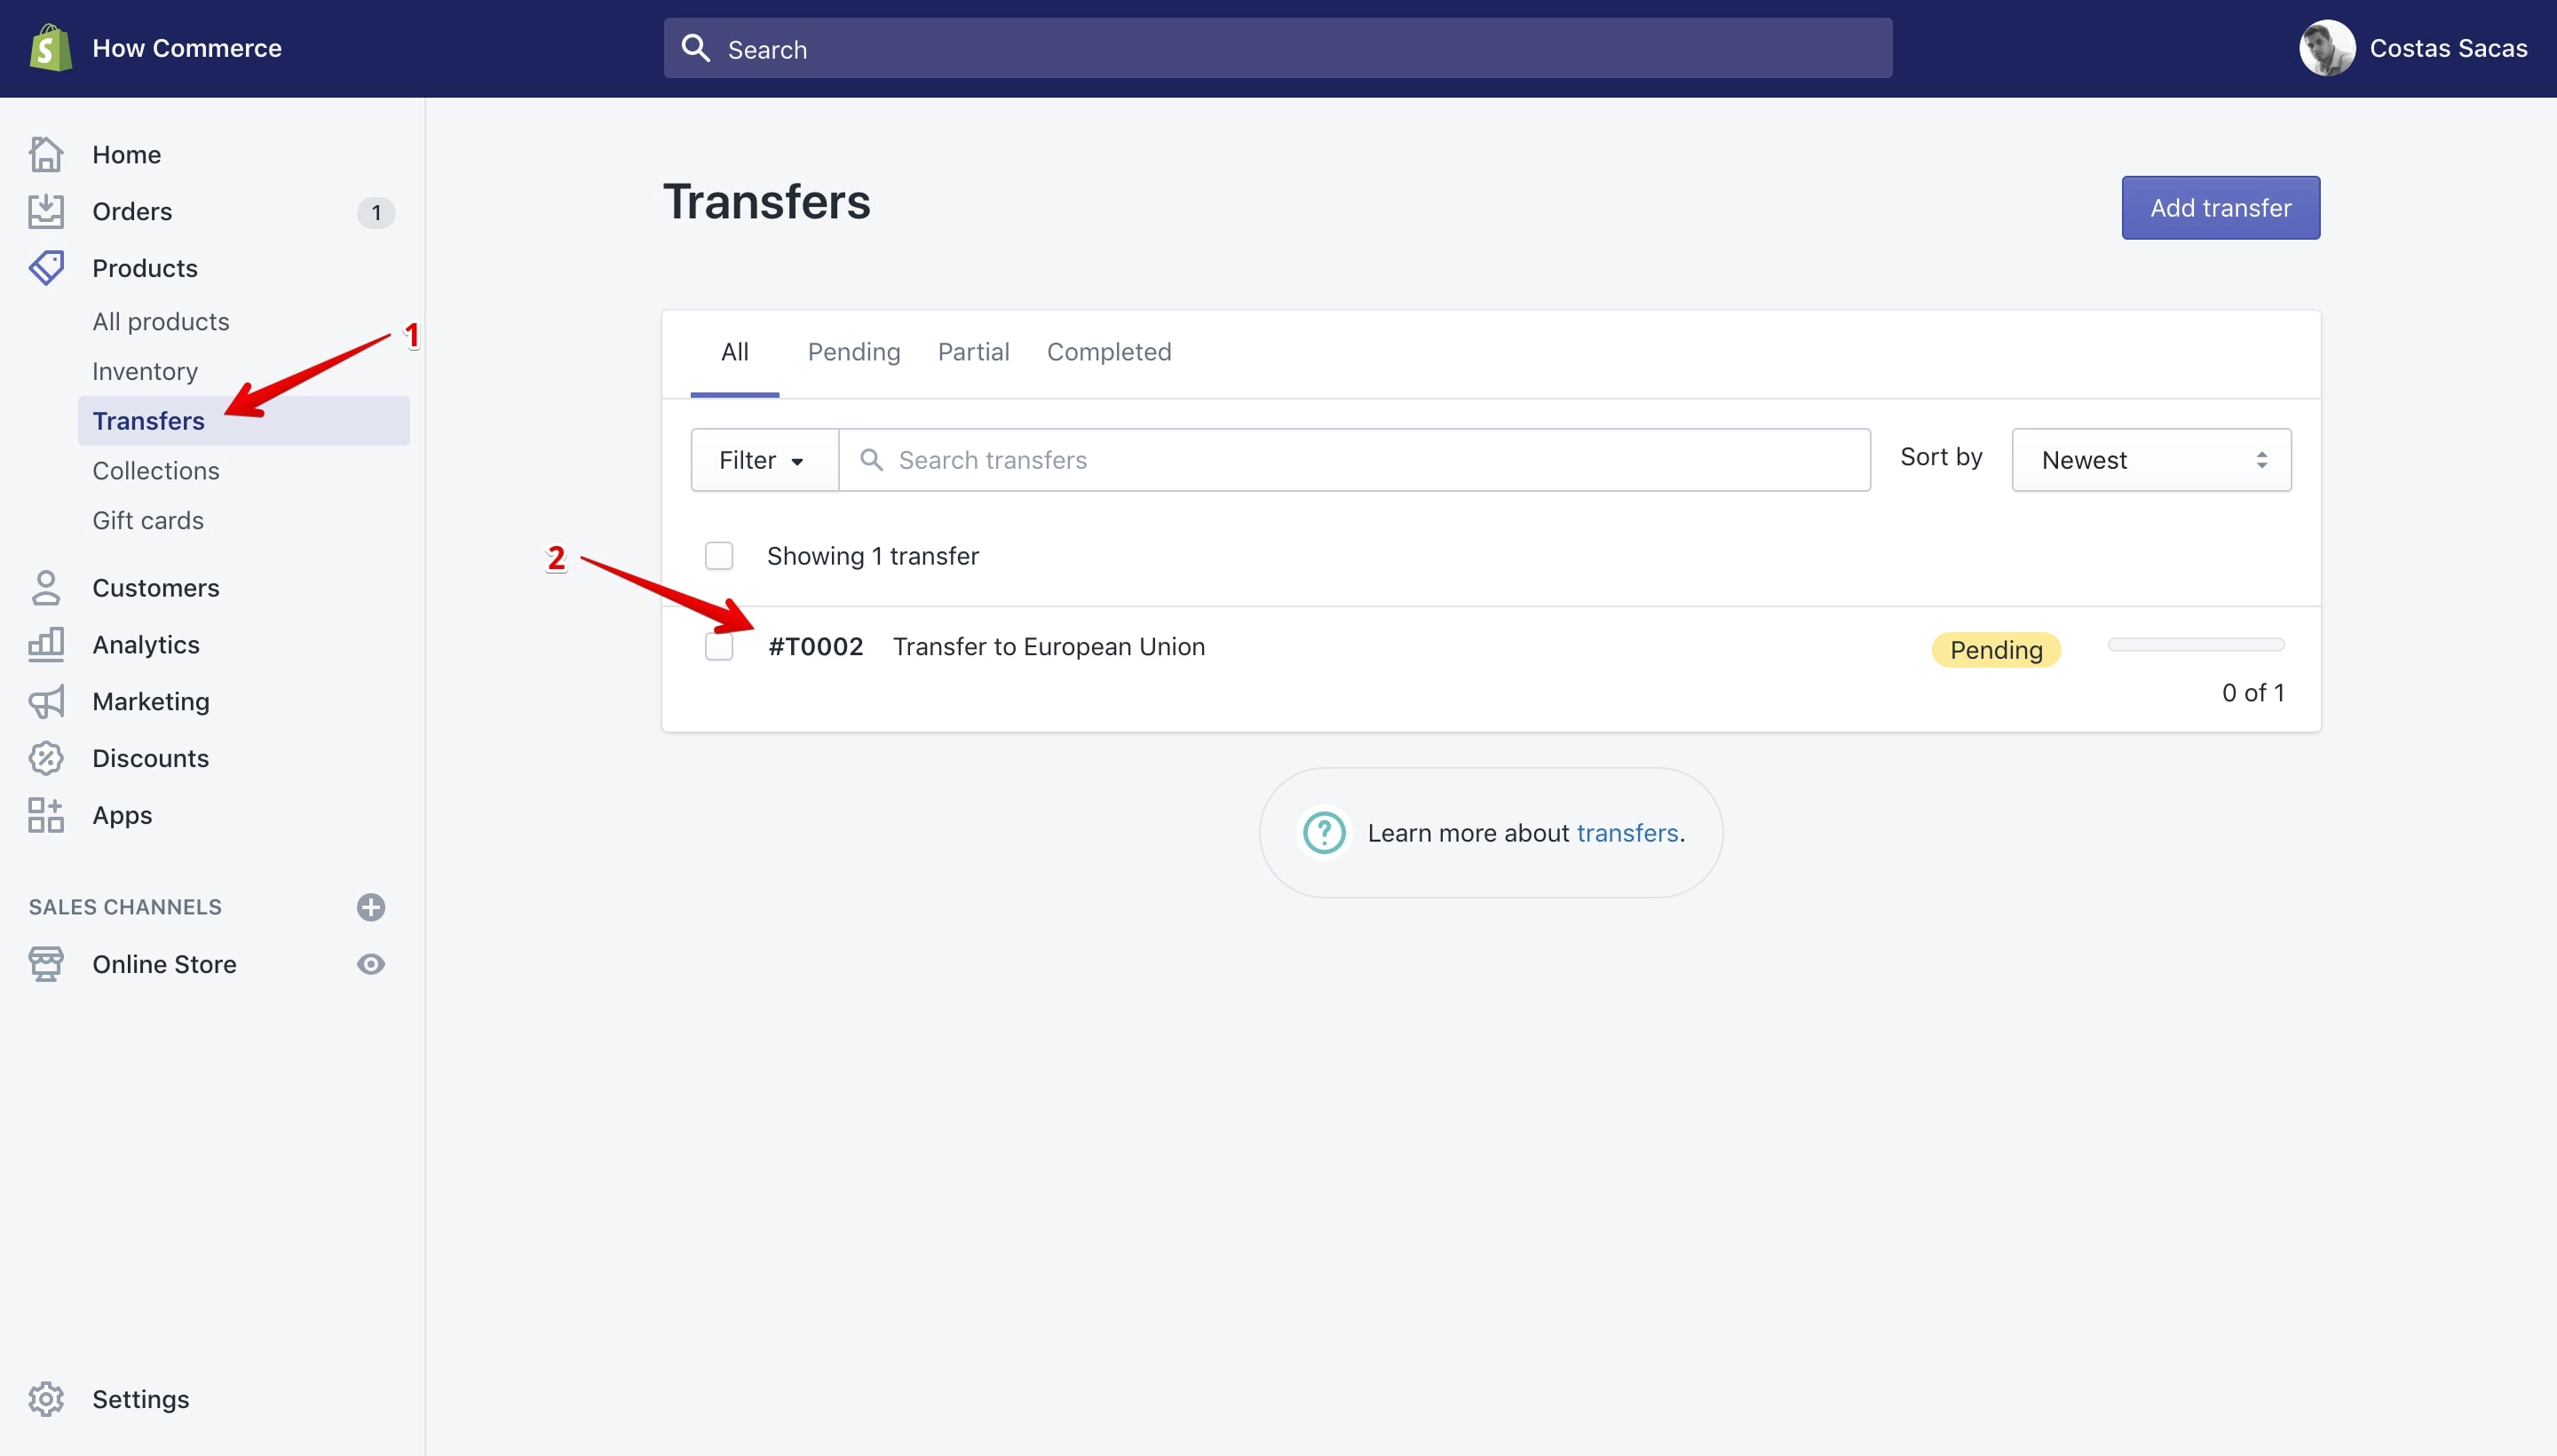
Duplicate transfers
Go to the transfers page by clicking on the “Transfers” (marked with 1 in the image below) link located in the sidebar and select a transfer that you want to duplicate (marked with 2 in the image below):
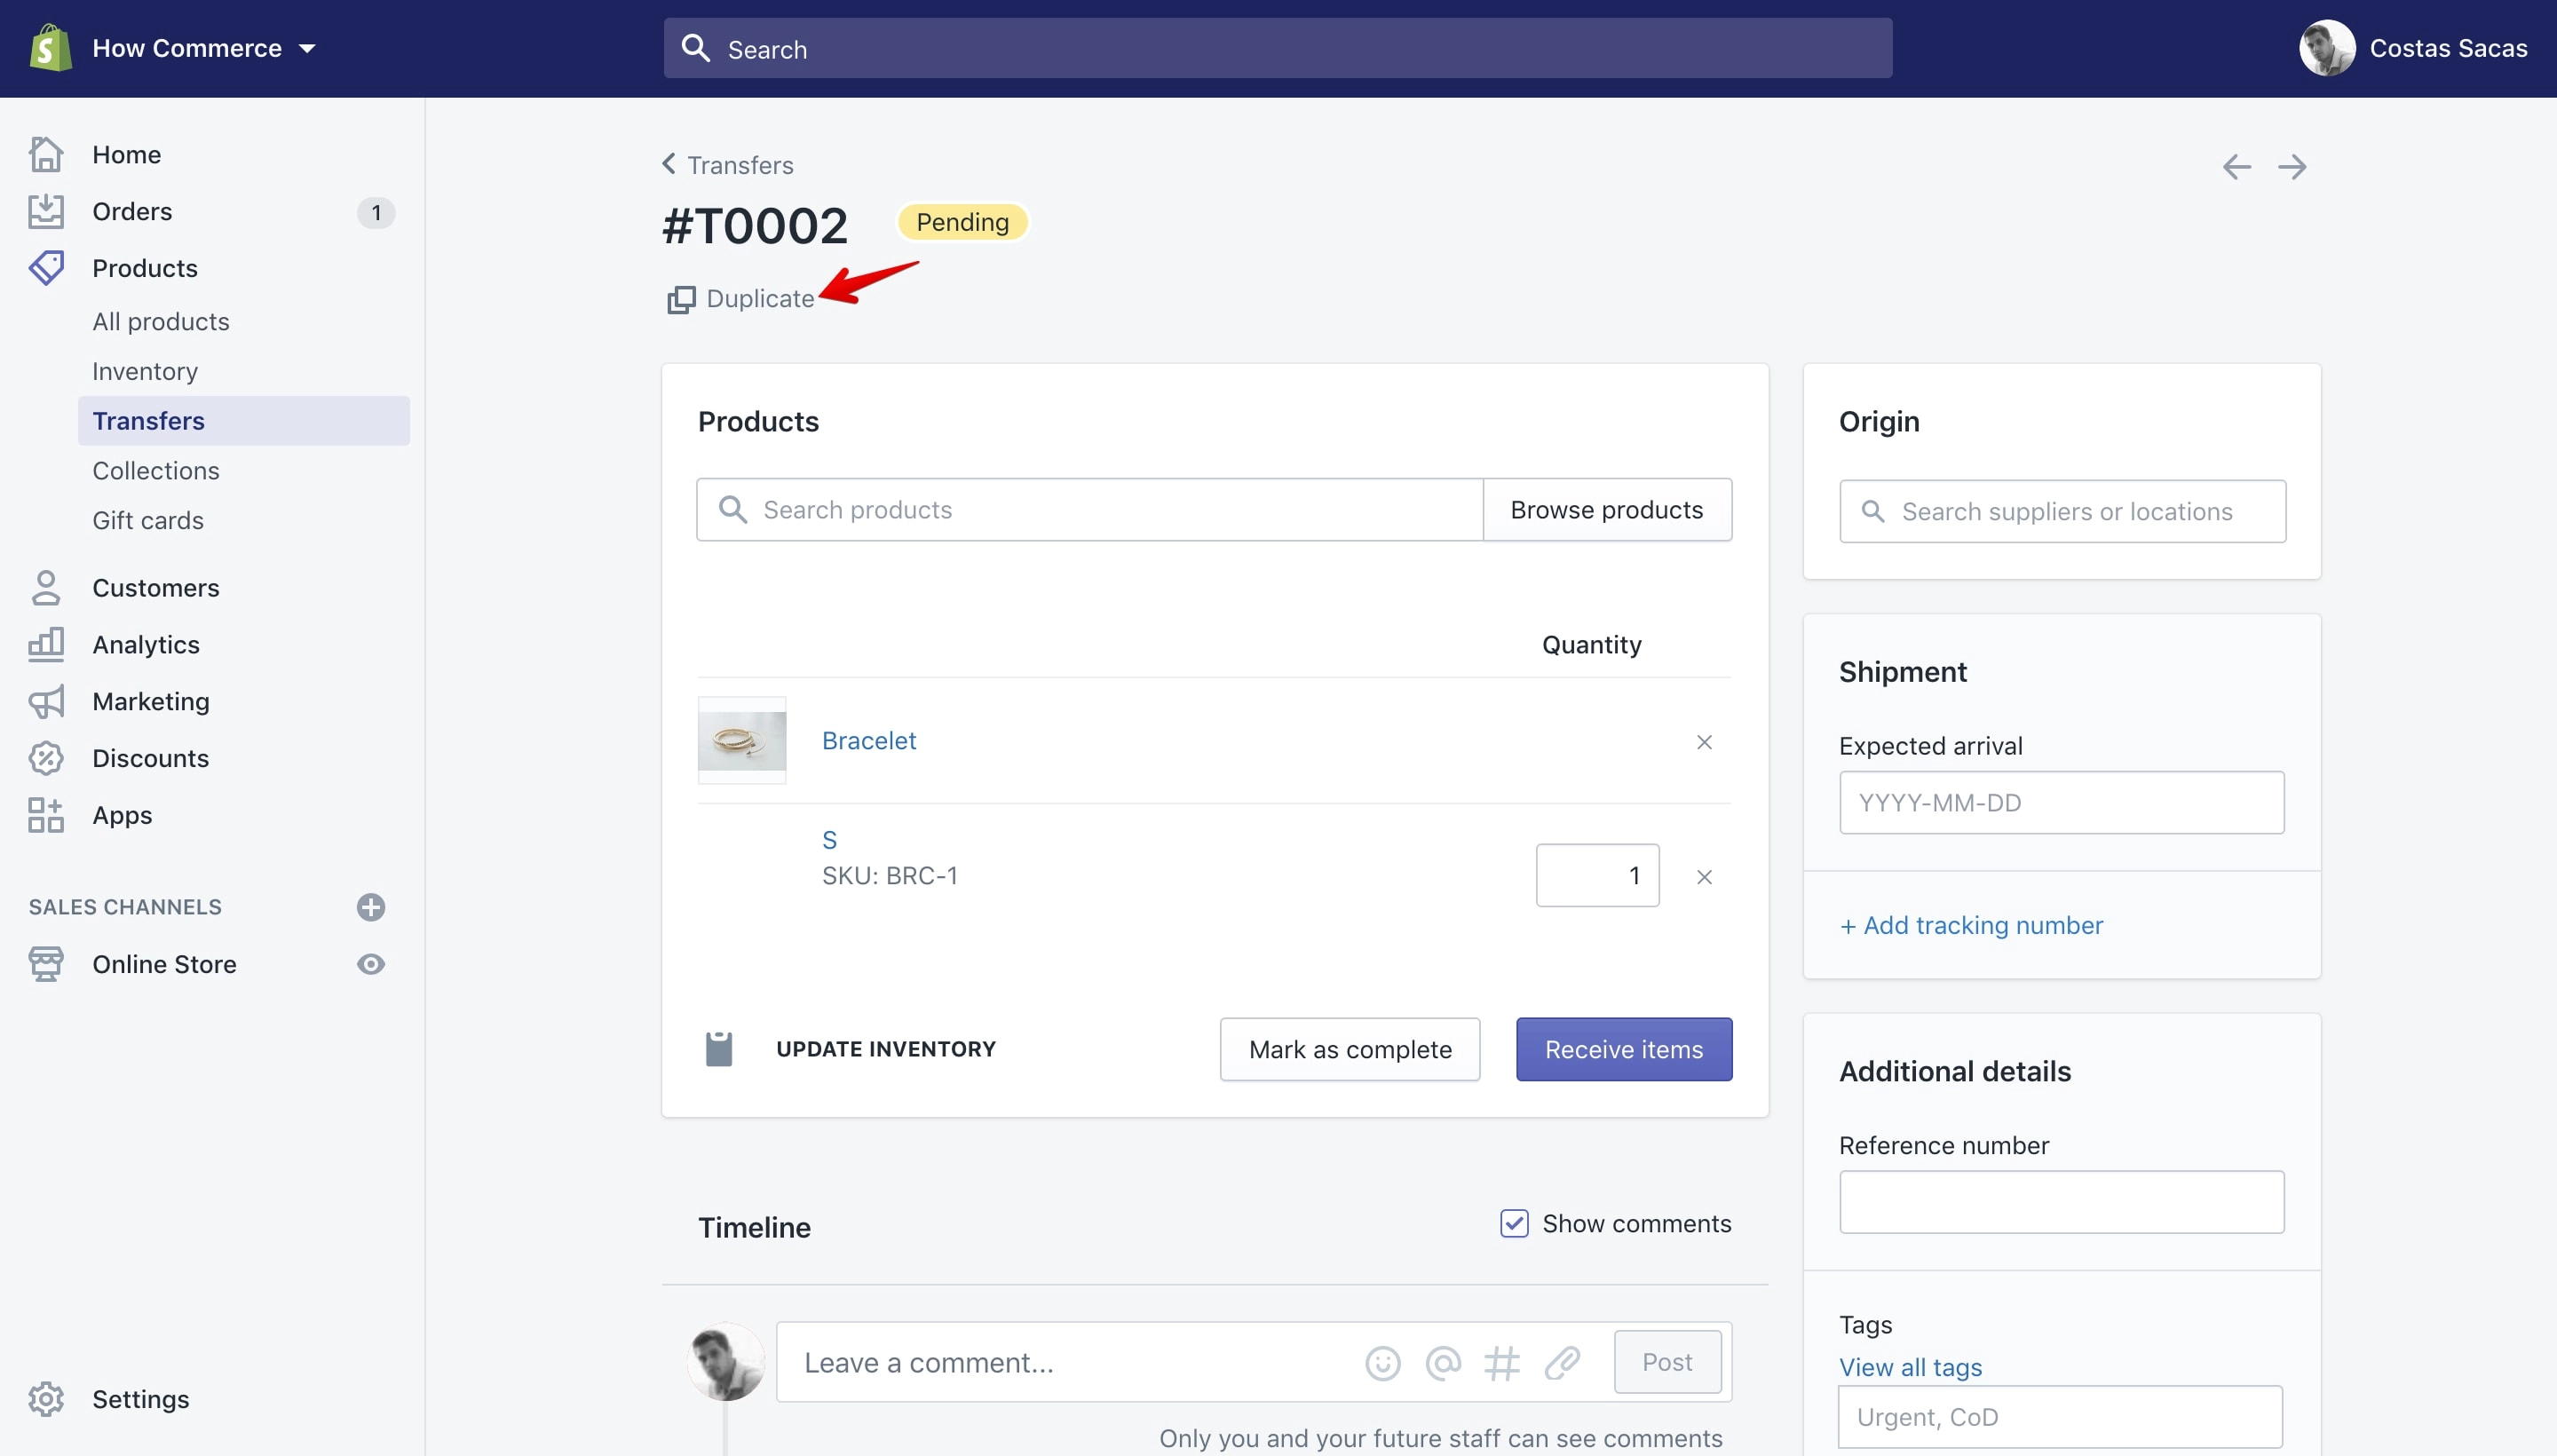
To duplicate the transfer click on the “Duplicate” link:
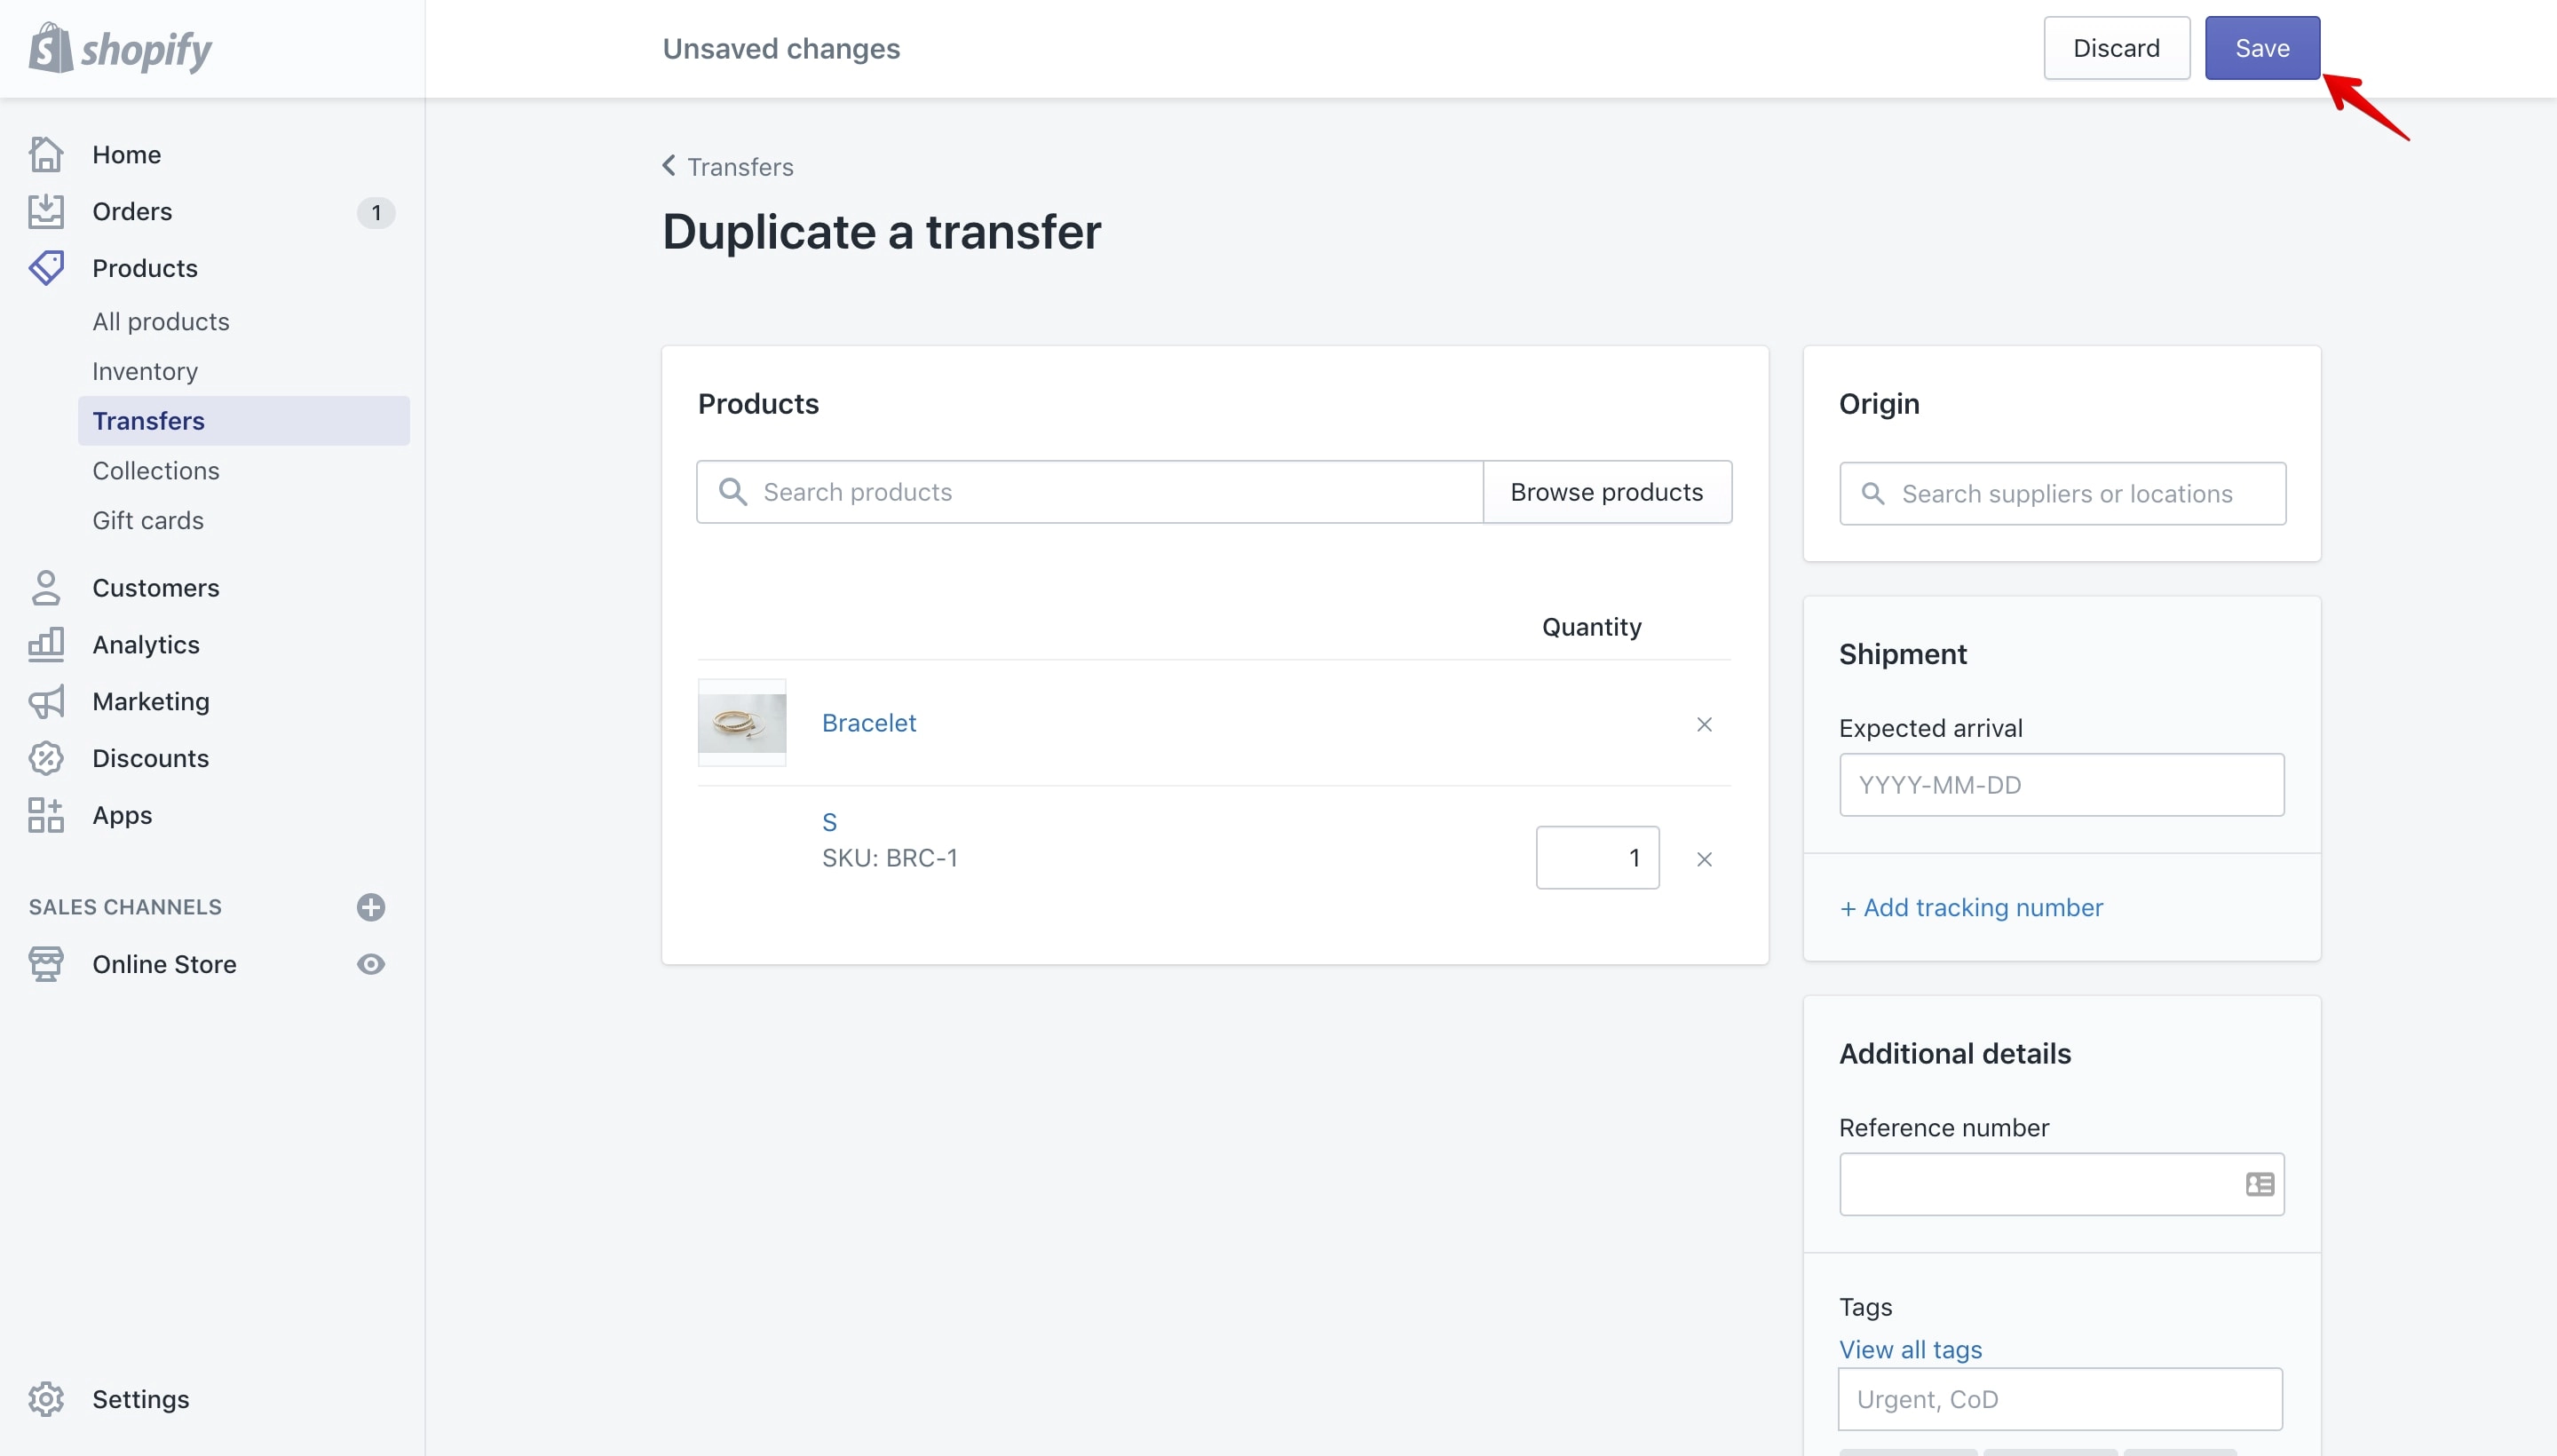
After you click the “Duplicate” link Shopify will duplicate your transfer.
Now all you have to do is “Save” it:
Duplicate themes
As a developer for me this duplicate function is the best. I used it a lot.
This not only duplicates a theme, but it offers you a staging environment where you can safely test new code and features and also some kind of version control since you can always save a theme as a backup.
To access this feature go to “Themes” (marked with 1 in the image below) and click on the “Actions” button (marked with 2 in the image below) of your current theme:
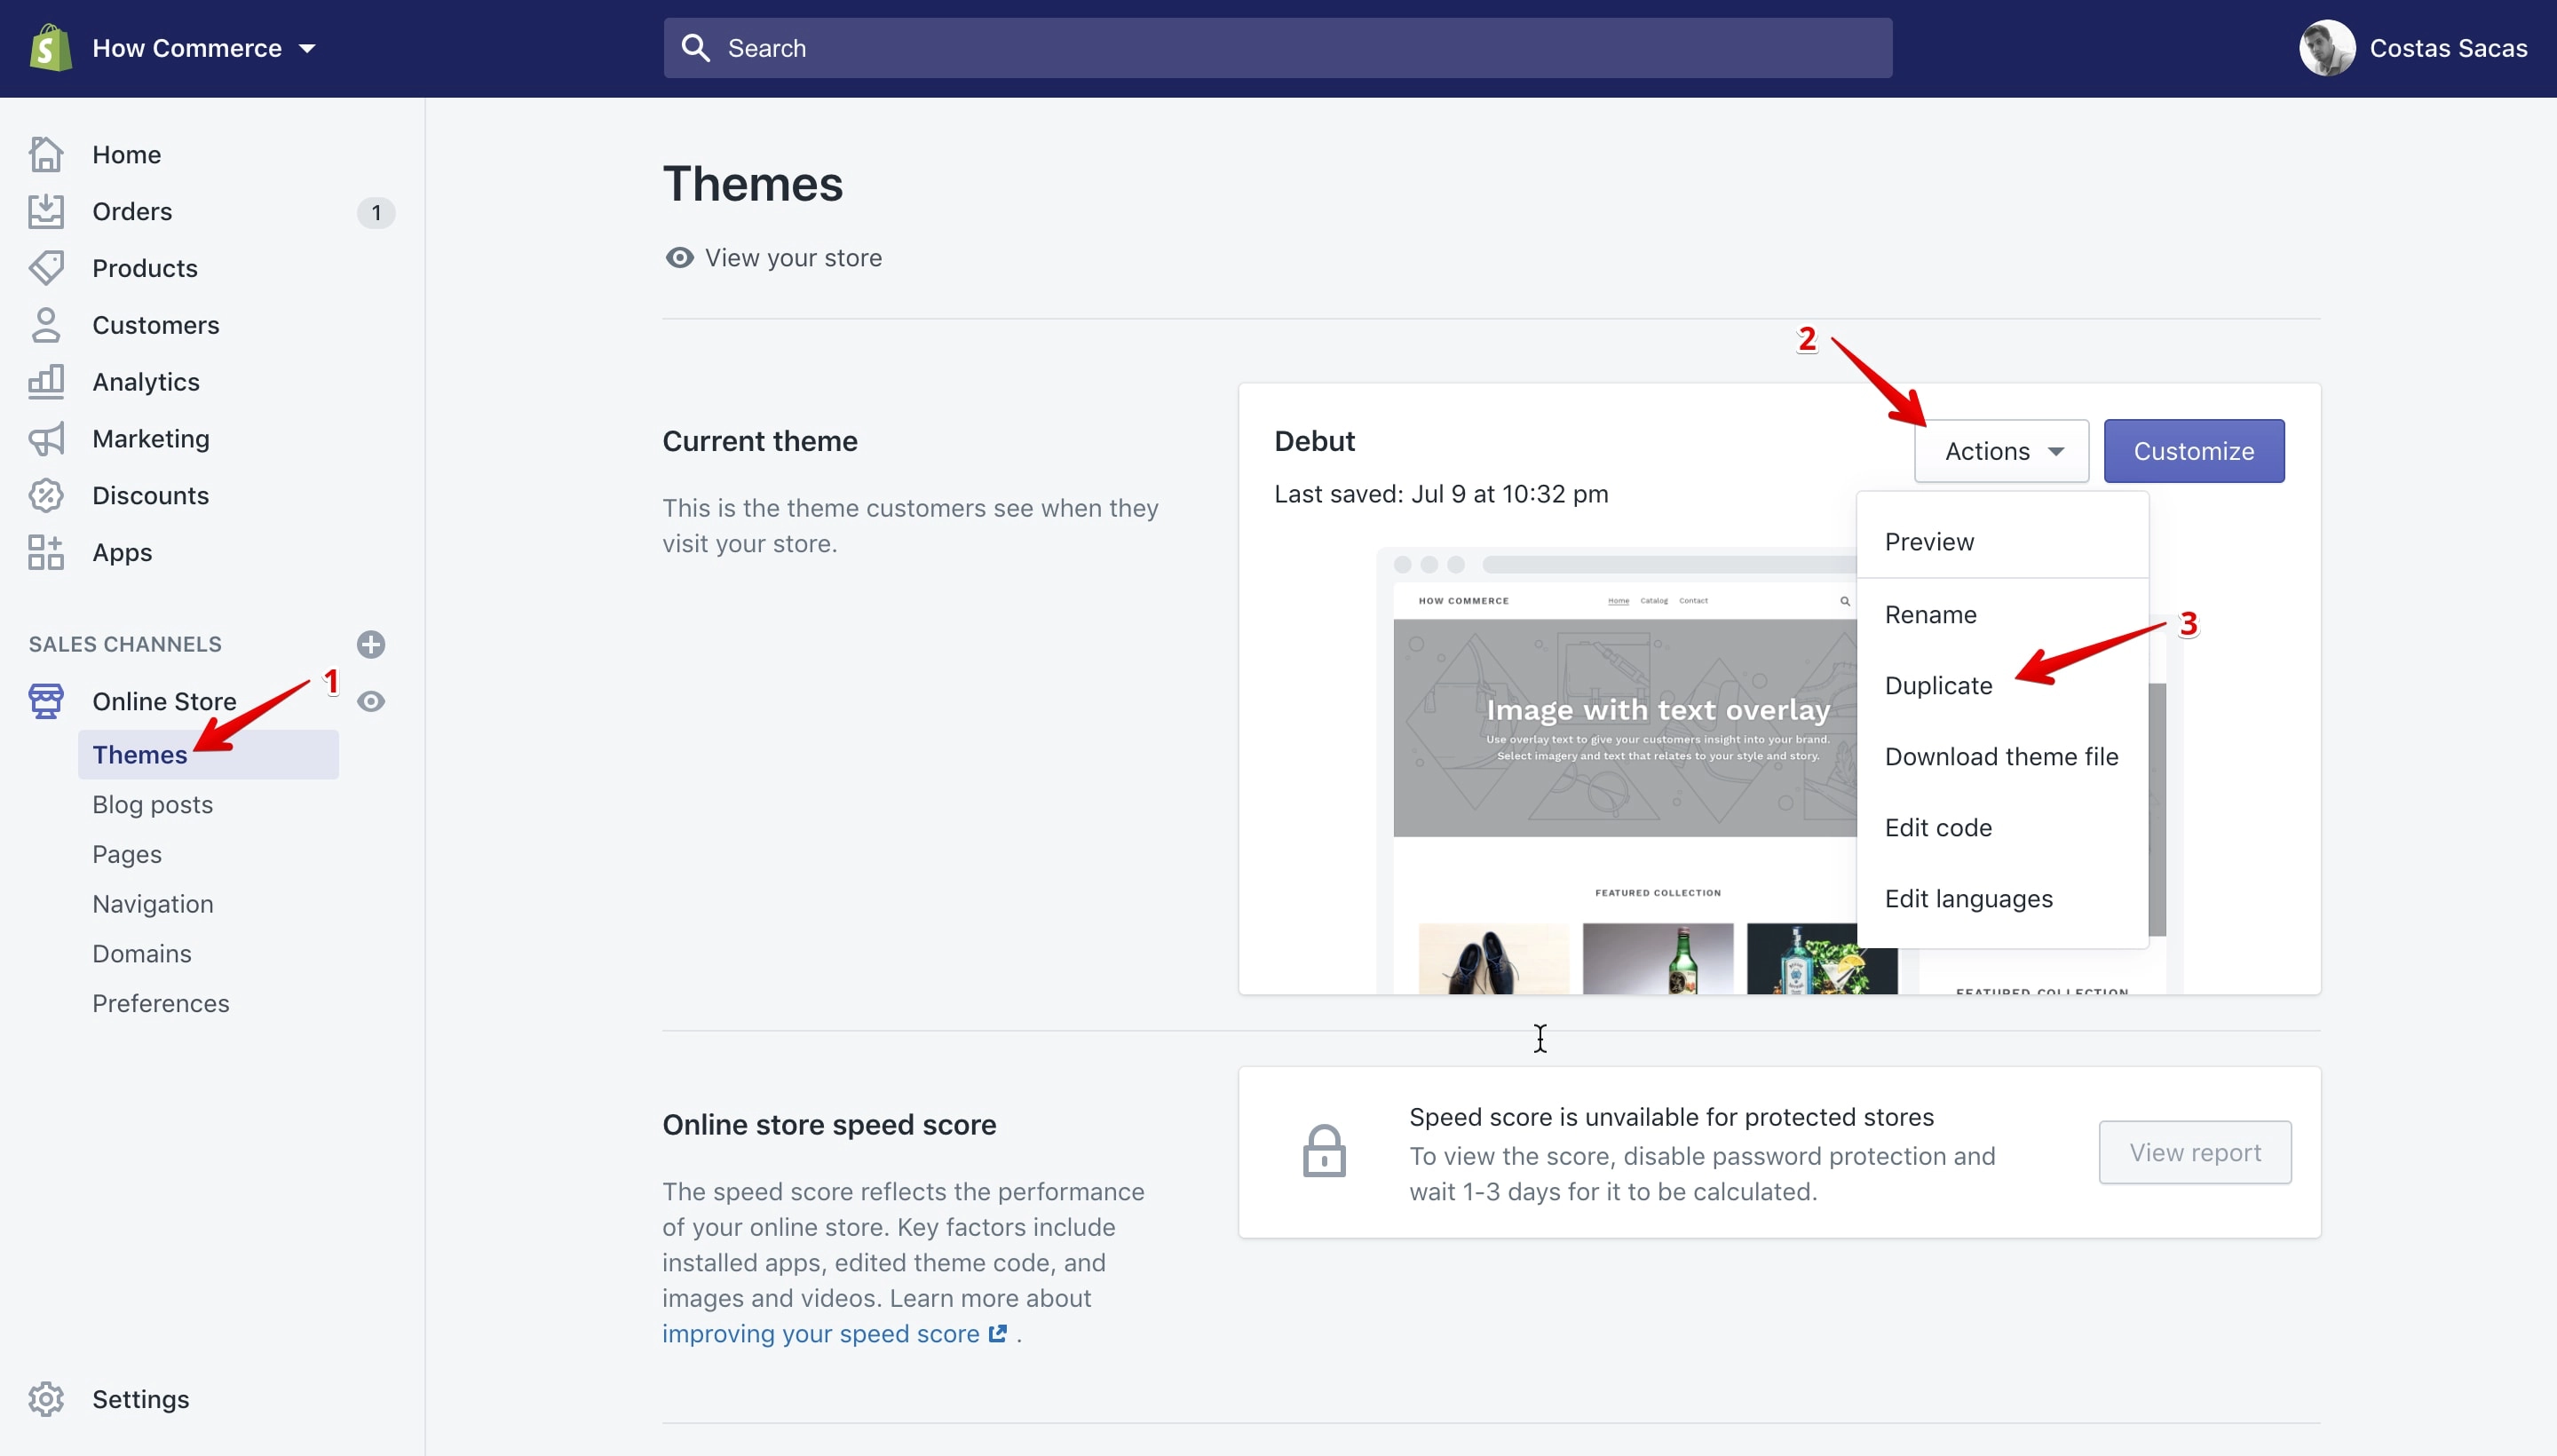
Click on the “Duplicate” option from the drop-down menu (marked with 3 in the image above) to duplicate the theme.
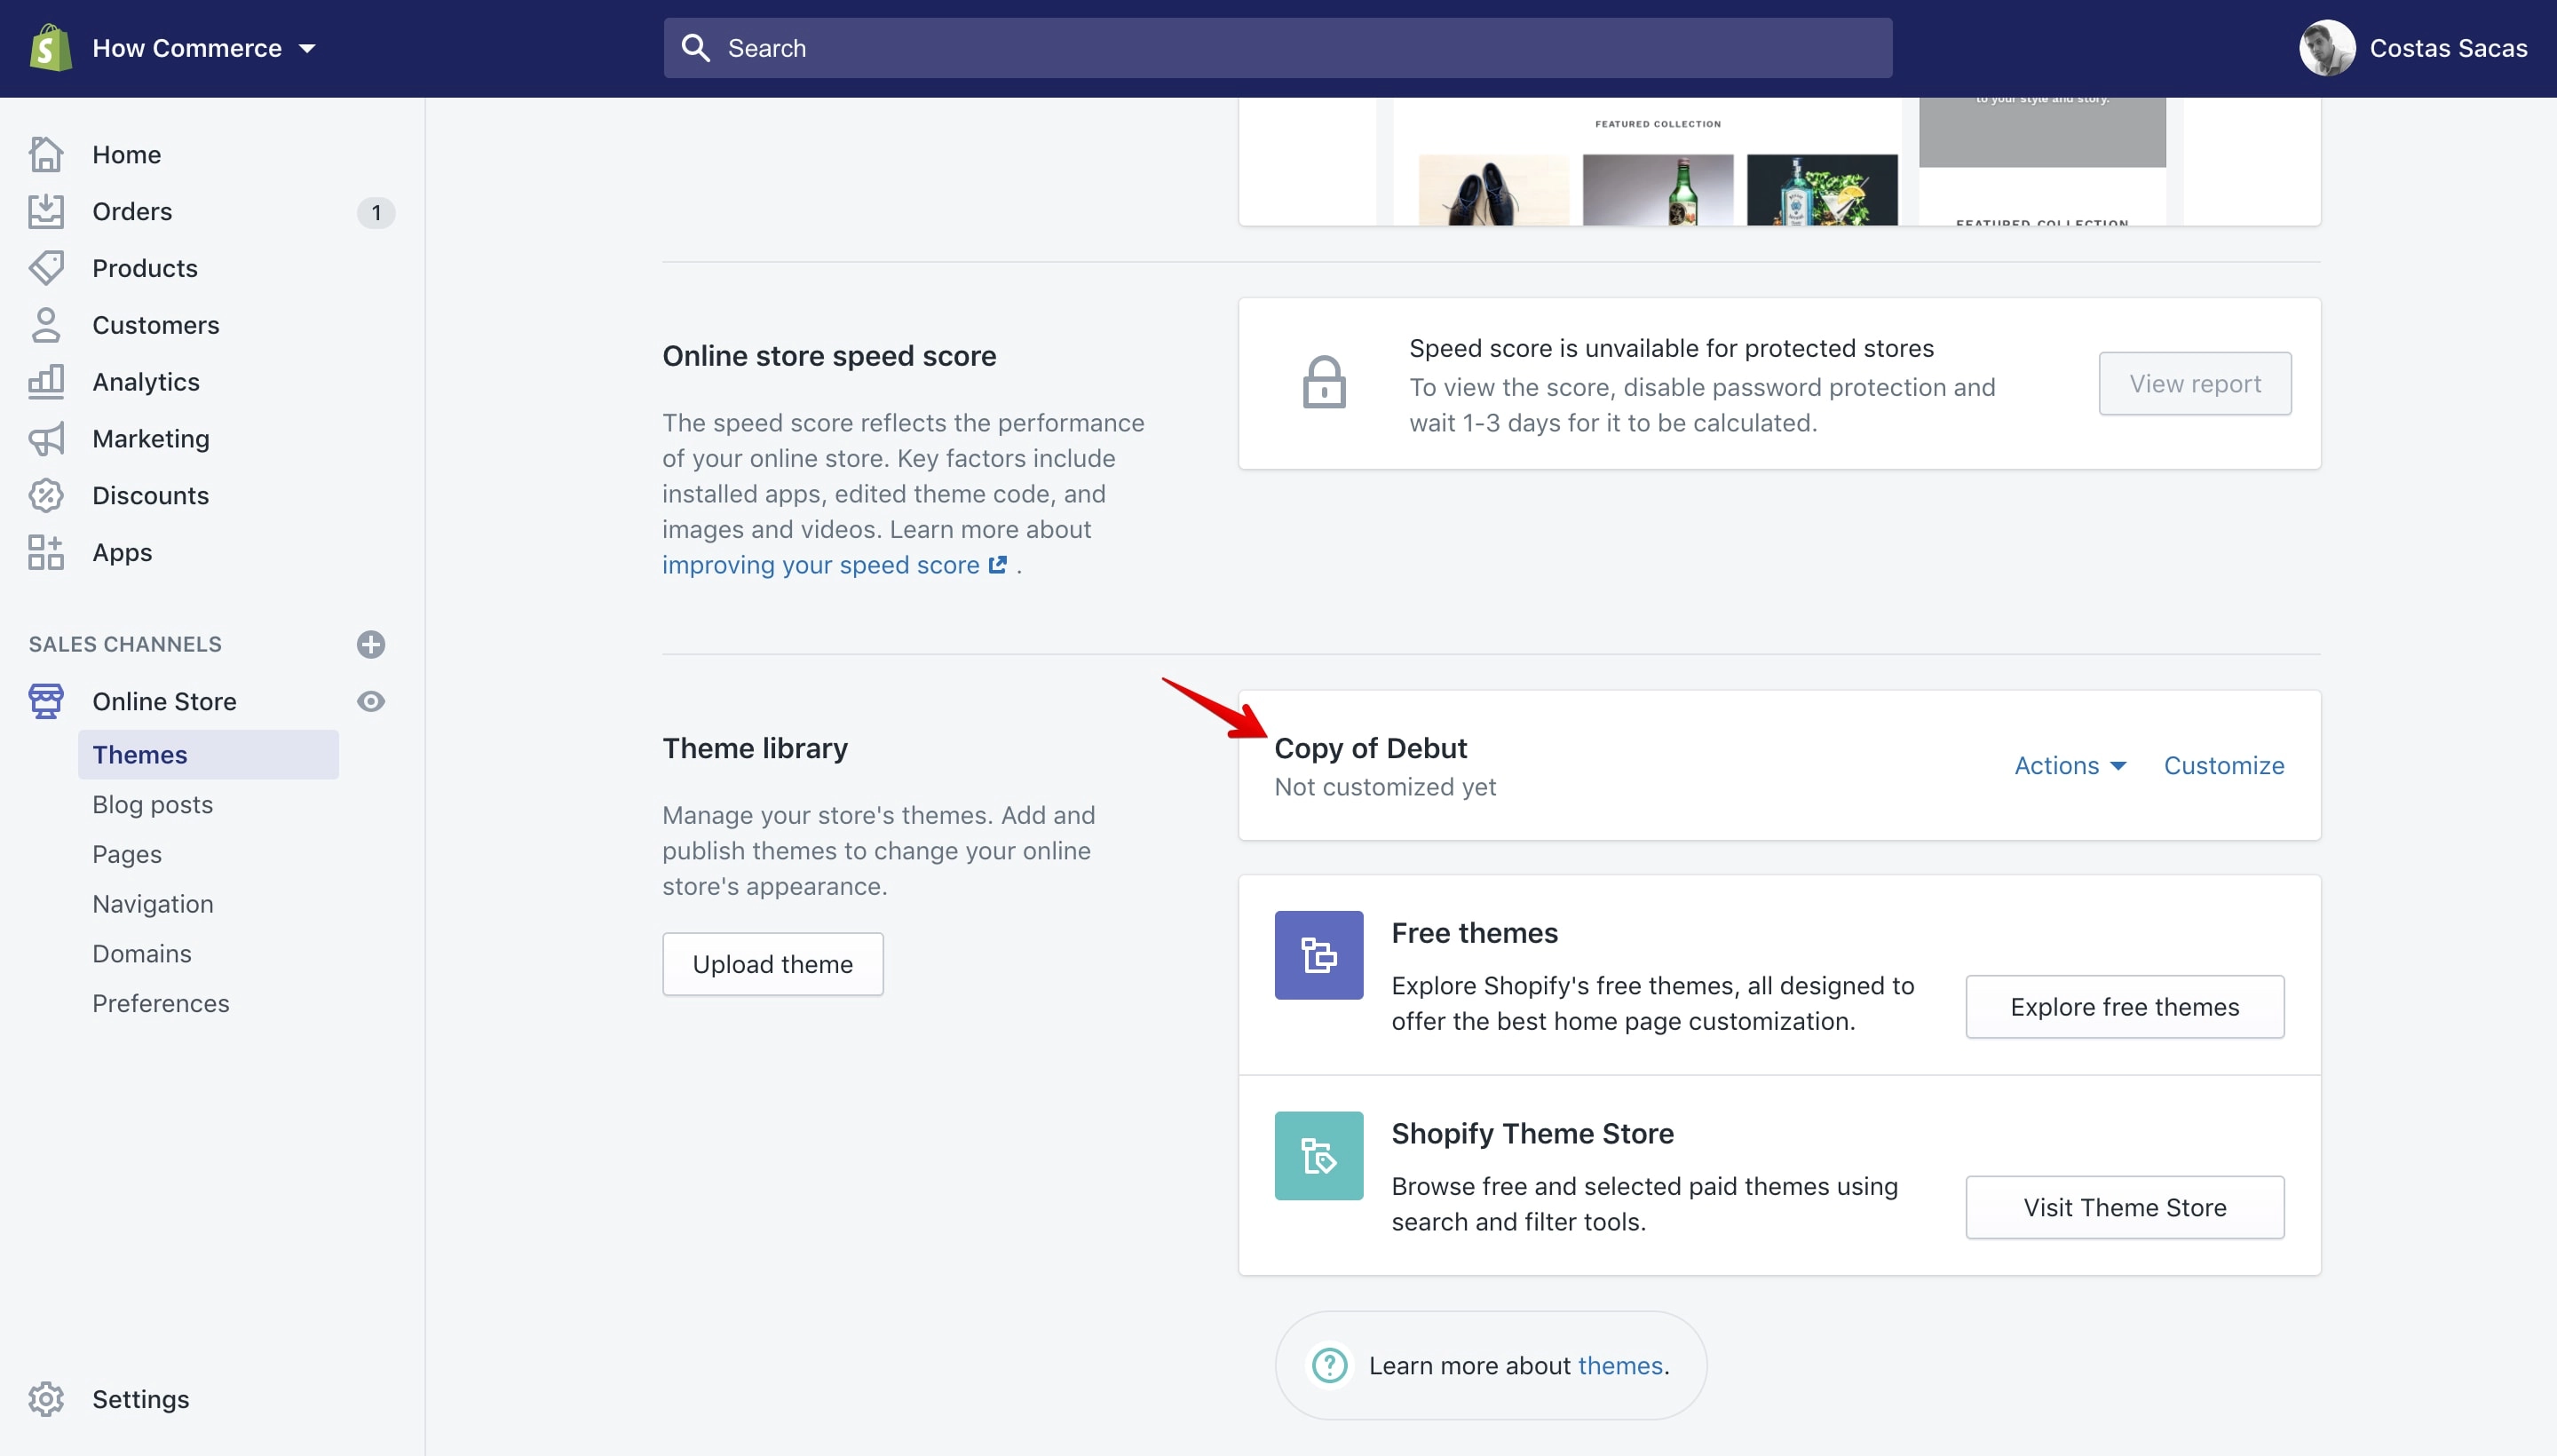
After you do that your new duplicate will be listed below the “Online store speed score”:
Future publishing
Future publishing allows you to set dates and time to products, collections, pages, or blog posts to make them available to your users automatically at a certain time without your interaction.
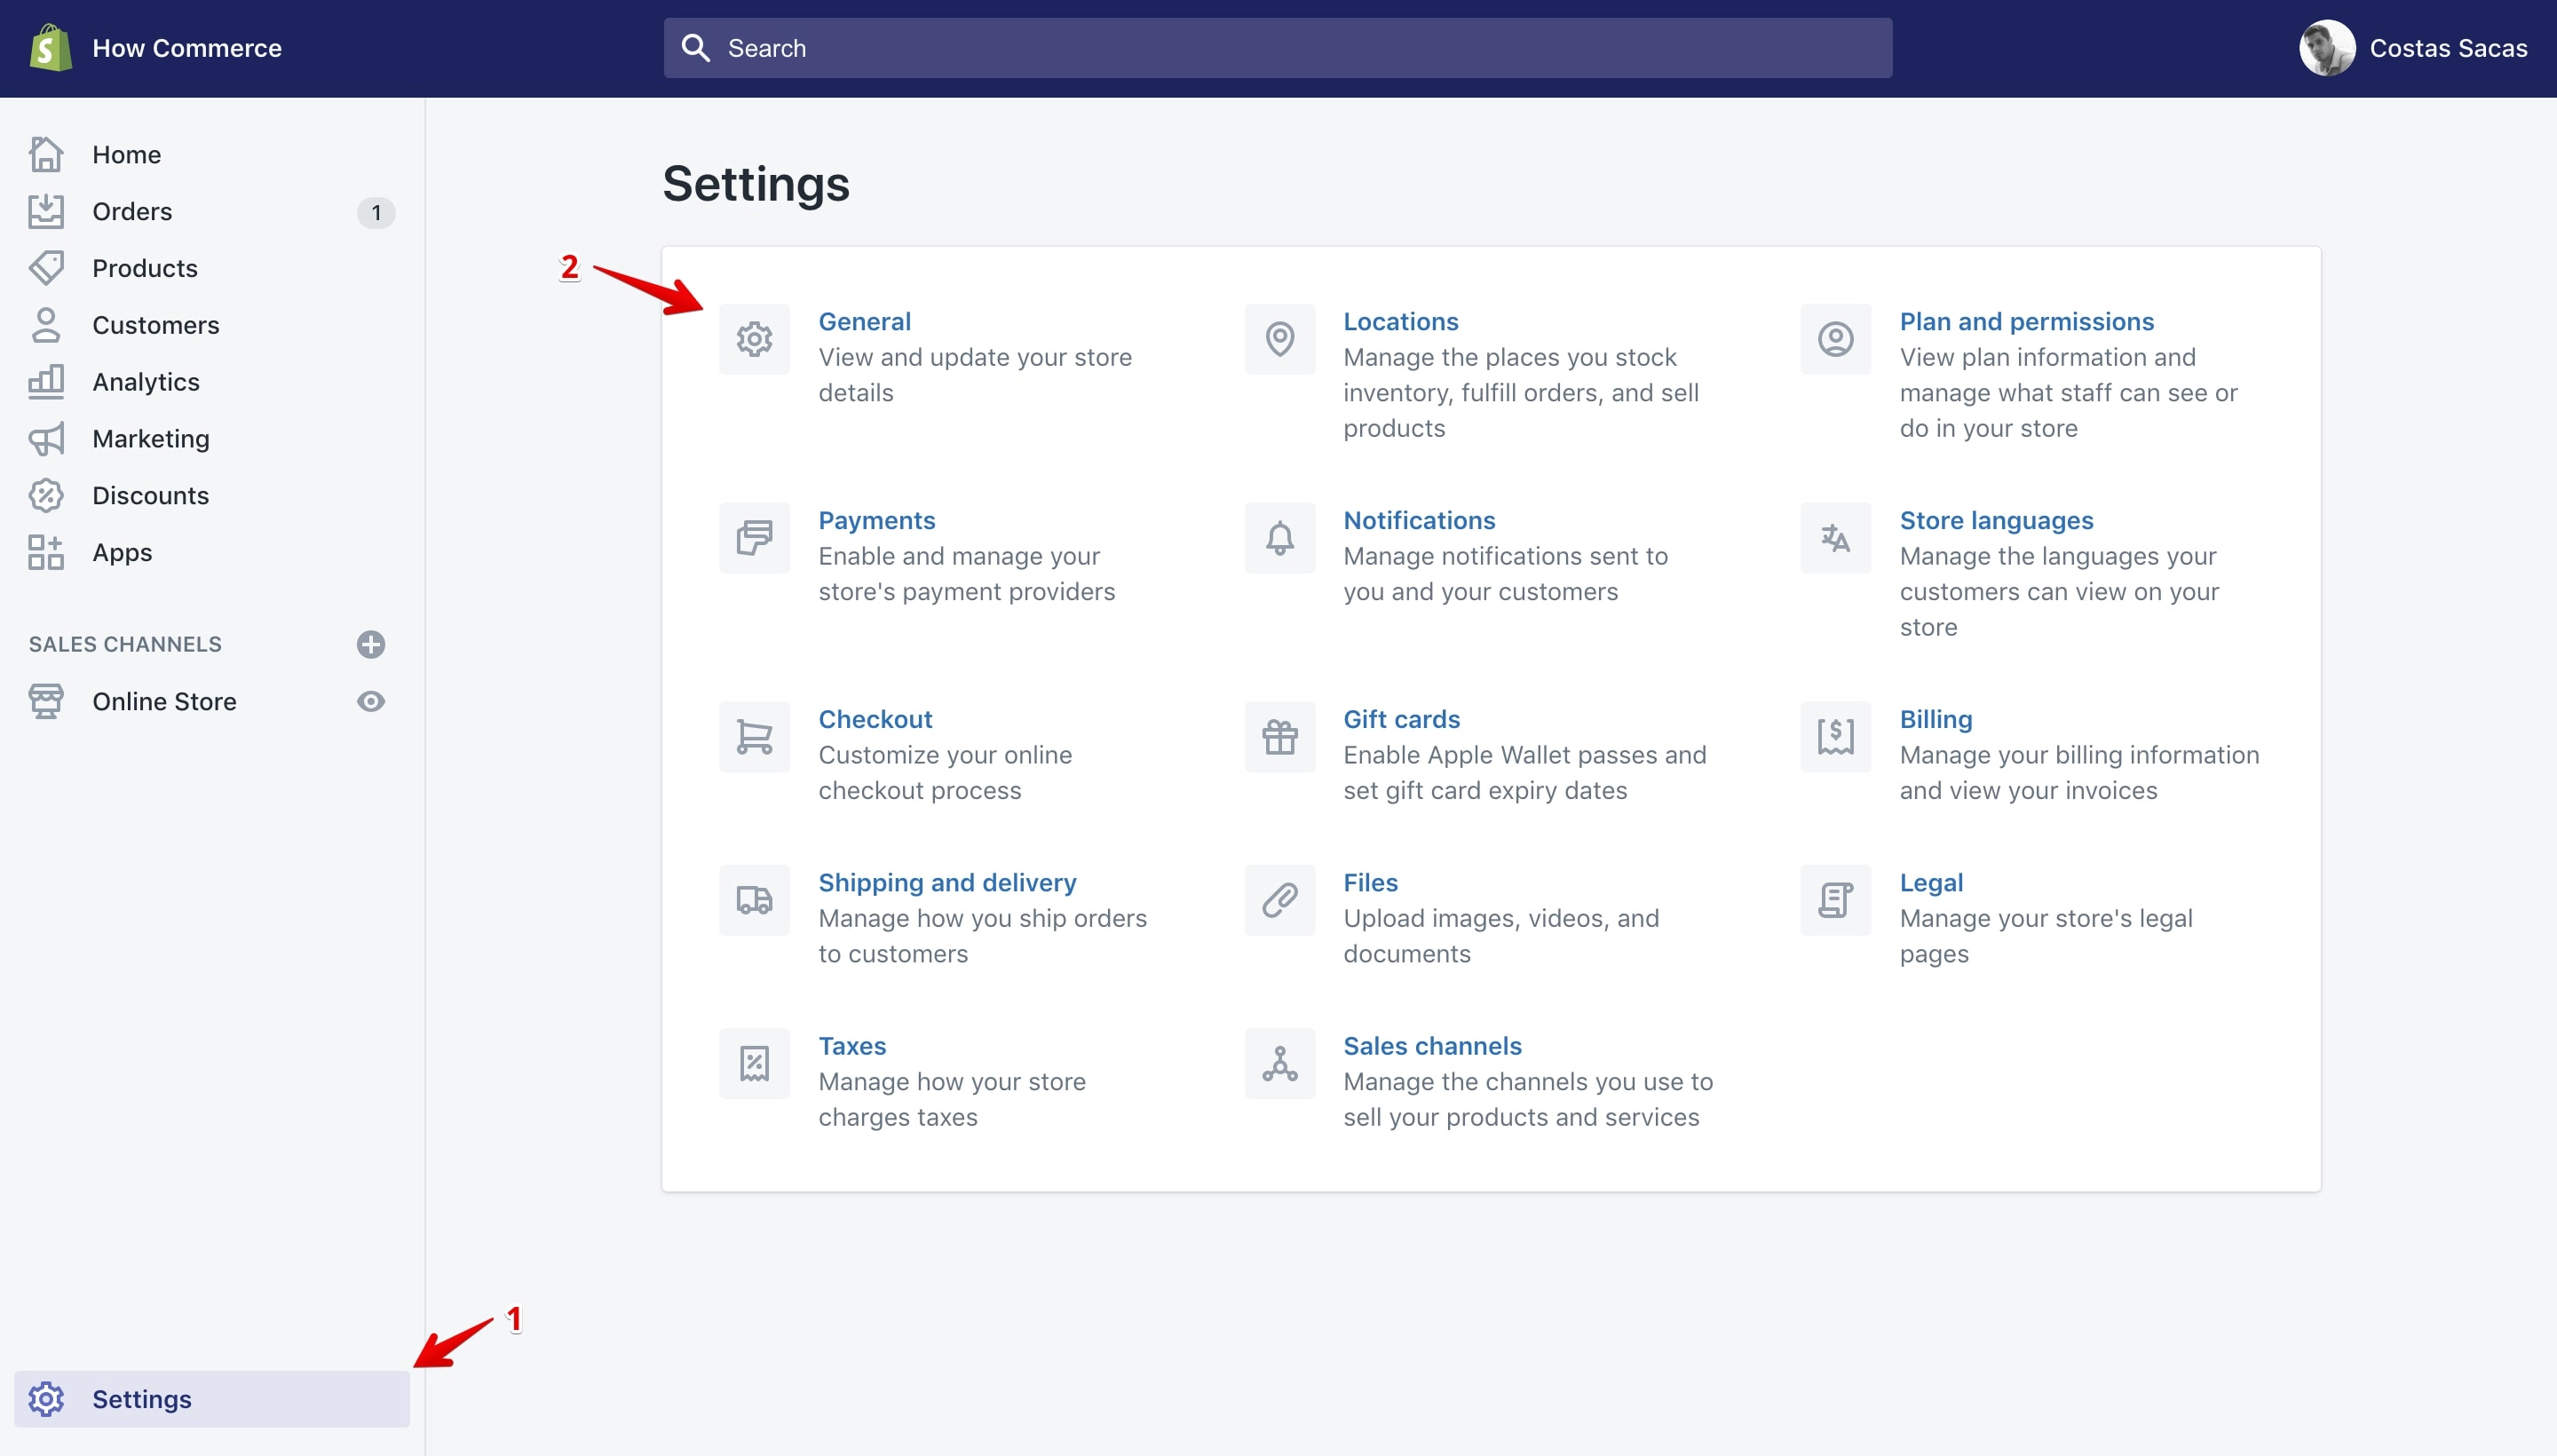
First you need to make sure that your time zone is set up correctly. To do that go to “Settings” (marked with 1 in the image below) and after that to the “General” section (marked with 2 in the image below) :
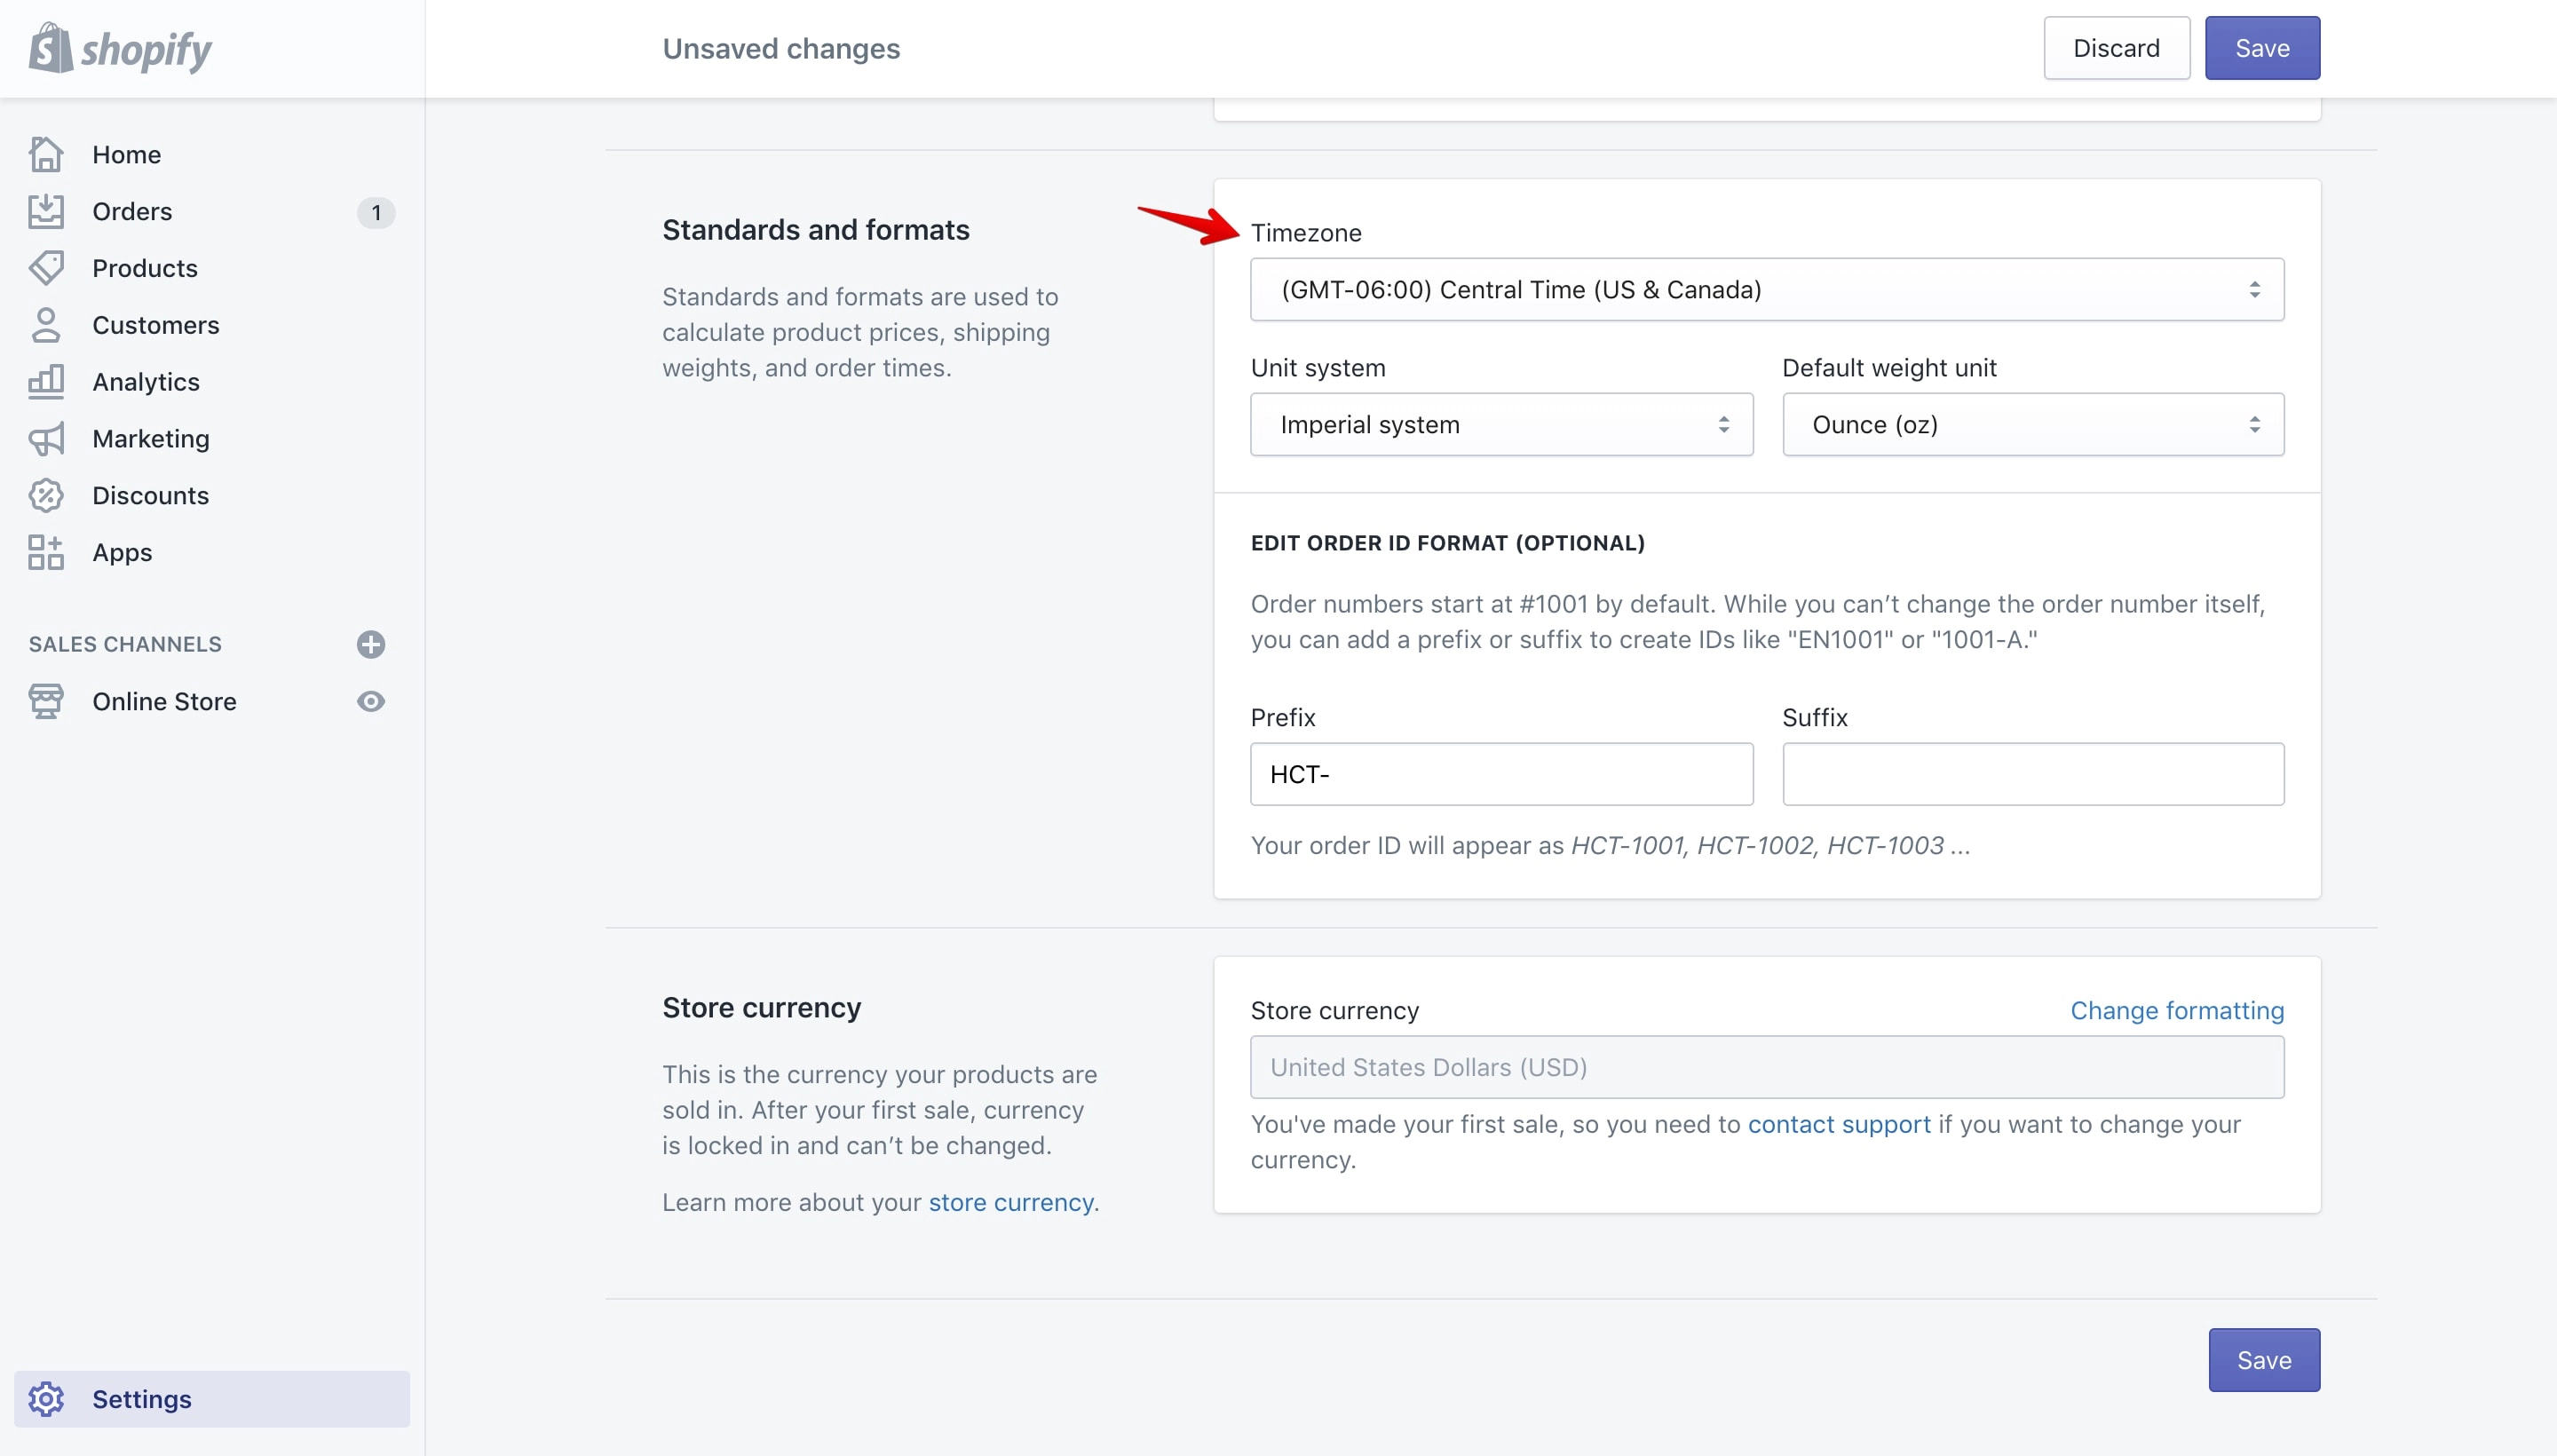
Now go to the bottom off the page to “Standards and formats” section and click on the select option under “Timezone” to select your time zone:
Set a future publish date for a product
Go to the “Products” page (marked with 1 in the image below) and select an unpublished product or create a new one. I already have one that I’ve created above as a duplicate of an existing one (marked with 2 in the image below):
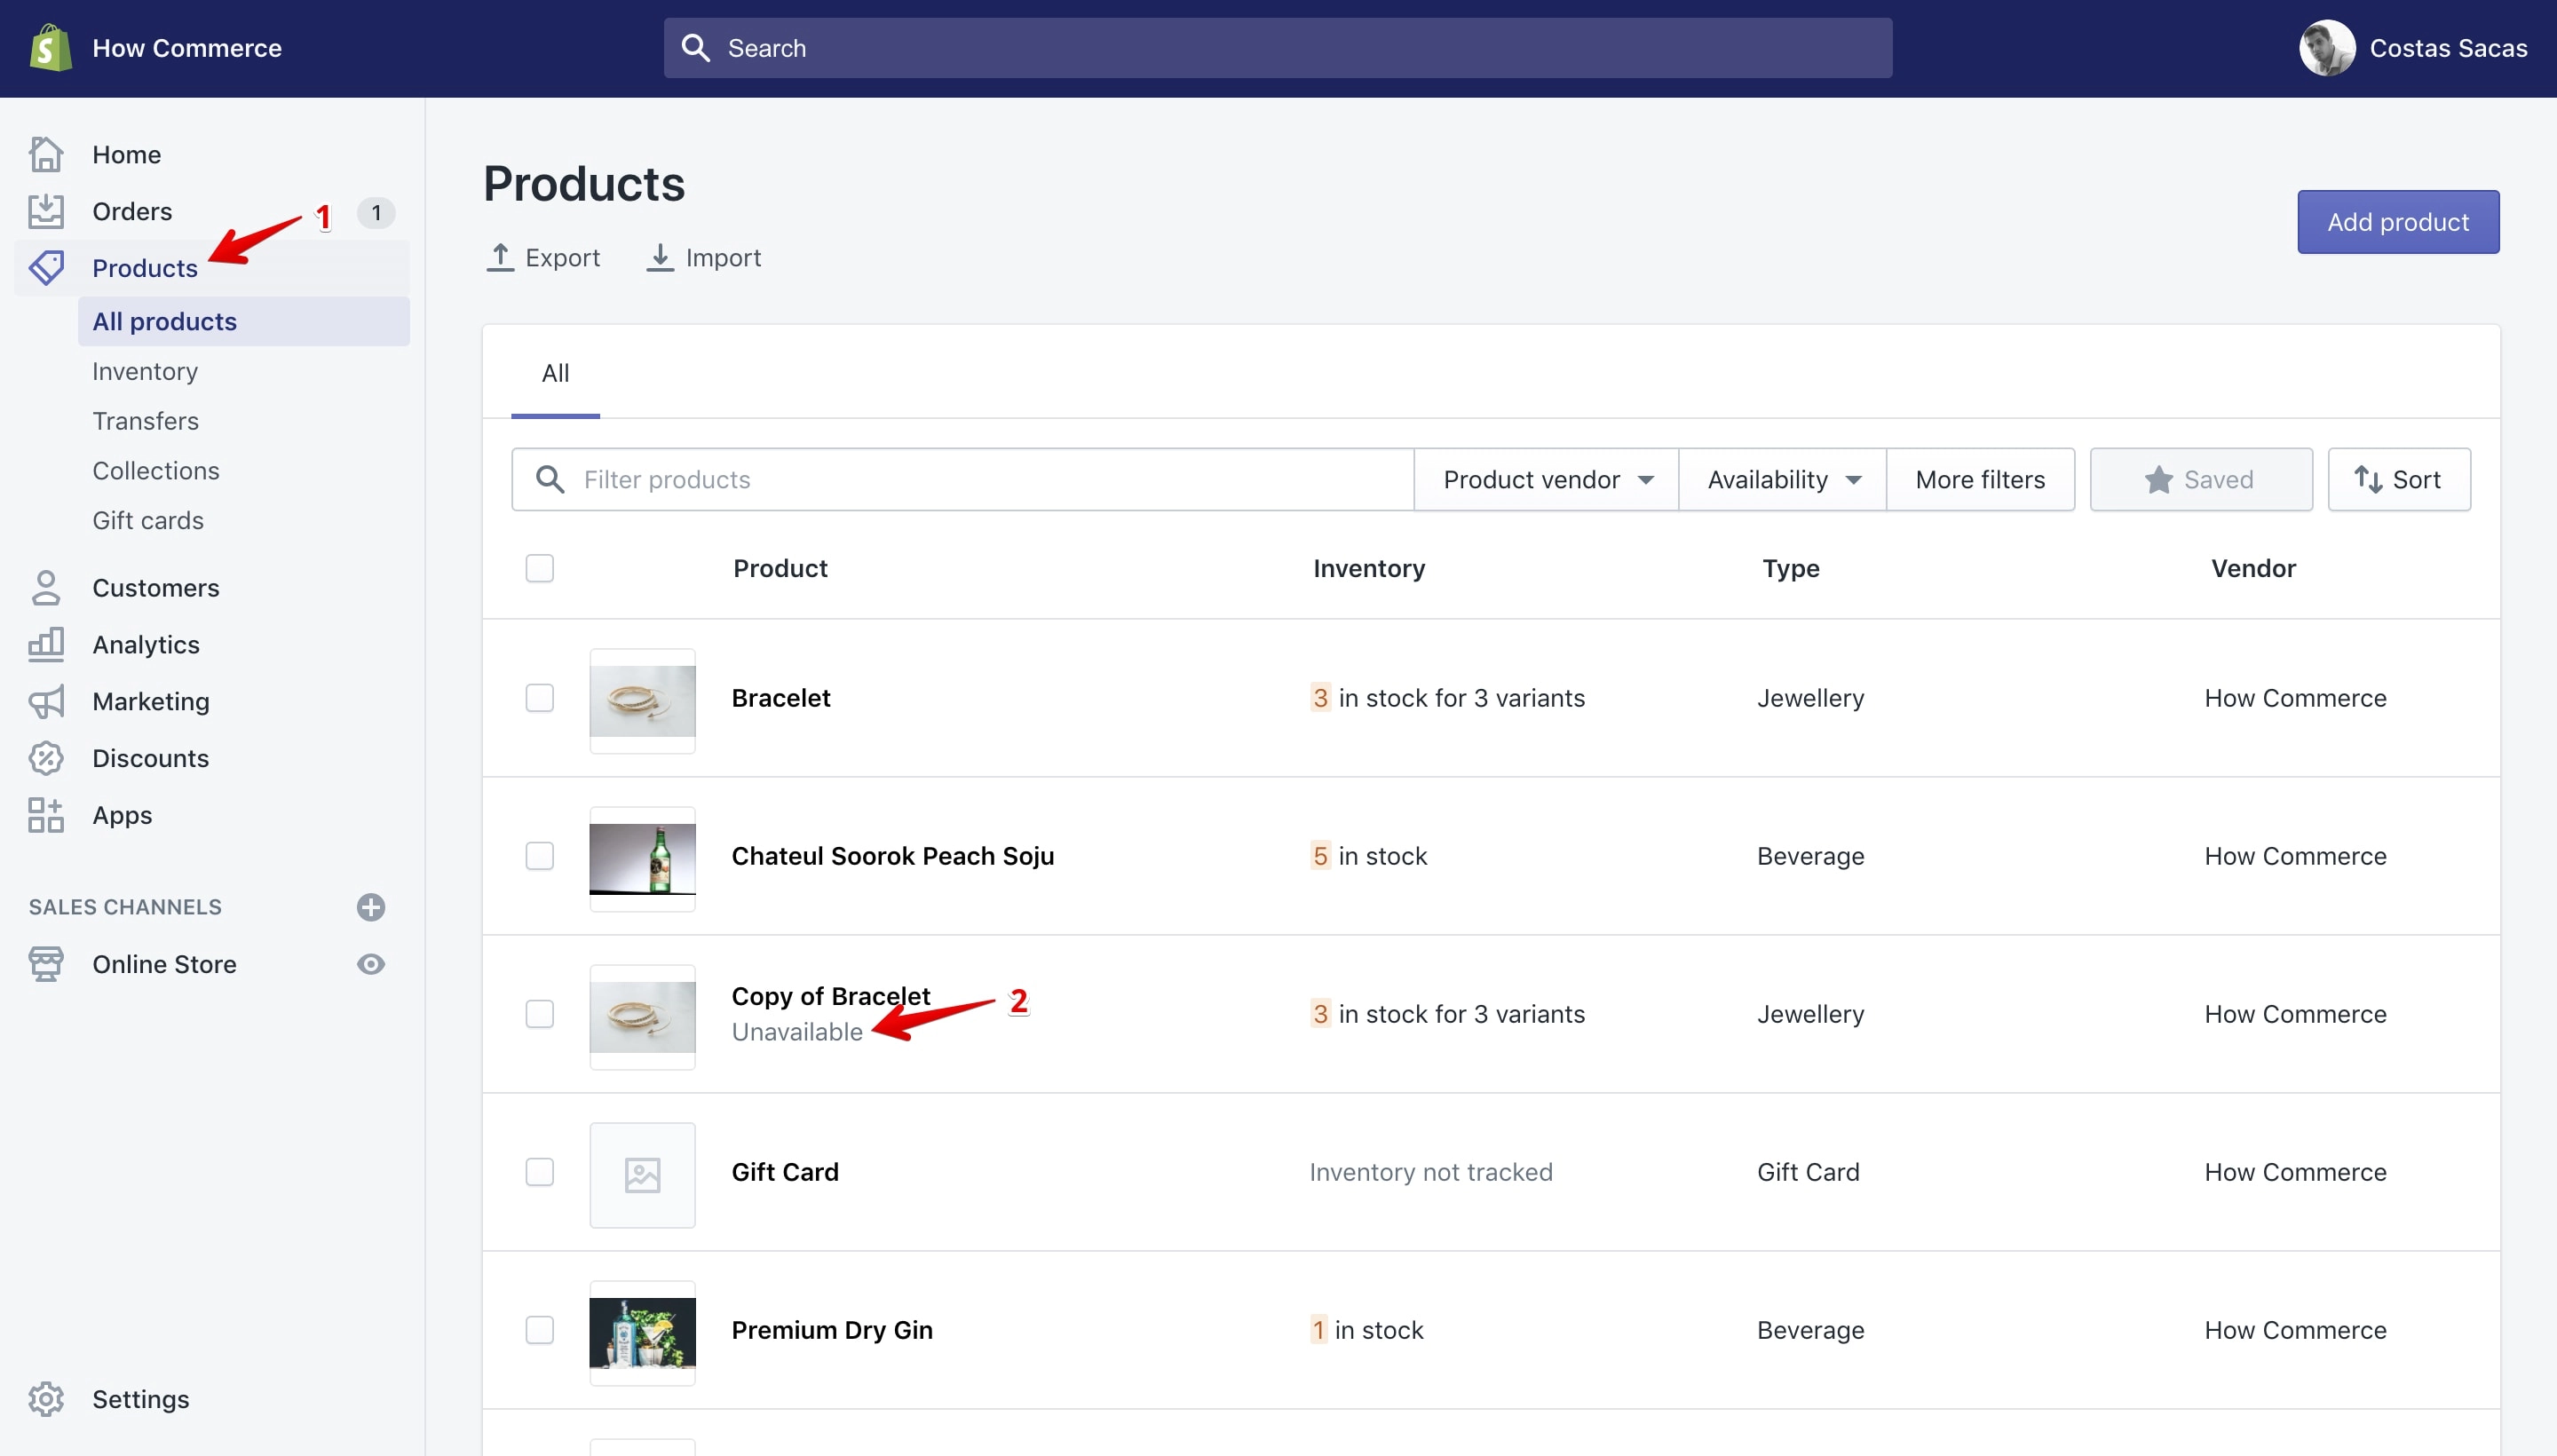
As you see the product is not available on the shop meaning that it is not published yet. I’ll set a future date on which the product will be published.
First I’ll change the product title to a more appropriate one called “Diamonds Bracelet”. This product is not assigned to any “Sales Channels”. To set a future publishing date I need to assign it first to a sales channel.
To assign it click the “Manage” button under “Product availability” section:
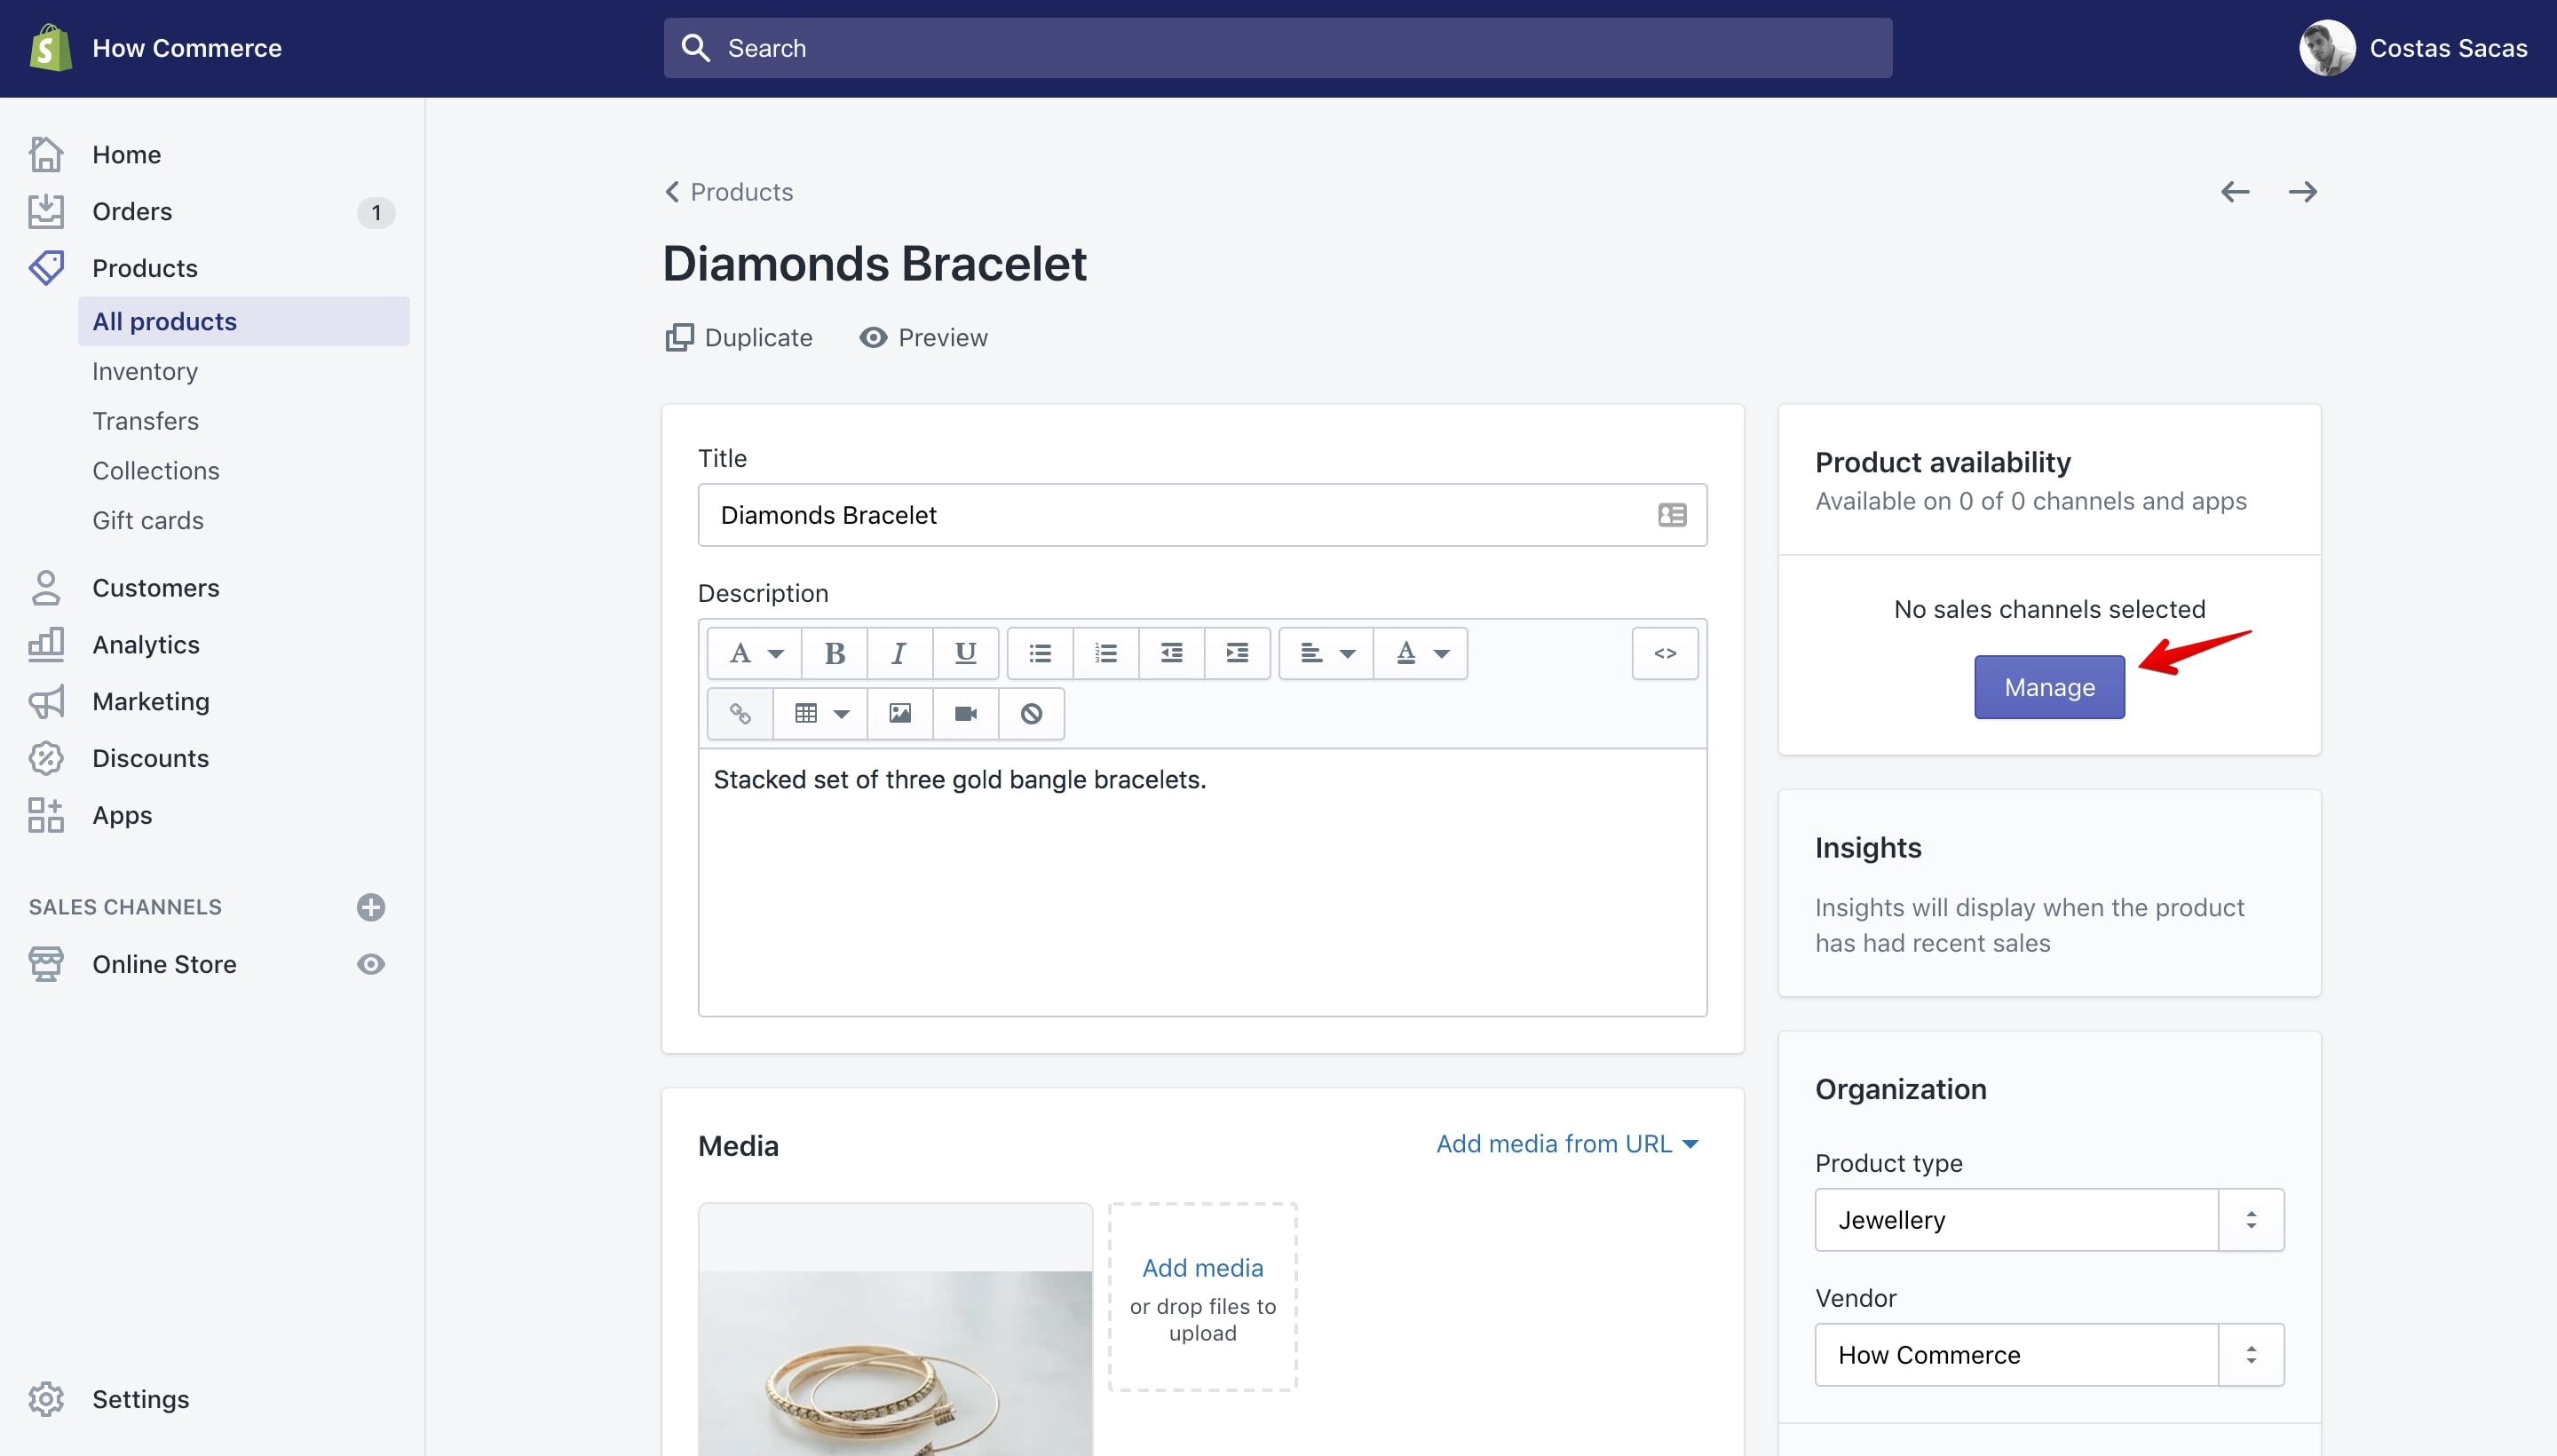
Clicking on the button will open a pop-up with all the “Sales Channels” available on your Shopify store:
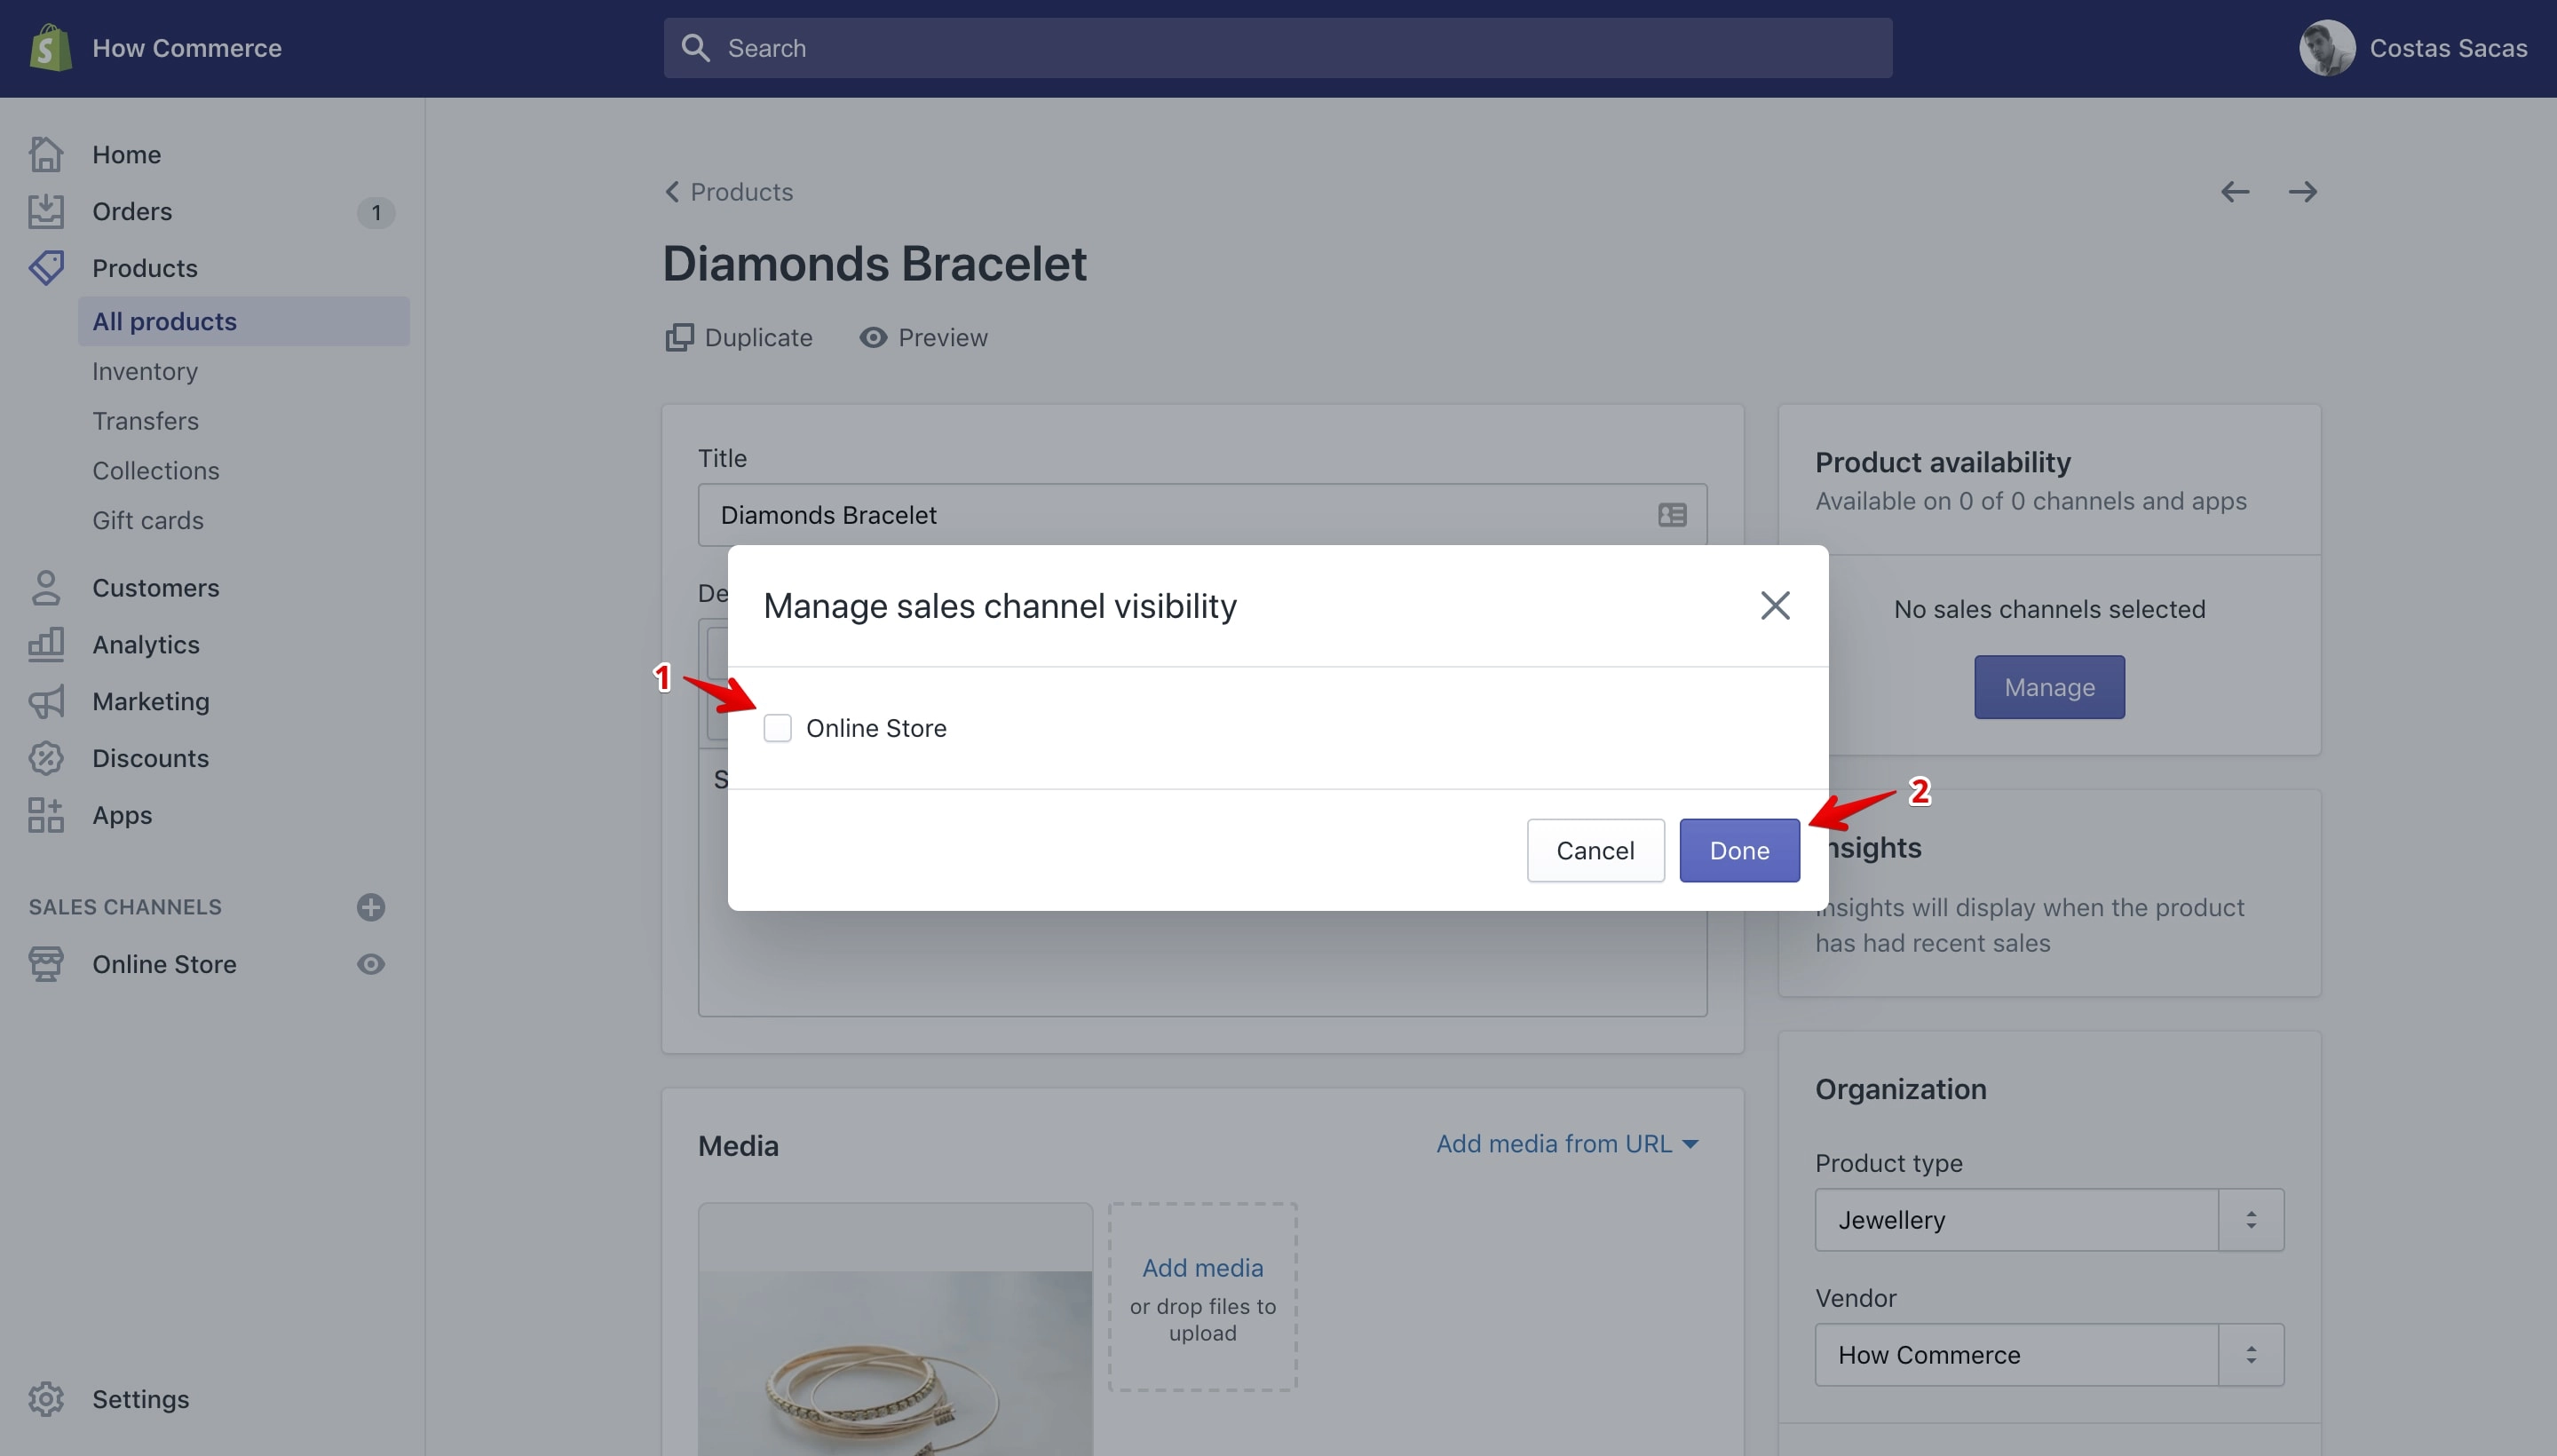
For the moment I have only one “Sale channel” on my Shopify store and that is the “Online Store” sales channel (marked with 1 in the image above). I’ll select it and click the “Done” button (marked with 2 in the image above) to assign the product to that channel.
Now click the “Save” button to save your new changes.
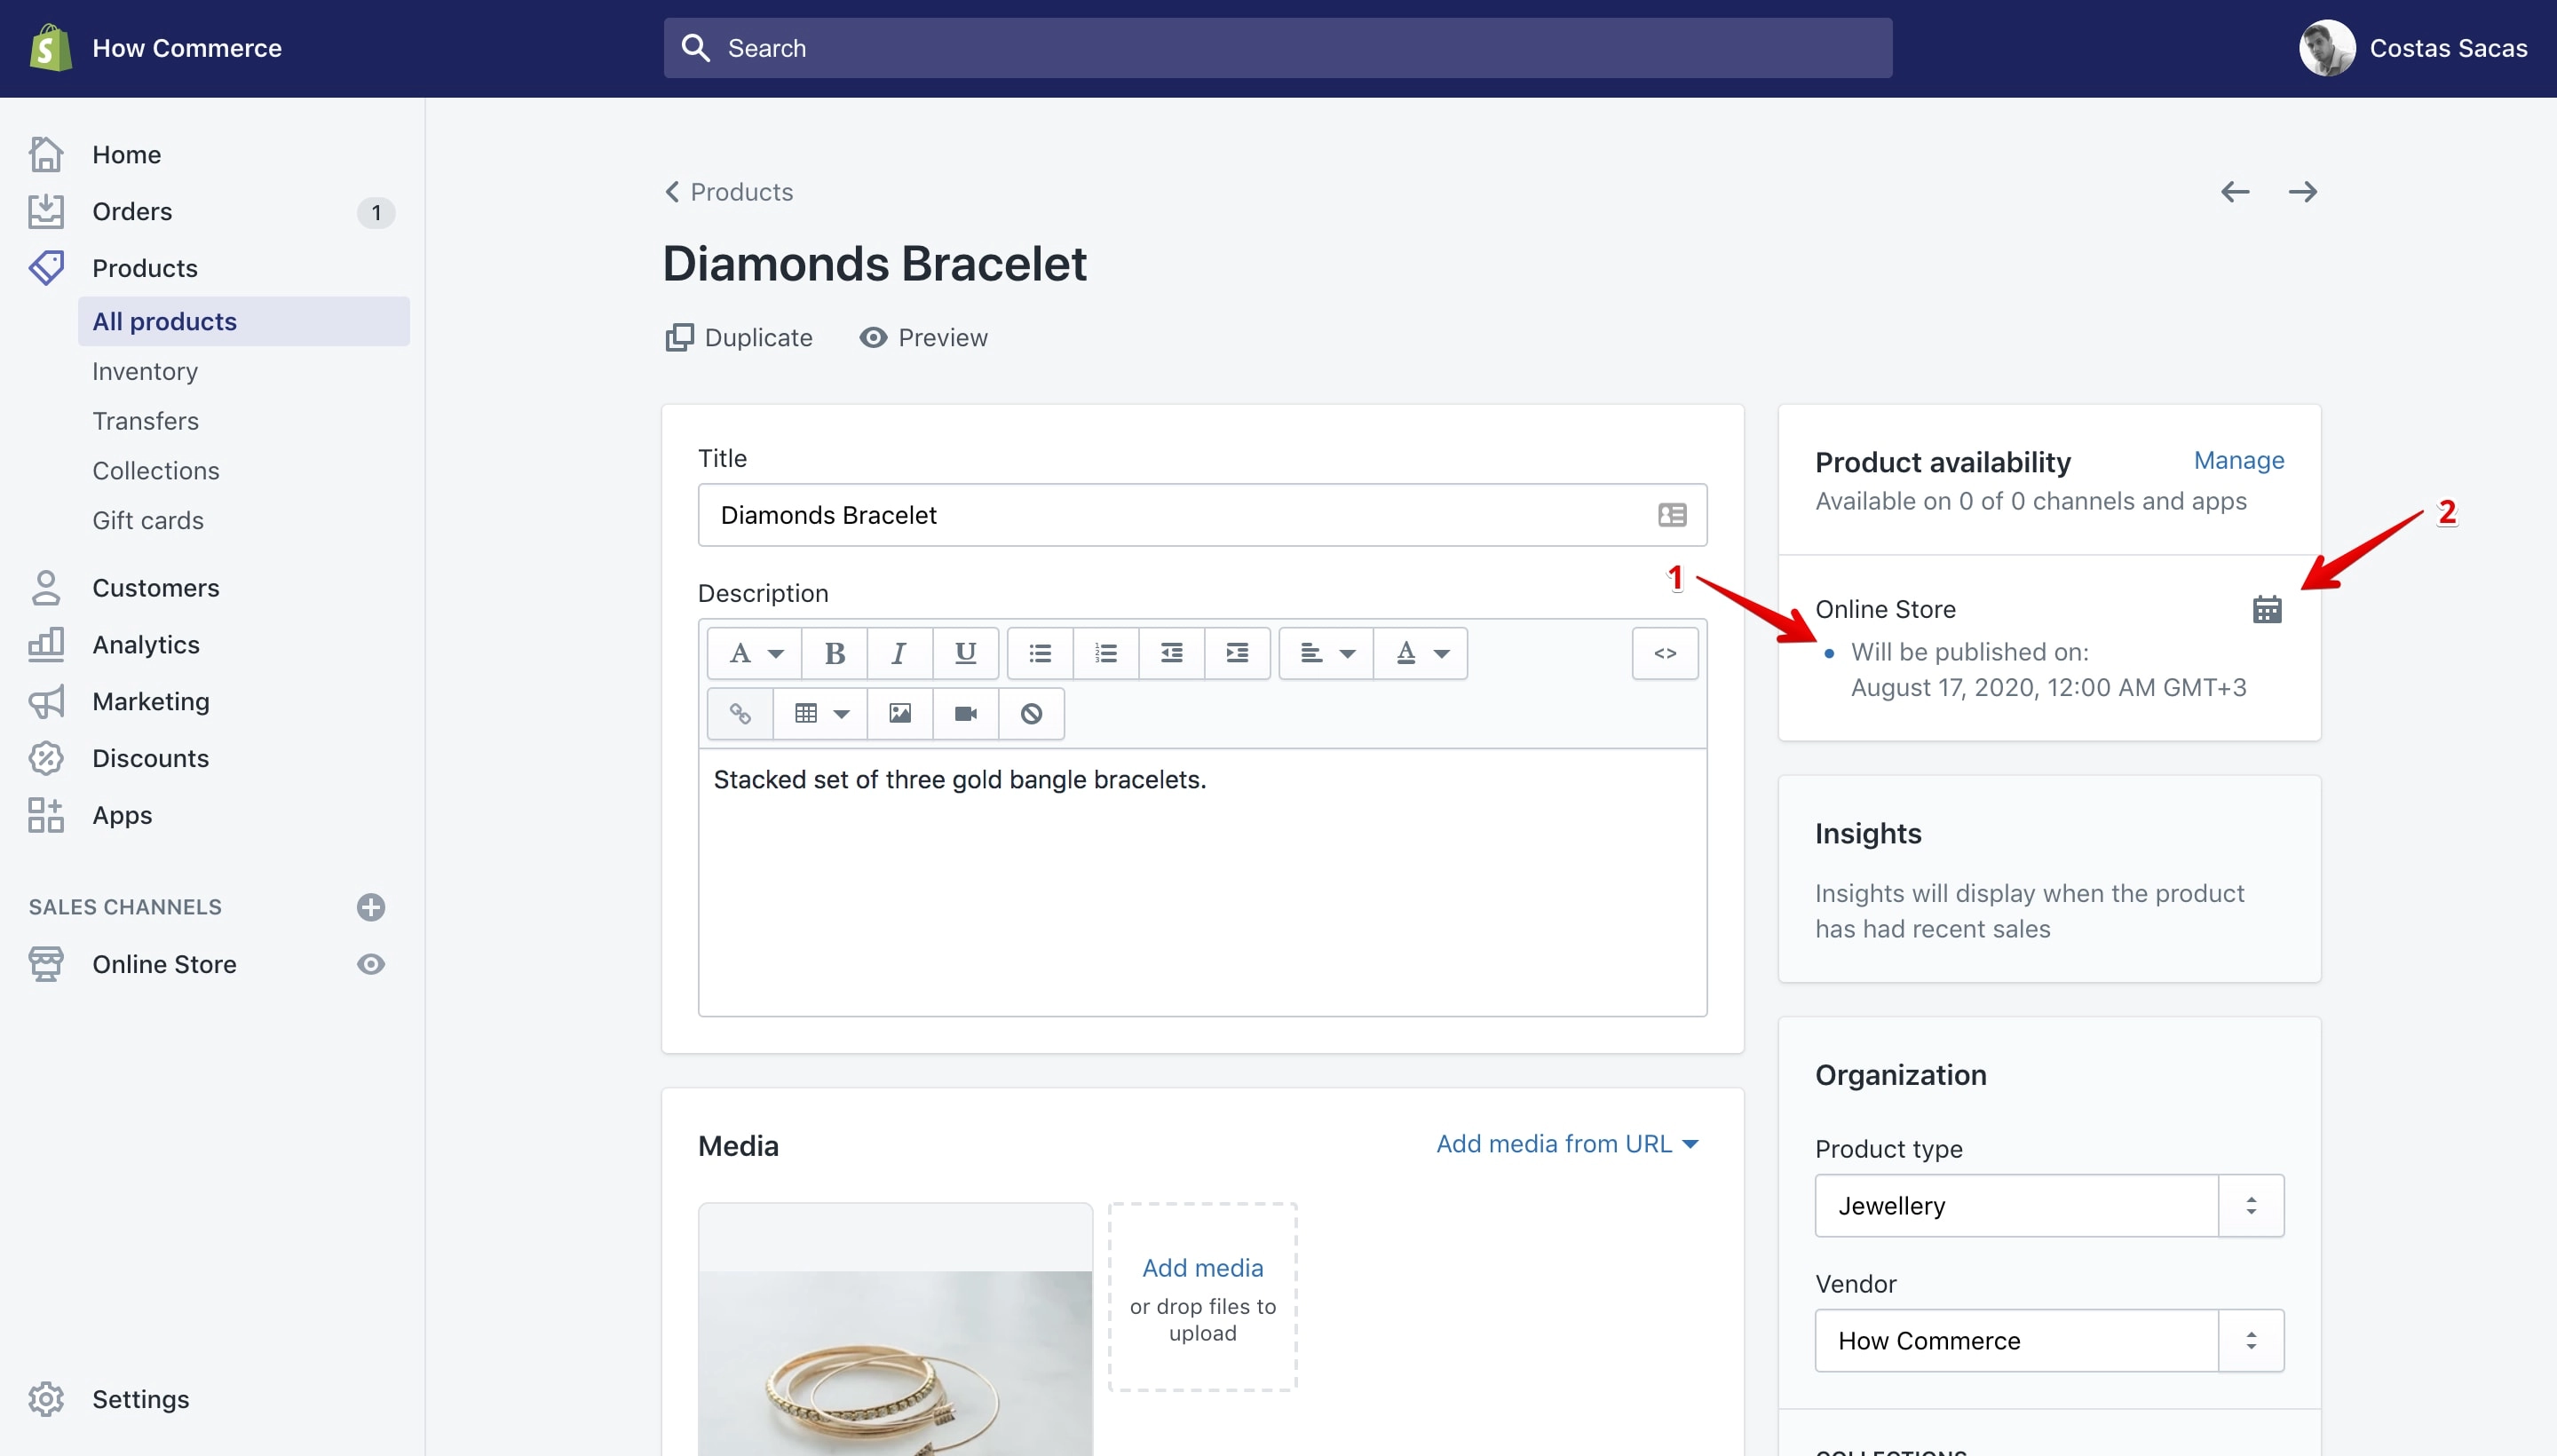
After you assign the new channel you can see it (marked with 1 in the image below) under the “Product Availability” section. You can also see the product availability across the sales channels and apps if there is more than one (marked with 2 in the image below).
What we are interested in for our tutorial is the little calendar icon (marked with 3 in the image below). This icon will allow us to set a future publishing date.
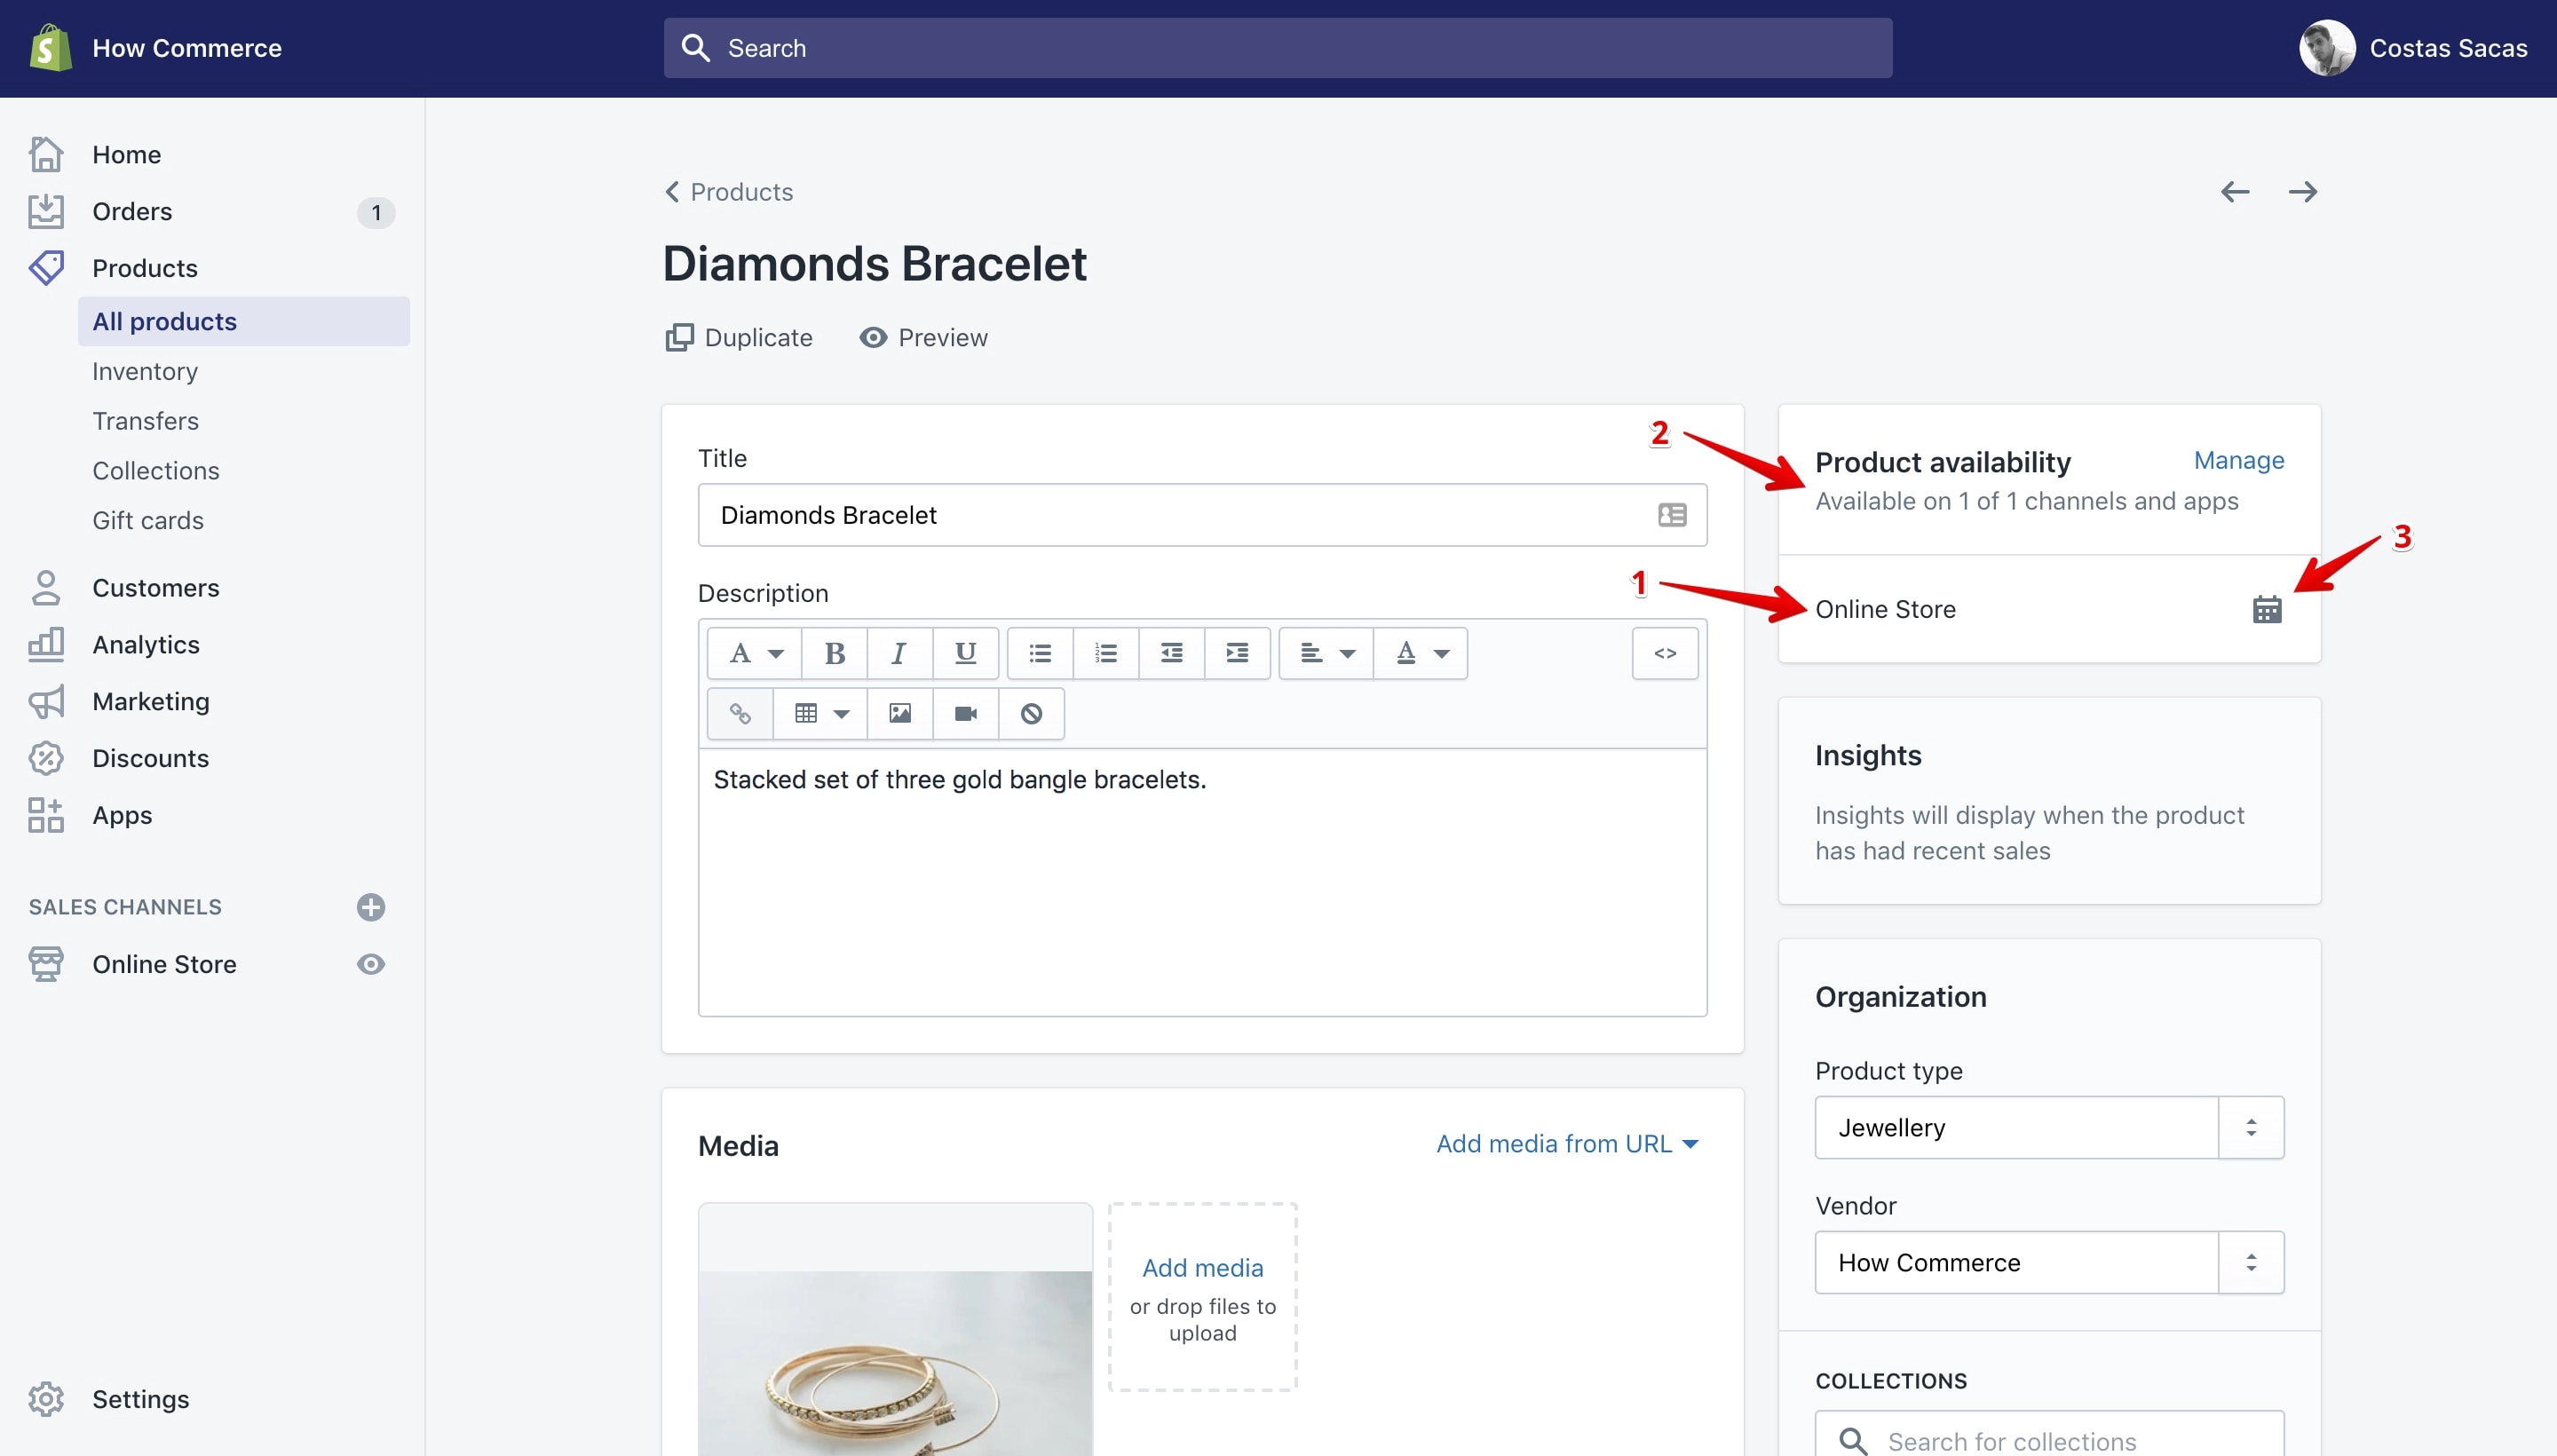
Click on the “Calendar icon” (marked with 1 in the image below):
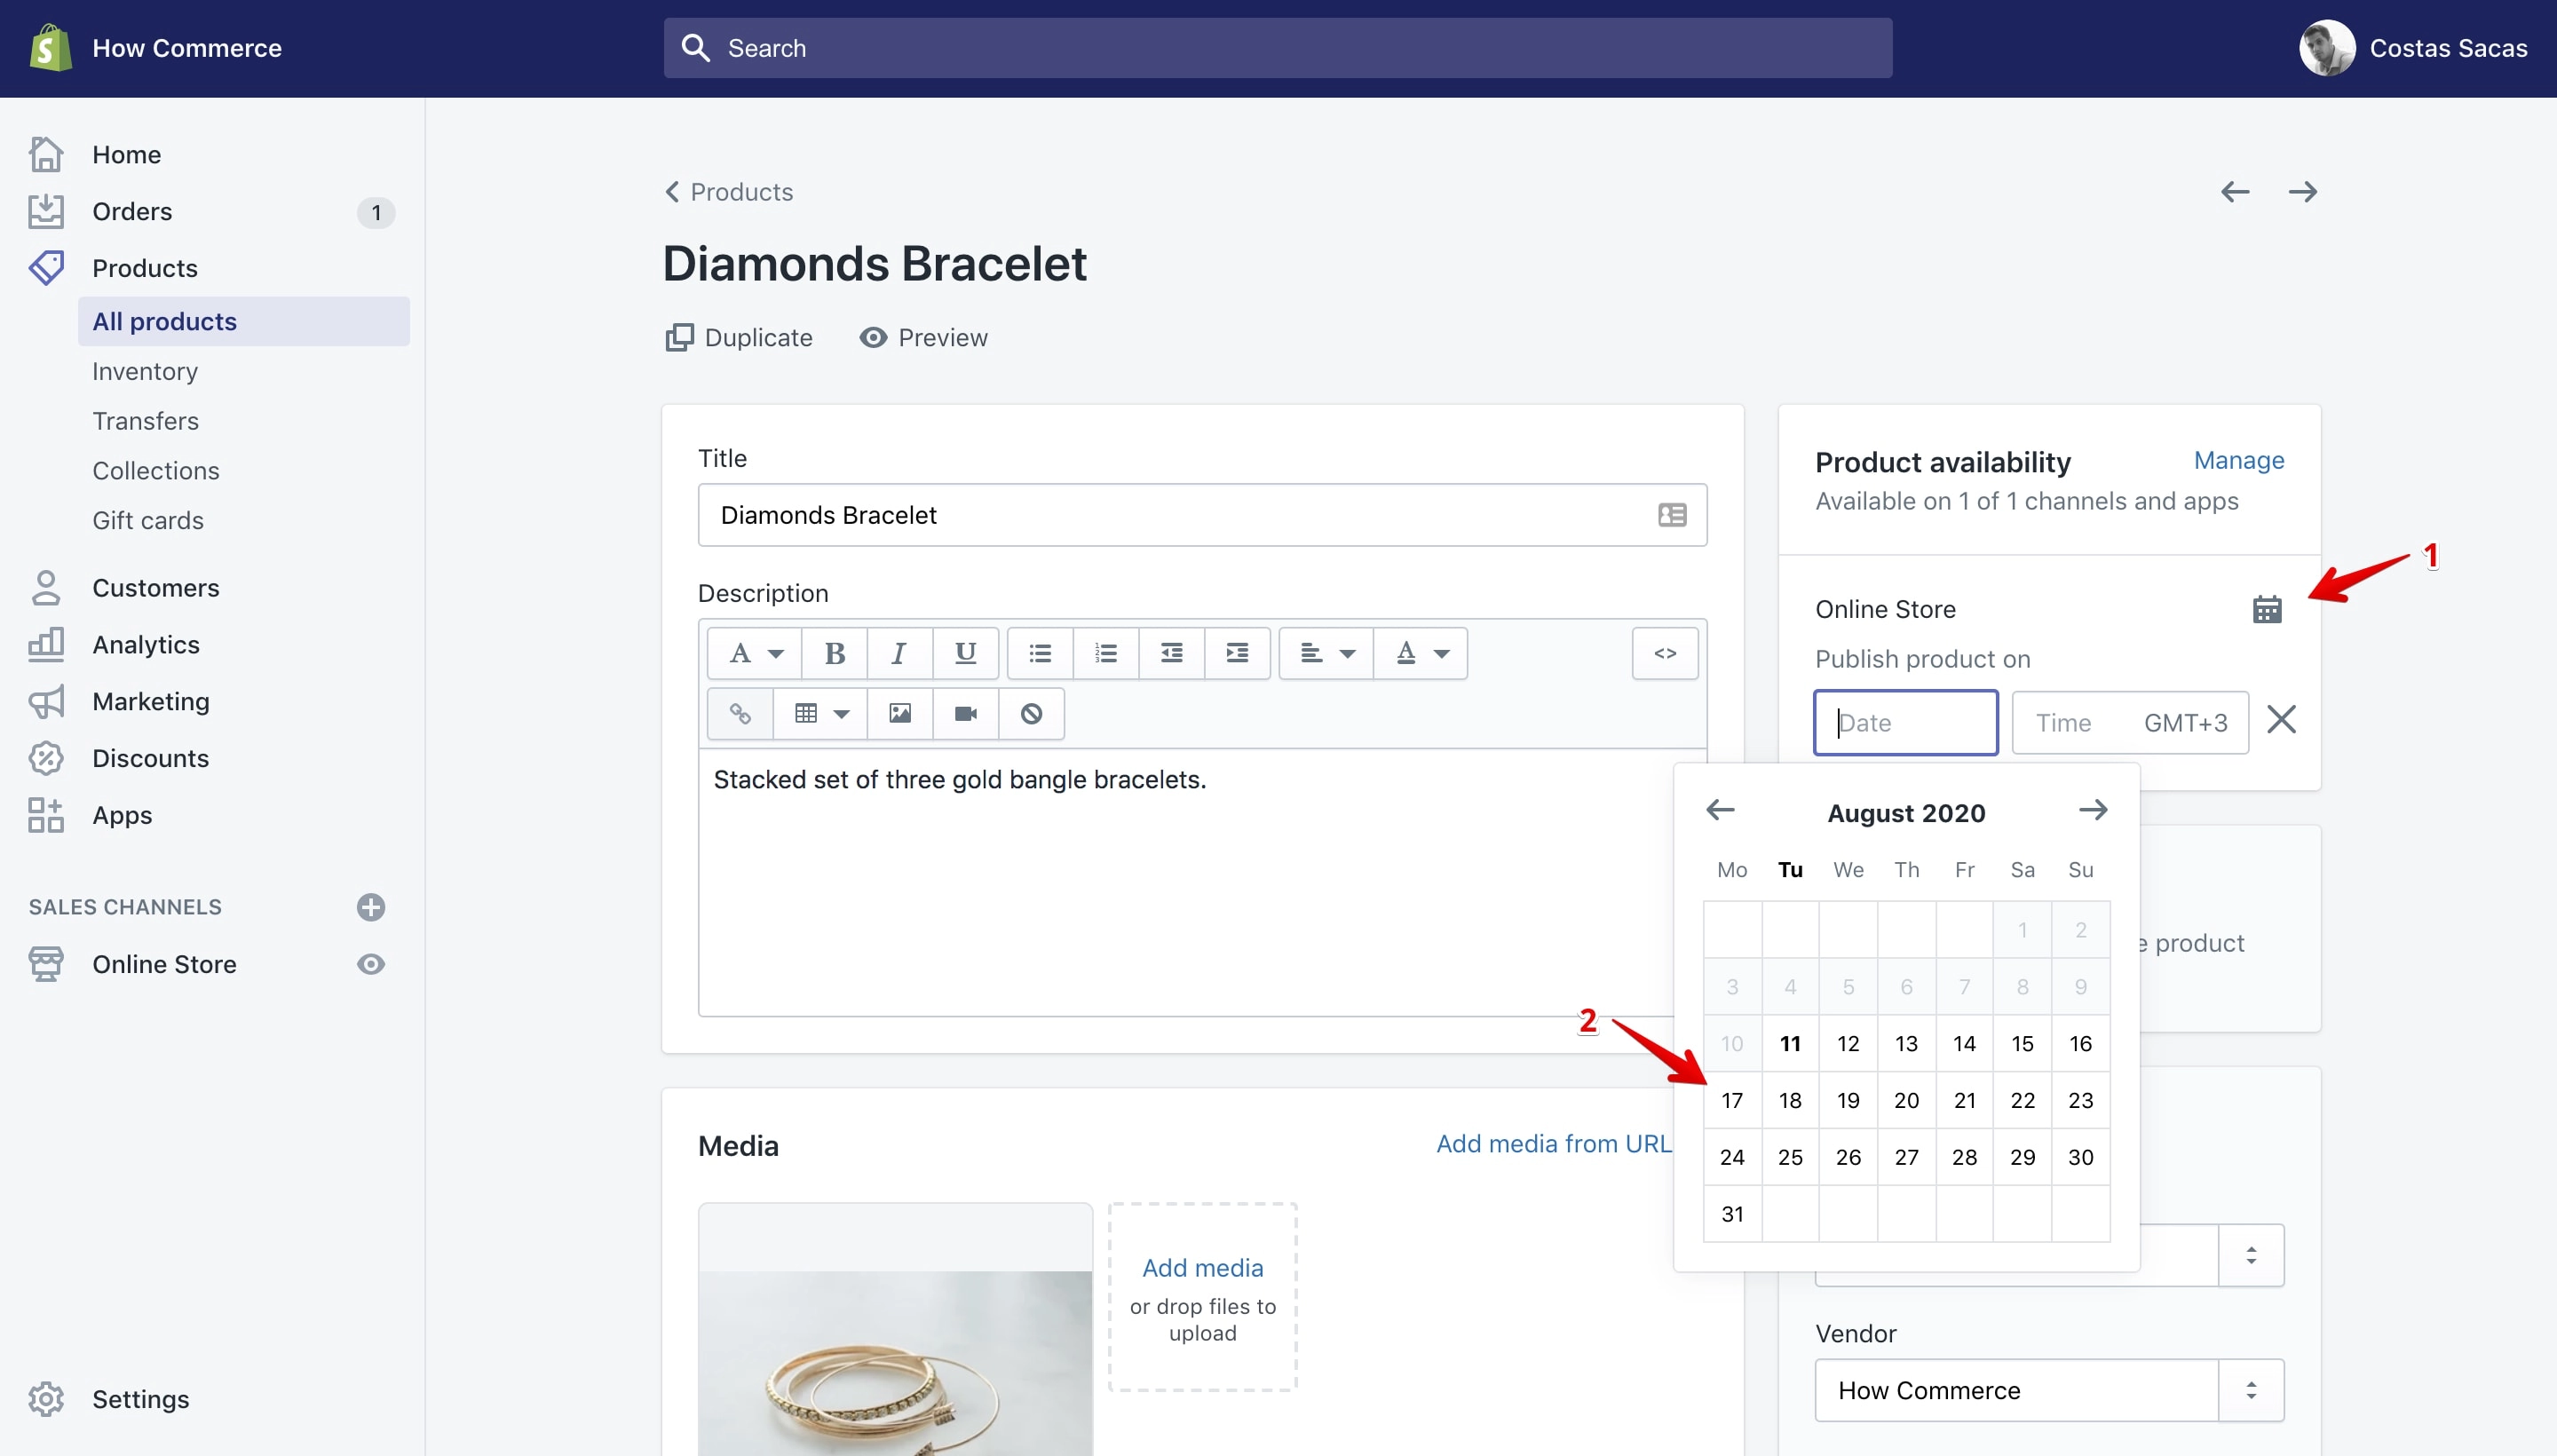
A calendar pop-up will display. From here select a future date (marked with 2 in the image above). After you do that you need to select an hour.
Once you select the date the default hour will be 12 AM so you’ll need to change it if that is not what you want:
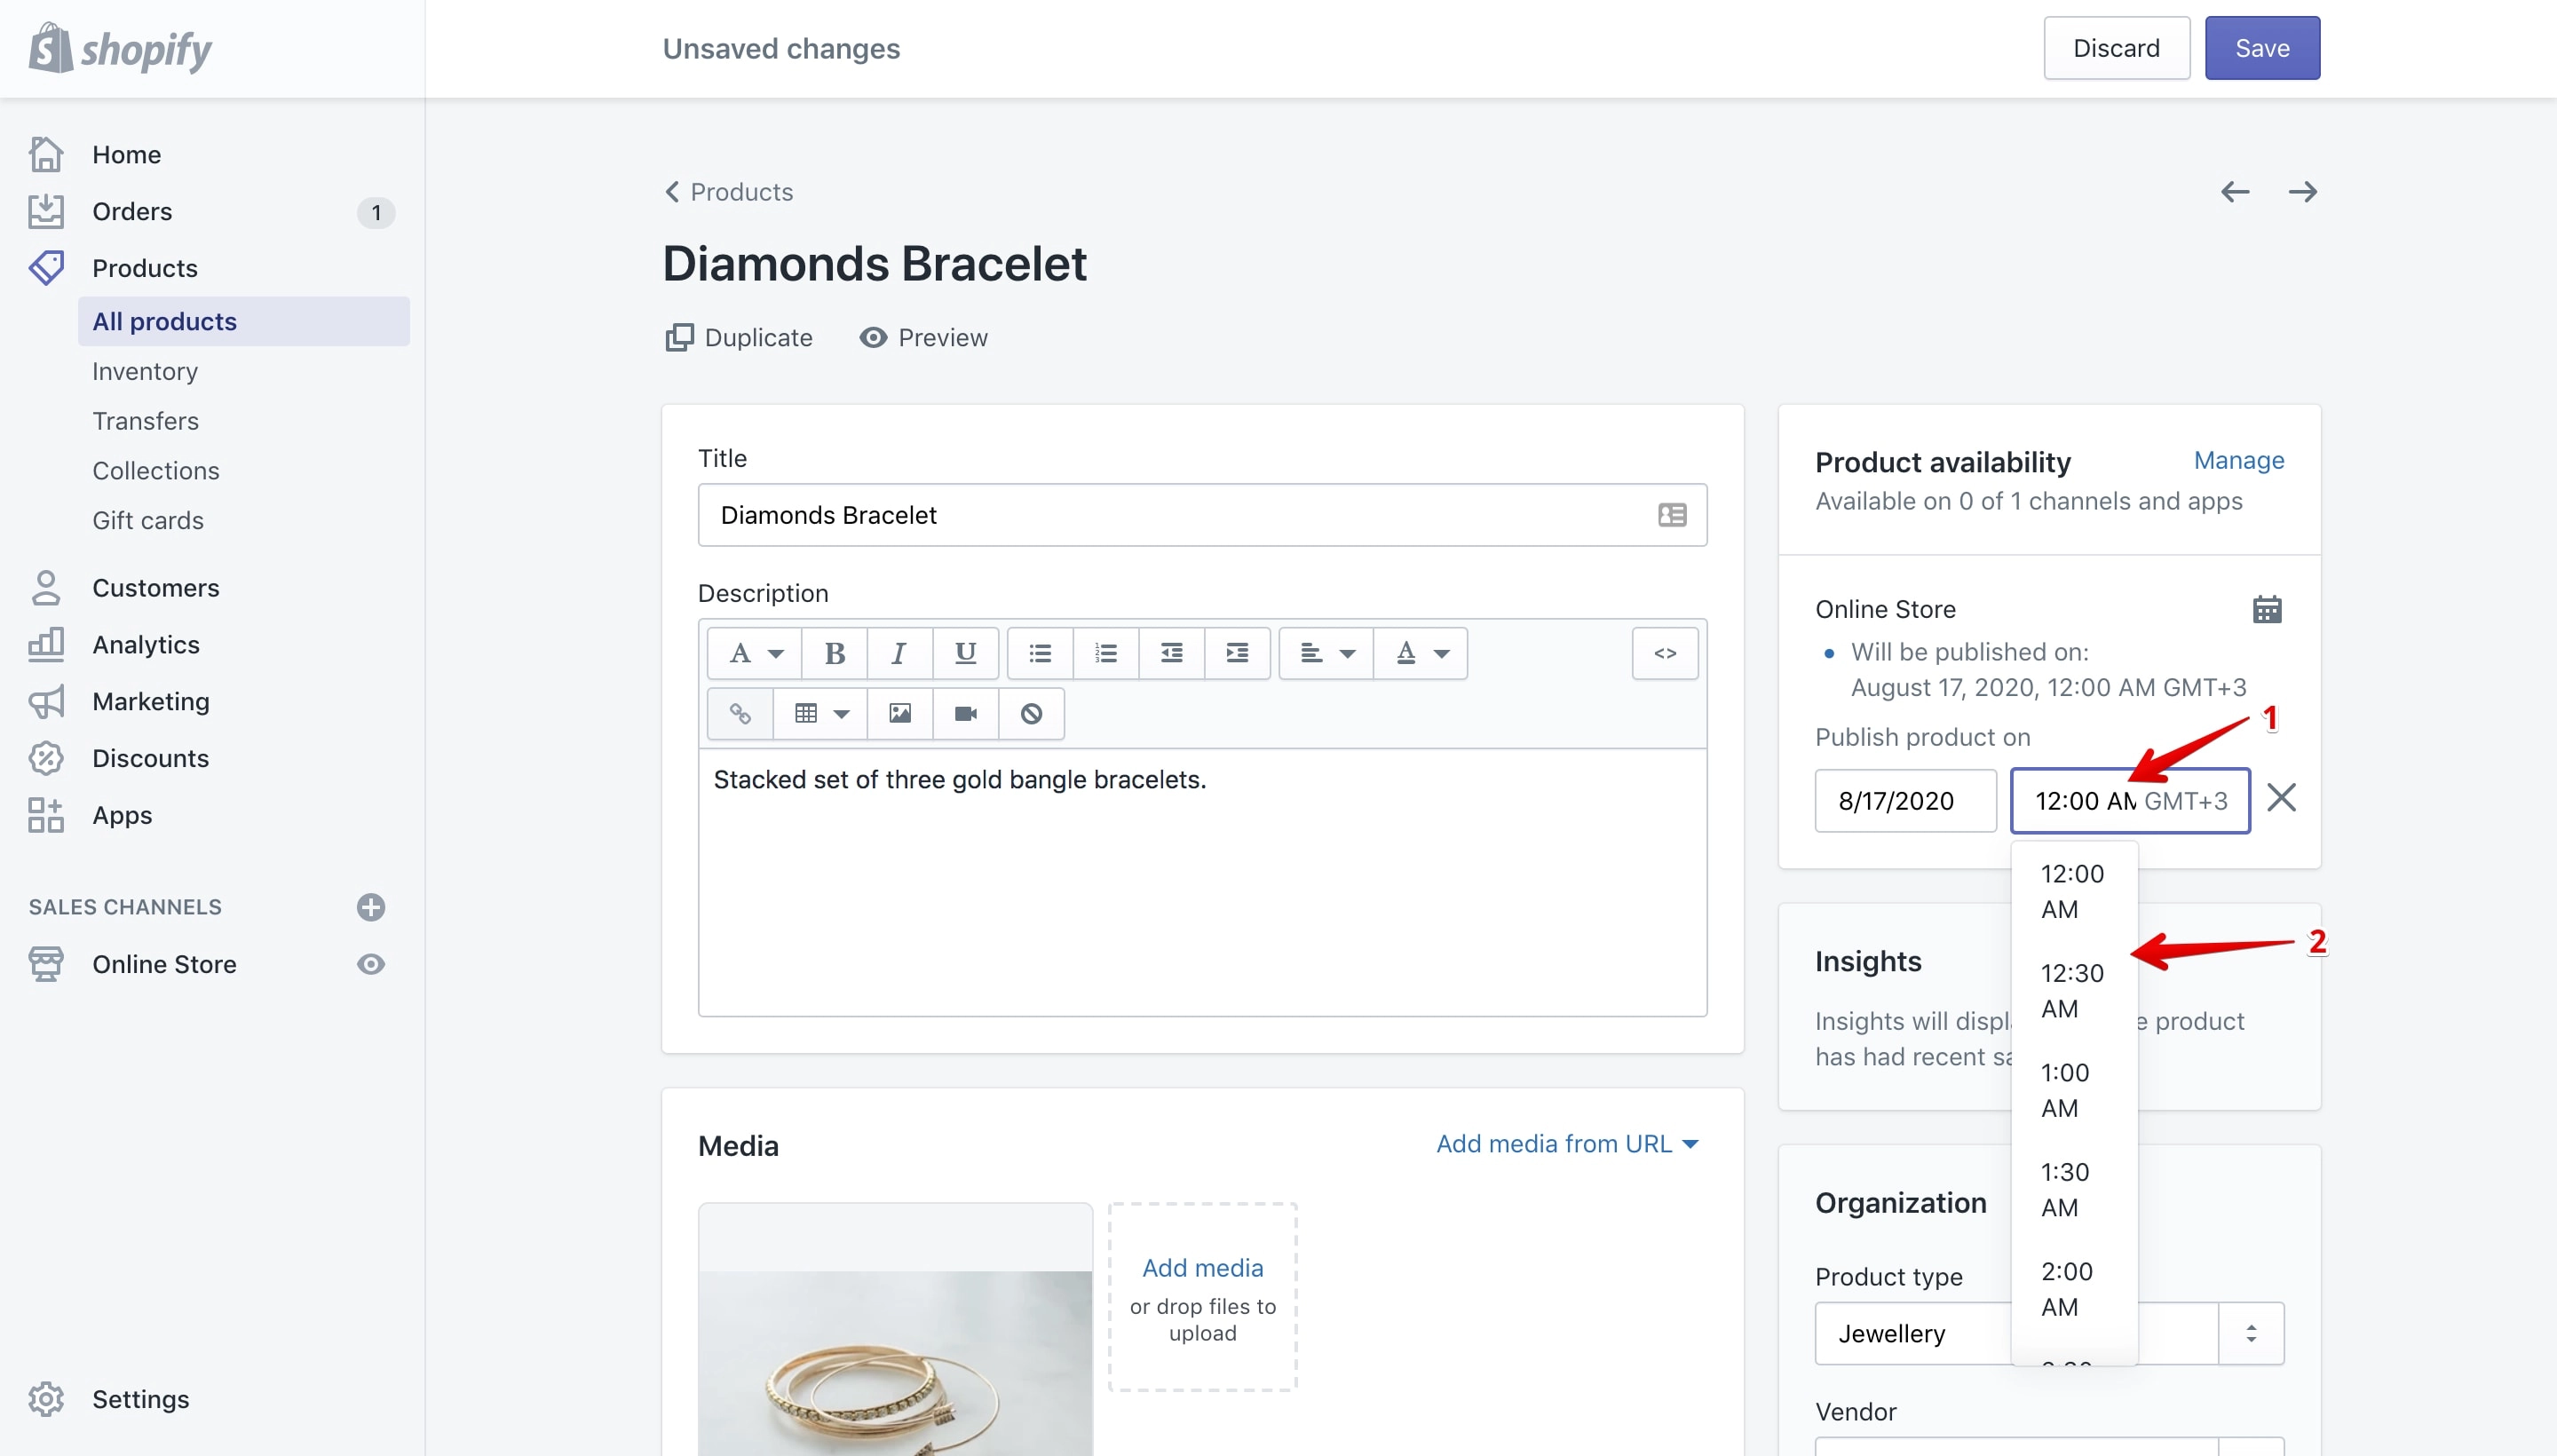
Click on the time input box (marked with 1 in the image above) and you’ll see a drop-down open. Select the appropriate time from the drop-down (marked with 2 in the image above).
Once everything is set up you can check if the future publishing is set correctly by looking above the settings (marked with 1 in the image below):
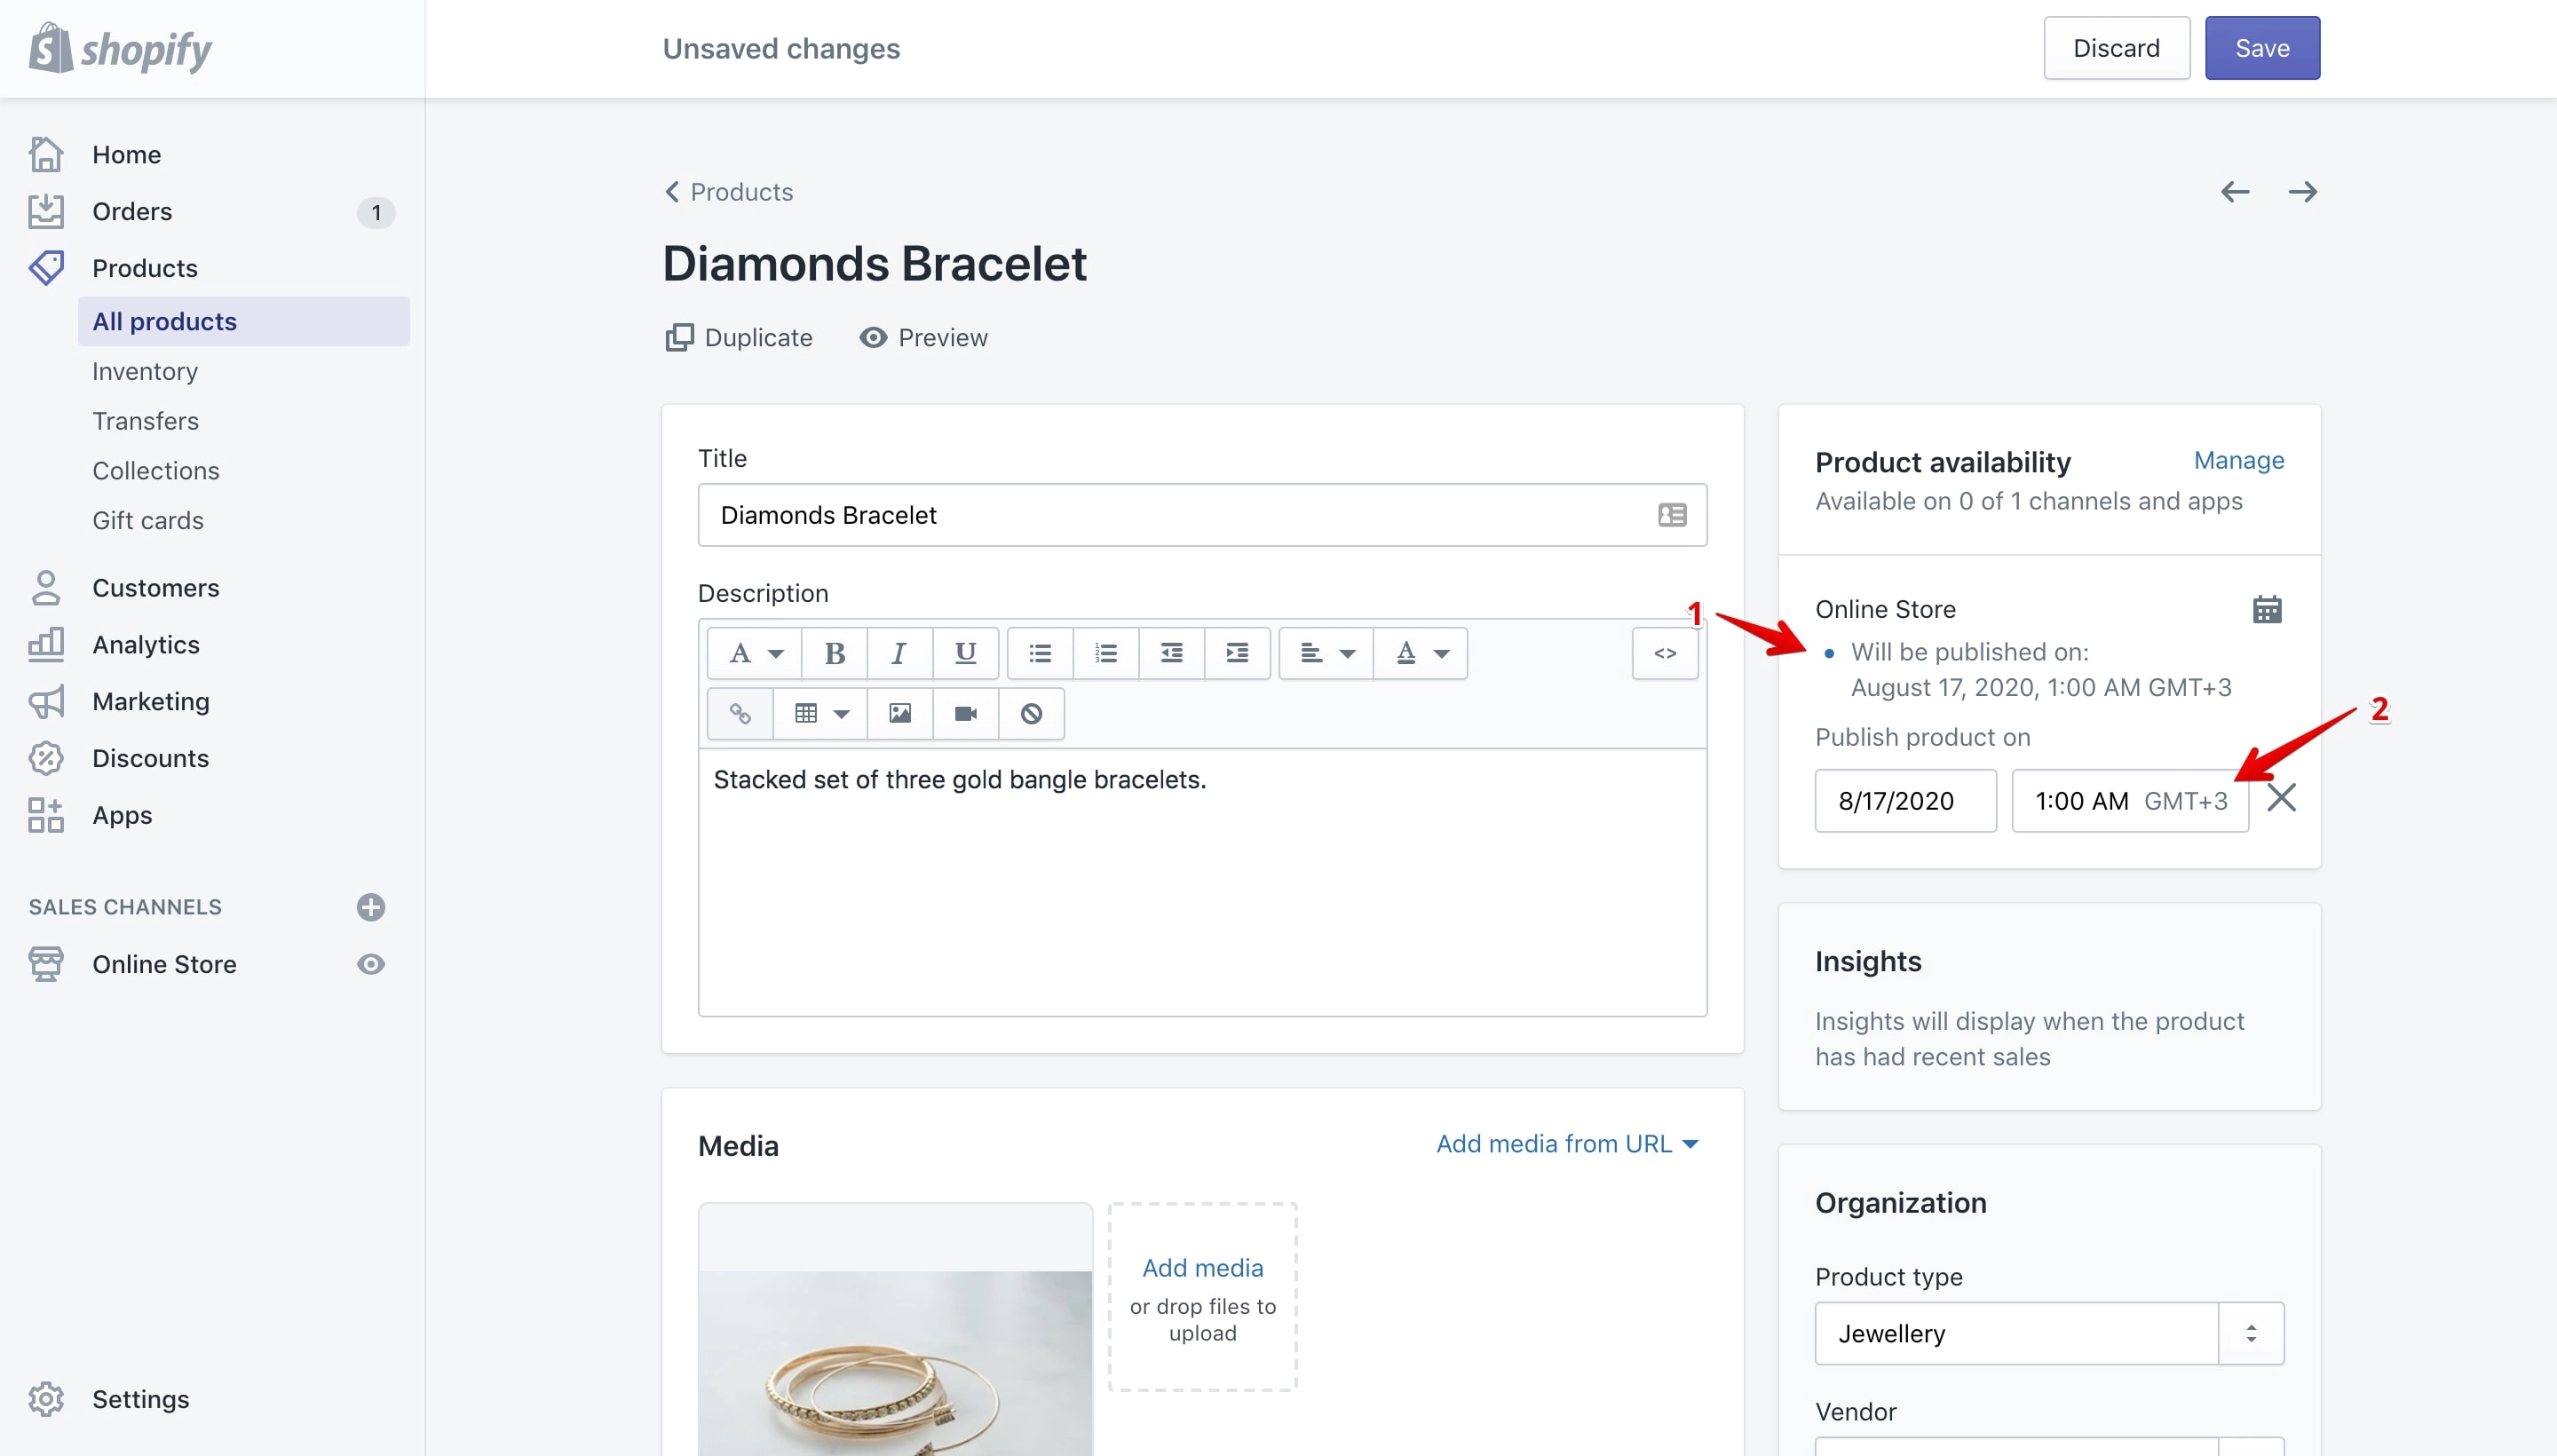
Product future publishing time verification.
On the time input box you can also see your GMT zone (marked with 2 in the image above). Depending on your location on the globe this is different.
If you want to cancel your future publishing time you can use the “X” icon like in the image below:
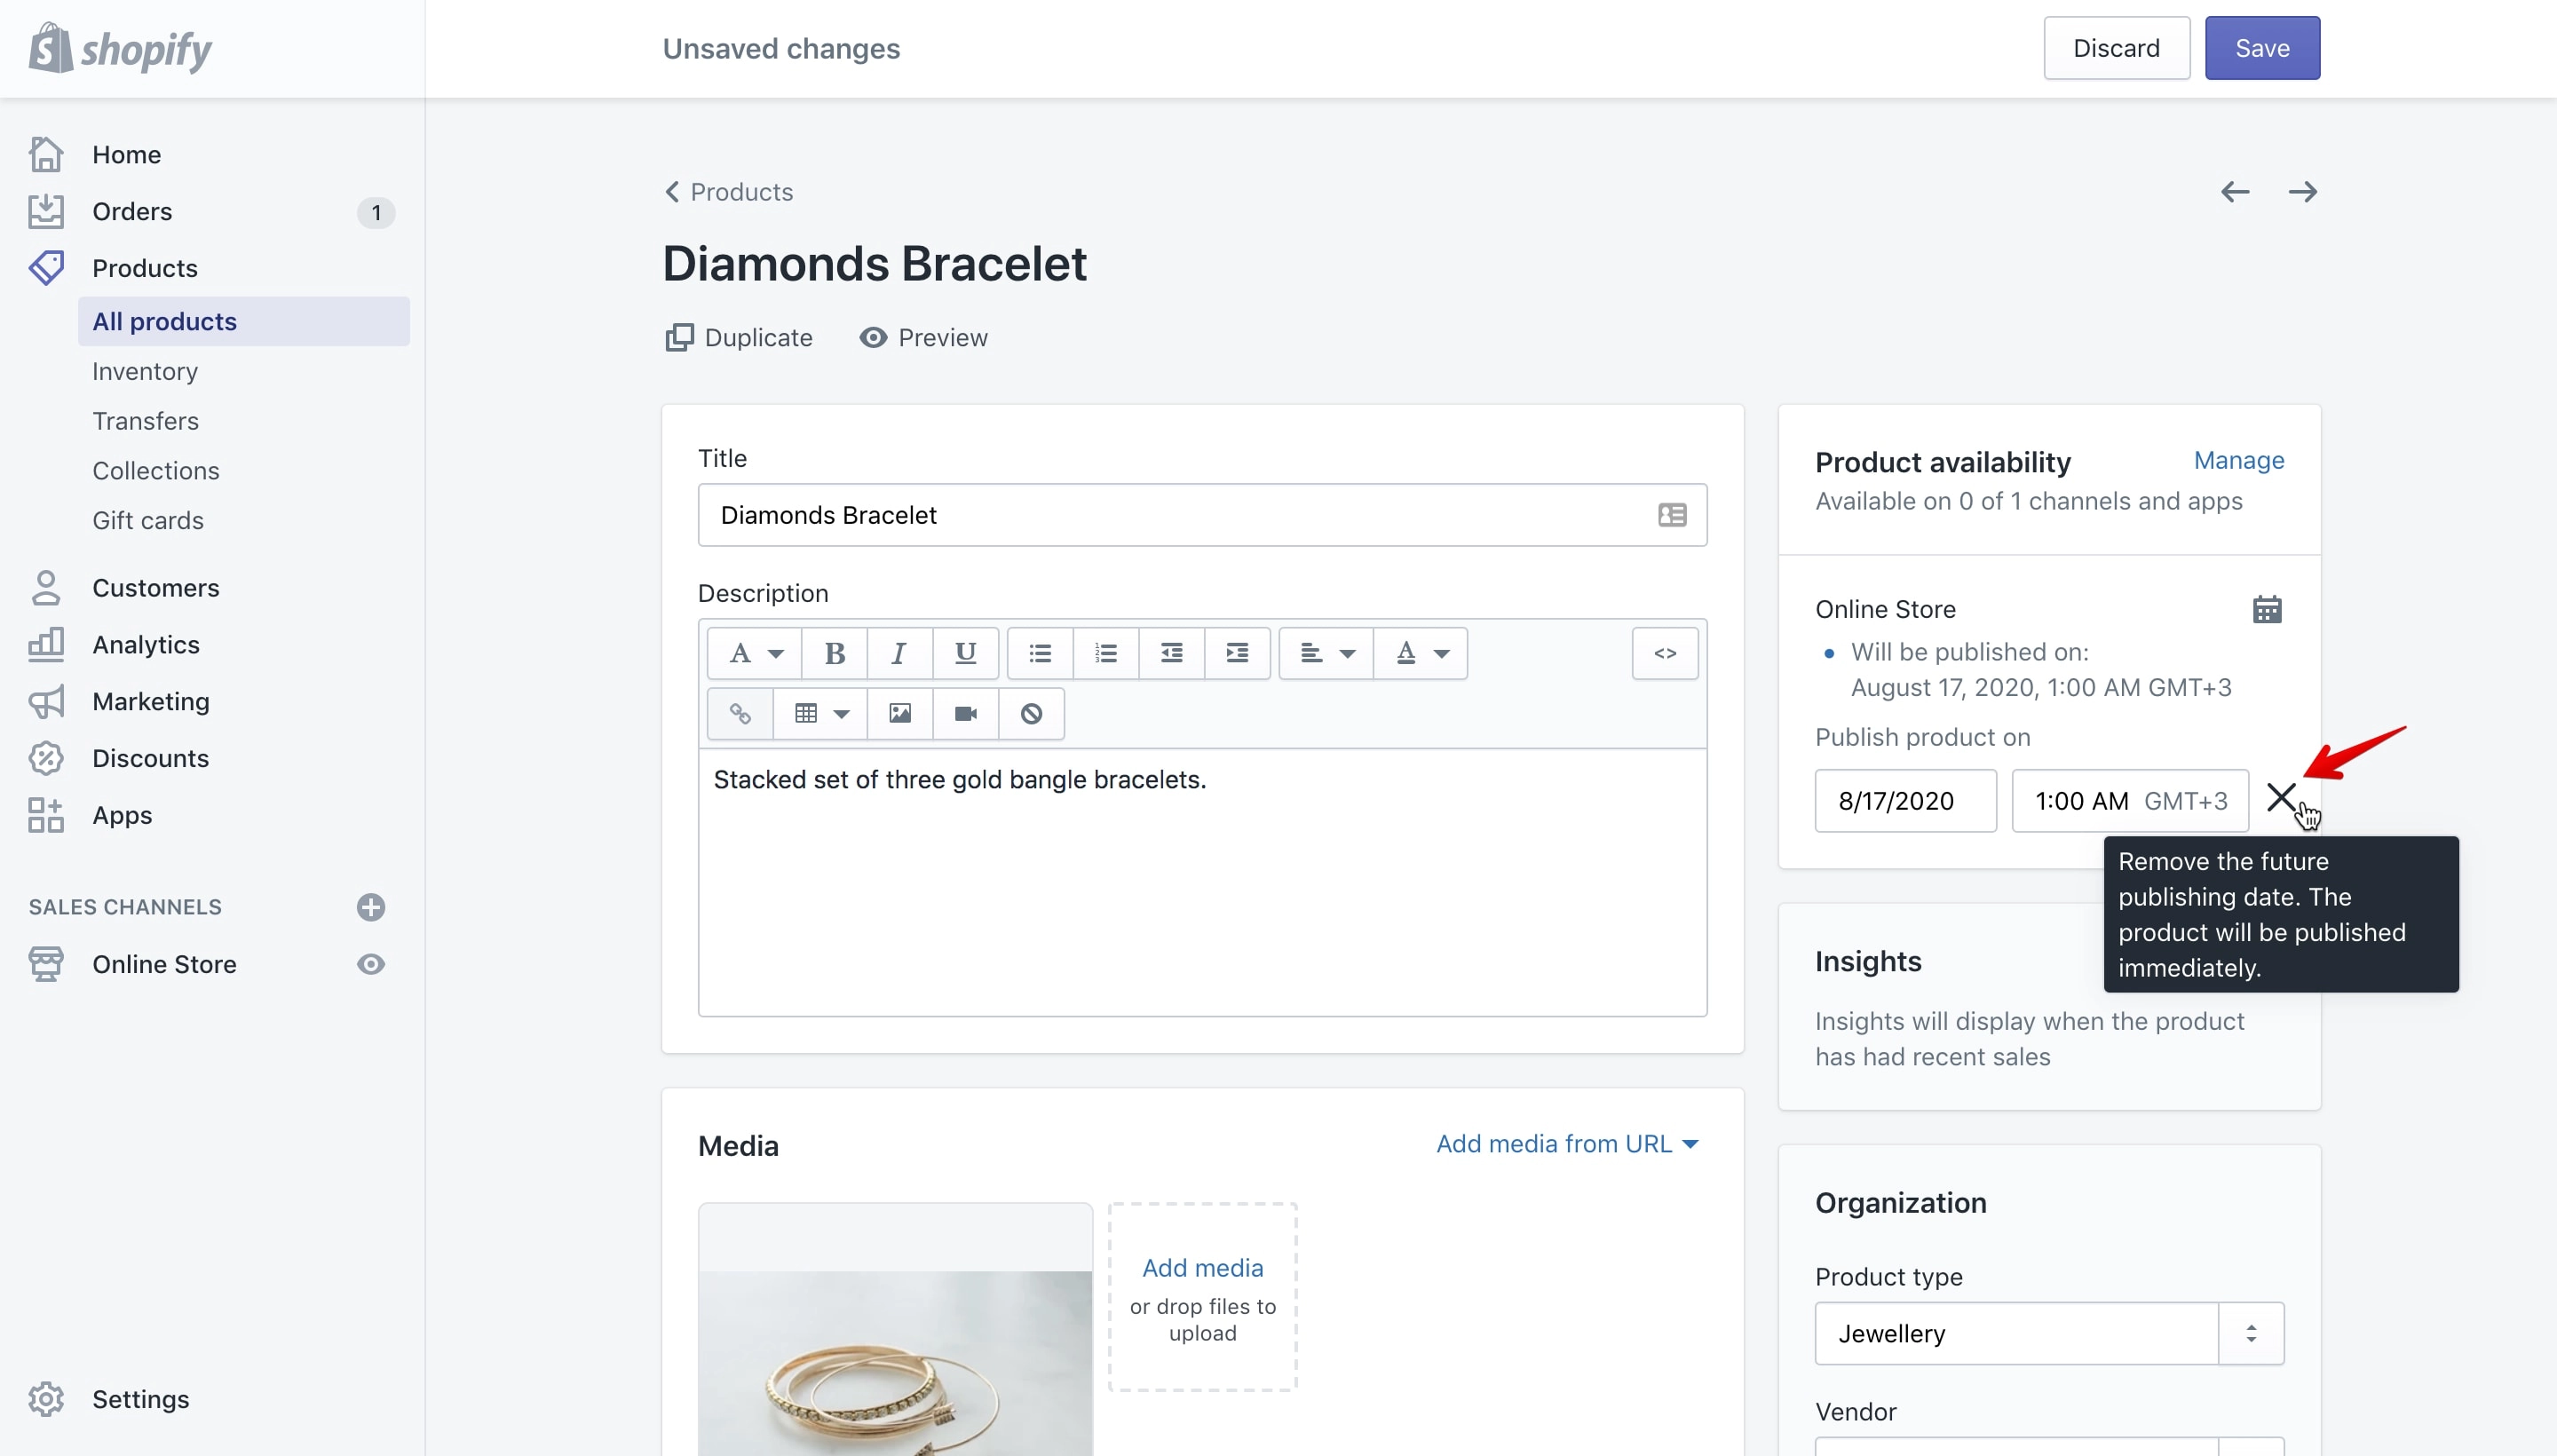
By removing the future publishing date the product will be published as soon as you hit the “Save” button.
Click on the “Save” button to save your changes.
After you “Save” the future publishing date you’ll see a message with the date and time you’ve selected showing you when the product will be published (marked with 1 in the image below).
If you want to change the date or the time all you have to do is click the calendar icon, make the modification and save again your new settings.
Set a future publish date for a collection
Go to the “Collections” page (marked with 1 in the image below) and select an unpublished collection or create a new one. I already have one that is unpublished (marked with 2 in the image below):
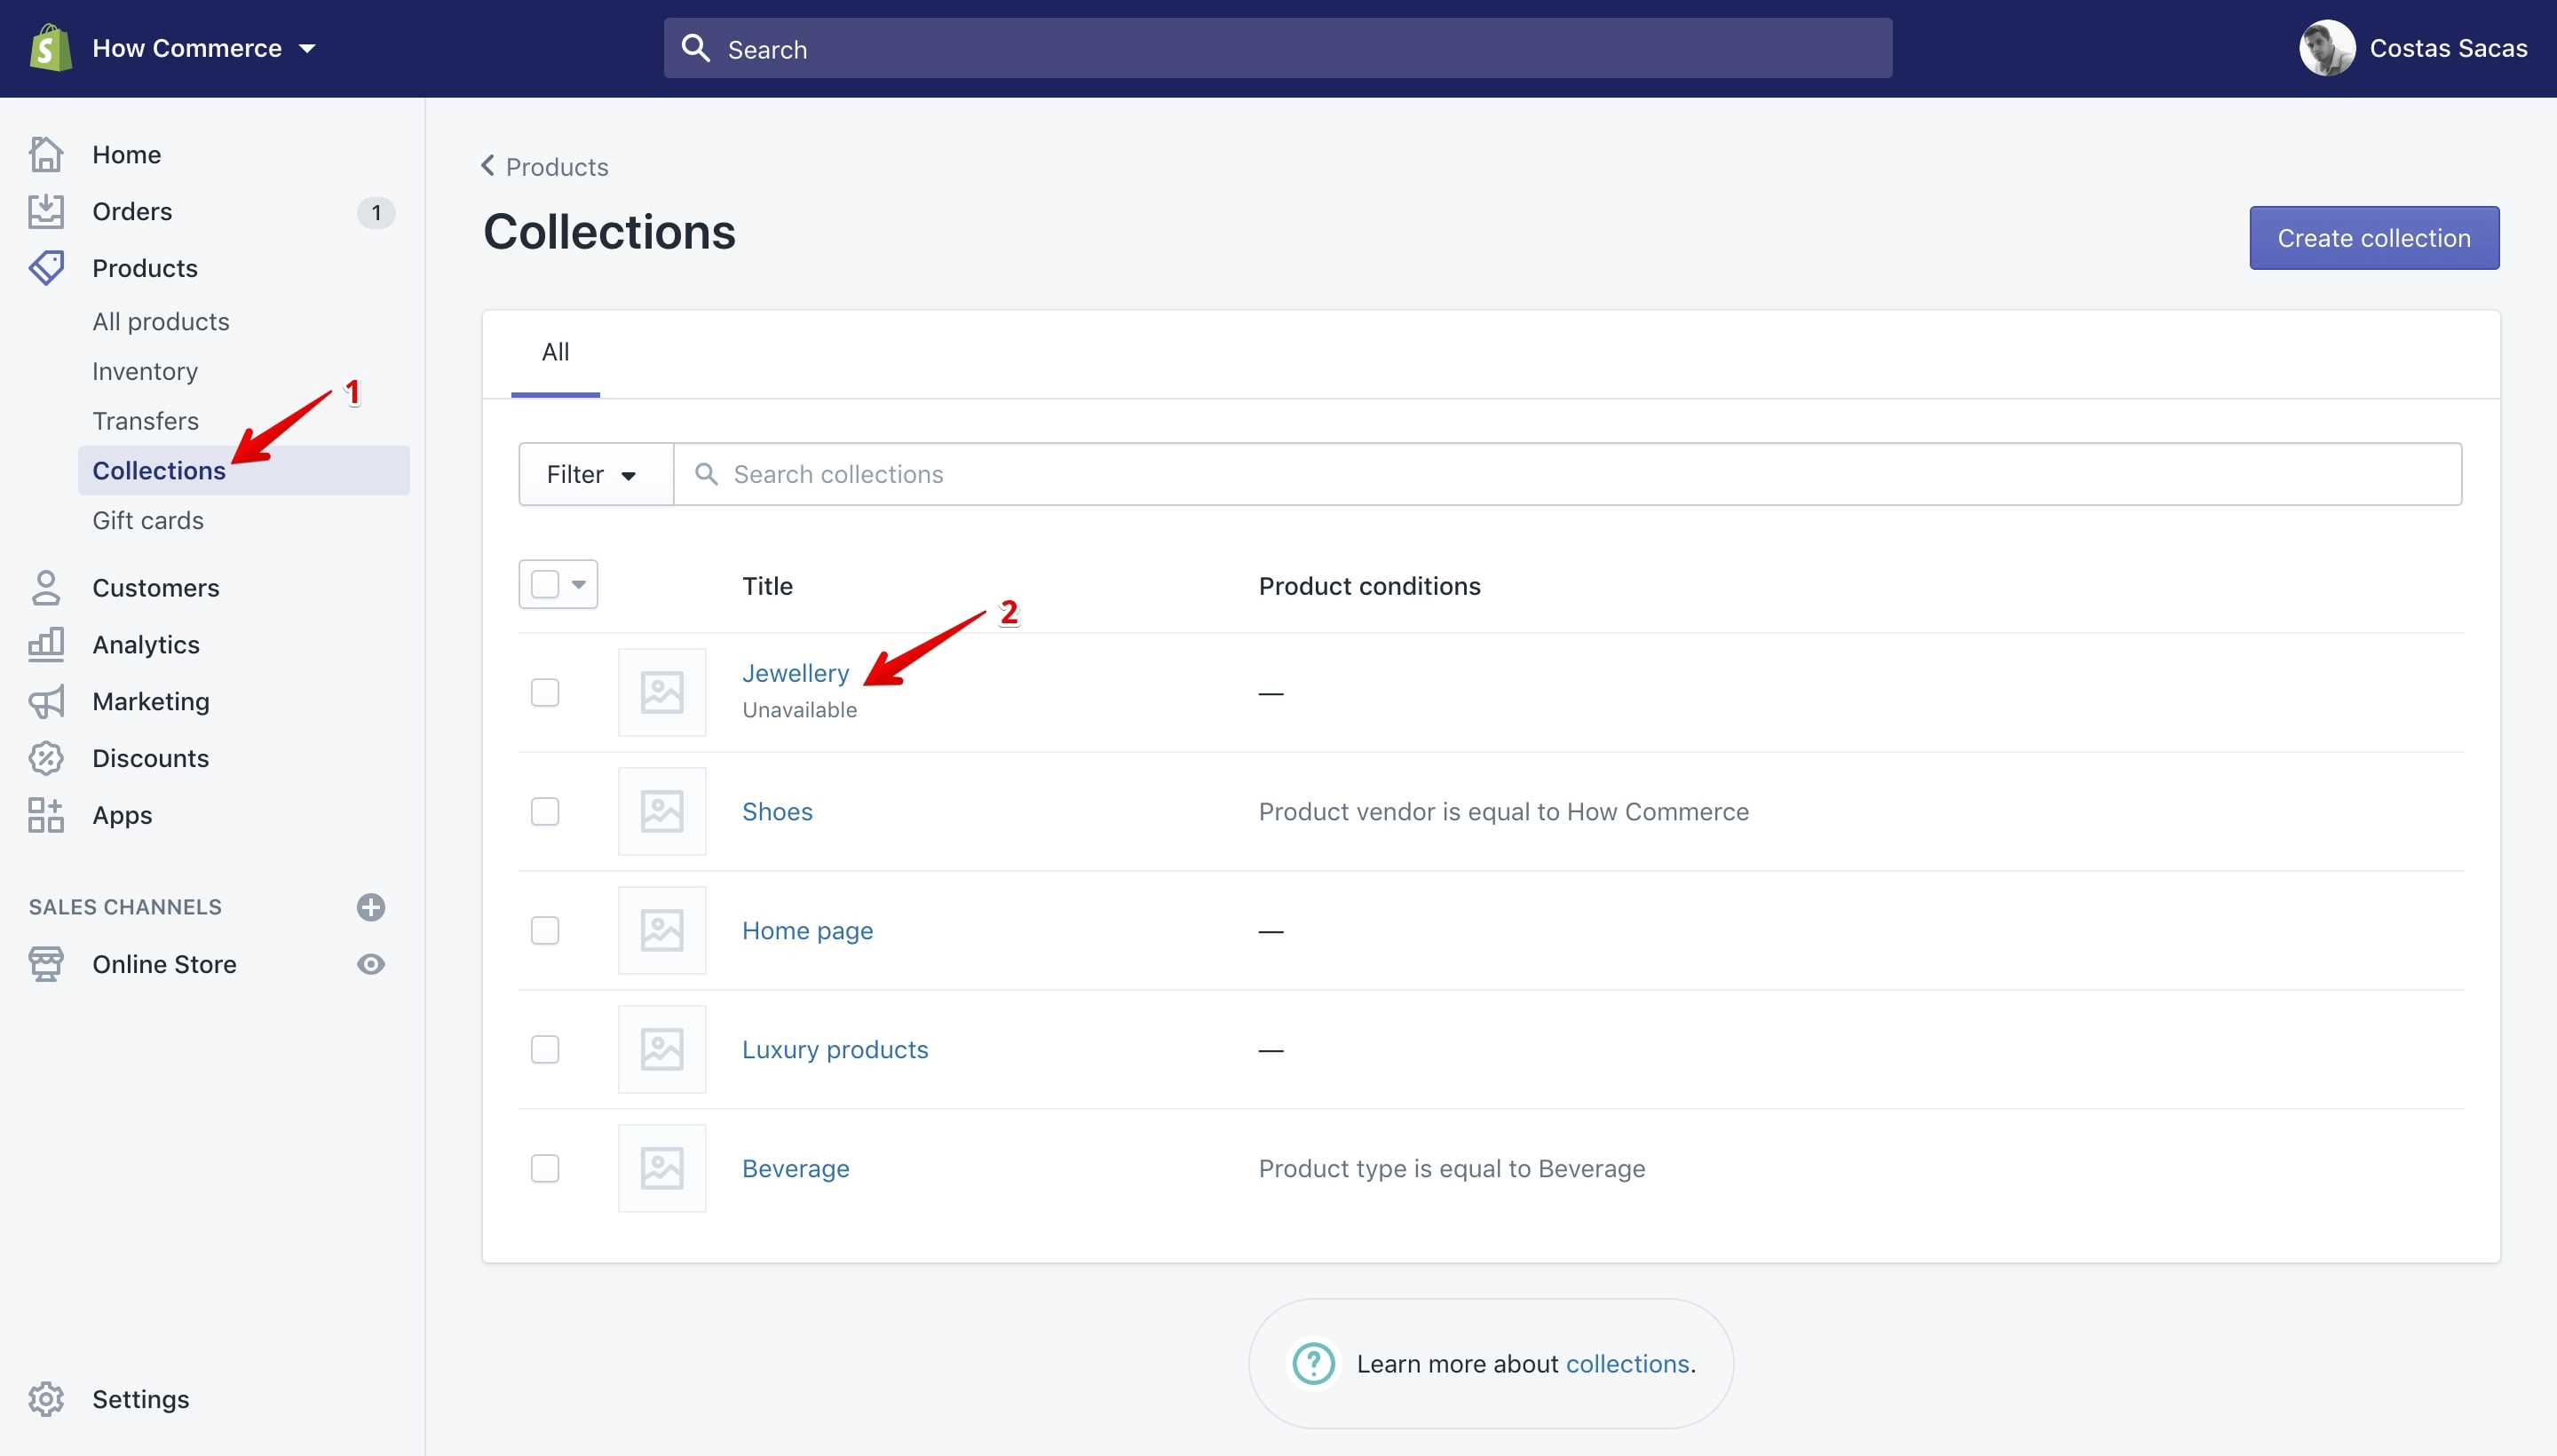
As you see the collection is not available on the shop meaning that it is not published yet. I’ll set a future date on which the collection will be published.
The collection is not assigned to any “Sales Channels”. To set a future publishing date I need to assign it first to a sales channel.
To assign it click the “Manage” button under “Collection availability” section:
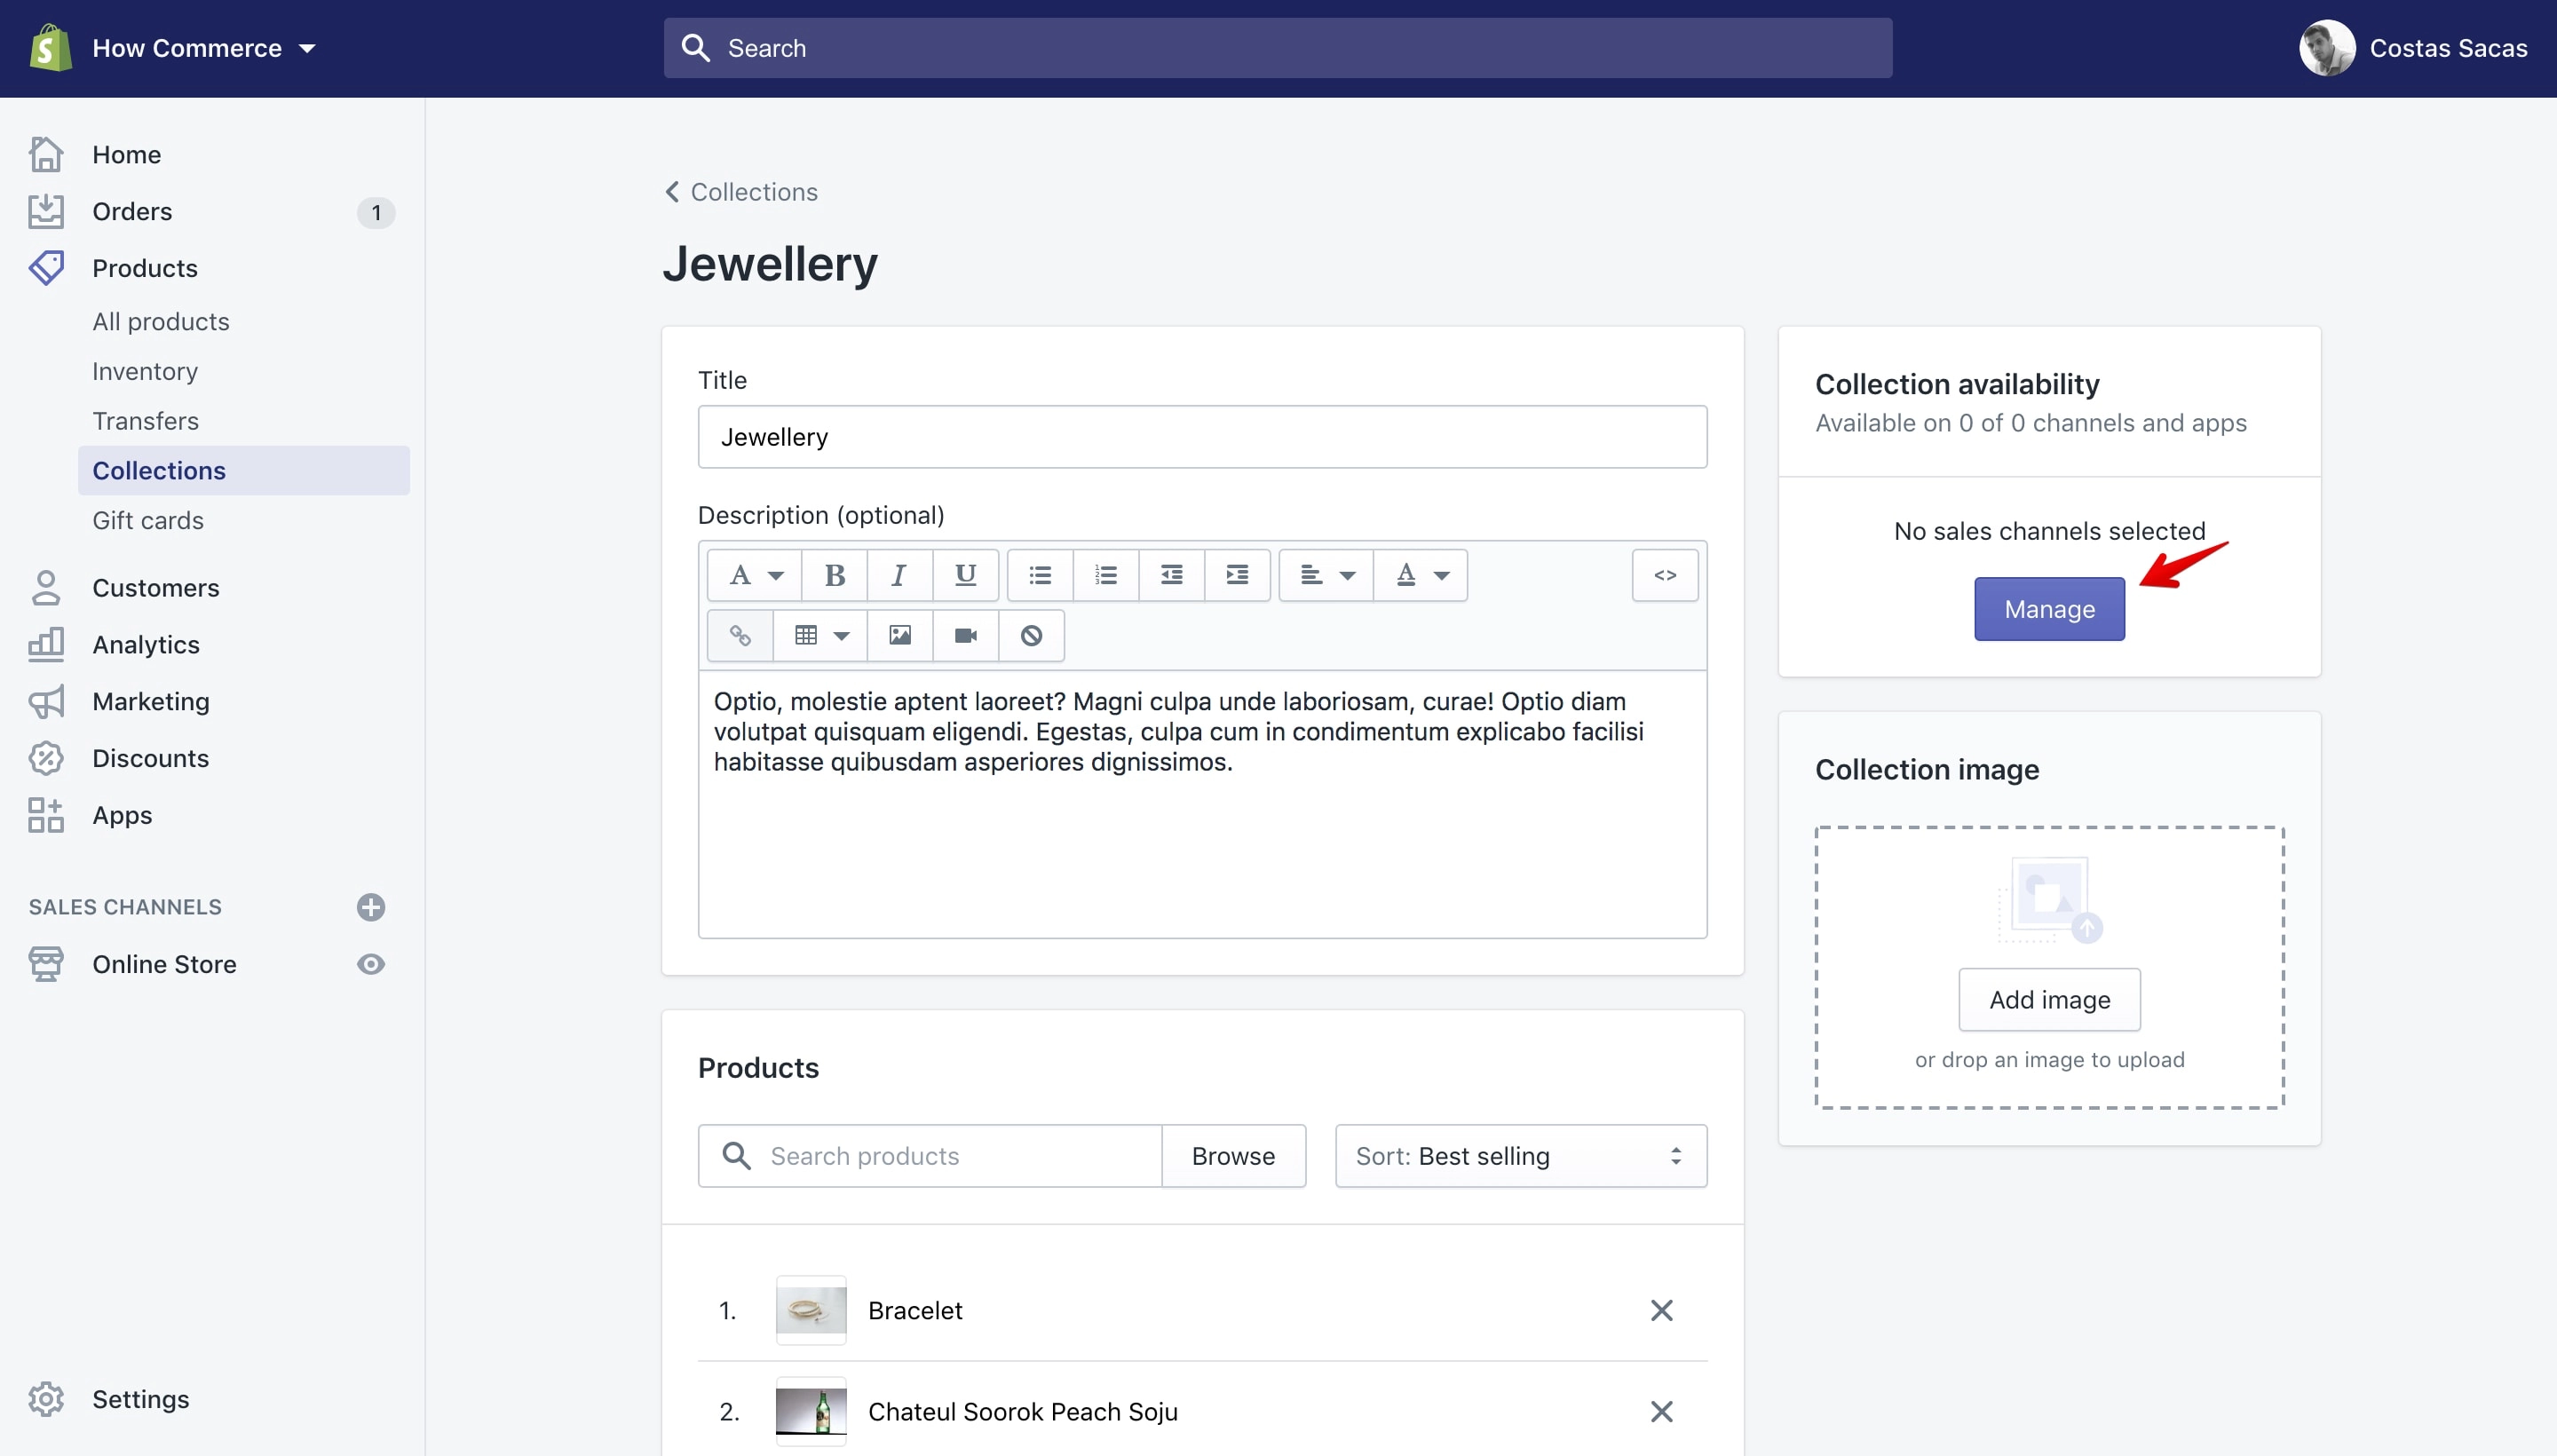
Clicking on the button will open a pop-up with all the “Sales Channels” available on your Shopify store:
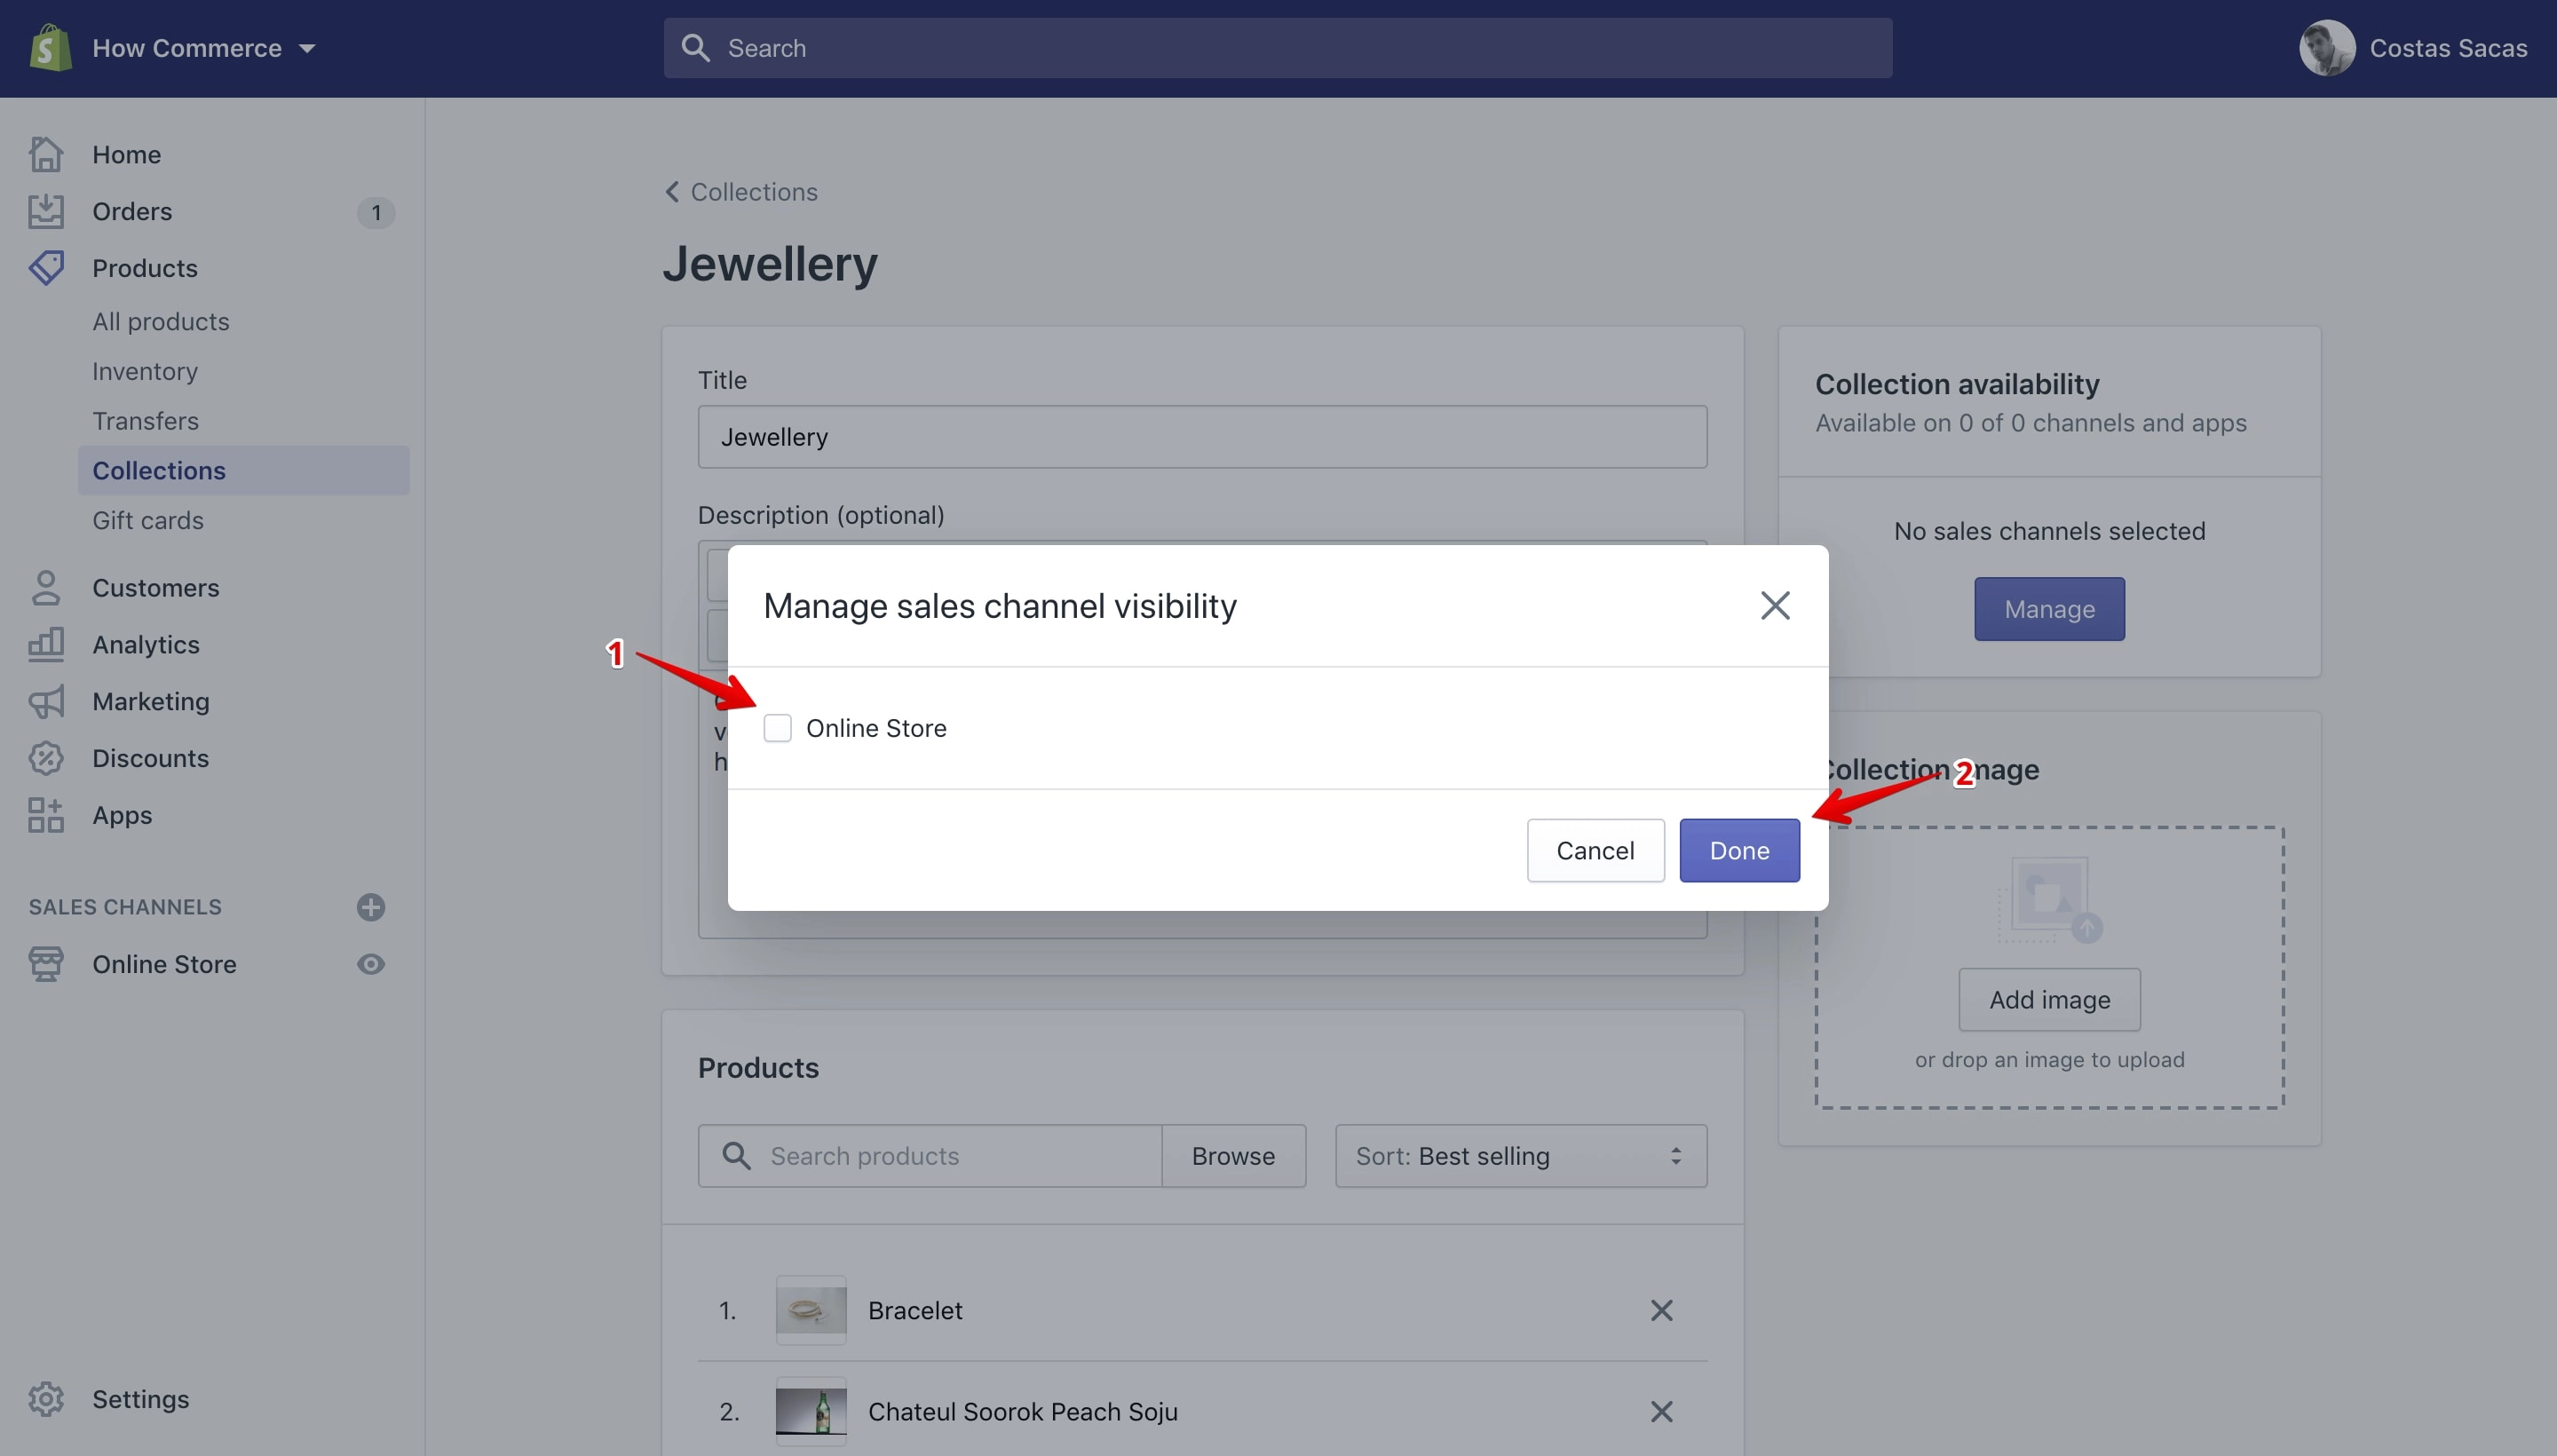
For the moment there is only one “Sale channel” on my Shopify store and that is the “Online Store” sales channel (marked with 1 in the image above) .
I’ll select it and click the “Done” button (marked with 2 in the image above) to assign the product to that channel.
Click the “Save” button to save your new changes.
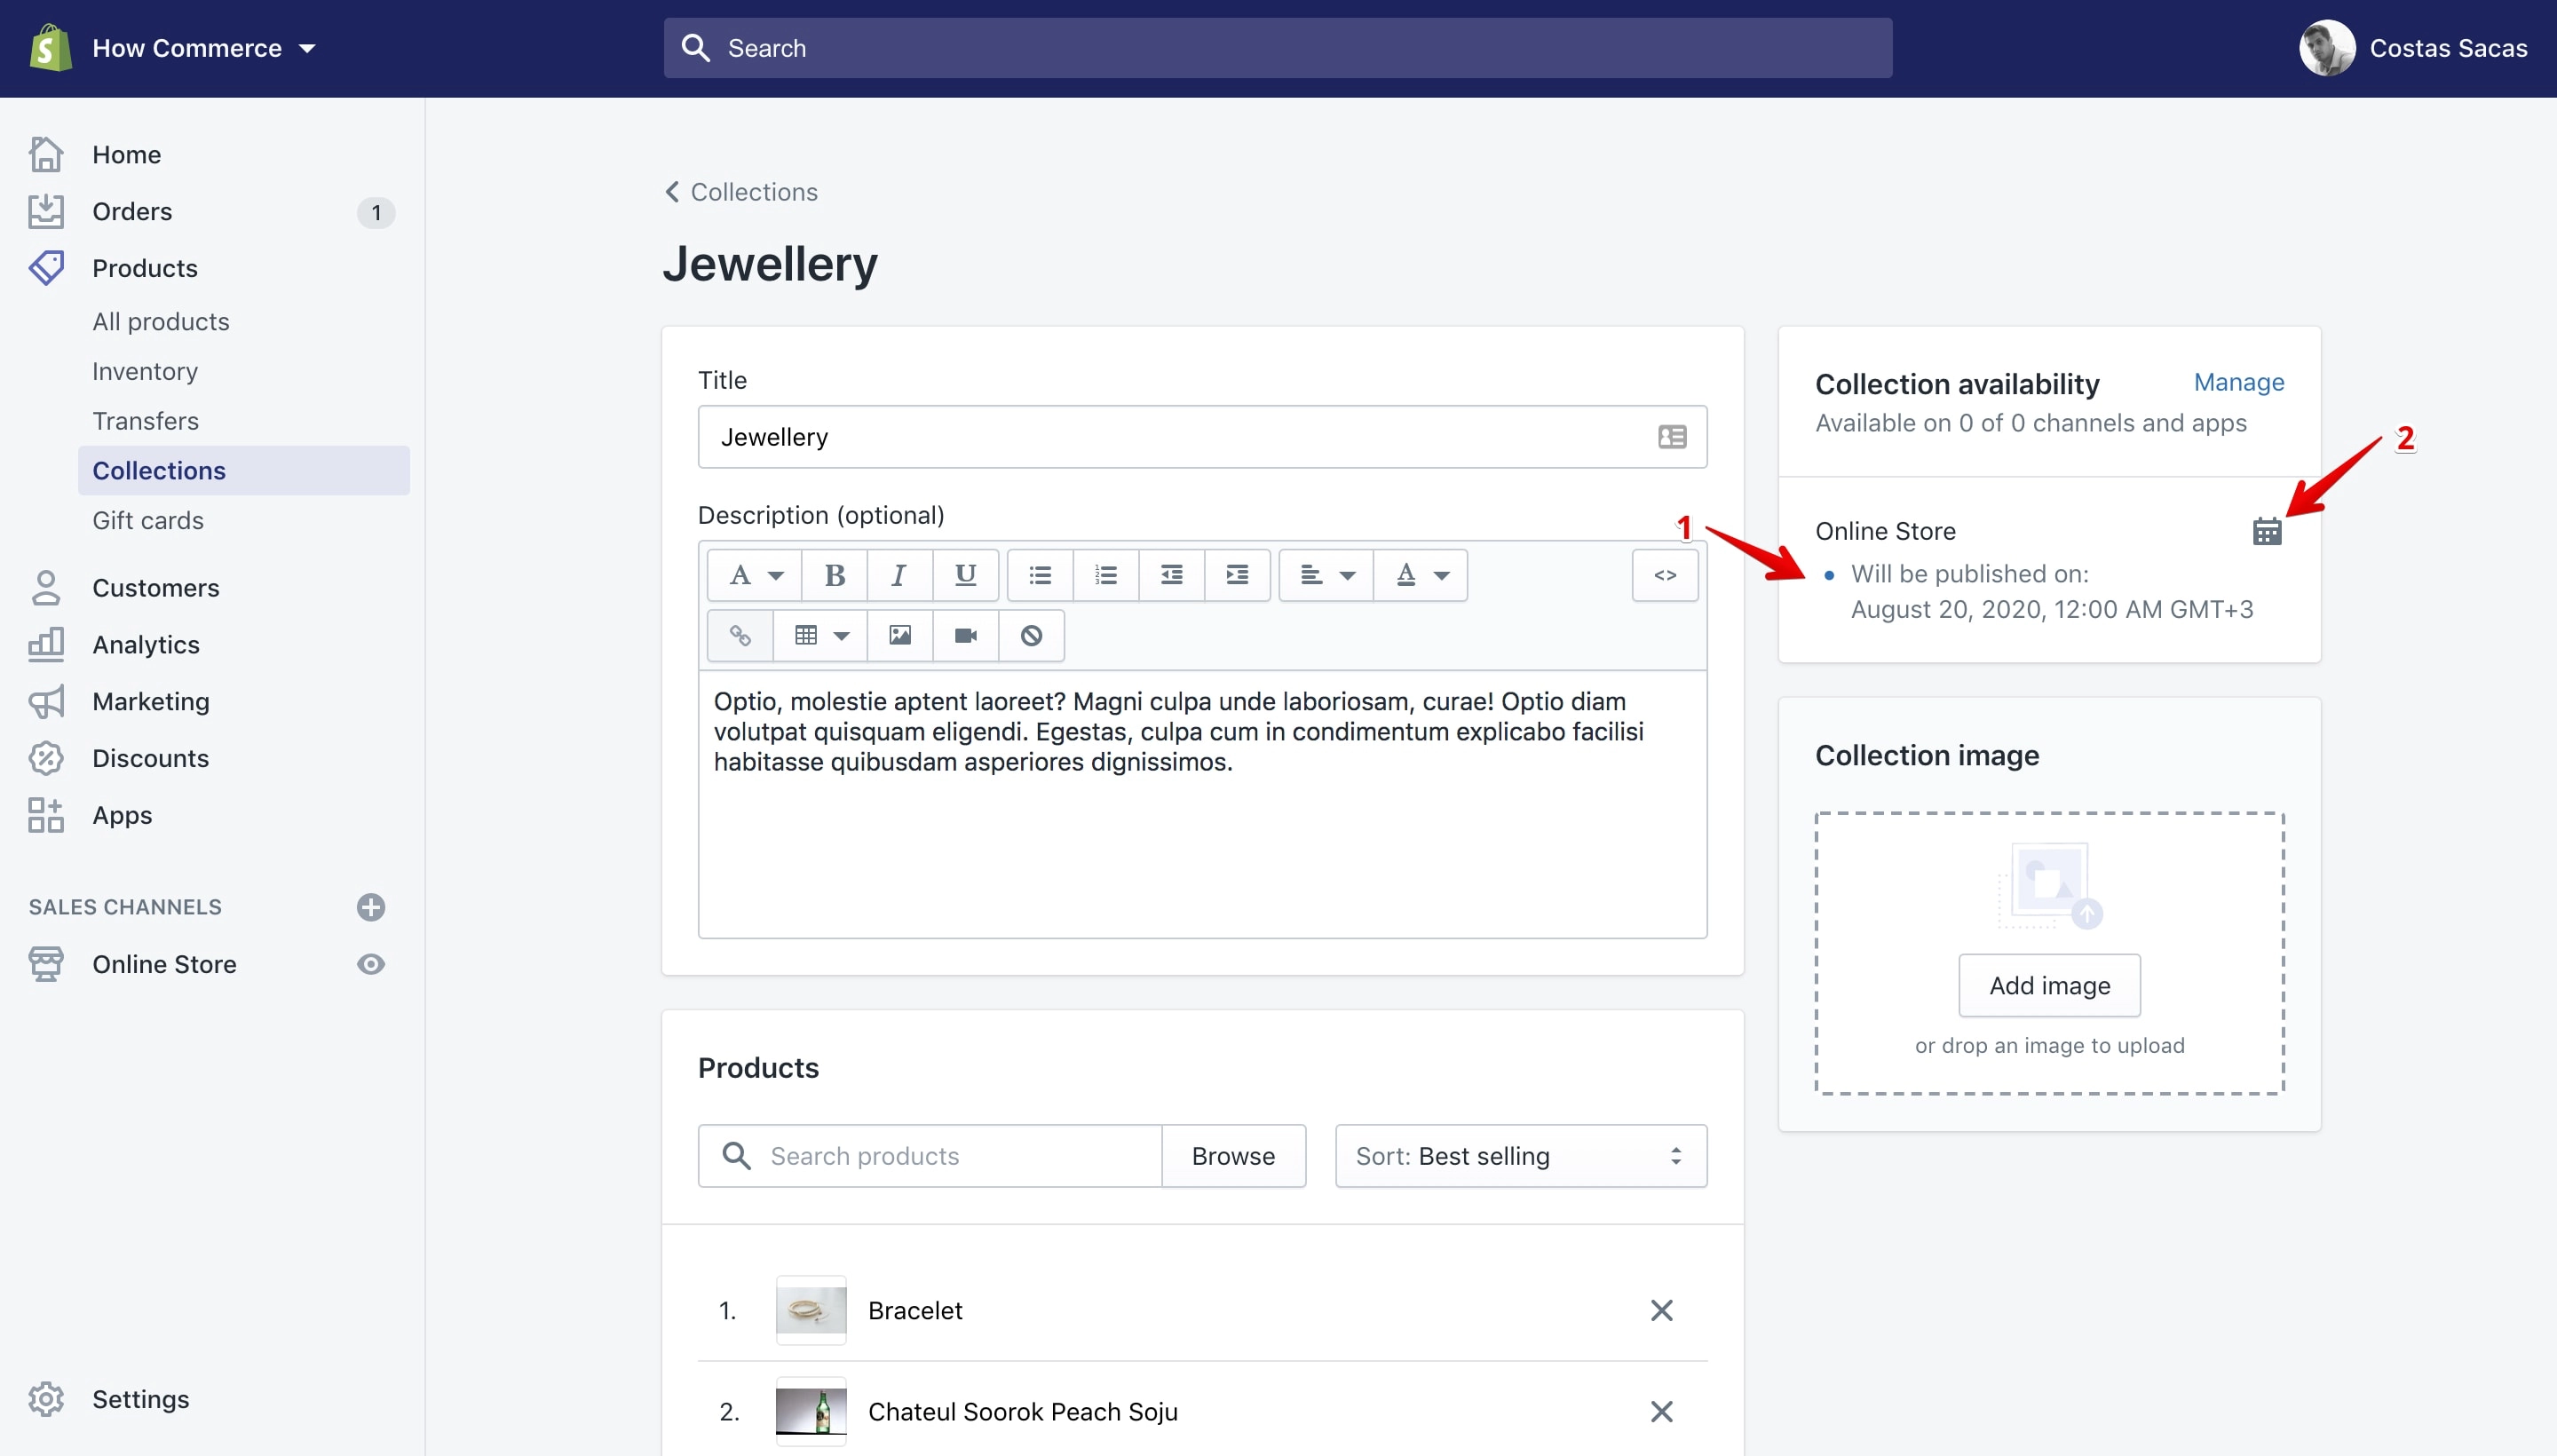
After you assign the new channel you can see it (marked with 1 in the image below) under the “Collection Availability” section. You can also see the collection availability across the sales channels and apps if there is more than one (marked with 2 in the image below).
What we are interested in for our tutorial is the little calendar icon (marked with 3 in the image below). This icon will allow us to set a future publishing date.
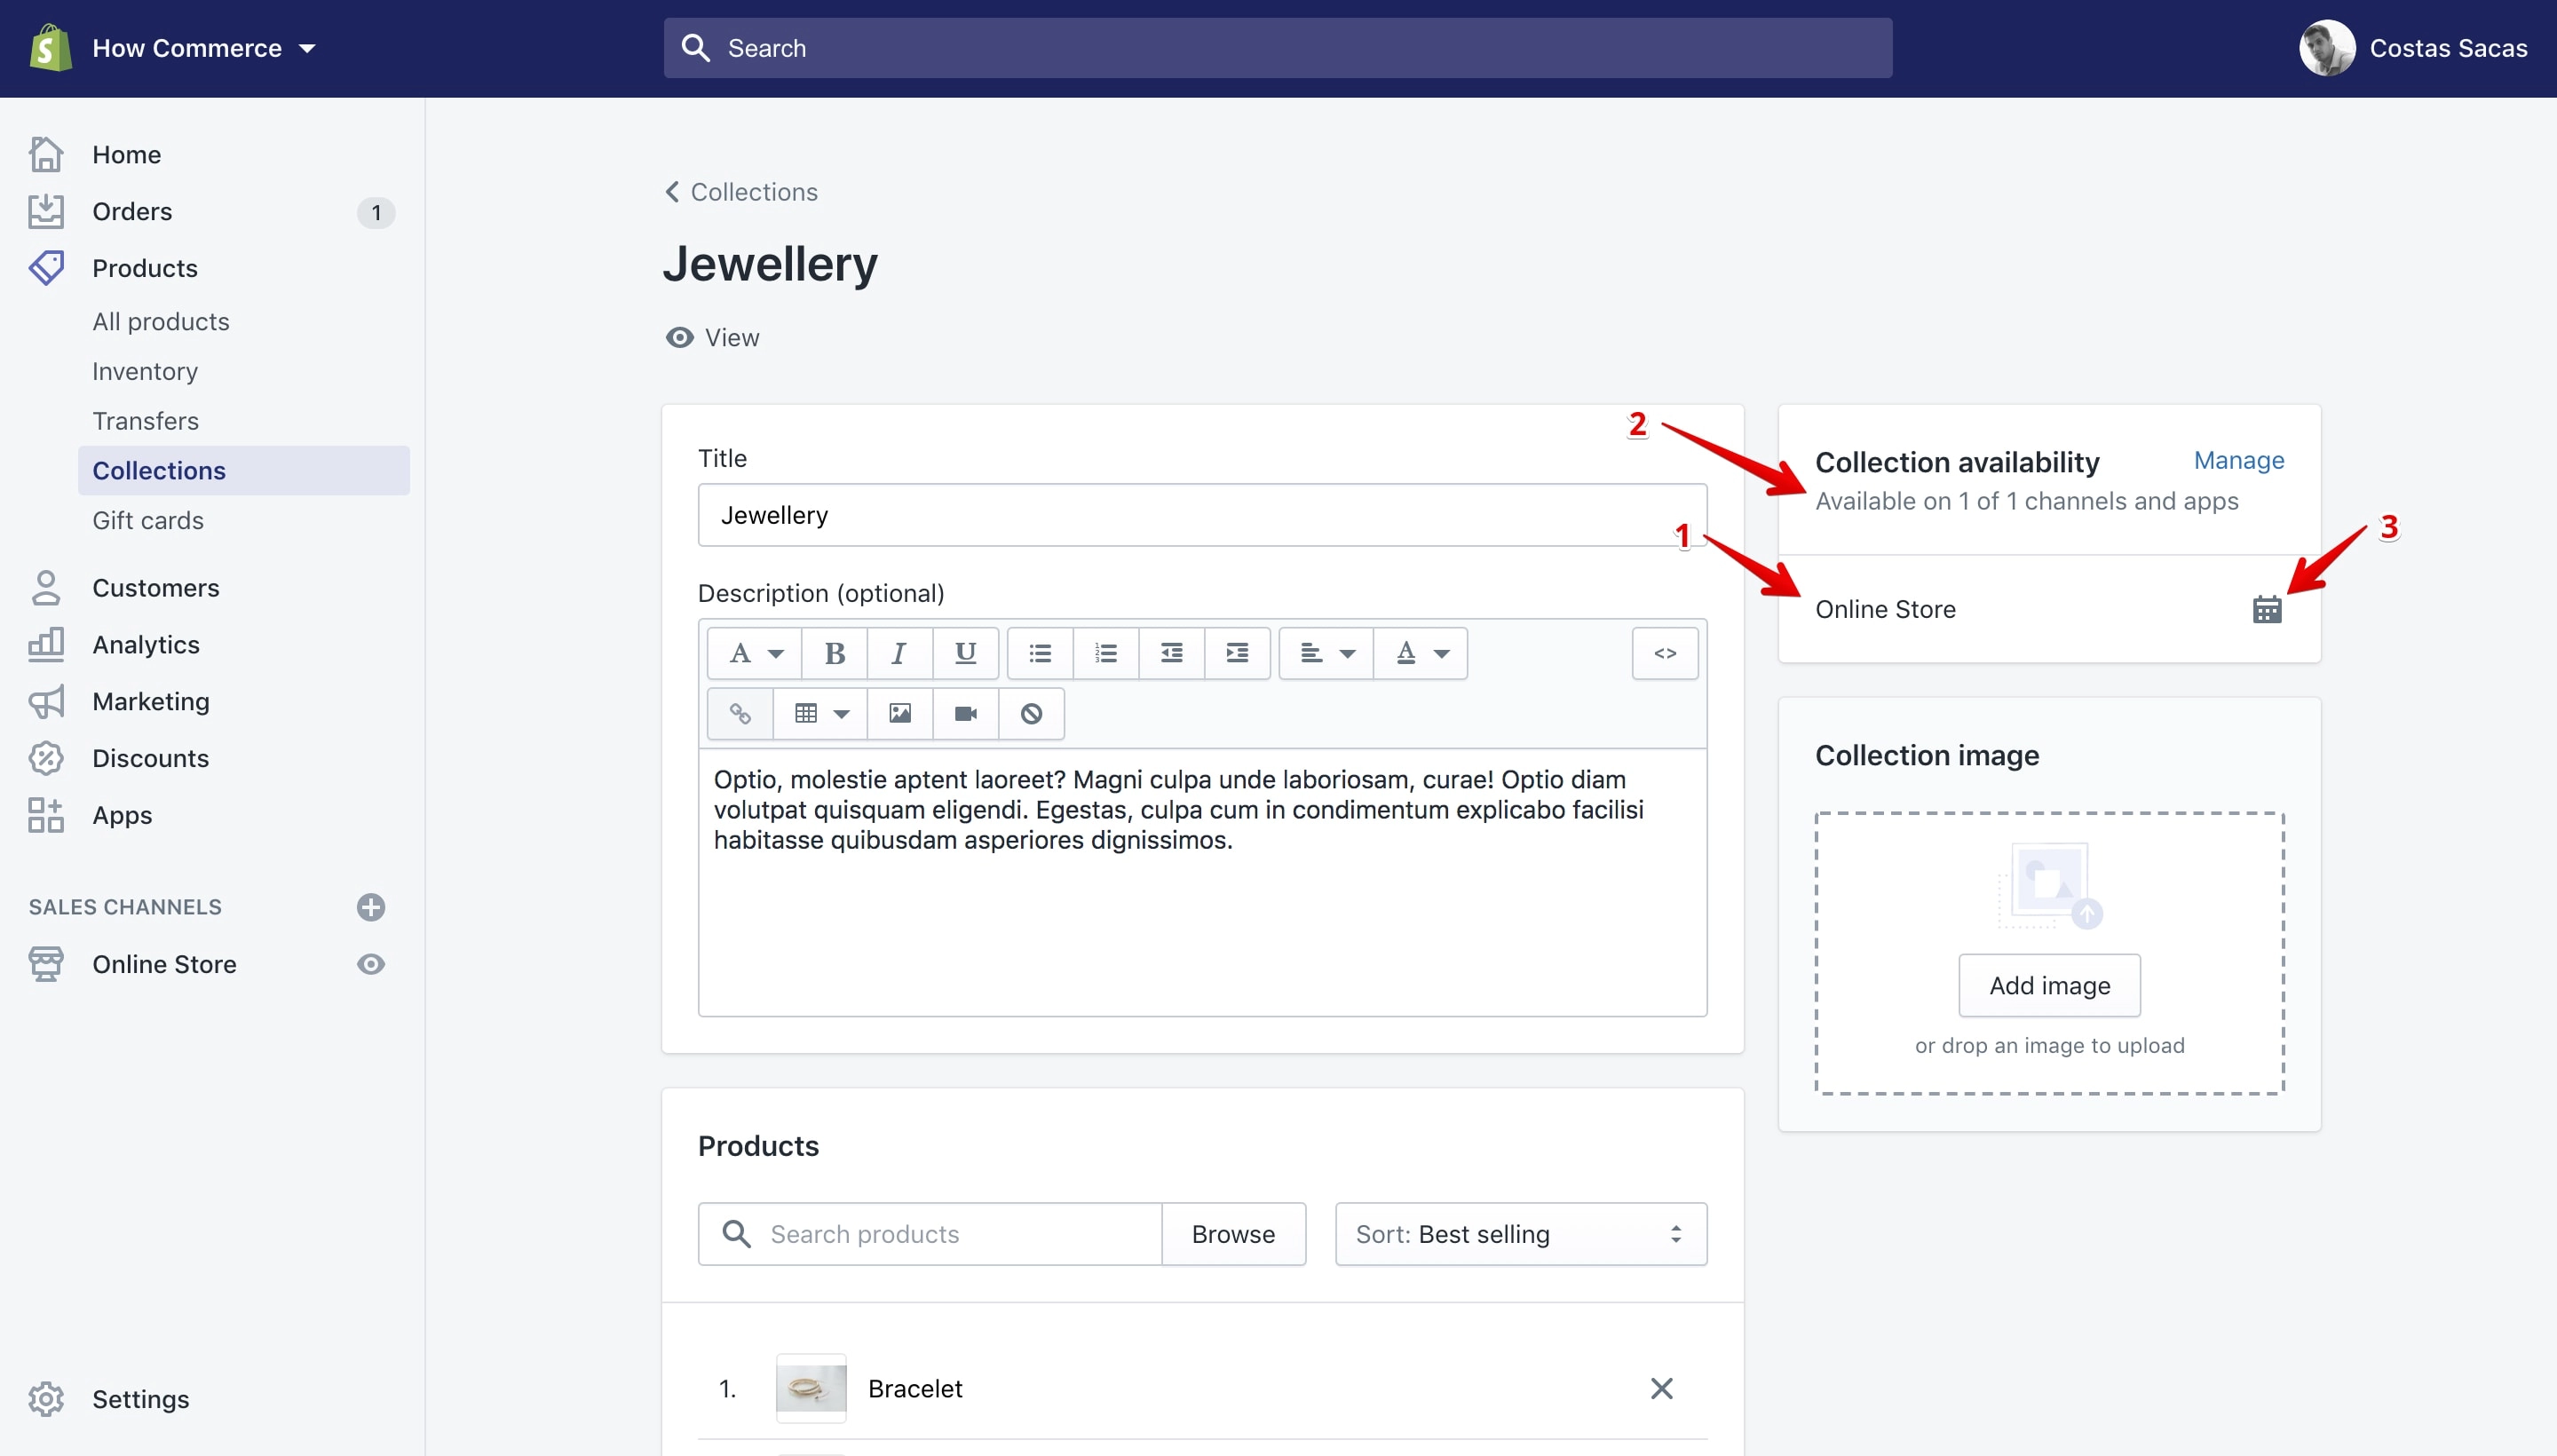
Click on the “Calendar icon” (marked with 1 in the image below):
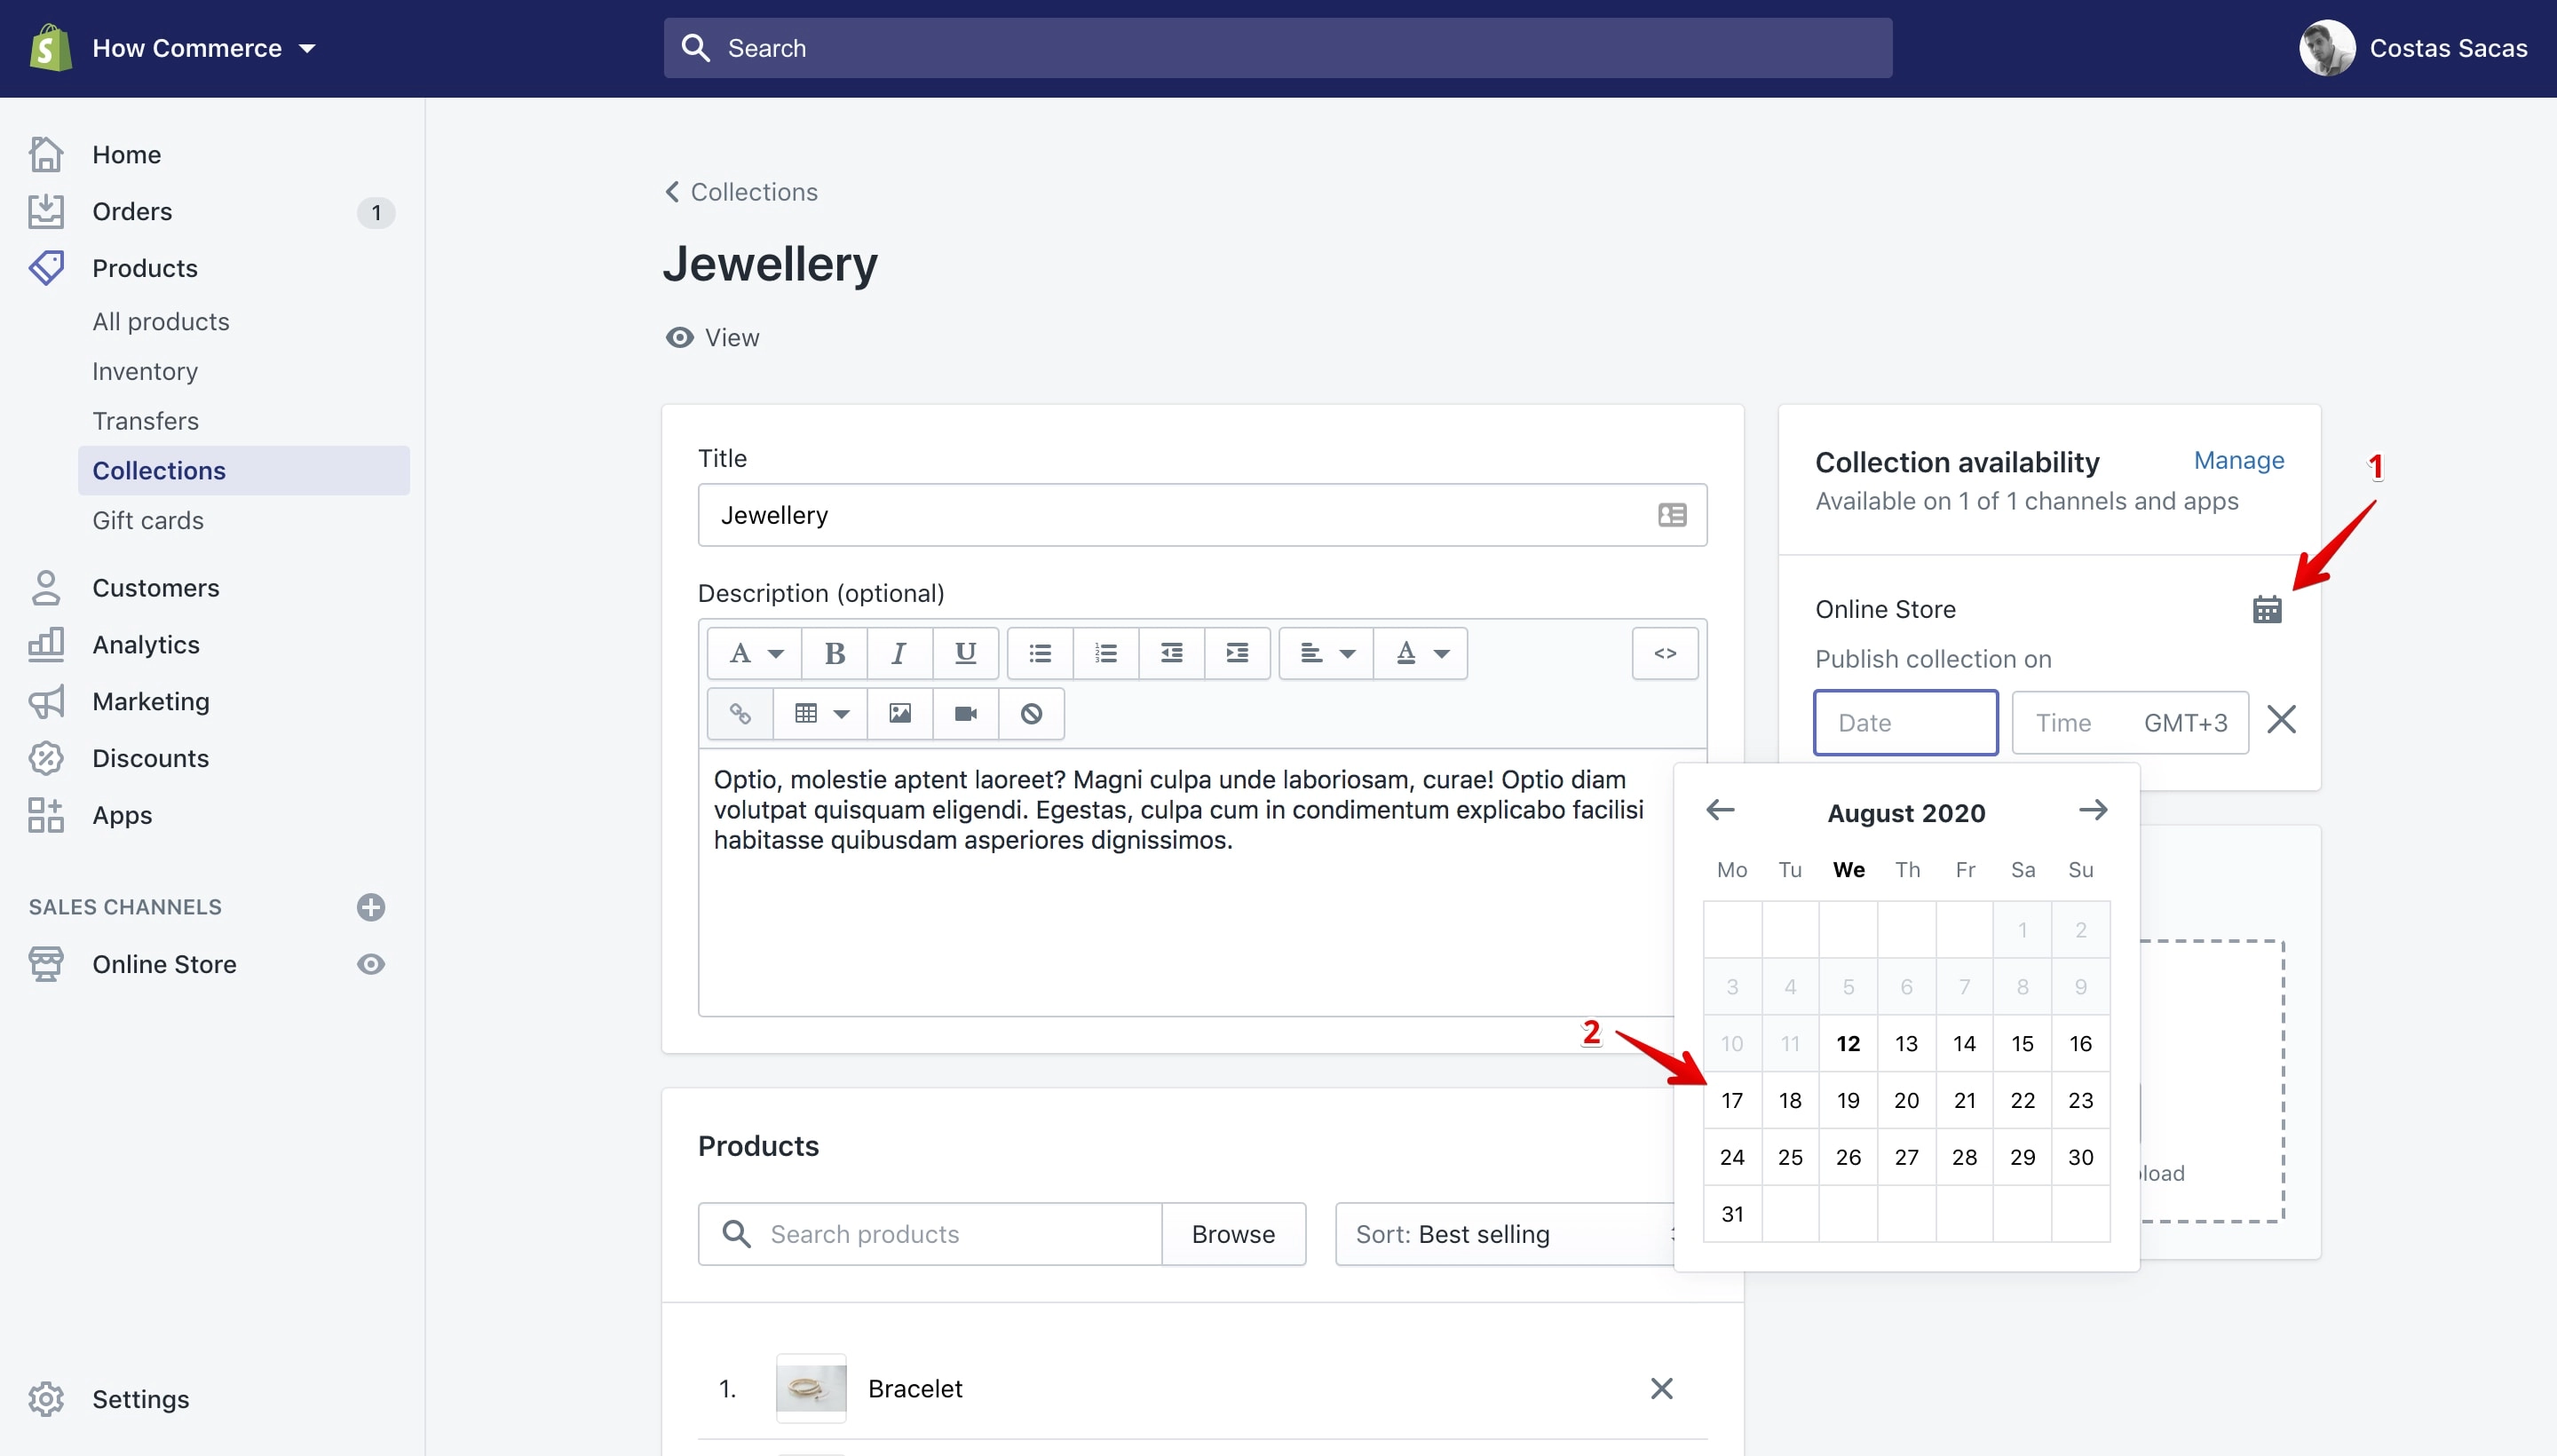
A calendar pop-up will display. From here select a future date (marked with 2 in the image above). After you do that you need to select an hour.
Once you select the date the default hour will be 12 AM so you’ll need to change it if that is not what you want:
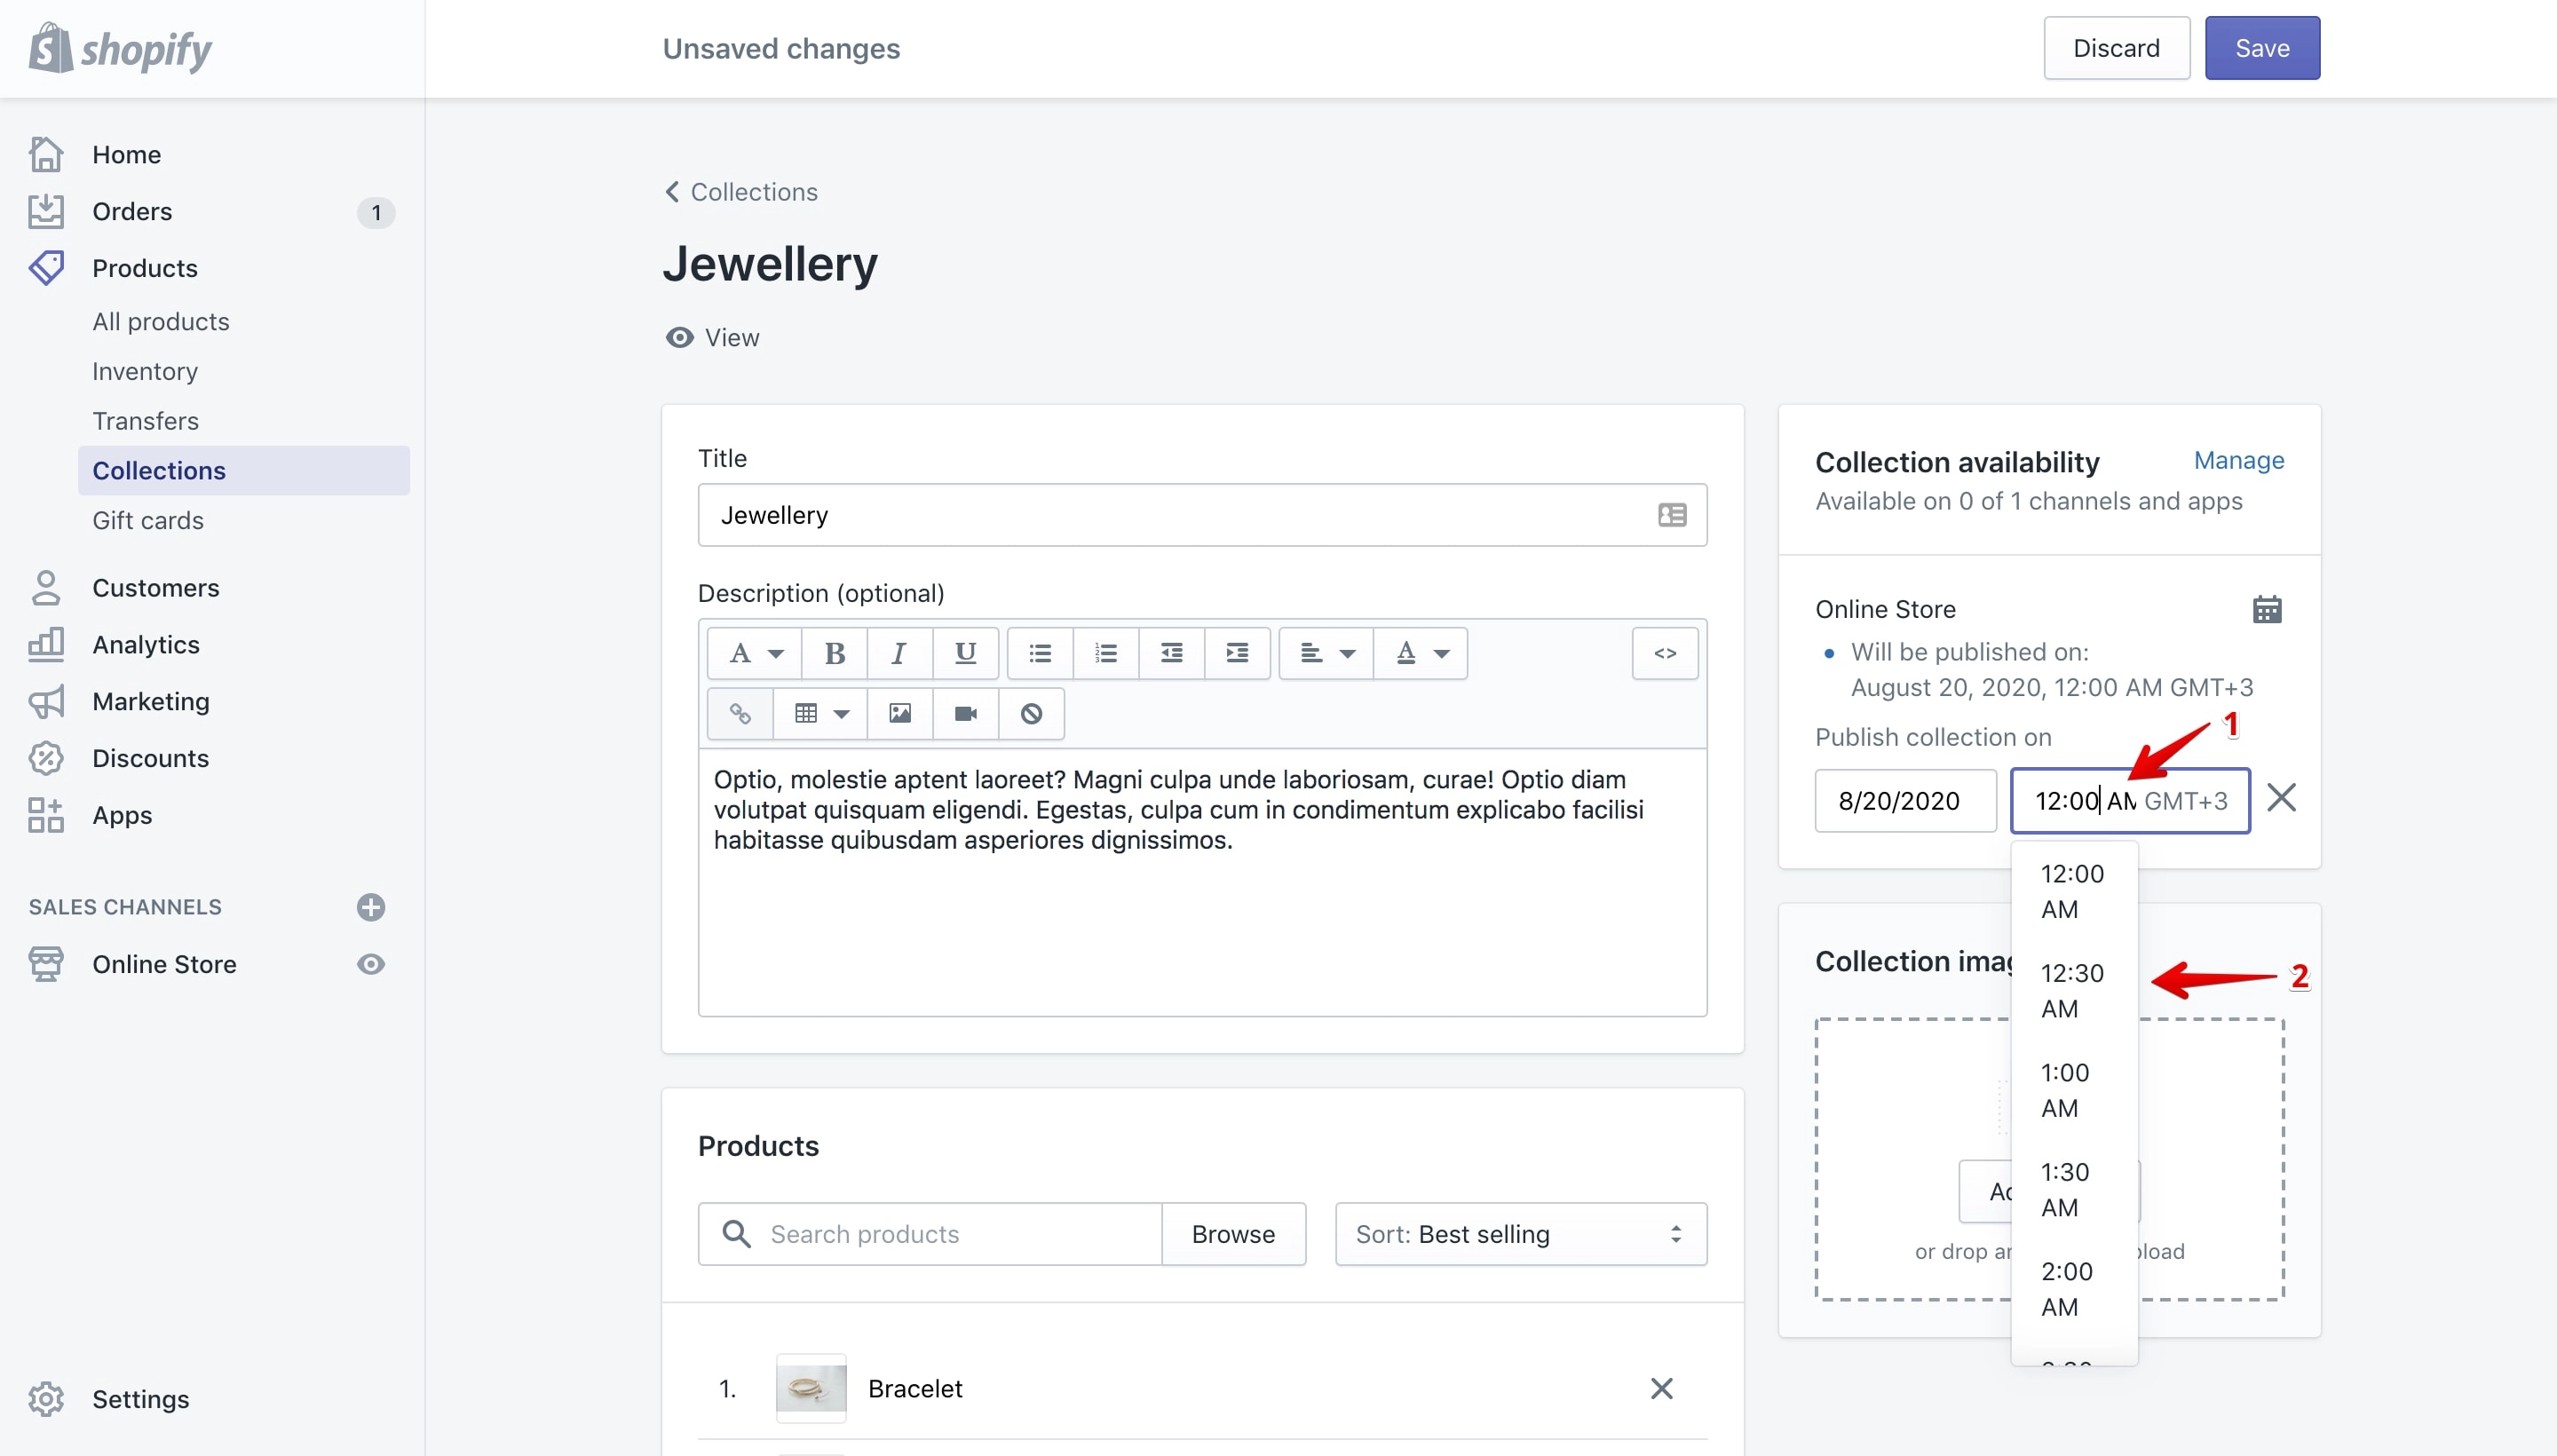
Click on the time input box (marked with 1 in the image above) and you’ll see a drop-down open. Select the appropriate time from the drop-down (marked with 2 in the image above).
Once everything is set up you can check if the future publishing is set correctly by looking above the settings (marked with 1 in the image below):
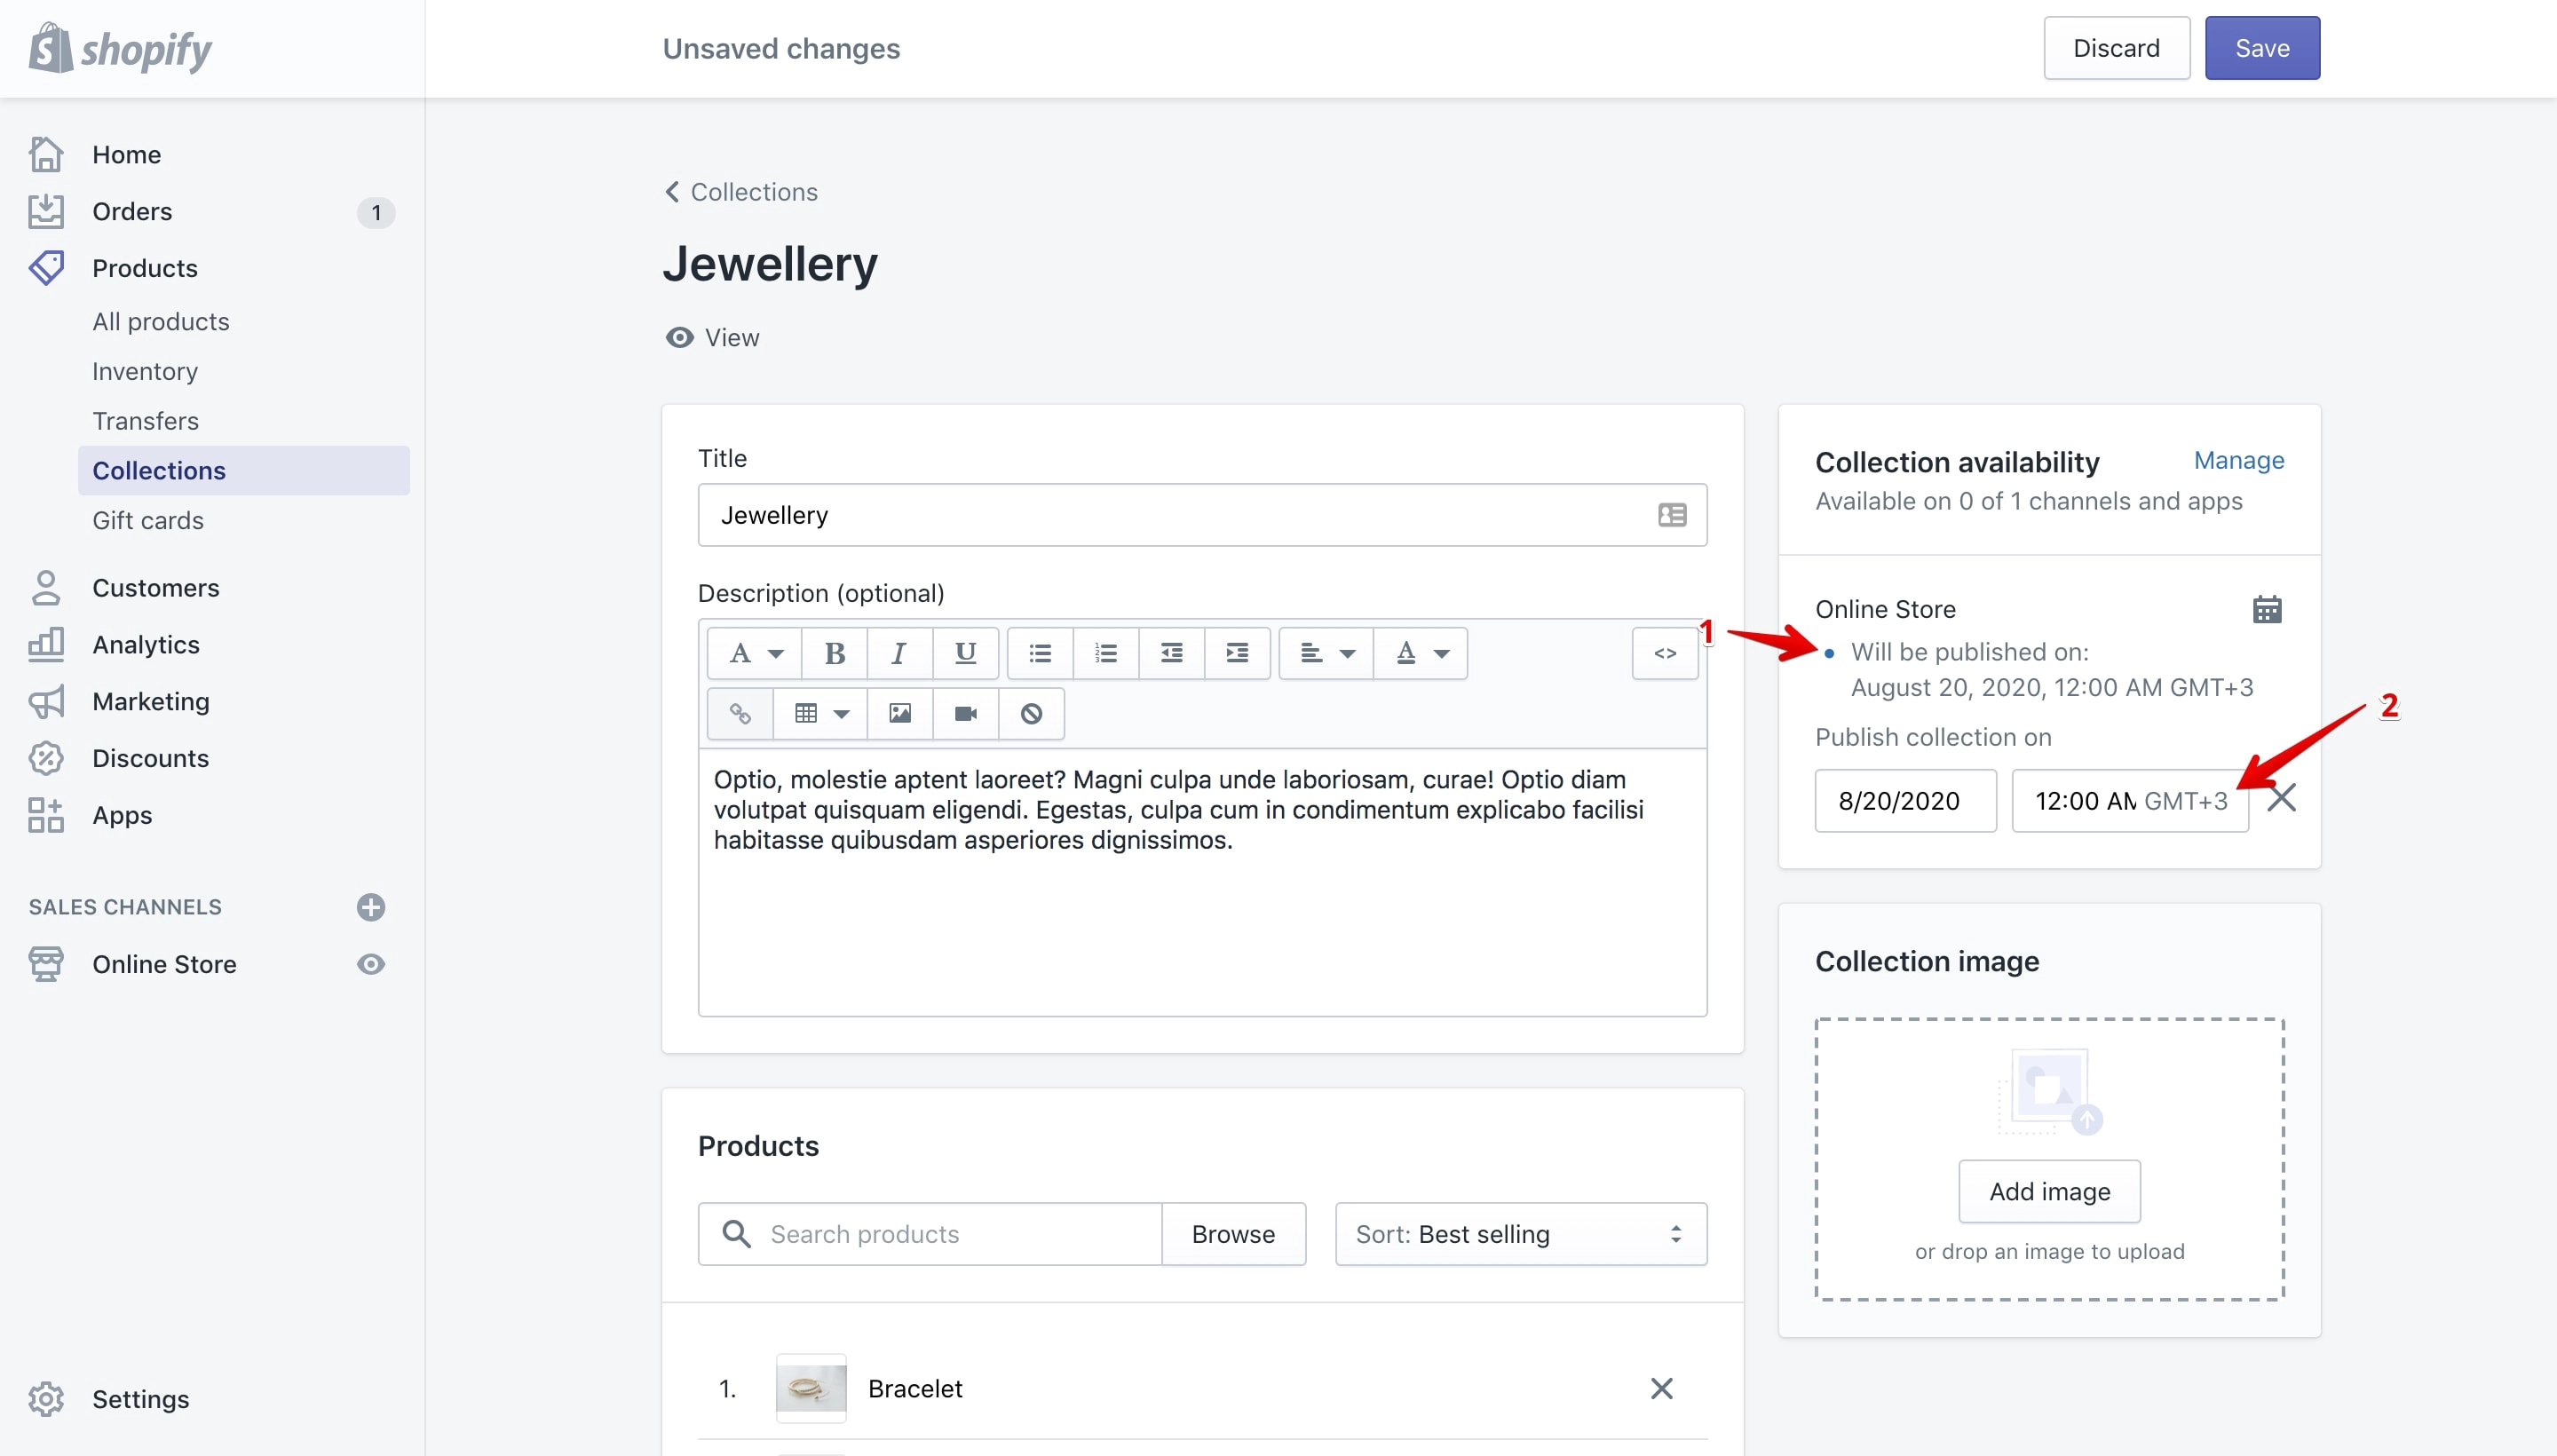
On the time input box you can also see your GMT zone (marked with 2 in the image above). Depending on your location on the globe this is different.
If you want to cancel your future publishing time you can use the “X” icon like in the image below:
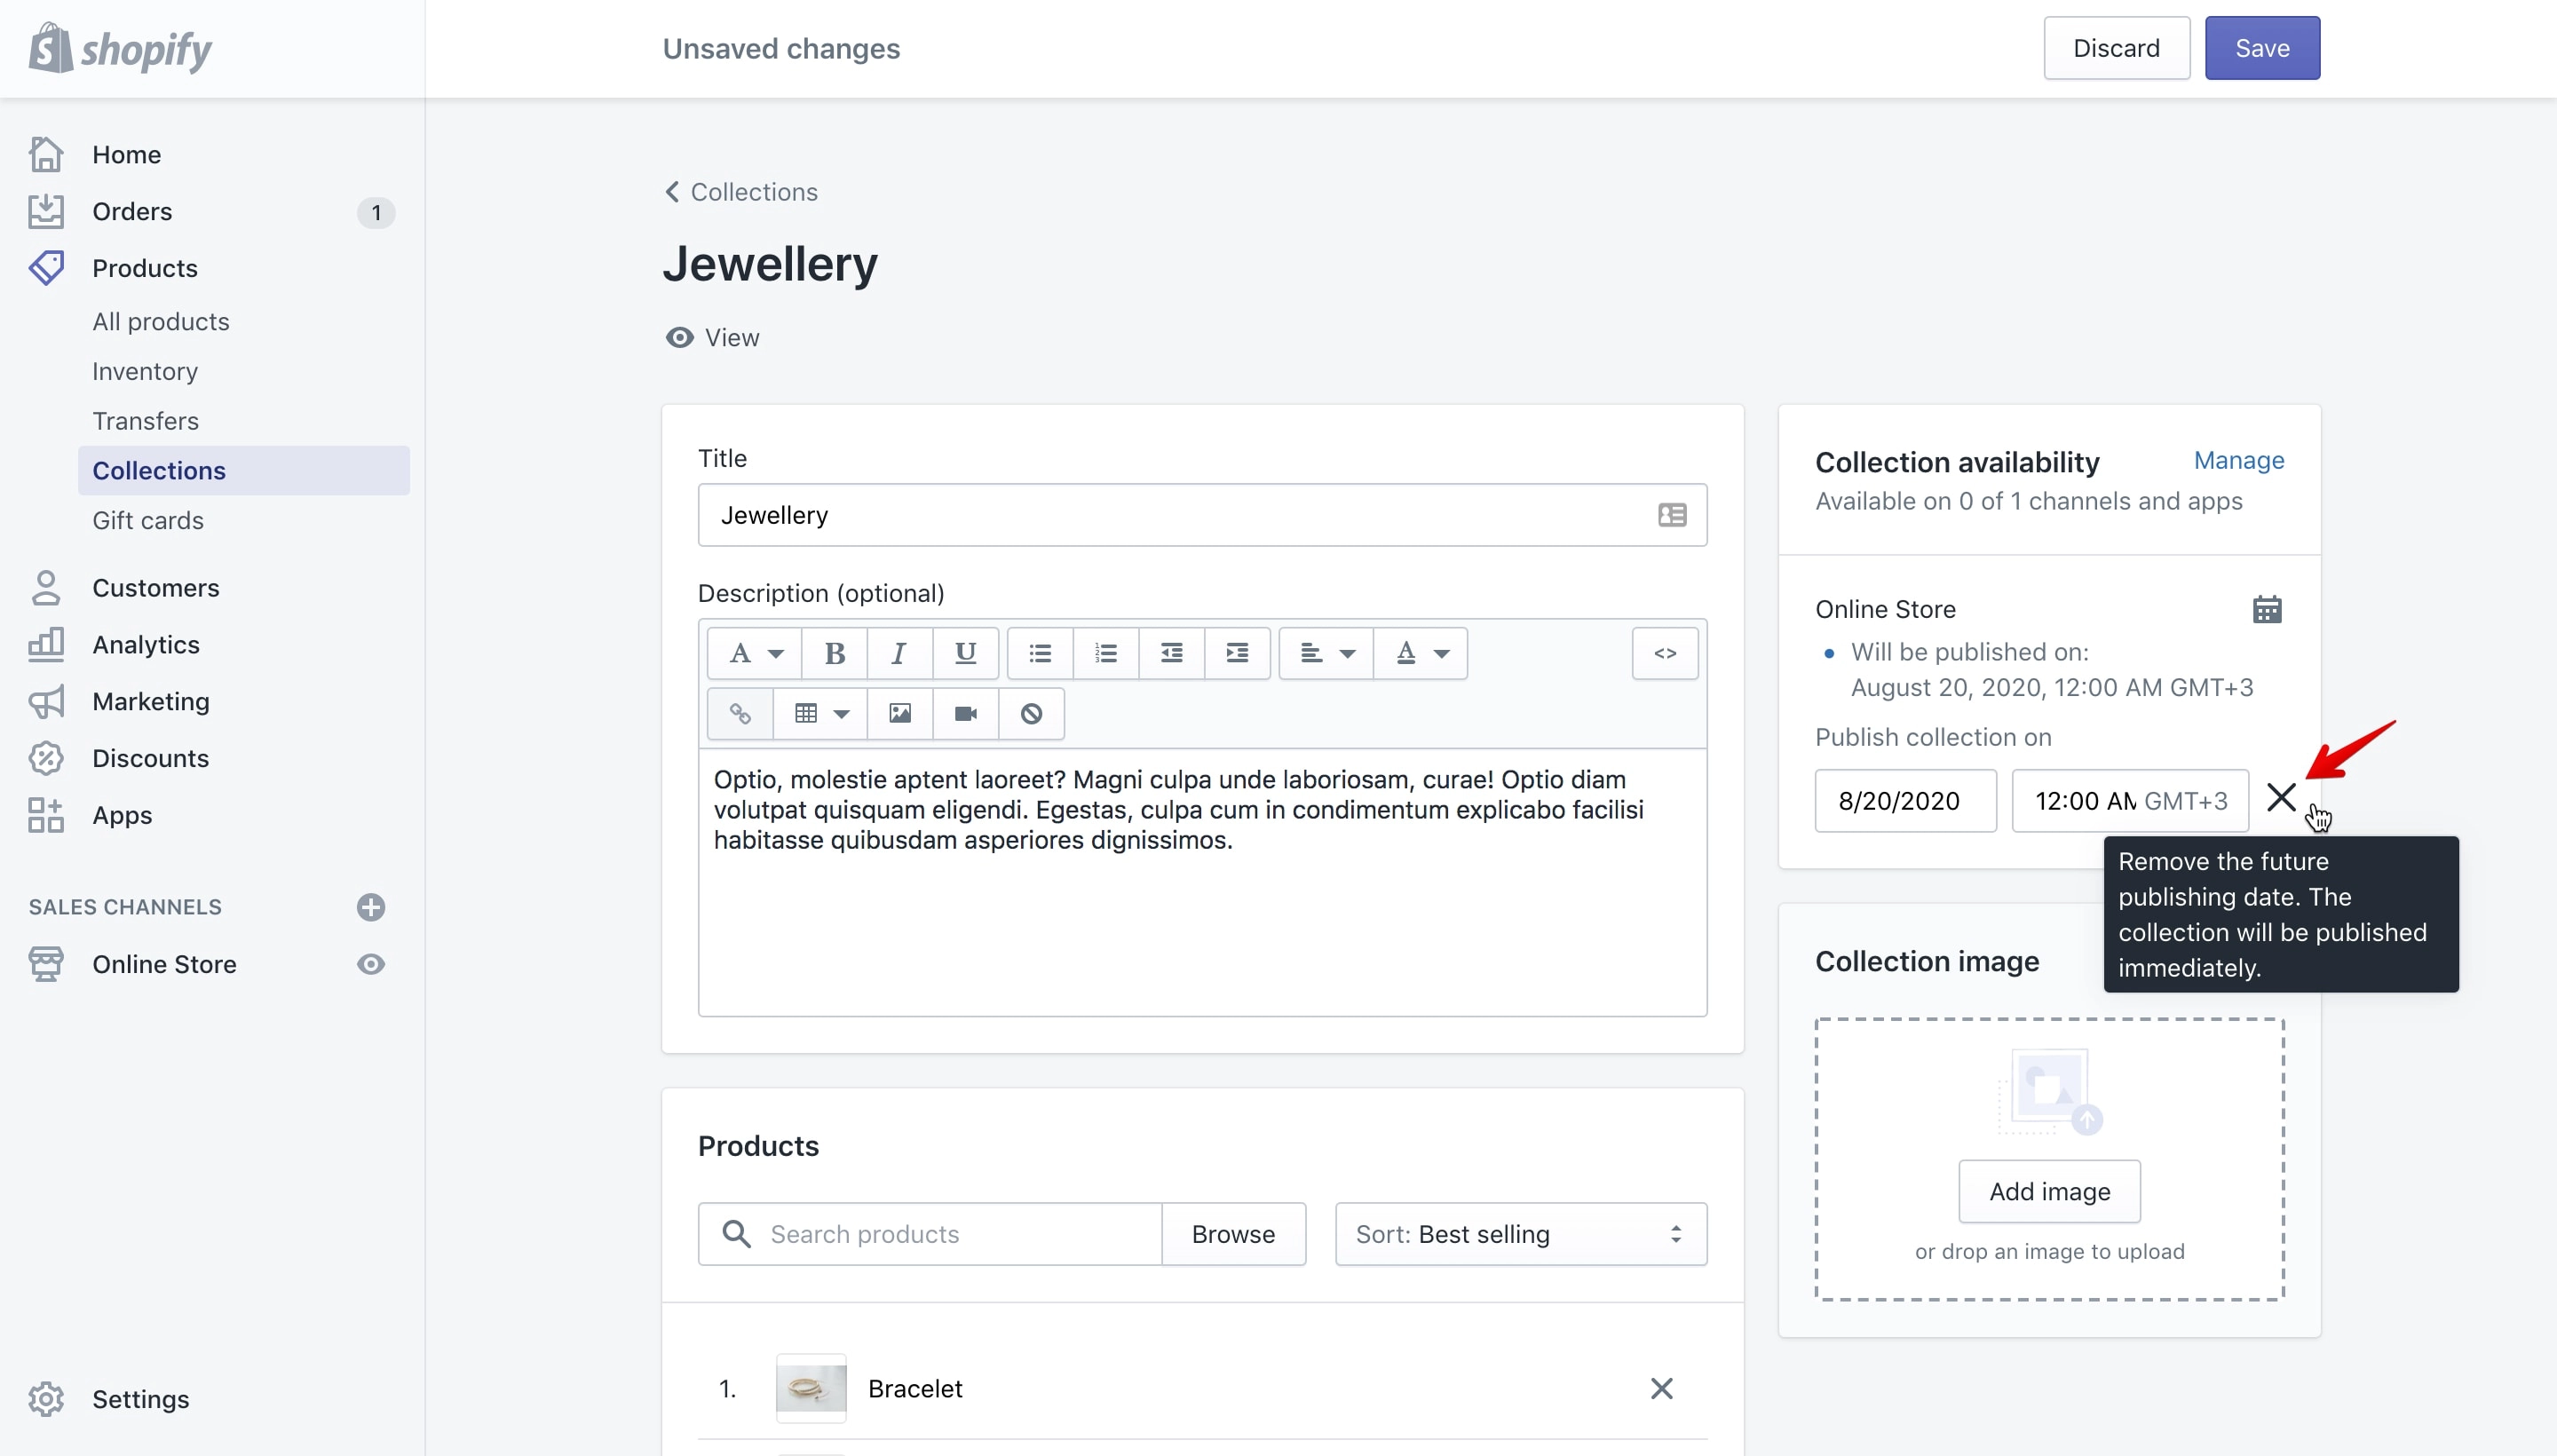
By removing the future publishing date the product will be published as soon as you hit the “Save” button.
After you “Save” the publishing date you’ll see a message with the date and time you selected showing you when the product will be published (marked with 1 in the image below).
If you want to change the date or the time all you have to do is click on the calendar icon, make the modification and save again your new settings.
Set a future publish date for a page
Go to the “Pages” section (marked with 1 in the image below) and select an unpublished page or create a new one.
I already have one that is unpublished (marked with 2 in the image below):
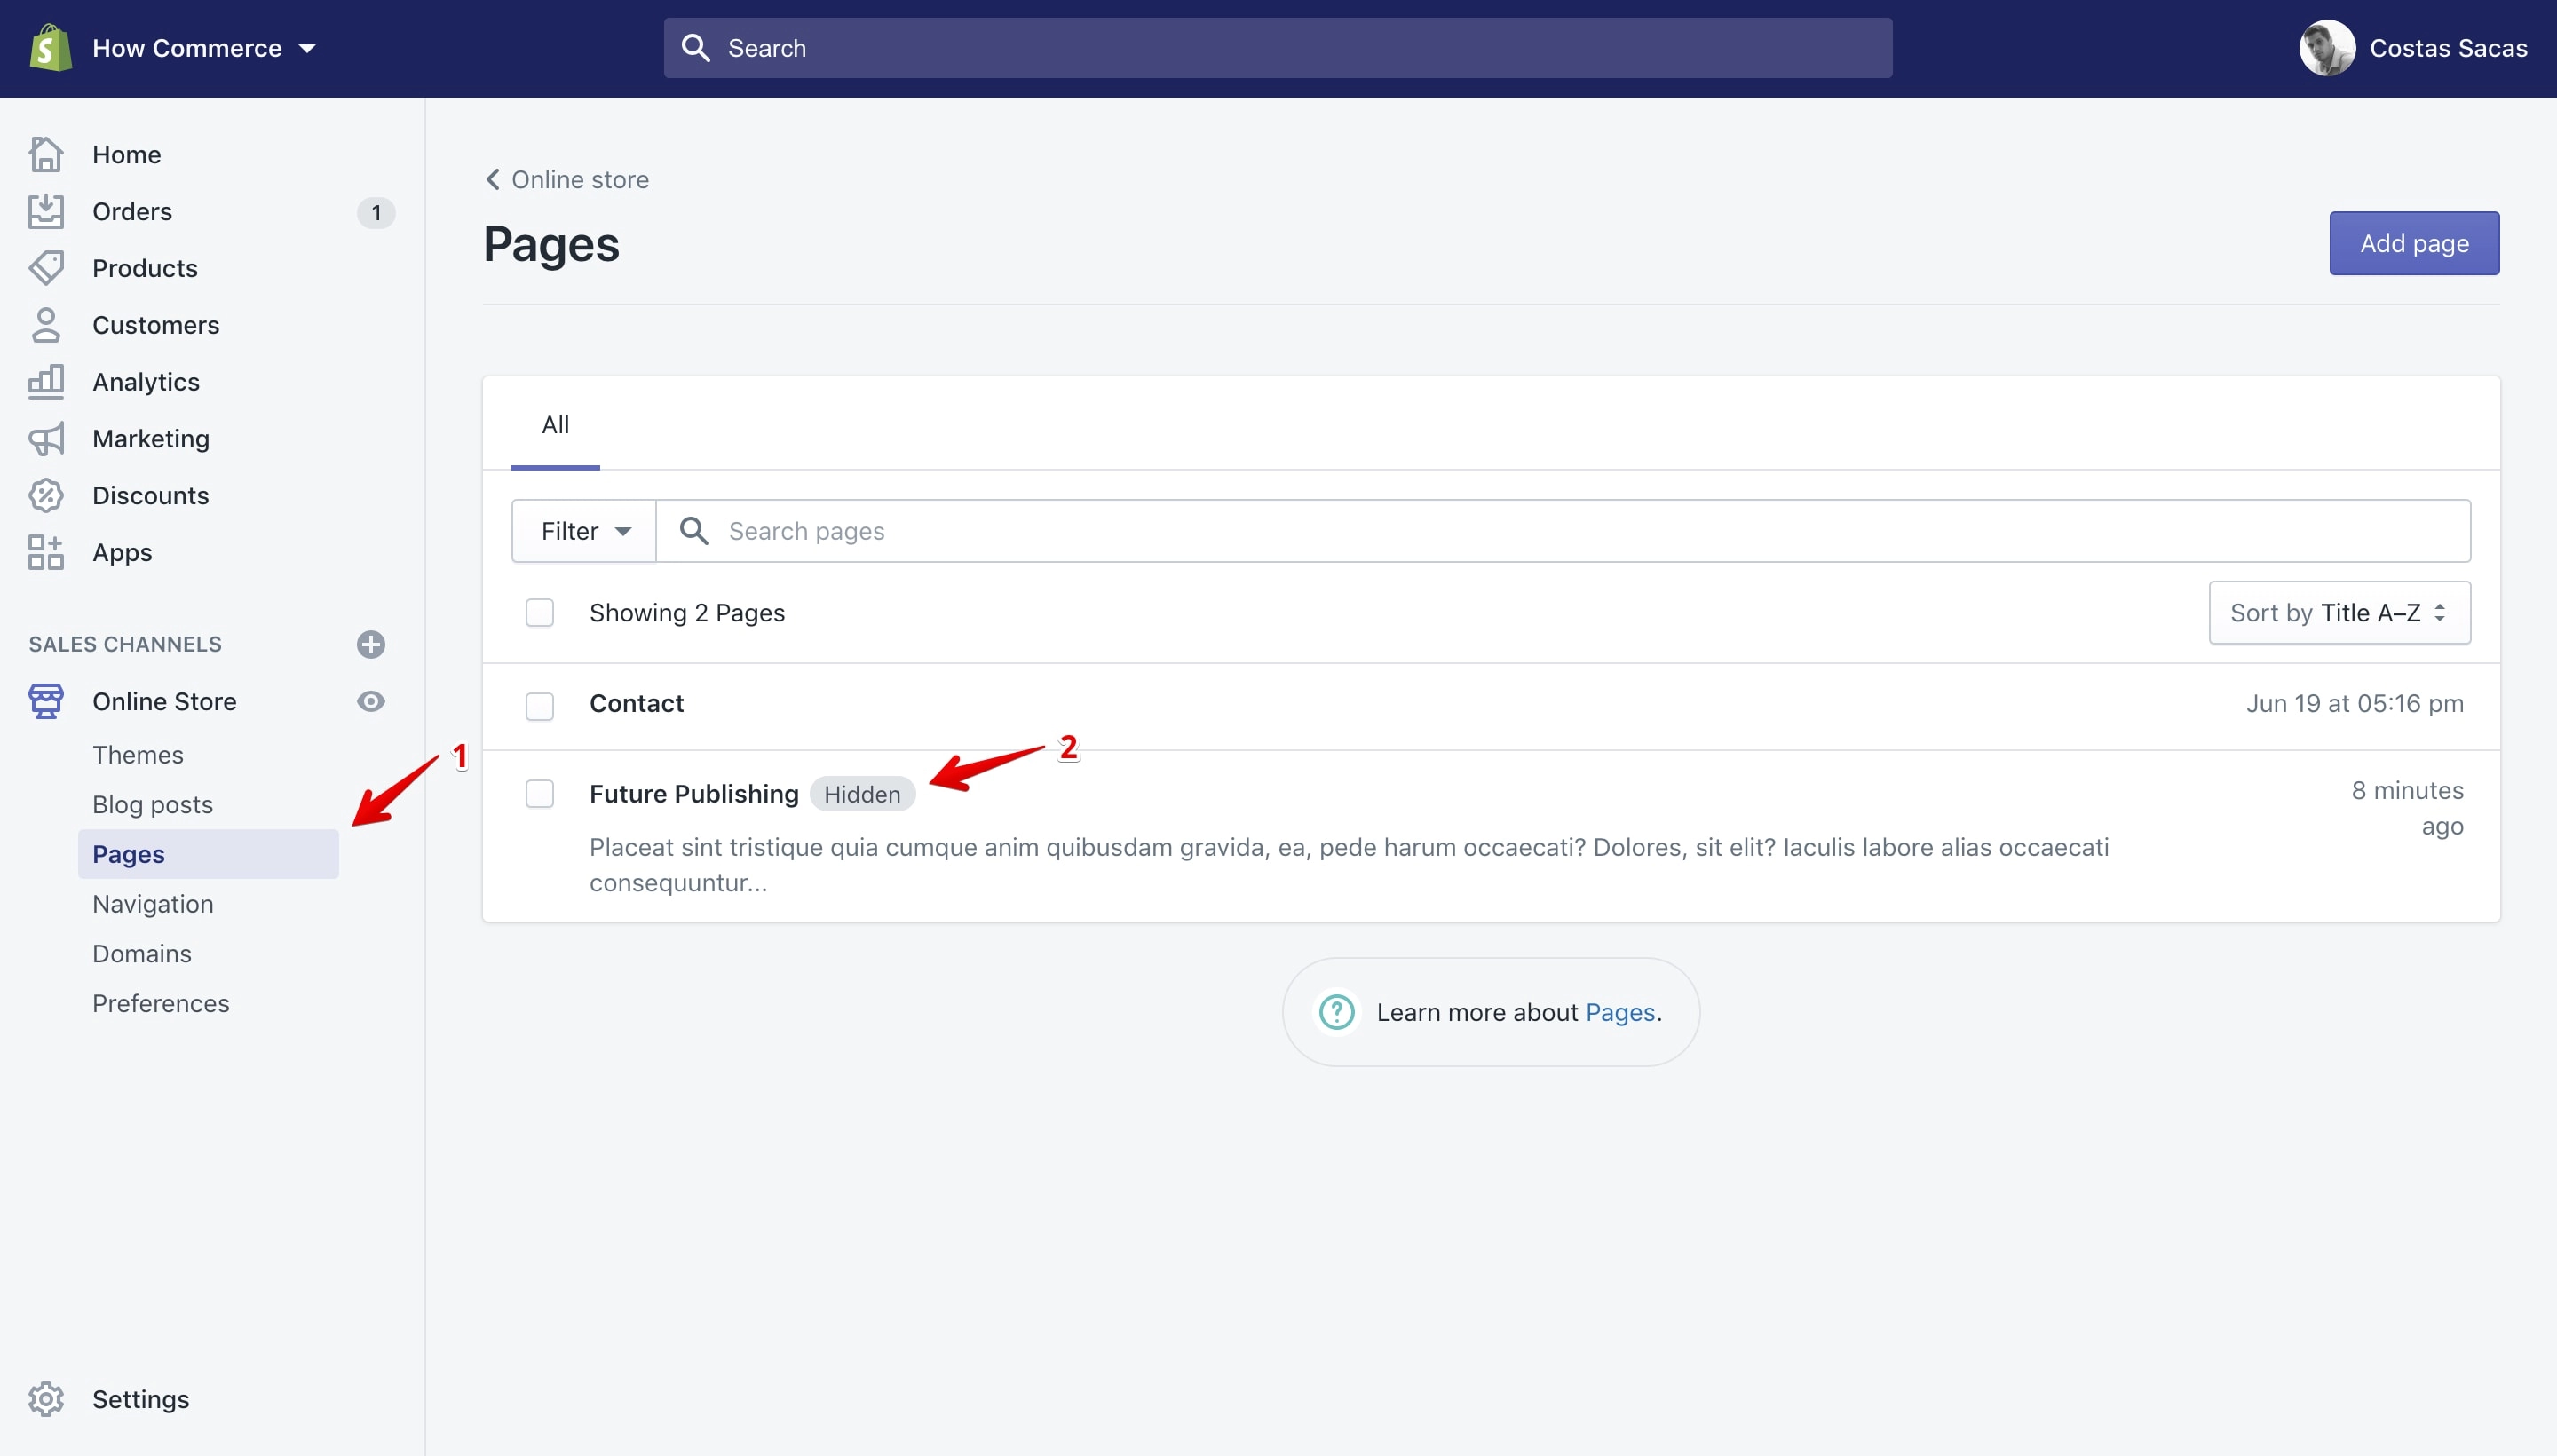
I’ve named the page “Future Publishing” to relate with the article section.
As you see the page is not available on the shop and it's marked with a grey label which contains the text “Hidden” meaning that it is not published yet on the store. I’ll set a future date on which the page will be published.
To do that we need to open the “Page” editing:
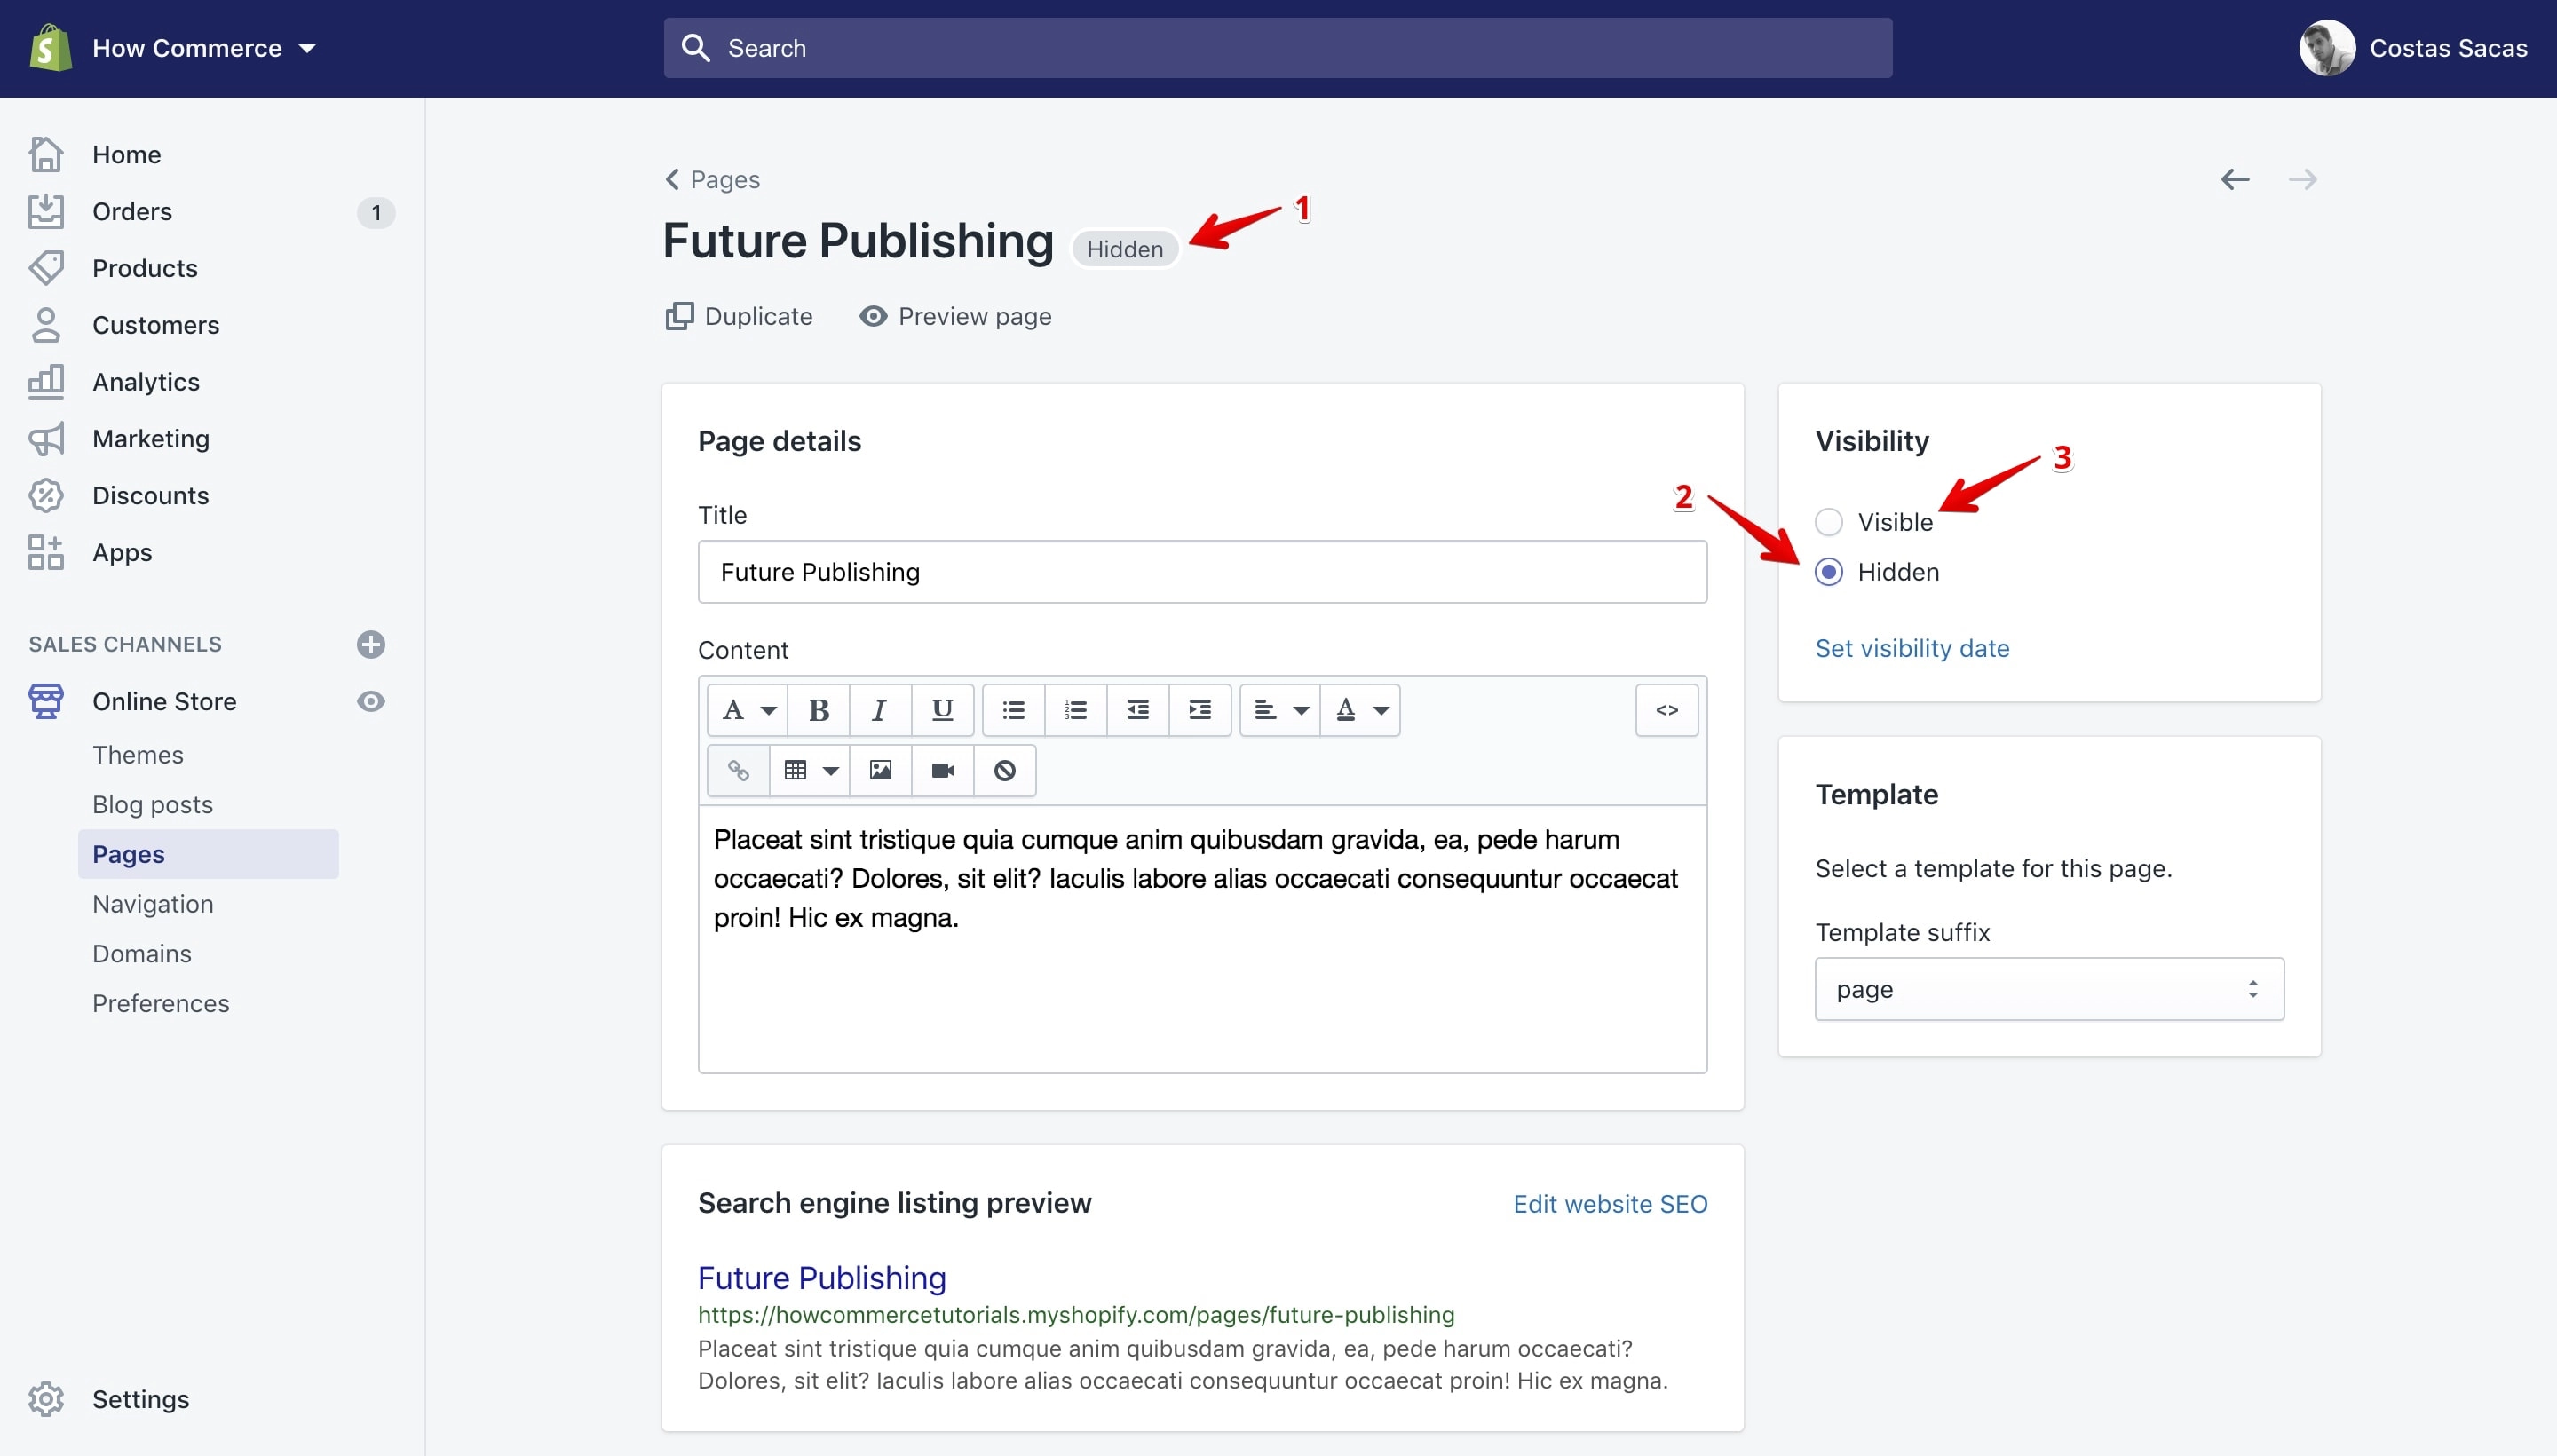
Another way to check if the page is unpublished in your store is by checking the grey label next to the page title (marked with 1 in the image above). You can also see that the visibility is set to “Hidden” (marked with 2 in the image above).
I can make the page visible right away by checking the “Visible” option (marked with 3 in the image above) and that will make the page visible on my store once I’ll save it.
I do not want to do that because I want to publish this page at a later date. To do that I’ll click on the “Set visibility date” like in the image below:
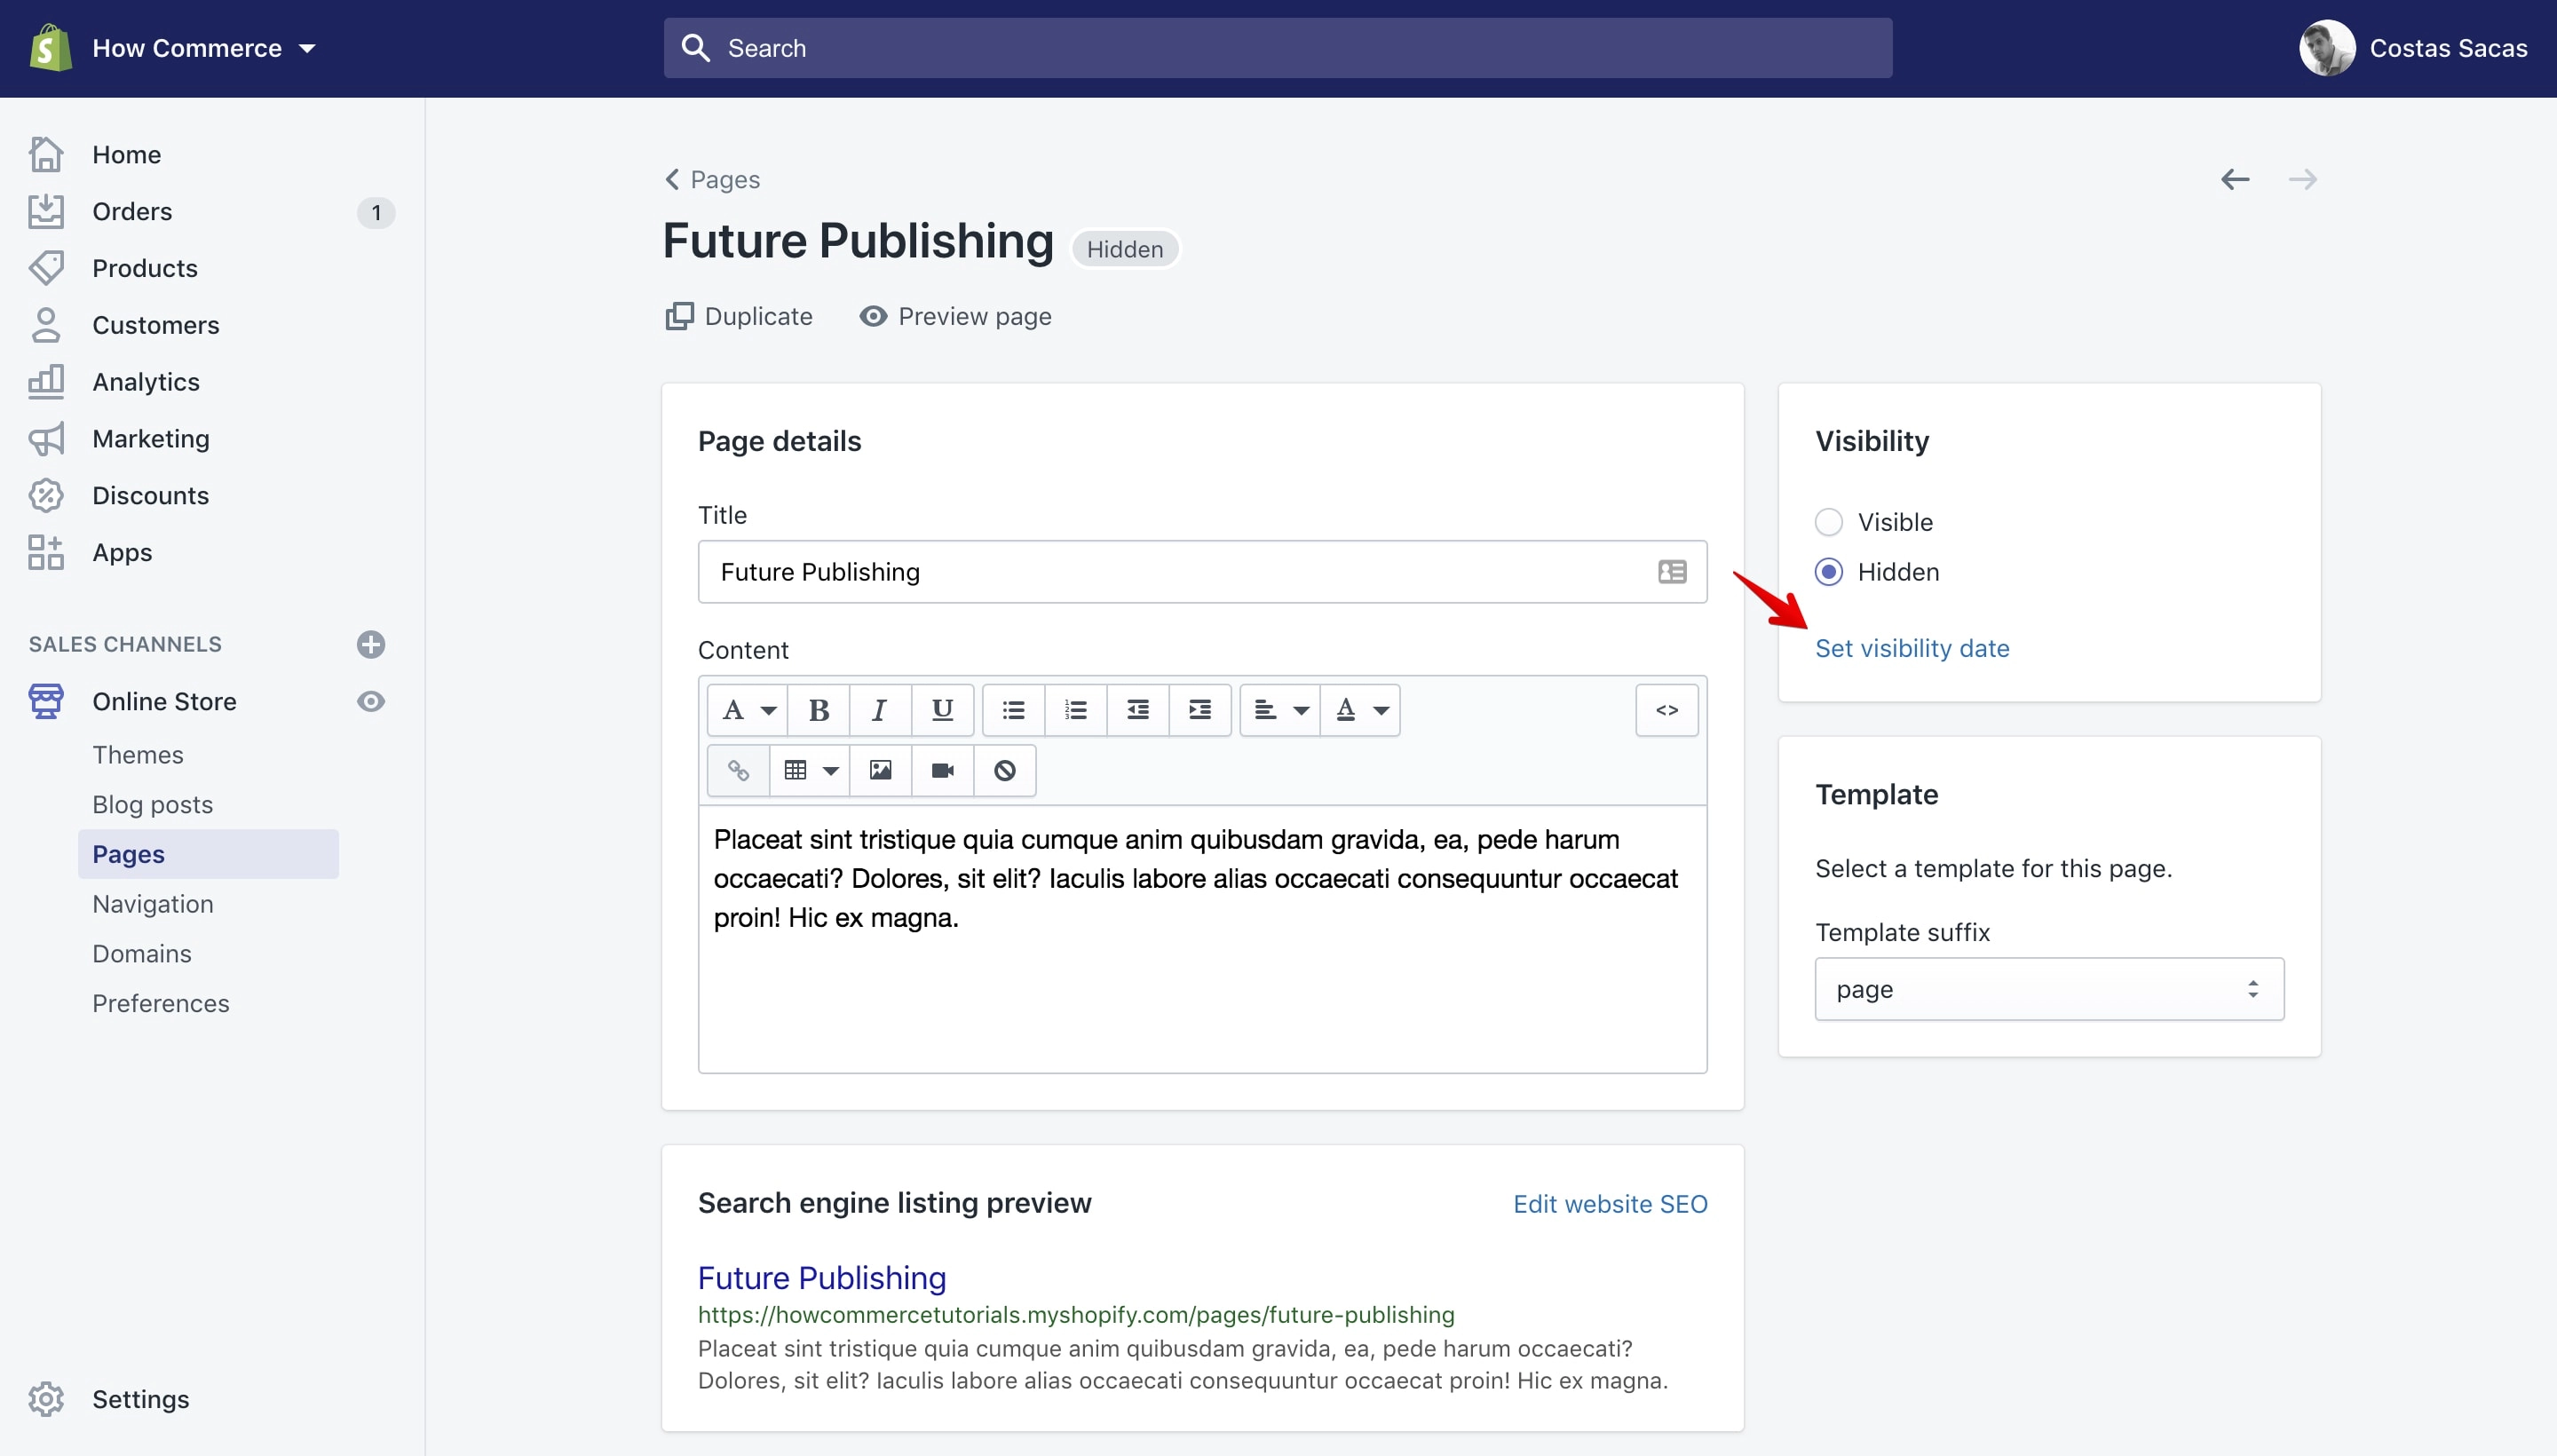
Clicking on this setting will give us options to select a future date and time when we want this page to be published on our store.
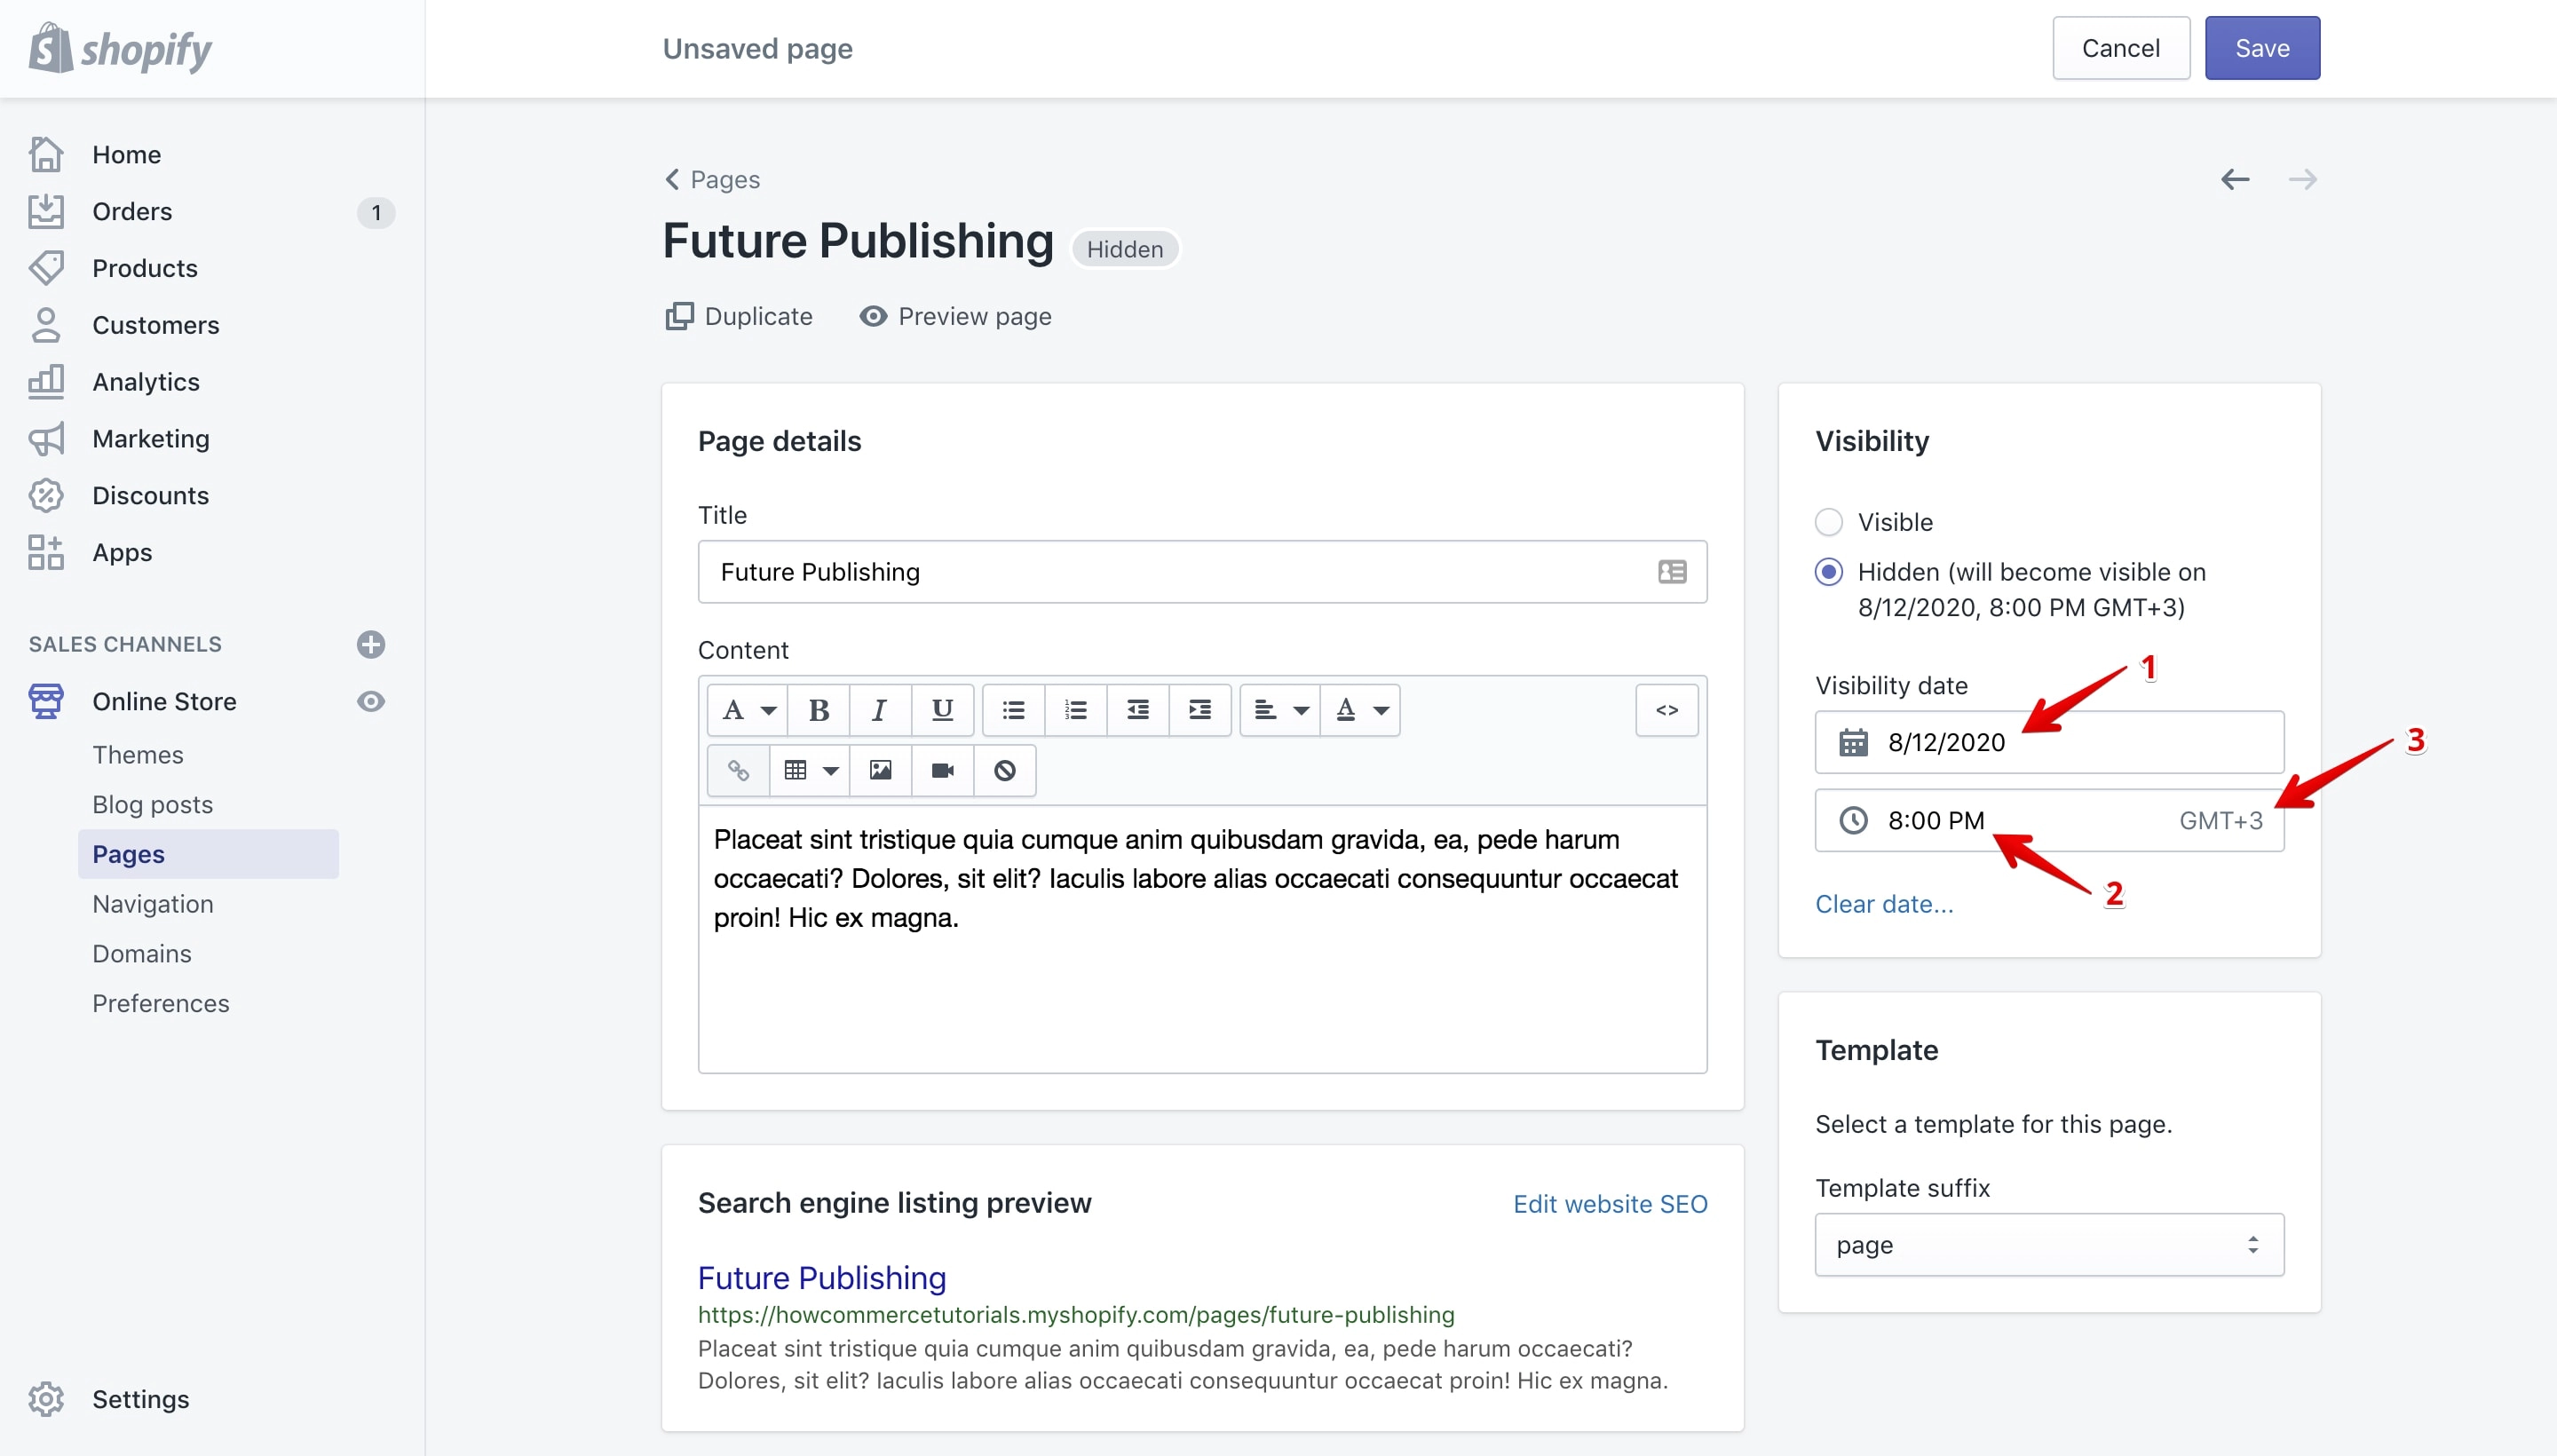
The “Set visibility date” settings are as follows: the date (marked with 1 in the image above), the time (marked with 2 in the image above) and also your GMT time zone (marked with 3 in the image above).
Click on the “Date” (marked with 1 in the image above). A calendar pop-up will display. From here select a future date like in the image below:
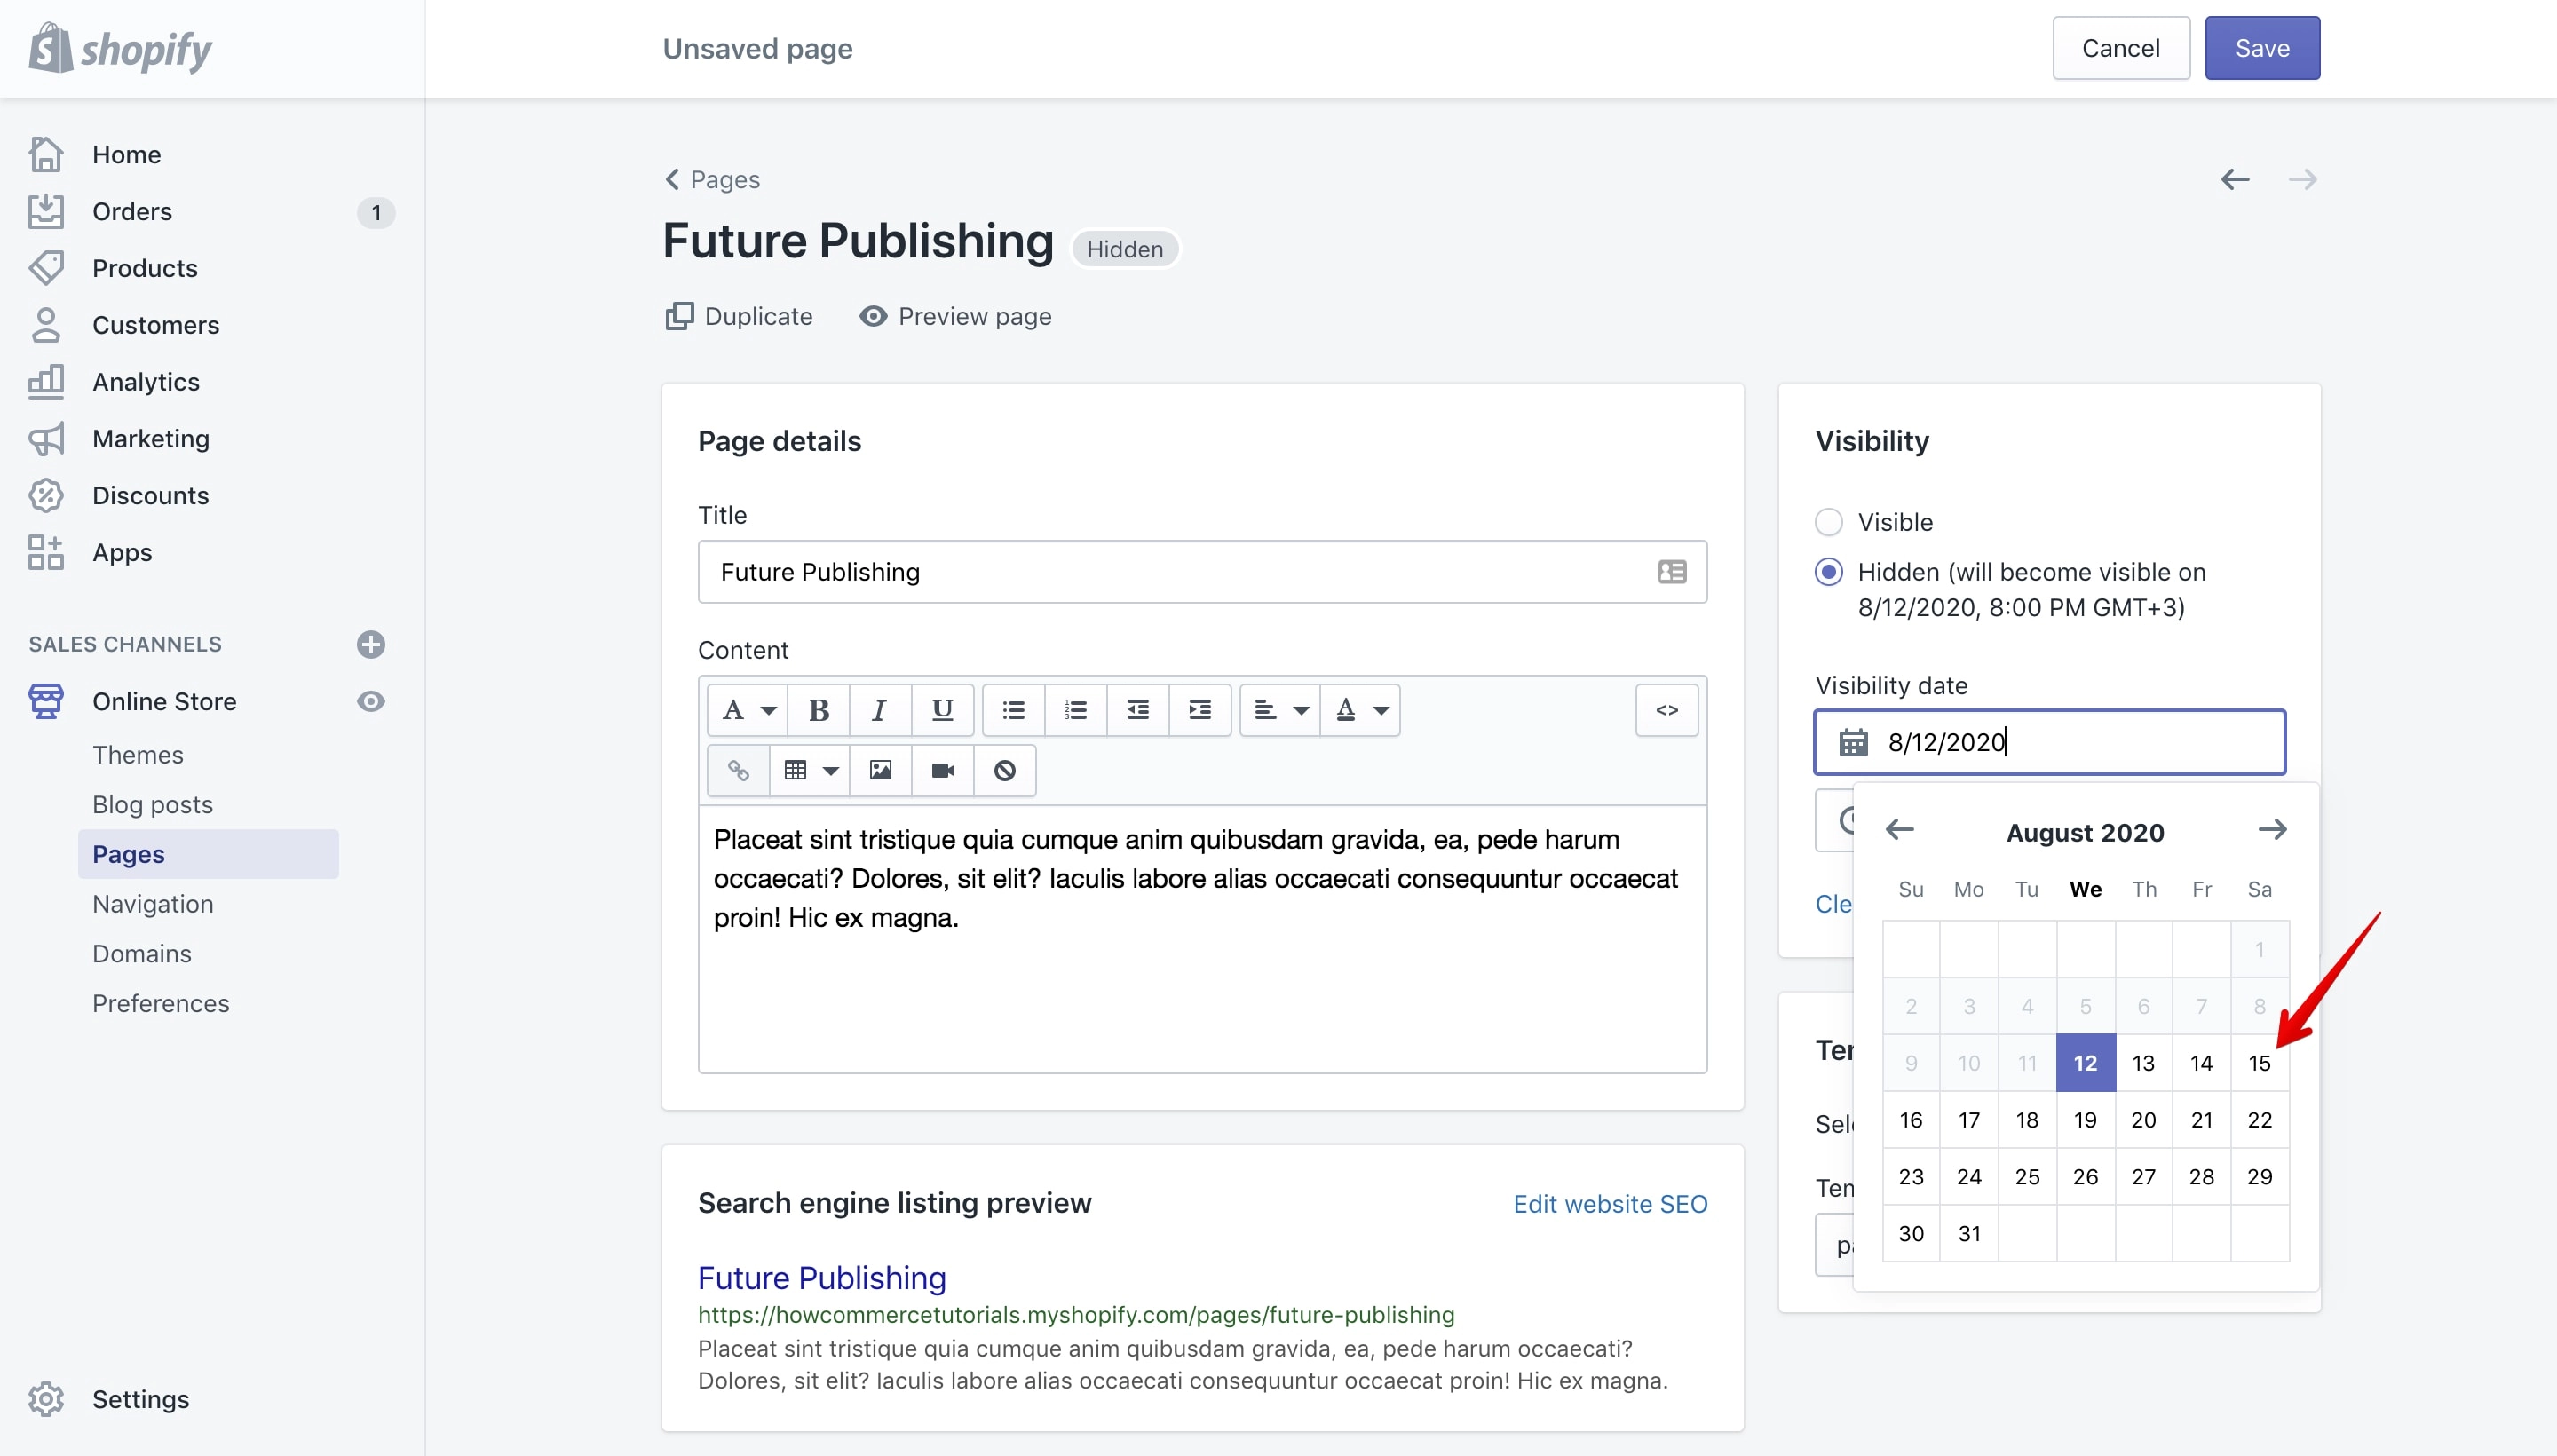
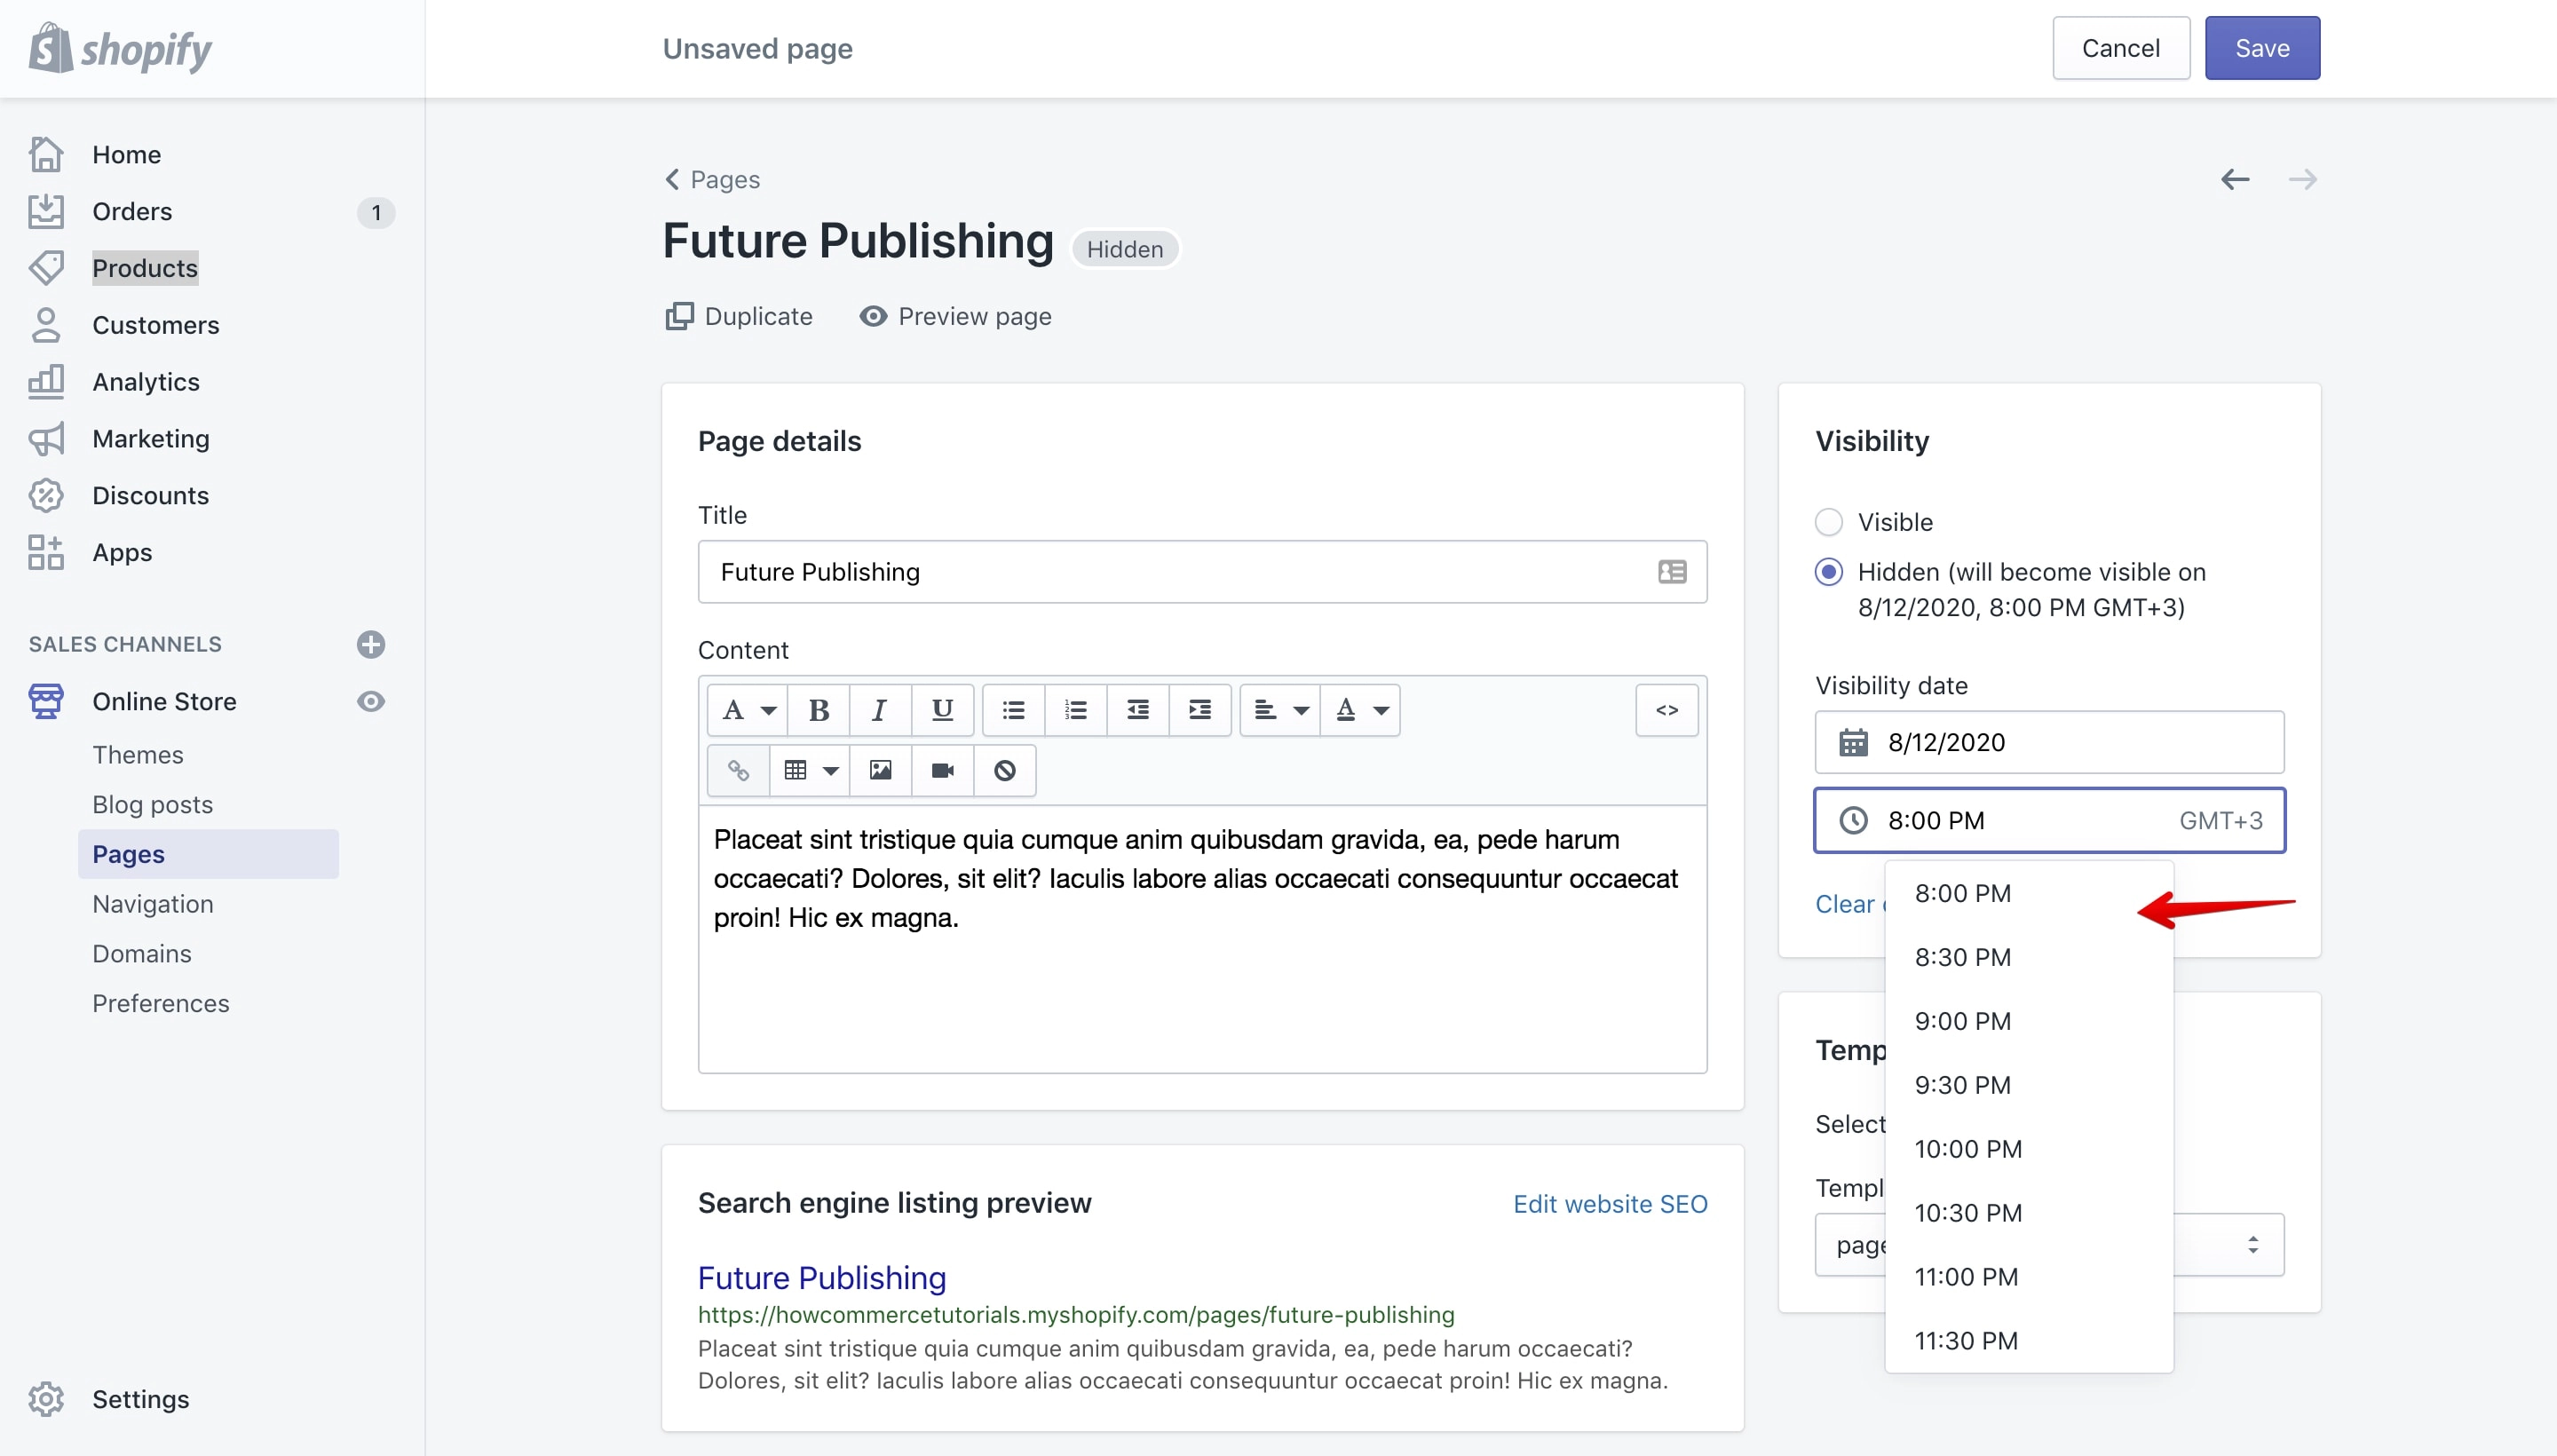
After you’ve selected the date you need to select an hour. Once you select the date the default hour will be the hour that you’ve set in the “Timezone” setting at the beginning of this article section so you’ll need to change it if that is not what you want.
Click on the time input box and you’ll see a drop-down open. Select the appropriate time from the drop-down (see image below):
Once everything is set-up you can check if the future publishing is set correctly by looking above the settings (marked with 1 in the image below):
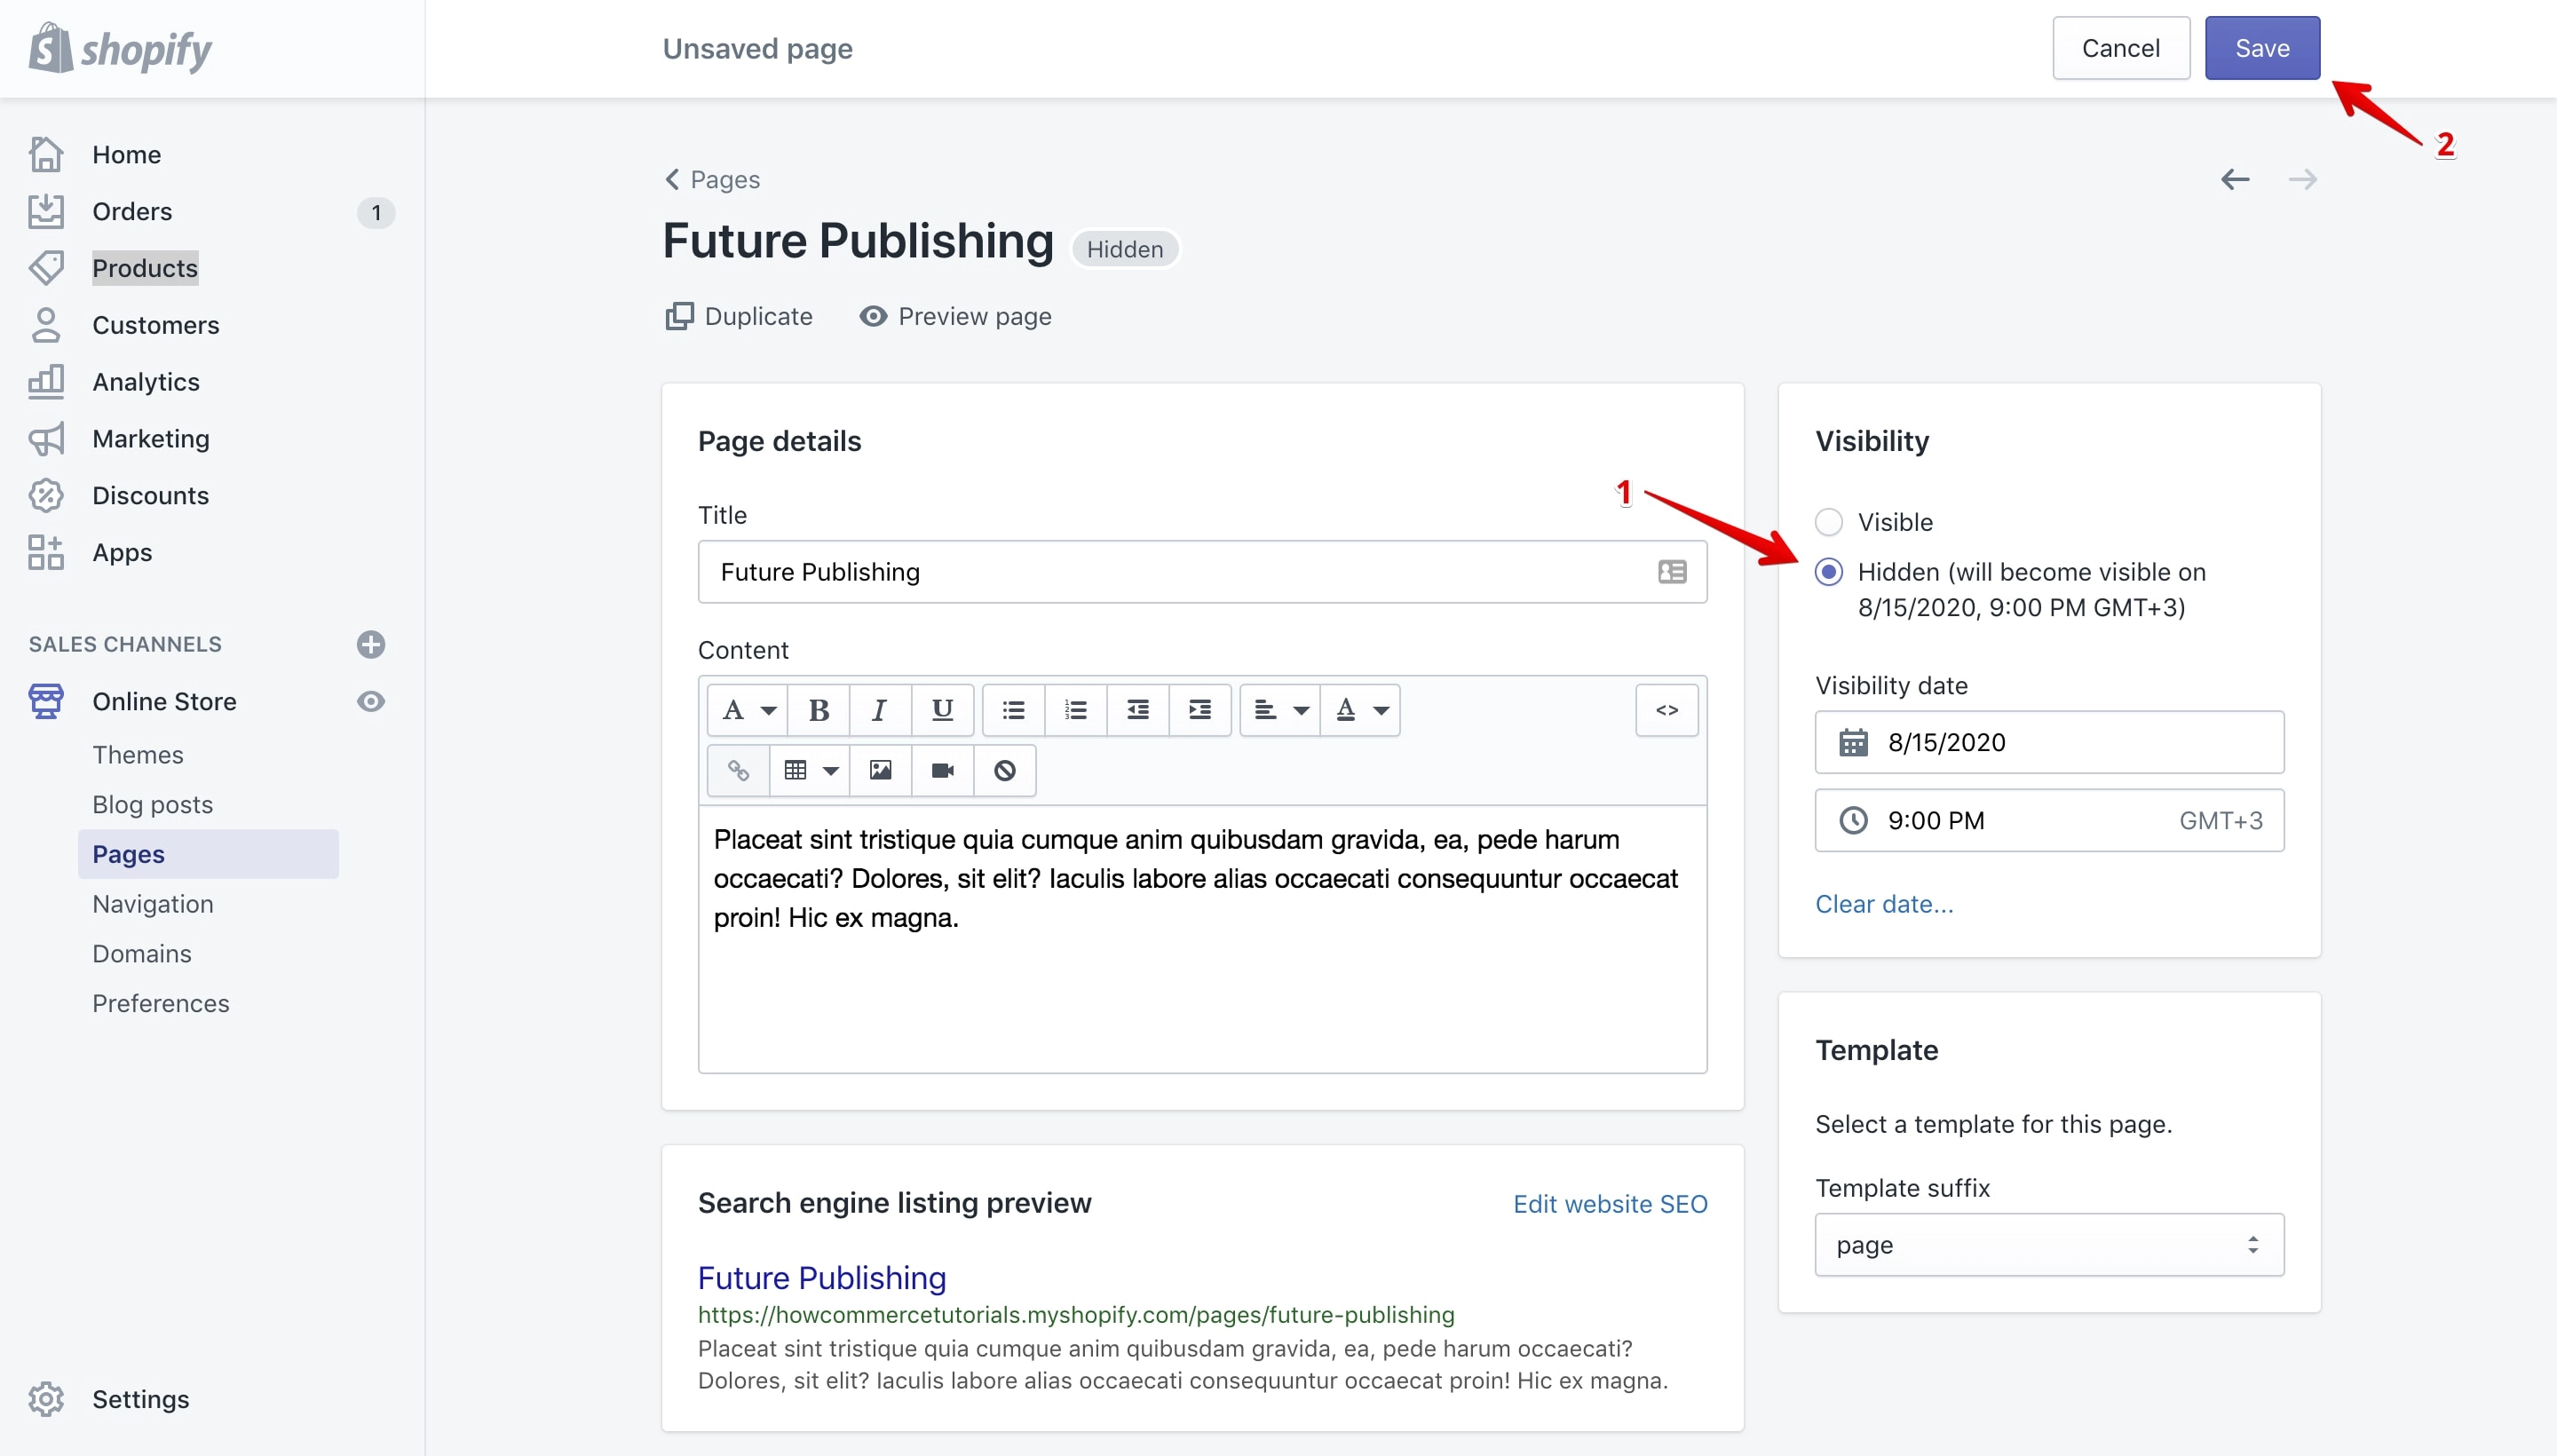
If everything is OK you can click the “Save” button (marked with 2 in the image above) to save your new future publishing date.
If you want to cancel before your changes are saved you can use the “Clear date...” link to do that like in the image below:
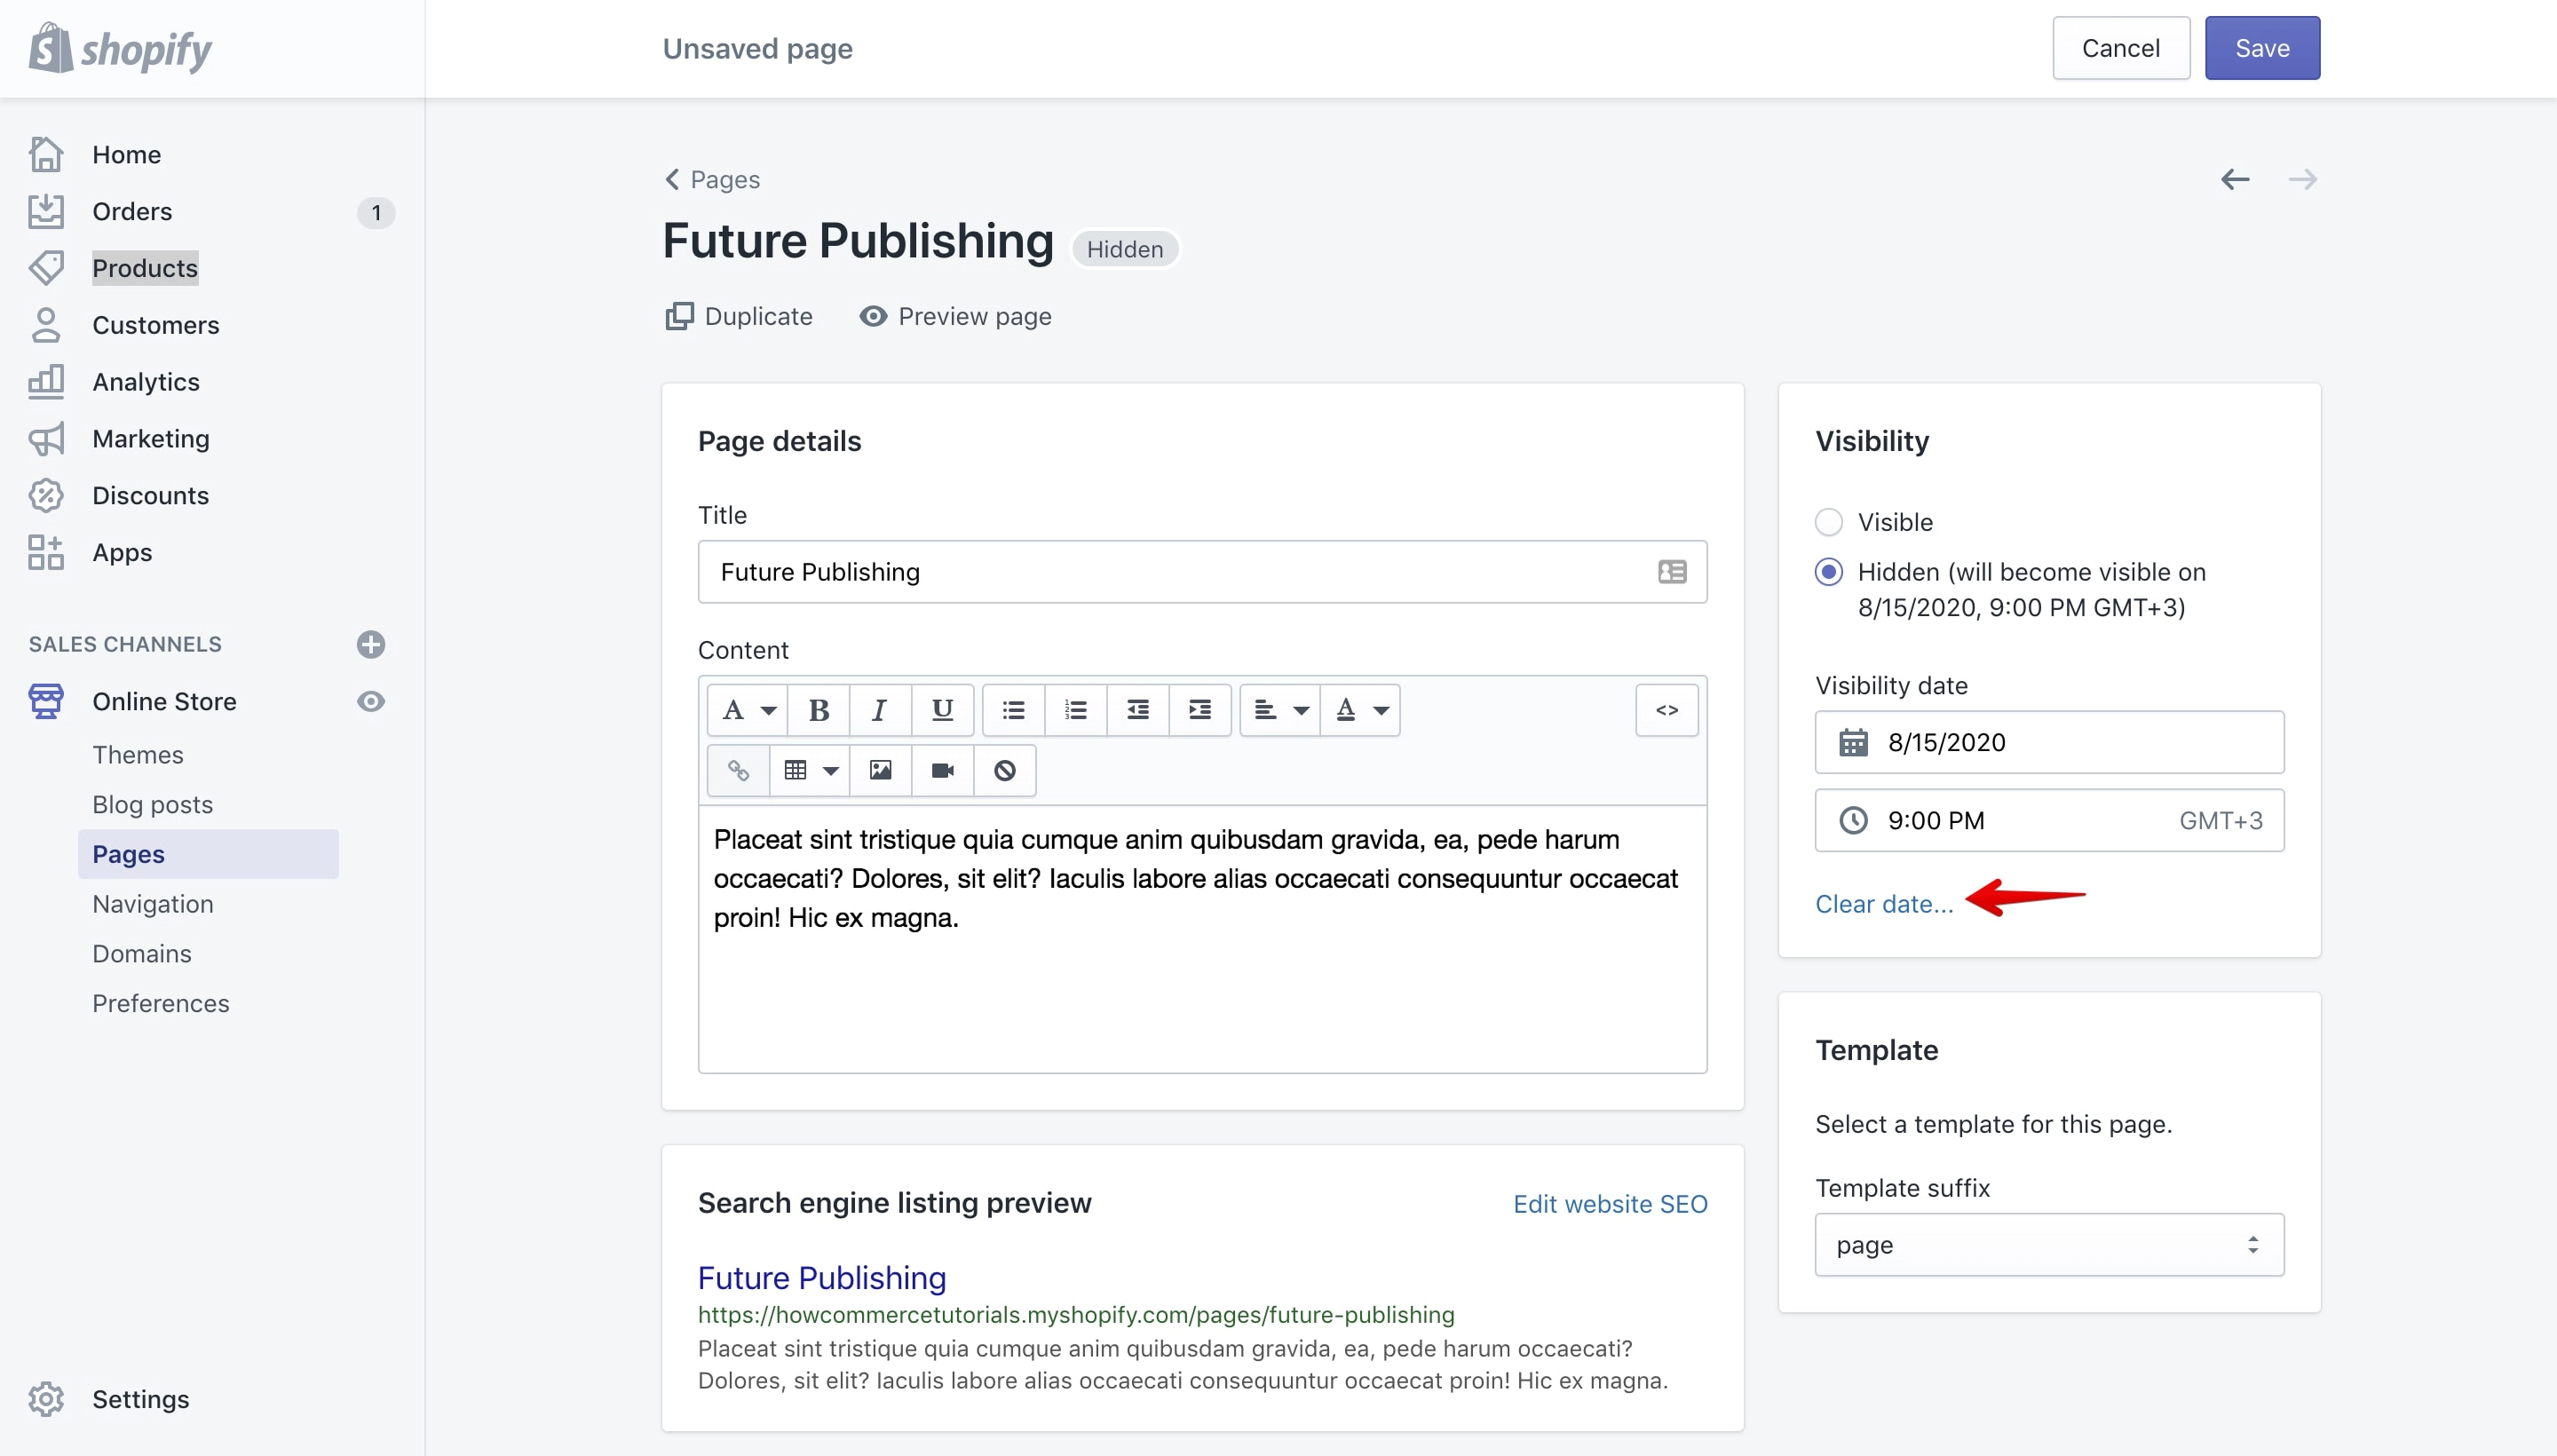
By removing the future publishing date the page will remain hidden from your store or if you check the “Visible” setting it will be published immediately.
After you “Save” the publishing date you’ll see a message with the date and time you selected showing you when the product will be published (marked with 1 in the image below).
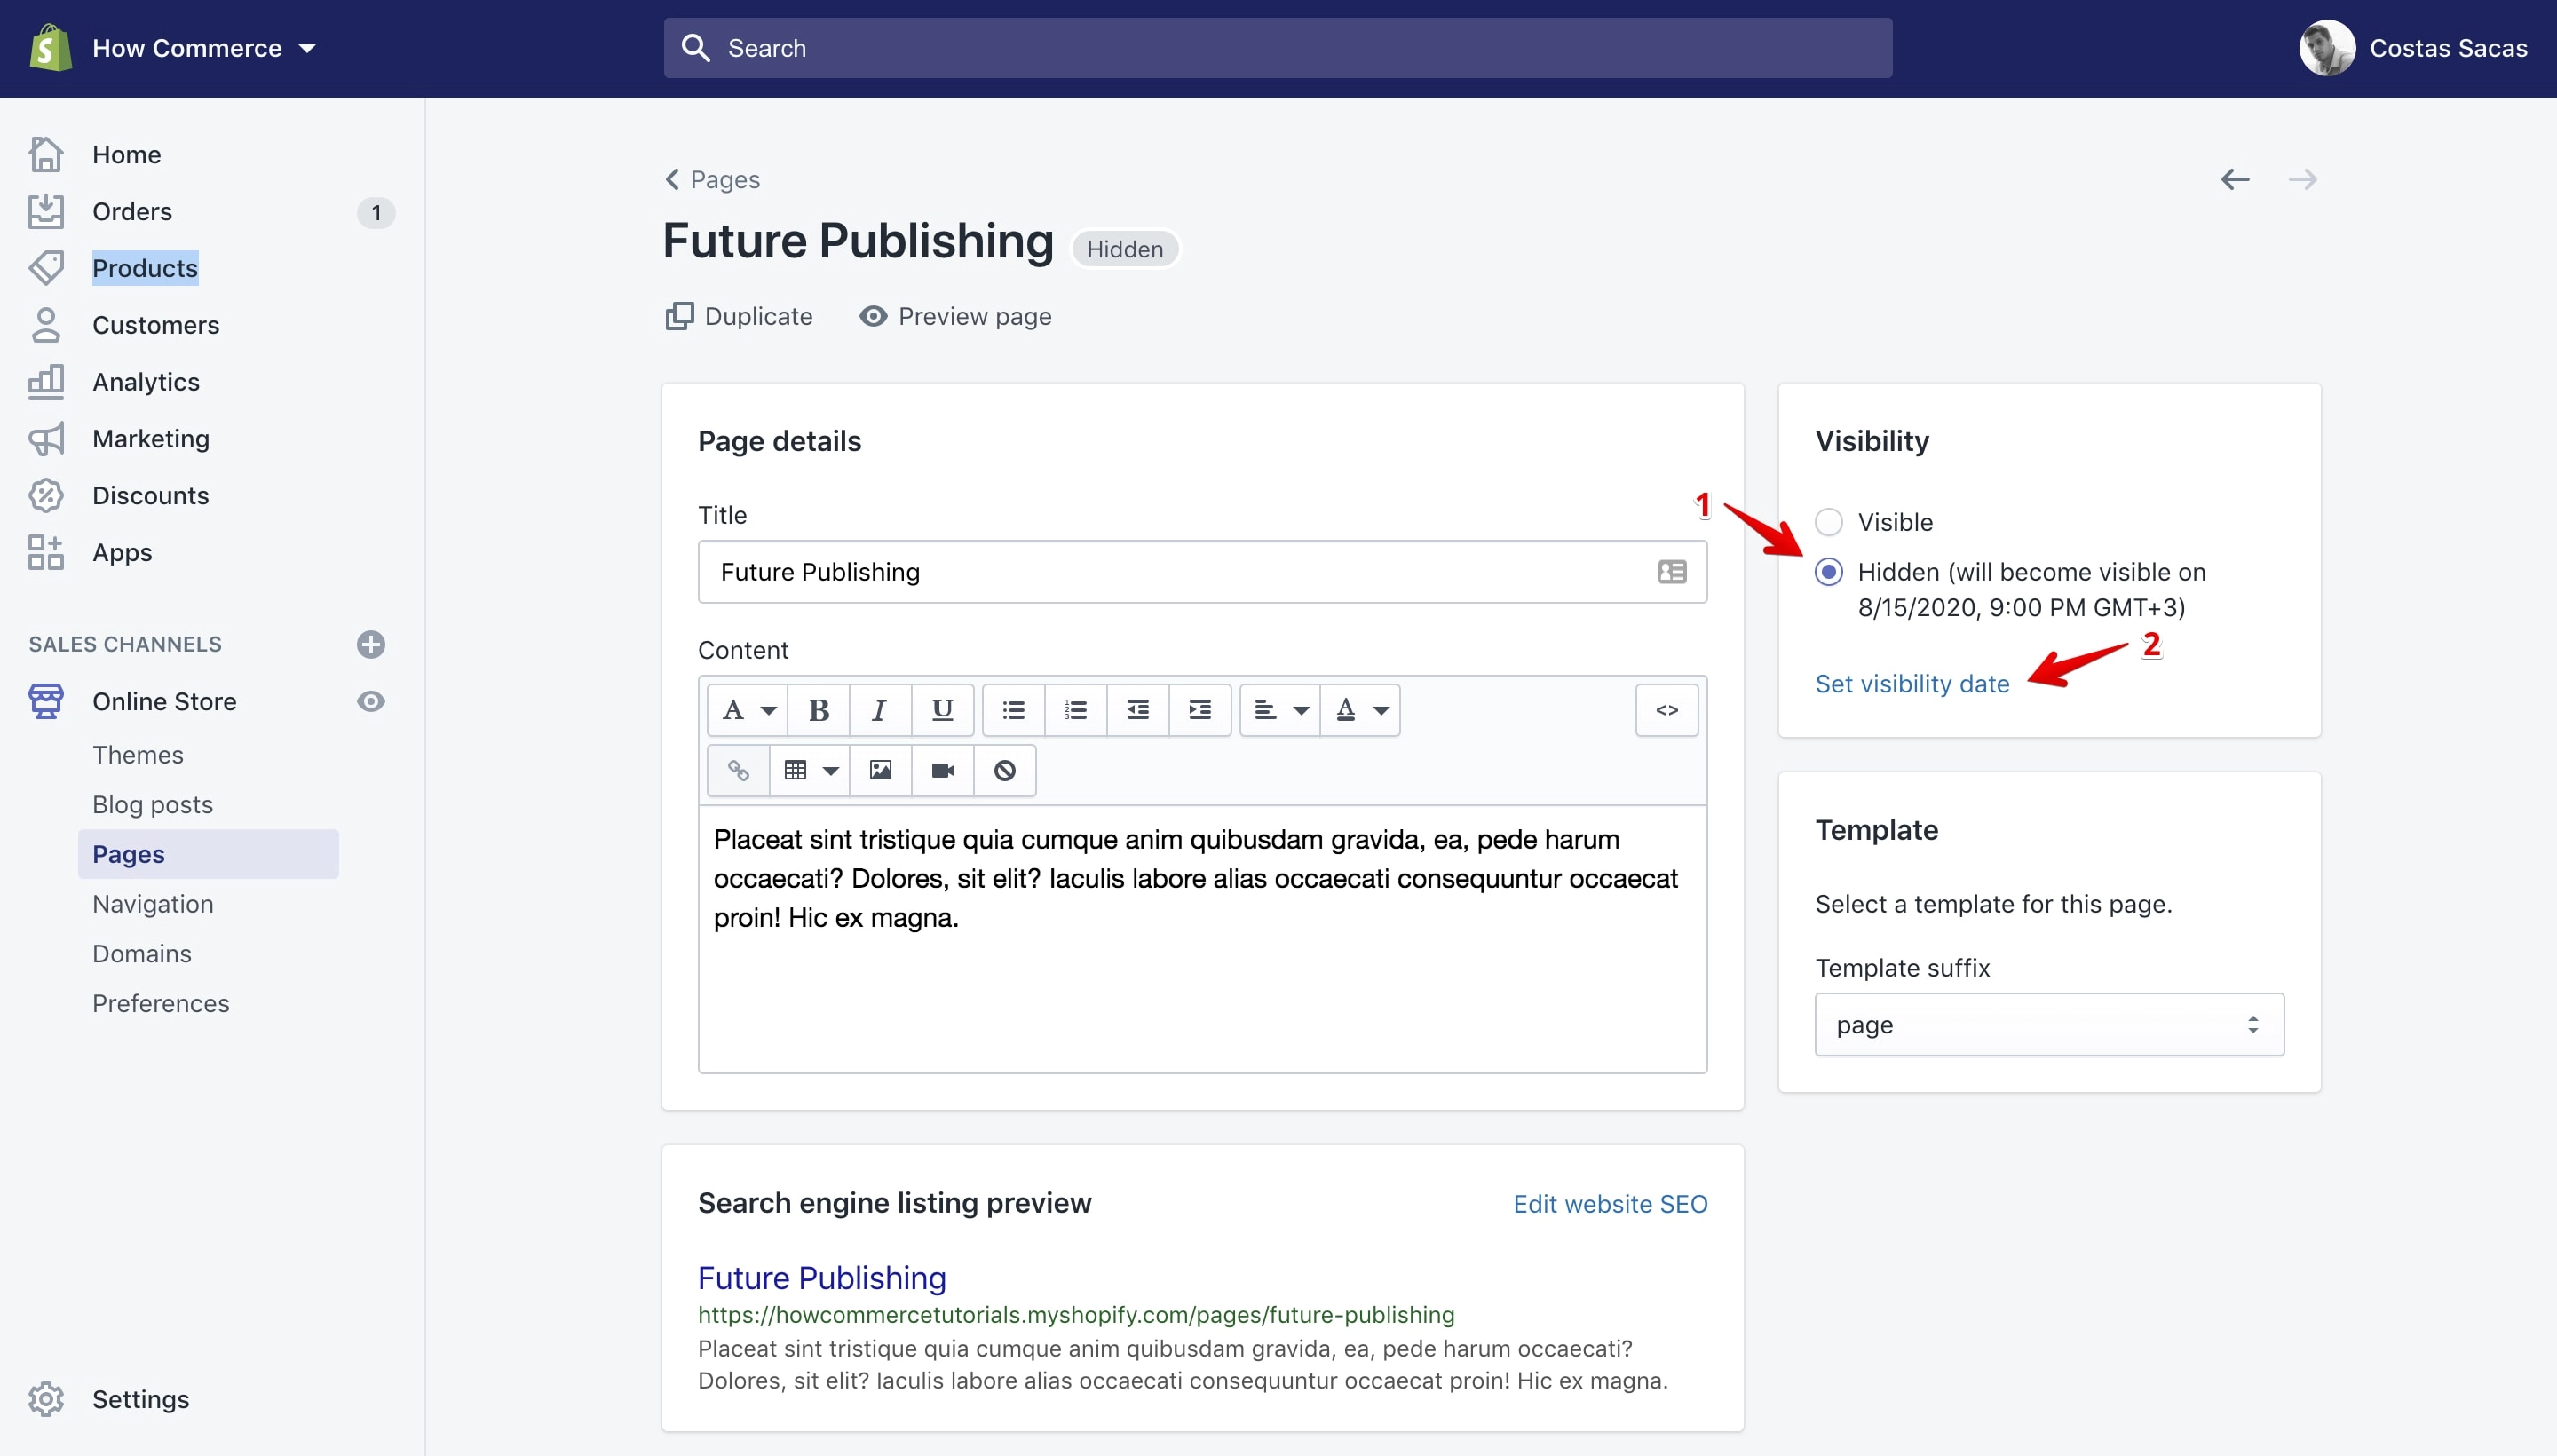
If you want to change the date or the time all you have to do is click on the “Set visibility date” link, make the modification and save again your new settings.
Set a future publish date for a blog post
Go to the “Blog posts” section (marked with 1 in the image below) and select an unpublished page or create a new one.
I already have one that is unpublished (marked with 2 in the image below):
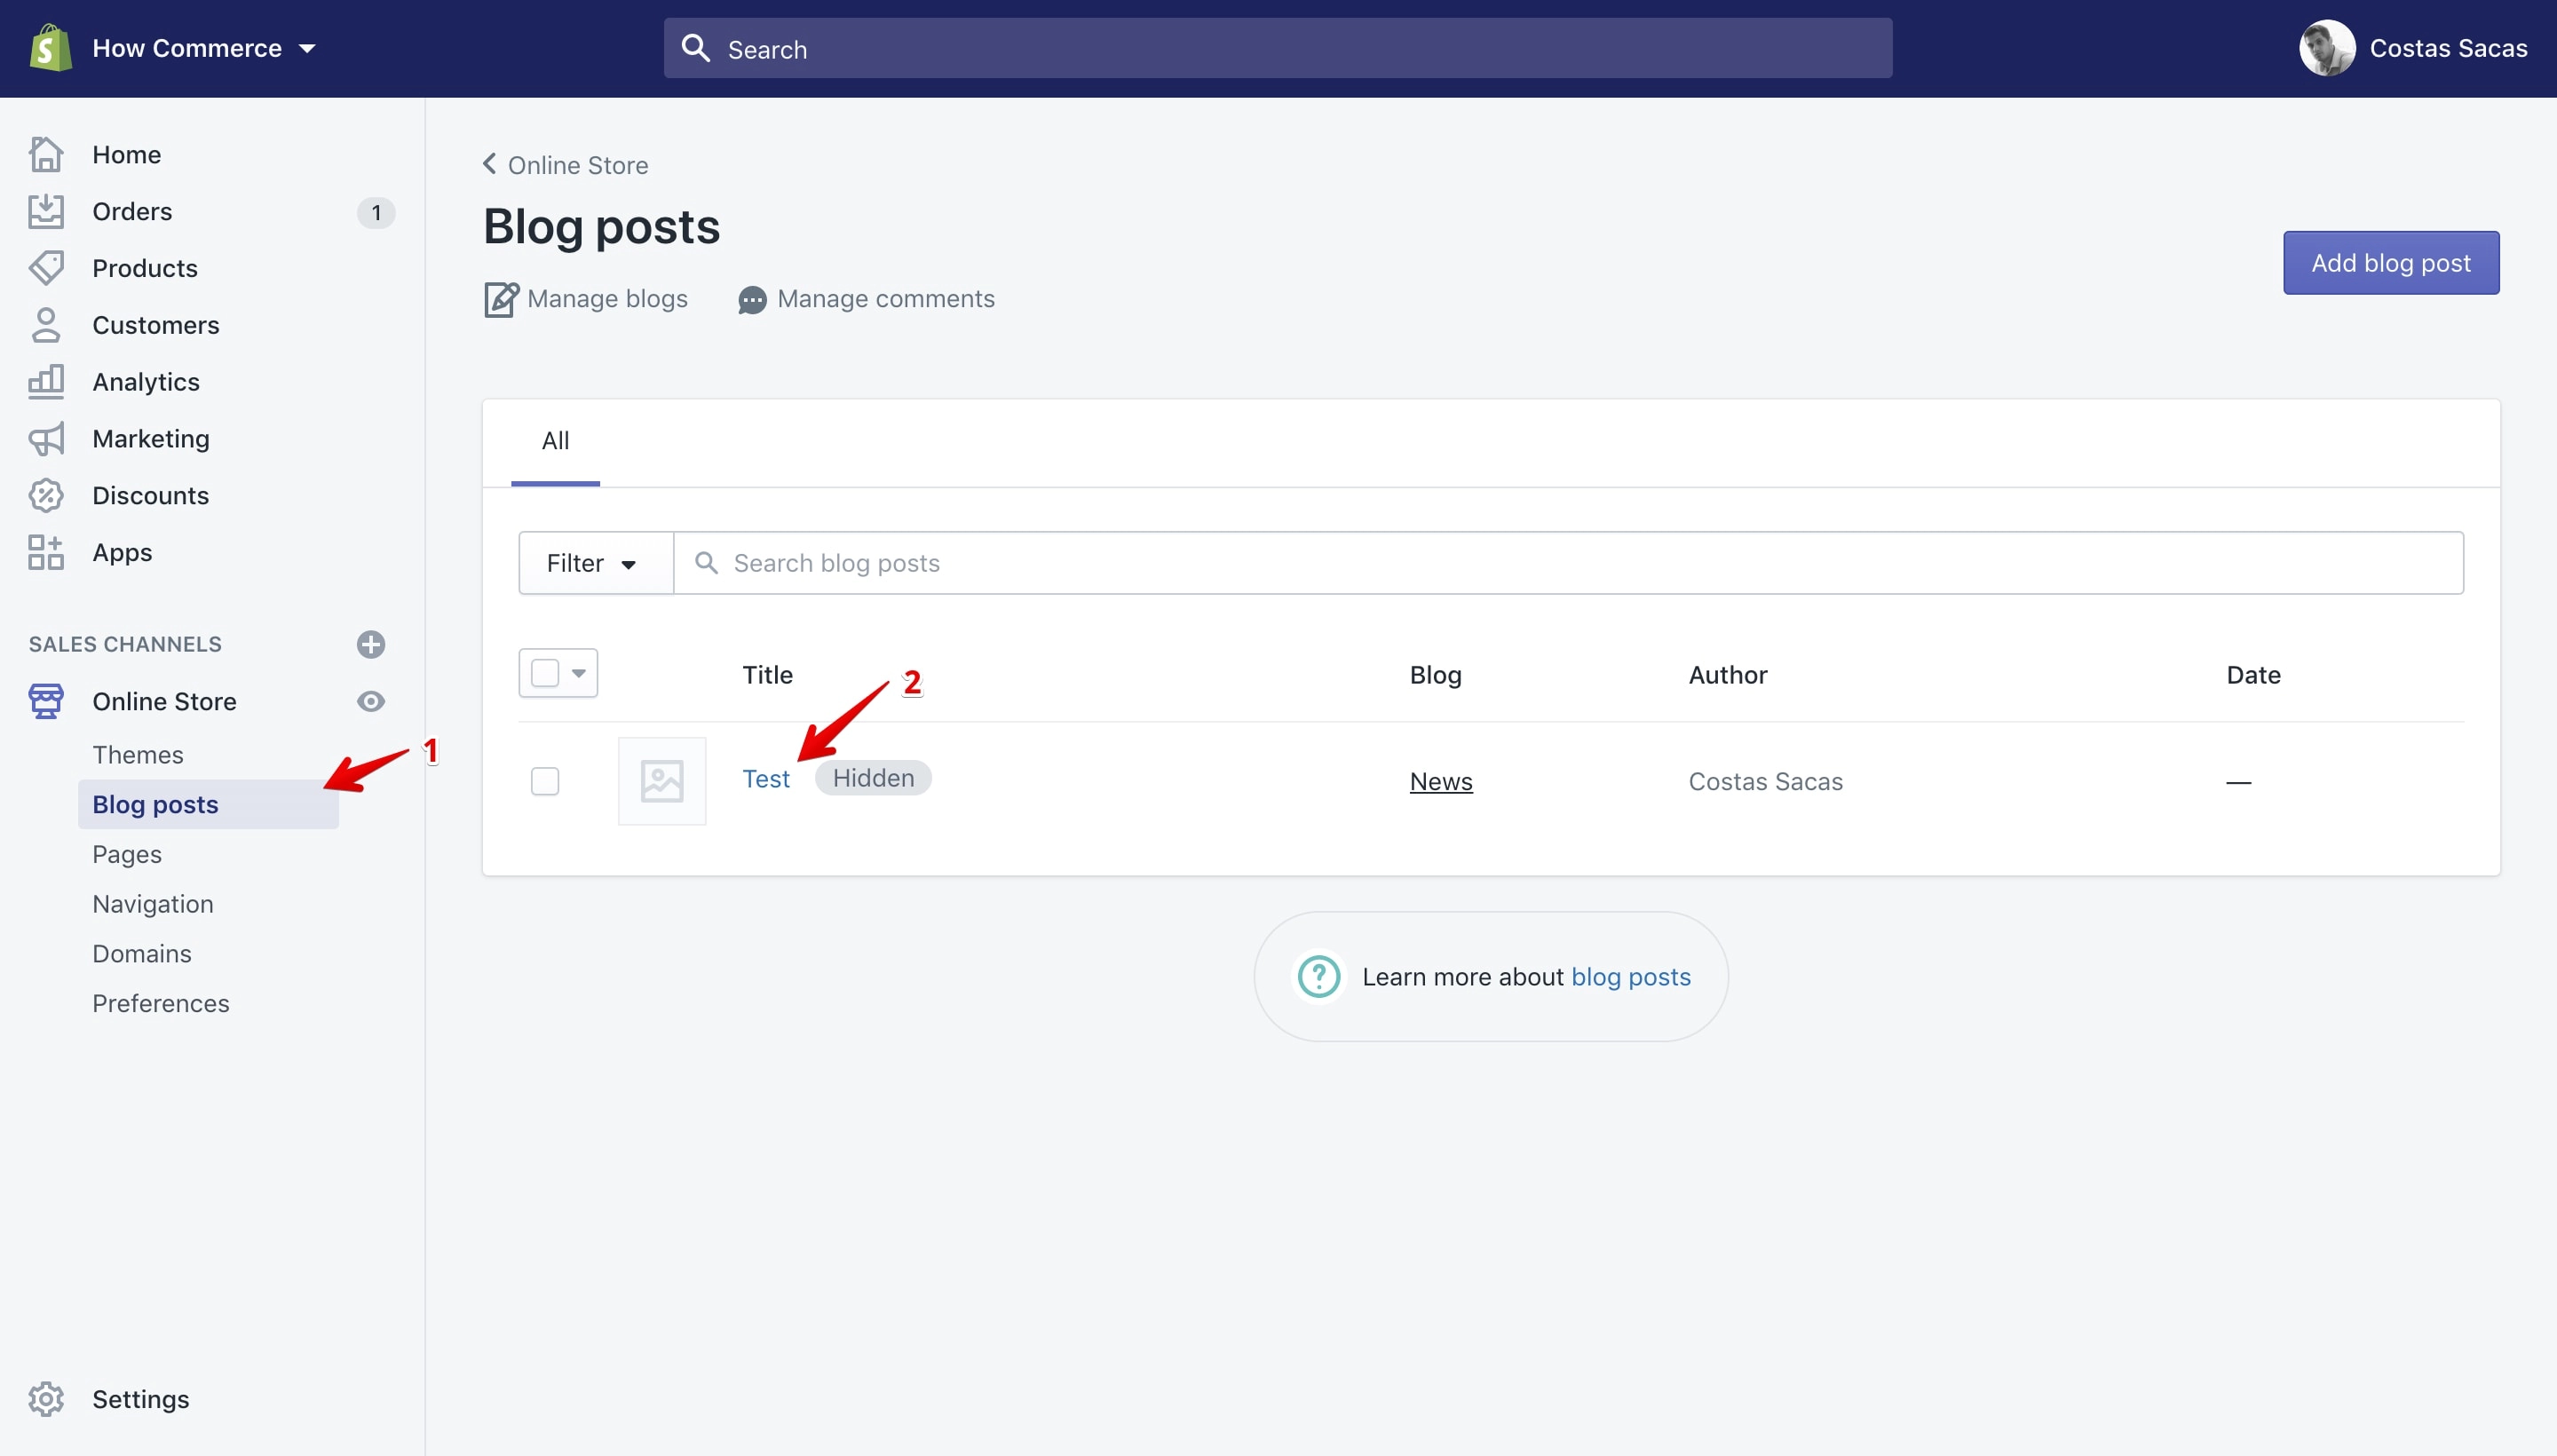
As you see the blog post is not available on the shop and it's marked with a grey label which contains the text “Hidden” meaning that it is not published yet on the store. I’ll set a future date on which the blog post will be published.
To do that we need to open the “Blog post” page editing:
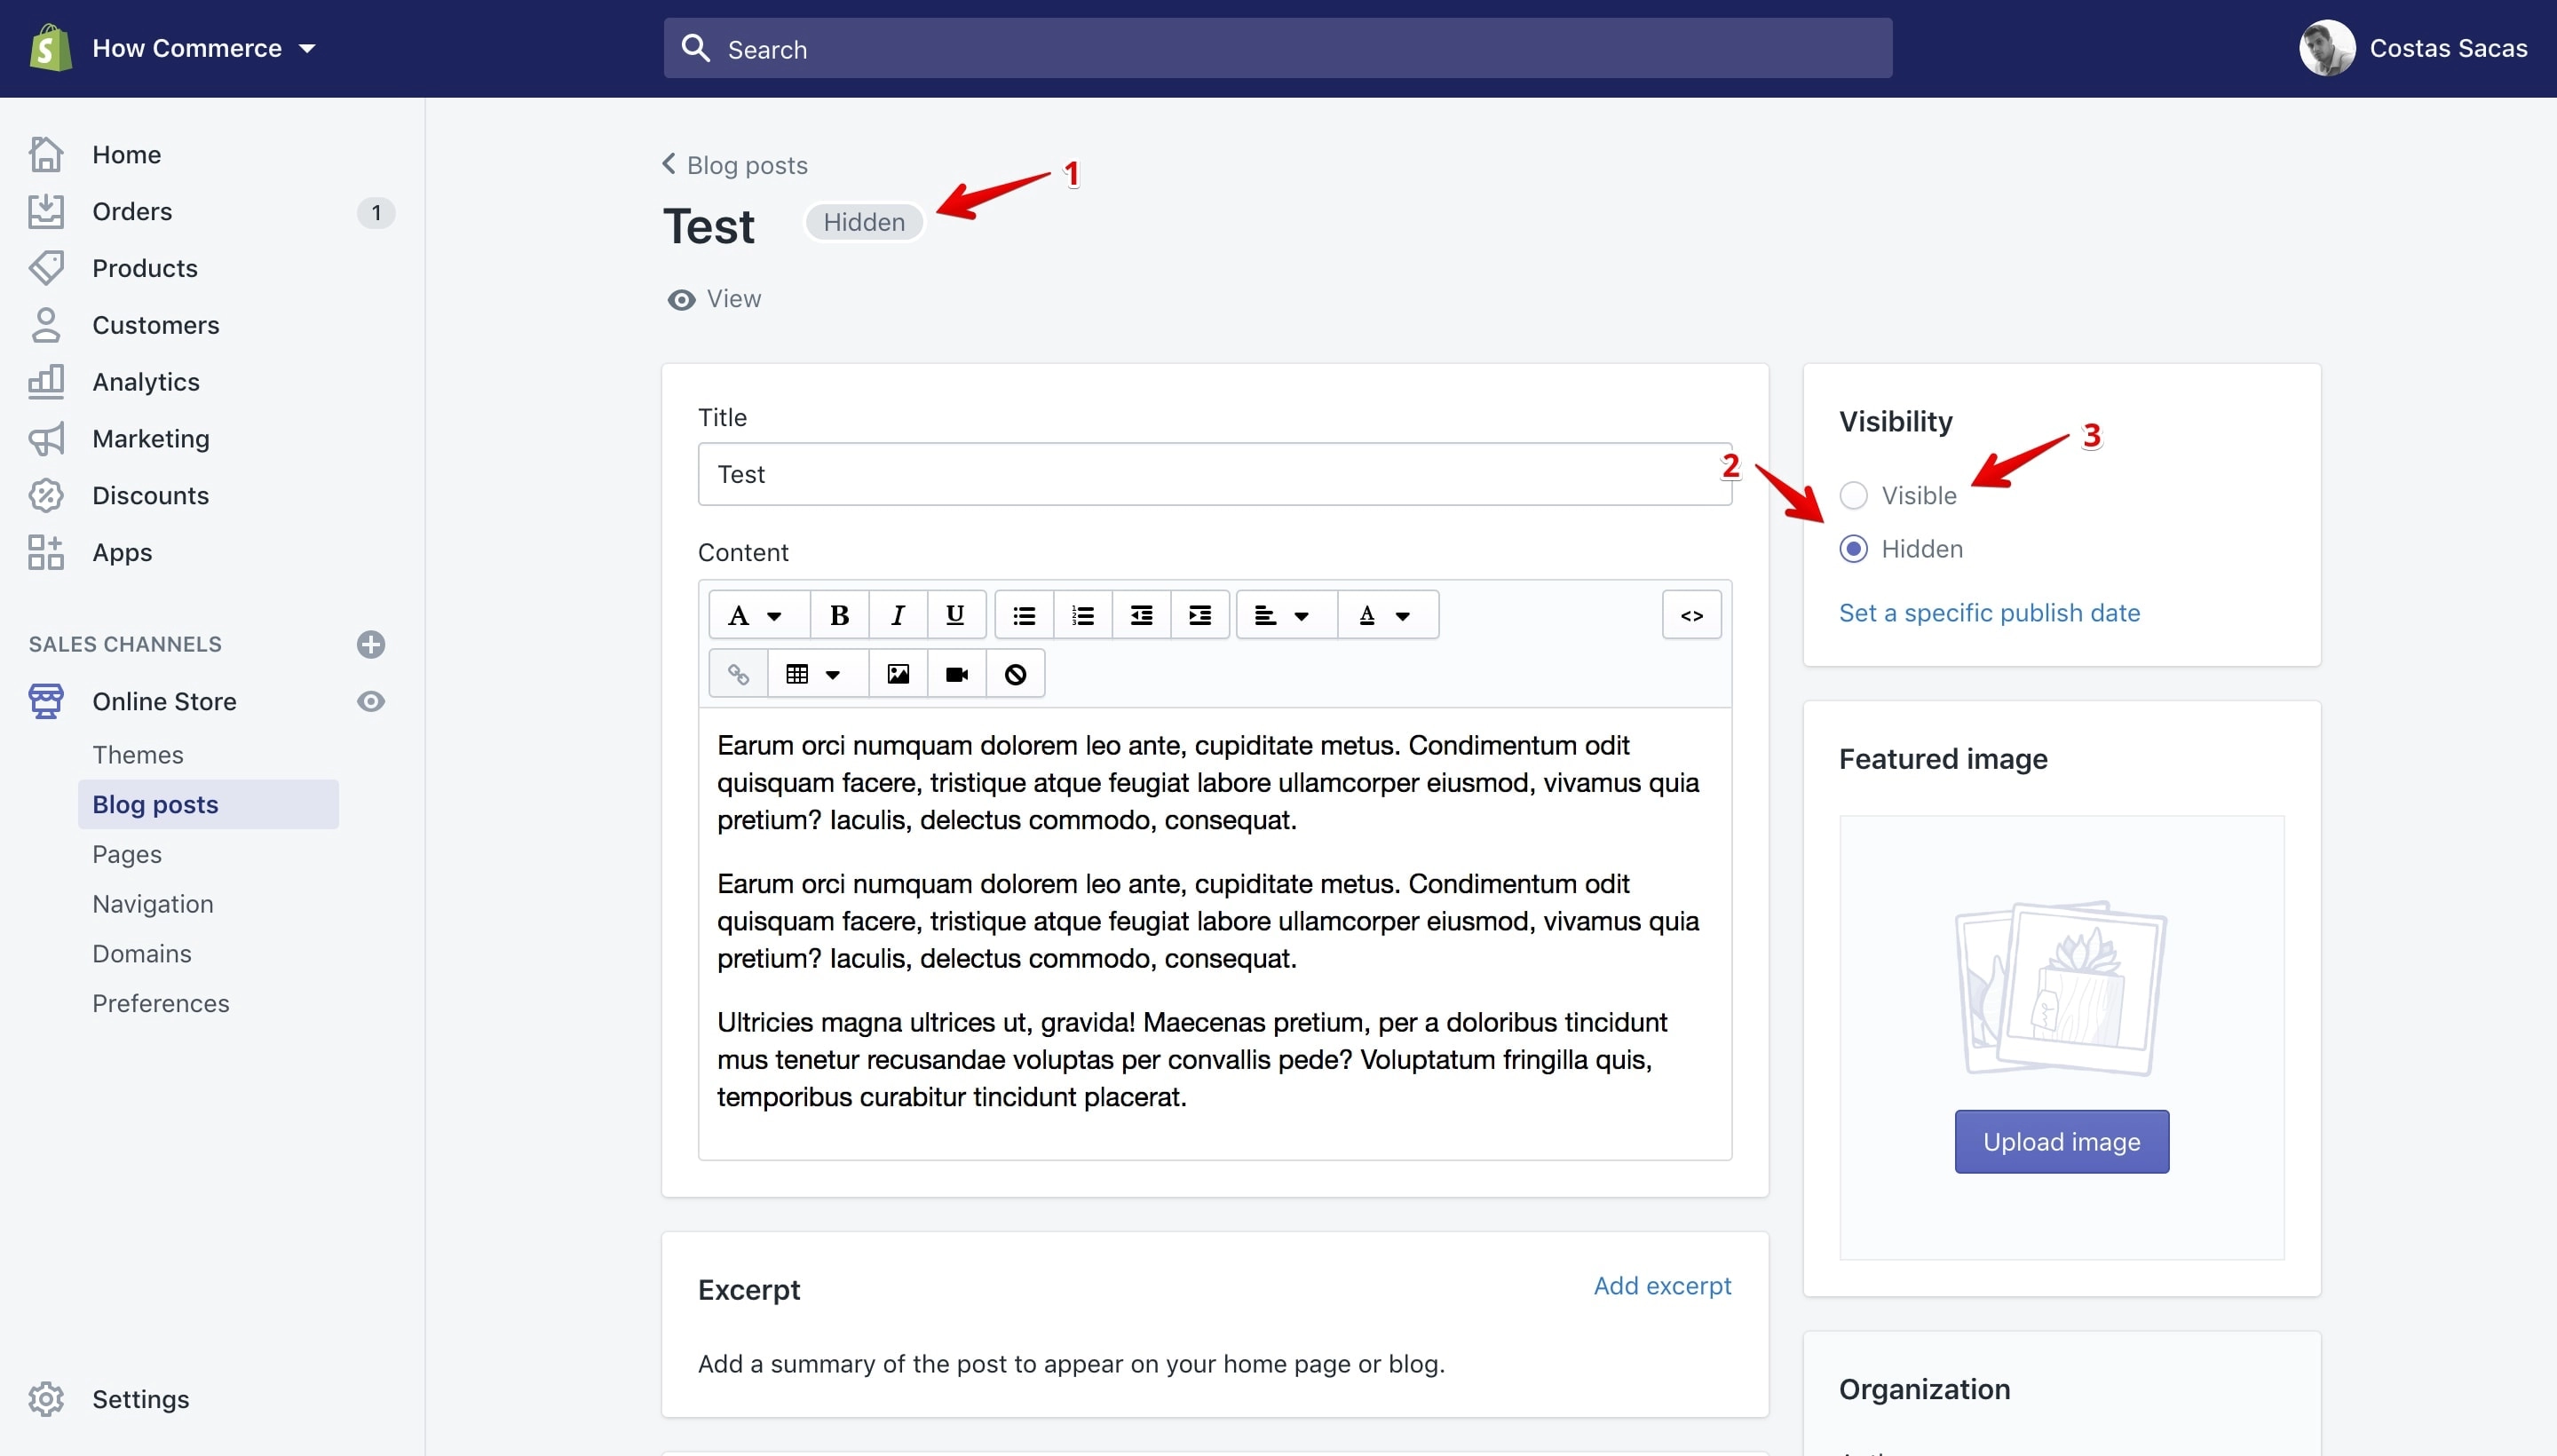
Another way to check if the page is unpublished in your store is by checking the grey label next to the page title (marked with 1 in the image above). You can also see that the Visibility is set to “Hidden” (marked with 2 in the image above).
I can make the blog post visible right away by checking the “Visible” option (marked with 3 in the image above) and that will make the page visible on my store once I’ll save it.
I do not want to do that because I want to publish this blog post at a later date. To do that I’ll click on the “Set a specific publish date” like in the image below:
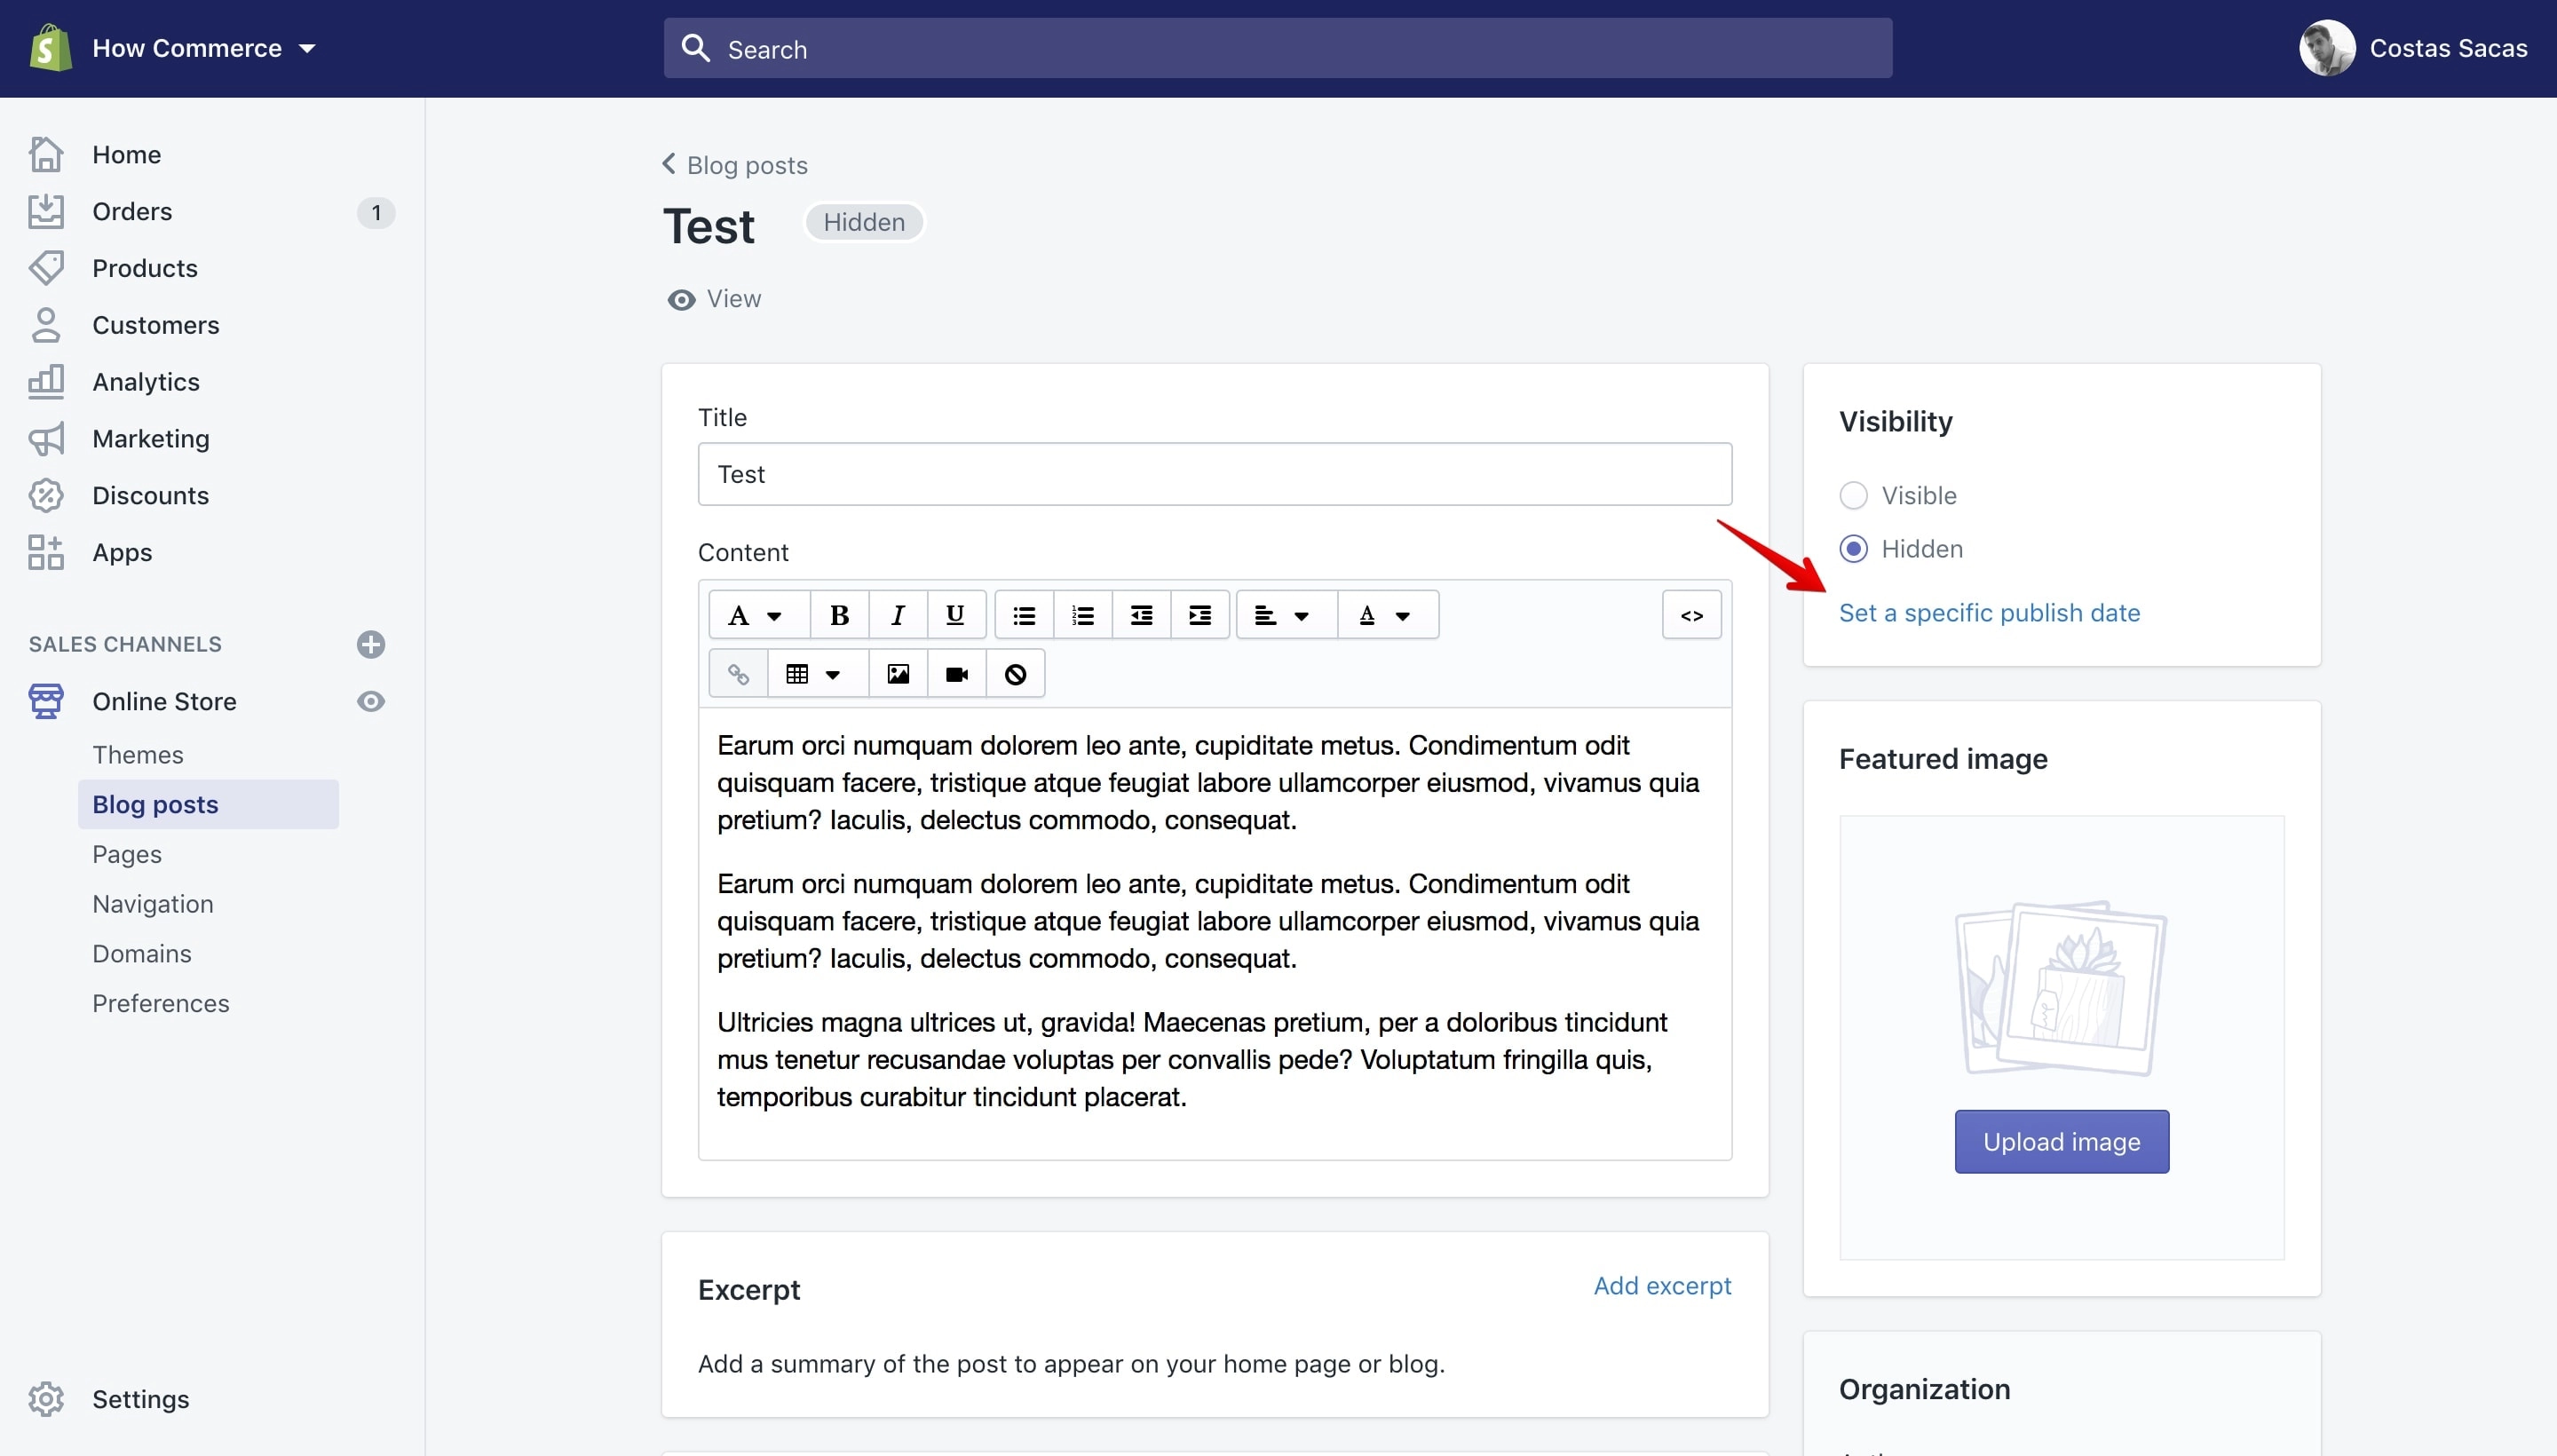
Clicking on this setting will give us options to select a future date and time when we want this blog post to be published on our store.
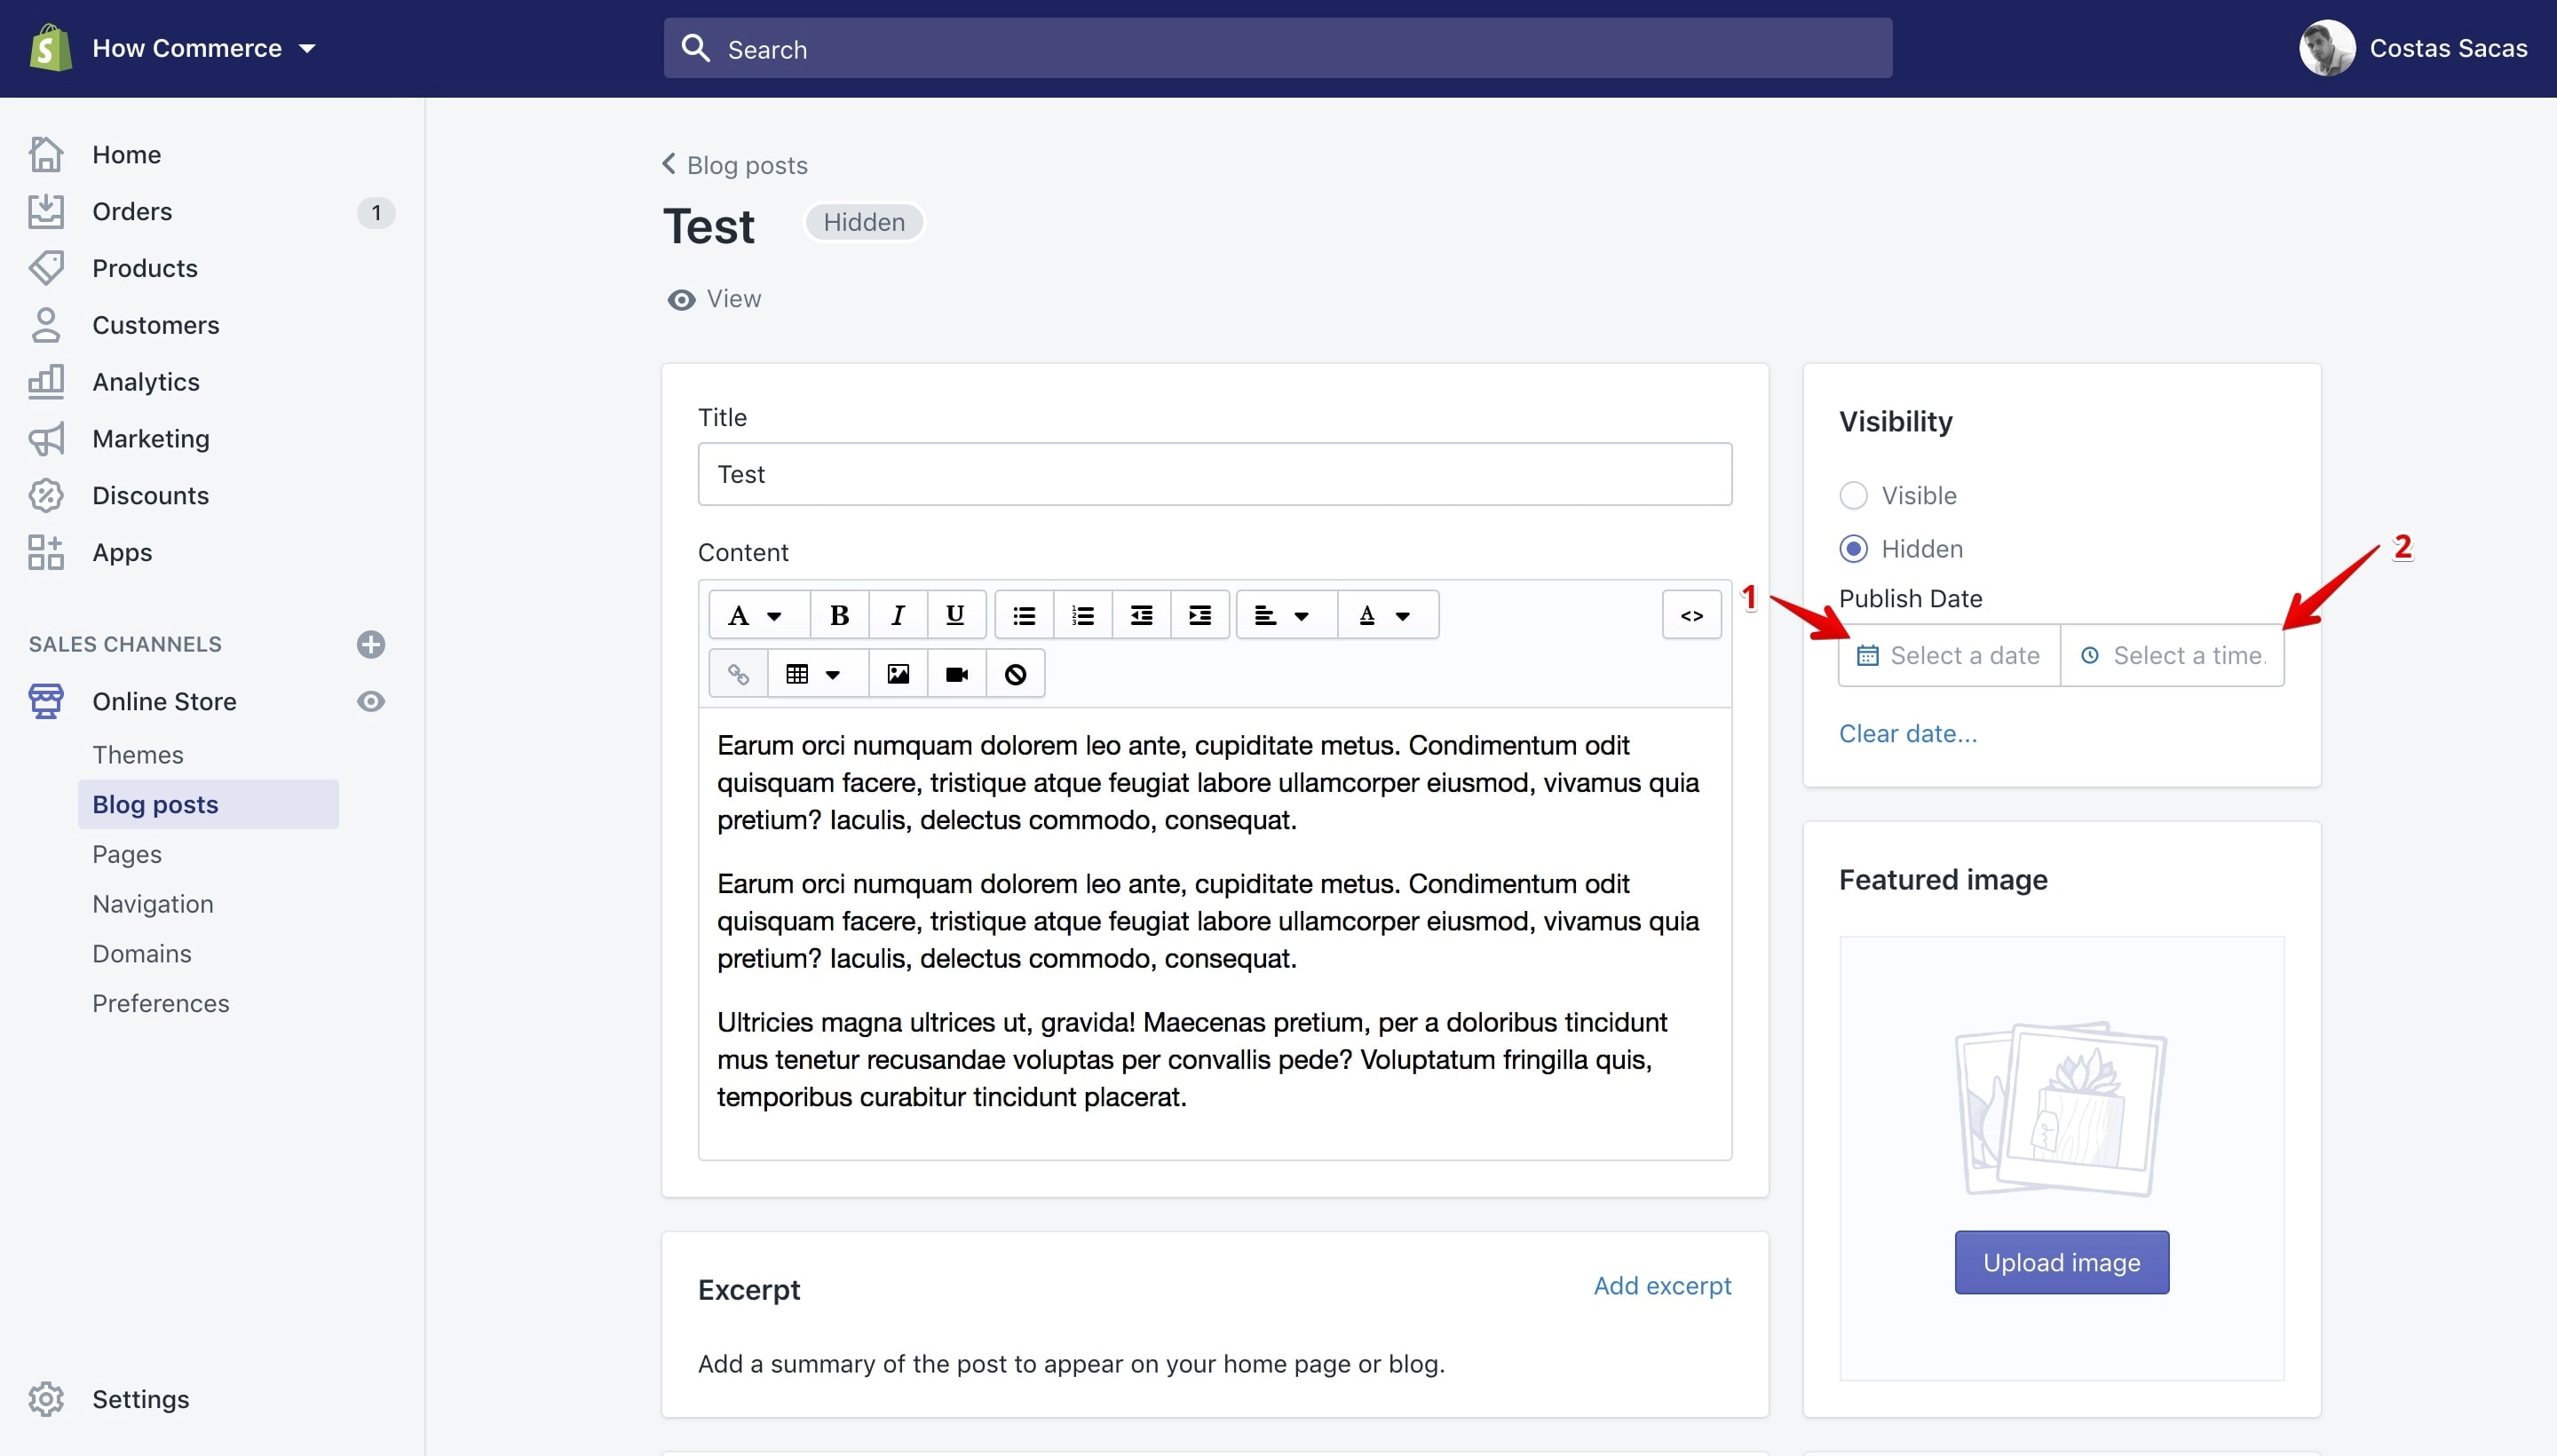
The “Publish date” settings are as follows: the date (marked with 1 in the image above) & the time (marked with 2 in the image above).
Click on the “Date” (marked with 1 in the image above). A calendar pop-up will display. From here you can select a future date like in the image below:
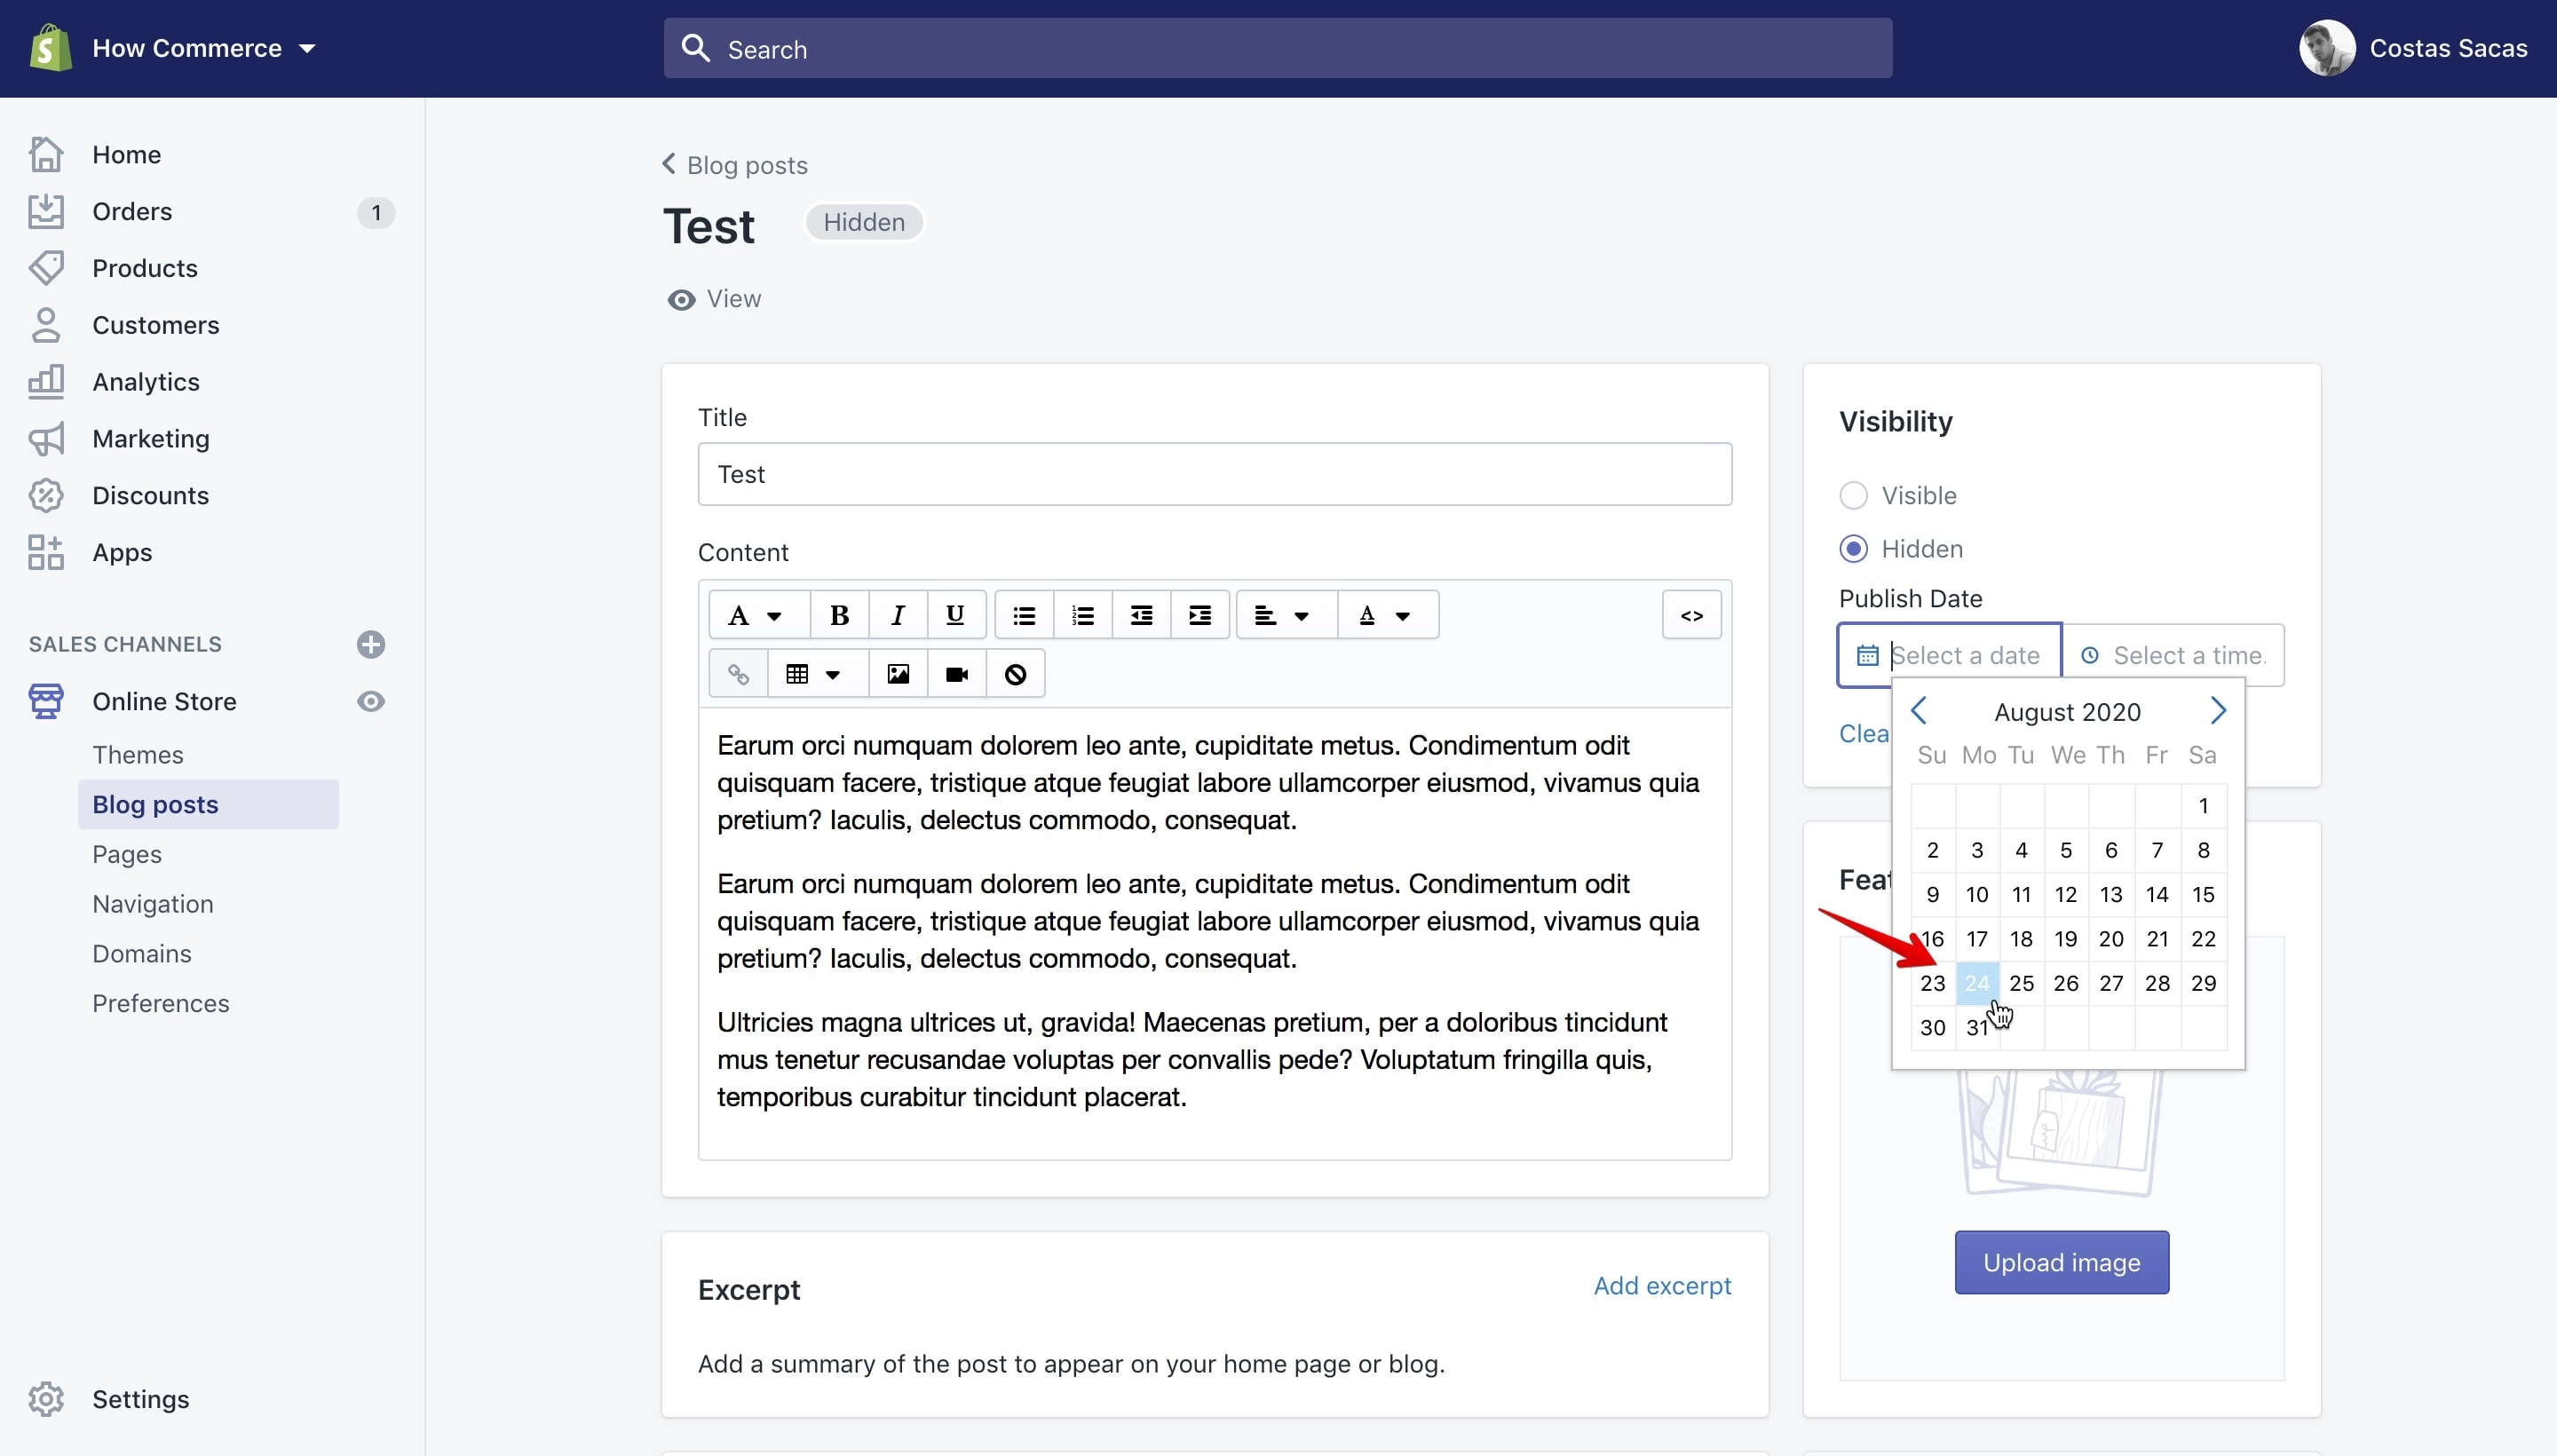
After you’ve selected the date you need to select the hour. Once you select the date the default hour will be 12:00 AM so you’ll need to change it if that is not what you want.
Click on the time input box and you’ll see a drop-down open. Select the appropriate time from the drop-down (see image below):
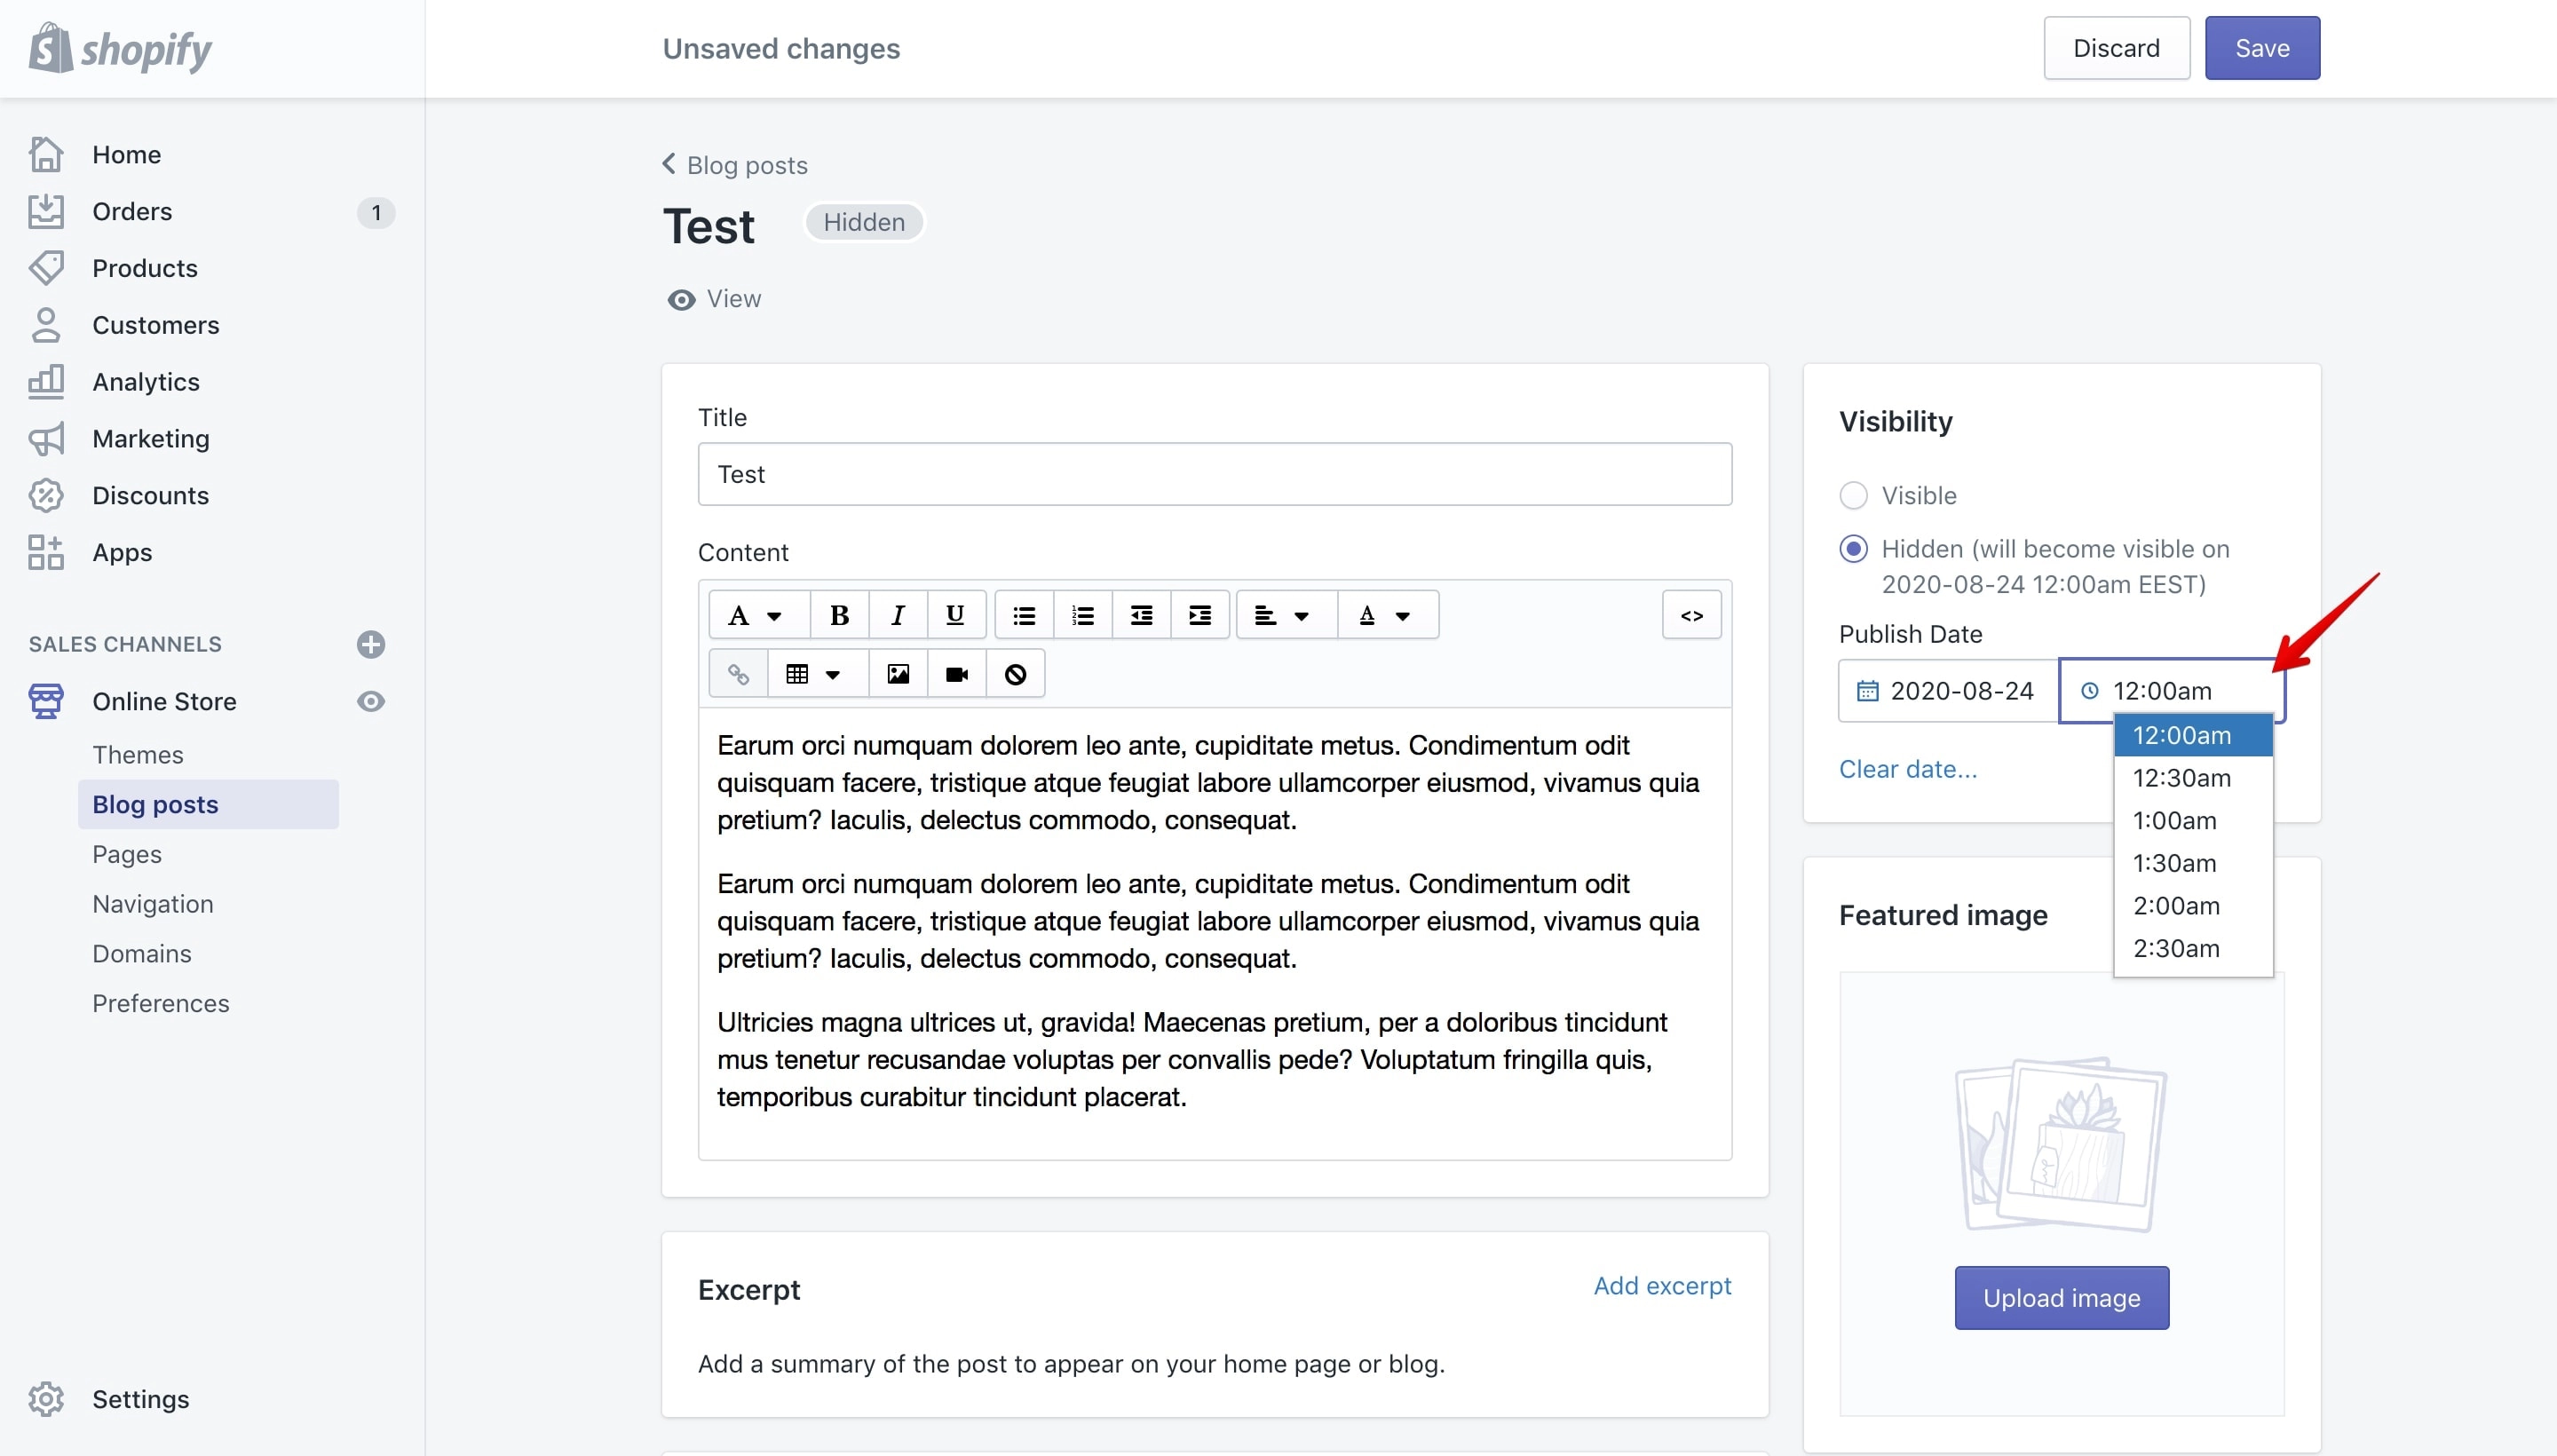
Once everything is set-up you can check if the future publishing is set correctly by looking above the settings (marked with 1 in the image below):
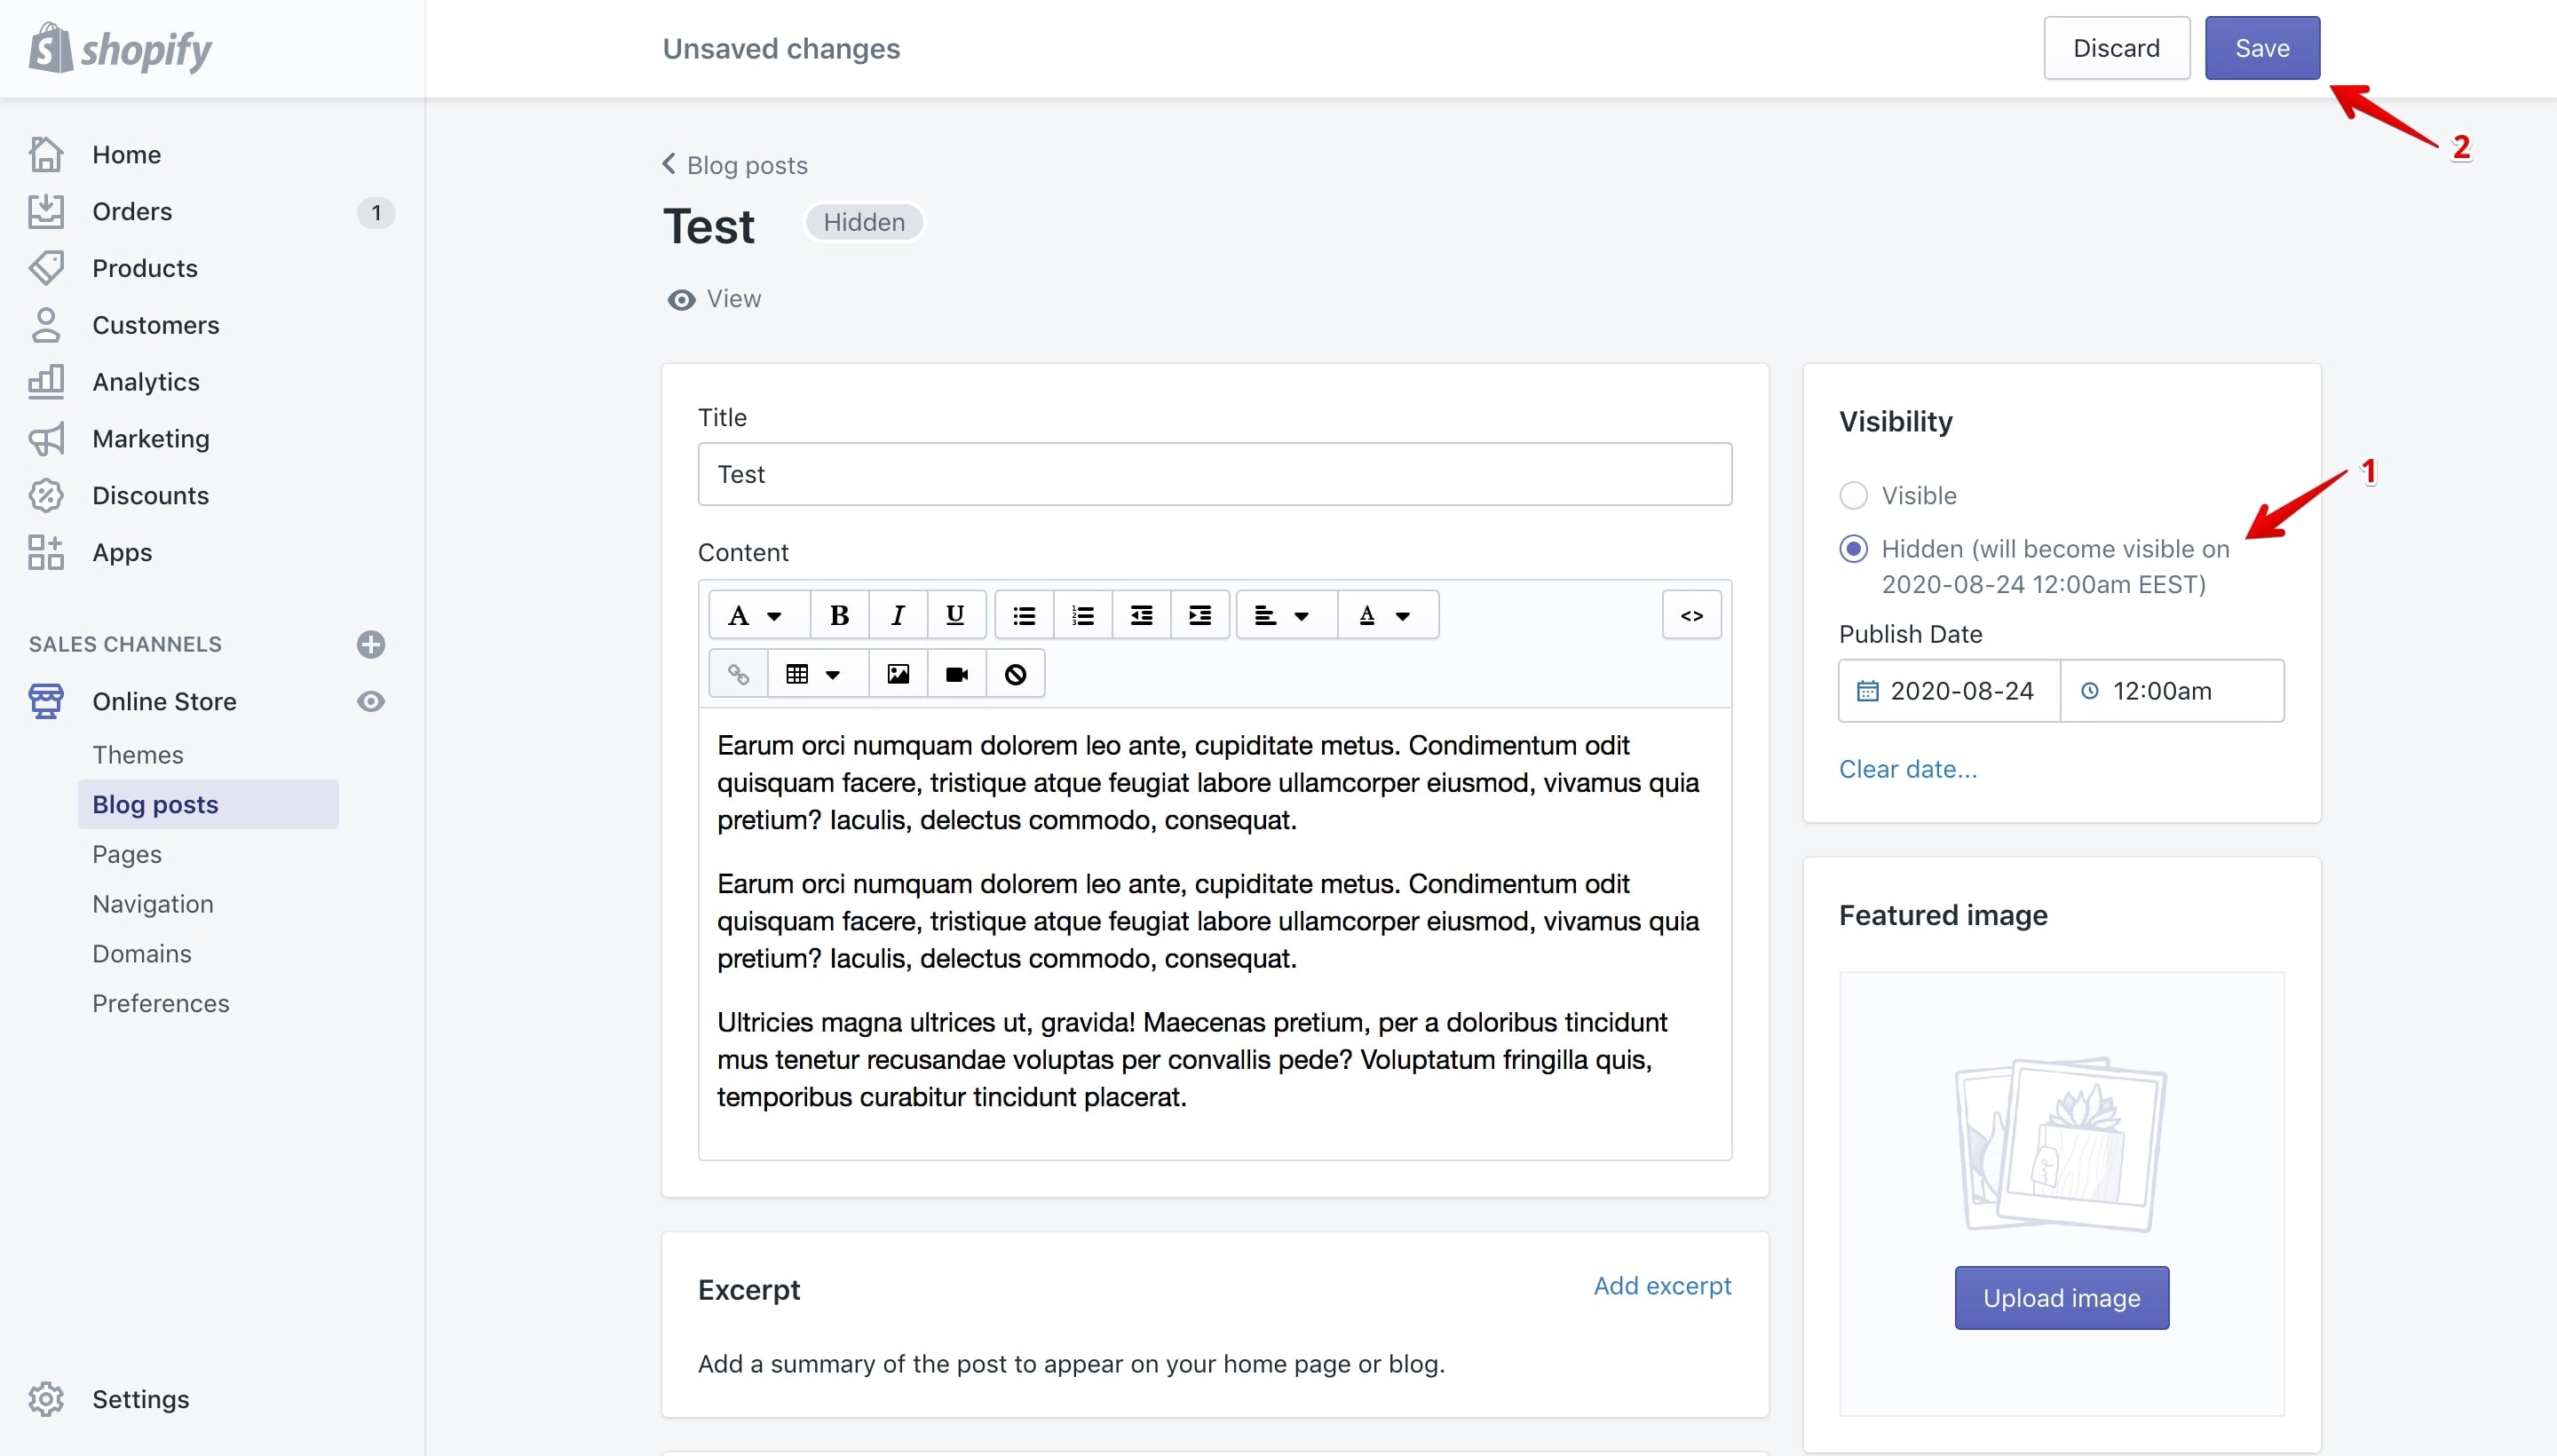
If everything is OK you can click the “Save” button (marked with 2 in the image above) to save your new future publishing date.
If you want to cancel your changes before saving you can use the “Clear date...” link to do that like in the image below:
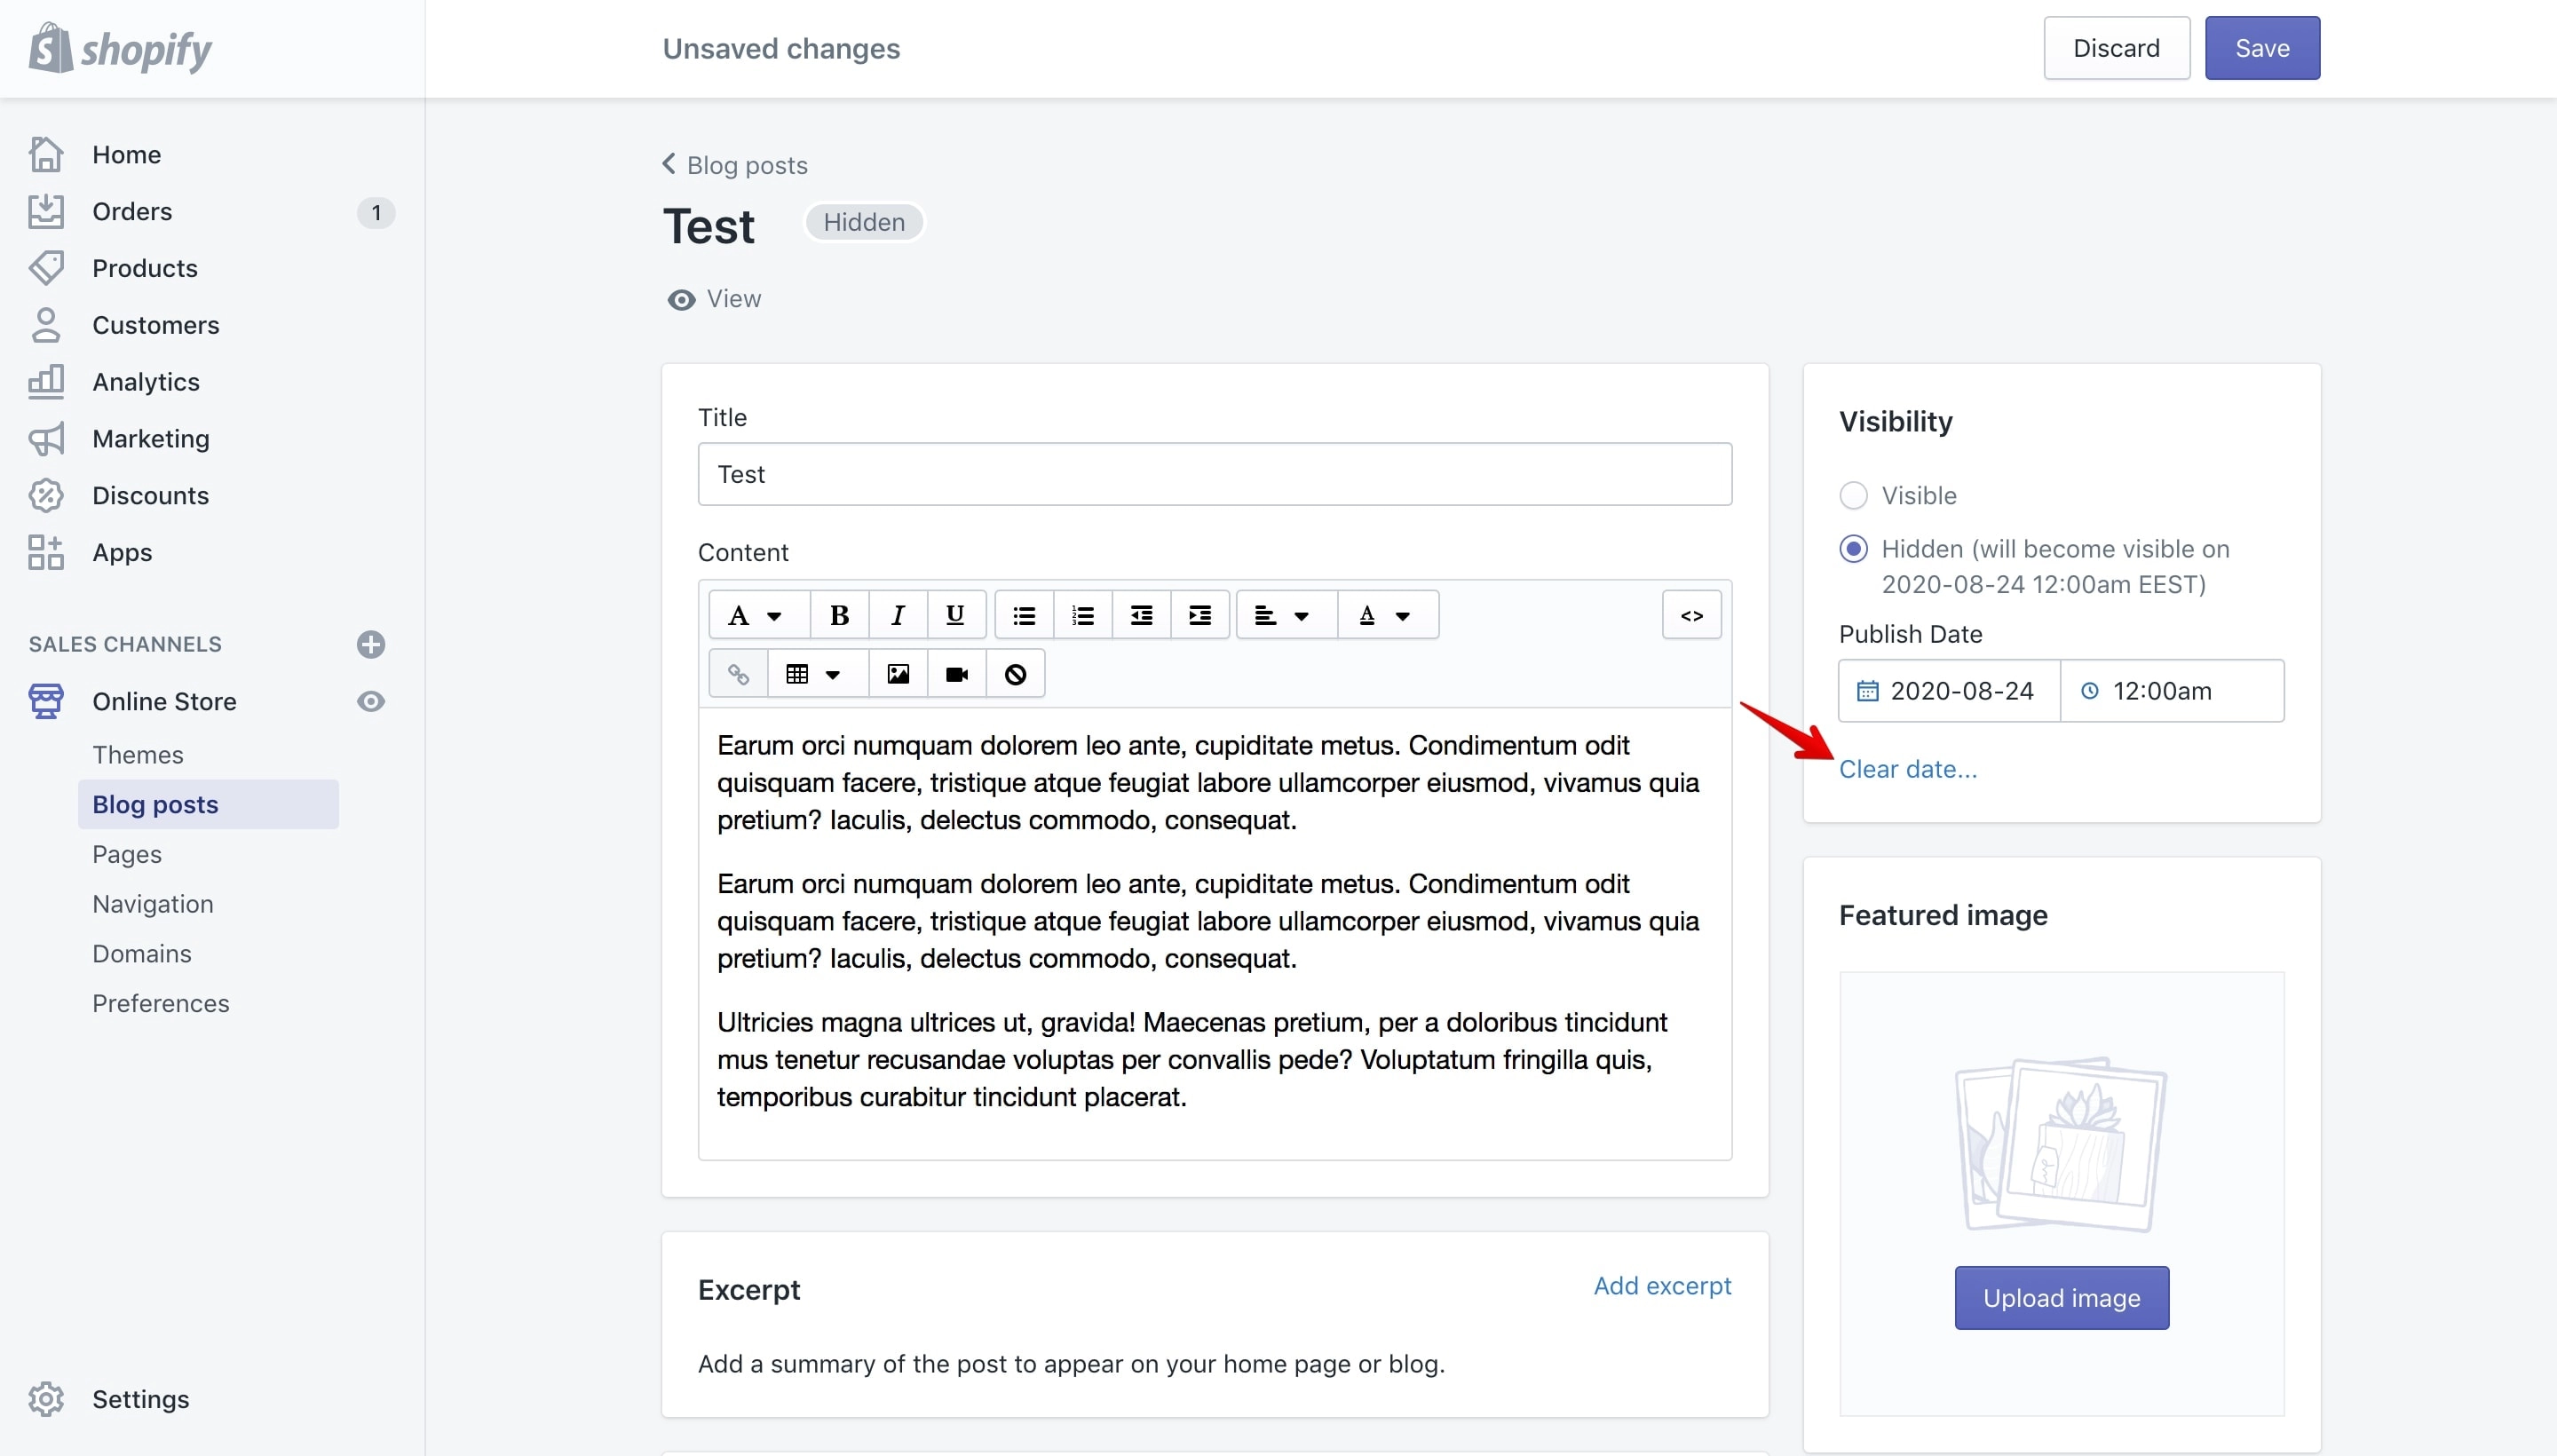
By removing the future publishing date the page will remain hidden from your store or if you check the “Visible” setting it will be published immediately.
If you want to change the date or the time all you have to do is click on the “Set a specific publish date” link, make the modification and save again your new settings.
Files management
In many Shopify sections you can’t upload multiple files and this is annoying since it’s a repetitive task and it takes time without any ROI.
Sections that don't allow you to upload multiple files are: the rich text editor, the blog featured image and the theme image picker setting.
For example, one client of mine had a need for a custom gallery with product images that should be listed on some custom pages that I’ve developed for him.
Every gallery needed multiple images uploaded to Shopify and they had to be uploaded via the image picker setting to allow the client to change them by himself.
Since the galleries needed multiple images, the client needed to upload them to Shopify one image at a time via the image picker setting.
Well, this is correct from the Shopify point of view because you’ll not be using more than one image via the image picker, but from a saving time perspective it is not good, so to save time I recommended to my client to upload them via the “Files manager” and after that to go to the image picker and select the images that he wants displayed in the products gallery.
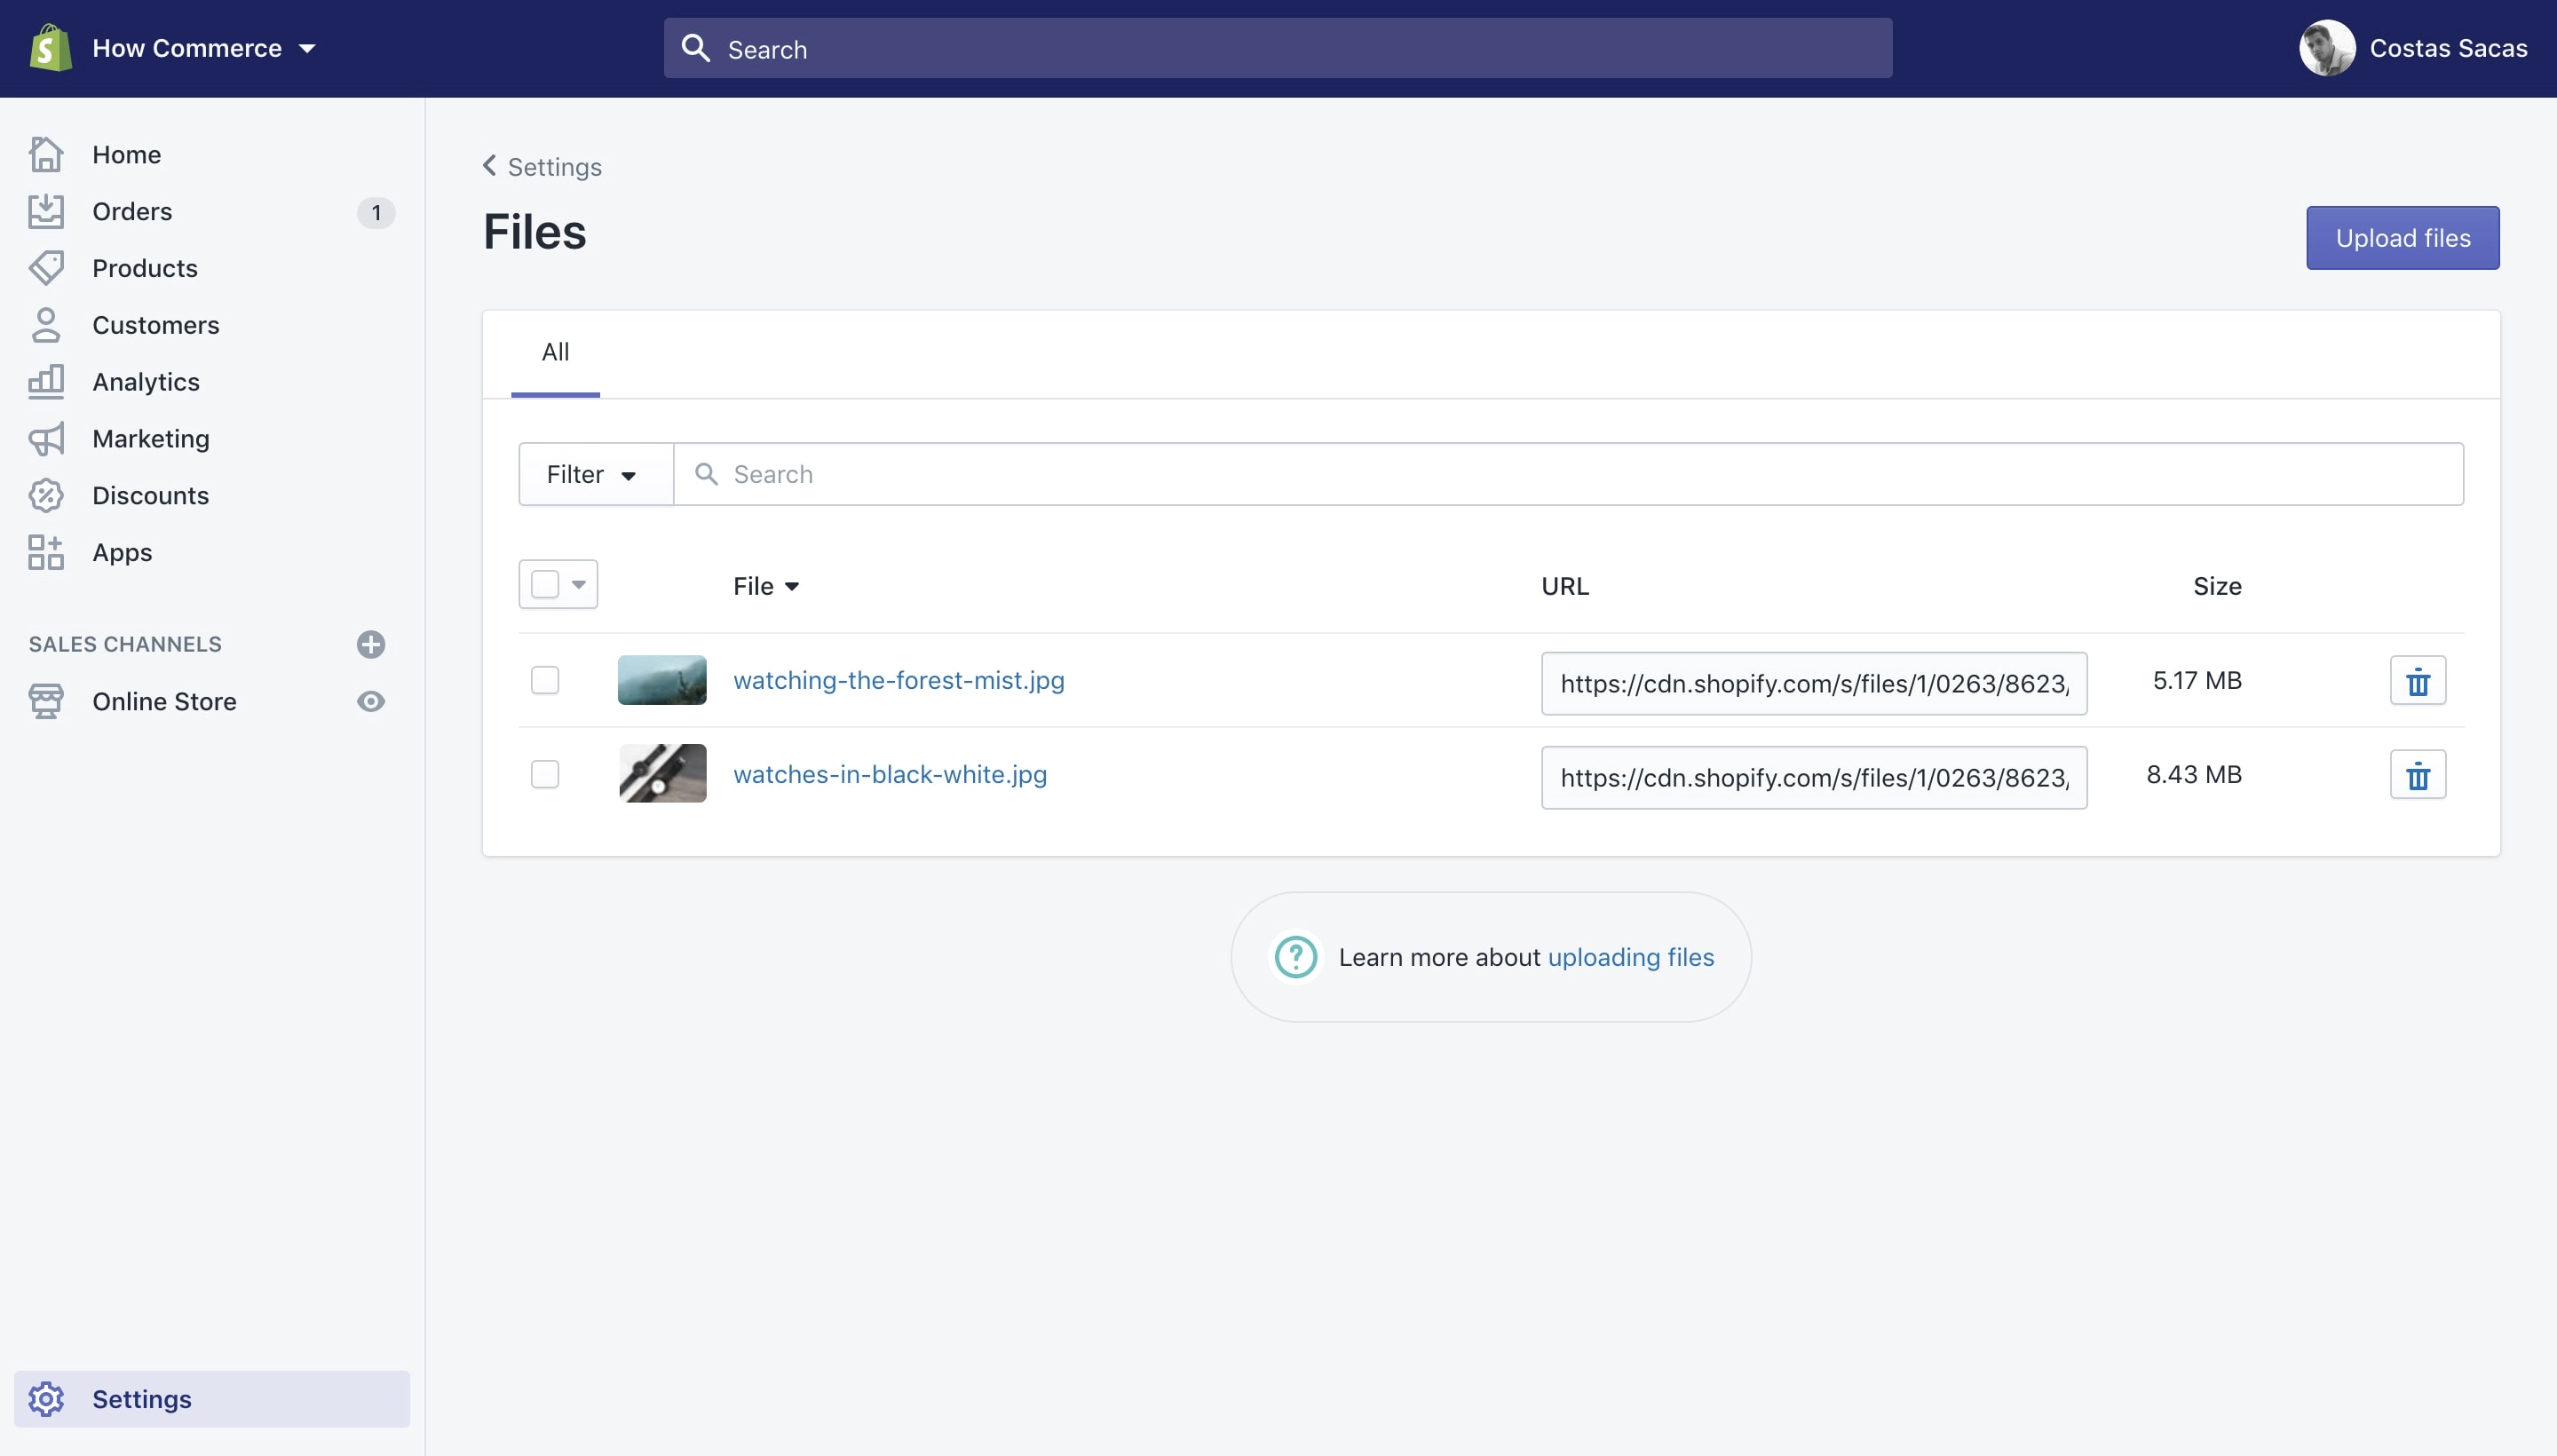
On the “Files manager” you can upload multiple files and use them across your Shopify store.
To access the “Files manager” go to “Settings” (marked with 1 in the image below) and after click on “Files” (marked with 2 in the image below) :
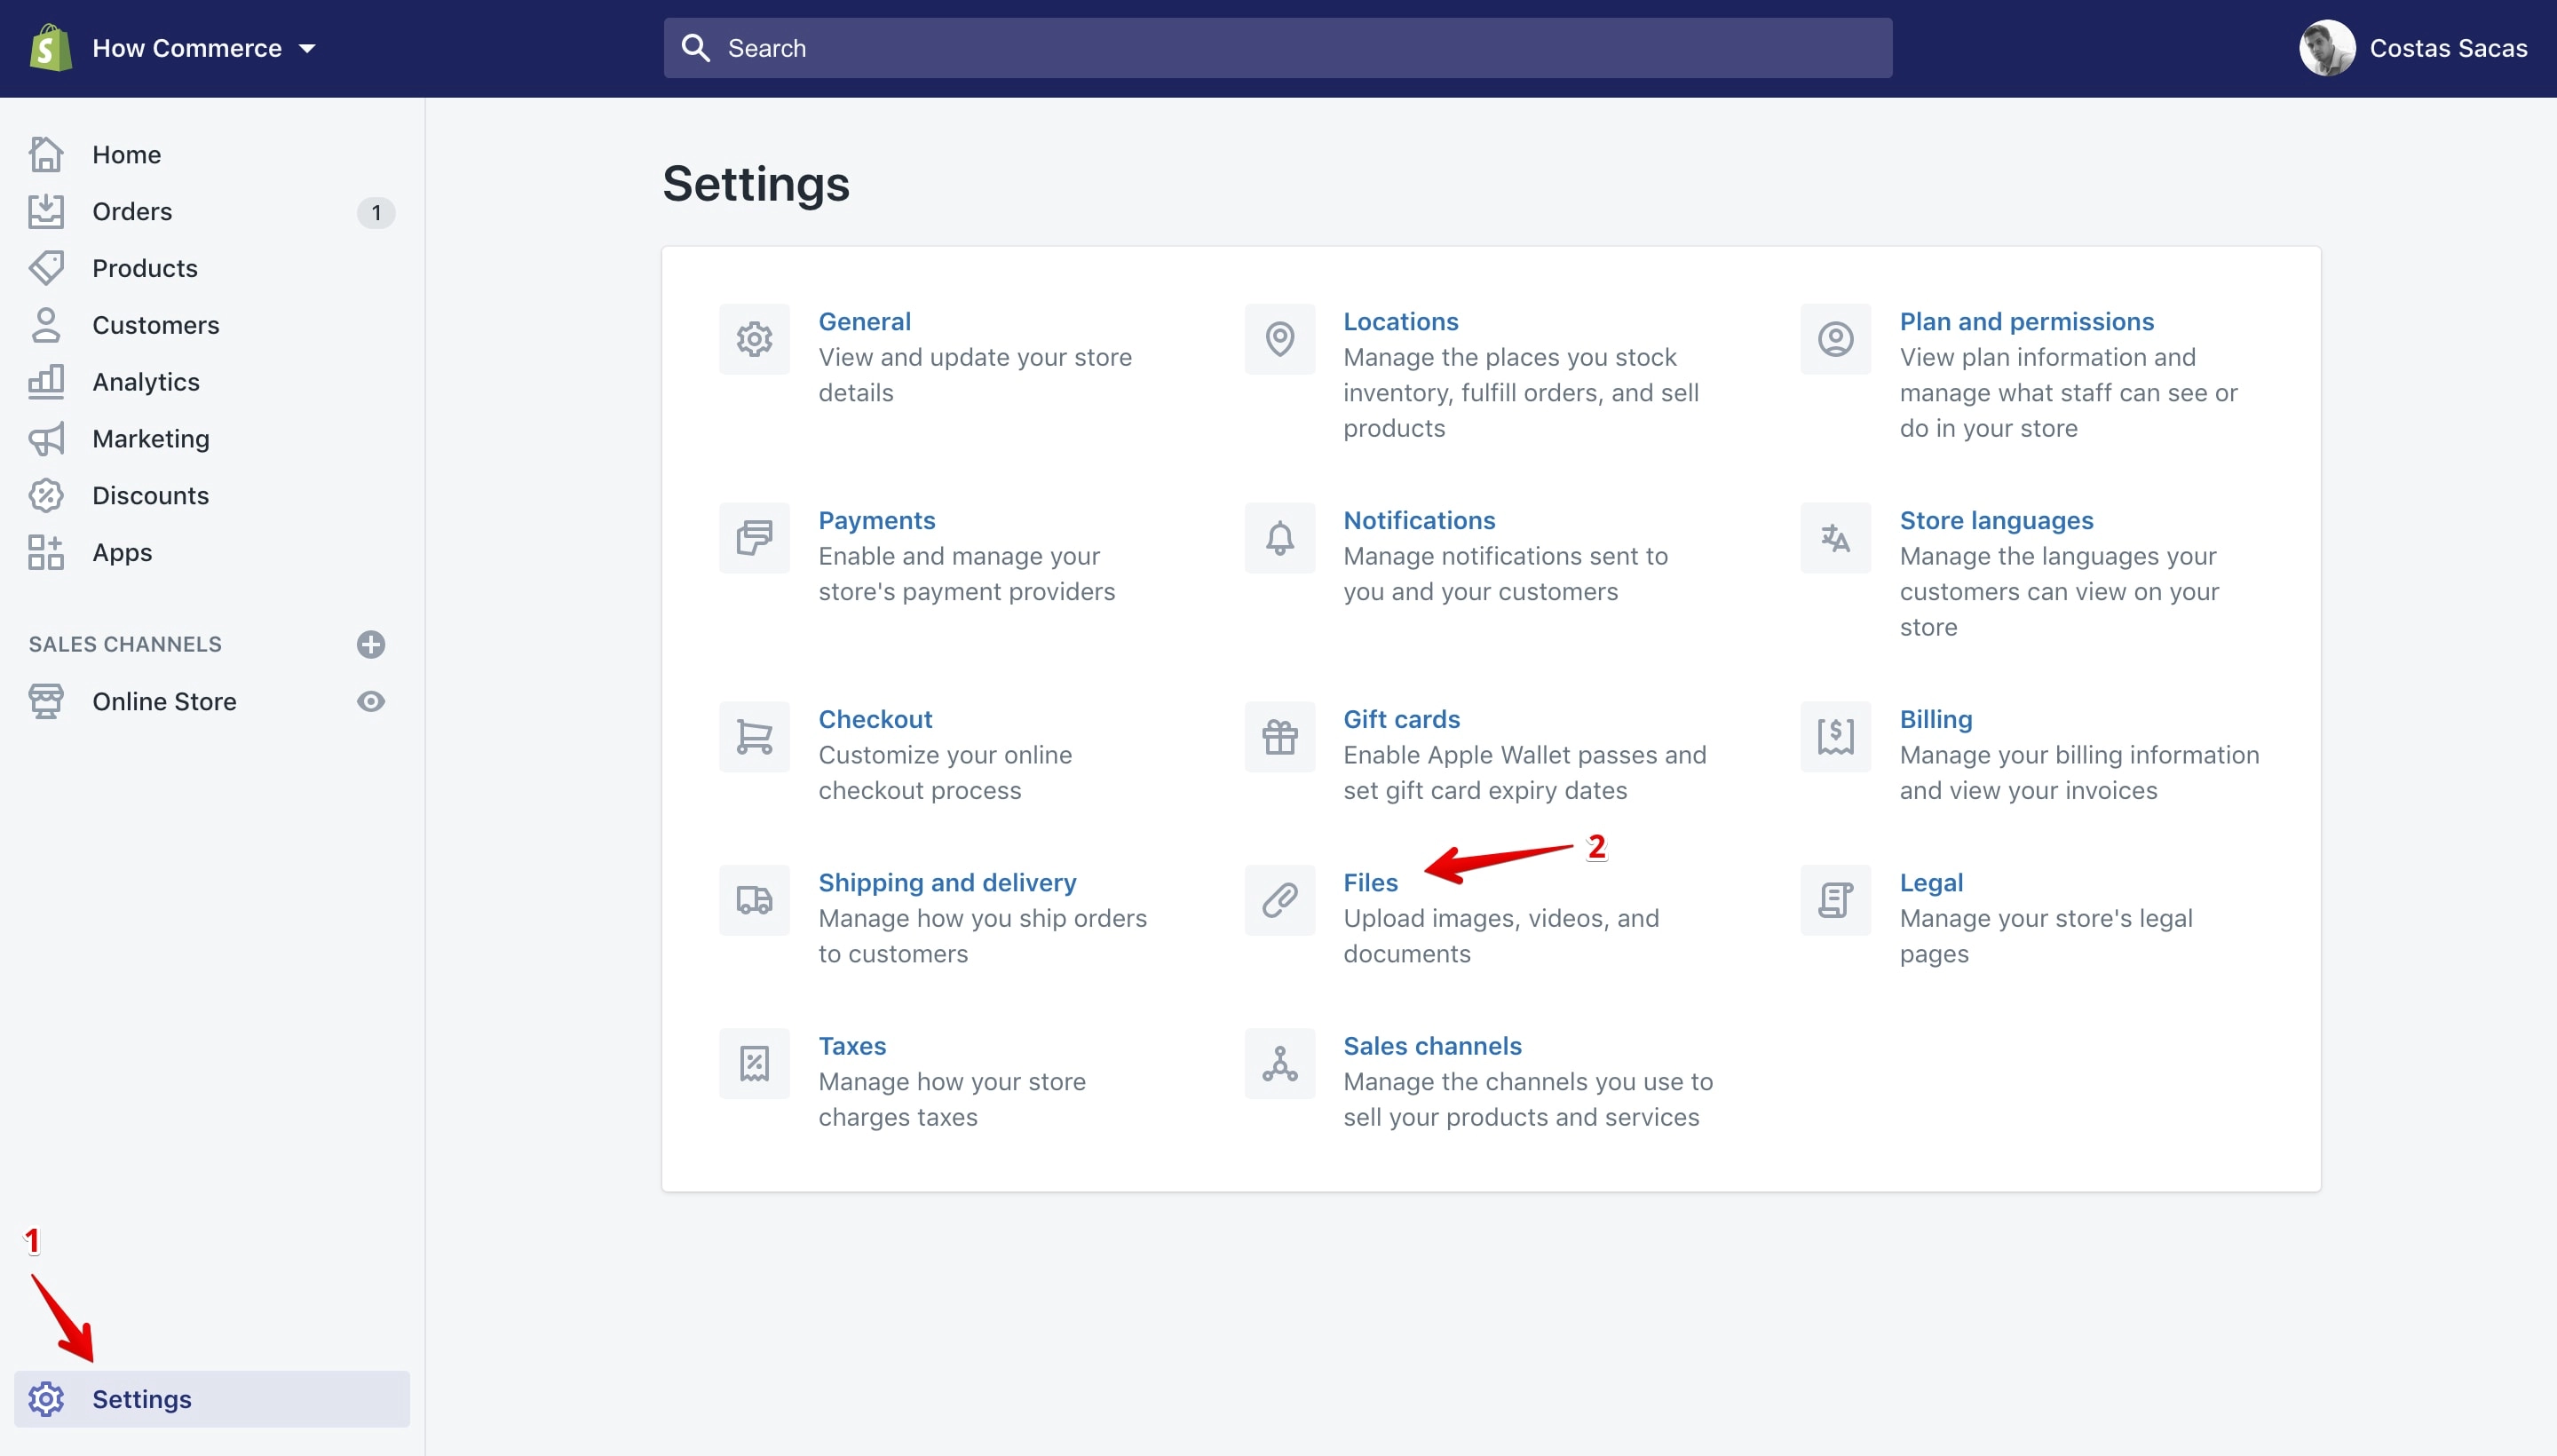
Once you click on the “Files” link you’ll see a page like this one:
How to upload multiple files
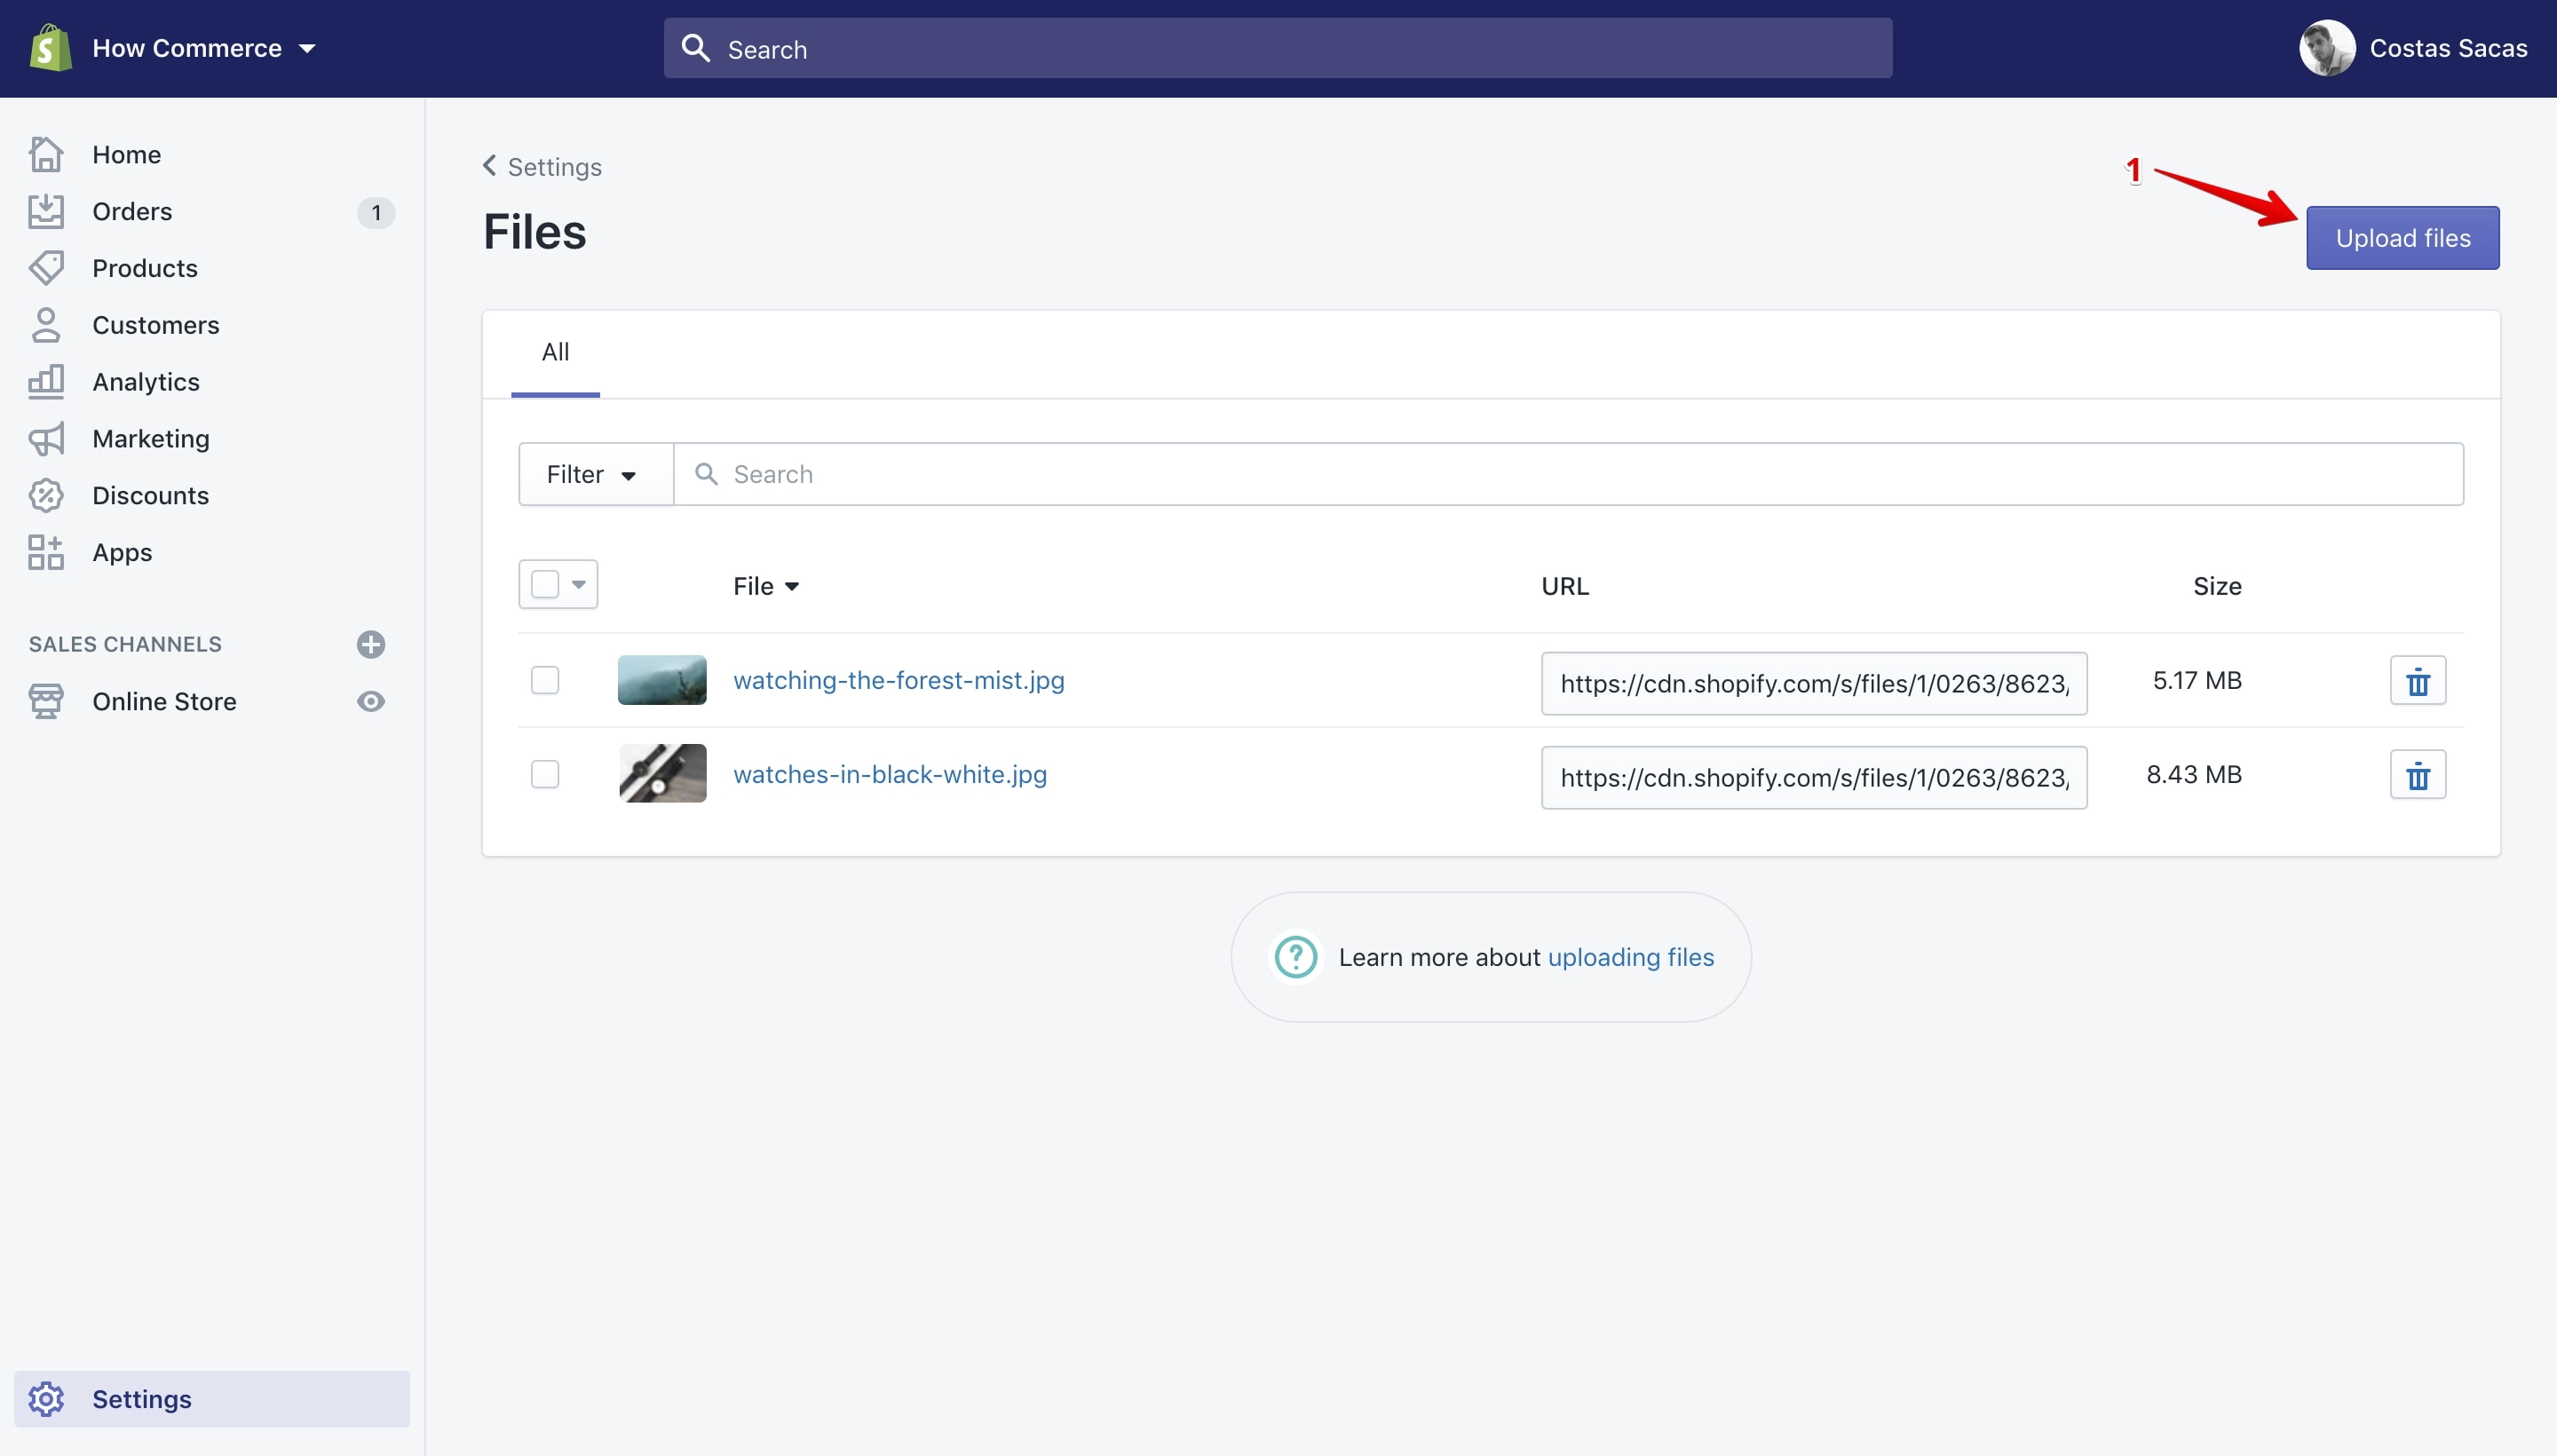
Click on the “Upload files” button and a pop-up window will display (marked with 1 in the image below):
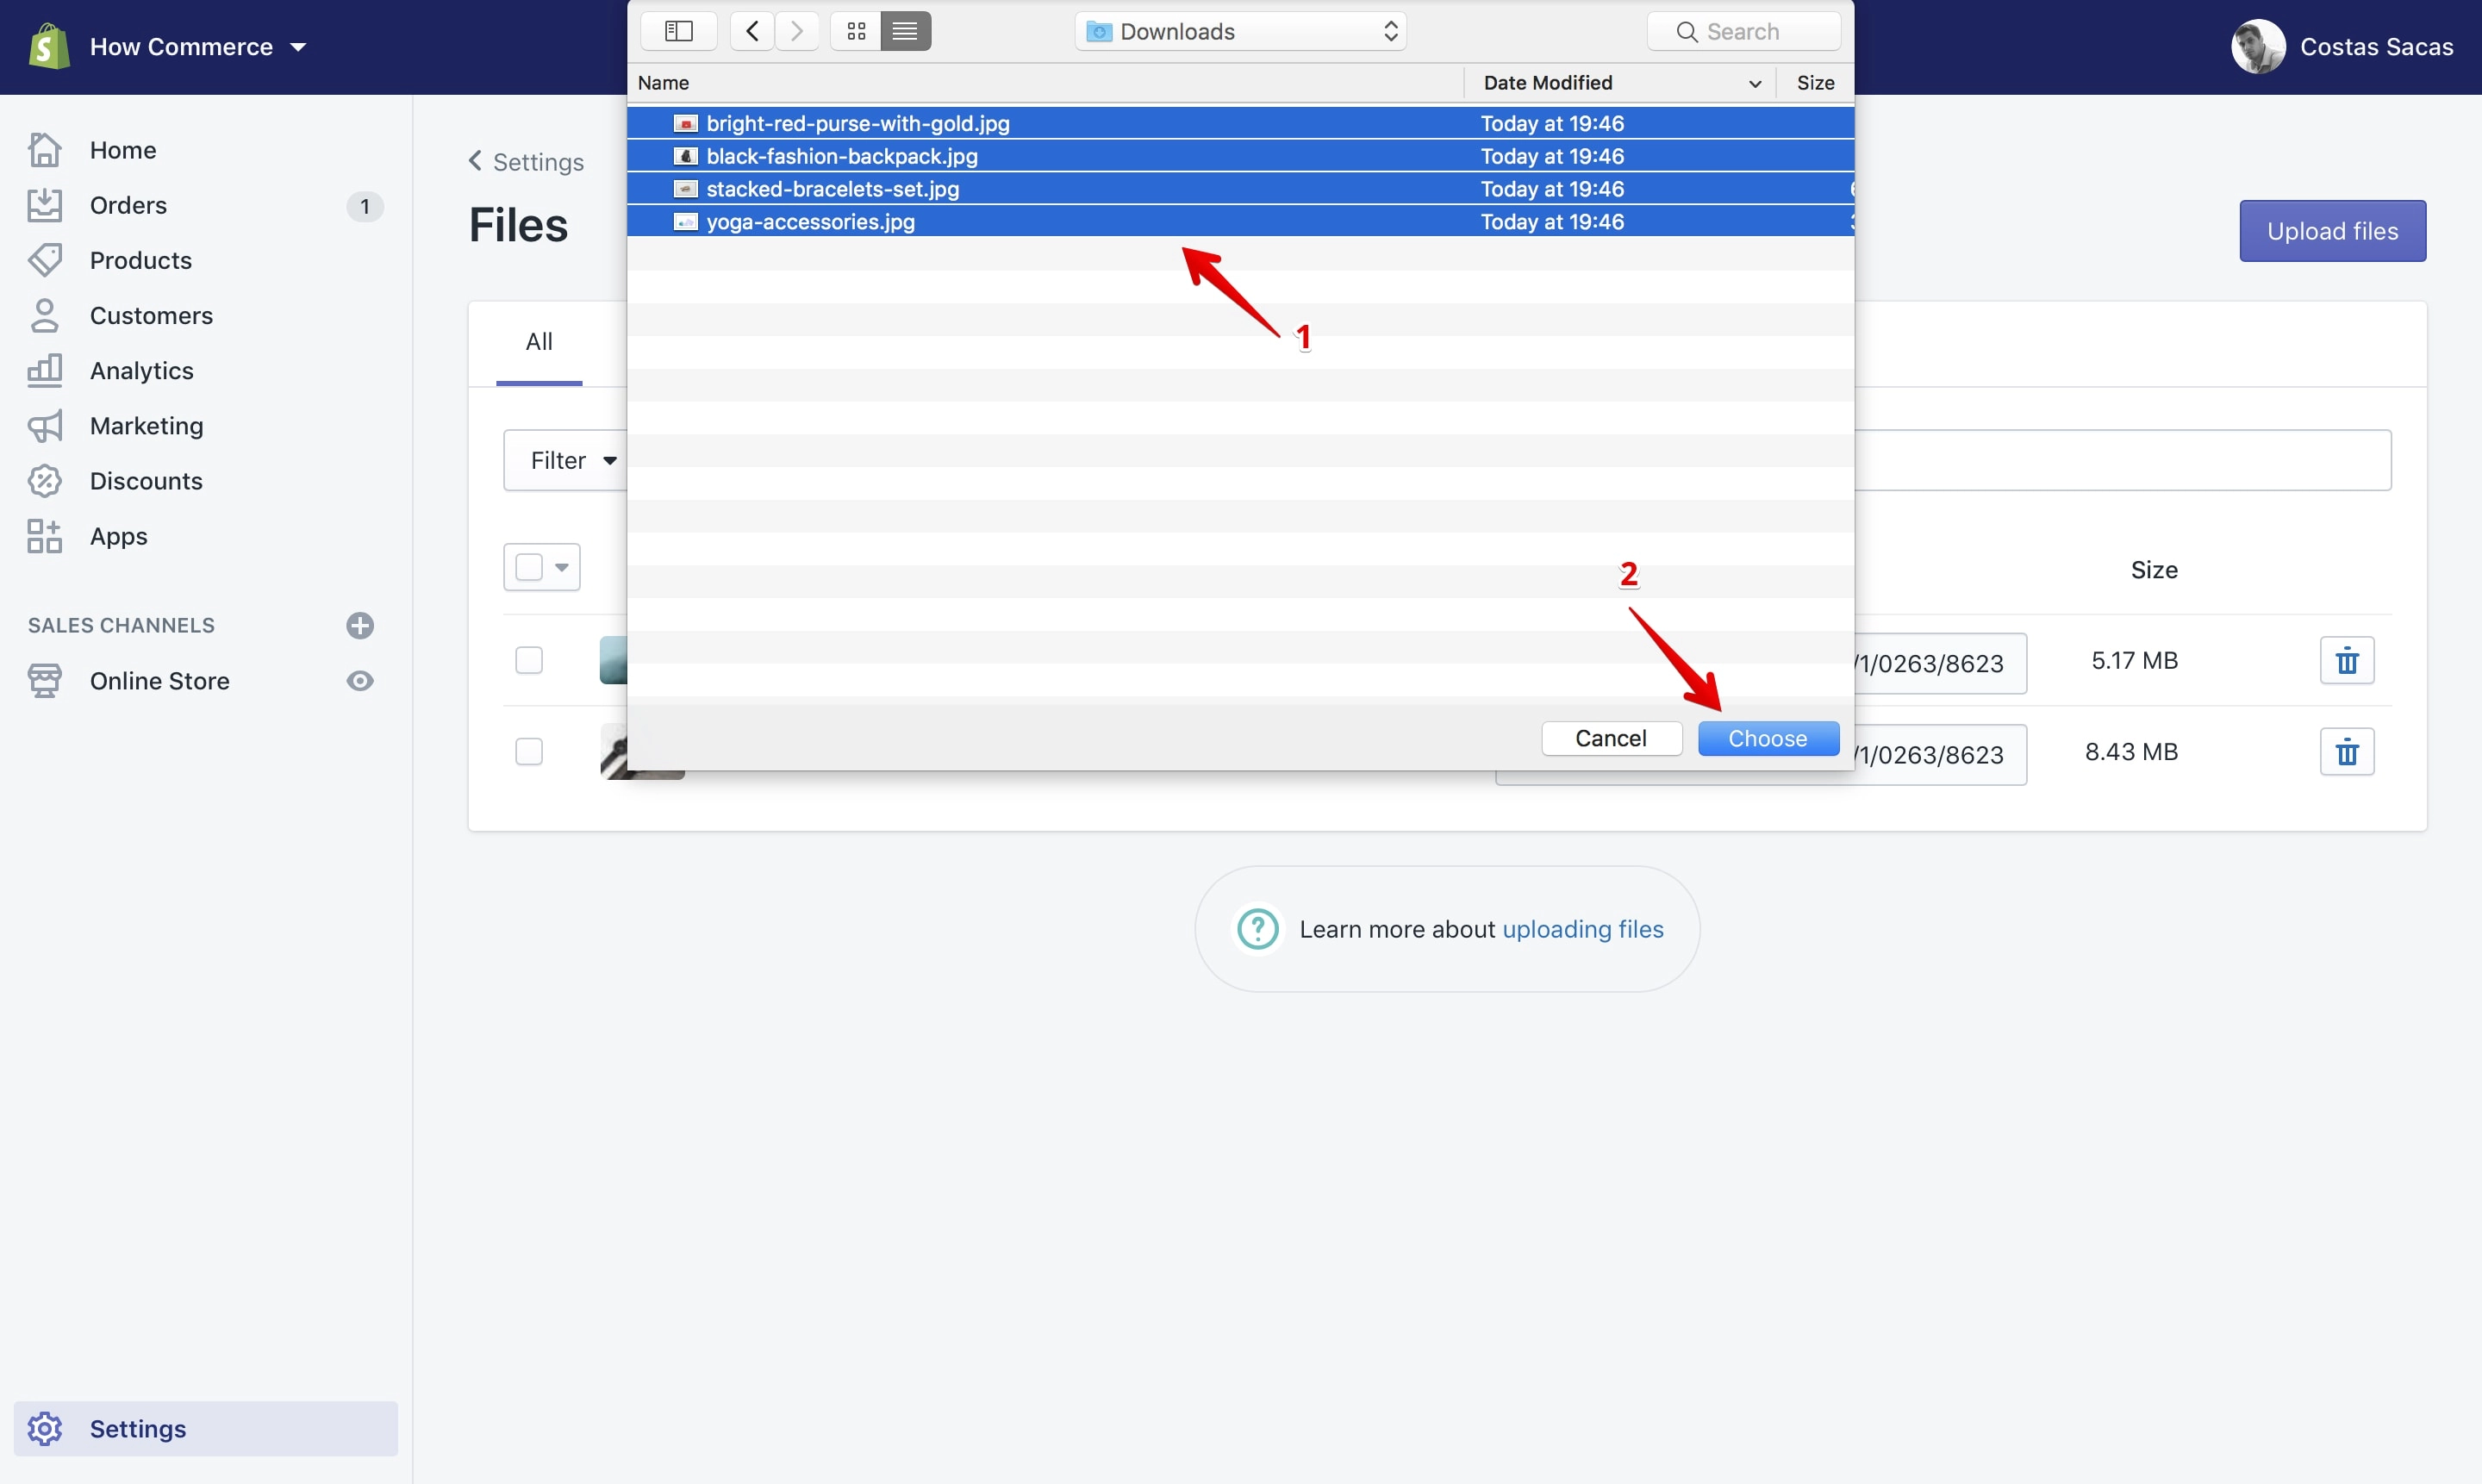
Select multiple files from your computer (marked with 1 in the image below) and upload them to Shopify by clicking the “Choose” button on MacOS or “Open” on Windows (marked with 2 in the image below):
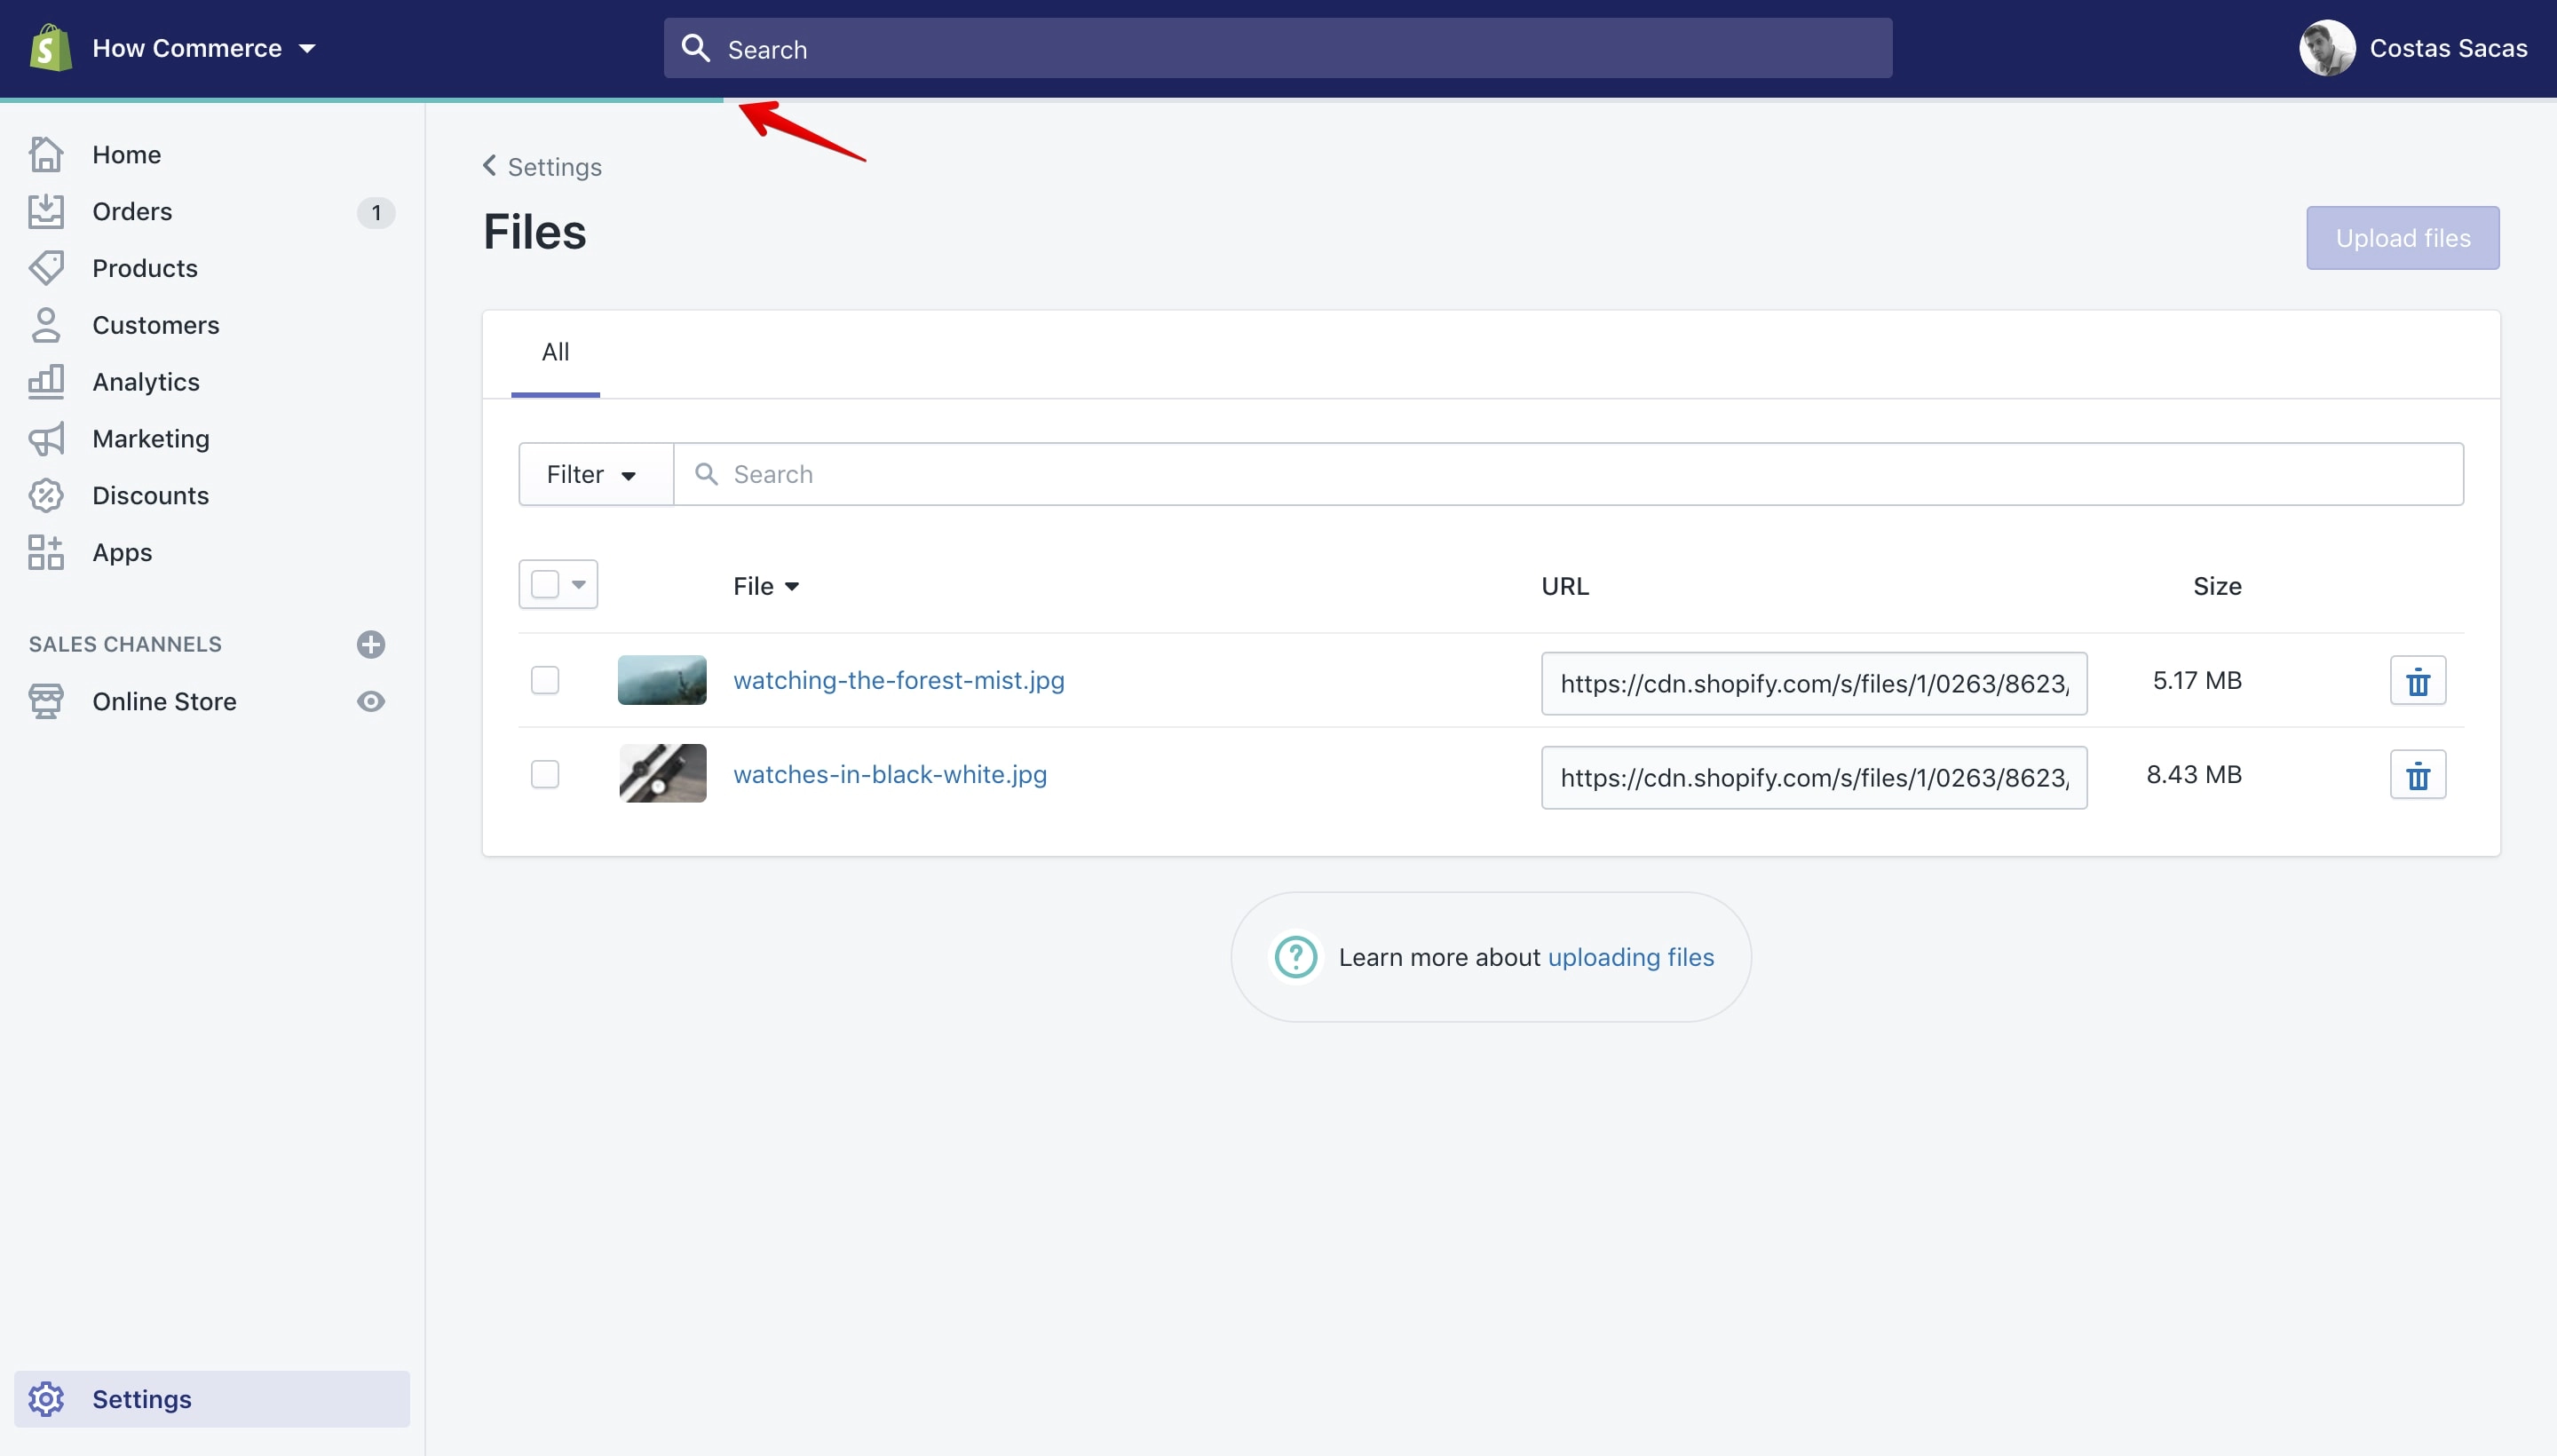
As the files are uploaded you’ll see a progress bar at the top of the page:
After Shopify complets uploading the files you’ll see them listed on the “Files manager”:
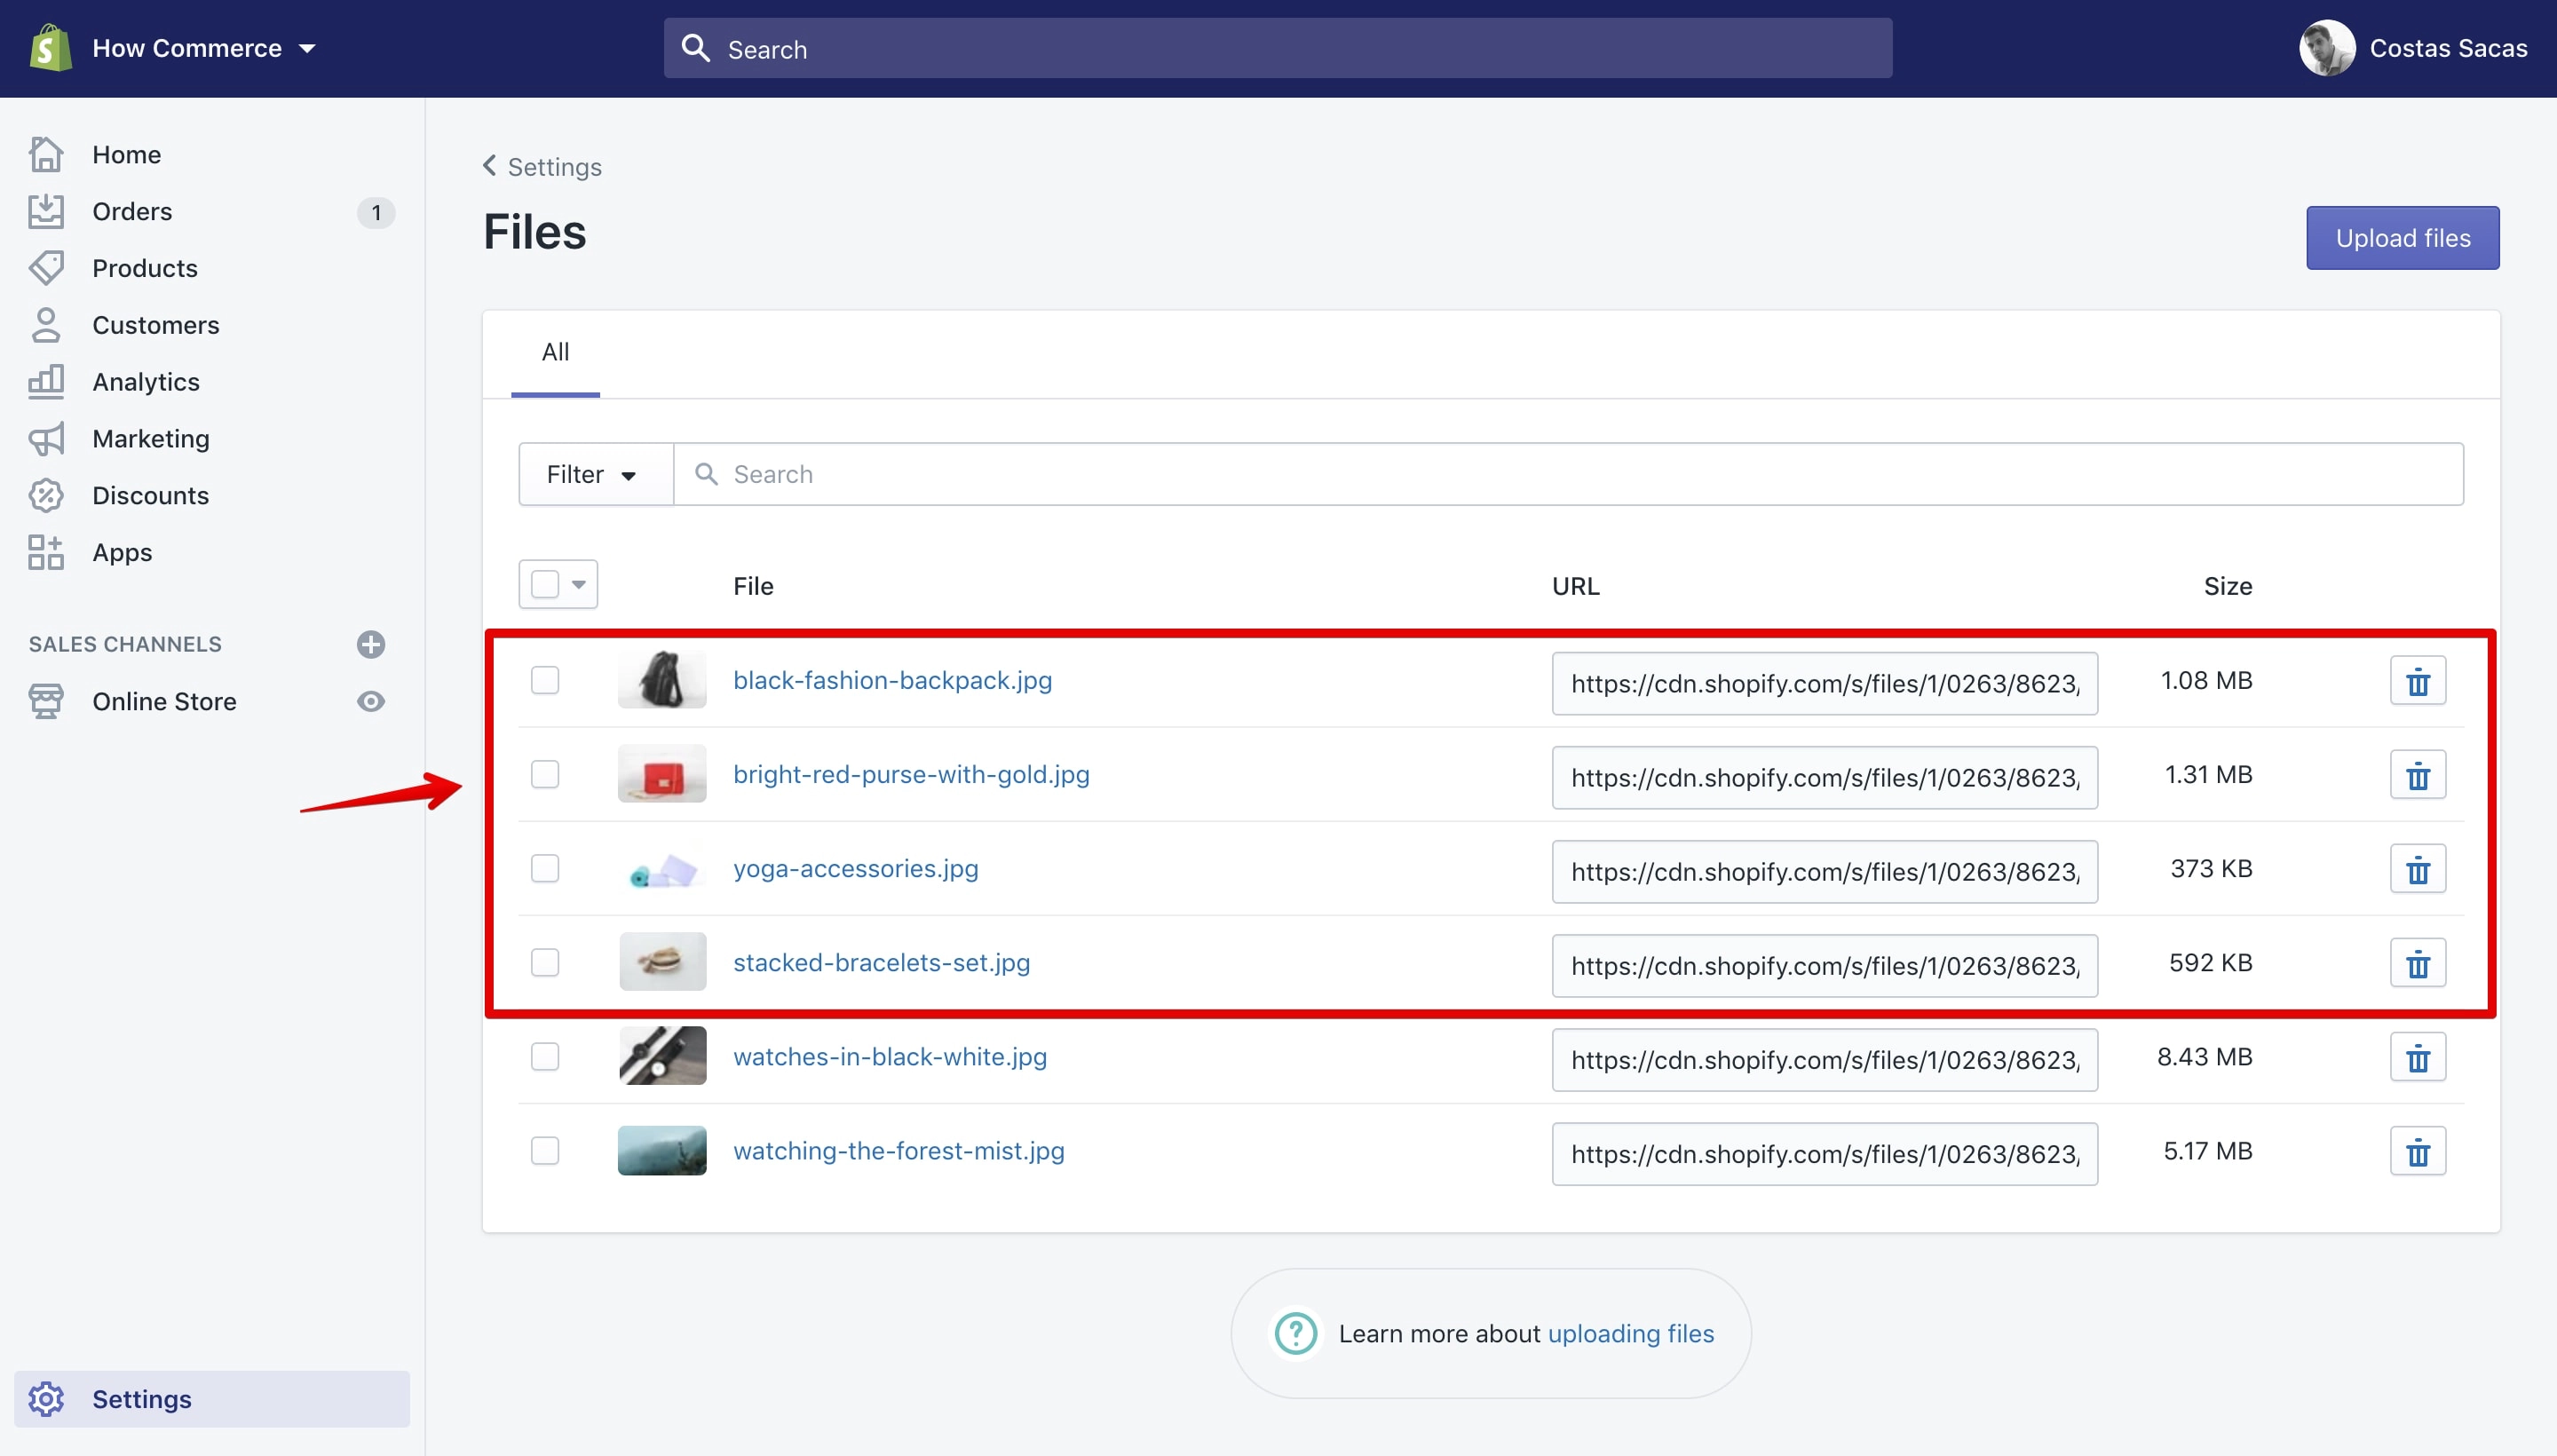
From here you can use the images in different sections of Shopify.
Keyboard shortcuts
You can use keyboard shortcuts in the Shopify admin to quickly navigate between pages or add items.
There is a keyboard shortcuts map in your Shopify admin. To see it you need to click the “?” key on your computer keyboard. Once you click the key a pop-up will open like in the image below:
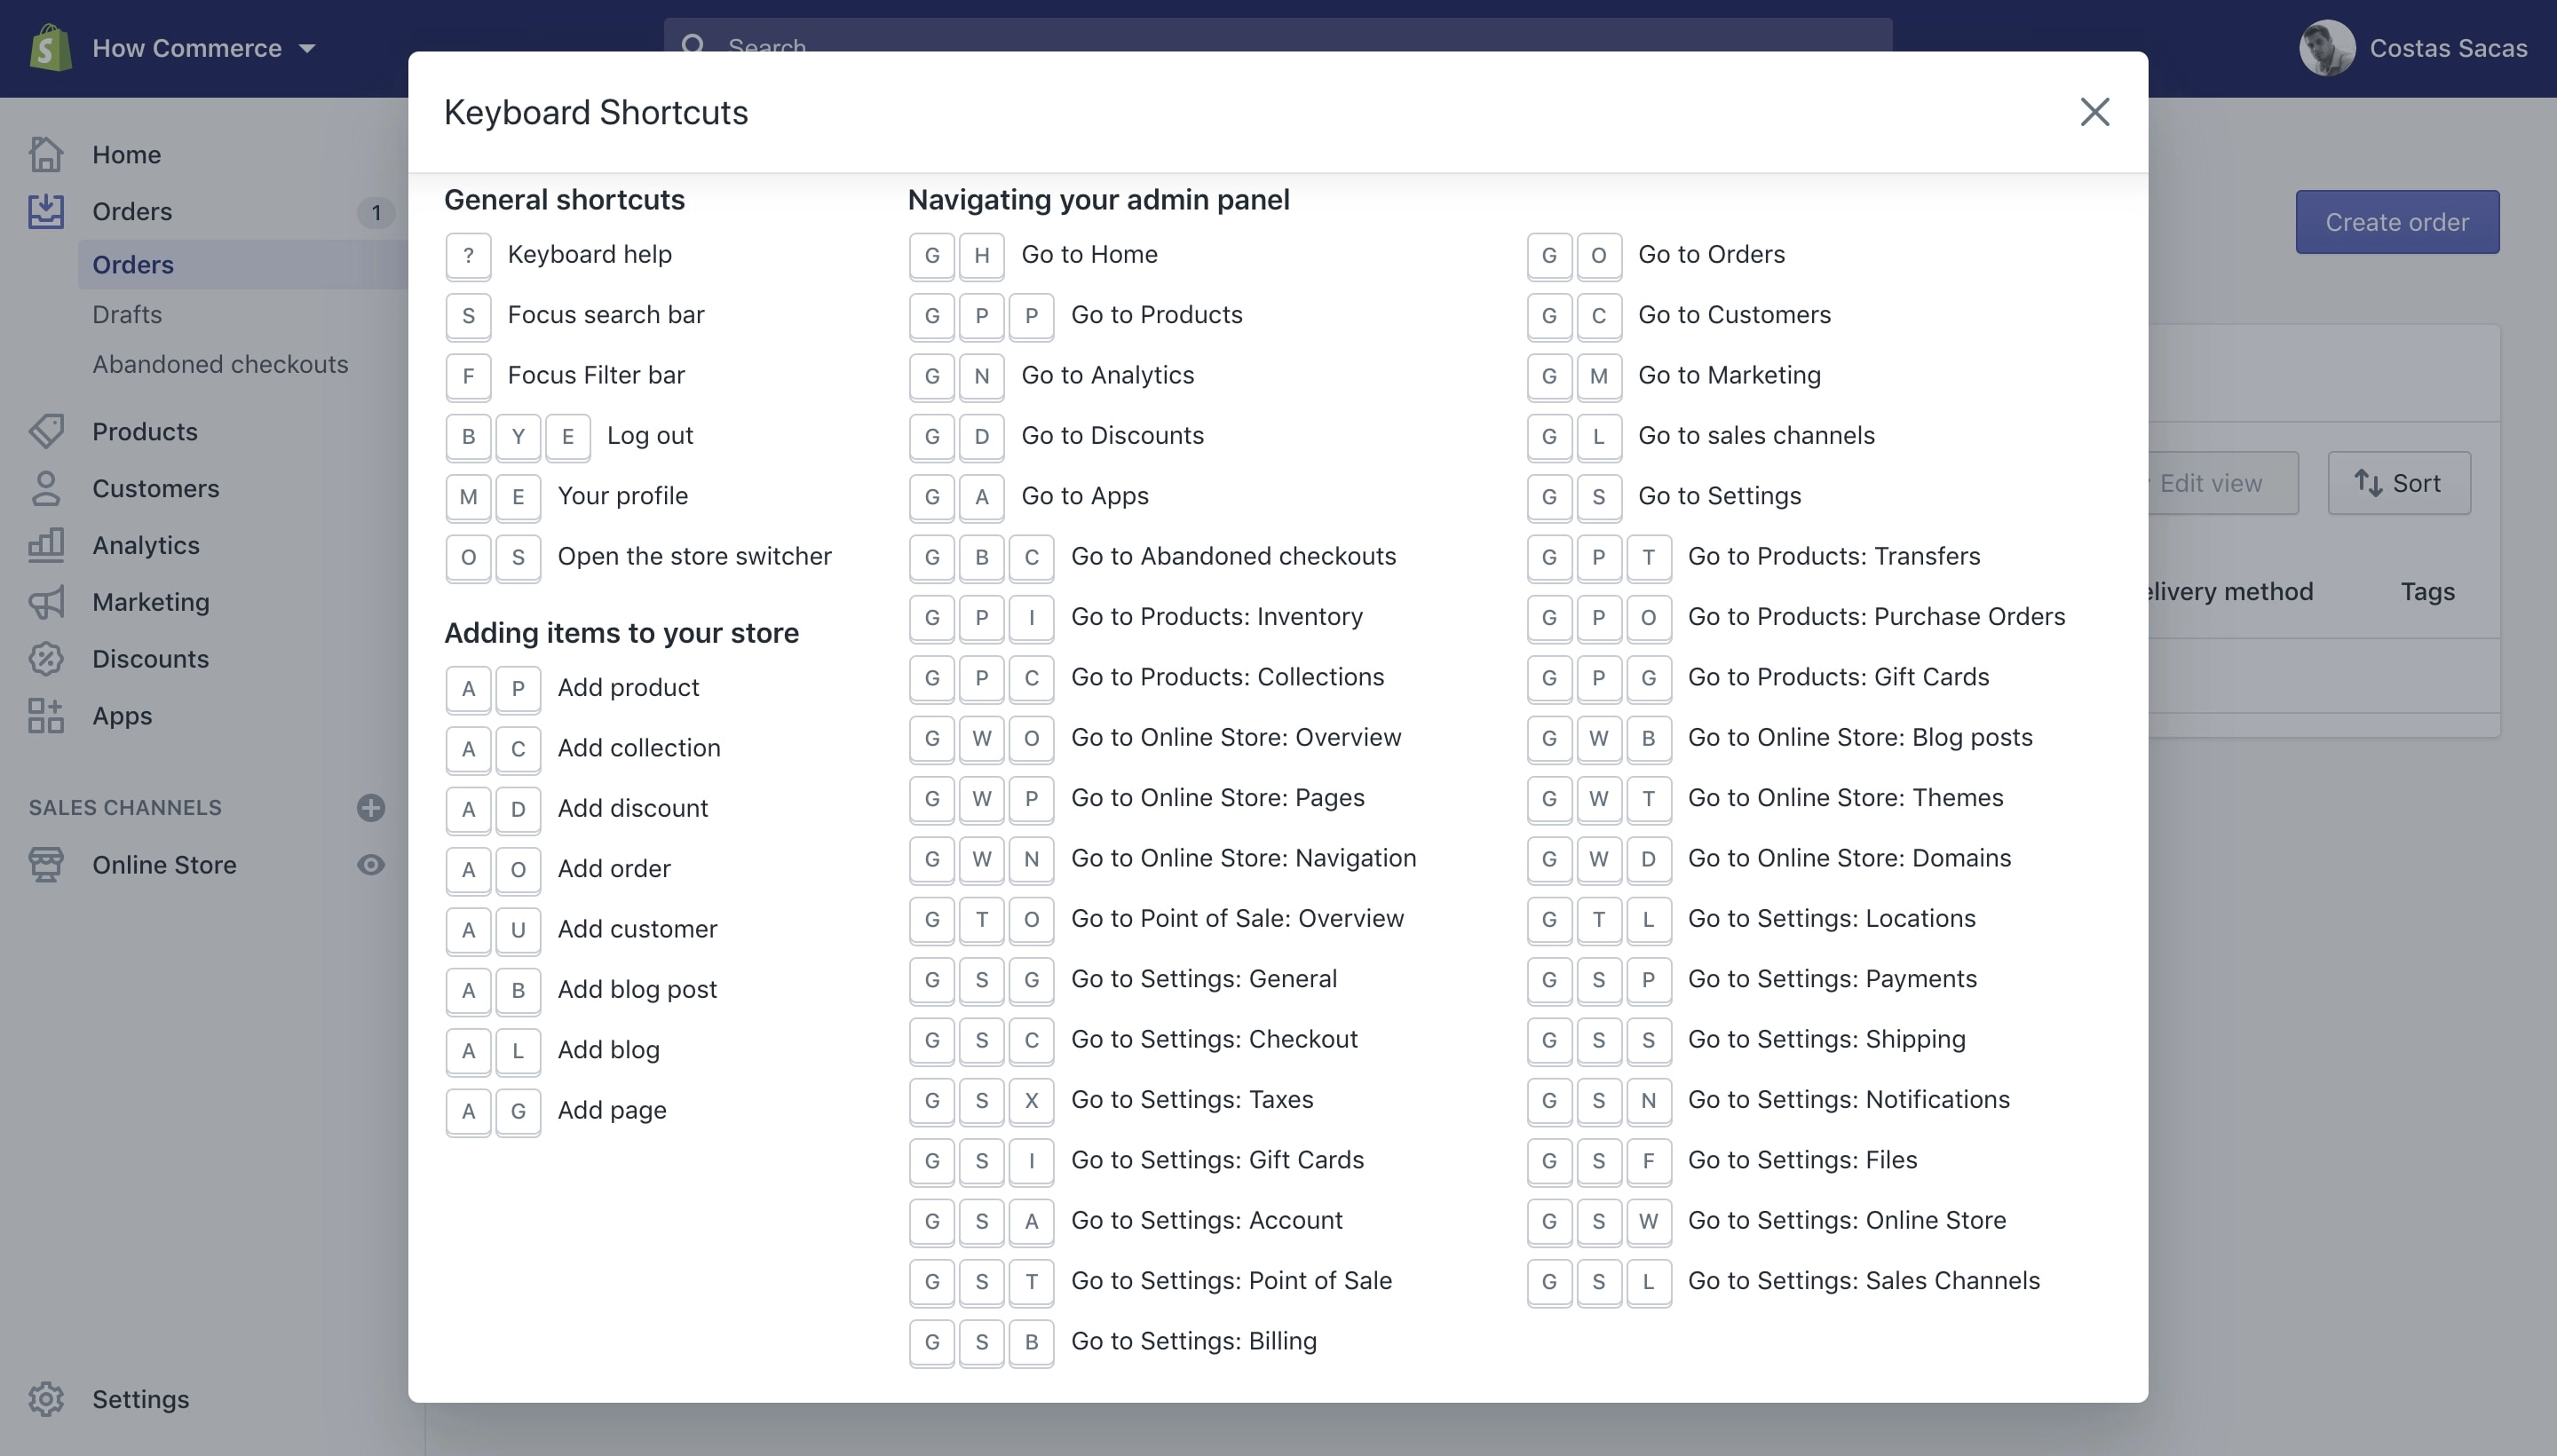
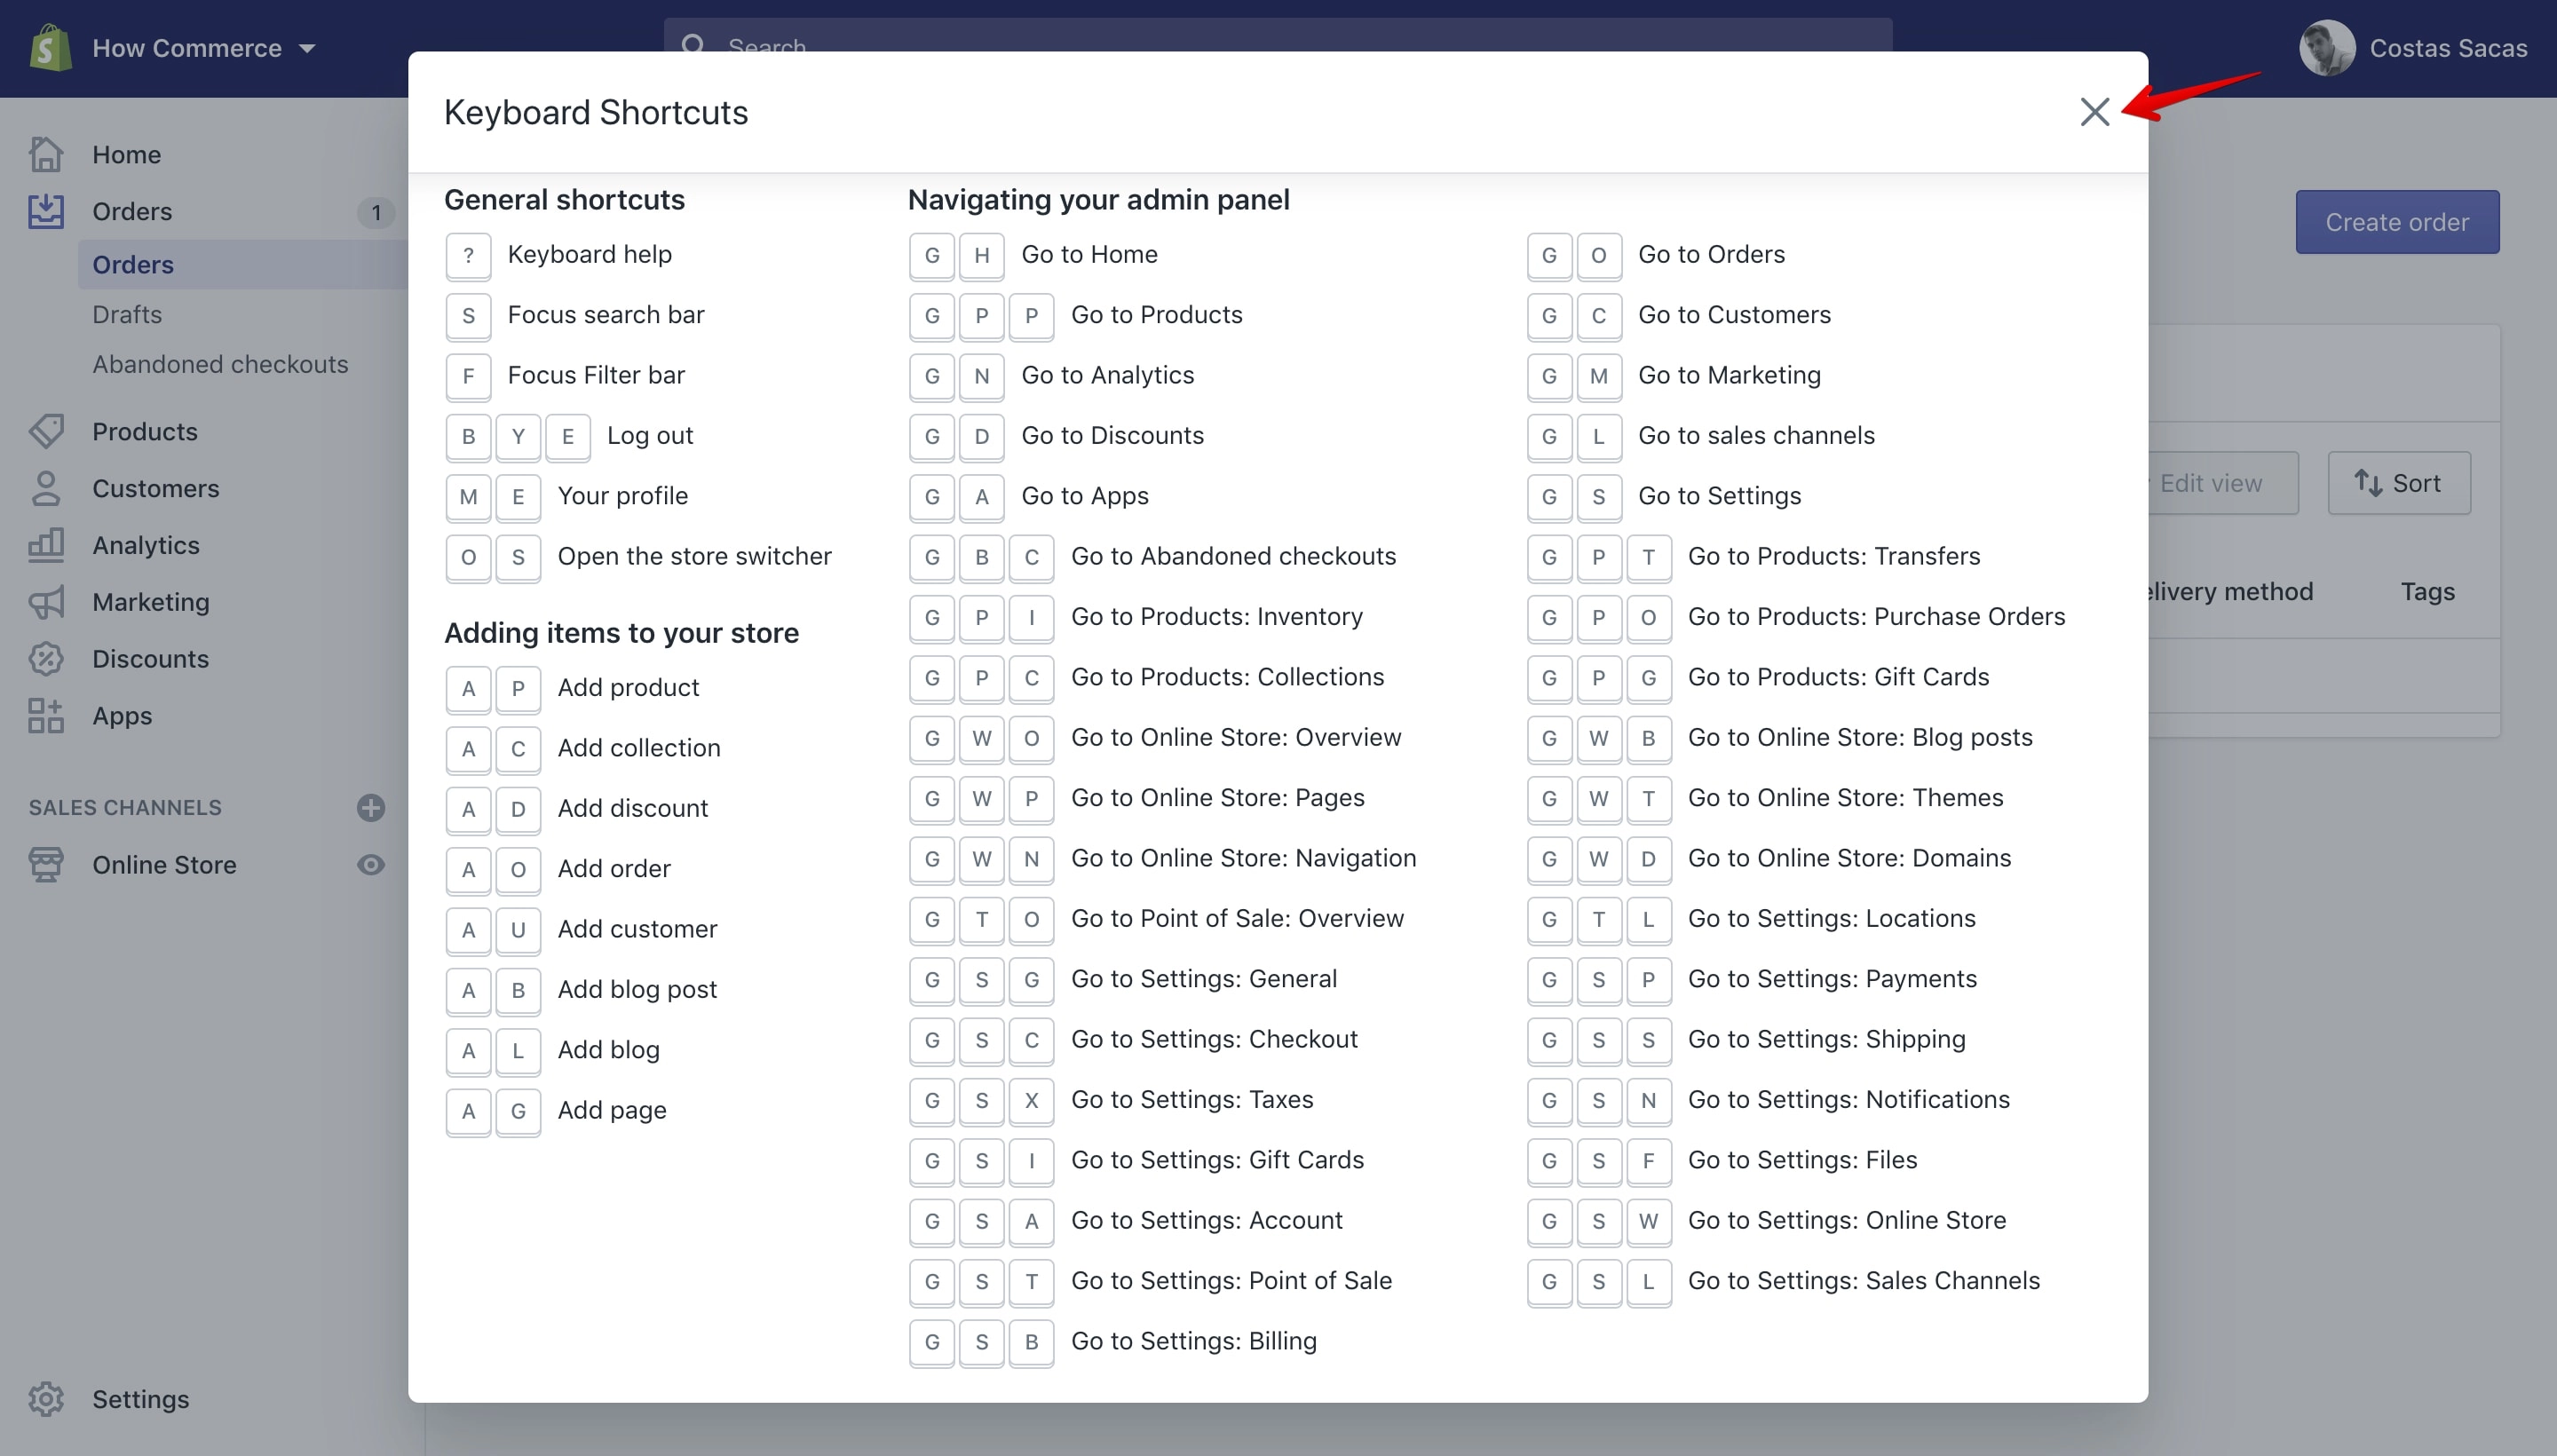
If you want to close the keyboard shortcuts pop-up you can do that by clicking the ESC key or clicking the “X” icon on the top right corner:
Note:
The keys that you use for a shortcut need to be pressed in the order that are listed in the “Keyboard Shortcuts” list. The keys must be typed at a difference of not more than a second. If you do not respect the order or press the next key in sequence after a second has passed the shortcut command will not work.
Keyboard shortcuts list
| Action to perform | Keyboard shortcut |
|---|---|
| General shortcuts | |
| ? | Keyboard help |
| S | Focus search bar |
| F | Focus Filter bar |
| BYE | Log out |
| ME | Your profile |
| OS | Open the store switcher |
| Add items to the store | |
| AP | Add product |
| AC | Add collection |
| AD | Add discount |
| AO | Add order |
| AU | Add customer |
| AB | Add blog post |
| AL | Add blog |
| AG | Add page |
| Navigate the admin panel | |
| GH | Go to Home |
| GPP | Go to Products |
| GN | Go to Analytics |
| GD | Go to Discounts |
| GA | Go to Apps |
| GBC | Go to Abandoned checkouts |
| GPI | Go to Products → Inventory |
| GPC | Go to Products → Collections |
| GWO | Go to Online Store → Overview |
| GWP | Go to Online Store → Pages |
| GWN | Go to Online Store → Navigation |
| GTO | Go to Point of Sale → Overview |
| GSG | Go to Settings → General |
| GSC | Go to Settings → Checkout |
| GSX | Go to Settings → Taxes |
| GSI | Go to Settings → Gift Cards |
| GSA | Go to Settings → Account |
| GST | Go to Settings → Point of Sale |
| GSB | Go to Settings → Billing |
| GO | Go to Orders |
| GC | Go to Customers |
| GM | Go to Marketing |
| GL | Go to sales channels |
| GS | Go to Settings |
| GPT | Go to Products → Transfers |
| GPO | Go to Products → Purchase Orders |
| GPG | Go to Products → Gift Cards |
| GWB | Go to Online Store → Blog posts |
| GWT | Go to Online Store → Themes |
| GWD | Go to Online Store → Domains |
| GTL | Go to Settings → Locations |
| GSP | Go to Settings → Payments |
| GSS | Go to Settings → Shipping |
| GSN | Go to Settings → Notifications |
| GSF | Go to Settings → Files |
| GSW | Go to Settings → Online Store |
| GSL | Go to Settings → Sales Channels |
Tags
Tags can be used to label different items in Shopify like:
- Products
- Transfers
- Customers
- Orders
- Draft orders
- Blog posts
Tags can help you become more productive since they help categorize items in Shopify and you can select them quickly by tag and make changes to them.
Tags are used for searching, filtering and to create automated collections.
Your store customers will not see the tags but the store uses them to list search results to your customers.
For example tags are great to group products for when you want to use the “Bulk Actions” or “Bulk Editor” you can select multiple products that have the same tag for editing.
Tag types
Tags are section dependent, meaning that you can’t use a tag that was created on one section on all your store sections.
That means that if you created a tag called “blue” on the “Products” section of your store, this tag will not appear and it can’t be used on the “Orders” section.
Note:
It is recommended to use only letters, numbers and hyphens (-) in your tags. Using other characters like symbols or accented characters will exclude the tags from search.
Please note that the following sections are somewhat repetitive since the process is almost the same for all Shopify sections, but in order to make the process easy to understand even for people that have never administered a shop online I’ve written detailed steps.
Product tags
Product tags can be added from the product details page on every product from your store.
Product tags support up to 255 characters and a number of 250 tags to each product.
To access the page go to “All products” (marked with 1 in the image below) and after to the product that you want to add tags too (marked with 2 in the image below):
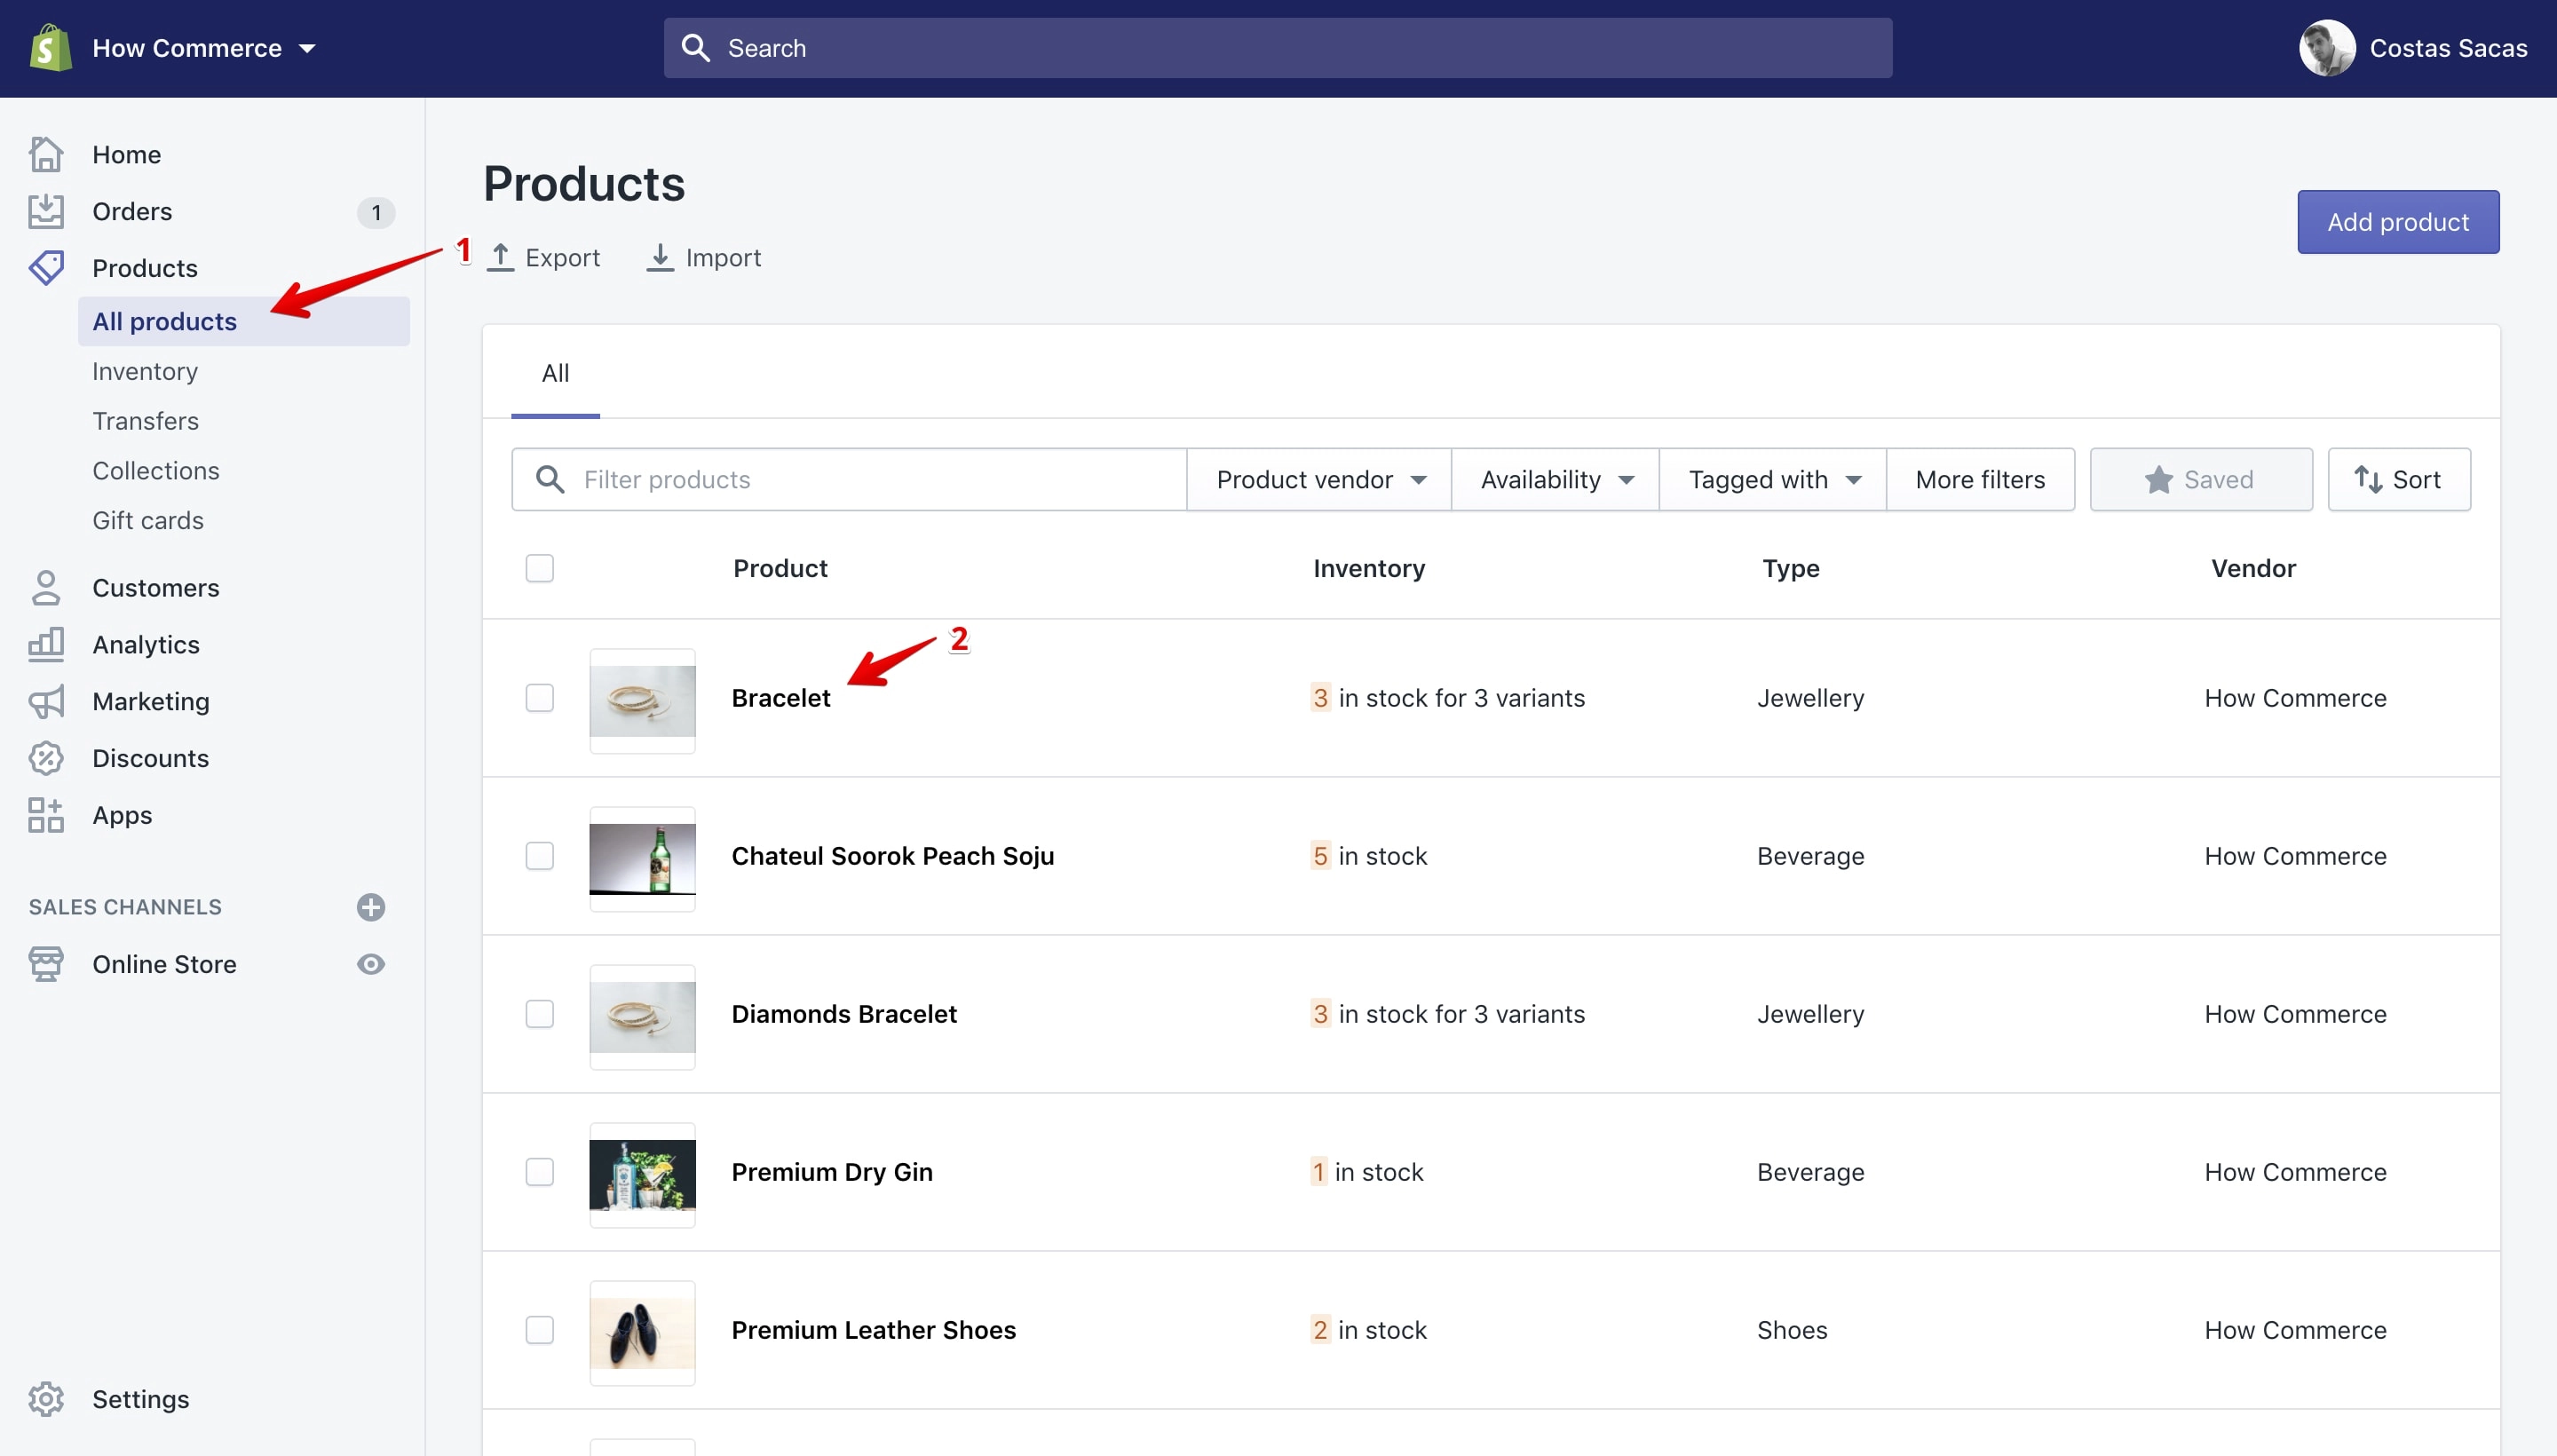
On the product details page you can view the tags section on the right sidebar (marked with 1 in the image below), and on this section you can see all tags associated with this product (marked with 2 in the image below):
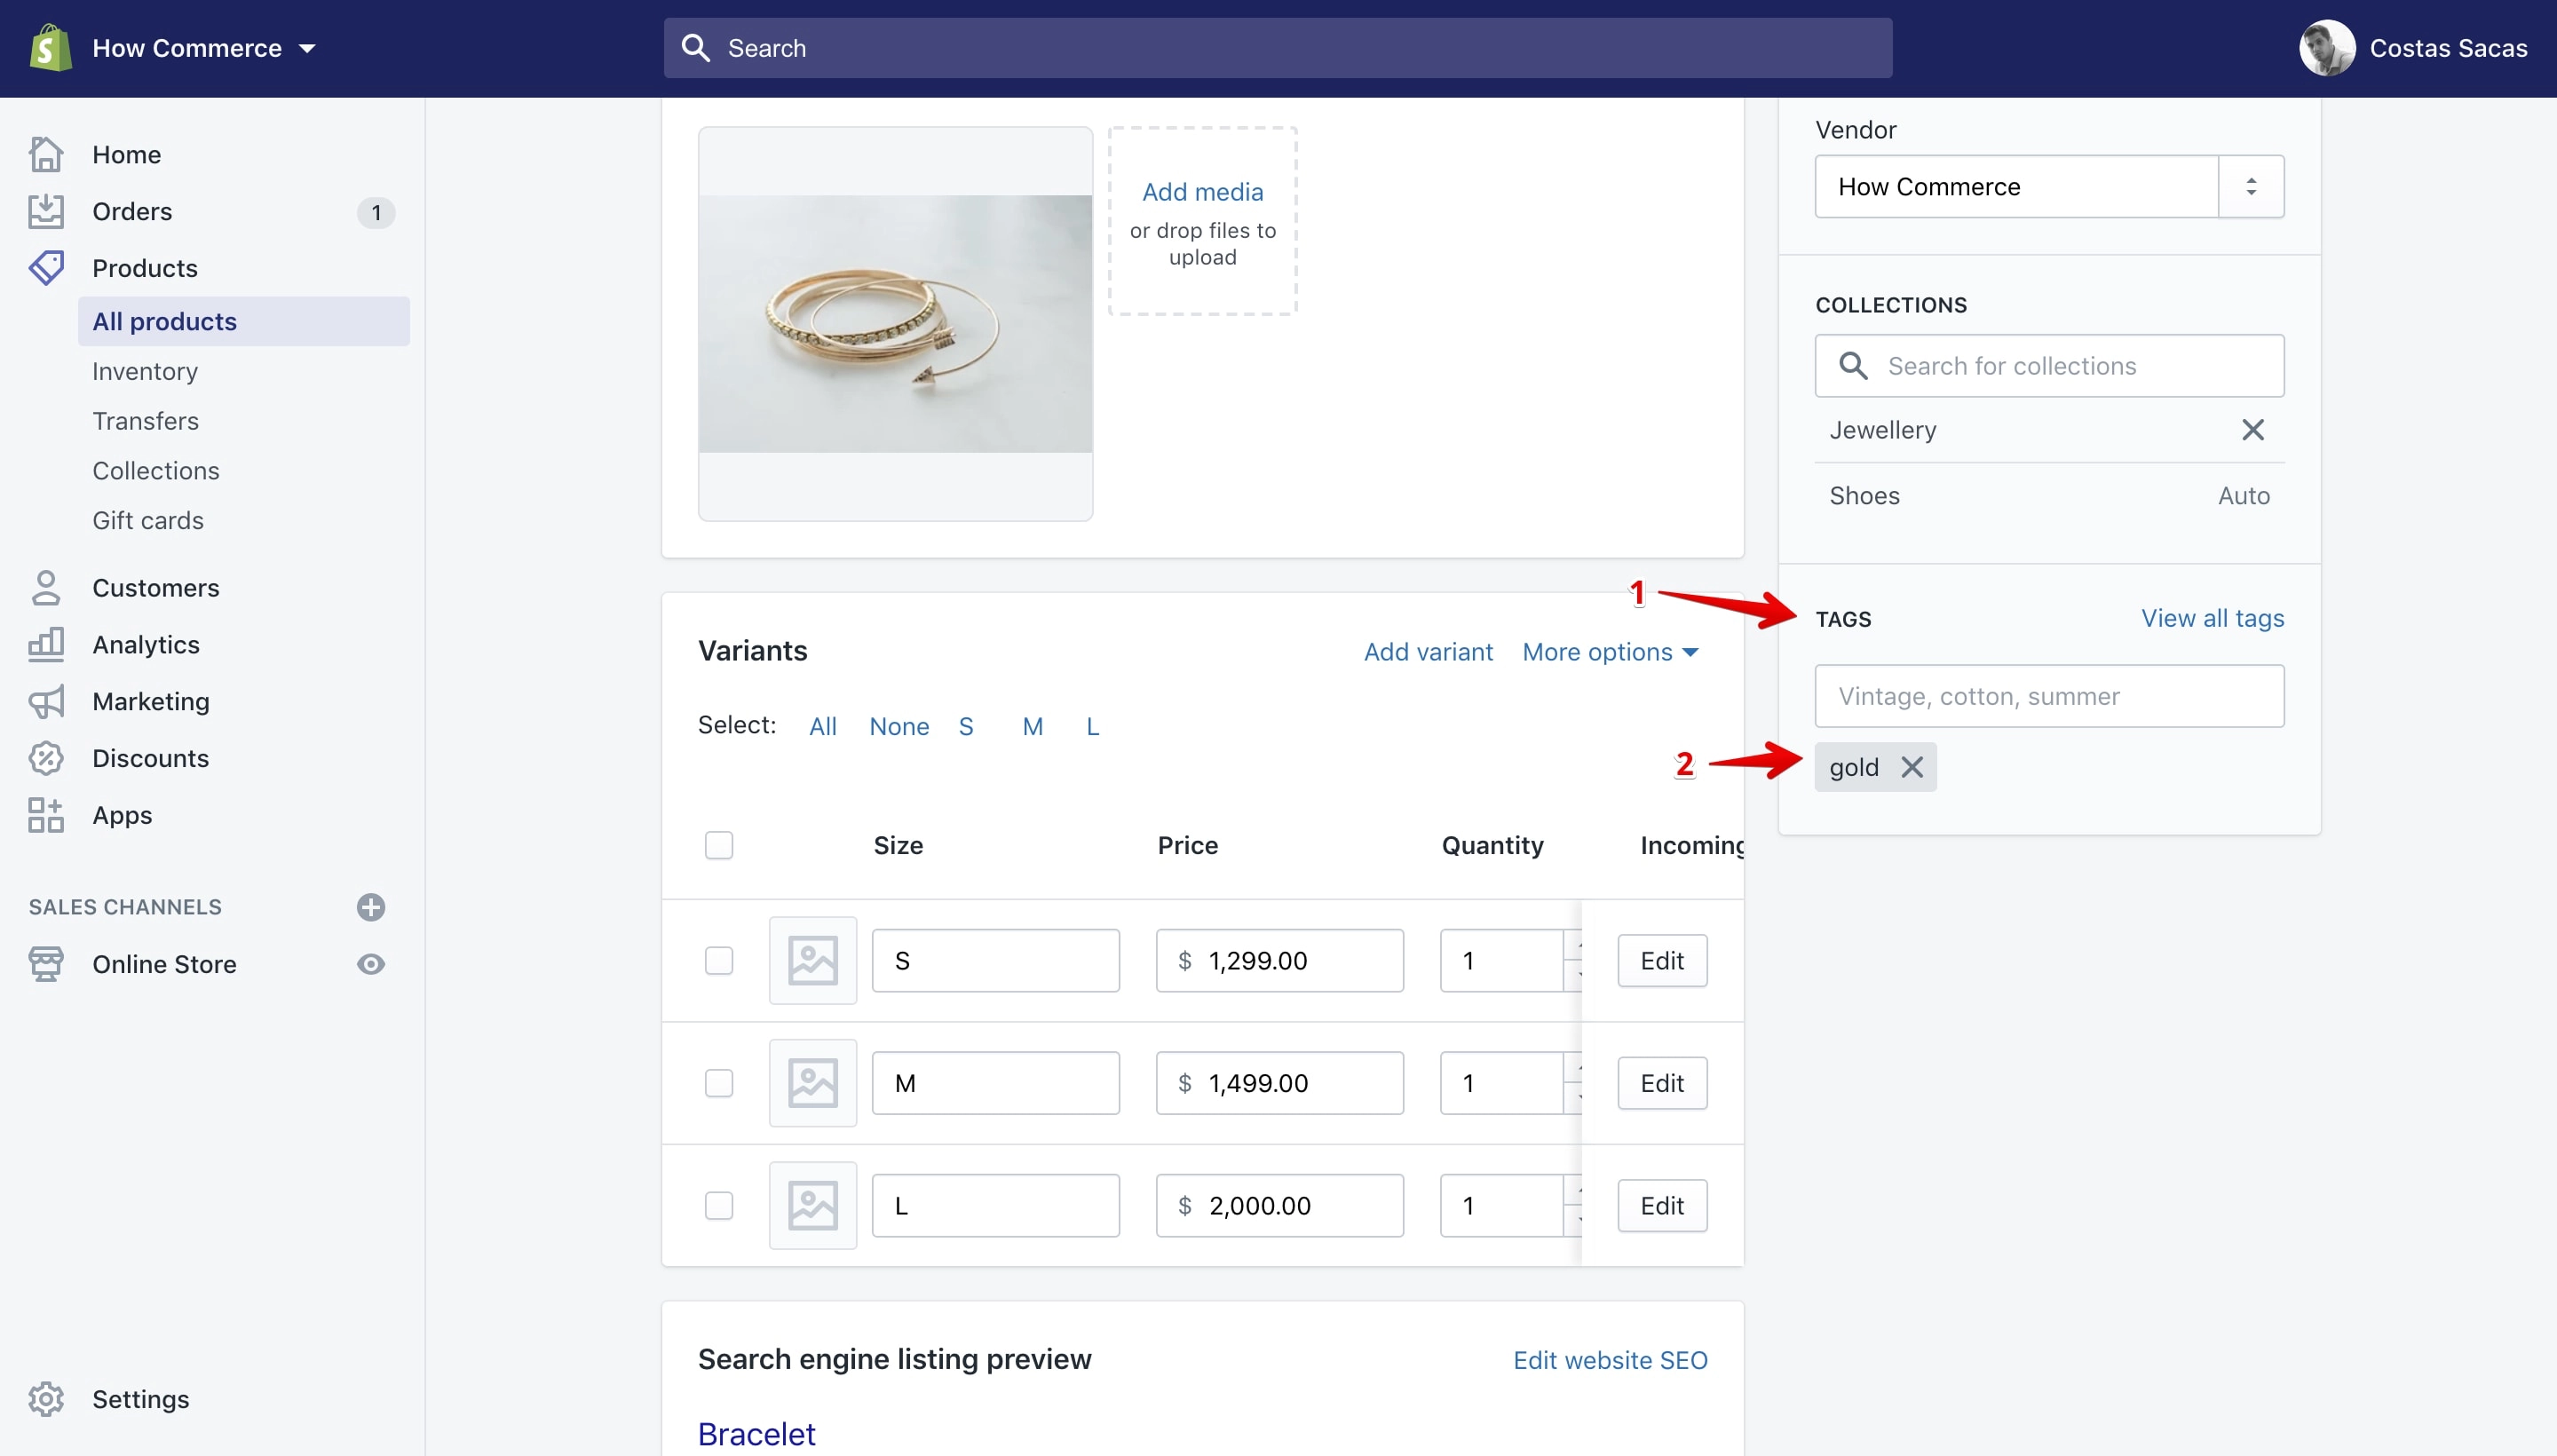
Add a tag
The tags that you add to one product can be viewed from any product details page and can be used by all products available in the online store.
Shopify allows you to add up to 250 tags to each product.
You can add a tag to a product in 2 ways:
- New and existing tags can be added through the input box.
- Existing tags can be added through the “View all tags” link.
Adding a tag through the input box
New tags can be added only through this option. Once you click inside the input box a list with all the tags available on the products section is listed:
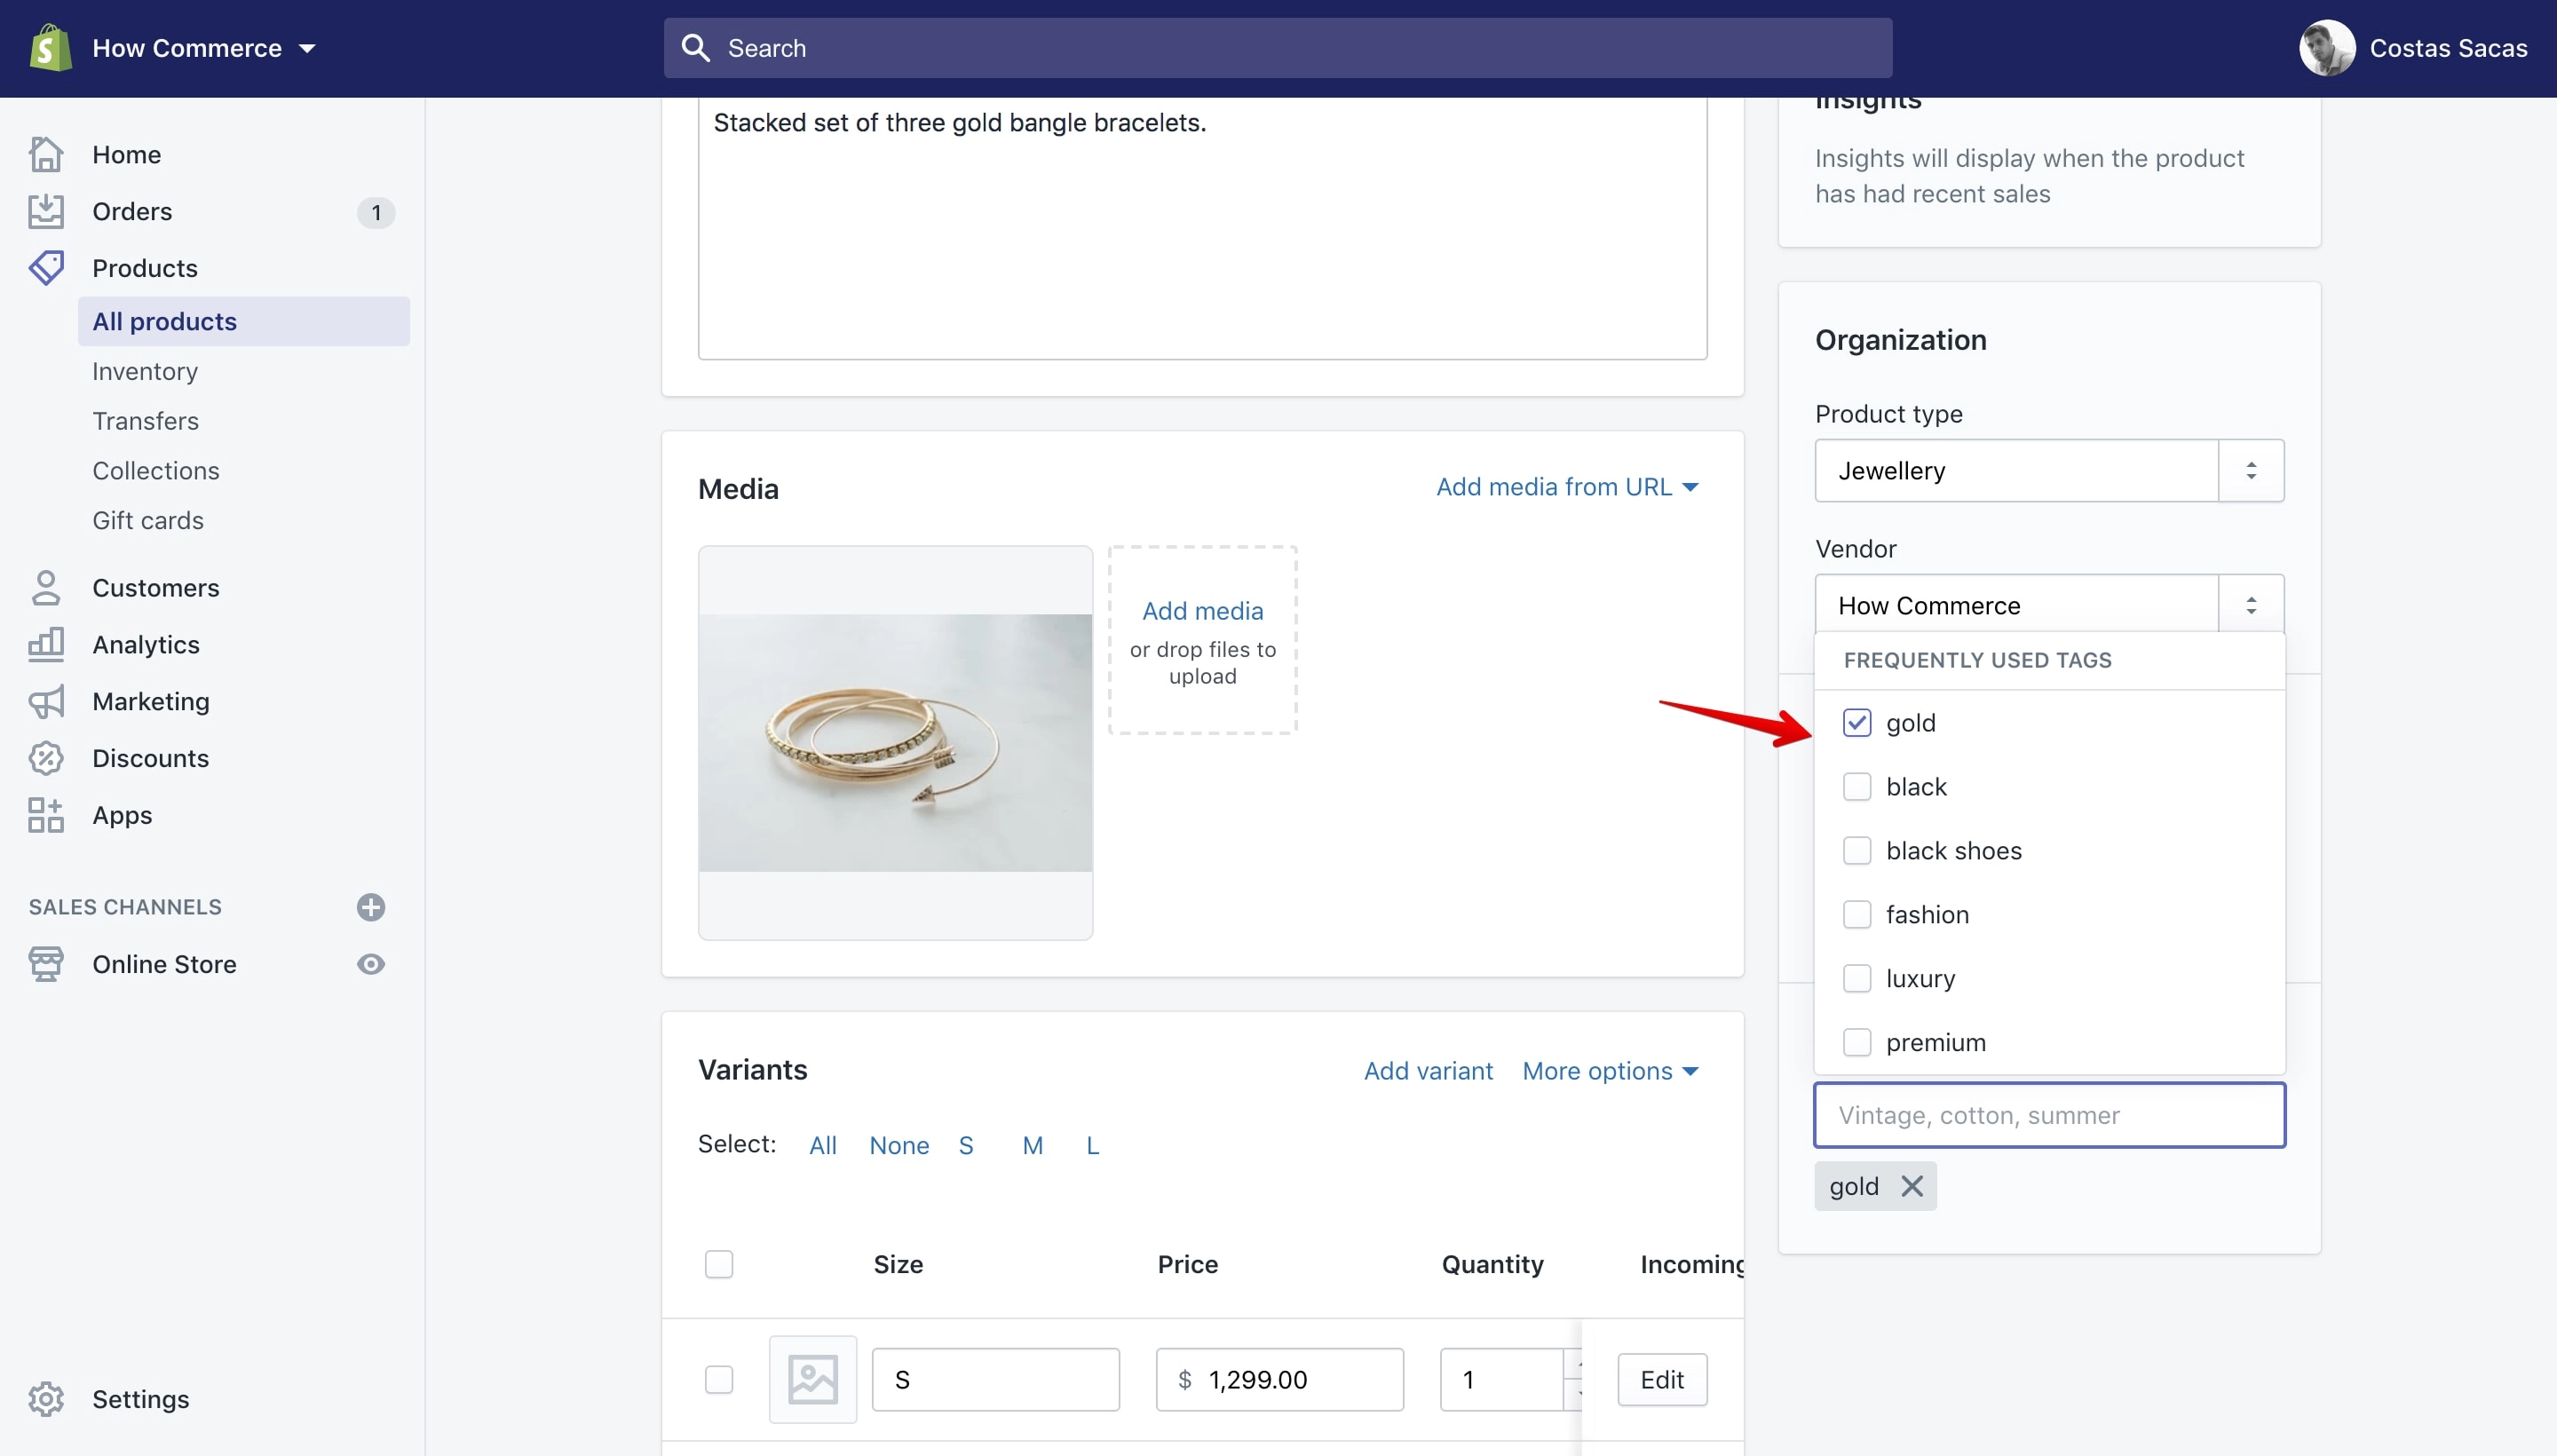
To add a new tag please type the name of the tag in the input box. I’ll add the tag “bracelet” as an example (marked with 1 in the image below):
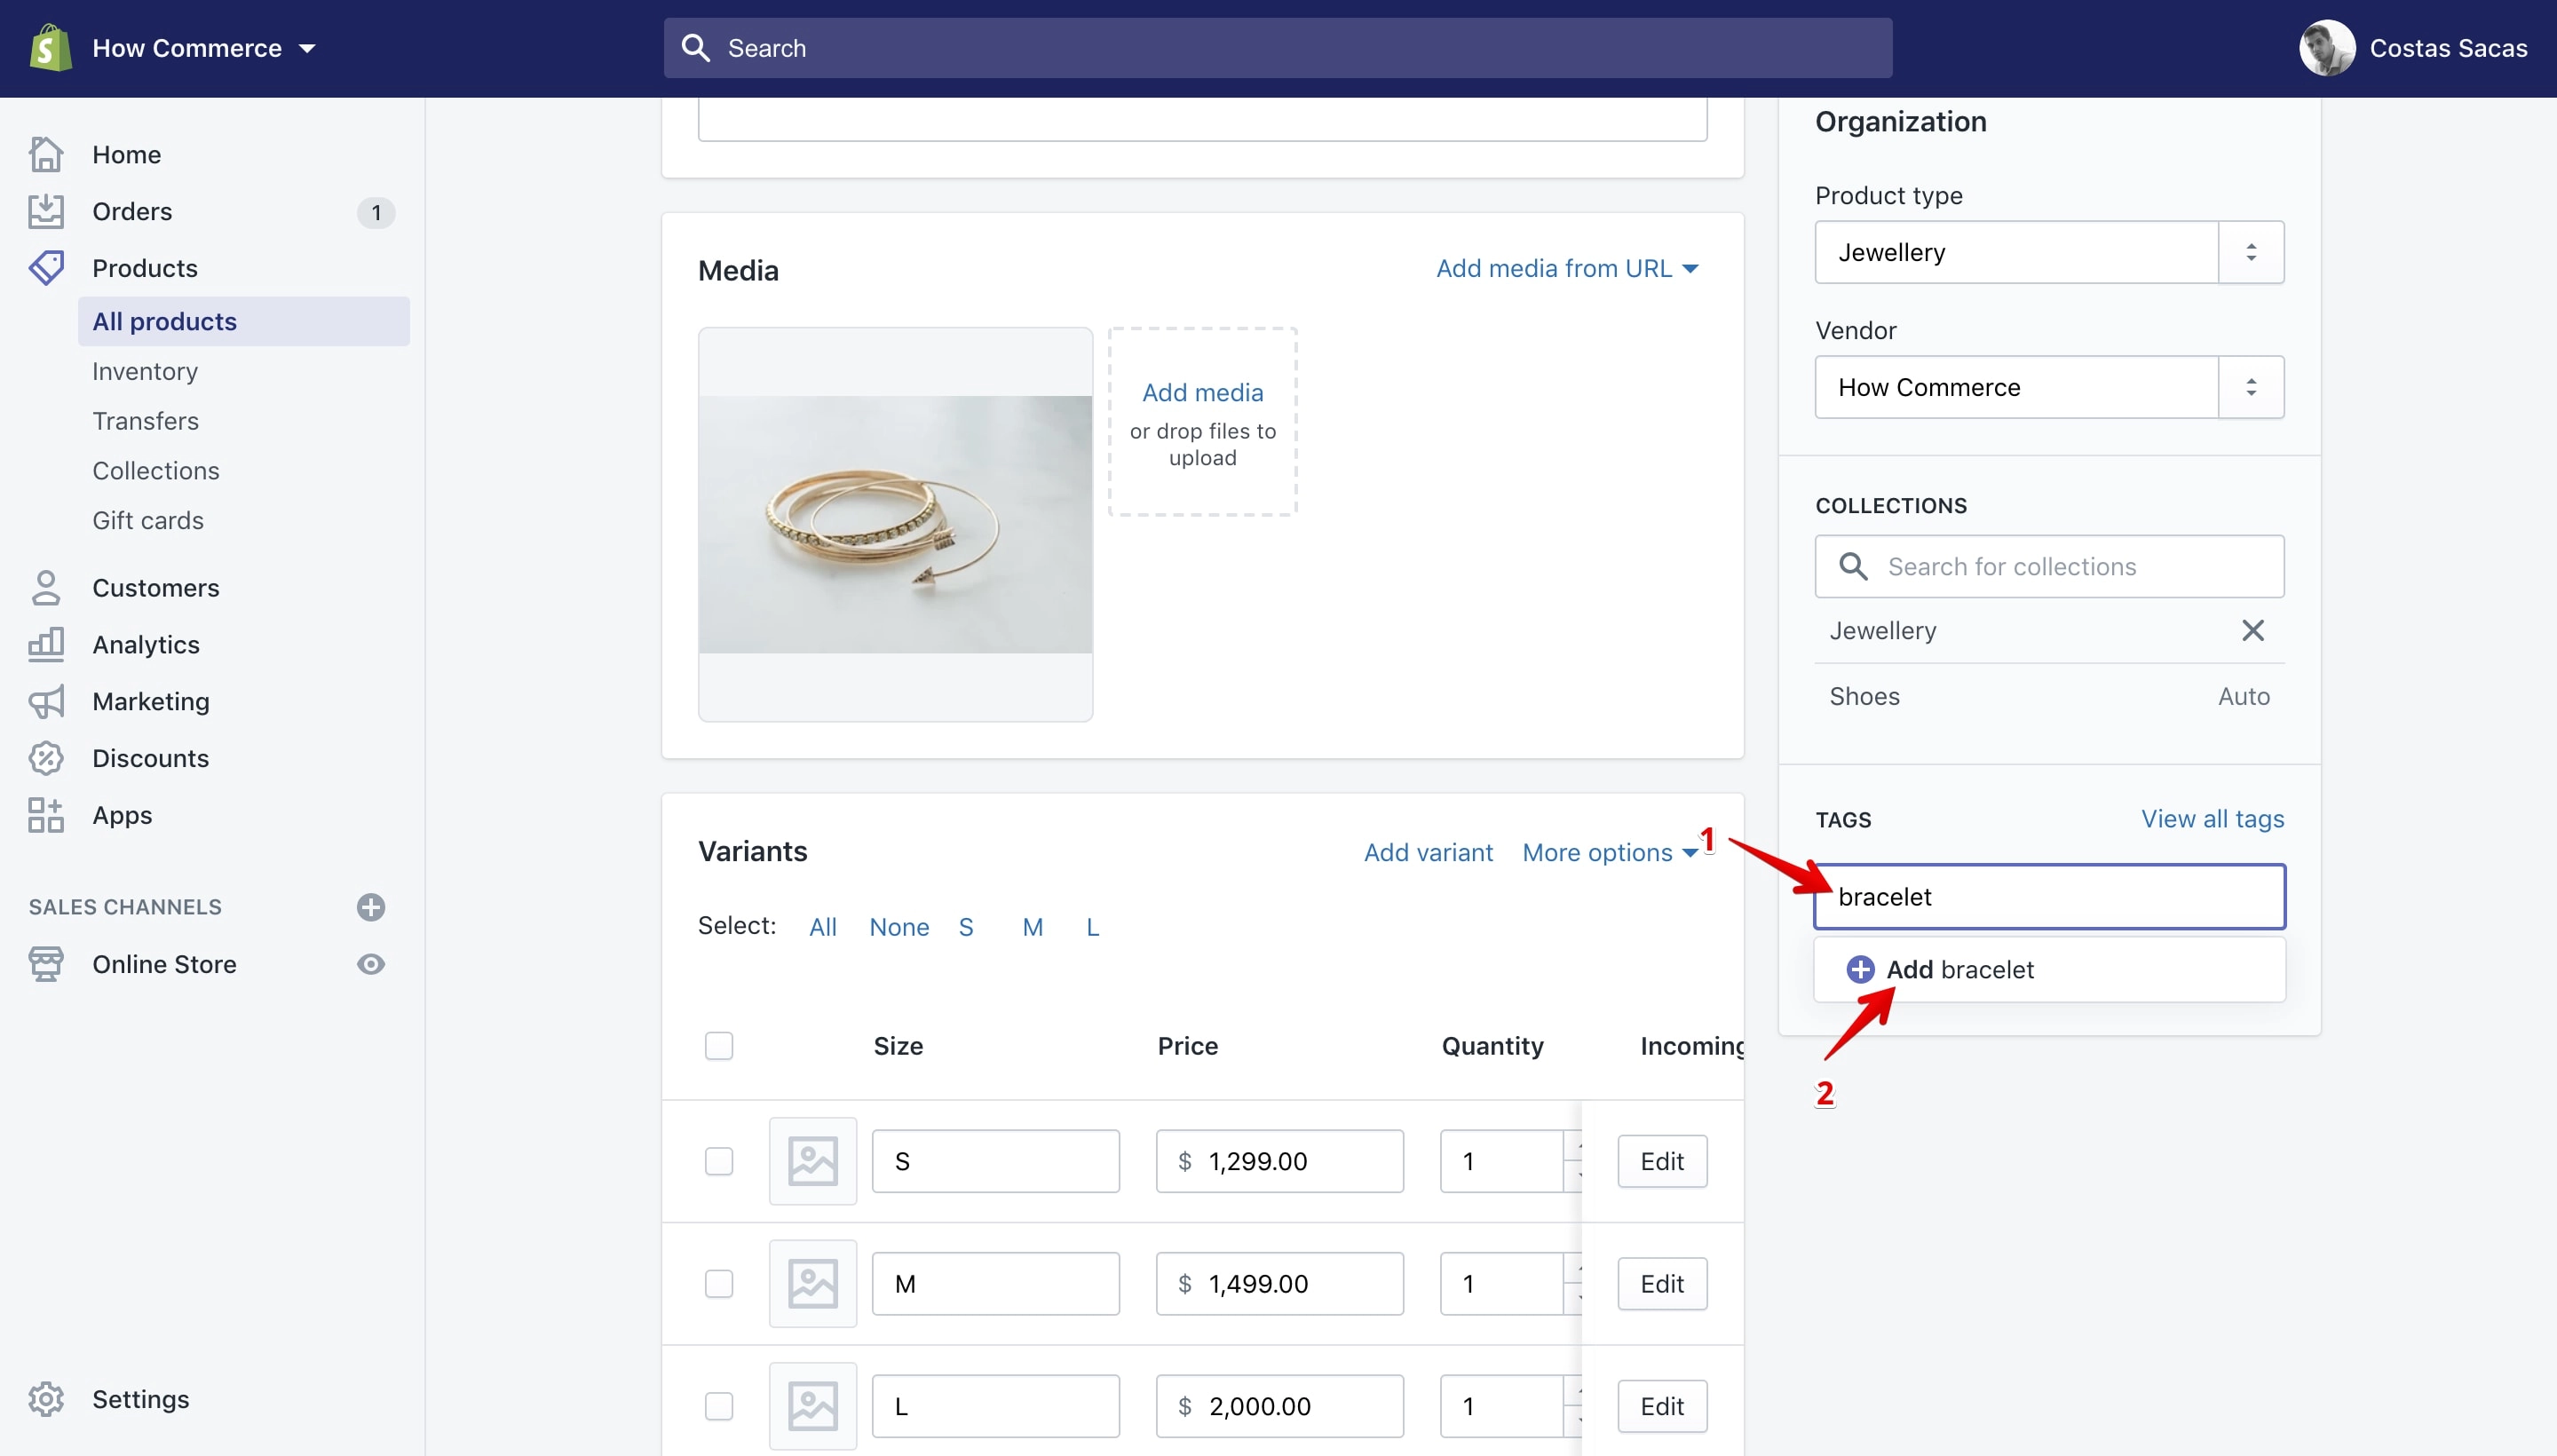
After you’ve typed the tag name in the input box you have 2 options to add it to the product: one is to click on the “Add bracelet” pop-up option and the other is to hit the ↵ (Enter) key.
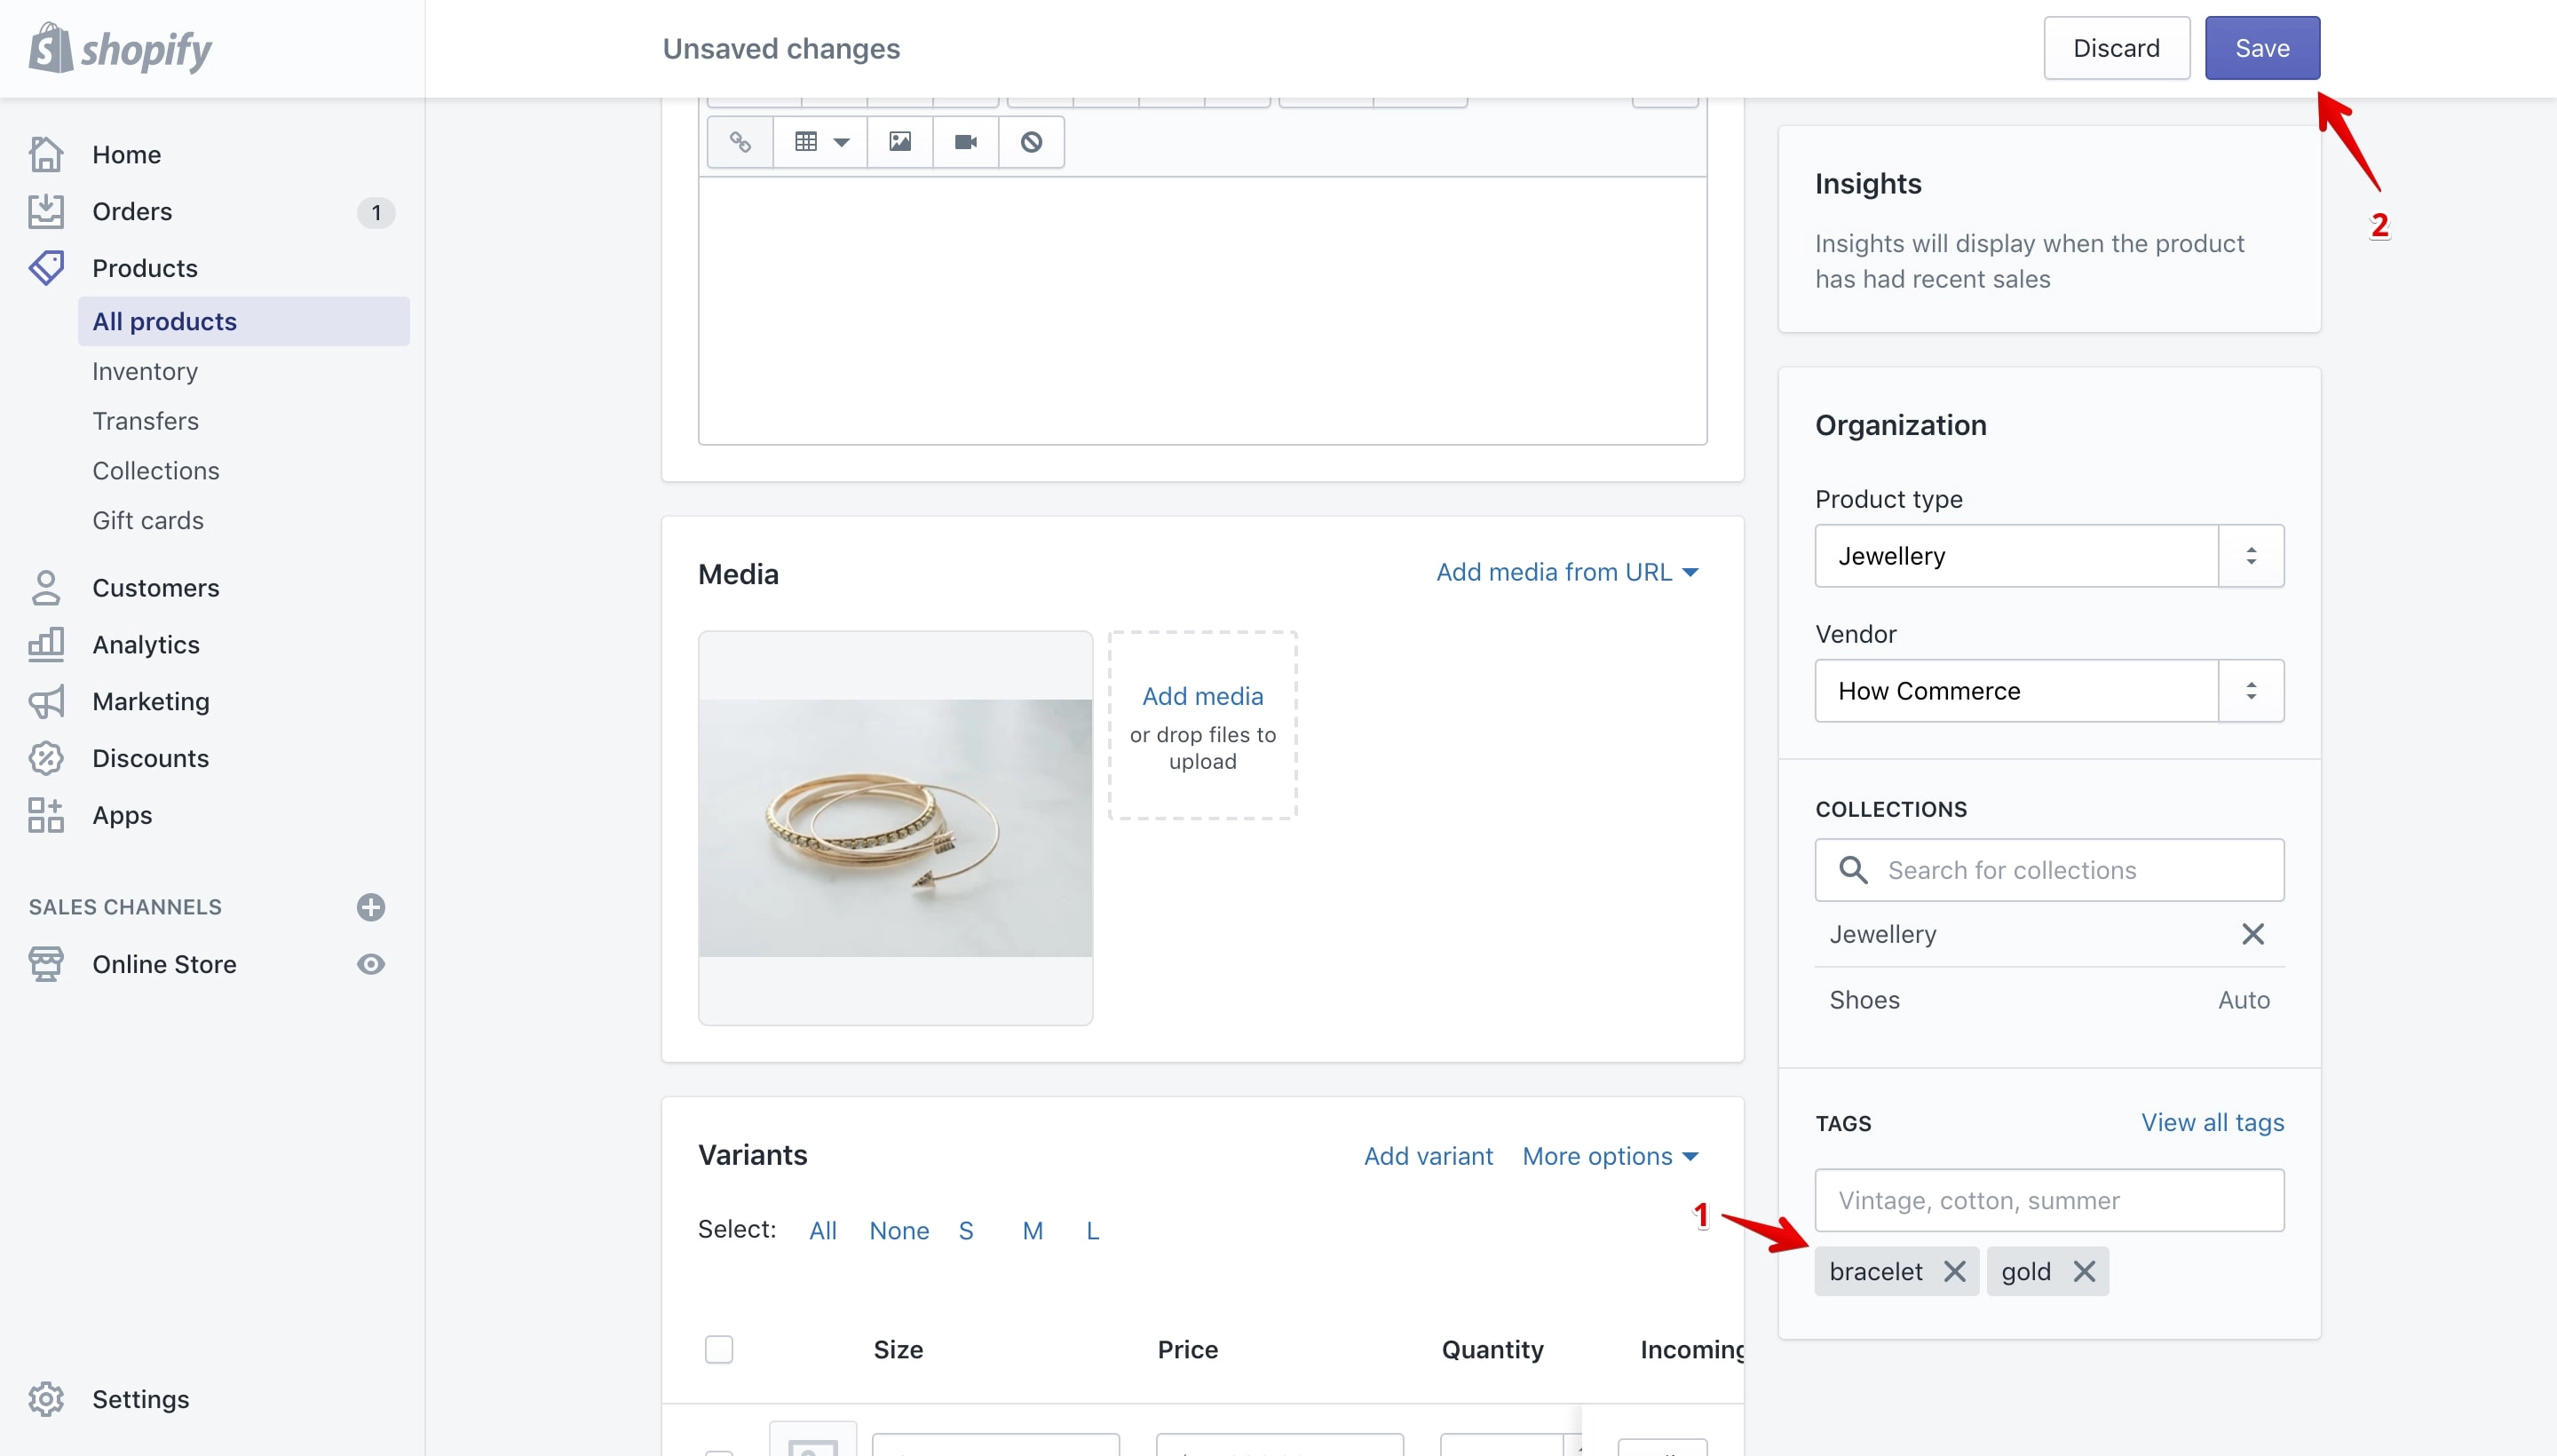
After you add the tag, it will display below the input box (marked with 1 in the image above). You need to save it so you can store it permanently and use it on all your store products. To do that click the “Save” button (marked with 2 in the image above).
Adding a tag through the “View all tags” link
Through this link you can add only existing tags to your products and you can’t create new ones.
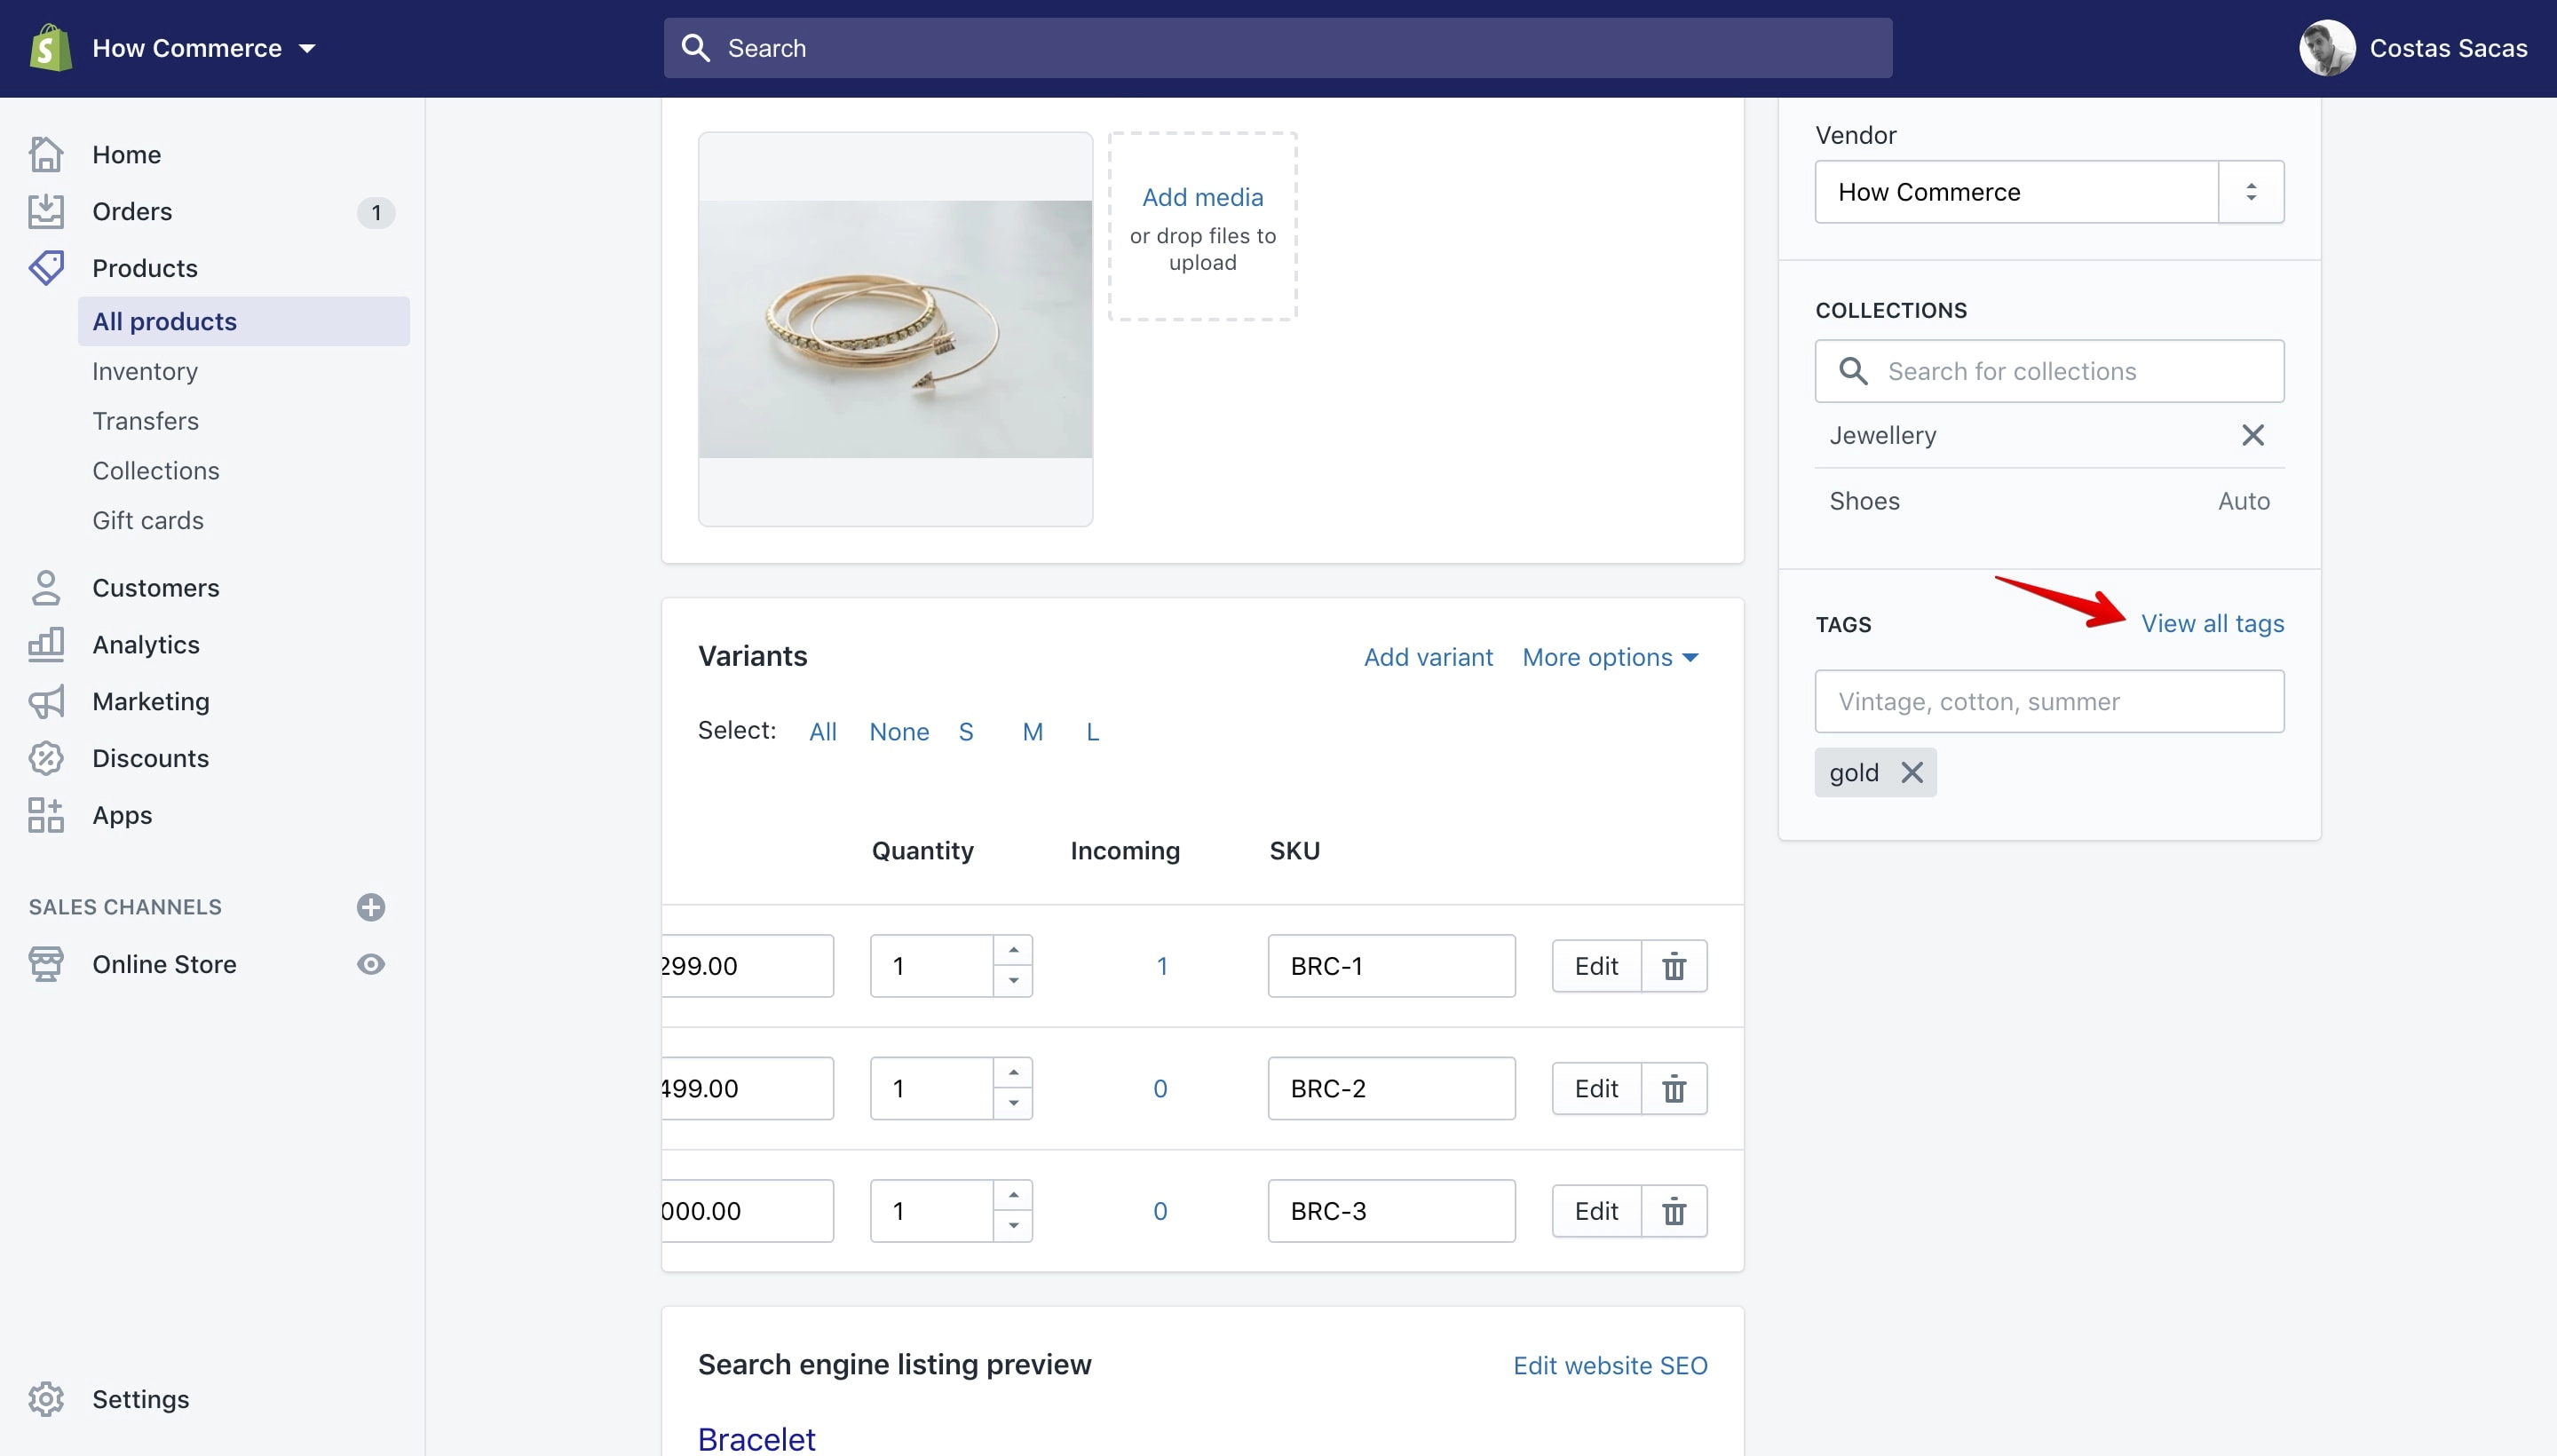
Clicking on the “View all tags” link will open a pop-up that will allow you to select and assign new tags to the product:
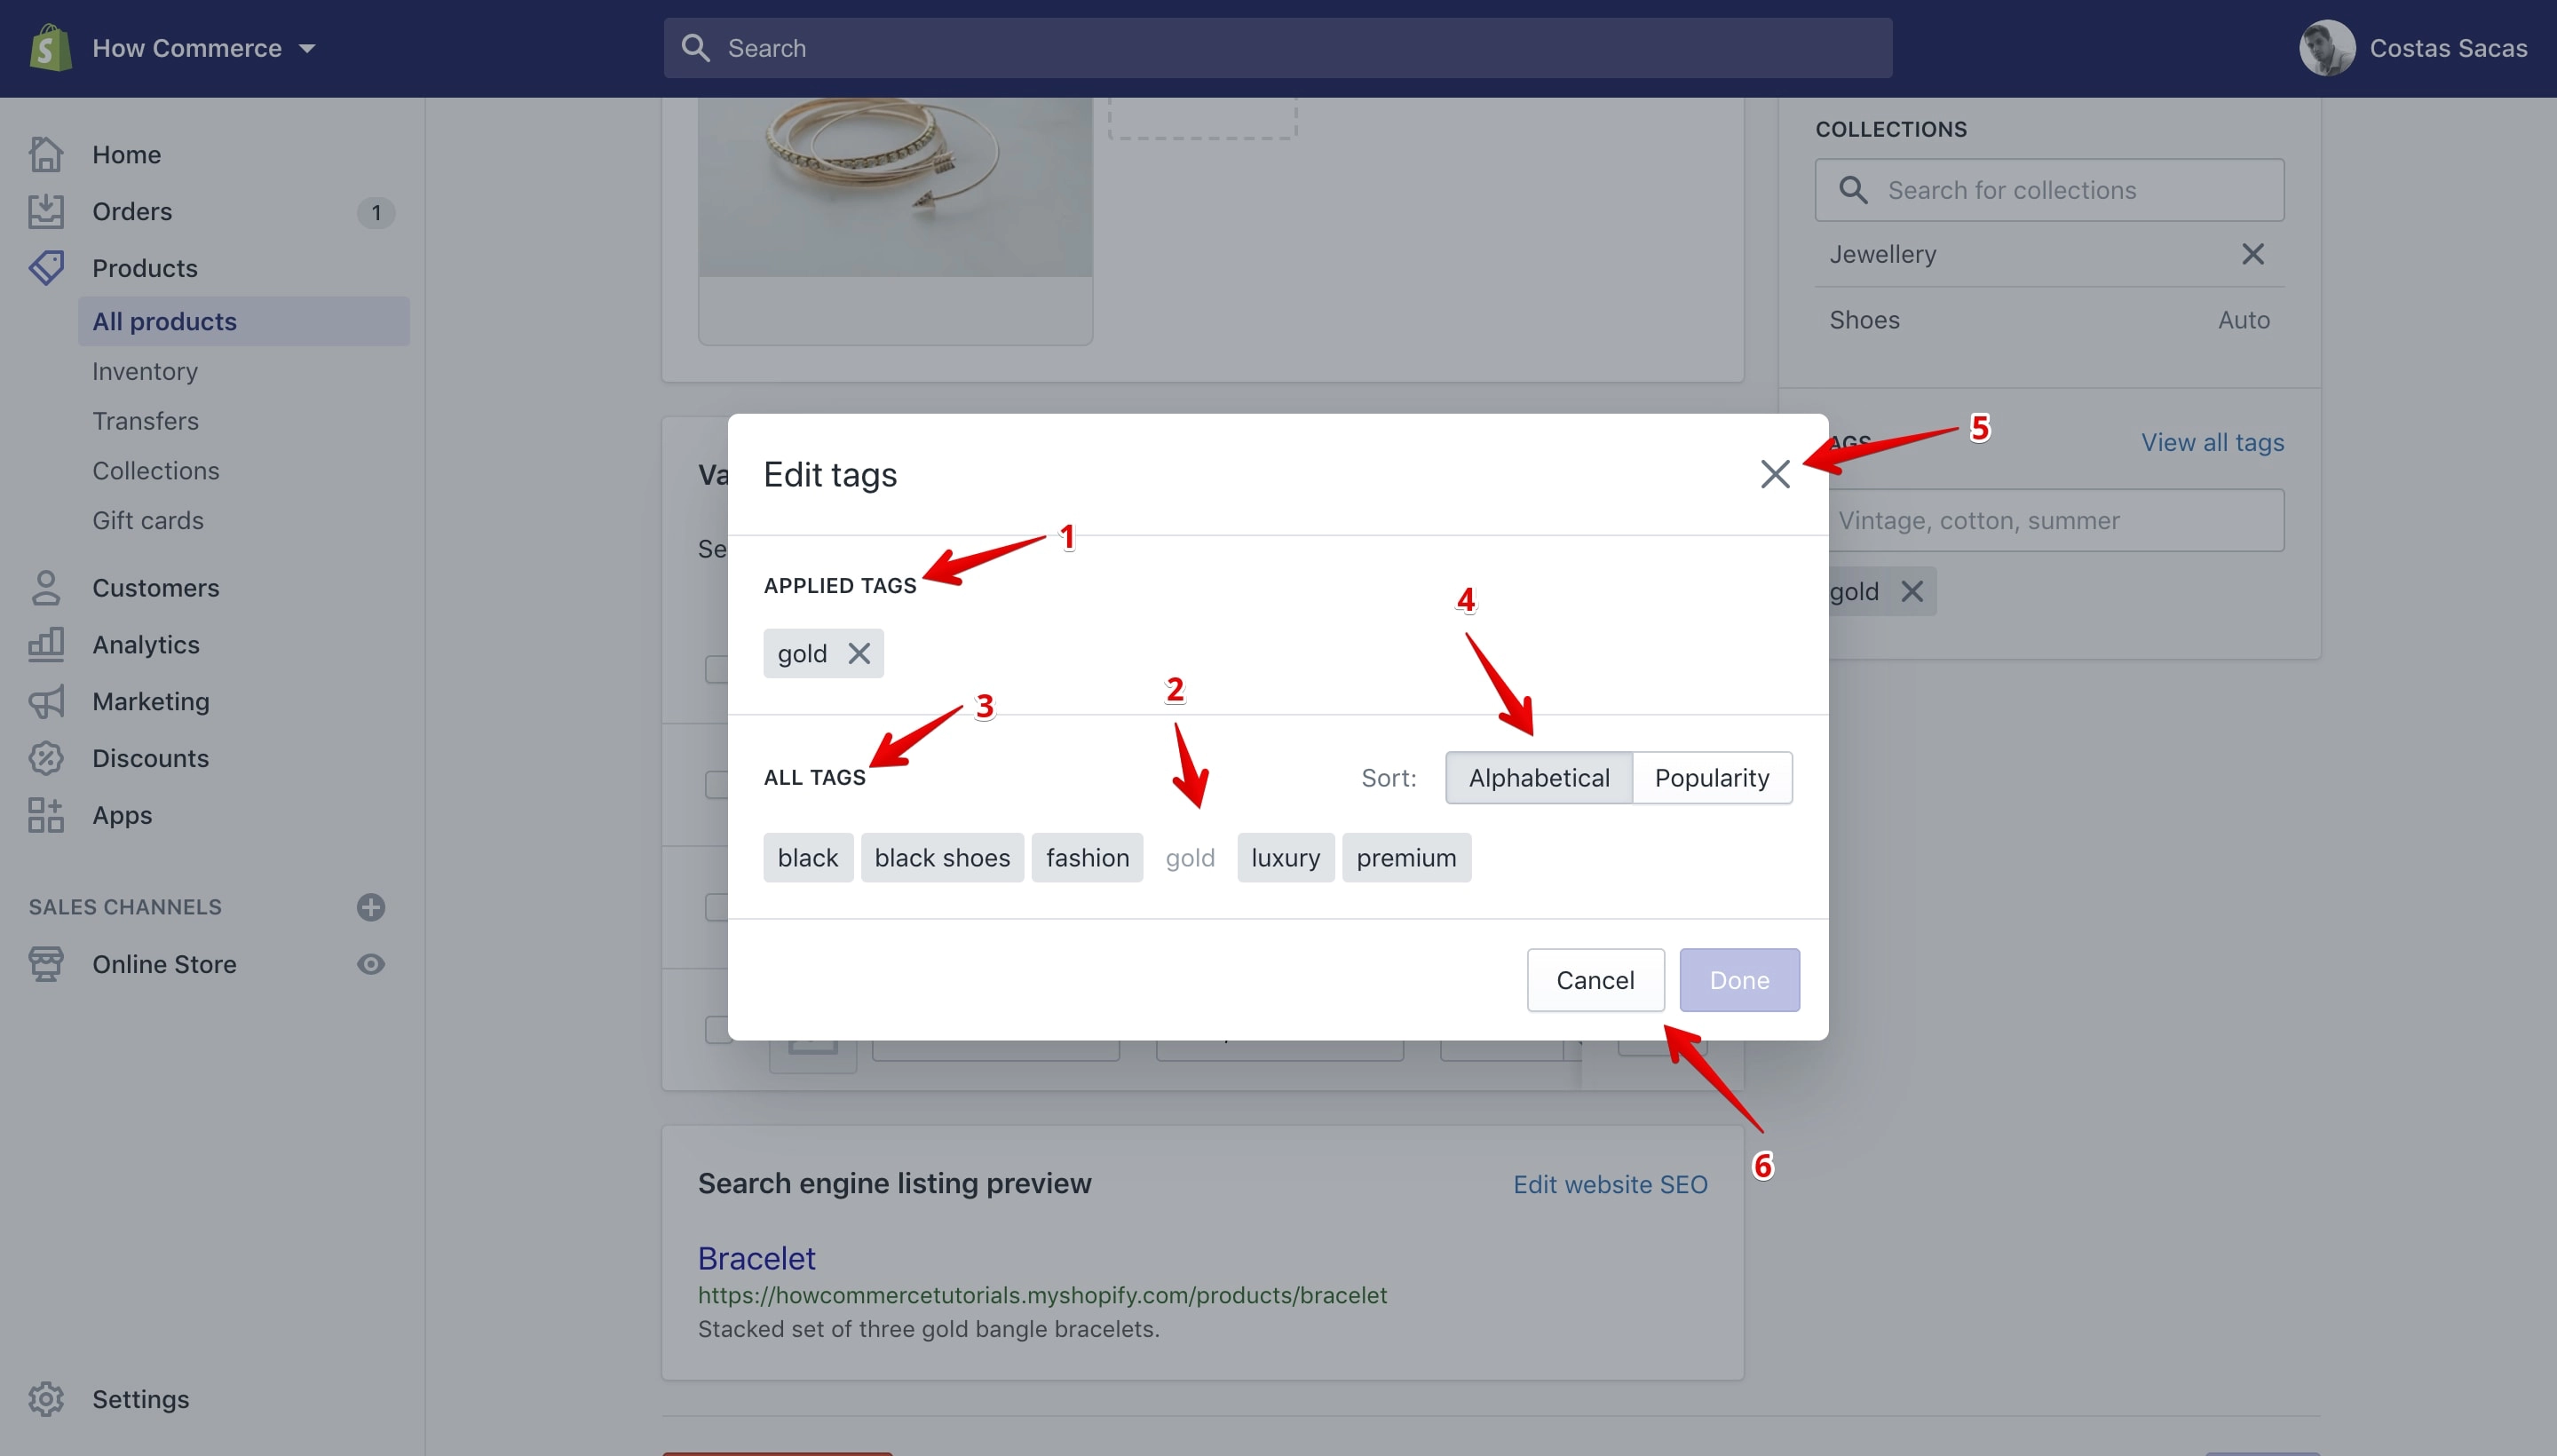
On the pop-up you can see all the tags assigned to this product in the “Applied Tags” section (marked with 1 in the image above).
Below that section you can see the “All Tags” section (marked with 3 in the image above). This section lists all the tags available in the store products section.
The tags that are greyed-out (marked with 2 in the image above) are already assigned to the product. You can assign more from this section by clicking on the desired tag.
If you have a lot of tags you can sort them “Alphabetically” or by “Popularity” from the sorting section (marked with 4 in the image above).
You can close the pop-up by clicking the “X” icon from the top right corner (marked with 5 in the image above) or by clicking the “Cancel” button (marked with 6 in the image above).
Note:
Clicking the “X” icon or the “Cancel” button will cancel your newly assigned tags and not save your changes.
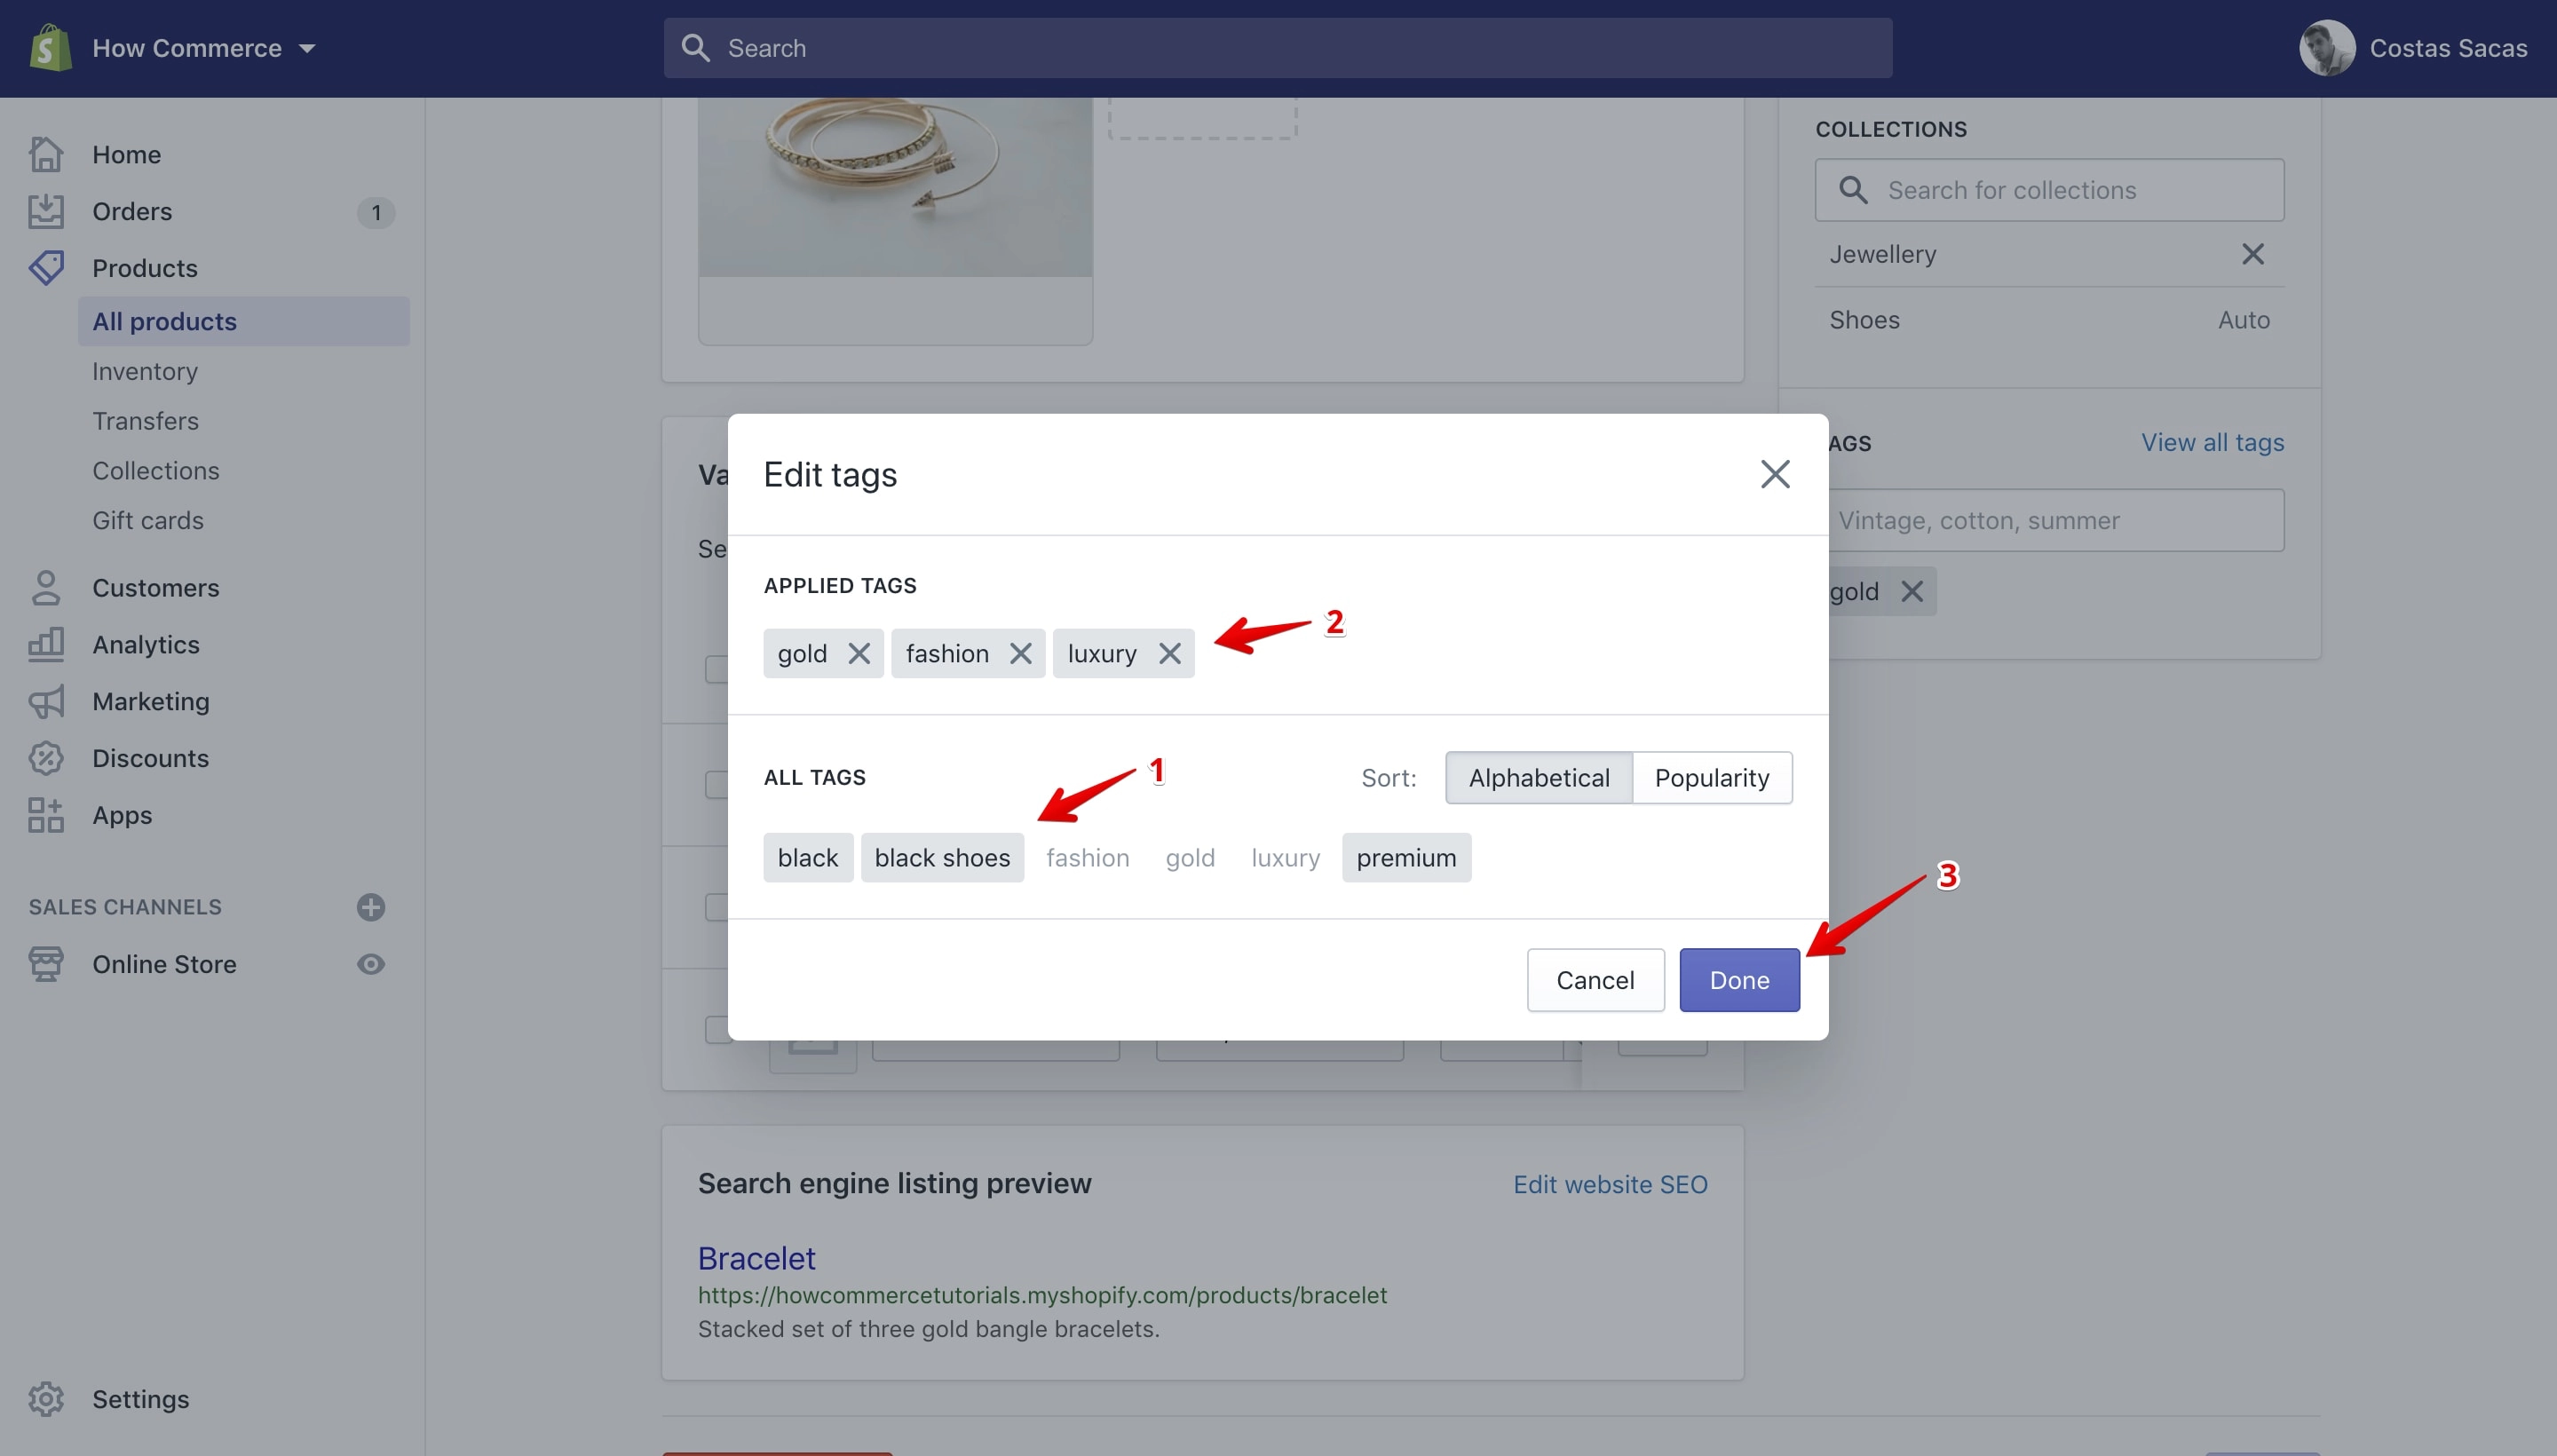
Assign new tags to the product by clicking on tags located on the “All Tags” section (marked with 1 in the image below).
Tags added will list in the “Applied Tags” section (marked with 2 in the image below). Once completed click the “Done” button (marked with 3 in the image below):
Clicking “Done” will list the newly added tags on the “Tags” section (marked with 1 in the image below) located on the product details page:
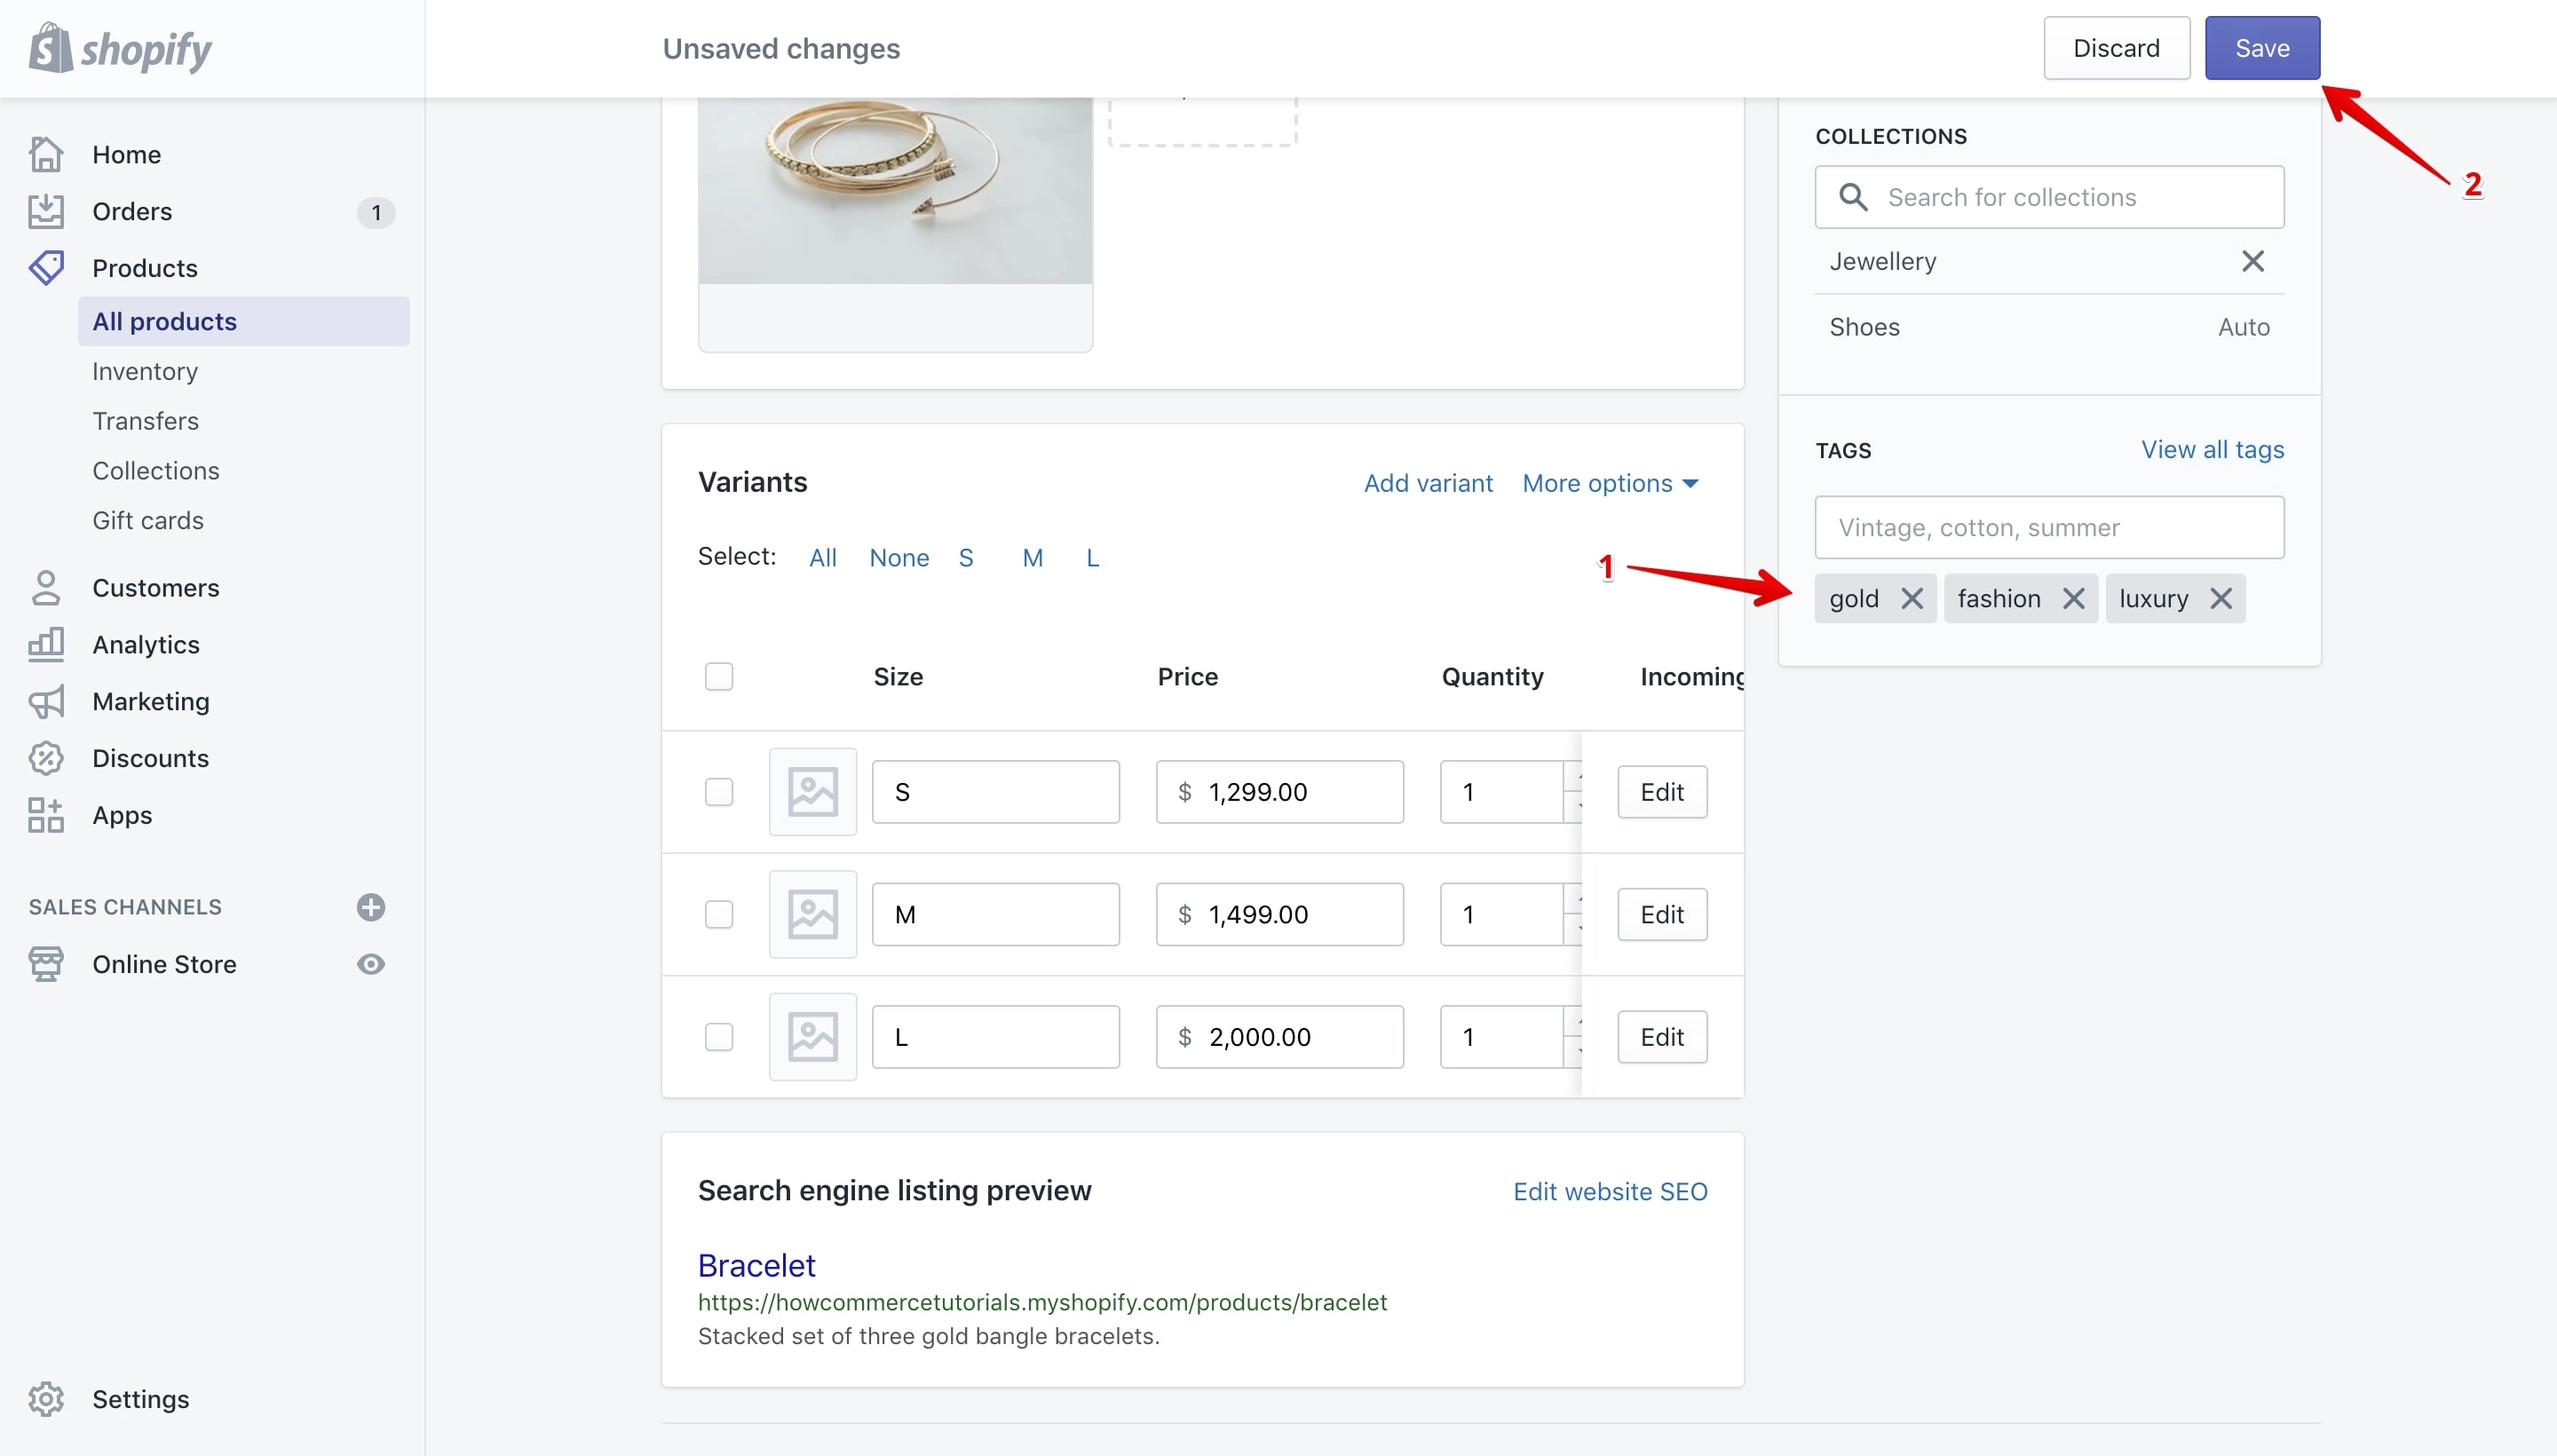
Note that the tags are not yet saved to the product. If you leave the page at this stage the tags will not be assigned to the product.
To save them click the “Save” button (marked with 2 in the image above).
Remove a tag
You can remove a tag from a product in 3 ways via the “Tags section” on the product details page, removing them from the “Frequently Used Tags” drop-down or from the “Applied Tags” section located on the “Edit tags” pop-up.
Remove a tag from the “Tags” section
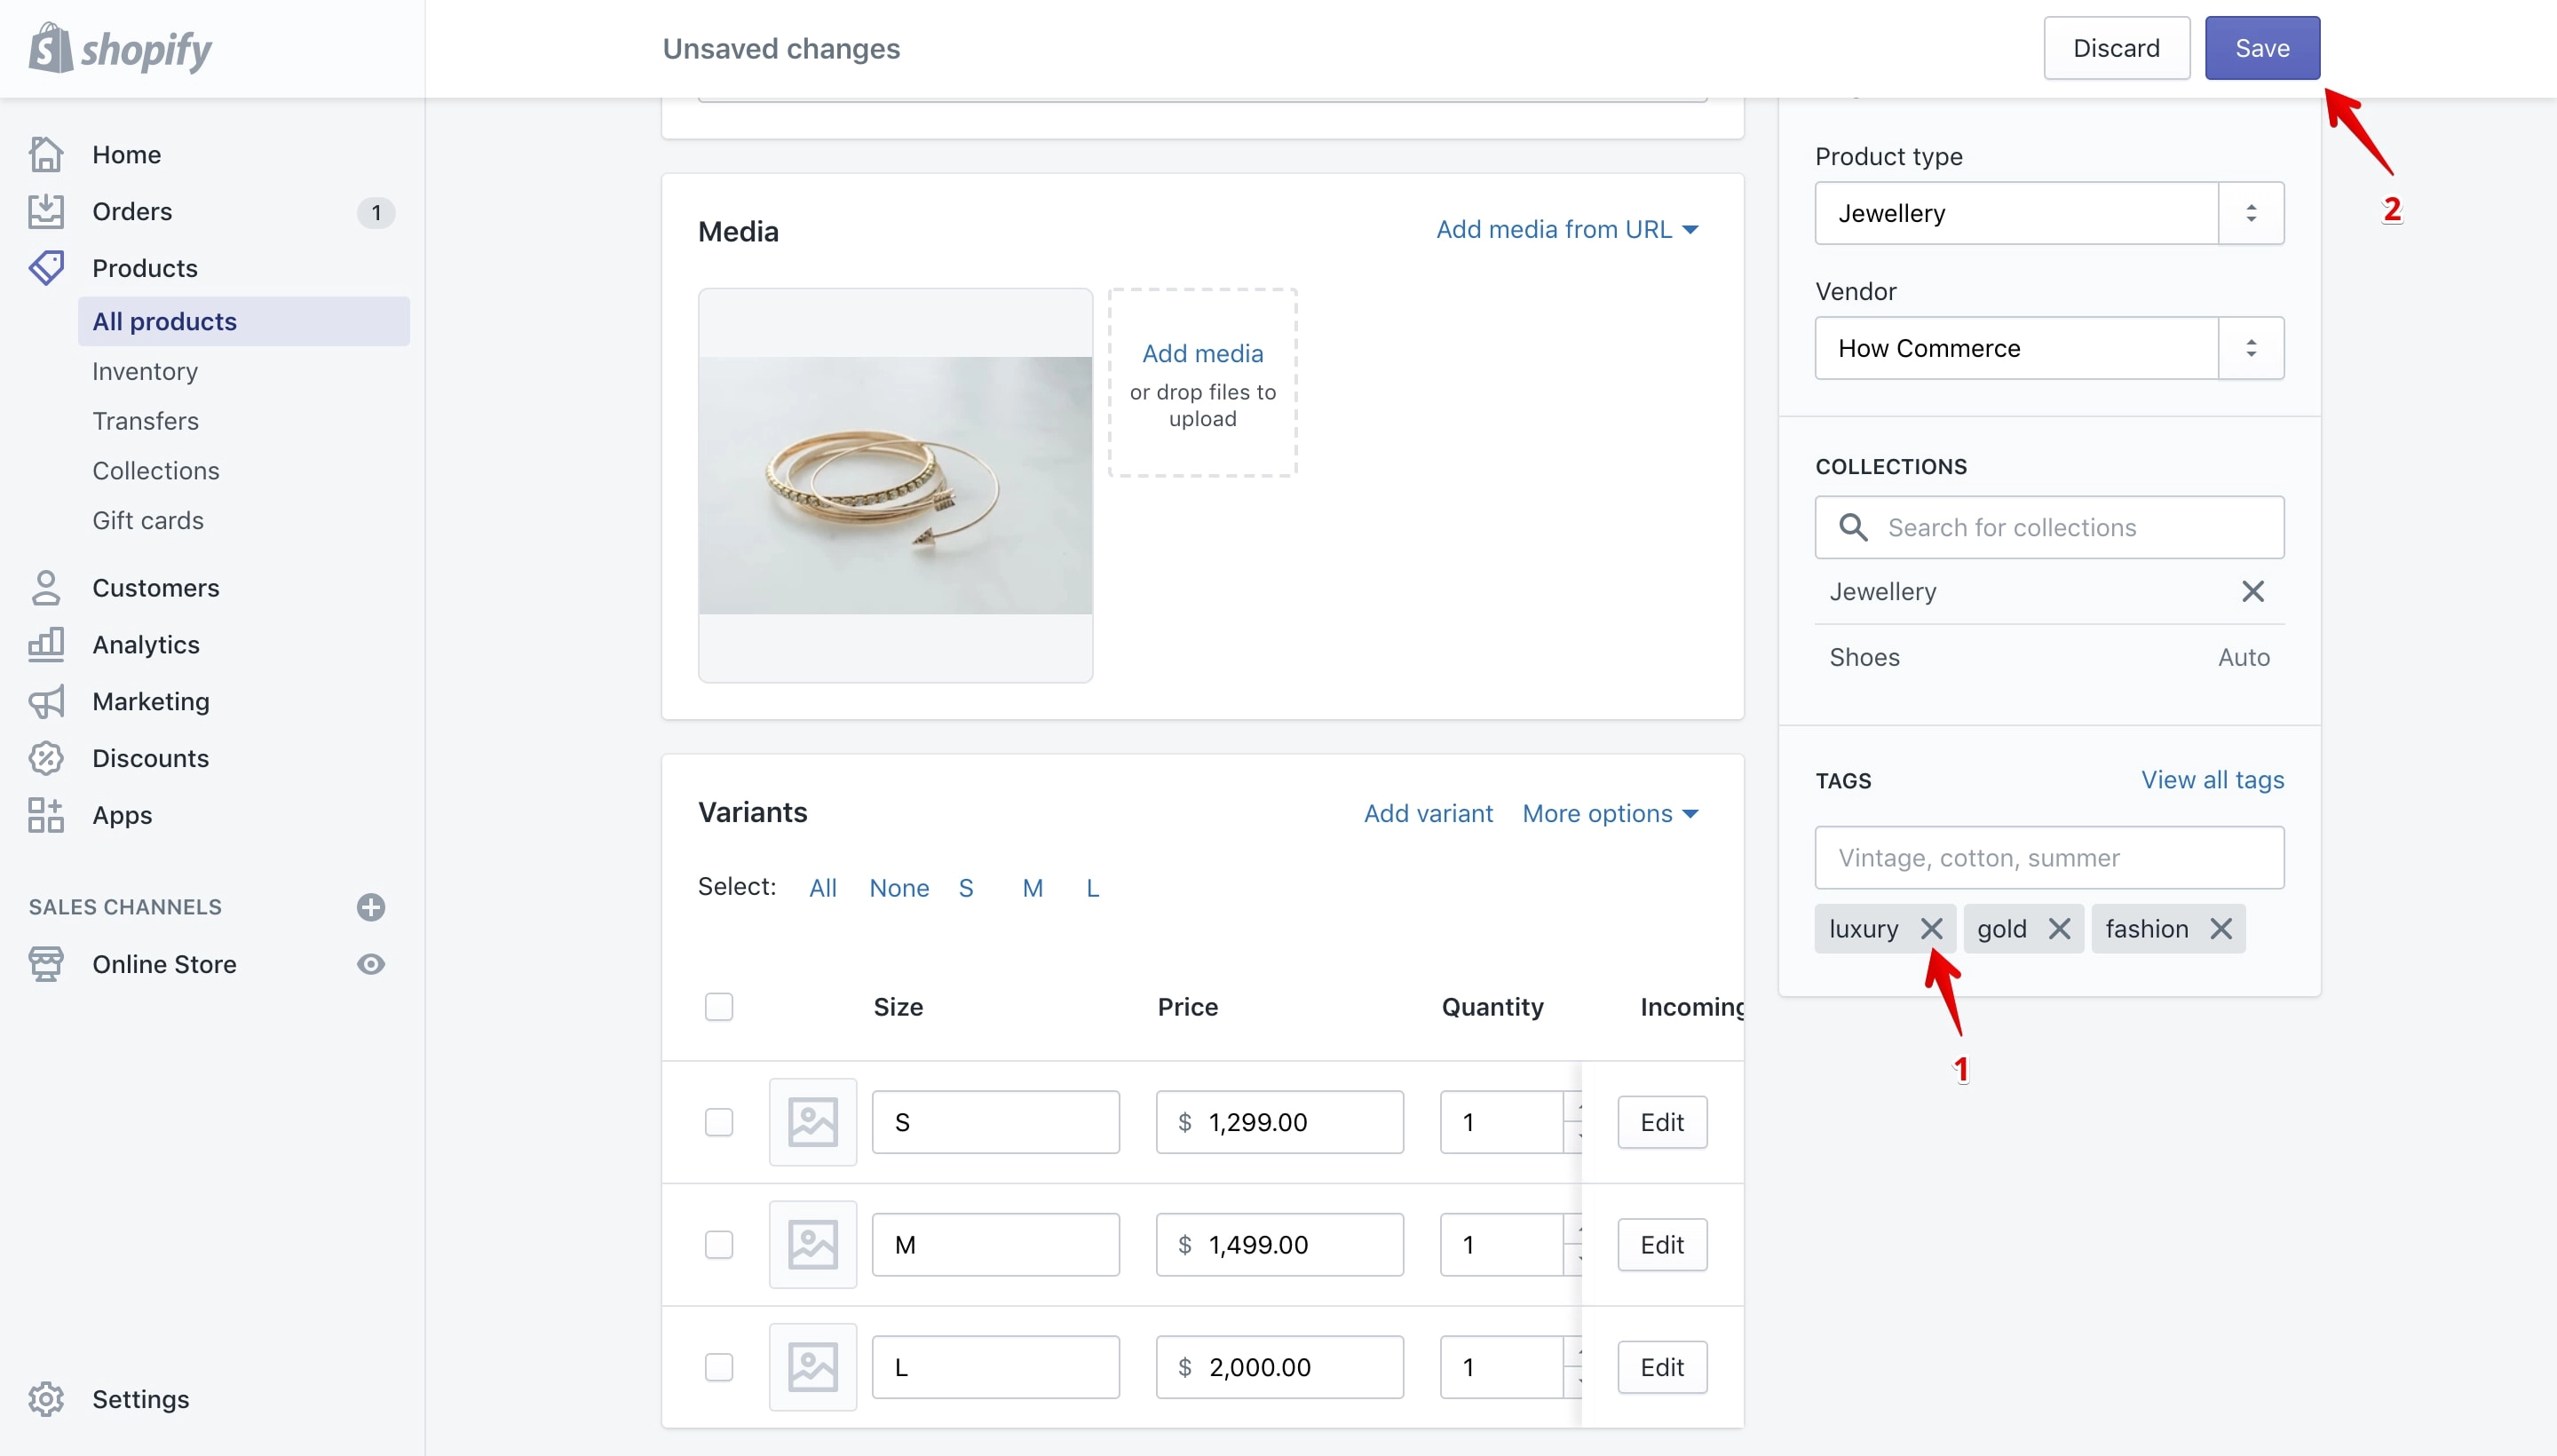
In my opinion this is the easiest and fastest way to do it. All you have to do is click the “X” (marked with 1 in the image below) from the tag and save your changes by clicking the “Save” button (marked with 2 in the image below):
Remove a tag from the “Frequently Used Tags” drop-down
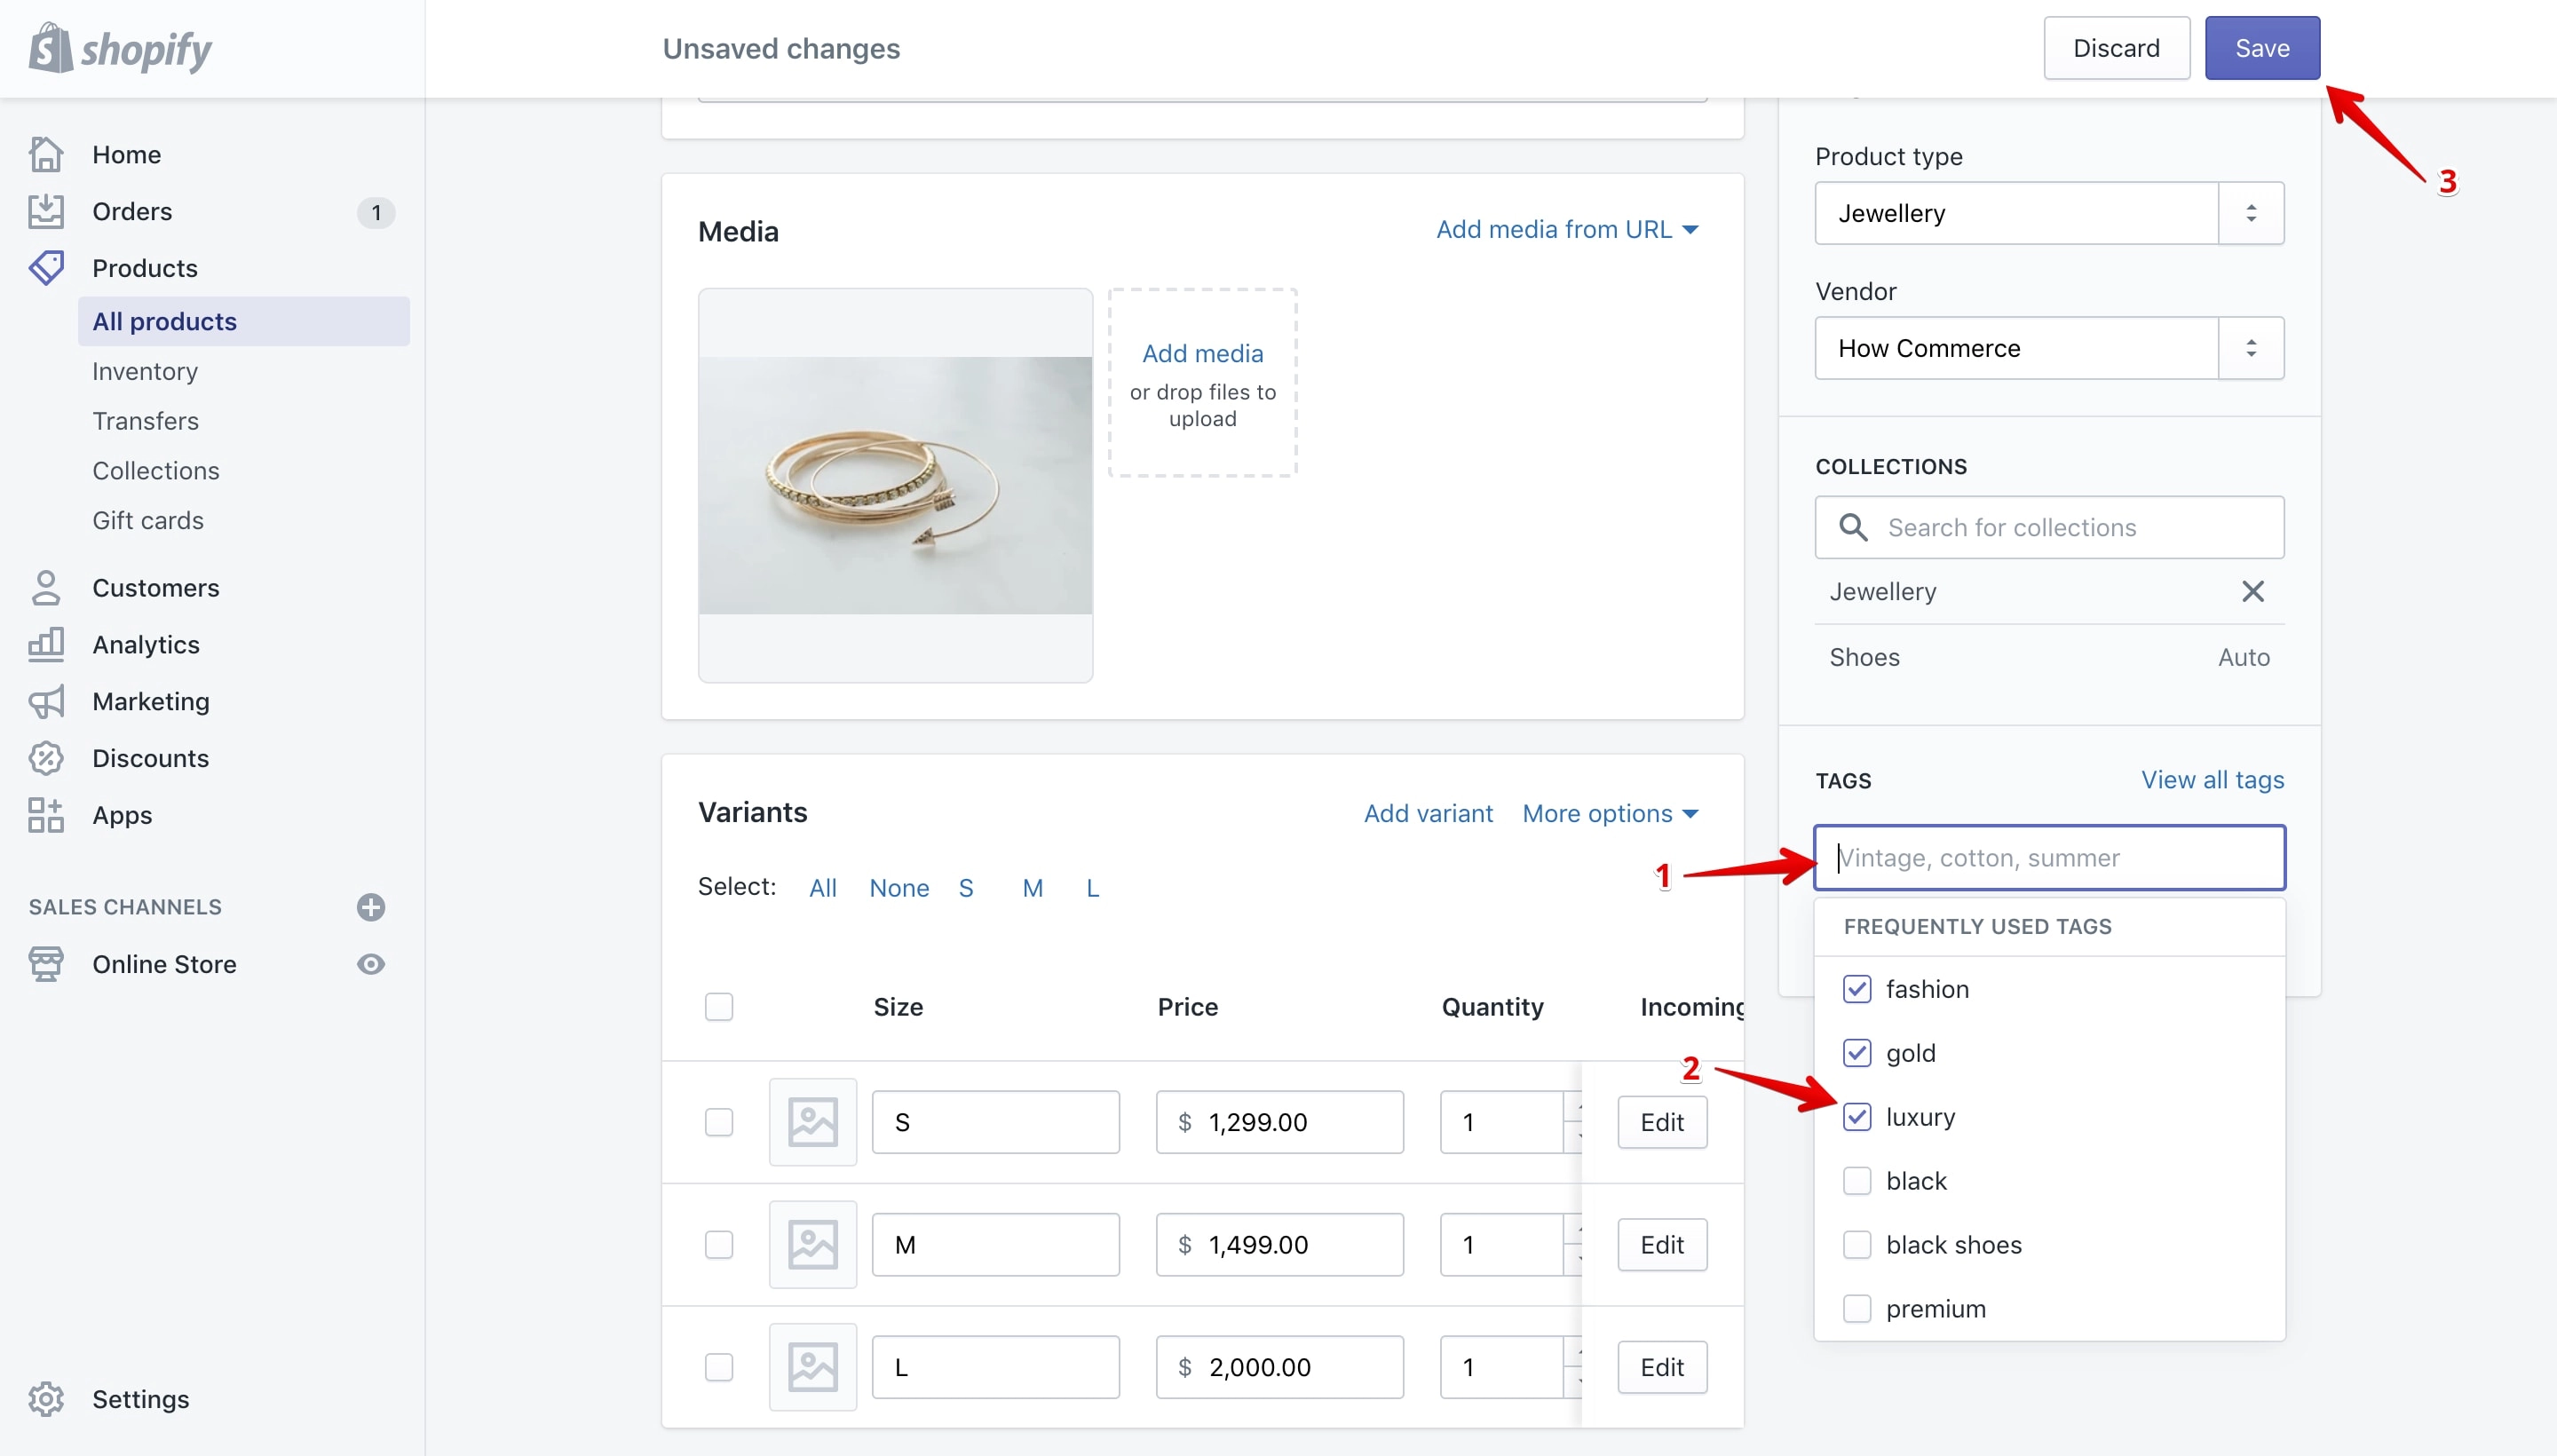
For this method you need to click inside the input box (marked with 1 in the image below) and uncheck the tags you want to remove from the drop-down list (marked with 2 in the image below).
Once completed click on the “Save” button (marked with 3 in the image below).
Remove a tag from the “Edit tags” pop-up
On the product details page click on the “View all tags” link:
This will open the “Edit Tags” pop-up that will allow you to remove tags from the product:
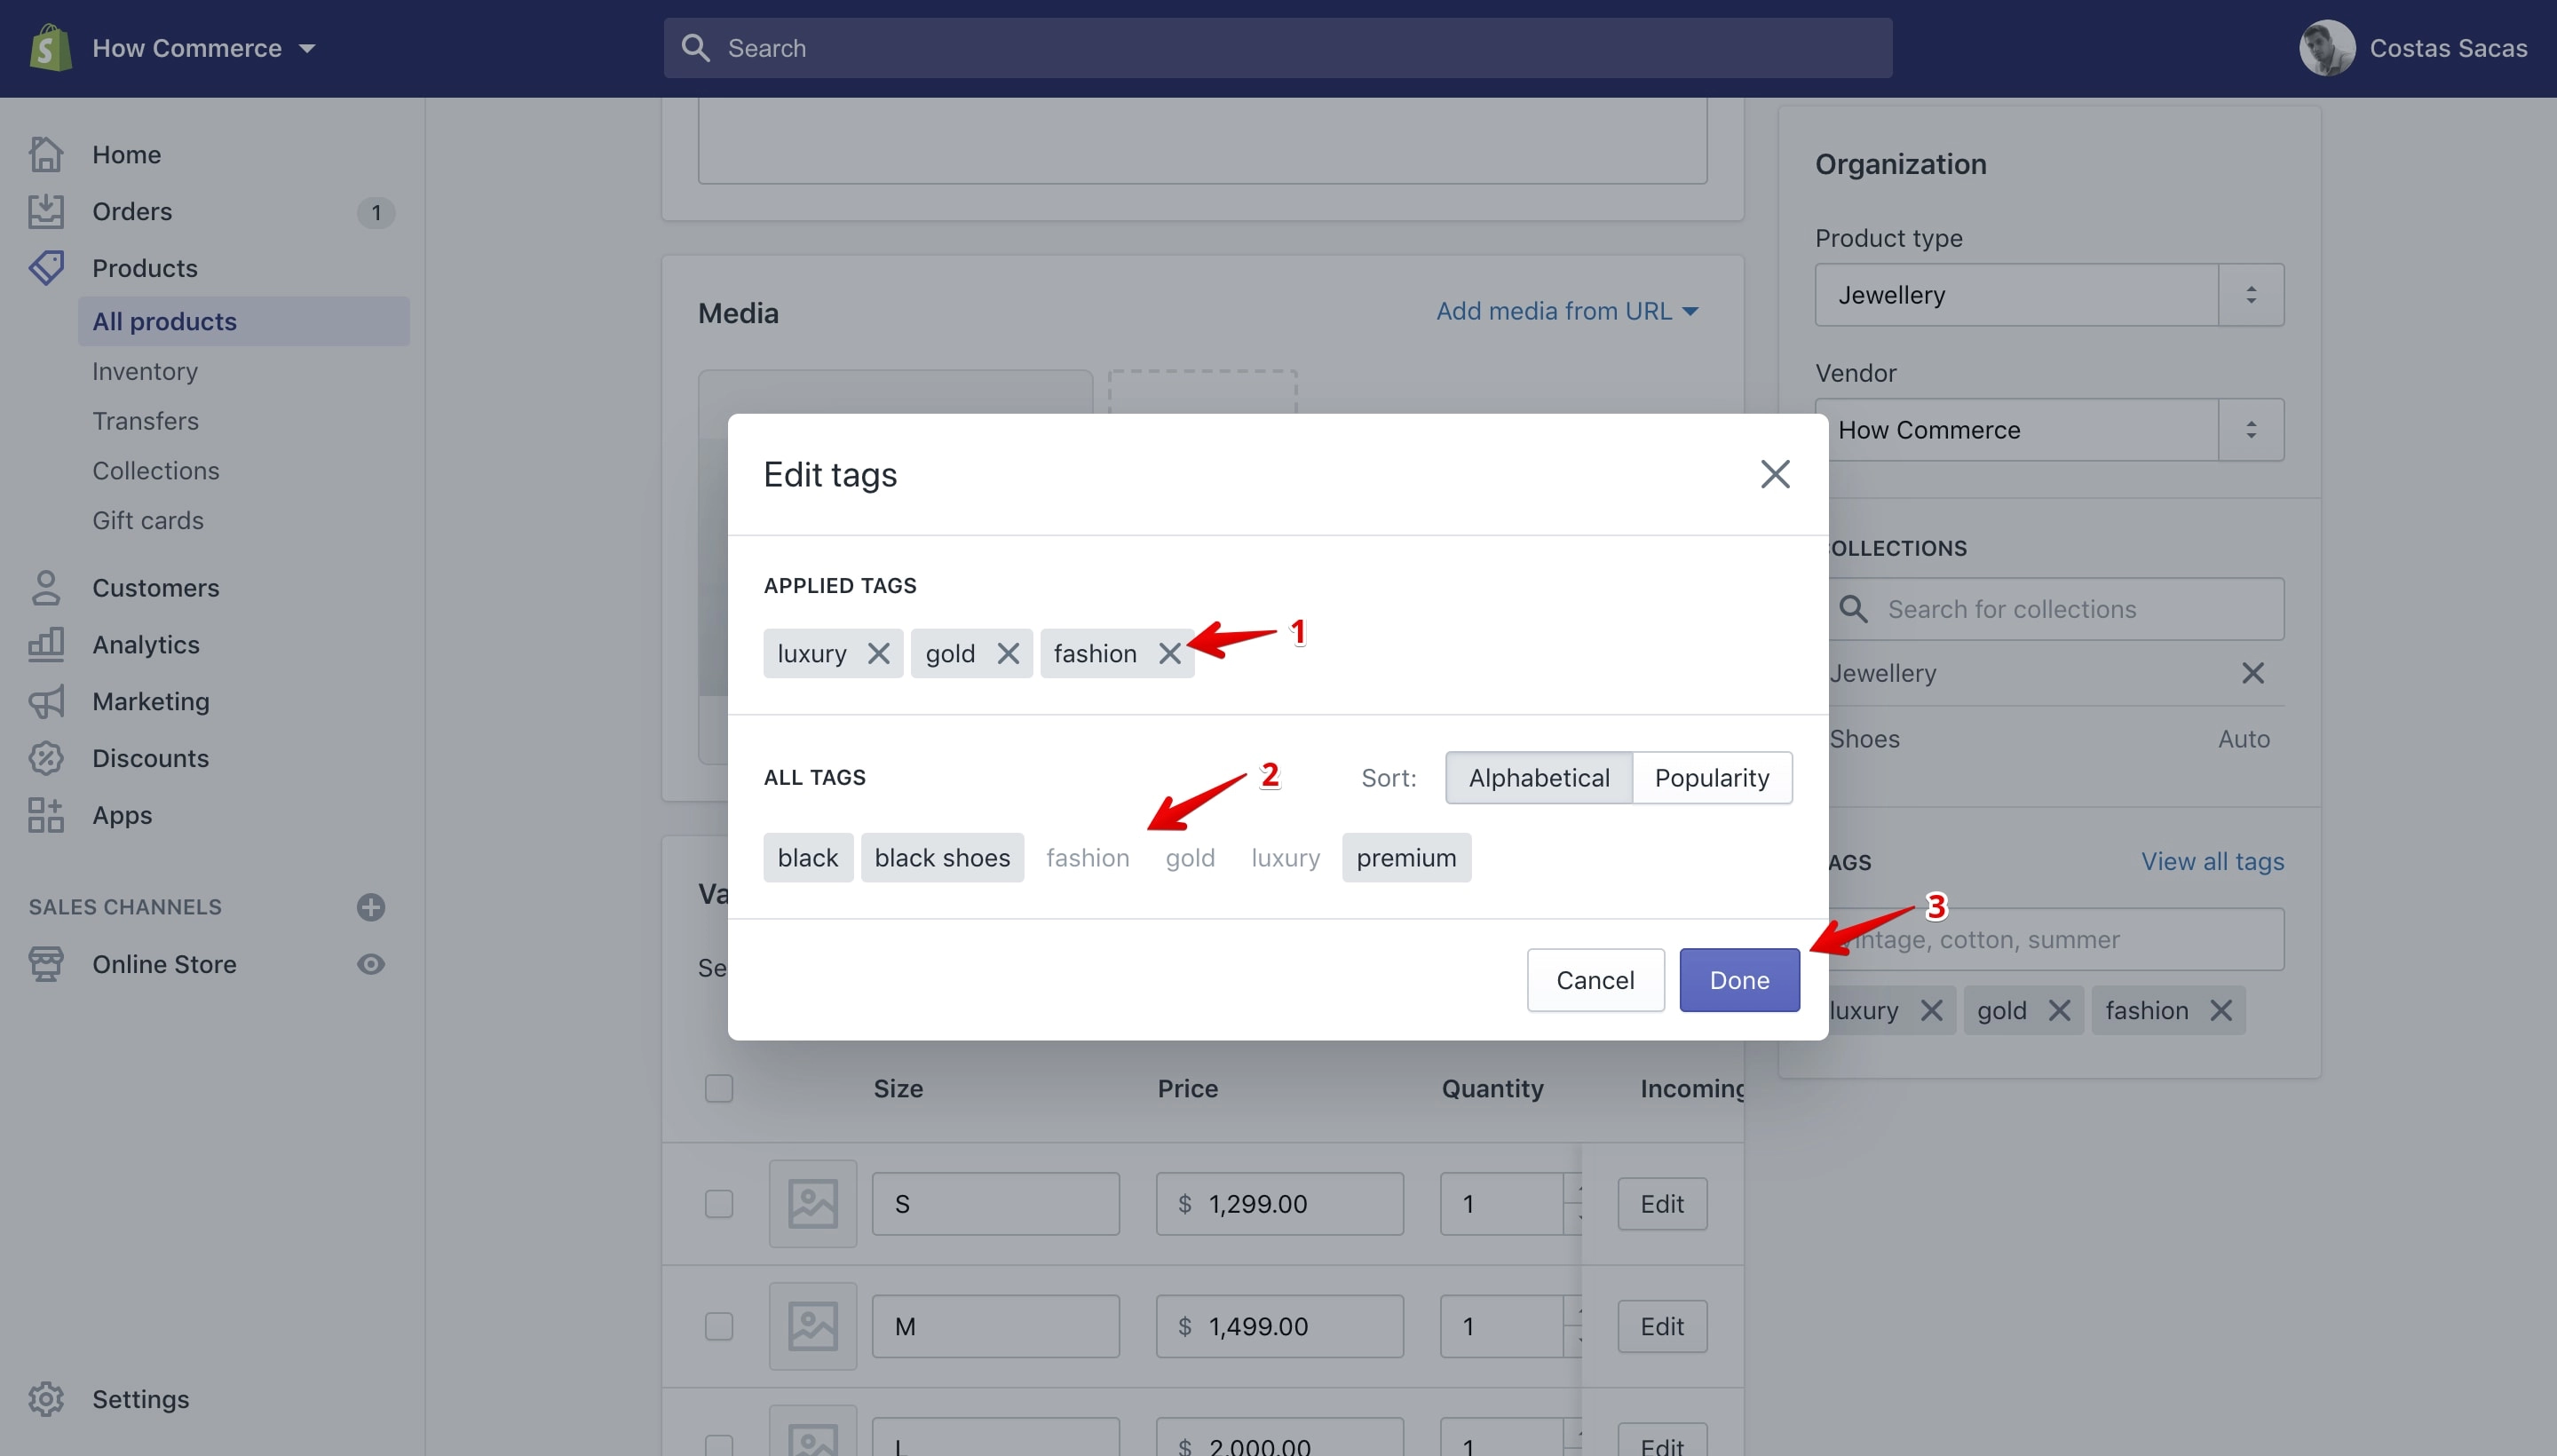
Click on the tag’s “X” icon to remove the tag (marked with 1 in the image above). Once you do that the tag will be removed from the “Applied Tags” section and added to the “All Tags” section of the pop-up (marked with 2 in the image above).
After you remove all the tags that you want from the product click the “Done” button (marked with 3 in the image above).
In my example I’ve removed the “fashion” tag from the product and once I’ve clicked the “Done” button the tags is no longer listed on the “Tags” section (marked with 1 in the image below) on the product details page:
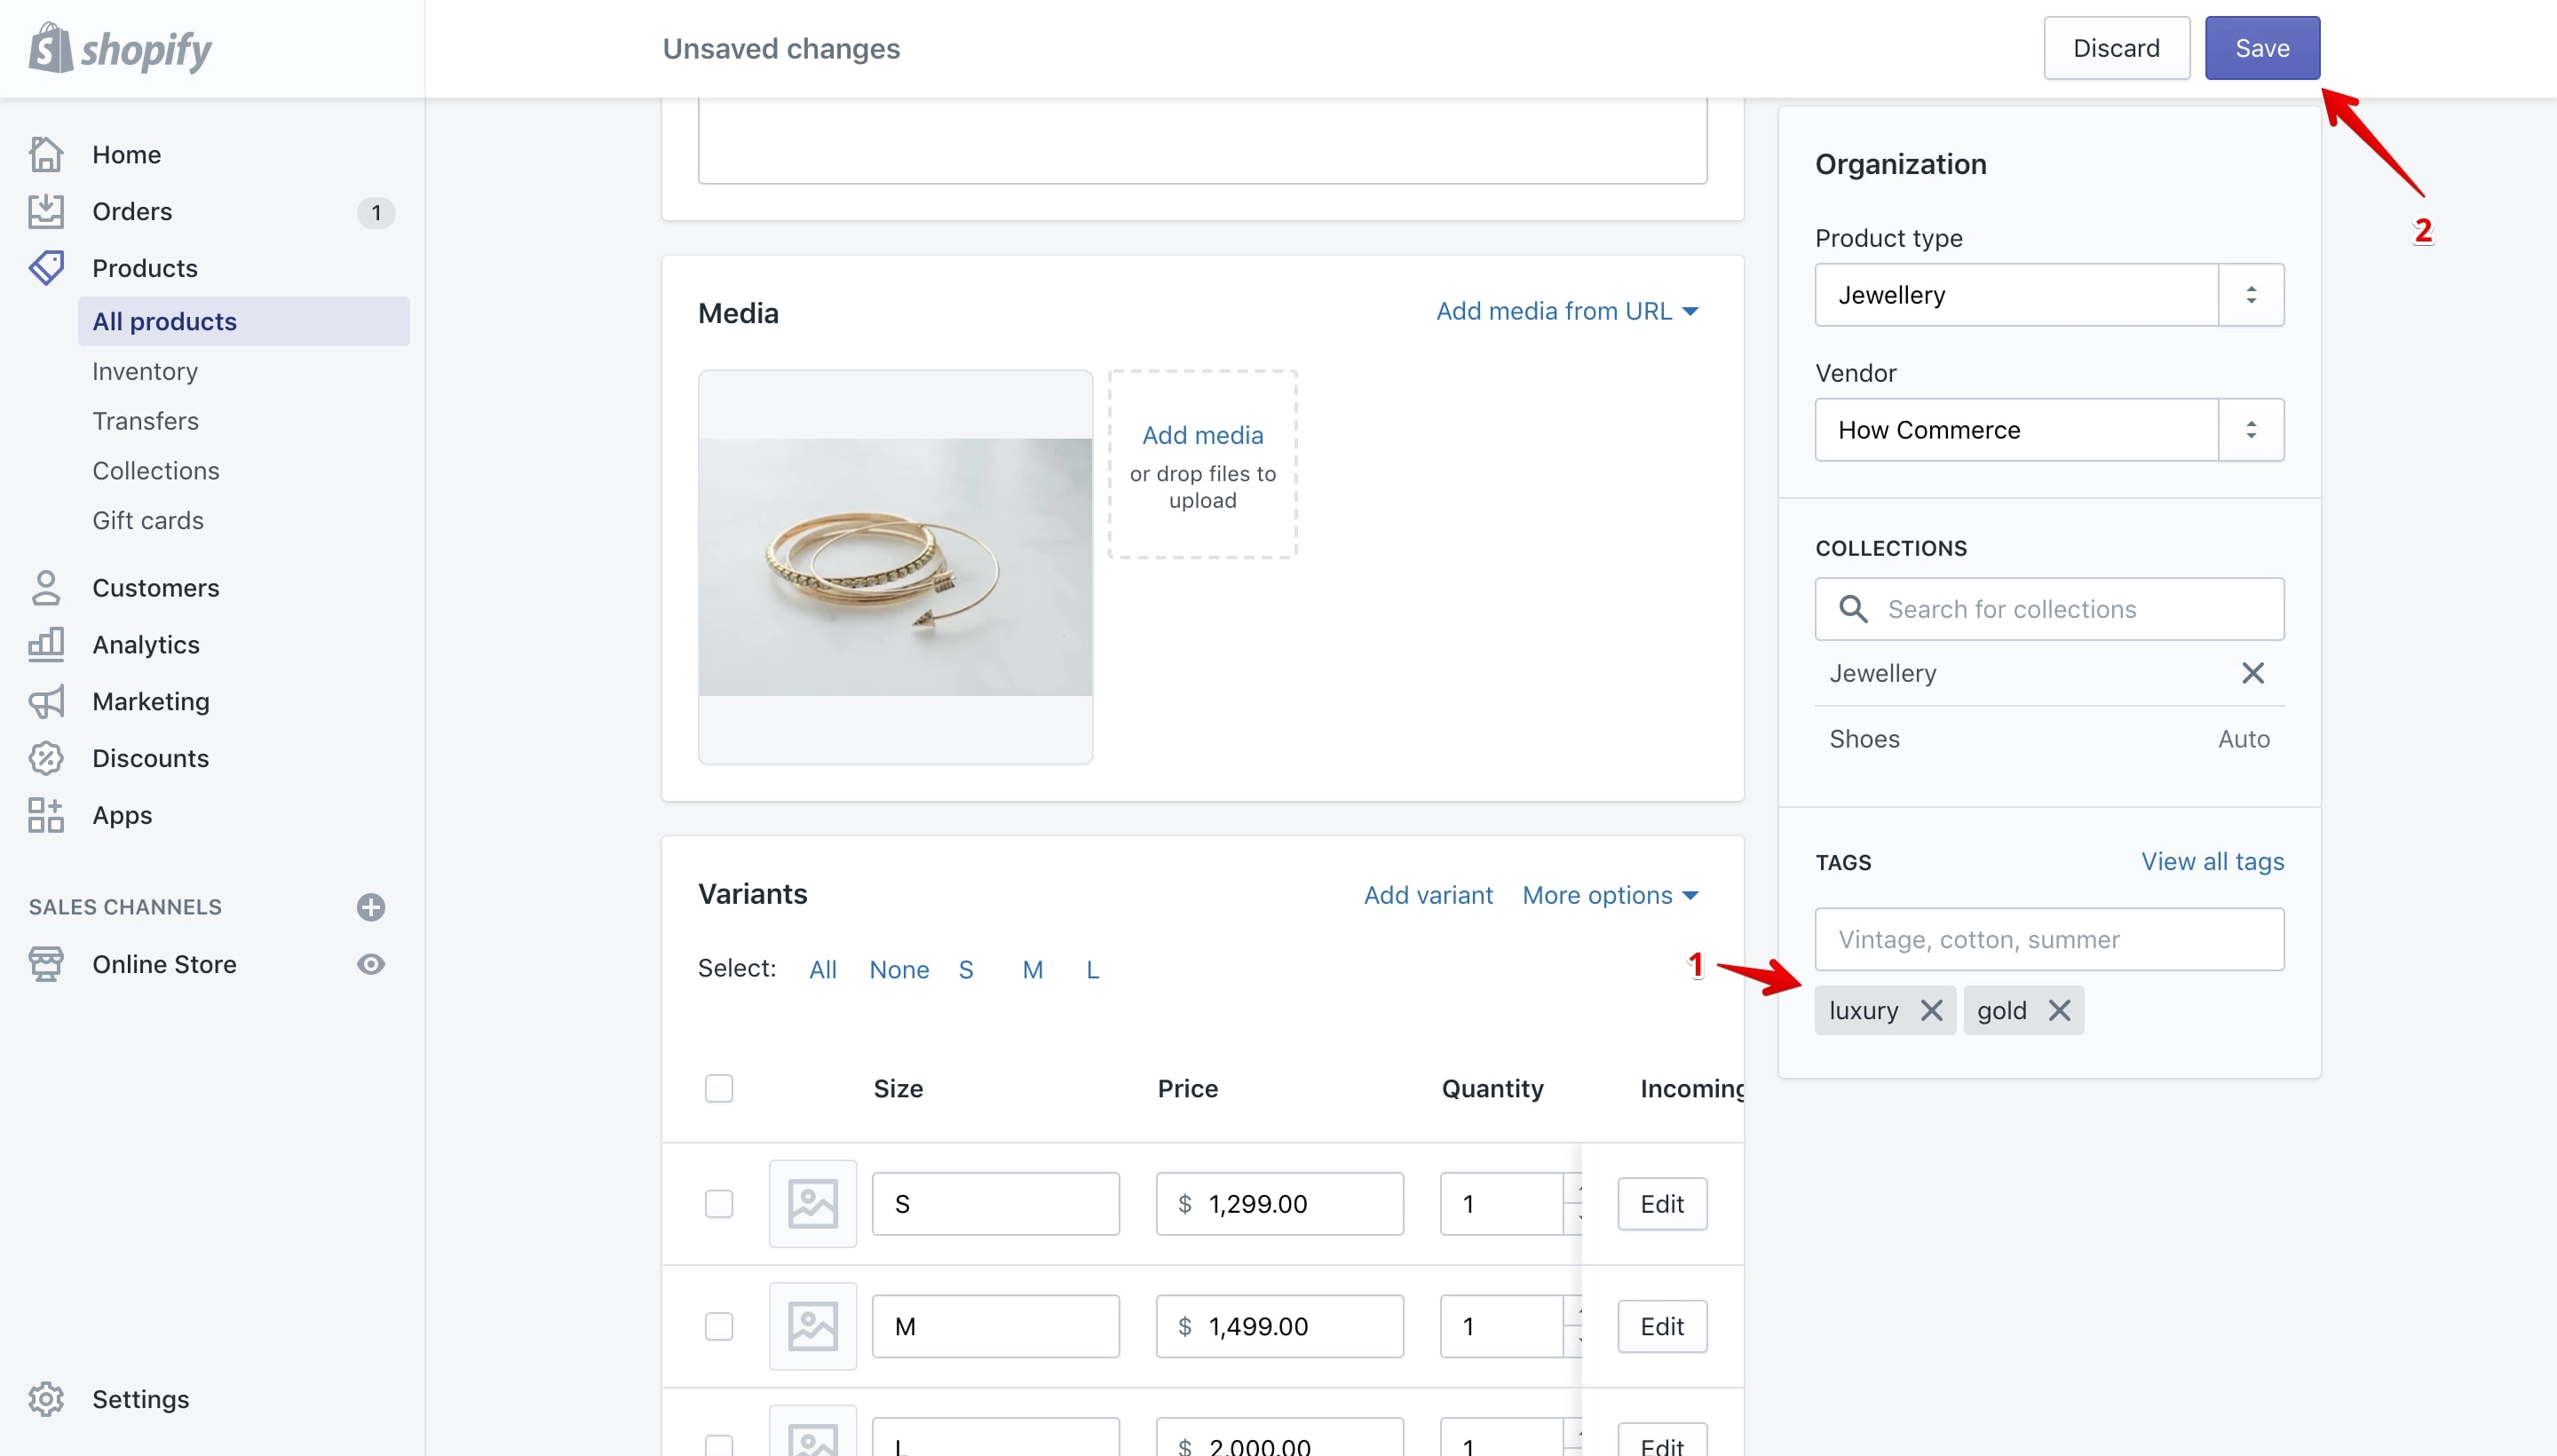
If the tag is removed from the “Tags” section that does not mean that it is also removed from the product at this stage.
To completely remove it you need to save it by clicking the “Save” button (marked with 2 in the image above).
Transfer tags
Supports up to 255 characters.
You can filter transfers by tag on the “Transfers” page.
To access the page go to “Transfers” (marked with 1 in the image below) and after to the transfer that you want to add tags too (marked with 2 in the image below):
On the transfer page you can view the tags section on the right sidebar in the “Additional details” section (marked with 1 in the image below), and on this section you can see all tags associated with this product (marked with 2 in the image below):
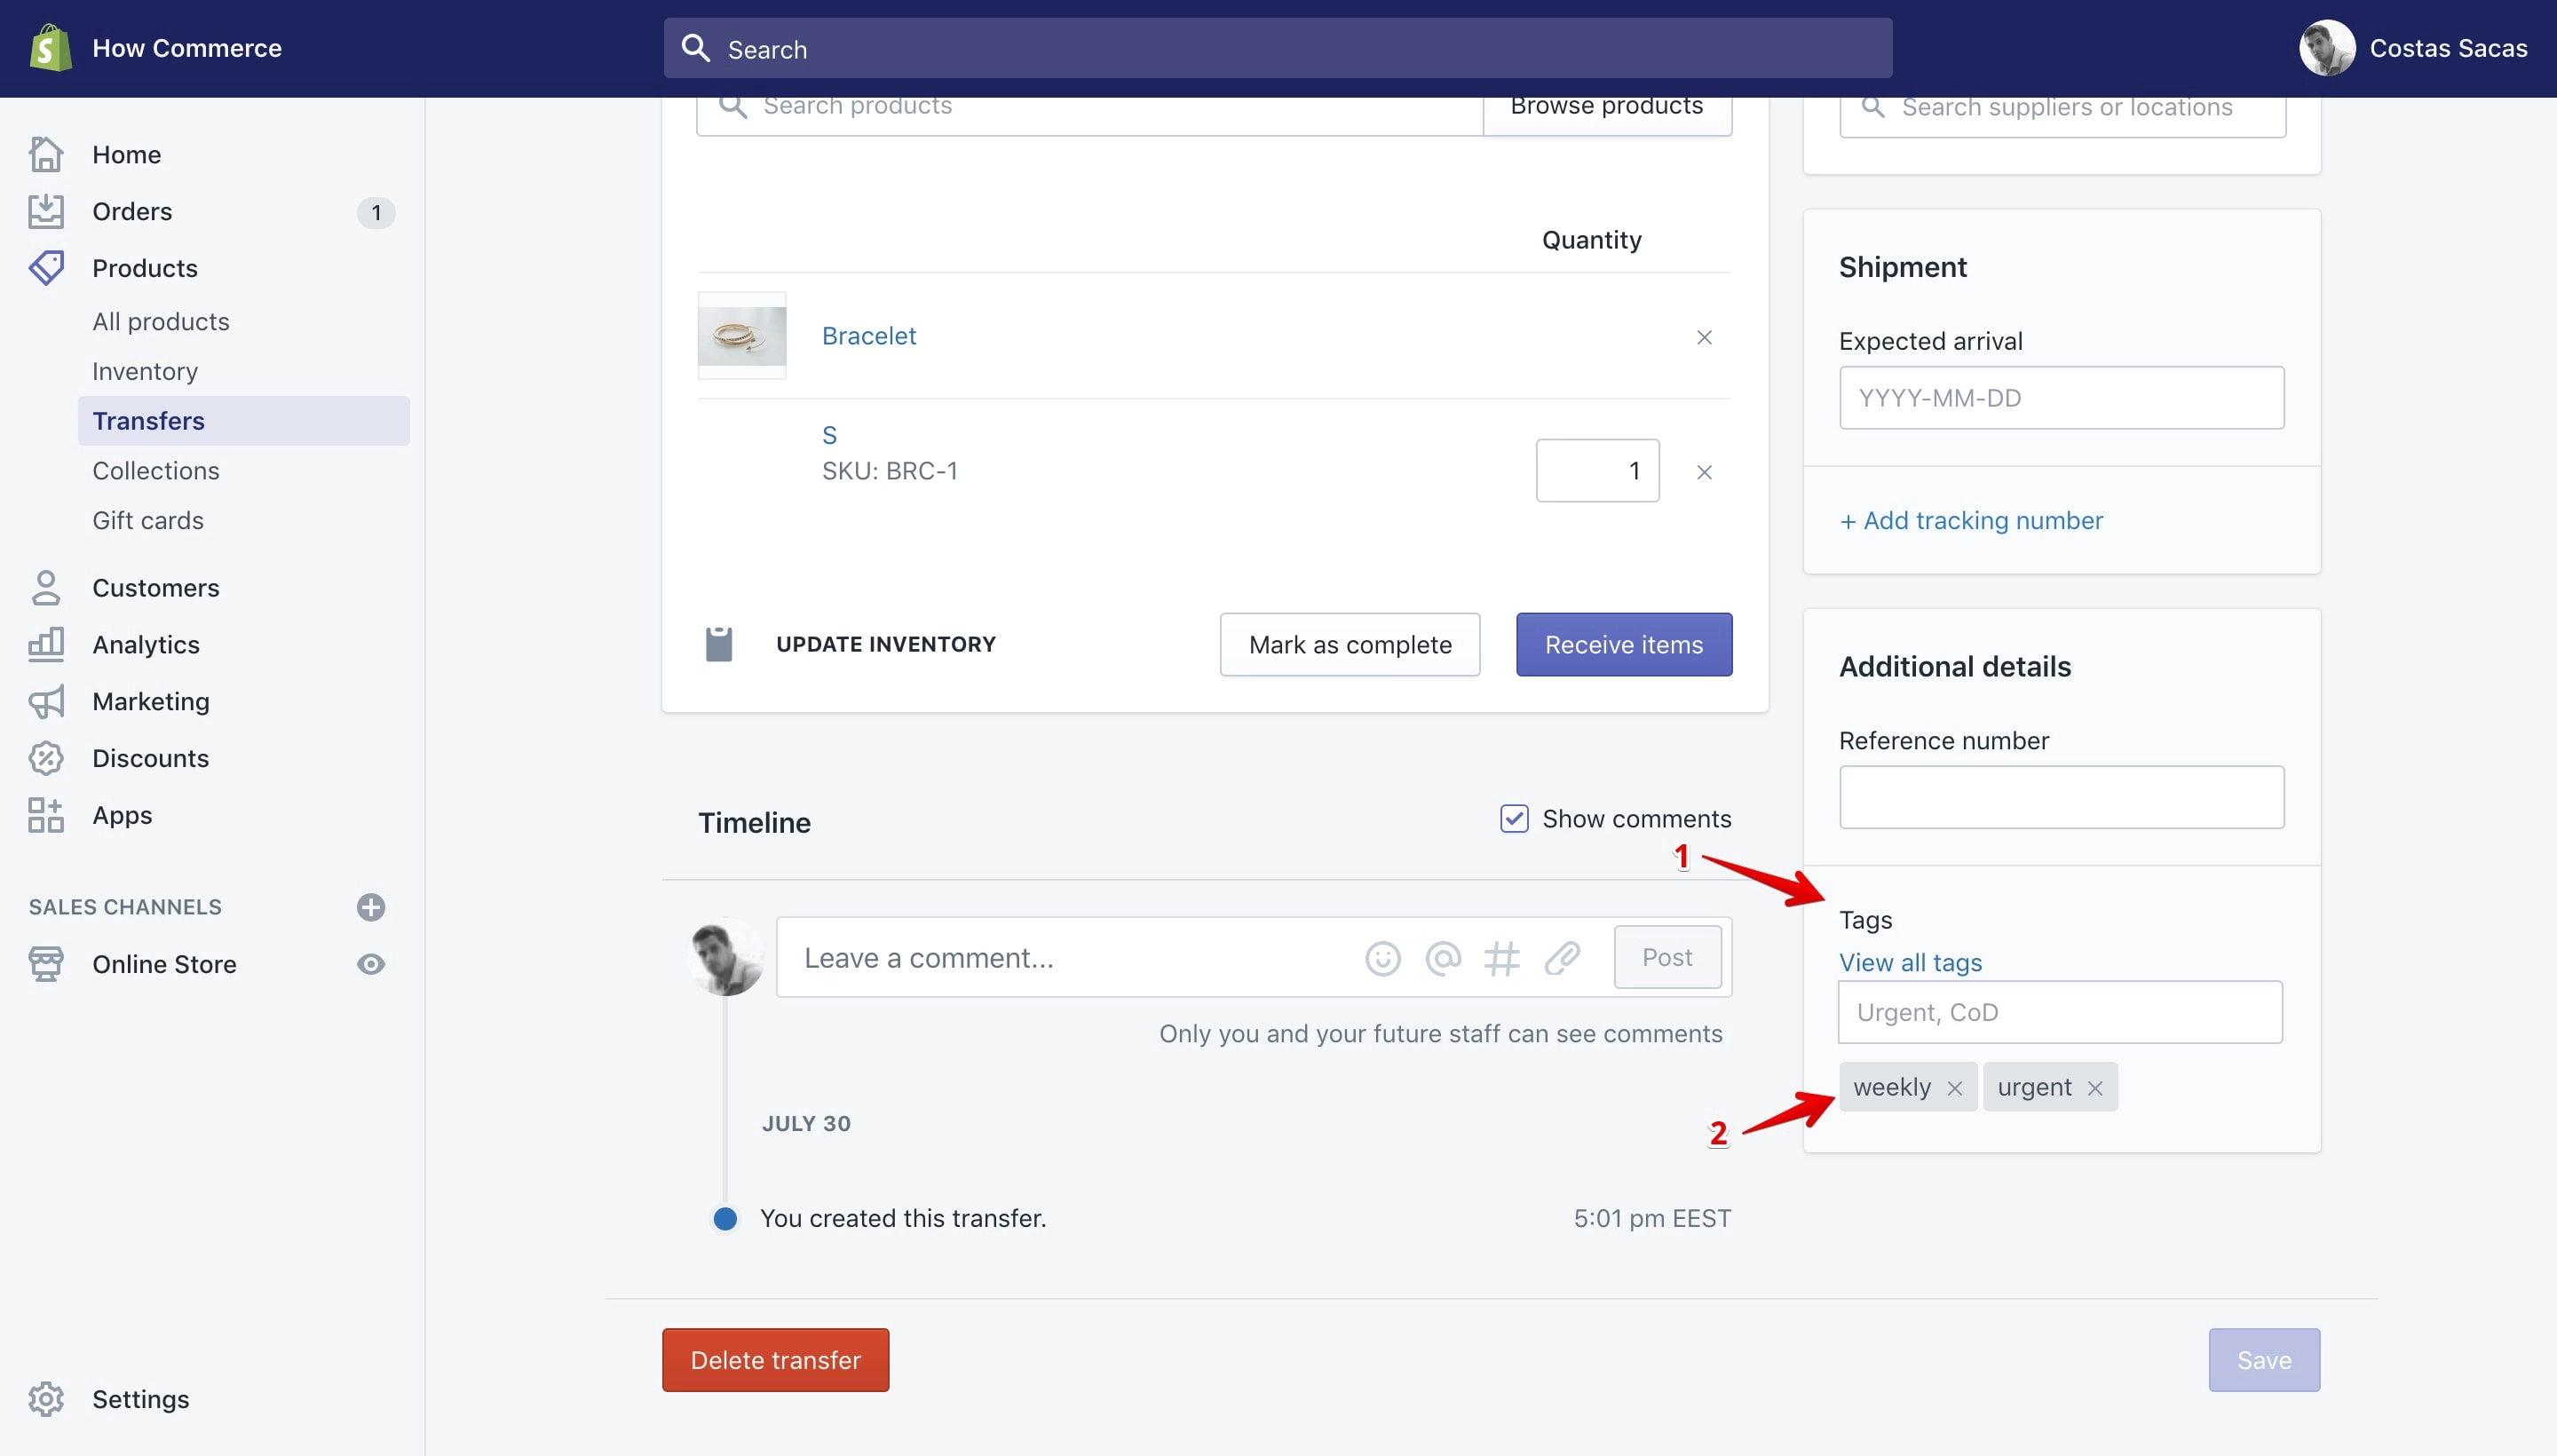
Add a tag
The tags that you add to one transfer can be accessed from any transfer details page and can be used by all transfers available in the online store. They can’t be used from other Shopify sections.
You can add a tag to a transfer in 2 ways:
- New tags can be added through the input box.
- Existing tags can be added through the “View all tags” link.
Adding a tag through the input box
New tags can be added only through this option. Type the name of the tag inside the input box and hit ↵ (Enter) key or click the “Add” tag:
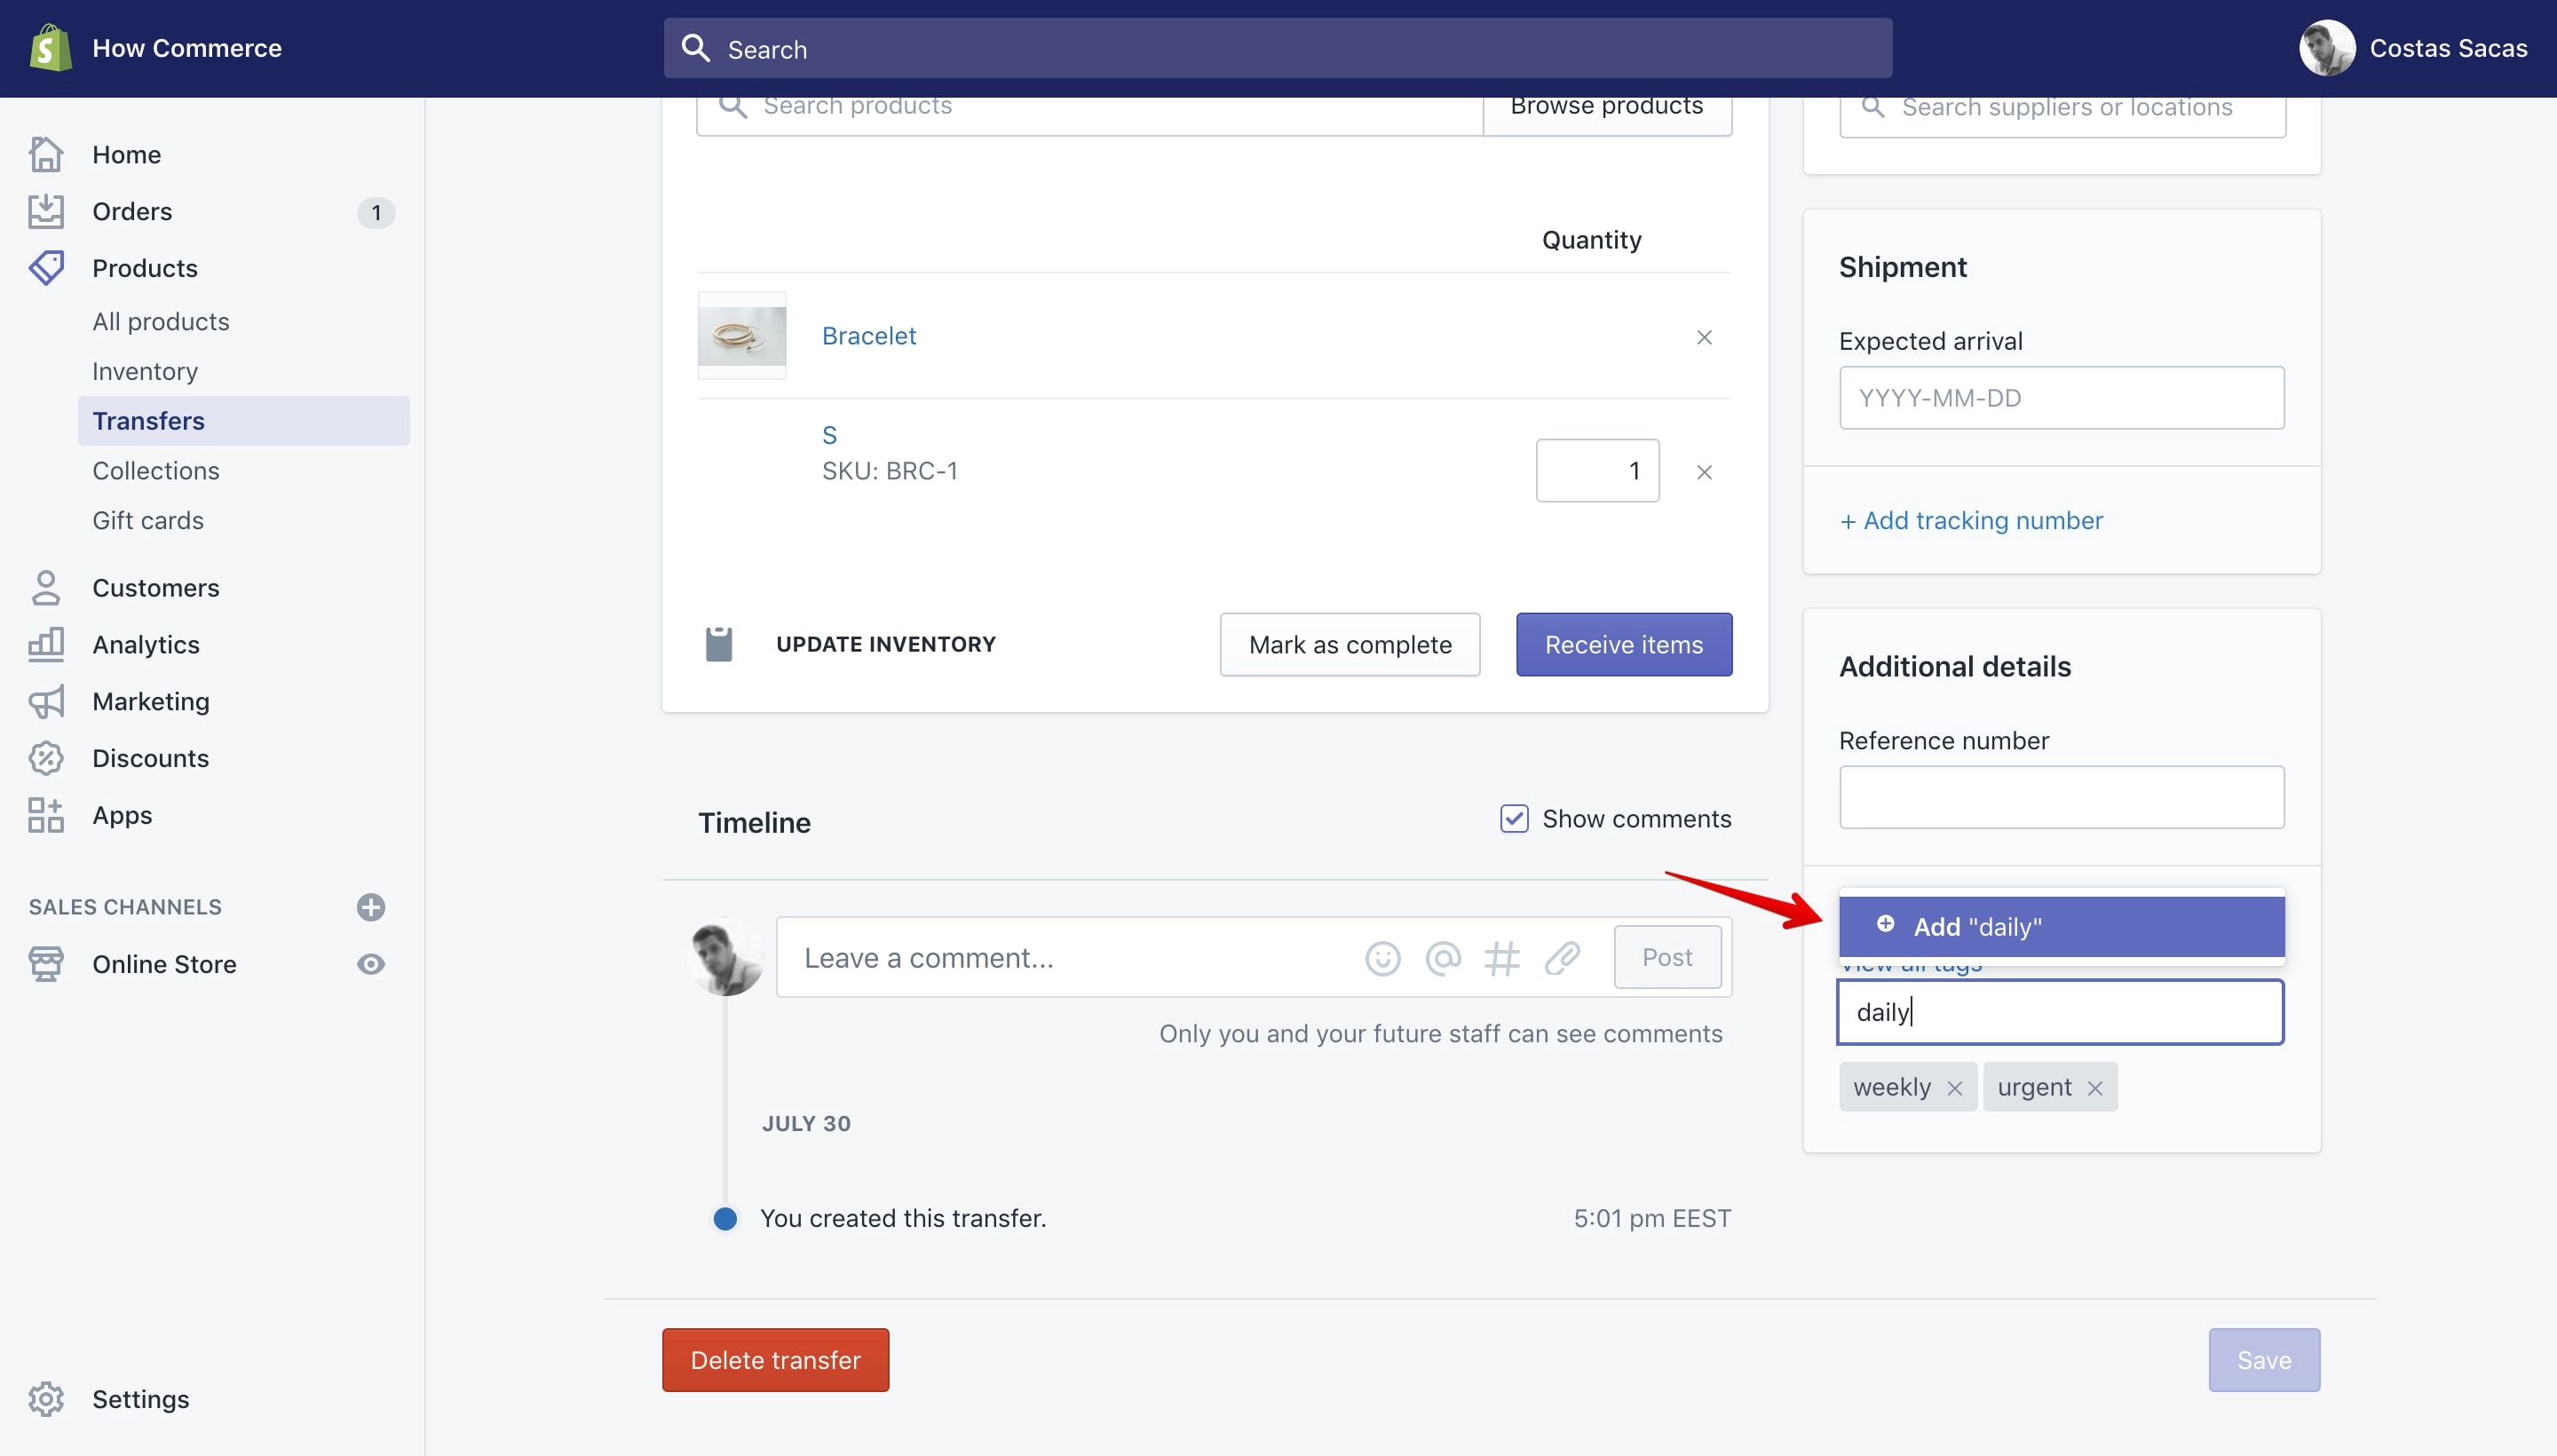
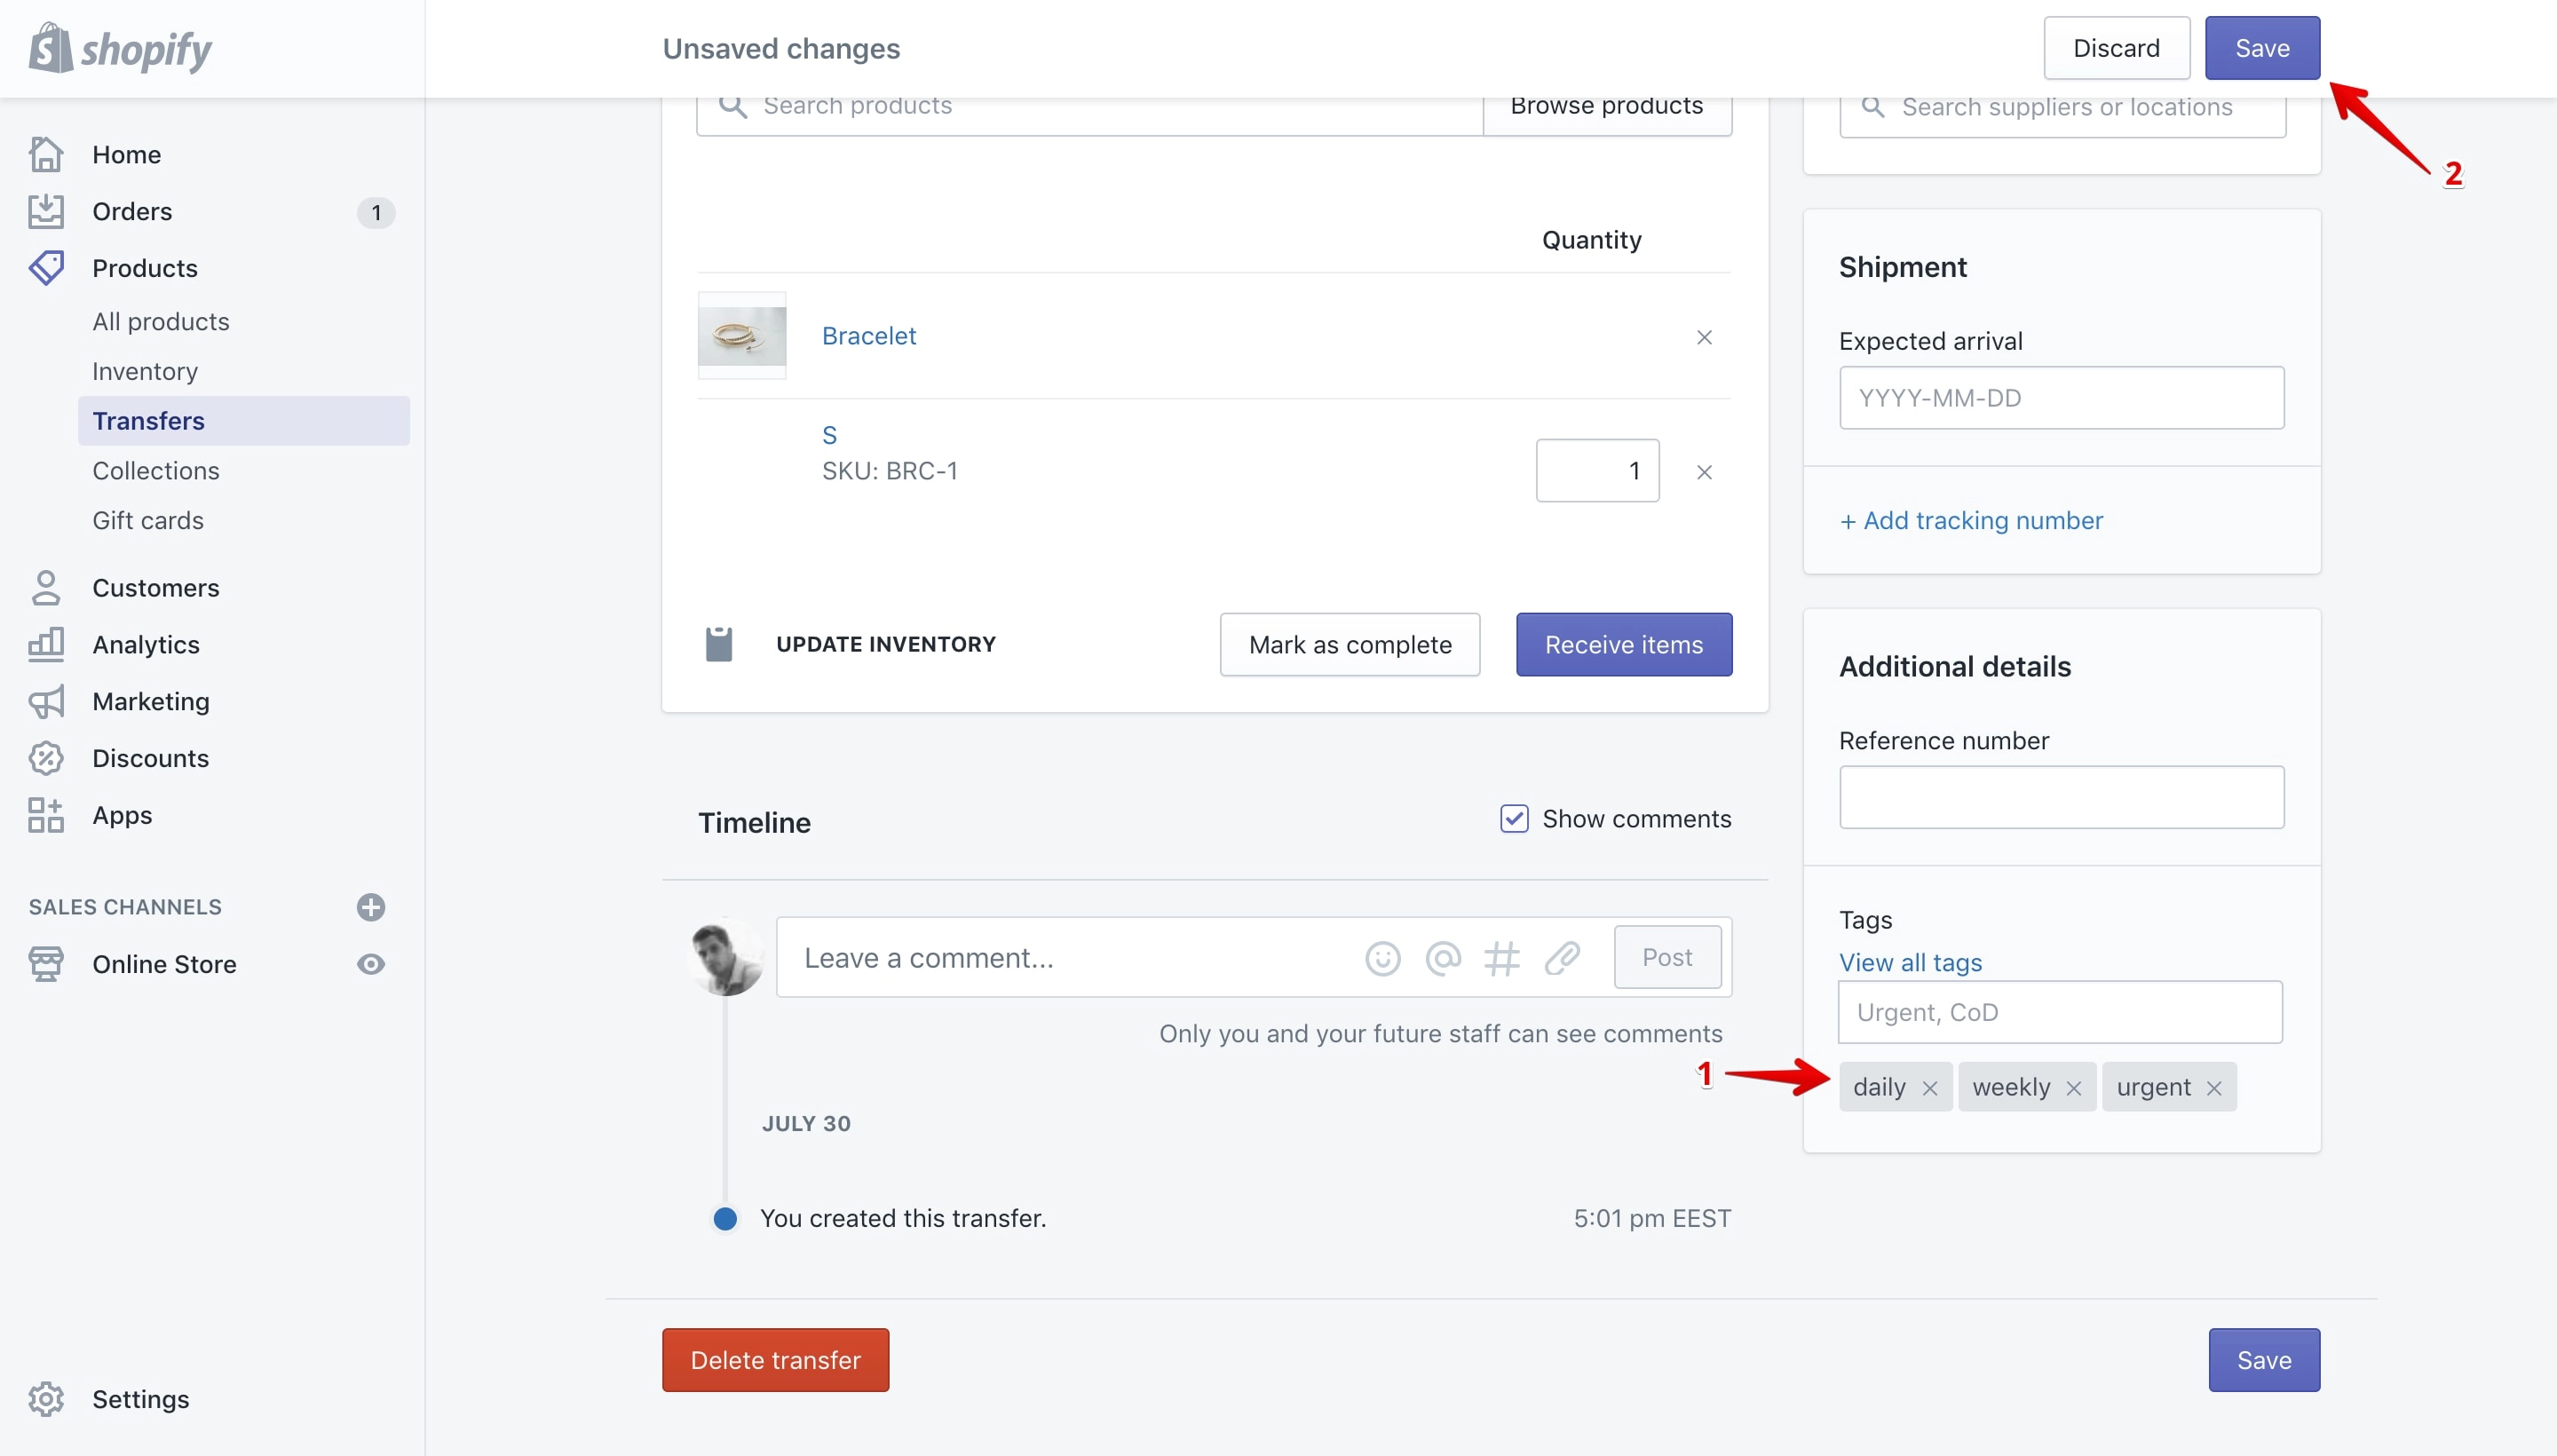
After you add the tag it will display below the input box (marked with 1 in the image below). You need to save it so you can store it permanently and use it on all your store products. To do that click the “Save” button (marked with 2 in the image below).
Adding a tag through the “View all tags” link
Through this link you can add only existing tags to your products and you can’t create new ones.
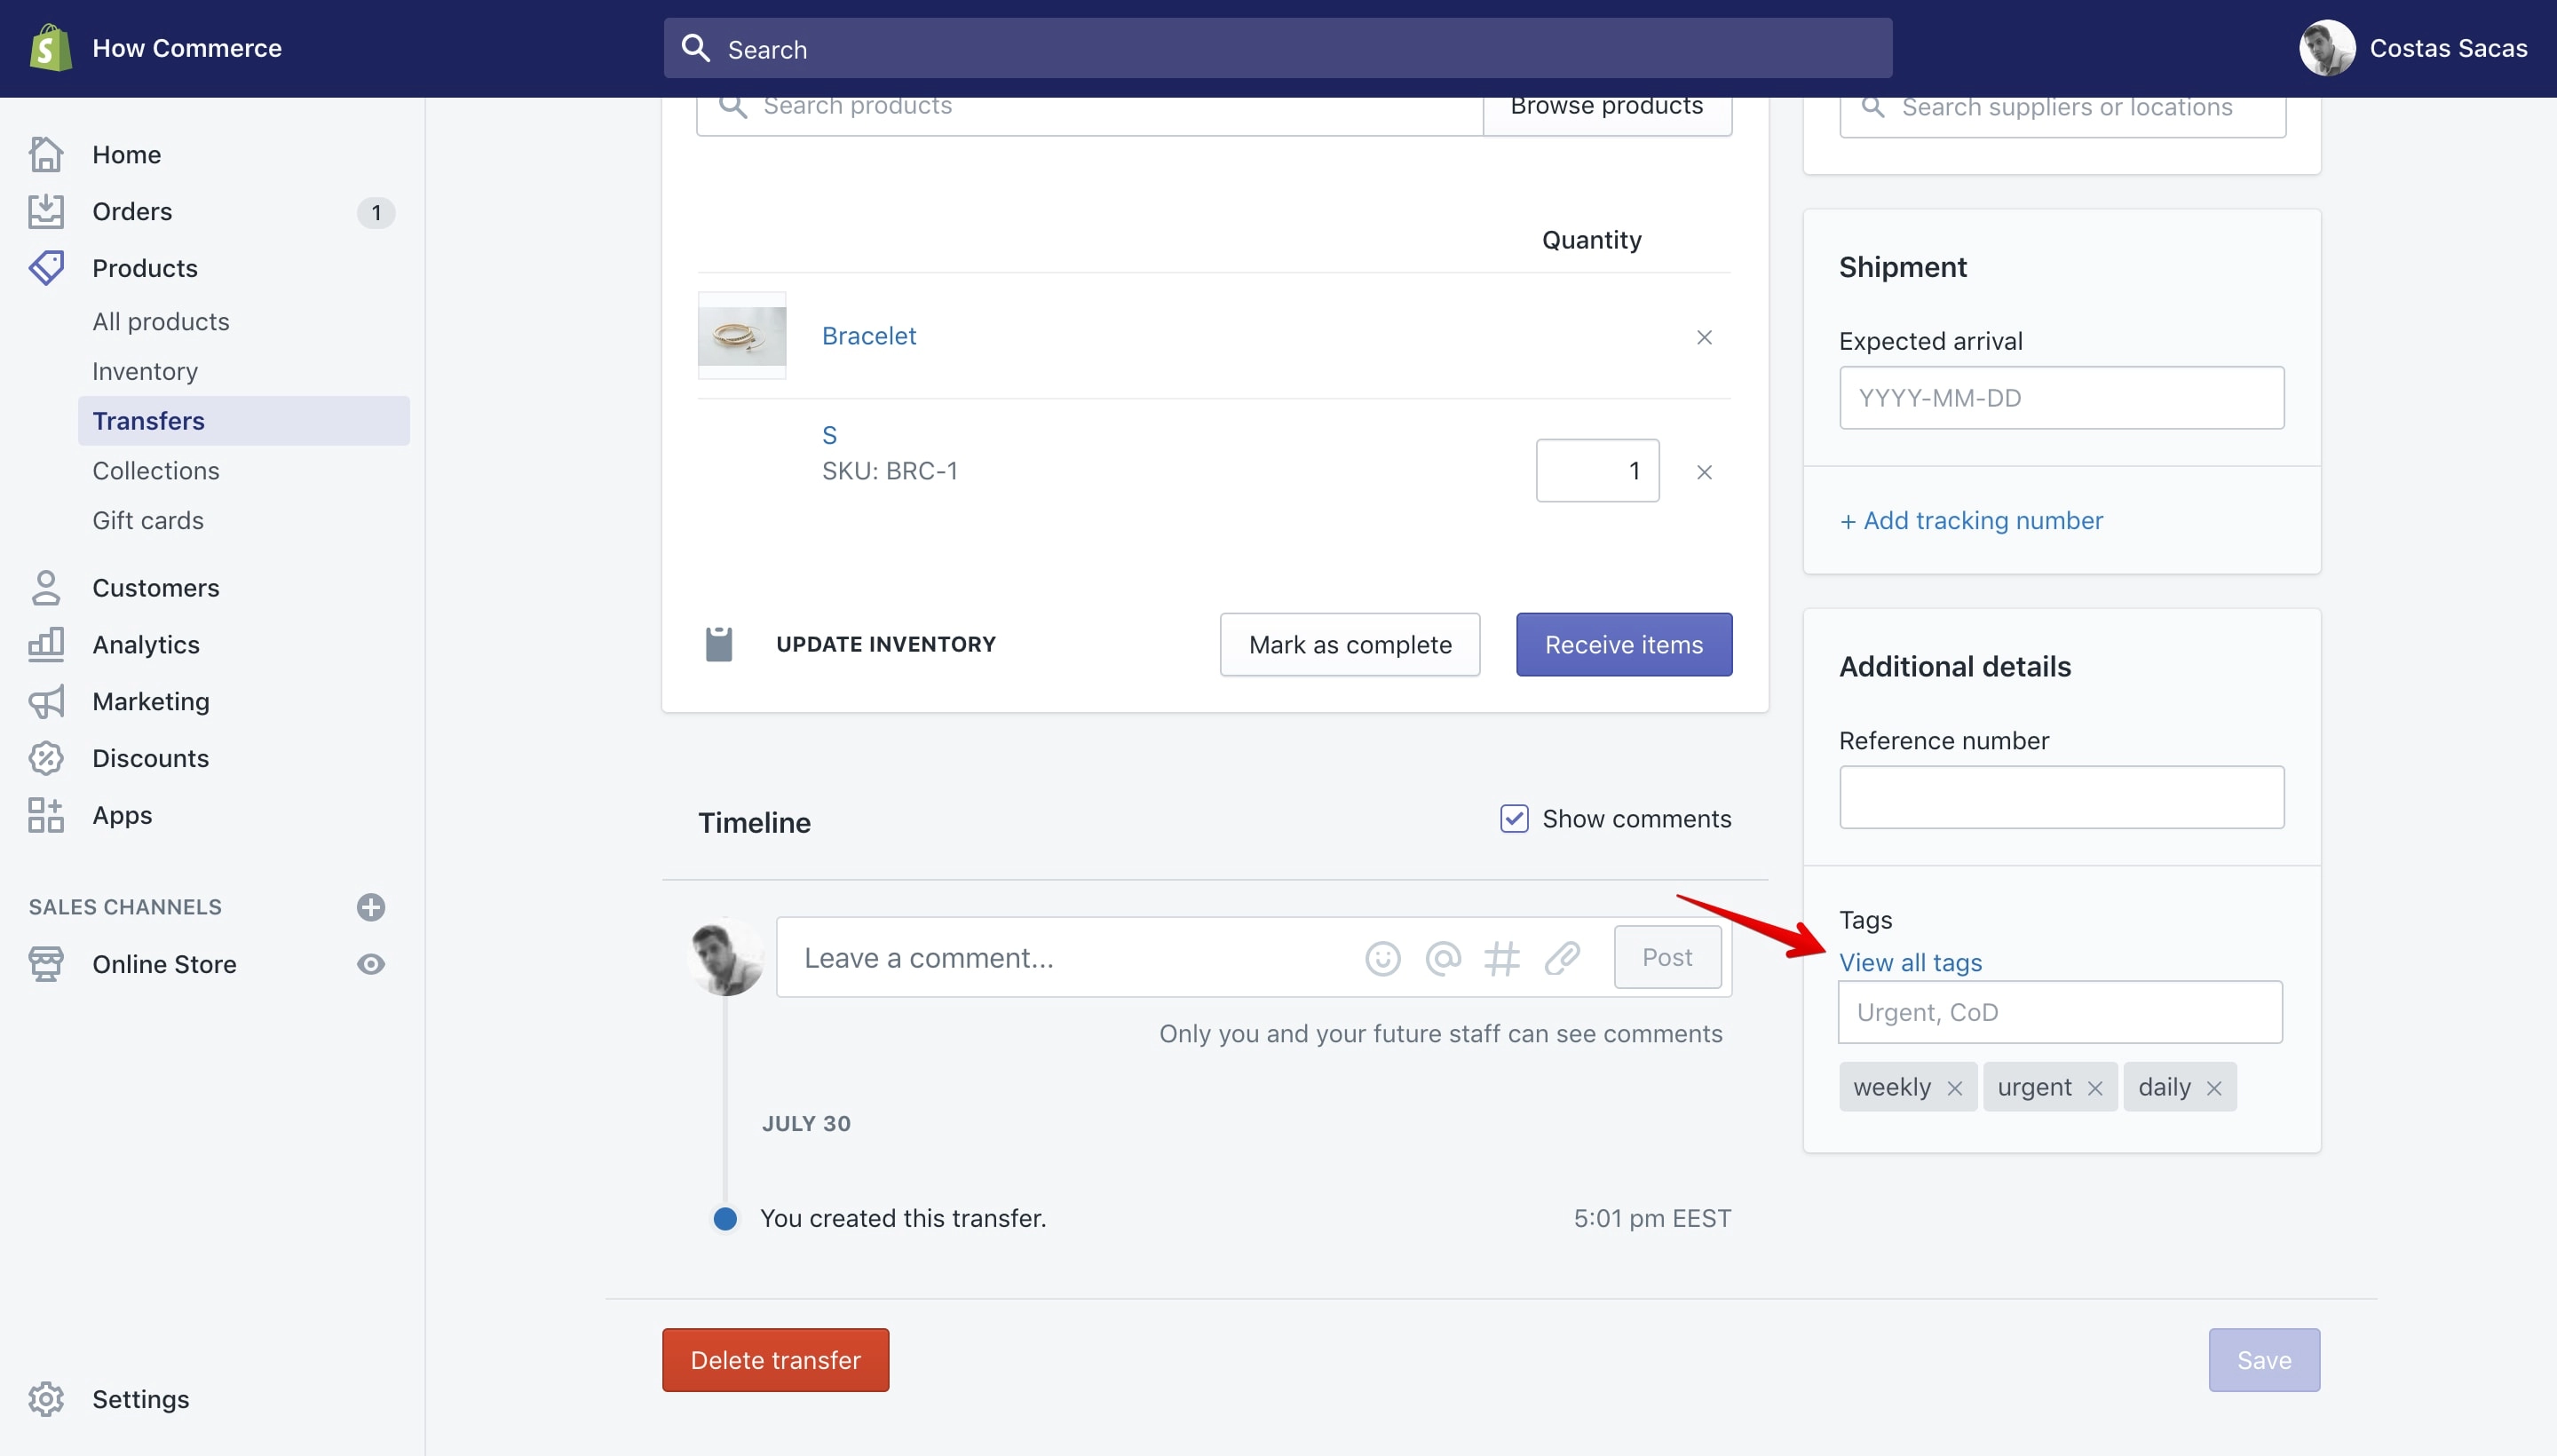
Clicking on the “View all tags” link will open a pop-up that will allow you to select and assign new tags to the transfer:
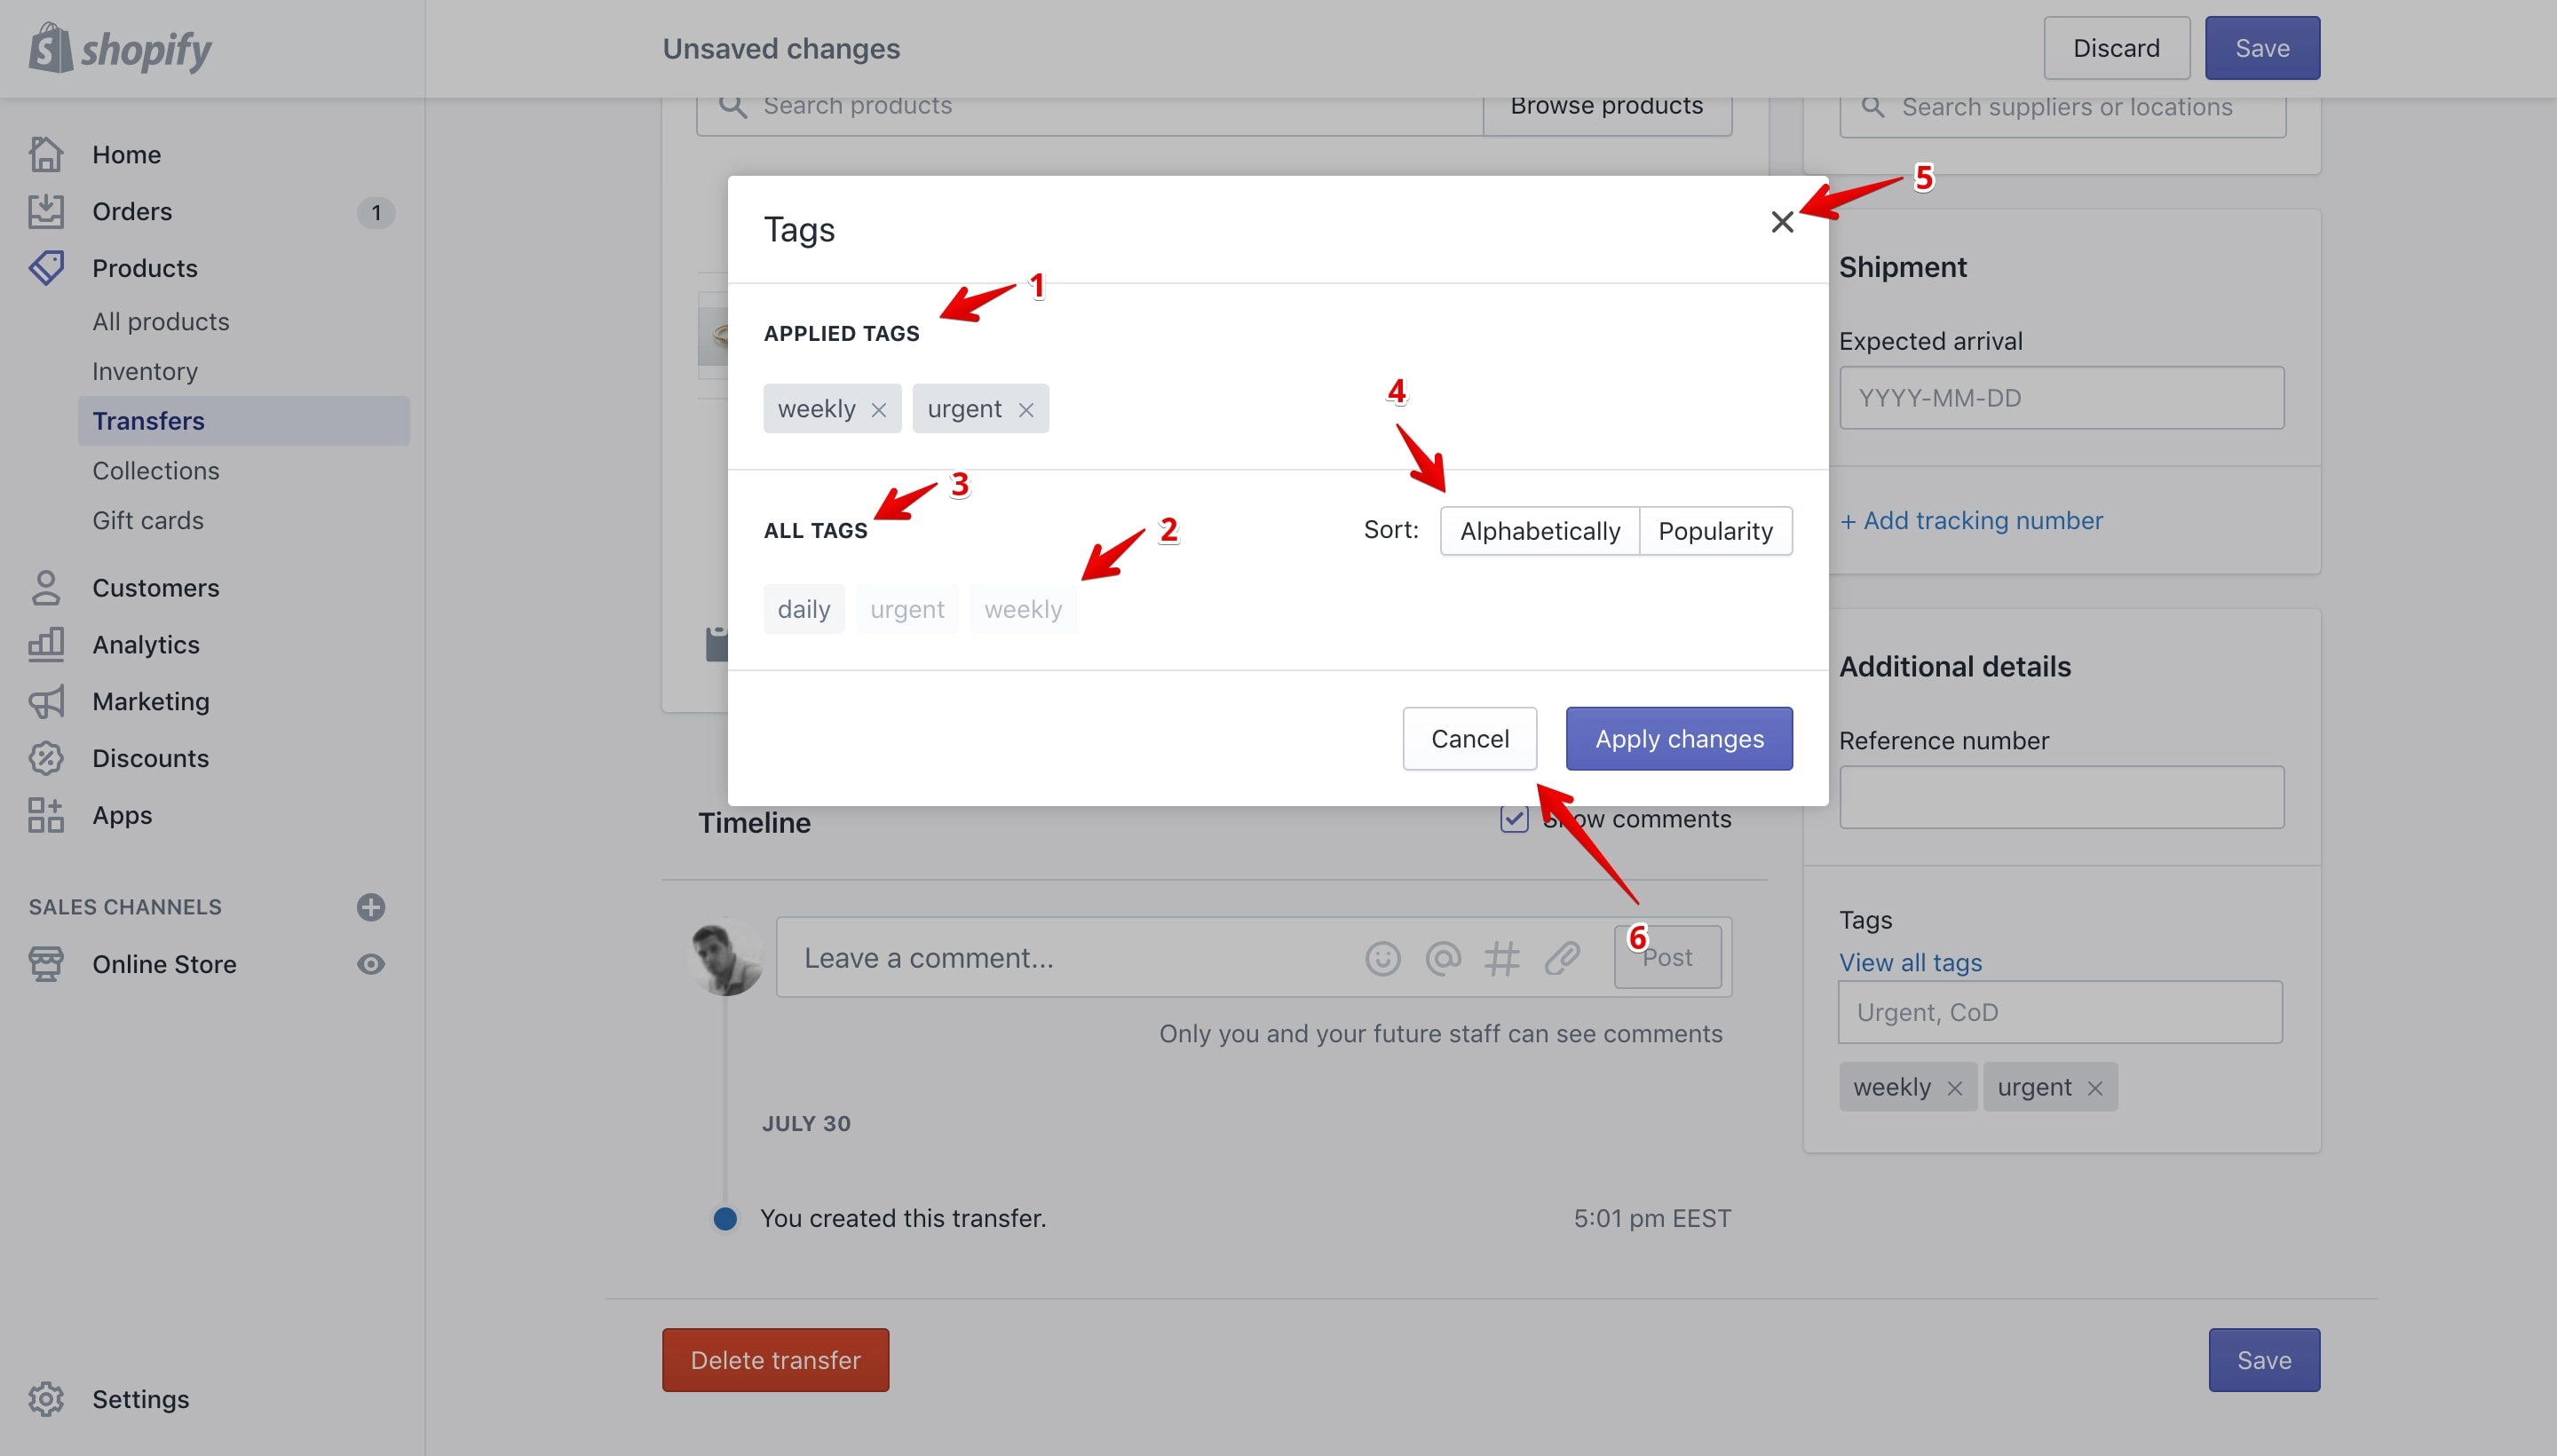
On the pop-up you can see all the tags assigned to this transfer in the “Applied Tags” section (marked with 1 in the image above).
Below that section you can see the “All Tags” section (marked with 3 in the image above). This section lists all the tags available in the store transfer section.
The tags that are greyed-out (marked with 2 in the image above) are already assigned to the transfer. You can assign more from this section by clicking on the desired tag.
If you have a lot of tags you can sort them “Alphabetically” or by “Popularity” from the sorting section (marked with 4 in the image above).
You can close the pop-up by clicking the “X” icon from the top right corner (marked with 5 in the image above) or by clicking the “Cancel” button (marked with 6 in the image above).
Note:
Clicking the “X” icon or the “Cancel” button will cancel your newly assigned tags and not save your changes.
Assign new tags to the transfer by clicking on tags located on the “All Tags” section (marked with 1 in the image below).
Tags added will list in the “Applied Tags” section (marked with 2 in the image below). Once completed click the “Apply changes” button (marked with 3 in the image below):
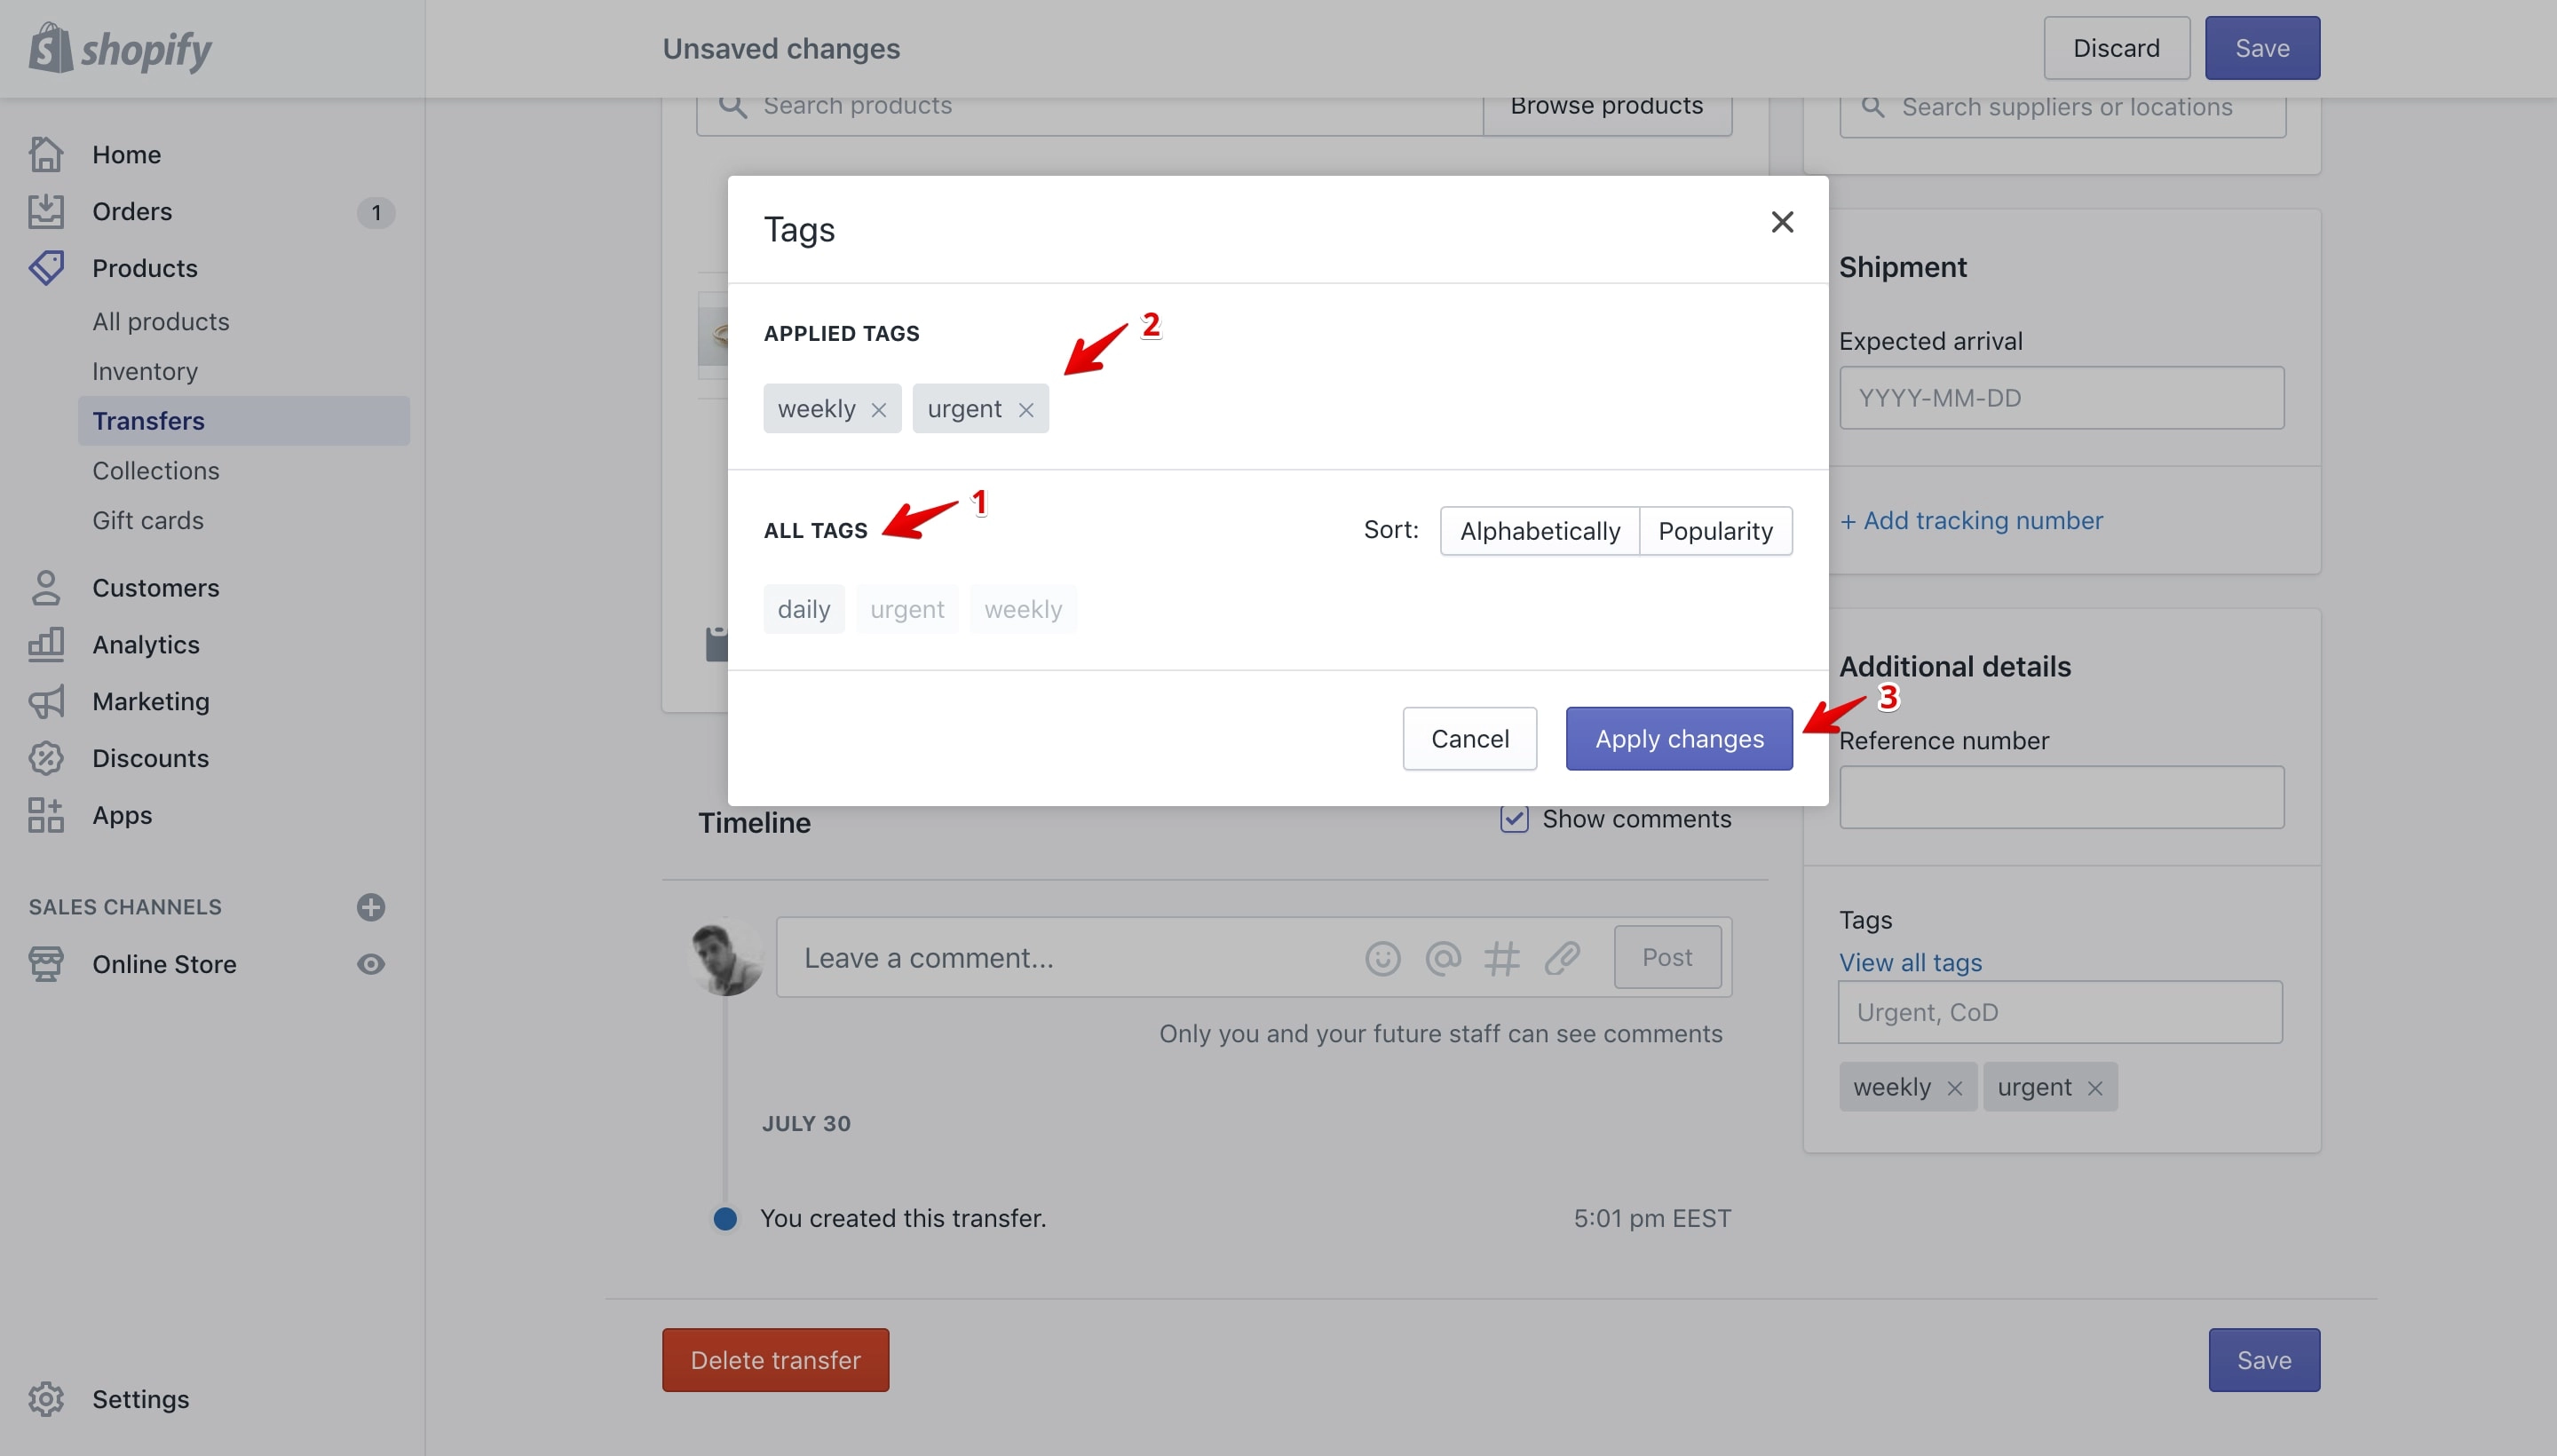
Clicking the “Apply changes” button will list the newly added tags on the “Tags” section (marked with 1 in the image below) located on the transfer details page:
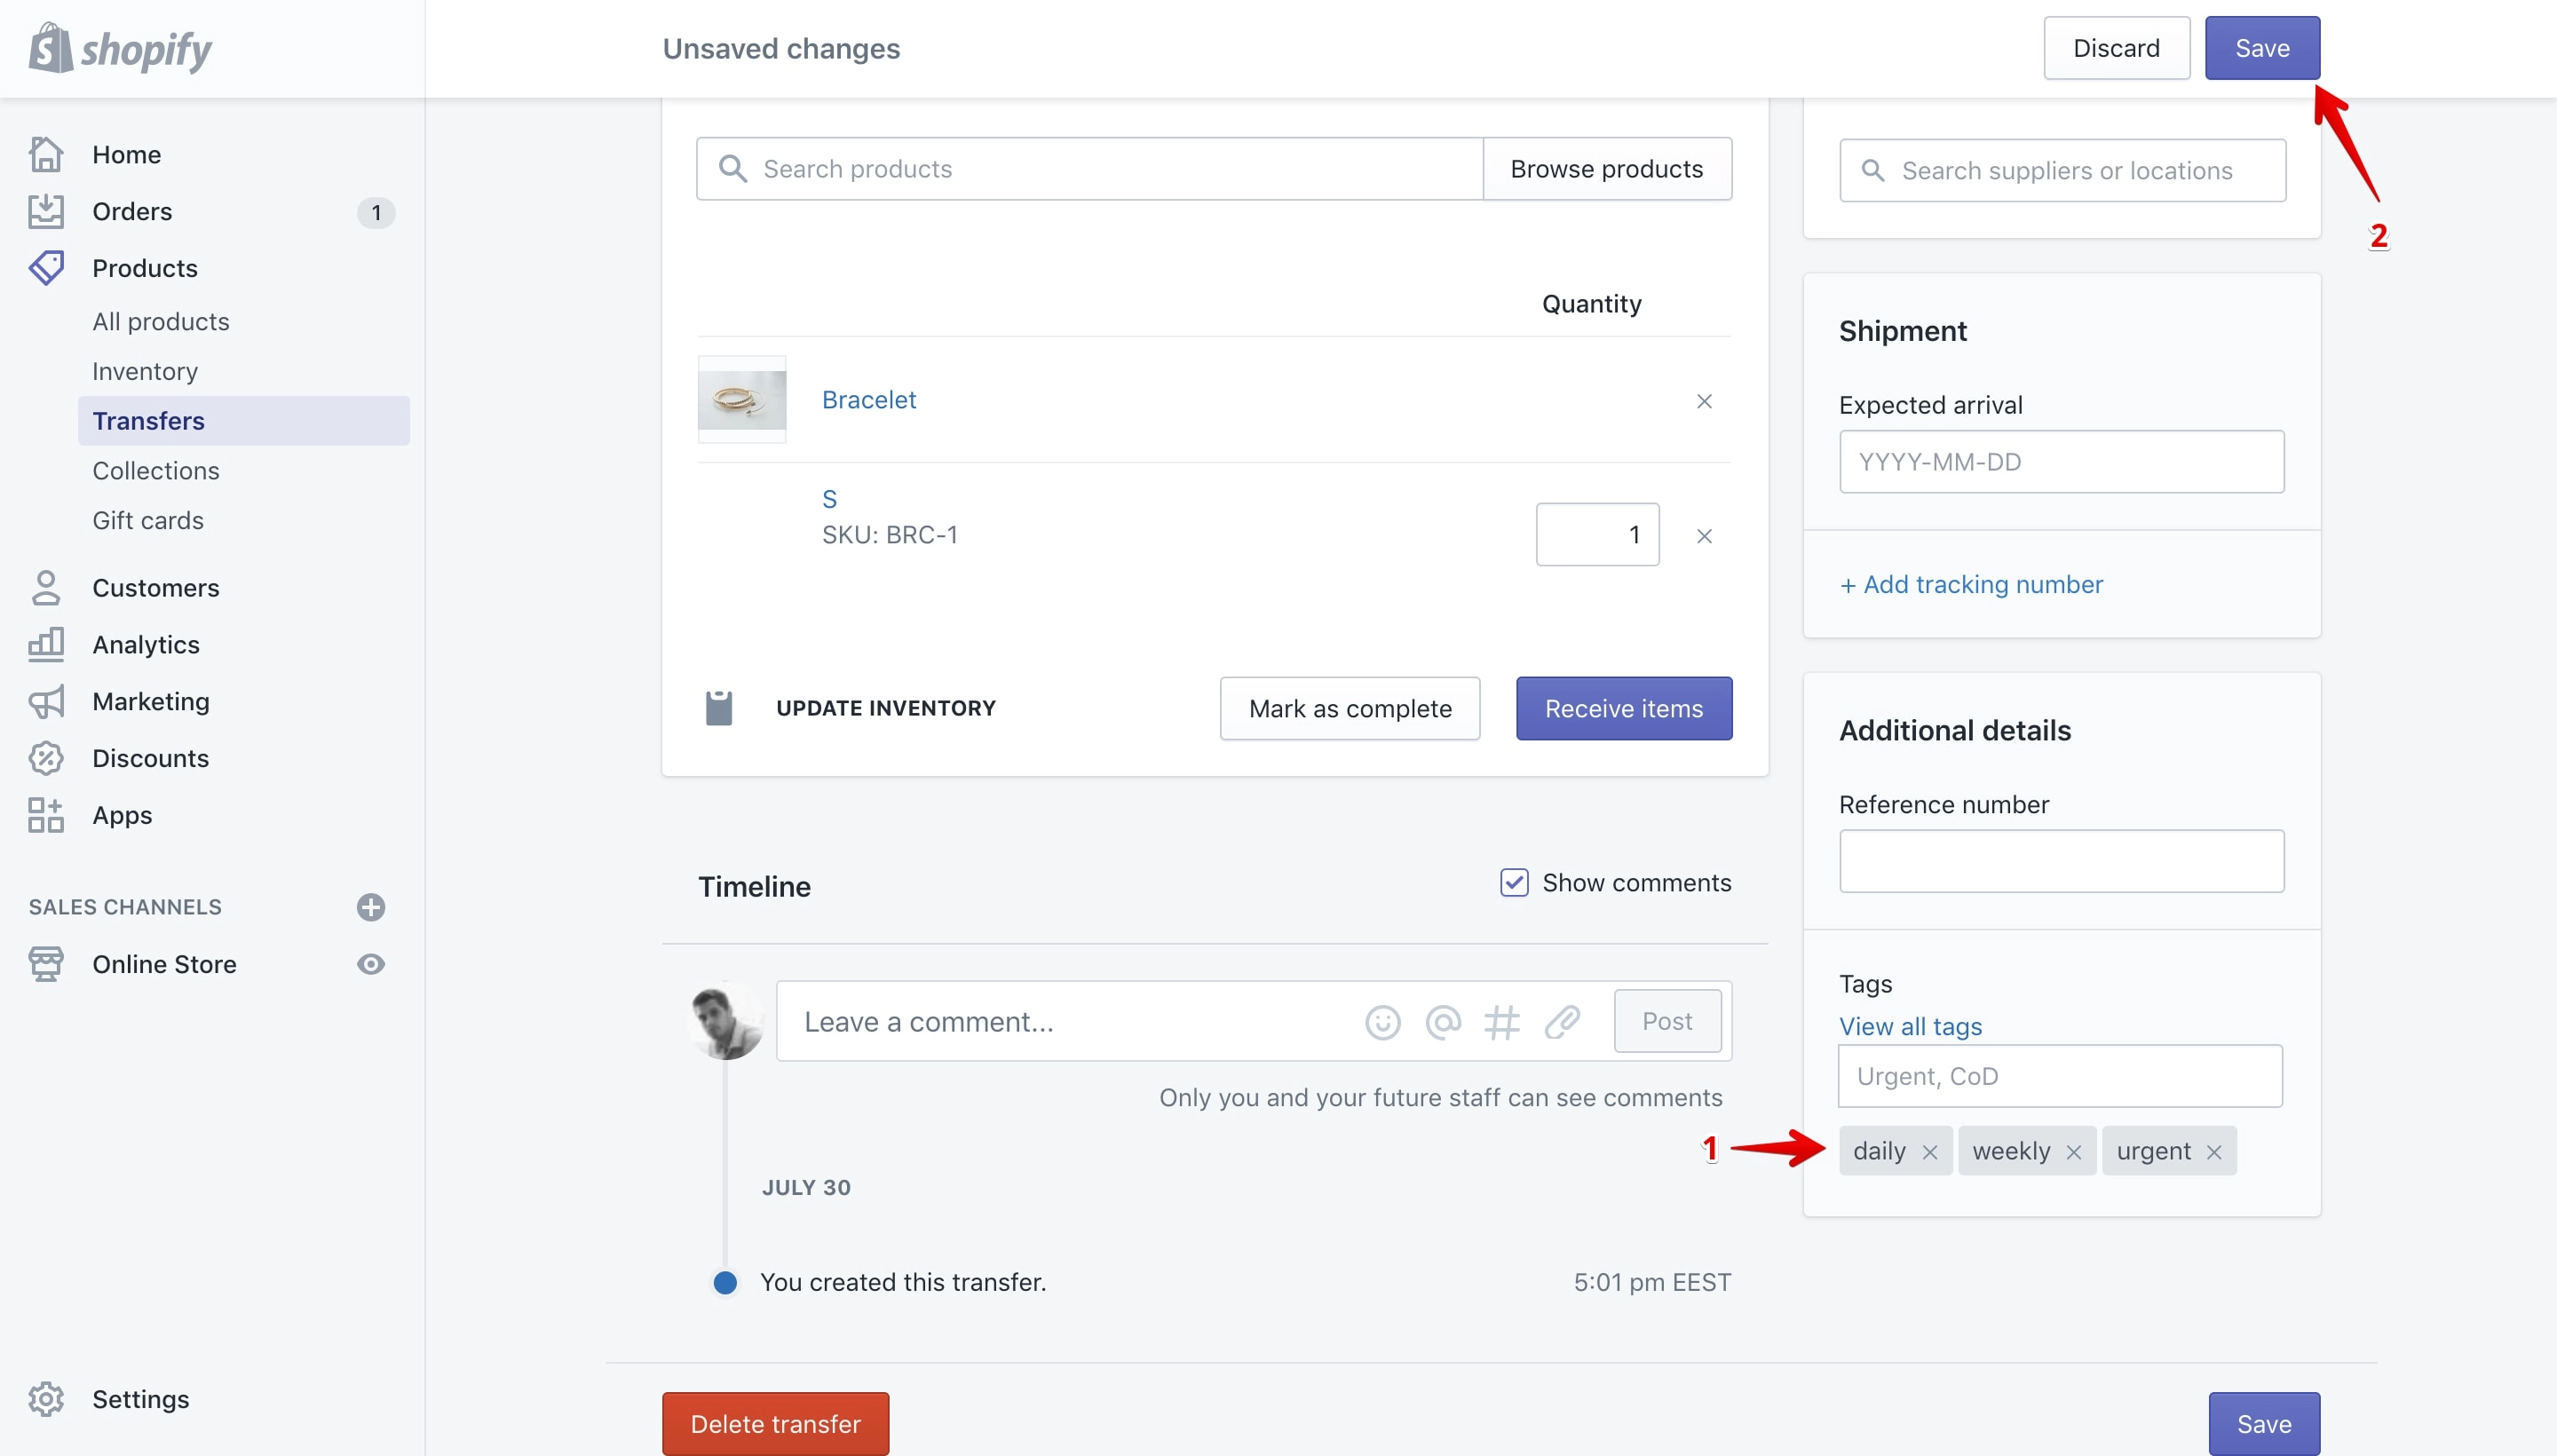
The tags are not yet saved to the transfer. If you leave the page at this stage the tags will not be assigned to the transfer.
To save them click the “Save” button (marked with 2 in the image above).
Remove a tag
You can remove a tag from a transfer in 2 ways via the “Tags section” on the transfer details page or from the “Applied Tags” section located on the “Edit tags” pop-up.
Remove a tag from the “Tags” section
I would say that this is the easiest and fastest way to do it. All you have to do is click the “X” (marked with 1 in the image below) from the tag and save your changes by clicking the “Save” button (marked with 2 in the image below):
Remove a tag from the “Edit tags” pop-up
On the transfer details page click on the “View all tags” link:
“View all tags” link on the transfer details page.
This will open the “Edit Tags” pop-up that will allow you to remove tags from the product:
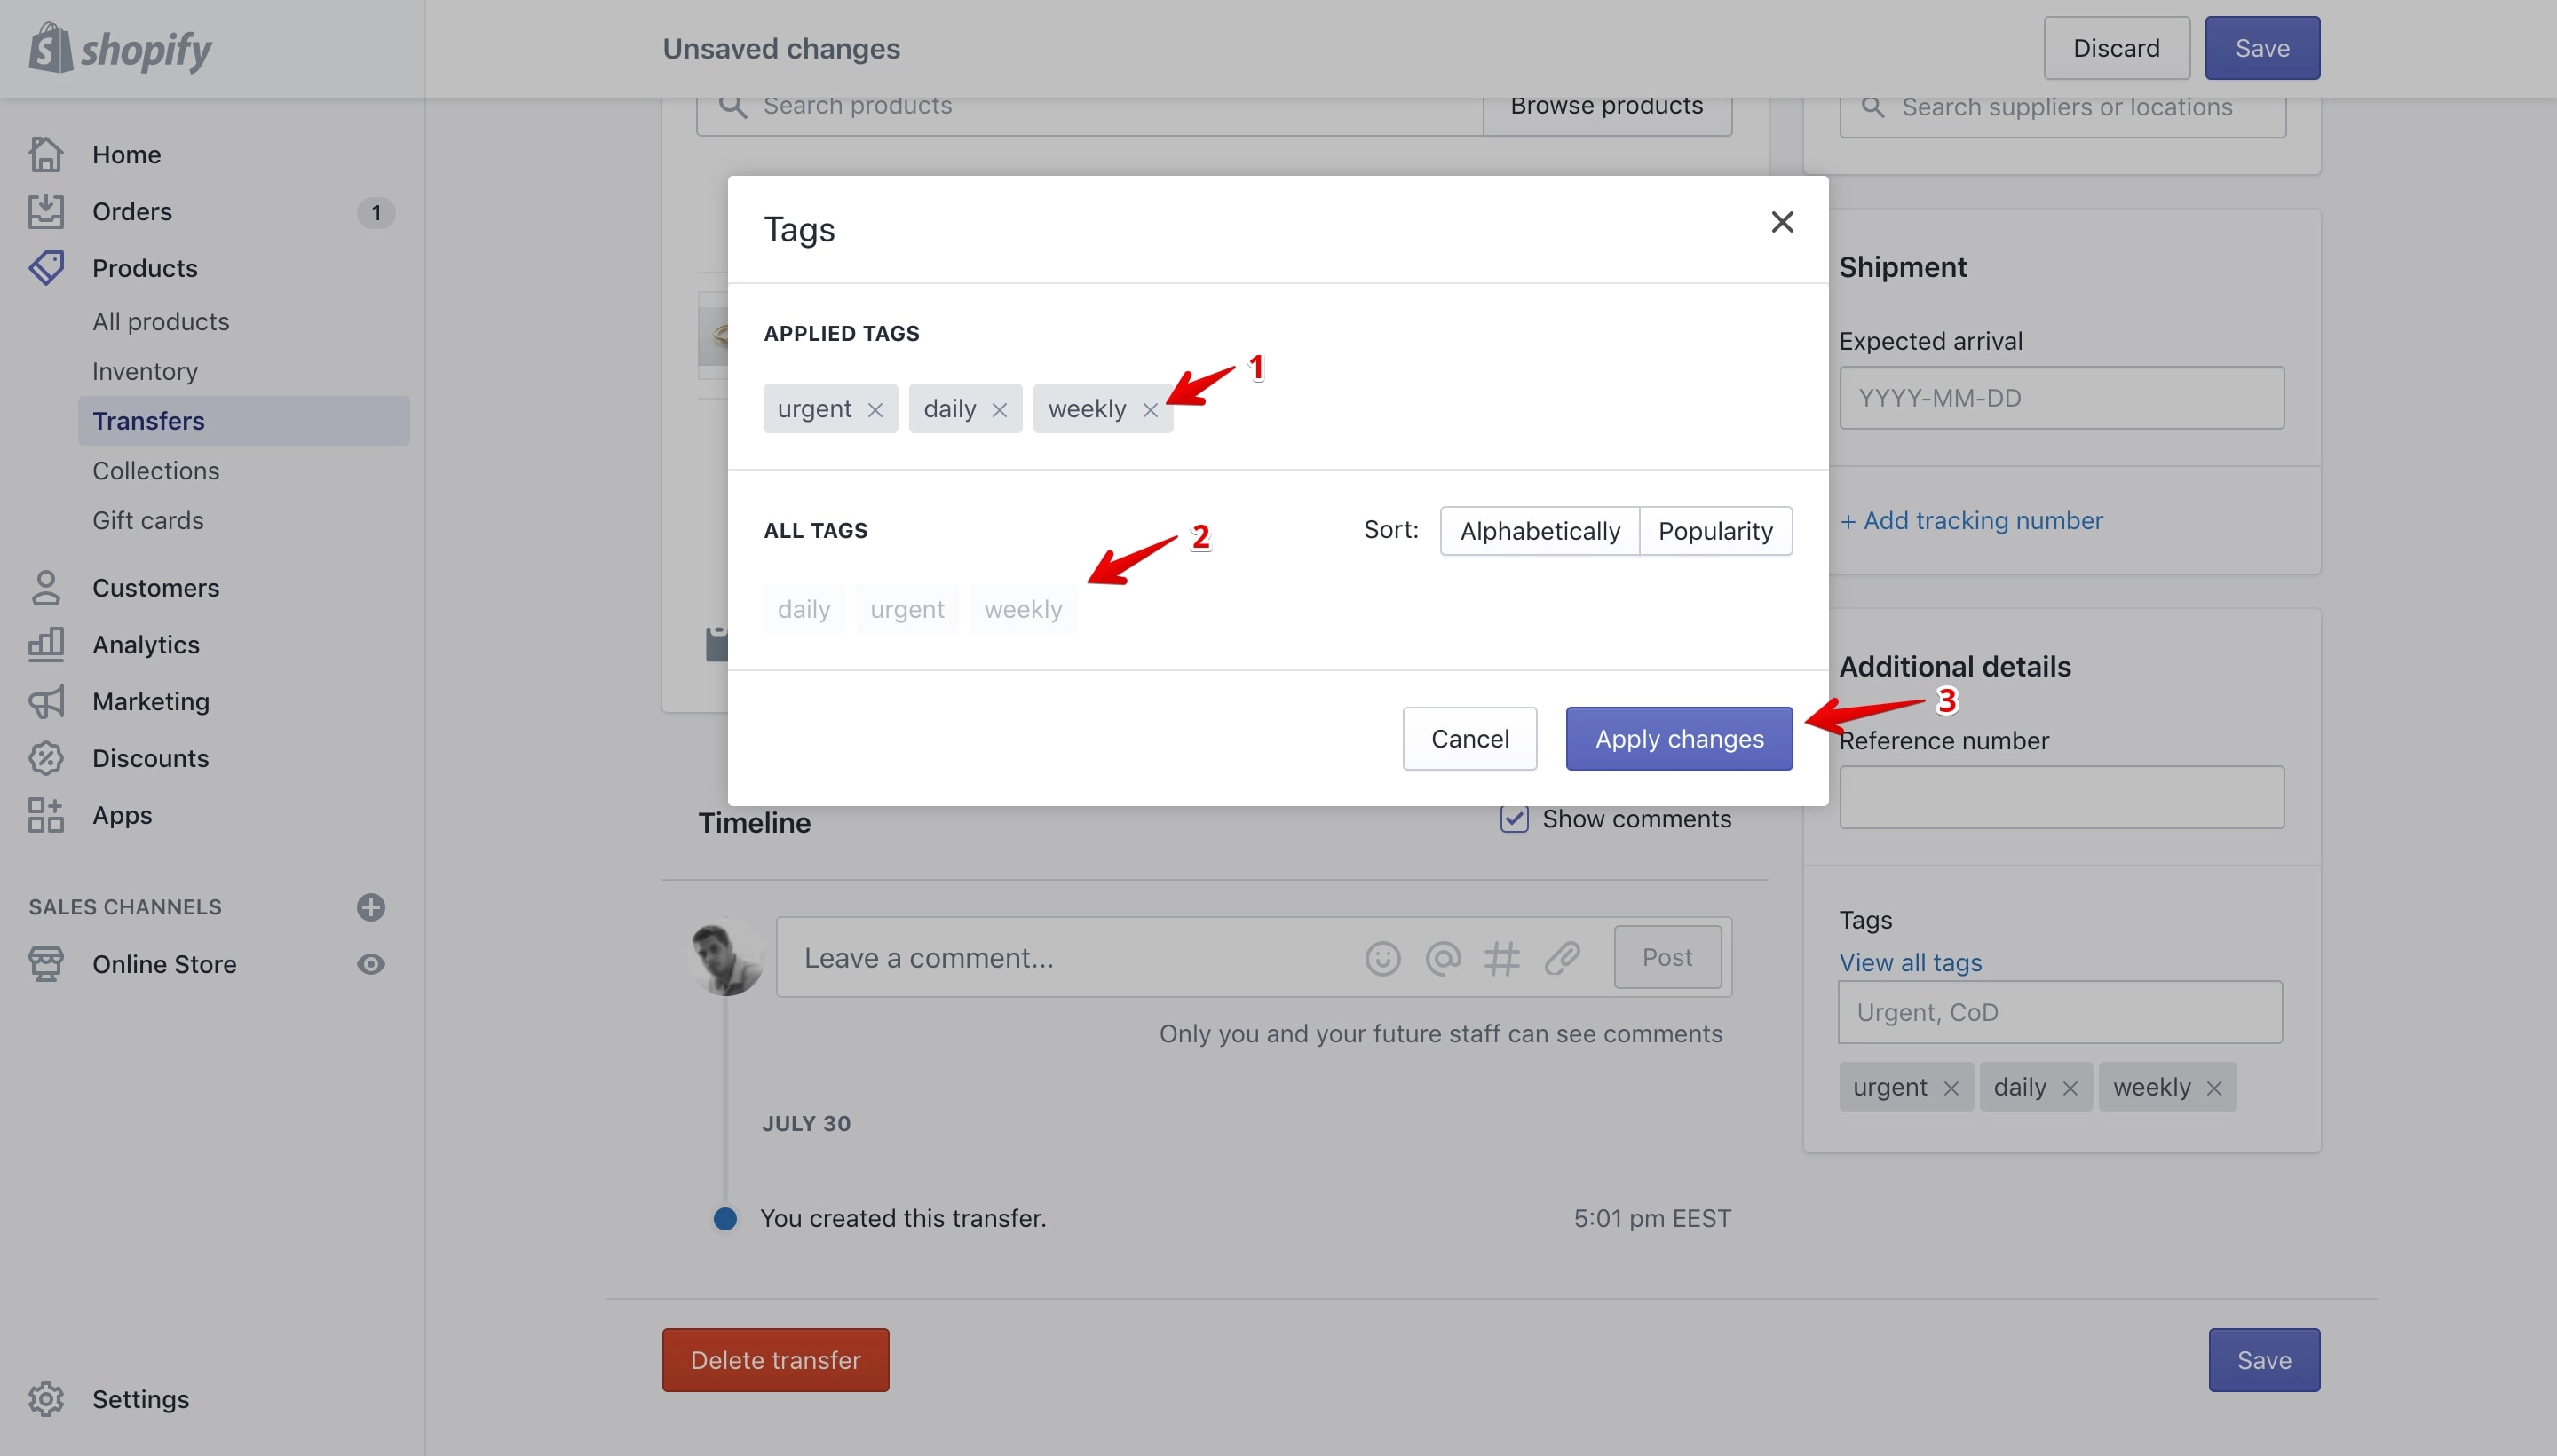
Click on the tag’s “X” icon to remove the tag (marked with 1 in the image above). Once you do that the tag will be removed from the “Applied Tags” section and added to the “All Tags” section of the pop-up (marked with 2 in the image above).
After you remove all the tags that you want from the product click the “Apply Changes” button (marked with 3 in the image above).
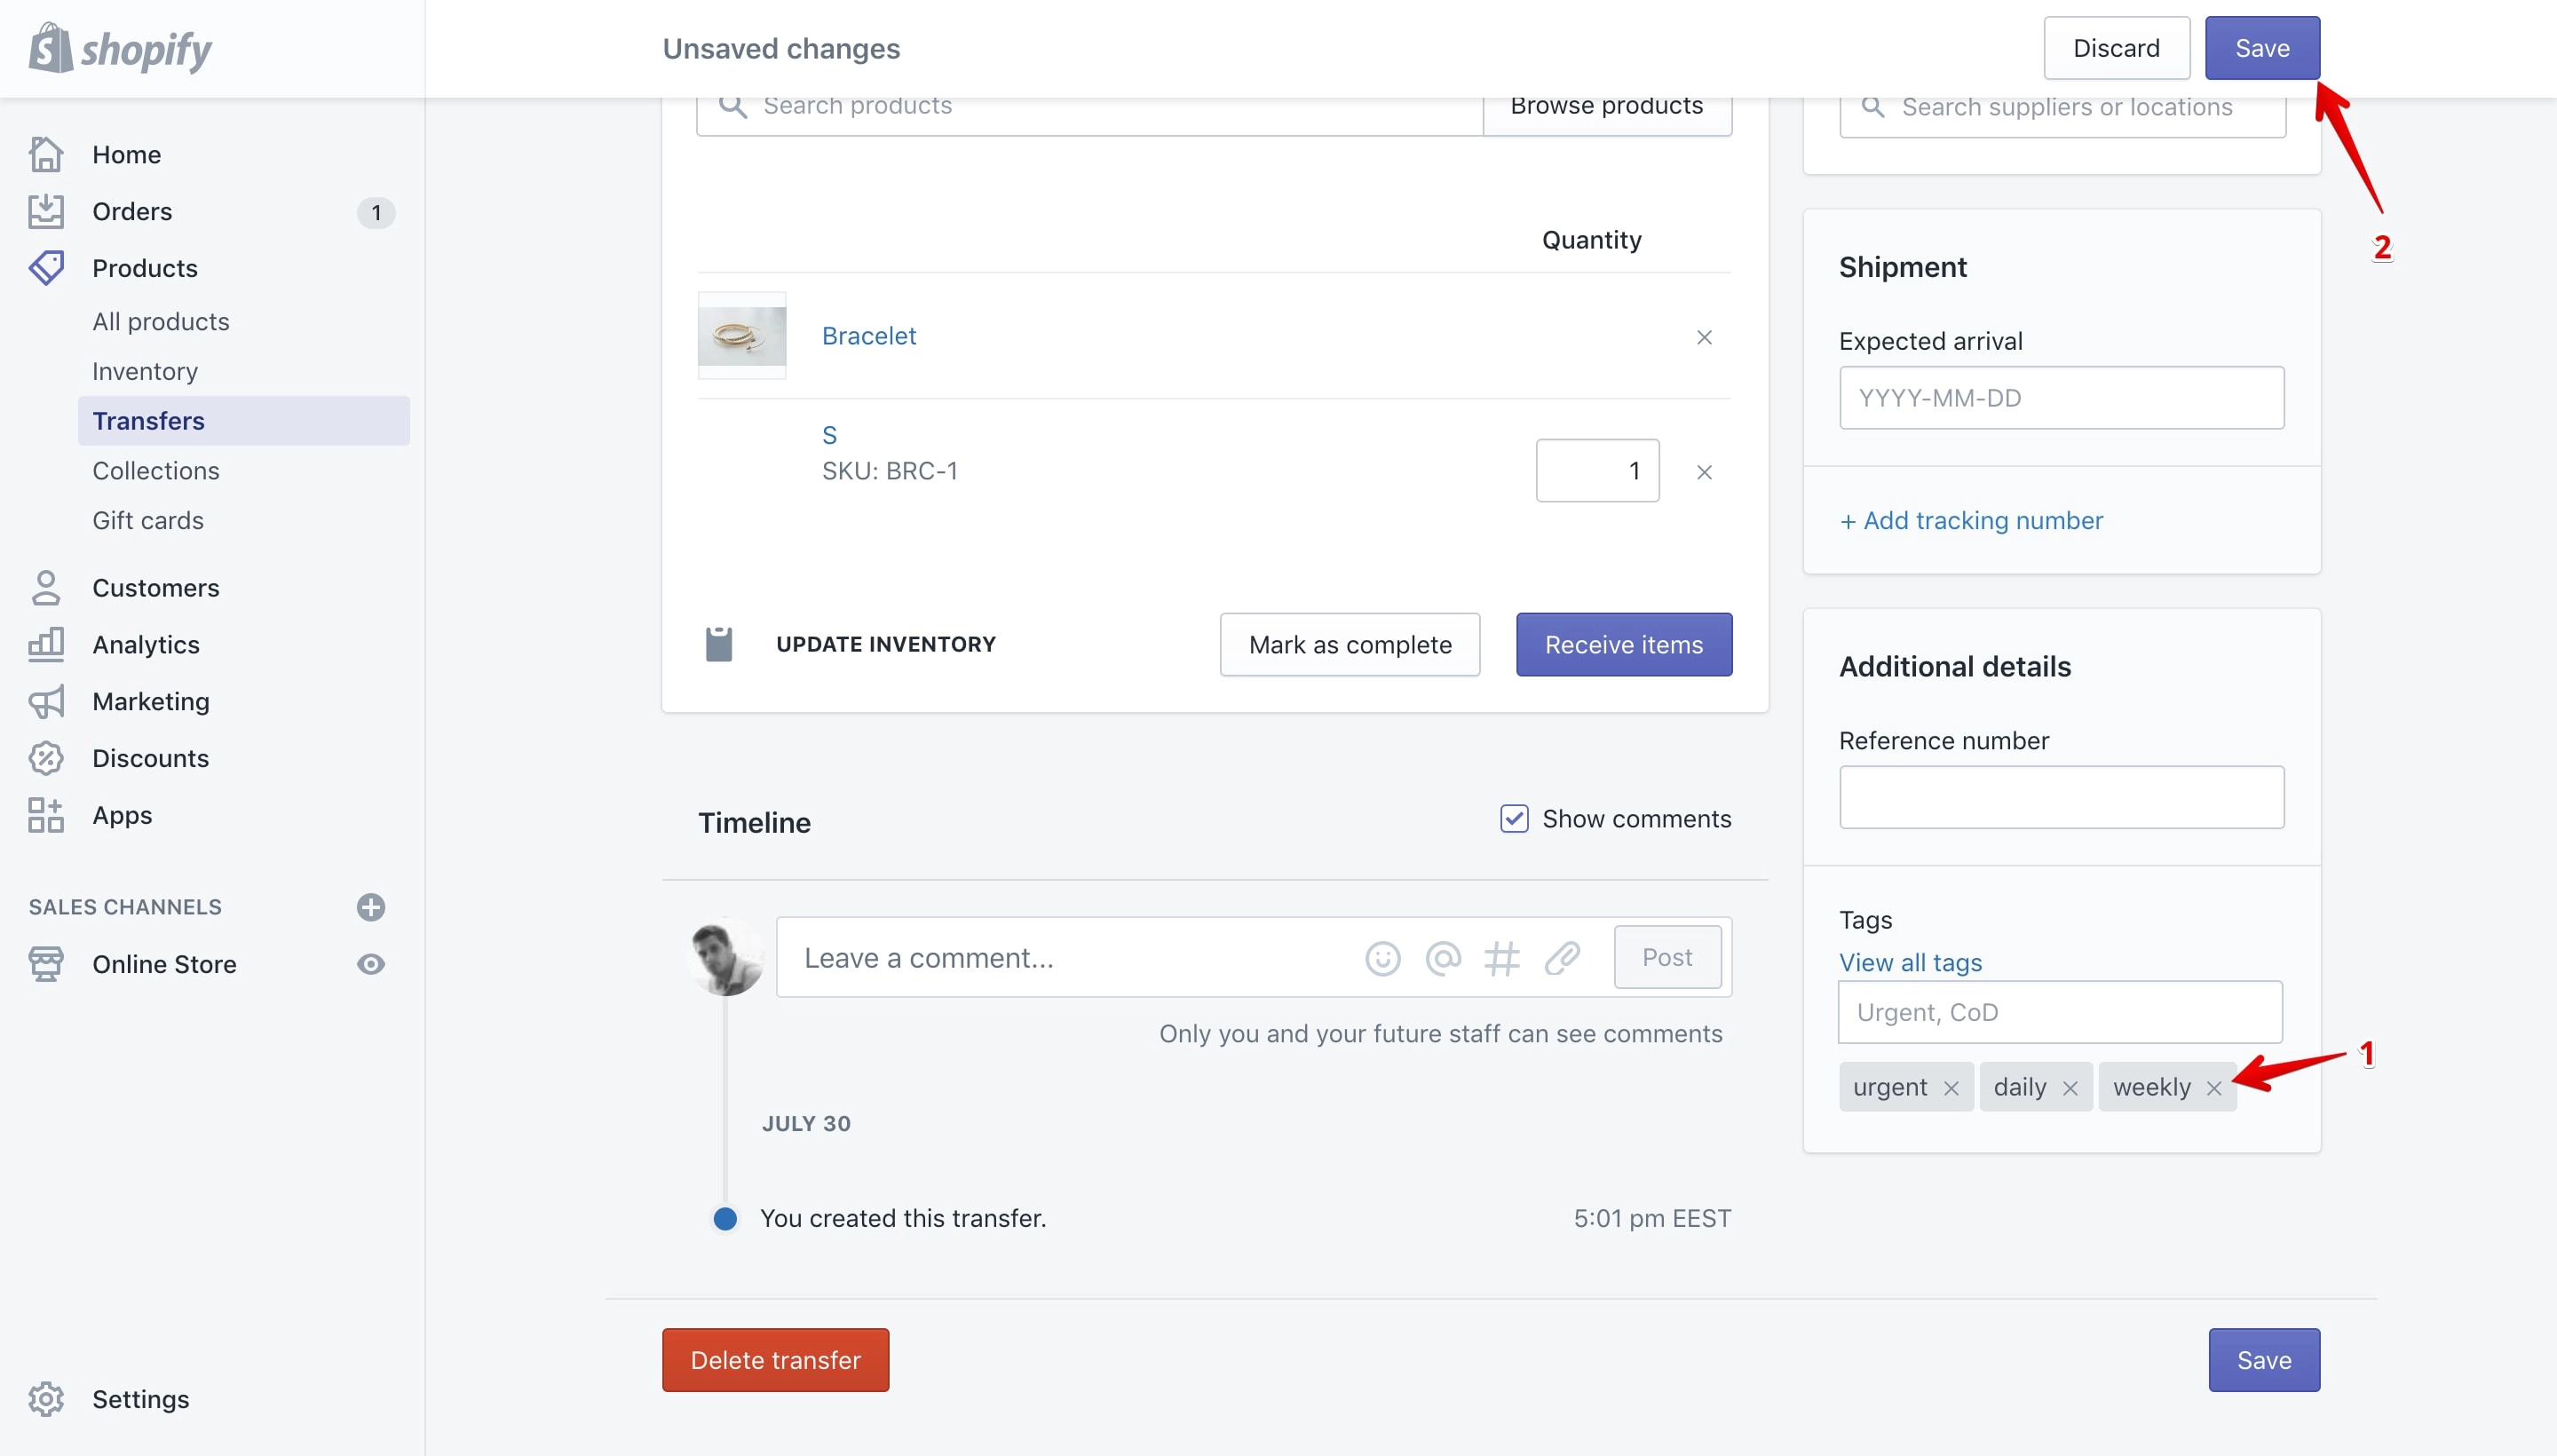
In my example I’ve removed the “weekly” tag from the transfer and once I’ve clicked the “Apply Changes” button the tag is no longer listed on the “Tags” section (marked with 1 in the image below) on the product details page:
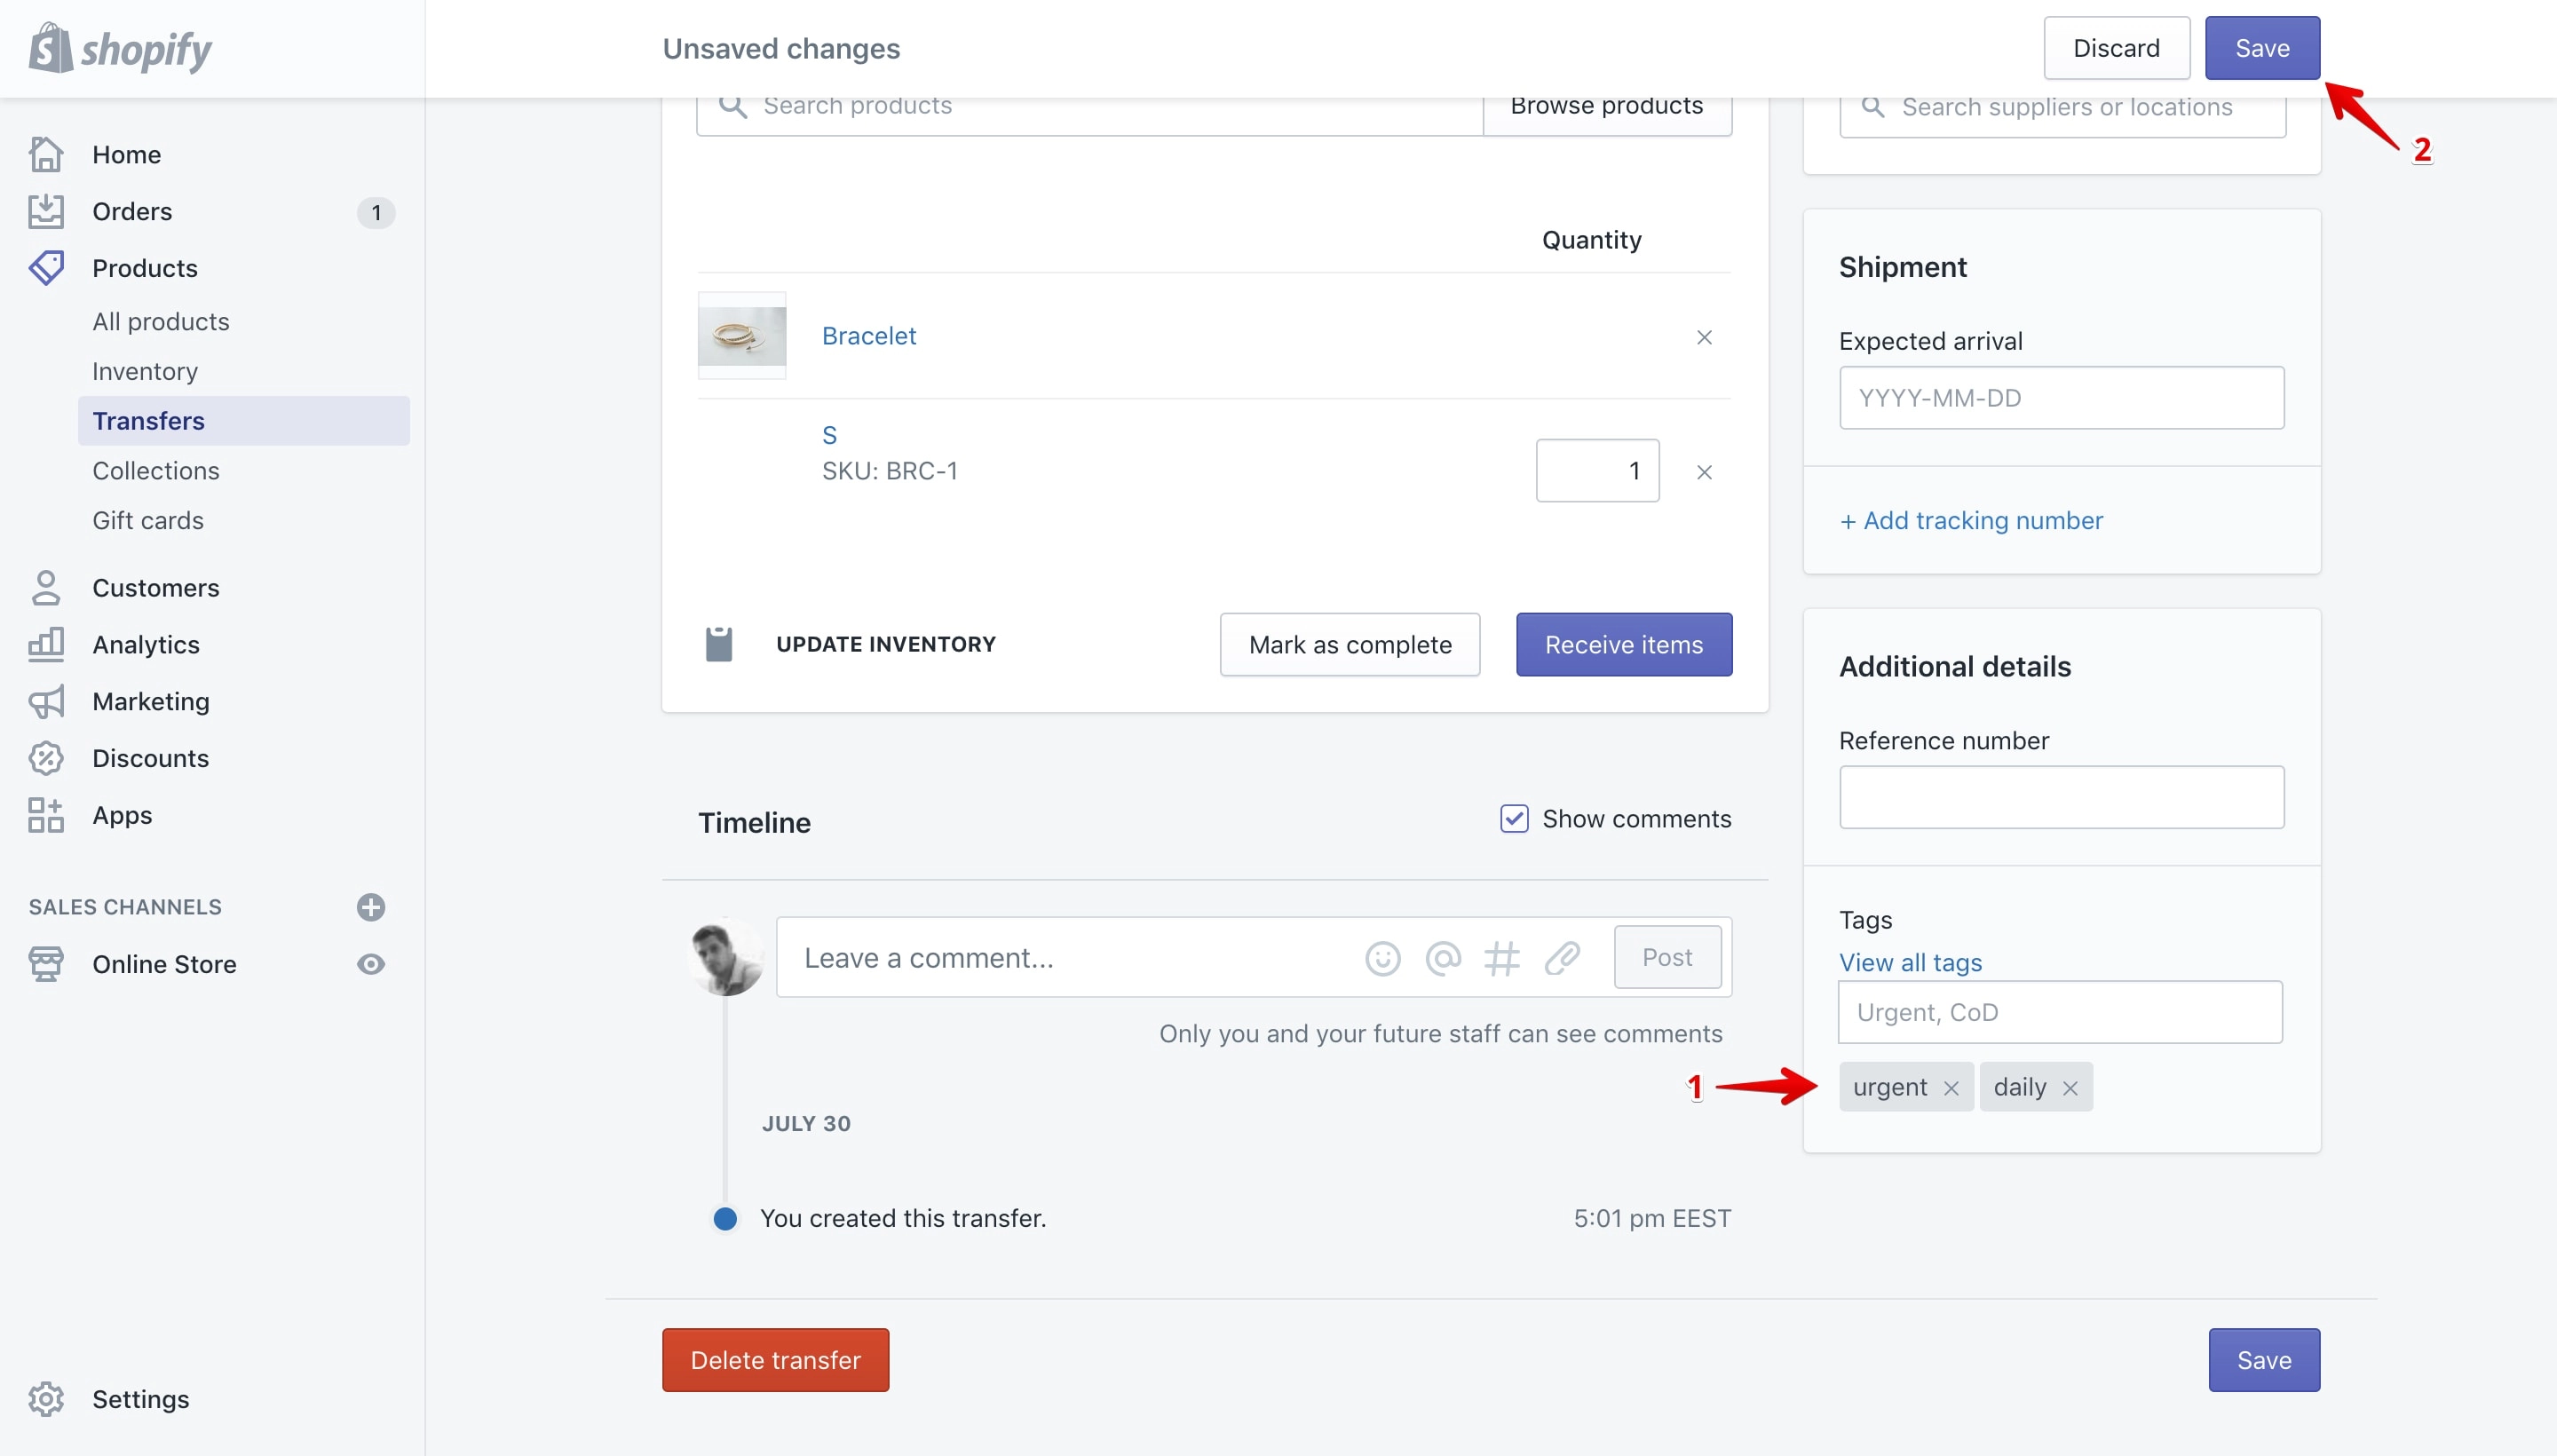
Keep in mind that if the tag is removed from the “Tags” section that does not mean that it is also removed from the transfer at this stage.
To completely remove it you need to save it by clicking the “Save” button (marked with 2 in the image above).
Order tags
Support up to 40 characters.
Order tags can be added from the order details page on every order from your store.
To access the page go to “Orders” (marked with 1 in the image below), and after to the order that you want to add tags too (marked with 2 in the image below):
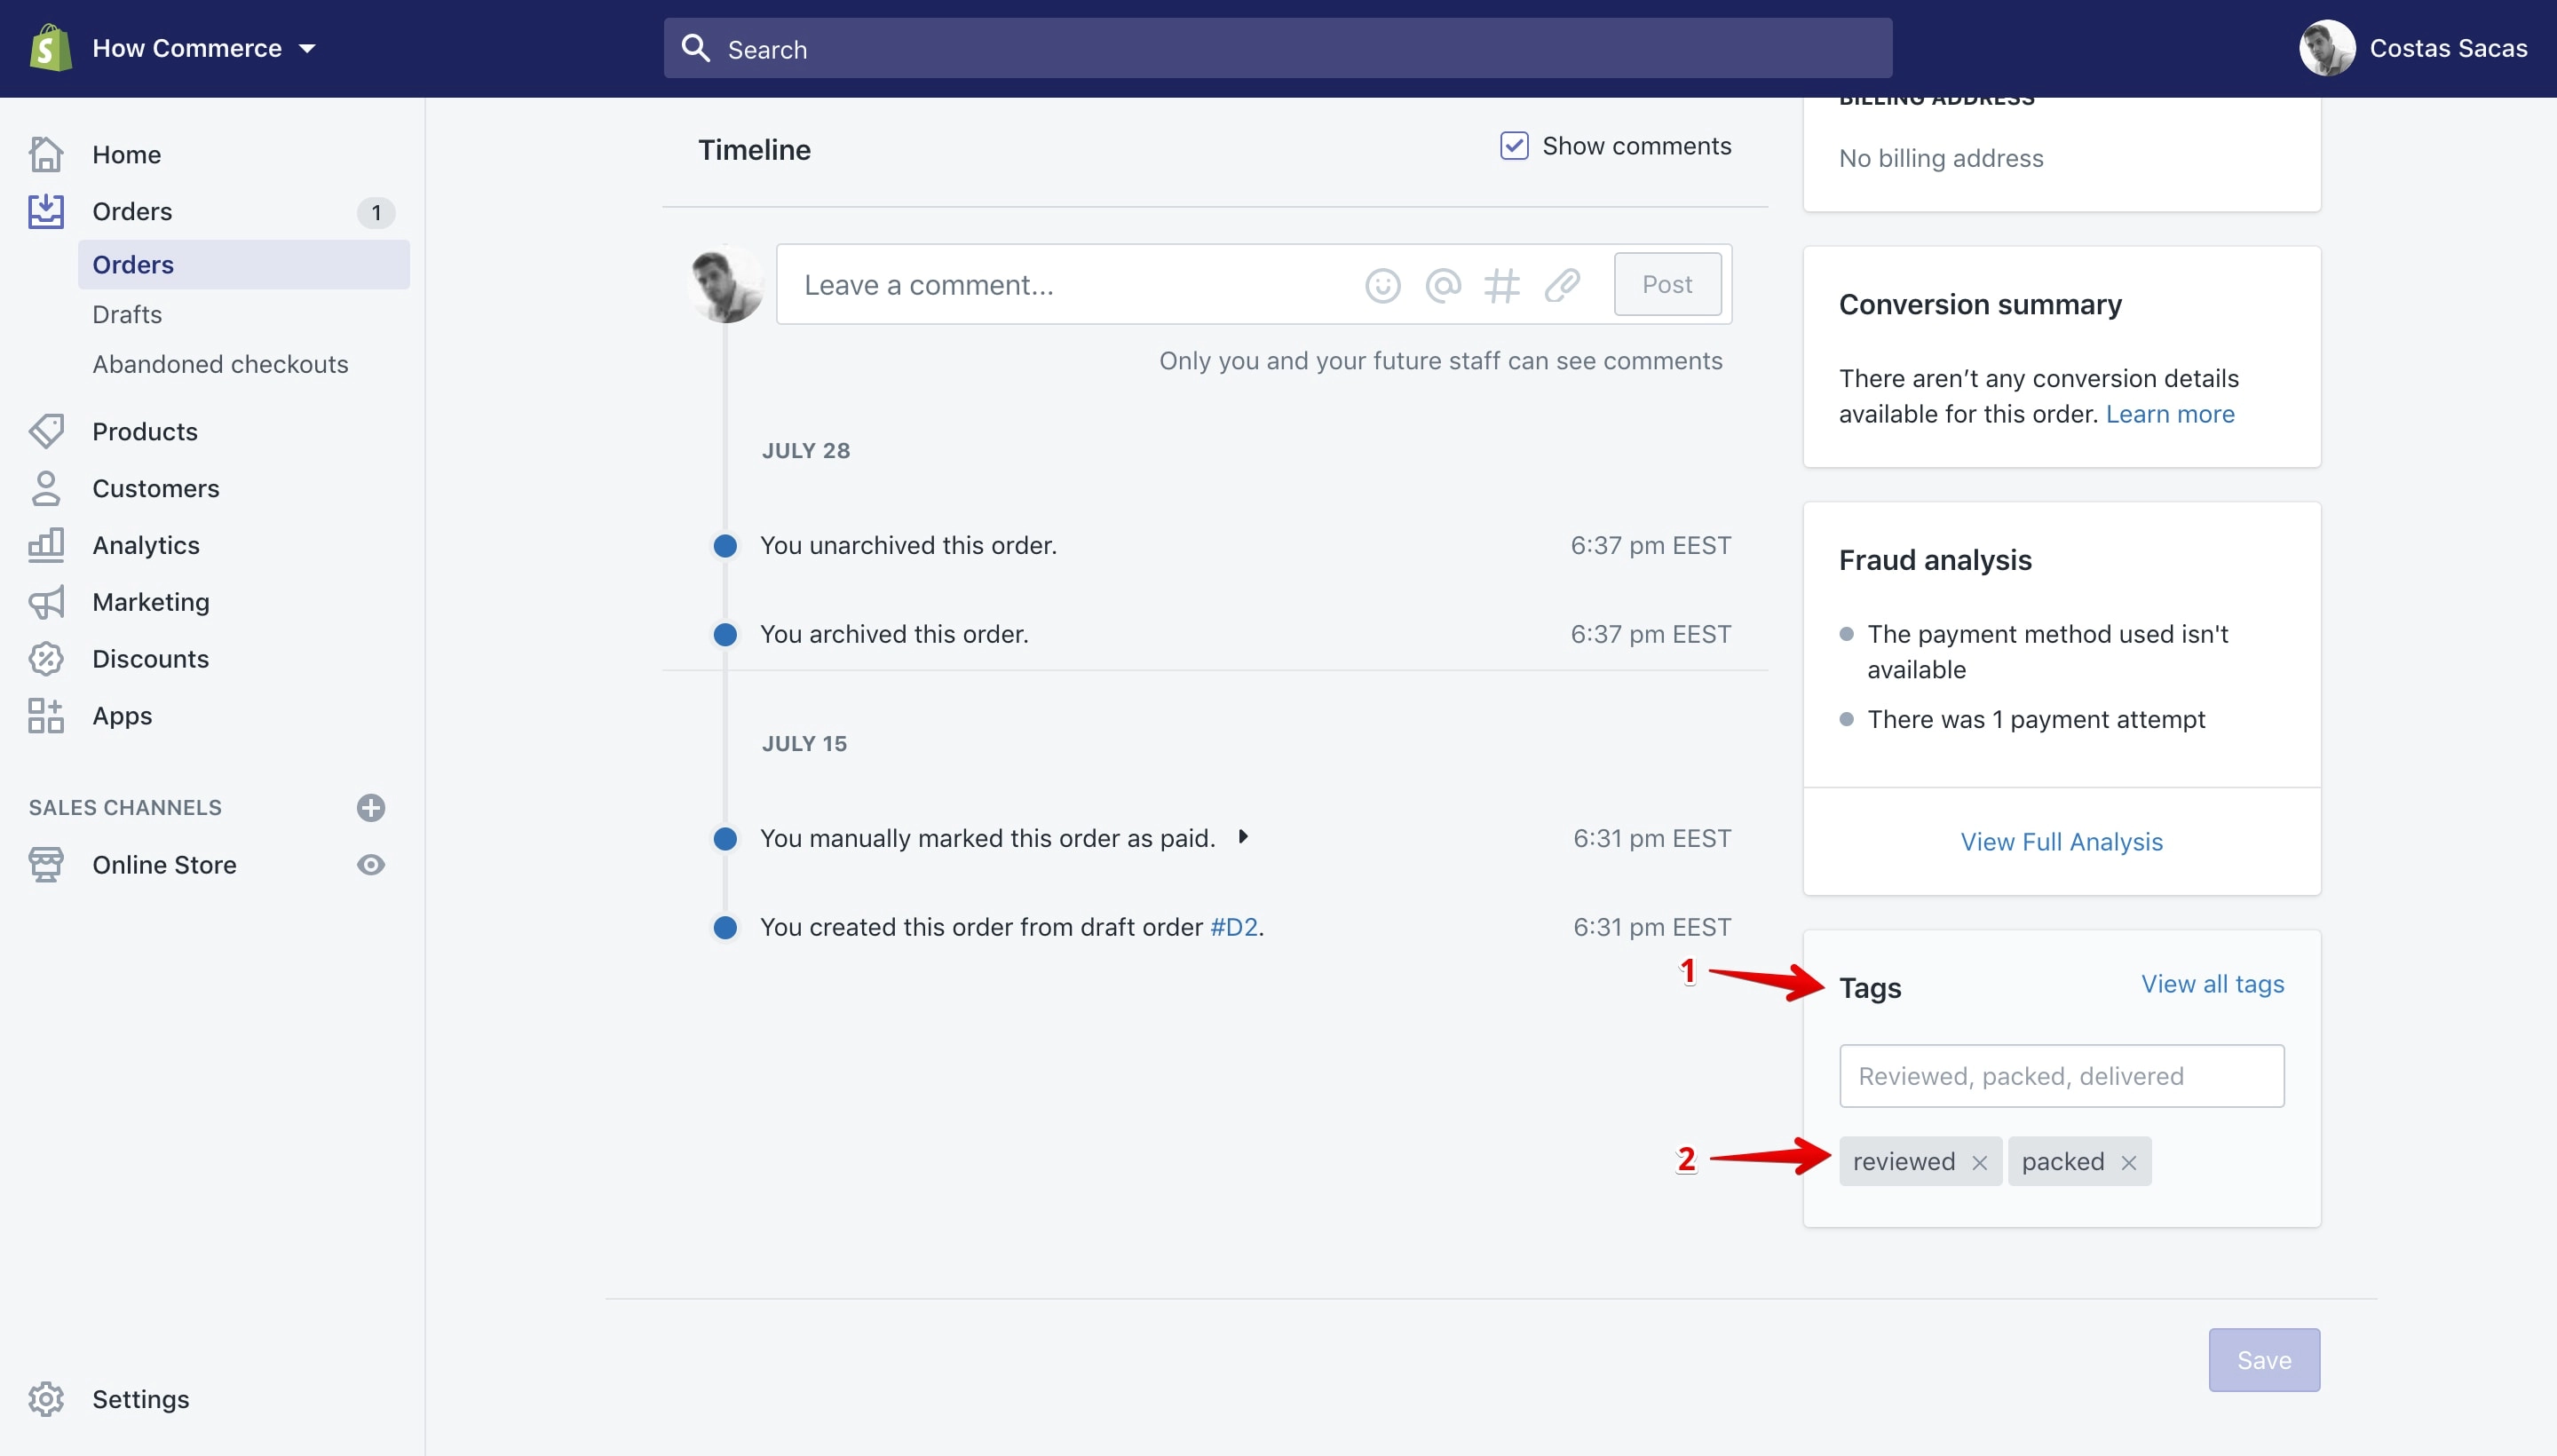
On the order details page you can view the tags section on the right sidebar (marked with 1 in the image below), and on this section you can see all tags associated with this order (marked with 2 in the image below):
Add a tag
The tags that you add to one order can be viewed from any order details page and can be used by all orders available in the online store.
You can add a tag to an order in 2 ways:
- New and existing tags can be added through the input box.
- Existing tags can be added through the “View all tags” link.
Adding a tag through the input box
New tags can be added only through this option. Type the name of the tag inside the input box and hit ↵ (Enter) key or click the “Add” tag:
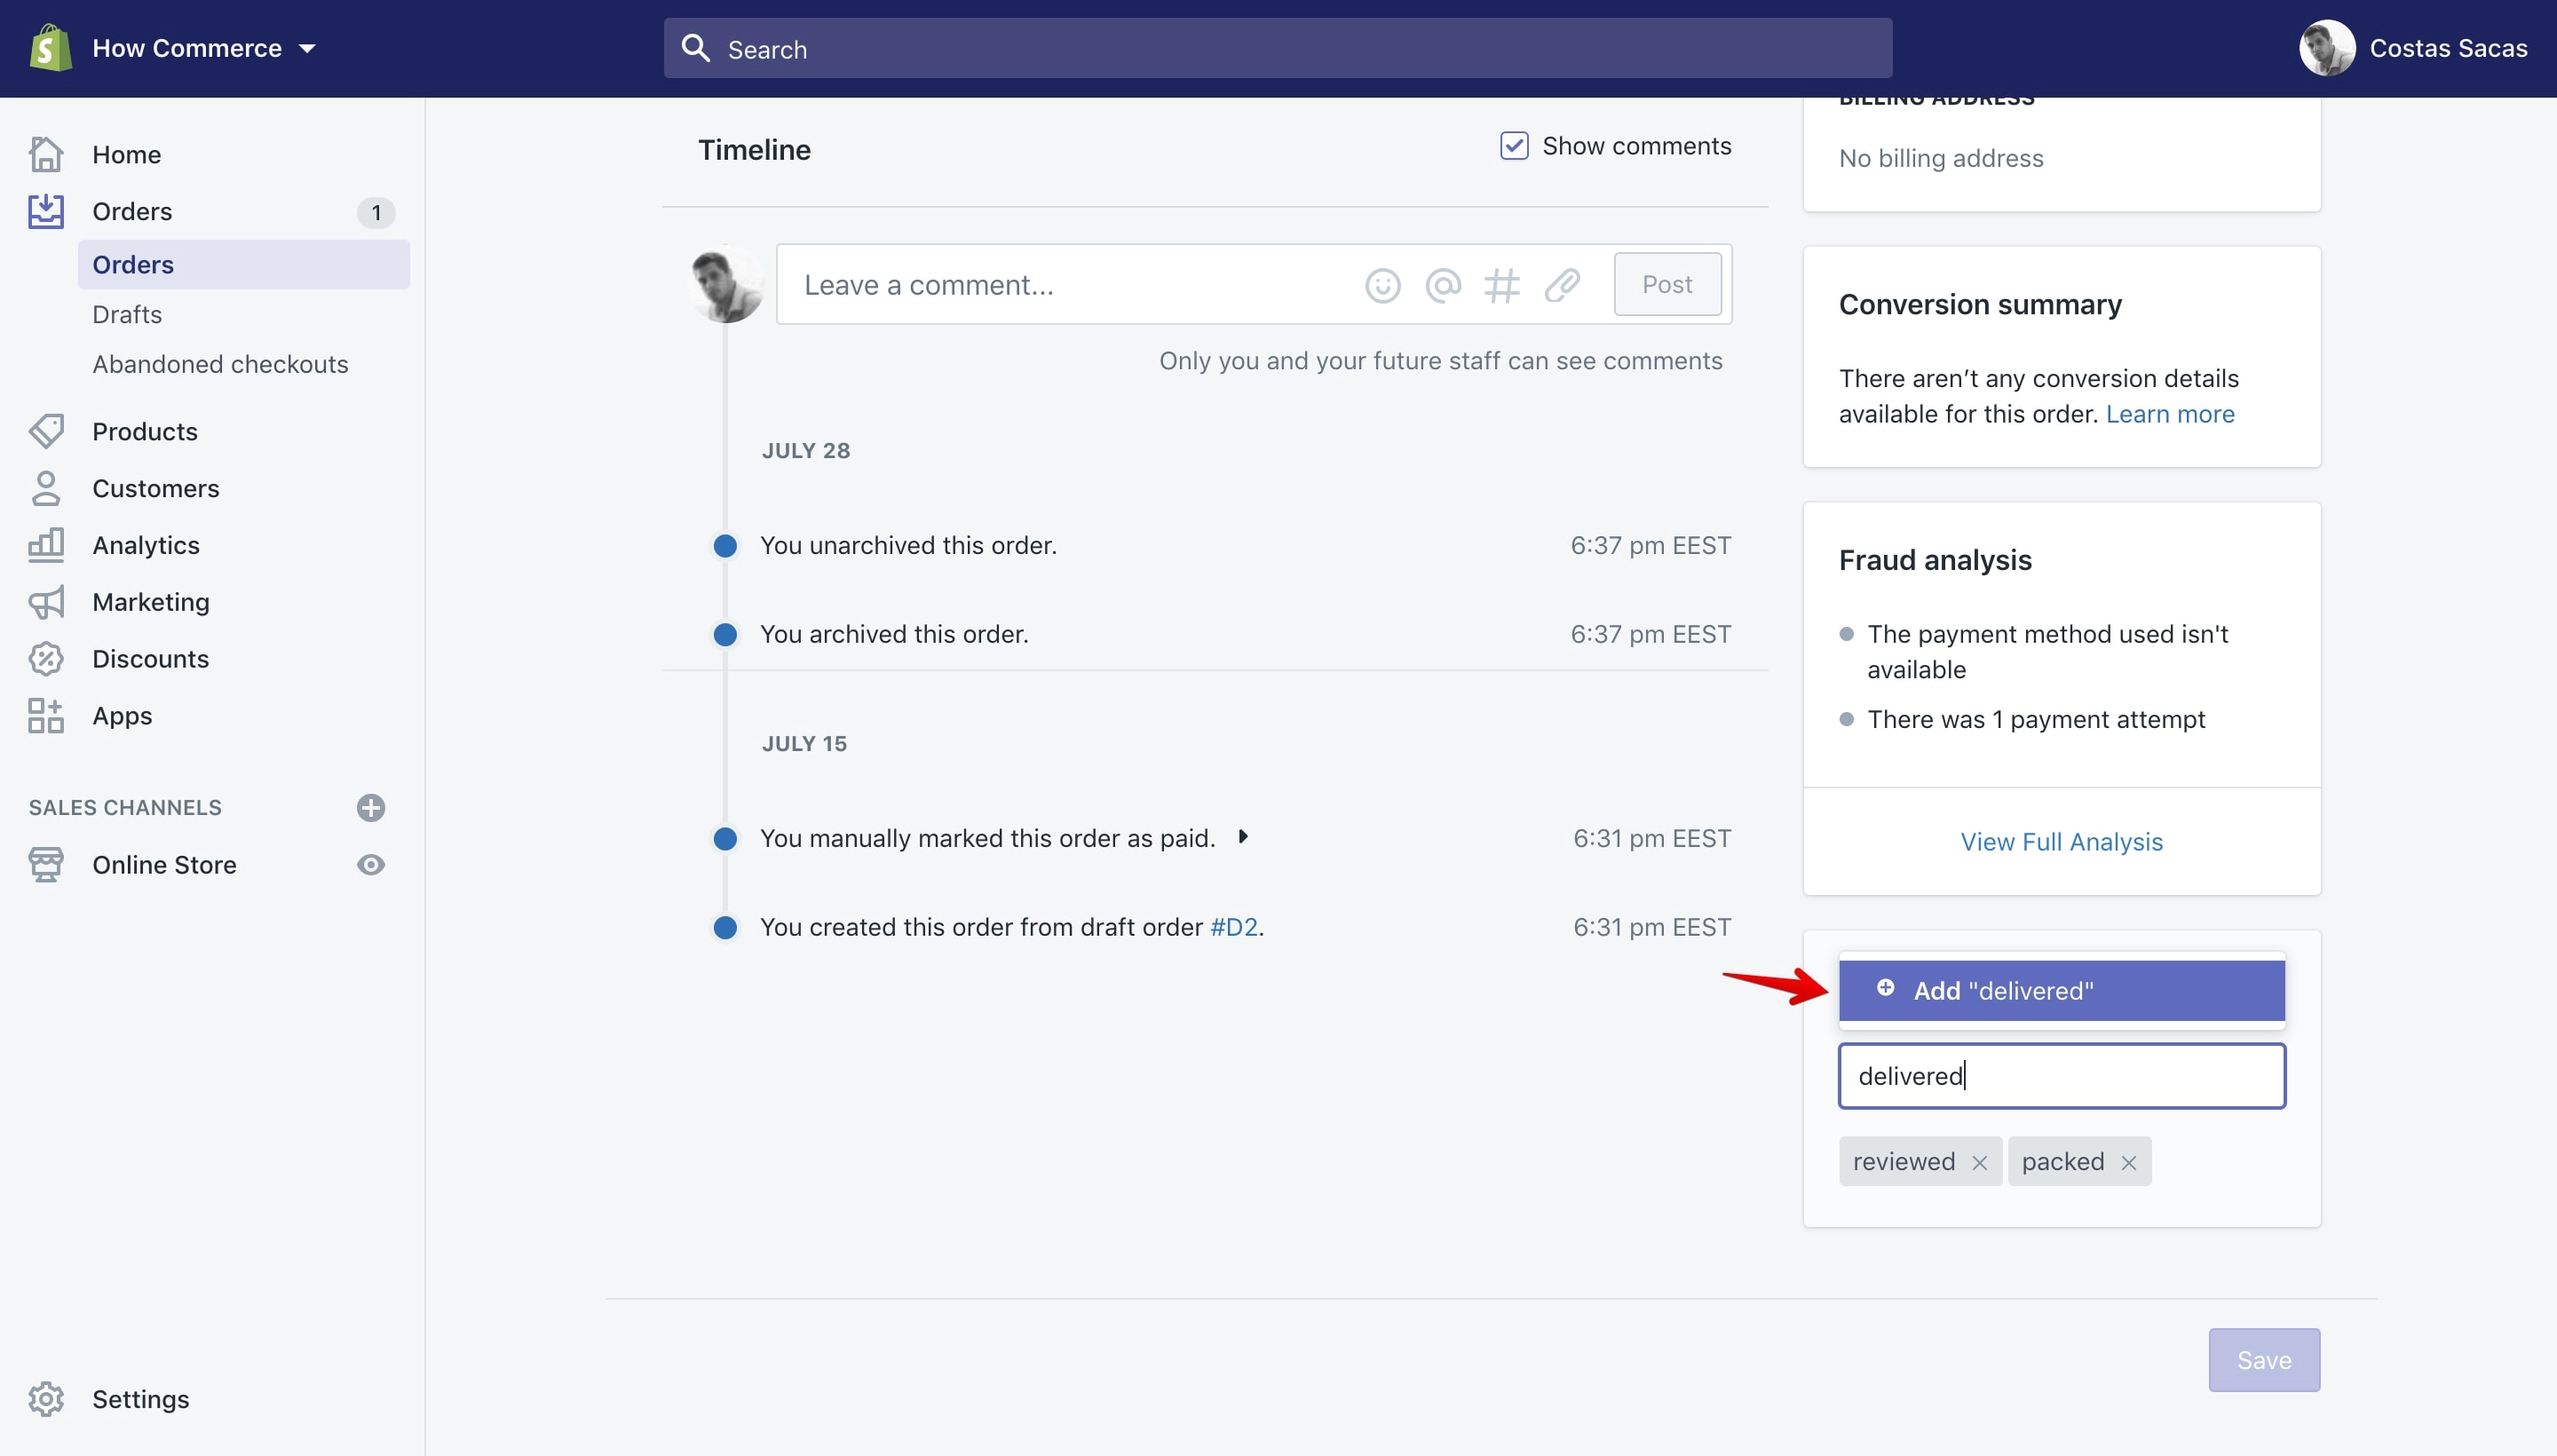
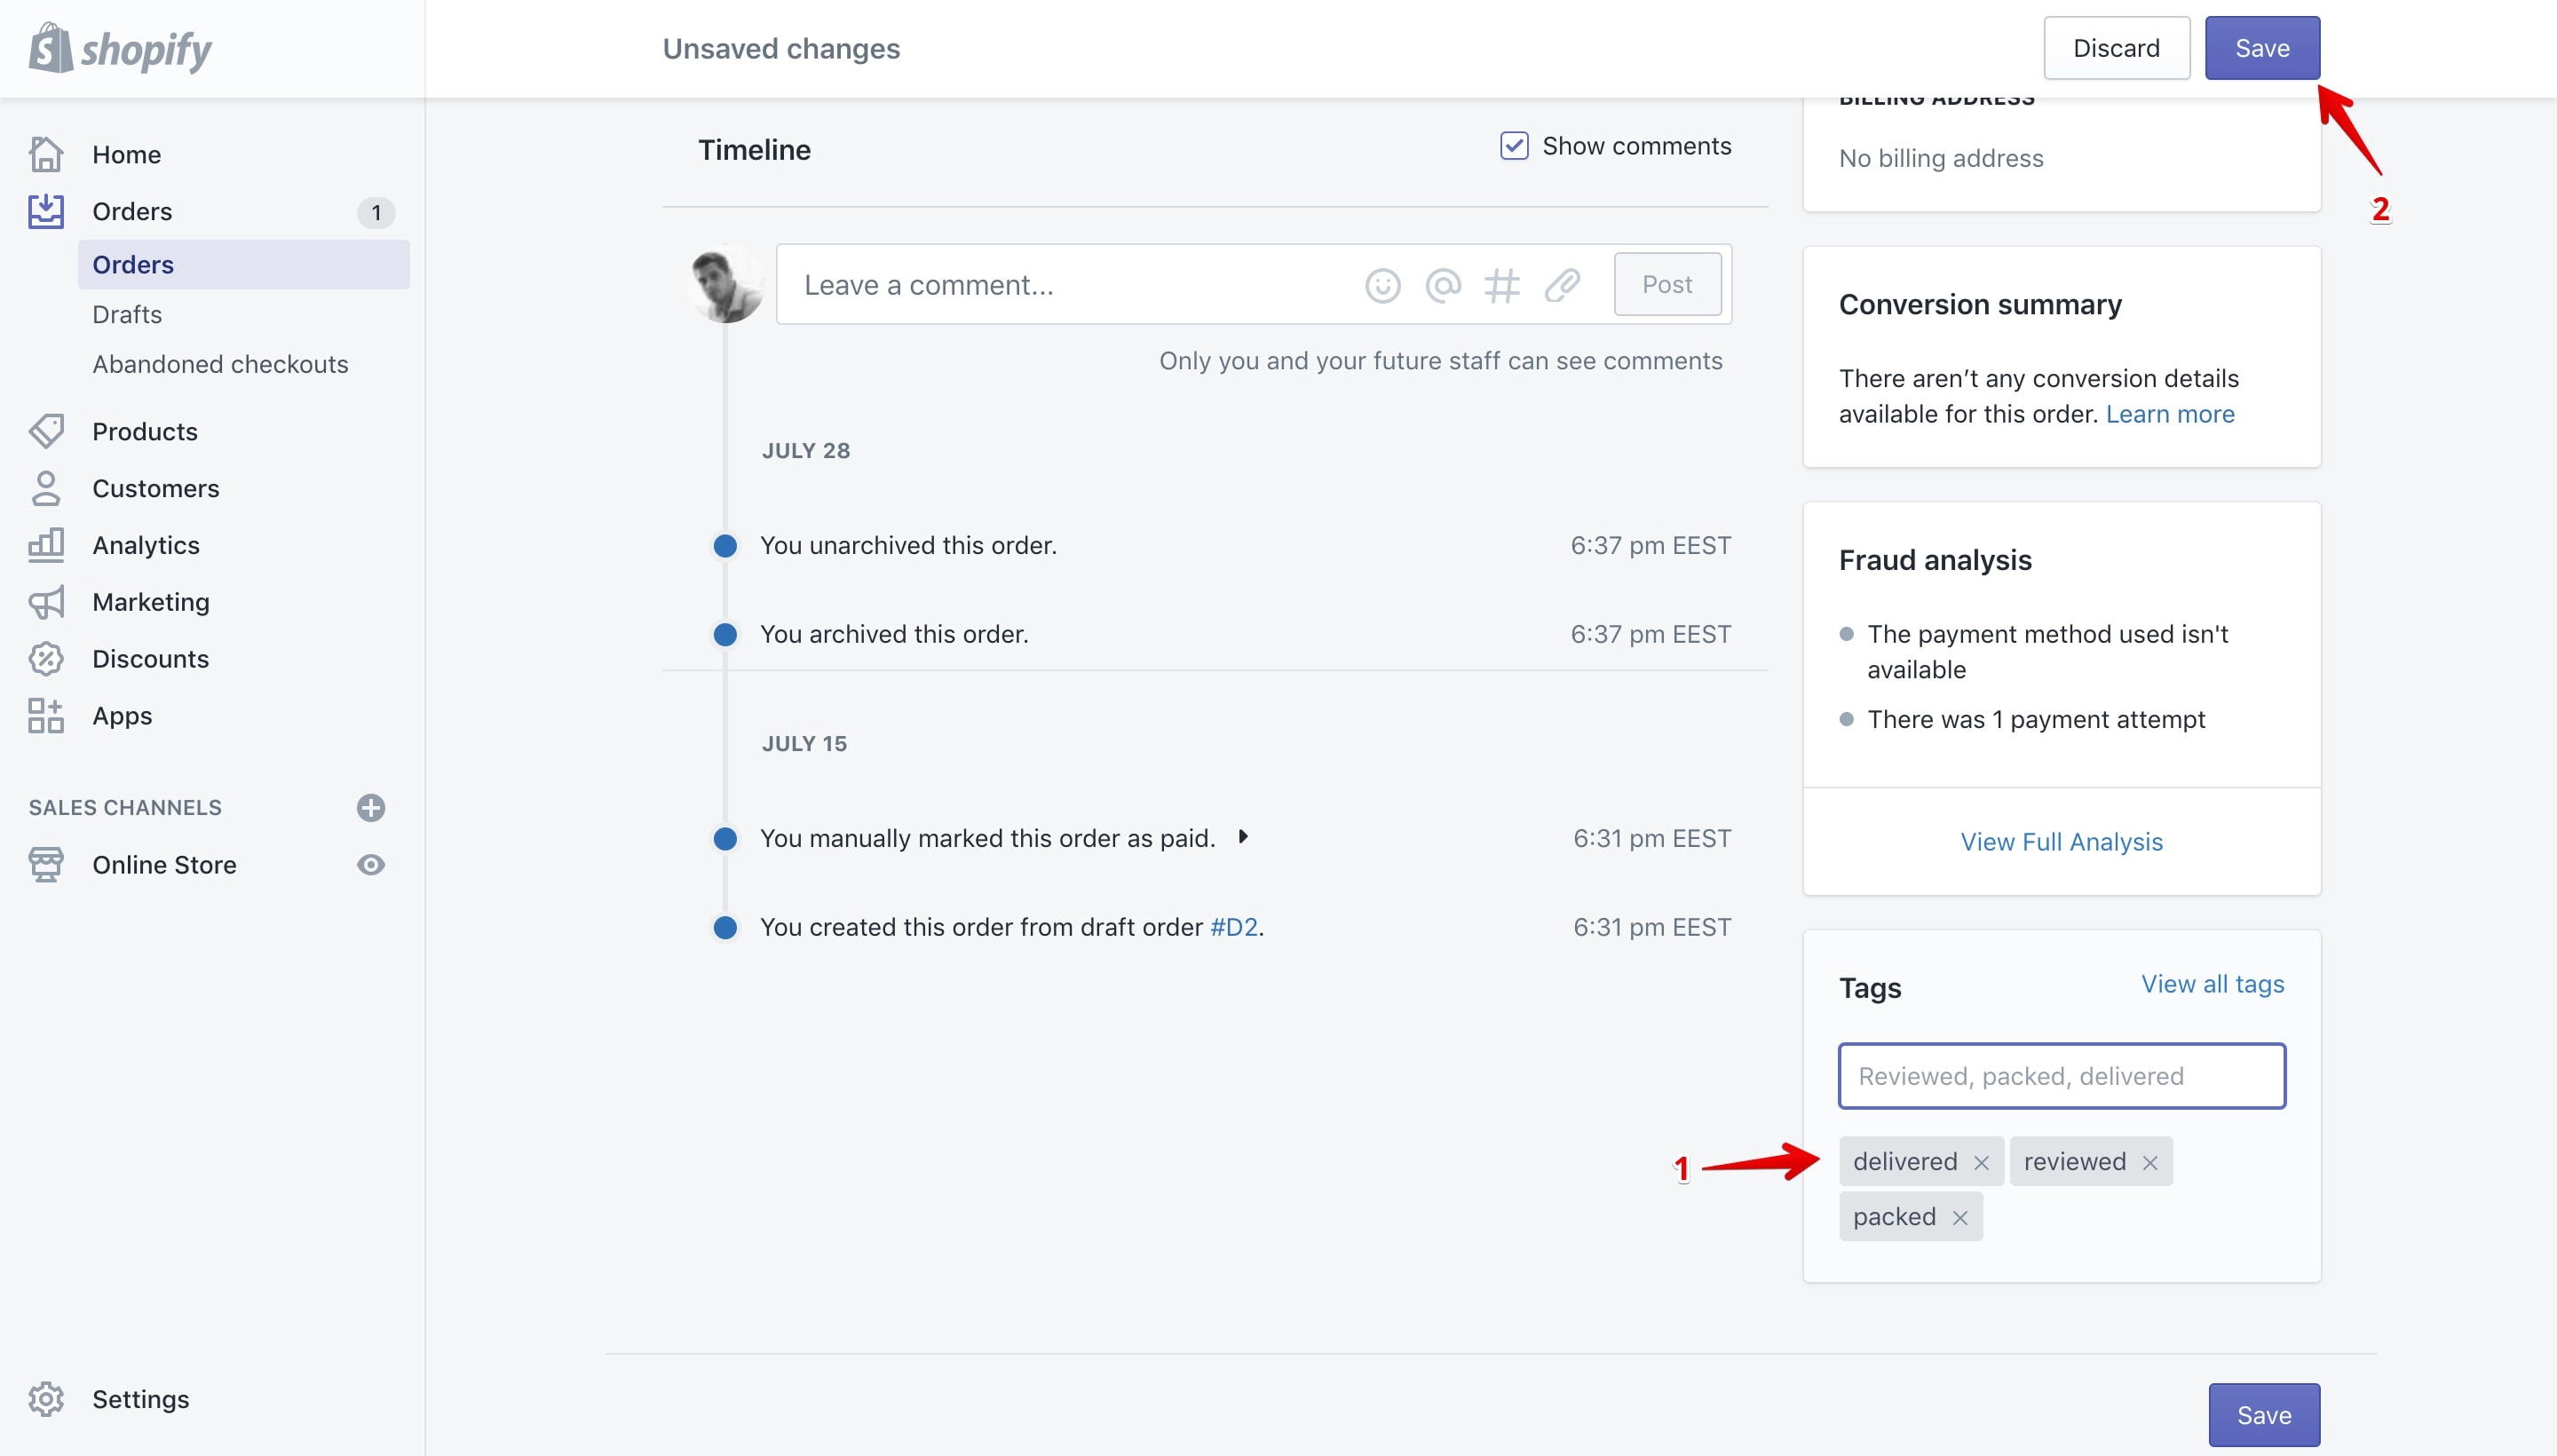
After you add the tag it will display below the input box (marked with 1 in the image below). You need to save it so you can store it permanently and use it on all your store orders. To do that click the “Save” button (marked with 2 in the image below):
Adding a tag through the “View all tags” link
Through this link you can add only existing tags to your orders and you can’t create new ones.
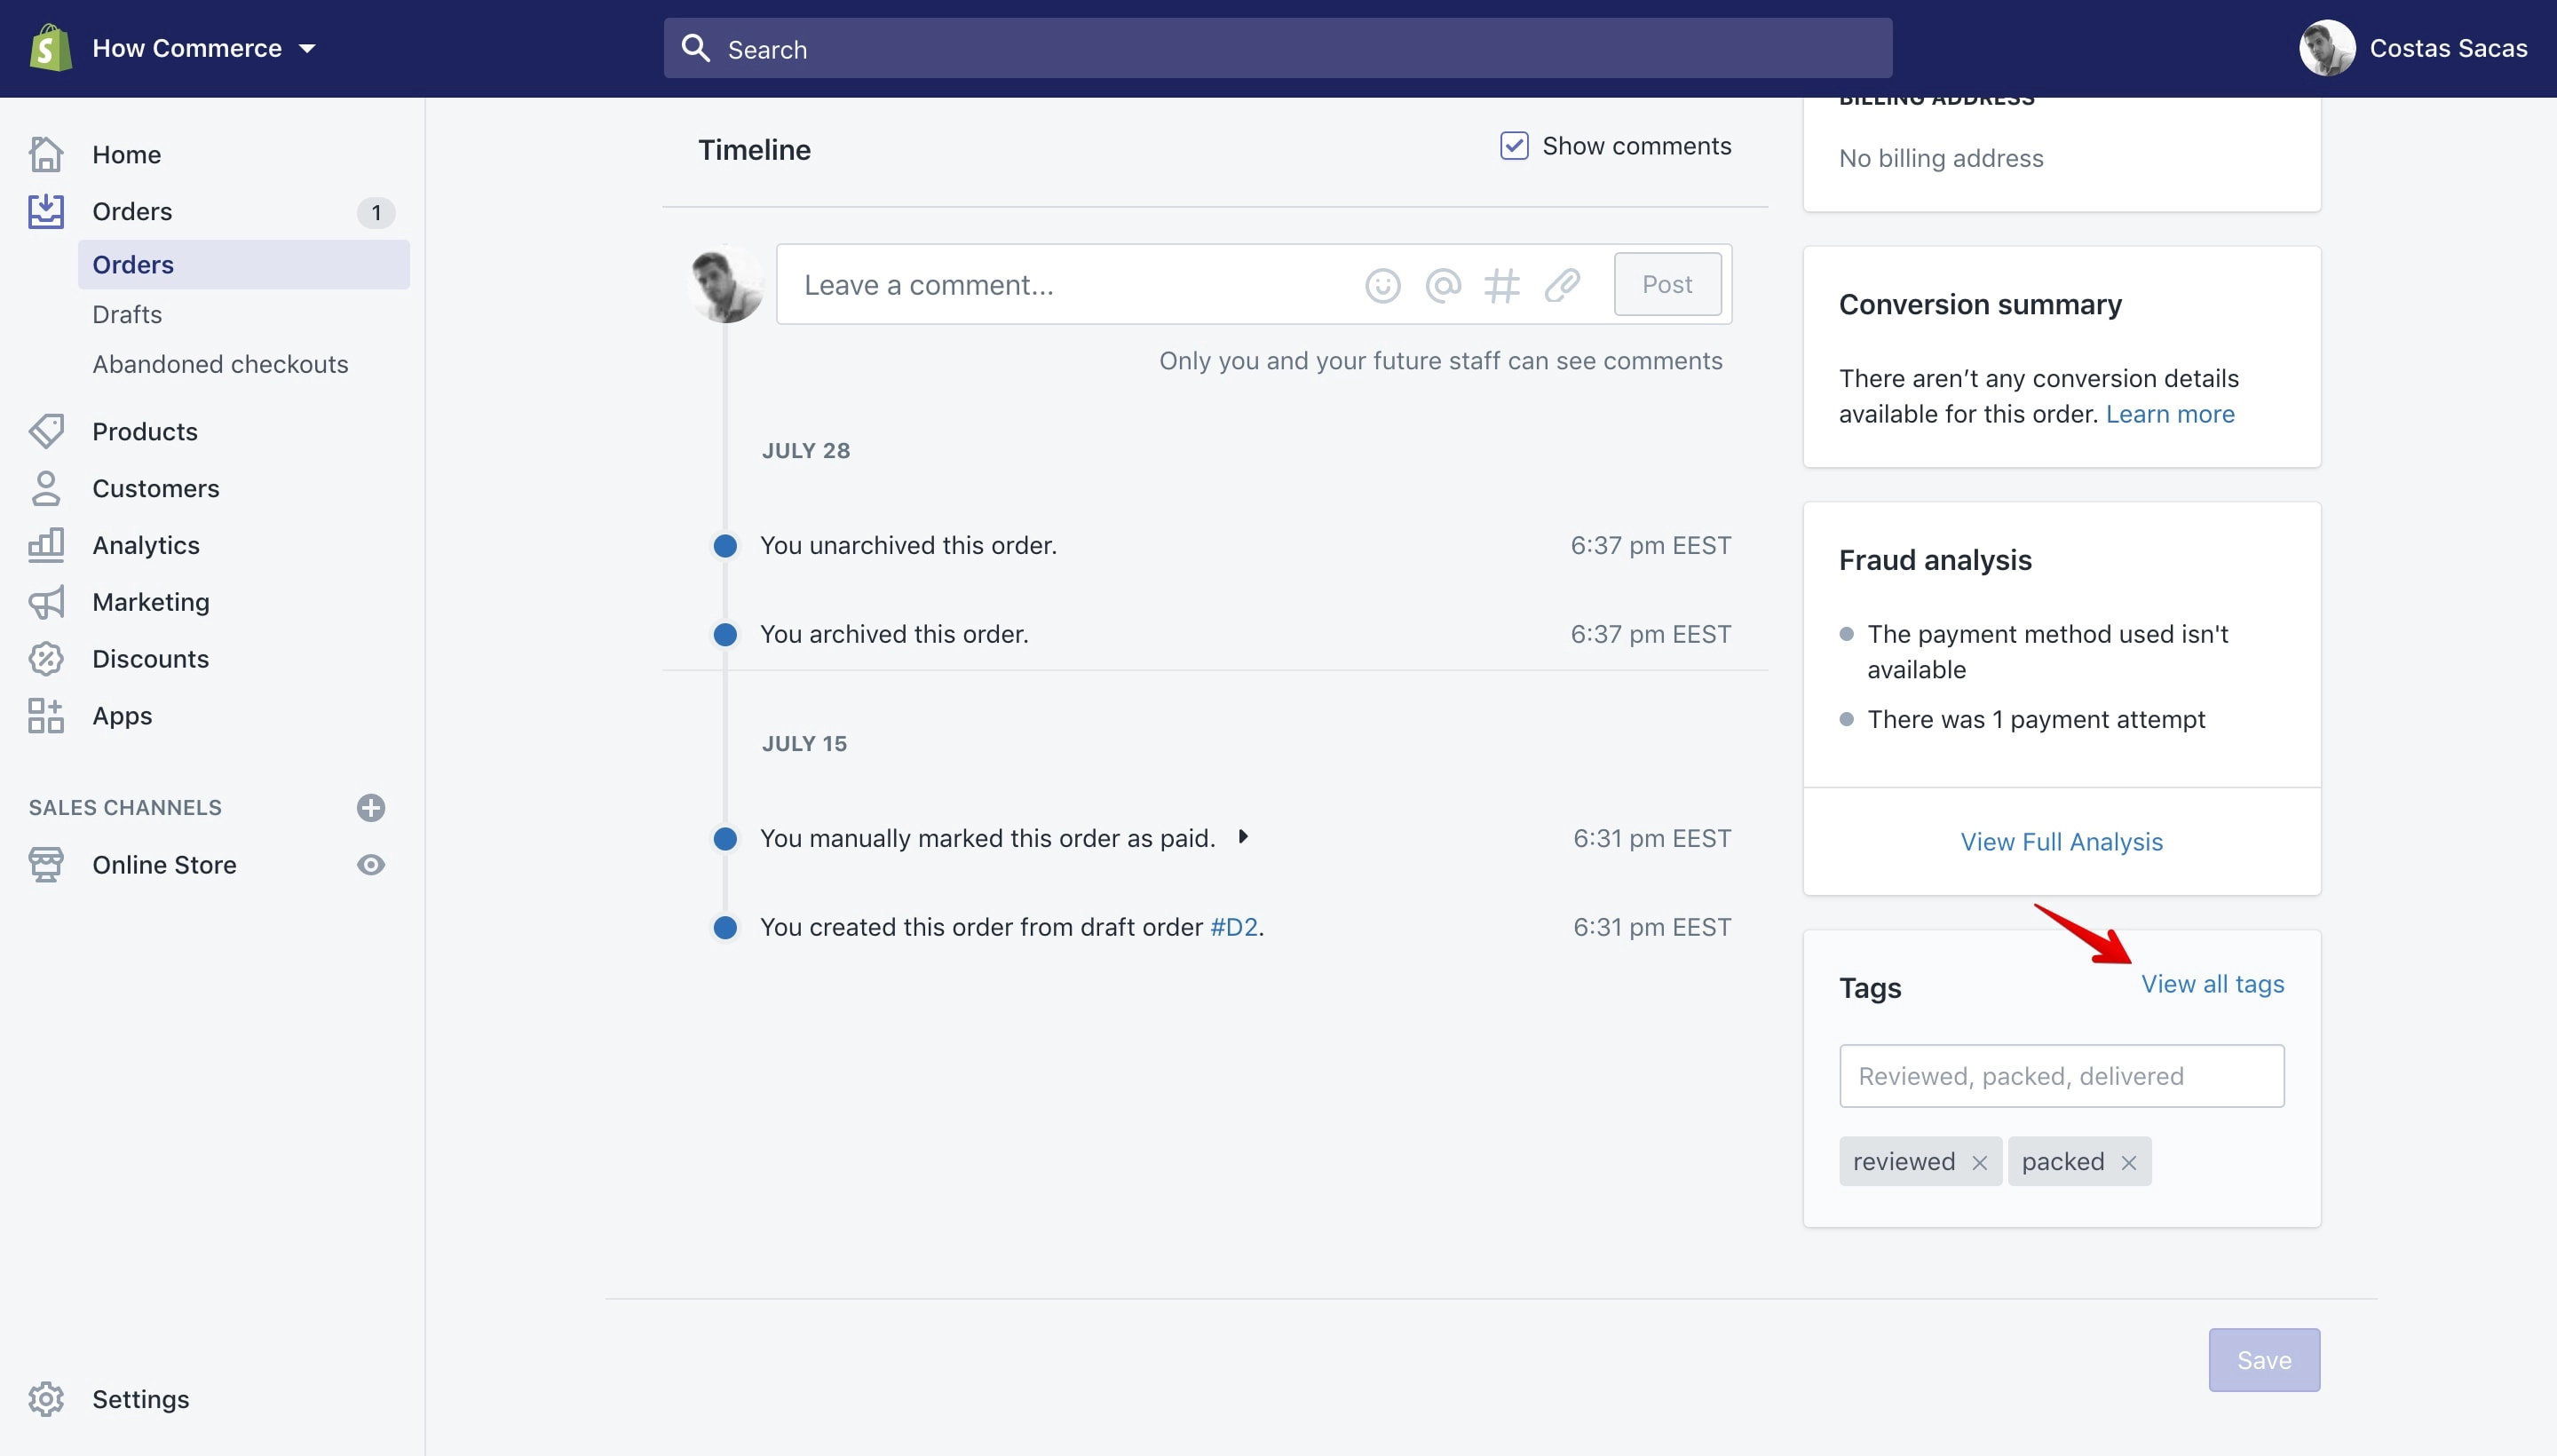
Clicking on the “View all tags” link will open a pop-up that will allow you to select and assign new tags to the order:
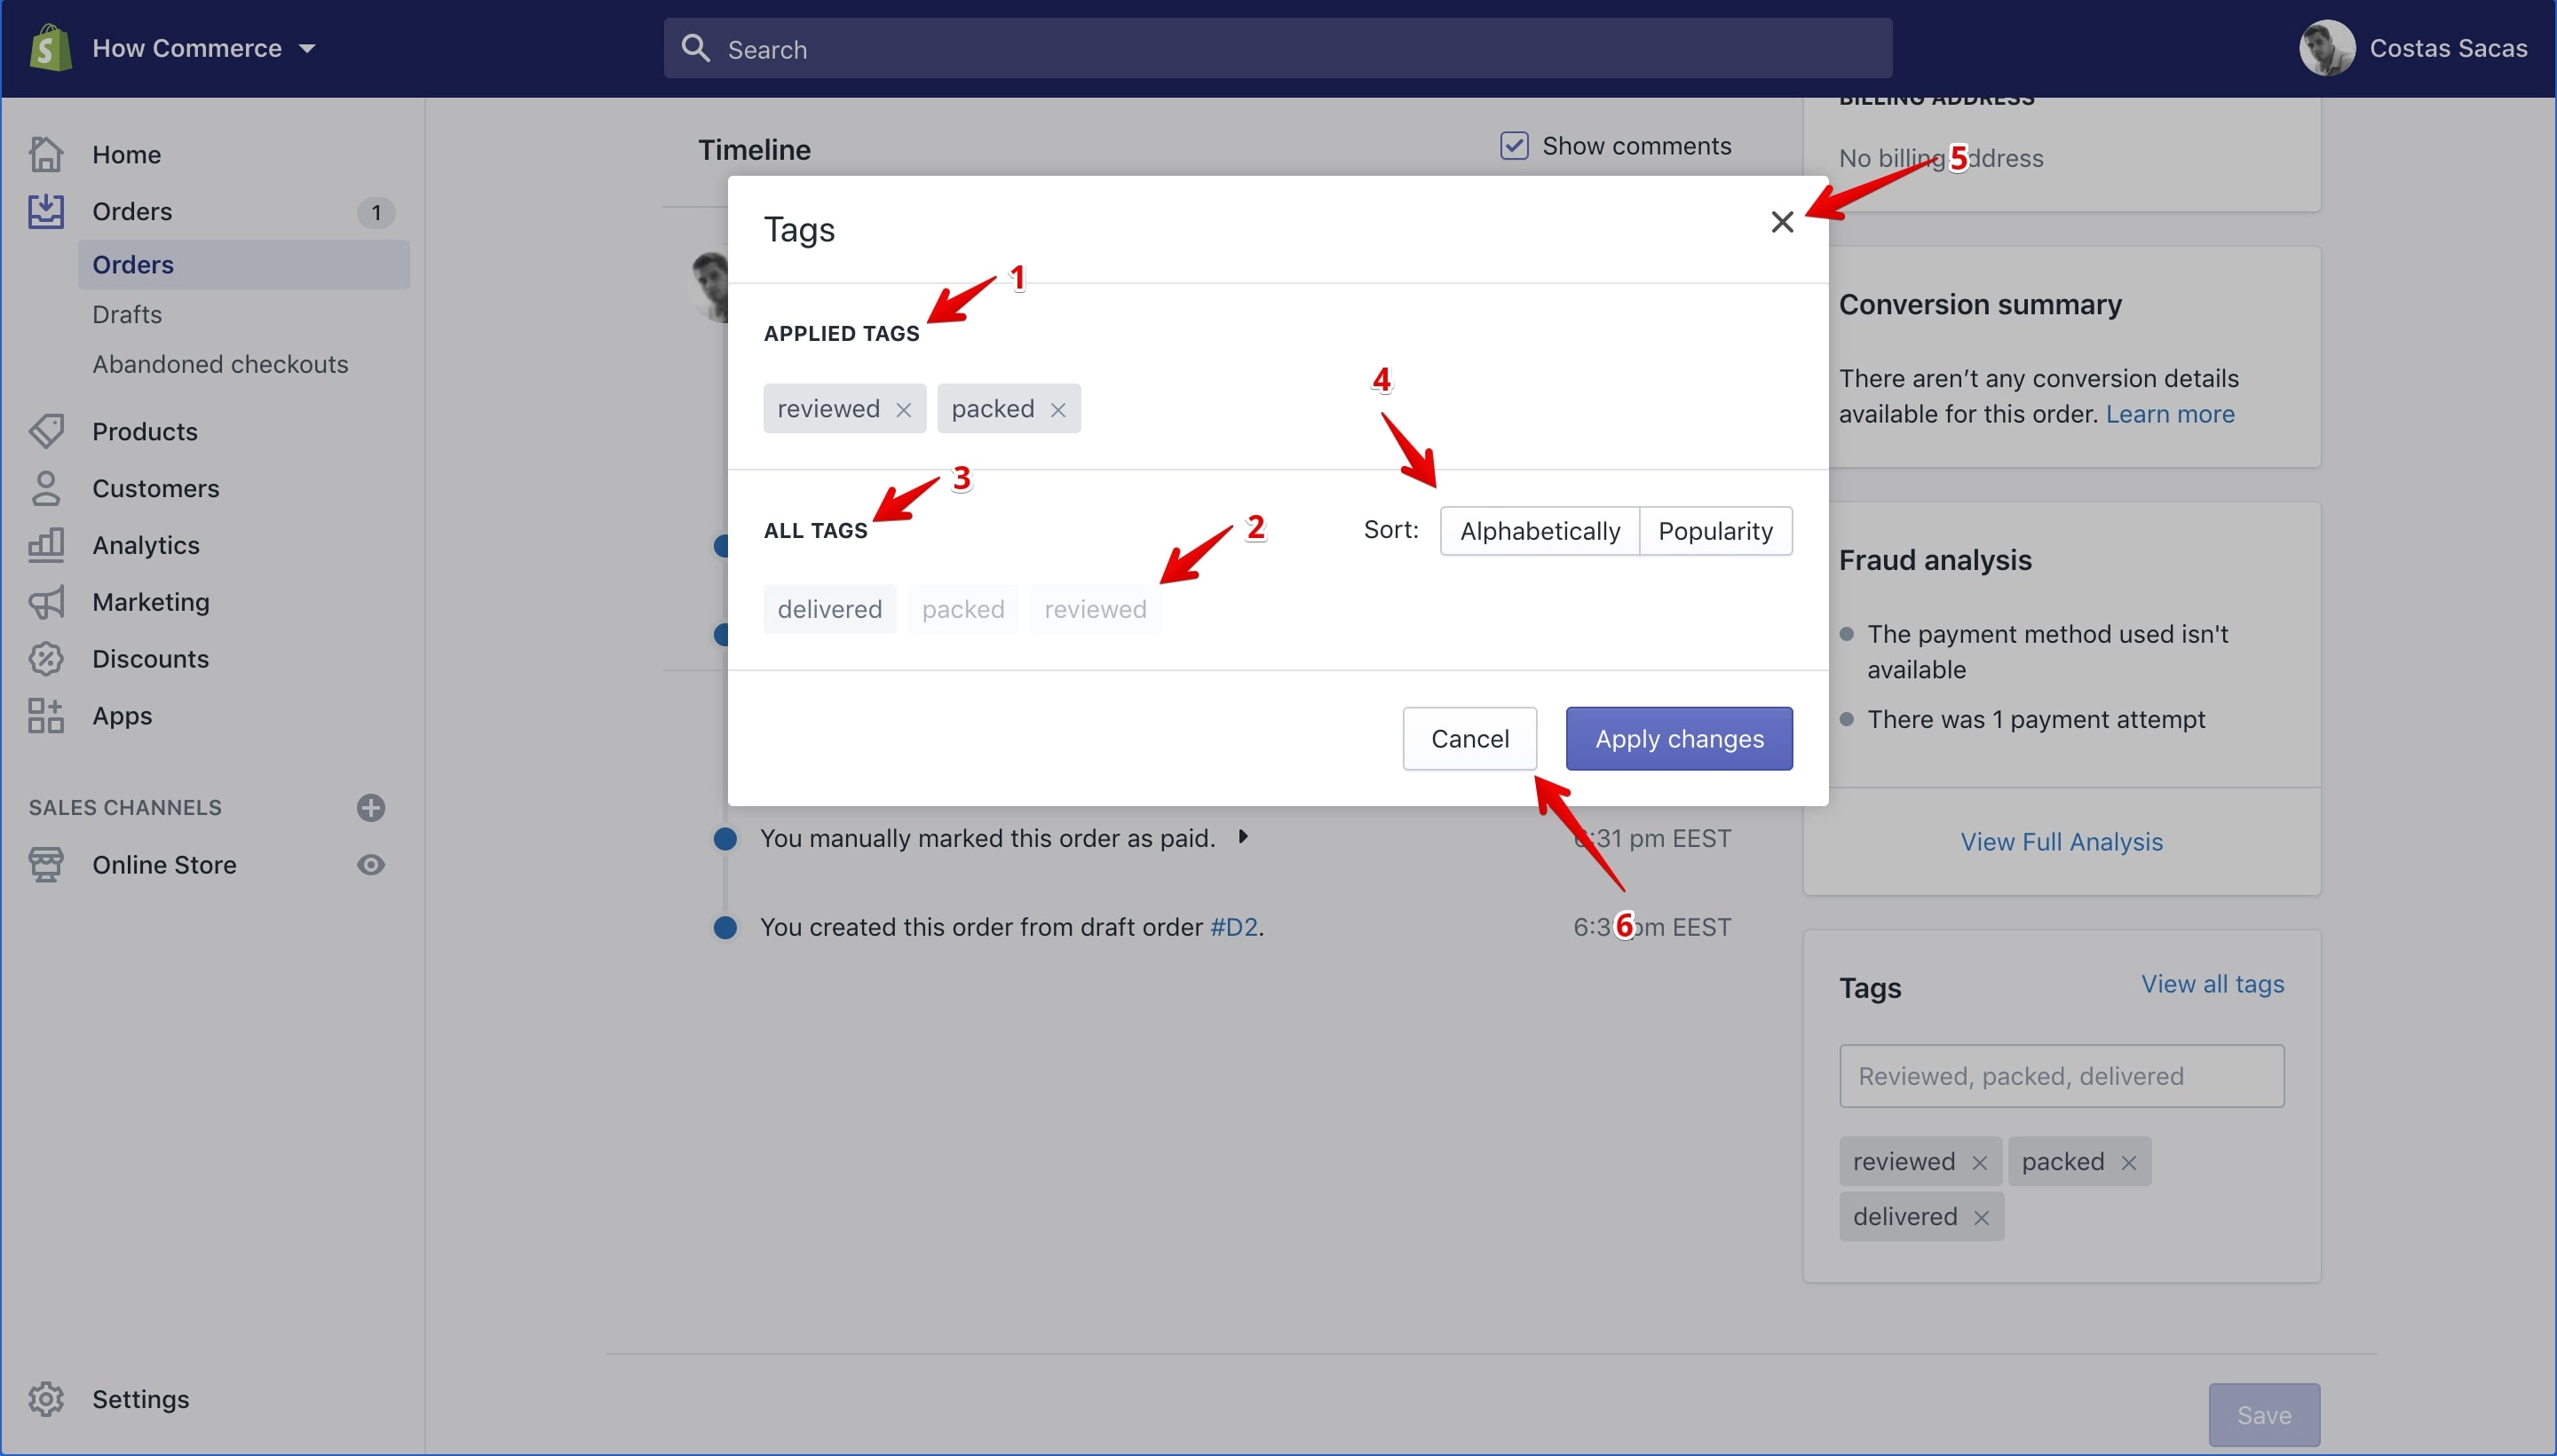
On the pop-up you can see all the tags assigned to this order in the “Applied Tags” section (marked with 1 in the image above).
Below that section you can see the “All Tags” section (marked with 3 in the image above). This section lists all the tags available in the store order section.
The tags that are greyed-out (marked with 2 in the image above) are already assigned to the order. You can assign more from this section by clicking on the desired tag.
If you have a lot of tags you can sort them “Alphabetically” or by “Popularity” from the sorting section (marked with 4 in the image above).
You can close the pop-up by clicking the “X” icon from the top right corner (marked with 5 in the image above) or by clicking the “Cancel” button (marked with 6 in the image above).
Note:
Clicking the “X” icon or the “Cancel” button will cancel your newly assigned tags and not save your changes.
Assign new tags to the order by clicking on tags located on the “All Tags” section (marked with 1 in the image below).
Tags added will display in the “Applied Tags” section (marked with 2 in the image below). Once completed click the “Apply changes” button (marked with 3 in the image below):
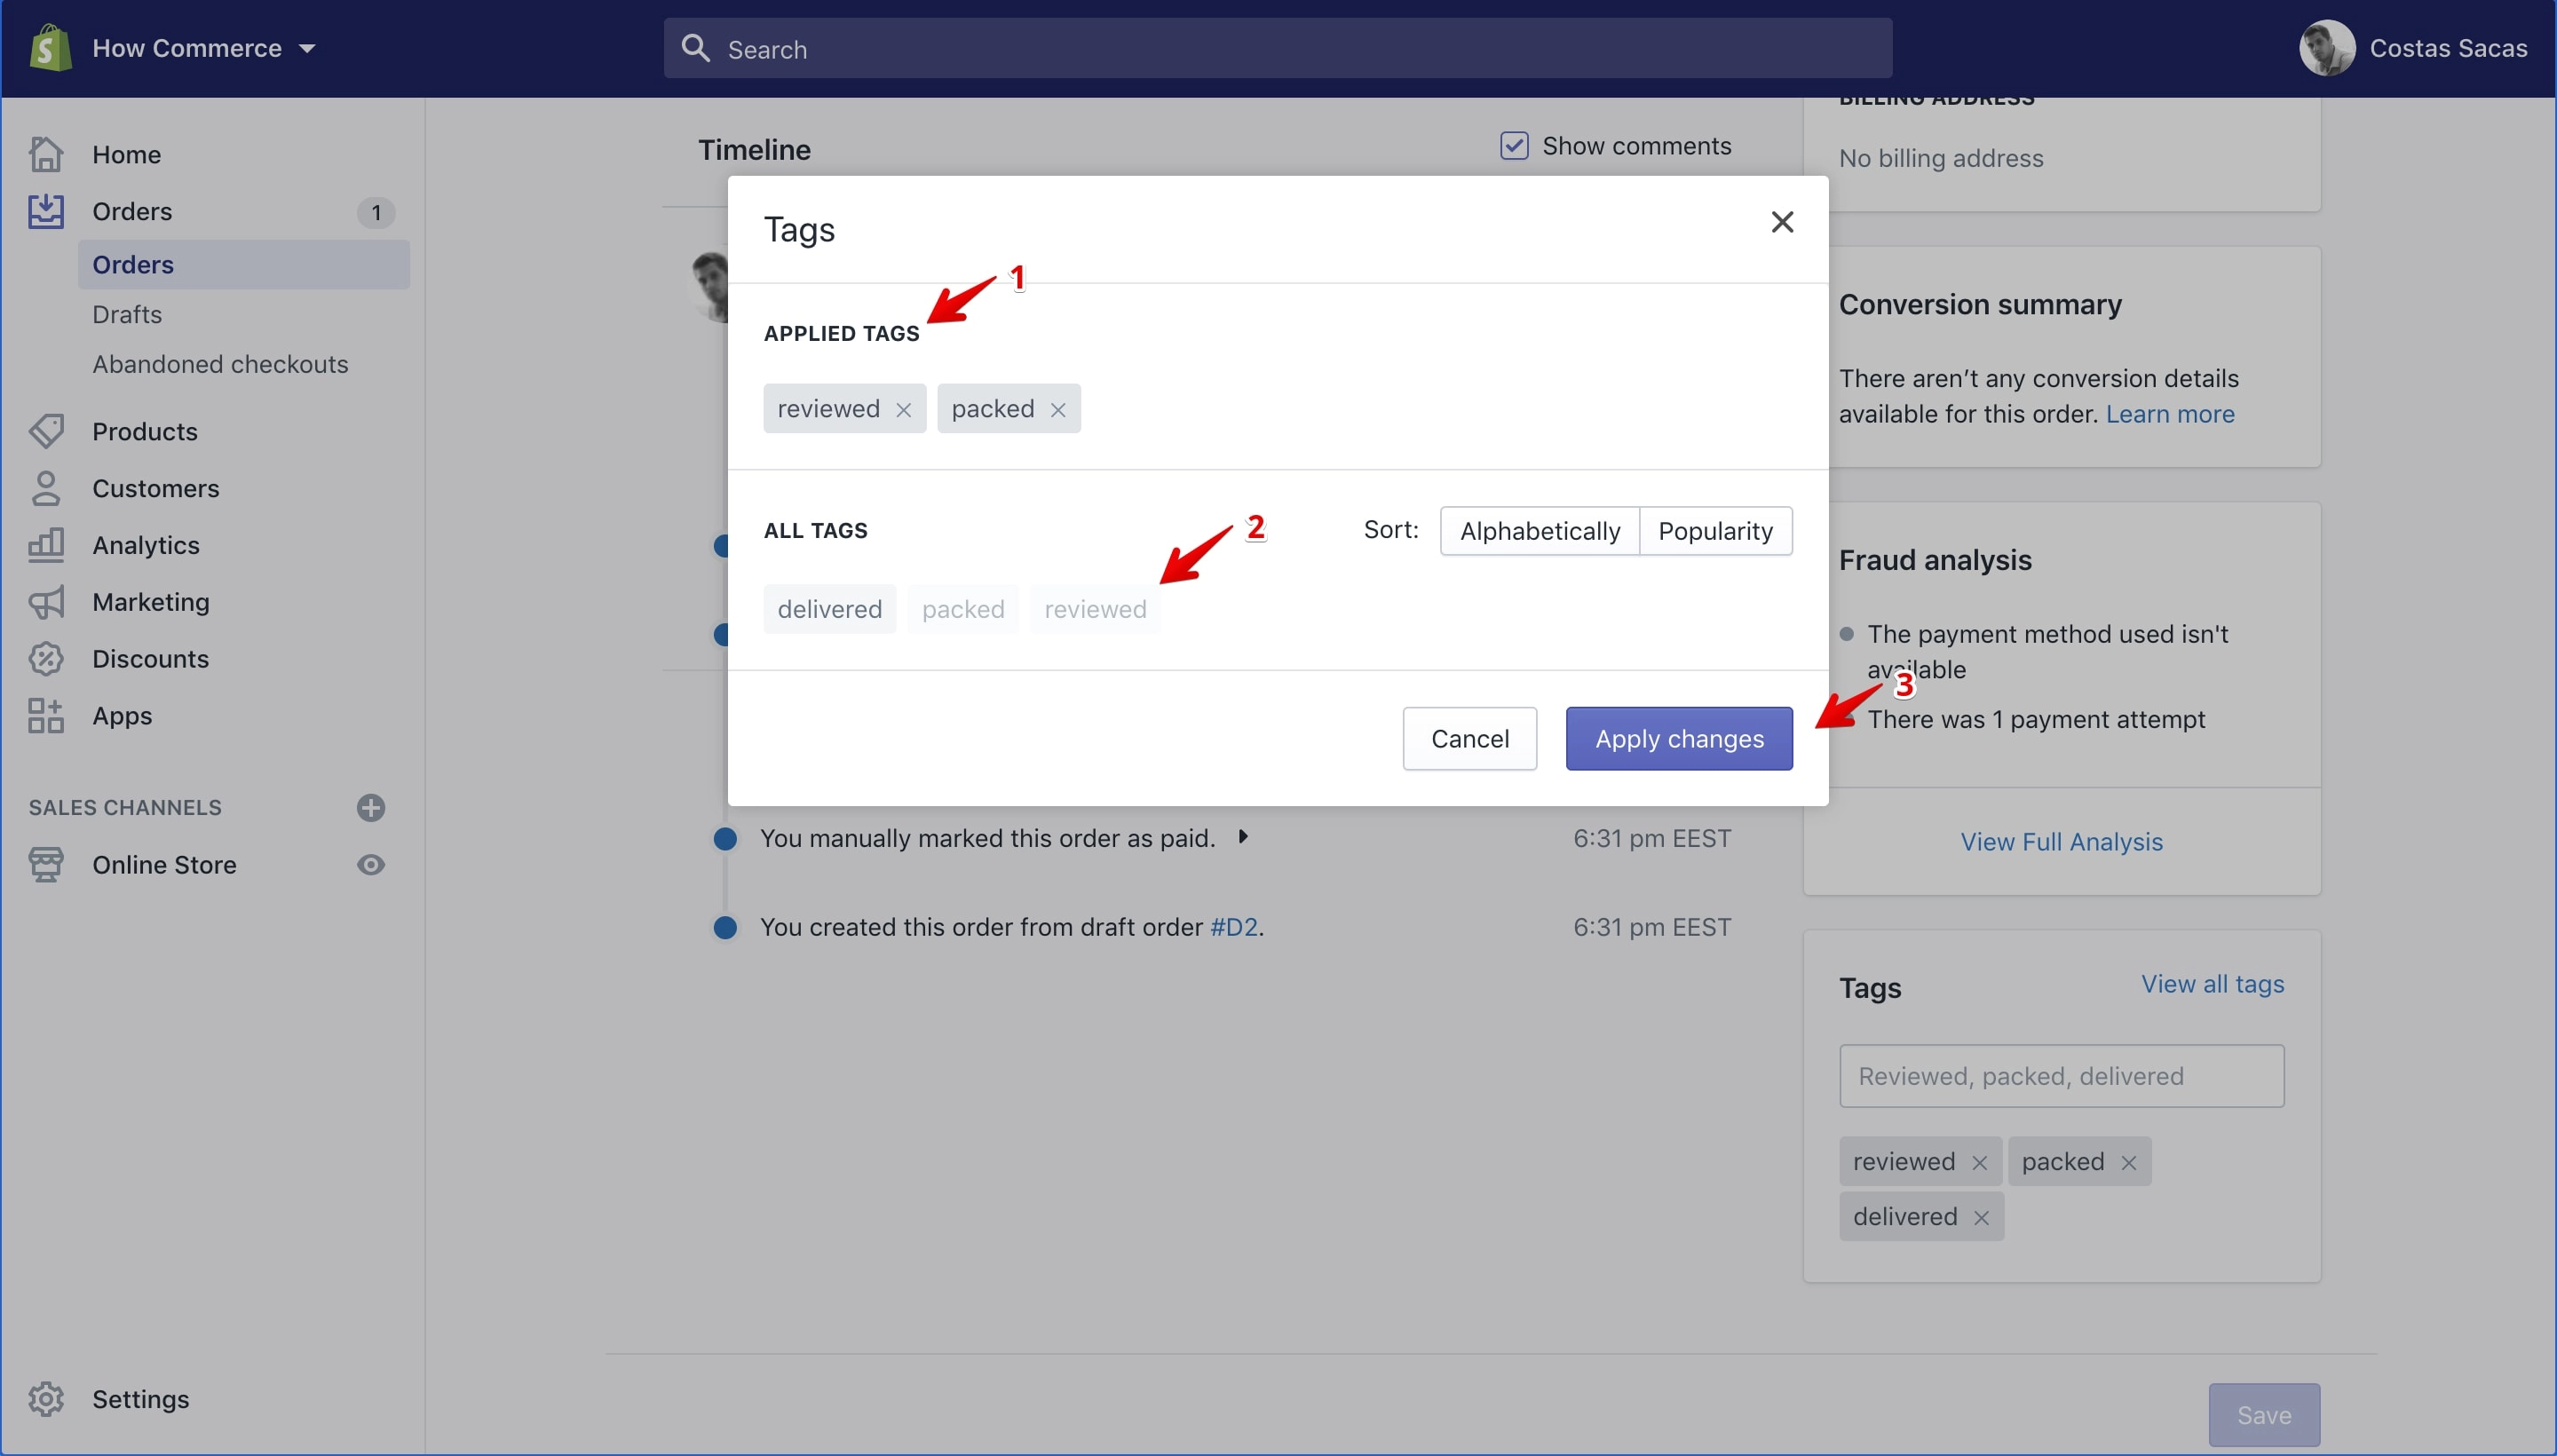
Clicking the “Apply changes” button will list the newly added tags on the “Tags” section (marked with 1 in the image below) located on the order details page:
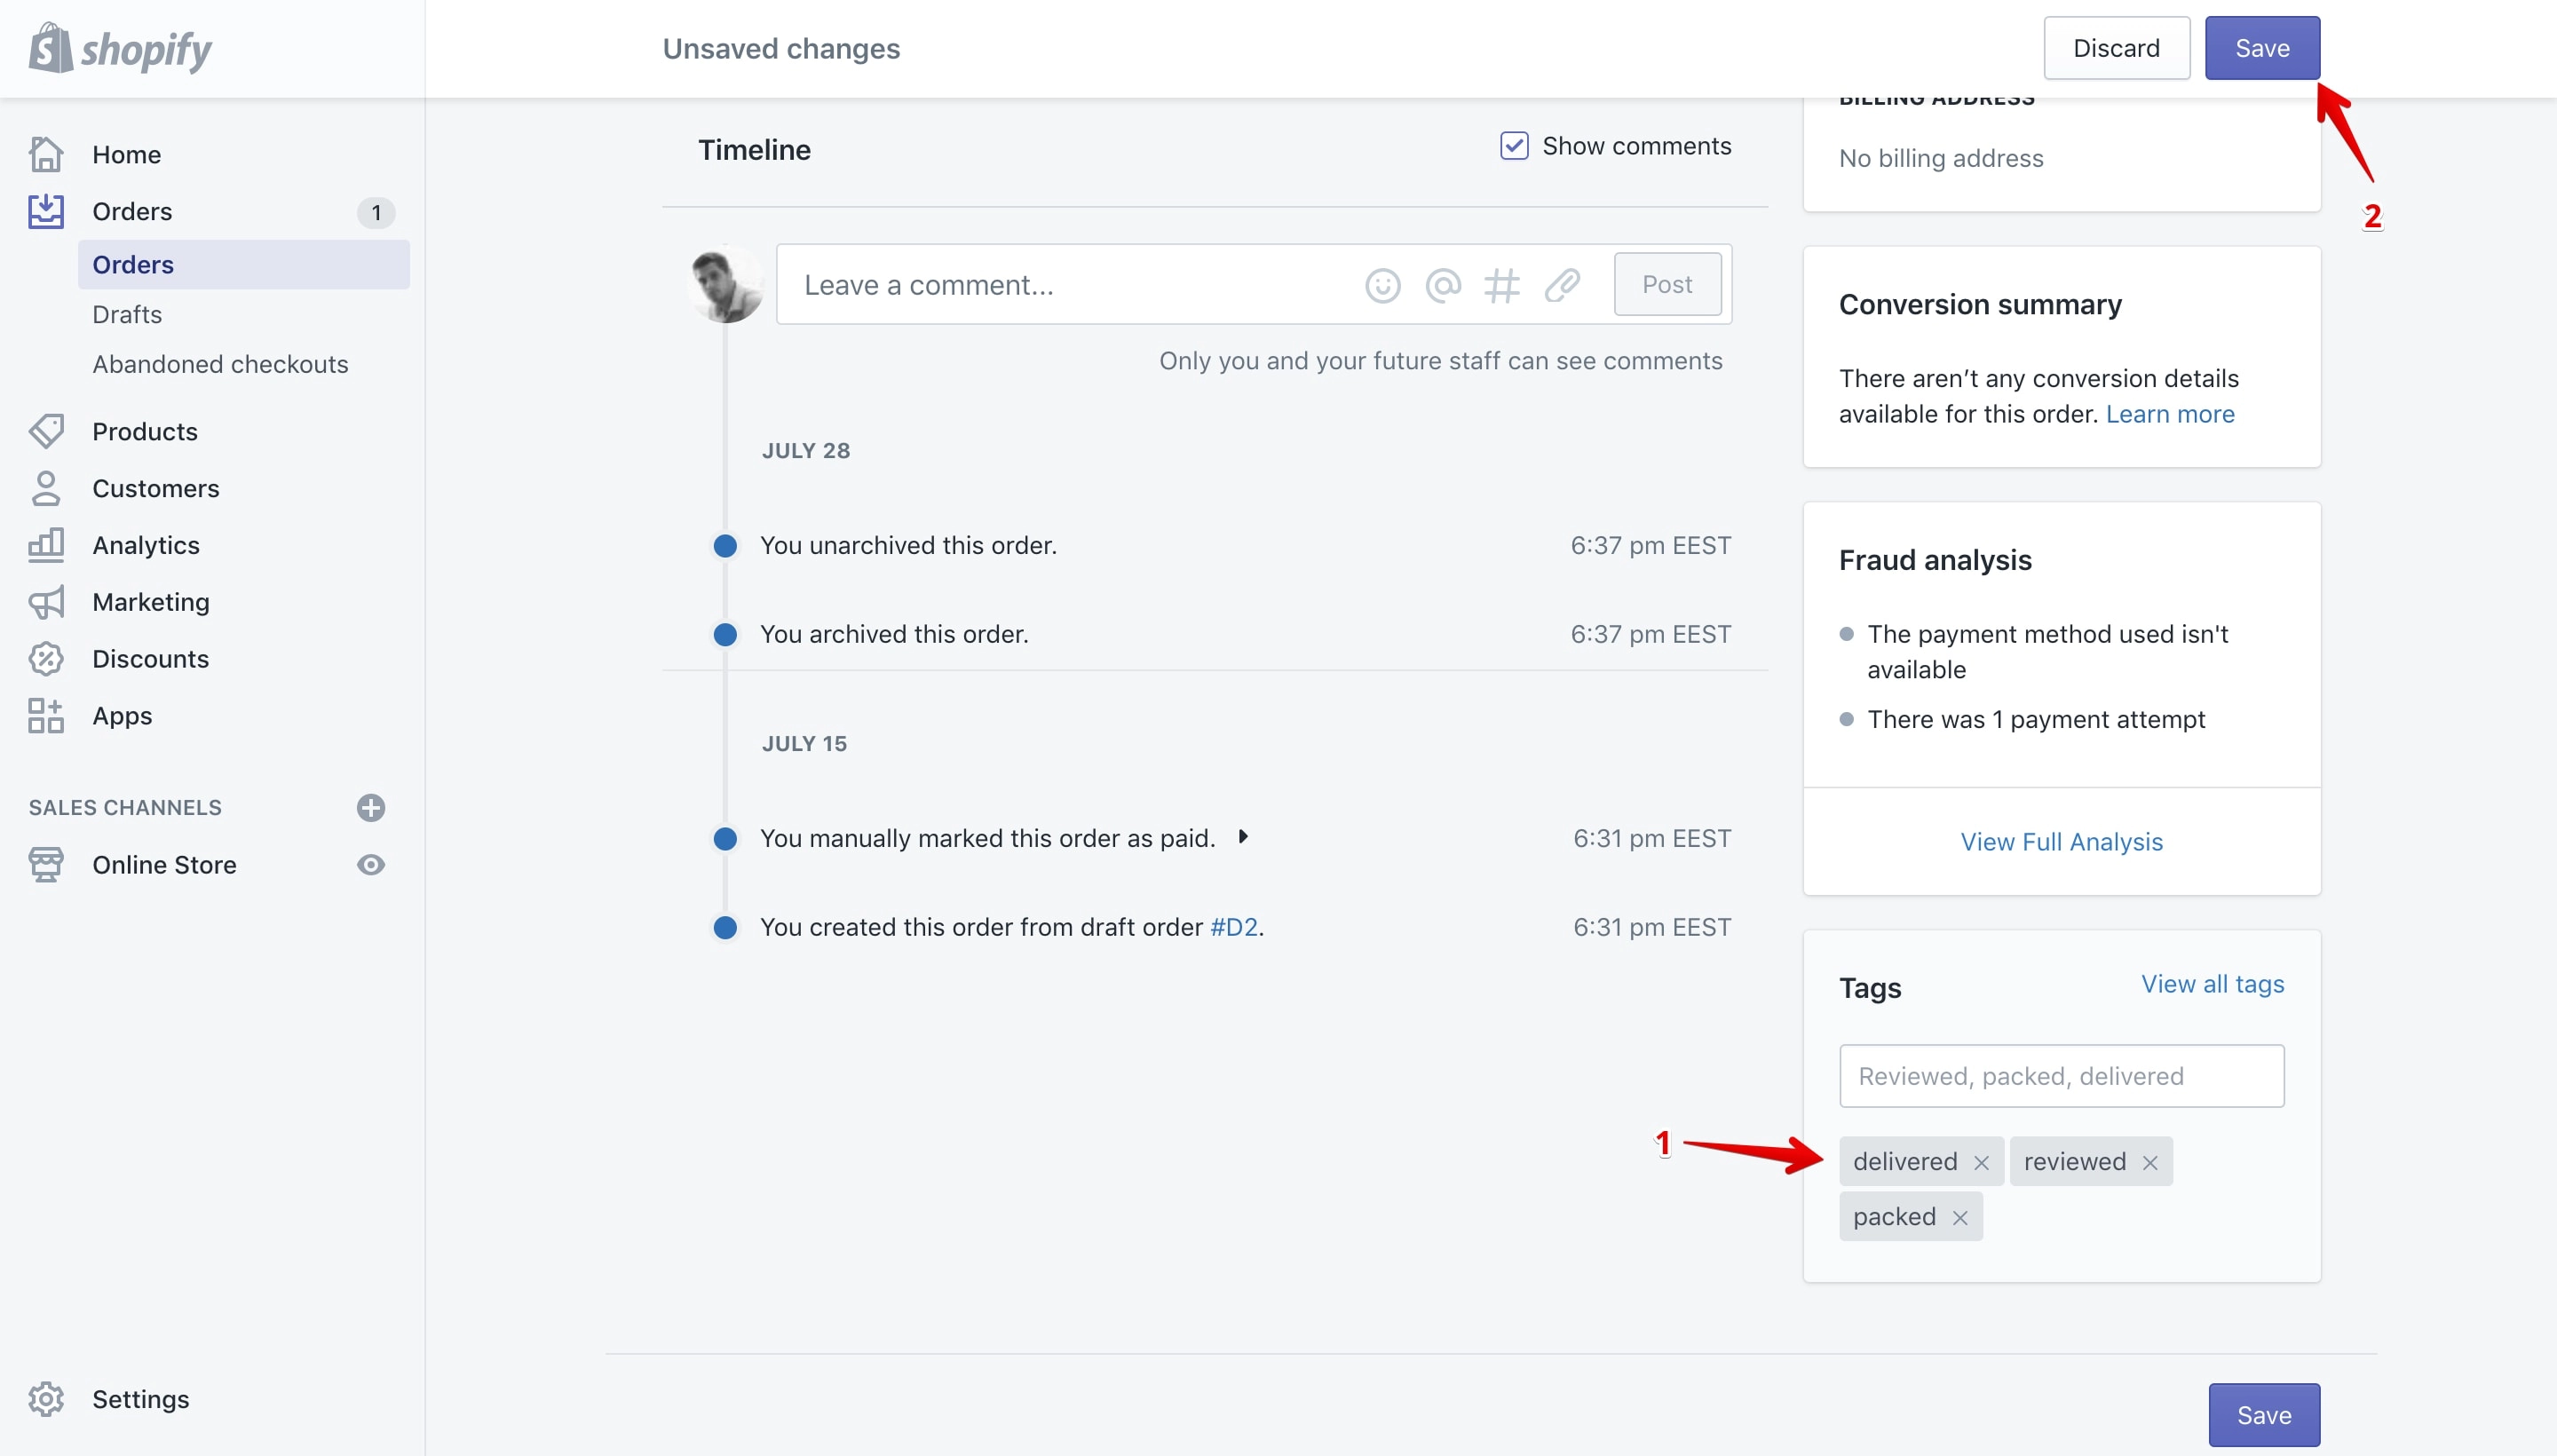
The tags are not yet saved to the order. If you leave the page at this stage the tags will not be assigned to the order.
To save them click the “Save” button (marked with 2 in the image above).
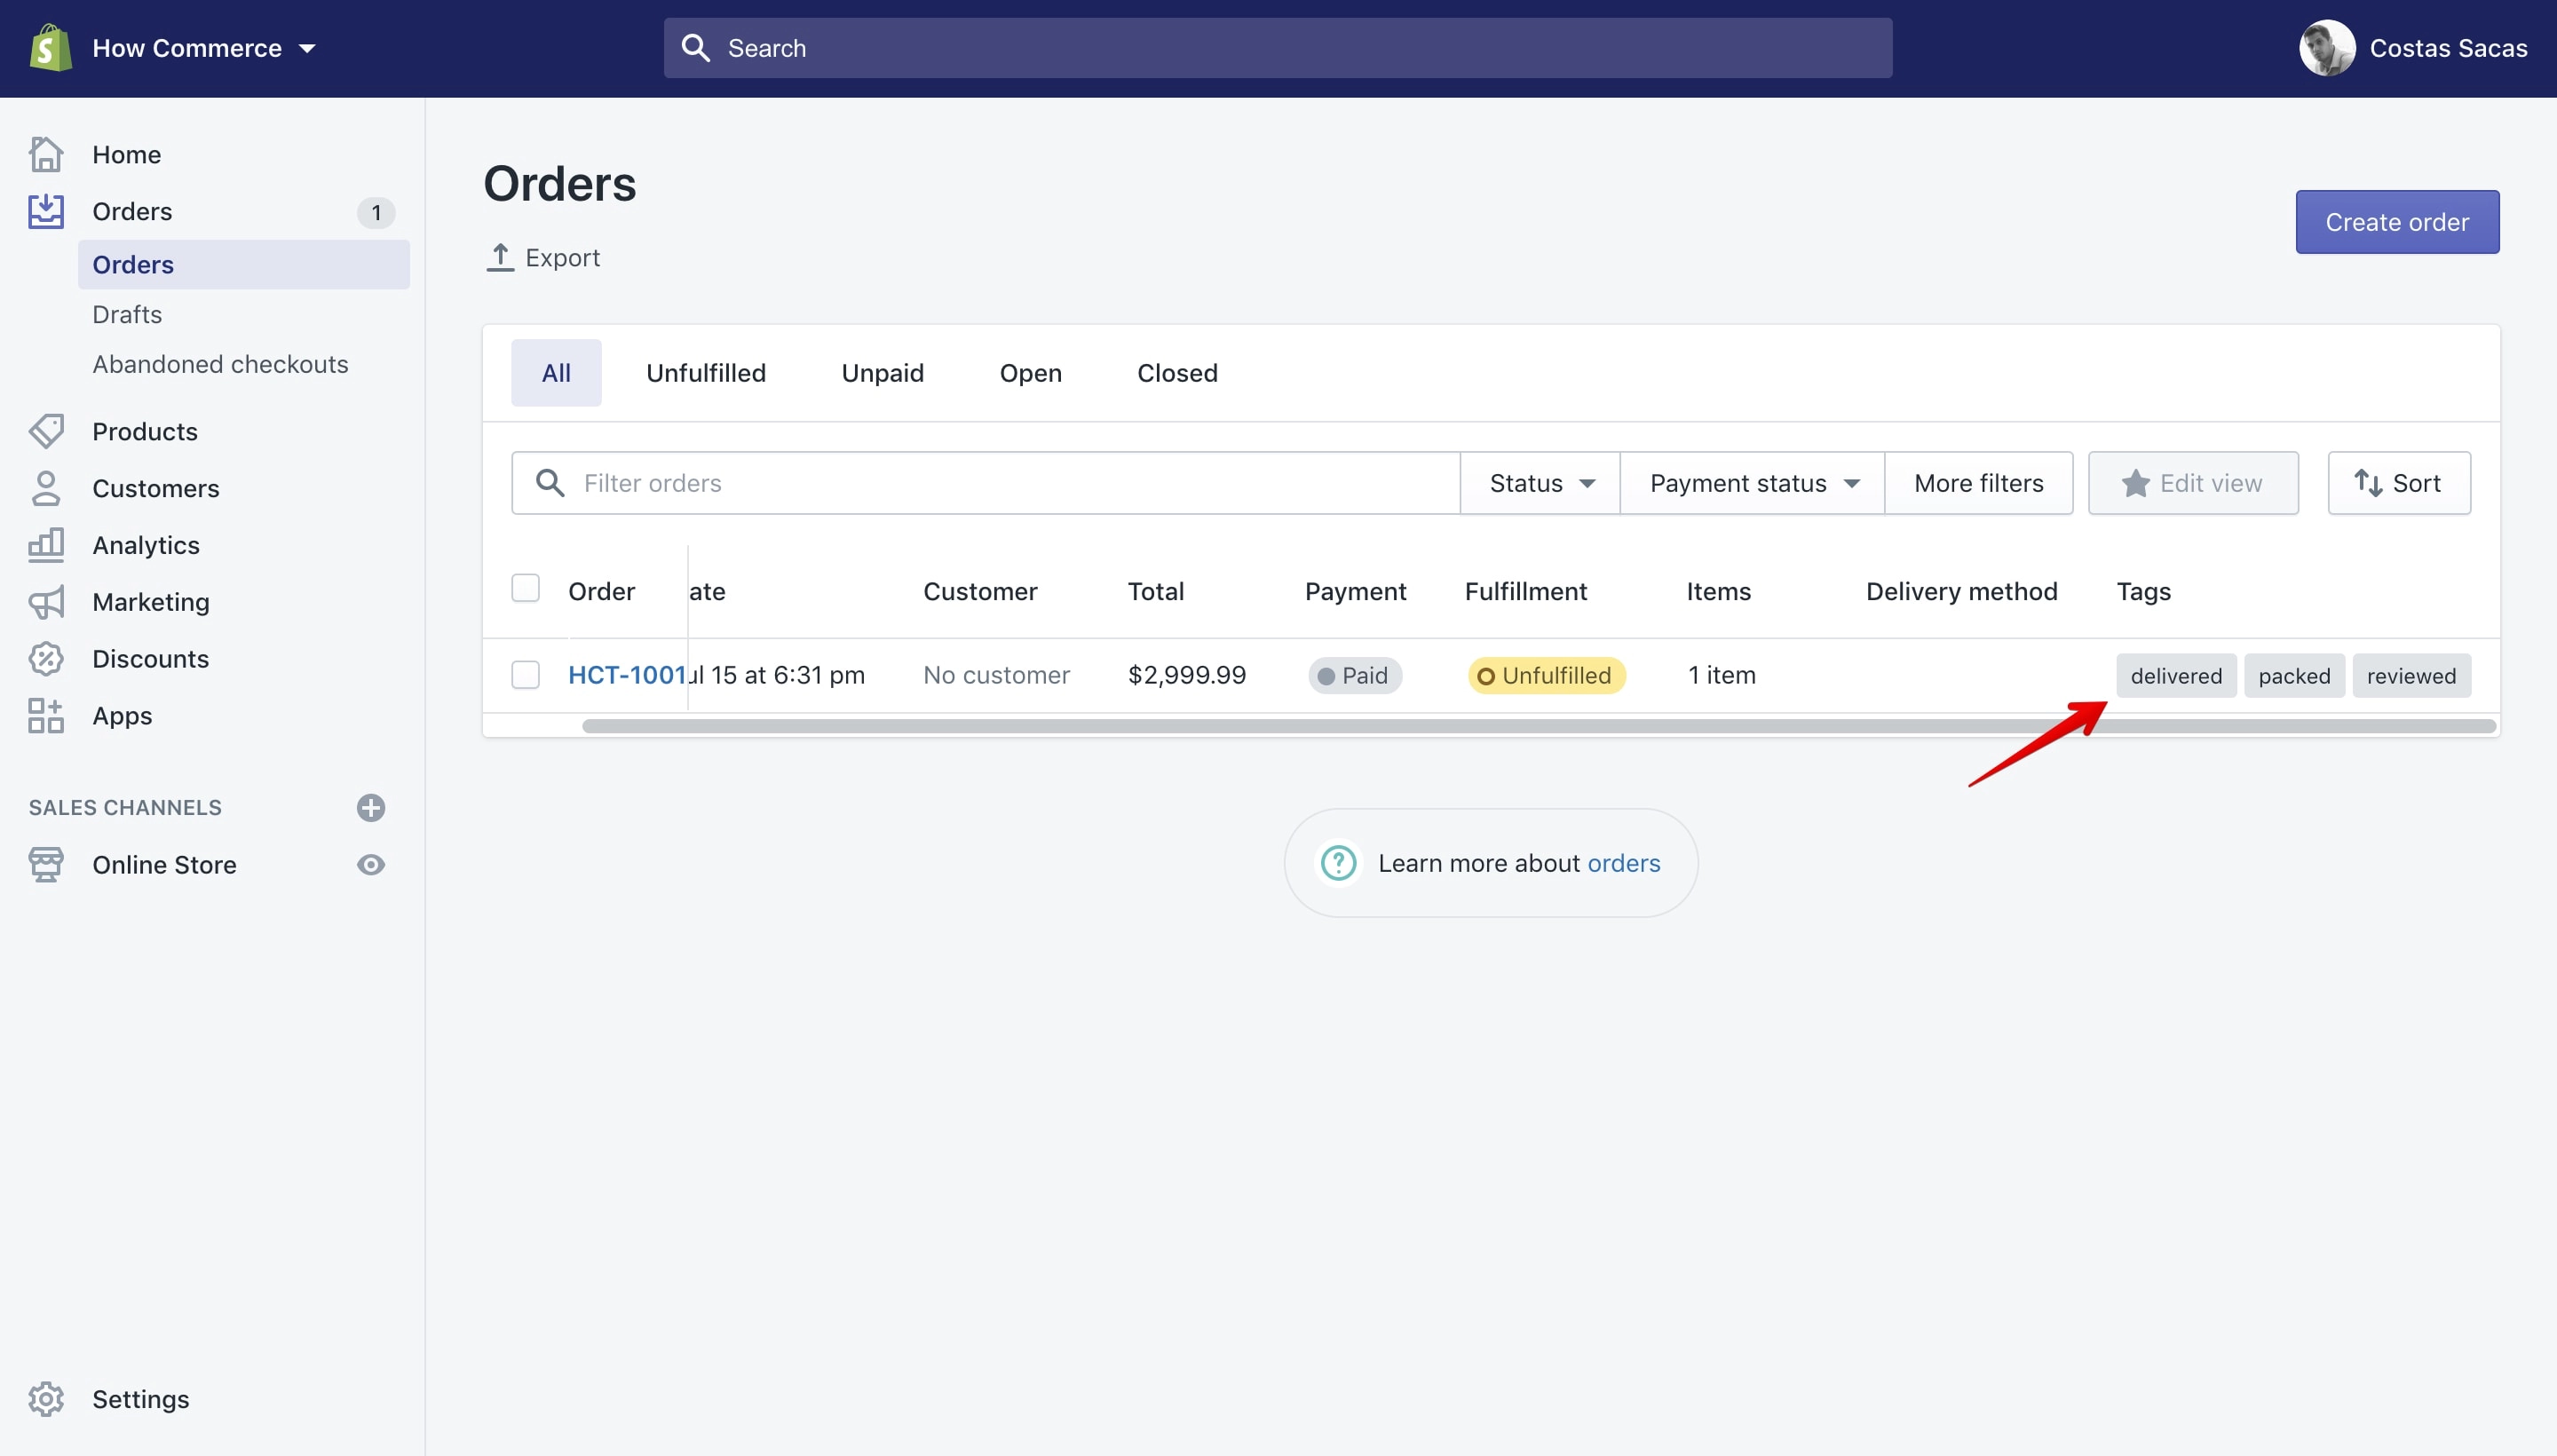
Added tags can also be viewed on the orders listing page:
Remove a tag
You can remove a tag from an order in 2 ways via the “Tags section” on the order details page or from the “Applied Tags” section located on the “Edit tags” pop-up.
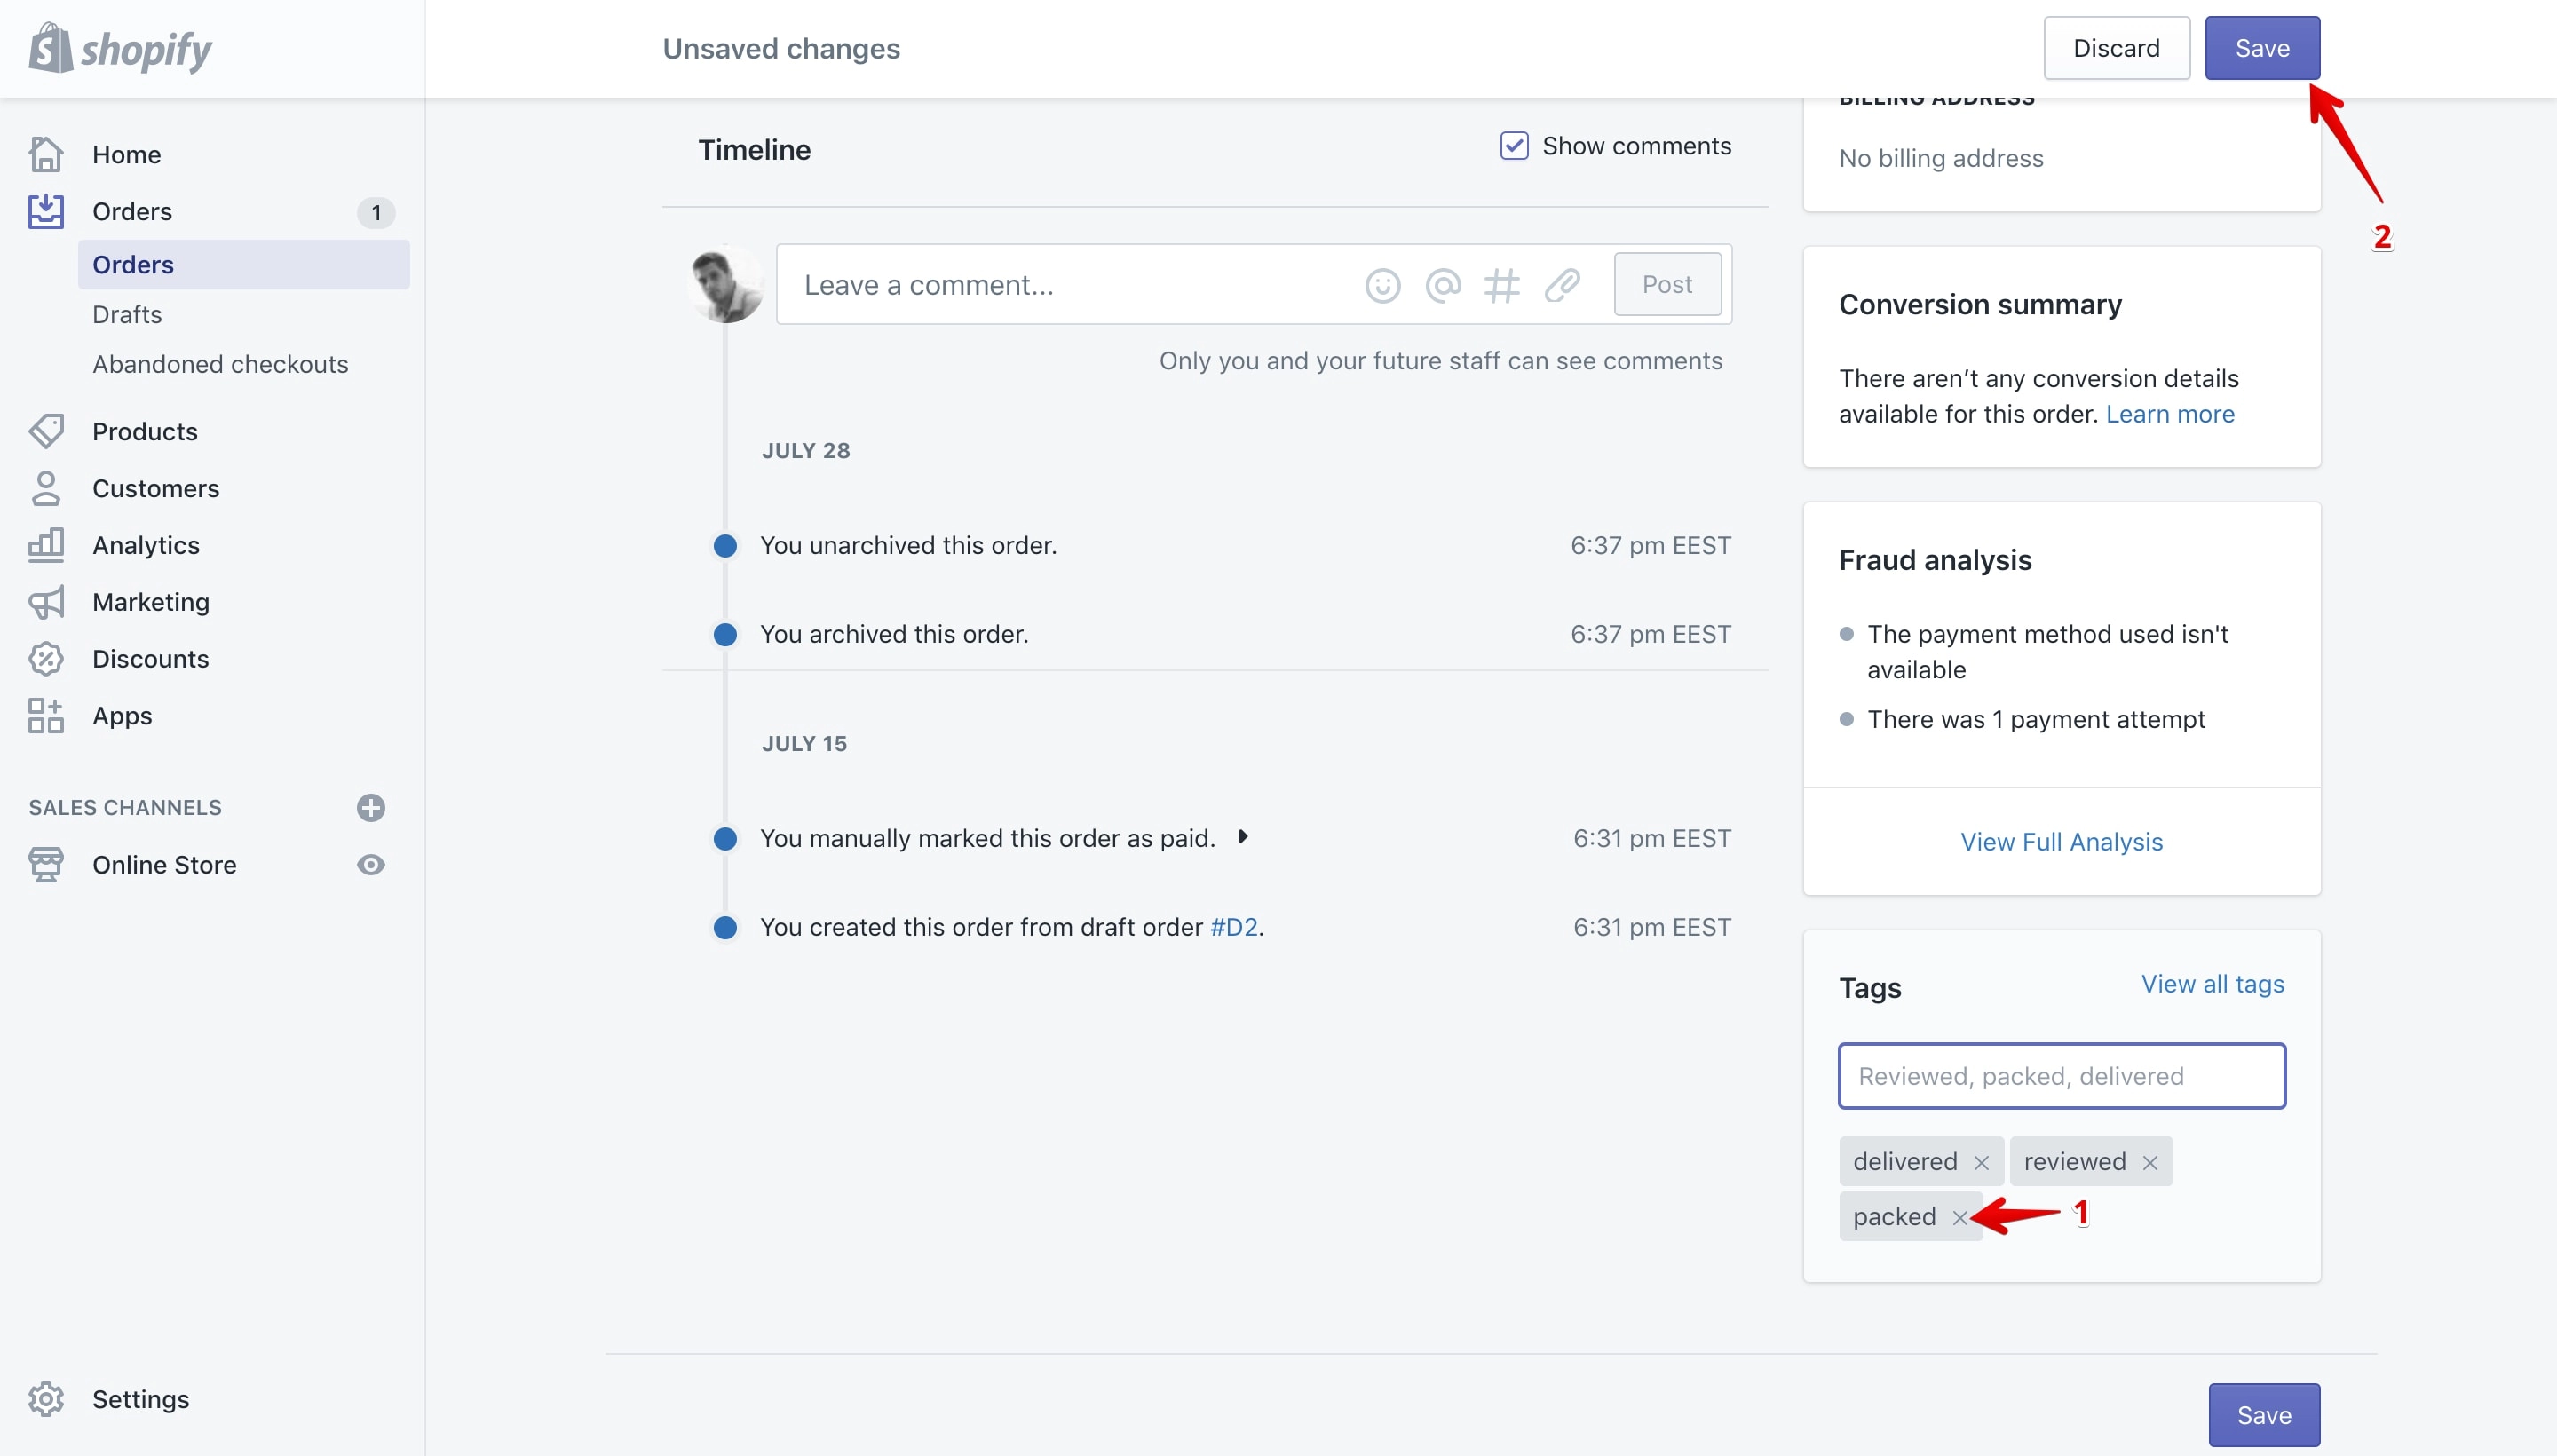
Remove a tag from the “Tags” section
I would say that this is the easiest and fastest way to do it. All you have to do is click the “X” (marked with 1 in the image below) from the tag and save your changes by clicking the “Save” button (marked with 2 in the image below):
Remove a tag from the “Edit tags” pop-up
On the order details page click on the “View all tags” link:
This will open the “Edit Tags” pop-up that will allow you to remove tags from the order:
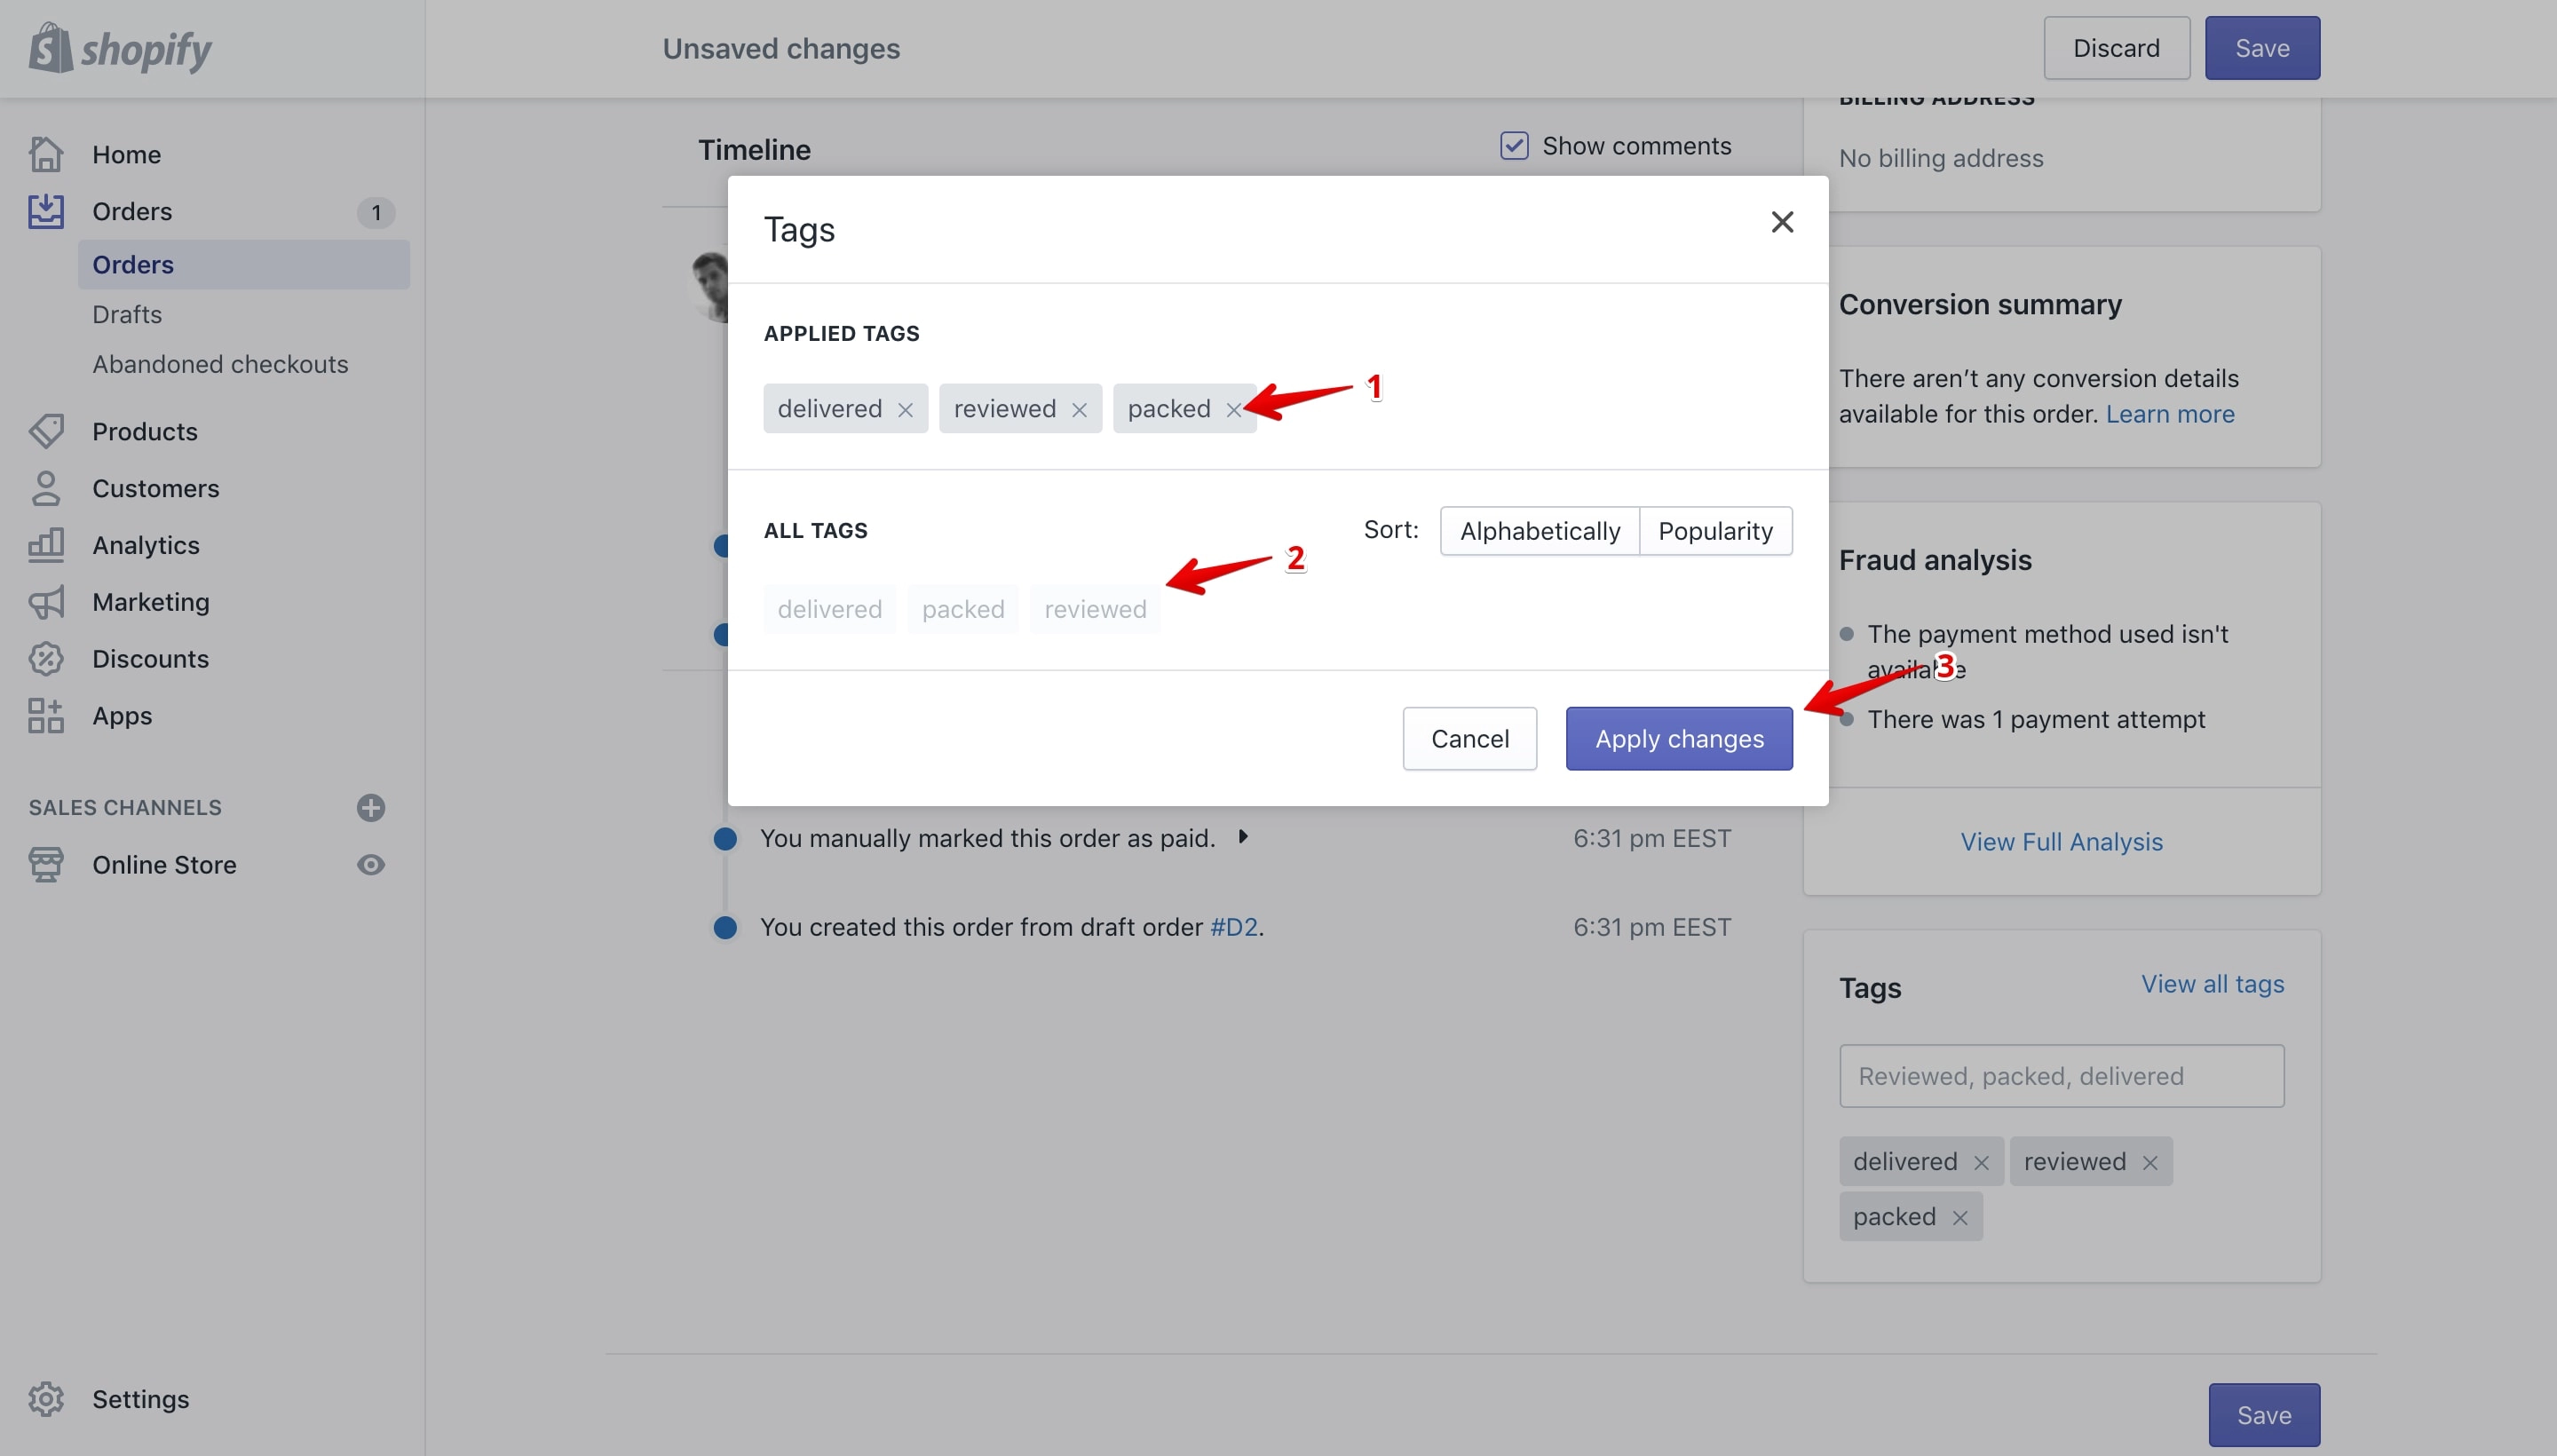
Click on the tag’s “X” icon to remove the tag (marked with 1 in the image above). Once you do that the tag will be removed from the “Applied Tags” section and added to the “All Tags” section of the pop-up (marked with 2 in the image above).
After you remove all the tags that you want from the order click the “Apply Changes” button (marked with 3 in the image above).
In my example I’ve removed the “packed” tag from the order and once I’ve clicked the “Apply Changes” button the tag is no longer listed on the “Tags” section (marked with 1 in the image below) on the order details page:
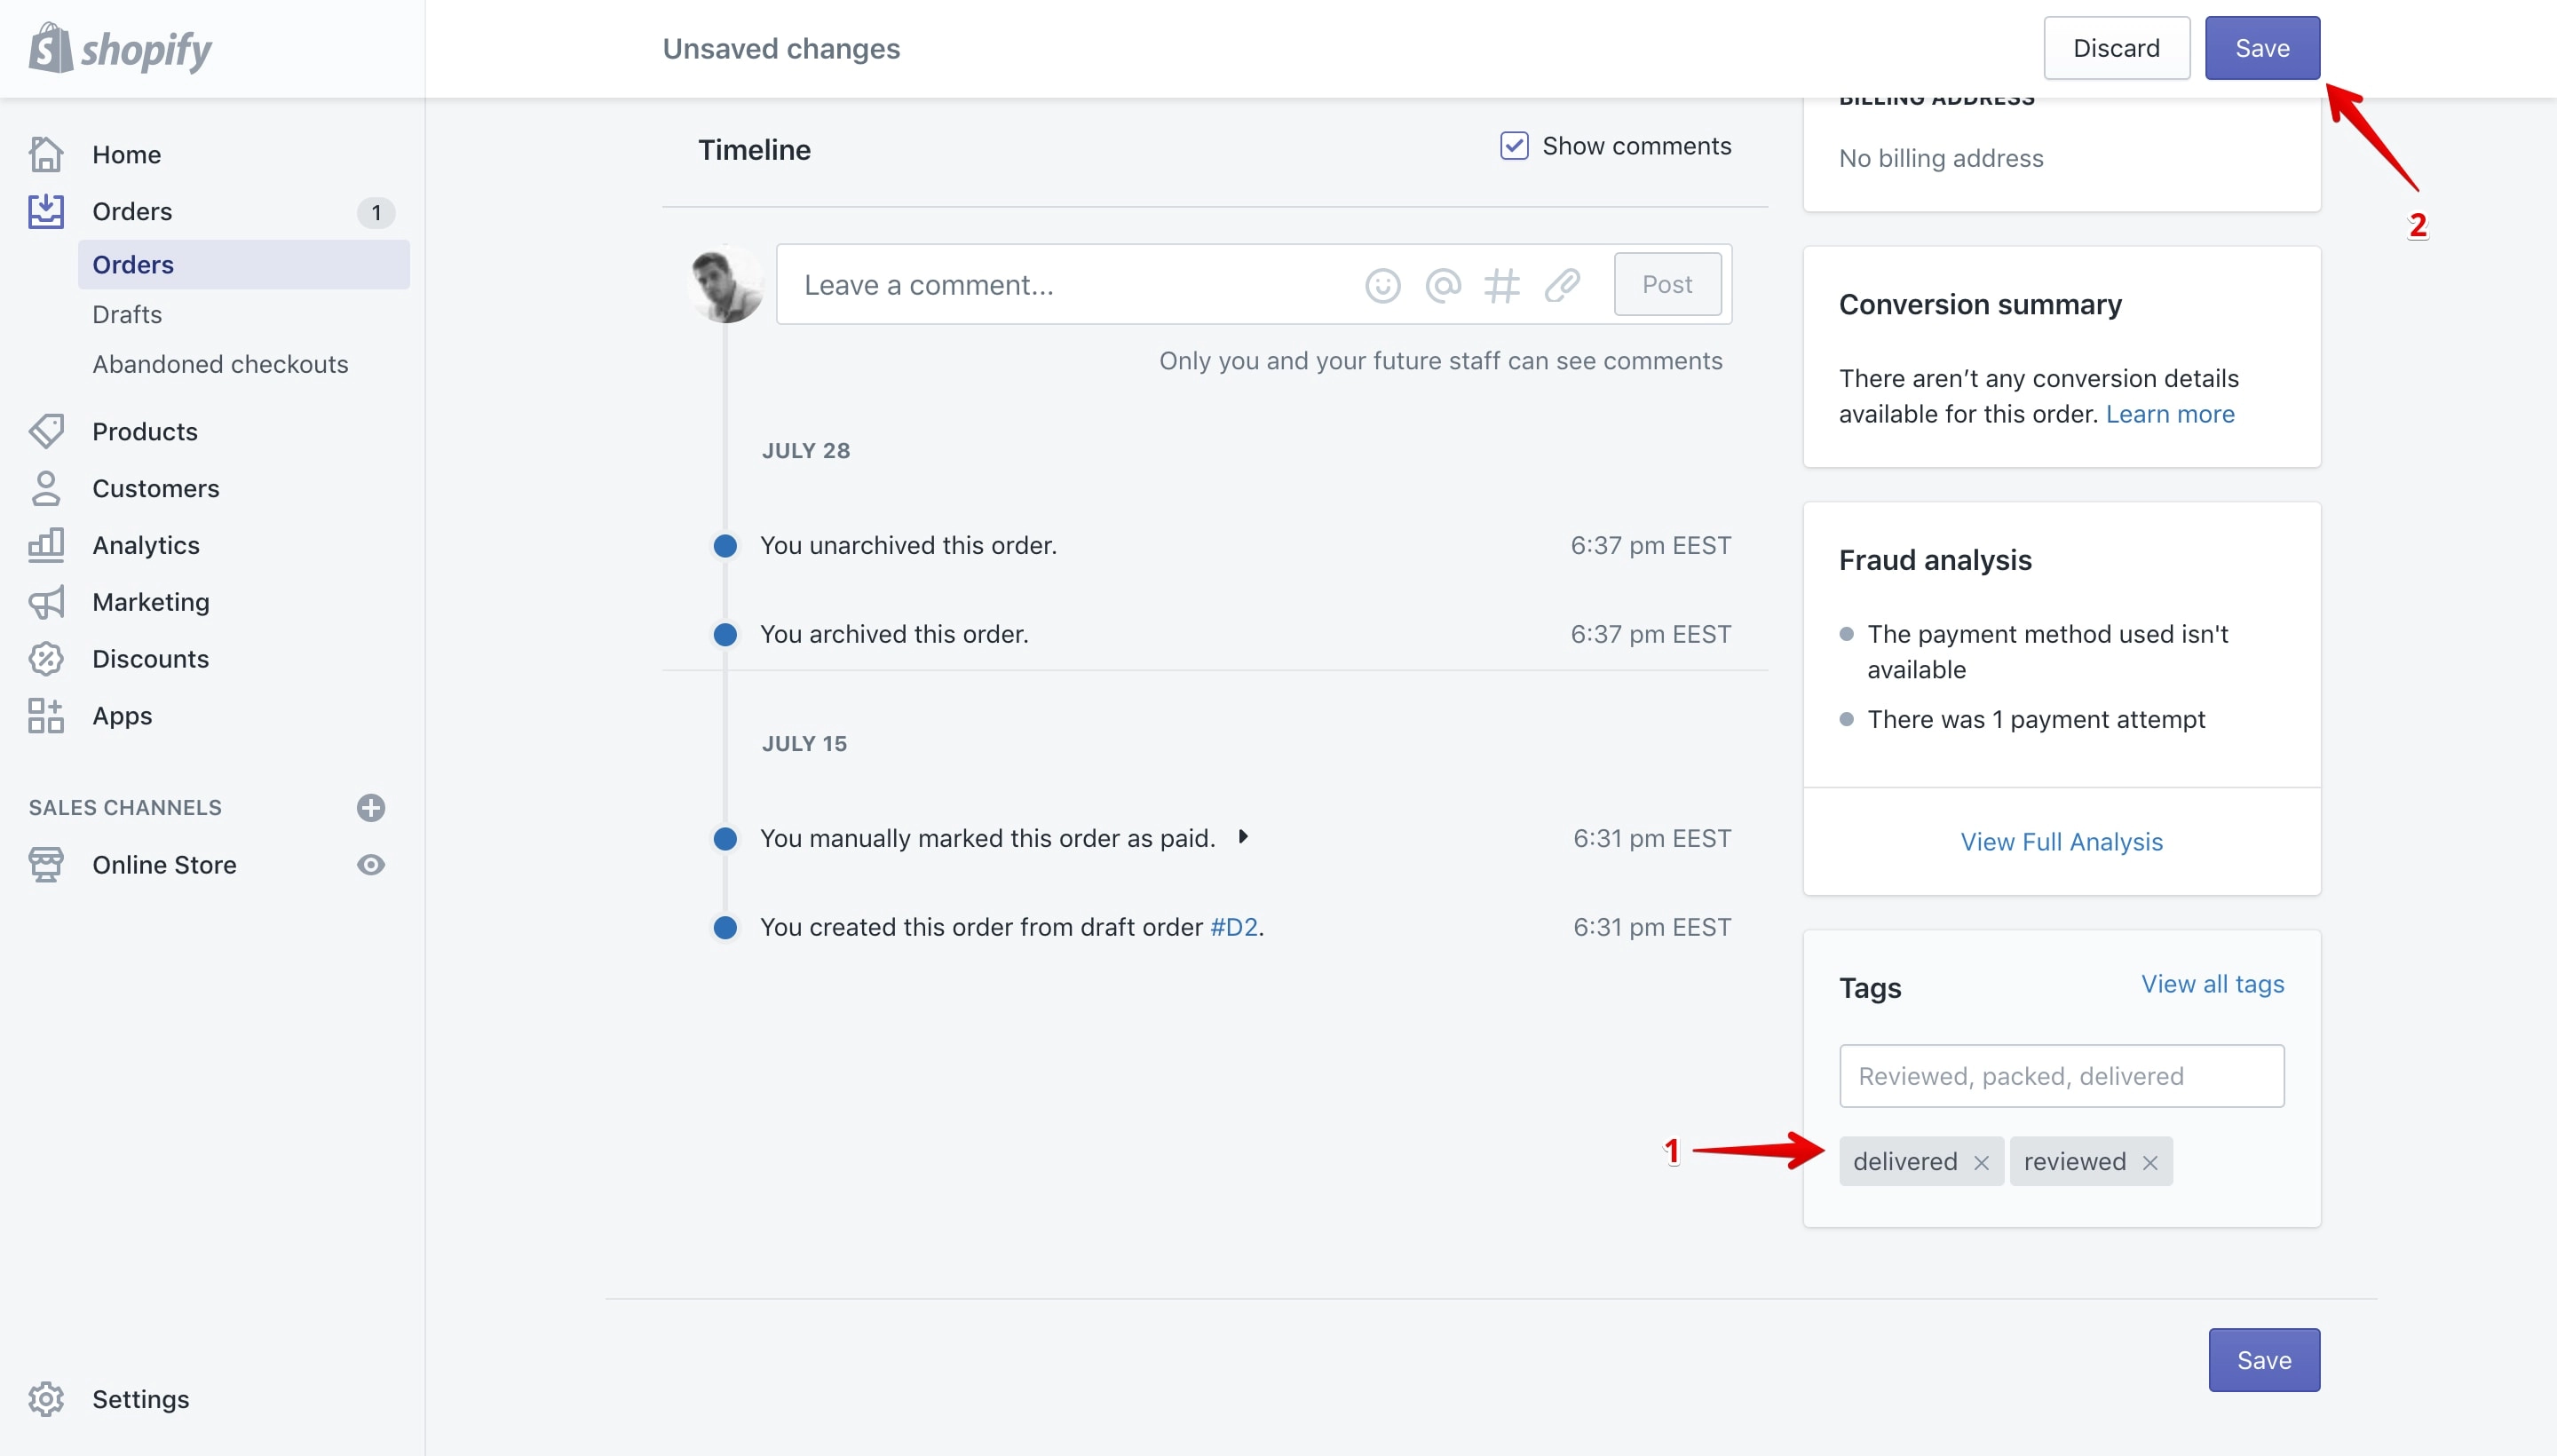
Keep in mind that if the tag is removed from the “Tags” section that does not mean that it is also removed from the order at this stage.
To completely remove it you need to save it by clicking the “Save” button (marked with 2 in the image above).
Draft orders tags
Support up to 40 characters.
Draft order tags can be added from the draft order details page on every draft order from your store.
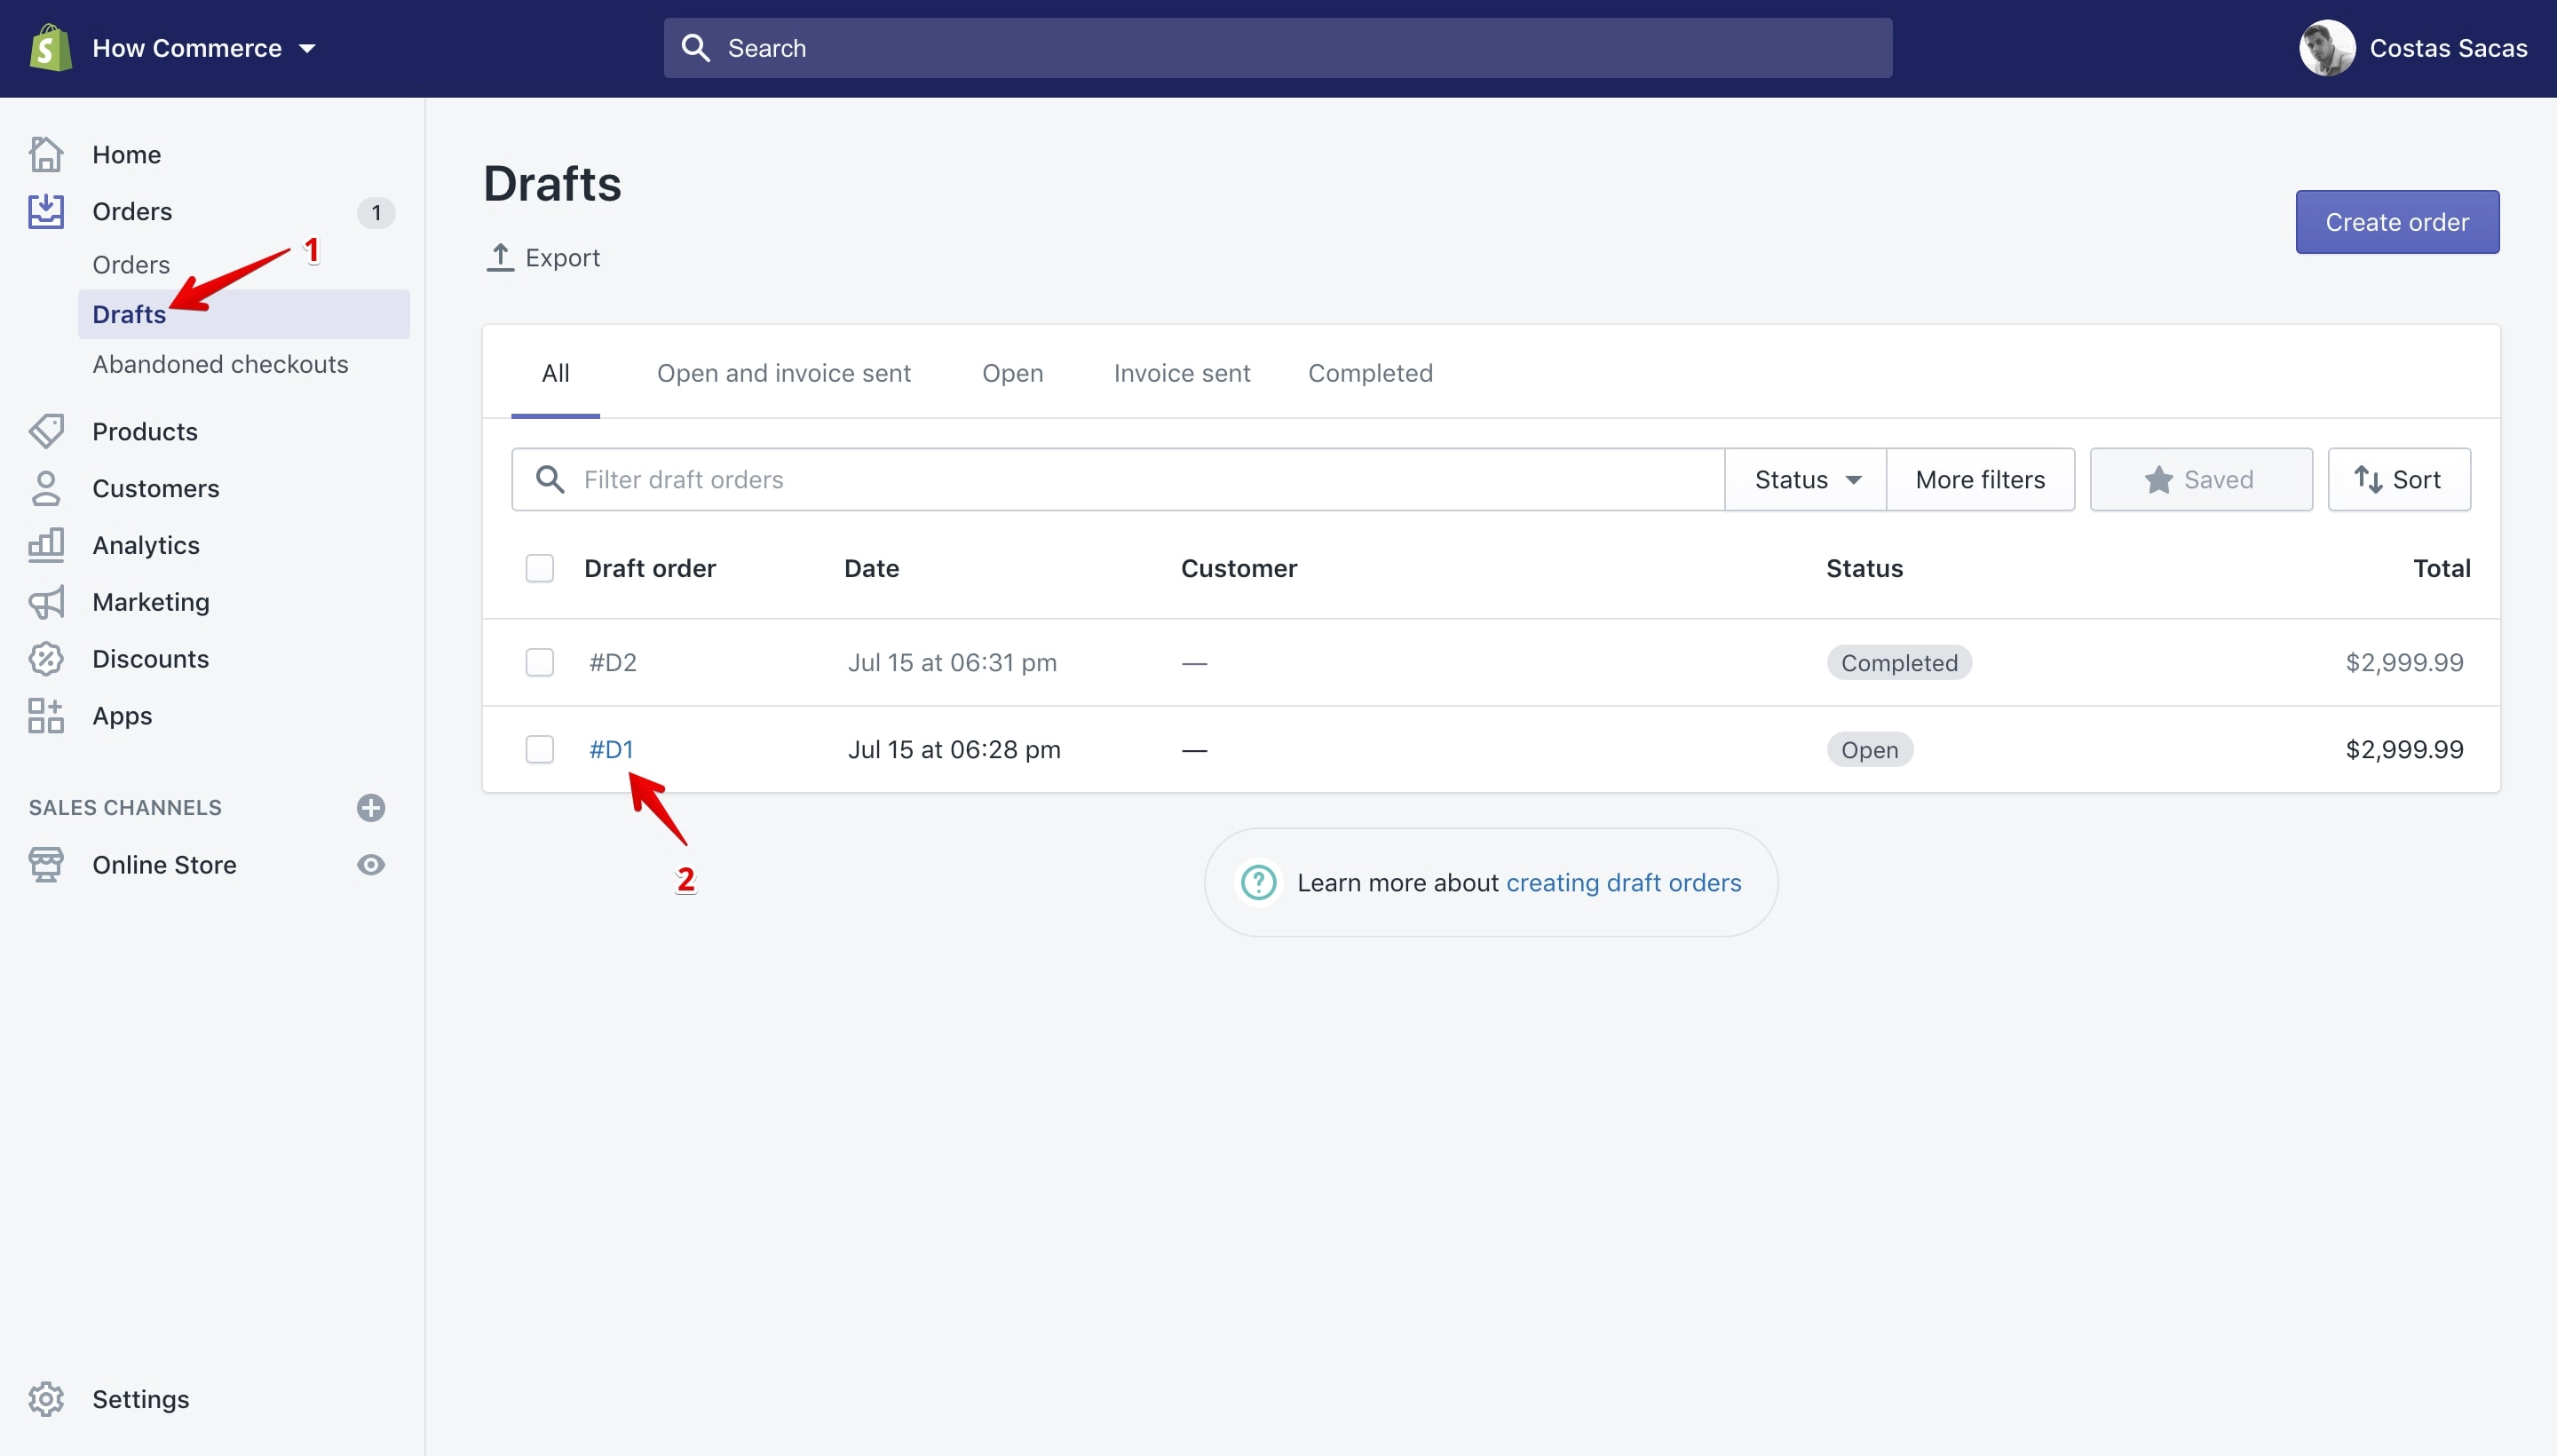
To access the page go to “Drafts” (marked with 1 in the image below), and after to the draft order that you want to add tags too by clicking the draft number (marked with 2 in the image below):
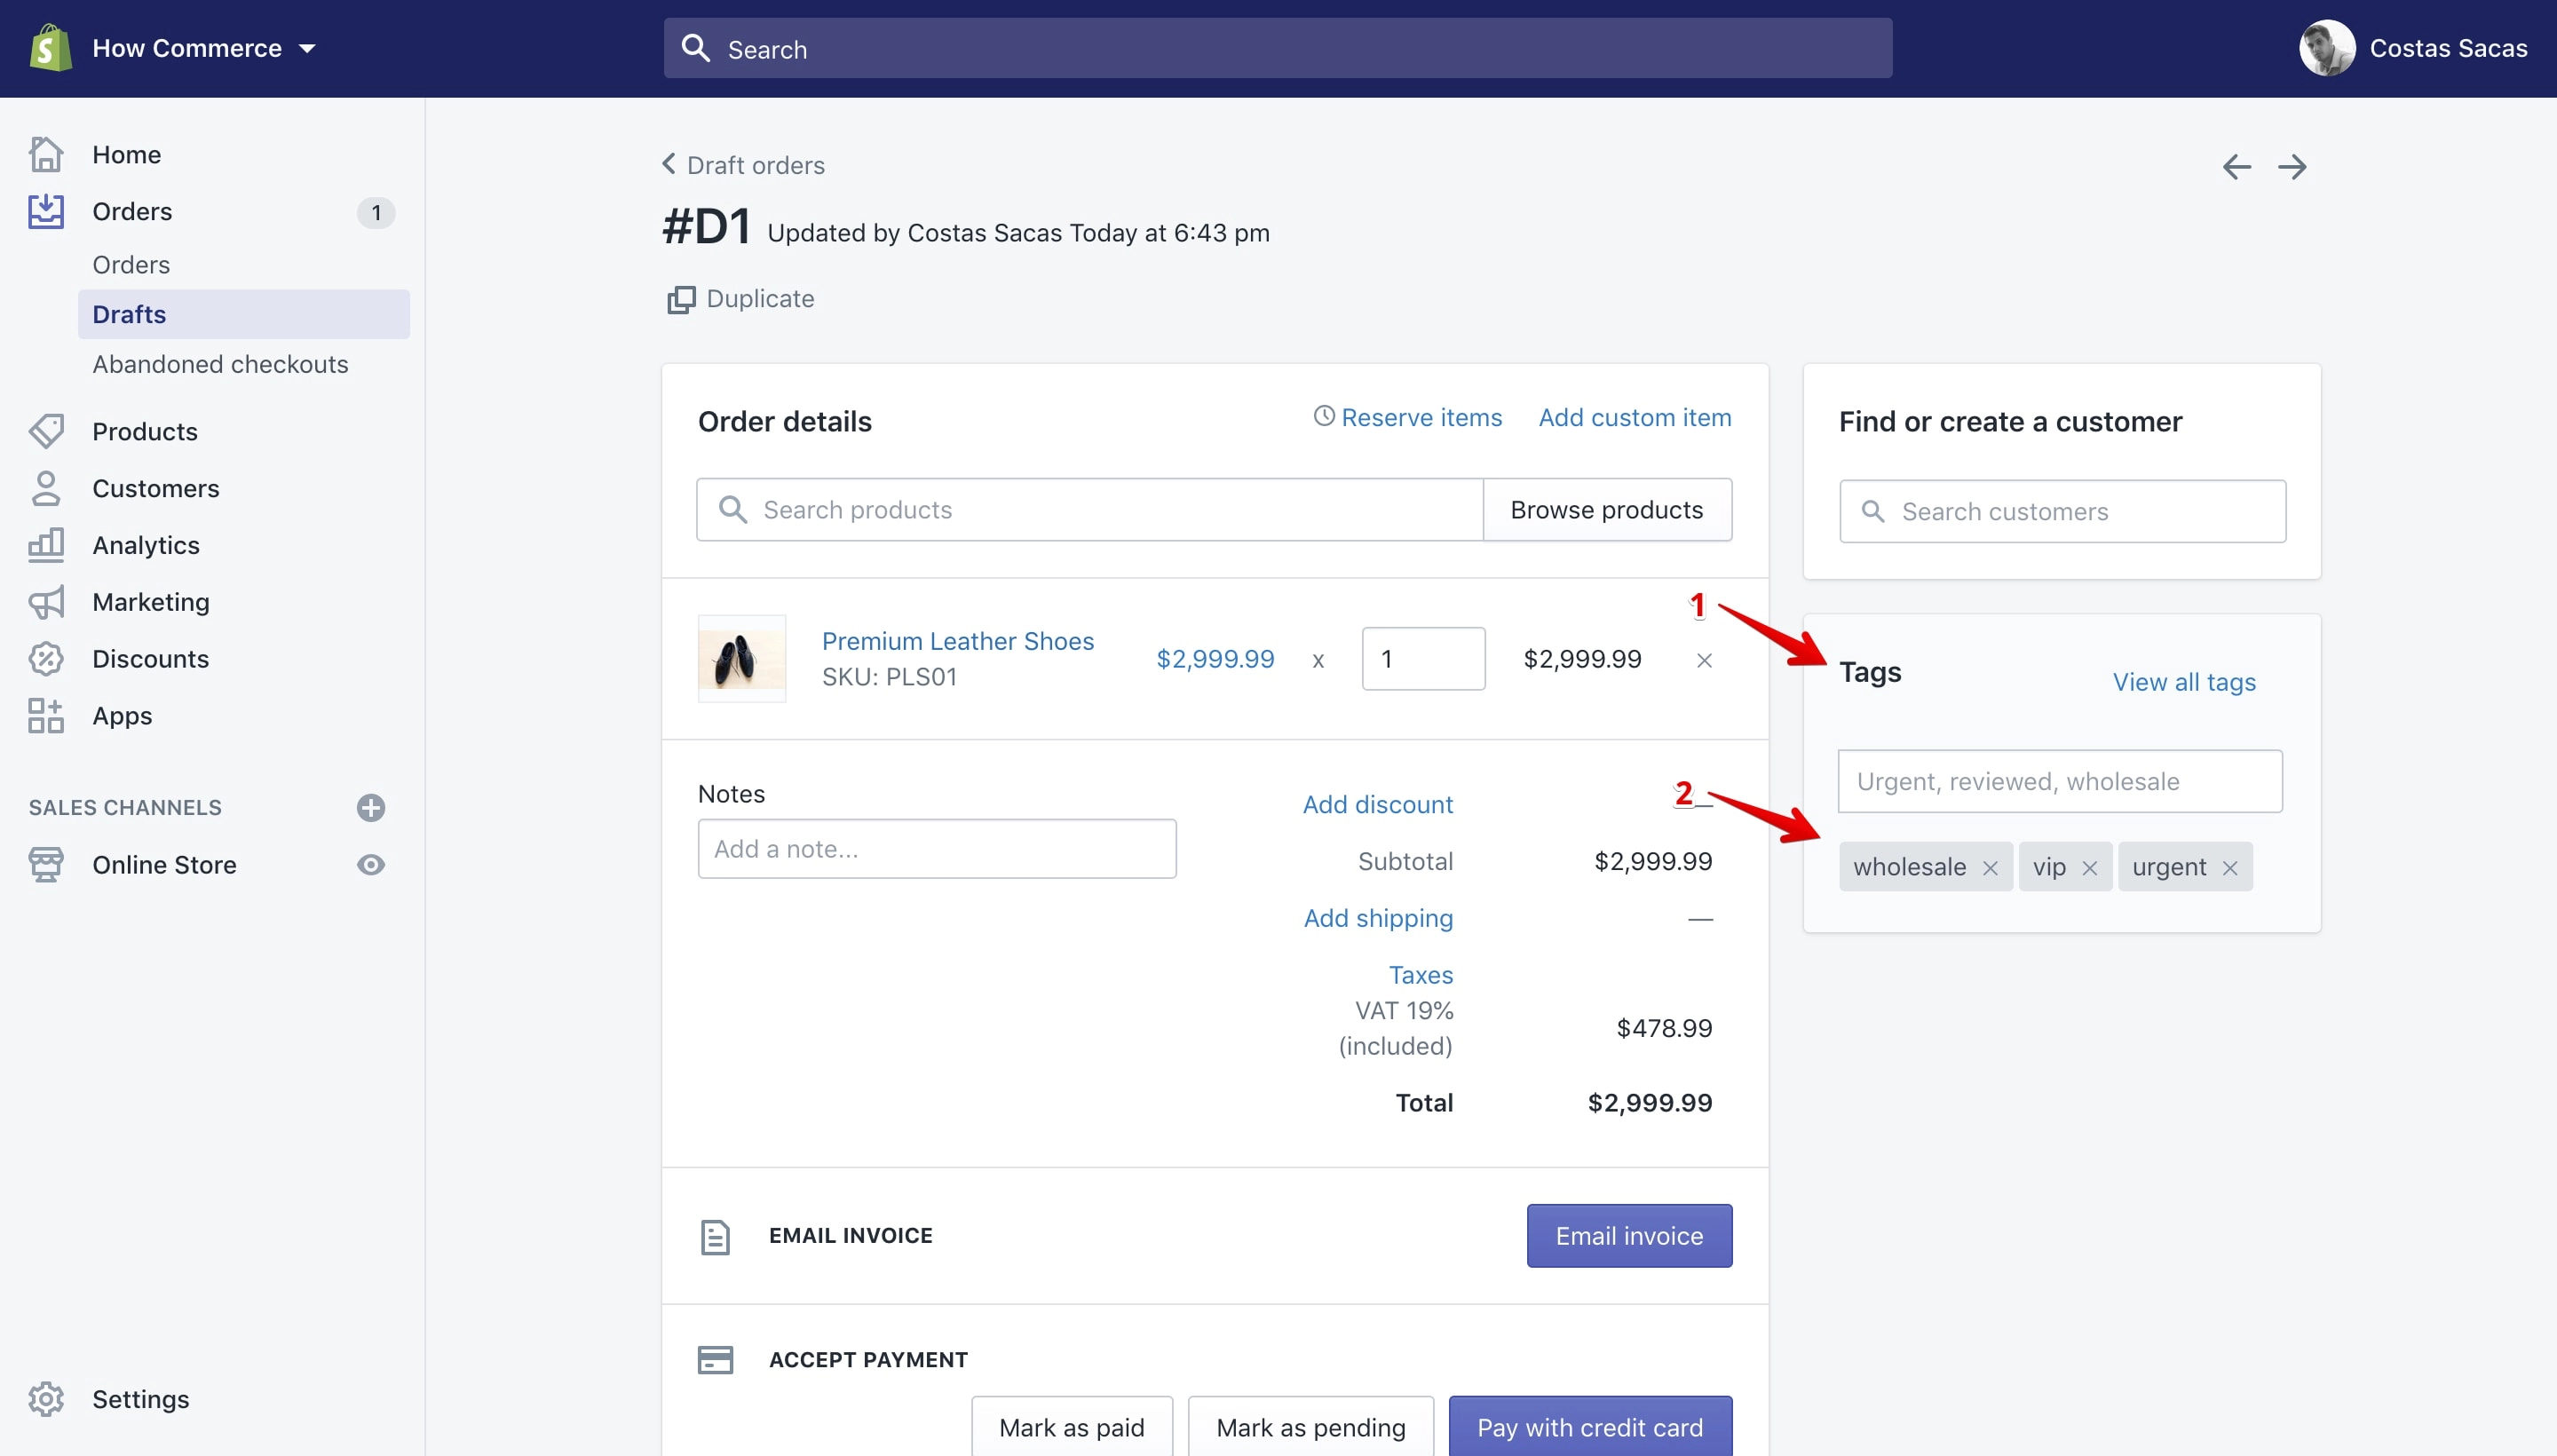
On the draft order details page you can view the tags section on the right sidebar (marked with 1 in the image below), and on this section you can see all tags associated with this draft order (marked with 2 in the image below):
Add a tag
The tags that you add to one draft order can be viewed from any draft order details page and can be used by all draft orders available in the online store.
You can add a tag to a draft order in 2 ways:
- New and existing tags can be added through the input box.
- Existing tags can be added through the “View all tags” link.
Adding a tag through the input box
New tags can be added only through this option. Type the name of the tag inside the input box and hit ↵ (Enter) key or click the “Add” tag:
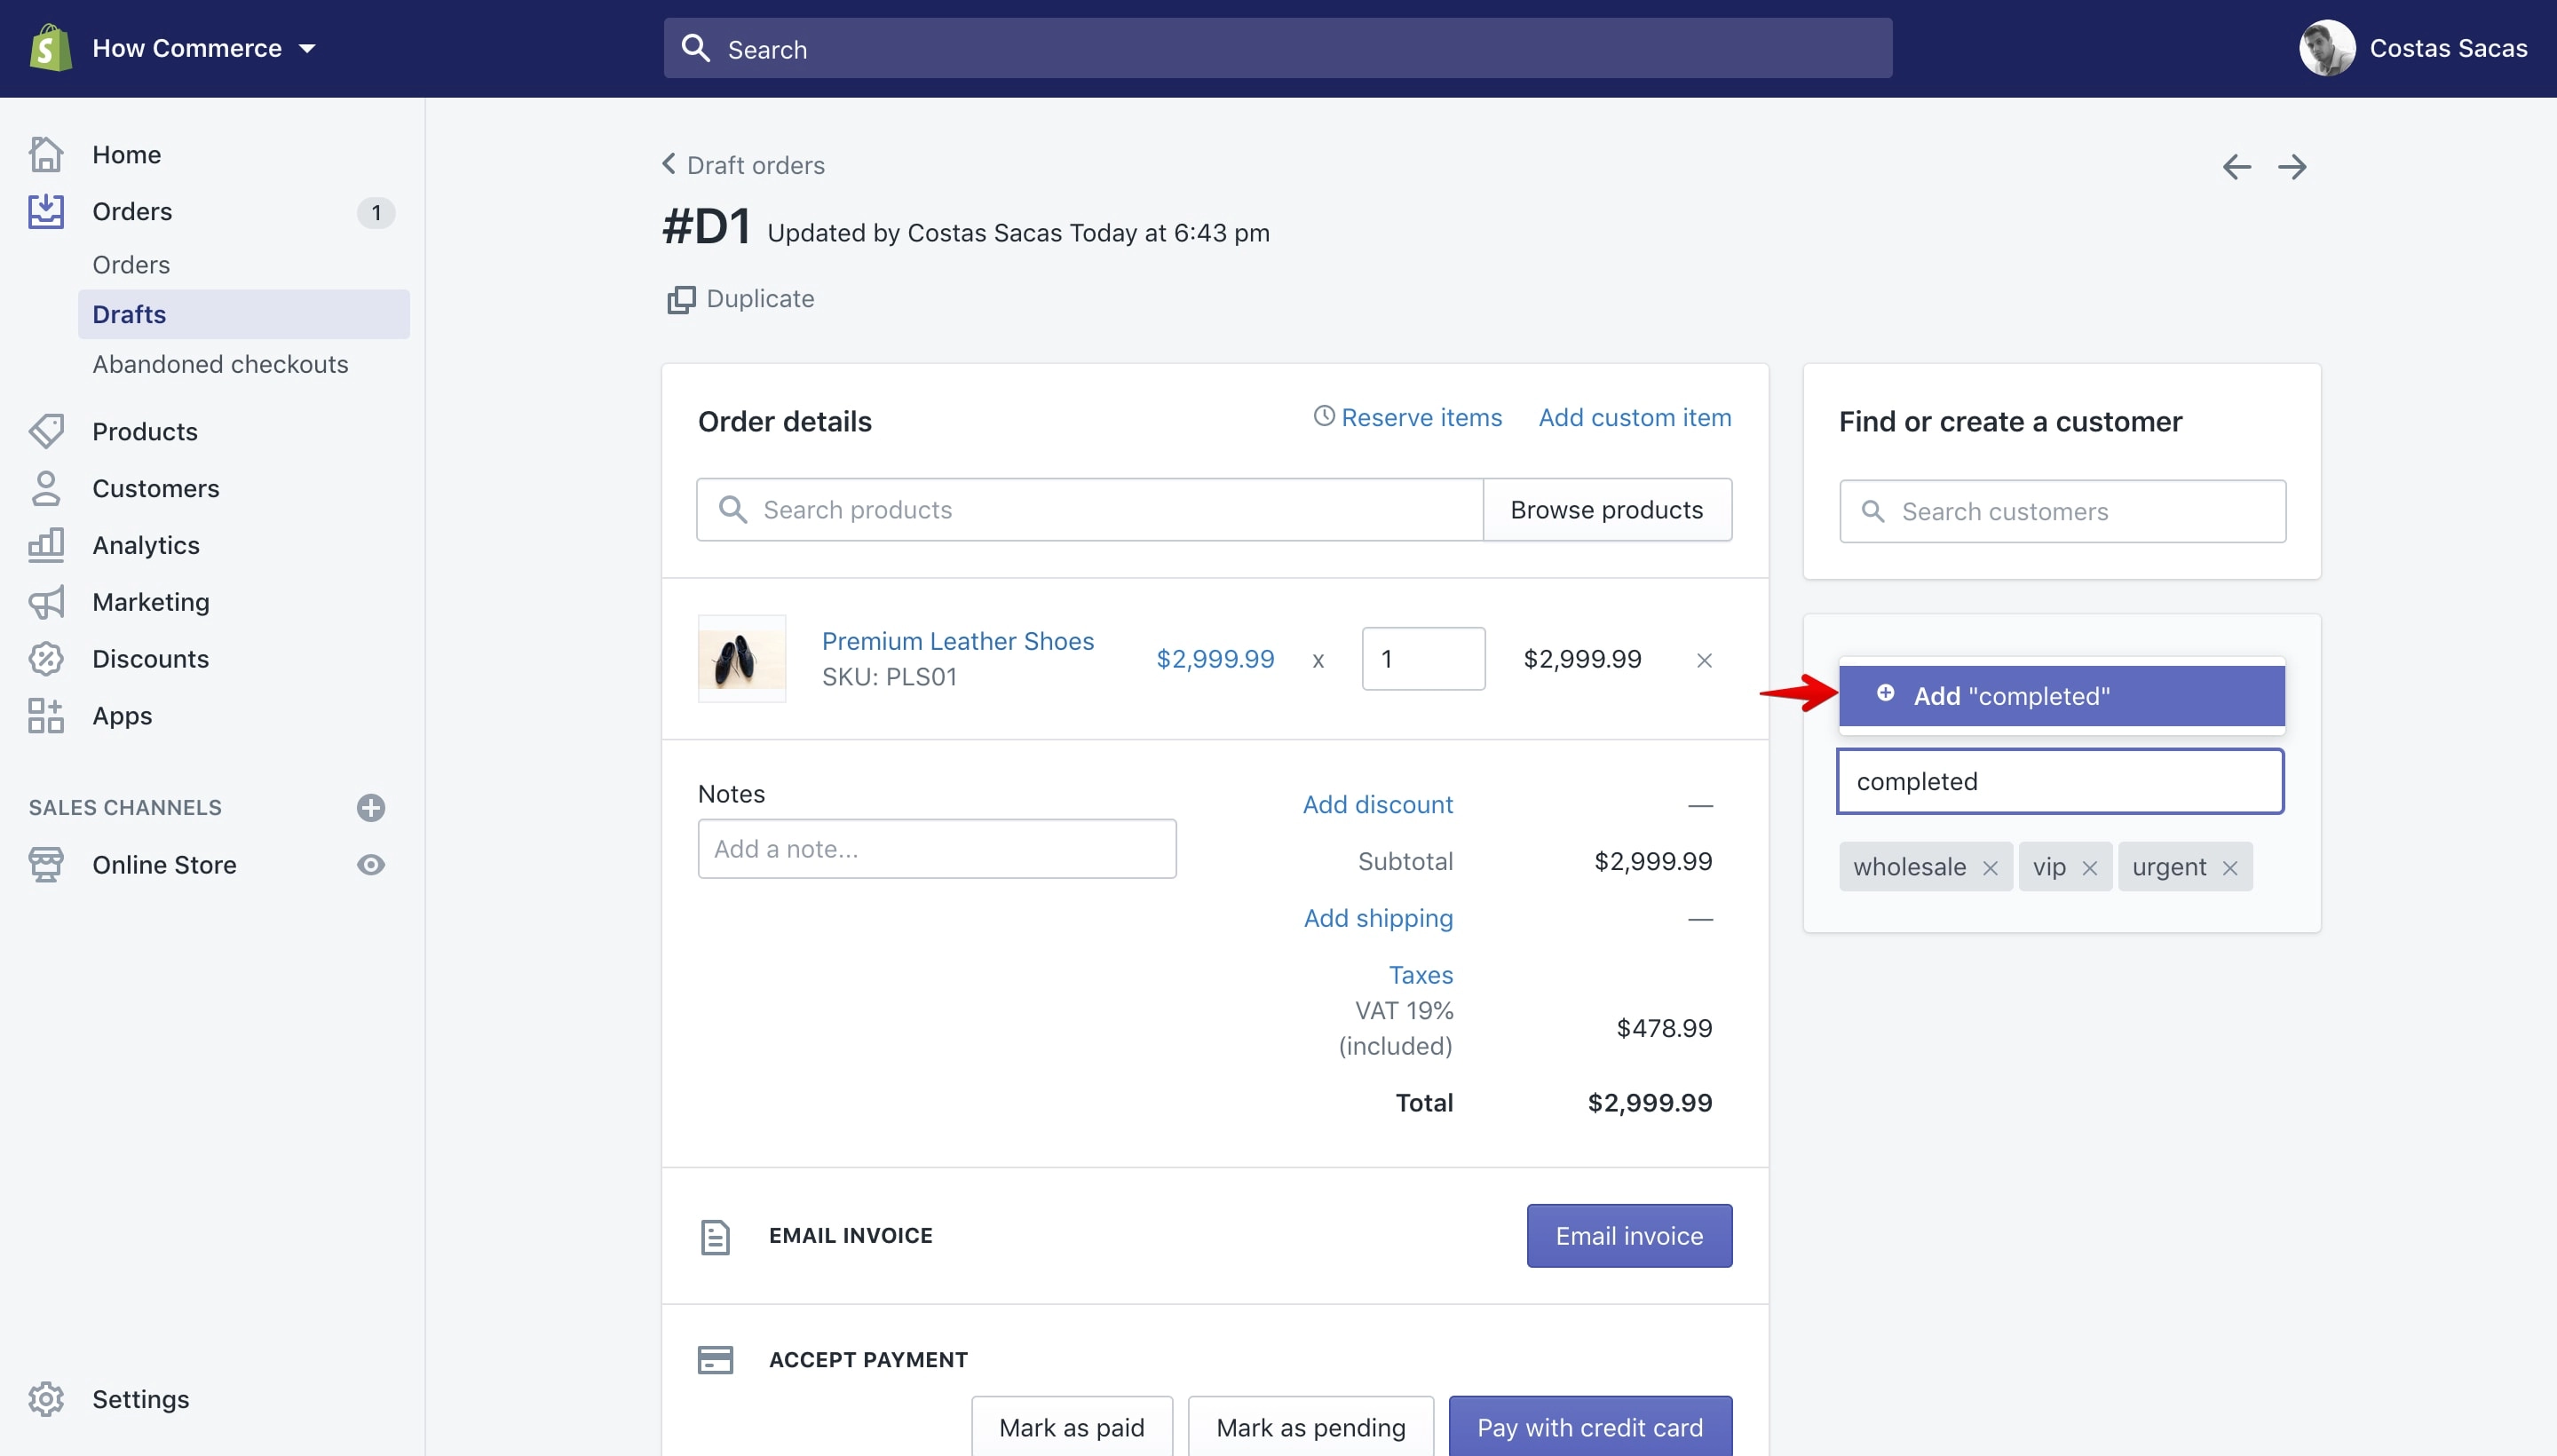
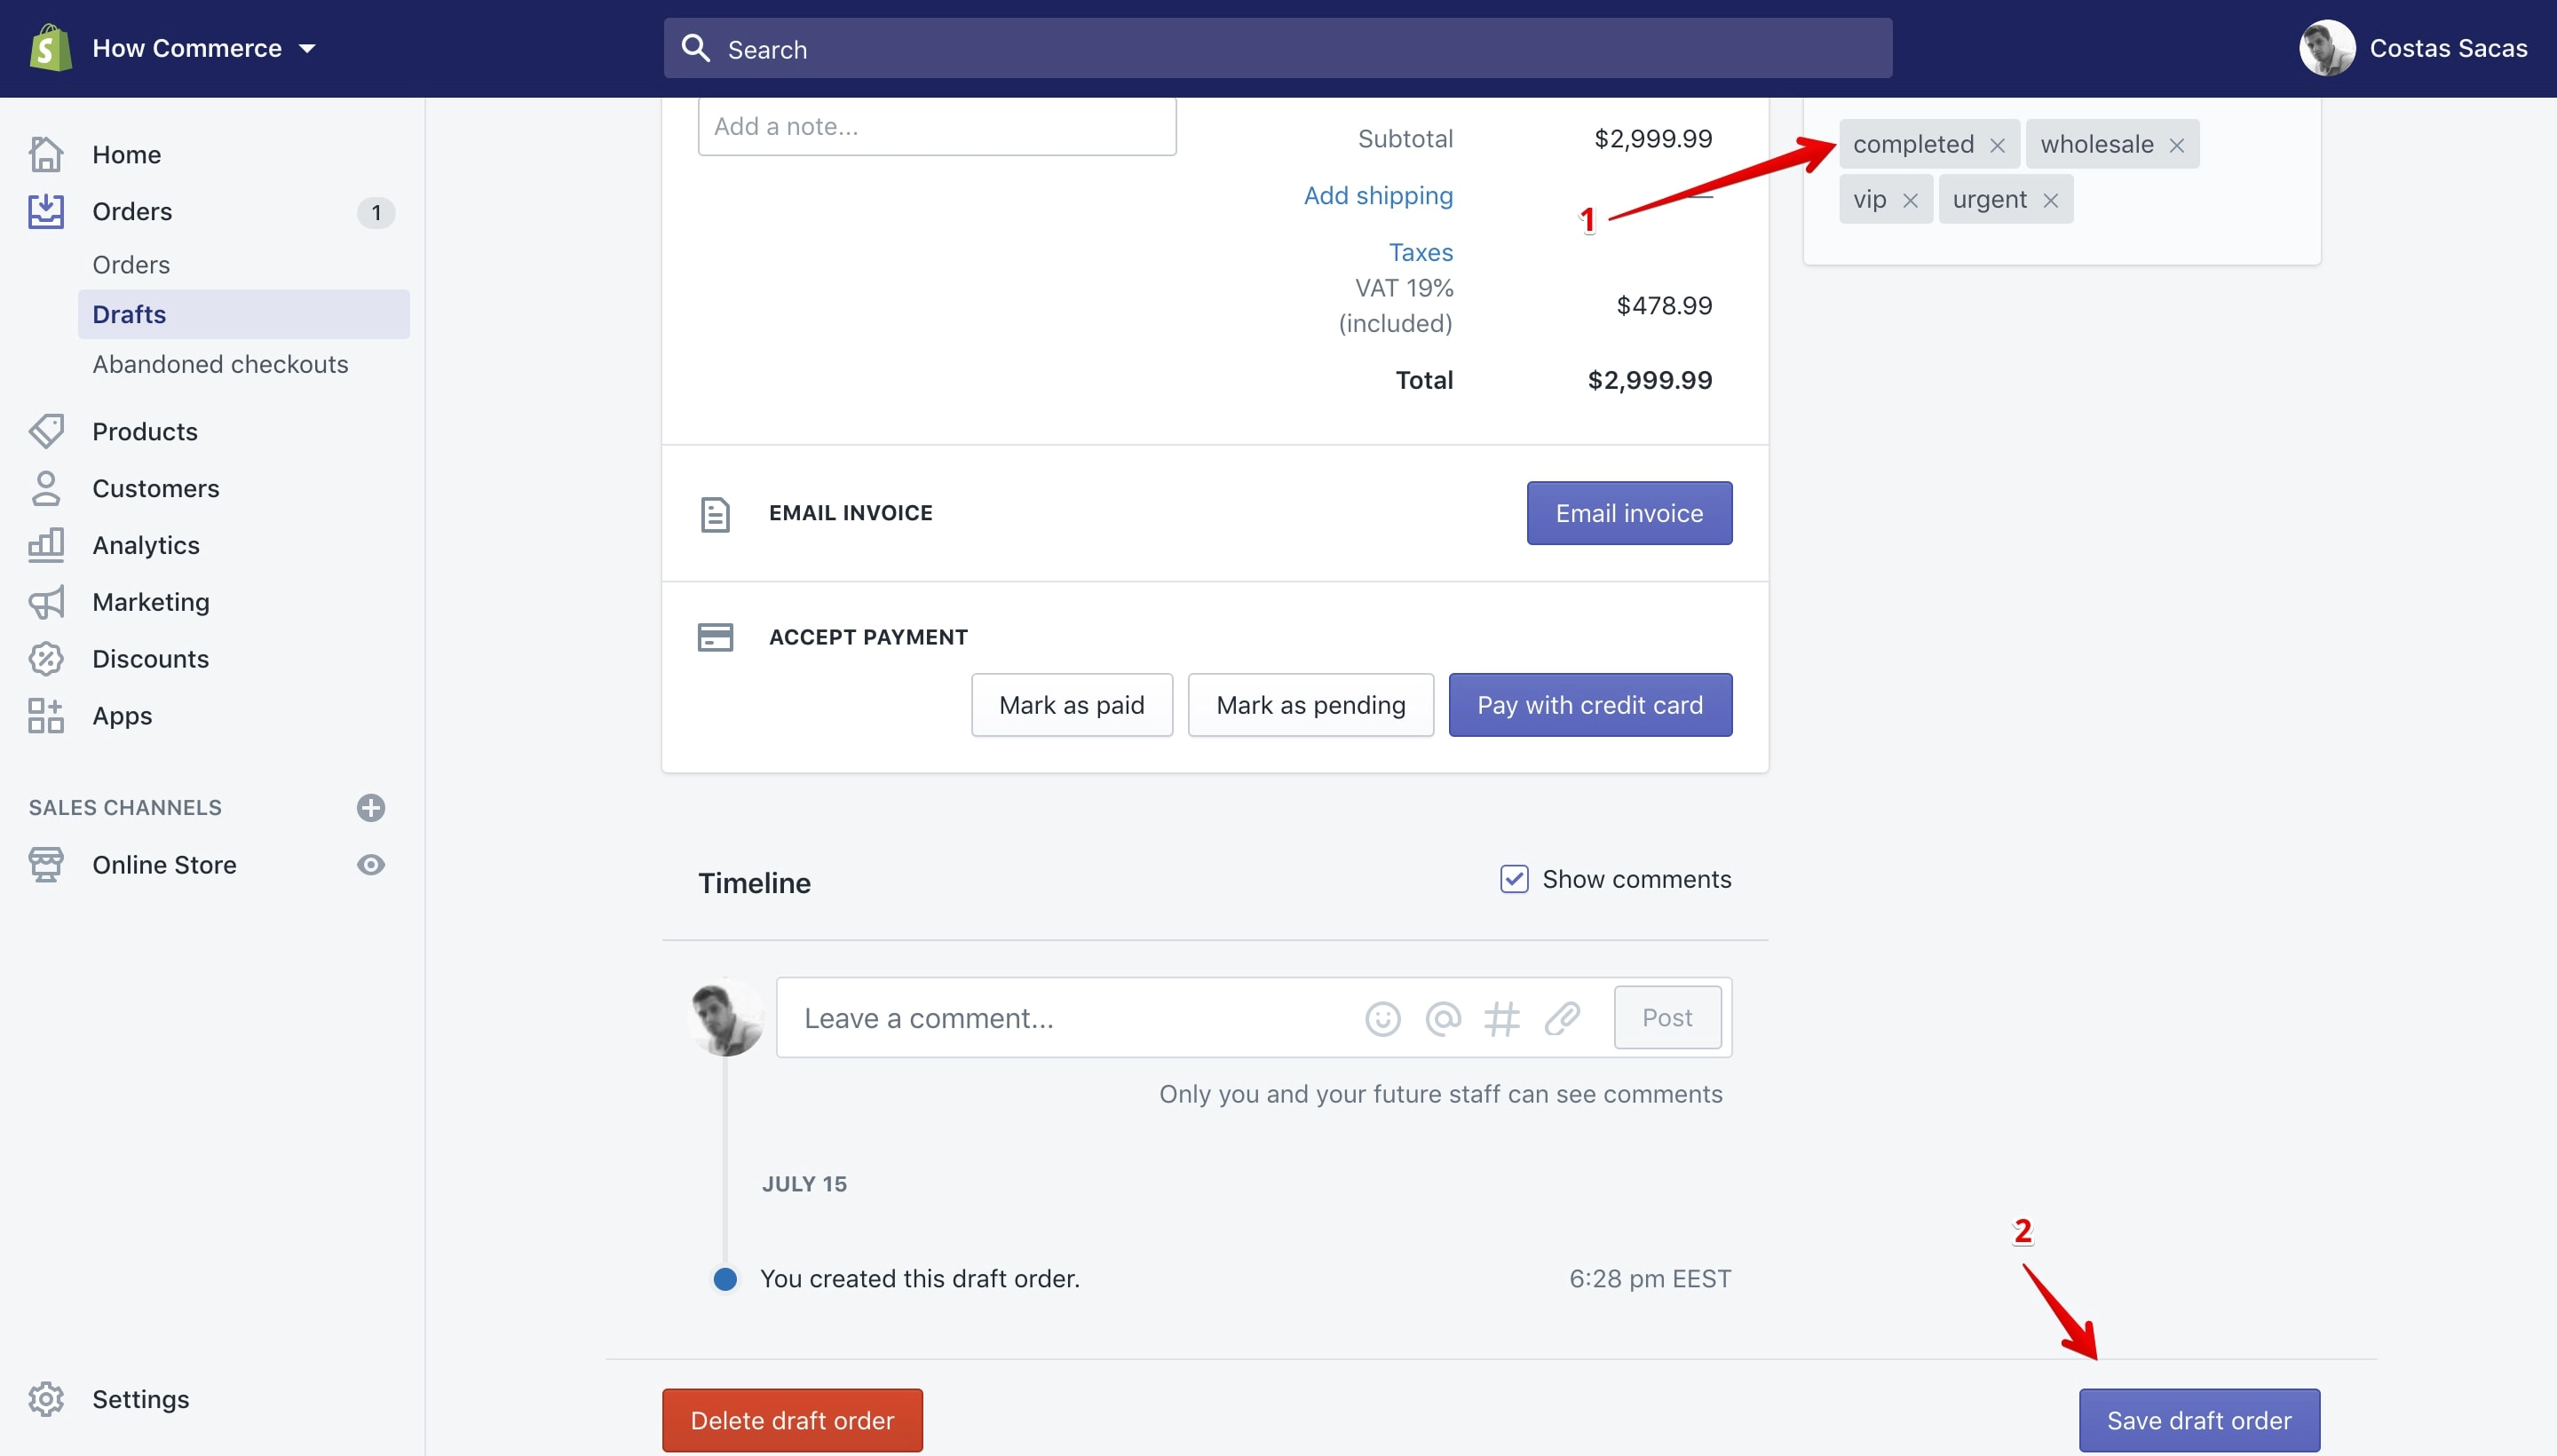
After you add the tag, it will display below the input box (marked with 1 in the image below). You need to save it so you can store it permanently and use it on all your store orders.
To do that click the “Save” button (marked with 2 in the image below):
Adding a tag through the “View all tags” link
Through this method you can add only existing tags to your draft orders and you can’t create new ones.
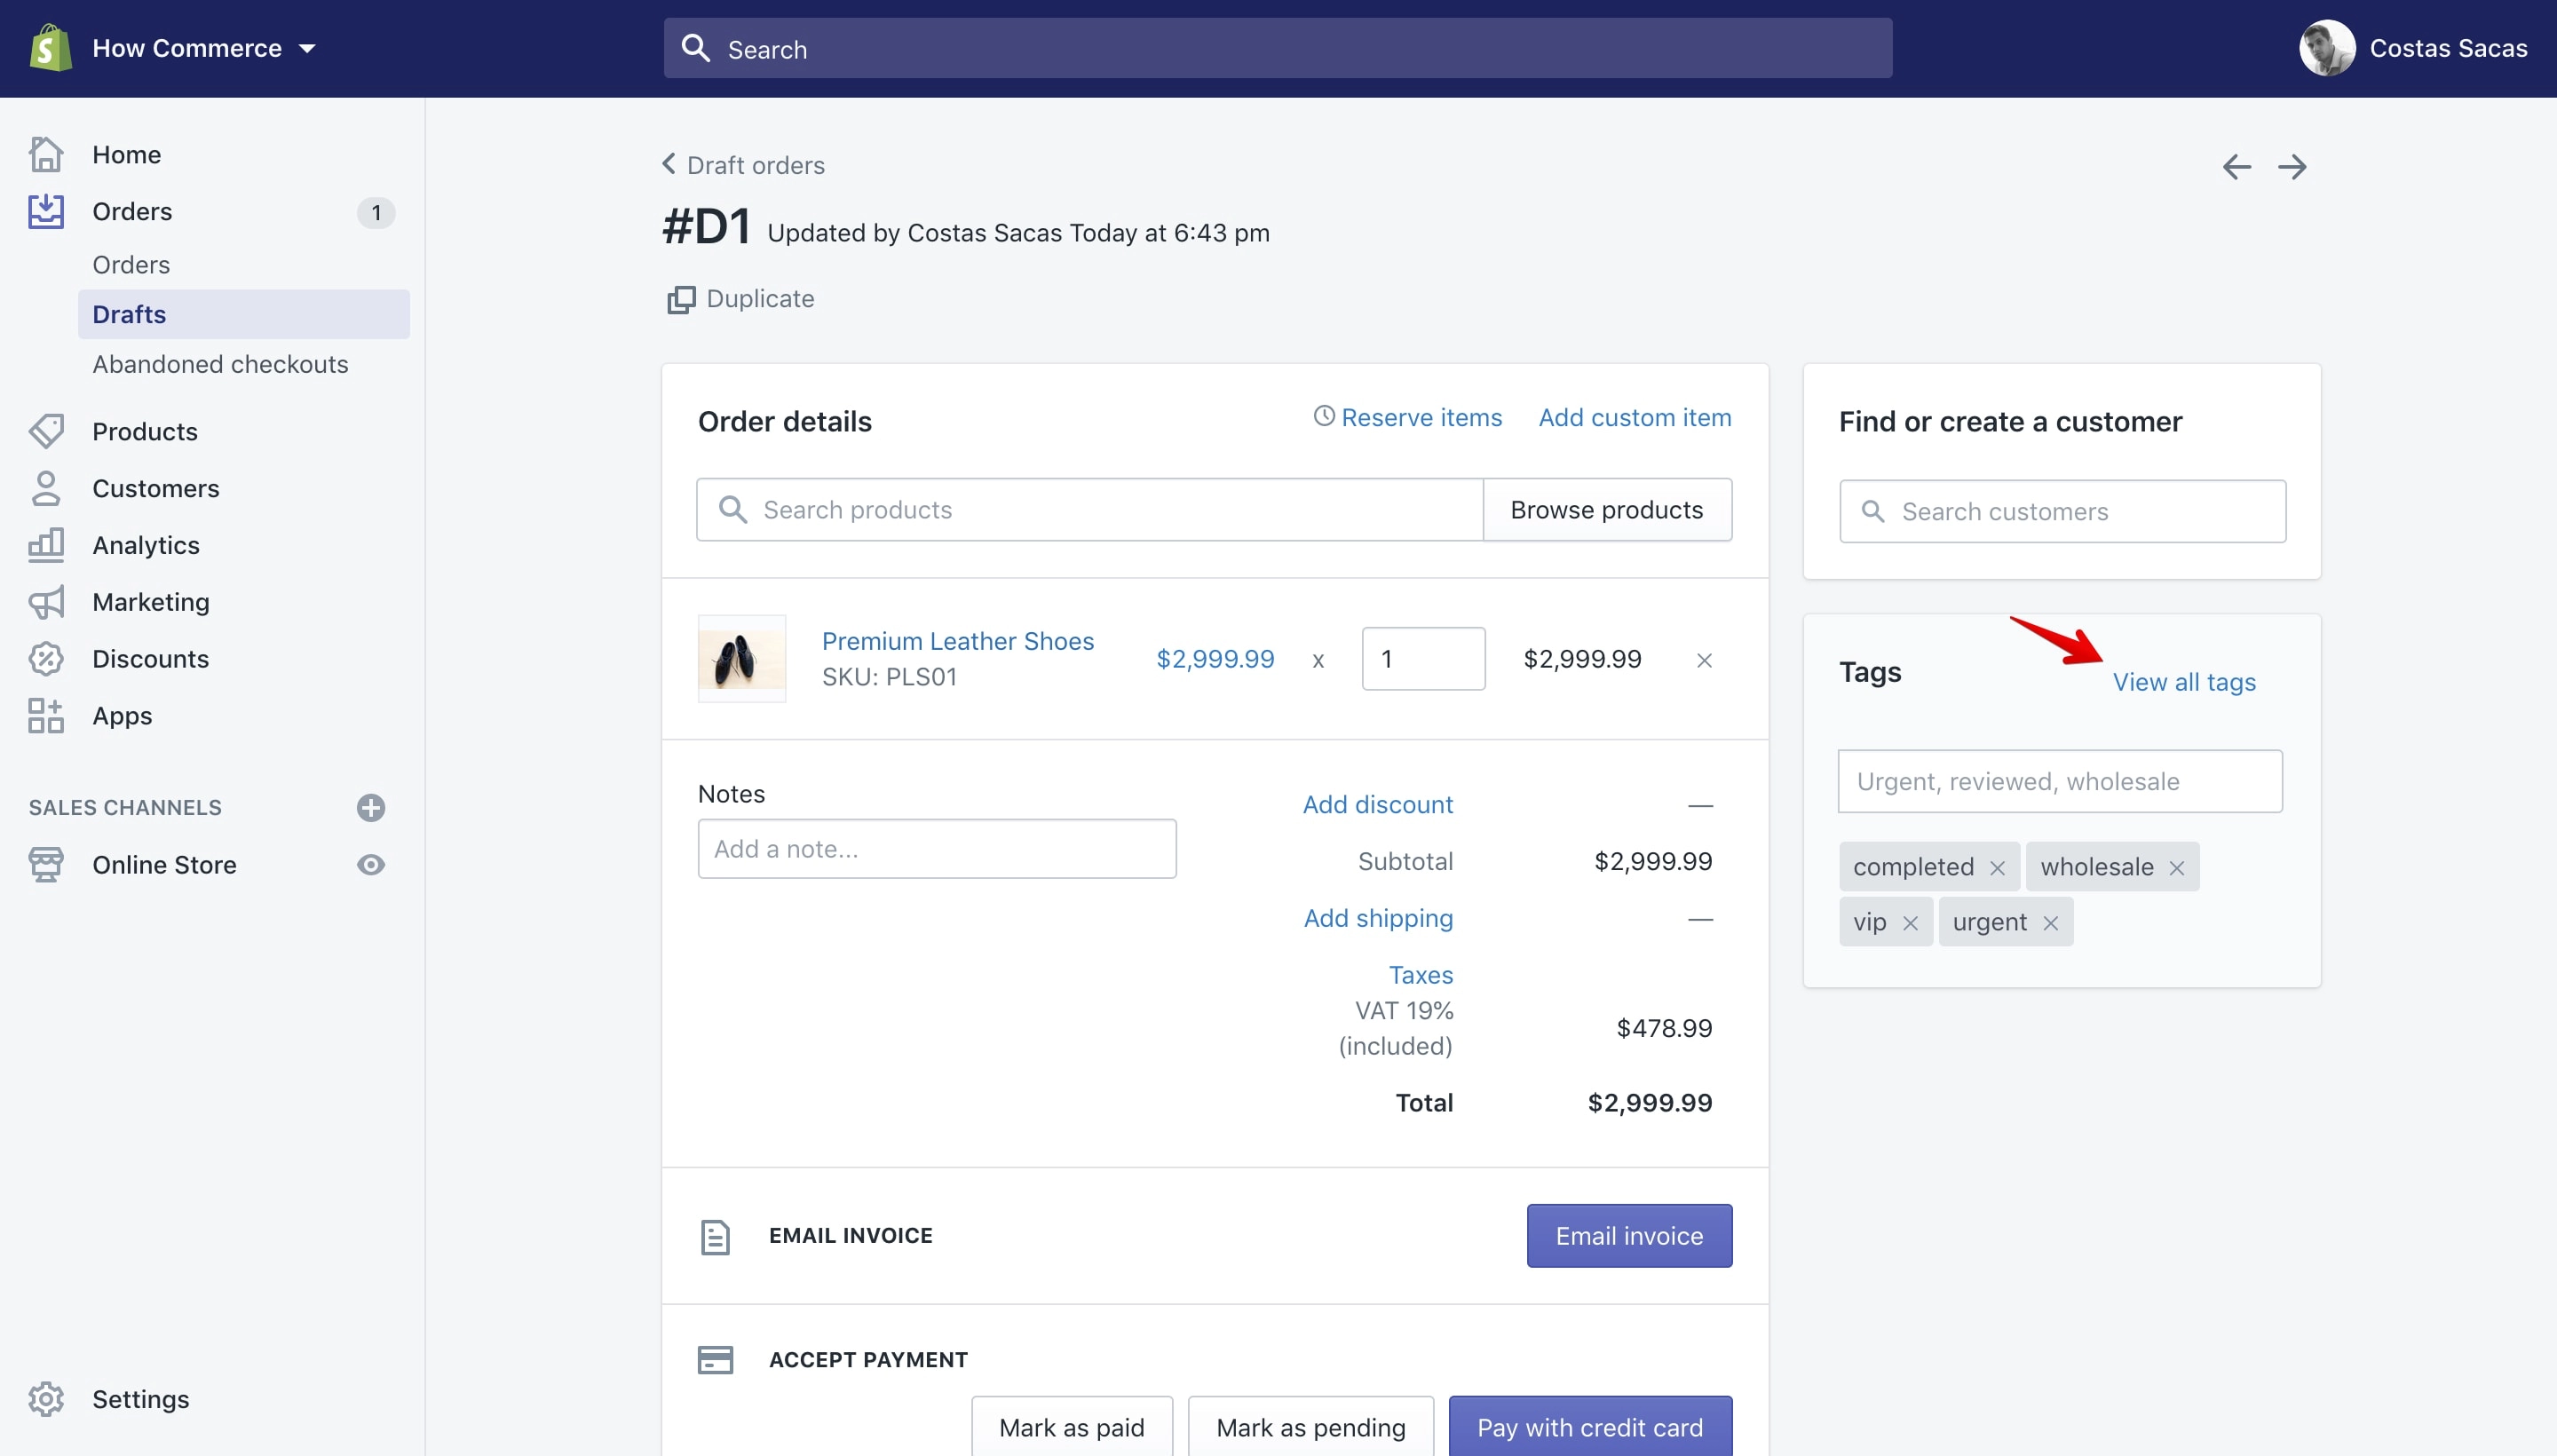
Clicking on the “View all tags” link will open a pop-up that will allow you to select and assign new tags to the order:
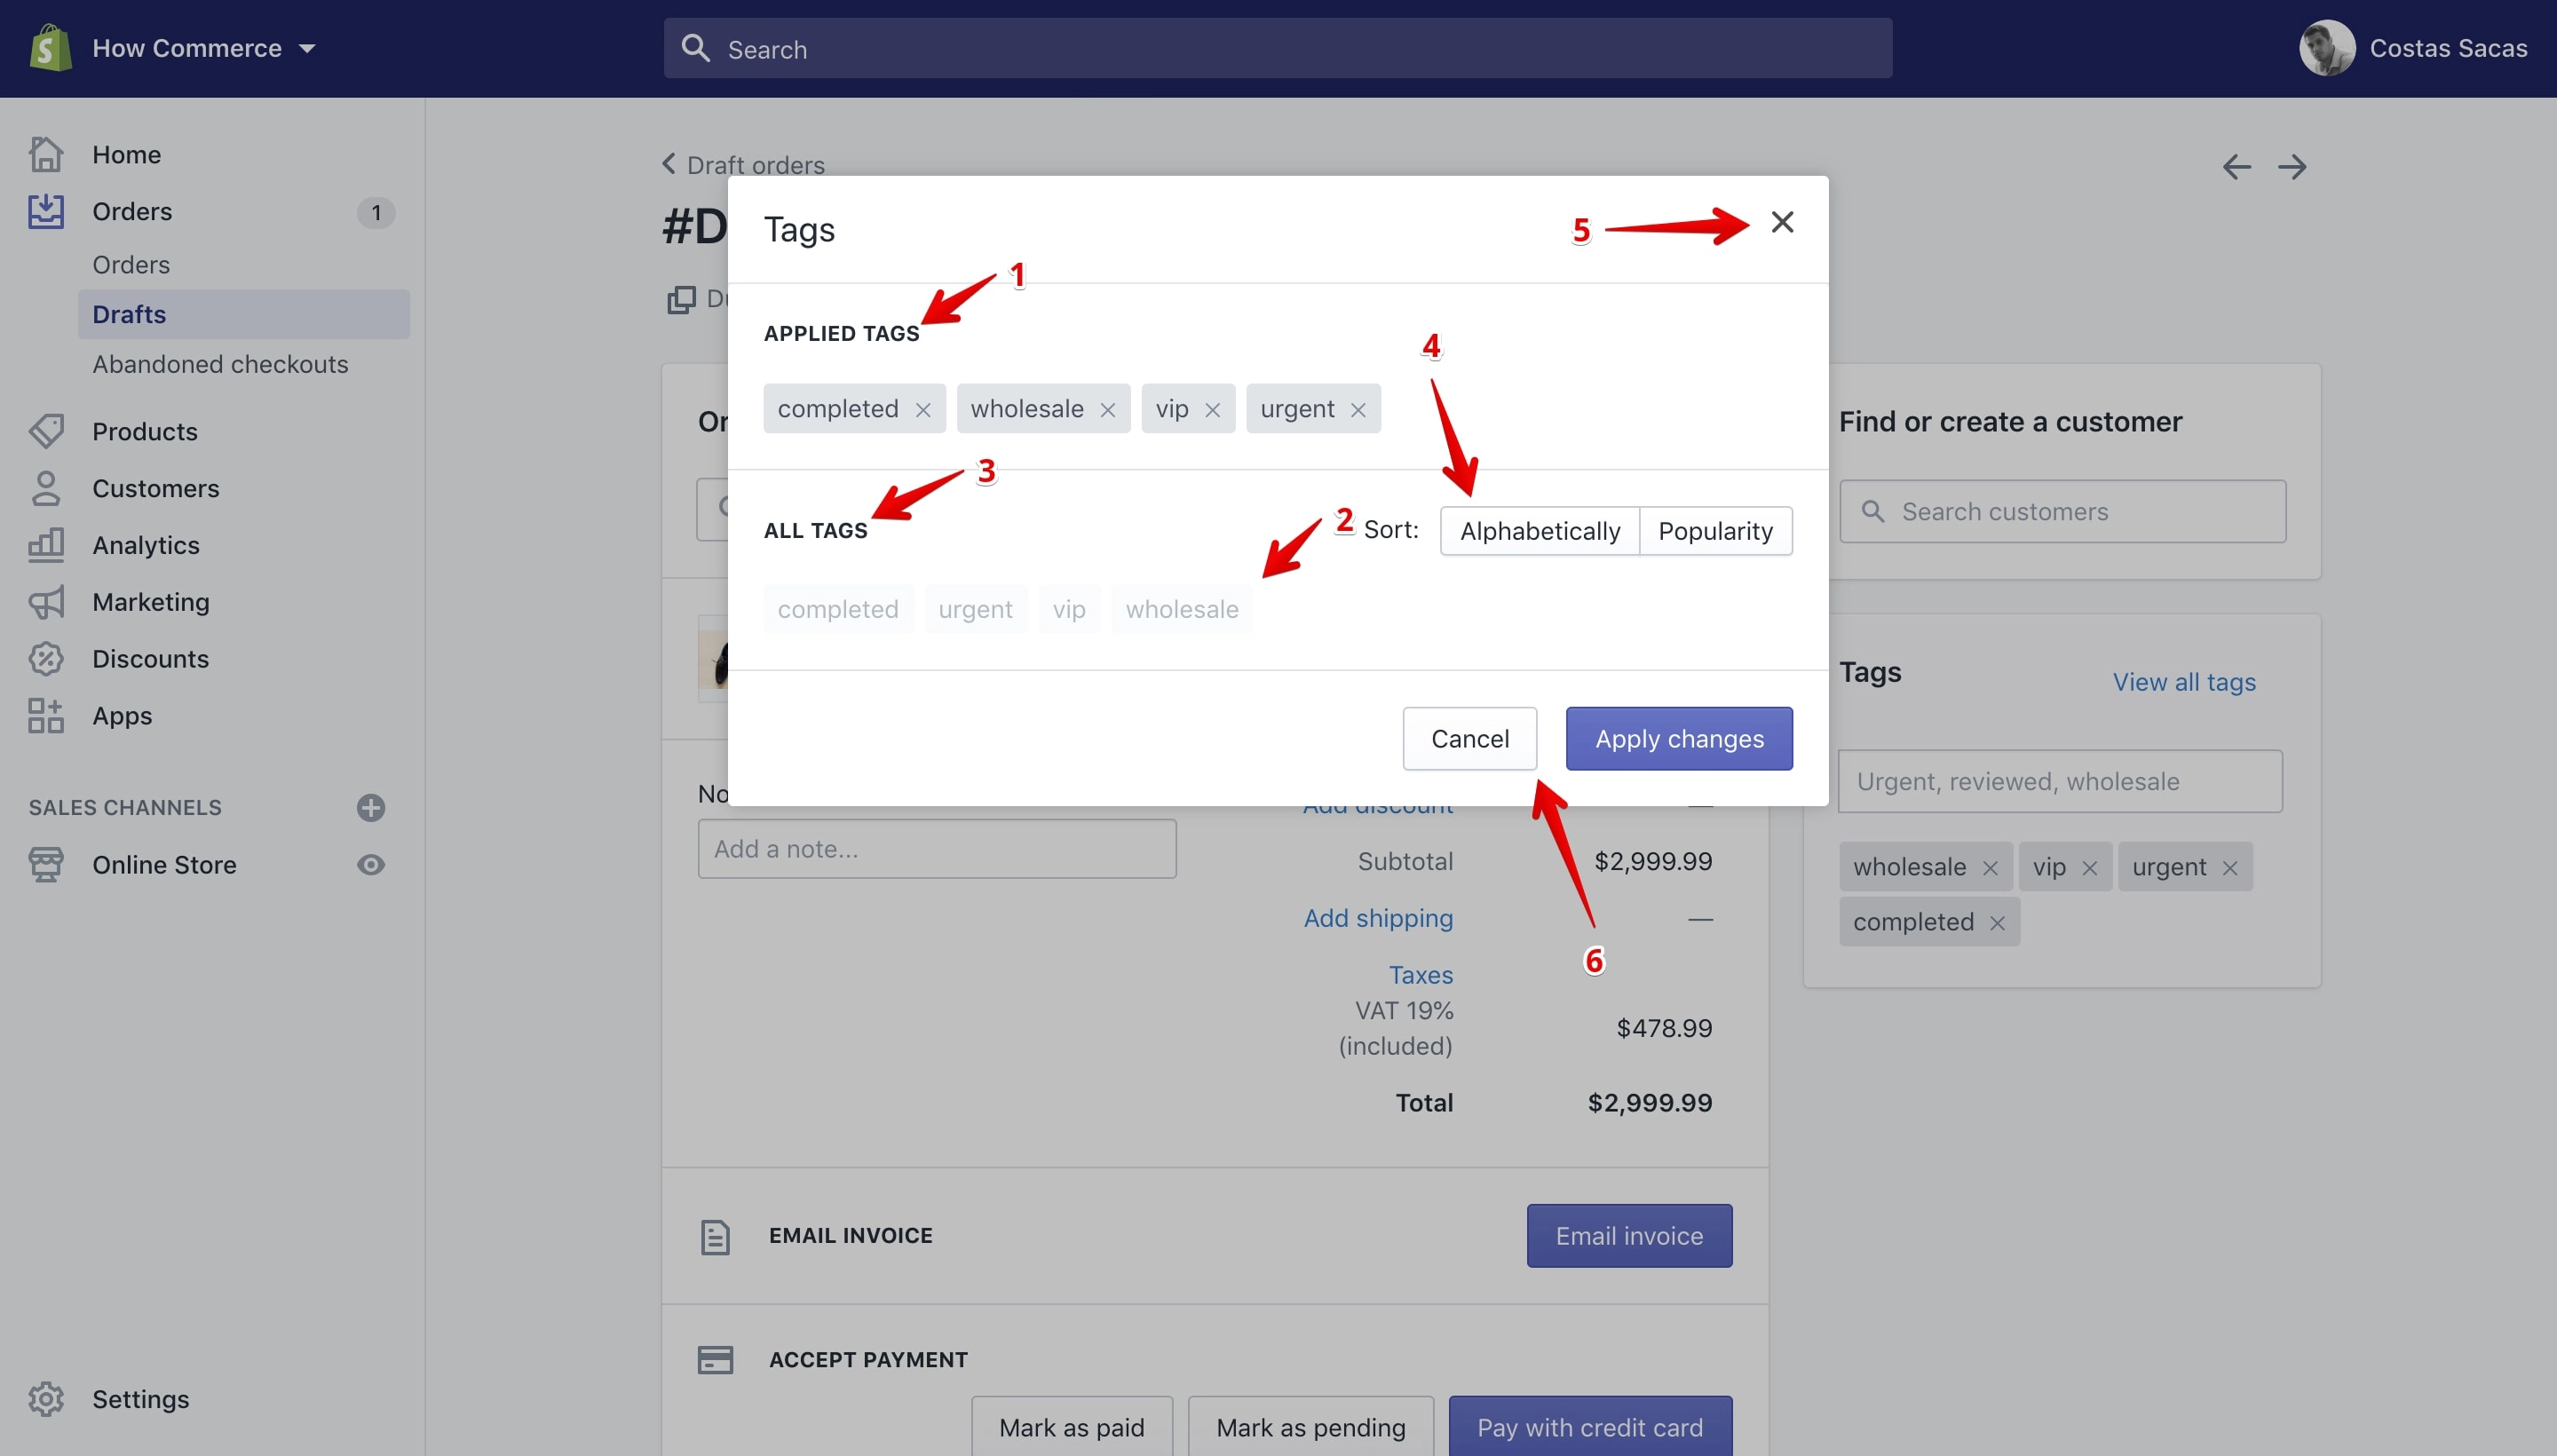
On the pop-up you can see all the tags assigned to this draft order in the “Applied Tags” section (marked with 1 in the image above).
Below that section you can see the “All Tags” section (marked with 3 in the image above). This section lists all the tags available in the store draft orders section.
The tags that are greyed-out (marked with 2 in the image above) are already assigned to the draft order. You can assign more from this section by clicking on the desired tag, if the tag is available.
If you have a lot of tags you can sort them “Alphabetically” or by “Popularity” from the sorting section (marked with 4 in the image above).
You can close the pop-up by clicking the “X” icon from the top right corner (marked with 5 in the image above) or by clicking the “Cancel” button (marked with 6 in the image above).
Note:
Clicking the “X” icon or the “Cancel” button will cancel your newly assigned tags and not save your changes.
Assign new tags to the draft order by clicking on tags located on the “All Tags” section (marked with 1 in the image below).
Tags added will display in the “Applied Tags” section (marked with 2 in the image below). Once completed click the “Apply changes” button (marked with 3 in the image below):
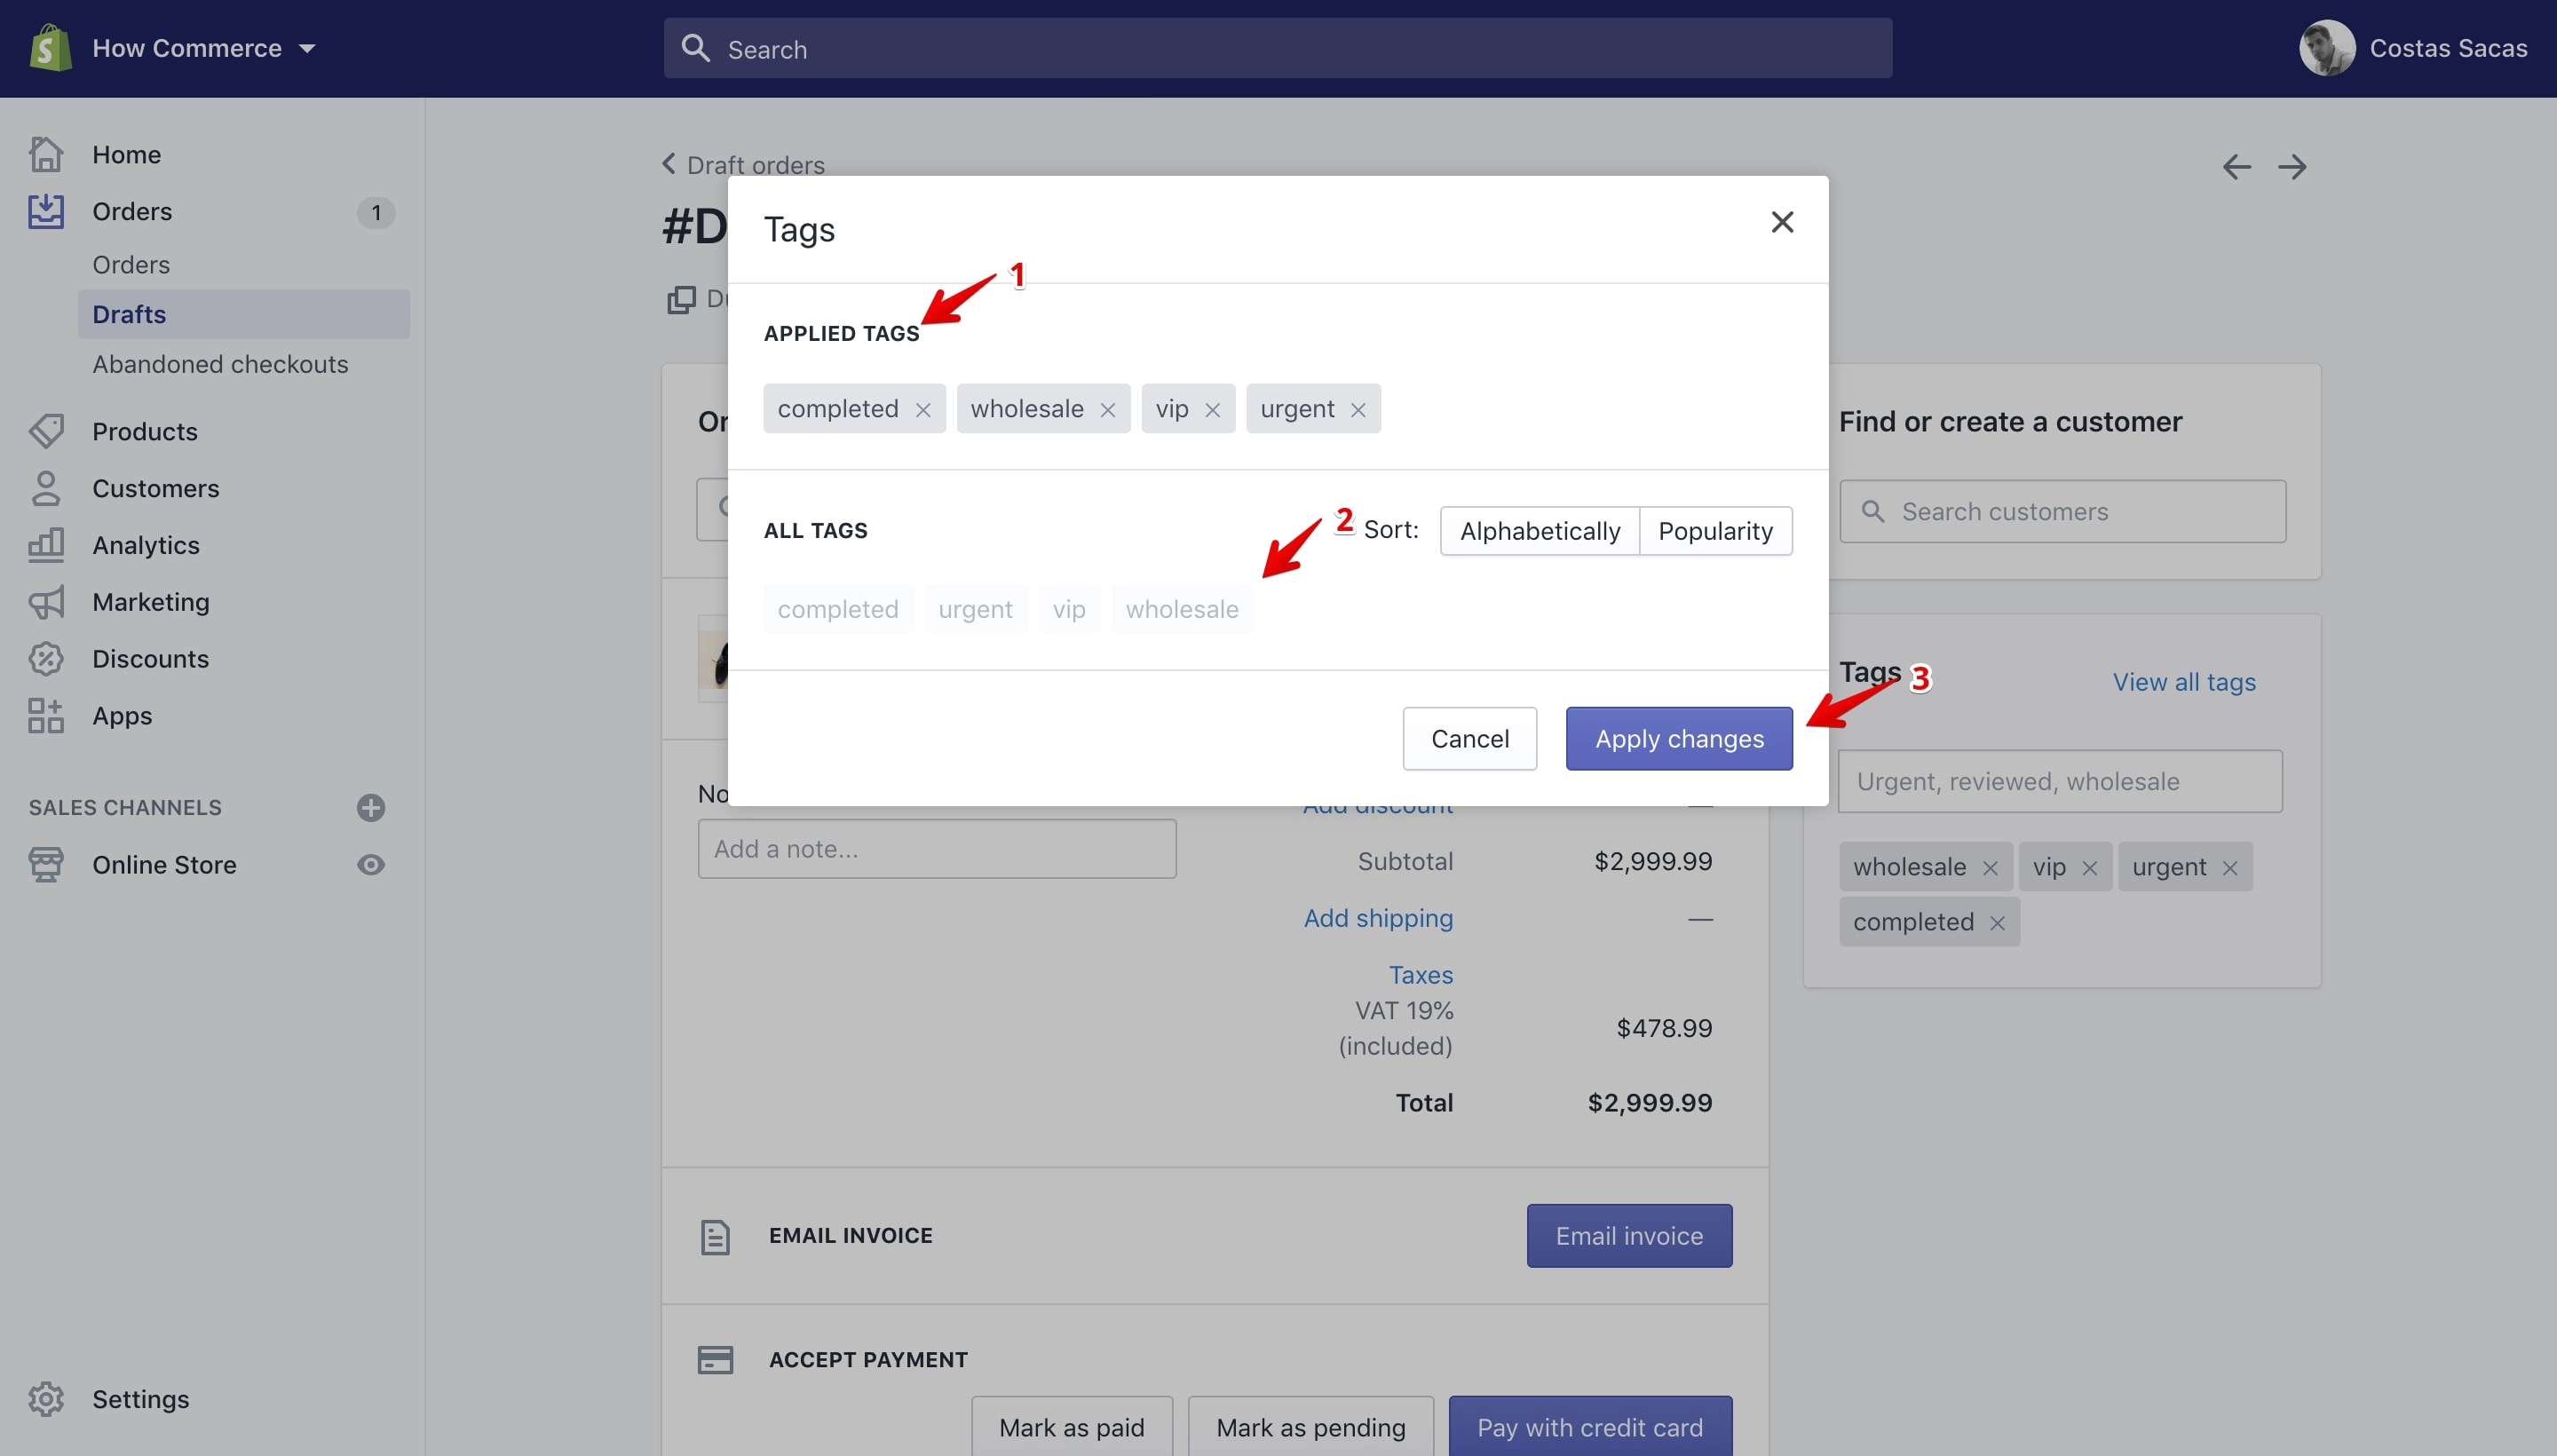
Clicking the “Apply changes” button will list the newly added tags on the “Tags” section (marked with 1 in the image below) located on the drafts order details page:
The tags are not yet saved to the draft order. If you leave the page at this stage the tags will not be assigned to the draft order.
To save them click the “Save” button (marked with 2 in the image above).
Remove a tag
You can remove a tag from an order in 2 ways via the “Tags section” on the draft order details page or from the “Applied Tags” section located on the “Edit tags” pop-up.
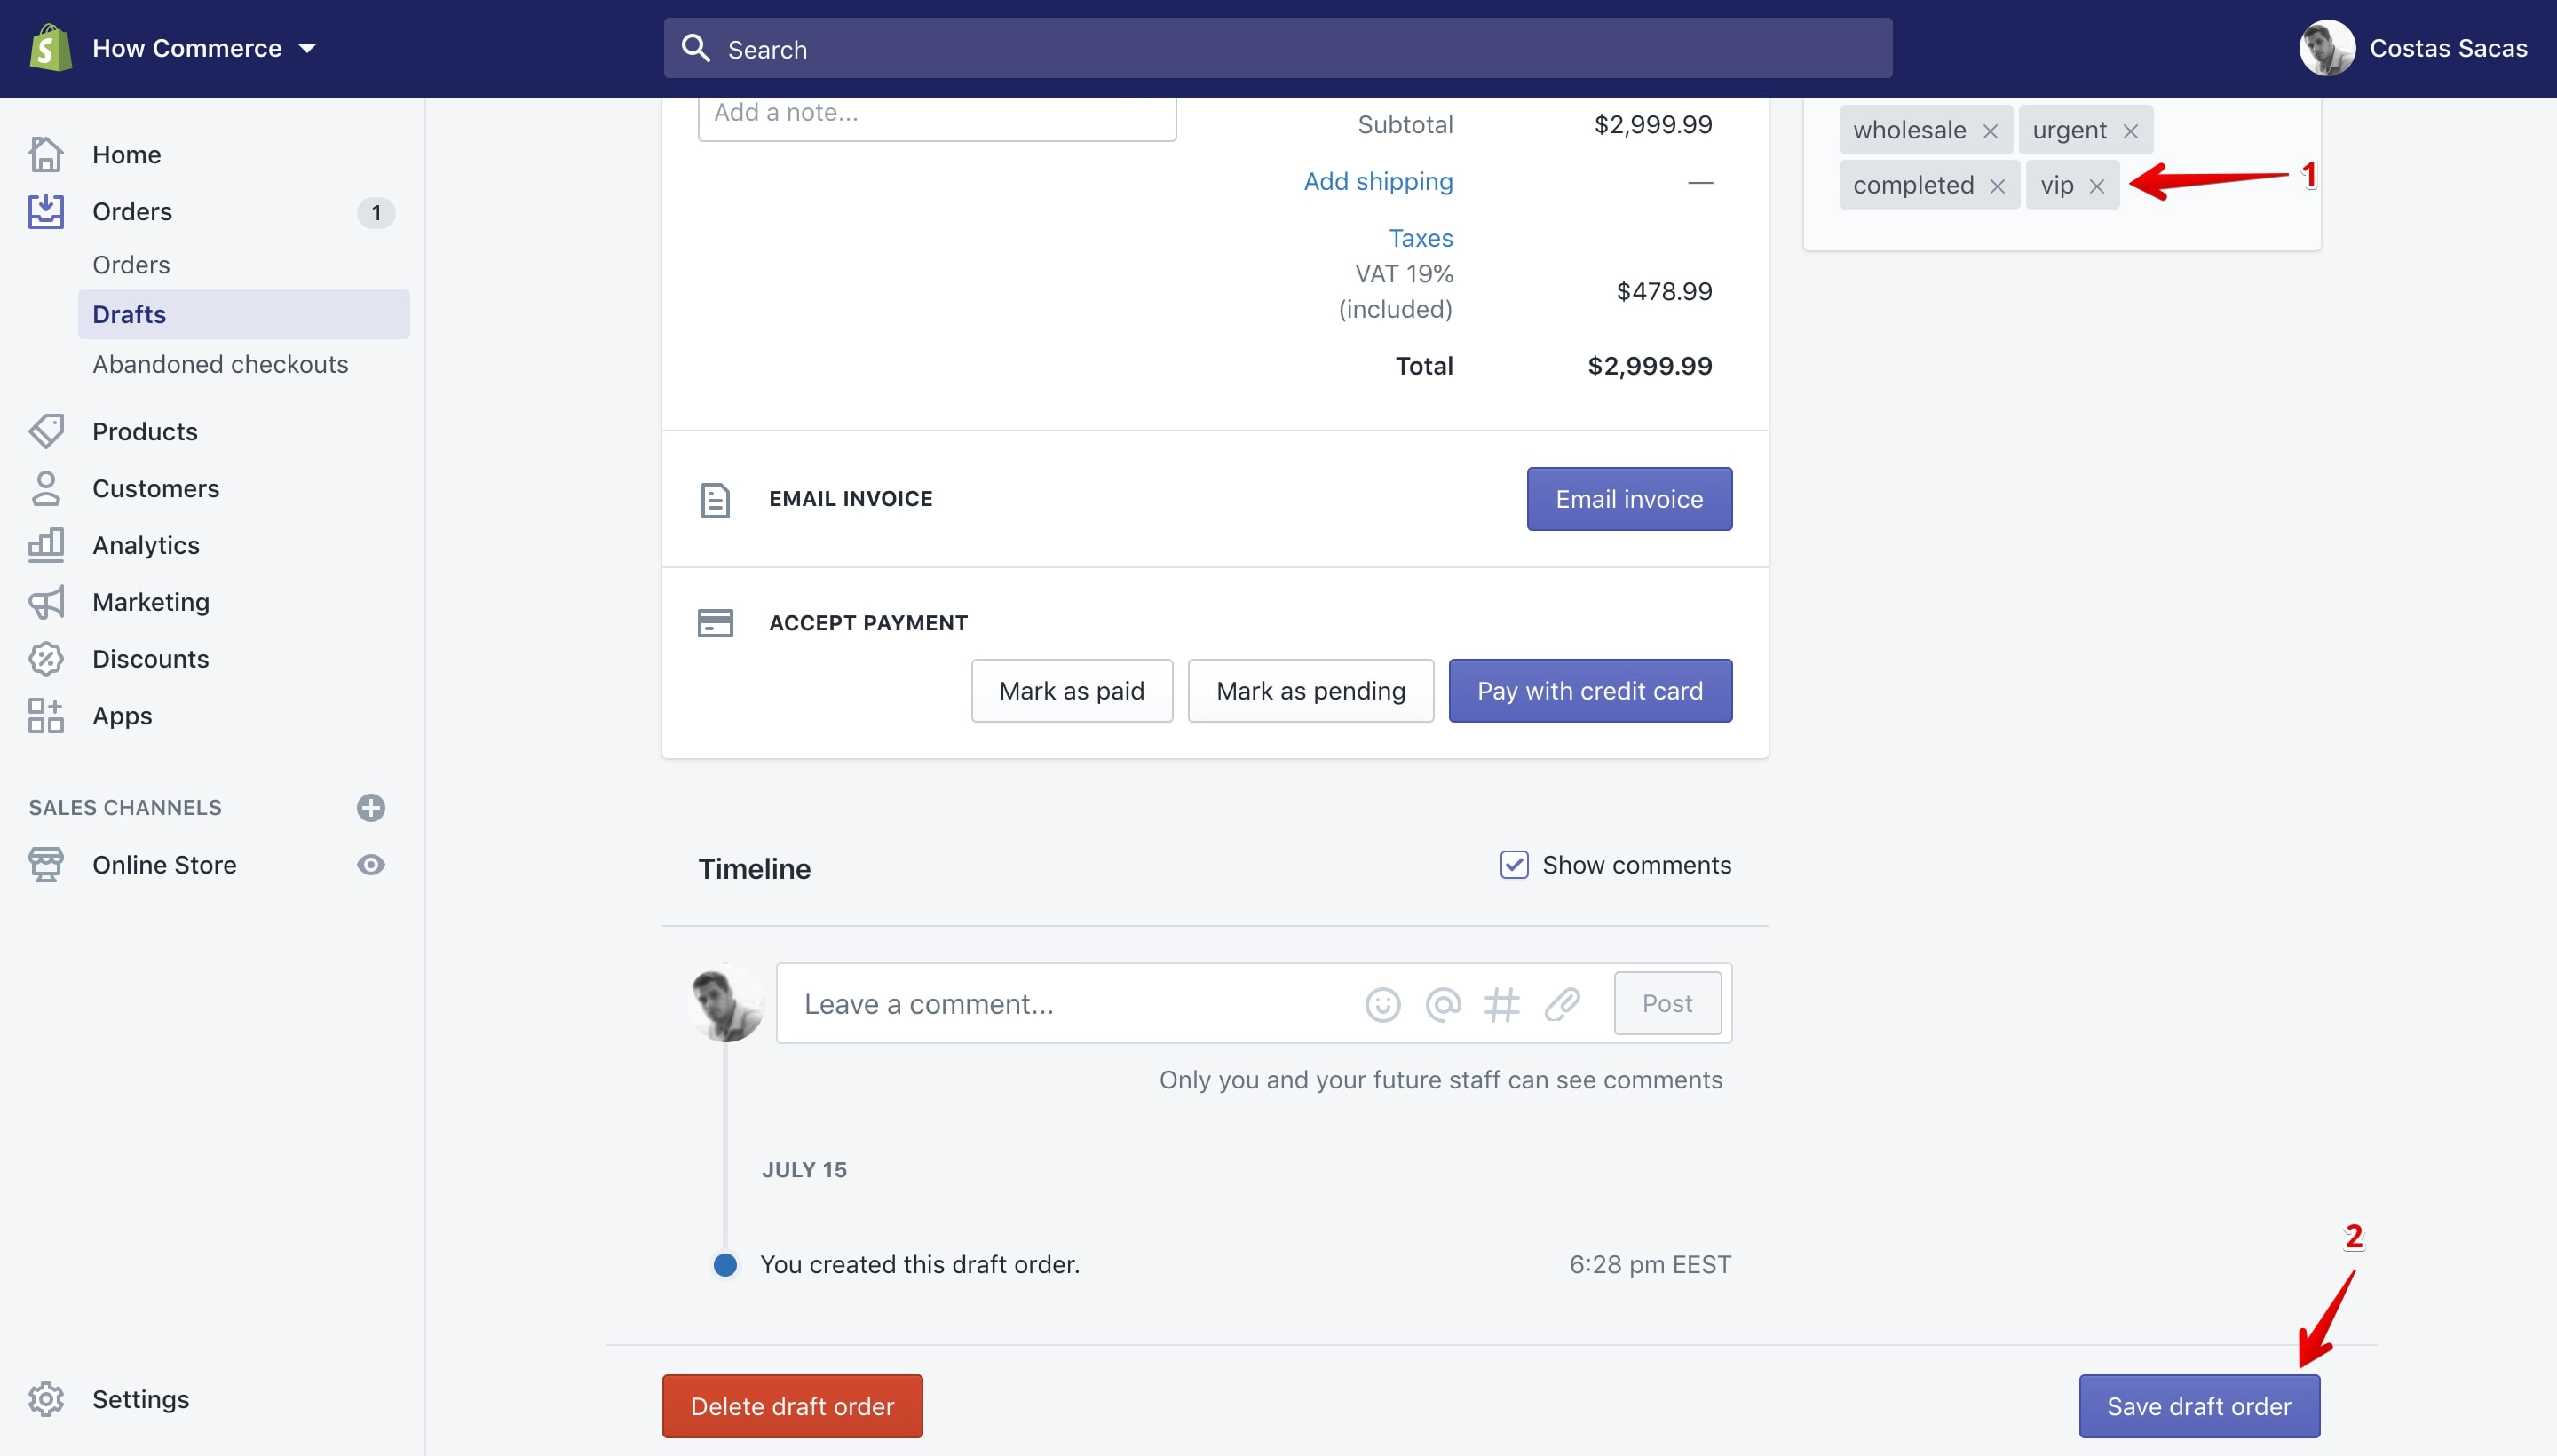
Remove a tag from the “Tags” section
For me this is the easiest and fastest way to do it.
All you have to do is click the “X” (marked with 1 in the image below) from the tag and save your changes by clicking the “Save” button (marked with 2 in the image below):
Remove a tag from the “Edit tags” pop-up
On the draft order details page click on the “View all tags” link:
This will open the “Edit Tags” pop-up that will allow you to remove tags from the order:
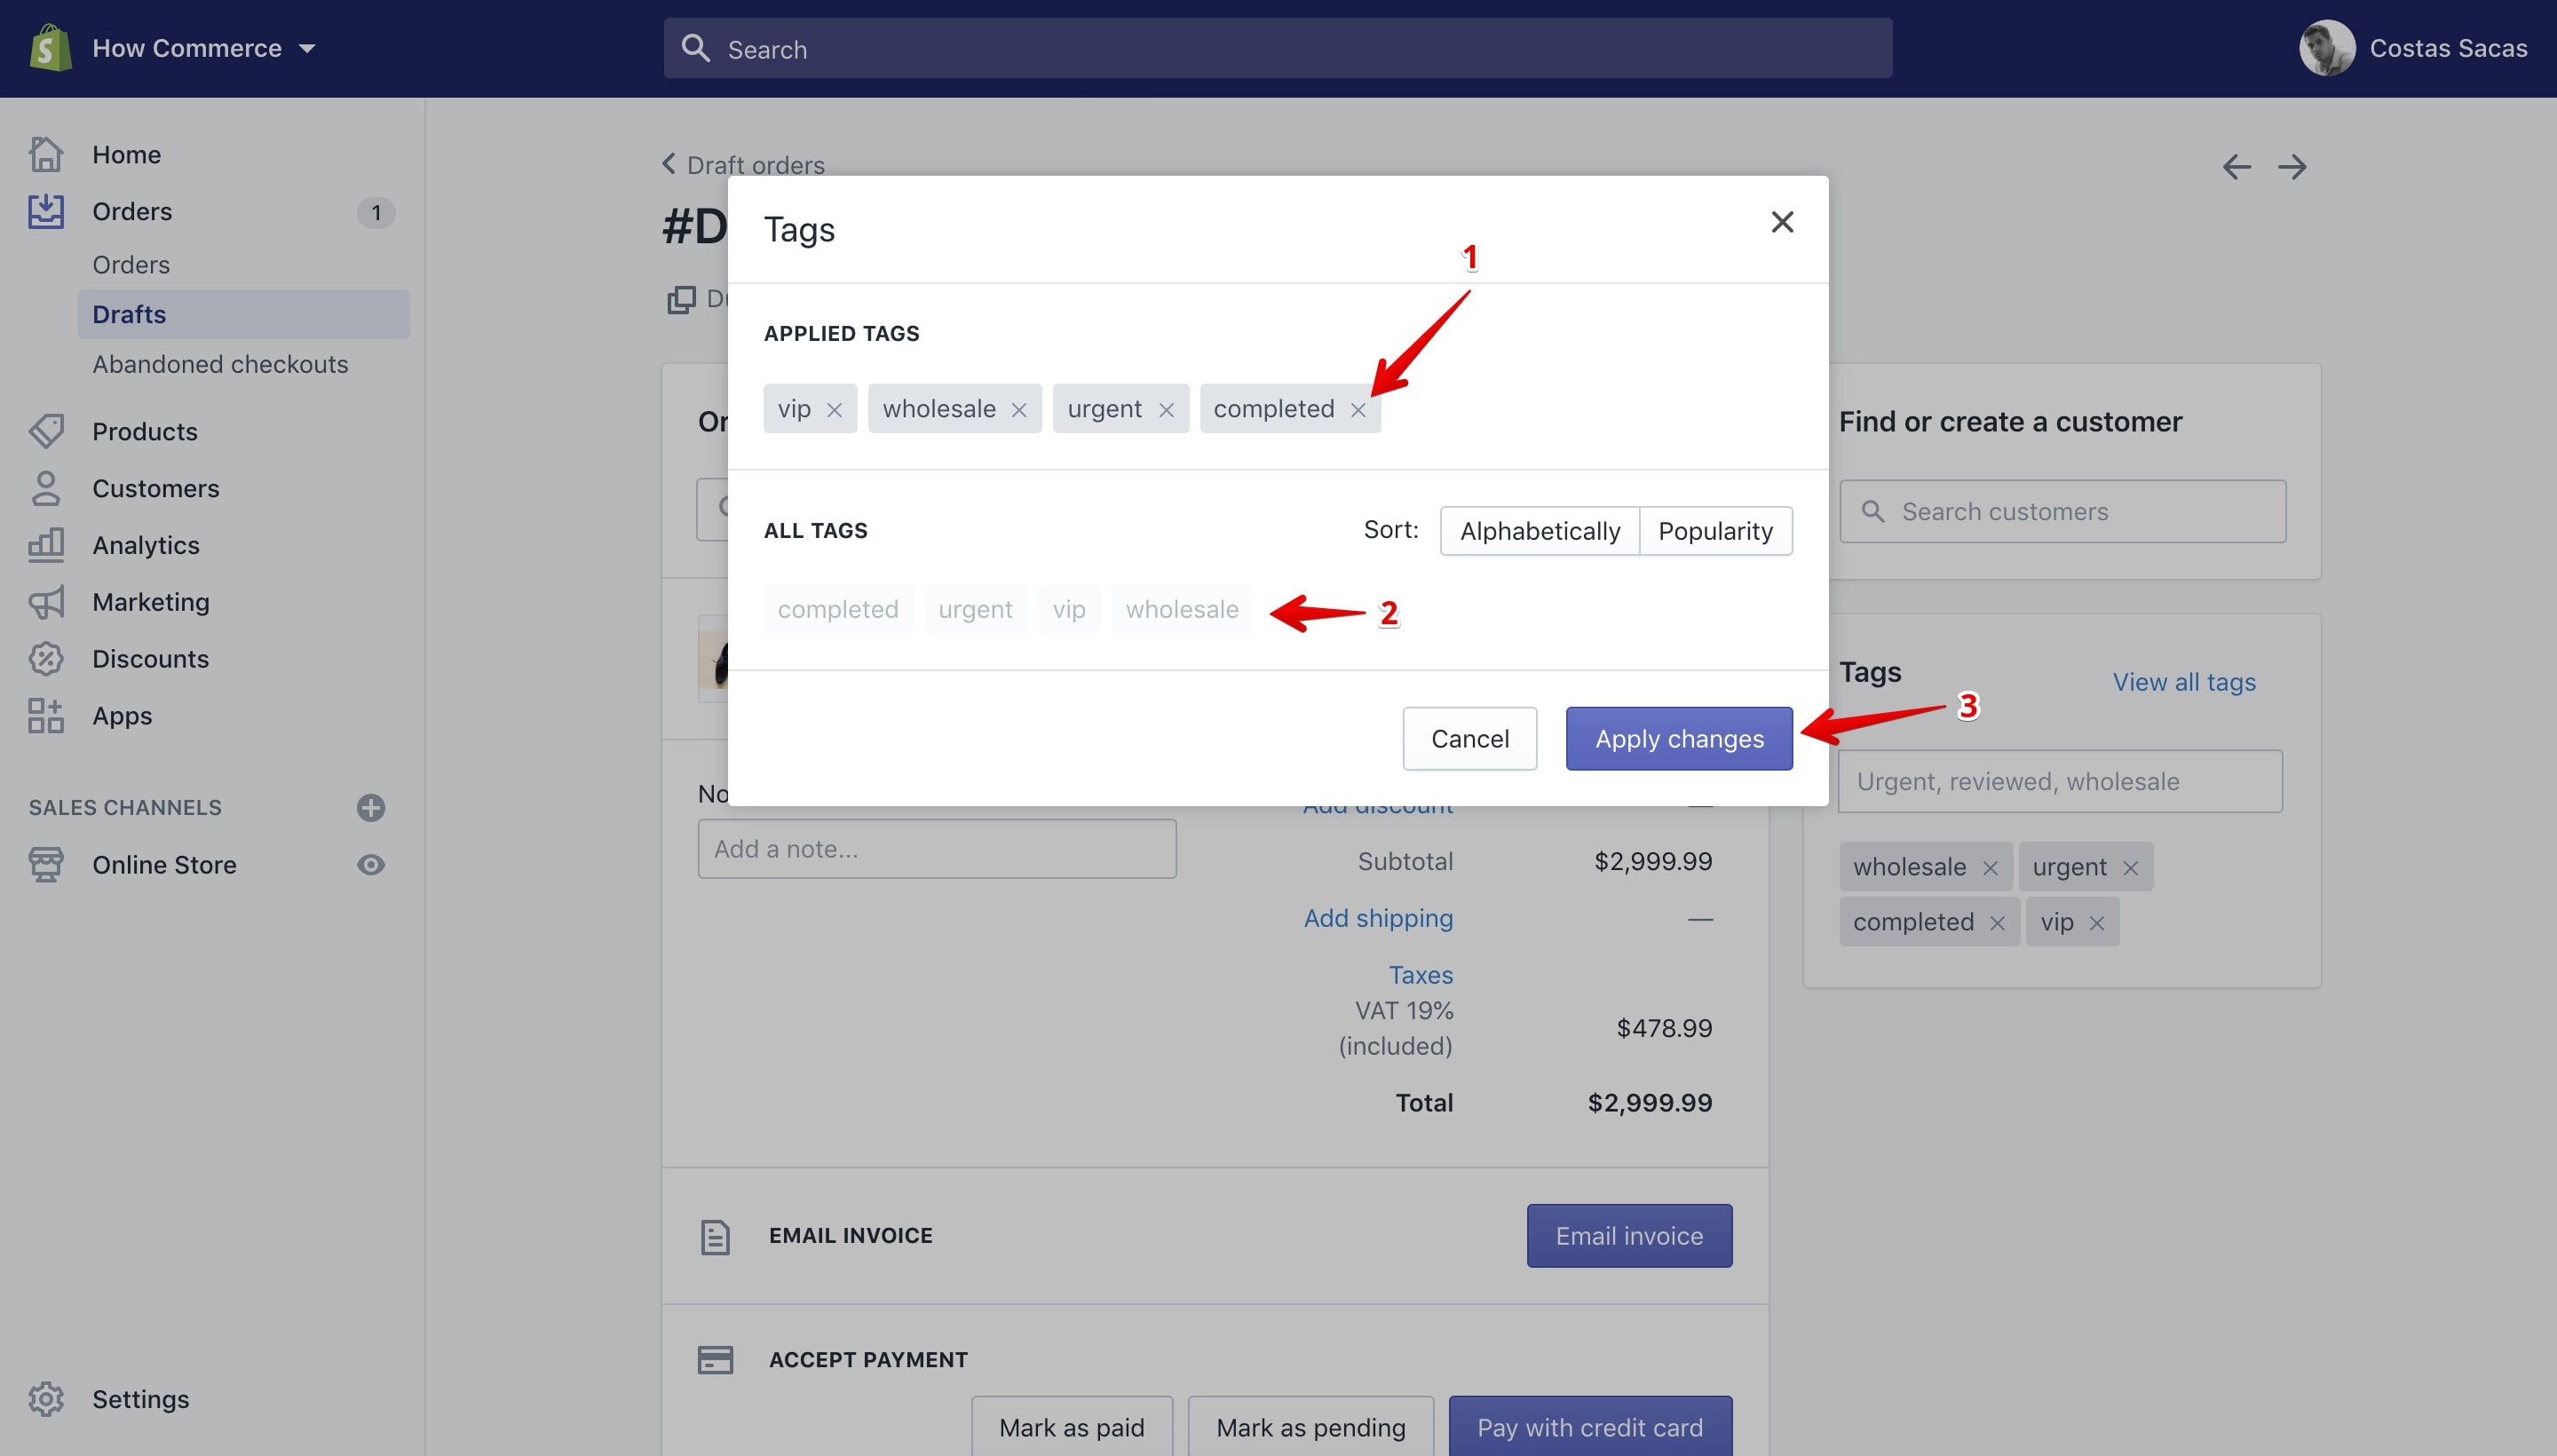
Click on the tag’s “X” icon to remove the tag (marked with 1 in the image above). Once you do that the tag will be removed from the “Applied Tags” section and added to the “All Tags” section of the pop-up (marked with 2 in the image above).
After you remove all the tags that you want from the draft order click the “Apply Changes” button (marked with 3 in the image above).
In my example I’ve removed the “completed” tag from the order and once I’ve clicked the “Apply Changes” button the tag is no longer listed on the “Tags” section (marked with 1 in the image below) on the draft order details page:
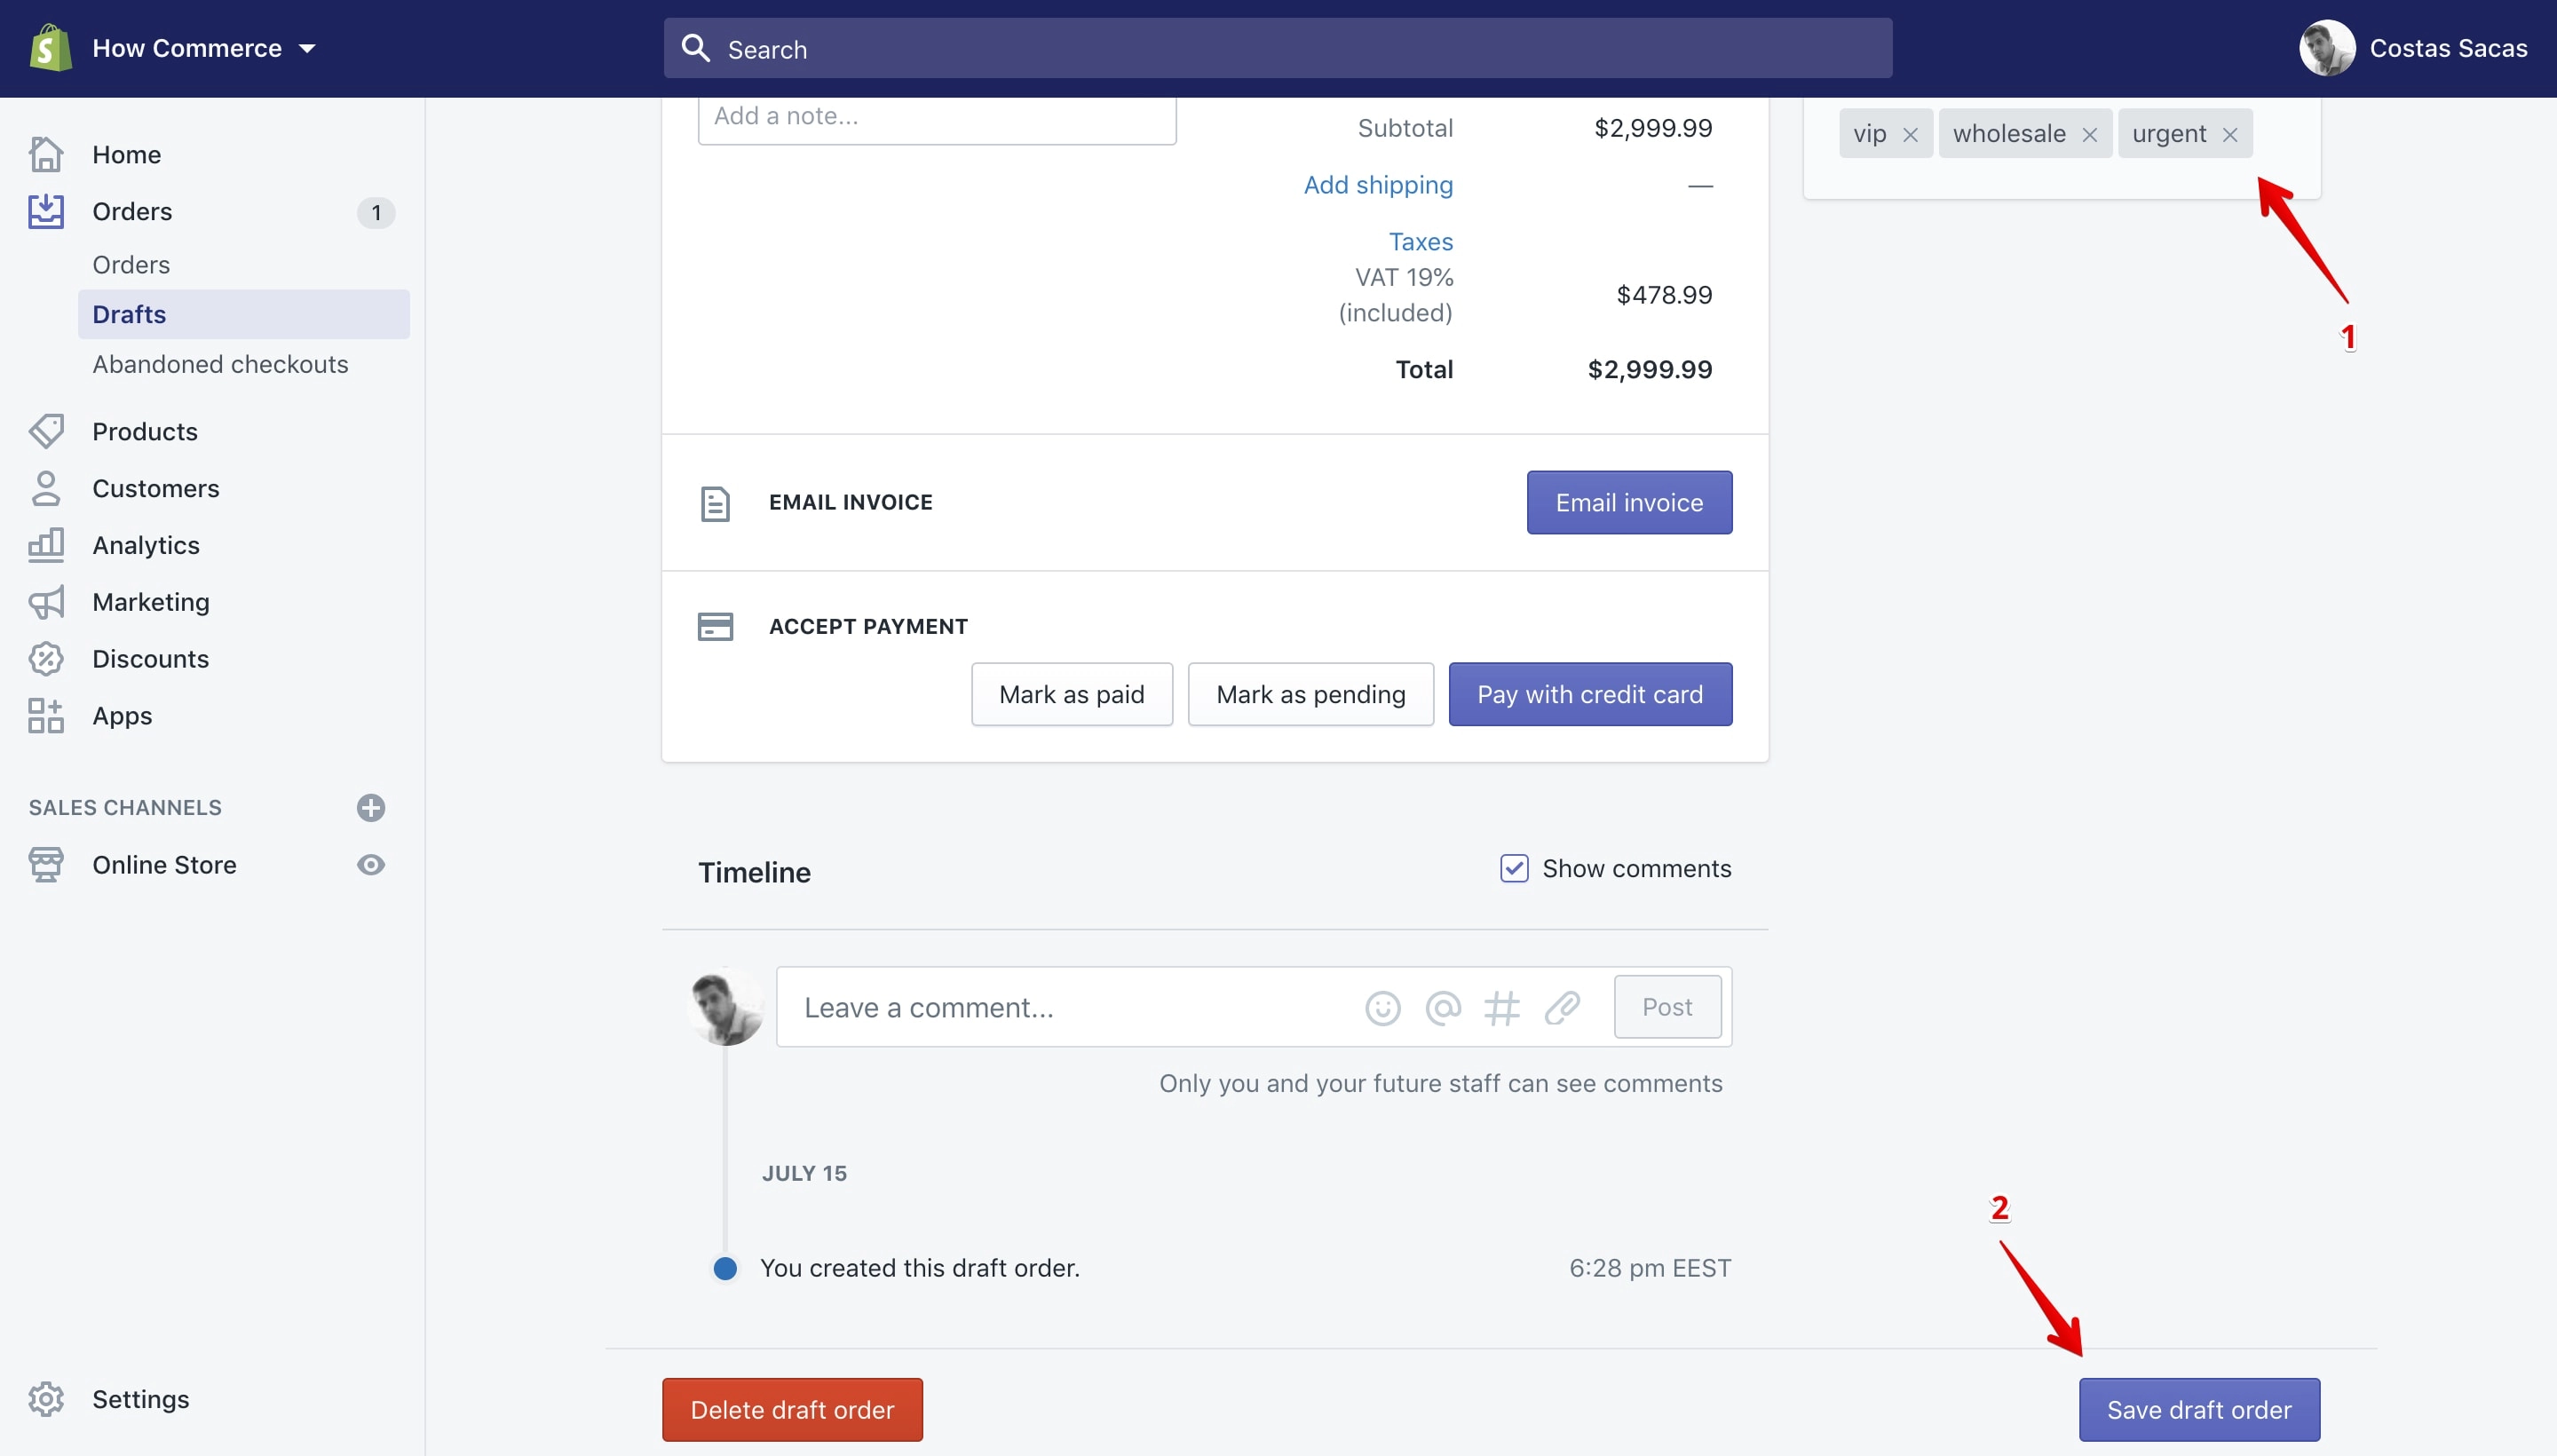
The tag is removed from the “Tags” section that does not mean that it is also removed from the draft order at this stage.
To completely remove it you need to save it by clicking the “Save” button (marked with 2 in the image above).
Customer tags
Support up to 255 characters.
Customer tags can be added from the customer details page on every customer that has an account on your store.
To access the page go to “Customers” (marked with 1 in the image below), and after to the customer that you want to add tags too (marked with 2 in the image below):
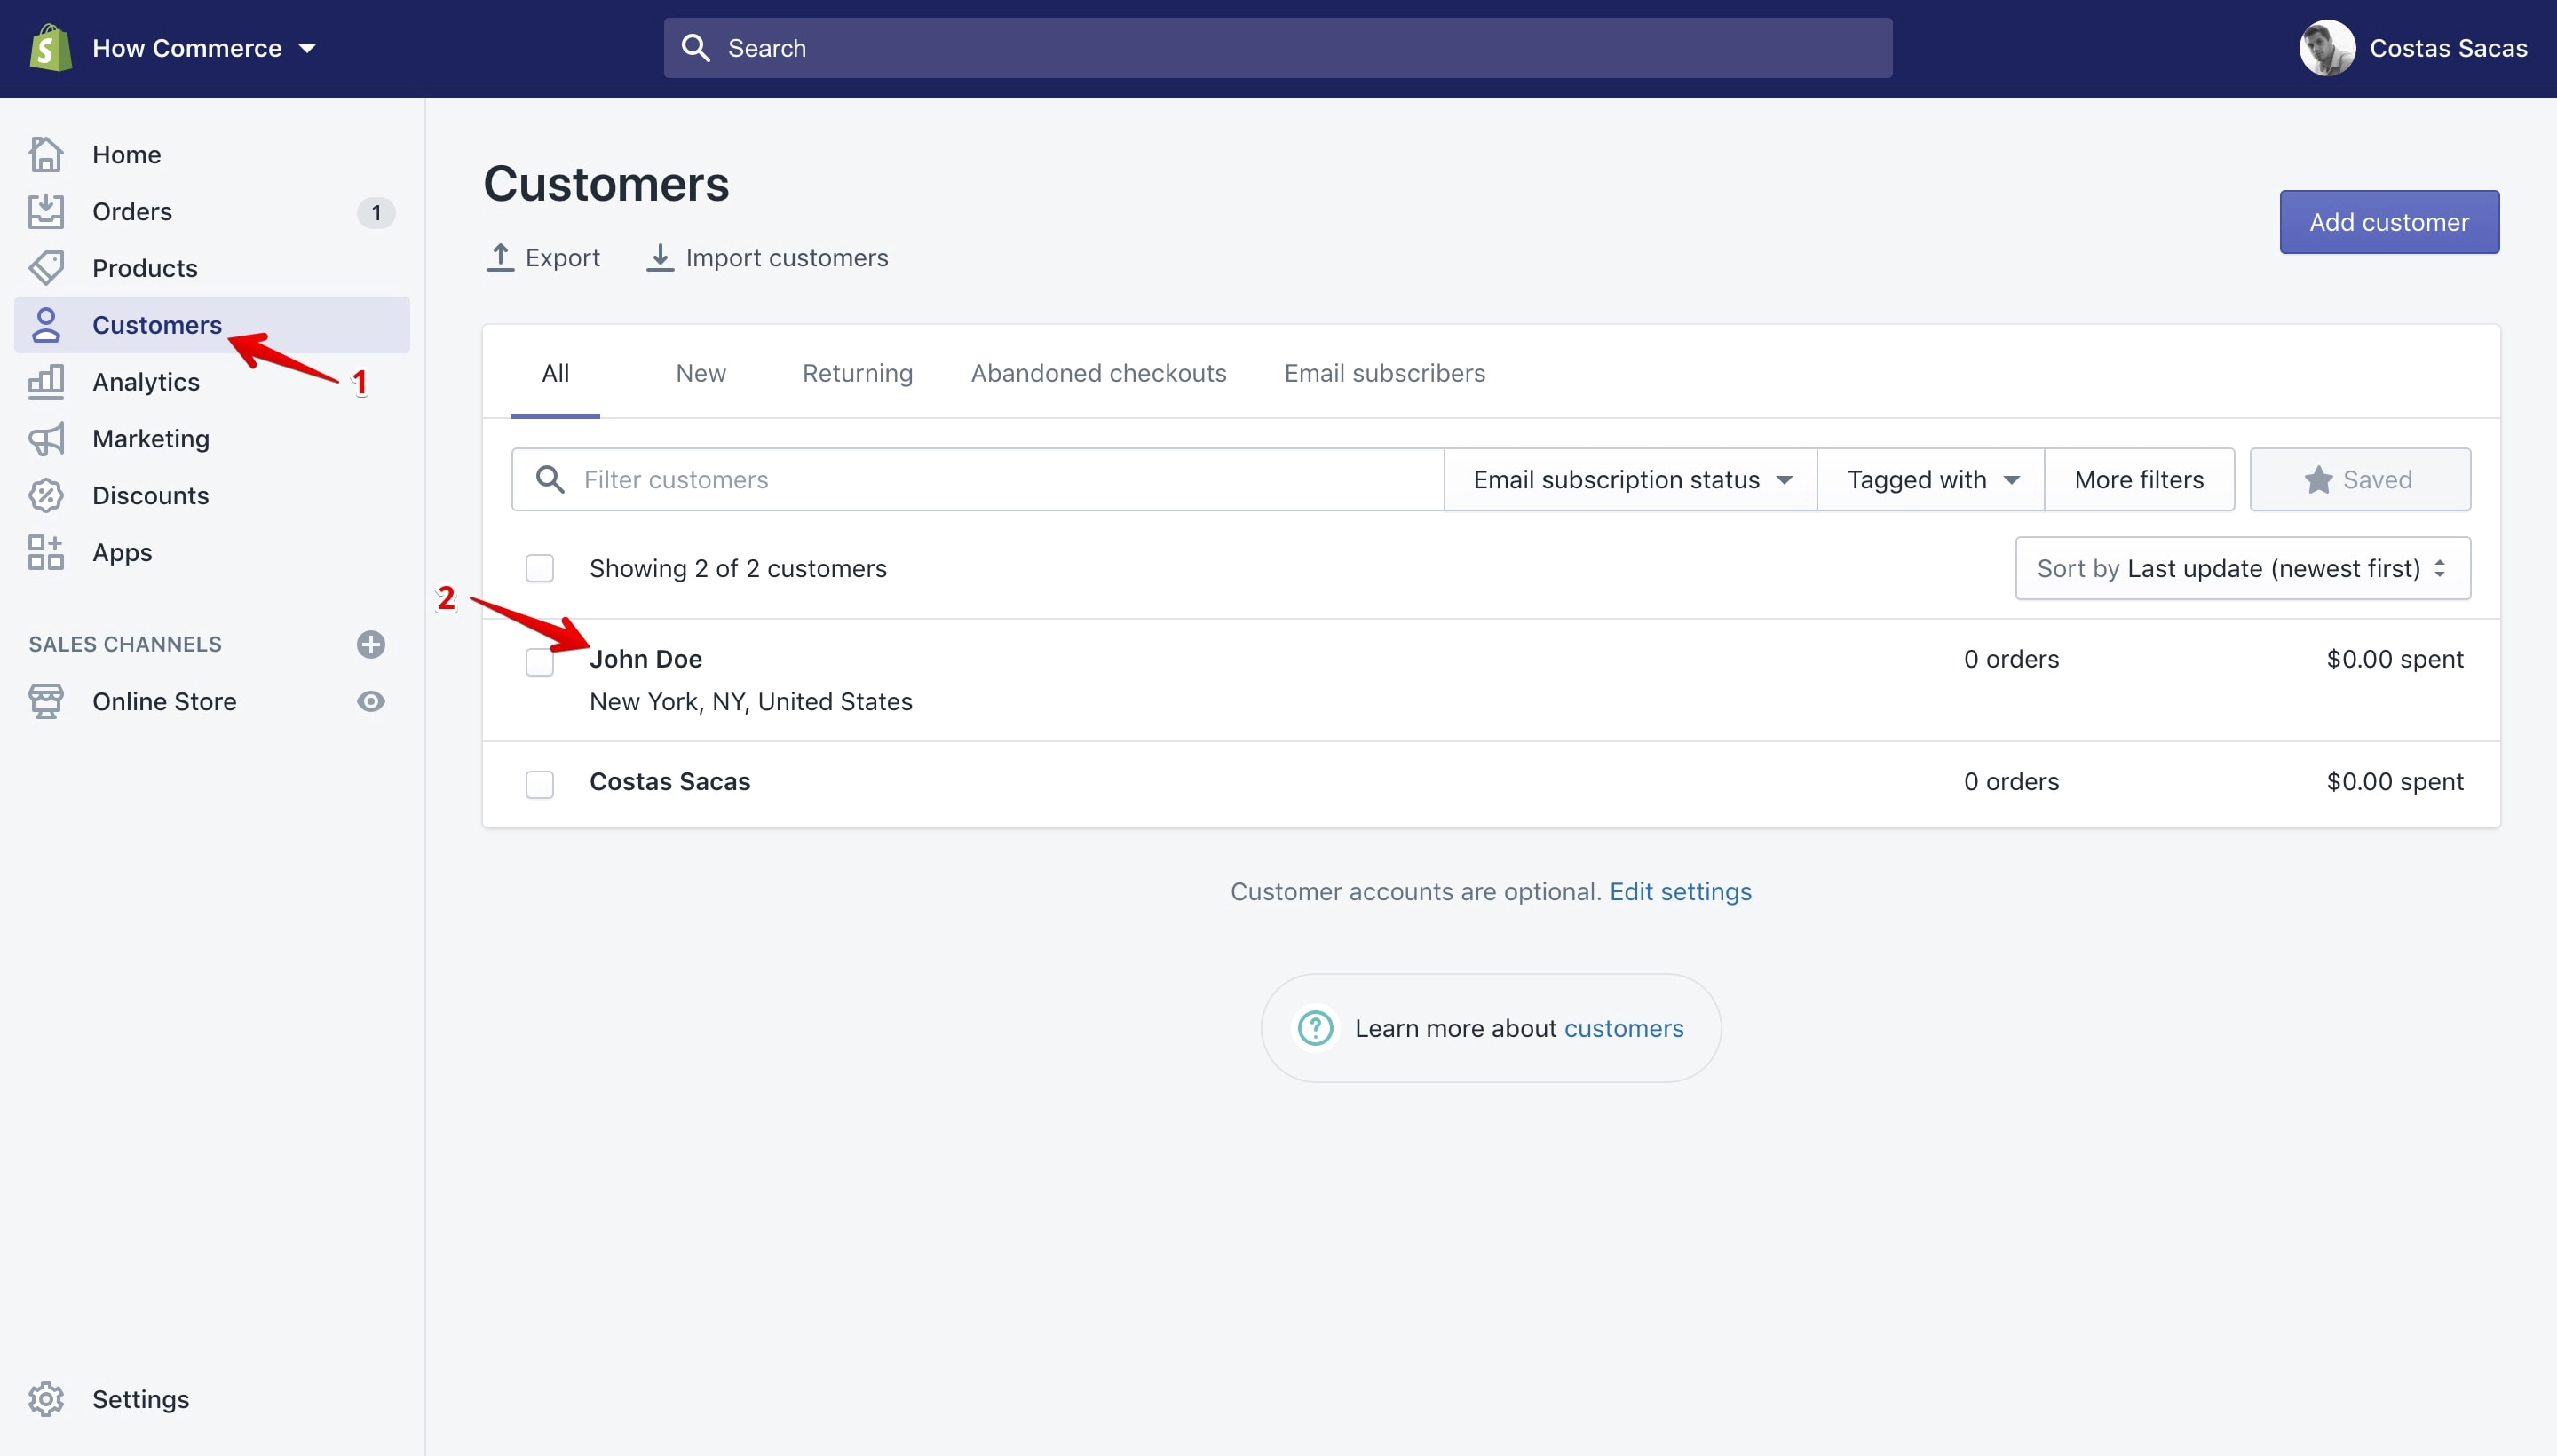
On the customer details page you can view the tags section on the right sidebar (marked with 1 in the image below), and on this section you can see all tags associated with this product (marked with 2 in the image below):
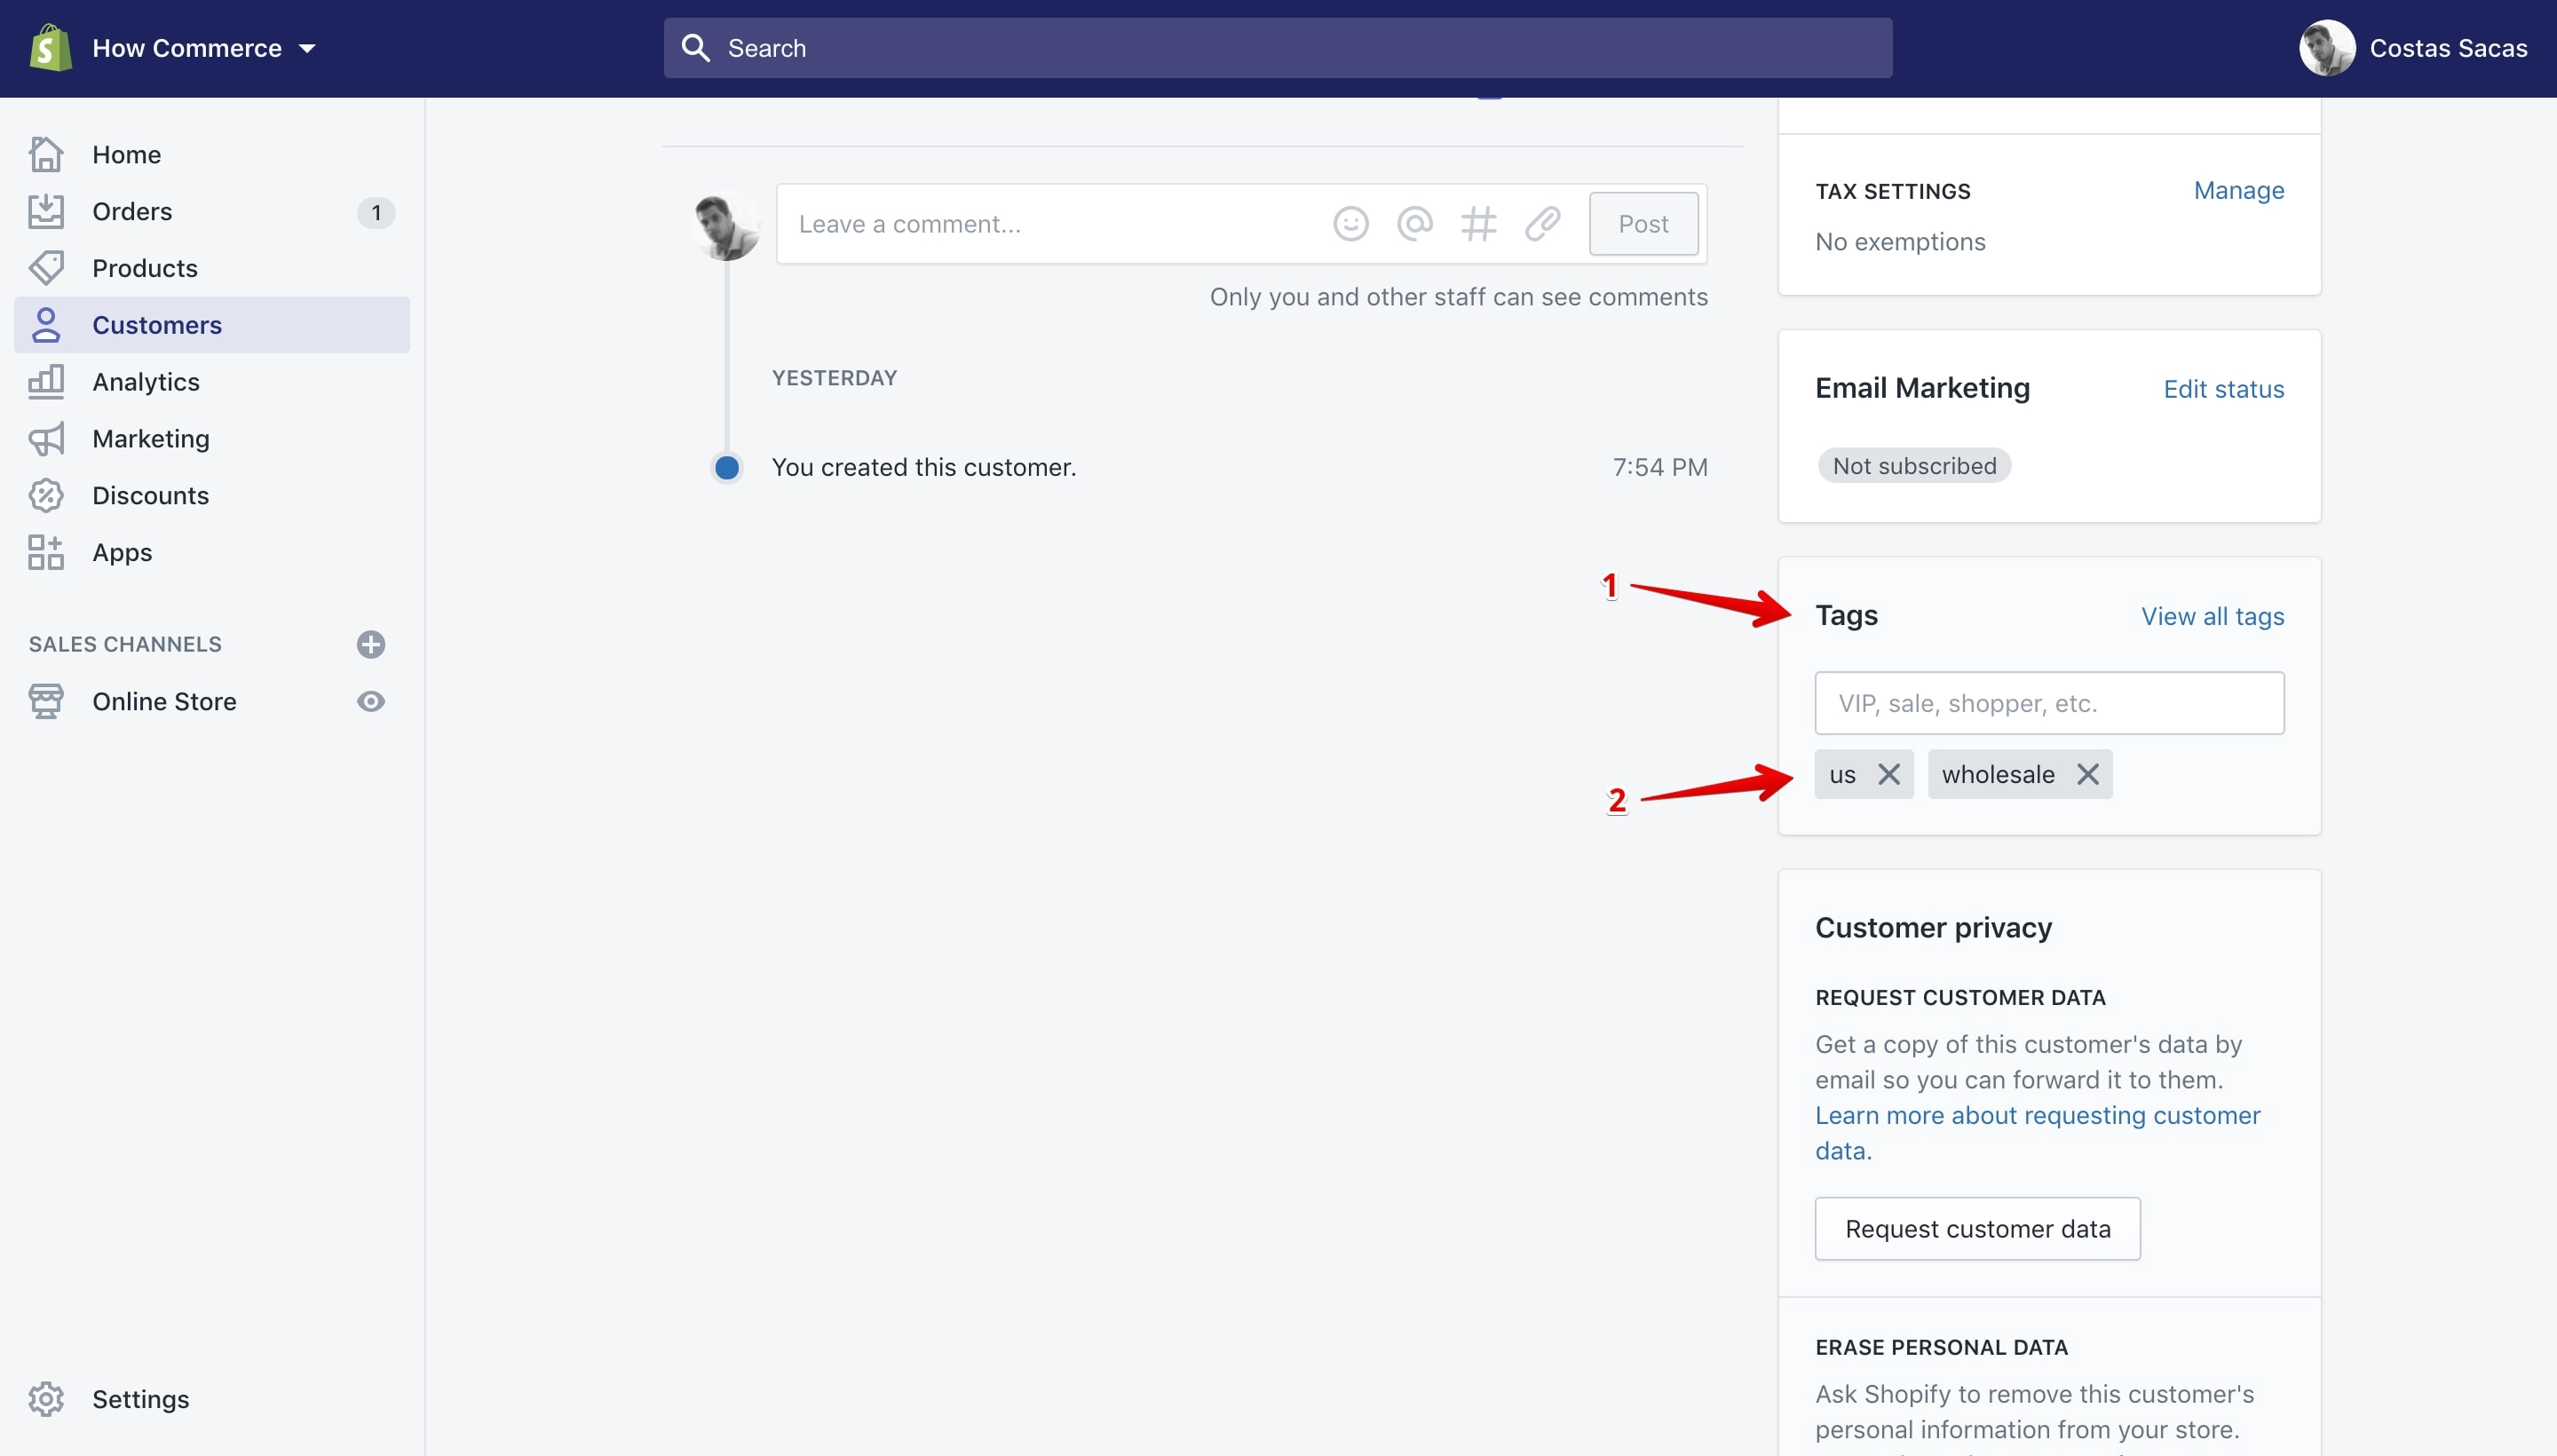
Add a tag
The tags that you add to one customer account can be viewed from any customer account details page and can be used by all customers accounts available in the online store.
You can add a tag to a draft order in 2 ways:
- New and existing tags can be added through the input box.
- Existing tags can be added through the “View all tags” link.
Adding a tag through the input box
New tags can be added only through this option. Type the name of the tag inside the input box and hit the ↵ (Enter) key or click the “Add” tag:
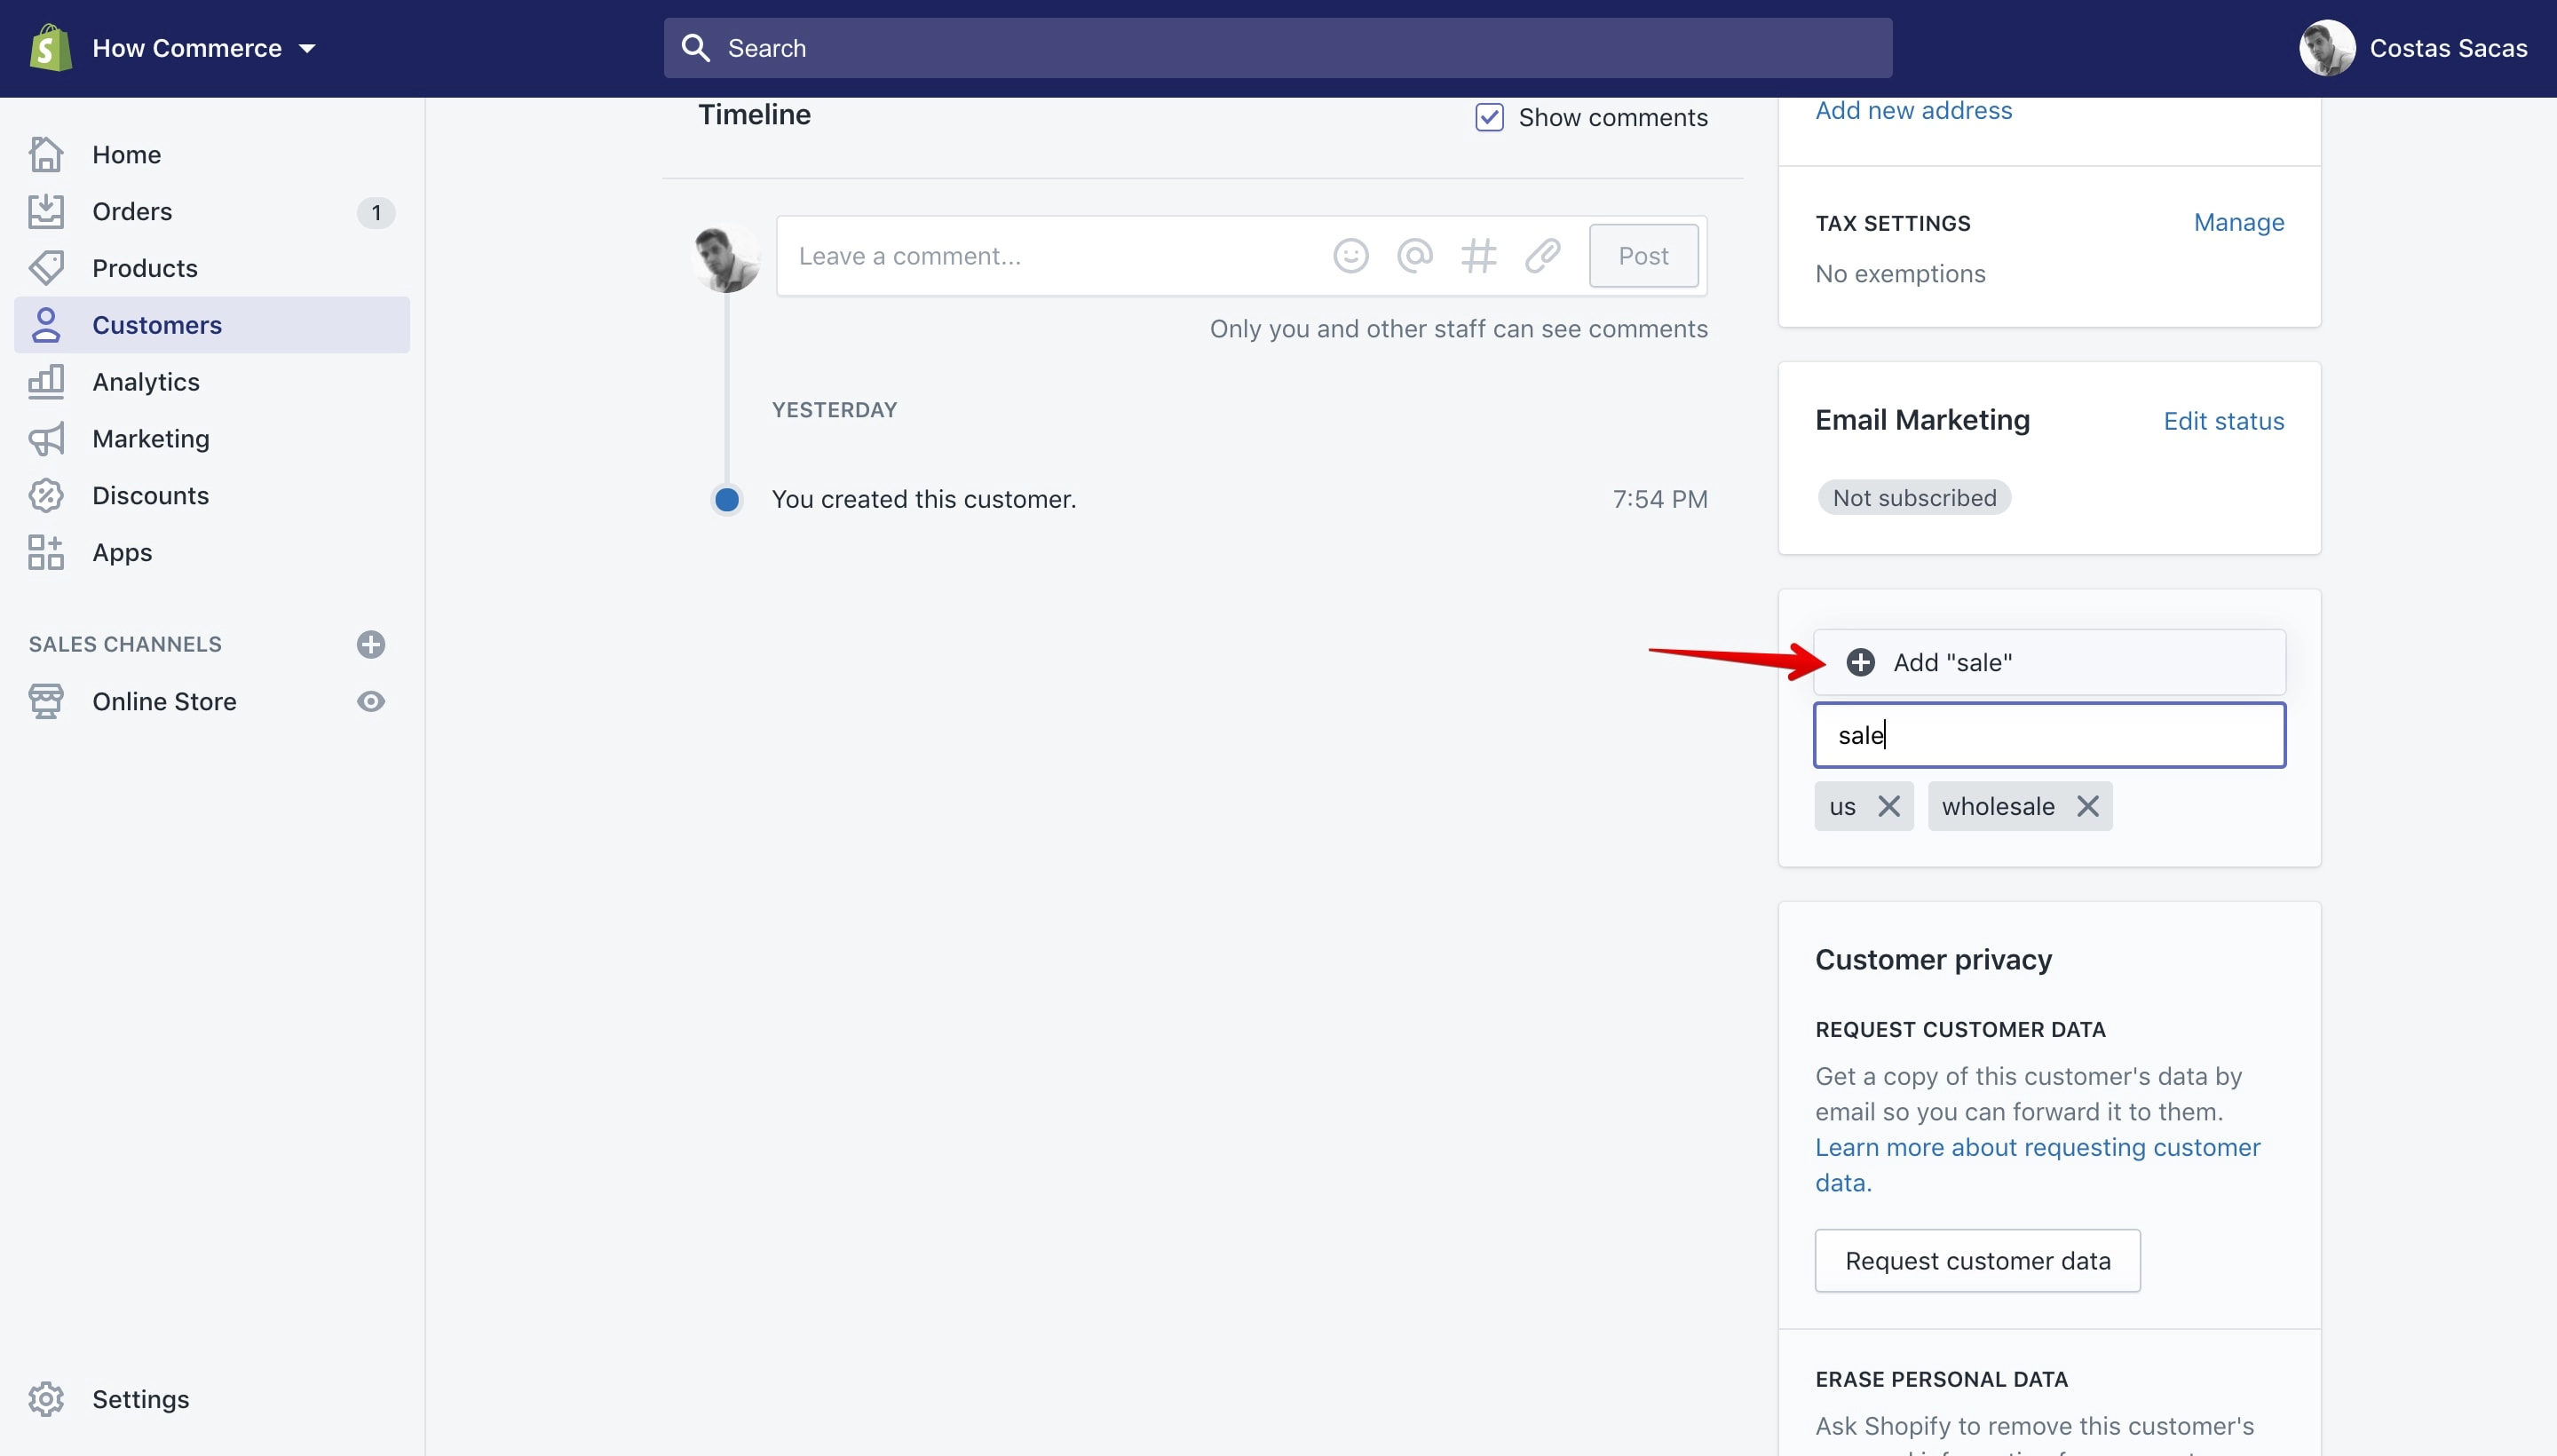
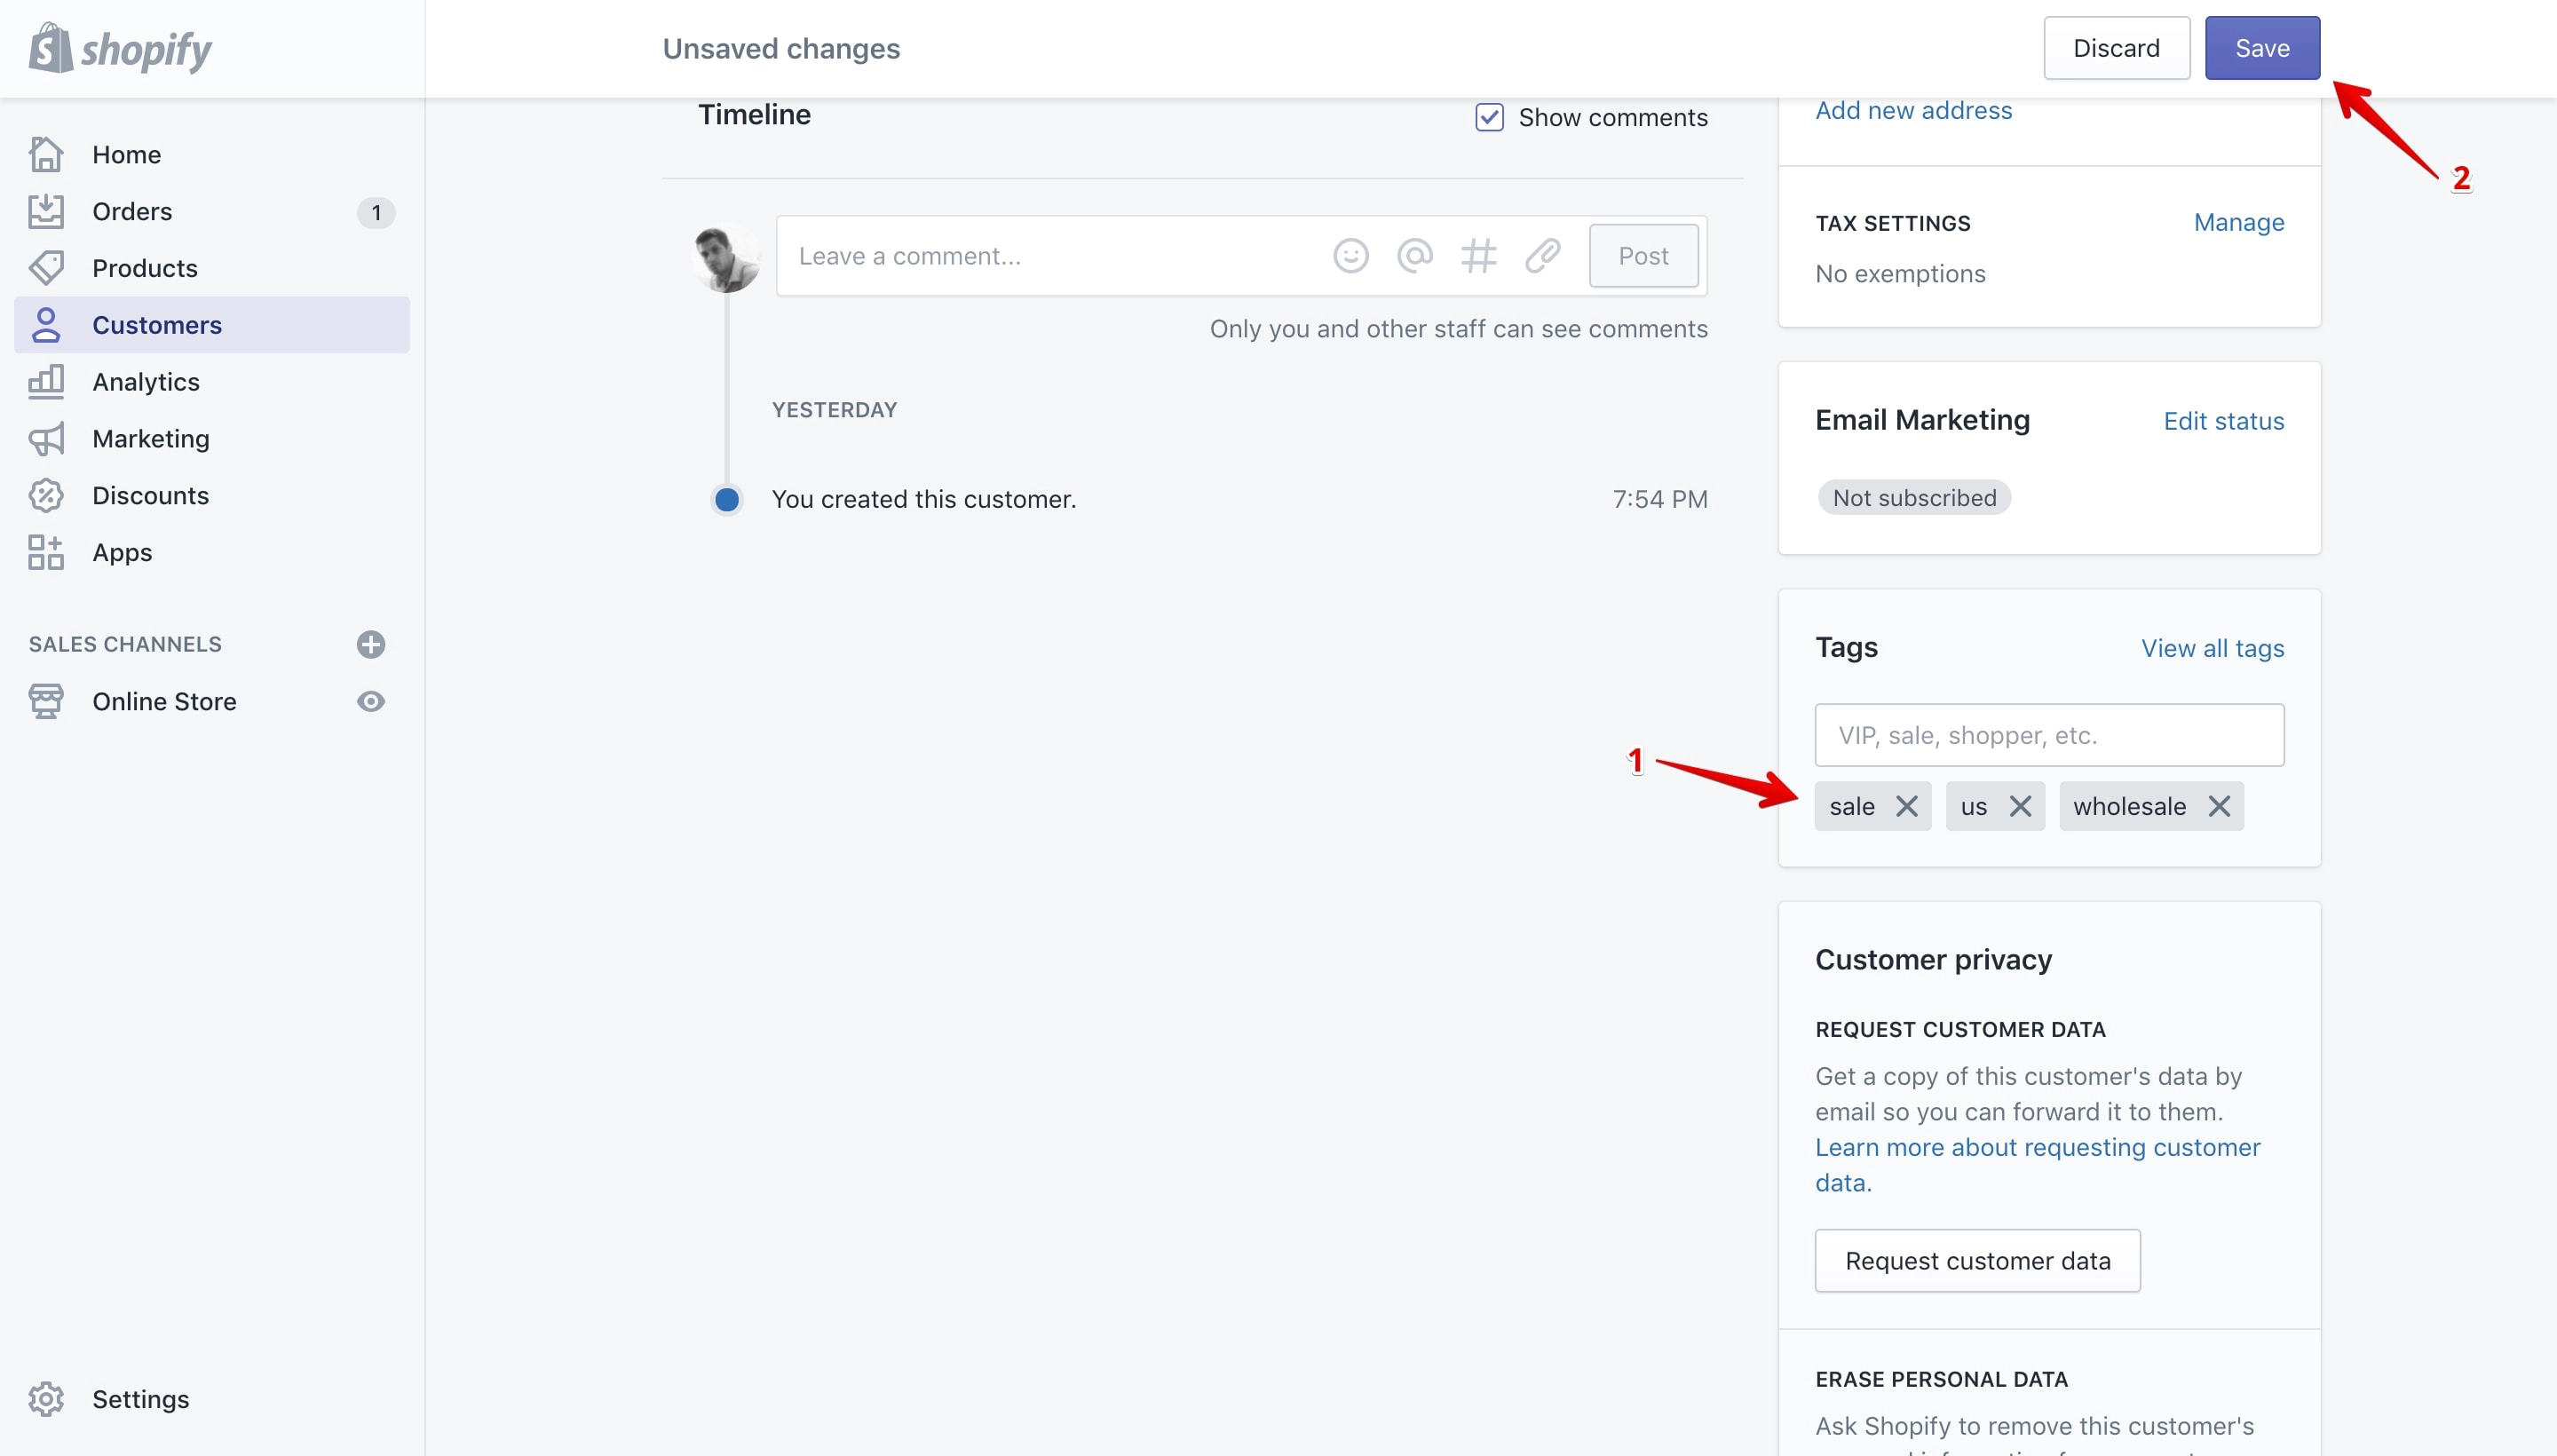
After you add the tag it will display below the input box (marked with 1 in the image below). You need to save it so you can store it permanently and use it on all your store customers.
To do that click the “Save” button (marked with 2 in the image below):
You can also add existing tags from the “Most recently created tags” pop-up like this:
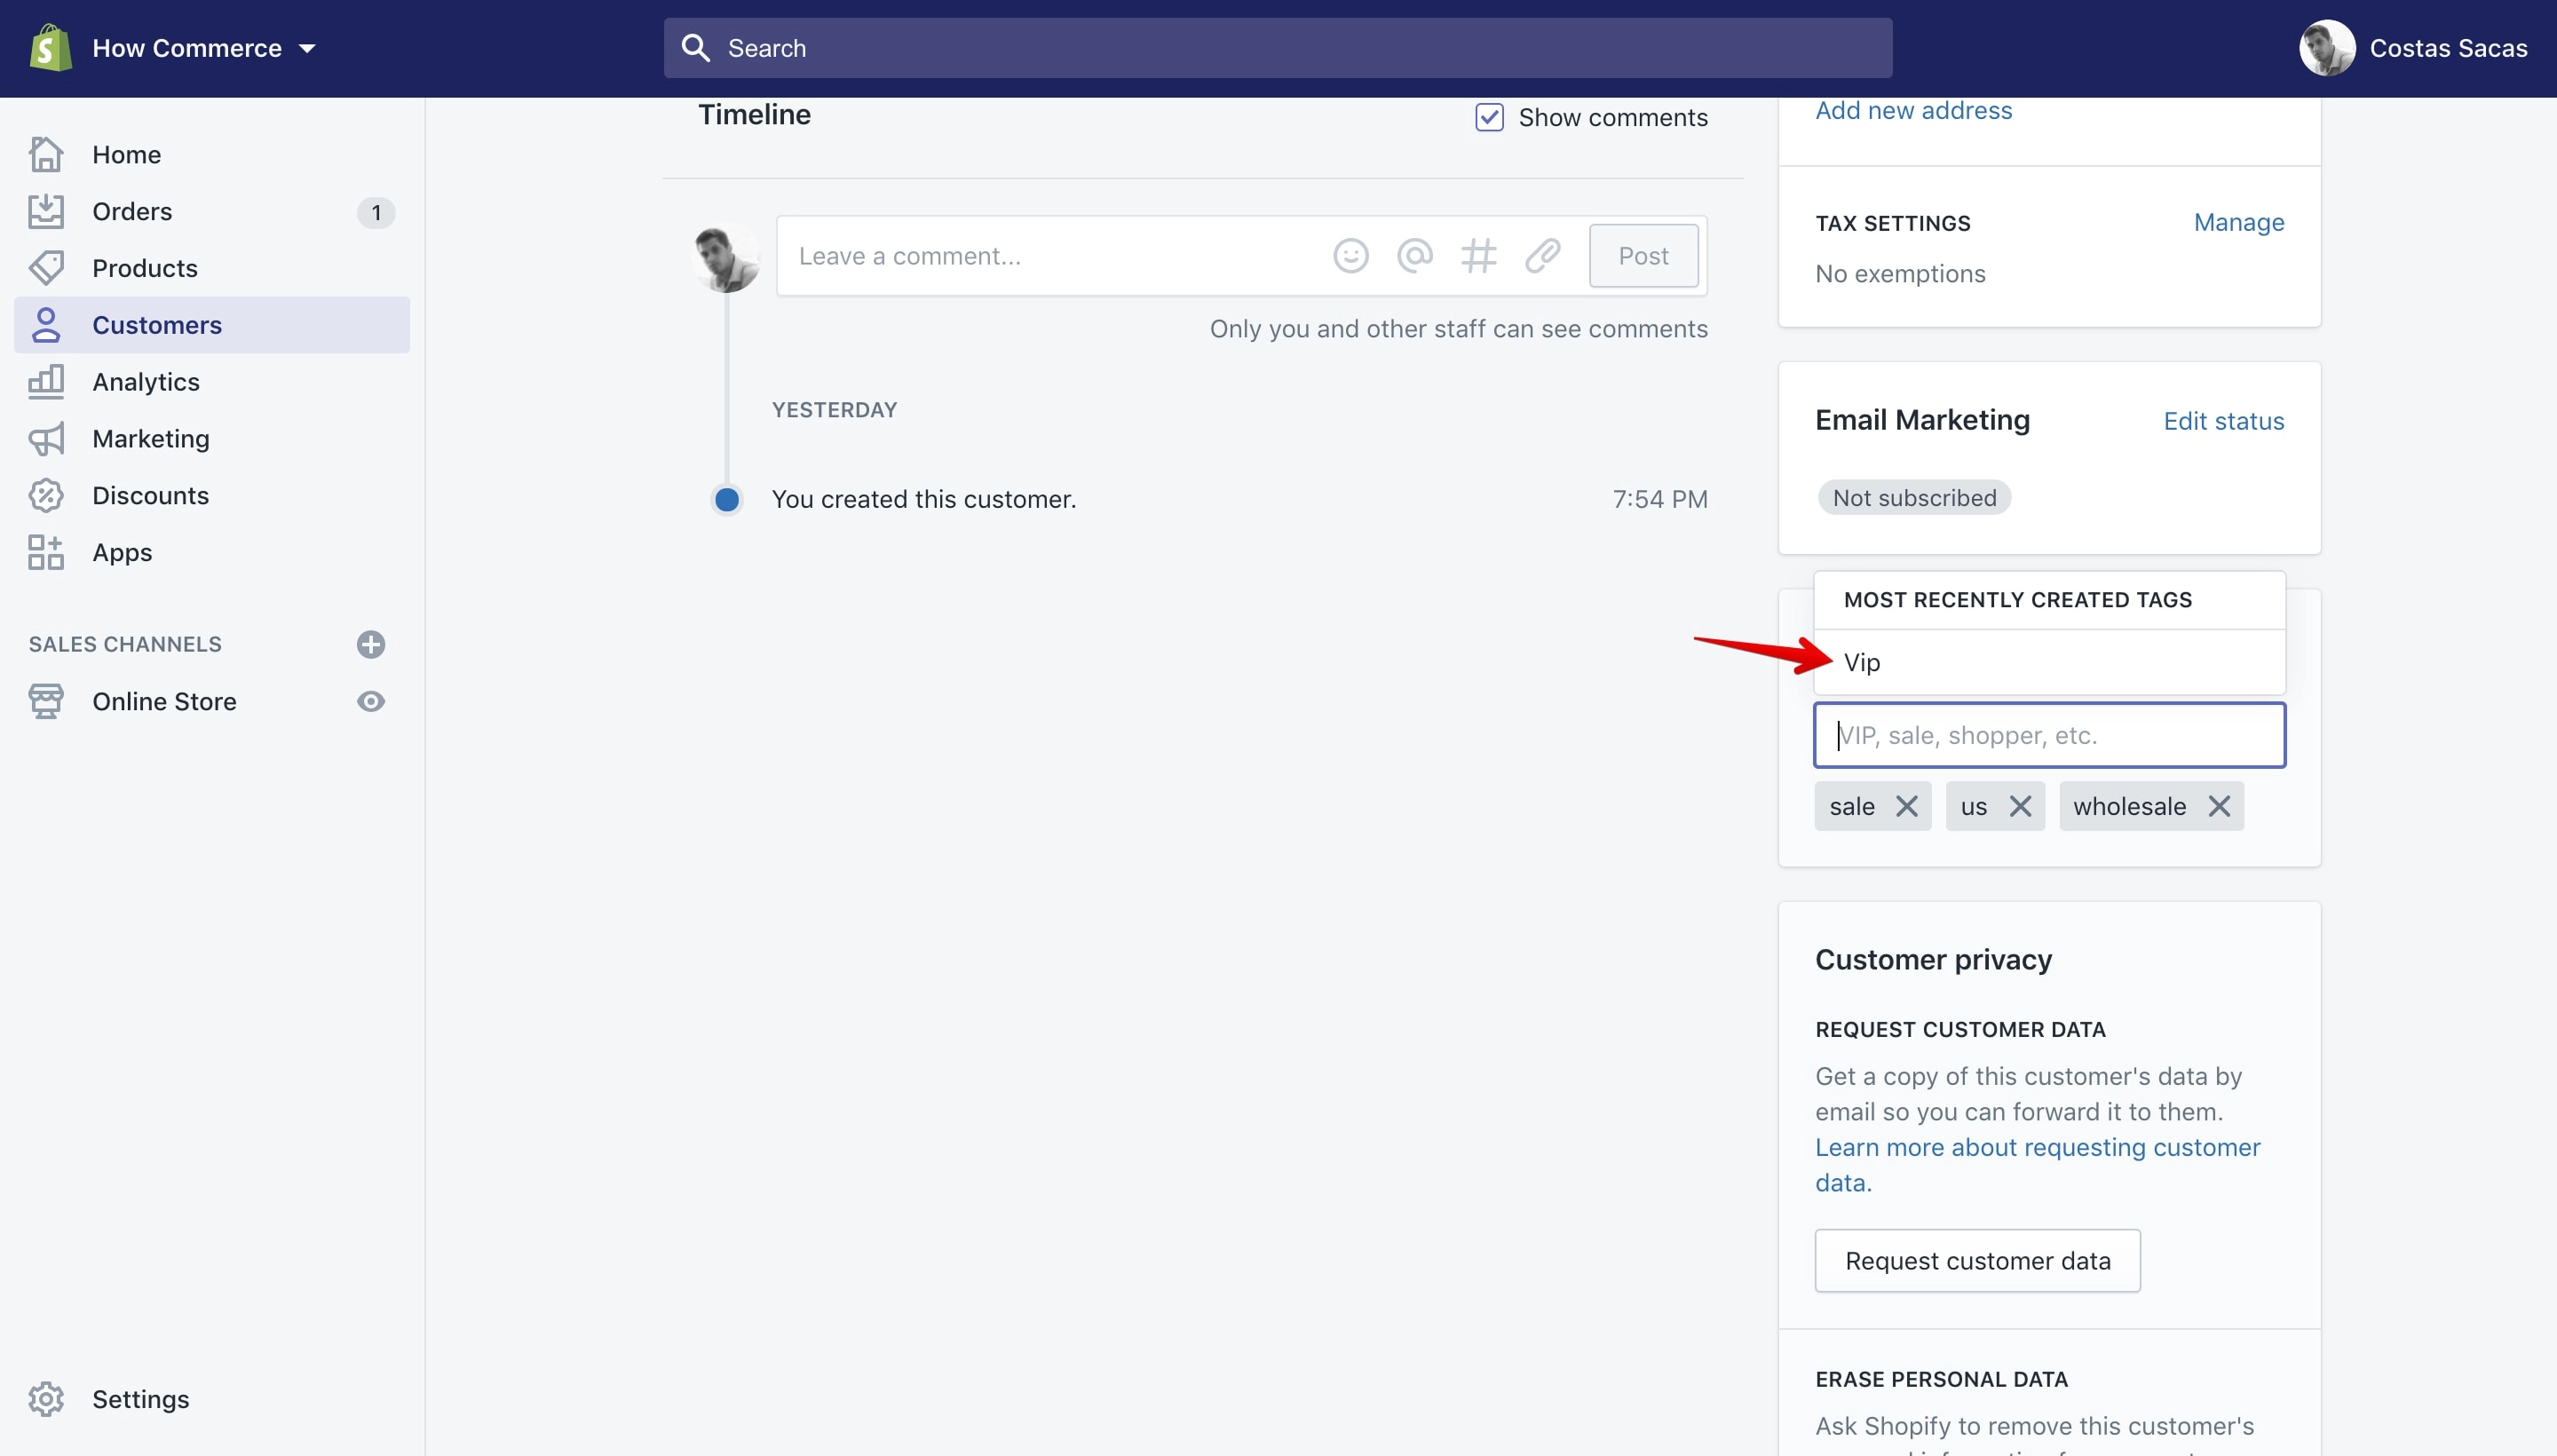
Make sure after you add the tag to click the “Save” button to save it.
Adding a tag through the “View all tags” link
Through this method you can add only existing tags to your customer account and you can’t create new ones.
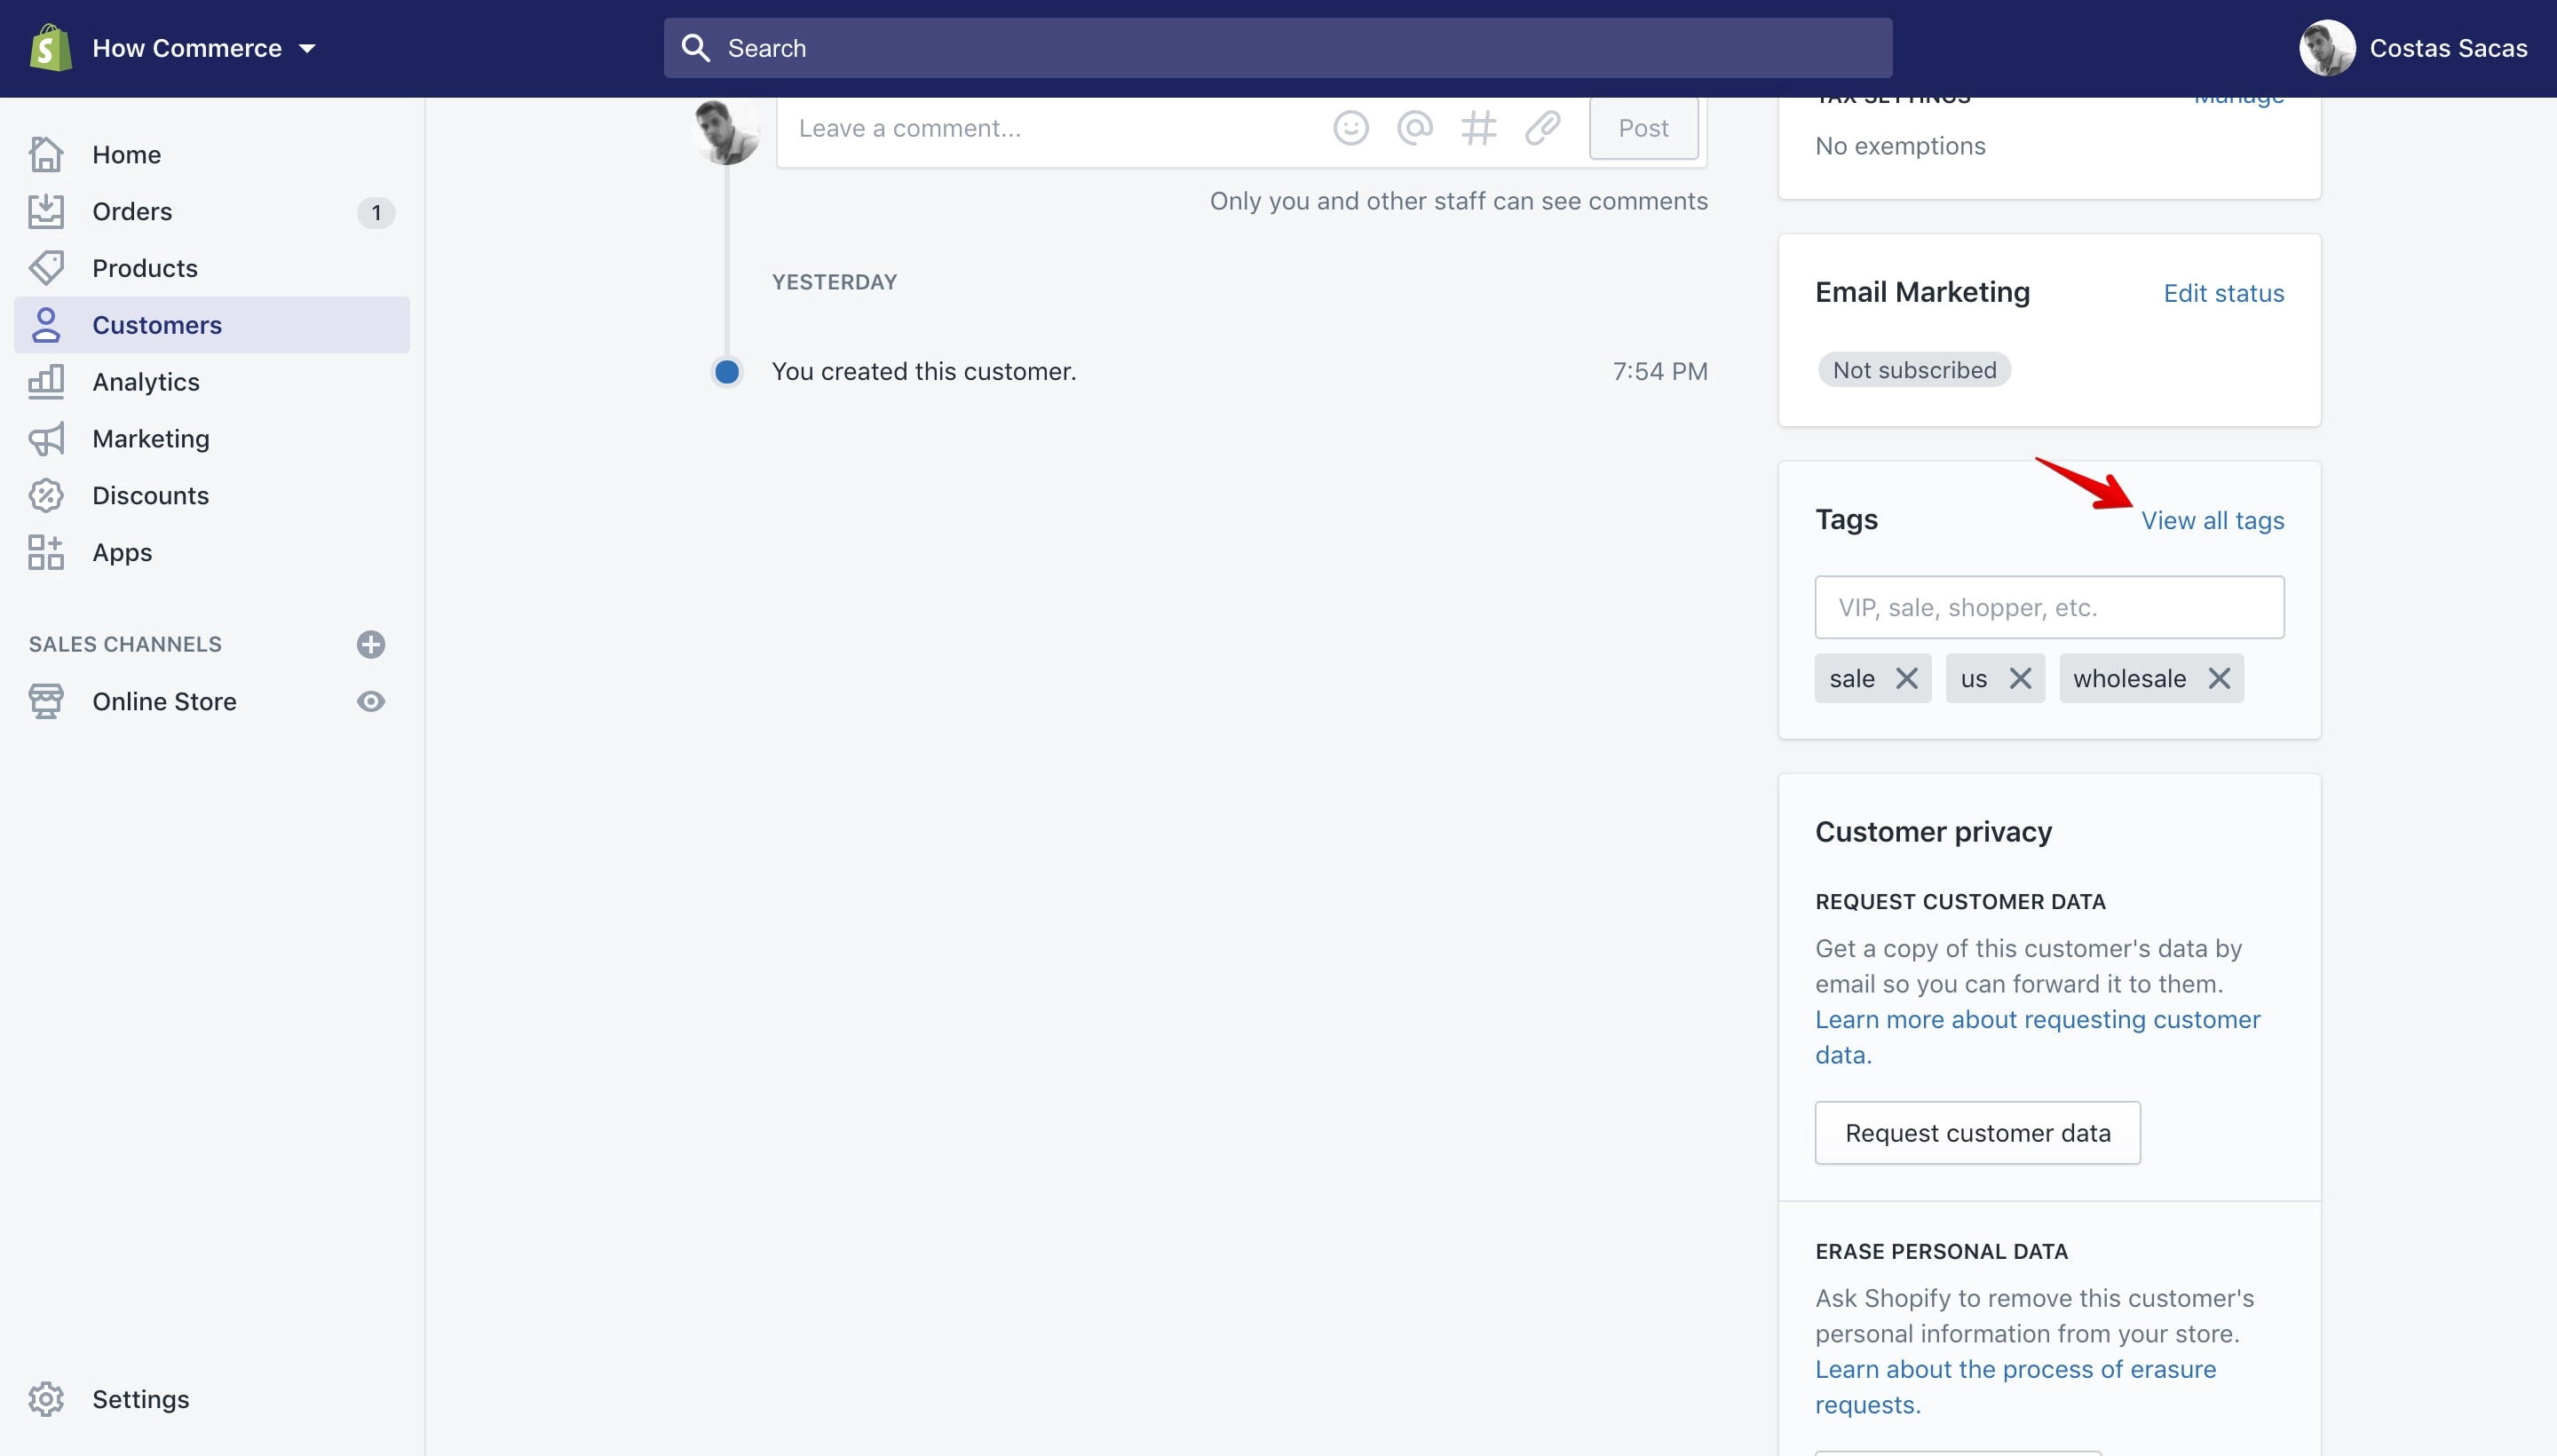
Clicking on the “View all tags” link will open a pop-up that will allow you to select and assign new tags to the customer account:
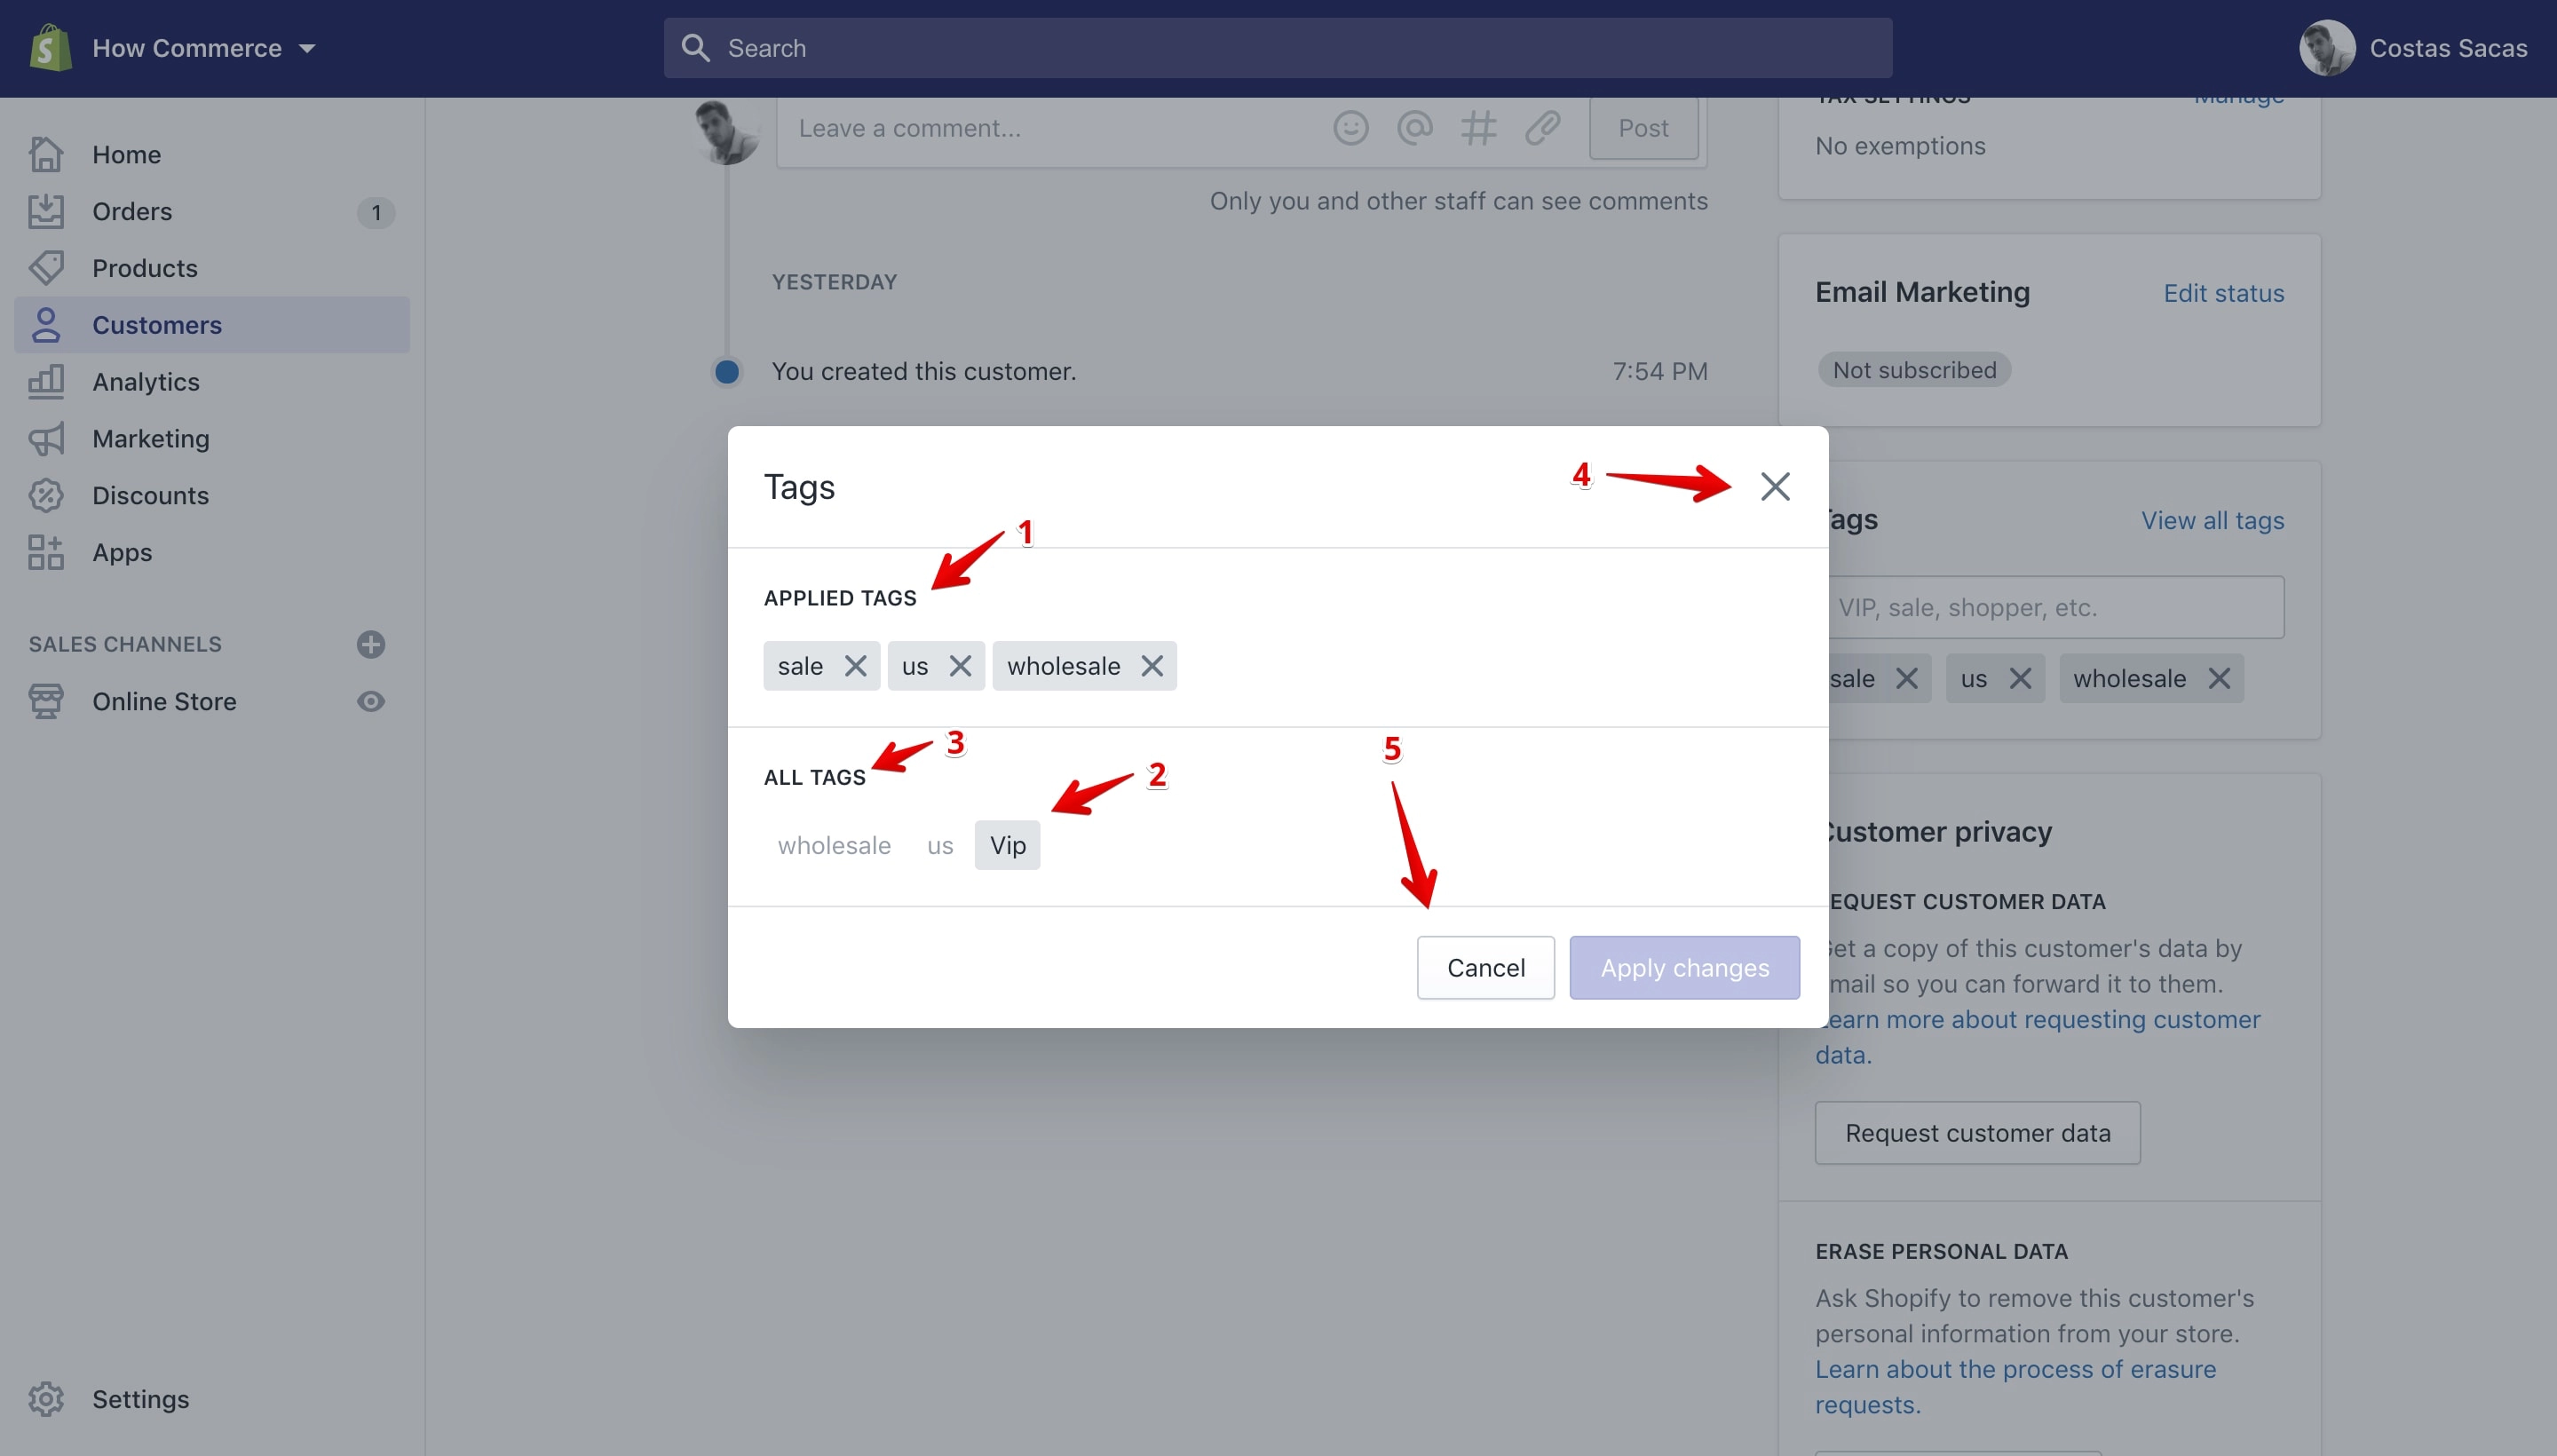
On the pop-up you can see all the tags assigned to this draft order in the “Applied Tags” section (marked with 1 in the image above).
Below that section you can see the “All Tags” section (marked with 3 in the image above). This section lists all the tags available in the store draft orders section.
The tags that are greyed-out (marked with 2 in the image above) are already assigned to the draft order. You can assign more from this section by clicking on the desired tag, if the tag is available.
You can close the pop-up by clicking the “X” icon from the top right corner (marked with 4 in the image above) or by clicking the “Cancel” button (marked with 5 in the image above).
Note:
Clicking the “X” icon or the “Cancel” button will cancel your newly assigned tags and not save your changes.
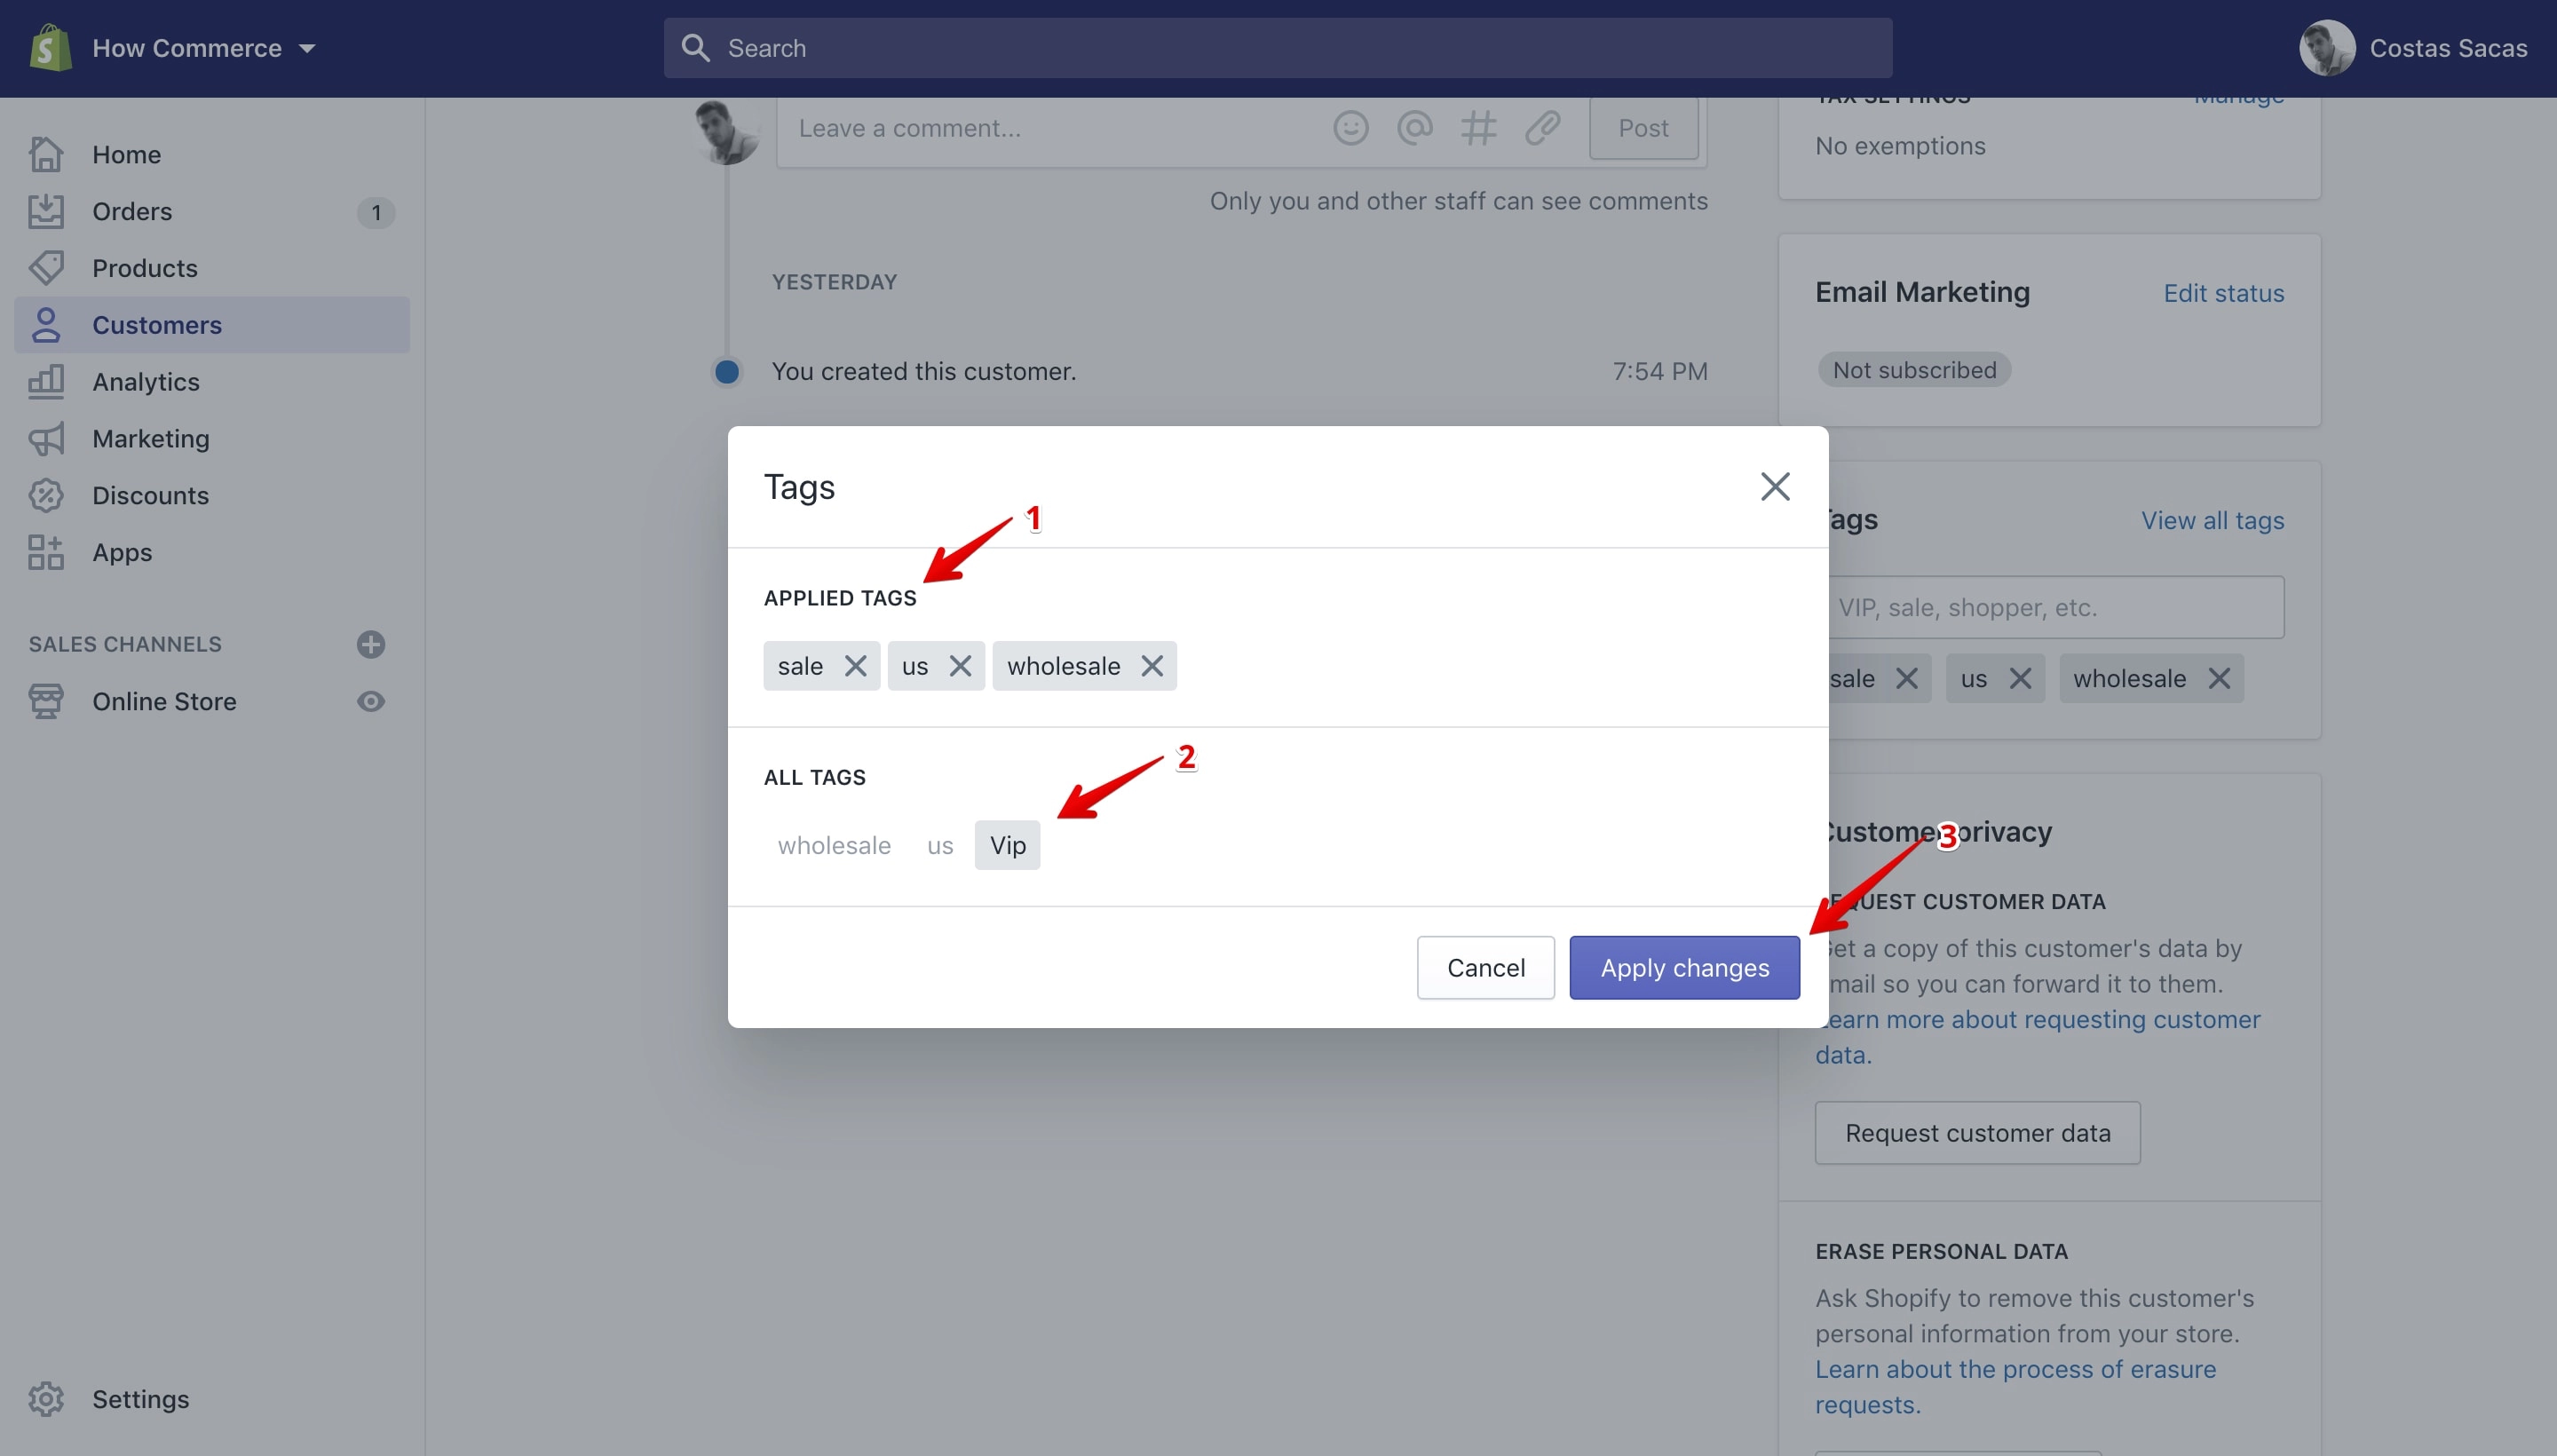
Assign new tags to the draft order by clicking on tags located on the “All Tags” section (marked with 1 in the image below).
Tags added will display in the “Applied Tags” section (marked with 2 in the image below). Once completed click the “Apply changes” button (marked with 3 in the image below):
Clicking the “Apply changes” button will list the newly added tags on the “Tags” section (marked with 1 in the image below) located on the customer details page:
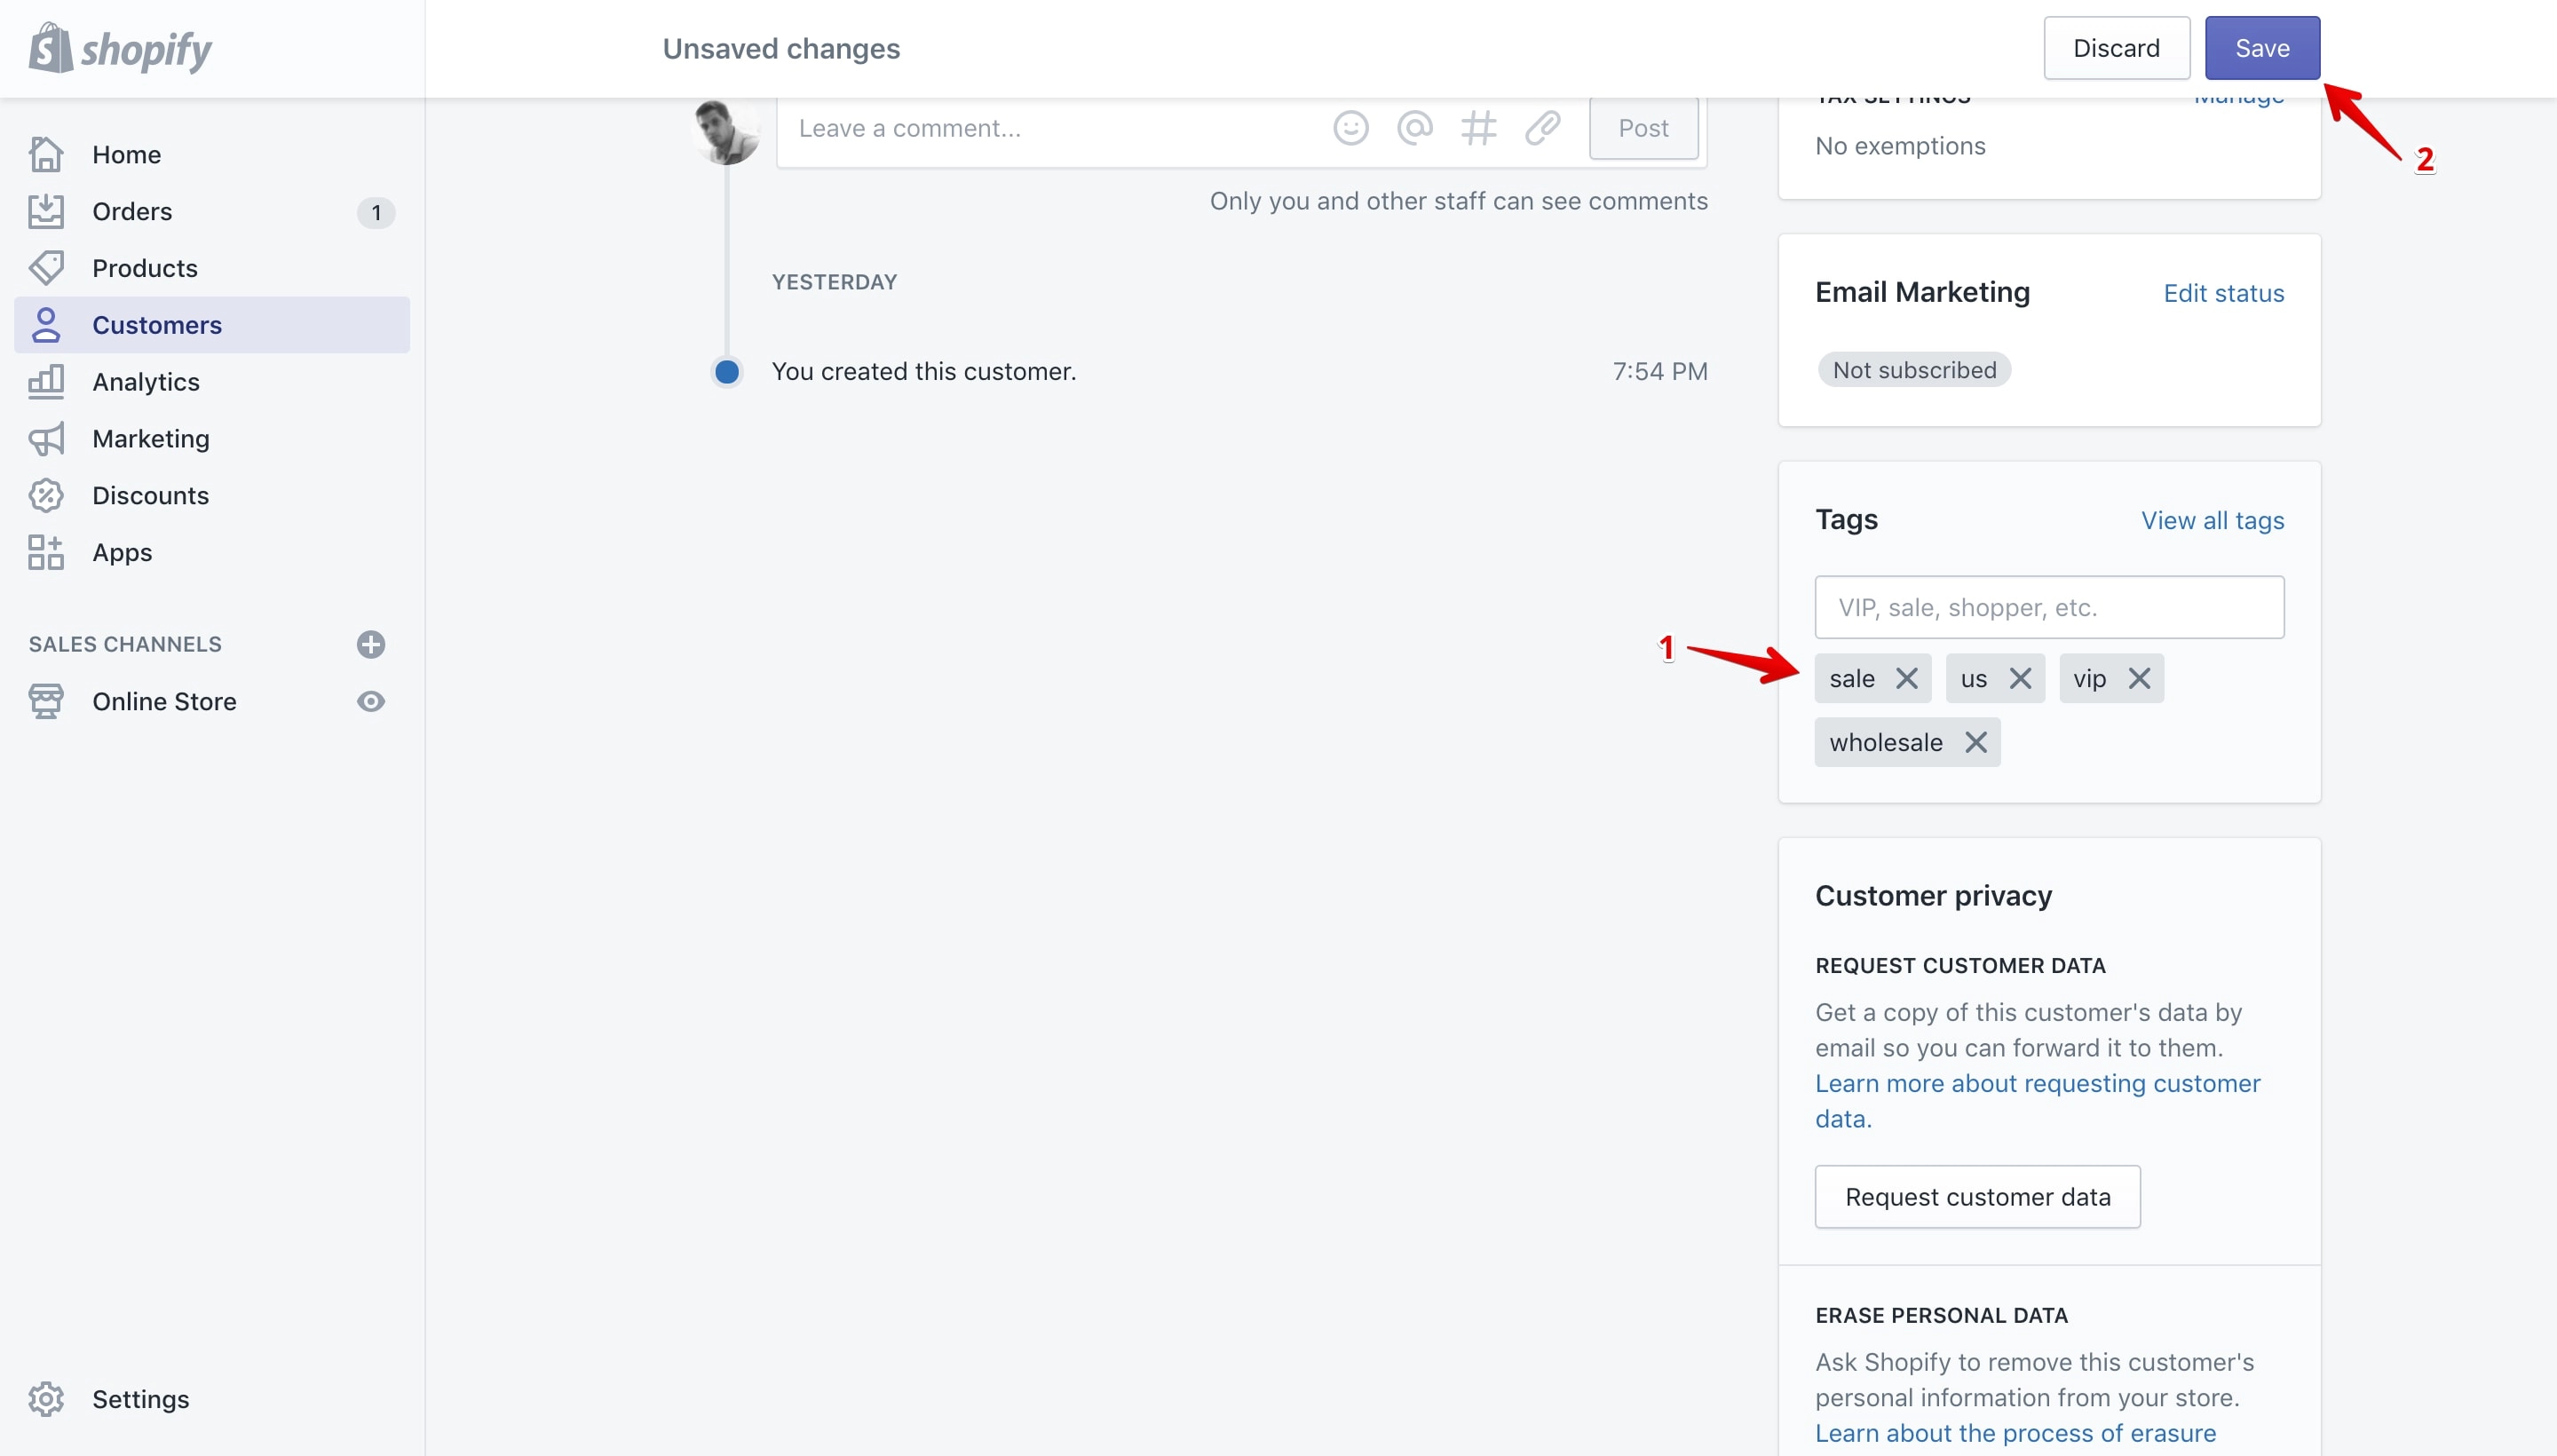
The newly added tag is not yet saved to the order. If you leave the page at this stage the tags will not be assigned to the order.
To save them click the “Save” button (marked with 2 in the image above).
Remove a tag
You can remove a tag from a customer in 2 ways via the “Tags section” on the customer details page or from the “Applied Tags” section located on the “Tags” pop-up.
Remove a tag from the “Tags” section
For me this is the easiest and fastest way to do it.
All you have to do is click the “X” (marked with 1 in the image below) from the tag and save your changes by clicking the “Save” button (marked with 2 in the image below):
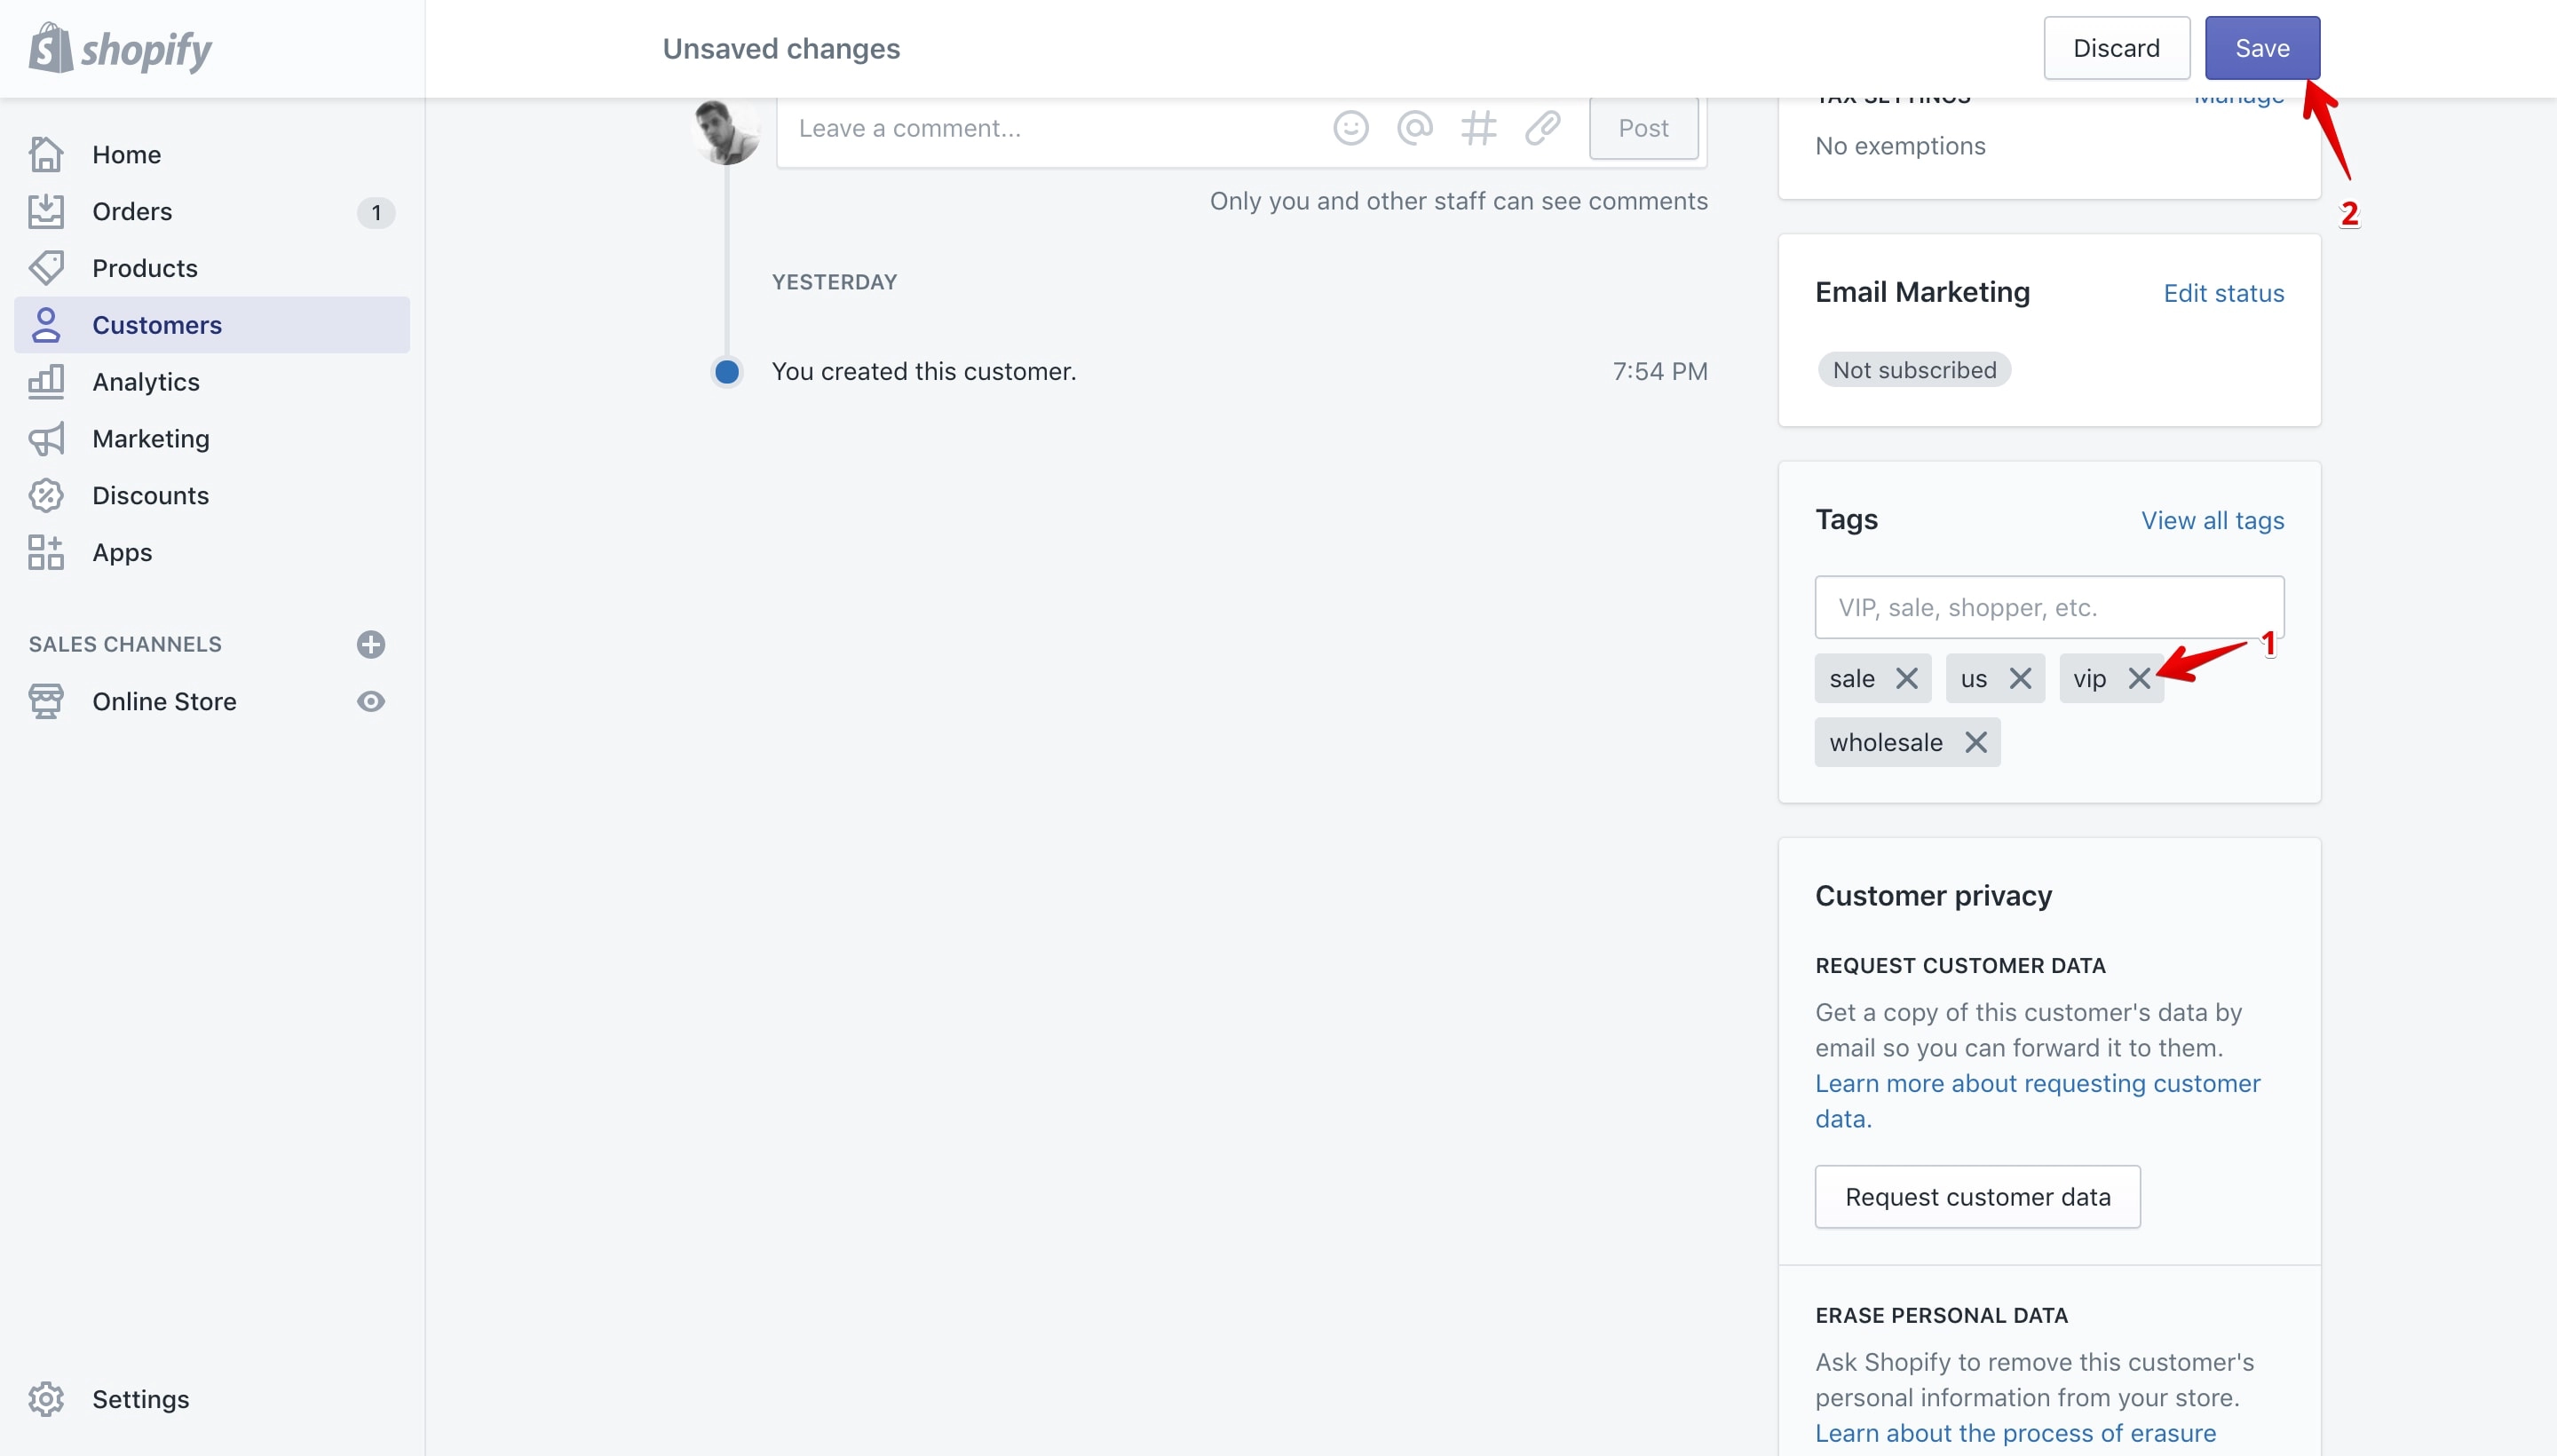
Remove a tag from the “Edit tags” pop-up
On the customer details page click on the “View all tags” link:
This will open the “Edit Tags” pop-up that will allow you to remove tags from the customer:
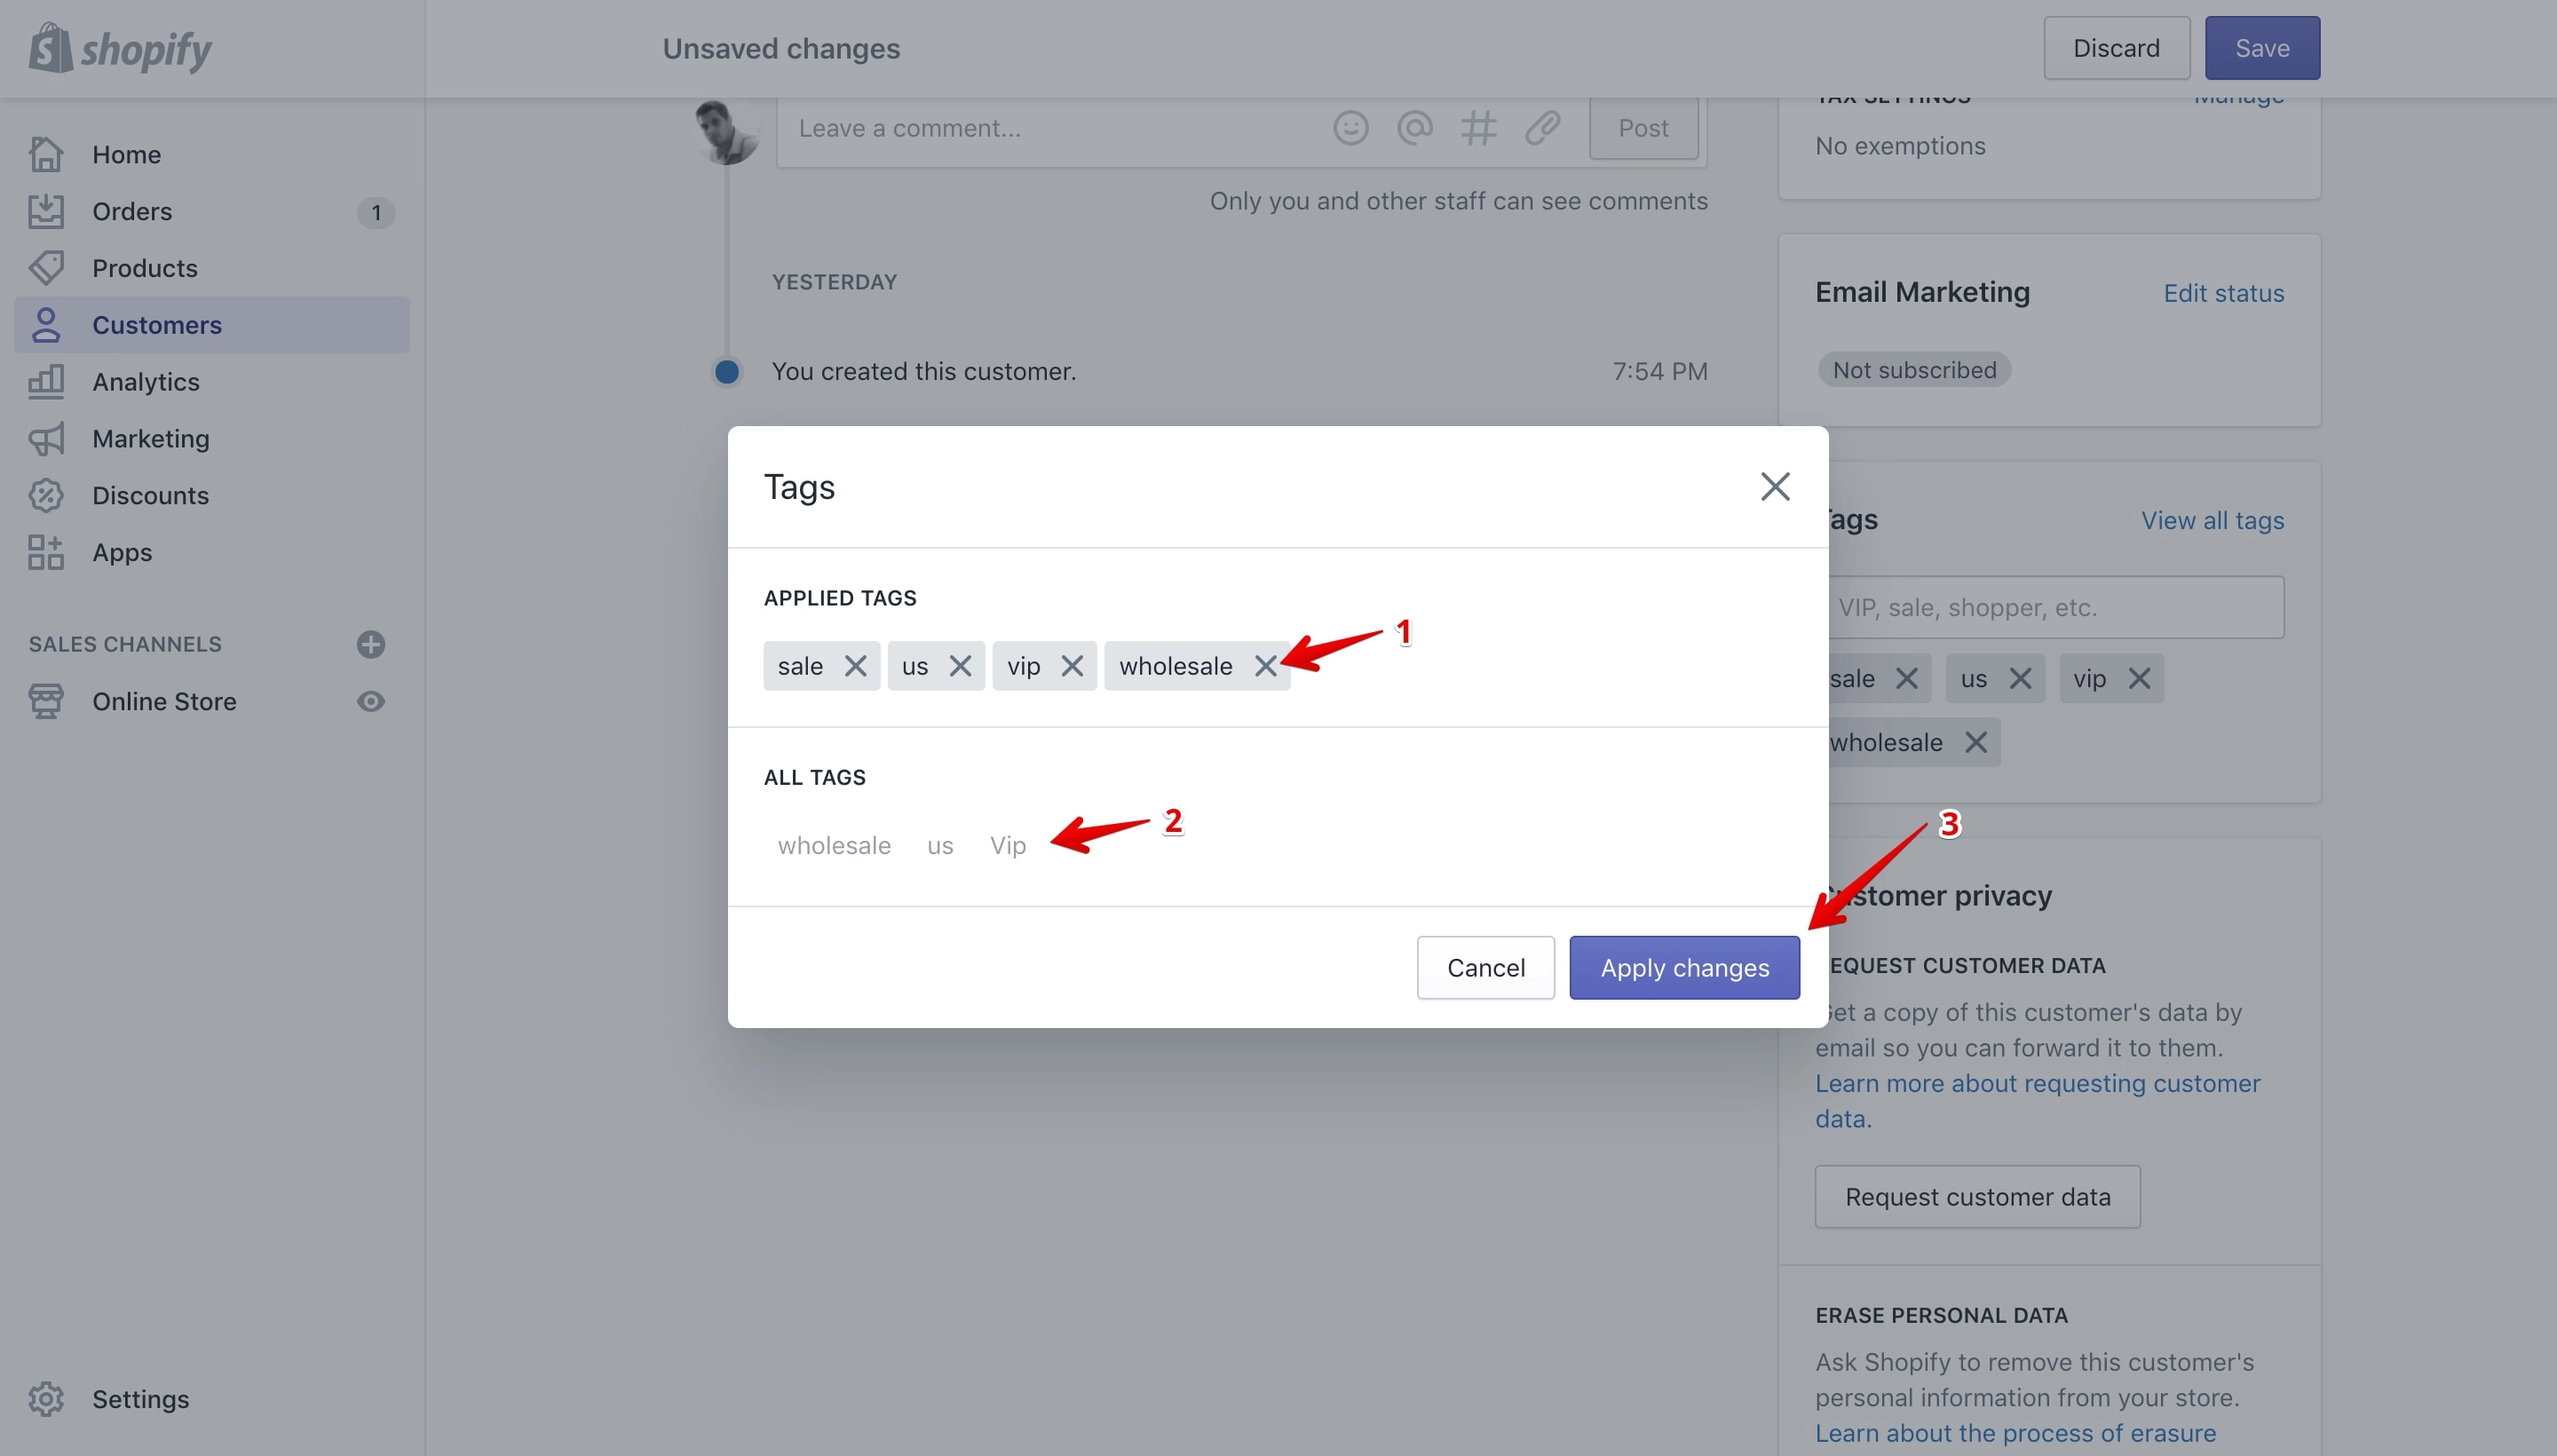
Click on the tag’s “X” icon to remove the tag (marked with 1 in the image above). Once you do that the tag will be removed from the “Tags” section and added to the “All Tags” section of the pop-up (marked with 2 in the image above).
After you remove all the tags that you want from the customer click the “Apply Changes” button (marked with 3 in the image above).
In my example I’ve removed the “wholesale” tag from the customer and once I’ve clicked the “Apply Changes” button the tag is no longer listed on the “Tags” section (marked with 1 in the image below) on the customer details page:
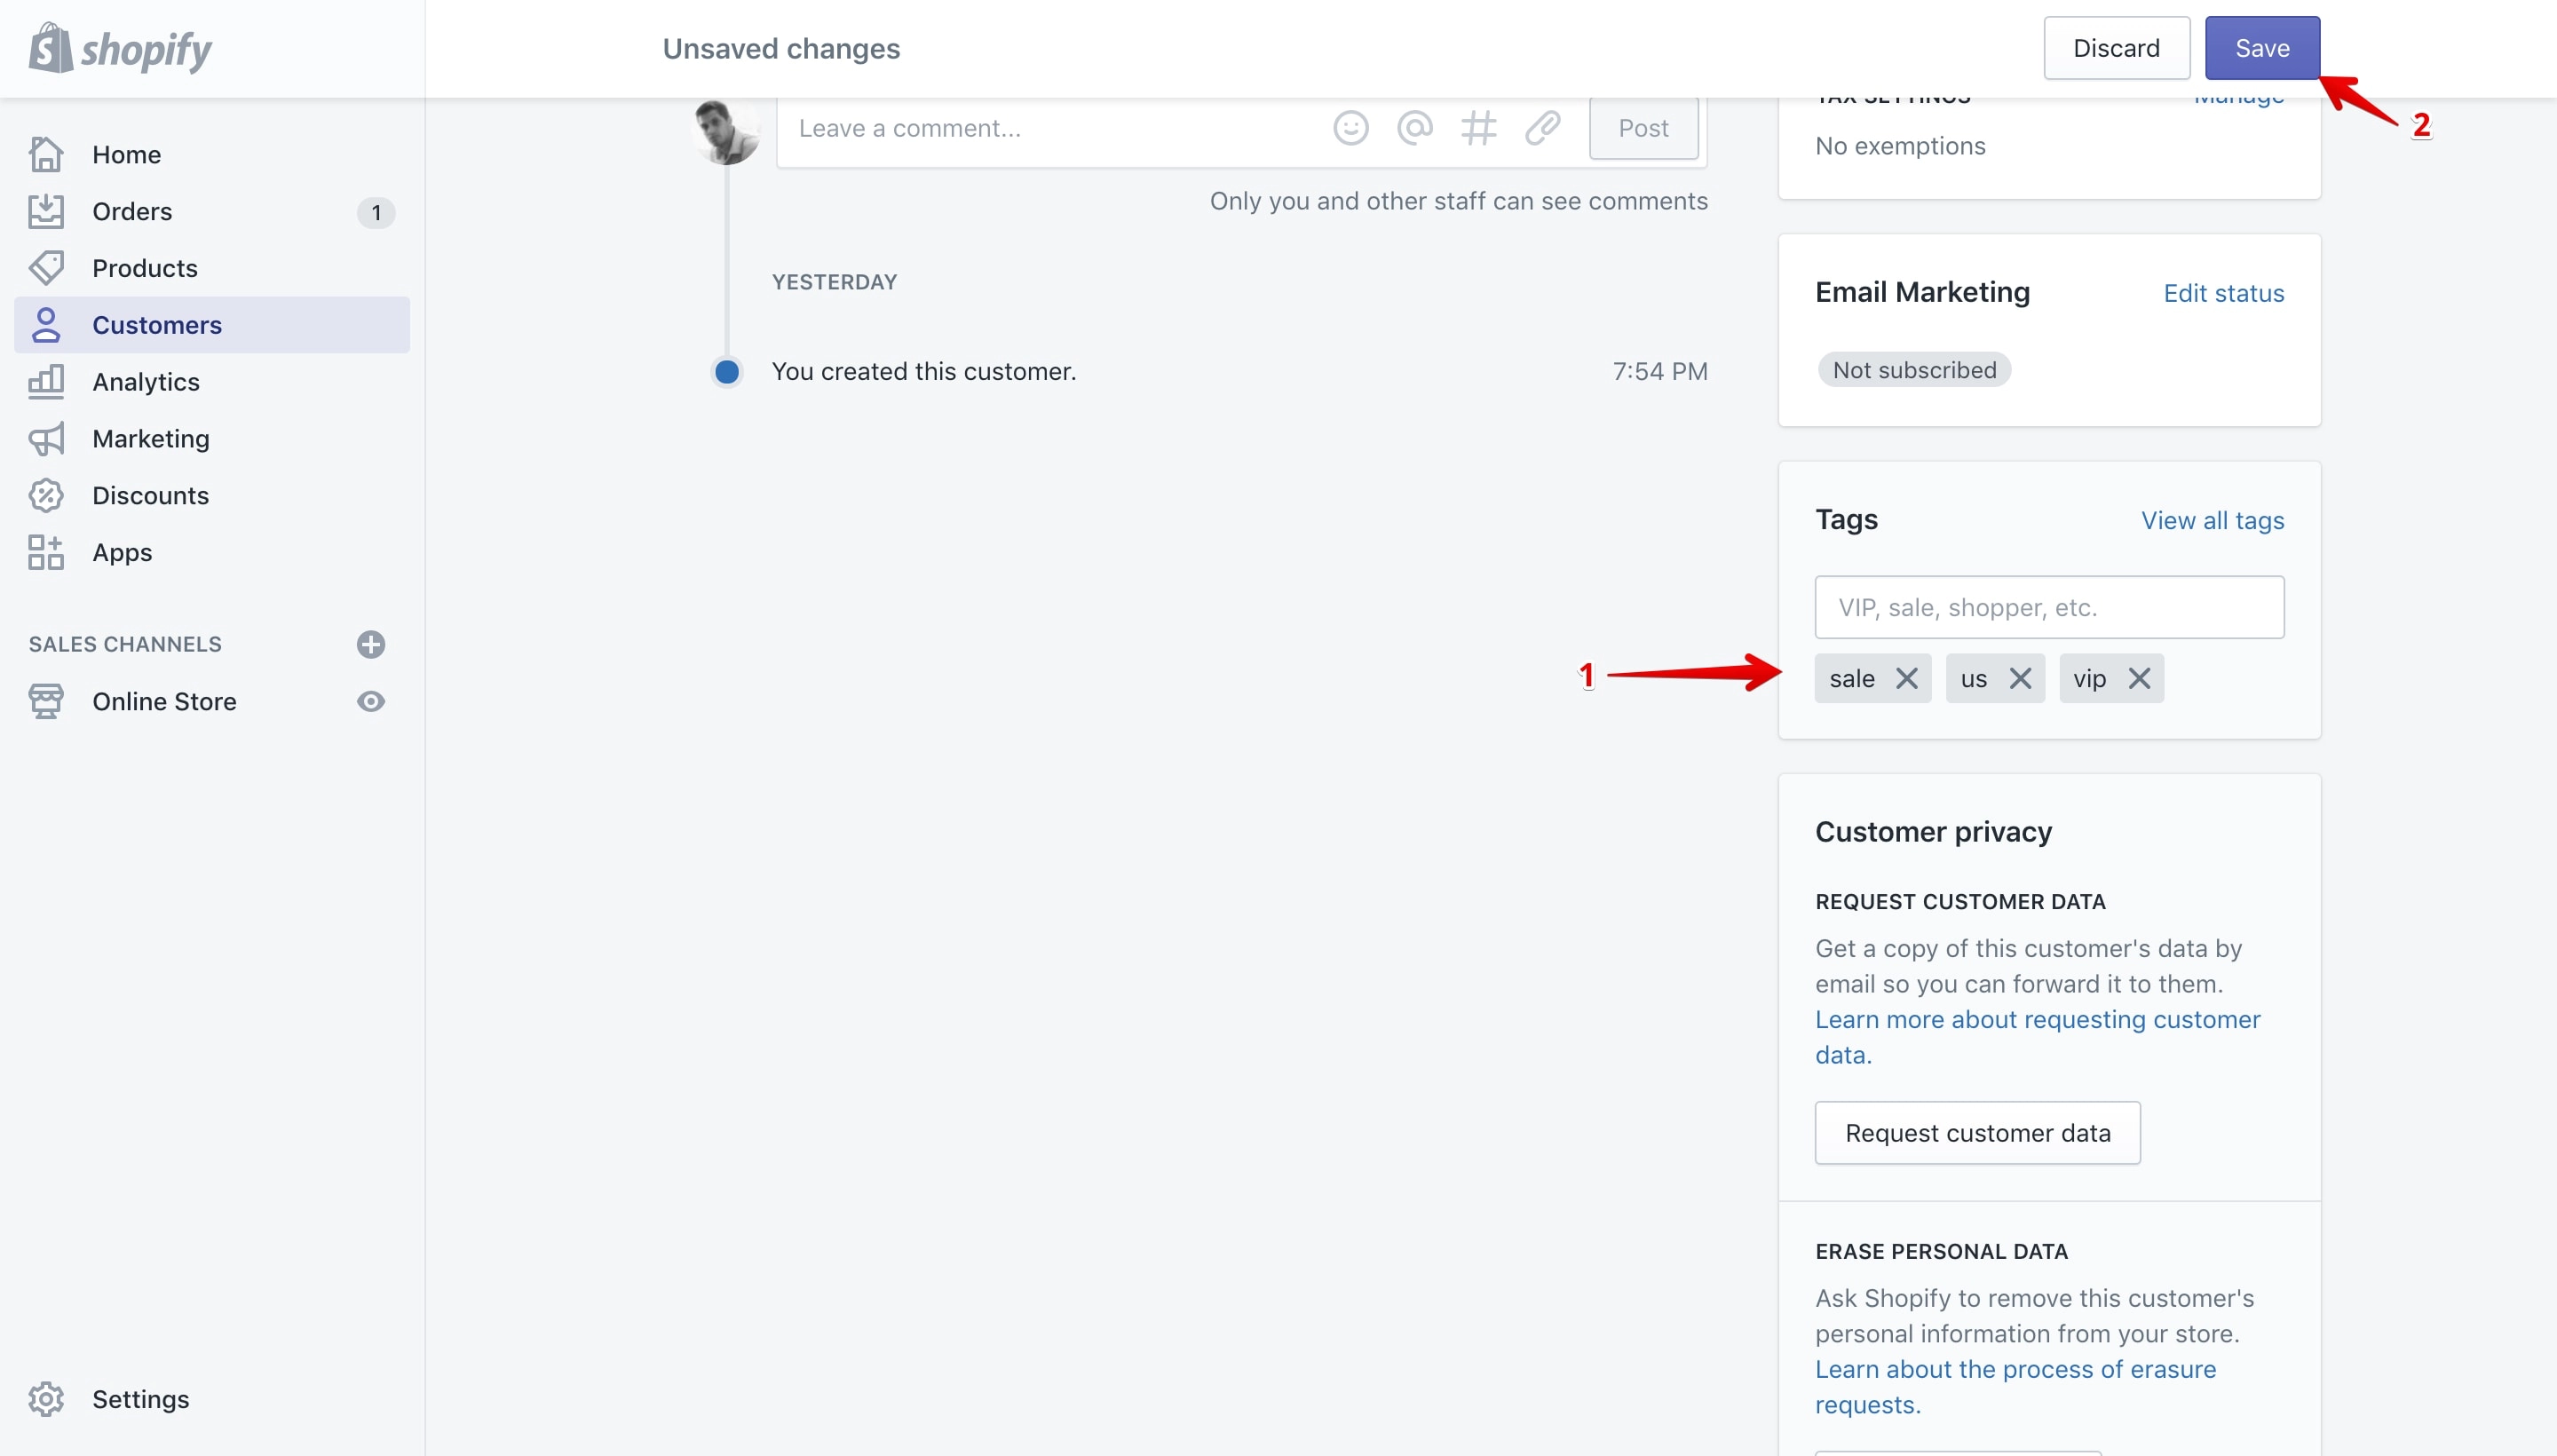
If the tag is removed from the “Tags” section that does not mean that it is also removed from the customer at this stage.
To completely remove it you need to save it by clicking the “Save” button (marked with 2 in the image above).
Blog post tags
Support up to 255 characters.
Blog tags can be added from the customer details page on every blog post on your store. Once you add a tag to a blog post, that tag can be accessed from the other posts as well.
To access the page go to “Blog posts” (marked with 1 in the image below) and after to the post that you want to add tags too (marked with 2 in the image below):
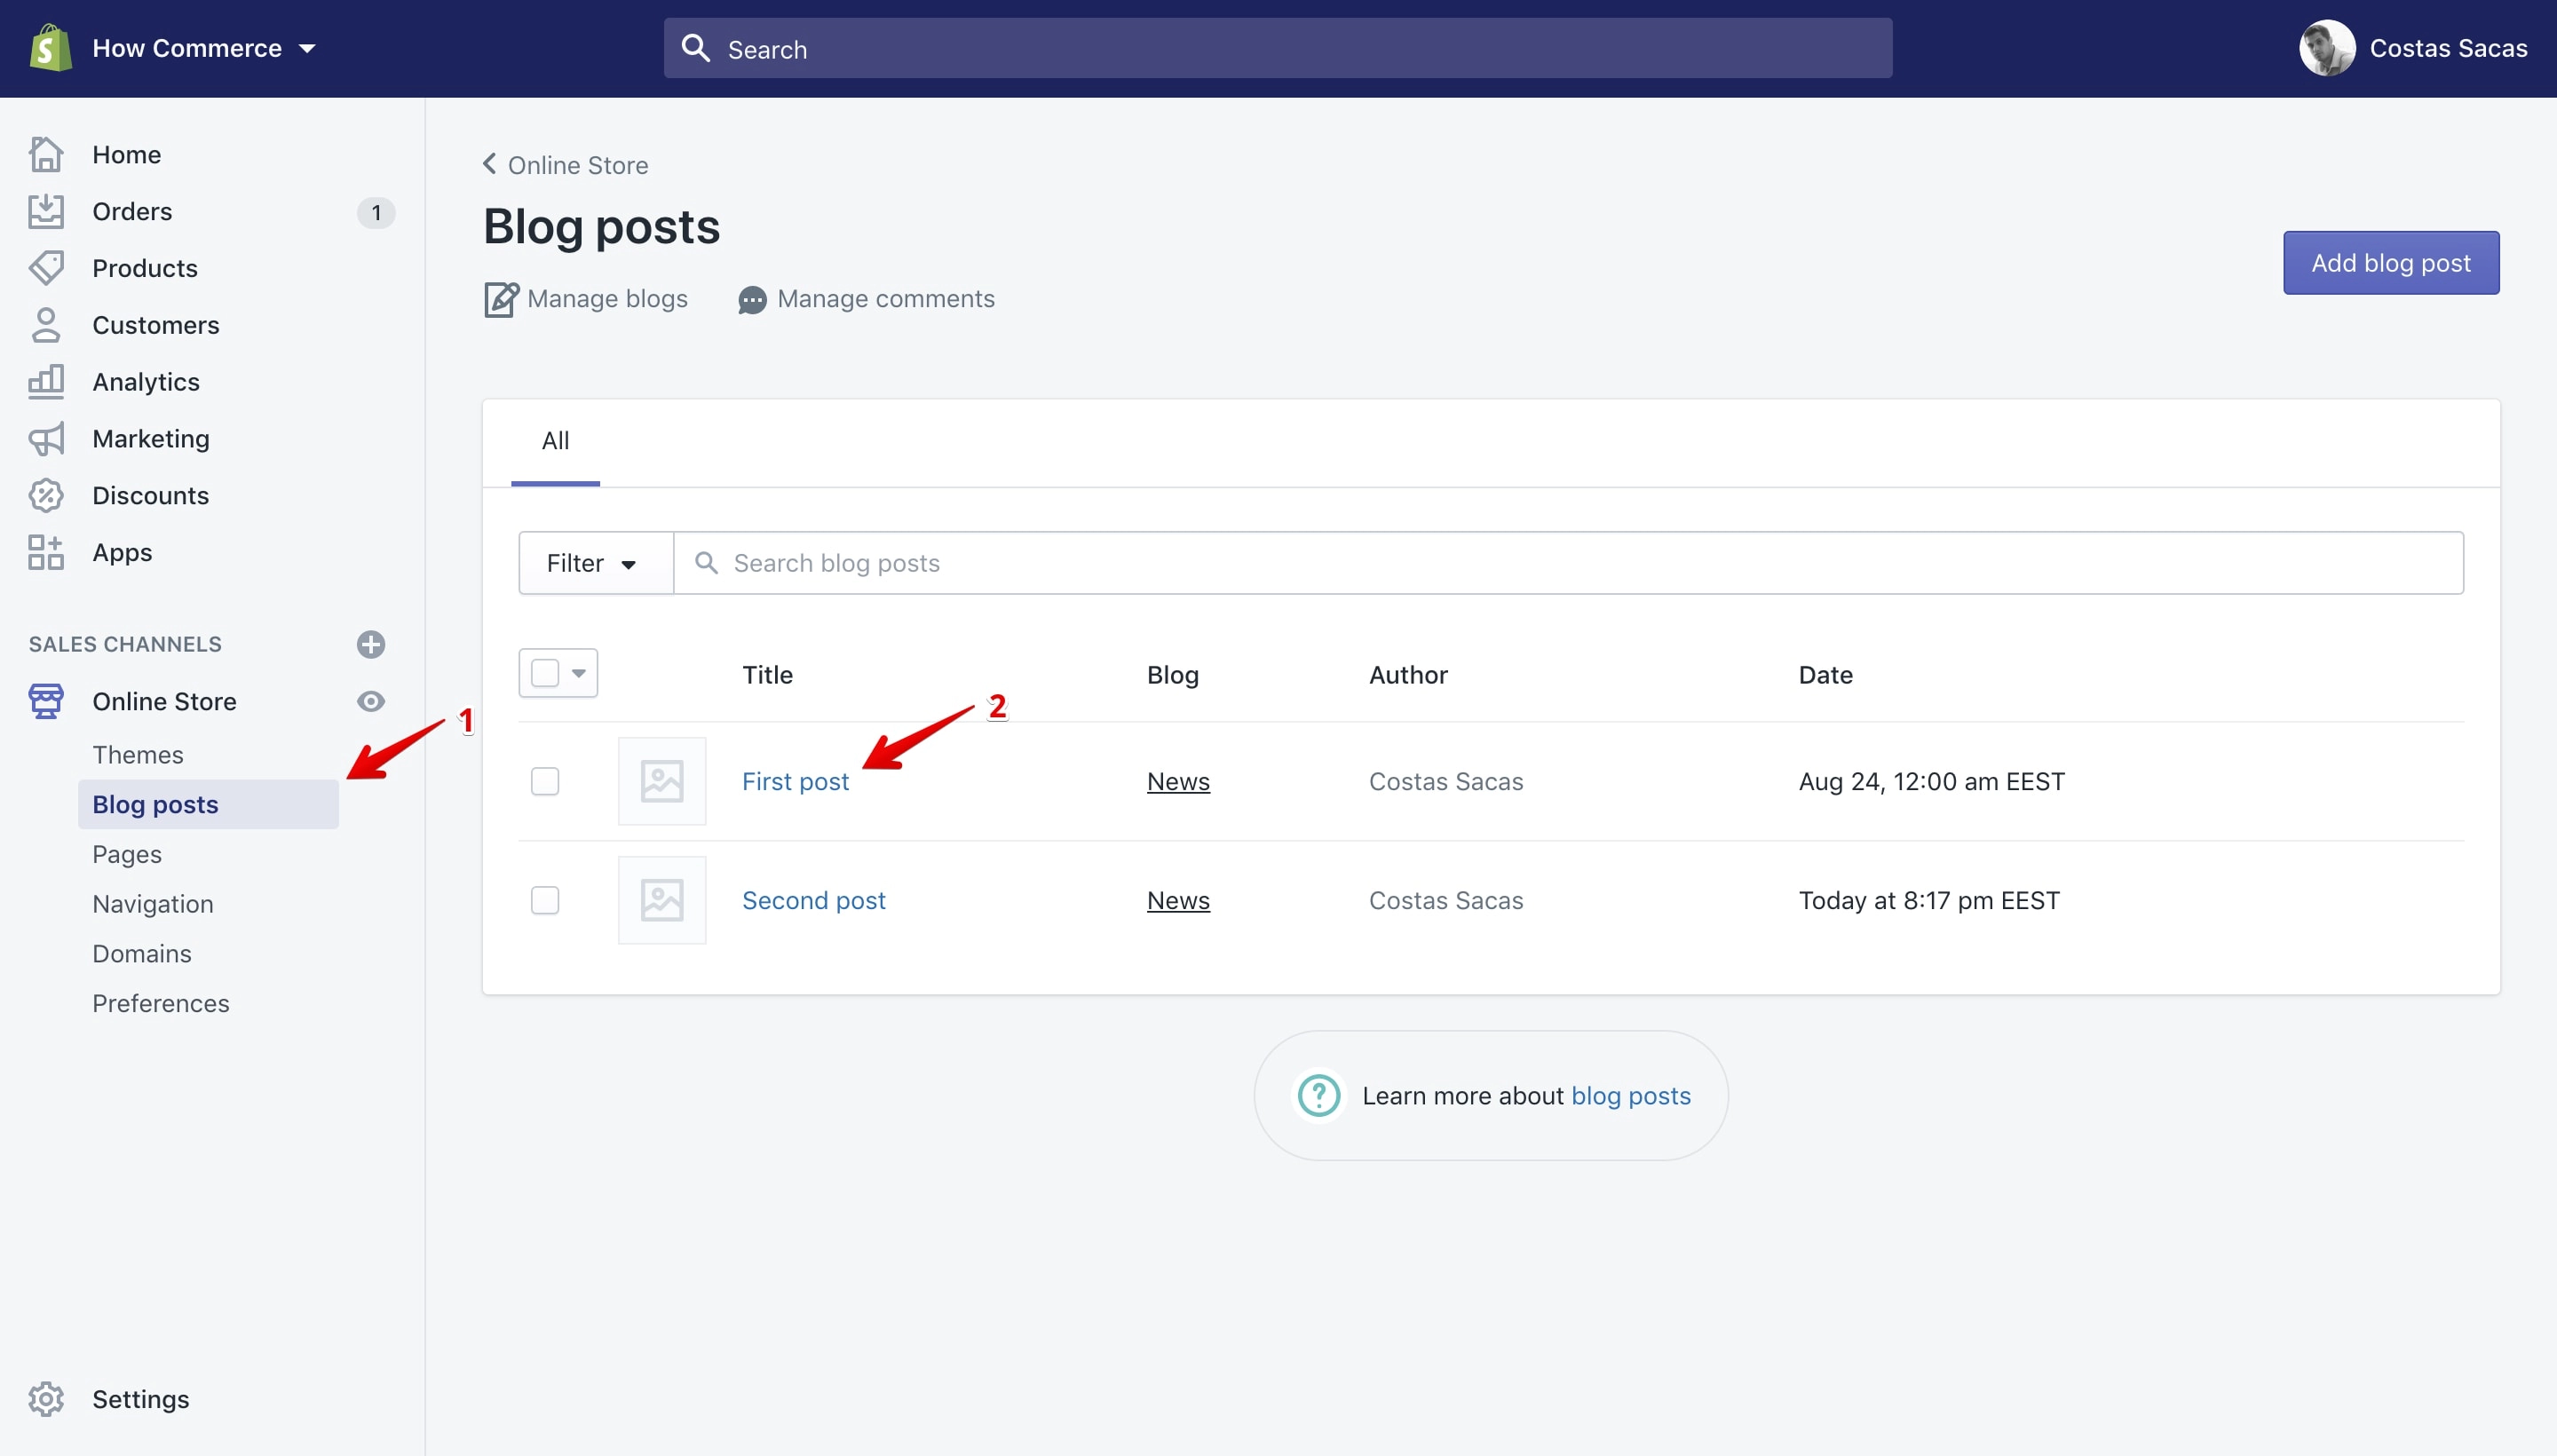
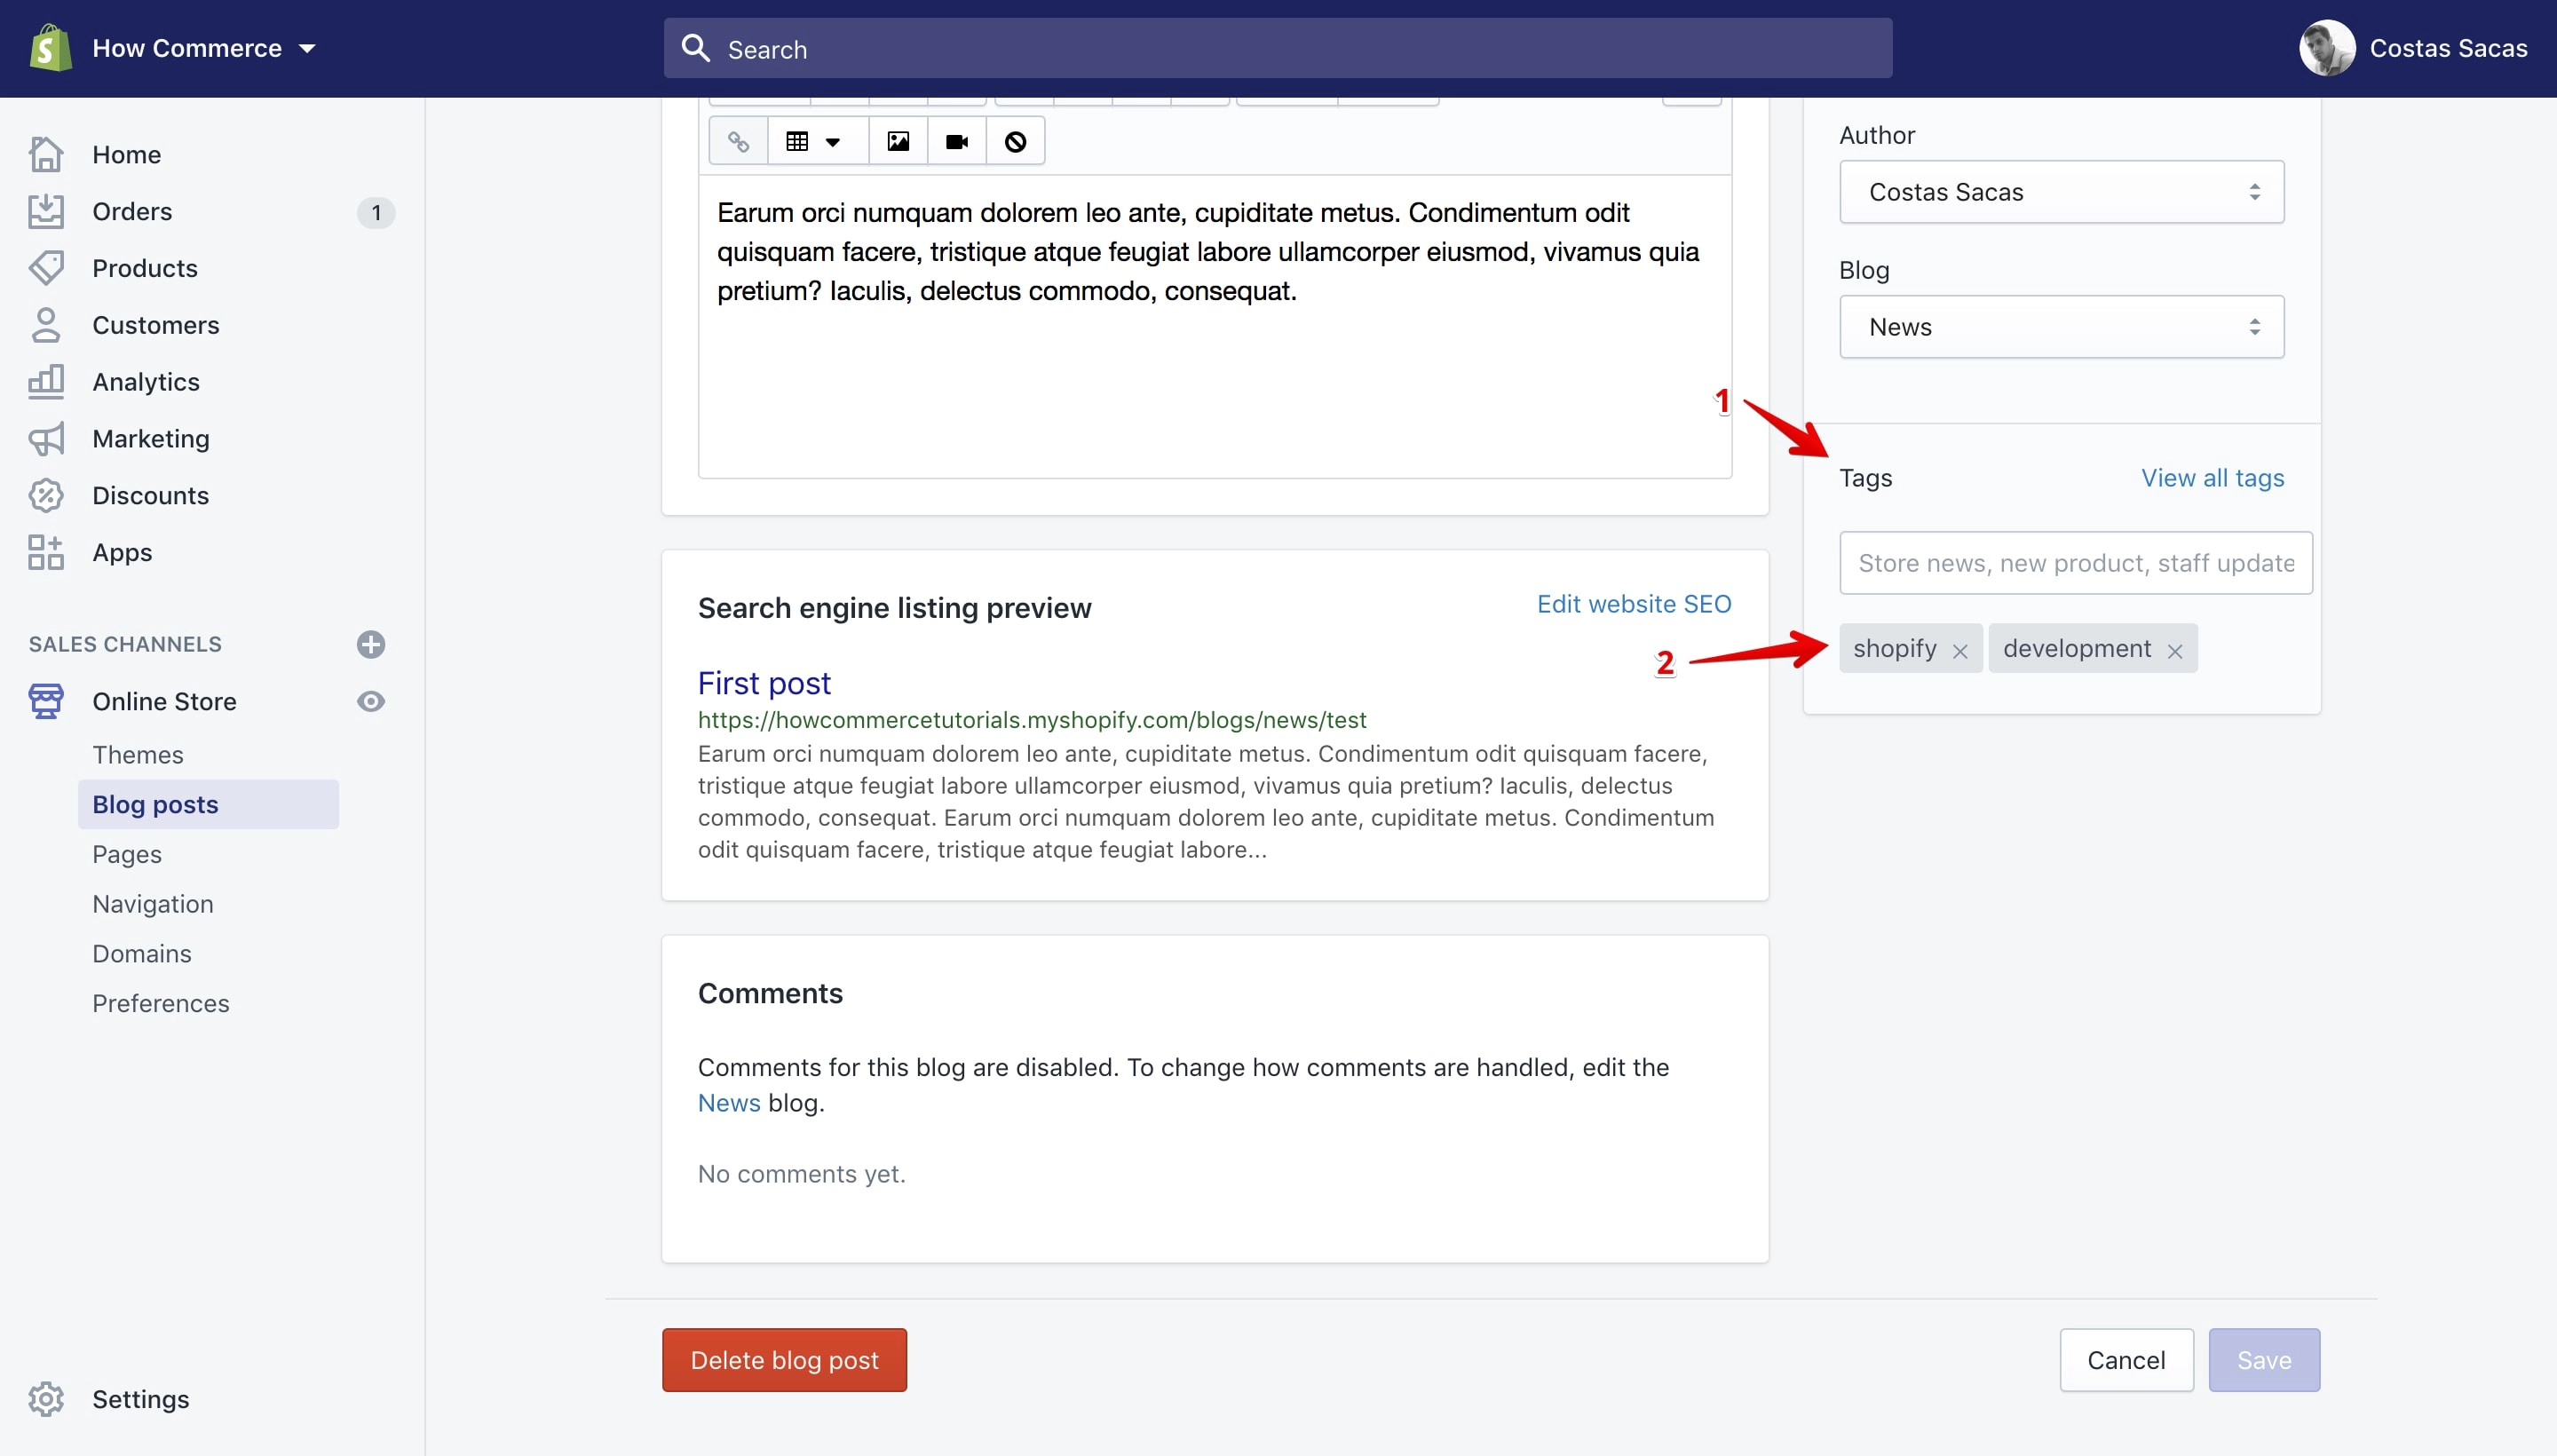
On the blog post details page you can view the tags section on the right sidebar (marked with 1 in the image below), and on this section you can see all tags associated with this post (marked with 2 in the image below):
Add a tag
The tags that you add to one blog post can be viewed from any blog post details page and can be used by all posts available in the online store.
You can add a tag to a draft order in 2 ways:
- New and existing tags can be added through the input box.
- Existing tags can be added through the “View all tags” link.
Adding a tag through the input box
New tags can be added only through this option. Type the name of the tag inside the input box and hit the ↵ (Enter) key or click the “Add” tag:
After you add the tag, it will display below the input box (marked with 1 in the image below). You need to save it so you can store it permanently and use it on all your blog posts.
To do that click the “Save” button (marked with 2 in the image below):
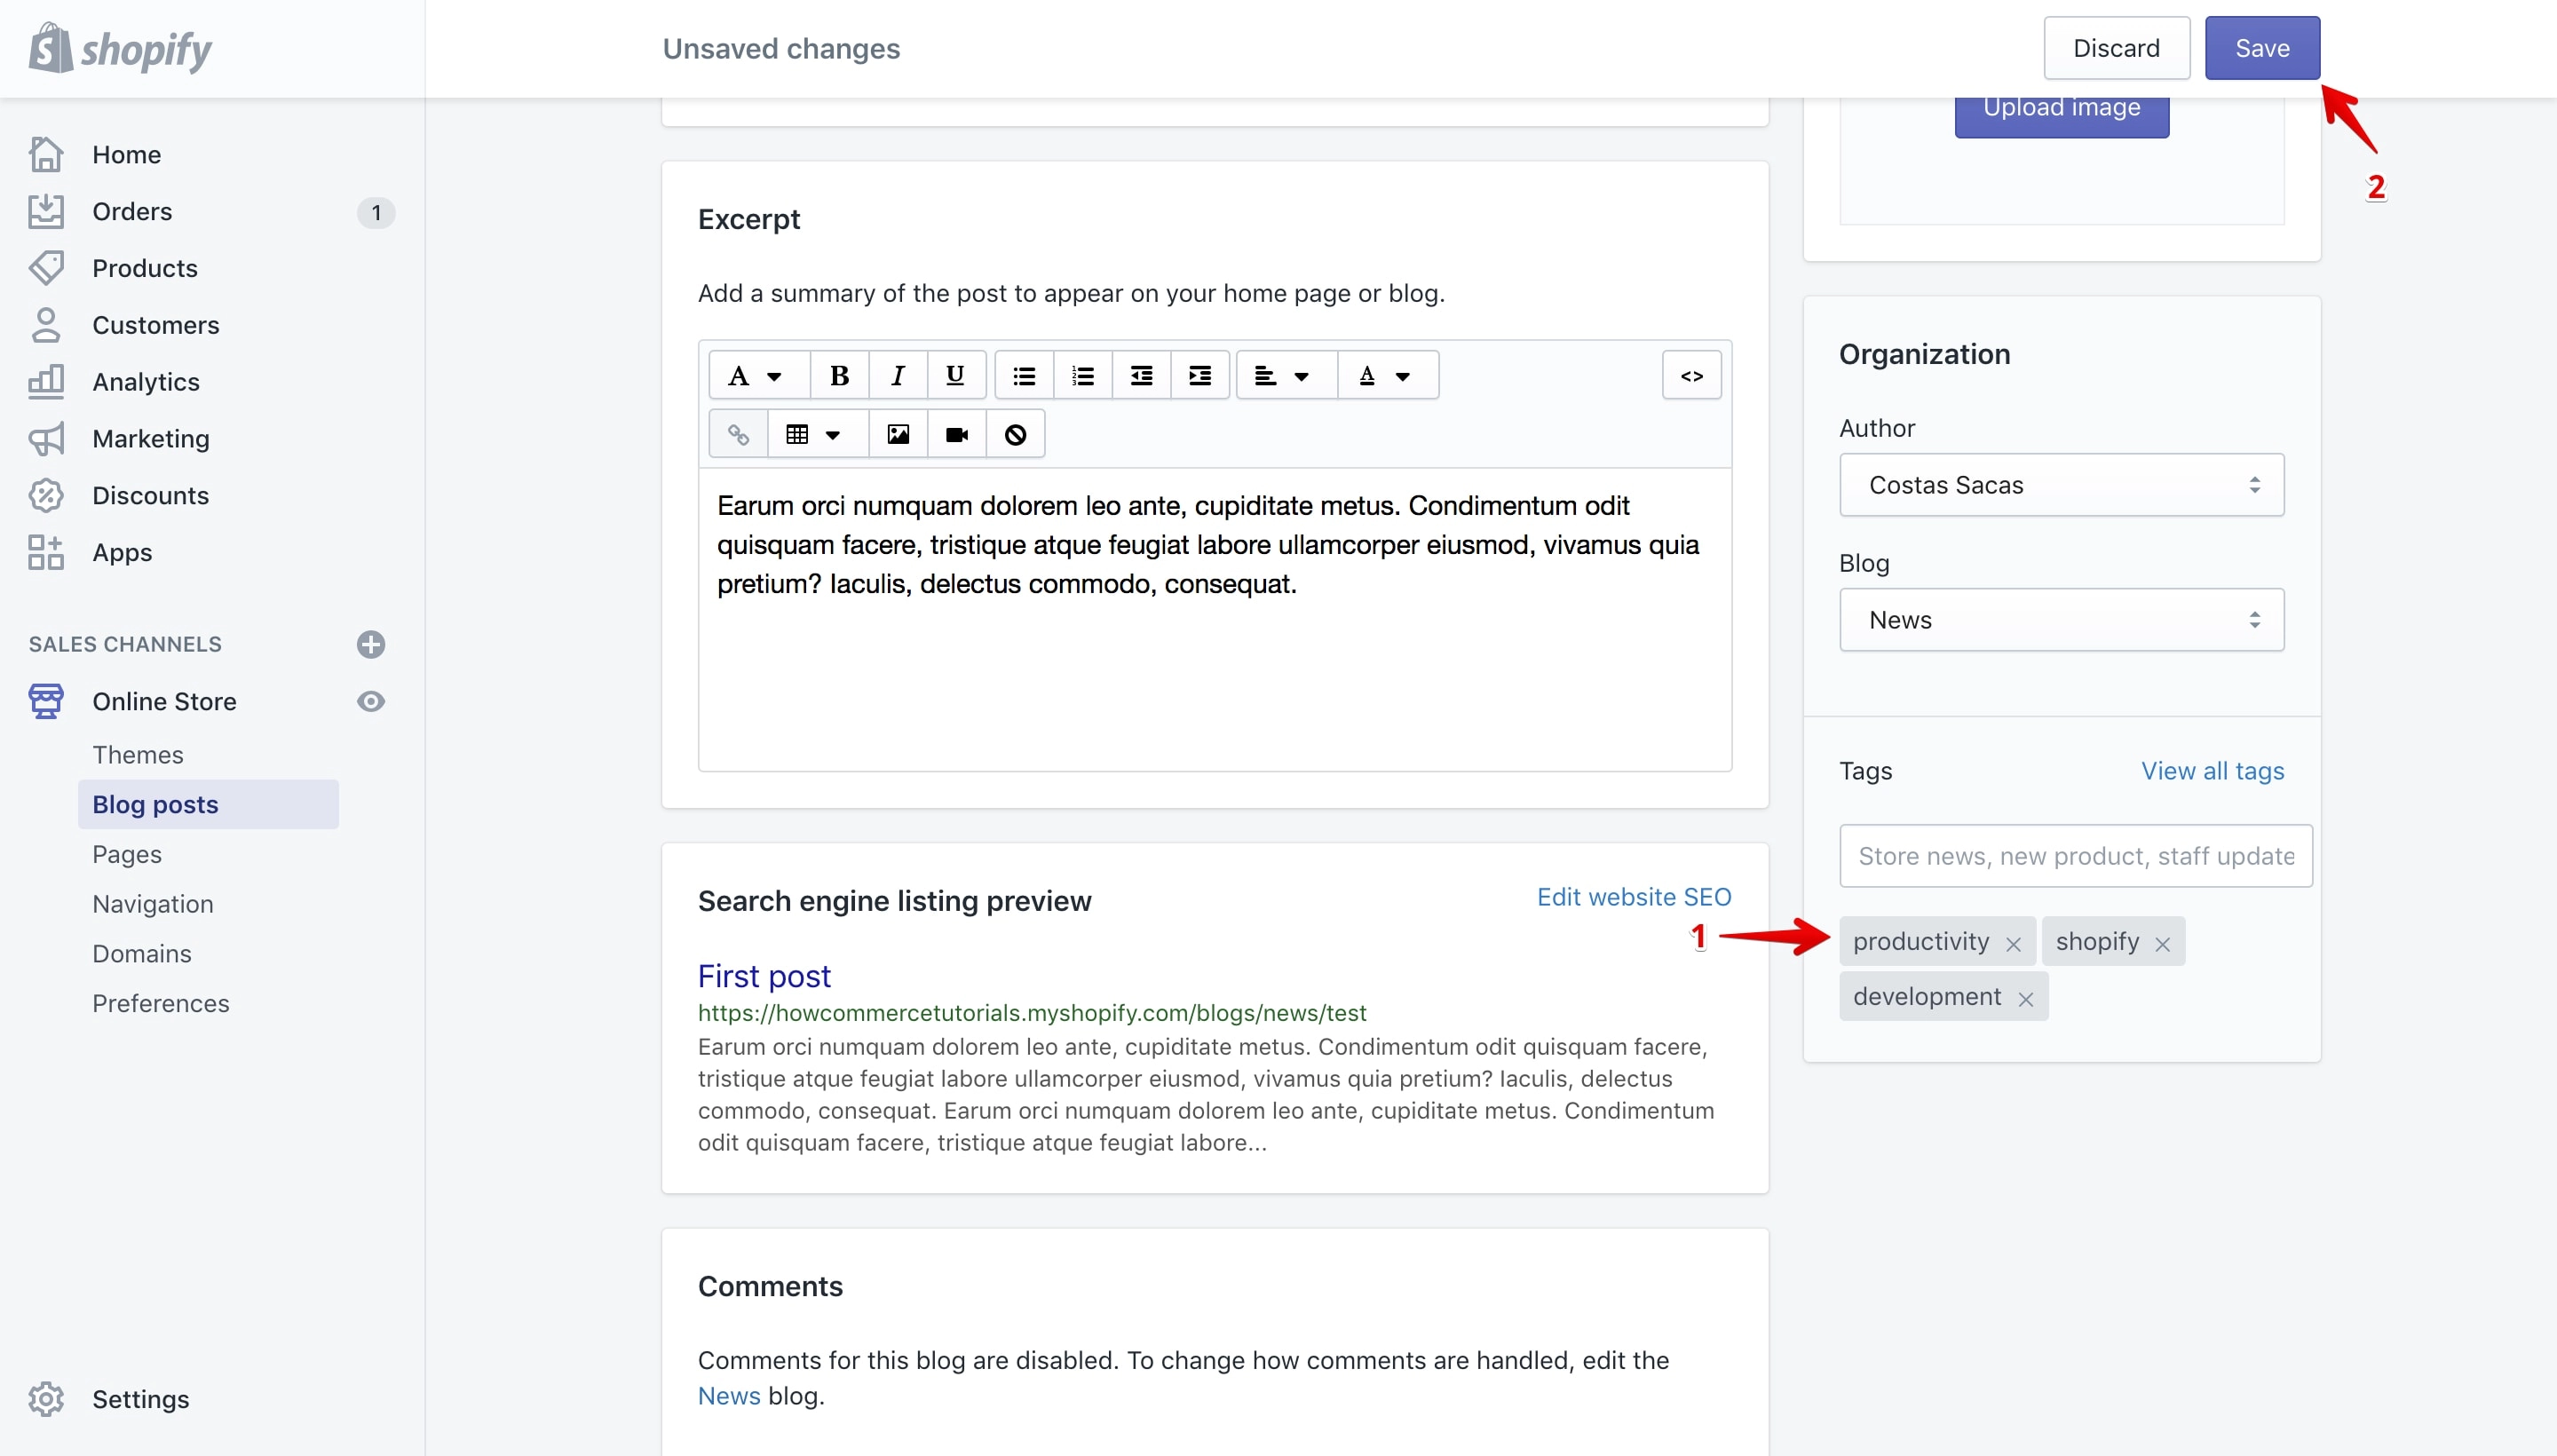
You can also add existing tags from the “Frequently used tags” pop-up like this:
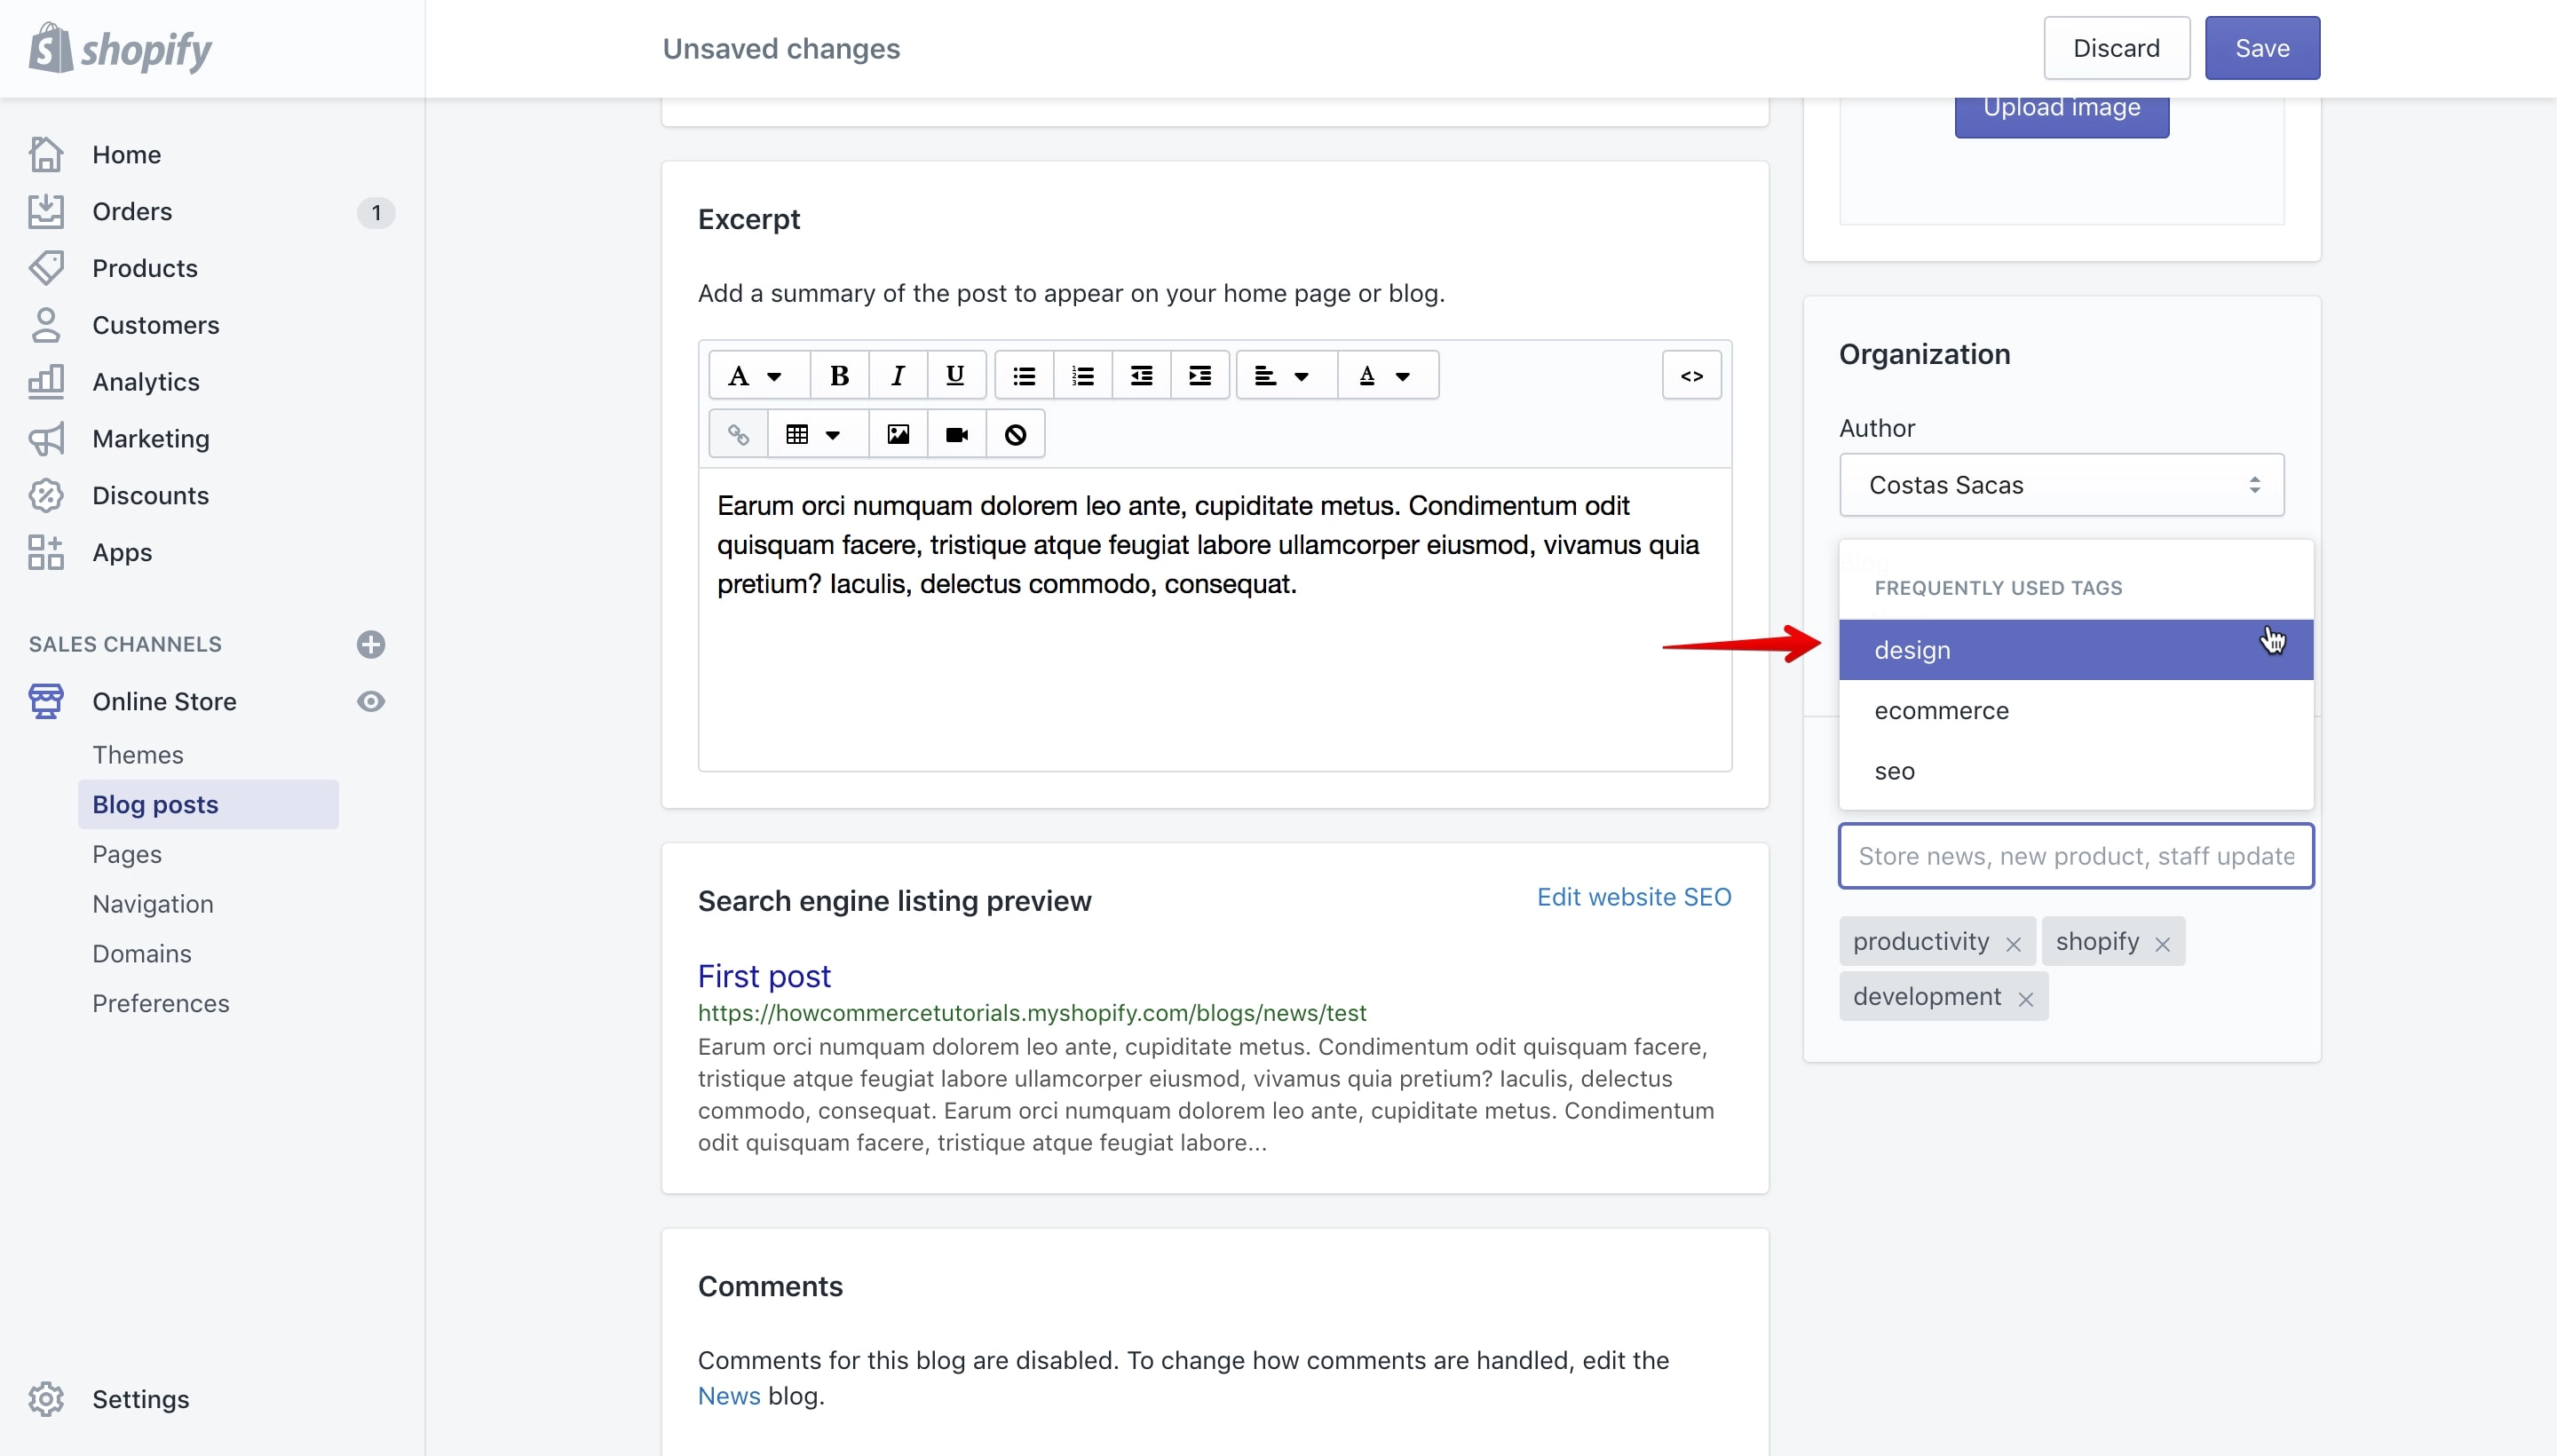
Make sure after you add the tag to the blog post that you click on the “Save” button to save it.
Adding a tag through the “View all tags” link
Through this method you can add only existing tags to the blog post and you can’t create new ones.
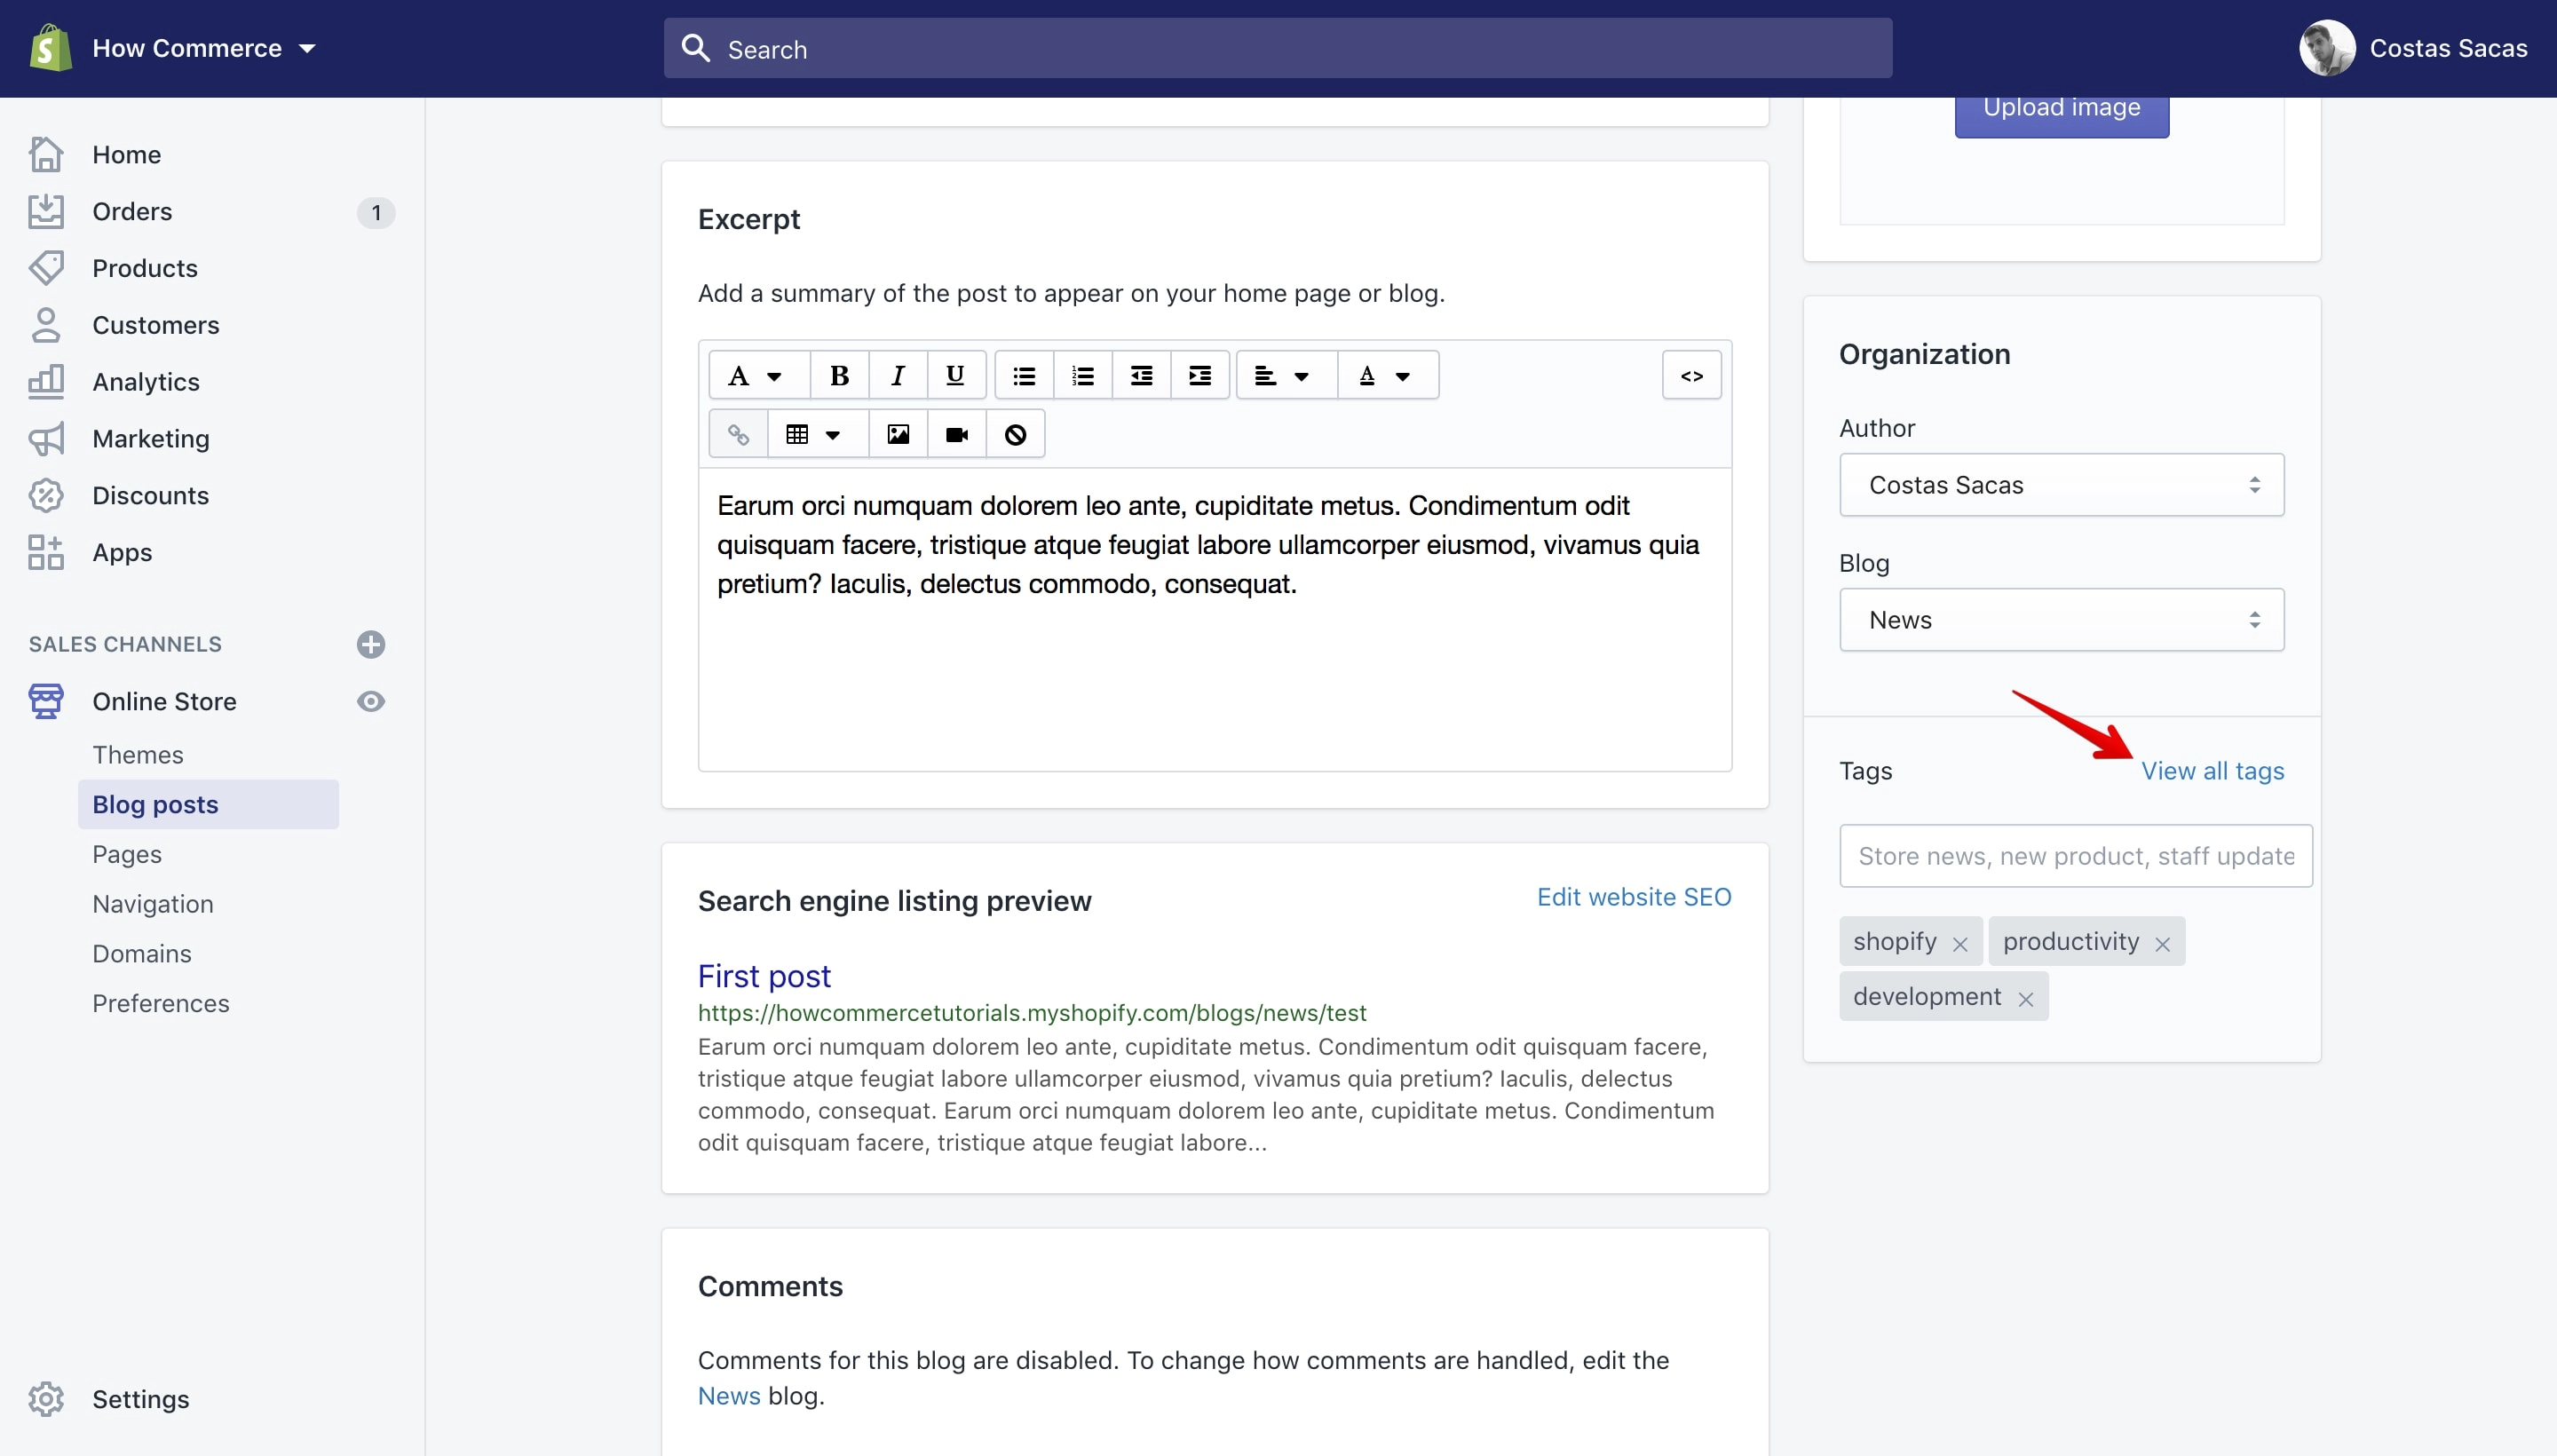
Clicking on the “View all tags” link will open a pop-up that will allow you to select and assign new tags to your blog post:
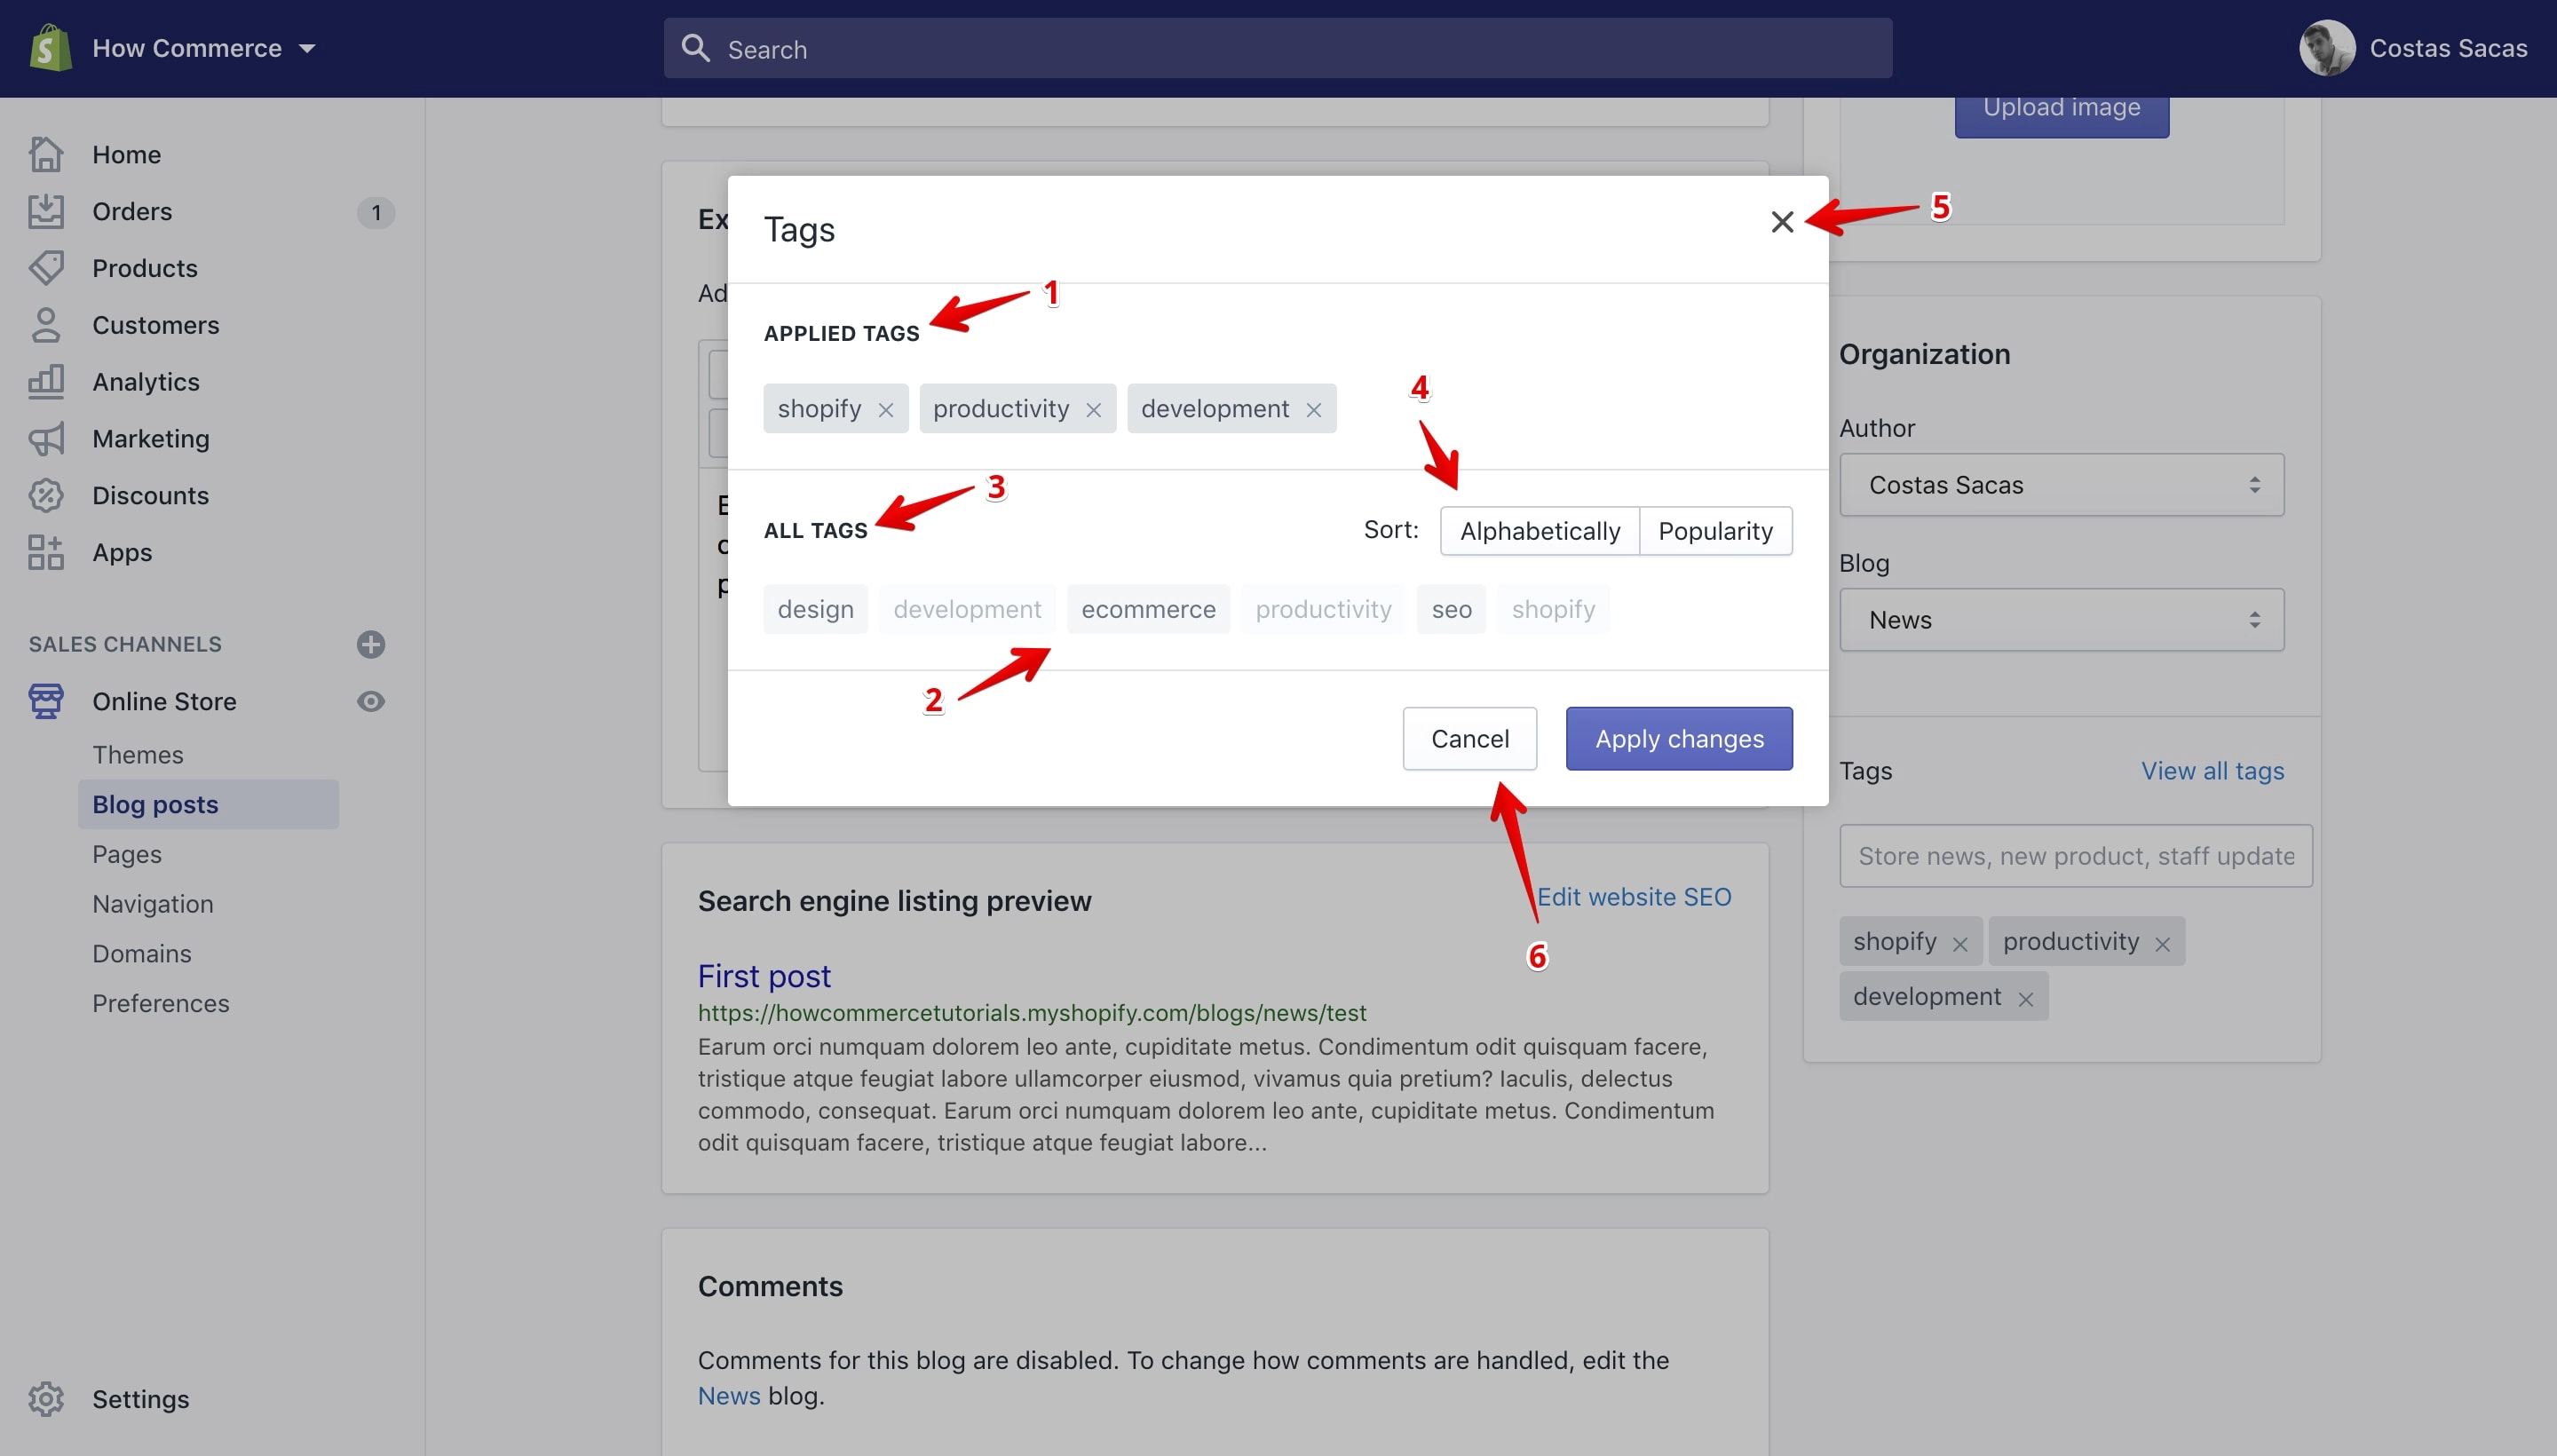
On the pop-up you can see all the tags assigned to the blog post in the “Applied Tags” section (marked with 1 in the image above).
Below that section you can see the “All Tags” section (marked with 3 in the image above). This section lists all the tags available in the blog section.
The tags that are greyed-out (marked with 2 in the image above) are already assigned to the blog post. You can assign more from this section by clicking on the desired tag, if the tag is available.
If you have a lot of tags you can sort them “Alphabetically” or by “Popularity” from the sorting section (marked with 4 in the image above).
You can close the pop-up by clicking the “X” icon from the top right corner (marked with 5 in the image above) or by clicking the “Cancel” button (marked with 6 in the image above).
Note:
Clicking the “X” icon or the “Cancel” button will cancel your newly assigned tags and not save your changes.
Assign new tags to the blog post by clicking on tags located on the “All Tags” section (marked with 1 in the image below).
Tags added will display in the “Applied Tags” section (marked with 2 in the image below). Once completed click the “Apply changes” button (marked with 3 in the image below):
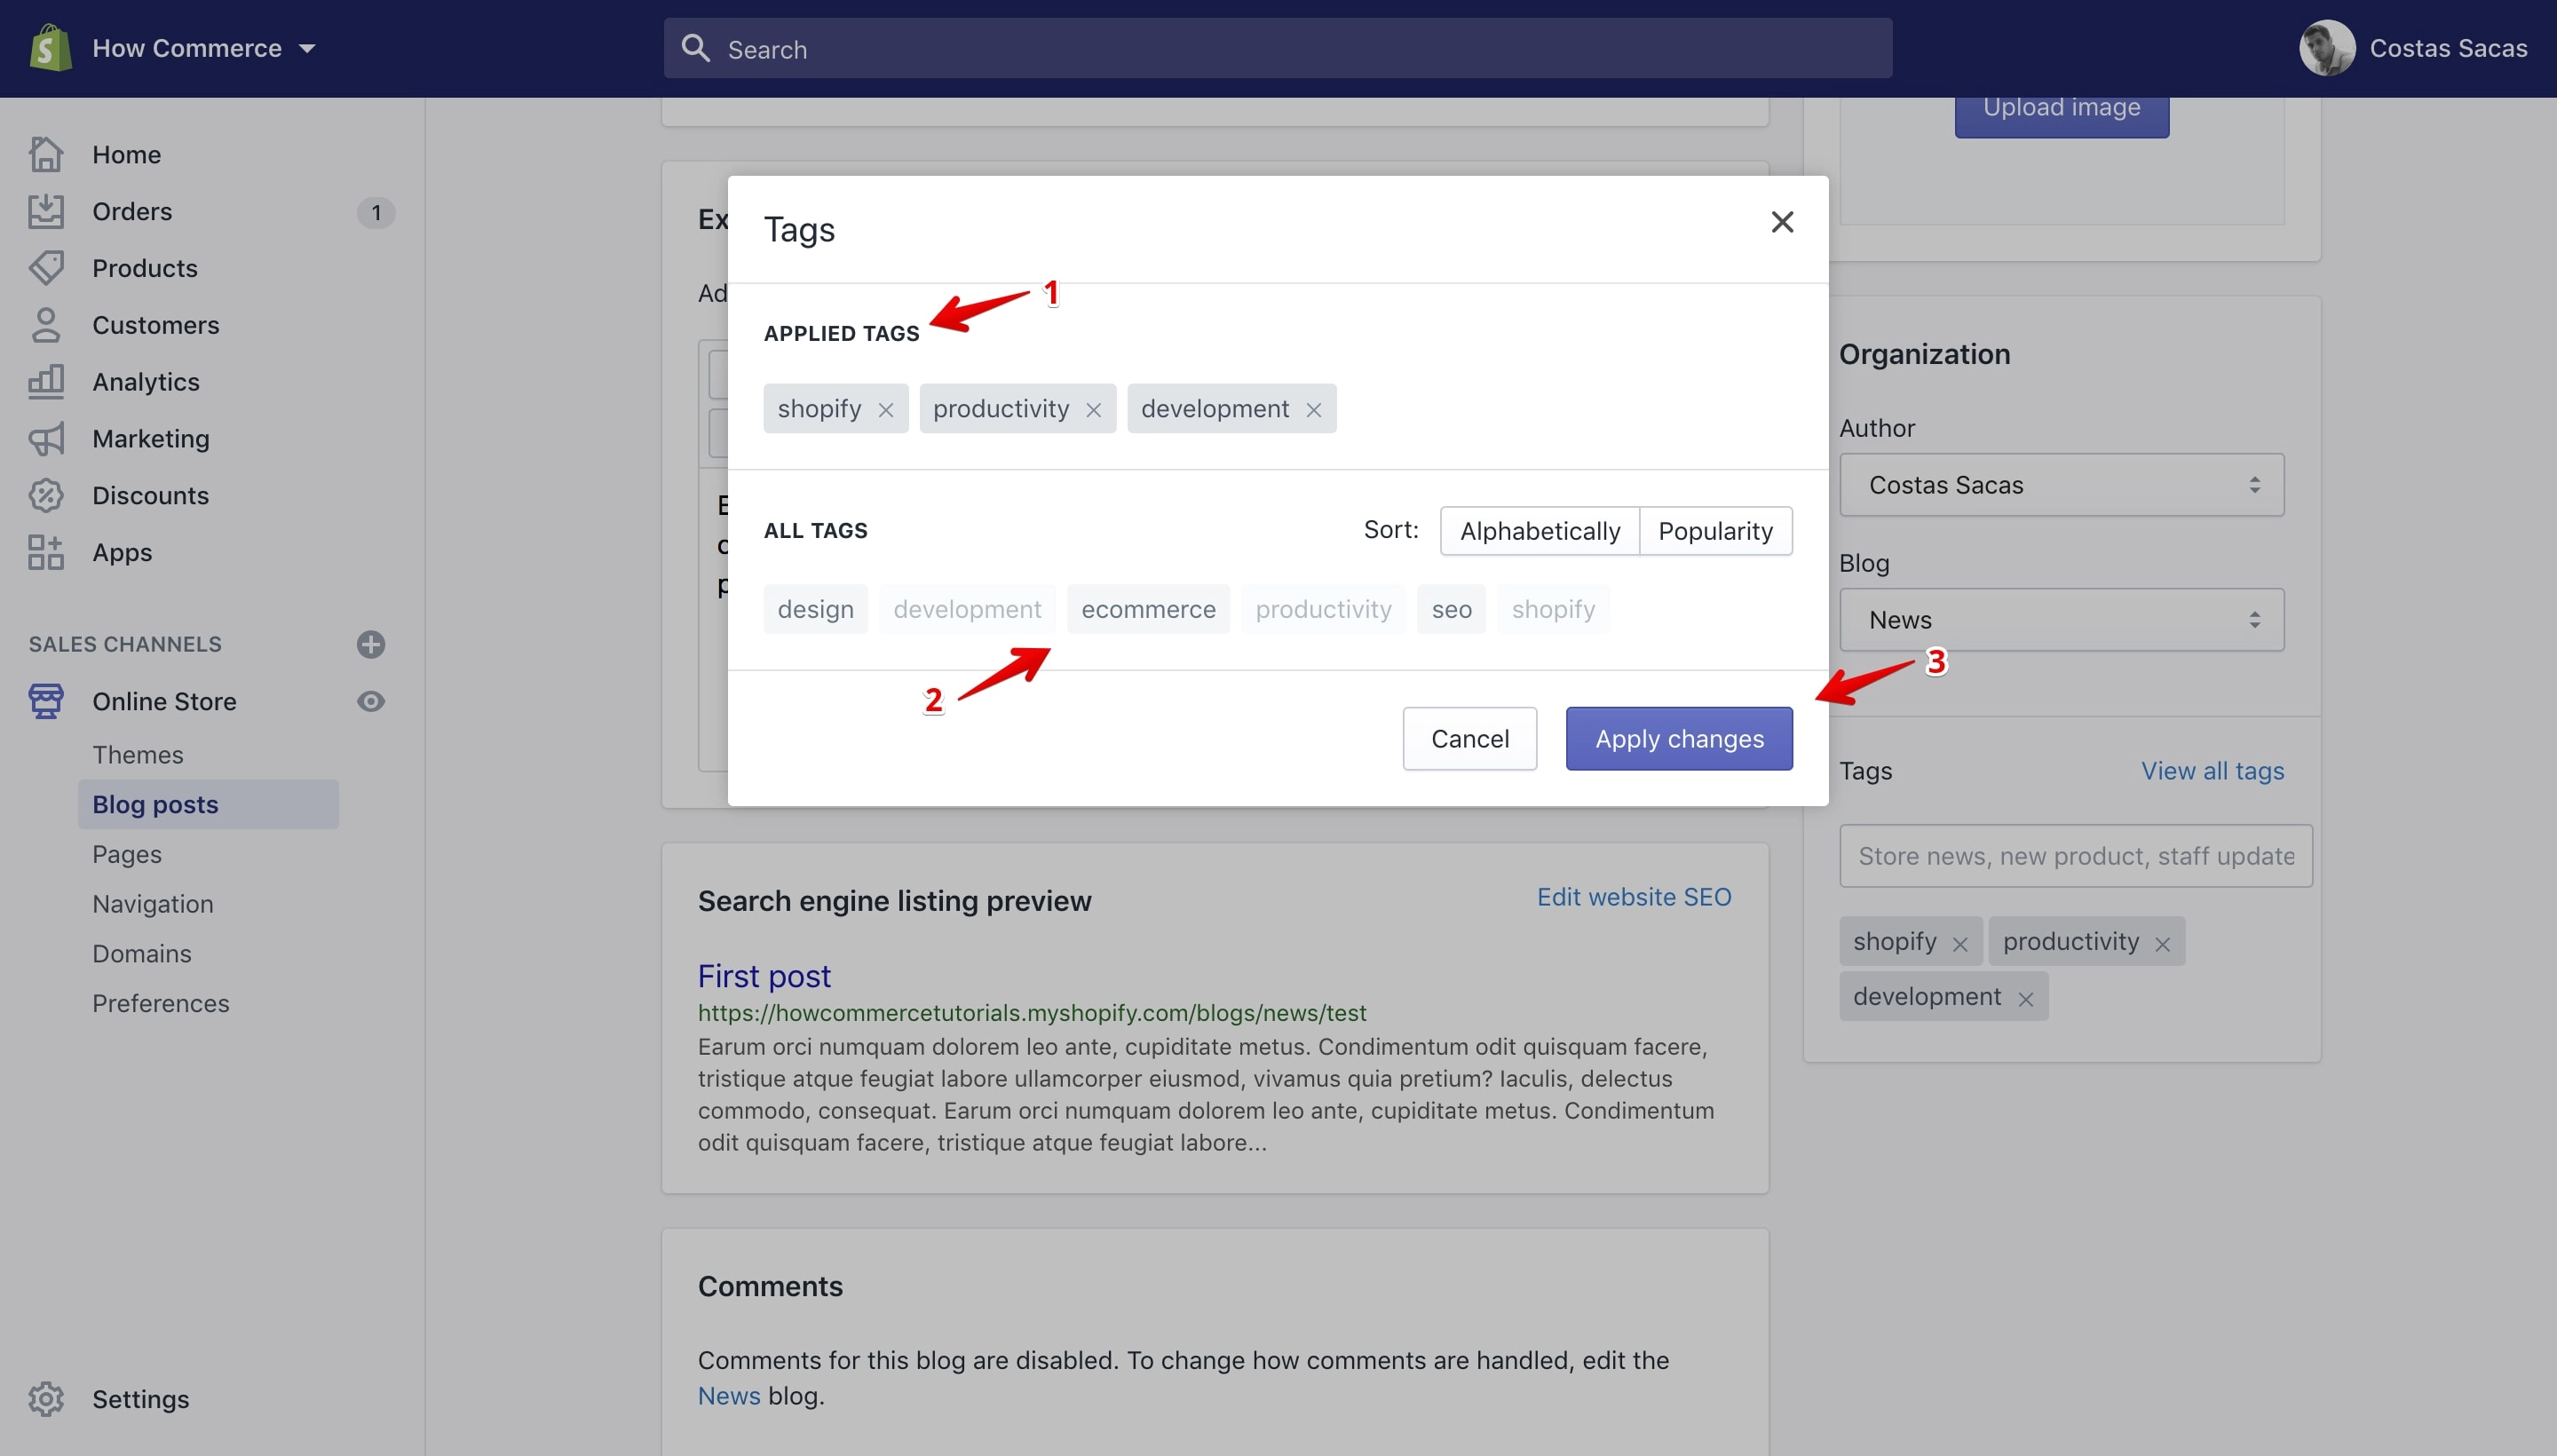
Clicking the “Apply changes” button will list the newly added tags on the “Tags” section (marked with 1 in the image below) located on the order details page:
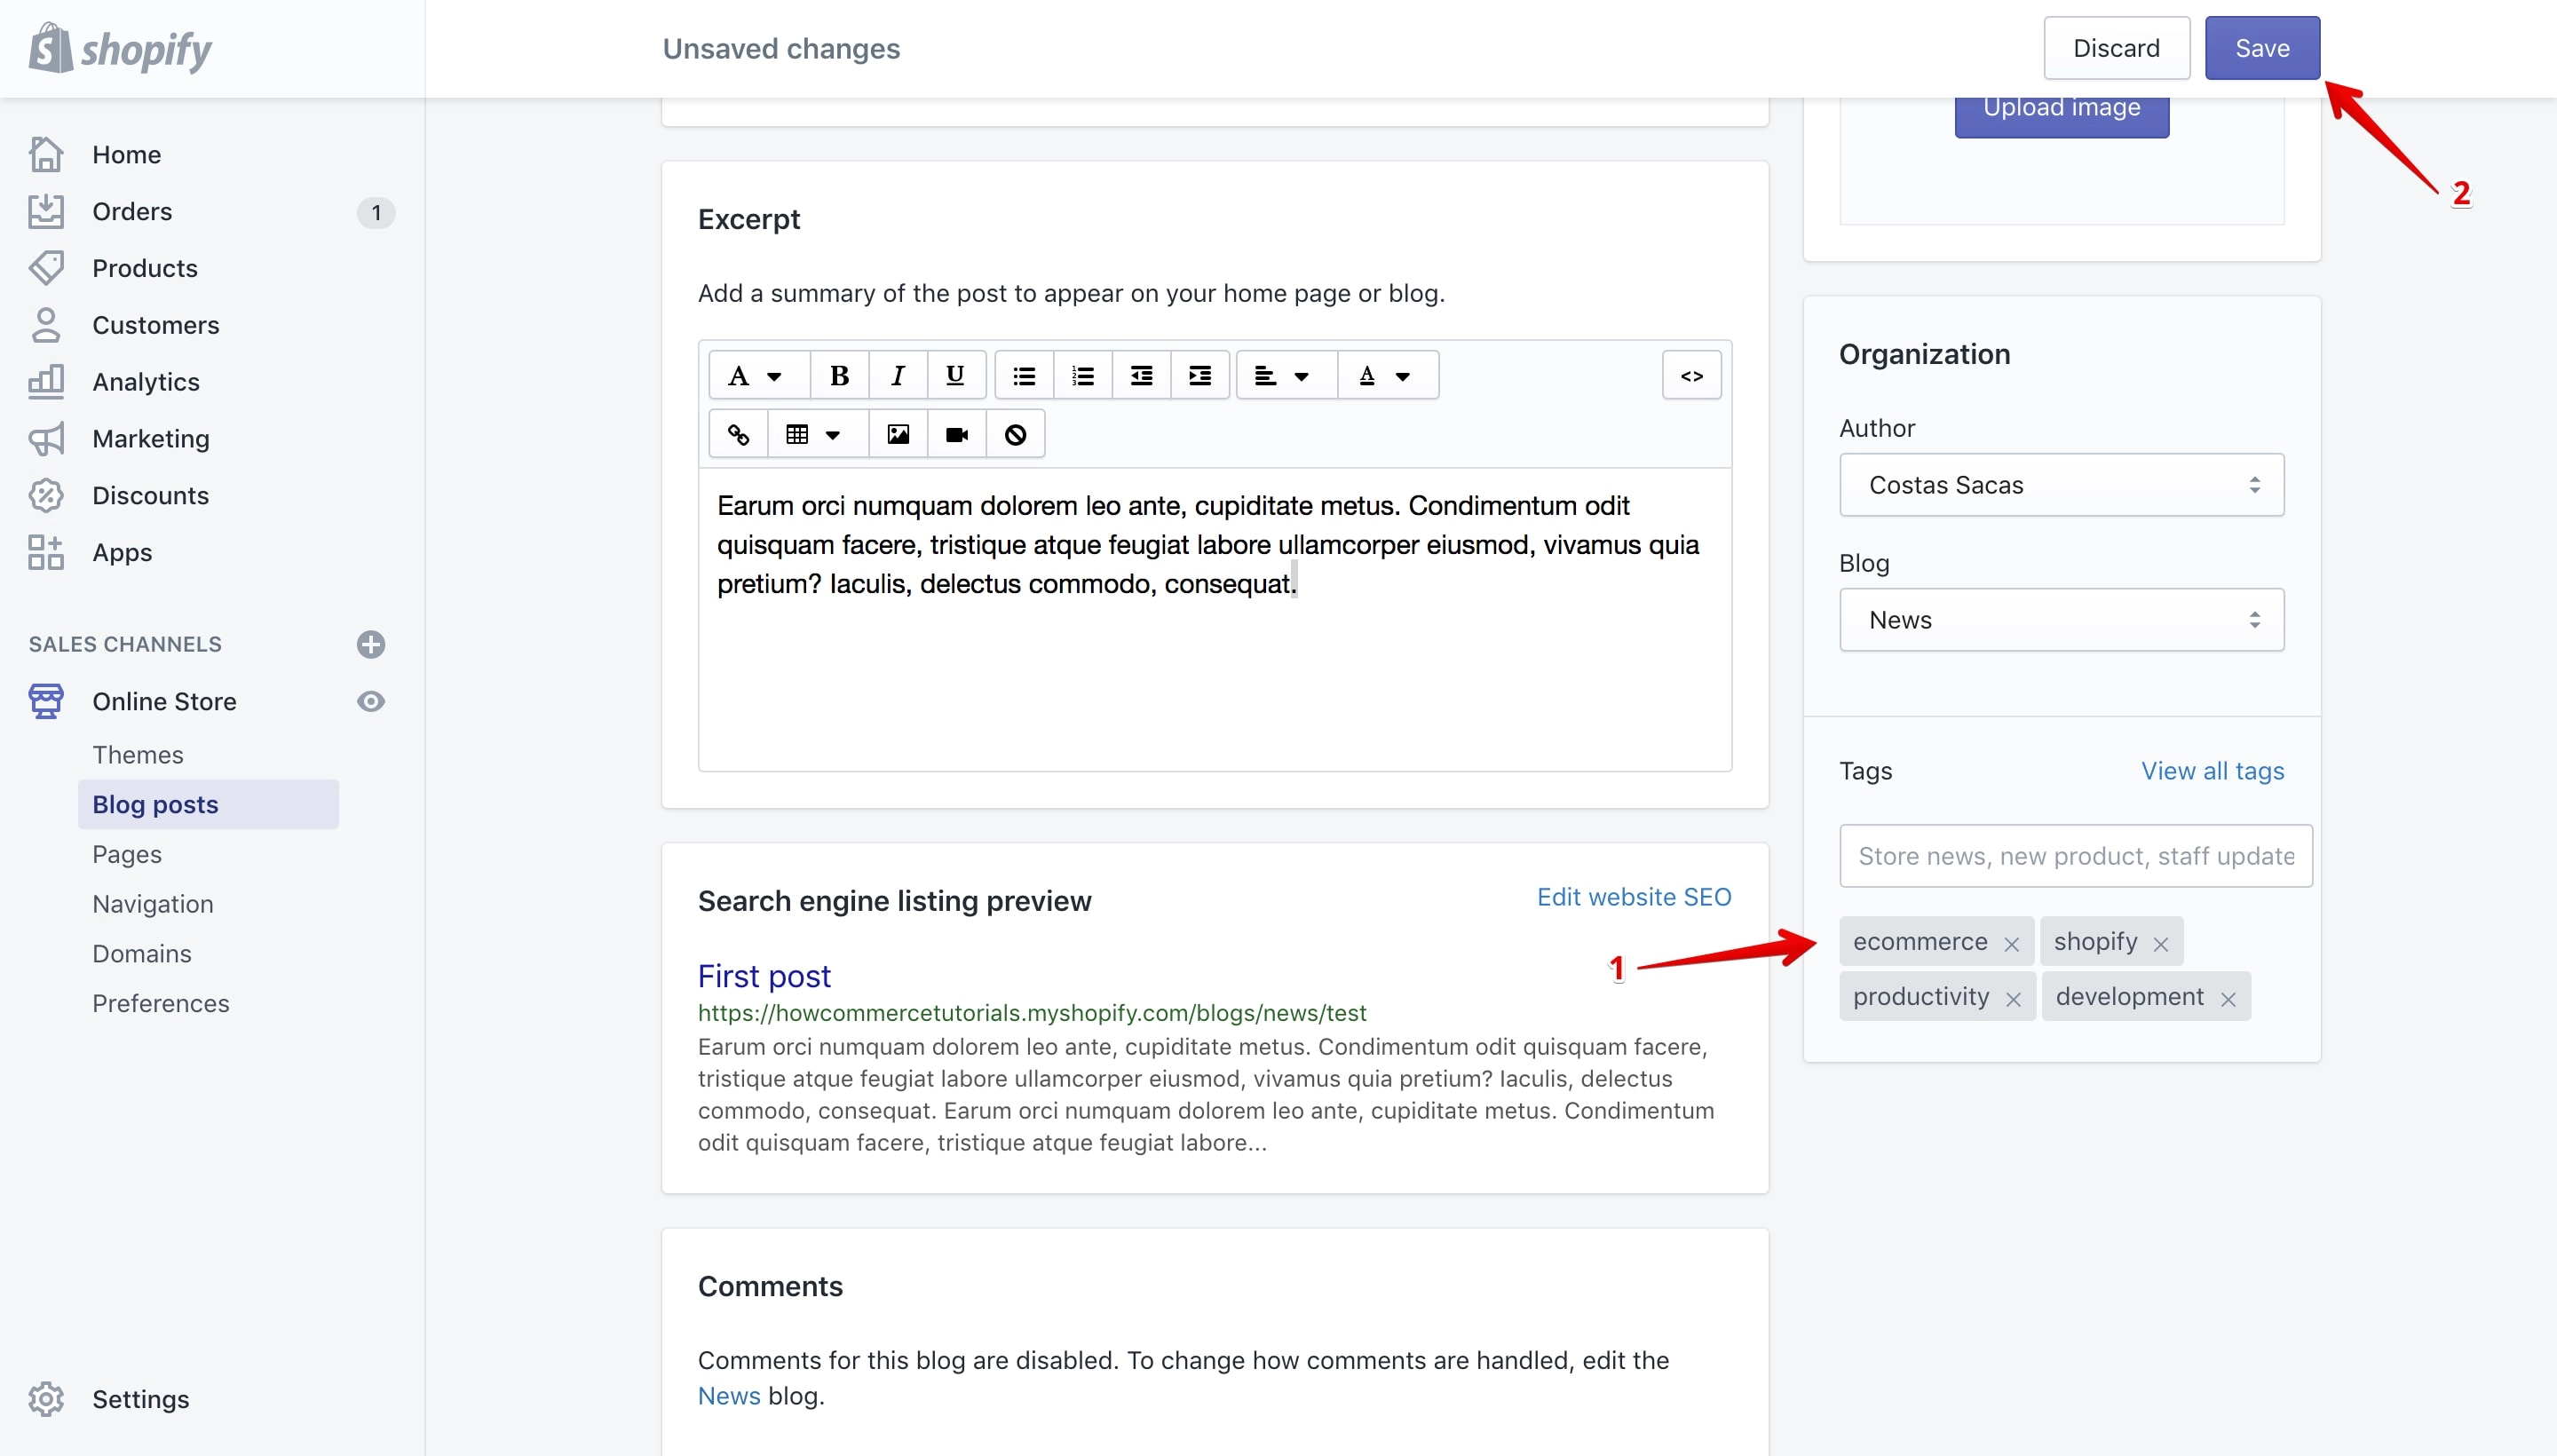
Note that the tags are not yet saved to the blog post. If you leave the page at this stage the tags will not be assigned to the post.
To save them click the “Save” button (marked with 2 in the image above).
Remove a tag
You can remove a tag from a blog post in 2 ways via the “Tags section” on the blog post details page or from the “Applied Tags” section located on the “Edit tags” pop-up.
Remove a tag from the “Tags” section
For me this is the easiest and fastest way to do it.
All you have to do is click the “X” (marked with 1 in the image below) from the tag and save your changes by clicking the “Save” button (marked with 2 in the image below):
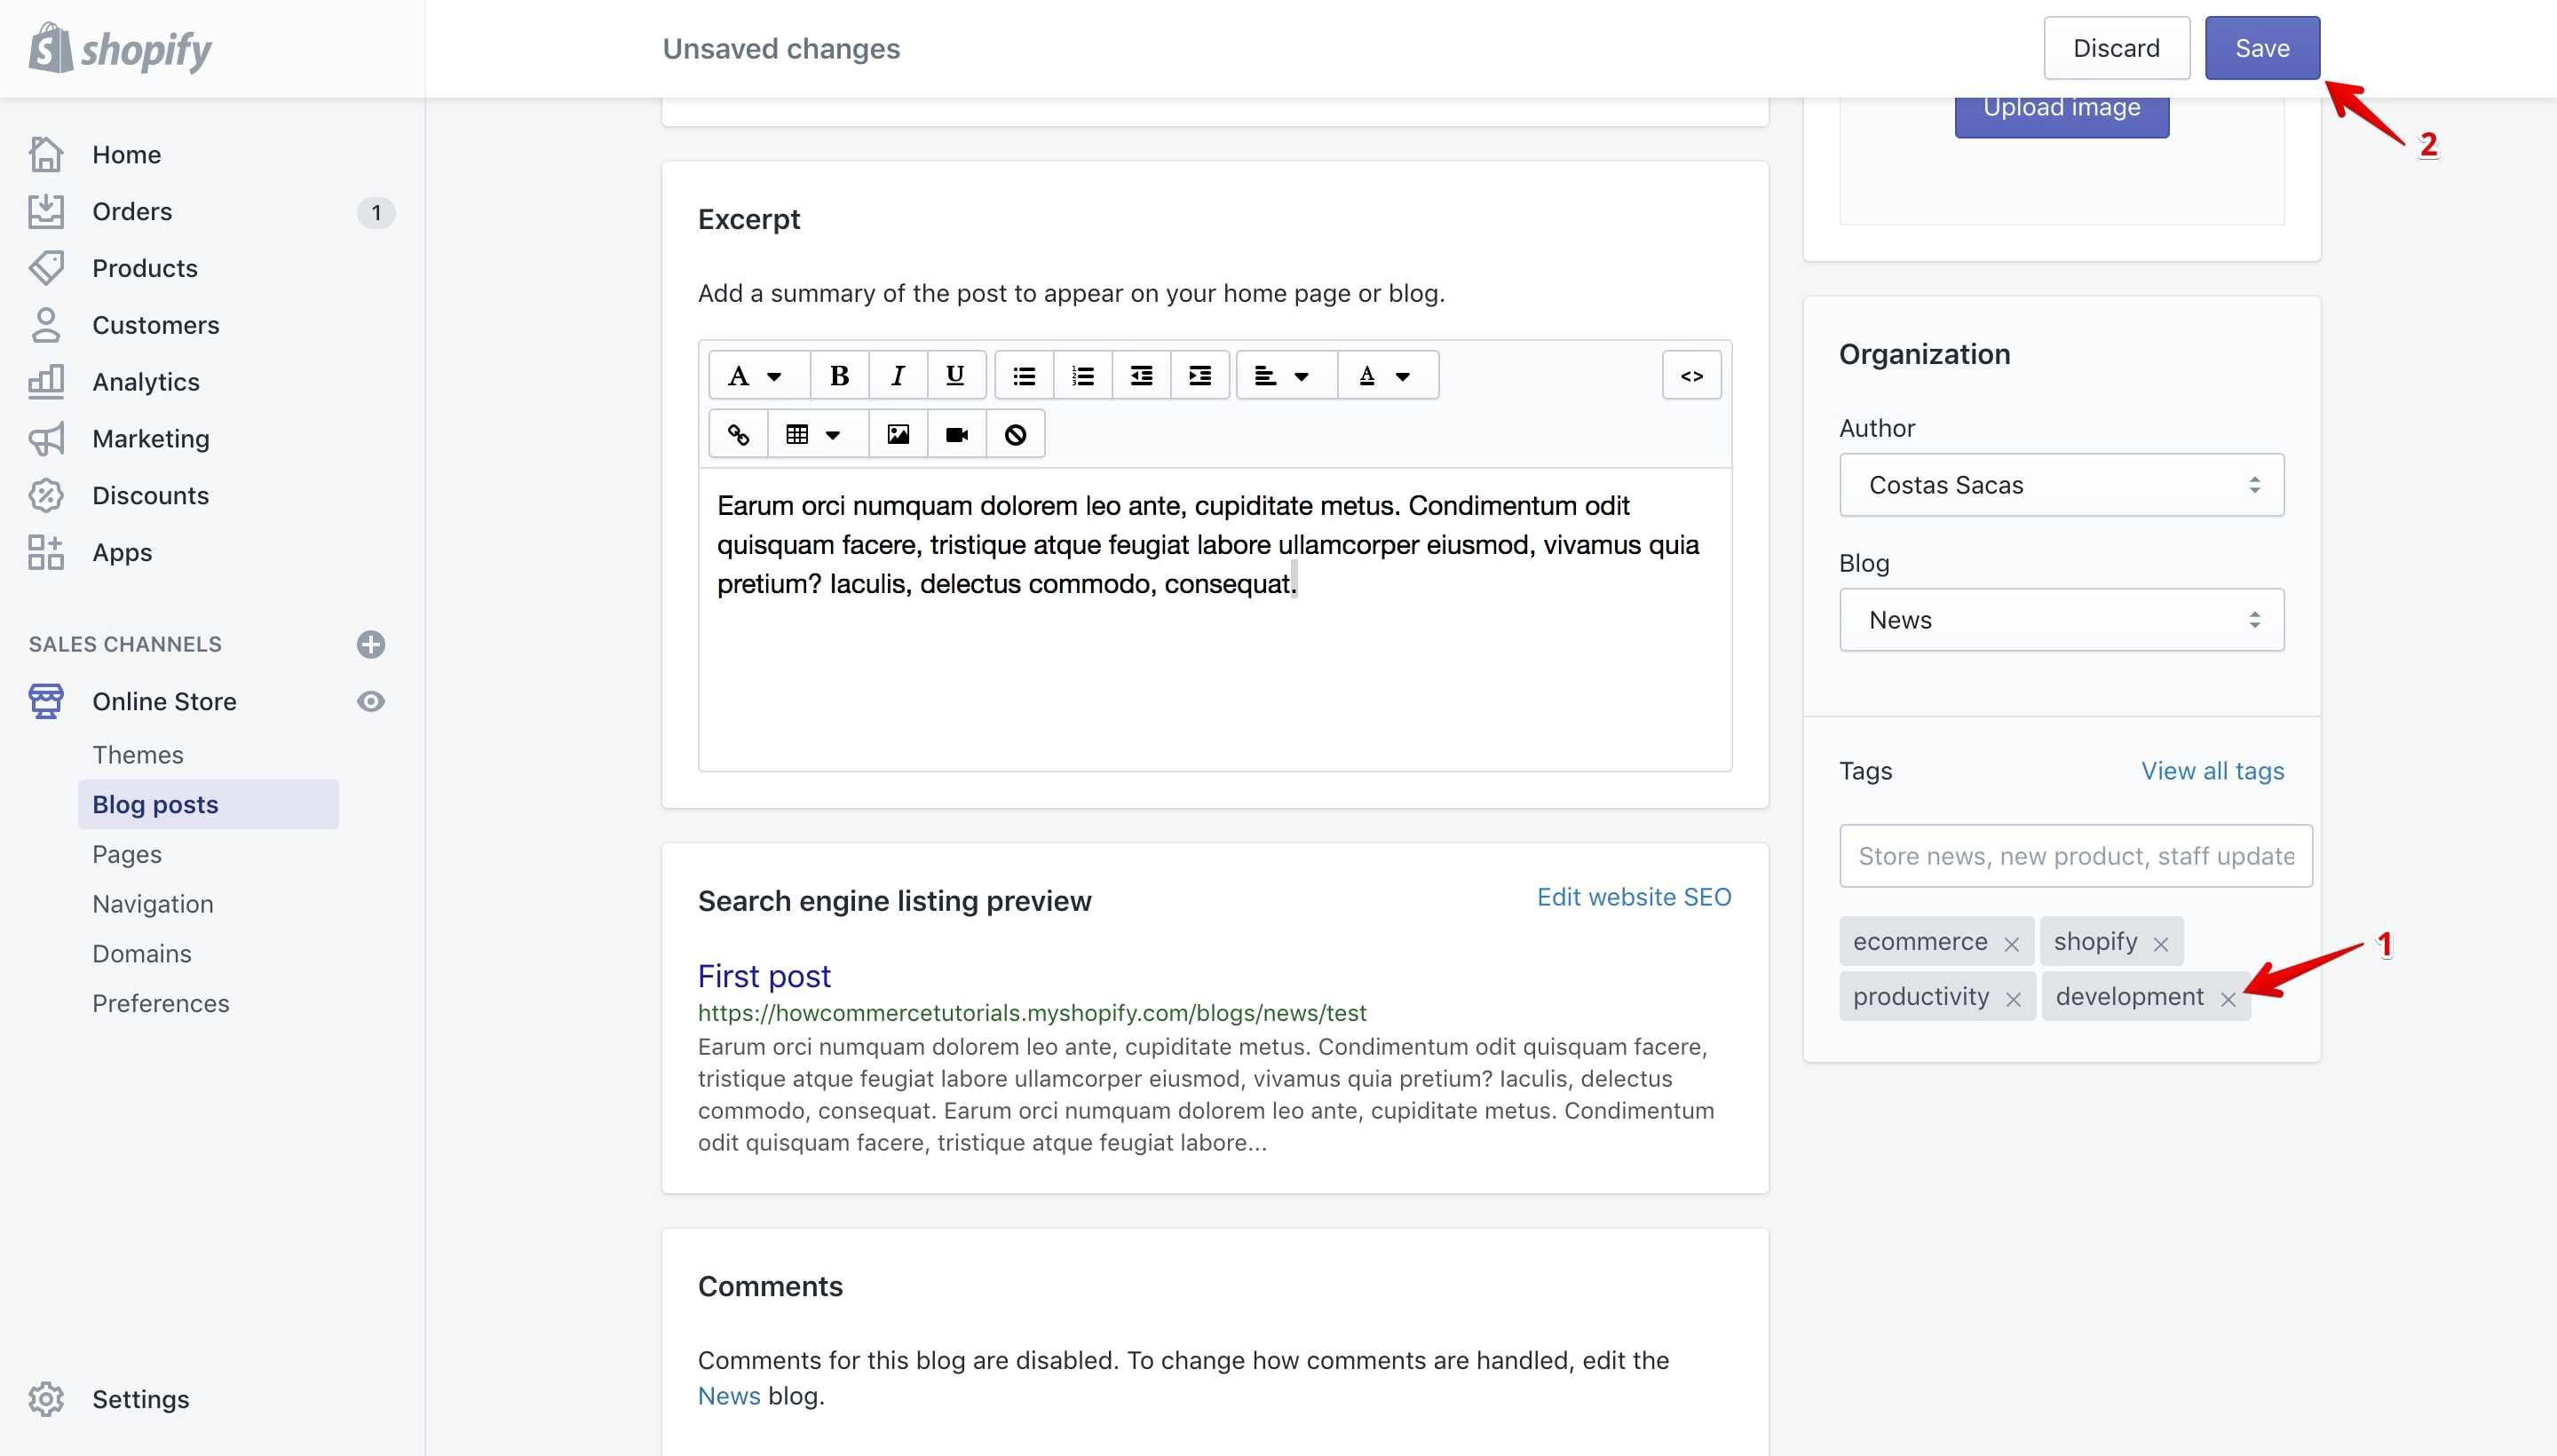
Remove a tag from the “Tags” pop-up
On the blog post details page click on the “View all tags” link:
This will open the “Tags” pop-up that will allow you to remove tags from the blog post:
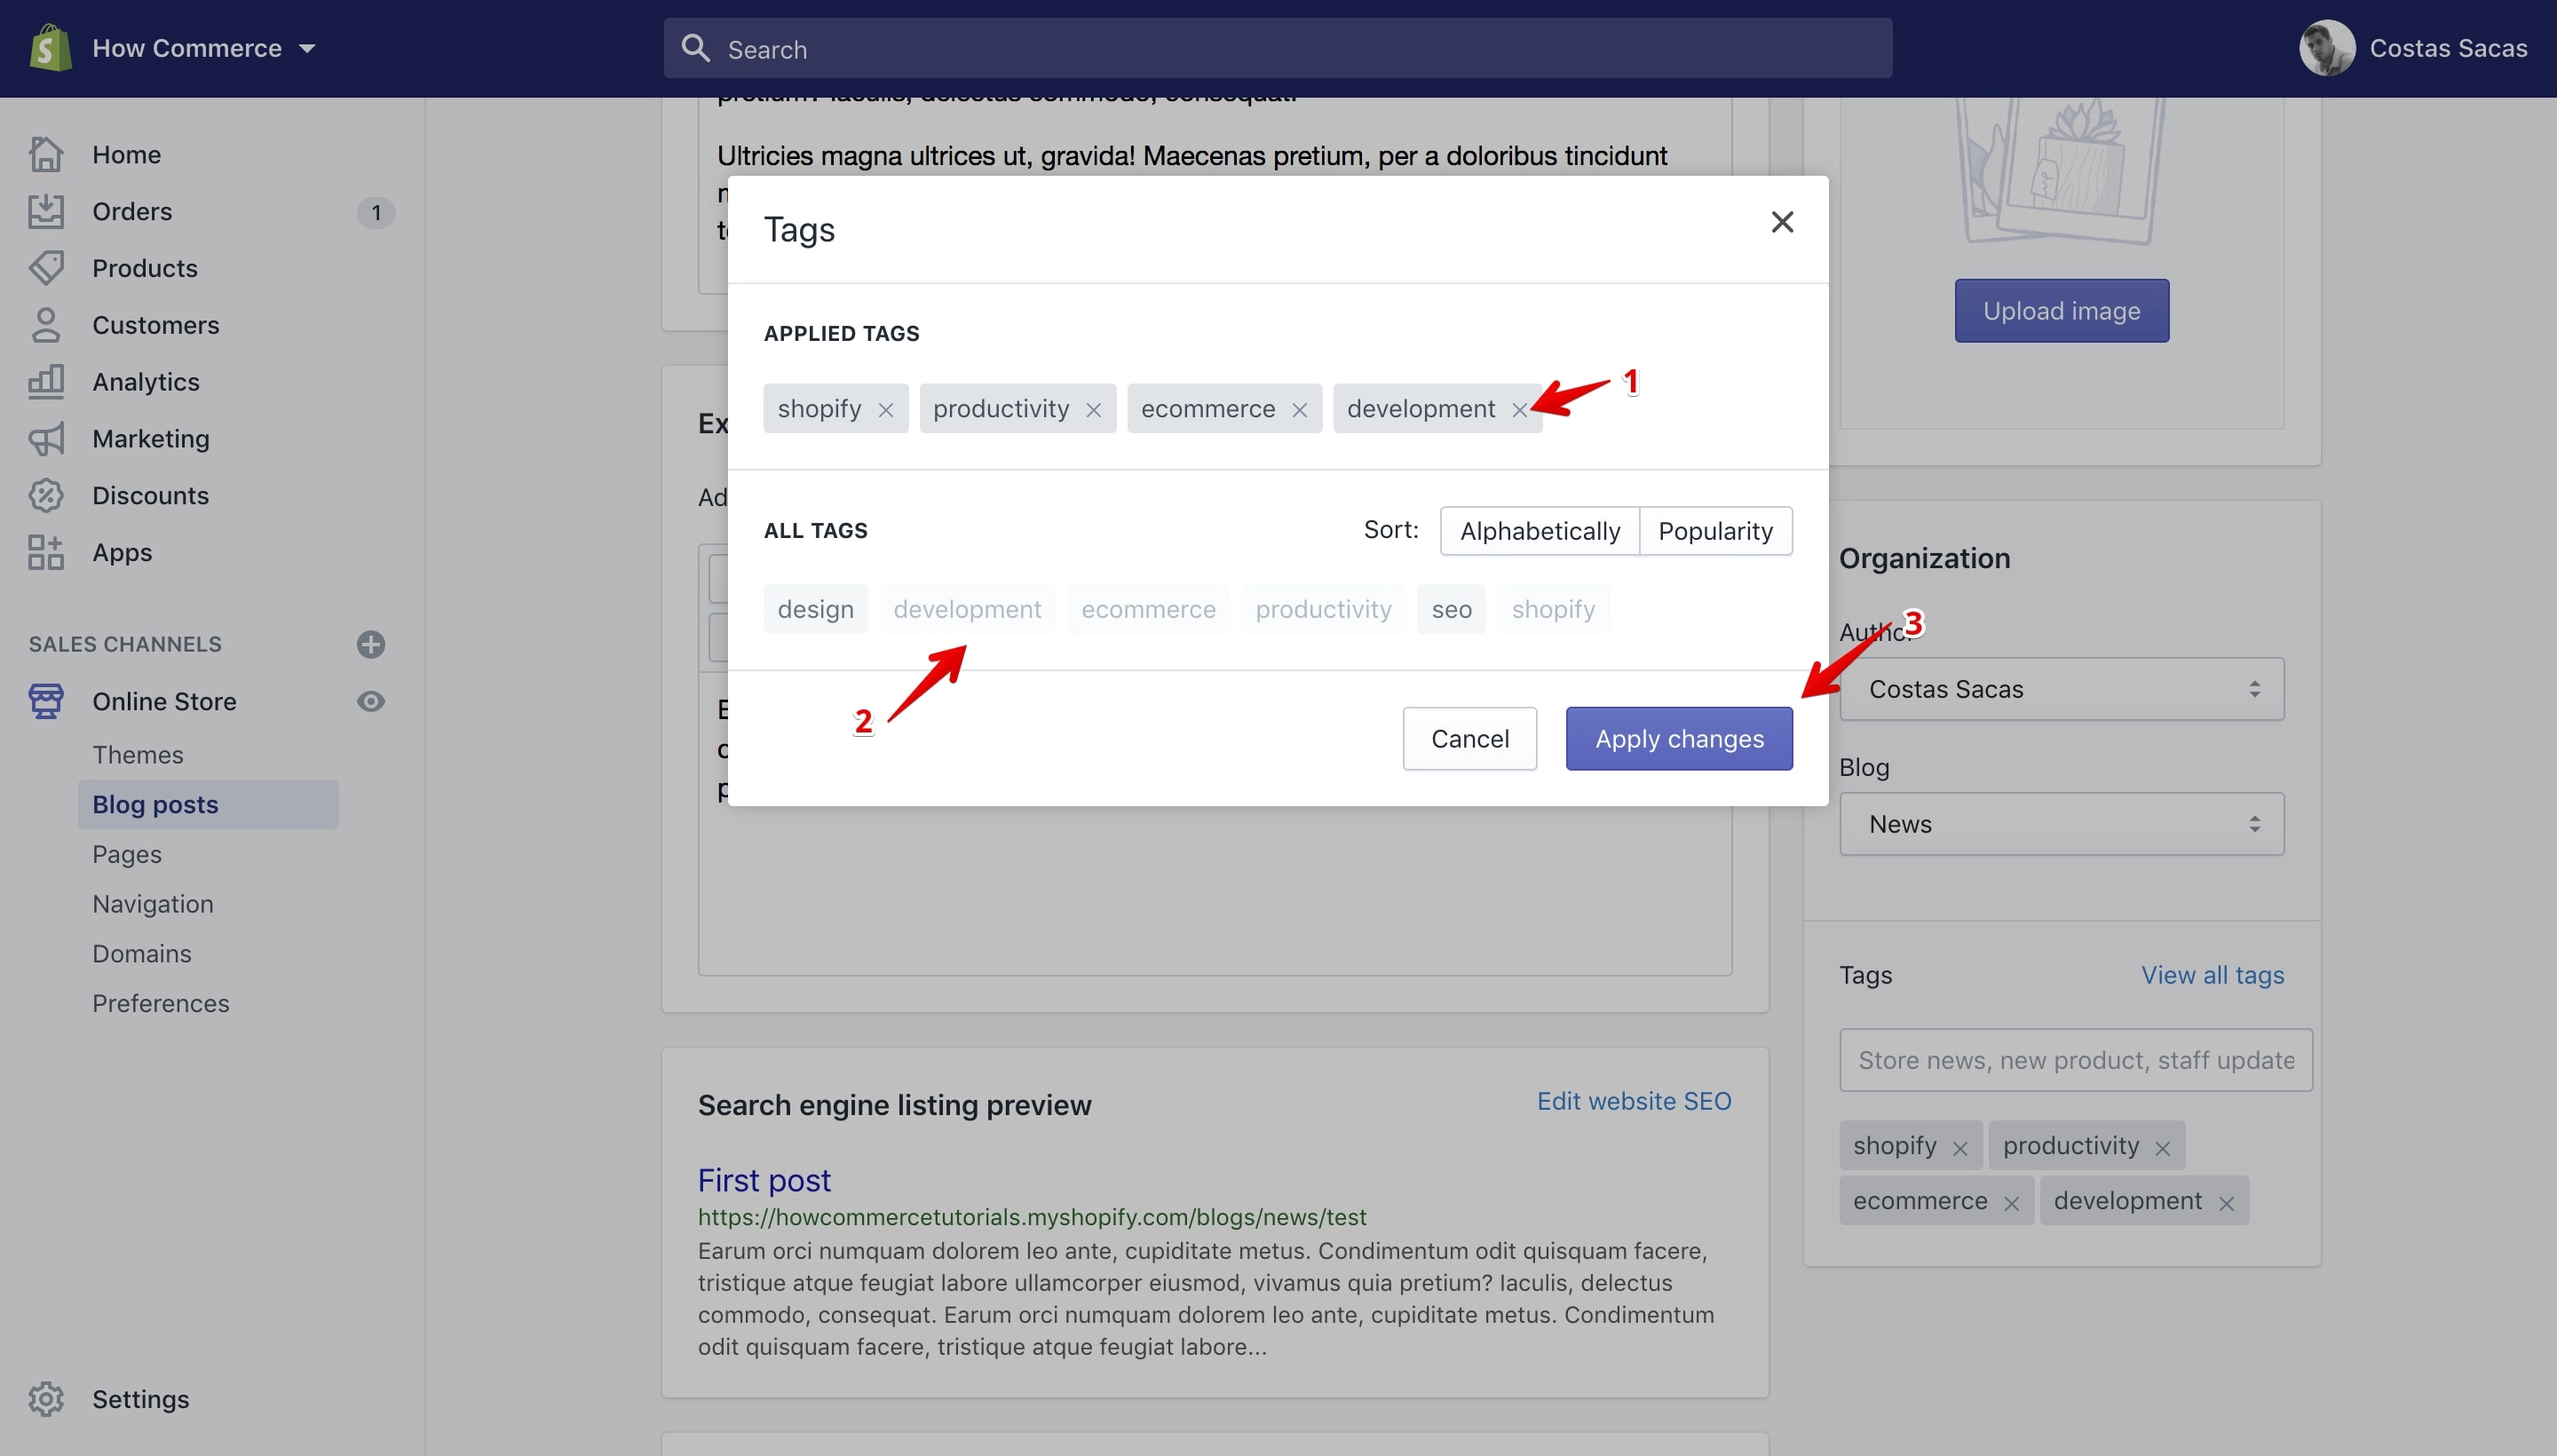
Click on the tag’s “X” icon to remove the tag (marked with 1 in the image above). Once you do that the tag will be removed from the “Tags” section and added to the “All Tags” section of the pop-up (marked with 2 in the image above).
After you remove all the tags that you want from the customer click the “Apply Changes” button (marked with 3 in the image above).
In my example I’ve removed the “development” tag from the blog post and once I’ve clicked the “Apply Changes” button the tag is no longer listed on the “Tags” section (marked with 1 in the image below) on the post details page:
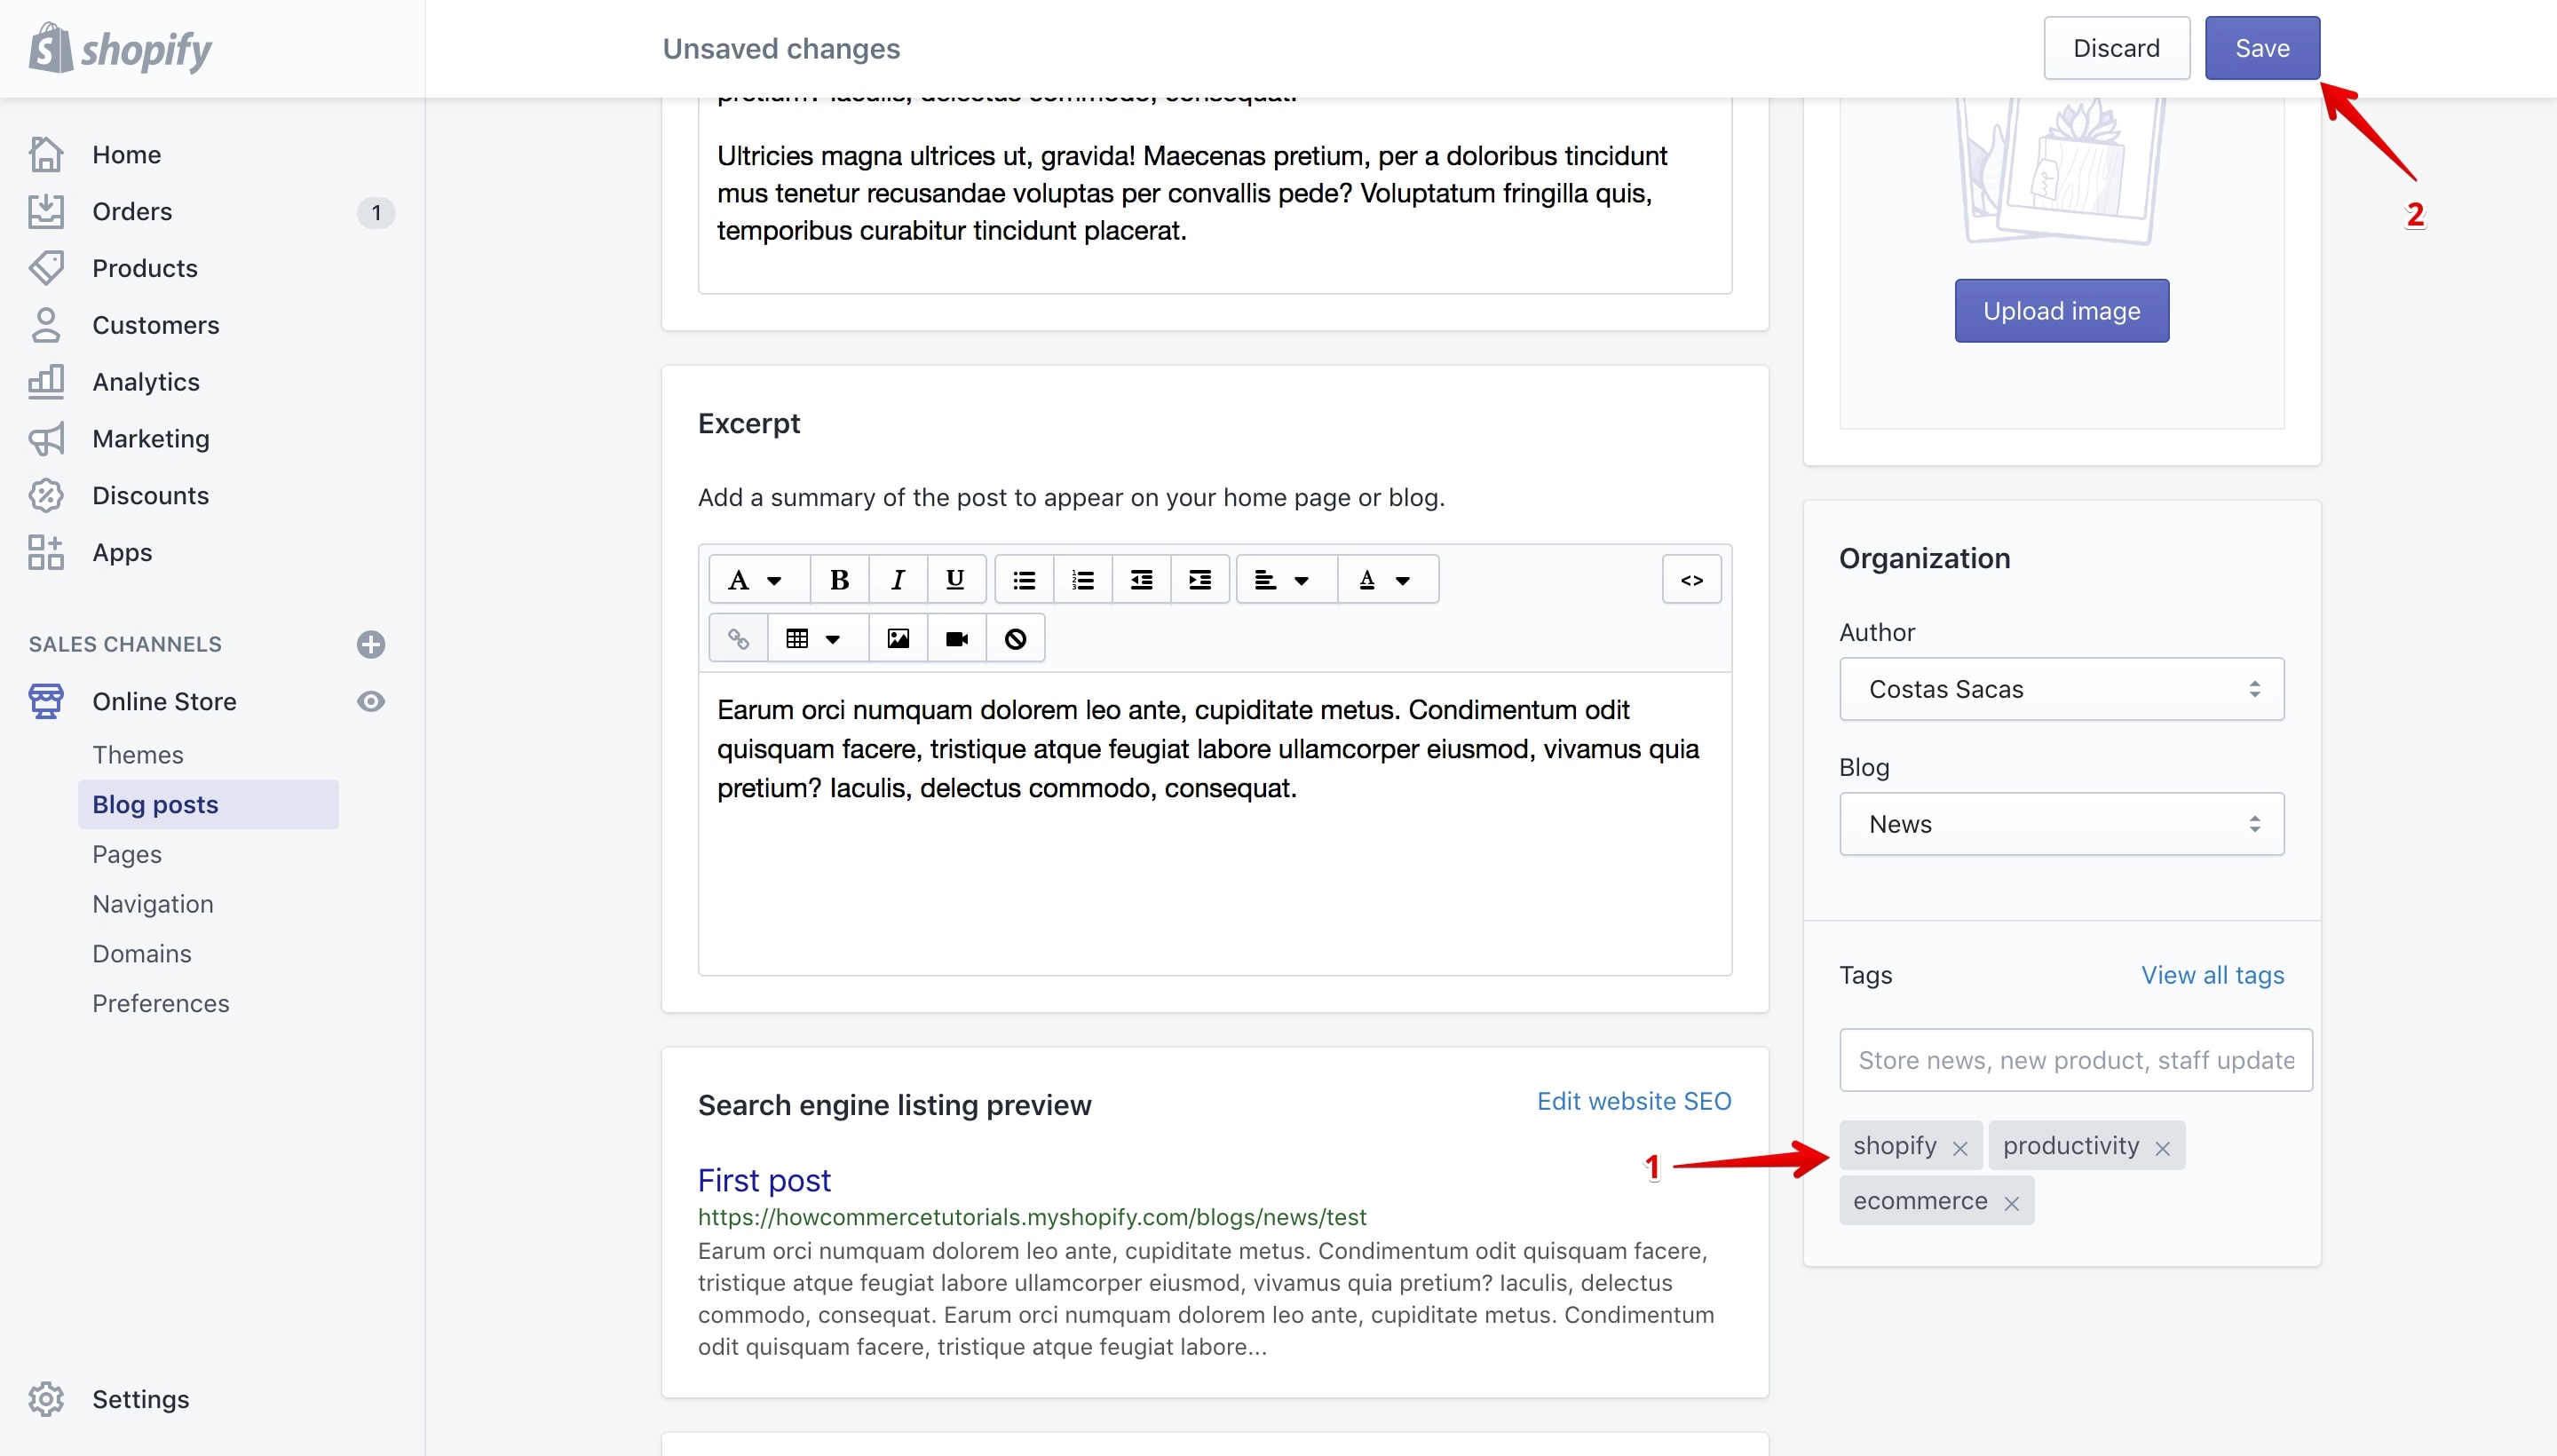
Note that if the tag is removed from the “Tags” section that does not mean that it is also removed from the blog post at this stage.
To completely remove it you need to save it by clicking the “Save” button (marked with 2 in the image above).
Search by tag
You can search by tag directly from the search bar in your Shopify dashboard. You can search for tags added to products, transfers, orders, draft orders, customers and blog posts.
You can perform a search by simply typing the tag name. I’ll perform a search for the tag “gold”:
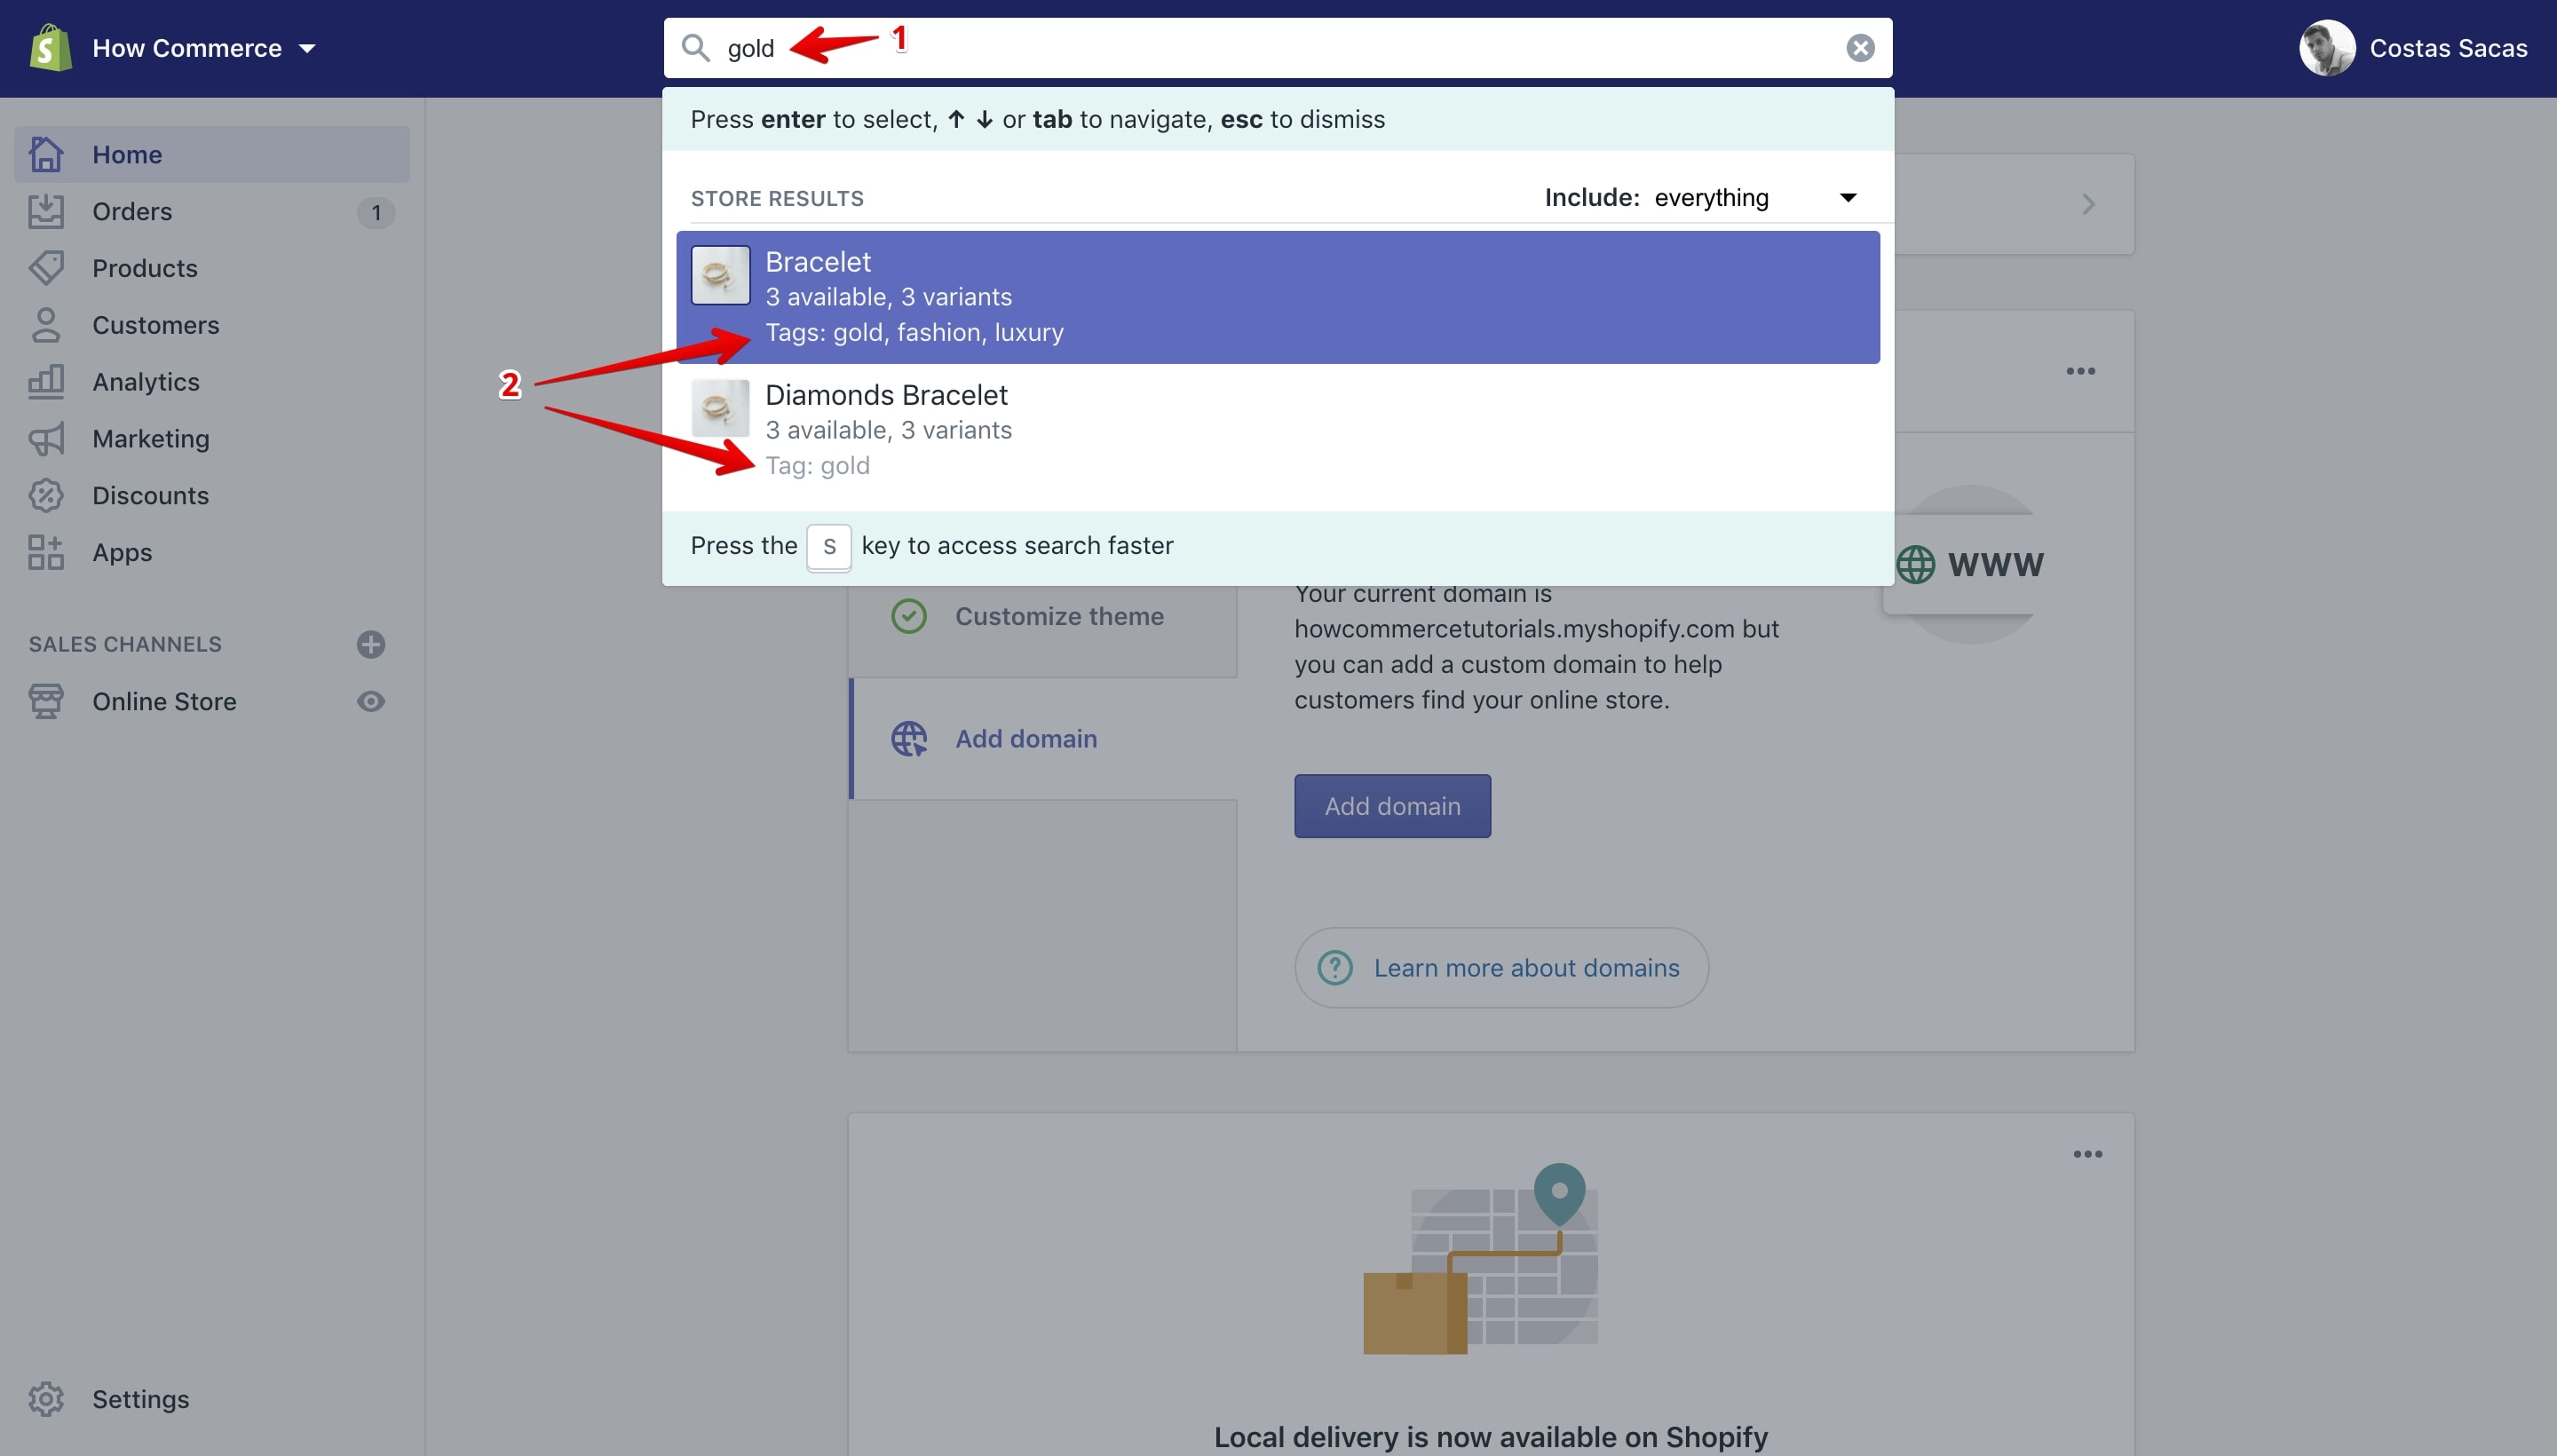
Type the desired tag in the search box (marked with 1 in the image above) and you’ll see the results listed in a pop-up (marked with 2 in the image above).
For more related to tag search and syntaxes please see the first chapter of this article called “Admin search”.
Note:
Keep in mind that if you have tags that are not assigned to items when you perform a search it is normal that nothing will be listed.
Filter by tag
You can use tags to filter the item listings on the “Products”, “Transfers”, “Orders”, “Draft orders”, “Customers”, “Blog posts” pages and the list of variants on the “Inventory” section.
Products
To access the products filters go to “All products” (marked with 1 in the image below) and after to “More filters” (marked with 2 in the image below):
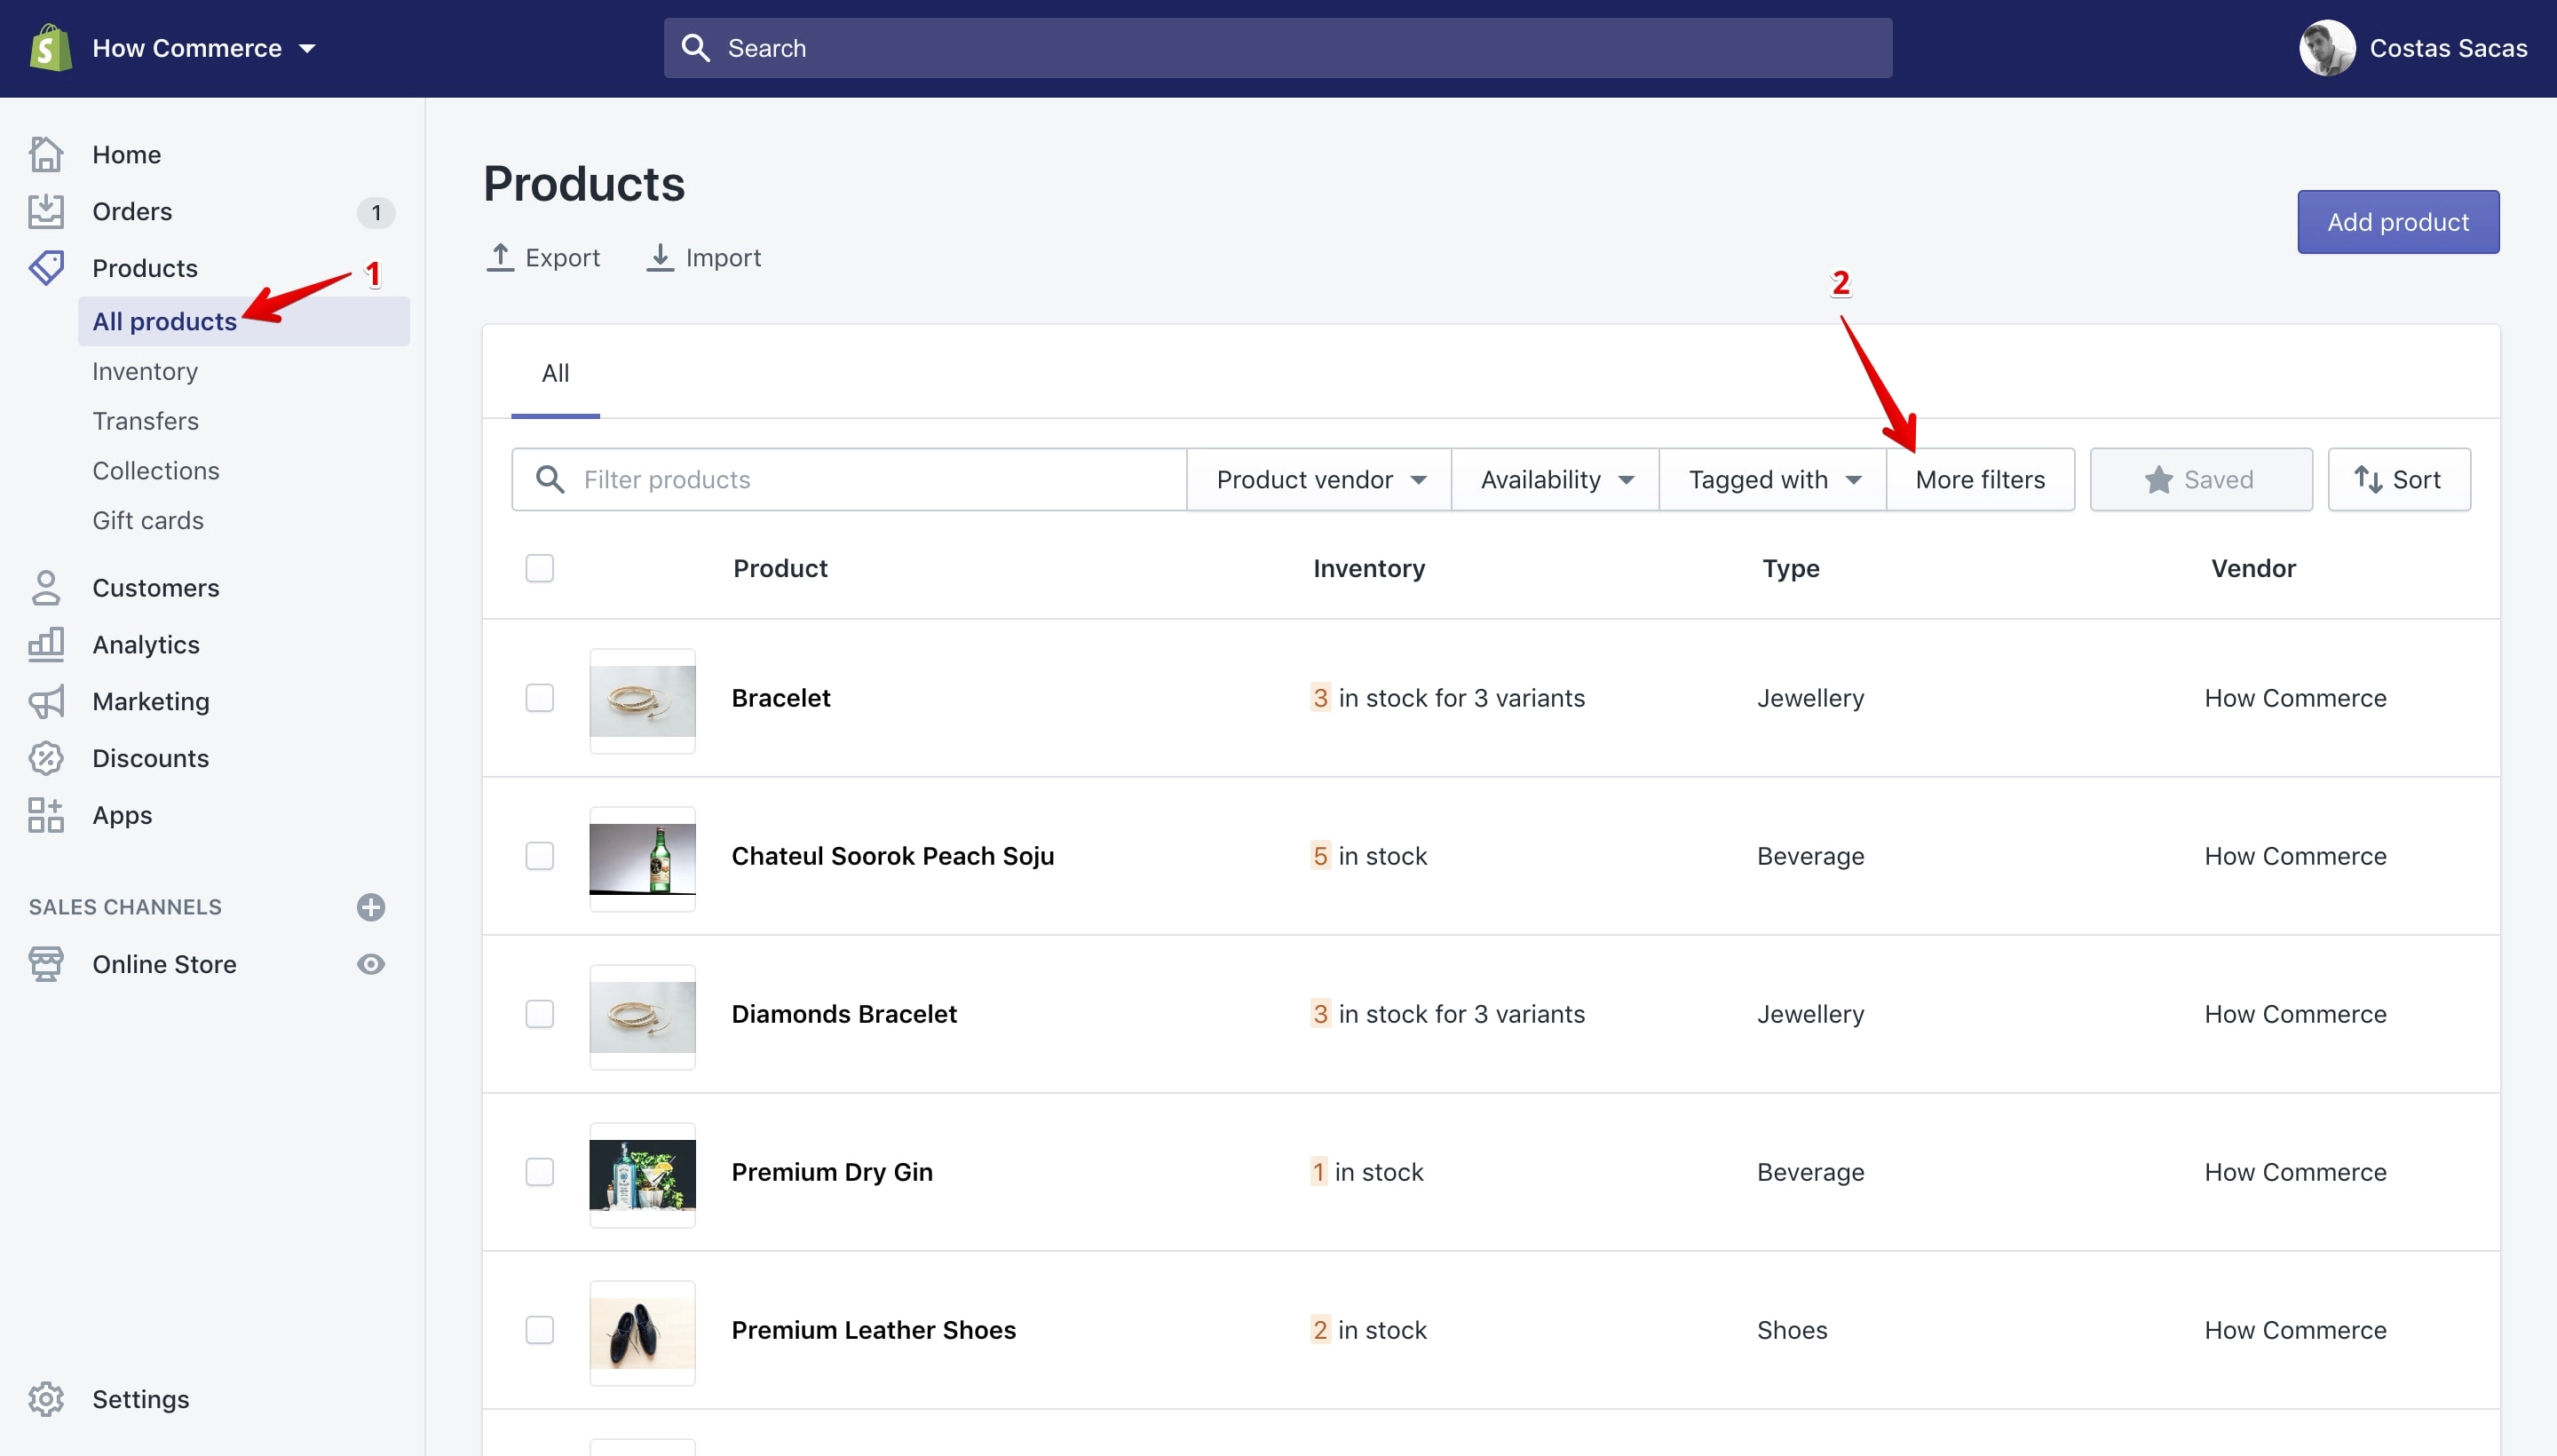
Click the “More filters” (marked with 2 in the image above) button and a pop-up will open on the right side:
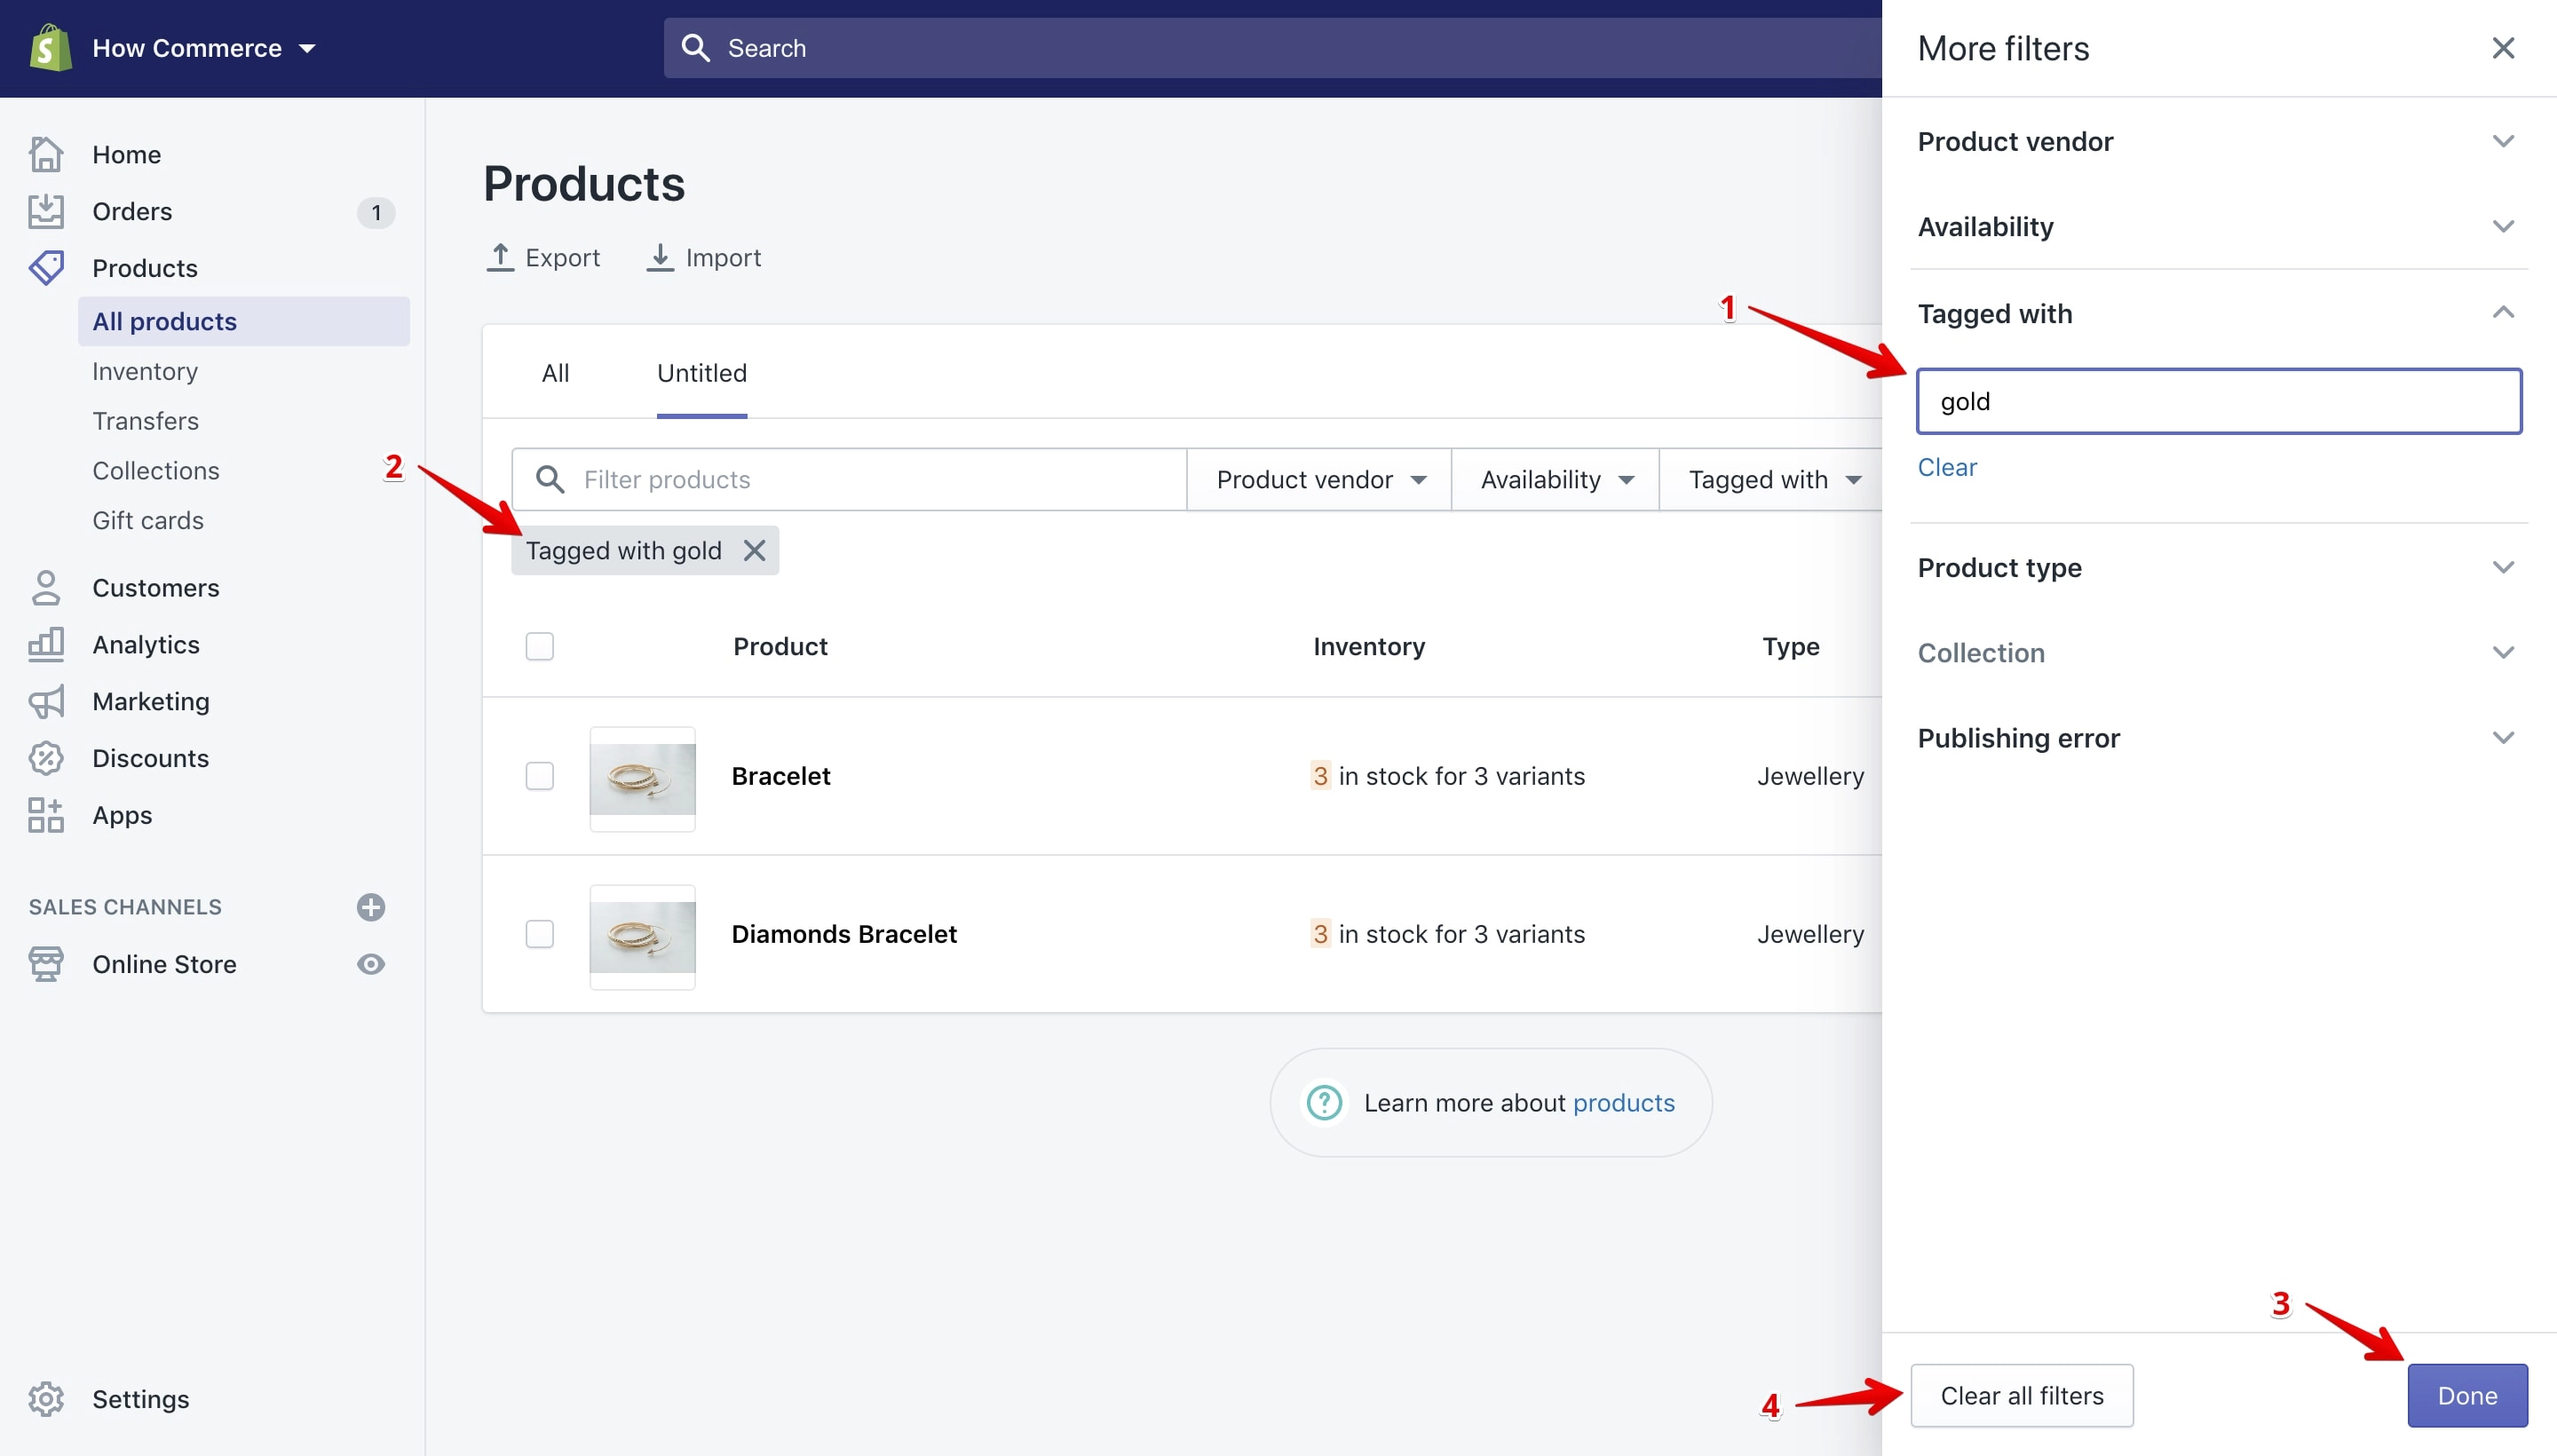
Type your desired tag in the “Tagged with” input box (marked with 1 in the image above). Soon as you complete typing the tag name Shopify will start listing all the products that have the chosen tag (marked with 2 in the image above).
When you are done with the search click the “Done” button (marked with 3 in the image above). If you decide instead to do a new filtering using a new tag click the “Clear all filters” button (marked with 4 in the image above).
Transfers
To access the transfer filters go to “Transfers” (marked with 1 in the image below) and after to “More filters” (marked with 2 in the image below):
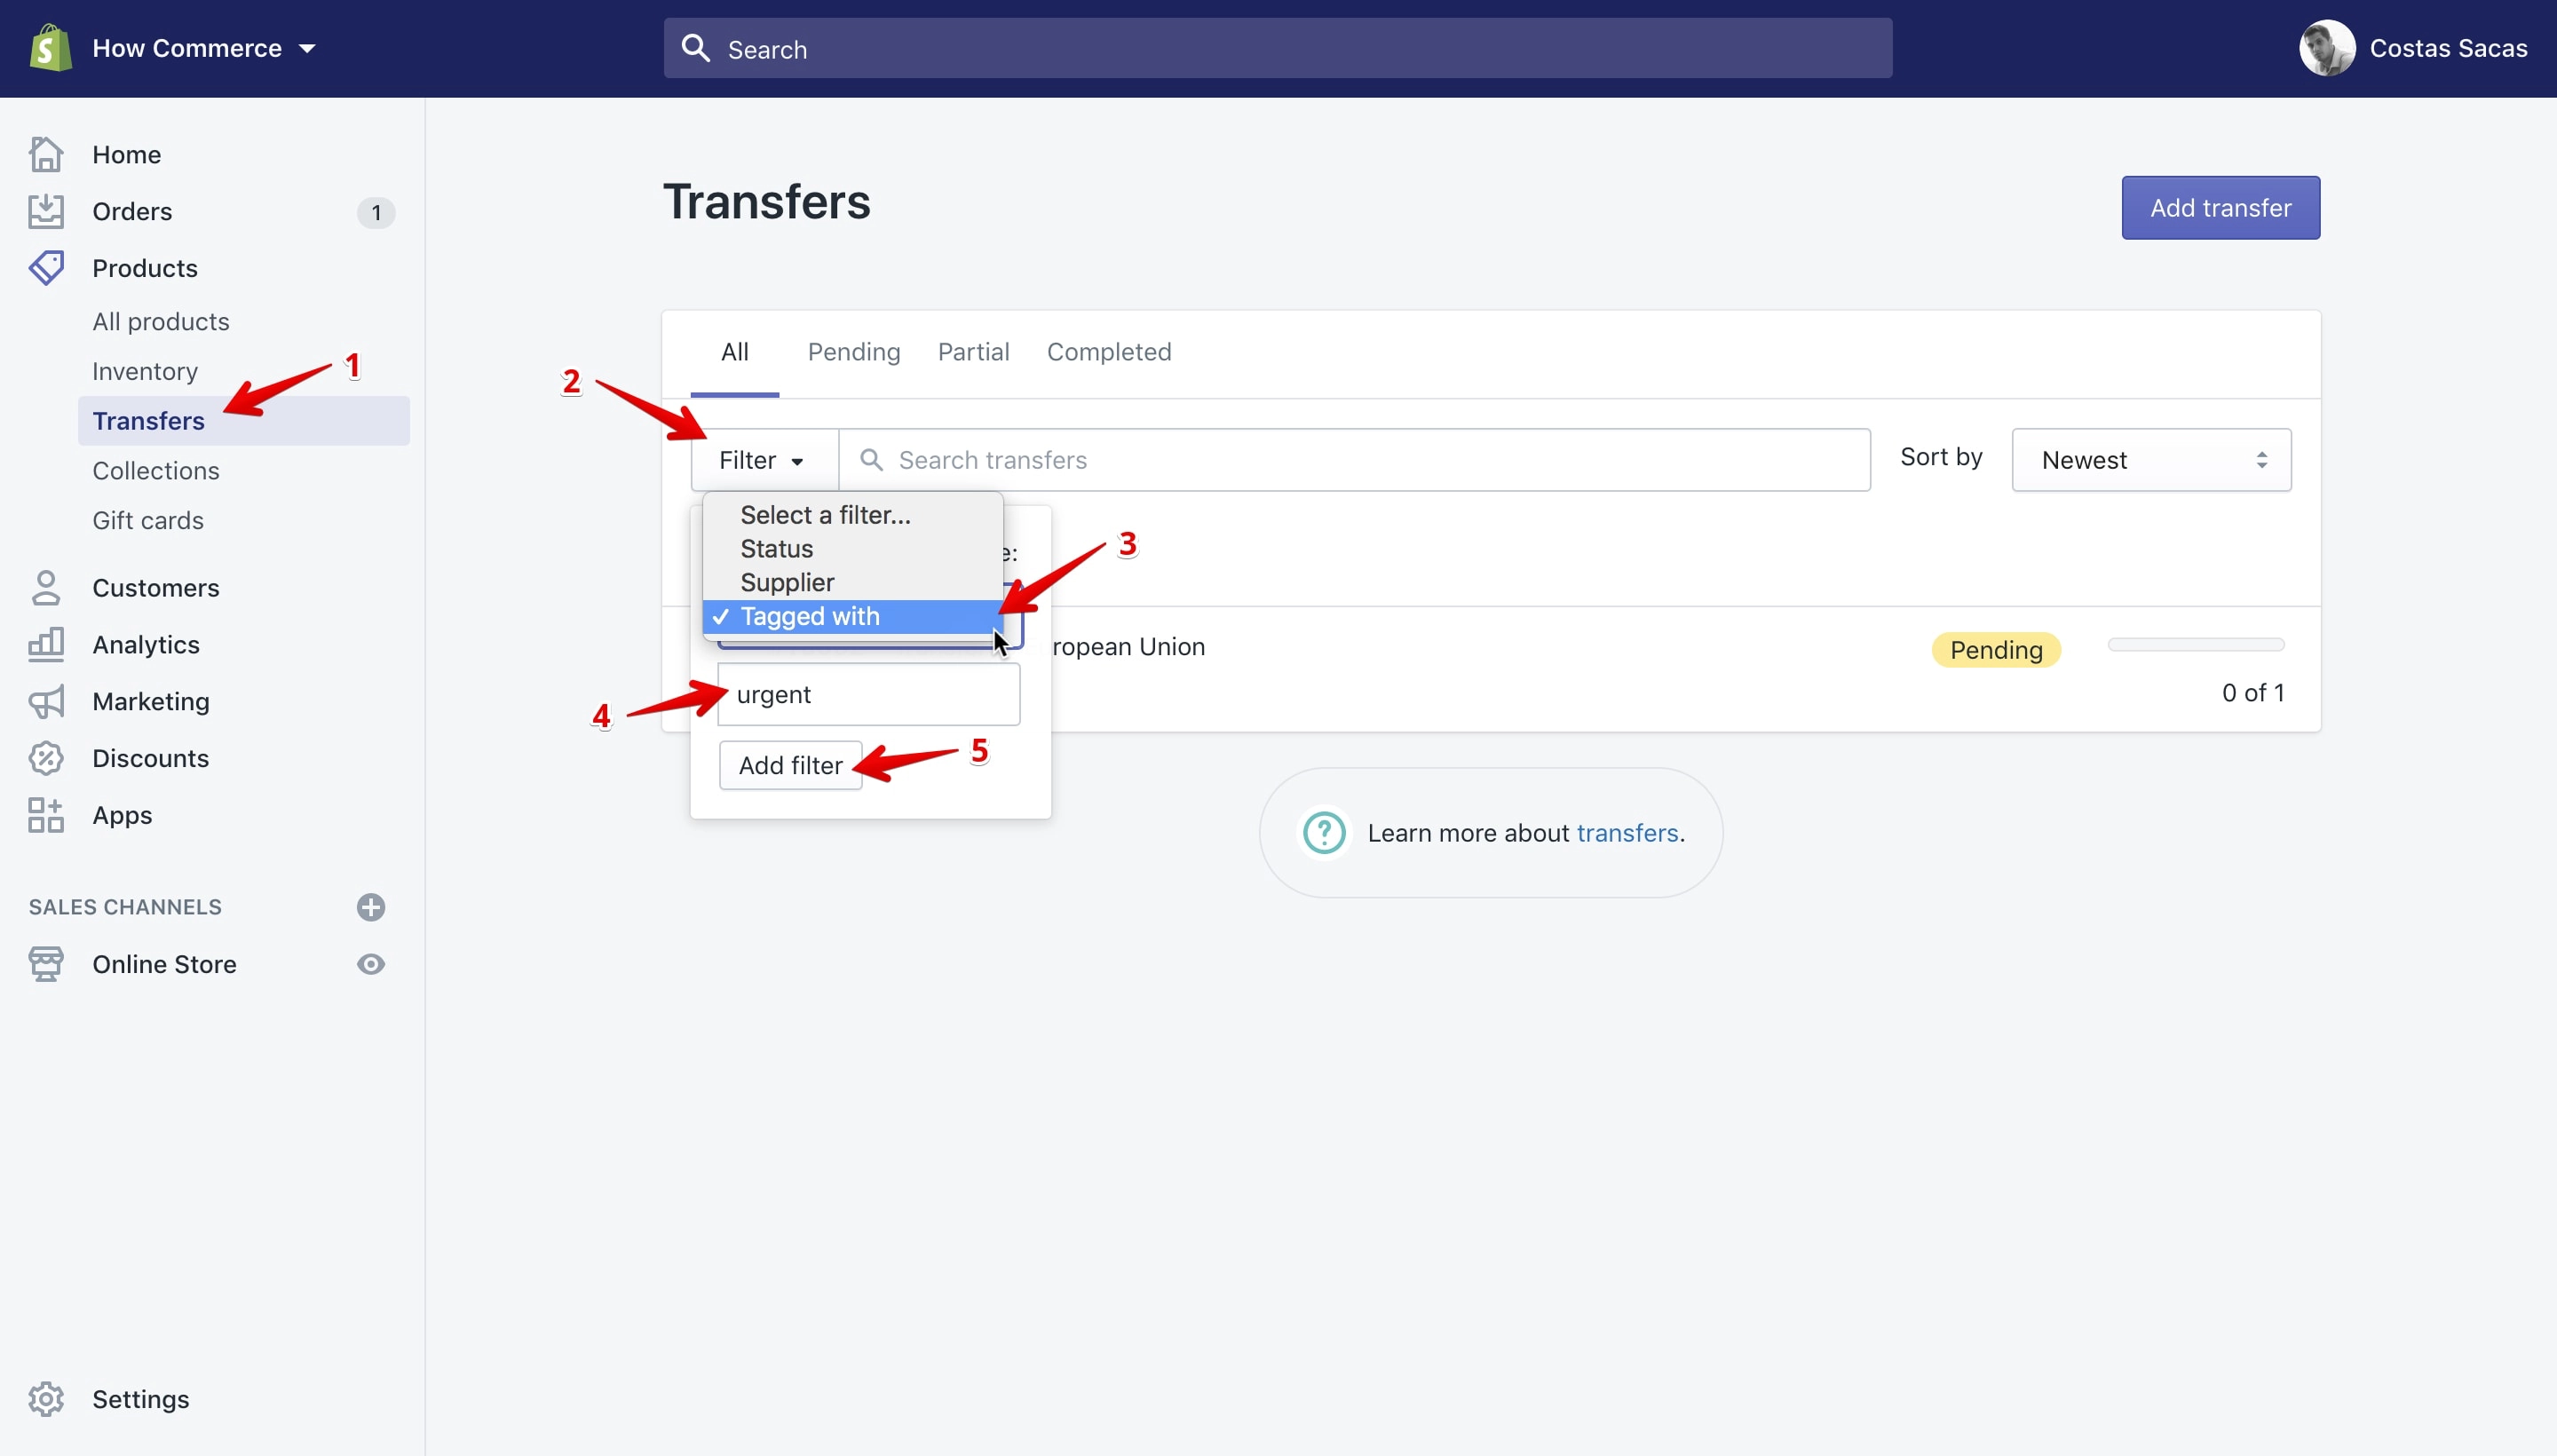
To access the transfers filters go to “Transfers” (marked with 1 in the image above) and after click “Filter” (marked with 2 in the image above).
Select from the drop-down “Tagged with” (marked with 3 in the image above).
Type the desired tag, in my case I’ve used the “urgent” tag (marked with 4 in the image above).
Click the “Add filter” button (marked with 5 in the image above).
Now Shopify will do a custom search (marked with 1 in the image below) and it will list all transfers that are tagged with the chosen tag (marked with 2 in the image below):
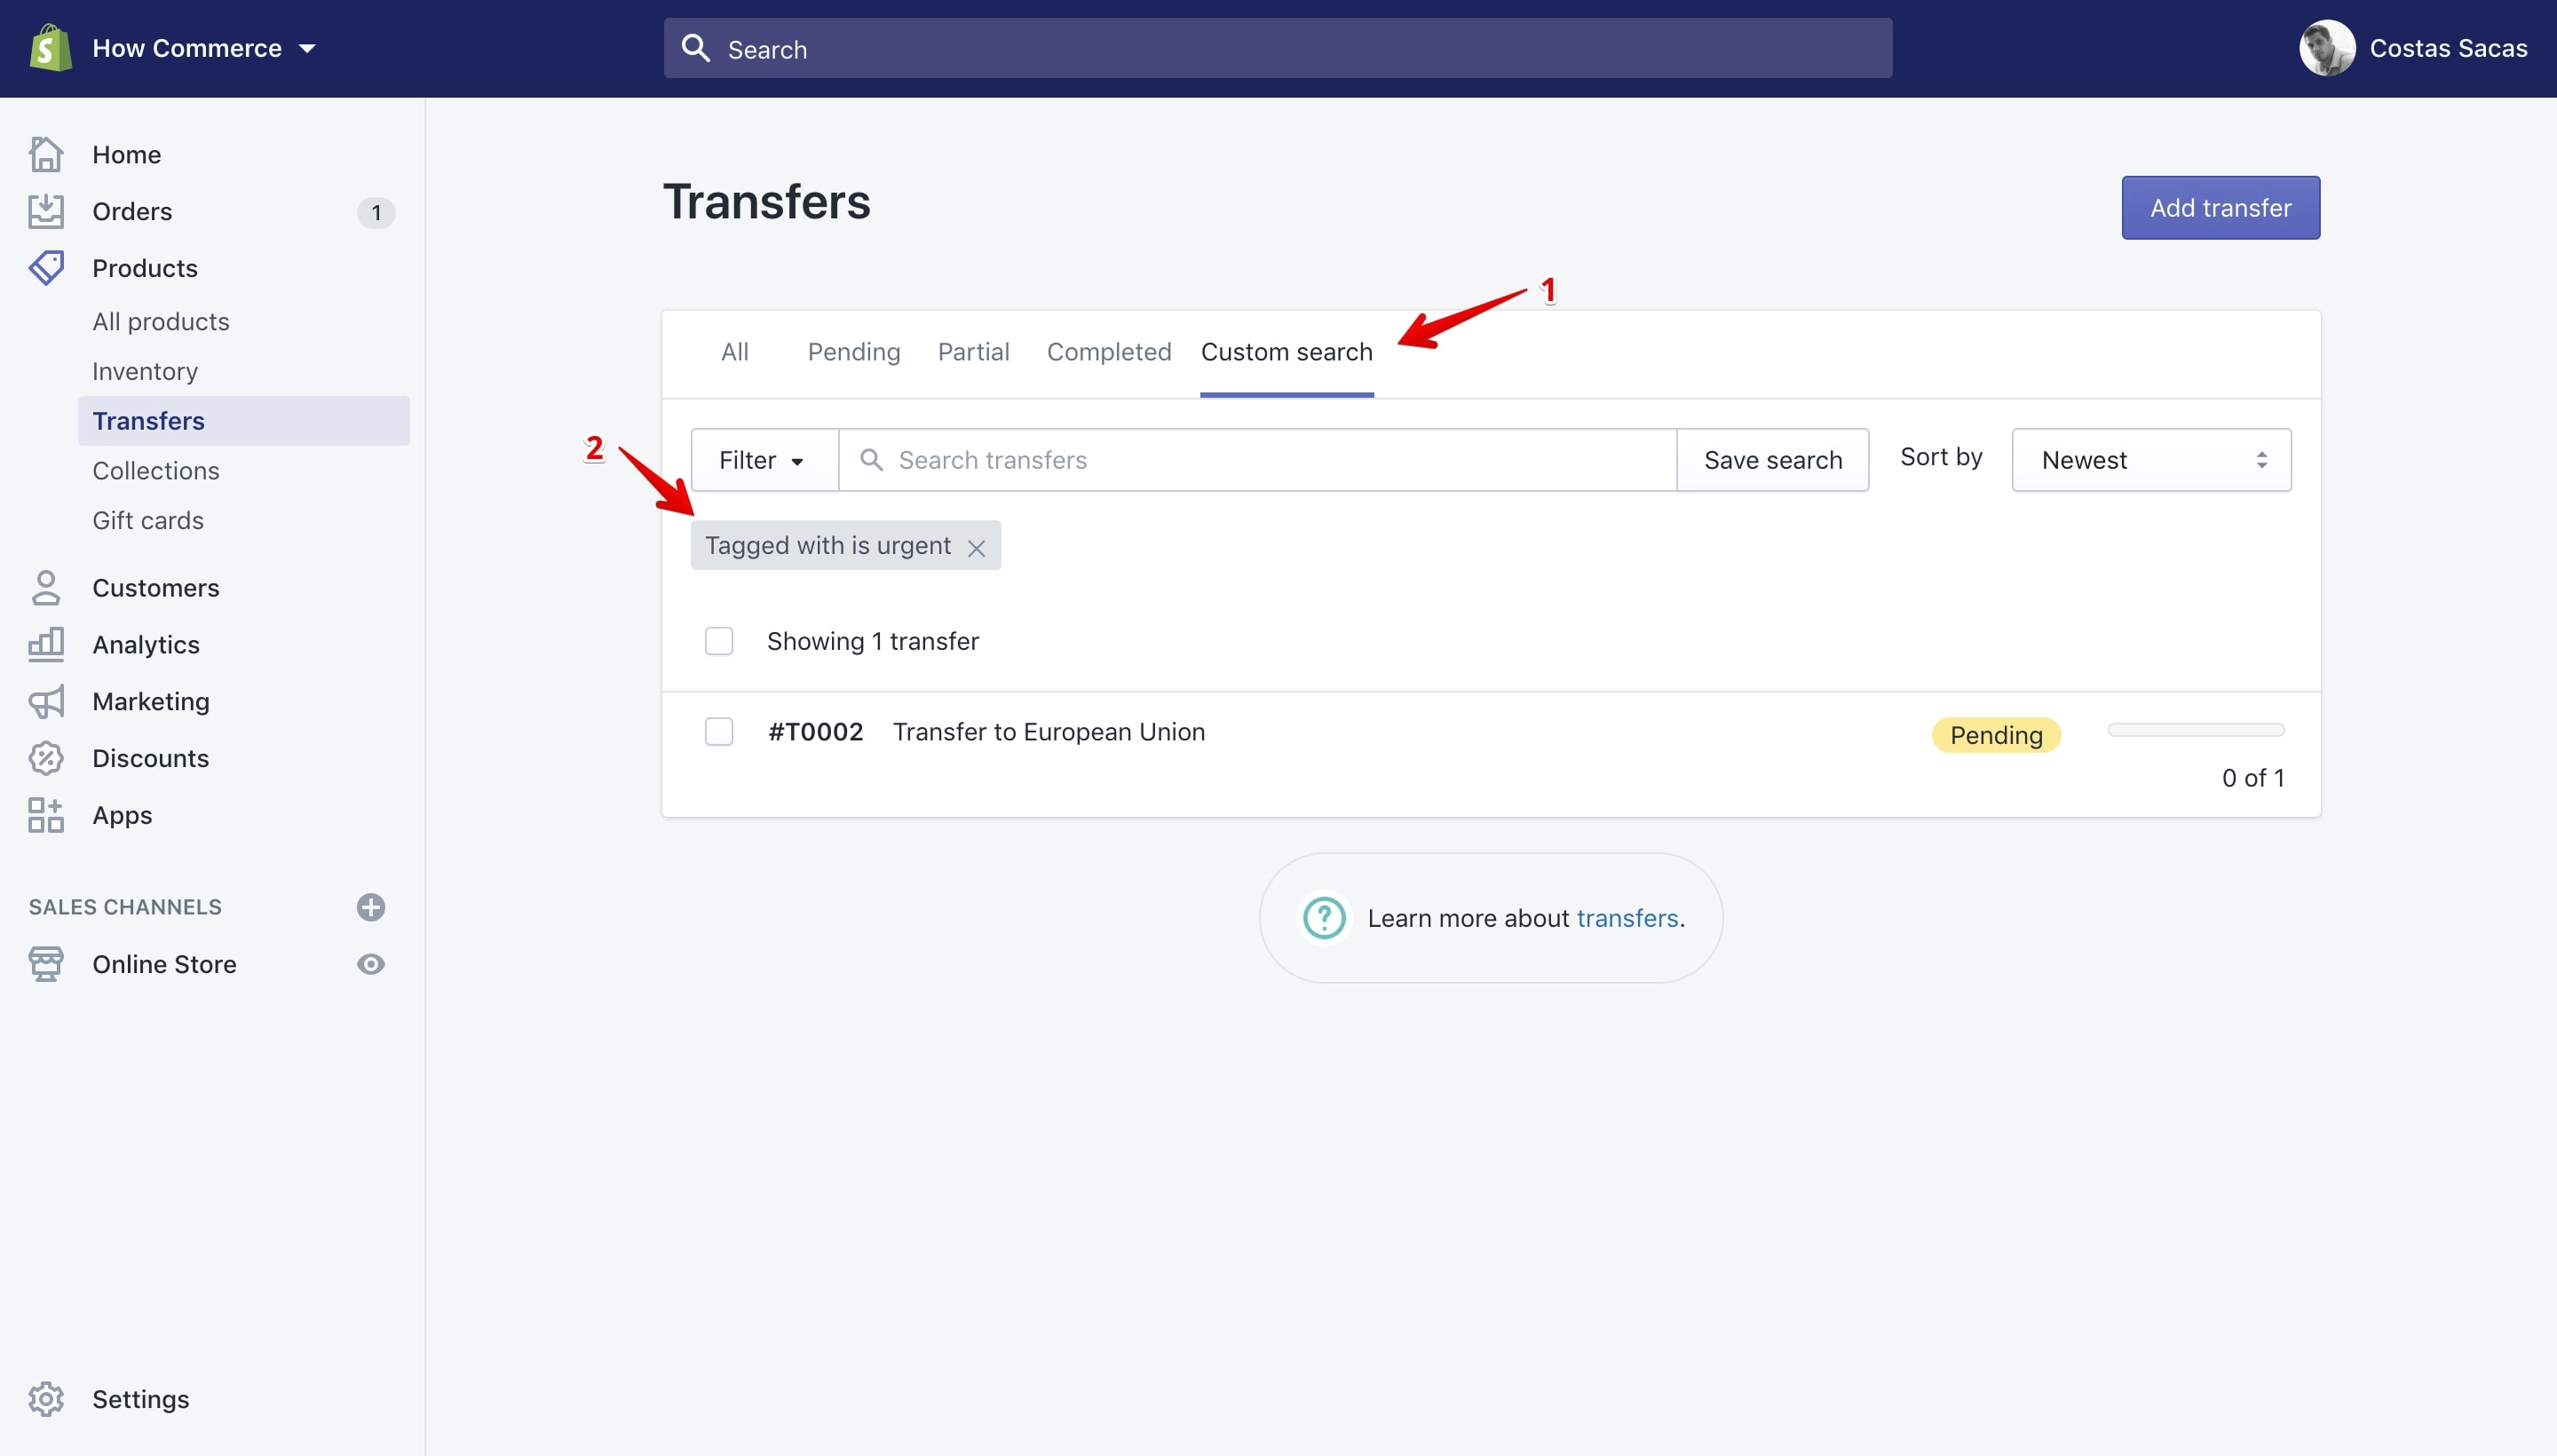
Orders
To access the order filters go to “Orders” (marked with 1 in the image below) and after to “More filters” (marked with 2 in the image below):
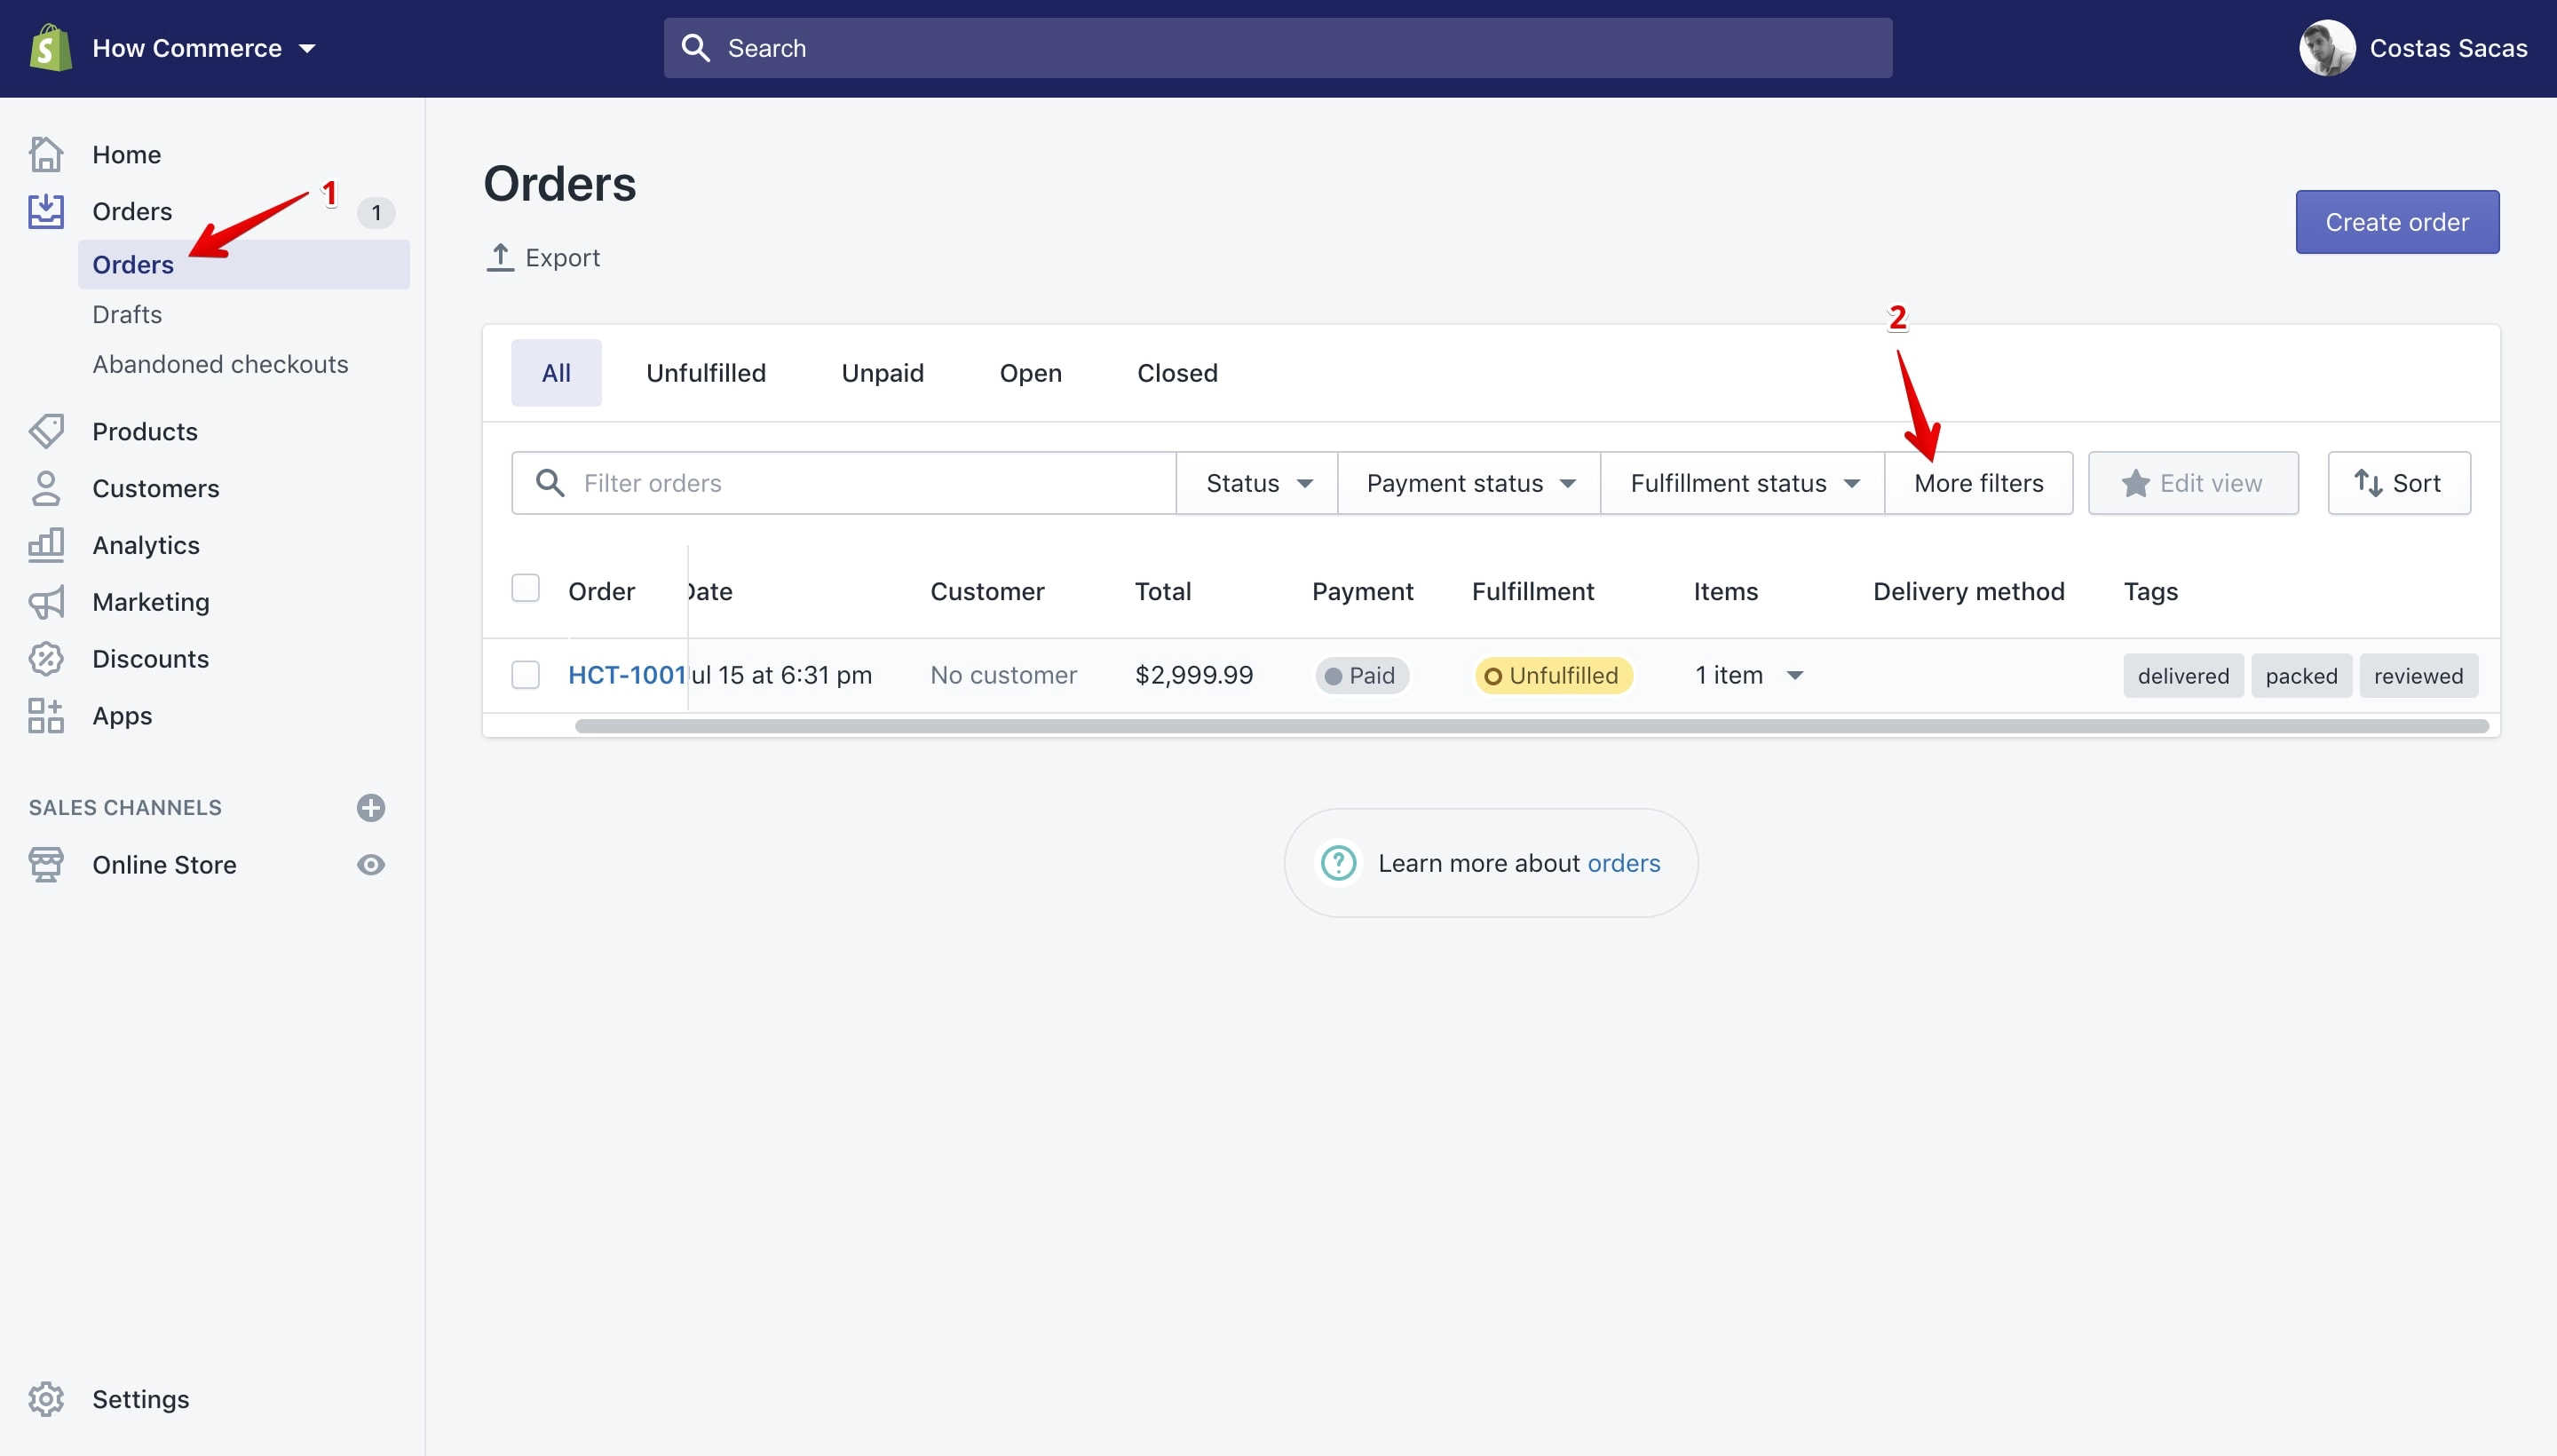
Click the “More filters” button (marked with 2 in the image above) and a pop-up will open on the right side:
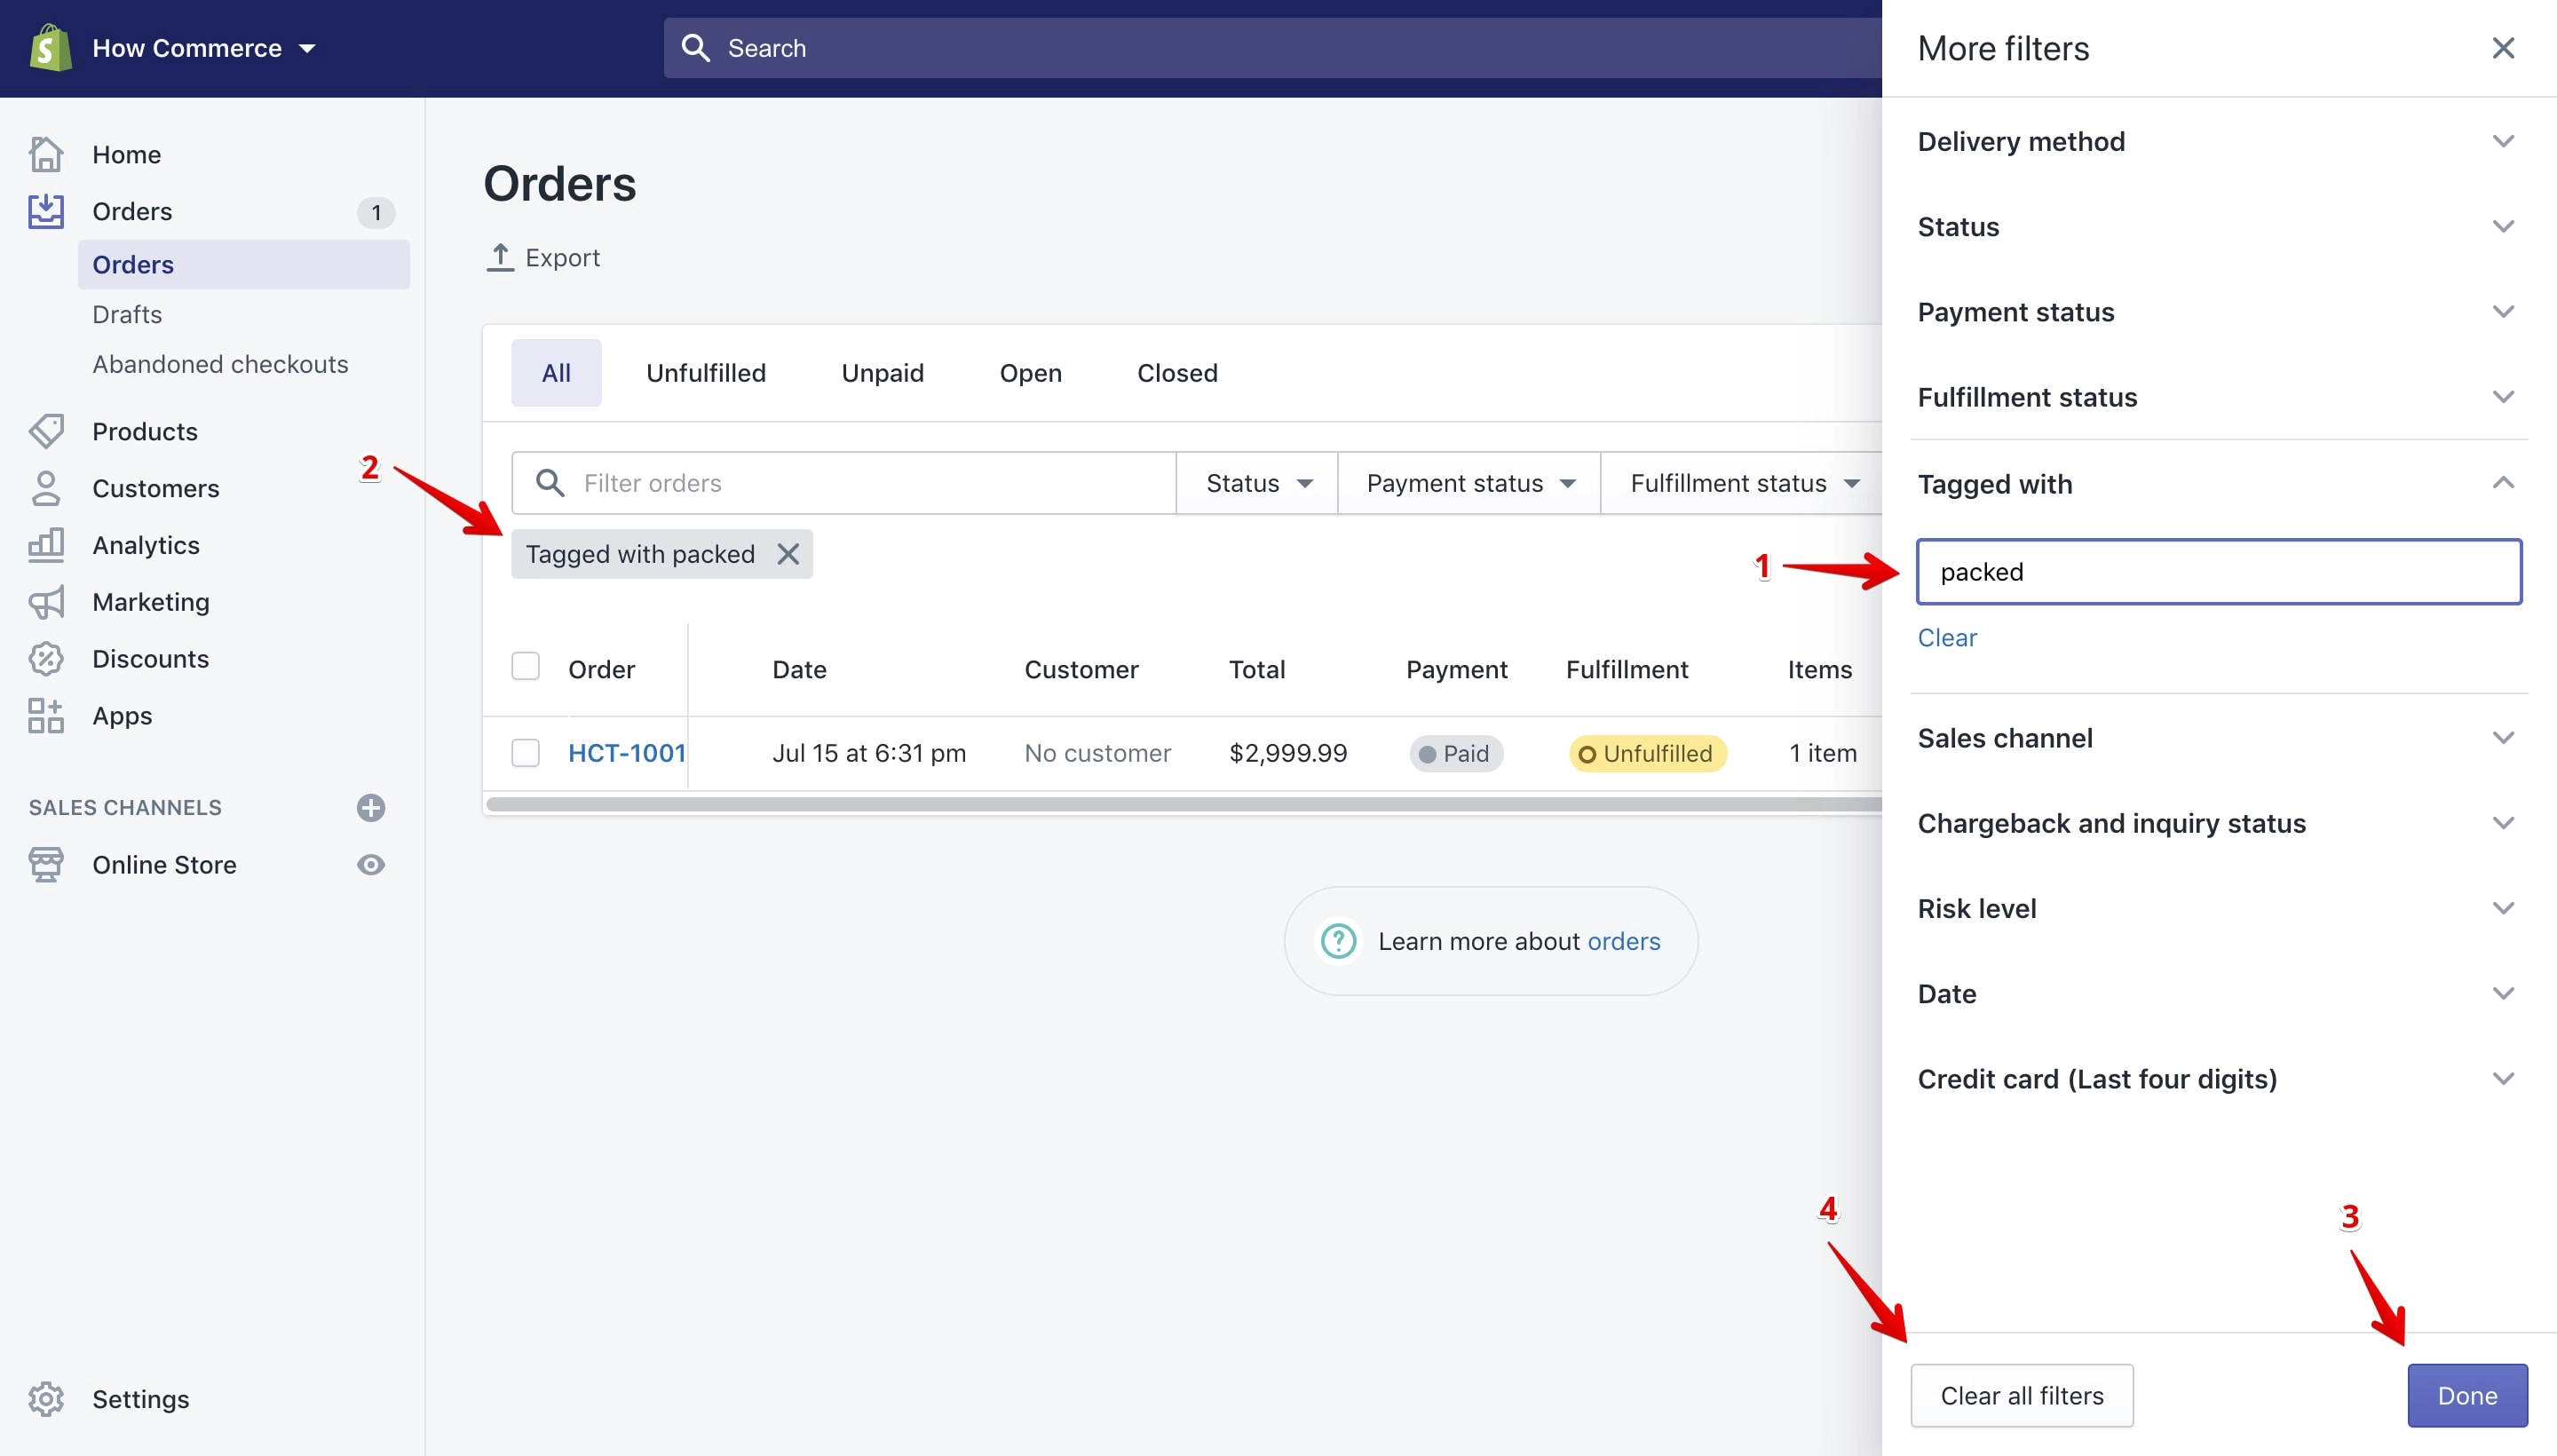
Type your desired tag in the “Tagged with” input box (marked with 1 in the image above). Soon as you complete typing the tag name Shopify will start listing all the orders that have the chosen tag (marked with 2 in the image above).
When you are done with the search click the “Done” button (marked with 3 in the image above). If you decide instead to do a new filtering using a new tag click the “Clear all filters” button (marked with 4 in the image above).
Draft orders
To access the order filters go to “Drafts” (marked with 1 in the image below) and after to “More filters” (marked with 2 in the image below):
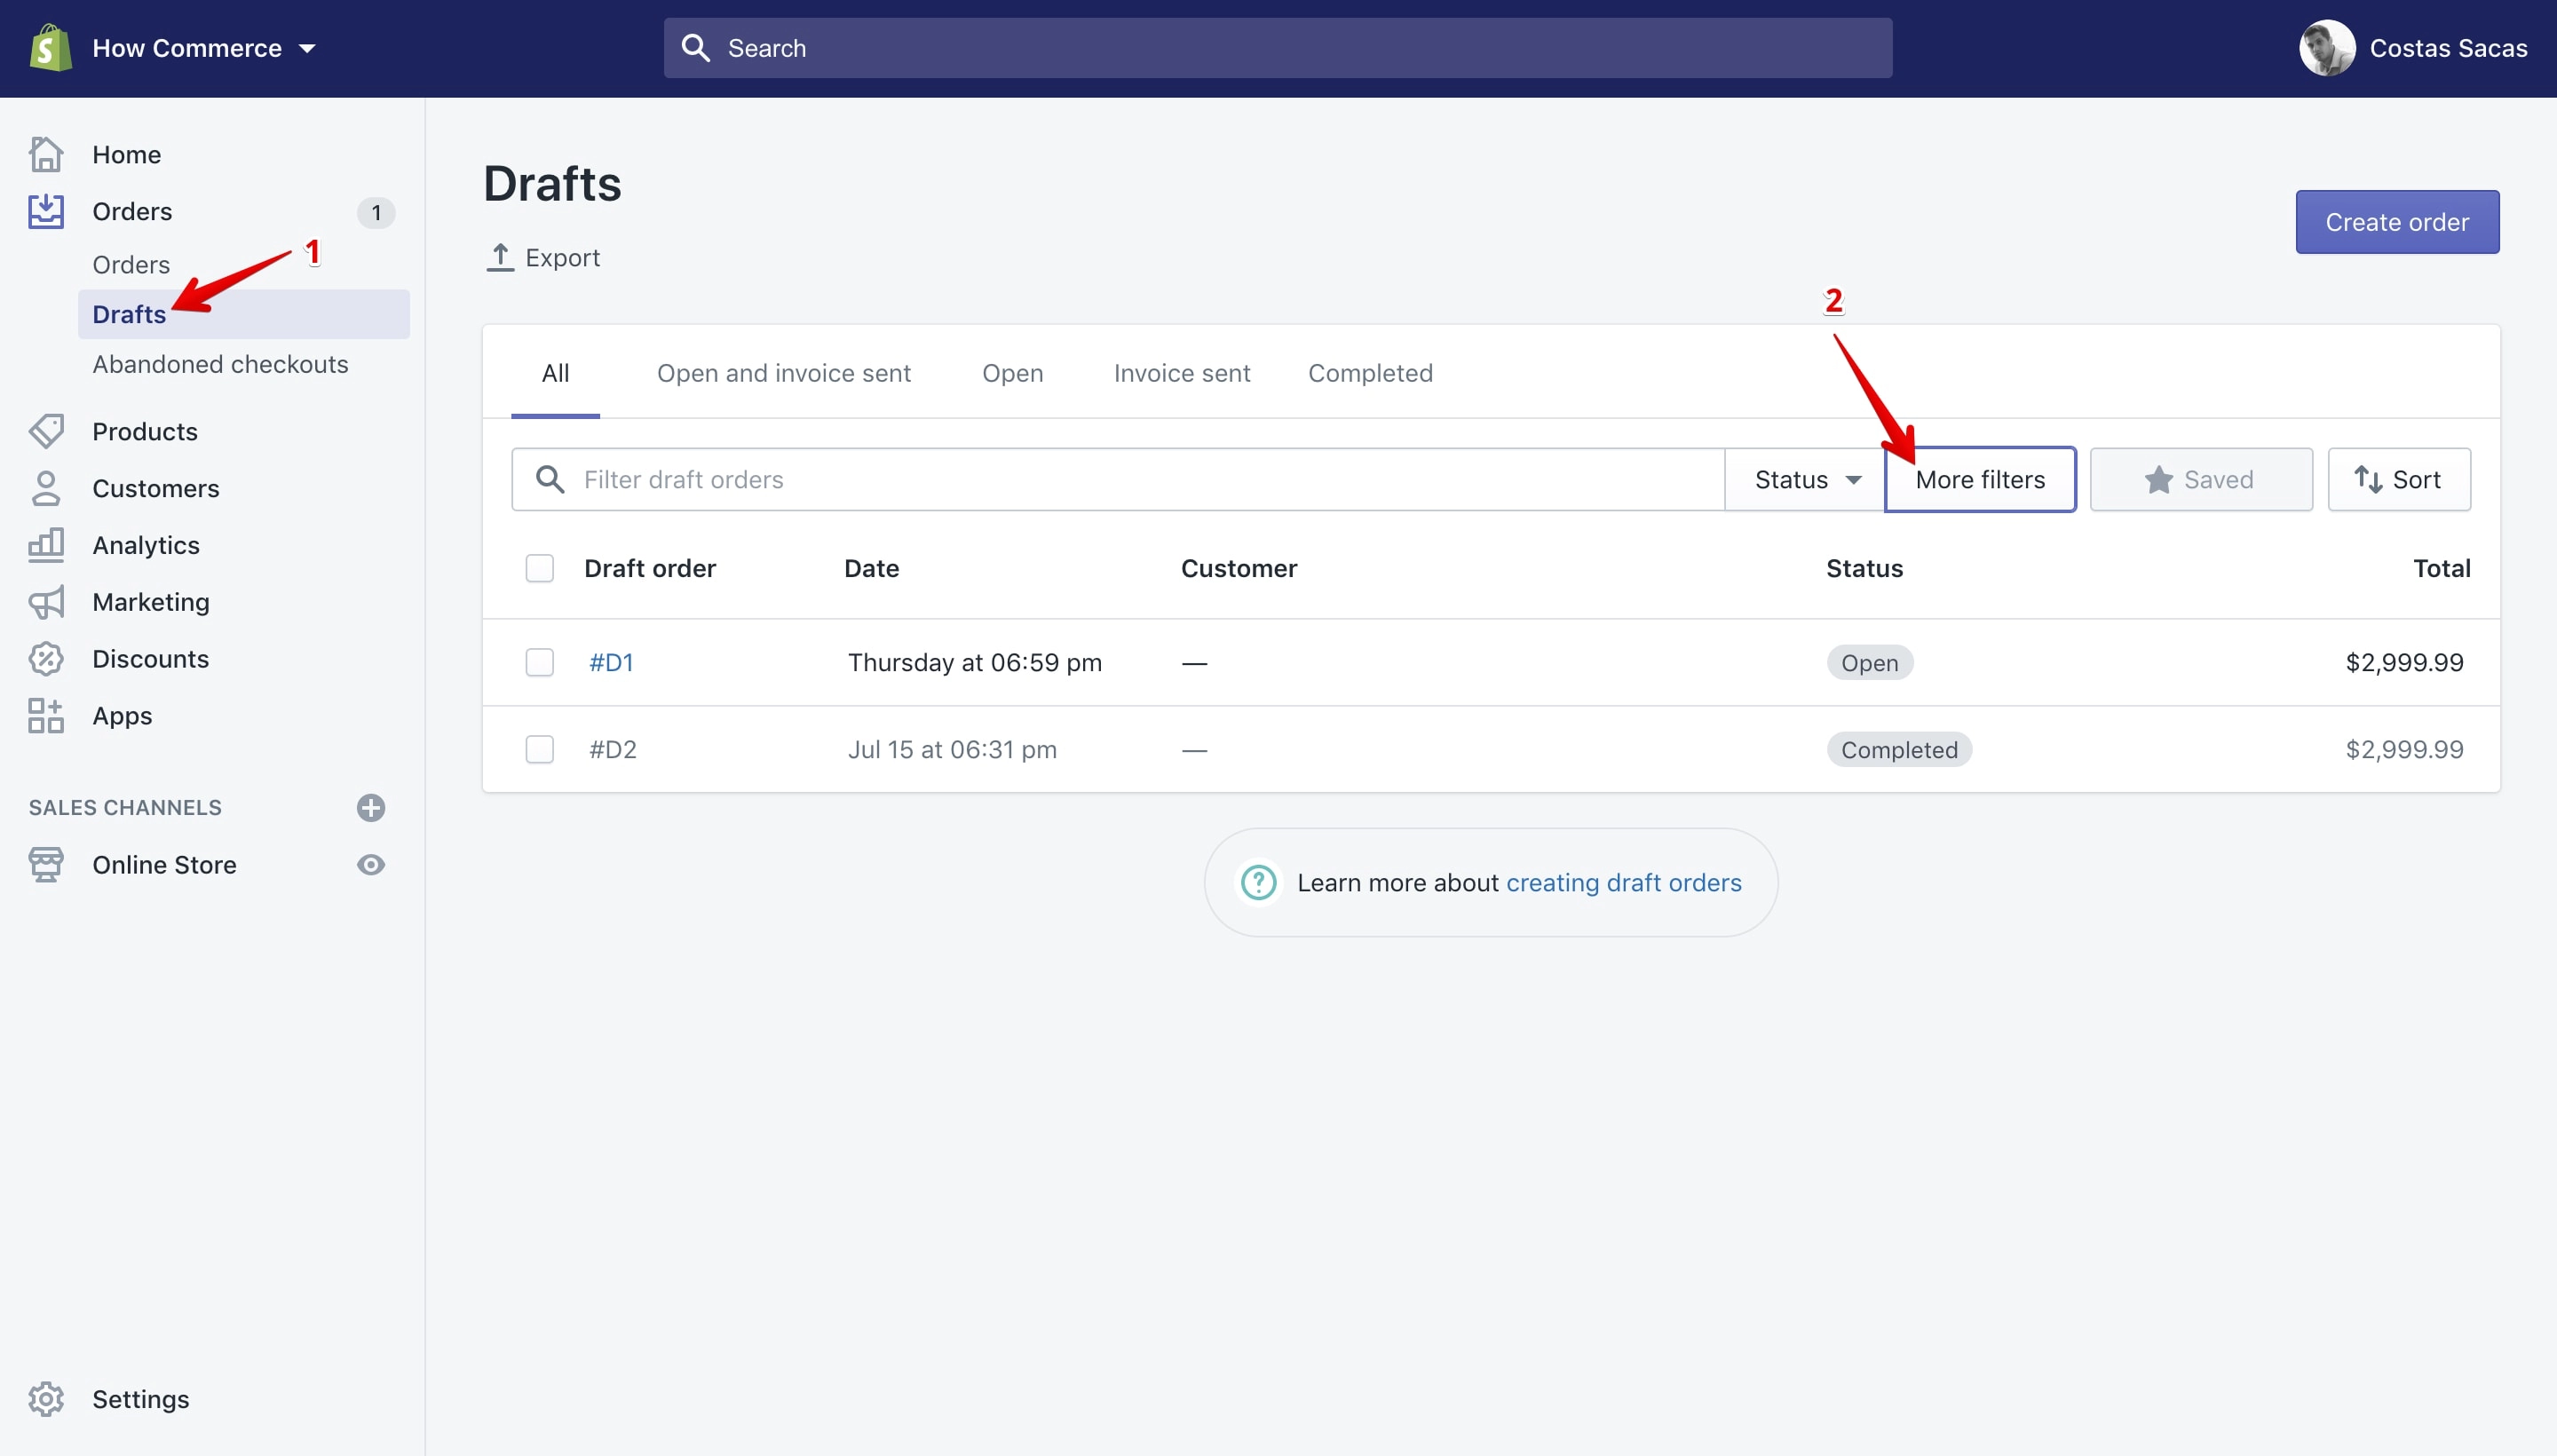
Click the “More filters” button (marked with 2 in the image above) and a pop-up will open from the right side:
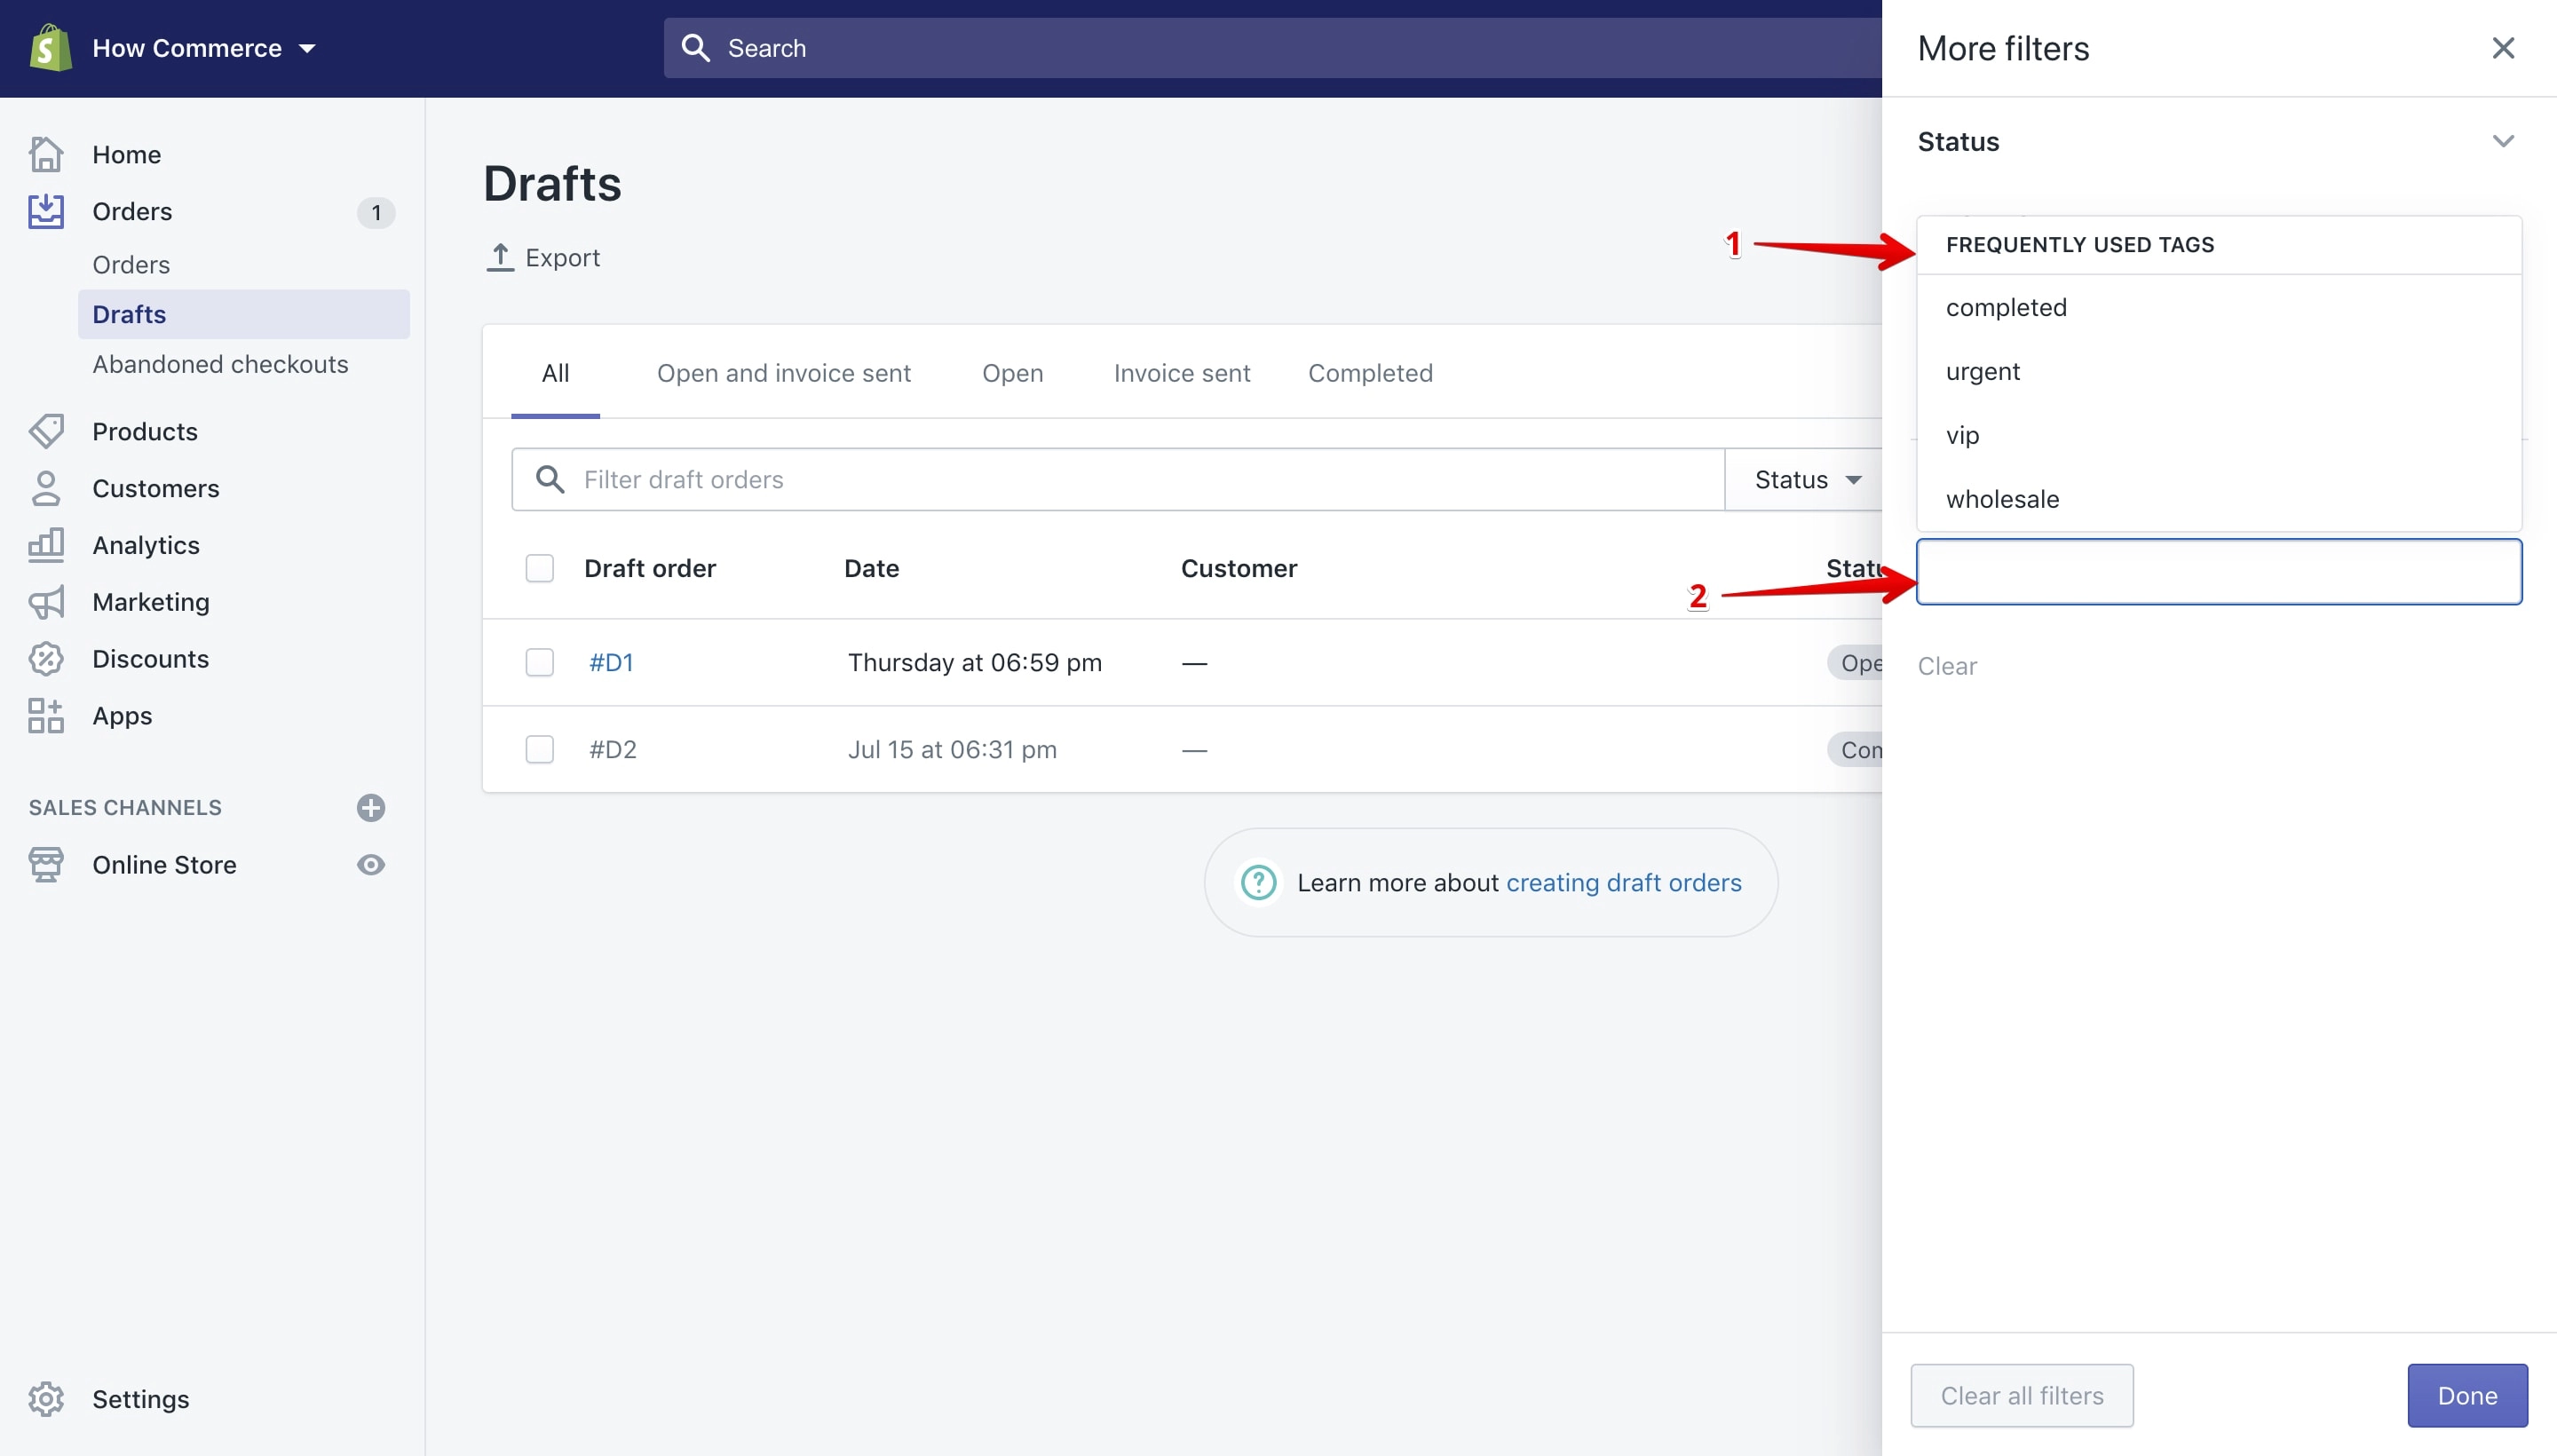
You can select a tag from existing ones from the “Frequently used tags” pop-up (marked with 1 in the image above) or you can type a new tag in the input box (marked with 2 in the image above).
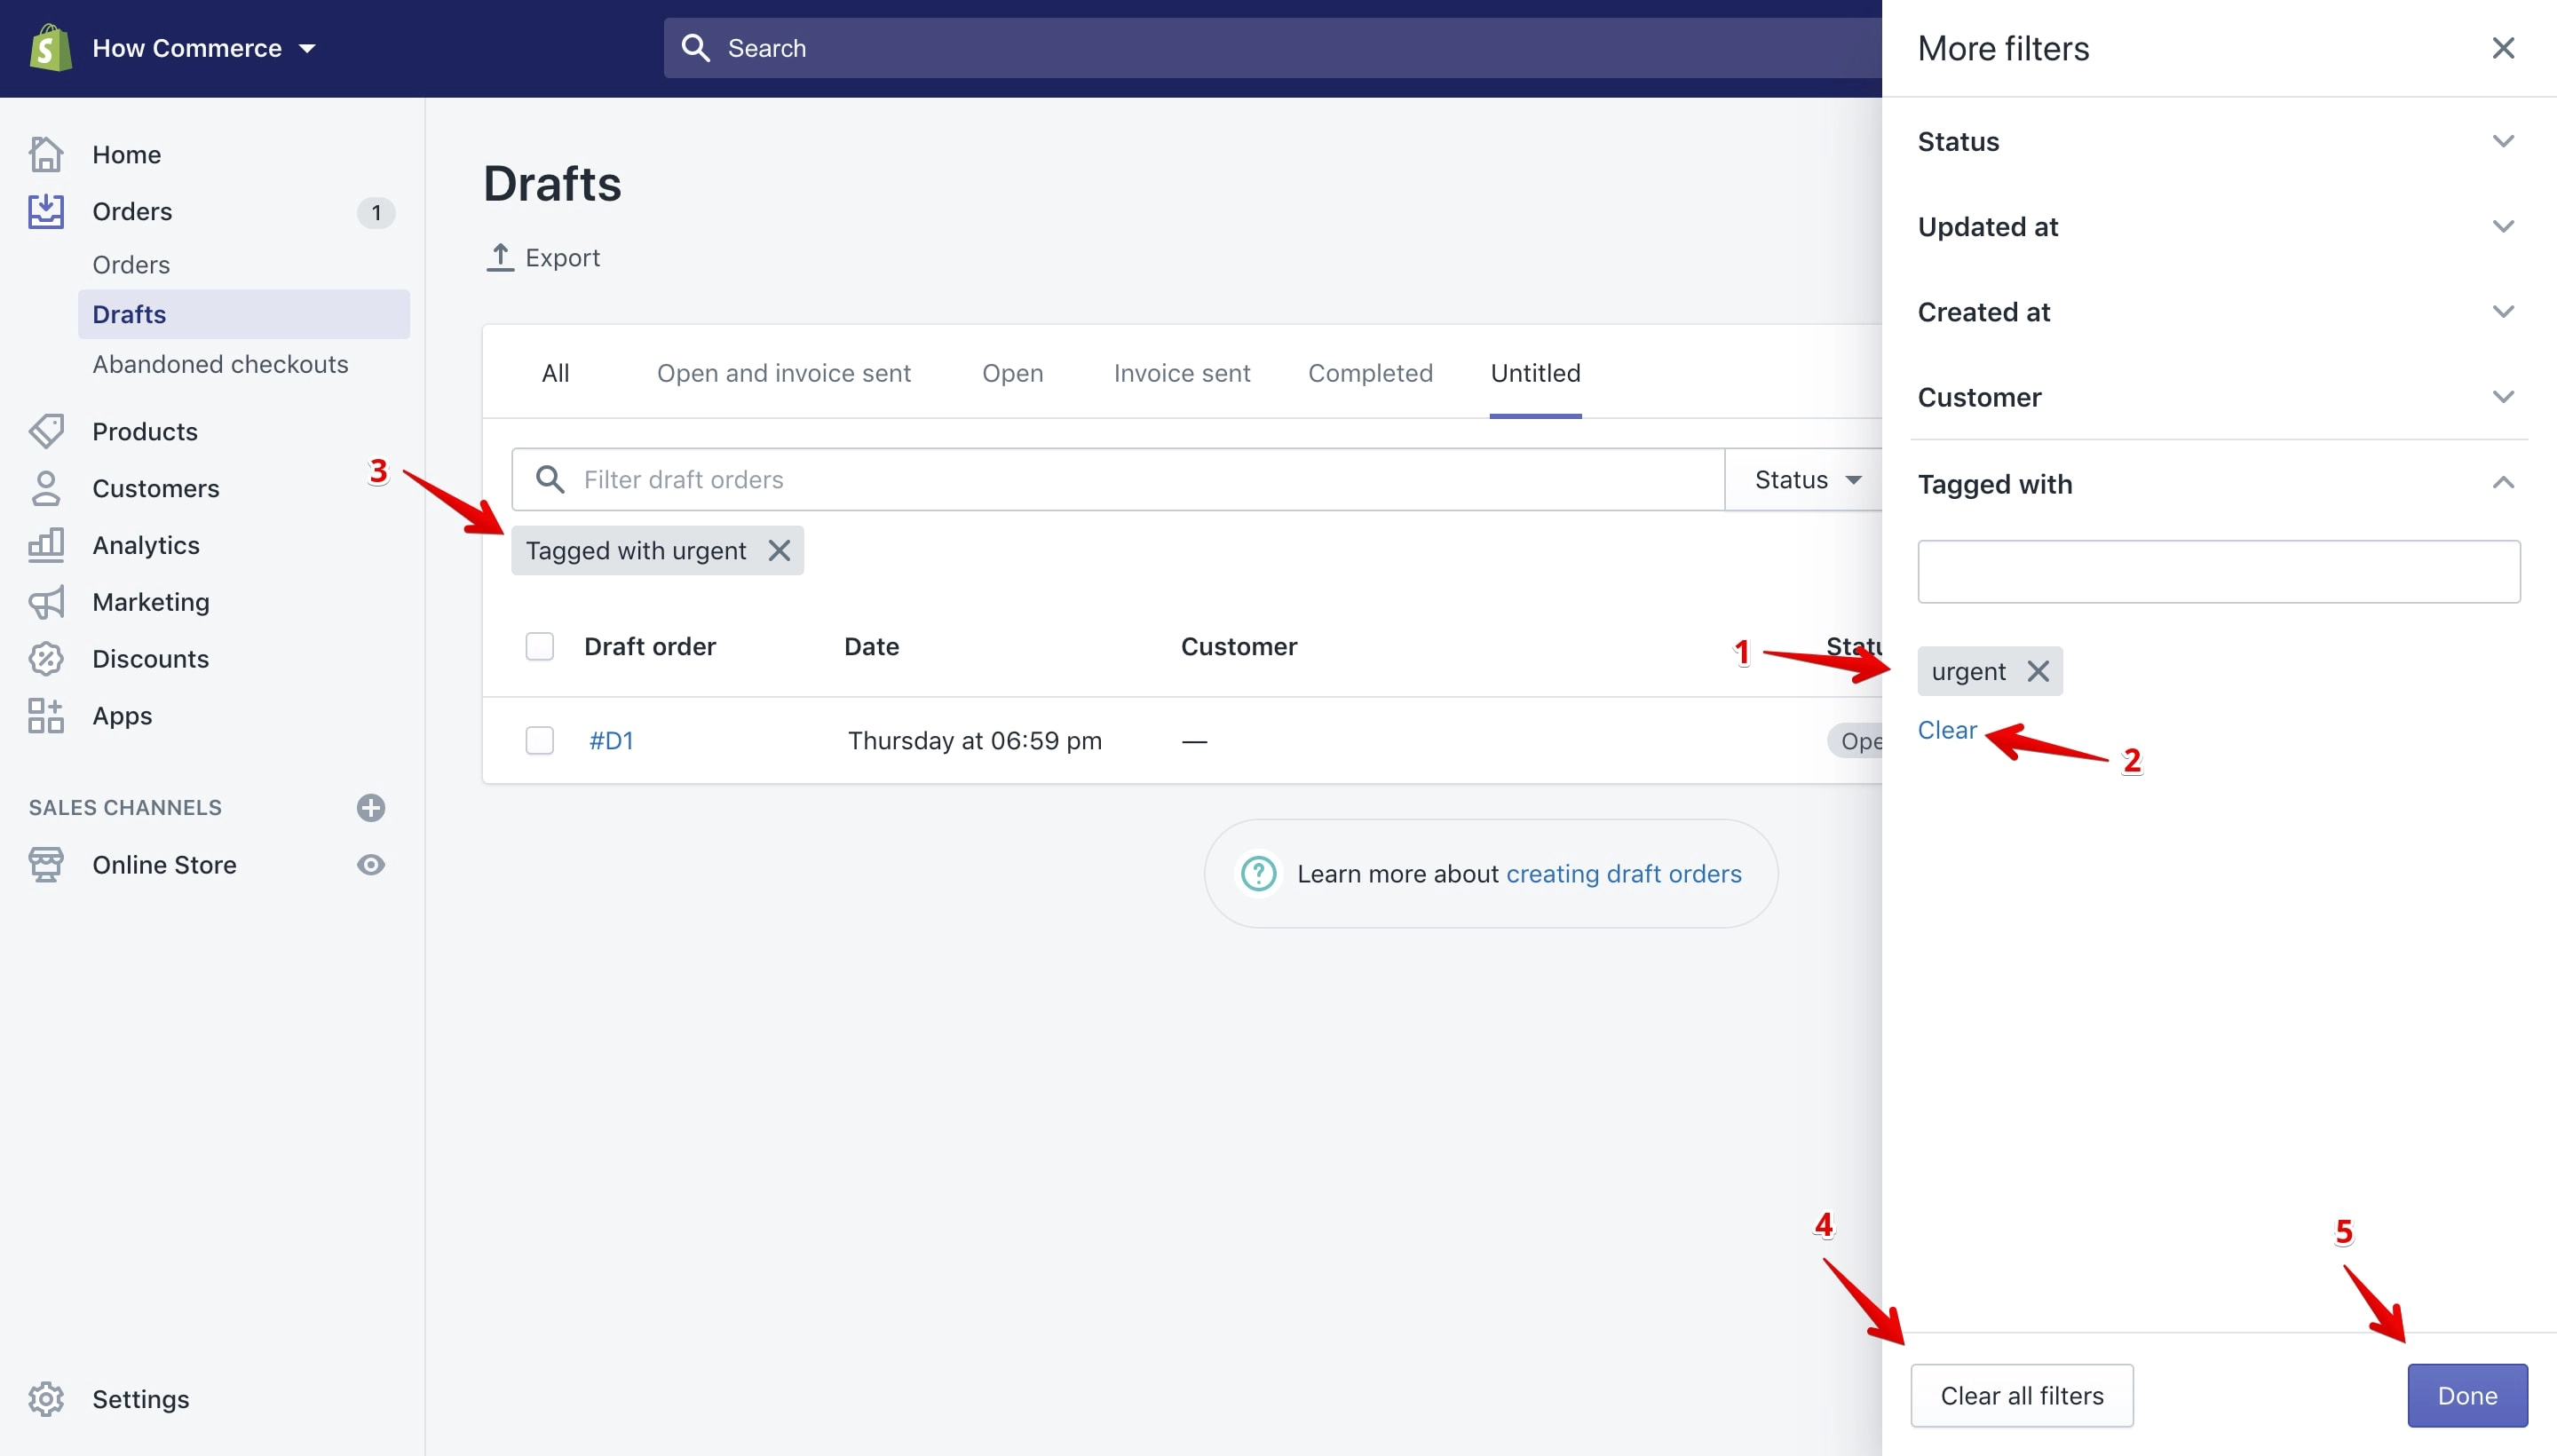
The newly added tag (marked with 1 in the image above) will display. As soon as you complete adding the tag name Shopify will start listing all the draft orders that have the chosen tag (marked with 3 in the image above).
When you are done with the search click the “Done” button (marked with 5 in the image above).
If you decide instead to do a new filtering using a new tag click the “Clear” link (marked with 2 in the image above).
You can also clear the tag with the “Clear all filters” button (marked with 4 in the image above) but this is used for clearing all the filters, not only the tag one.
Customers
To access the customers filters go to “Customers” (marked with 1 in the image below) and after to “More filters” (marked with 2 in the image below):
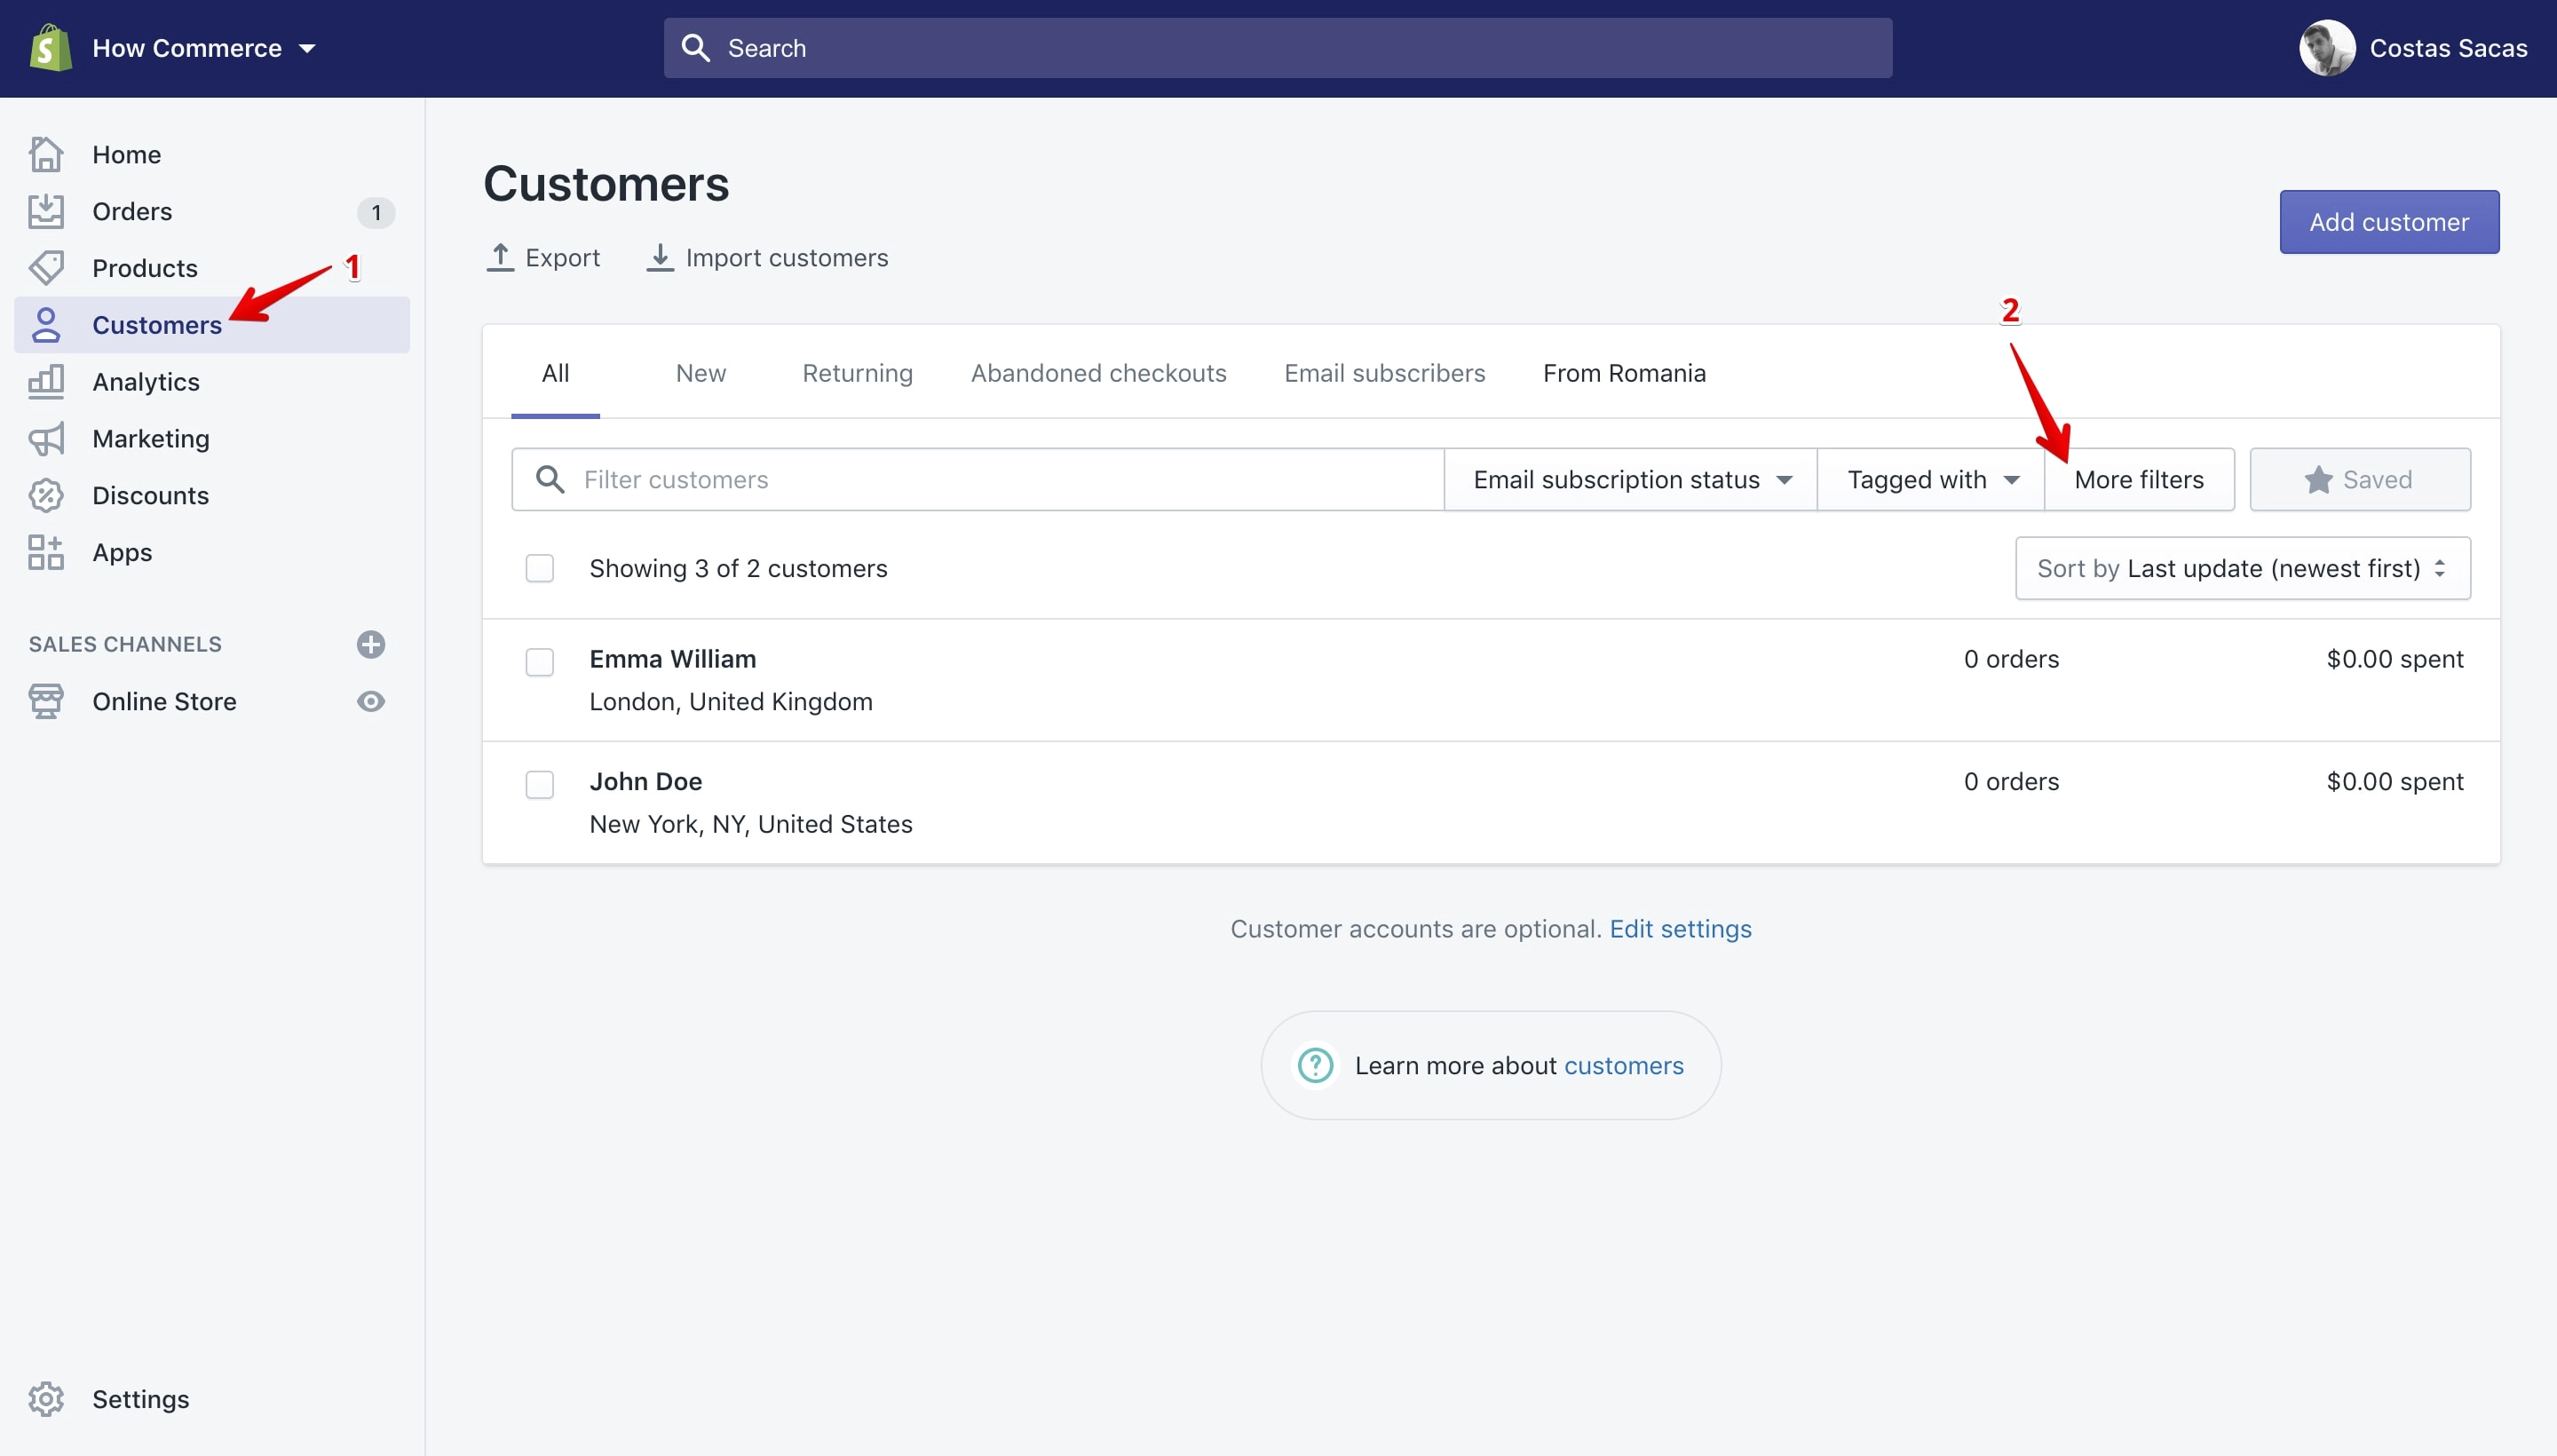
Click the “More filters” button (marked with 2 in the image above) and a pop-up will open from the right side:
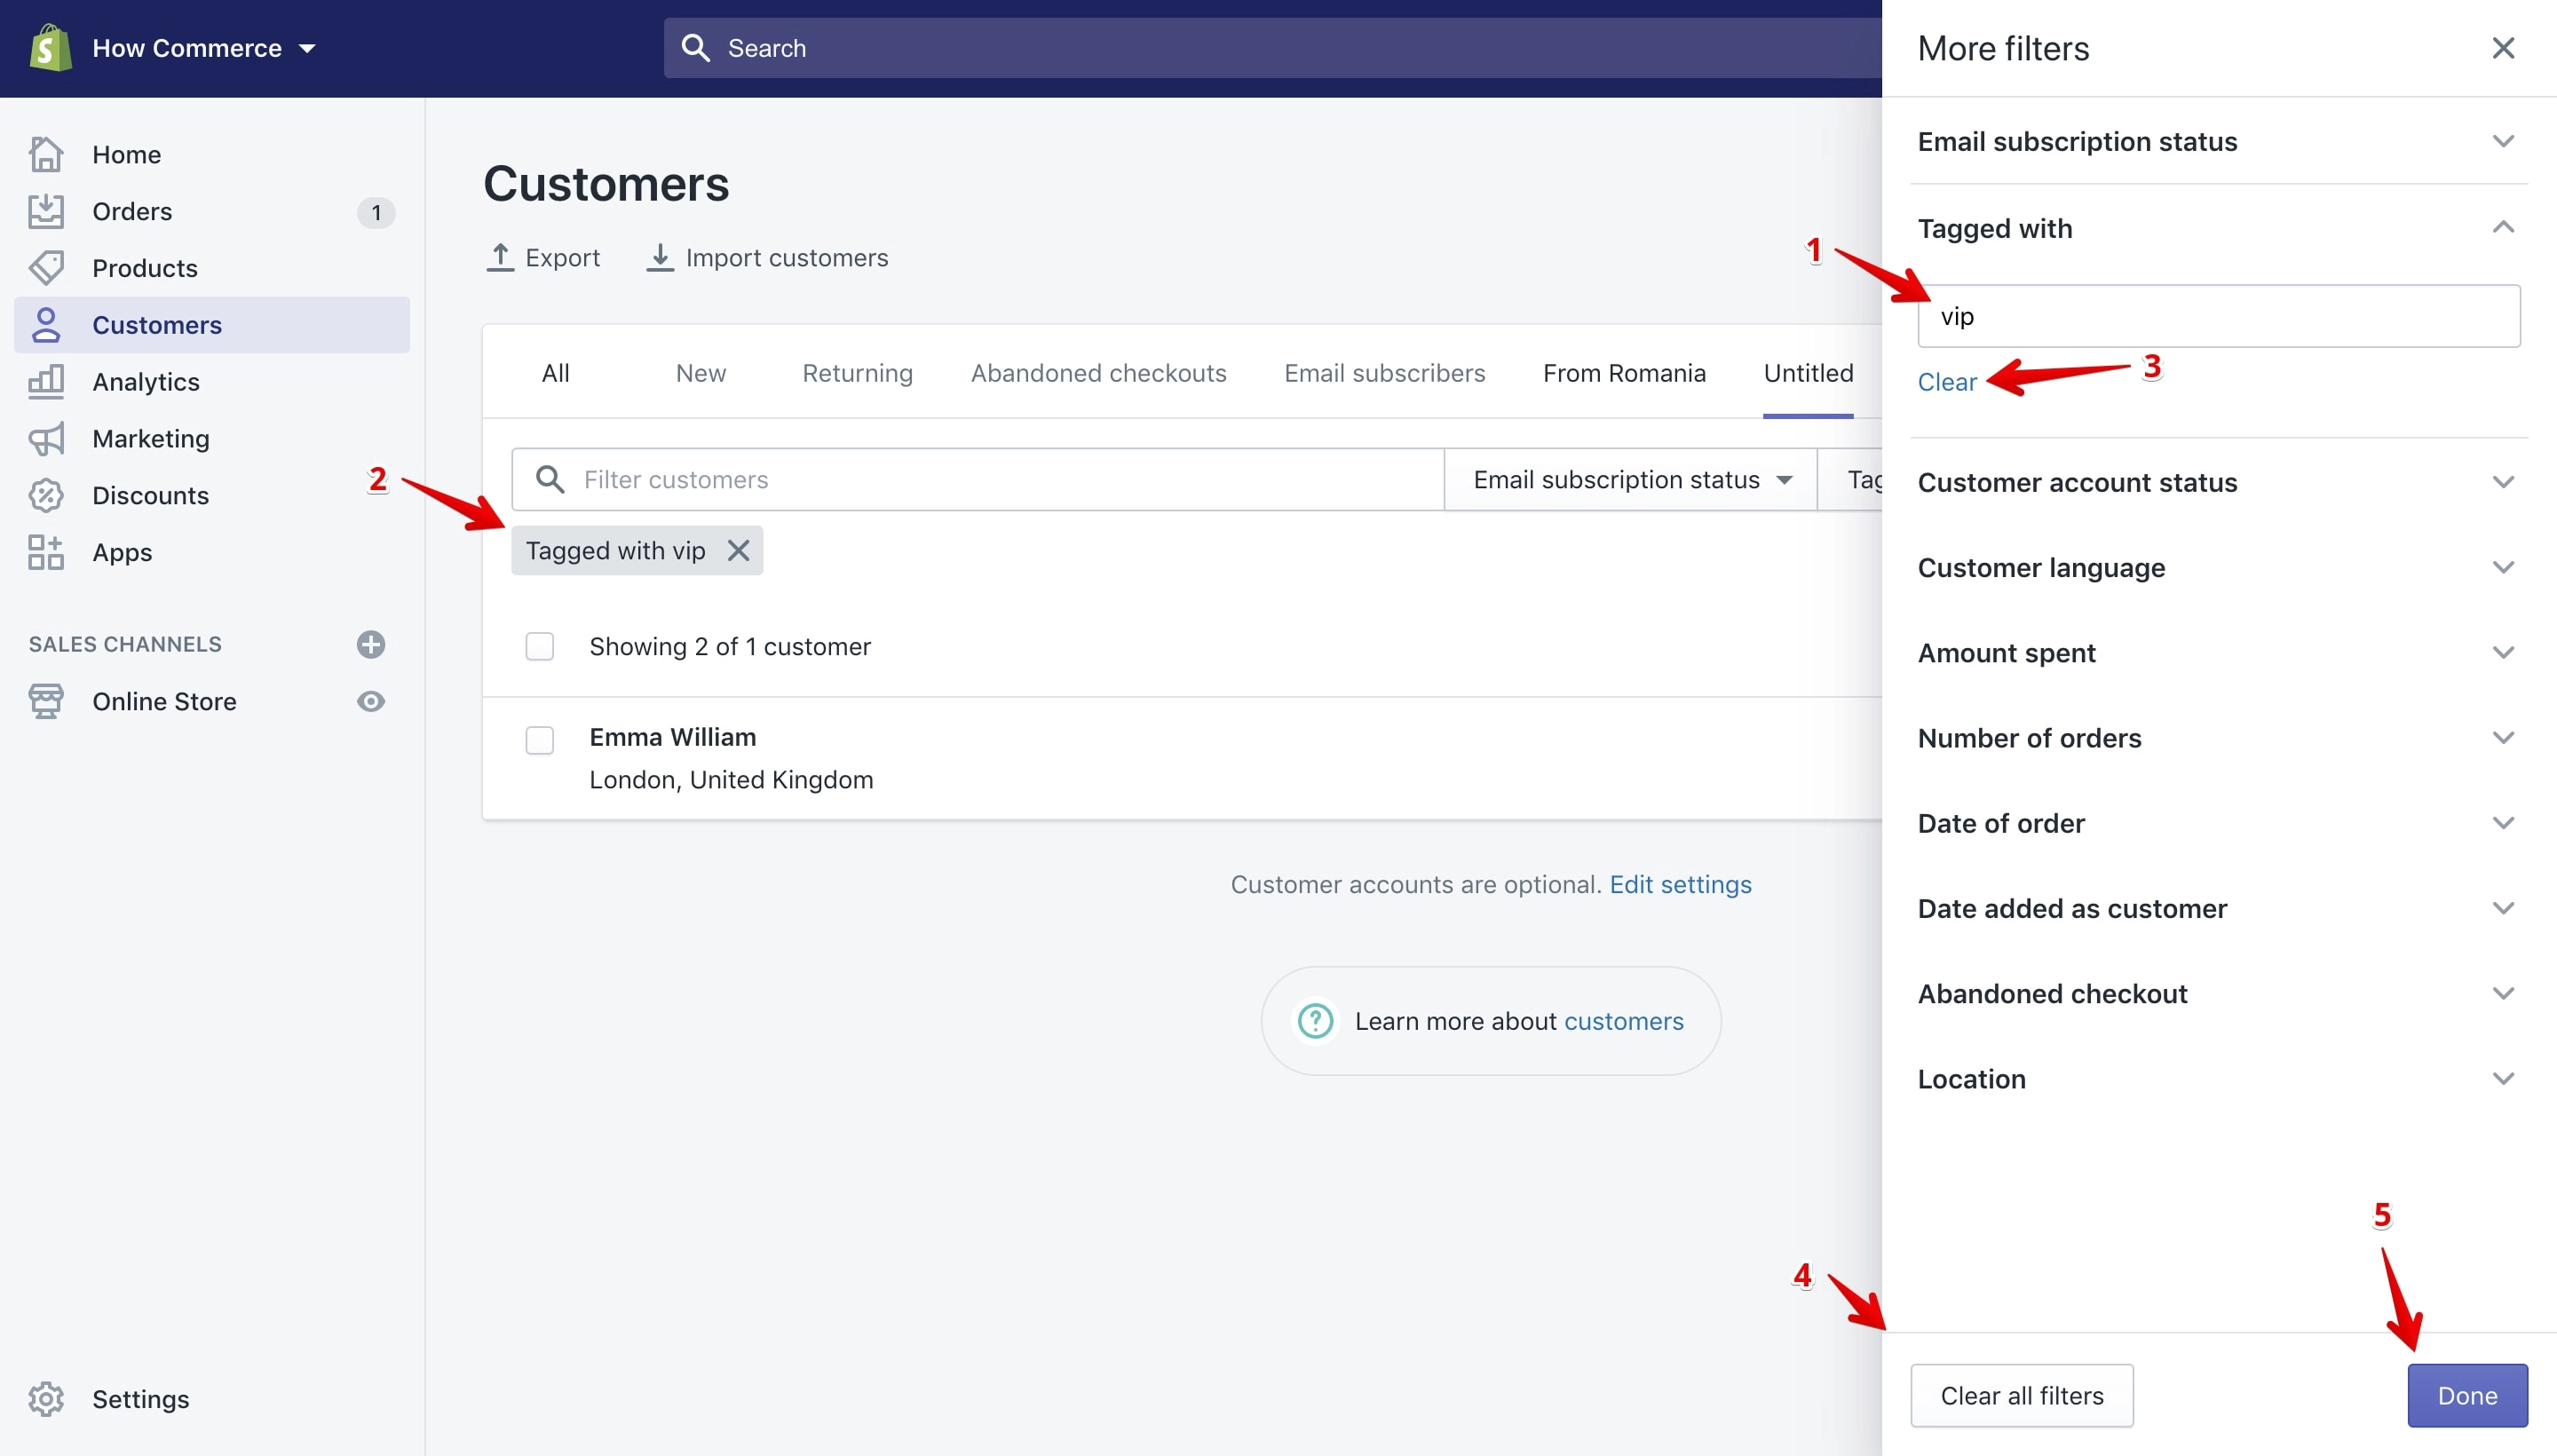
The newly added tag (marked with 1 in the image above). As soon as you complete adding the tag name Shopify will start listing all the customers that have the chosen tag (marked with 2 in the image above).
When you are done with the search click the “Done” button (marked with 5 in the image above).
If you decide instead to do a new filtering using a new tag click the “Clear” link (marked with 3 in the image above).
You can also clear the tag with the “Clear all filters” button (marked with 4 in the image above) but this is used for clearing all the filters not only the tag one.
Blog posts
To access the customers filters go to “Blog posts” (marked with 1 in the image below):
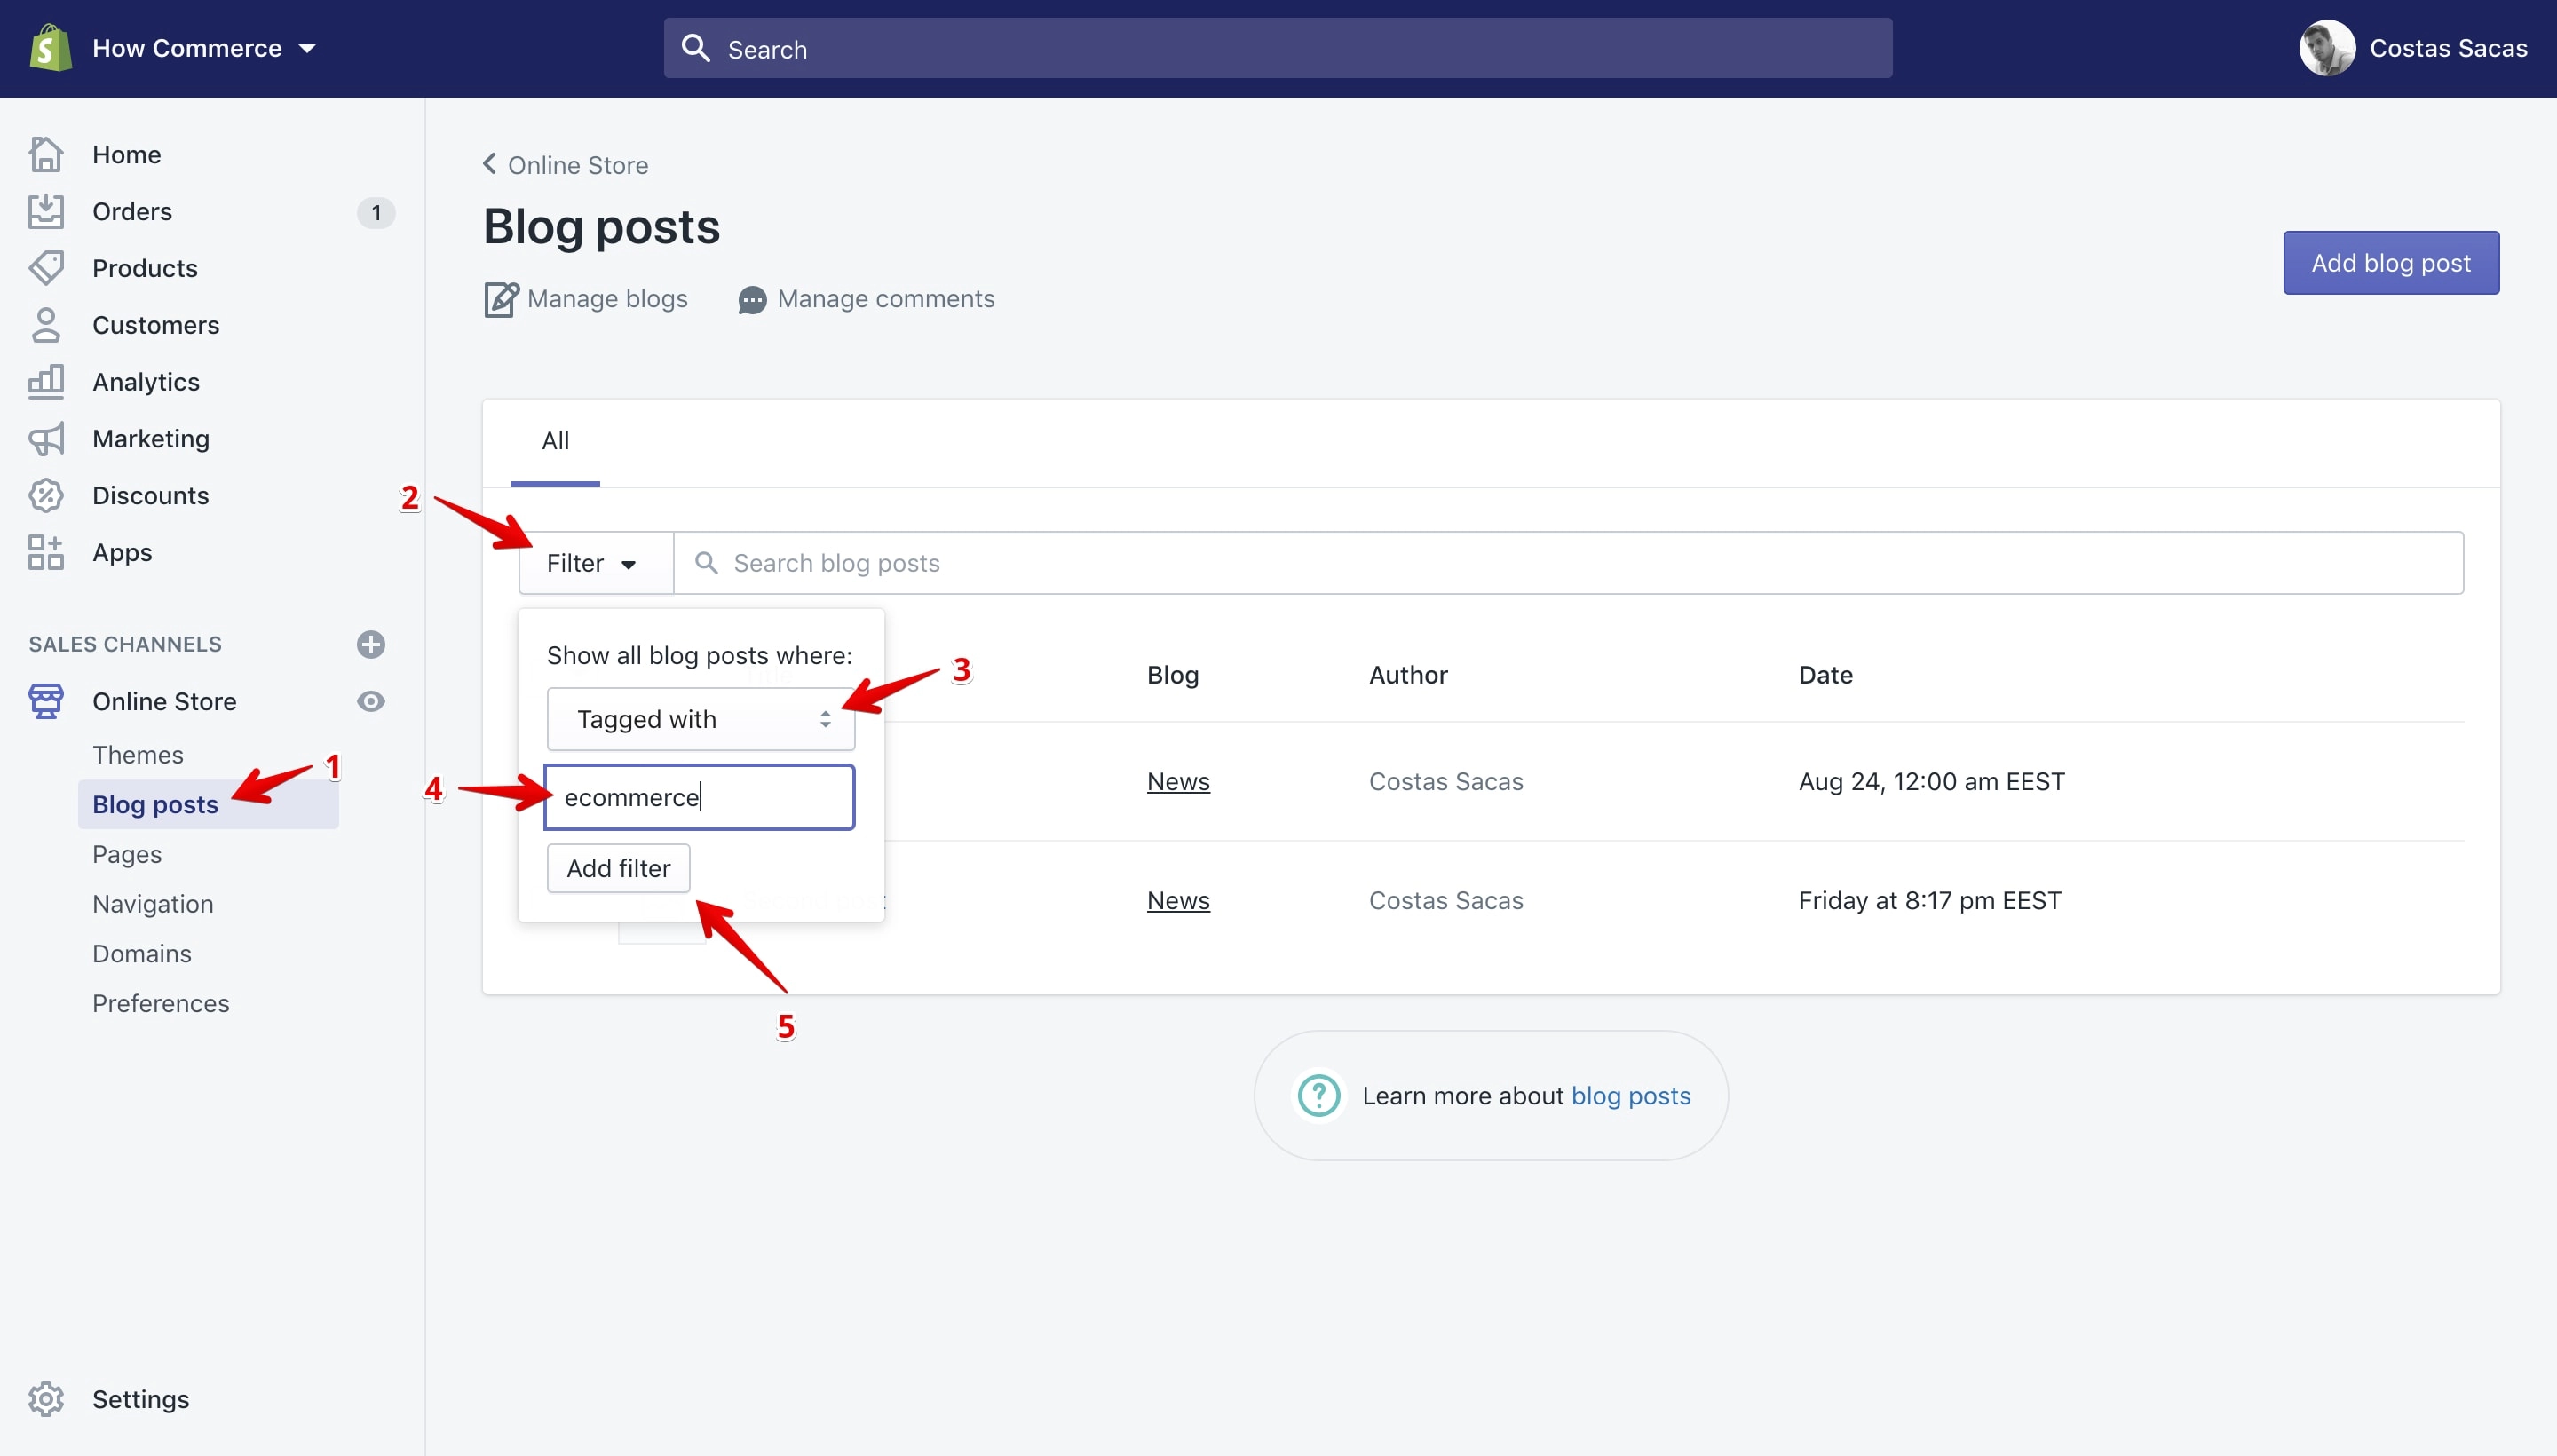
Click the “Filter” button (marked with 2 in the image above) and after select the “Tagged with” from the select box (marked with 3 in the image above).
Add the desired tag in the input box (marked with 4 in the image above) and click on the “Add filter” button (marked with 5 in the image above).
Once you click the “Add filter” button (marked with 5 in the image above) Shopify will list all the blog posts that have the tag.
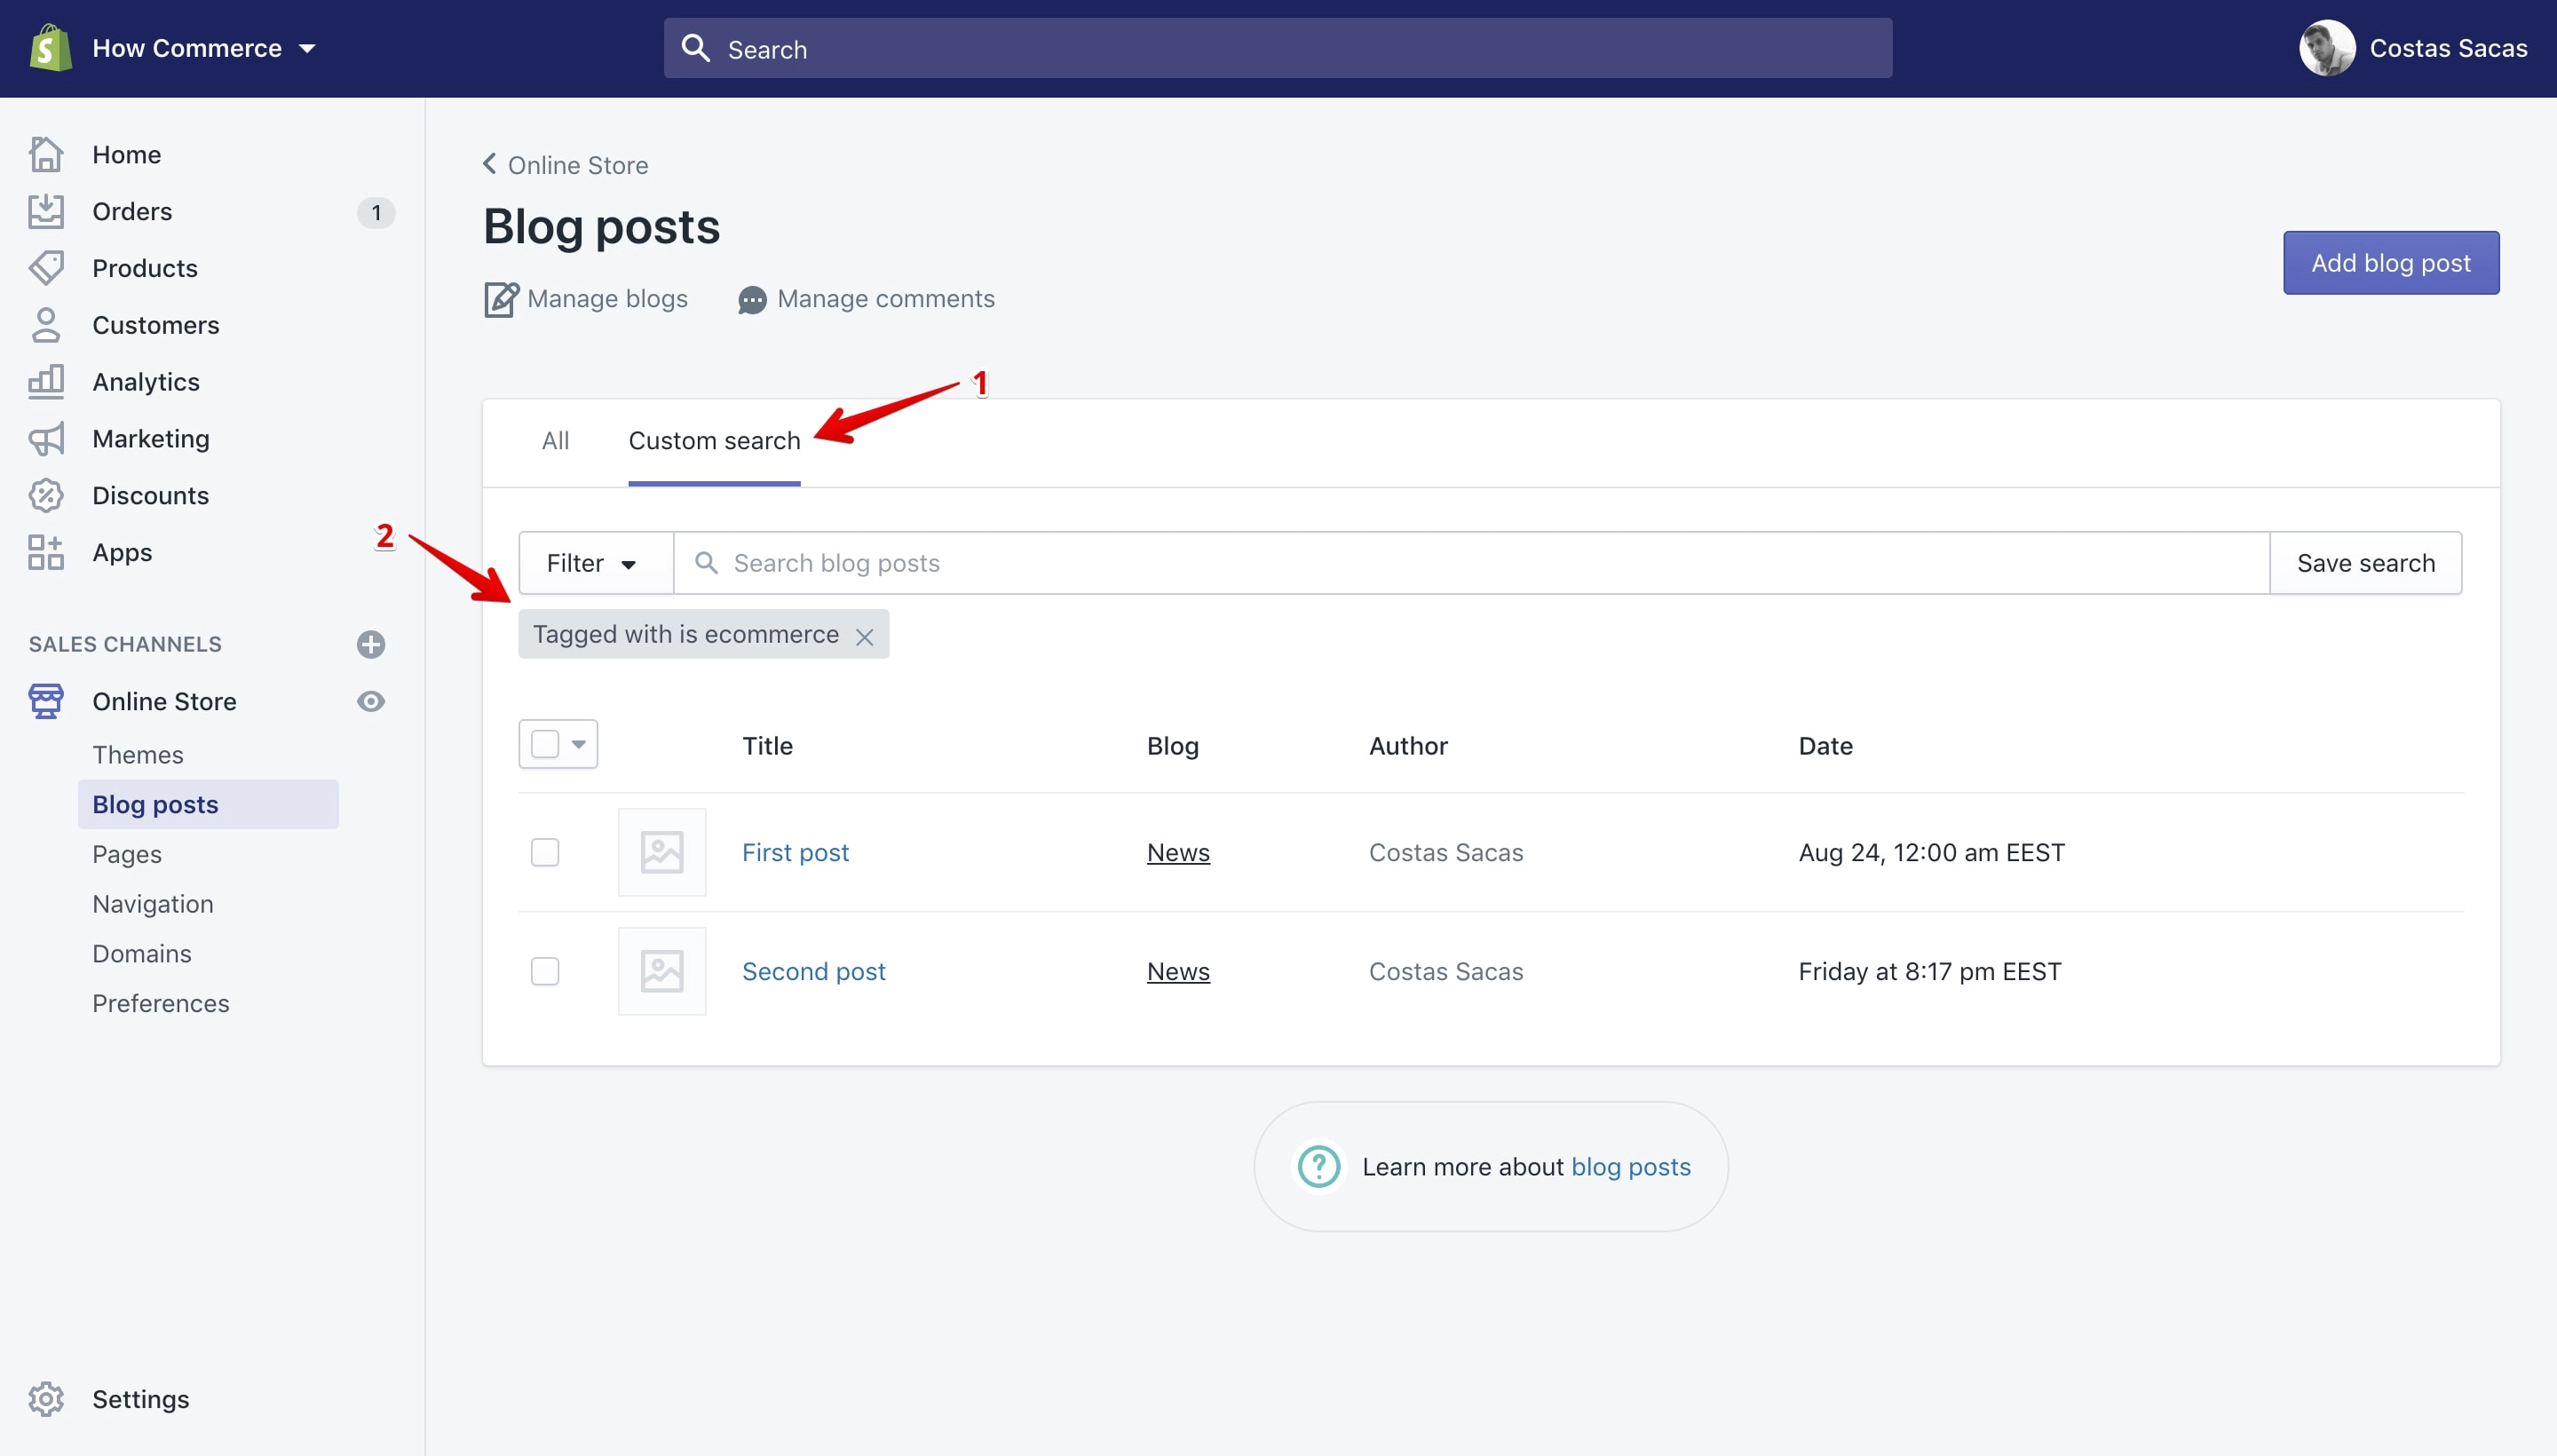
Filter blog posts by tag results.
Inventory
To access the inventory filters go to “Inventory” (marked with 1 in the image below):
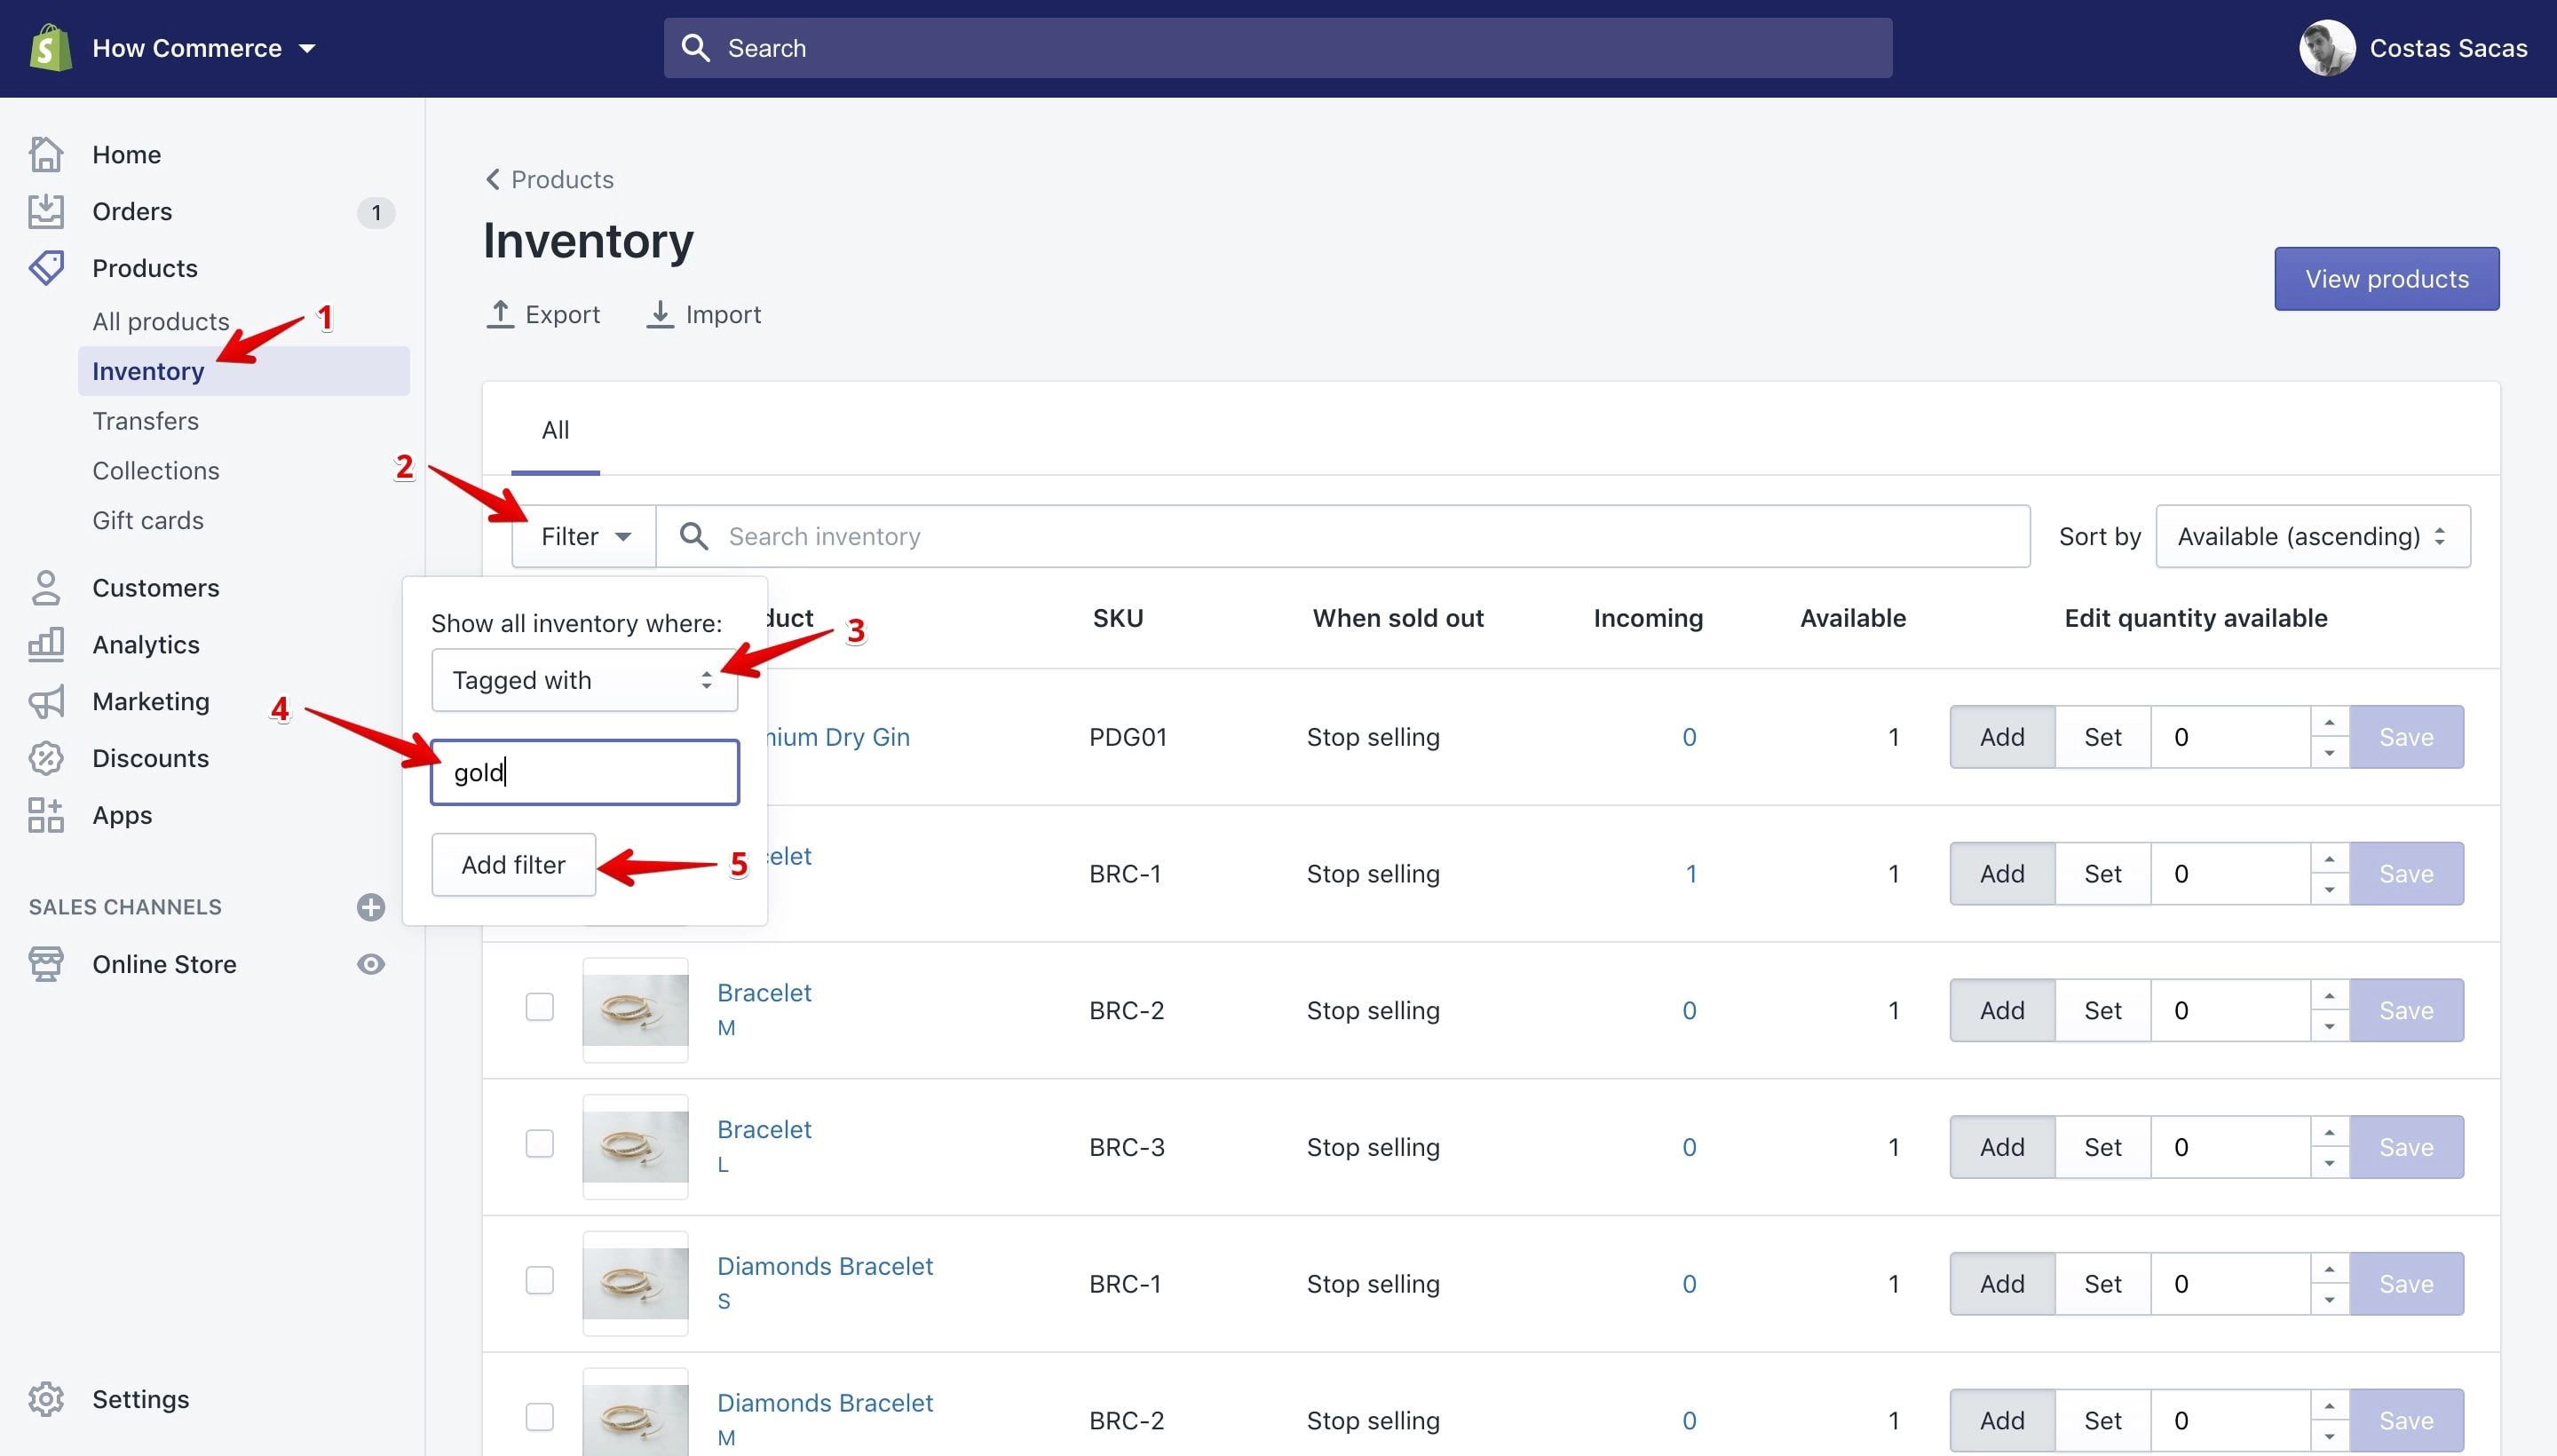
Click the “Filter” button (marked with 2 in the image above) and after select the “Tagged with” from the select box (marked with 3 in the image above).
Add the desired tag in the input box (marked with 4 in the image above) and click on the “Add filter” button (marked with 5 in the image above).
Once you click the “Add filter” button (marked with 5 in the image above) Shopify will list all the blog posts that have the tag.
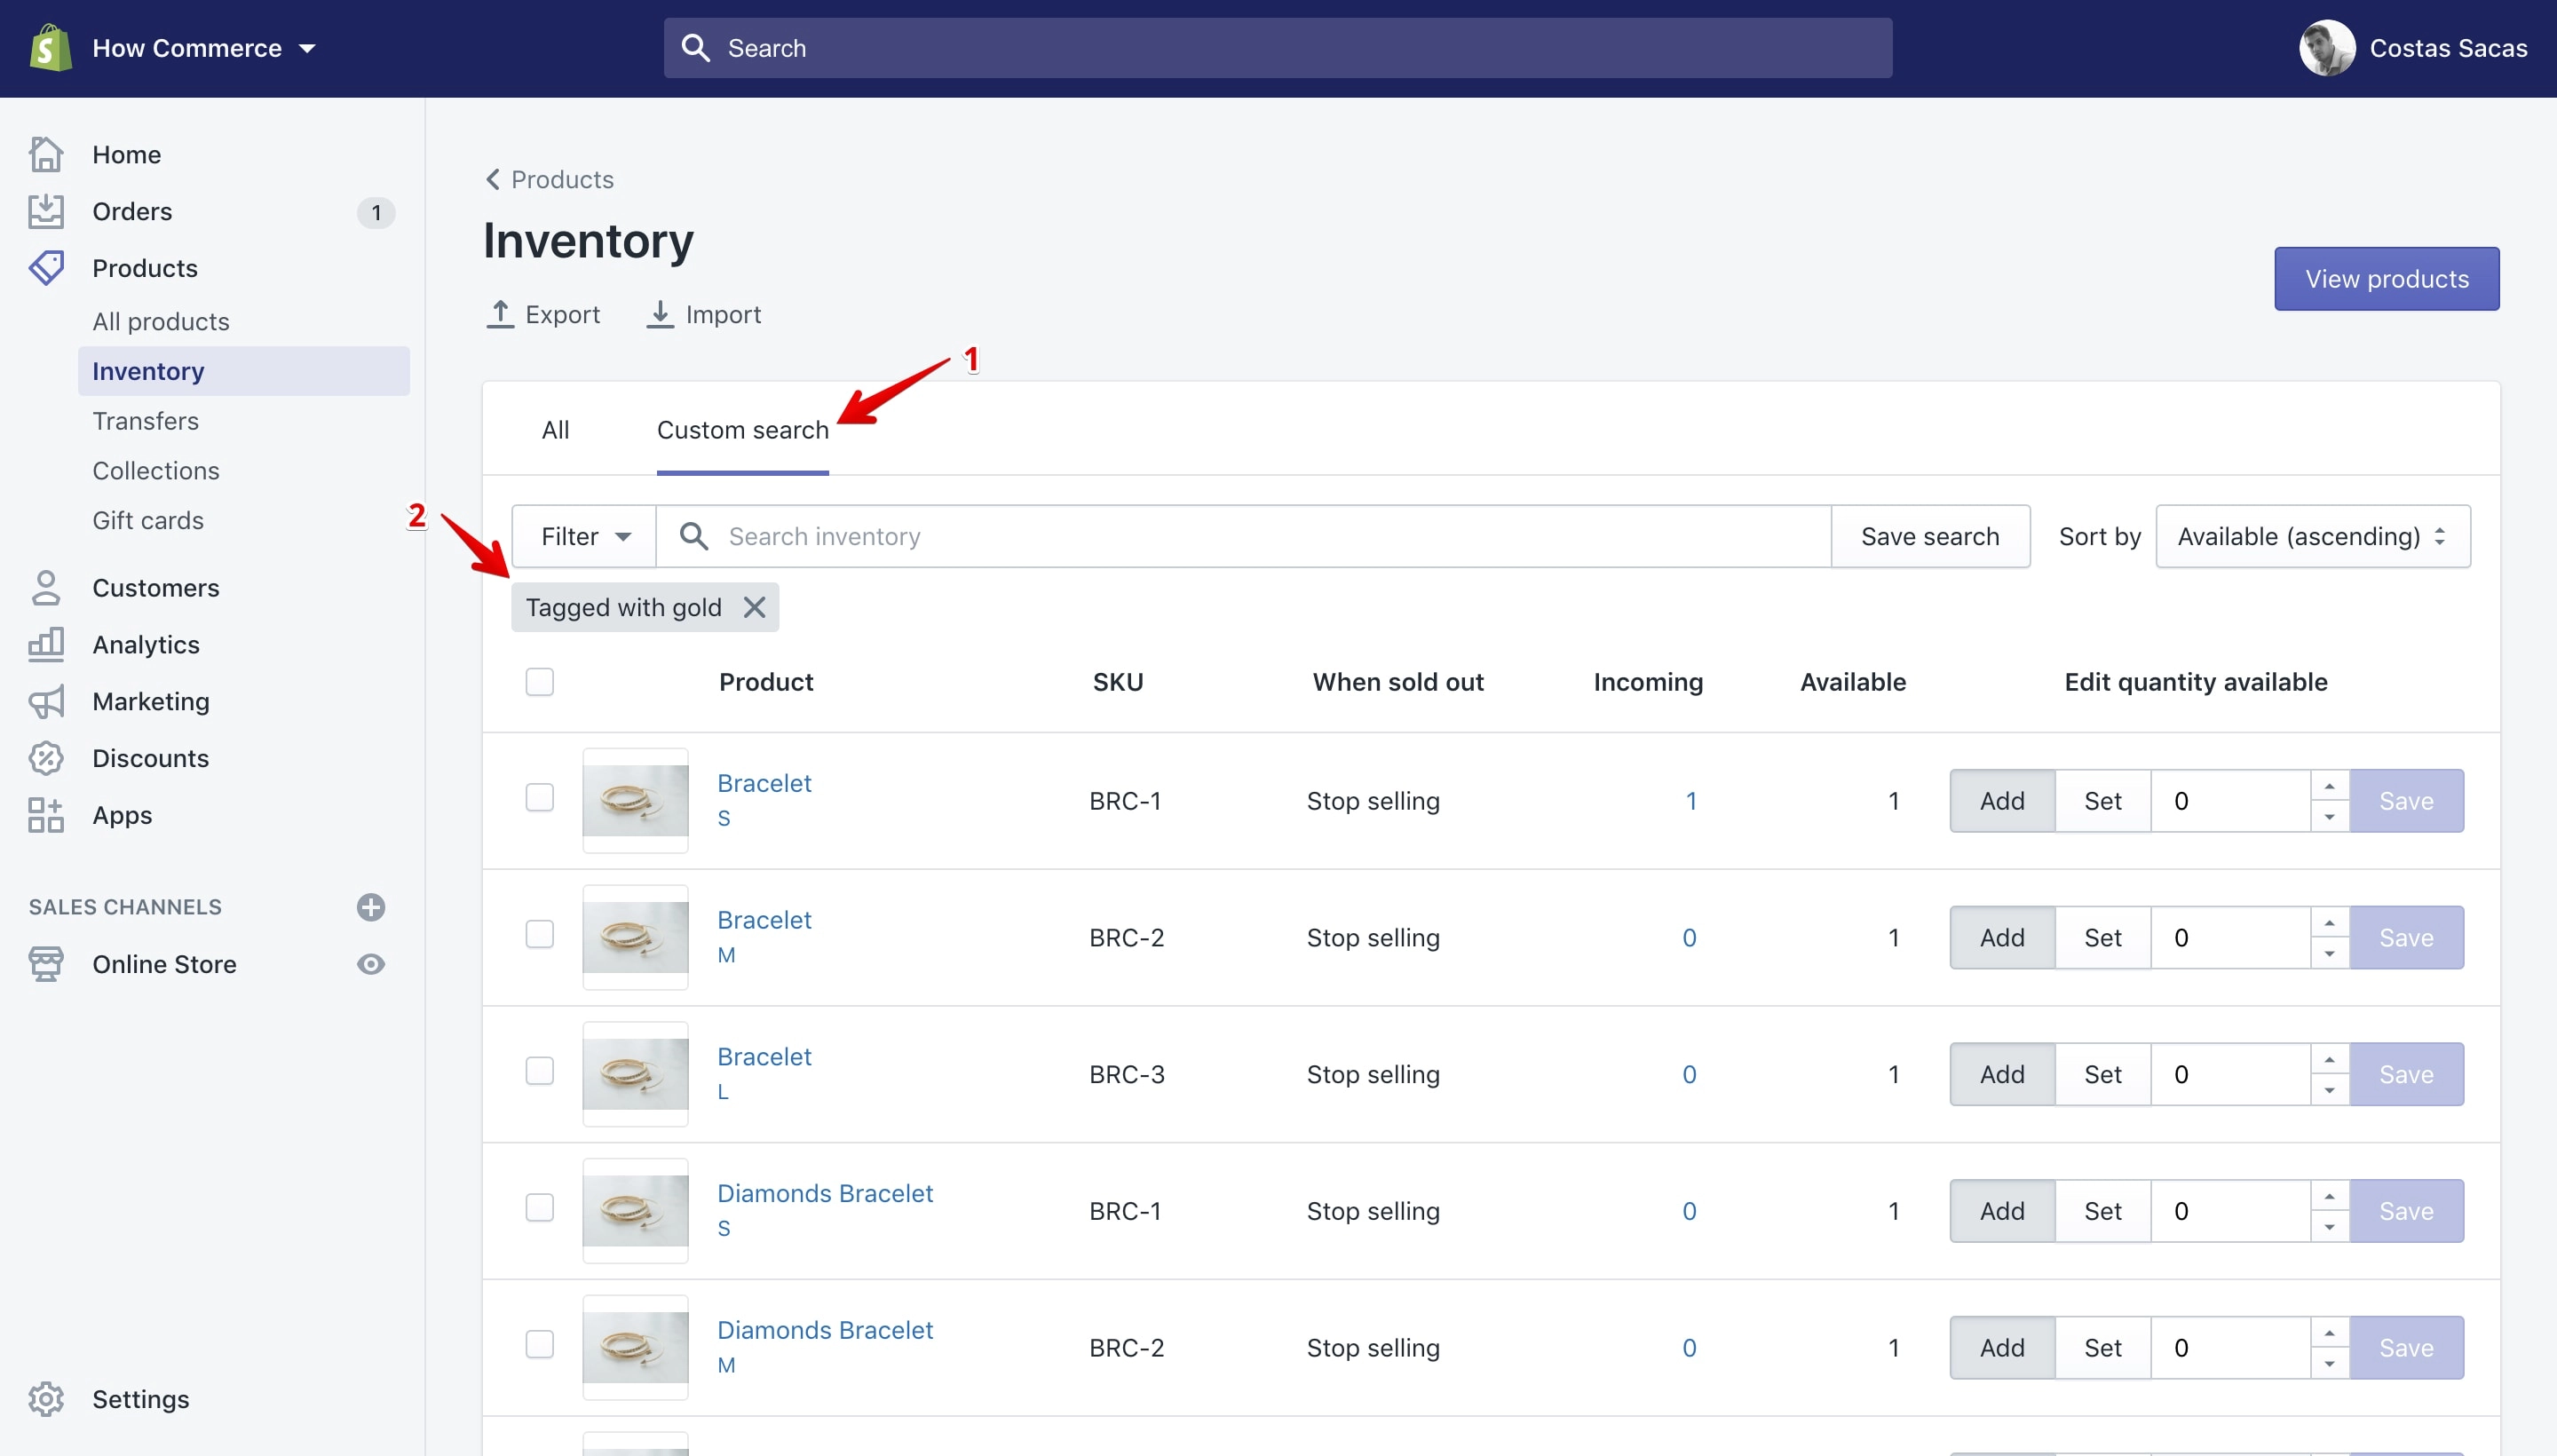
Conclusion
I hope these tools will save you time and increase your productivity. As new tools will arrive in Shopify I’ll make sure to update the article.