

Shopify recently introduced a new Liquid tag called Liquid Doc.
Although it’s fairly new to me as well, I’ve been working with it actively since its release.
New themes, such as Horizon, are already making use of this tag.
Looking ahead, it will likely become a checklist requirement for themes to be approved in the Shopify Theme Store.
That makes it worth the time to understand what it does and how to use it effectively.
Here are my hands-on findings: what works, what to watch out for, and how it can enhance your Shopify projects.
Intro
For this tutorial you'll need to have a code editor. I use VS Code.
For "Theme Check" to work, you need the Shopify Liquid extension in VS Code.
If you use a different editor, make sure a similar extension is available.
The Shopify Liquid extension reads Liquid Doc inside snippets and blocks, then provides smart suggestions based on it.
This extension is essential for Shopify development. It supports:
Coding assistance:
- Syntax highlighting
- Code formatting
- Code completion and hover documentation
- Auto-closing pairs
Liquid and HTML support:
- Liquid tags, filters, and objects
- HTML tags, attributes, and values
Theme development
- Theme, section, and block settings
- Theme translations
- Render tag snippets
Productivity & quality
- Code navigation
- Theme checks and fixes
The last tool you'll need is the Shopify CLI.
If you’ve been working with Shopify themes for a while, there’s a good chance you already have it installed.
The CLI is a command-line tool that makes theme development, app building, and general Shopify workflows much smoother.
It’s a core part of the modern Shopify development stack.
Before continuing with this tutorial, double-check that all the required tools are installed and set up properly.
Without them, you won’t be able to take full advantage of the Liquid Doc tag or see its real benefits in your workflow.
In this guide, I won’t go into step-by-step installation or configuration details for each tool.
Instead, we’ll focus on putting everything into practice and showing you how Liquid Doc can fit into your everyday Shopify theme development process.
What is LiquidDoc?
Liquid Doc is Shopify’s new way of documenting Liquid code.
You can think of it as similar to JSDoc, but at this stage it's simpler and comes with fewer features.
With Liquid Doc, you can add structure to your snippets and blocks by defining inputs, writing clear descriptions, and including usage examples.
This makes your code easier to understand not just for you, but also for anyone else working on the theme.
According to Shopify, Liquid Doc is intended for use specifically on snippets and blocks.
However, in my own custom themes, I’ve found it useful beyond that.
I often use it to document larger sections of code where regular comments wouldn’t provide enough clarity.
Before Liquid Doc, the only option was to rely on basic comments using the old {% comment %} {% endcomment %} tags.
The problem was that these comments were static, they didn’t connect with developer tools.
Liquid Doc changes that.
The documentation you write can now be surfaced in code hints, hover previews, and theme validation through the Theme Check linter.
This helps you build faster, with fewer mistakes, and with more confidence.
In short, Liquid Doc gives Shopify developers a proper way to document Liquid code.
If you’re already familiar with JSDoc, the learning curve will be minimal.
For completeness, I’ll briefly explain what snippets and blocks are.
Most Shopify developers should already be familiar with these concepts, but if not, this tutorial may be a bit challenging to follow.
Understanding theme snippets and theme blocks
I’ll be very brief since I’ll write in the future detailed tutorials about each.
But if you are new to Shopify development just to get an idea about what I’m talking about, I'll explain Shopify theme snippets and blocks.
What is a Shopify theme snippet?
Snippets are small, reusable pieces of code used in Shopify theme development.
They help developers keep code logic clean and maintainable by following the DRY principle (“Don’t Repeat Yourself”).
I always recommend using snippets wherever possible.
Without them, your code can quickly become repetitive and hard to understand.
The next developer working on your theme may find themselves asking, “Why was this built like that?”
Snippets solve that problem by giving your code structure and reusability.
You can render a snippet anywhere it’s needed, inside sections, blocks, or other templates.
Snippets can also accept parameters, as long as you design them to handle those inputs.
This makes them flexible and powerful for building consistent, dynamic components.
Common examples of snippets include: buttons, menus, forms or any piece of code that needs to be reused across the theme.
To use a snippet, you rely on the render tag.
I've written a separate, in-depth tutorial on the render tag - check it out if you'd like to dive deeper into how to use it effectively.
What is a Shopify theme Block?
Blocks are client-facing components that allow merchants to add, remove, and configure features directly in the Shopify theme editor, without touching the code.
As developers, we prebuild these blocks to make life easier for clients and other developers working with premium themes.
Blocks also make it easier for app developers to integrate functionality into a theme, so merchants don’t have to deal with complex code themselves.
Before blocks, app installation was messy.
When you added an app to a Shopify store, you often had to manually copy and paste integration code into the theme files.
For many clients, this was painful and confusing.
And when it came time to uninstall the app, things got worse.
If the changes weren’t tracked - and most clients didn’t track them - it was nearly impossible to know what was added, what was safe to remove, or how to undo the integration without breaking the store.
I’ve personally seen this problem in businesses generating seven figures or more.
After working with multiple agencies and developers, their codebases became tangled and fragile.
In some cases, it took months of work just to clean things up, standardize the theme, and rebuild a scalable, future-proof system.
Blocks changed that.
With just a couple of clicks, merchants can now integrate app features directly into their theme.
And when an app is removed, the related blocks are removed as well - no leftover code and no headaches.
That said, not all apps have adopted blocks.
Many still rely on the old method of manual code injection.
My advice: if you don’t absolutely need an app that uses outdated methods, find an alternative that supports blocks.
Be cautious, though.
Even apps and themes that use blocks don’t always provide full flexibility.
Many block implementations only expose a few settings.
If you need more advanced customization, you’ll still need a developer to create custom blocks and sections tailored to your needs.
For a simple store, this may not matter much.
But for Shopify Plus businesses - where revenue often ranges from six to ten figures or more - every detail matters.
Small changes in design or functionality can significantly impact conversion rates.
In those cases, custom blocks and sections are often worth the investment.
Why does it matter?
Writing Liquid code without documentation leaves plenty of room for subtle mistakes that are easy to miss and hard to debug later. For example:
Missing parameters: If a required parameter is missing, Liquid won’t raise a warning. Your code just won’t behave as expected.
Typos and unknown parameters: These are silently ignored, which means errors can slip by unnoticed.
No type validation: Liquid doesn’t enforce types, so values may be in the wrong format and still render incorrectly.
Unclear expectations: Often, the only way to figure out what a snippet expects is to dig through its source code, which wastes time.
Properly documenting your Liquid code with Liquid Doc solves these issues.
By defining inputs, writing clear descriptions, and adding examples, you reduce mistakes, improve collaboration, and make your codebase easier to maintain.
Missing required parameters won’t raise any warning
If a snippet needs certain variables (for example, a product object or a title string) and you forget to pass them, Liquid doesn’t complain.
The snippet just receives nil or an empty value.
Why it’s an issue:
You may not notice the bug until you test the page manually, and even then the failure might be subtle (like a missing label or broken layout).
Without warnings, these mistakes are easy to miss during development.
Typos or unknown parameters are silently ignored
If you misspell a parameter or pass an extra one that the snippet doesn’t use, Liquid doesn’t give any feedback.
{% render 'product-card', prodcut: product %}Here, “prodcut” is a typo. Liquid won’t throw an error, it will just ignore the variable.
Why it’s an issue: It leads to confusing bugs where data doesn’t show up and there’s no obvious clue why.
Developers waste time tracking down trivial typos.
There’s no type validation to ensure values are in the right format
Liquid doesn’t check whether a value passed to a snippet matches the expected type or structure.
Example: If a snippet expects a boolean for “show_vendor” but you pass a string like "yes", Liquid will still accept it.
Why it’s an issue:
Incorrect types can cause subtle logic errors inside the snippet. You won’t know until you test the UI or inspect the rendered output, which slows down debugging.
Figuring out what a snippet expects often means digging through its source code
Liquid doesn’t have built-in documentation for snippets.
To know what parameters are required or what they do, you often need to open the snippet file and read the implementation directly.
Why it’s an issue:
This wastes time and creates friction, especially when working on a large theme or collaborating with other developers.
There’s no standard way to see expected inputs at a glance.
Liquid Doc solves all these issues by letting you declare parameters, their types, and descriptions directly in the snippet.
Then your code editor (through theme-check, autocompletion, or hover hints) can catch missing parameters, typos, or wrong types, and show what the snippet expects without opening its source.
So this is a time saver.
Let’s see how you can use it to properly document your code and make everything clean, scalable and easy to maintain.
How to use Liquid Doc
LiquidDoc adds structured documentation directly inside your snippets or blocks using the {% doc %} and {% enddoc %} tags.
Everything written between these tags describes the snippet’s expected inputs, parameters, and usage details. This makes it clear - both to you and to anyone else working on the theme - what the snippet requires and how it should be used.
Here's an example of how a block documented with LiquidDoc looks in practice:
{%- doc -%}
  Your documentation text here.
{%- enddoc -%}
Liquid Doc comments should generally be placed above the code being documented.
At the time I’ve written this tutorial Liquid Doc supports 3 tags:
- @description – Explains what the snippet or block does.
- @param – Defines the parameters the snippet expects, including names and types.
- @example – Provides an example of how to use the snippet in practice.
These tags are just the starting point. Shopify will probably expand LiquidDoc with additional tags and functionality as the system evolves.
How to use @description ?
To add a description for the snippet or code block you can do it in two ways.
Example 1
In this example, you can add the @description tag followed by the snippet description.
One important detail: the @description tag can be placed anywhere inside the {% doc %} block. Its position doesn’t matter.
You can put it above other tags, below them, or even in between. It will always be recognized as the snippet's description.
{% doc %}
  @param
  @description This is my snippet description.
  @param
{% enddoc %}
Example 2
You can also document a snippet by simply writing a plain description, without using the @description tag.
For this method to work, the description text must come before any other @ tags. In other words, your description should be the very first content inside the {% doc %} block.
If another tag appears above it, LiquidDoc won't recognize the text as the snippet description.
{% doc %}
  This is my snippet description.
  @param
  @param
{% enddoc %}
How to use @param ?
Parameters are the inputs a snippet or block accepts.
Documenting them properly helps both developers and tools understand what the code expects.
The syntax for defining a parameter in Liquid Doc looks like this:
@param {type} name - descriptionThe name of the @param is required while type and description are optional.
When defining parameters in LiquidDoc, you can assign a type to help tools validate inputs and guide developers.
These types fall into four main categories:
1. string - Text values
Represents plain text.
Example: "Hello World" or 'SKU123'
Used for things like titles, handles, or IDs.
Why it matters: Ensures developers don’t pass numbers or objects when a simple string is expected.
Example:
@param {string} title - The heading text for the card.2. number - Numeric values
Represents integers or decimals.
Example: 5, 99.99
Useful for things like product limits, quantities, or rating values.
Why it matters: Prevents bugs where someone might mistakenly pass text like "five" instead of 5.
@param {number} limit - Maximum number of products to display.3. boolean - True/false values
Represents a logical switch: true or false.
Example: true, false
Used for options like showing/hiding an element.
Important note in Liquid: Every value in Liquid is evaluated as truthy or falsy (e.g., an empty string "" is falsy, but "false" as a string is actually truthy).
Why it matters: Declaring a parameter as boolean signals that it should only accept true or false.
@param {boolean} show_vendor - Show the vendor name if true.4. object – Complex Liquid types or non-primitives
Represents structured data rather than a simple value.
Examples:
- A product object
- A collection object
- An array of products (collection.products)
Why it matters: Lets developers know that the parameter expects a full Liquid object (with properties), not just text or a number.
@param {object} product - The product object to display.Optional parameters
If you want to make a parameter optional you should mark it between square brackets.
Example:
@param {object} [product] - The product object to display.In practice using these types inside Liquid Doc ensures that editors and validation tools can:
- Autocomplete parameter names.
- Flag invalid values or typos.
- Show hover hints describing expected input.
How to use @example?
The @example tag in Liquid Doc is used to show how a snippet or block should be implemented in real code.
This is extremely valuable, not only for other developers working on the same theme but also for your future self.
Usage examples appear directly in hover hints, autocomplete suggestions, and documentation checks, making it much easier to understand how a snippet is supposed to work without digging through its source.
Below is a sample snippet with parameters and two usage examples:
{% doc %}
  @description Test display snippet
  @param {number} price - Price value
  @param {boolean} [show_compare_at] - Whether to show the compare-at price
  @example
  {% render 'test', price: product.price, show_compare_at: true %}
  @example
  {% render 'test',
    price: product.price,
    show_compare_at: true
  %}
{% enddoc %}
In the example above, you saw how the @param tags define what types parameters should be and what they do.
The @example tag complements this by showing how those parameters are actually passed into a snippet or block.
A few key points to keep in mind:
Multiple examples are allowed and encouraged.
Each example can illustrate a different use case or parameter combination.
Multi-line examples are supported.
They are automatically formatted to start on a new line, making longer snippets easier to read.
Consistency is crucial.
Your examples should always align with the @param definitions so developers immediately see the correct way to pass inputs.
Better documentation means fewer support tickets.
If you’re selling a theme, well-written examples reduce confusion, cut down on support requests, and save you time.
For instance, when someone hovers over a parameter like price in their editor, these documented examples will appear directly in the hover preview.
That way, developers don’t need to open the snippet source just to figure out how it works.
Here's what a good example looks like:
@example
{% render 'test', price: product.price, show_compare_at: true %}
A bad example:
@example
{% render 'test', price: "product.price", show_compare_at: "true" %}
In the example above, notice that "product.price" is written as a string, not an actual object property.
Similarly, "true" is shown as a string instead of a boolean.
These small mistakes can cause big confusion.
For beginners especially, it’s frustrating to follow the @example exactly as written, only to hit errors again and again.
That’s why it’s critical to provide accurate, real-world examples.
Treat the @example tag as both documentation and real-time developer guidance.
Done correctly, it prevents errors, saves time, and builds confidence for anyone working with your snippets or blocks.
Real-World Use Cases
Let’s now see some real-world examples in the code editor on how this works.
Hover documentation
When you hover over a snippet that you want to render for example, inside a block or a section a tooltip will appear showing the full Liquid Doc documentation for that snippet.
Let’s walk through an example using a button block that renders a snippet.
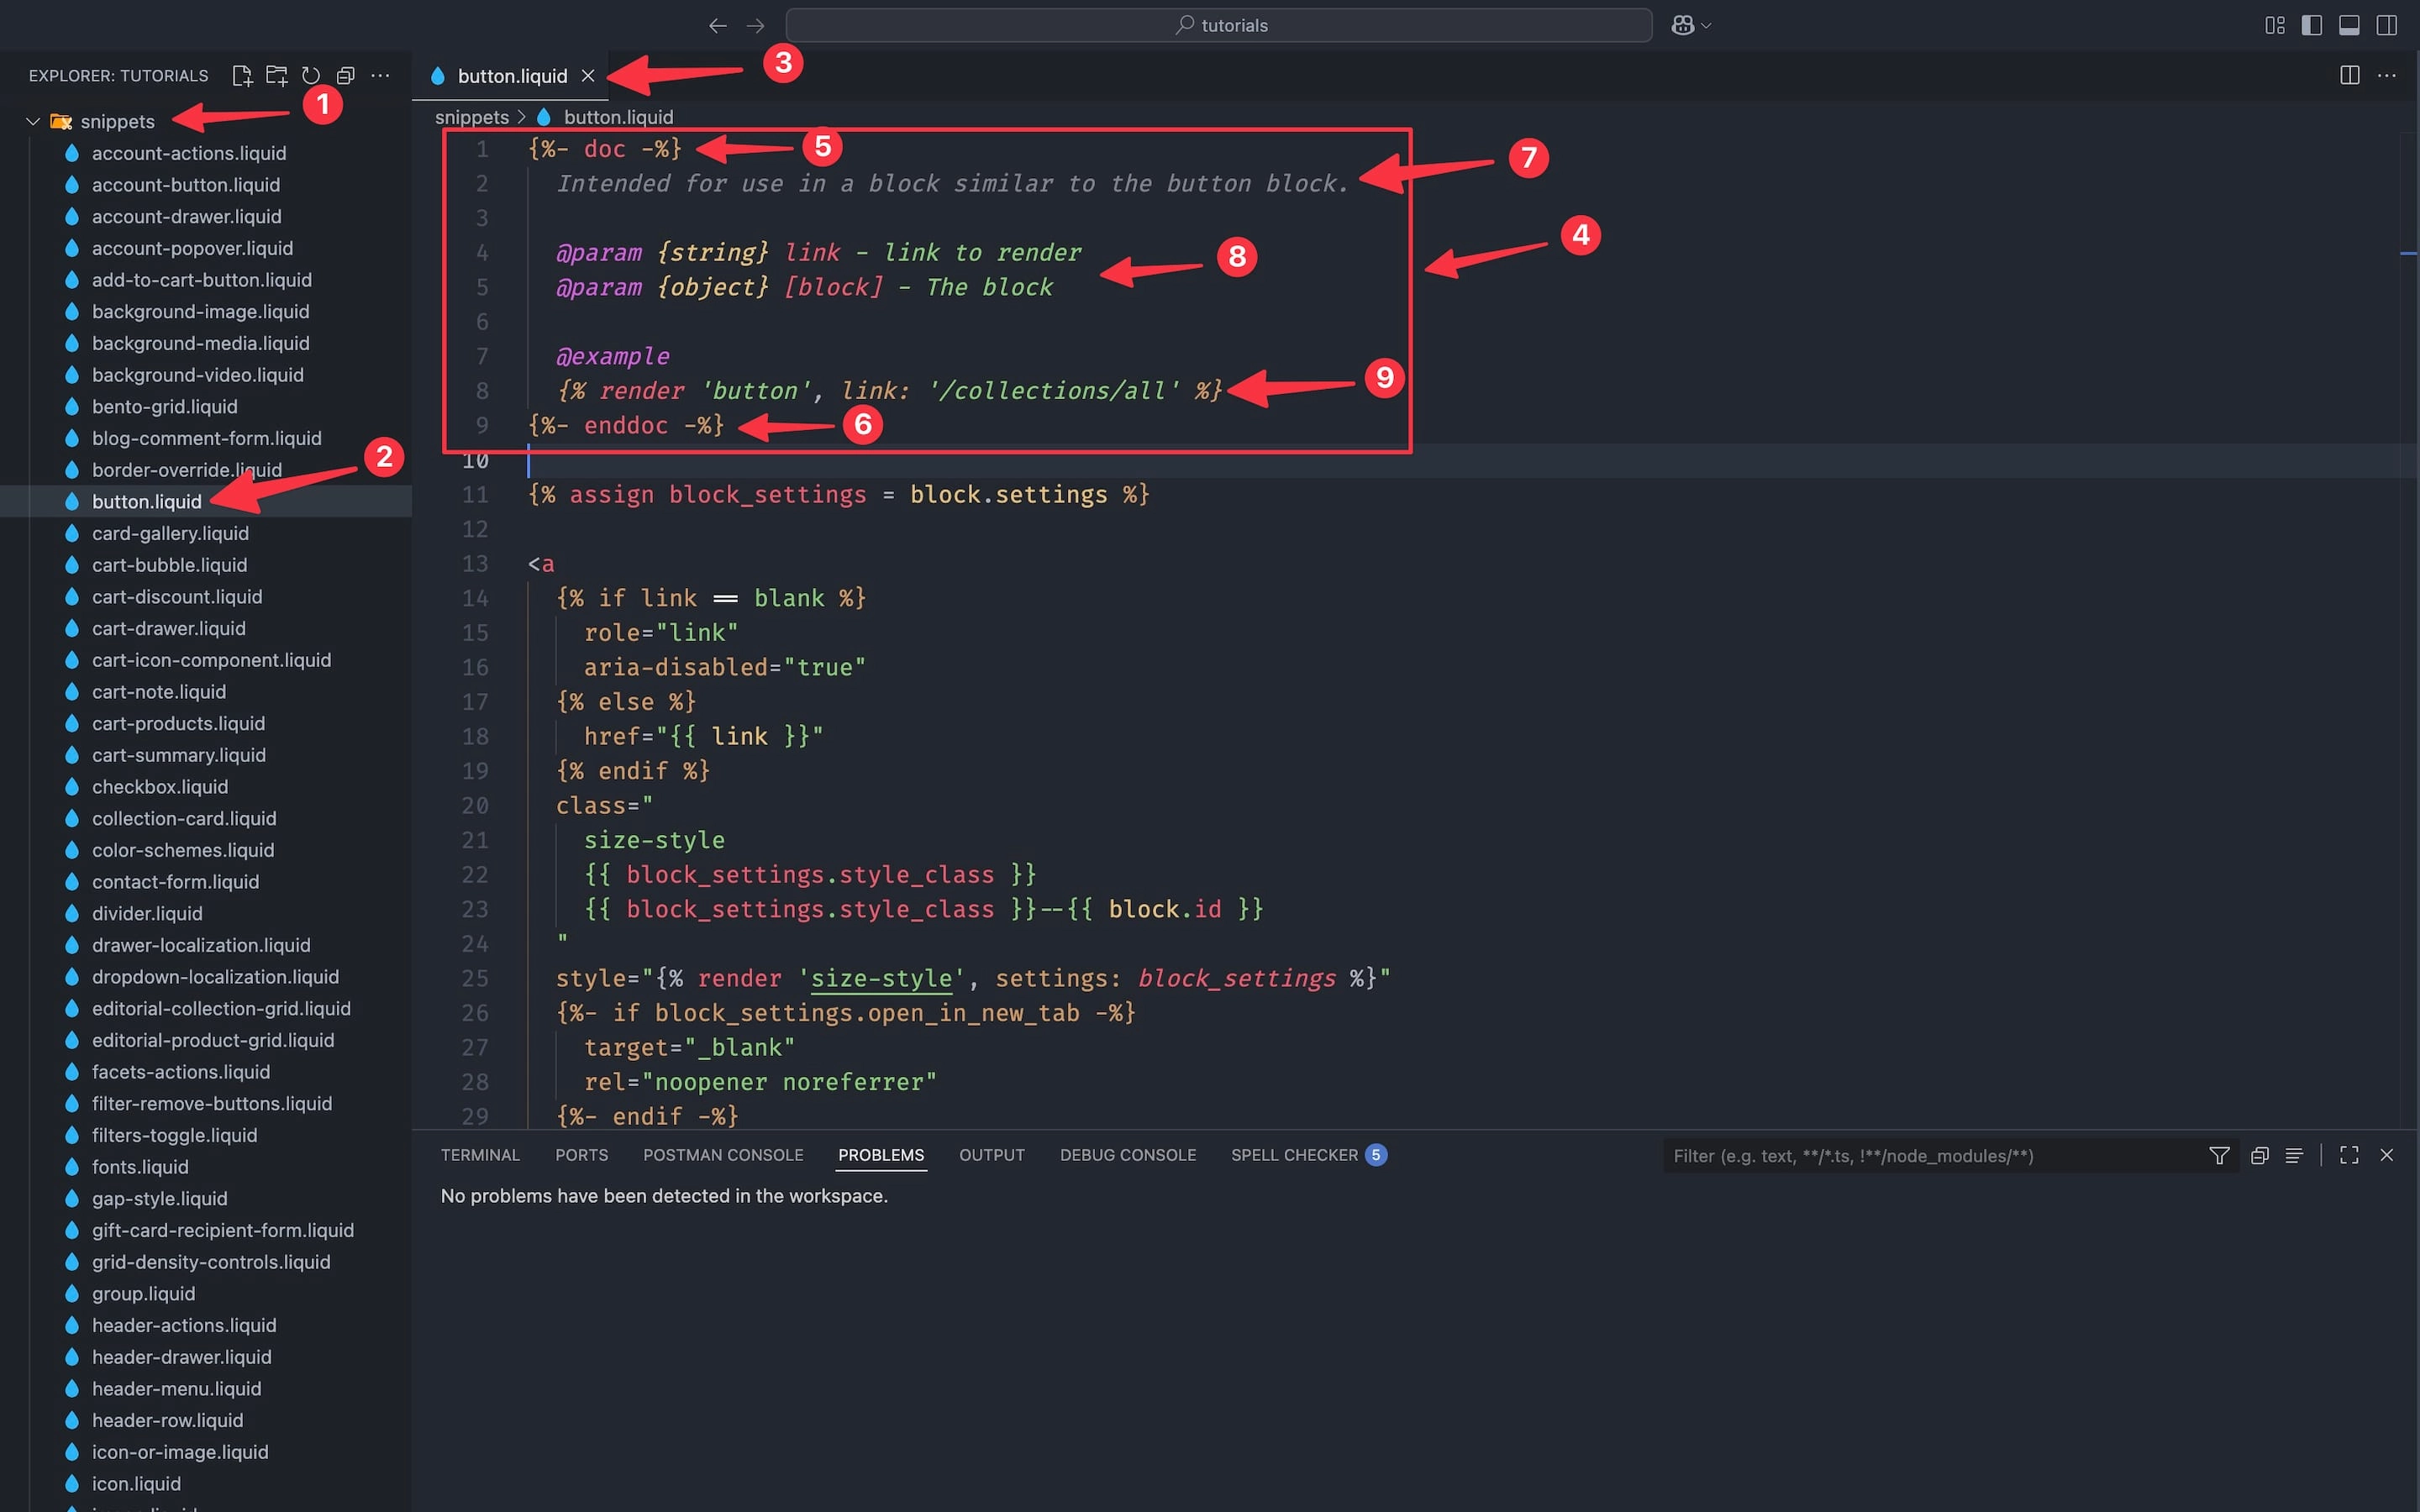
In the snippets folder (marked with 1 in the image below), you’ll find the file “button.liquid” (marked with 2 in the image below).
This file contains the reusable button code.
The “button.liquid” snippet is opened in the code editor (marked with 3 in the image below).
At the very top of the file, you can see the full Liquid Doc block (marked with 4 in the image below).
The documentation starts with the {%- doc -%} tag (marked with 5 in the image below) and ends with the {%- enddoc -%} tag (marked with 6 in the image below).
The first line, shown in grey, is the description (marked with 7 in the image below).
Notice it doesn’t use the @description tag, because it’s placed immediately after the opening {%- doc -%} tag.
As explained earlier, @description is only needed if you put the description below other tags, such as @param (marked with 8 in the image below).
In this example, there are two @param definitions: one is mandatory and the other is optional.
The first @param is defined as a string and is expected to contain a link.
If you don't provide this parameter when rendering the snippet, the code won't work as intended and may throw errors.
@param {string} link - link to renderThe second @param is defined as an object and is optional.
You can tell it’s optional because the parameter name is wrapped in square brackets, for example, [block].
This notation makes it clear to developers and tools that the parameter isn't required when rendering the snippet.
@param {object} [block] - The blockThe last tag in this example is @example (marked with 9 in the image below).
This shows how the snippet should be rendered so that Theme Check doesn’t throw any errors.
Keep in mind, this is just an example.
The link shown can be replaced with any valid link you want, as long as it’s a string type.
One note here: this example comes from a Shopify free theme.
Personally, I think the @param descriptions could be more detailed.
Clearer, developer-written documentation would make these snippets even easier to use and reduce the chances of mistakes.
Now that we've reviewed the snippet we want to render, let's move on to the block where it will be used.
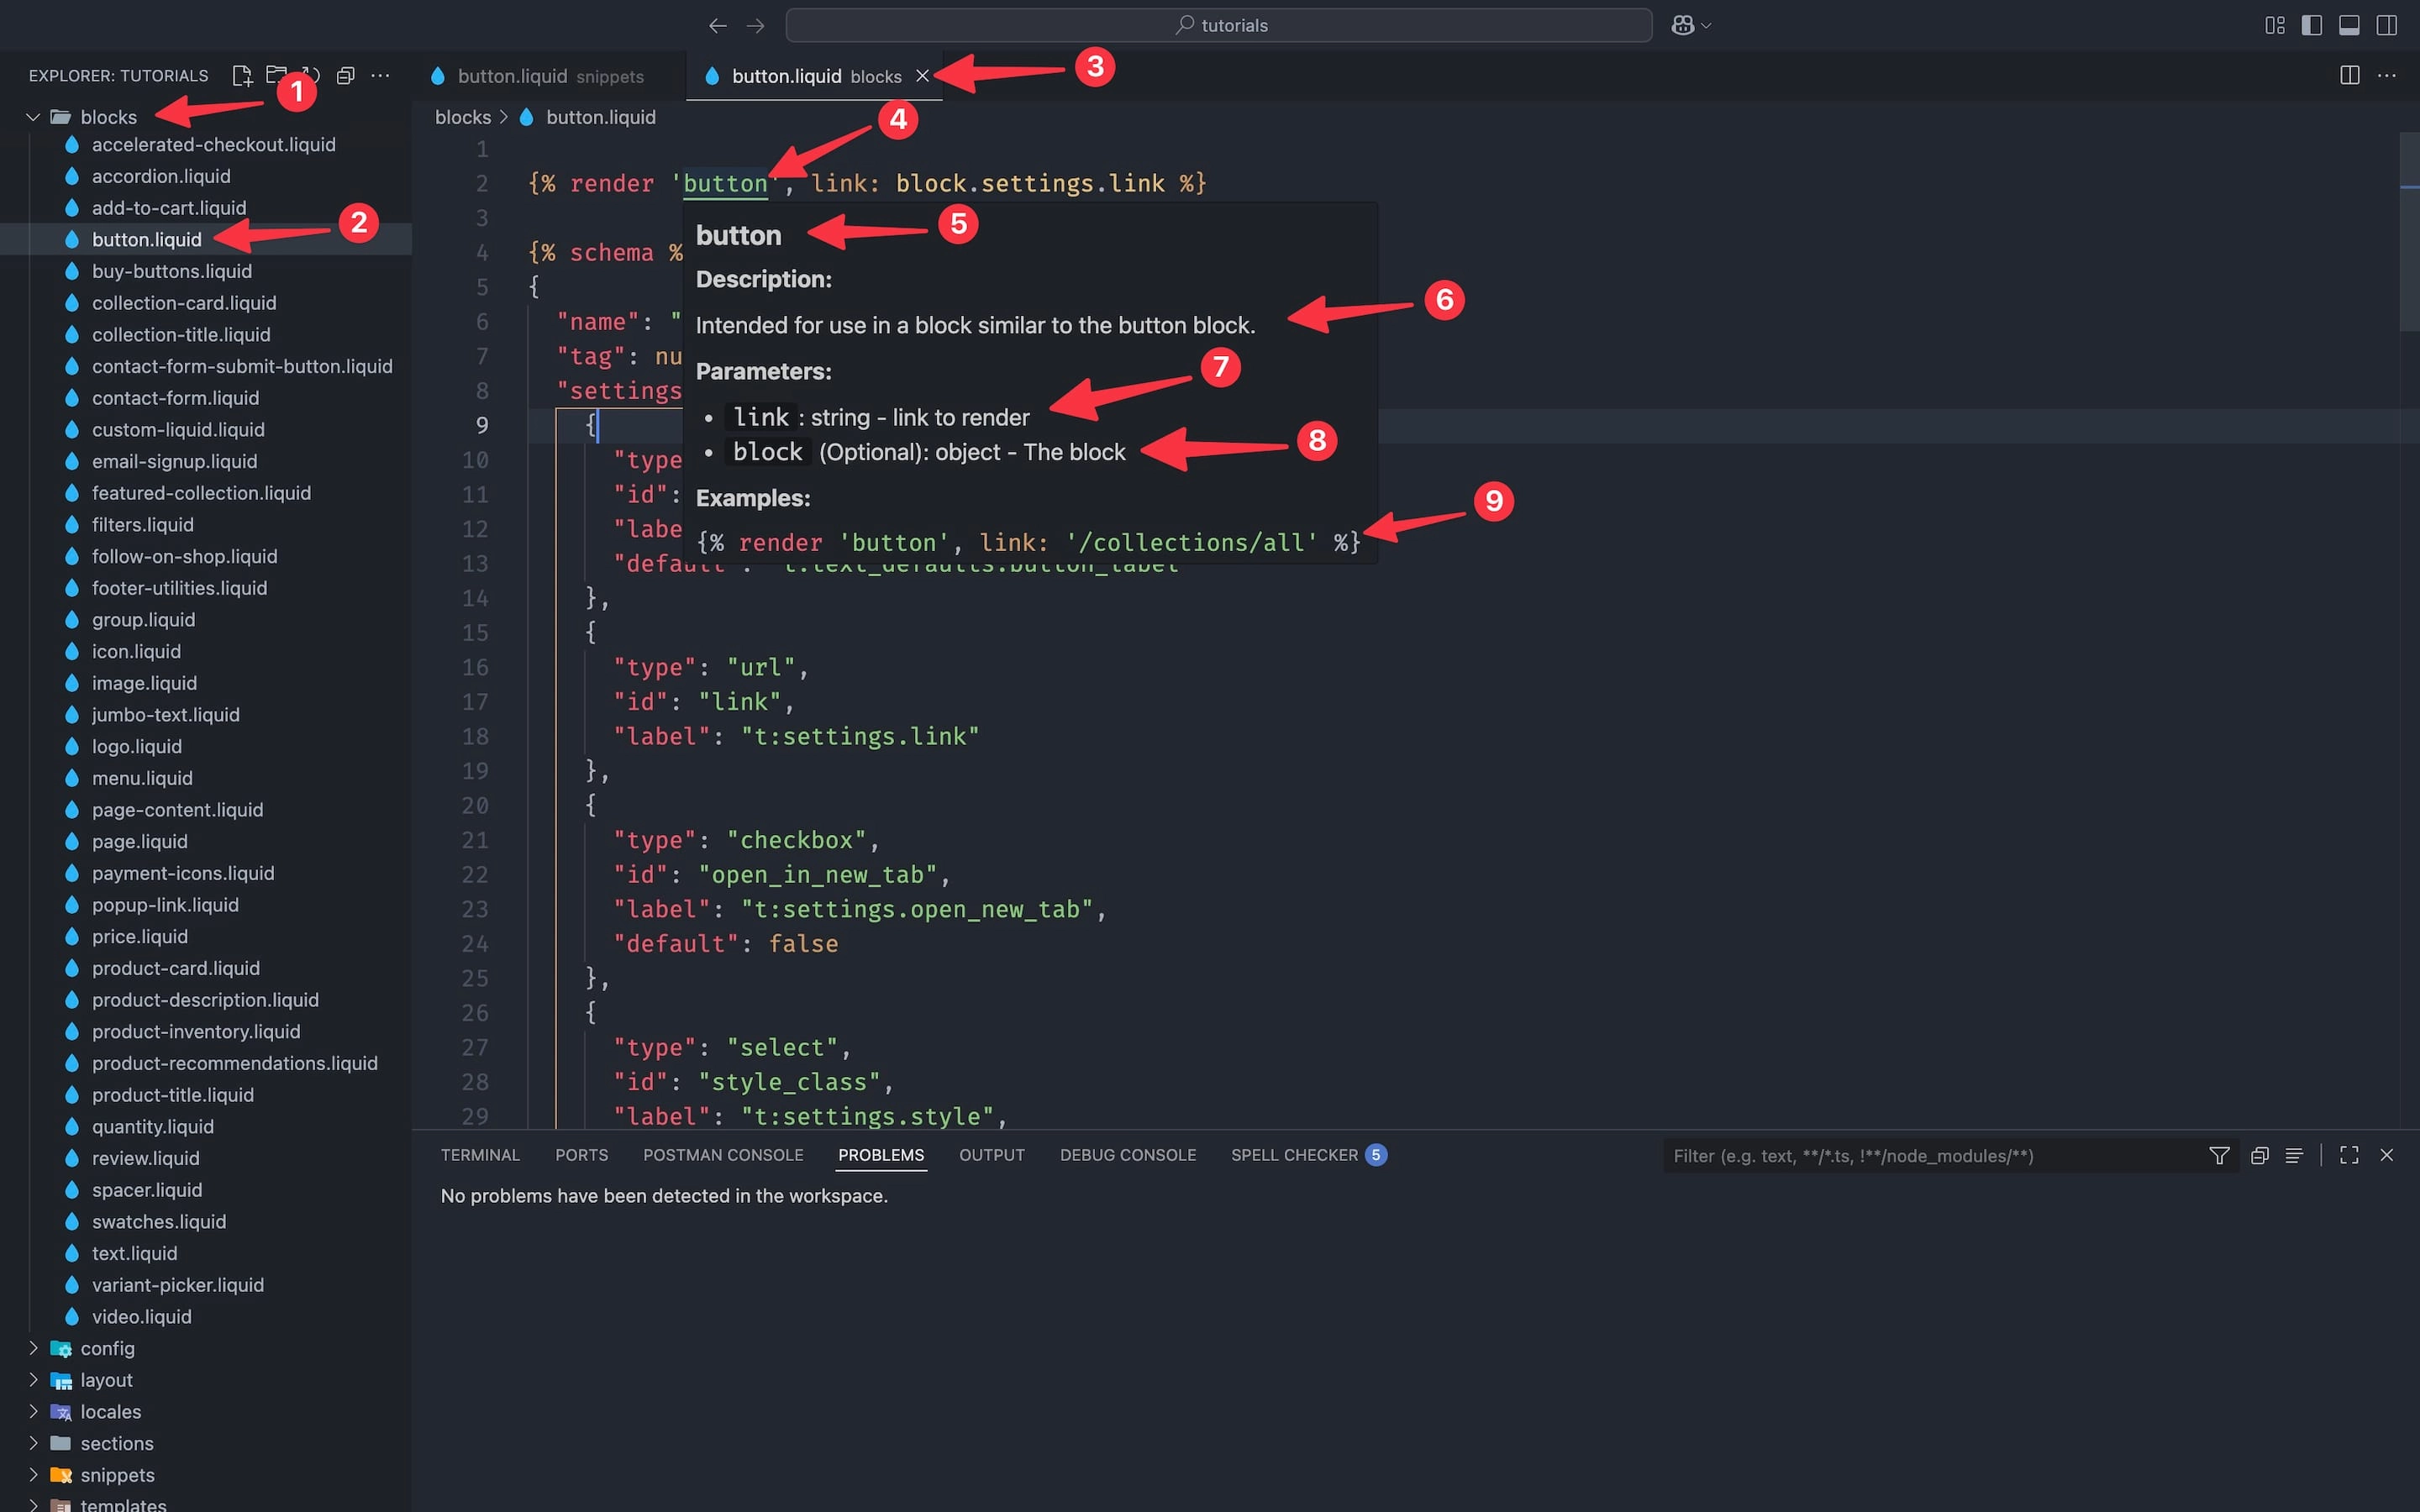
In the blocks folder (marked with 1 in the image below), open the file button.liquid (marked with 2 in the image below).
Notice that the block filename is the same as the snippet.
While not an official Shopify standard, this is a common naming convention that helps developers quickly understand the connection between files.
With the file open in the code editor (marked with 3 in the image below), locate the render line.
In the “render” line you can see the snippet name “button” (marked with 4 in the image below).
When you hover over the snippet name, a tooltip appears showing all the Liquid Doc documentation defined inside the snippet.
The tooltip includes:
Snippet name (marked with 5 in the image below): in this case, button.
Description (marked with 6 in the image below): exactly as written in the {% doc %} block. Even though we didn’t explicitly use the @description tag, the system automatically recognizes the first line as the description and labels it as such.
Parameters:
link – required (marked with 7 in the image below). If you don’t pass it, the snippet will fail.
[block] – optional (marked with 8 in the image below). The square brackets indicate that this parameter isn’t mandatory.
If you remove the brackets and rename it to block, it becomes required, and Theme Check will throw an error if you forget to include it.
Examples (marked with 9): usage examples showing how the render line should look. These come directly from the @example tags you add inside the snippet.
This hover tooltip is where Liquid Doc really shines.
It surfaces all the important details, description, parameters, and examples, right where you need them, without forcing you to dig into the snippet's source file.
Code completion
Once you’ve checked the hover tooltip and seen which parameters the snippet requires, you can start typing them into your render line.
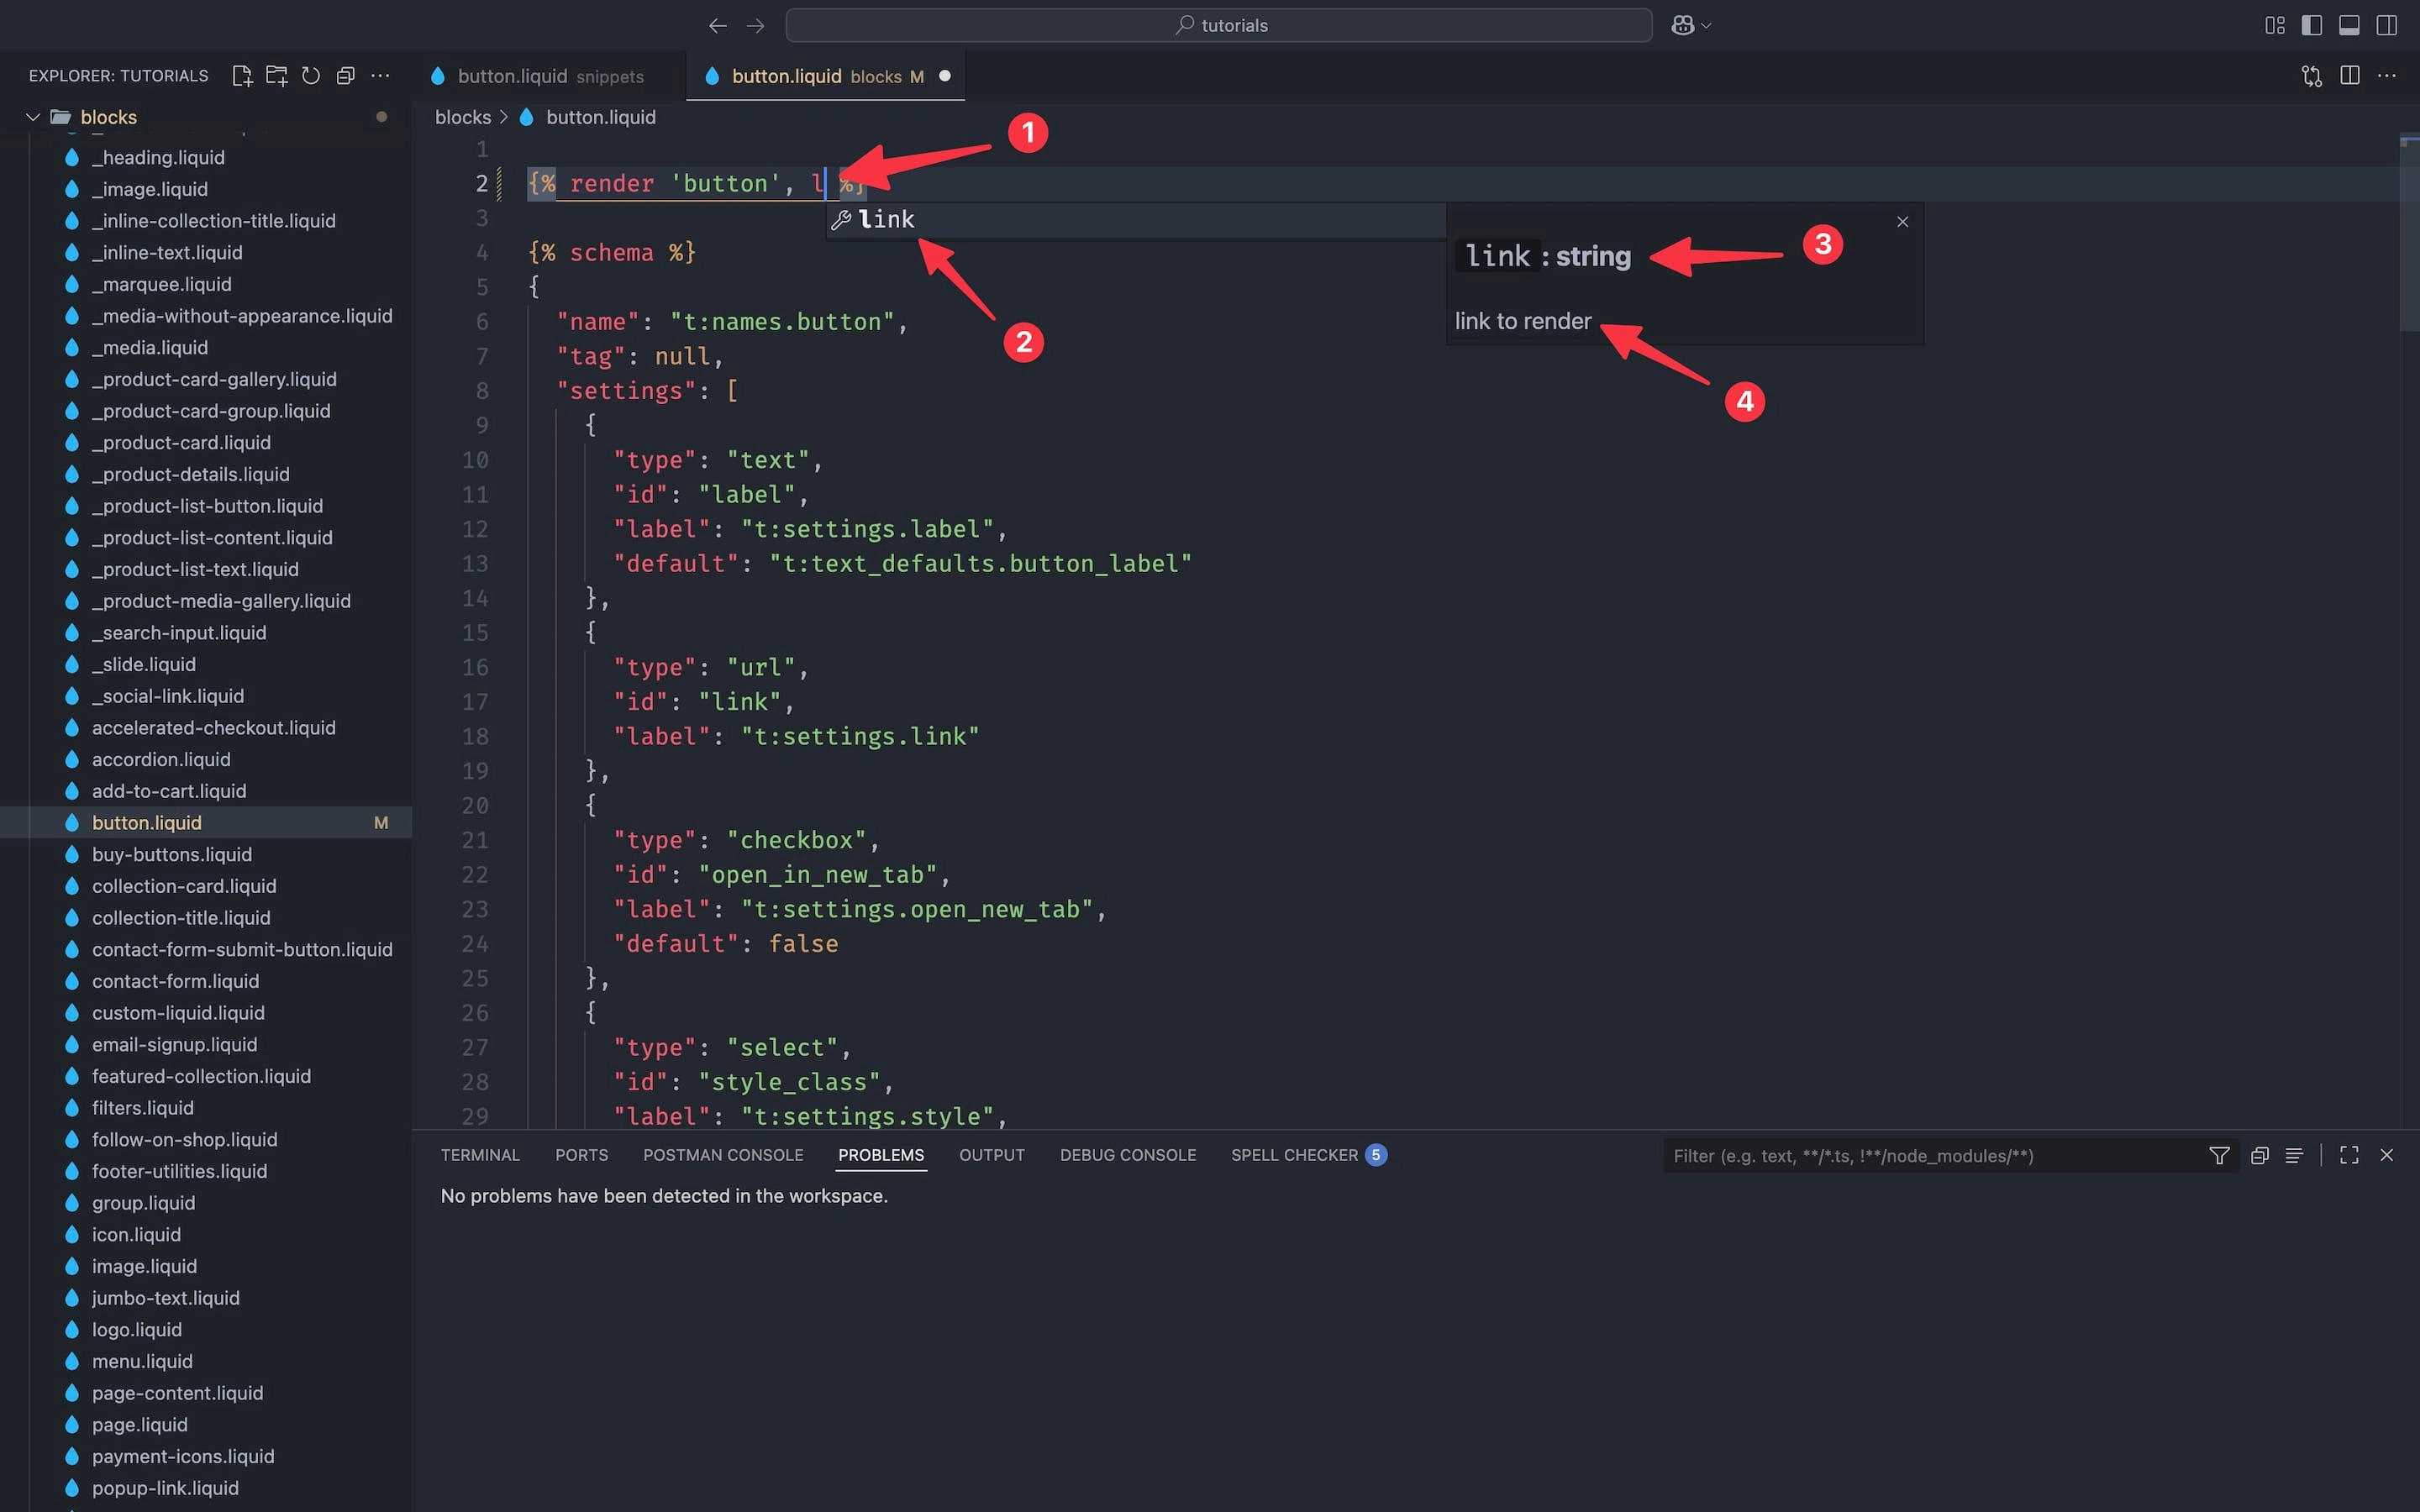
For example, when you type the first letter of the parameter - in this case, l (marked with 1 in the image below) - an autocomplete tooltip appears showing the required parameter name, link (marked with 2 in the image below).
After selecting or continuing to type, another tooltip displays additional details:
The name of the parameter (link) (marked with 2 in the image below).
The type of the parameter, in this case string (marked with 3 in the image below).
The description of the parameter, exactly as defined in your LiquidDoc block (marked with 4 in the image below).
At this point, you can either finish typing the parameter manually or simply click on the suggested name in the tooltip (marked with 2 in the image below).
If you choose to click the suggestion in VS Code, the editor will automatically insert the parameter for you.
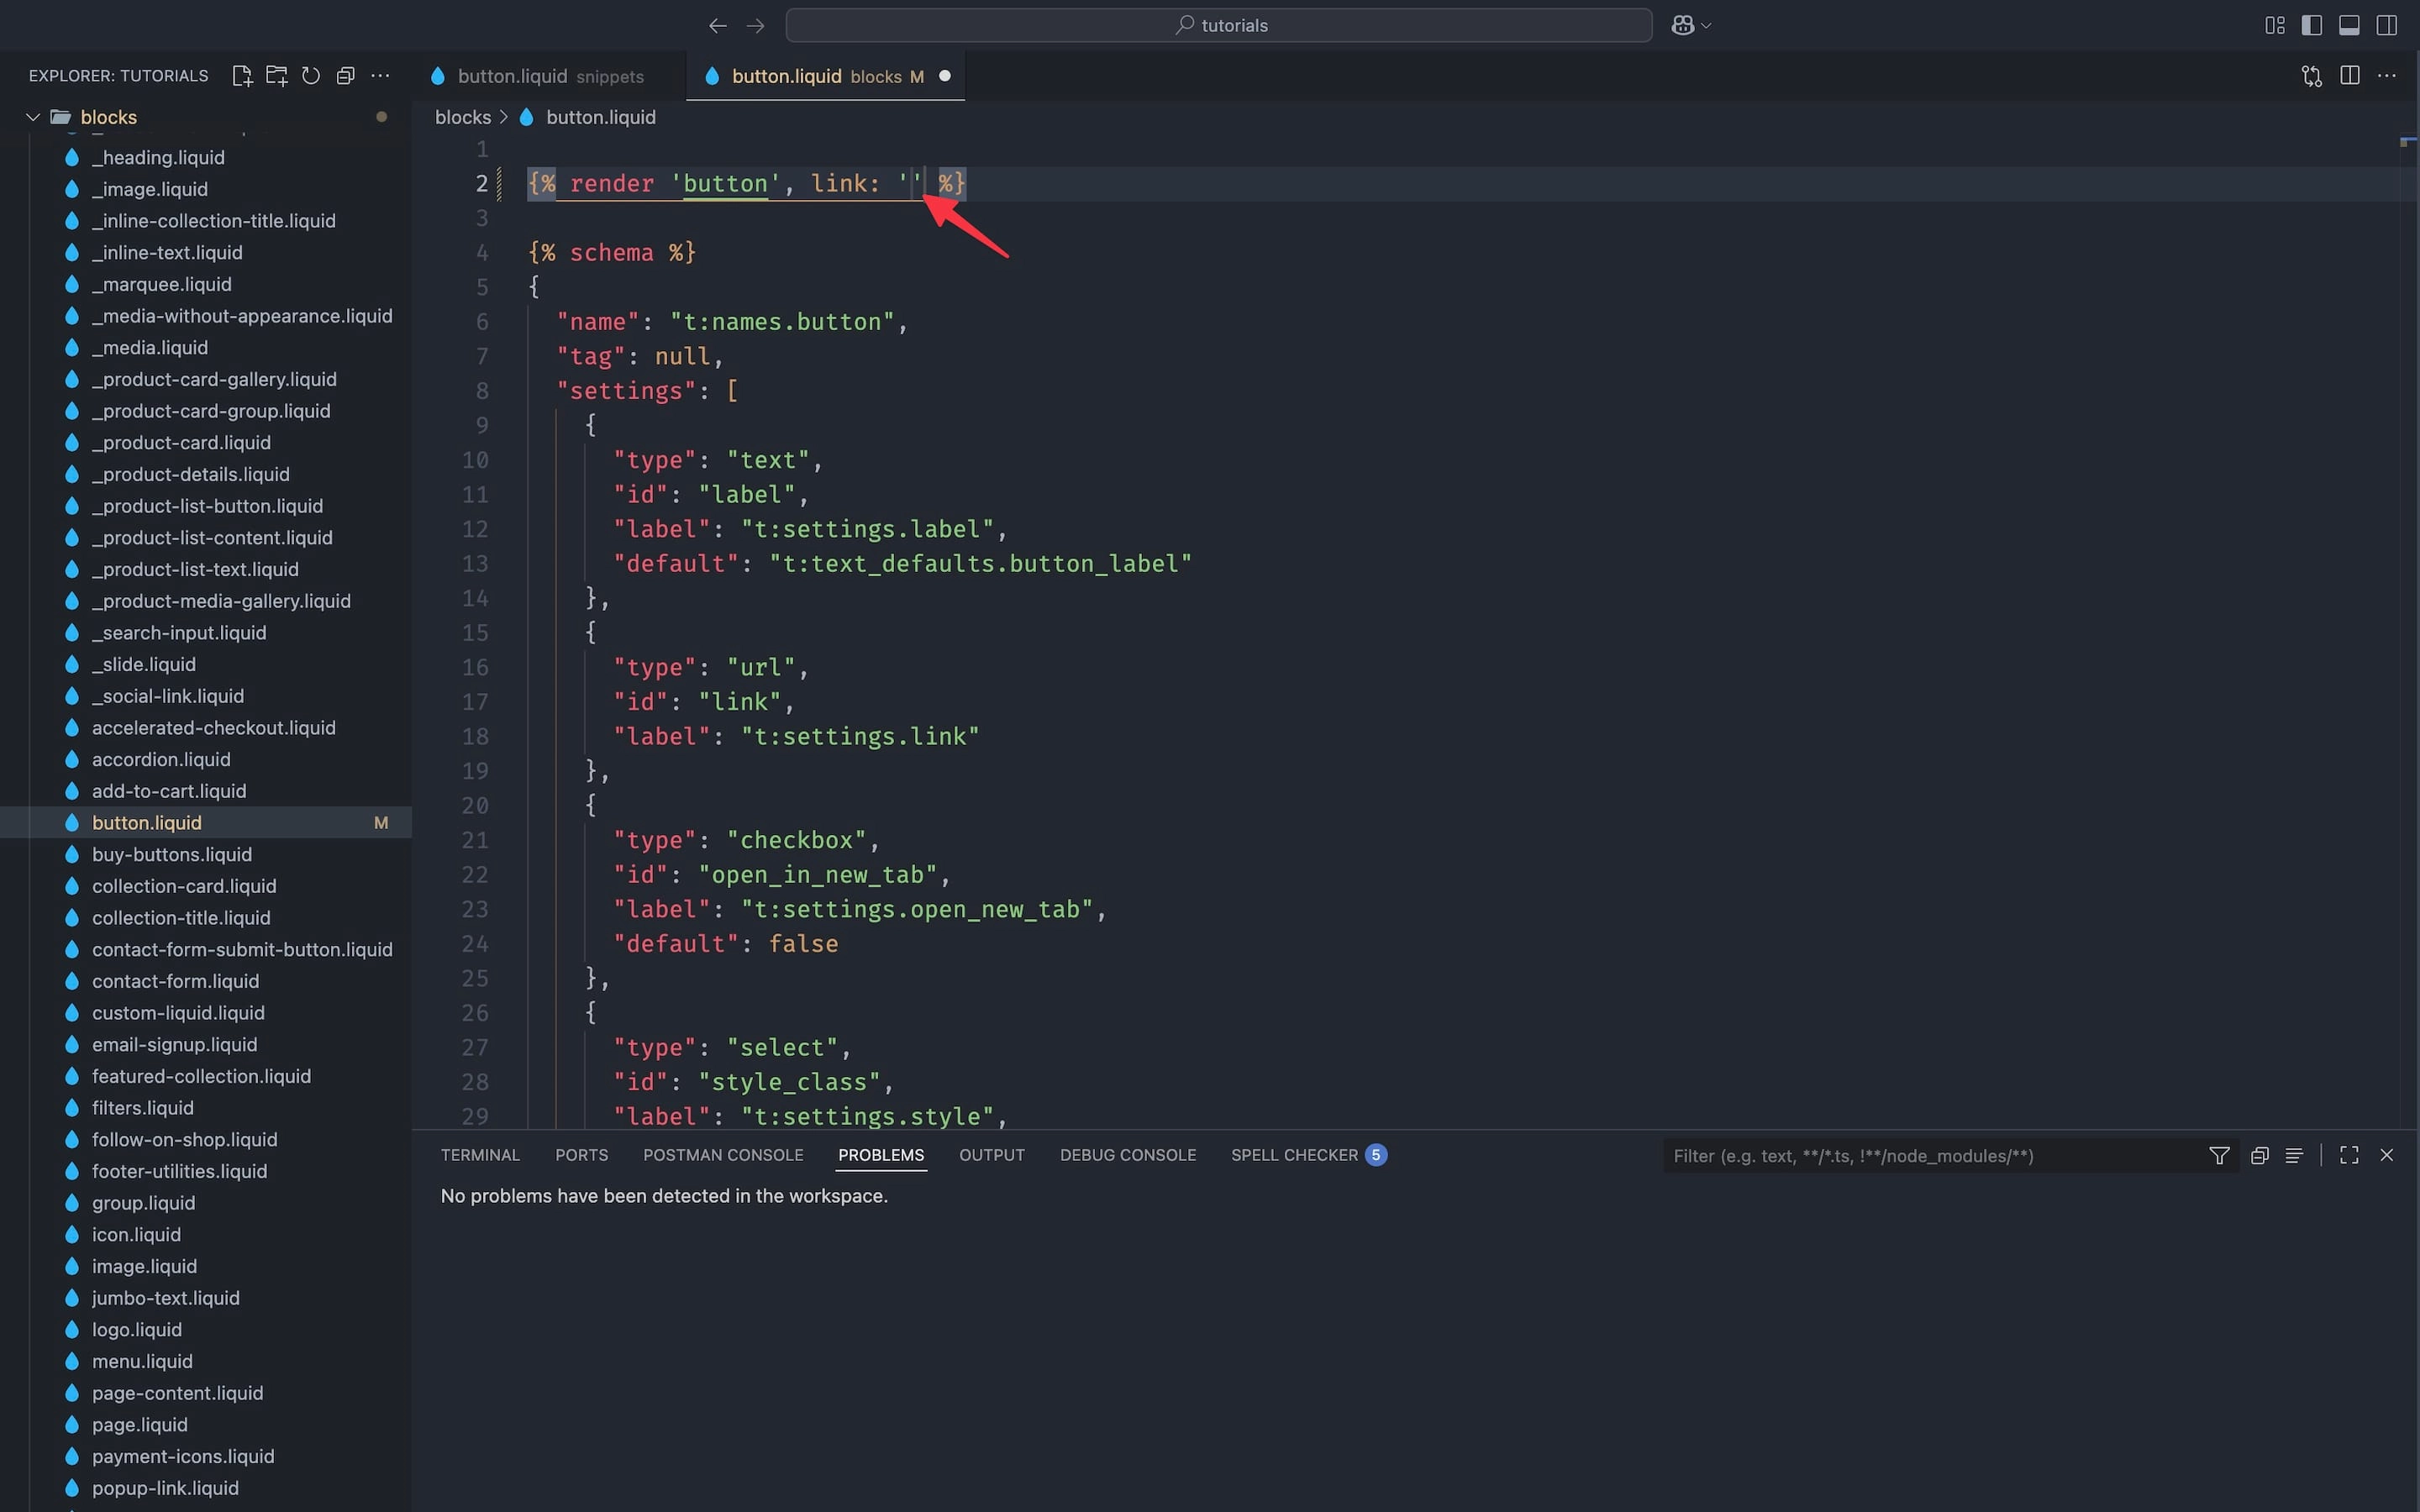
It autocompletes the parameter name and places the cursor inside a pair of single quotes, leaving the value empty so you can type it directly.
In this case, the autocomplete inserts “link: ''”, with the cursor positioned between the quotes, ready for you to add the link value. (See image below.)
This small feature saves time and helps ensure you’re always using the correct parameter name and syntax.
Parameter validation
One of the most useful benefits of Liquid Doc is parameter validation.
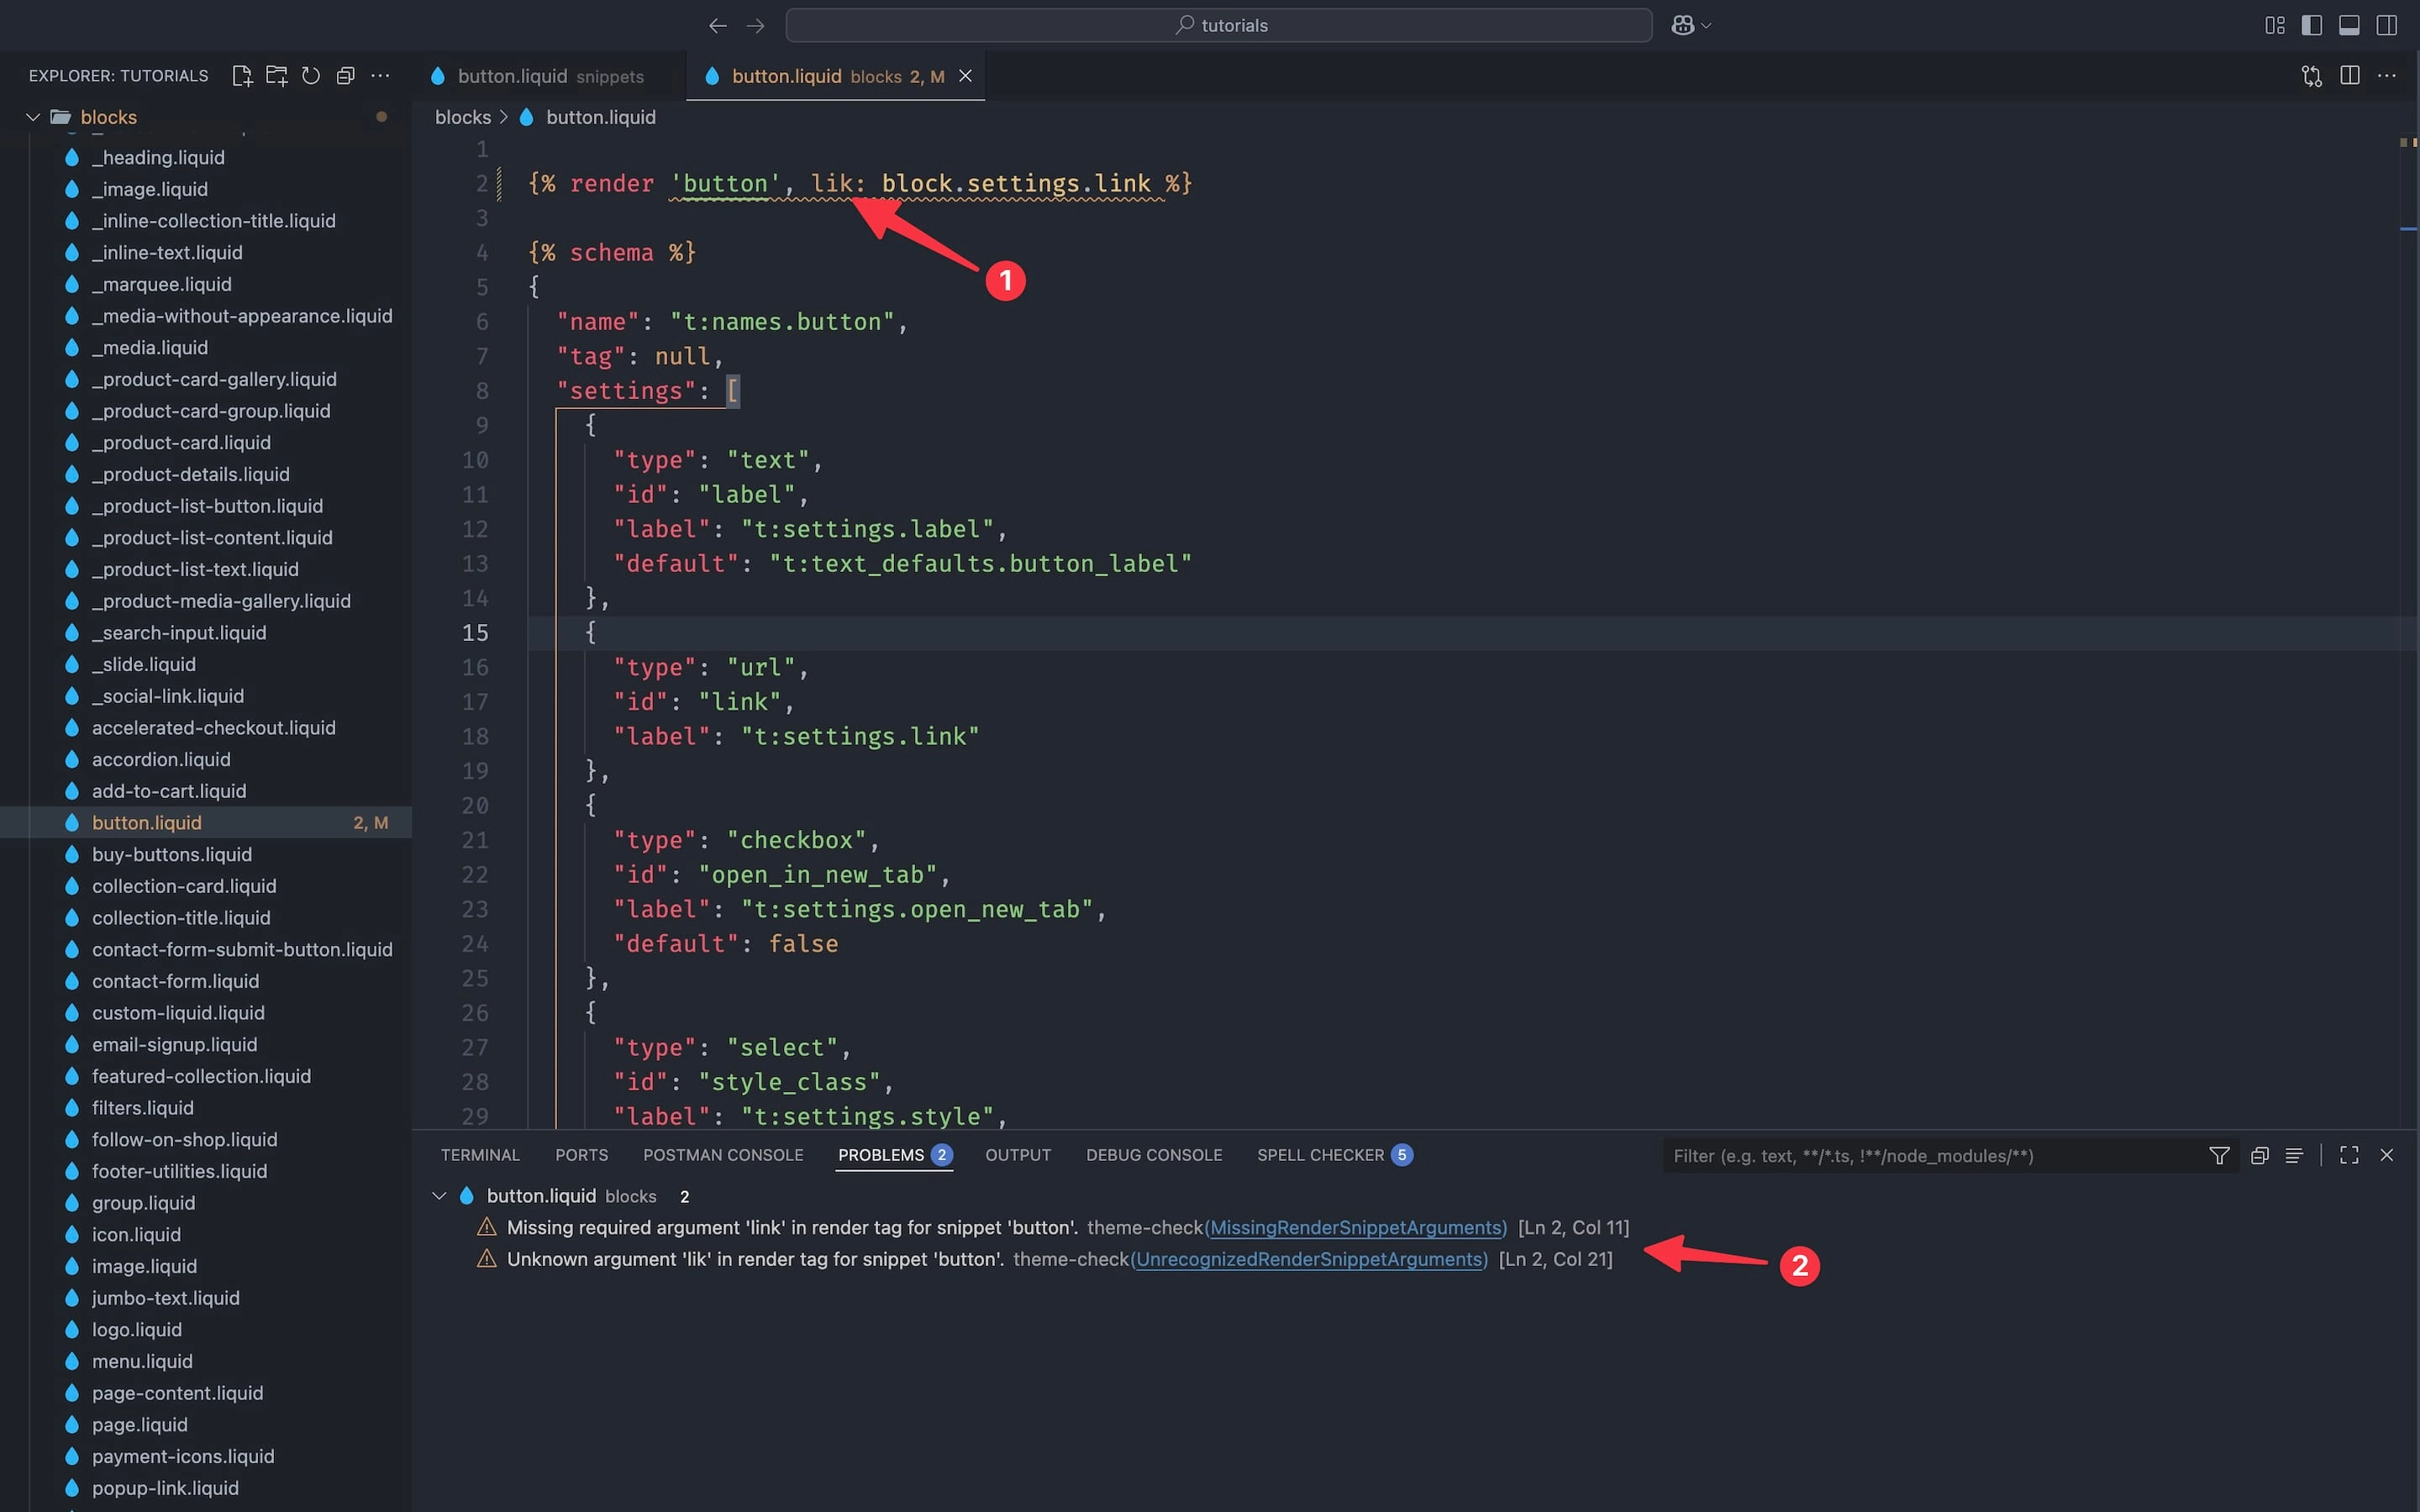
If you mistype a parameter when rendering a snippet or block, Theme Check compares it against the parameter names defined in your Liquid Doc comments.
When a mismatch is found, Theme Check throws a warning in two places:
- Directly in the file itself (marked with 1 in the image below).
- Inside the VS Code Problems panel (marked with 2 in the image below).
For example, if you try to pass “lik” instead of “link”, Theme Check immediately flags it.
Since “lik” doesn’t match any parameter in the documentation, it warns you to correct it to “link”, exactly as specified in the snippet’s Liquid Doc block.
This kind of validation helps you catch mistakes early, before they lead to broken layouts or confusing bugs in your theme.
Type checking
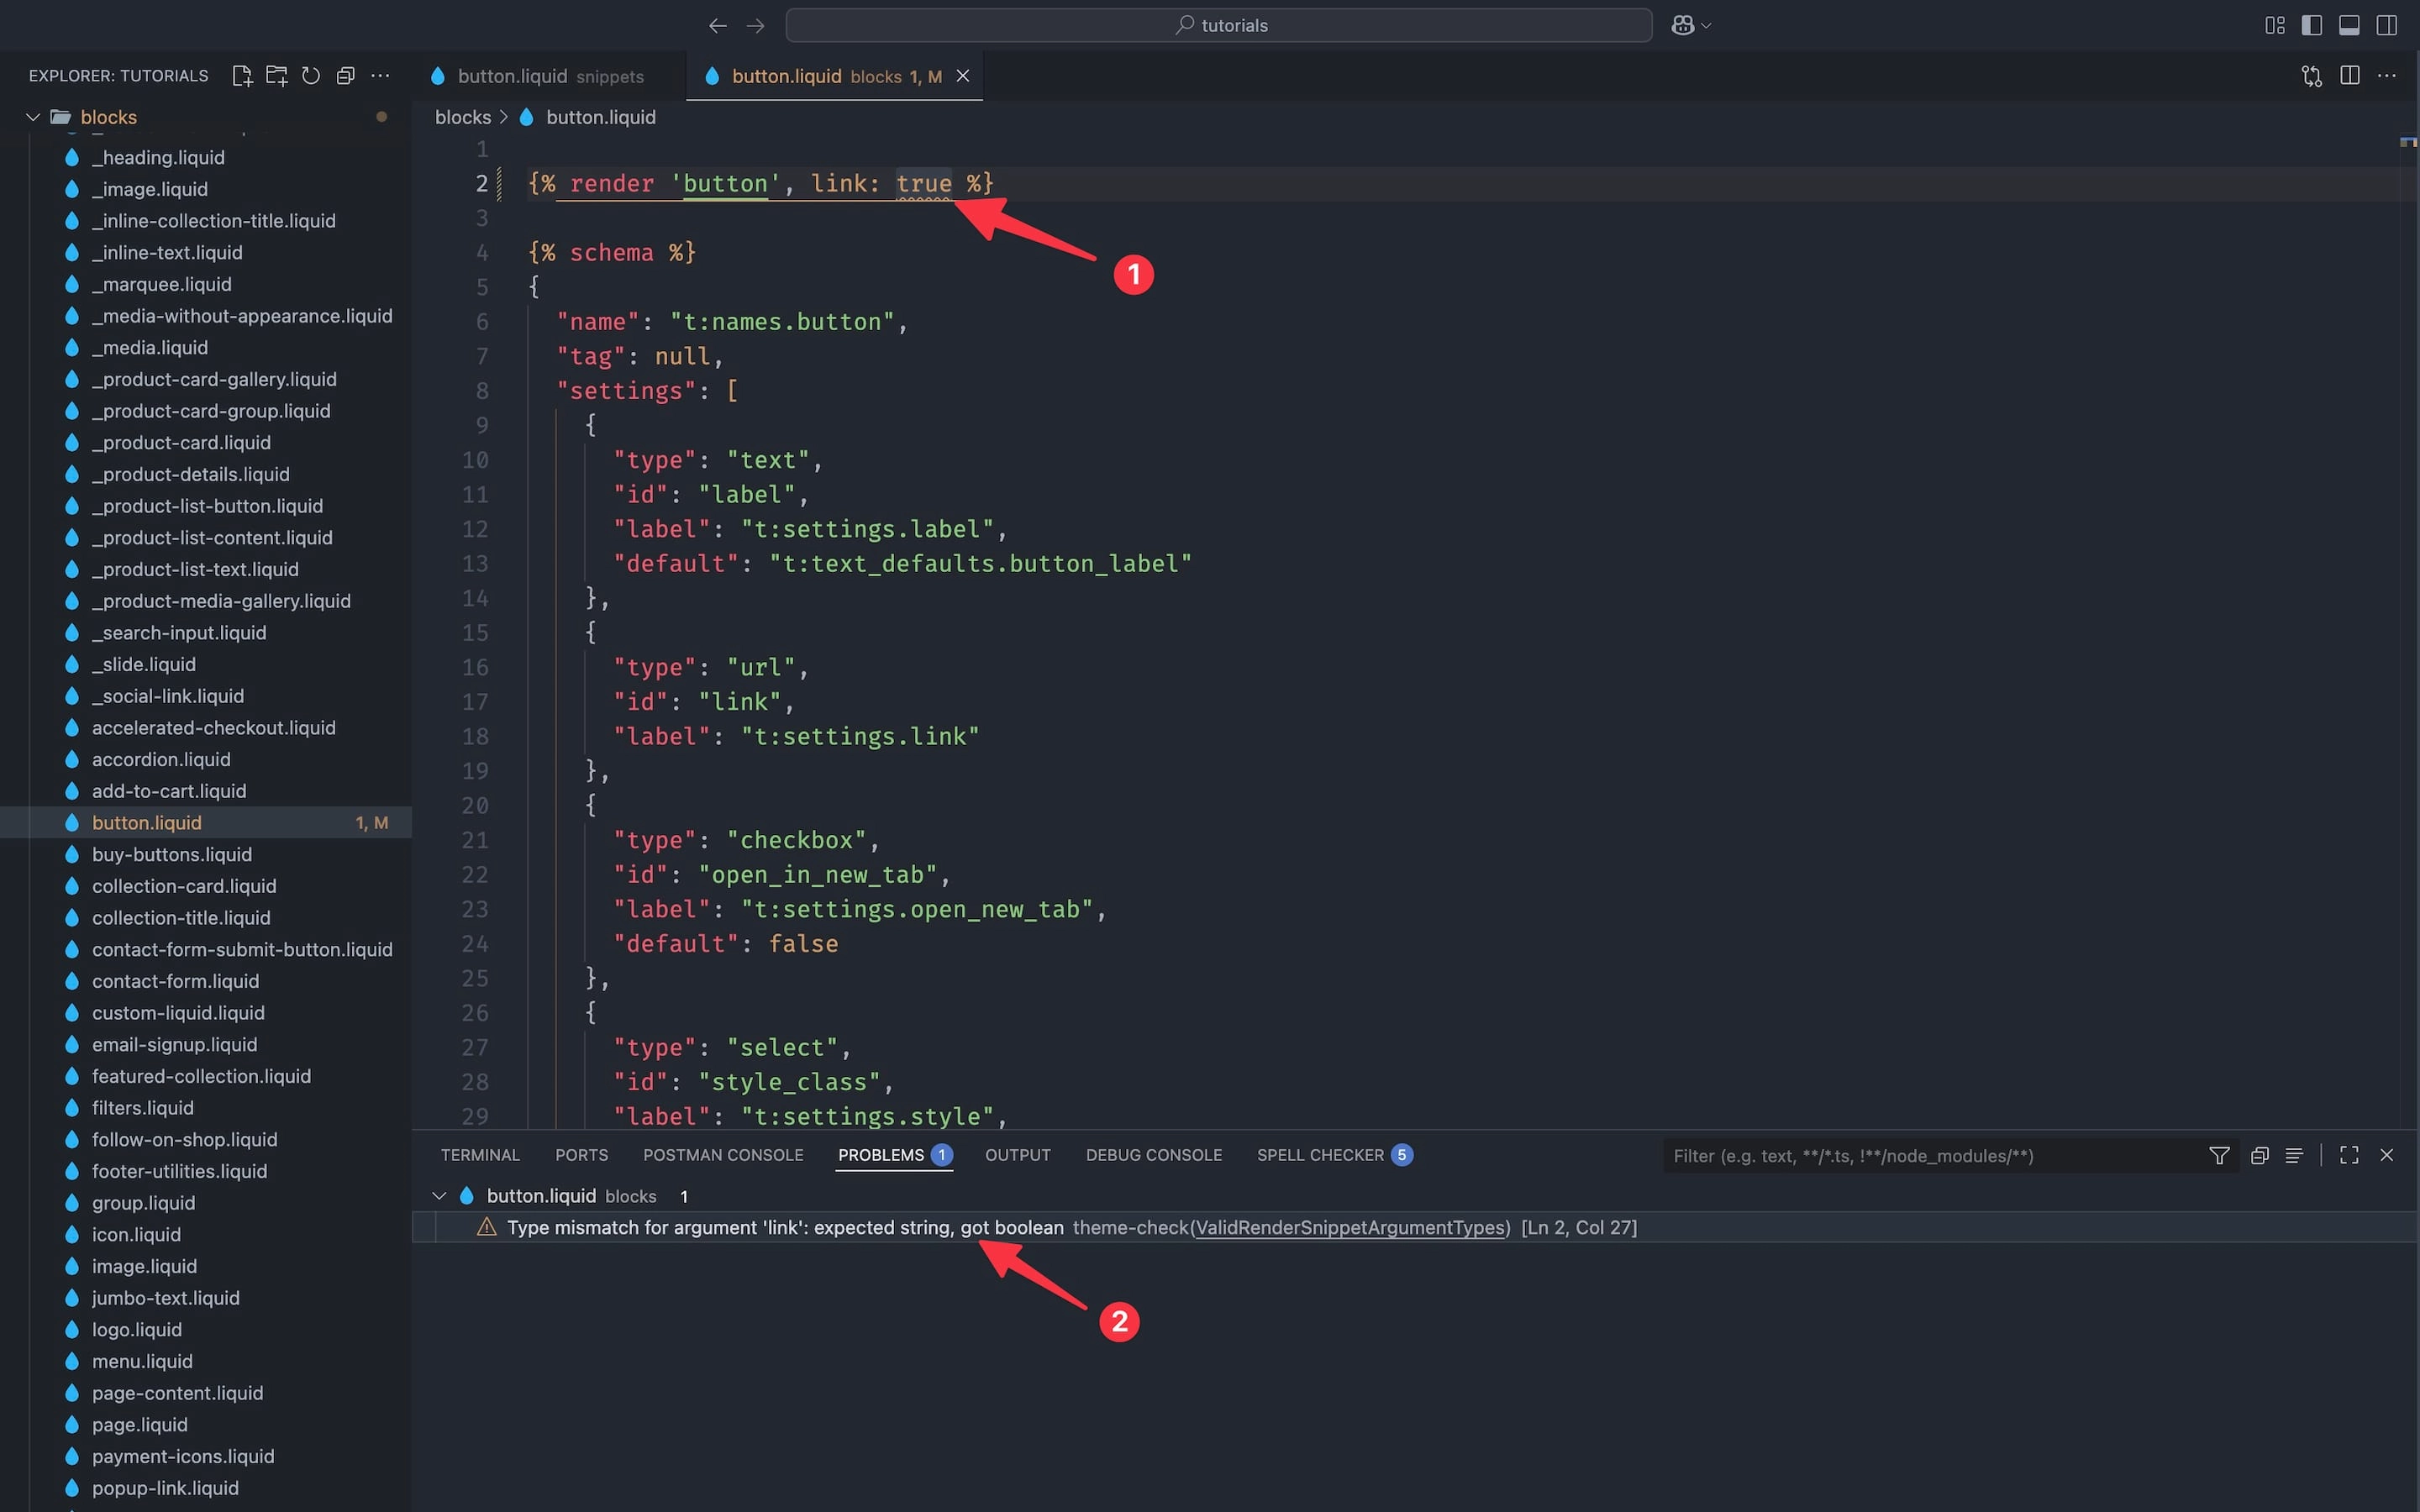
Liquid Doc also supports type validation, which helps ensure you’re passing the right kind of values to your snippets and blocks.
In the example below, I’ve purposely passed a boolean value (true) (marked with 1 in the image below).
Theme Check immediately flagged the issue in the “Problems” panel (marked with 2 in the image below).
The warning clearly explains the issue: the snippet is expecting a string, but it received a boolean instead.
This type of validation is especially helpful for catching subtle errors early.
Without it, you might not notice the problem until much later, when a layout breaks or data renders incorrectly on the storefront.
Dynamic snippet documentation validation
Liquid Doc can only validate parameters when the snippet or block name is written as a literal string.
If the snippet name is stored in a variable and then rendered dynamically, Liquid Doc and the associated editor tooling cannot determine which snippet is being referenced.
In that case, validation checks are disabled.
{% assign snippetName = 'button' %}
{% render snippetName %}
In this case:
The “snippetName” holds the value "button".
Liquid will correctly render the button snippet at runtime.
But since the snippet name comes from a variable, LiquidDoc can’t analyze it ahead of time.
Why validation is skipped:
Tools can’t predict what the variable will contain (it could be any snippet).
Without a fixed reference, Liquid Doc can’t provide autocomplete, type checking, or parameter validation.
Correct validation:
{% render 'button' %}With a literal name ('button'), Liquid Doc knows exactly which snippet is being used and loads the documentation.
Result: All checks are enabled, missing parameters, typos, and usage errors are caught immediately.
Dynamic type validation for params passed to the snippet
Currently, Liquid Doc does not validate the types of objects or variables passed into parameters.
{% render 'product', id: product.id %}Here, “product.id” comes from a Shopify object.
Liquid Doc can’t confirm its type, so it won’t enforce whether it matches the expected parameter type.
Result: Type validation is disabled and you don’t get warnings if “product.id” is incorrect.
Correct validation:
{% render 'product', id: 1000 %}Here, 1000 is a plain number literal.
Theme check can validate it against the “@param {number} id” definition found in Liquid Doc.
Result: Type validation is enabled, you’ll see warnings if the wrong type is passed.
Performance and SEO considerations
I'm in the process of running tests for this and I’ll get back with results.
Best practices and recommendations
When writing Liquid Doc comments, clarity beats cleverness.
Many developers working with Shopify themes are either new to Liquid or even new to programming altogether.
Clear, explicit documentation makes your snippets easier to understand, easier to use, and easier to maintain.
Well-documented code reduces technical debt because future developers (or even you, months later) won’t waste time guessing what a snippet does, which parameters it needs, or how it should be rendered.
A few best practices to follow:
- Use explicit snippet names and primitive values in your examples and documentation. Keep things simple and concrete.
- Avoid dynamic values in your docs unless runtime flexibility is absolutely required. If you use variables for snippet names or parameters, remember that you lose the safety net of real-time validation.
- Update the LiquidDoc whenever you extend a snippet. If you add new parameters, document them with @param. If the rendering logic changes, update your @example accordingly.
By being explicit, you’re not just documenting for yourself you’re making life easier for every developer who comes after you.
In the long run, this small effort saves time, prevents errors, and ensures your theme code remains scalable and maintainable and builds a good reputation with the clients.
Conclusion
LiquidDoc may still be new and relatively simple compared to tools like JSDoc, but it’s already a game-changer for Shopify theme development.
By adding structured documentation directly inside your snippets and blocks, it transforms how developers write, maintain, and collaborate on Liquid code.
With descriptions, parameters, and examples built right into your codebase, you get more than just documentation, you get real-time guidance, validation, and error checking.
This reduces mistakes, speeds up development, and makes your themes easier to scale and maintain.
Whether you’re building a personal project, shipping a premium theme, or managing a Shopify Plus store, adopting LiquidDoc now will pay off later.
The better you document your code, the fewer bugs, support tickets, and headaches you’ll face down the line.
Start small, be explicit, keep your examples accurate, and treat LiquidDoc as an integral part of your development workflow.
You’ll thank yourself later, and so will the developers who come after you.