

Why custom fonts matter
Choosing the right font is one of the simplest but most powerful ways to elevate your Shopify store’s branding and customer experience.
Unfortunately, Shopify’s built-in font options are limited and overused, making most stores look generic and forgettable.
If you want your site to stand out, reflect your brand’s personality, or match your unique design language, you need to go beyond the default and implement your own custom font.
The good news: adding a custom font to Shopify is entirely possible and you don’t need to rely on third-party apps, or bloated solutions.
Though I always recommend a developer to follow this tutorial and implement it for you.
I have a saying:
“In web development, just because it works doesn’t mean that your implementation is good and will not have repercussions somewhere.”
In this guide, you’ll get a practical, code-first approach to integrating any font you choose, the right way.
Whether you want to upload a professional font file, use Google Fonts, or integrate a specialized font library, this article will walk you through each step, including key performance, SEO, and legal considerations you can’t afford to ignore.
If you want a Shopify store that’s truly on-brand, fast, and professional, adding a custom font is not just a nice touch it’s a must.
Many articles regarding adding custom fonts to Shopify are copied one after the other and many of them don't know what they are saying and do not understand how fonts need to be loaded on a theme.
Shopify fonts
Shopify already offers a comprehensive library of fonts but as I said everybody uses them.
System fonts
System fonts are the default fonts pre-installed on every major operating system, such as Arial, Helvetica, Times New Roman on Windows and macOS, or Roboto and Noto on Android devices.
When you use system fonts on your Shopify store you are instructing the browser to display text using the visitor’s own device fonts rather than loading additional font files over the network.
This has two major benefits:
Performance
Since system fonts do not need to be downloaded, your site’s text renders instantly.
This significantly improves load speed and Core Web Vitals directly impacting SEO and conversion rates.
Reliability
There’s no risk of a “flash of invisible text” (FOIT) or “flash of unstyled text” (FOUT) while waiting for web fonts to load.
Your typography is always readable and functional, even on slow connections.
However, the trade-off is that system fonts are generic and can make your store look like countless others unless your brand’s personality is communicated through other means.
For high-conversion, minimalistic or performance-obsessed stores, system fonts remain a best practice.
System fonts are a smart default for speed and reliability.
They keep your store lightweight and accessible, but offer limited uniqueness compared to custom or web fonts.
Shopify default fonts
These are fonts that are integrated in Shopify via a font picker in the theme editor in your theme settings and a curated selection of web-safe and web-hosted fonts integrated directly into the Shopify platform.
These fonts are carefully chosen by Shopify to ensure wide compatibility, good performance, and legal licensing for commercial use.
When you use the Shopify font picker which comes with most of the free and premium themes, you can select from popular typefaces such as Roboto, Open Sans, Lato, Montserrat, Playfair Display, and others, depending on your theme.
These fonts are either served from Shopify’s own CDN or from trusted providers like Google Fonts.
This means the fonts will load reliably and quickly across all major browsers and devices.
Here are a couple of advantages in using the Shopify’s default font picker:
No coding required
Changing fonts is a point-and-click process in the theme customizer making it accessible even to non-technical users.
The picker is integrated by theme developers in their themes and if the theme is from the Shopify theme store this is a must.
Consistent experience
All selected fonts are automatically loaded and applied throughout your store ensuring your branding is consistent site-wide, that is if your store theme was developed correctly.
Performance managed
Shopify optimizes how these fonts are served, minimizing negative impact on site speed compared to many third-party font integrations.
Legally safe
Fonts offered through Shopify’s picker are vetted for proper licensing so you do not risk copyright issues by using them in your store.
I’ve seen this many times, people using proprietary fonts without rights or any license.
Please do not do that.
You can get sued by the font copyright owner or filed DMCA against you and there is a probability that Shopify will also take down your store.
Just pay the license.
To make money you need to invest money.
See this as an investment in your brand and business not as an expense.
Limitation
The main limitation is creative flexibility.
If you want to use a unique brand font not found in the font picker, or need advanced font features (variable fonts, icon fonts, etc.), you will need to go beyond the built-in options and add your custom font manually.
Shopify’s font picker is a fast, reliable, and safe way to manage typography for most stores, but it cannot deliver a truly custom brand identity if your required font is not included.
Before going further with this tutorial and in order to save you time go to your theme and look for the font picker and see if the font you need is already there.
If the custom font you want to add is in an open source format, there are 99% chances Shopify already has this added to their system fonts.
Usually you’ll find the font picker in the theme editor.
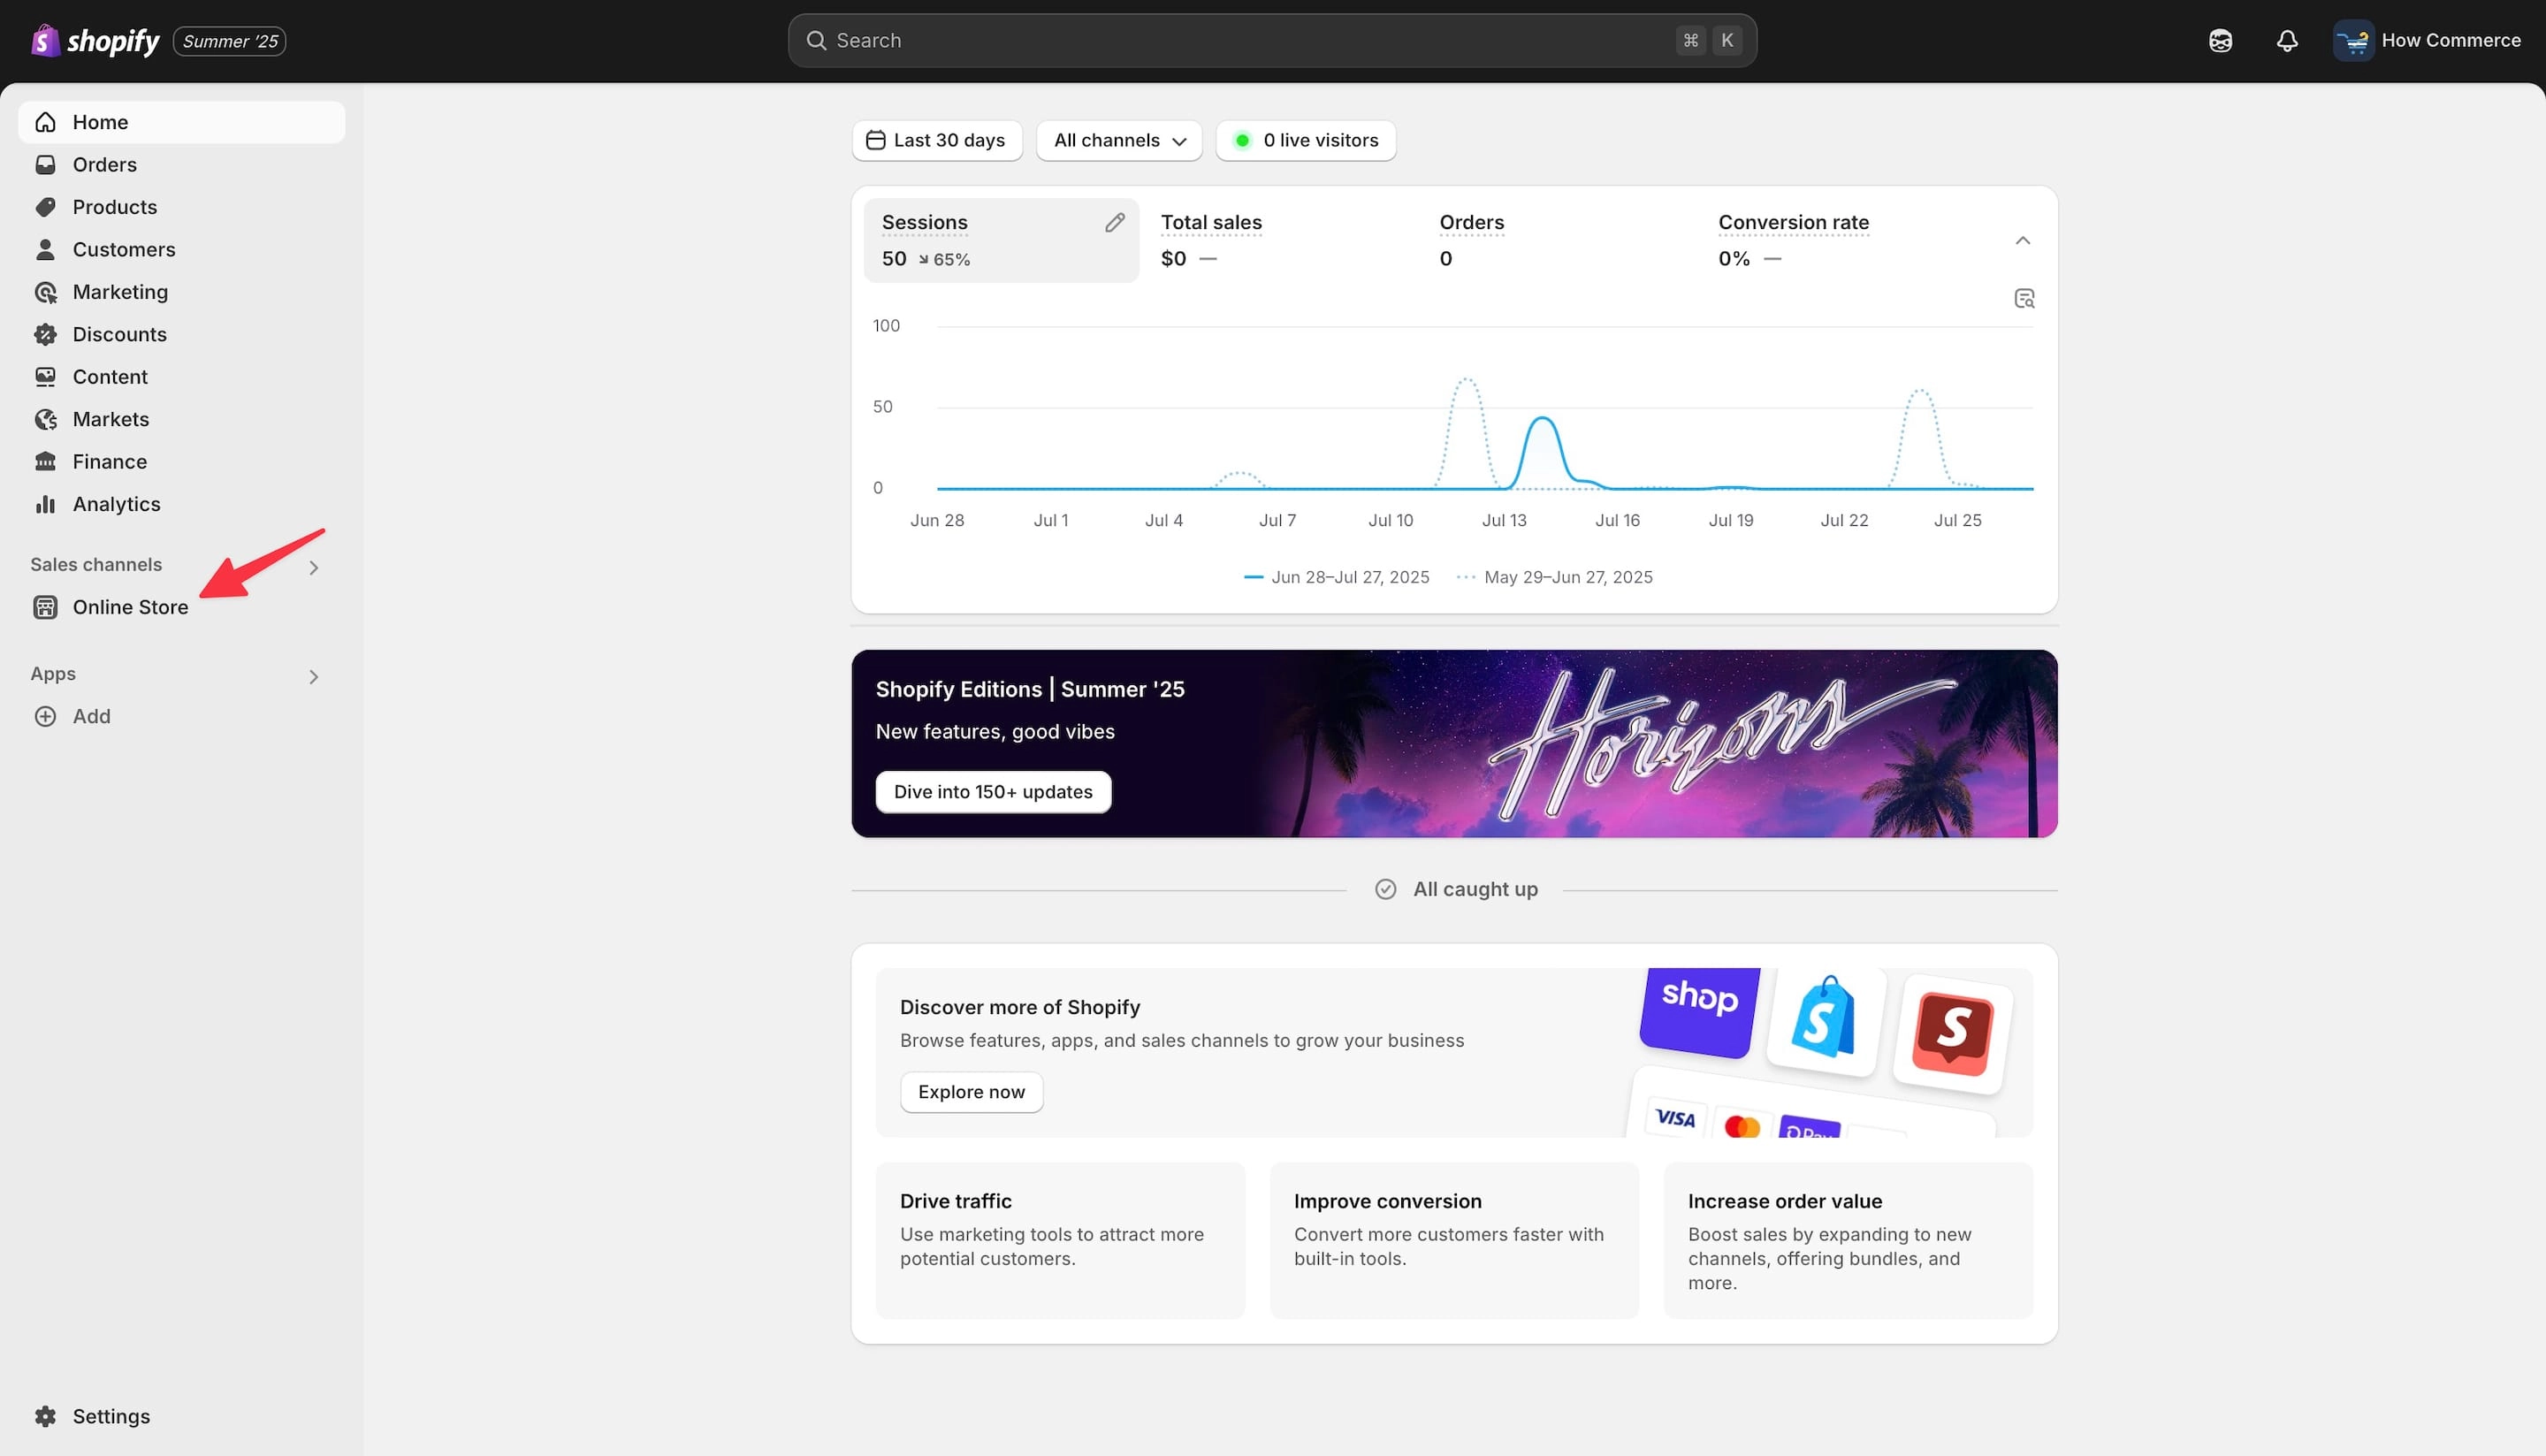
Open the Shopify admin and go to the “Online Store” channel:
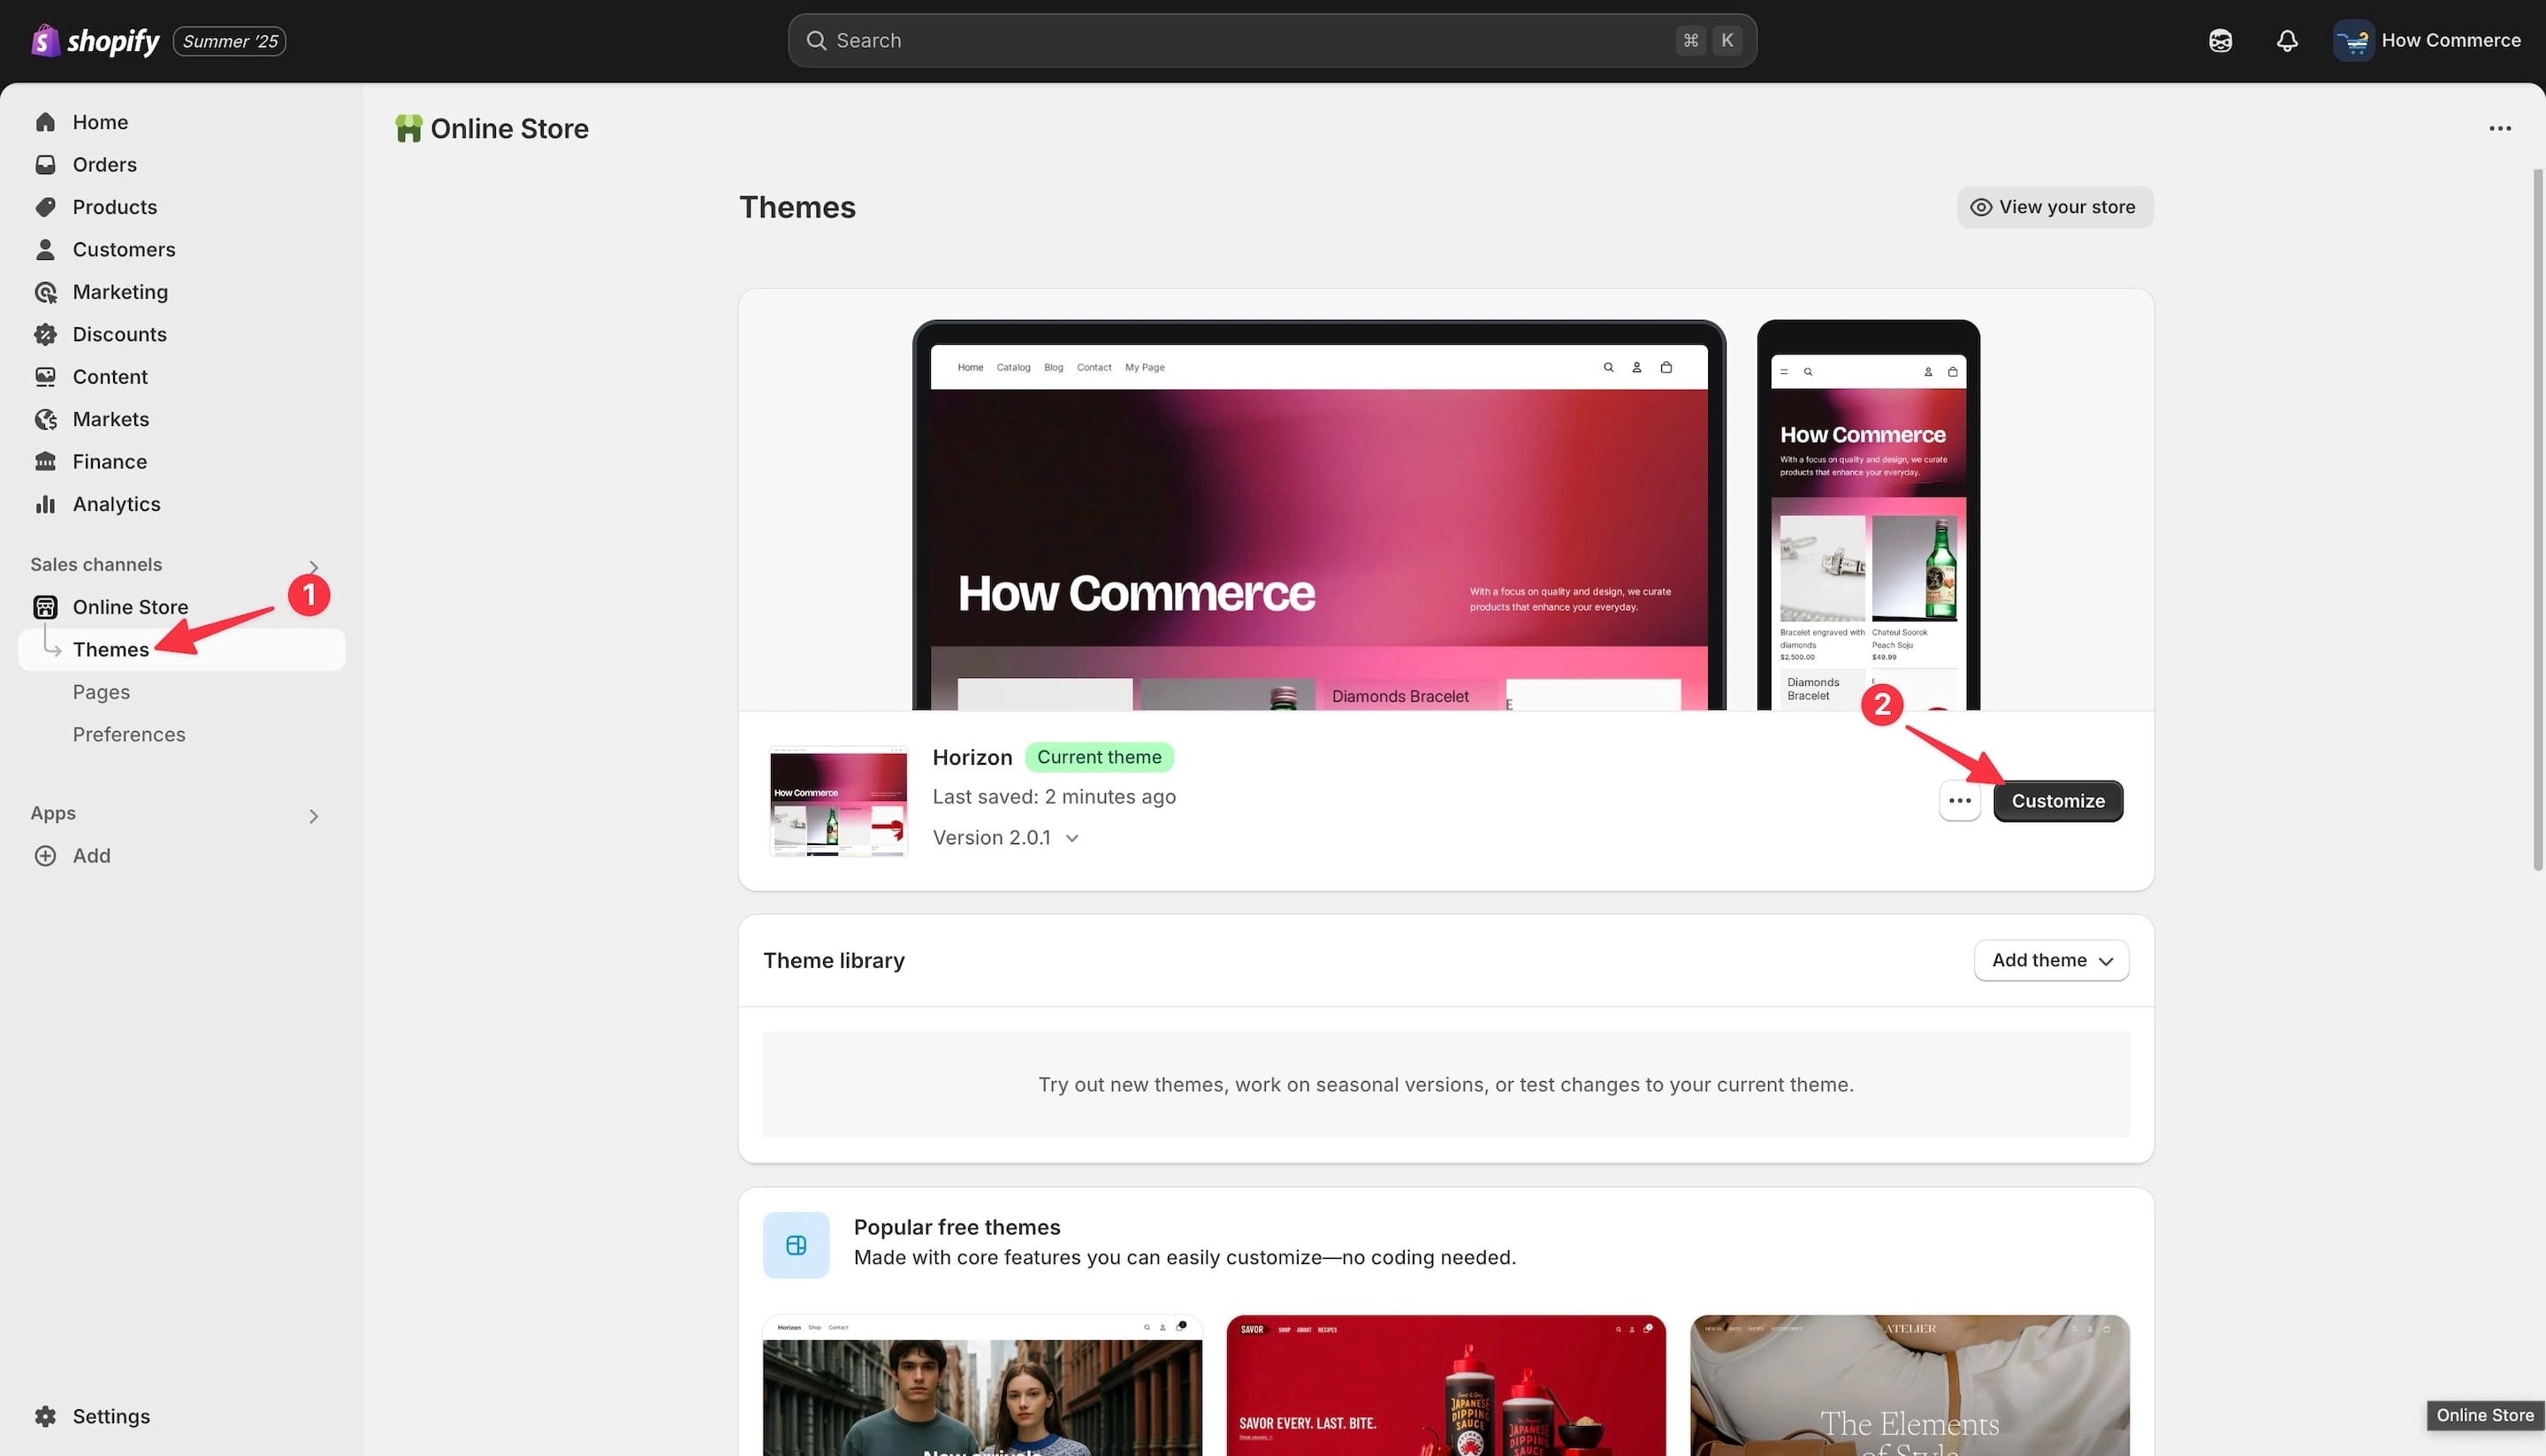
Go to Themes (marked with 1 in the image below) and after click on the “Customize” button (marked with 2 in the image below) to open the theme editor / customizer:
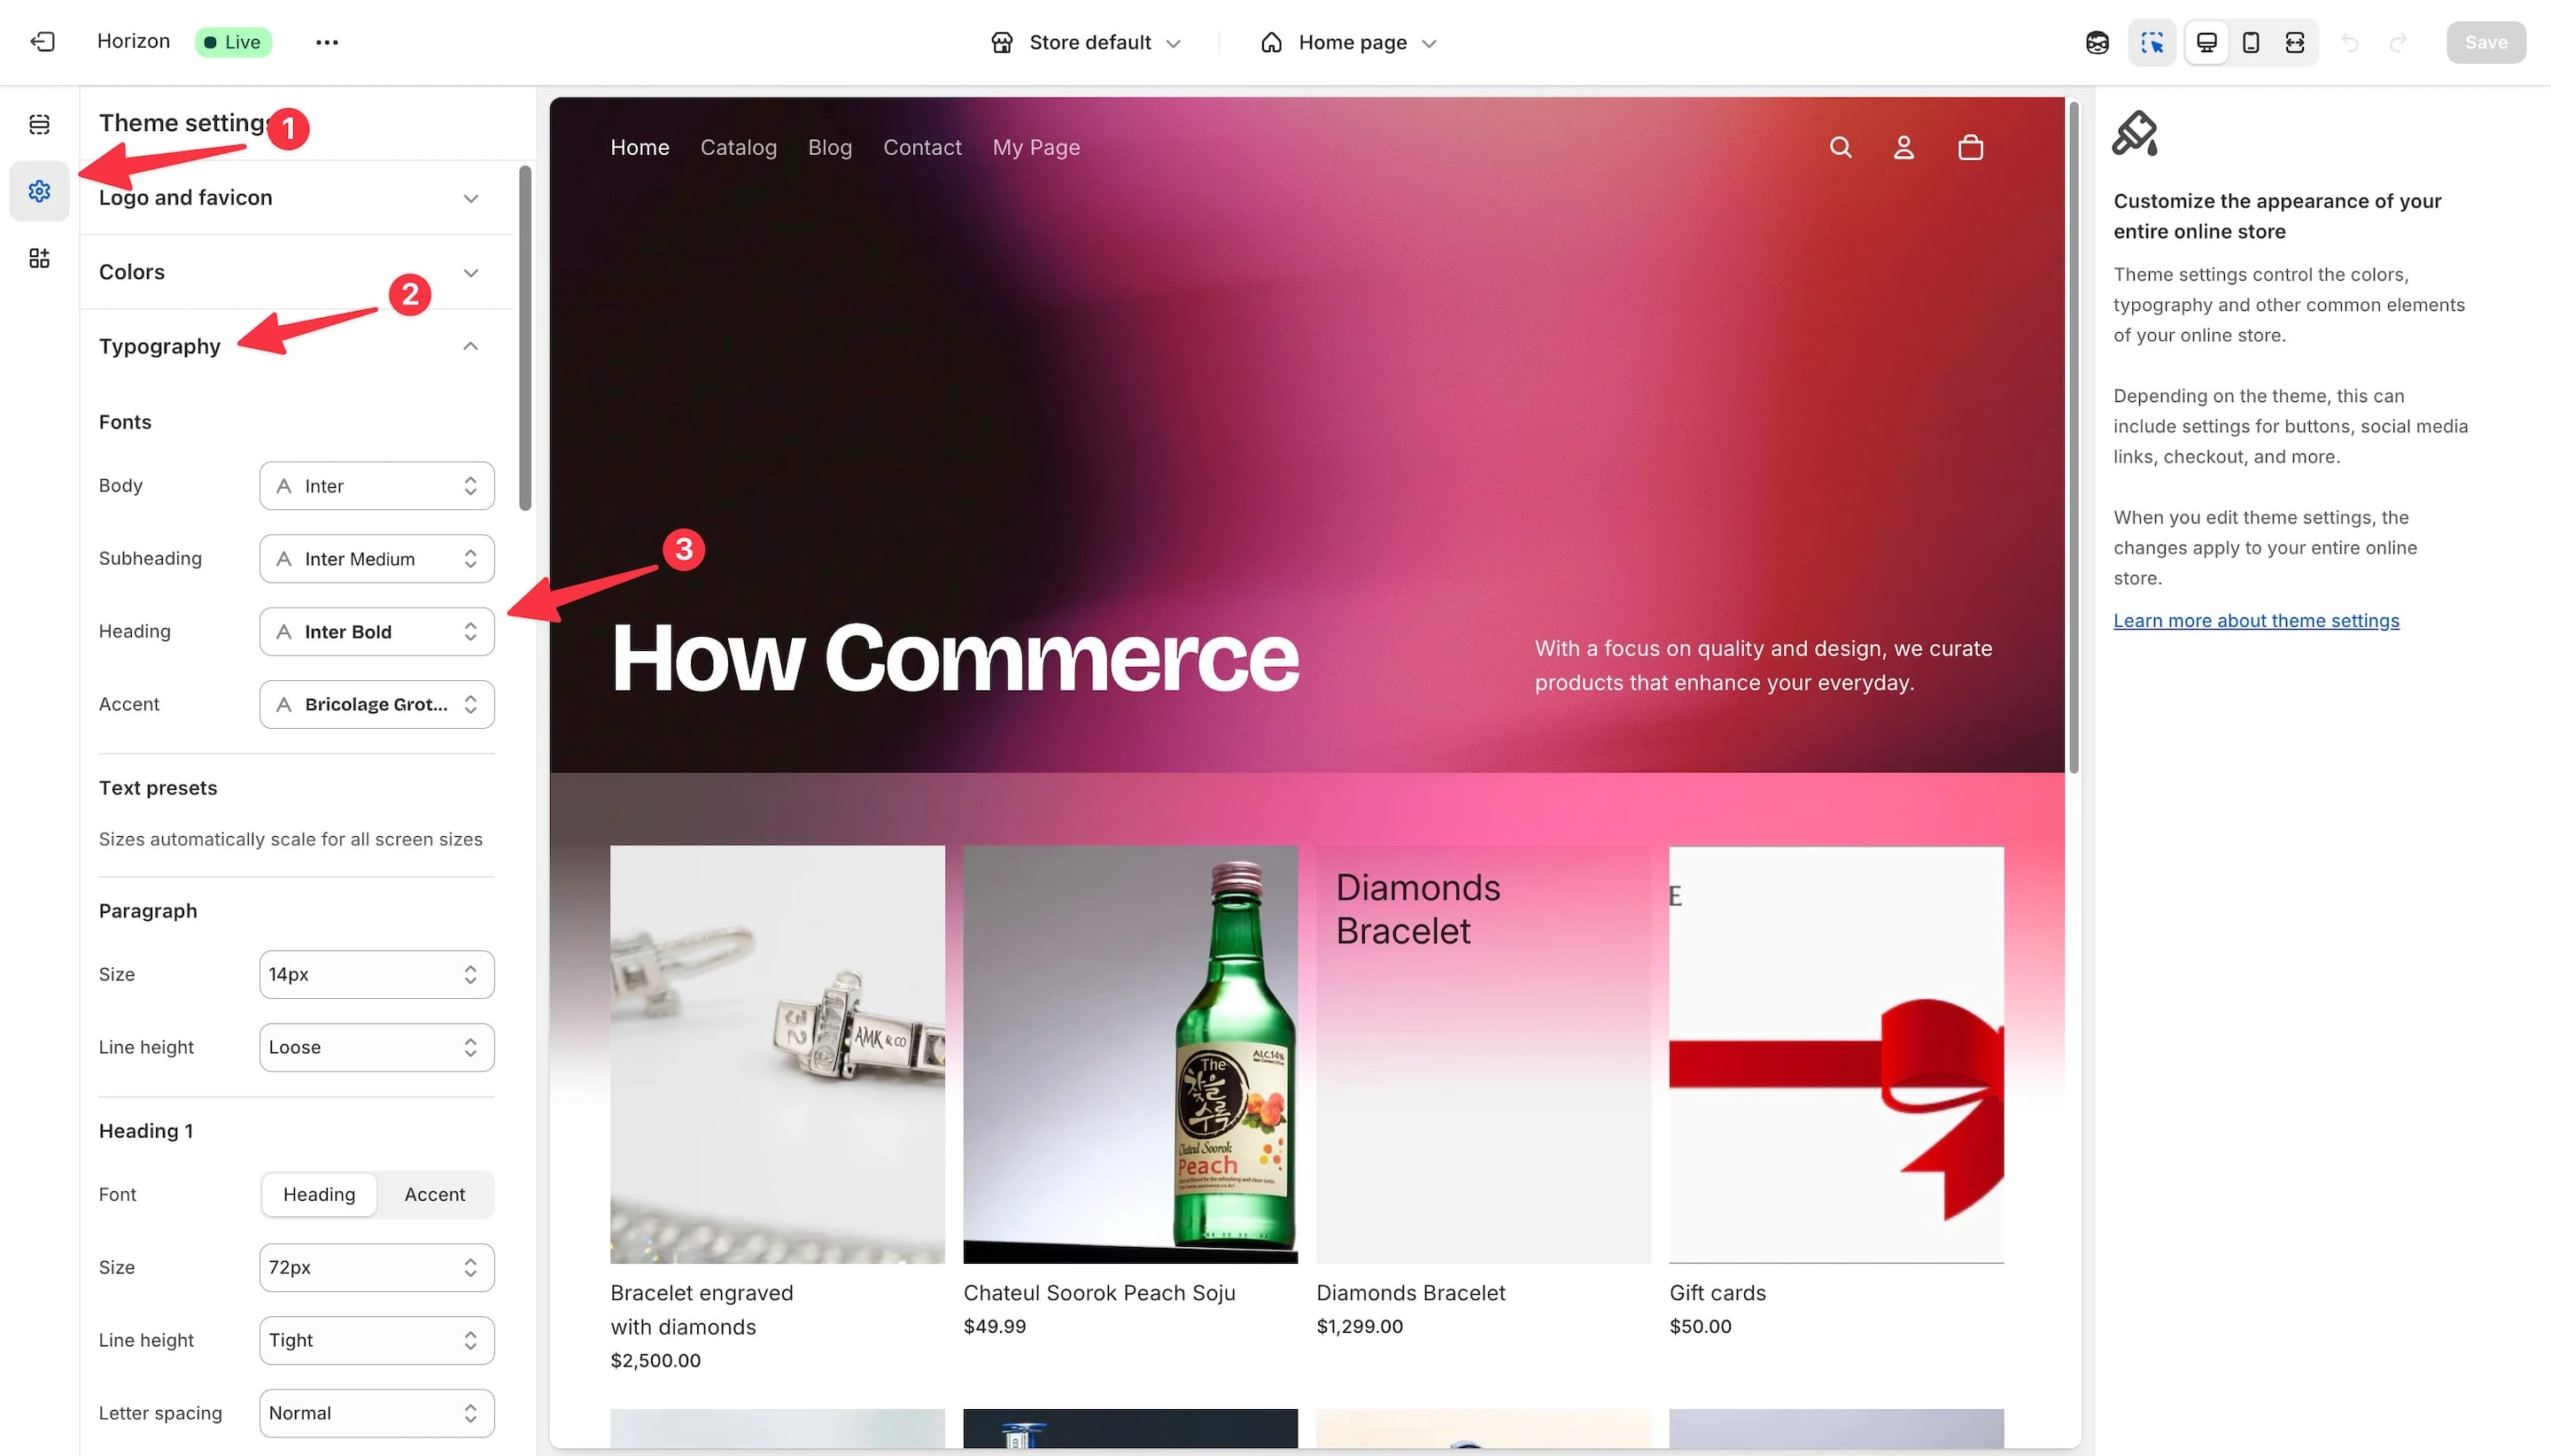
Inside the theme editor, you’ll find the font picker under the theme settings section (marked with 1 in the image below).
Search on the page for “Typography” (marked with 2 in the image below).
If the theme is coming from the Shopify theme directory then this is named the same on all themes.
If the theme is coming from third-party devs not listed in the theme directory then this may be called something else like: “Fonts”, “Heading” fonts and so on.
What is important is to look for a setting that is allowing you to change the fonts on headings or whatever element you want to change the fonts in the form of a font picker.
Here you also need to understand that the majority of premium themes will only allow you to change fonts for: headings, body or paragraphs.
Usually, any other elements will need to be added by a developer and customized to fit your theme.
For the purpose of this tutorial I’ll try to find a font that I need for the headings.
If the font is here in this font picker then a custom font is not needed to be added to my theme as I can use the one integrated by the font picker saving time and frustrations during the implementation.
Not my case since I’ve been developing software for 2 decades but for people that are not devs or are just starting this is a pain and sometimes could take countless hours of debugging and “why does this not work” type of questions.
This is why before going any deeper I’m trying to save your time and energy.
Look for the “Heading” (marked with 3 in the image below) and click on the select box to open it.
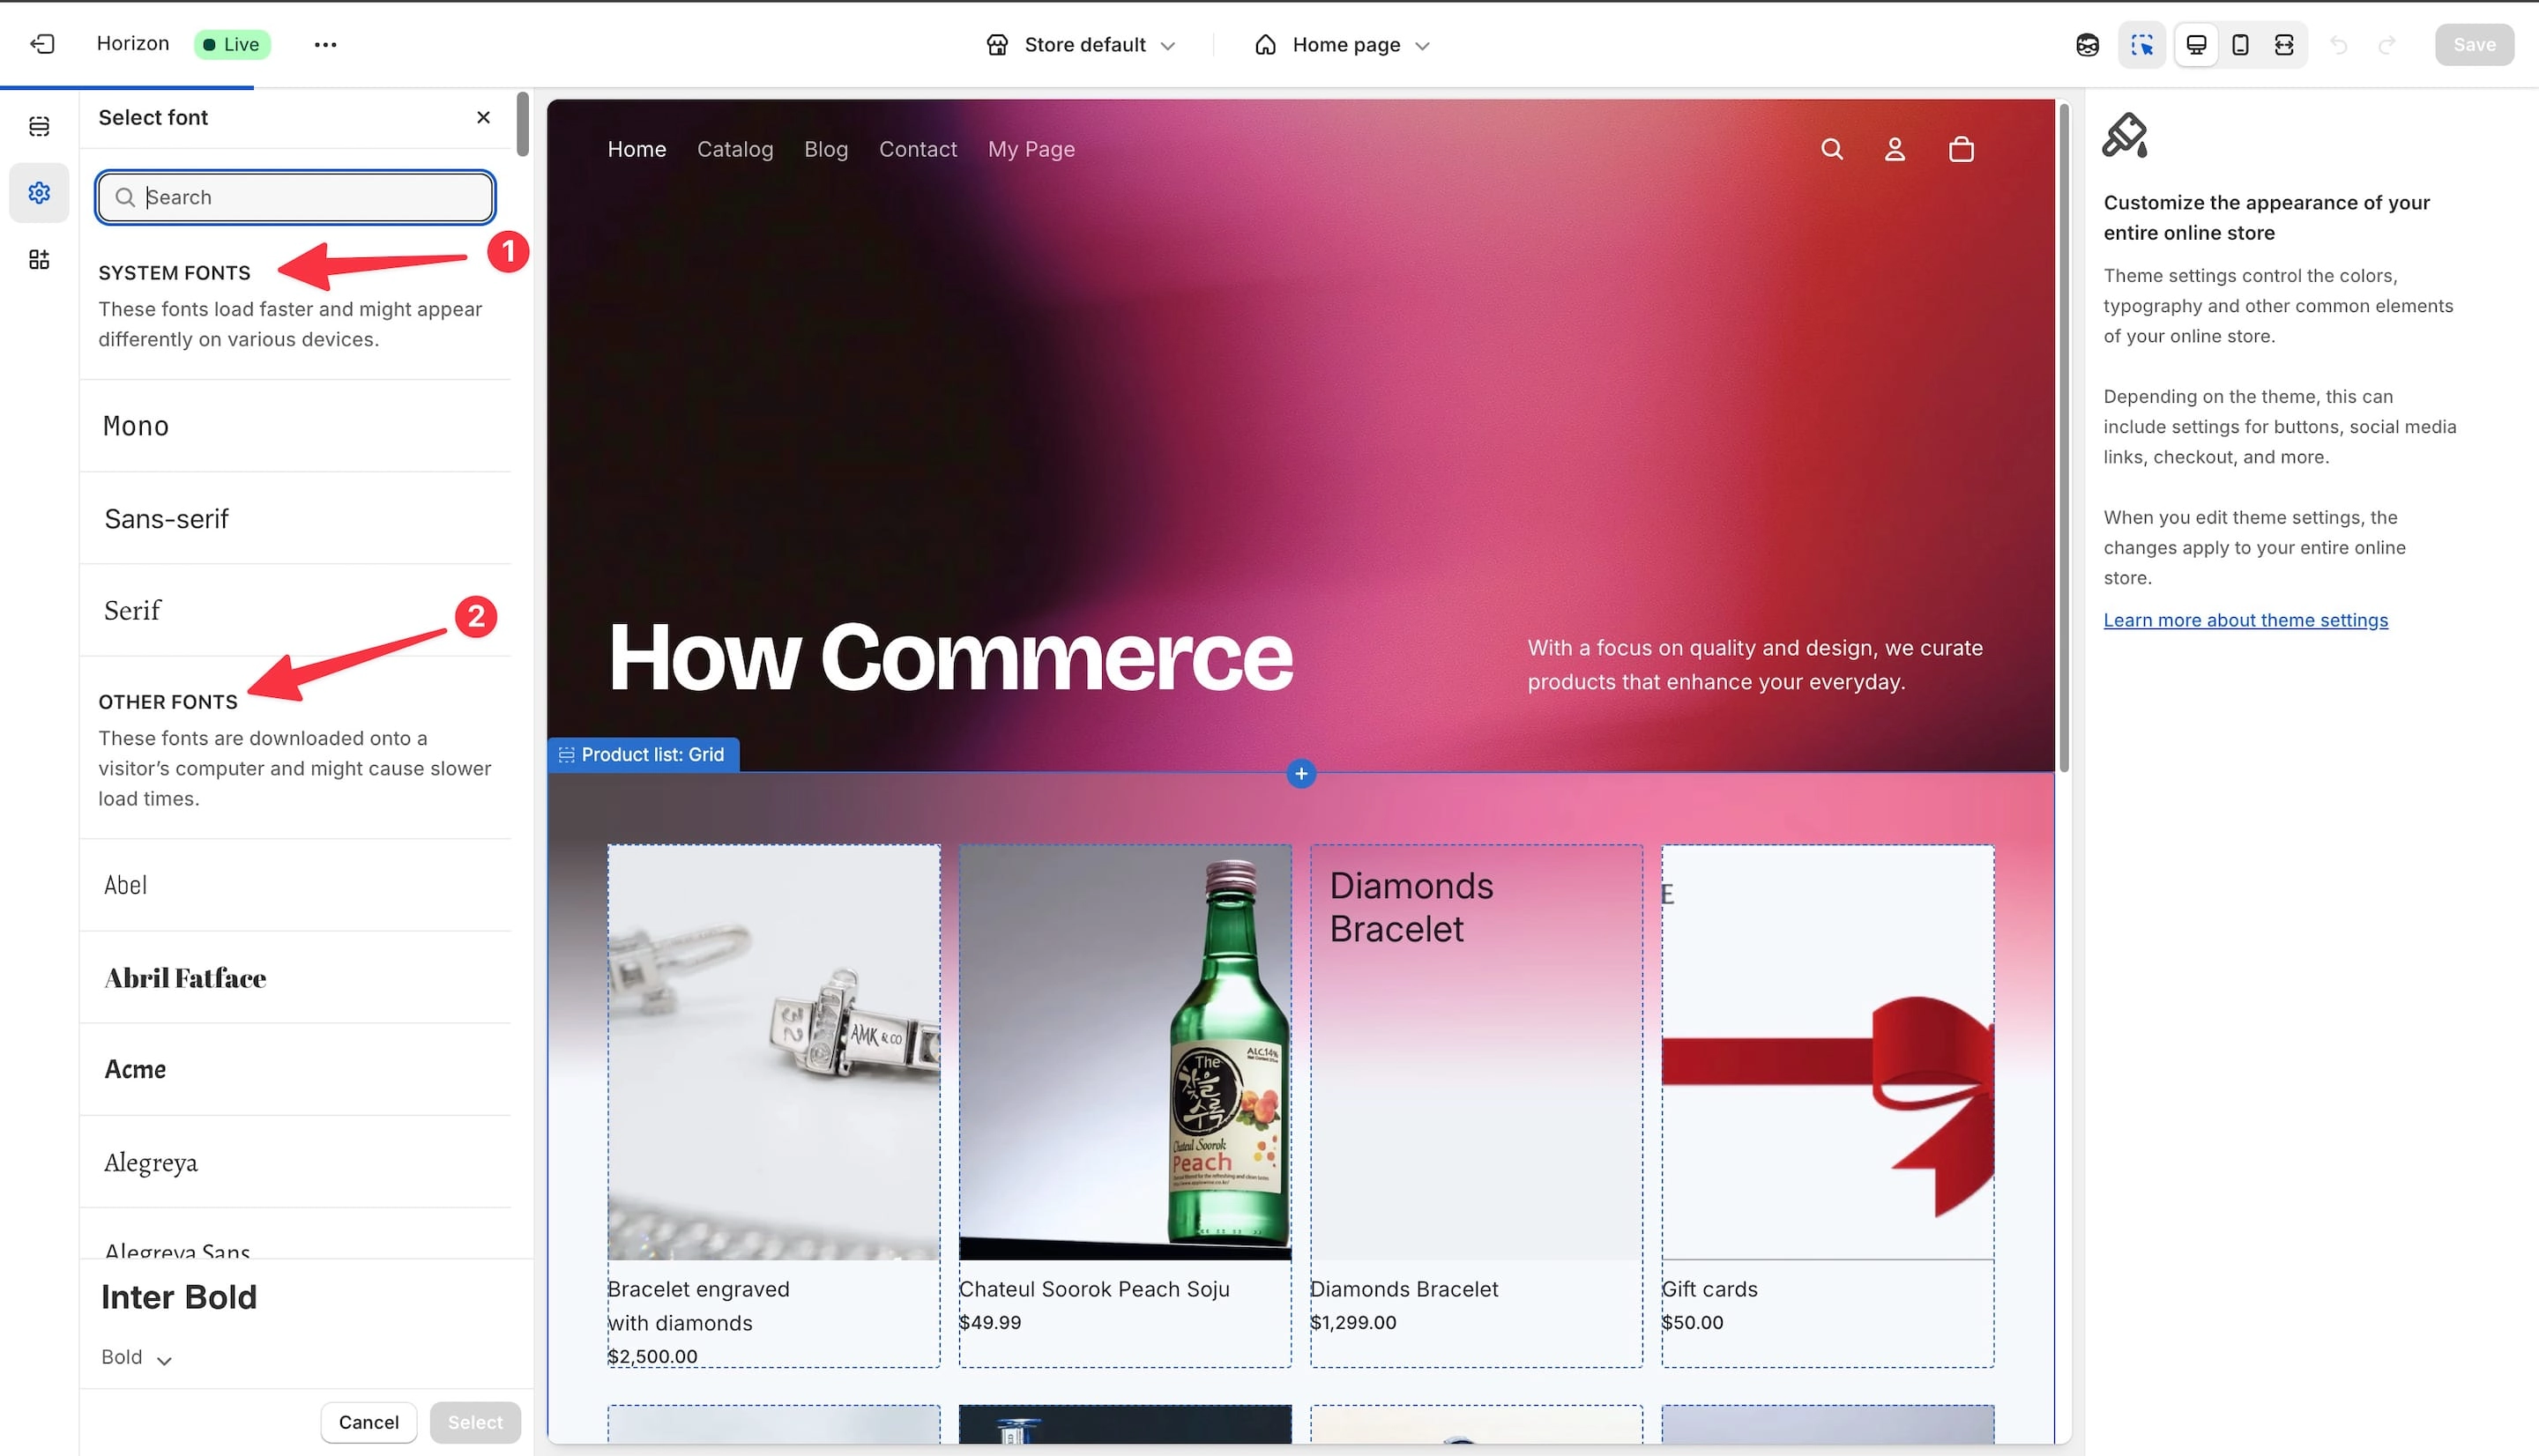
Now inside the font picker for these specific elements you can see the “System fonts” (marked with 1 in the image below) and “Other fonts” (marked with 2 in the image below).
“System fonts” as explained above are fonts pre-installed on every major operating system: MacOS, Windows, IOS, Android, Linux and so on.
These fonts are not needed to be downloaded by the users that visit your site since the fonts are already in their system.
“Other fonts” or the default Shopify fonts are custom fonts added by Shopify to their default fonts picker.
These fonts need to be downloaded by the users in order for them to see your website text with your intended font.
And this is where you’ll search for your custom font to see if it’s already integrated by Shopify in their font picker.
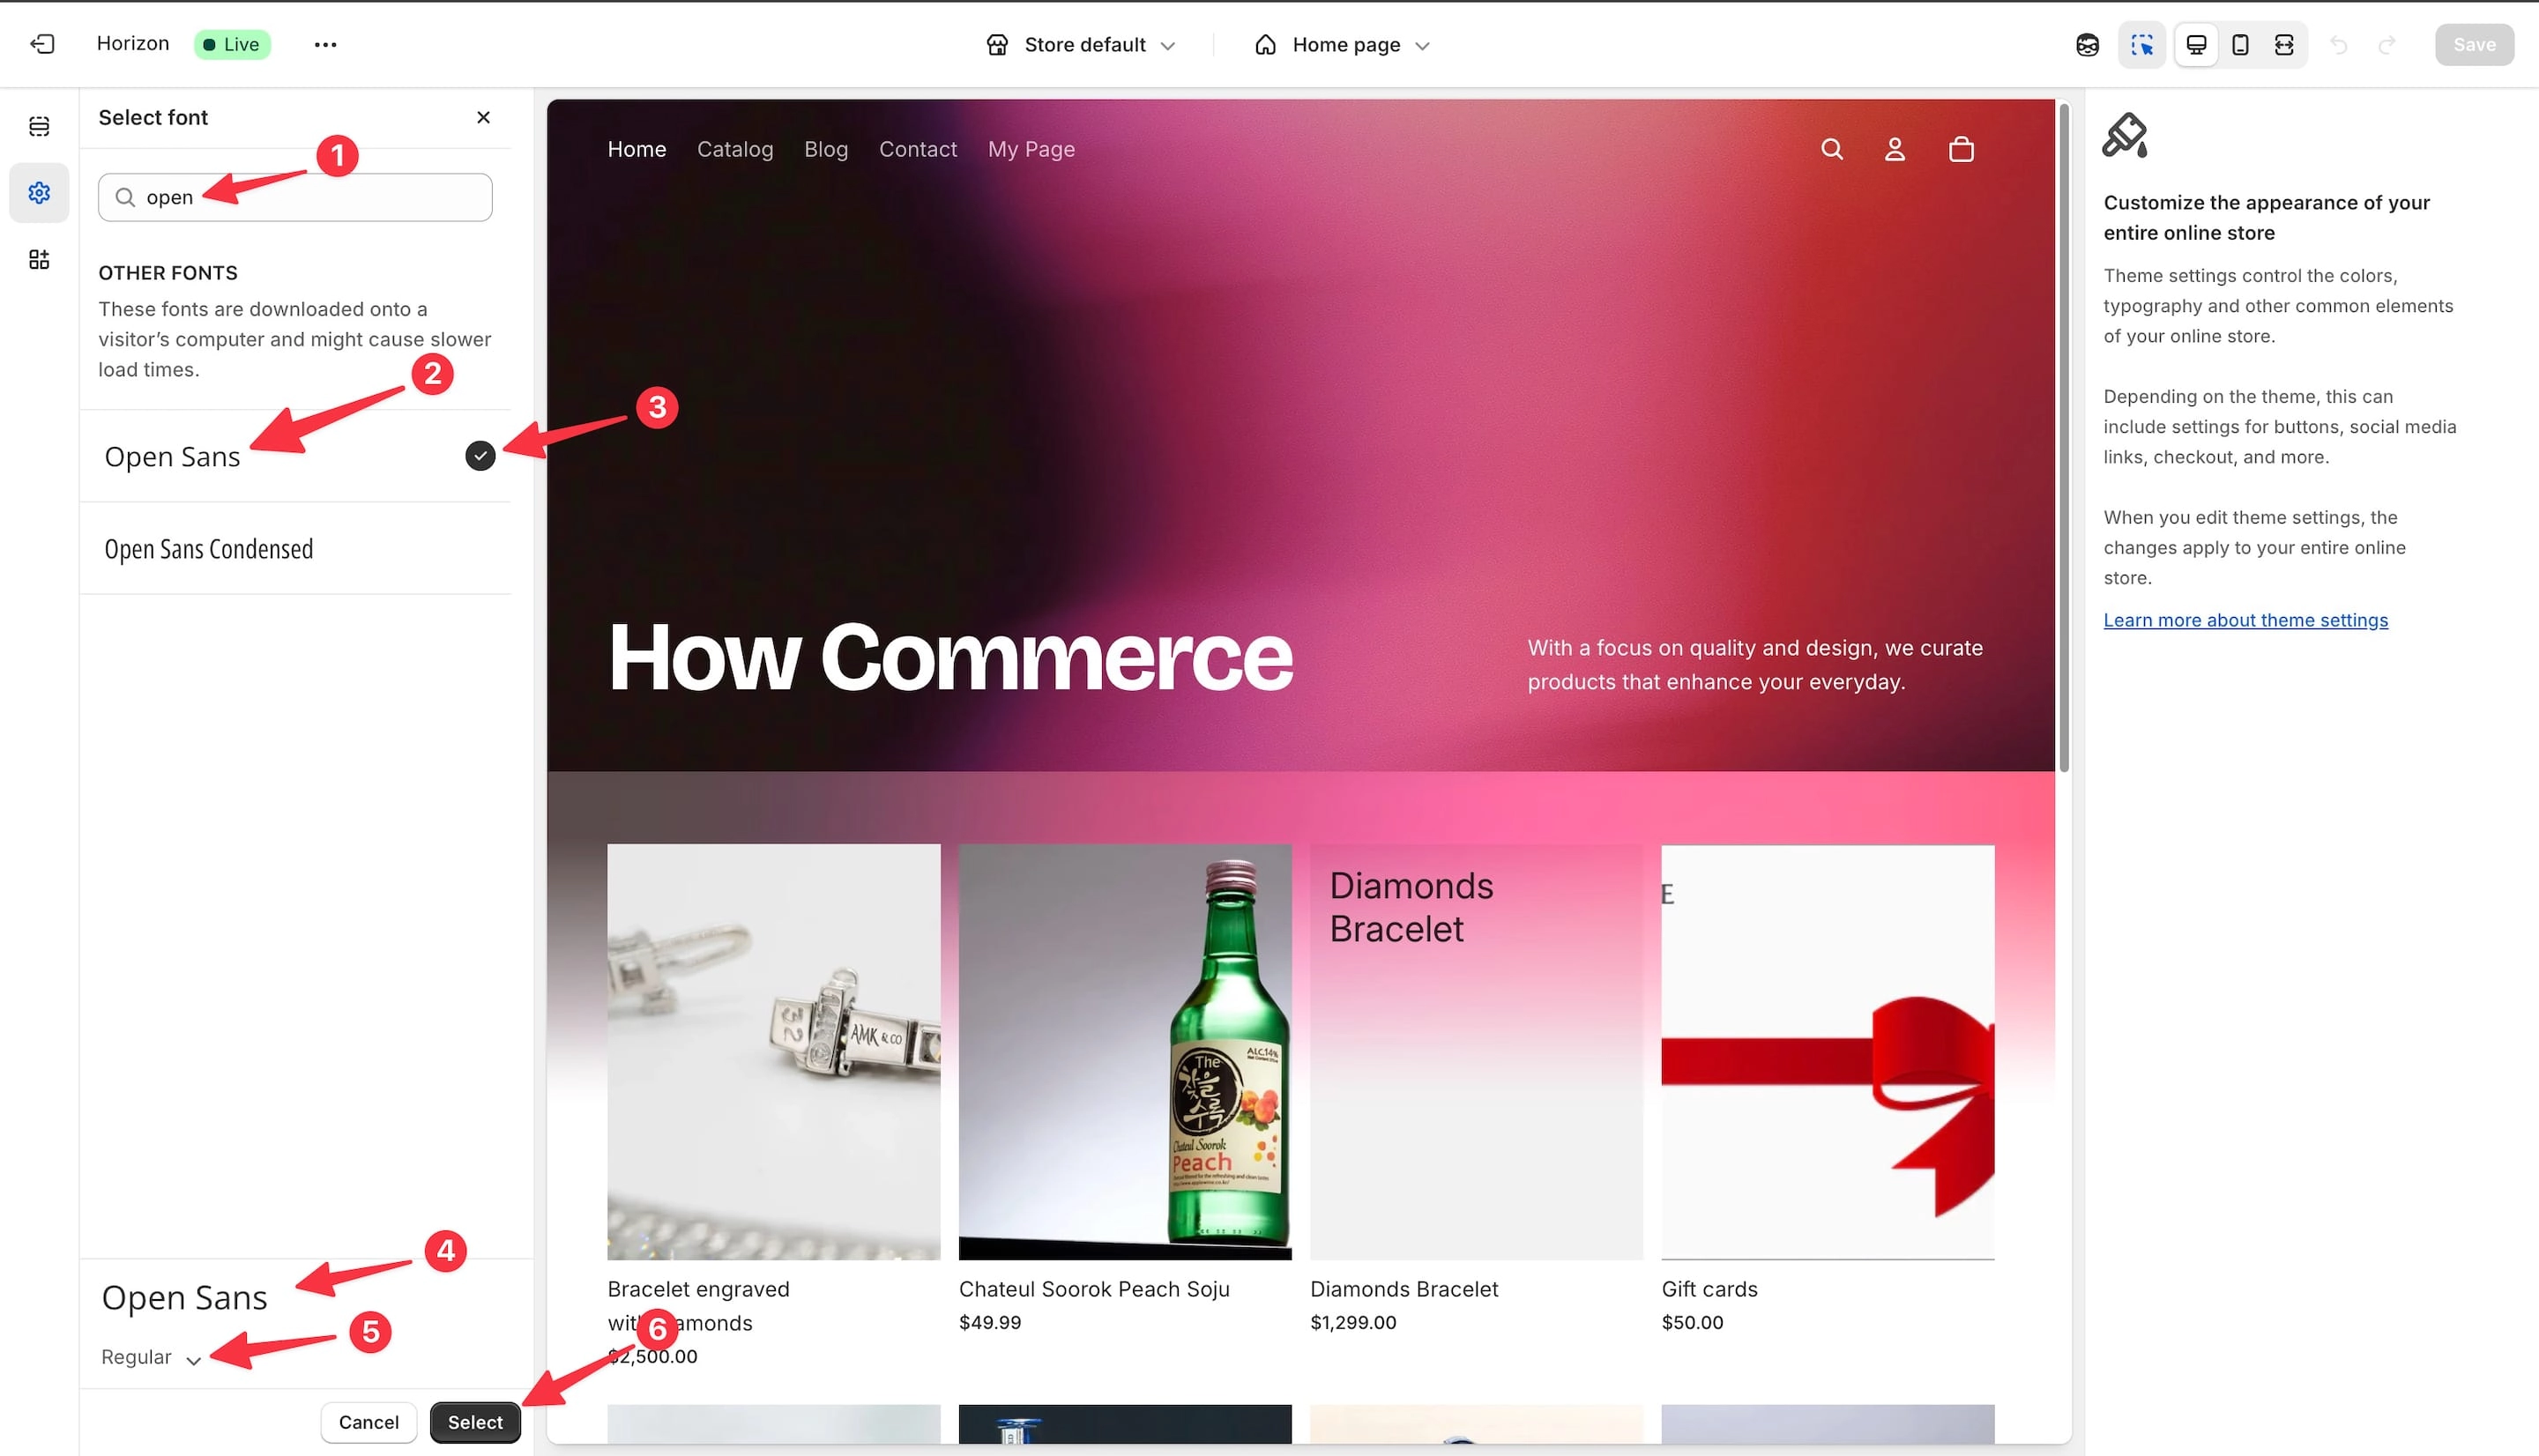
I’m interested in using the “Open Sans” font on my theme.
A beautiful font which is open source.
In the search input box (marked with 1 in the image below) type the name of the font.
If the font exists inside the font picker Shopify will list it.
As seen, the Open Sans font (marked with 2 in the image below) I’m interested in is already there.
Beside that Shopify has another version of the “Open Sans” font and that is the “Condensed” version.
Click on the font to select it.
Once selected you’ll see the small check mark (marked with 3 in the image below) and the font listed at the bottom of the page (marked with 4 in the image below).
You can also select a style for it from the select box (marked with 5 in the image below).
Once all is done click “Select” (marked with 6 in the image below).
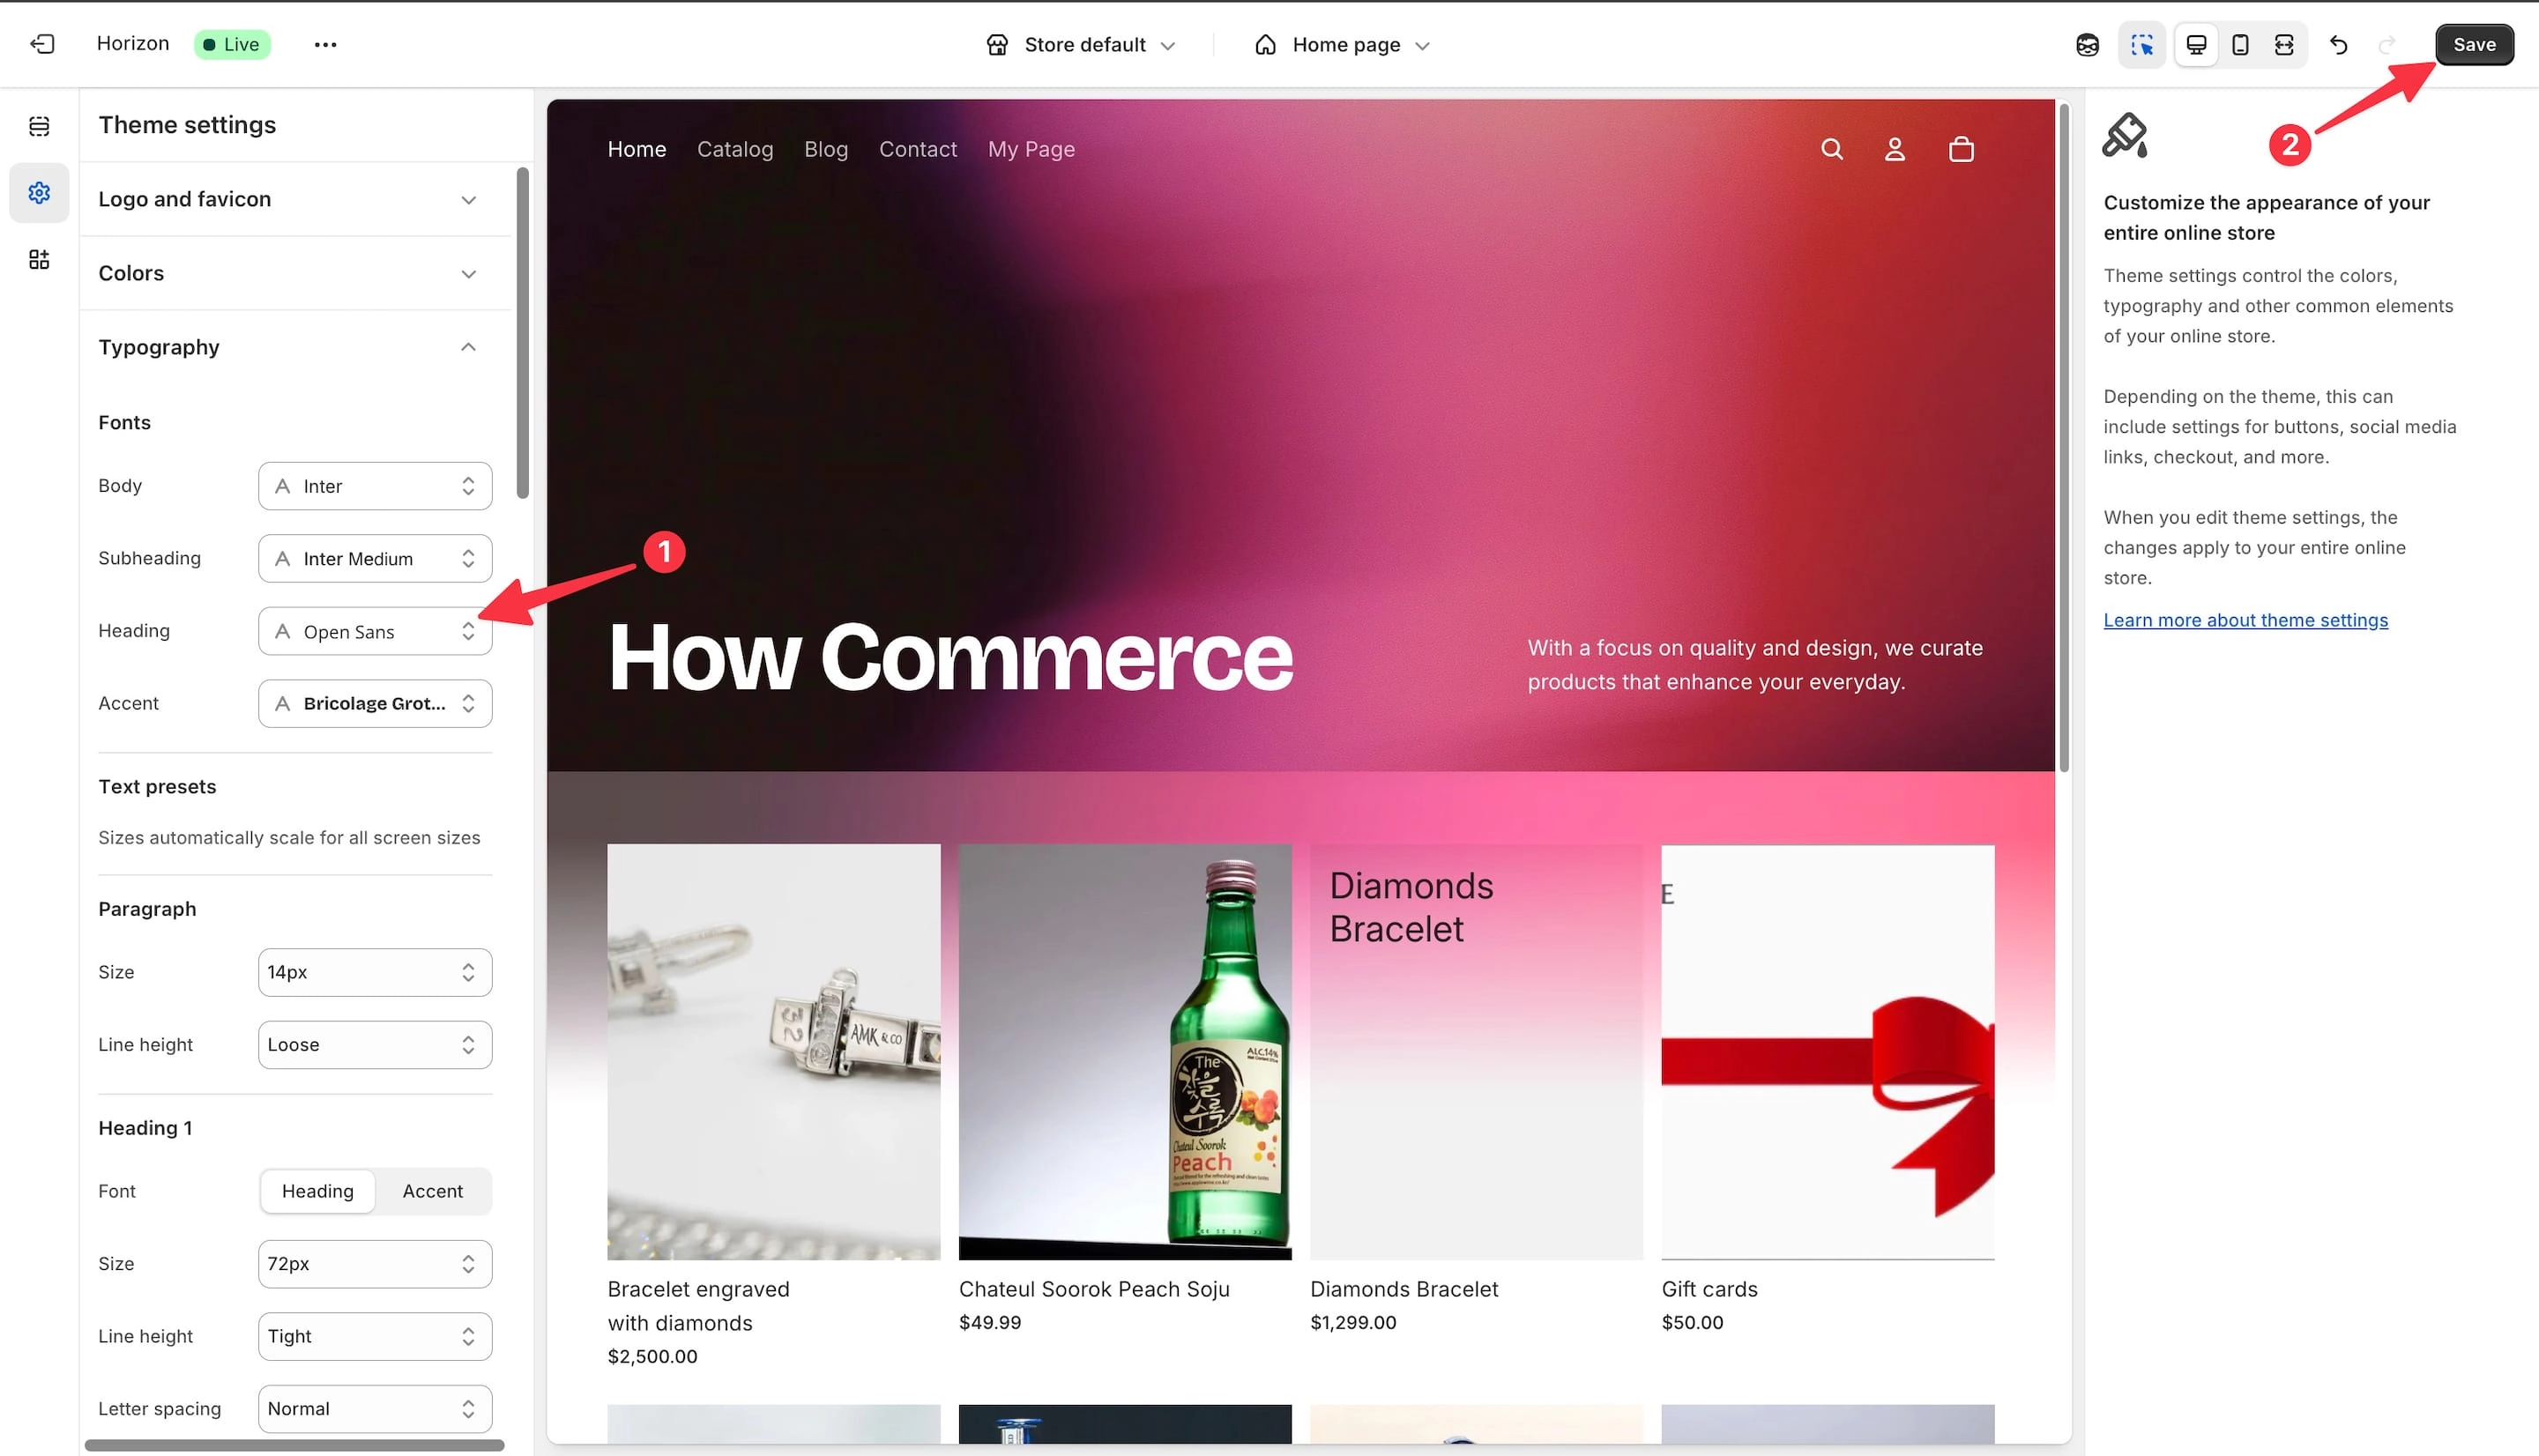
If the font is selected correctly you’ll see the “Open Sans” font selected inside the “Heading” select box (marked with 1 in the image below).
If that is the case and all is correct click “Save” (marked with 2 in the image below).
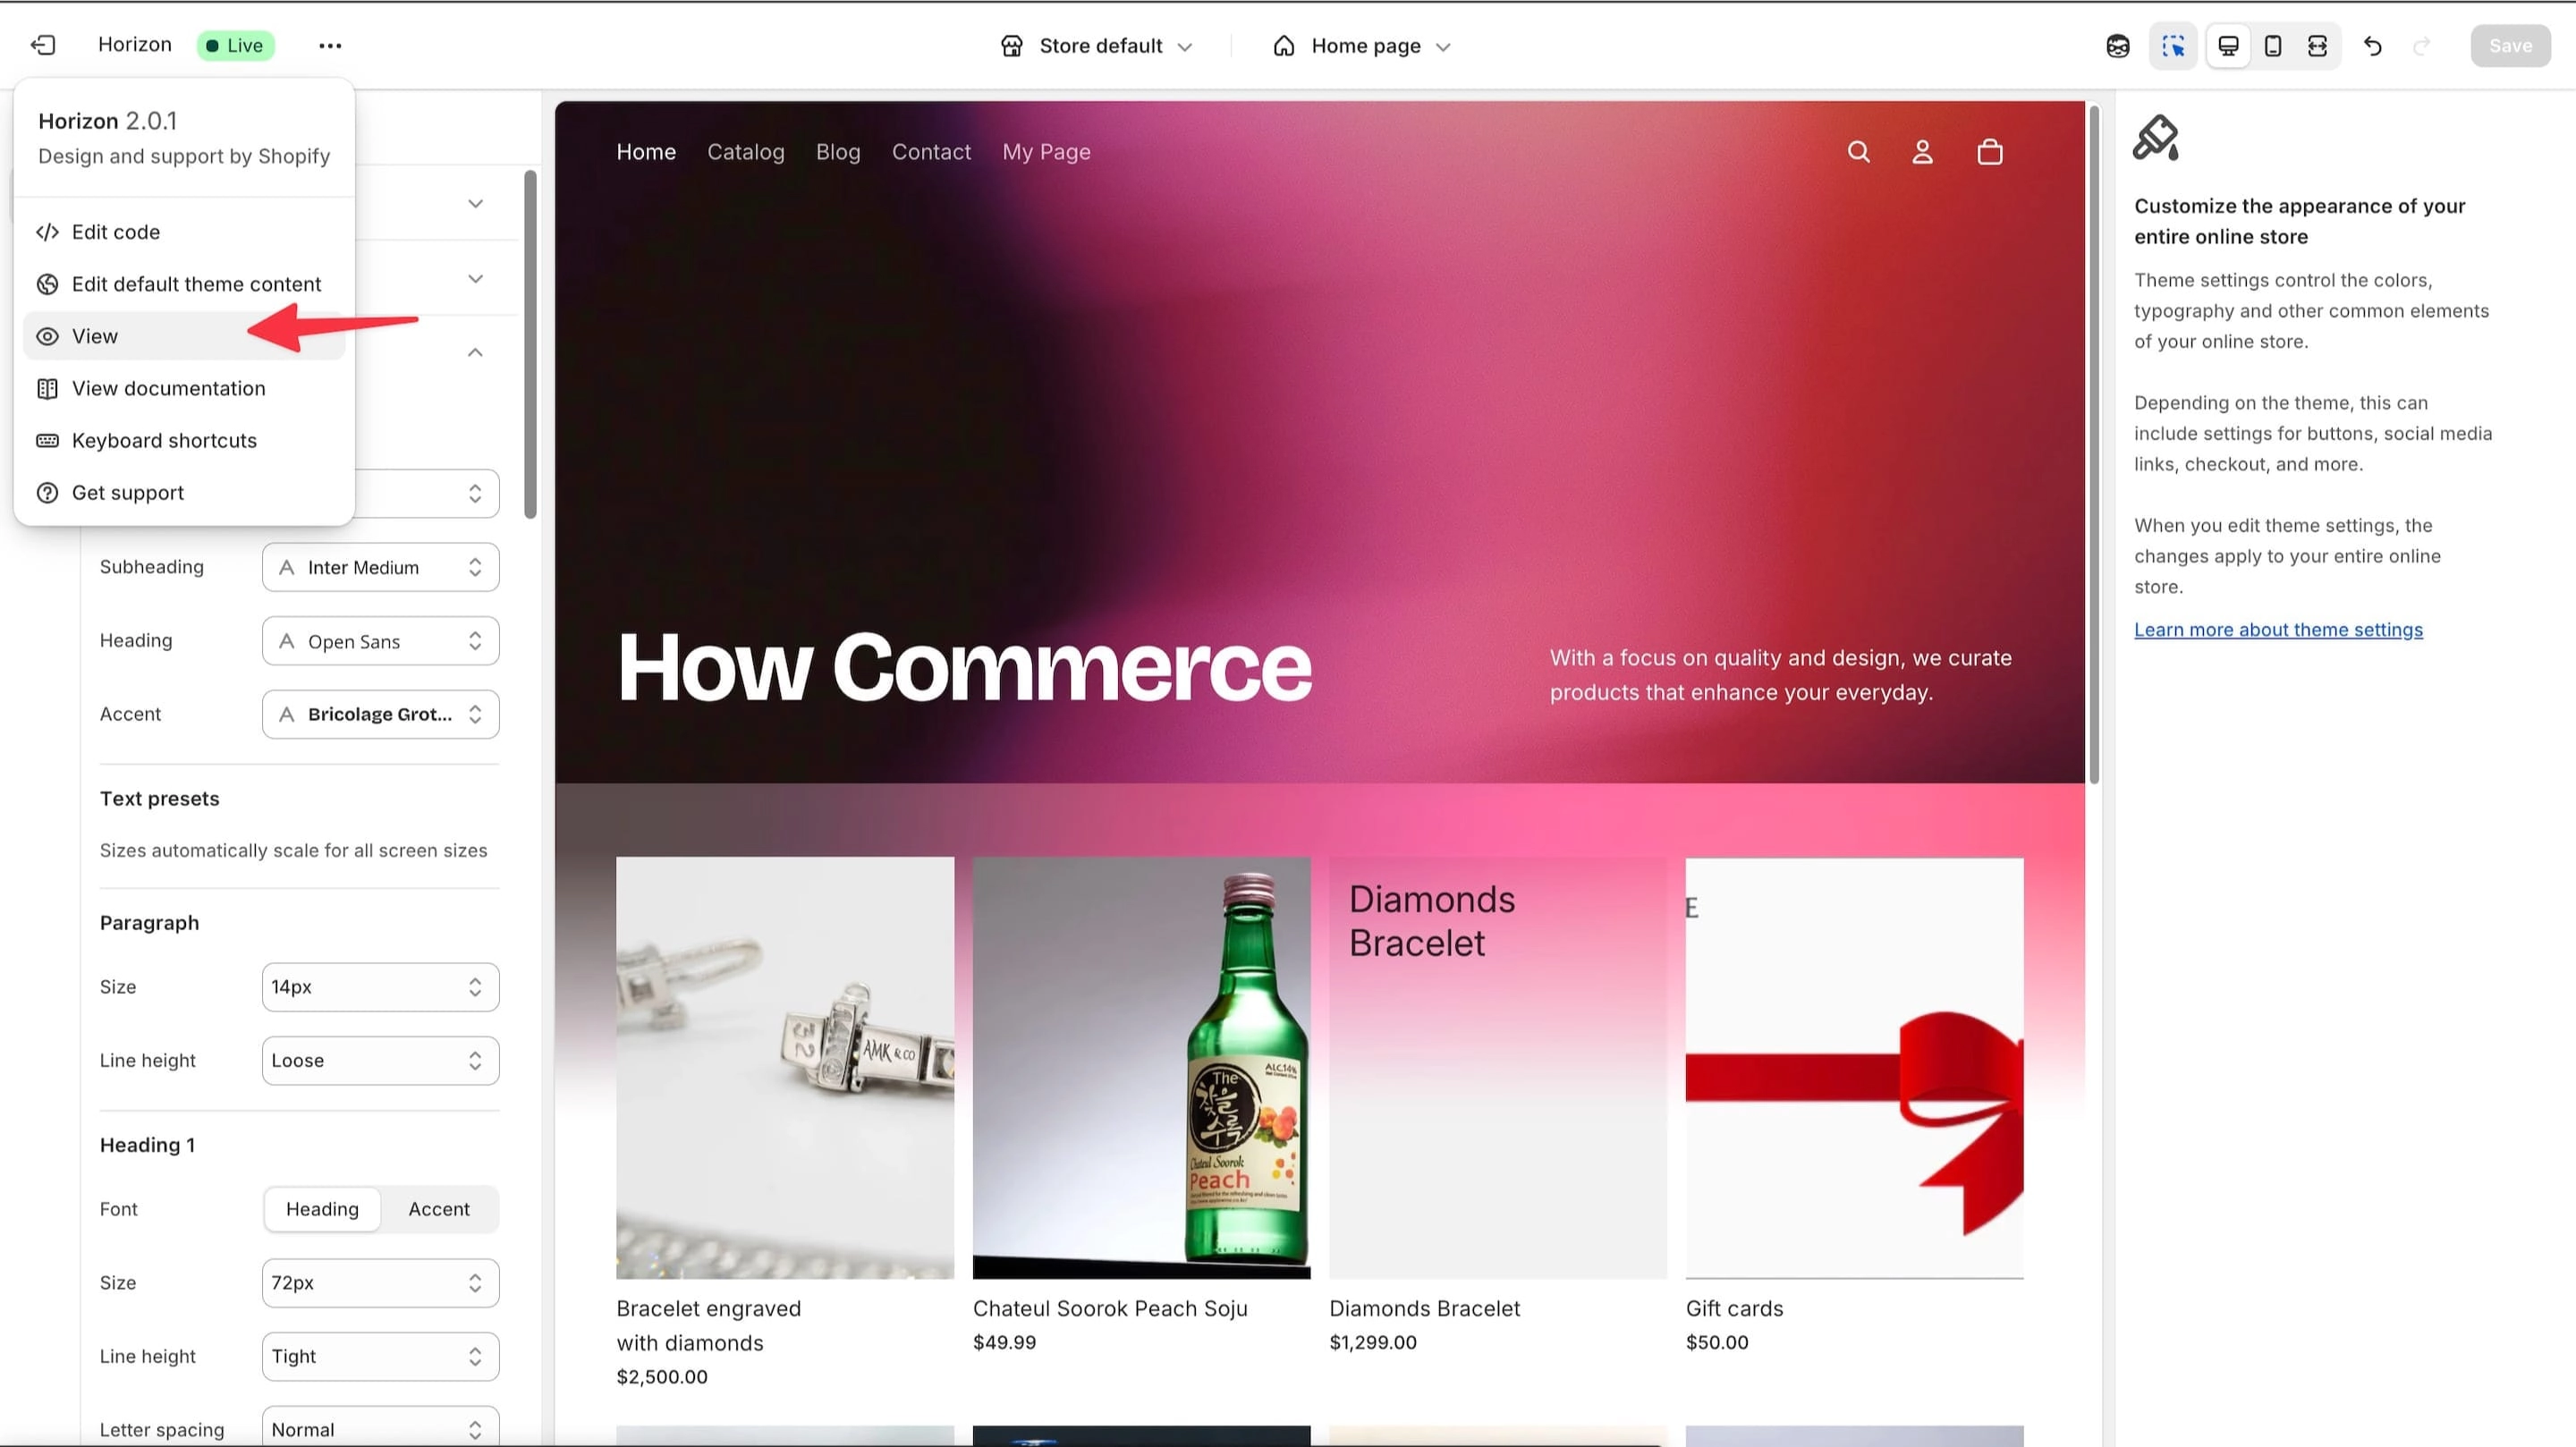
Now go and check the font in the store front. To do that click on the “View” button as in the image below:
If you’ve found the font and you set it up then you are done here.
If not you need to follow the tutorial and get inside a code editor like VS code or any other code editor to implement a custom font.
Many tutorials use the Shopify code editor inside the theme, honestly I don’t consider that to be a safe approach and if you are a pro dev you’ll use a code editor since you understand why it is much safer.
Especially since you need to run proper tests in a staging environment before pushing the custom font changes to live since this could break the layout in the store front.
Never run tests in a live environment.
I’ve seen it many times, even in big earning stores since many clients and even agencies do not understand the risks of not testing thoroughly changes on a staging before going live.
One thing that no platform should do is allow non-qualified people to manage the code infrastructure of a store, practically doing something like this you help people destroy their own businesses.
Add custom fonts directly integrated in the theme
When you need just a font, a font picker is not needed.
My recommendation is that if you want a fast store integrate the font like this and share this tutorial with a professional developer that knows what it does.
Font pickers are usually needed when you build a custom Shopify theme to be sold later to a big number of store owners since those need options to set up the store as they need via theme settings.
Usually on custom themes a custom font picker is rarely used since usually custom themes are built for Shopify Plus or Headless and in this case the store needs to be as fast and light as possible so the store owner will be asked to decide on one or 2 fonts that will be tightly integrated with the theme to increase speed.
Honestly in many cases you need a maximum of 2 fonts: one for the headings and one for the body text.
My recommendation is to use just one font if possible, in order to avoid loading 2, but as I said in many cases the designers that are creating your theme design use font pairings and use 2 fonts.
On an e-commerce store every millisecond counts and affects conversions.
In this tutorial I’ll use only one font.
I'll use the font for the headings, to make them look different than the body text.
What font types to use?
My recommendation is always use variant fonts wherever possible, and I’ll tell you why below.
Performance Gains
Why it matters: Faster sites convert better.
Traditional fonts often require multiple files for different weights/styles (e.g., regular, bold, italic).
Variable fonts consolidate all styles into a single file reducing HTTP requests and improving load time.
This matters on mobile where bandwidth and speed are limited.
Impact: Faster page loads → better UX → lower bounce rates → higher conversion rates.
Design Flexibility
Why it matters: More control, less compromise.
Variable fonts allow fine-grained control over weight, width, slant, etc., without needing separate files.
You can create subtle distinctions in hierarchy, emphasis, or branding tone dynamically.
Impact: Cleaner, more modern look that adapts well across screen sizes and use cases.
Responsive Typography
Why it matters: Consistent experience across devices.
With variable fonts, you can dynamically adjust typography with CSS based on screen size or user preferences.
This leads to better accessibility and visual coherence on mobile, tablet, and desktop.
Impact: Improved readability, accessibility, and consistency.
Modern Brand Appeal
Why it matters: Design influences trust.
E-commerce is visual. A unique, well-rendered typeface can subtly influence perceived quality.
Variable fonts open up more expressive typographic branding without bloating page weight.
Impact: Better brand perception and trust, especially on first impression.
Animation & Interactivity
Why it matters: Engagement.
Variable fonts support CSS animation on font properties, useful for hover states, hero transitions, etc.
This can add a modern, dynamic feel to key UI elements.
Impact: Subtle motion can improve engagement without relying on heavy JS libraries.
With that said, for my example I’ll use a variant font.
Download the font
For this example I’ll use “Alumni Sans” which is an open source font that you can find on Google Fonts.
This font has a variant font format and is not included inside the default Shopify font picker.
You can use any font you want since the process is the same.
I’ll use my code editor to do the integration.
I’ll not go deep on how to connect your Shopify CLI to the Shopify partner account, setting up a development environment or any type like this in this tutorial and I’ll assume you already have everything in place.
It’s just too much to cover in this tutorial.
So starting from this point on I assume that you are connected via Shopify CLI, you are running “shopify theme dev --store storename.myshopify.com” in the terminal, you can see your local copy when you visit http://127.0.0.1:9292/
Add the font to the theme
For Shopify to find your font you need to add it inside the theme.
For that Shopify uses the “Assets” folder.
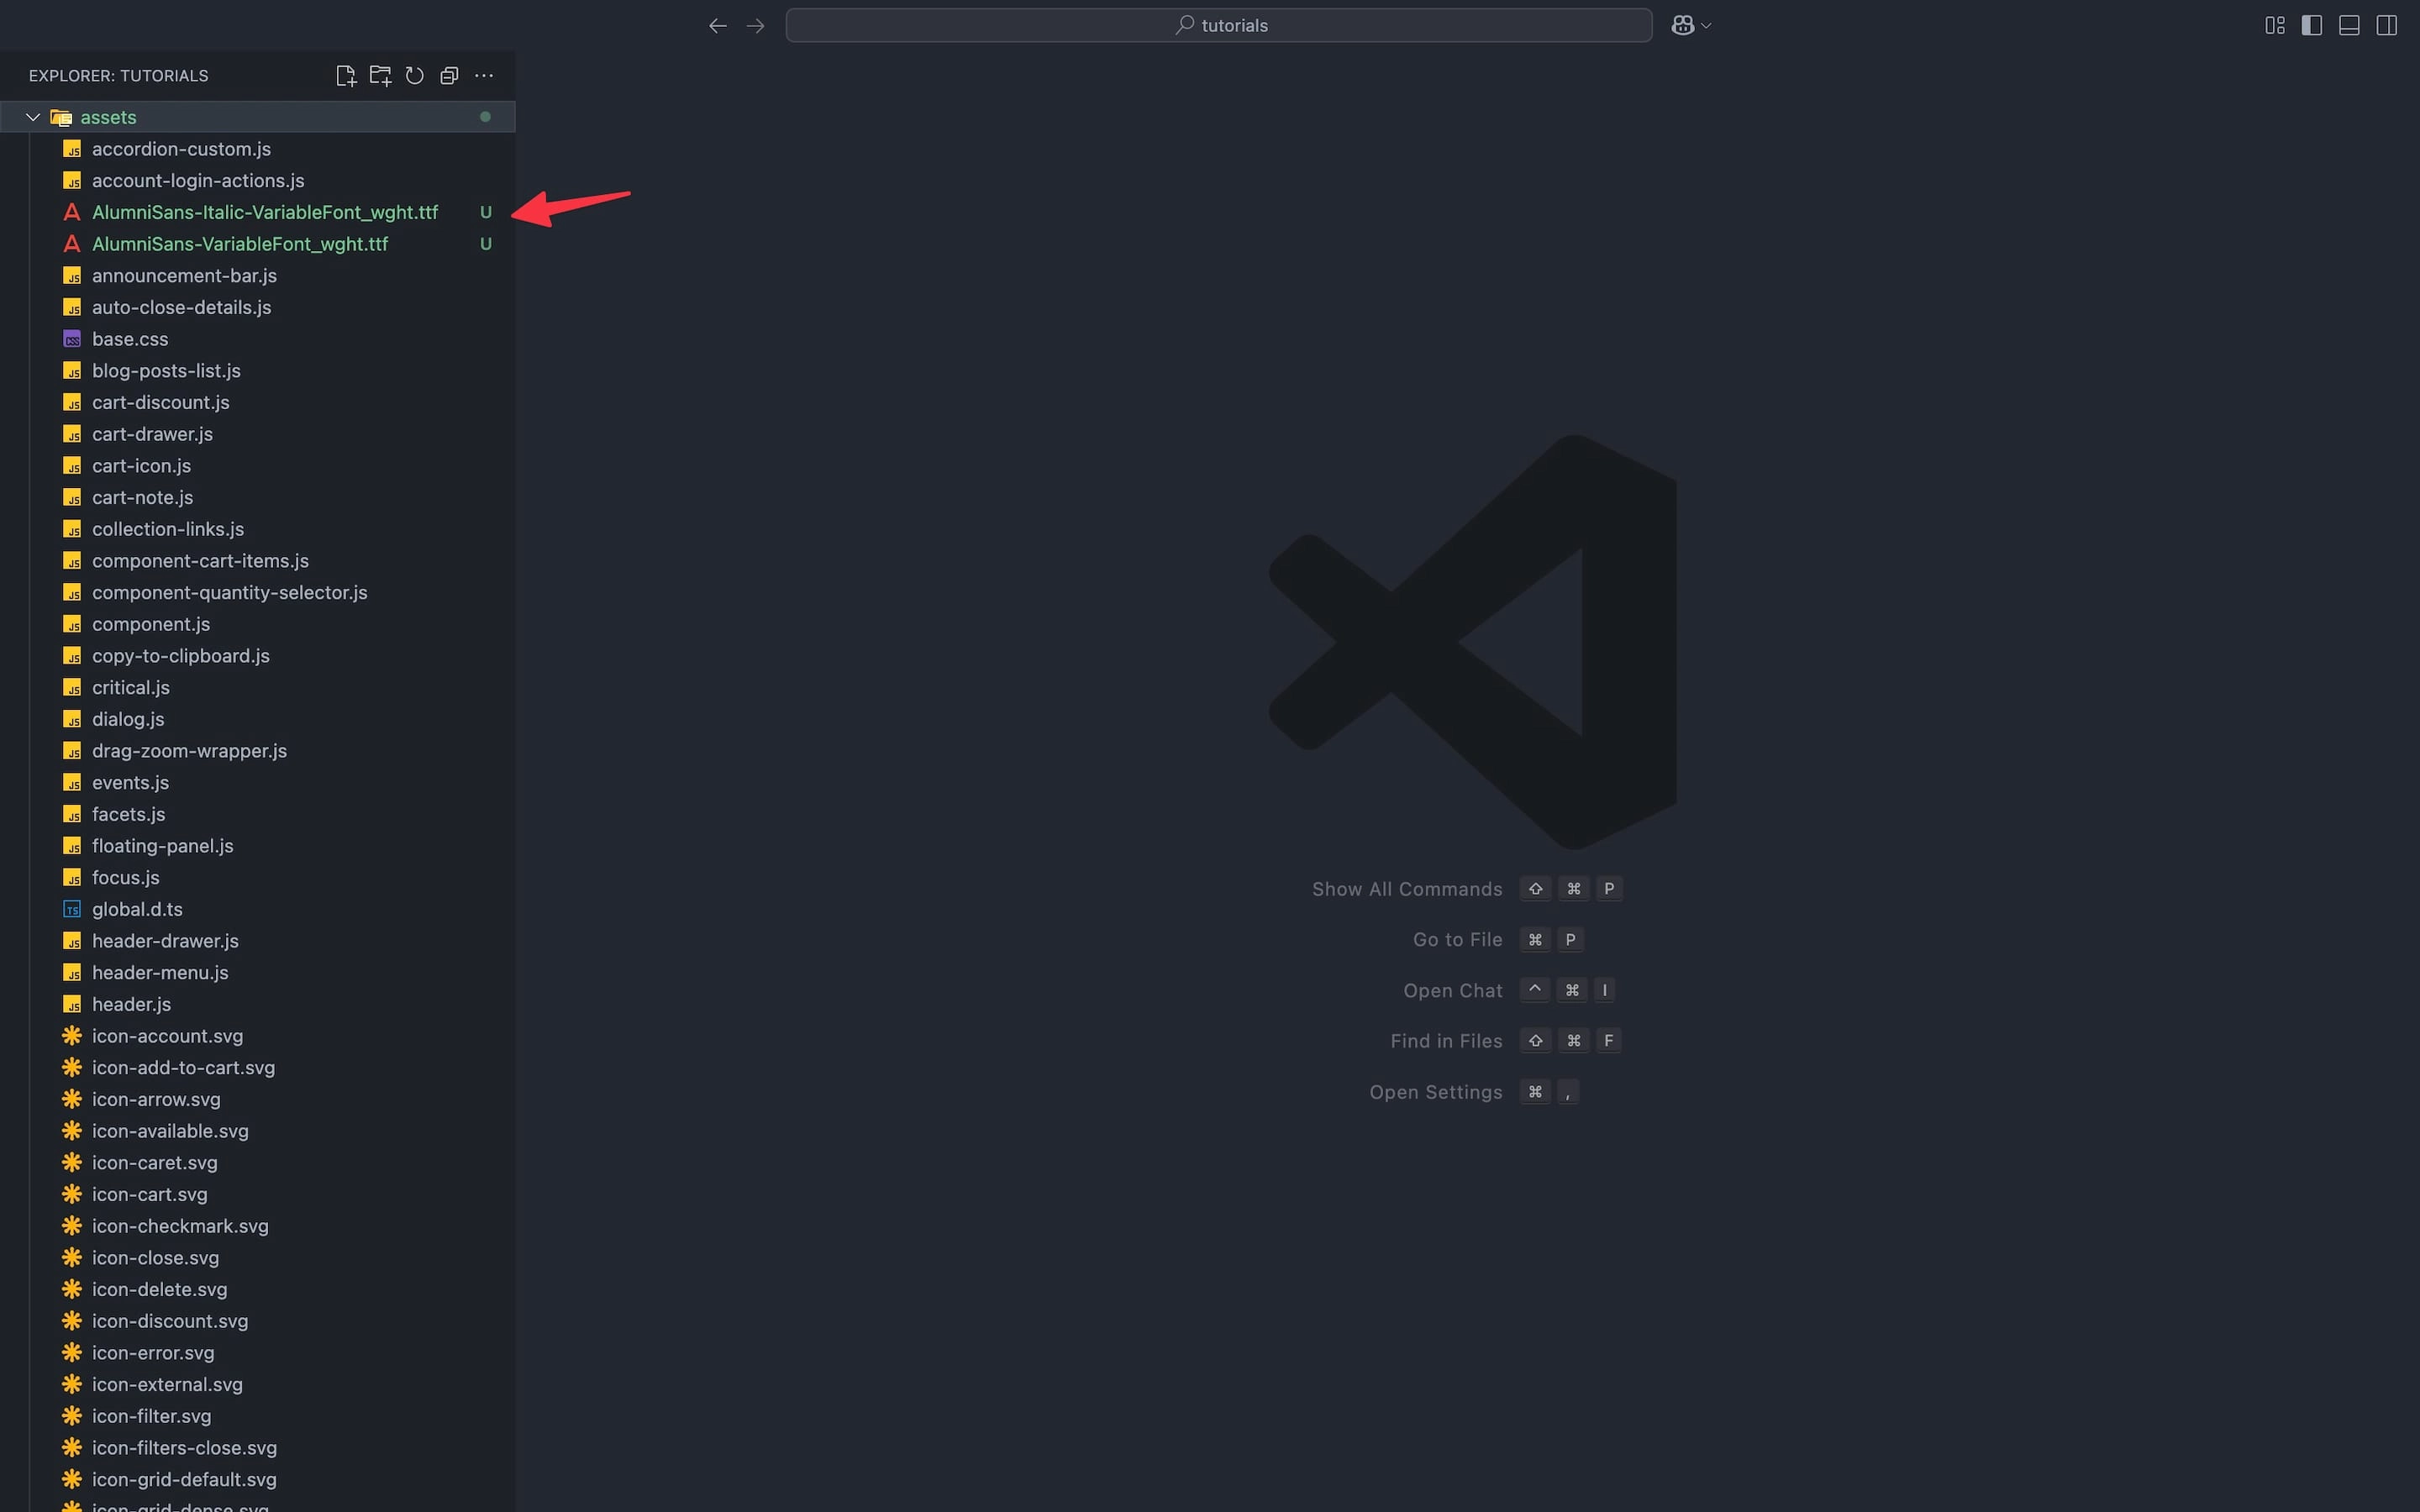
This is how the “Assets” folder looks in my code editor.
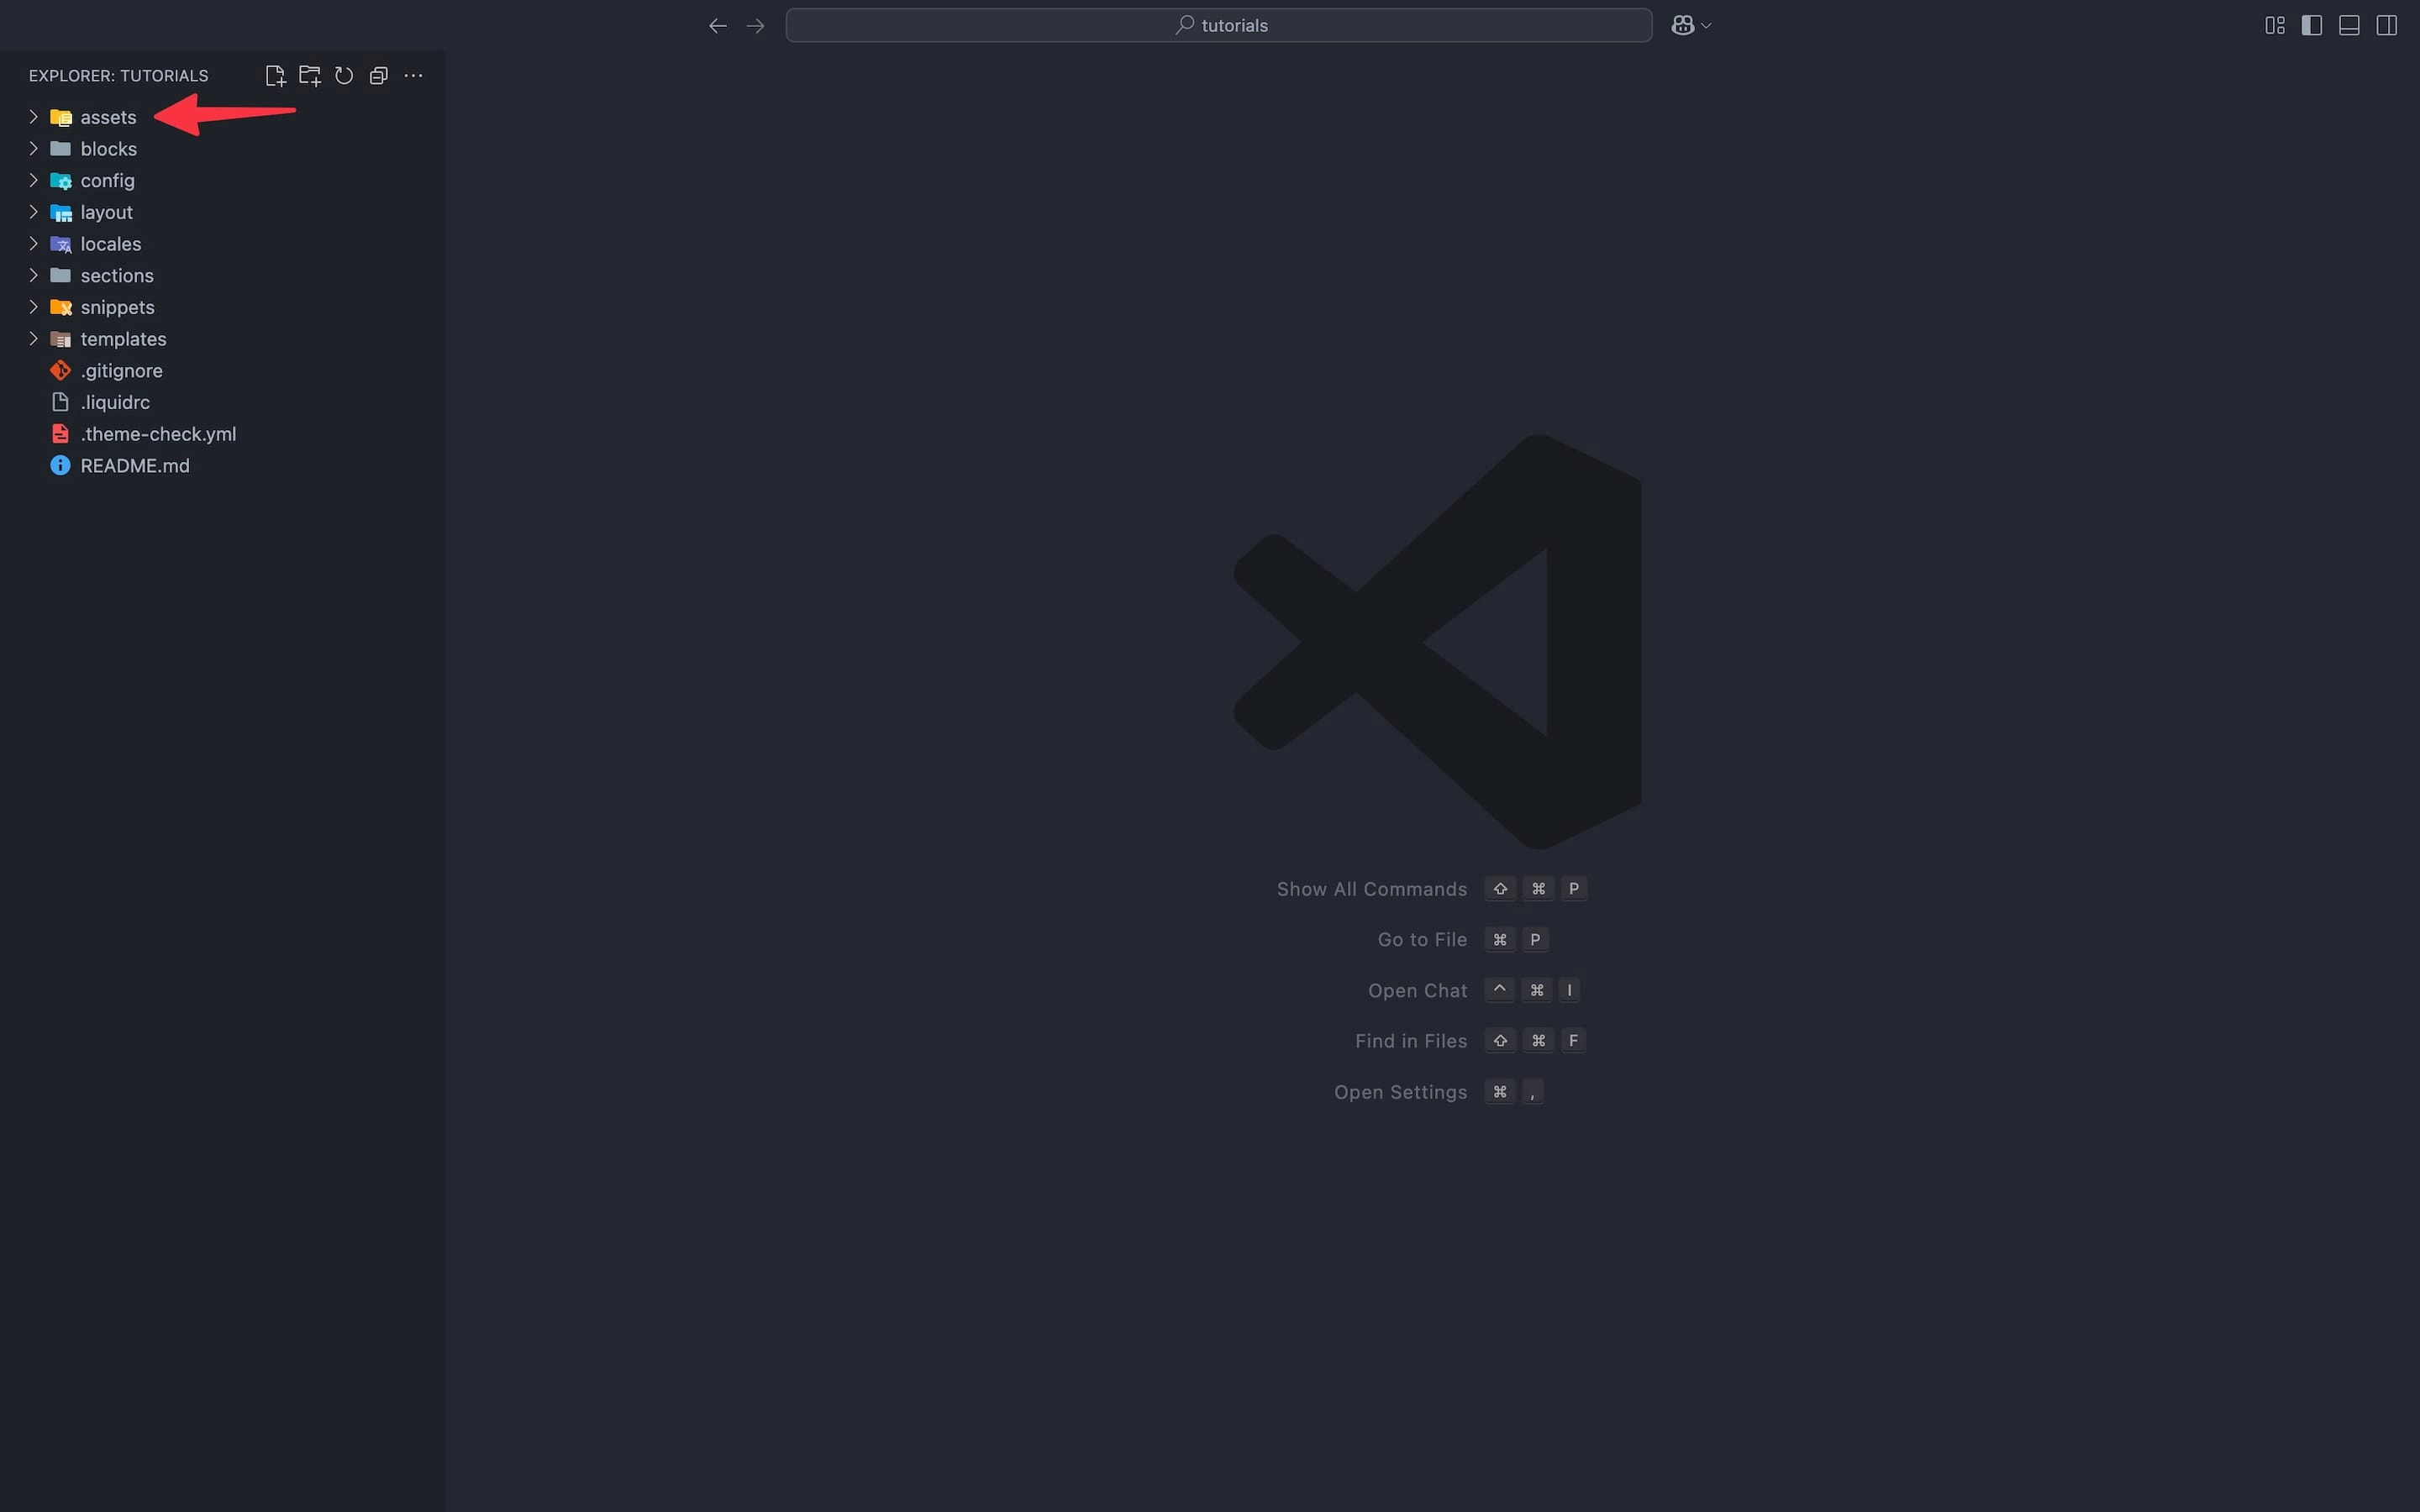
Go on and upload the font inside this folder.
Do not try to create new folders inside the assets folder to structure it differently, since it will not upload to Shopify when you do the deployment to the theme hosted in the Shopify CDN and you’ll see errors in your terminal generated by the Shopify CLI.
Practically when you work on your theme locally, you work on a copy of the theme hosted on Shopify CDN.
Also the assets folder is limited to a couple type of files.
My font has 2 files:
AlumniSans-VariableFont_wght.ttf
This is the upright (non-italic) variable font. It contains a weight axis (“wght”) that lets you interpolate between different font weights (e.g., Thin to Black) in an upright style.
AlumniSans-Italic-VariableFont_wght.ttf
This is the italic variant of the same font, also with a “wght” axis. It's the same range of weights but styled in italics.
When integrating into CSS or a design system:
Use “AlumniSans-VariableFont_wght.ttf” for normal text.
Use “AlumniSans-Italic-VariableFont_wght.ttf” for italicized text.
This is how my font is looking inside the Shopify “assets” folder.
Shopify doesn’t have a theme override system like other CMS’s: WordPress (child themes), Joomla (template overrides) and so on.
Every override is done directly inside the theme's original files.
This is why we need to create a file like “theme-custom.css” to override the original CSS styles and keep everything separated so that later we can update the original theme easily.
This method that I’m going to show you with CSS overrides is the safest, fastest and simpler way to implement a custom font into your theme.
If you want to do it by the book then you need to find all fonts implemented in the theme and replace them with the current one without any override files.
This is how I do it for all my Shopify Plus or Headless clients. This method is clean and keeps the theme lean and performant but it is also the most complex method and varies from theme to theme since each theme has a different font implementation, and for this you absolutely need a professional developer to help you with it especially if you have a high earning store where each millisecond counts.
Here we can also talk about preloading fonts and many other performance perks that only a pro developer can help you with.
With this said let me show you the safest & fastest way to do it which works well for most Shopify stores.
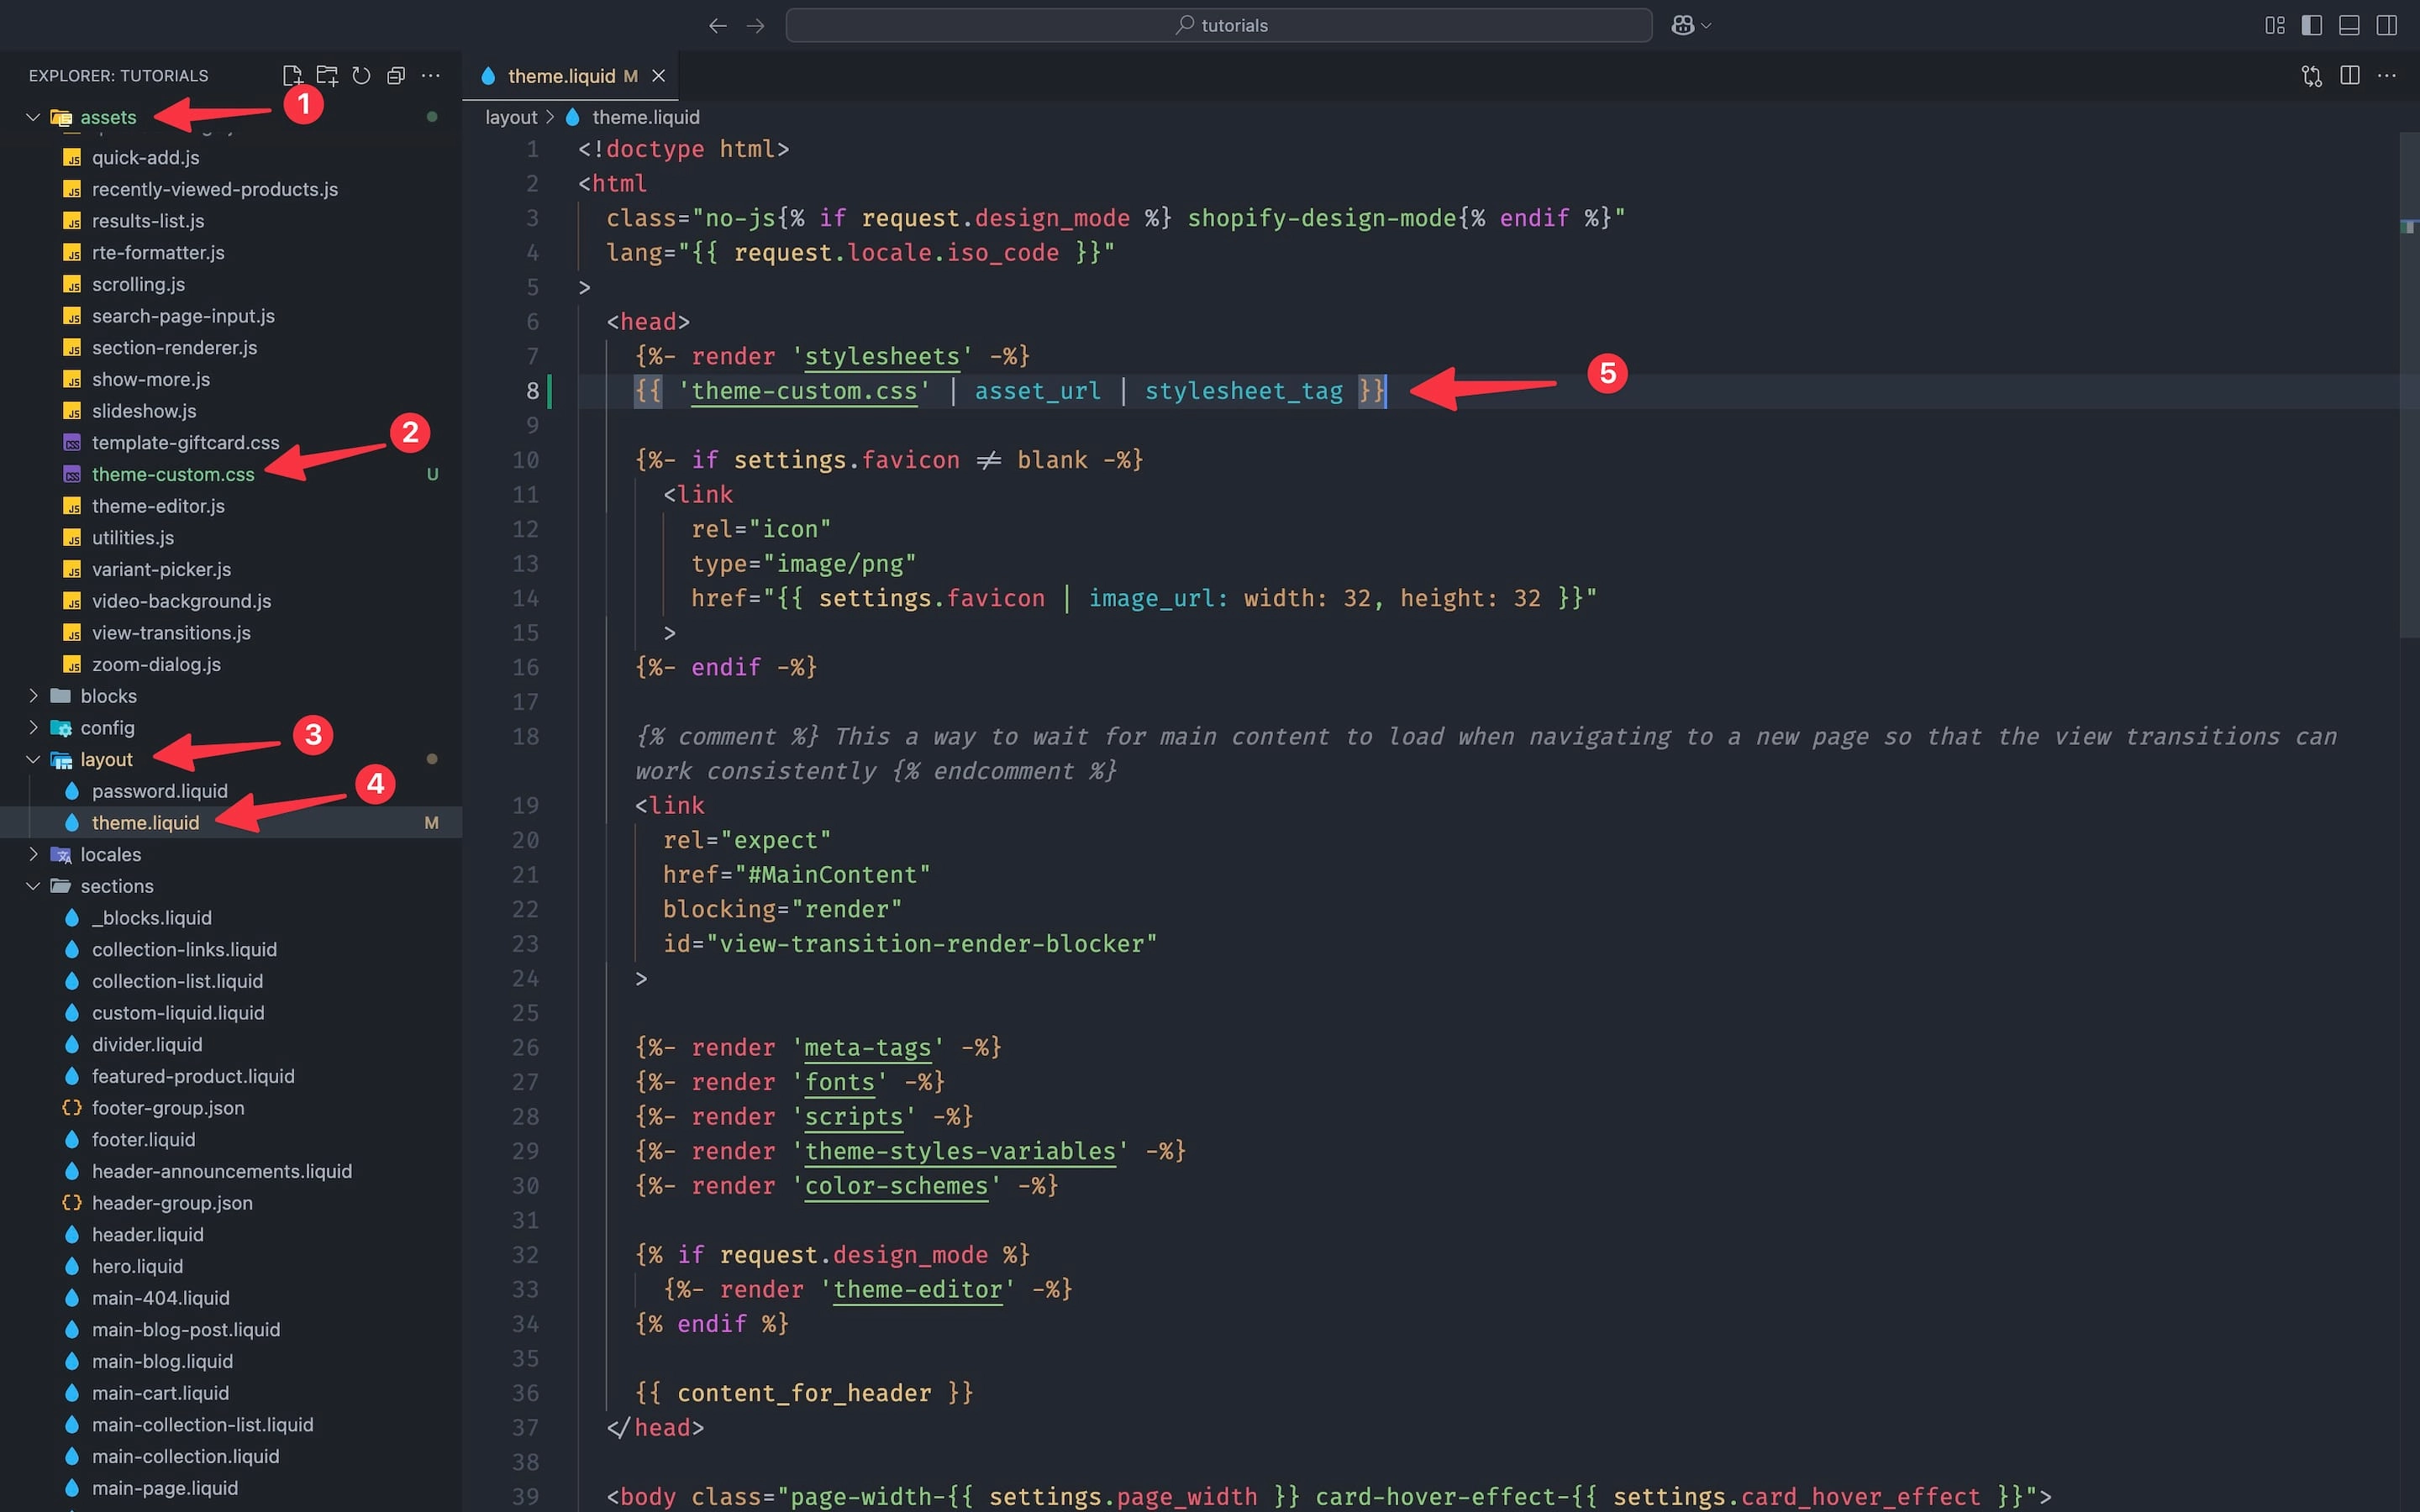
In the “assets” folder (marked with 1 in the image below) create the “theme-custom.css” file (marked with 2 in the image below).
Now, in the “layout” folder (marked with 3 in the image below) open the “theme.liquid” file (marked with 4 in the image below) and link the “theme-custom.css” (marked with 5 in the image below).
{{ 'theme-custom.css' | asset_url | stylesheet_tag }}Make sure that the “theme-custom.css” is linked below all your CSS files.
Do this in order to make sure that this specific file will override all your other CSS files loaded by the theme, else it will not work.
As you see in my theme I have all stylesheets loaded in a separate snippet file to keep the code clean.
Normally this is where I’ll add the file but in order to override all other CSS files I’m going to add the “theme-custom.css” below this snippet file and in this way my new file will override all other CSS files.
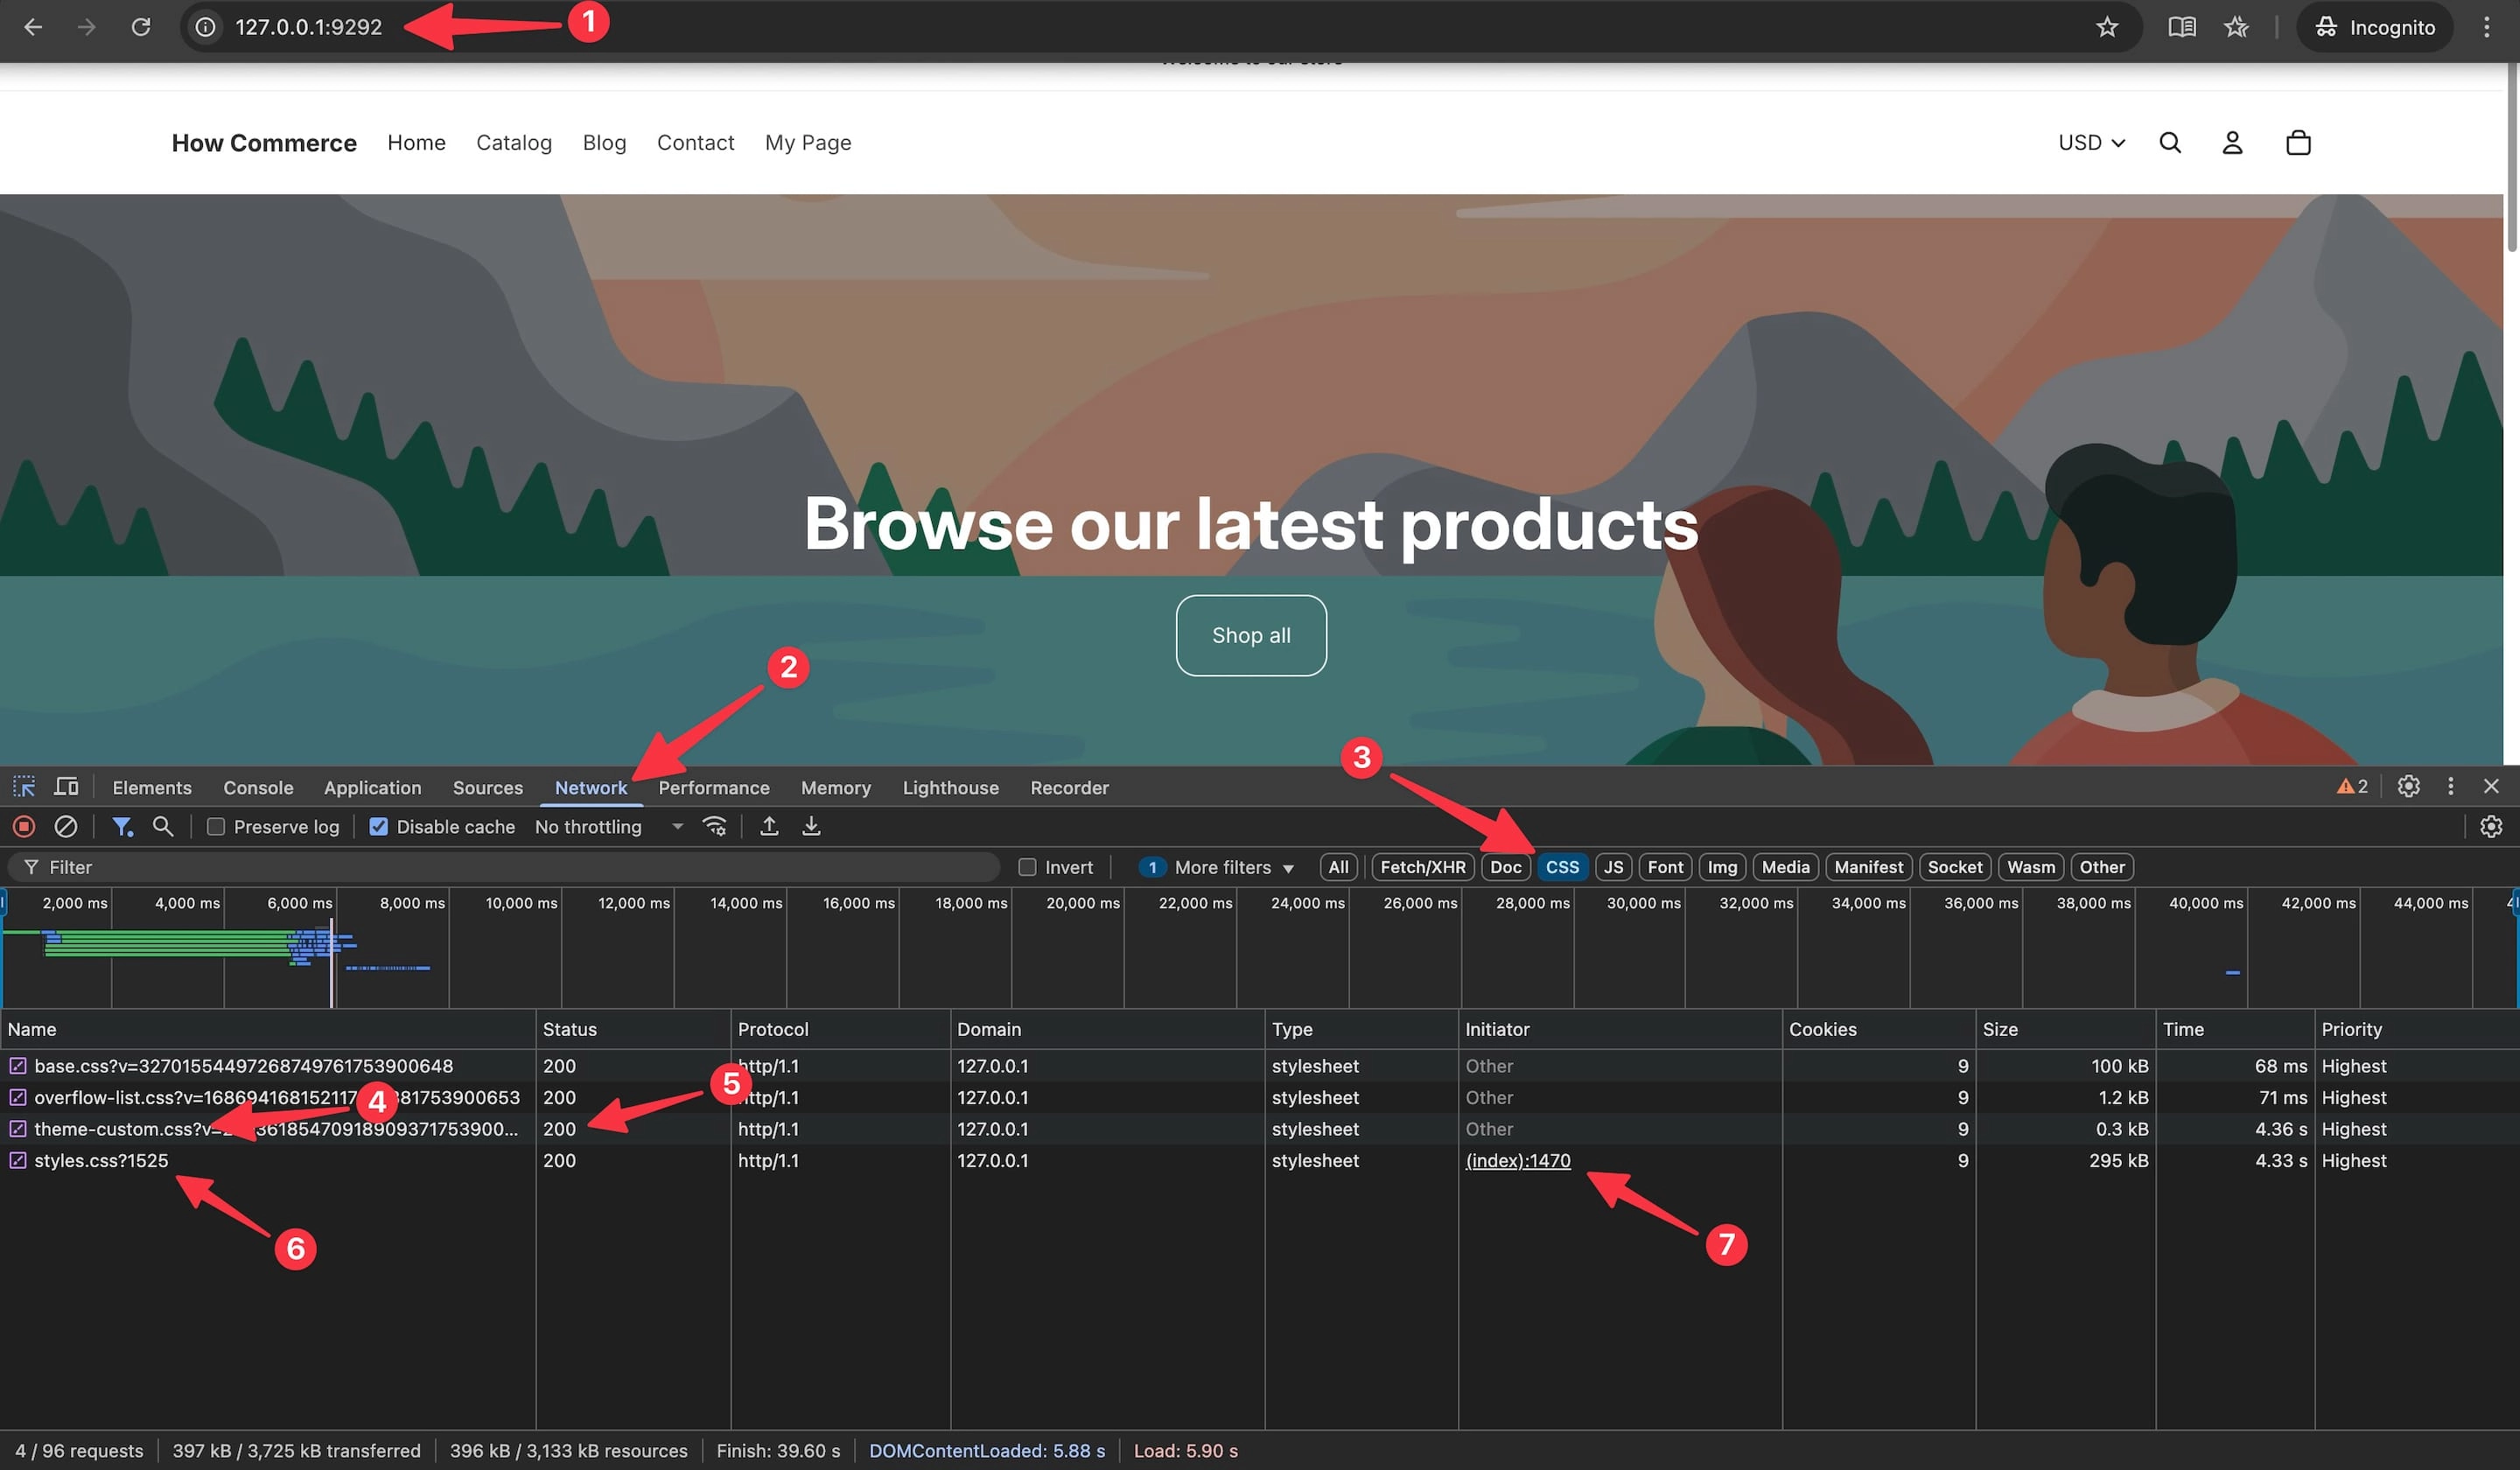
To be sure that the file is loaded correctly go to your browser and since you develop locally type the address as seen (marked with 1 in the image below).
Open the Chrome Developer tools or Dev tools in whatever browser you use, go to the “Network” tab (marked with 2 in the image below) then to the “CSS” (marked with 3 in the image below).
Search after the “theme-custom.css” file (marked with 4 in the image below) and check the “Status” to be 200 (marked with 5 in the image below).
As I said this file needs to be loaded last to override previous font CSS code, but in many themes due to the fact that many developers deliver sections with CSS included in them, between the “{% stylesheet %}{% endstylesheet %}” tags you’ll see this “style.css” file which is compiled by Shopify (marked with 7 in the image below) from the code found on each section between these 2 tags.
Usually fonts are used globally so most of the time they will not be included in each section and because of that this override technique should work.
On the contrary if your font doesn’t work this is the one thing you should check.
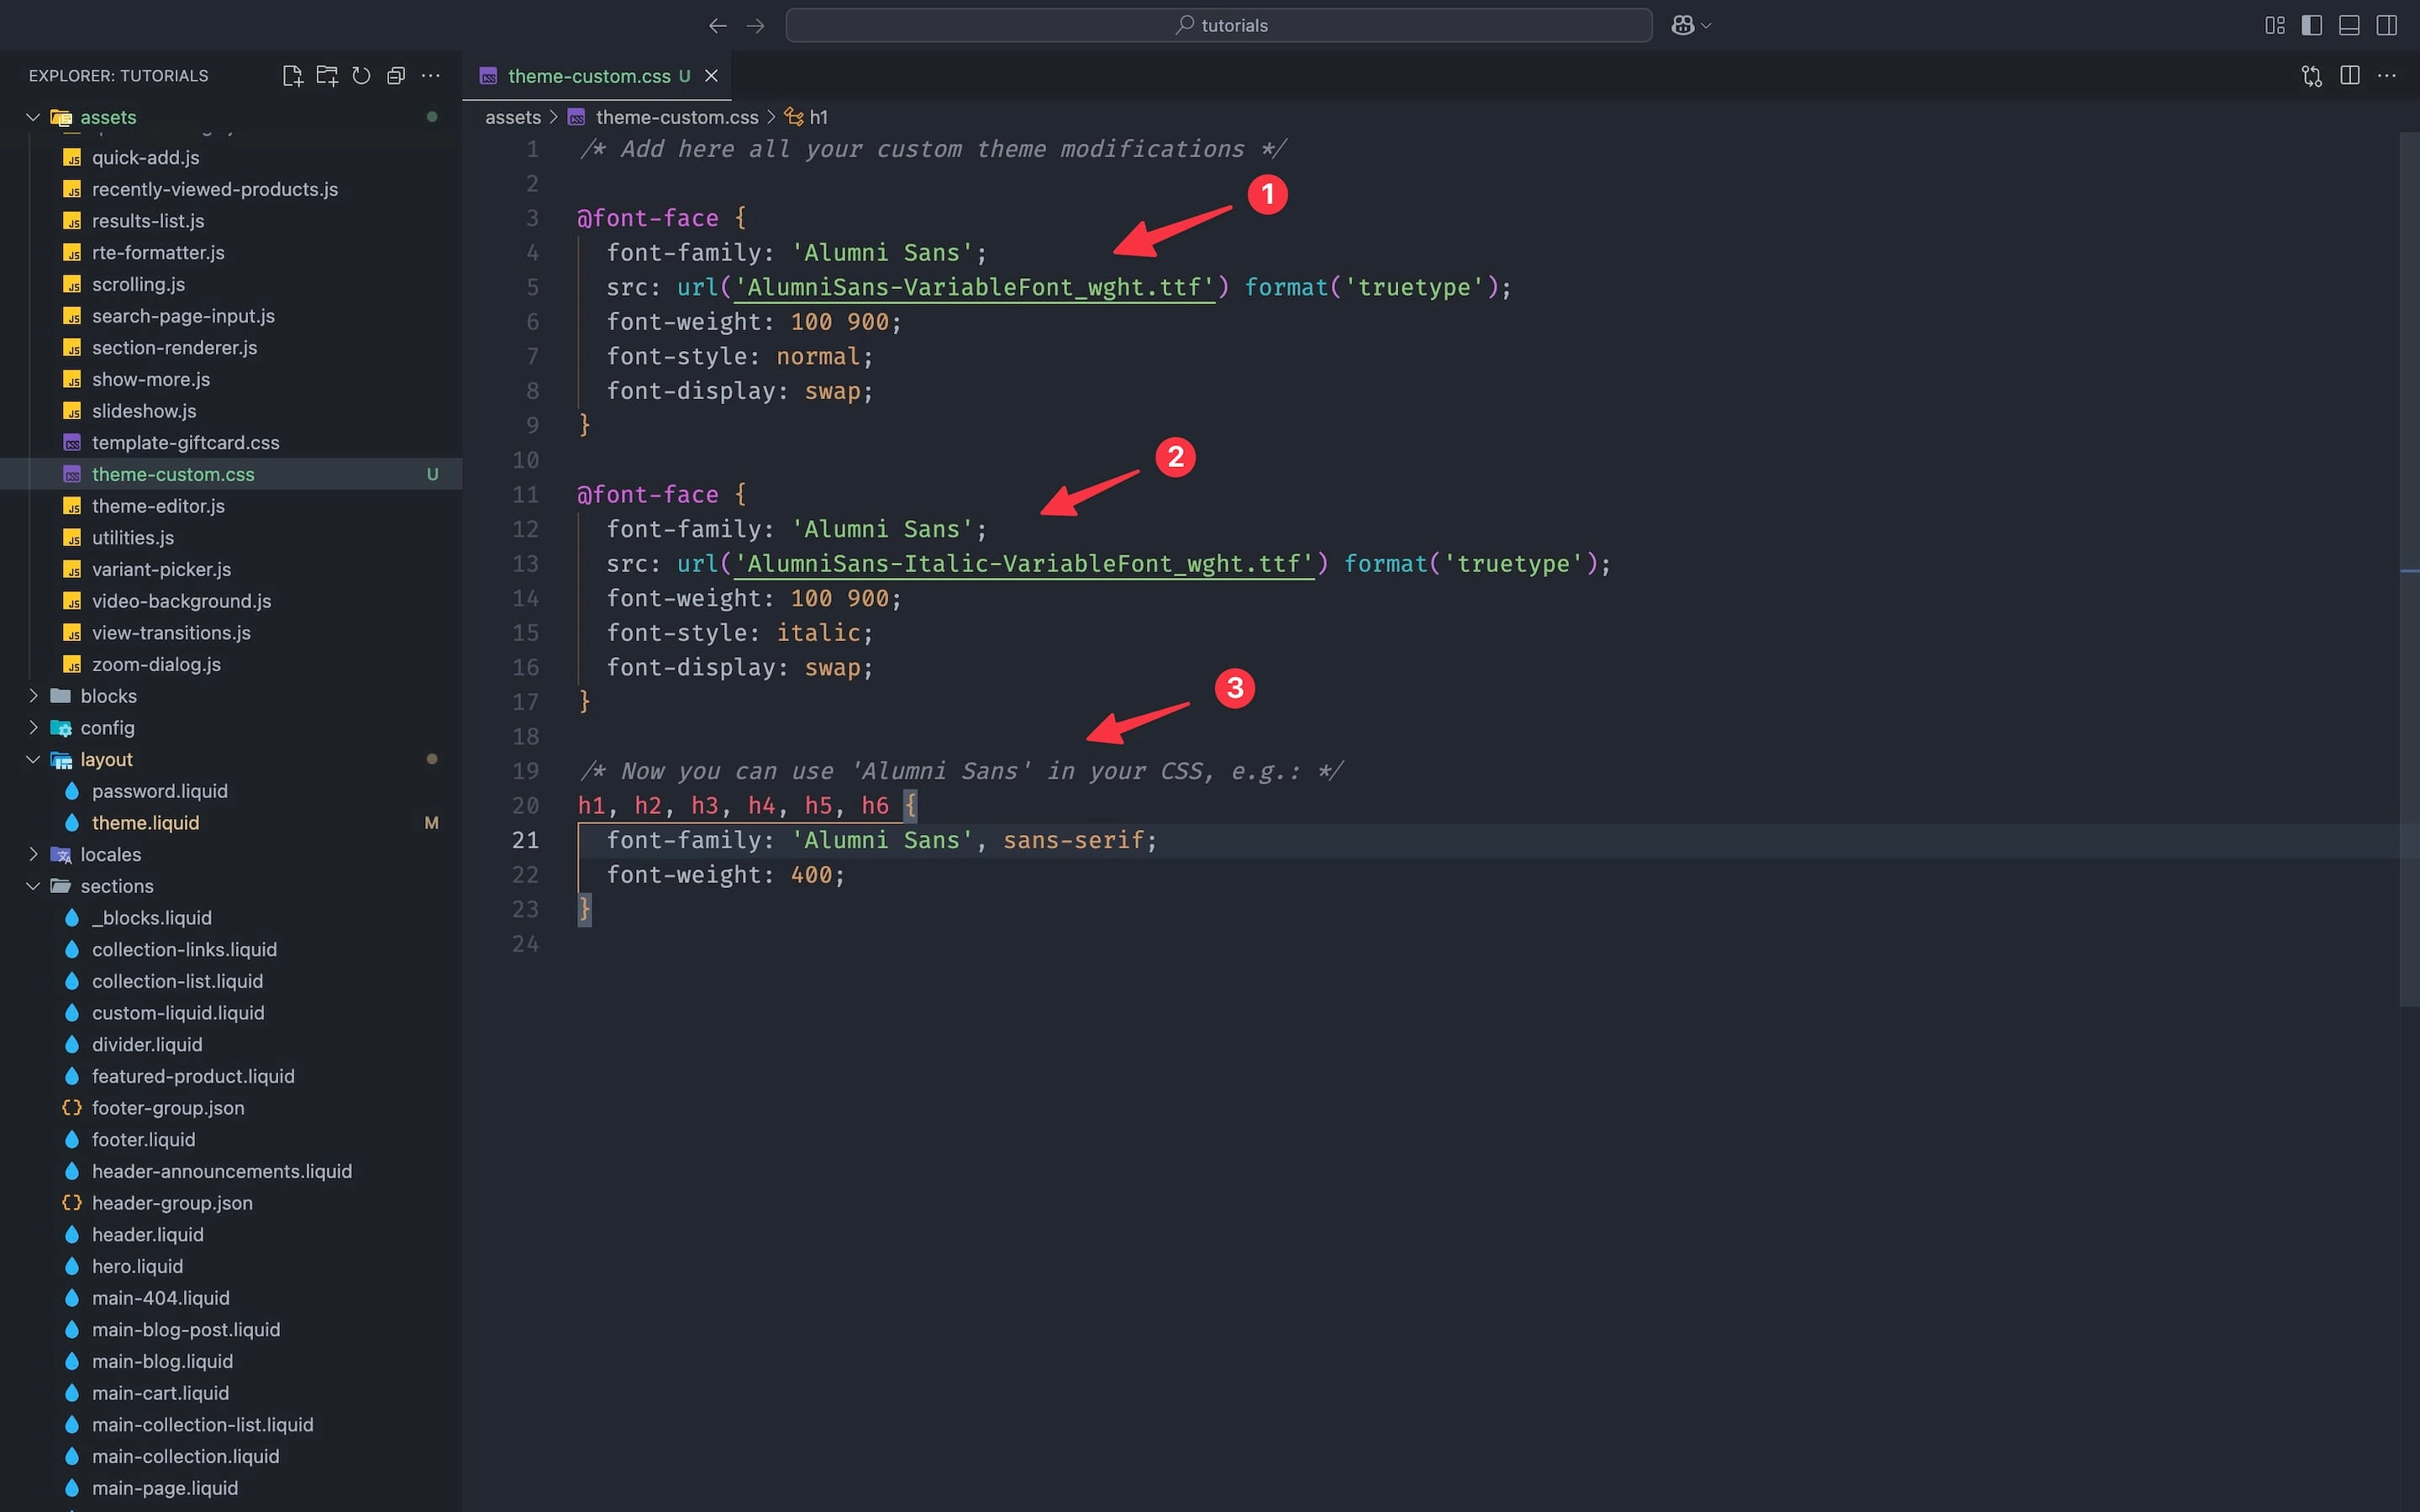
Now that the file is in place you need to add the code that will load the font in your theme and after that assign it to HTML tags you want to use.
Since the variant font I want to use has 2 files, one for regular and one for italic, I’ll load both of them.
I’ll use the font on my headings so I’ll assign it to all “h” tags (marked with 3 in the image below).
Code for the upright (non-italic) style:
@font-face {
 font-family: 'Alumni Sans';
 src: url('AlumniSans-VariableFont_wght.ttf') format('truetype');
 font-weight: 100 900;
 font-style: normal;
 font-display: swap;
}
font-family: This assigns the name ‘Alumni Sans’ to the uploaded font file. You’ll use this name in your CSS to assign the font to different HTML tags.
src: This points to the font file location, here, a variable font file in TrueType format (.ttf).
font-weight: By specifying 100 900, you tell the browser this file supports a full weight range (thin to bold), as it’s a variable font.
font-style: Set to normal for the upright (non-italic) style and in the second example the italic style.
font-display: swap; Instructs the browser to show fallback text until the custom font is loaded, preventing invisible text and improving performance.
Code for the italic style:
@font-face {
 font-family: 'Alumni Sans';
 src: url('AlumniSans-Italic-VariableFont_wght.ttf') format('truetype');
 font-weight: 100 900;
 font-style: italic;
 font-display: swap;
}
font-family: This assigns the name ‘Alumni Sans’ to the uploaded font file. You’ll use this name in your CSS to assign the font to different HTML tags.
src: This points to the font file location, here, a variable font file in TrueType format (.ttf).
font-weight: By specifying 100 900, you tell the browser this file supports a full weight range (thin to bold), as it’s a variable font.
font-style: Set to italic style.
font-display: swap; Instructs the browser to show fallback text until the custom font is loaded, preventing invisible text and improving performance.
/* Now you can use 'Alumni Sans' in your CSS, e.g.: */
h1, h2, h3, h4, h5, h6 {
 font-family: 'Alumni Sans', sans-serif;
 font-weight: 400;
}
This CSS applies the custom “Alumni Sans” font to all headings (h1 - h6) in your store.
If “Alumni Sans” font fails to load, it falls back to the browser’s default sans-serif font.
font-weight: uses the “Regular” weight from the variable font range which is 400.
Go to your store front and test the font.
The font should work on all the tags you applied to it.
In my case I’ve applied the font only to headings.
I’ve added a test heading just to test the font (marked with 1 in the image below).
In the Chrome Dev tools you can see it is a H1 tag (marked with 2 in the image below).
On the “Styles” panel in Chrome Dev tools you can see the new custom font added to the theme “Alumni Sans”.
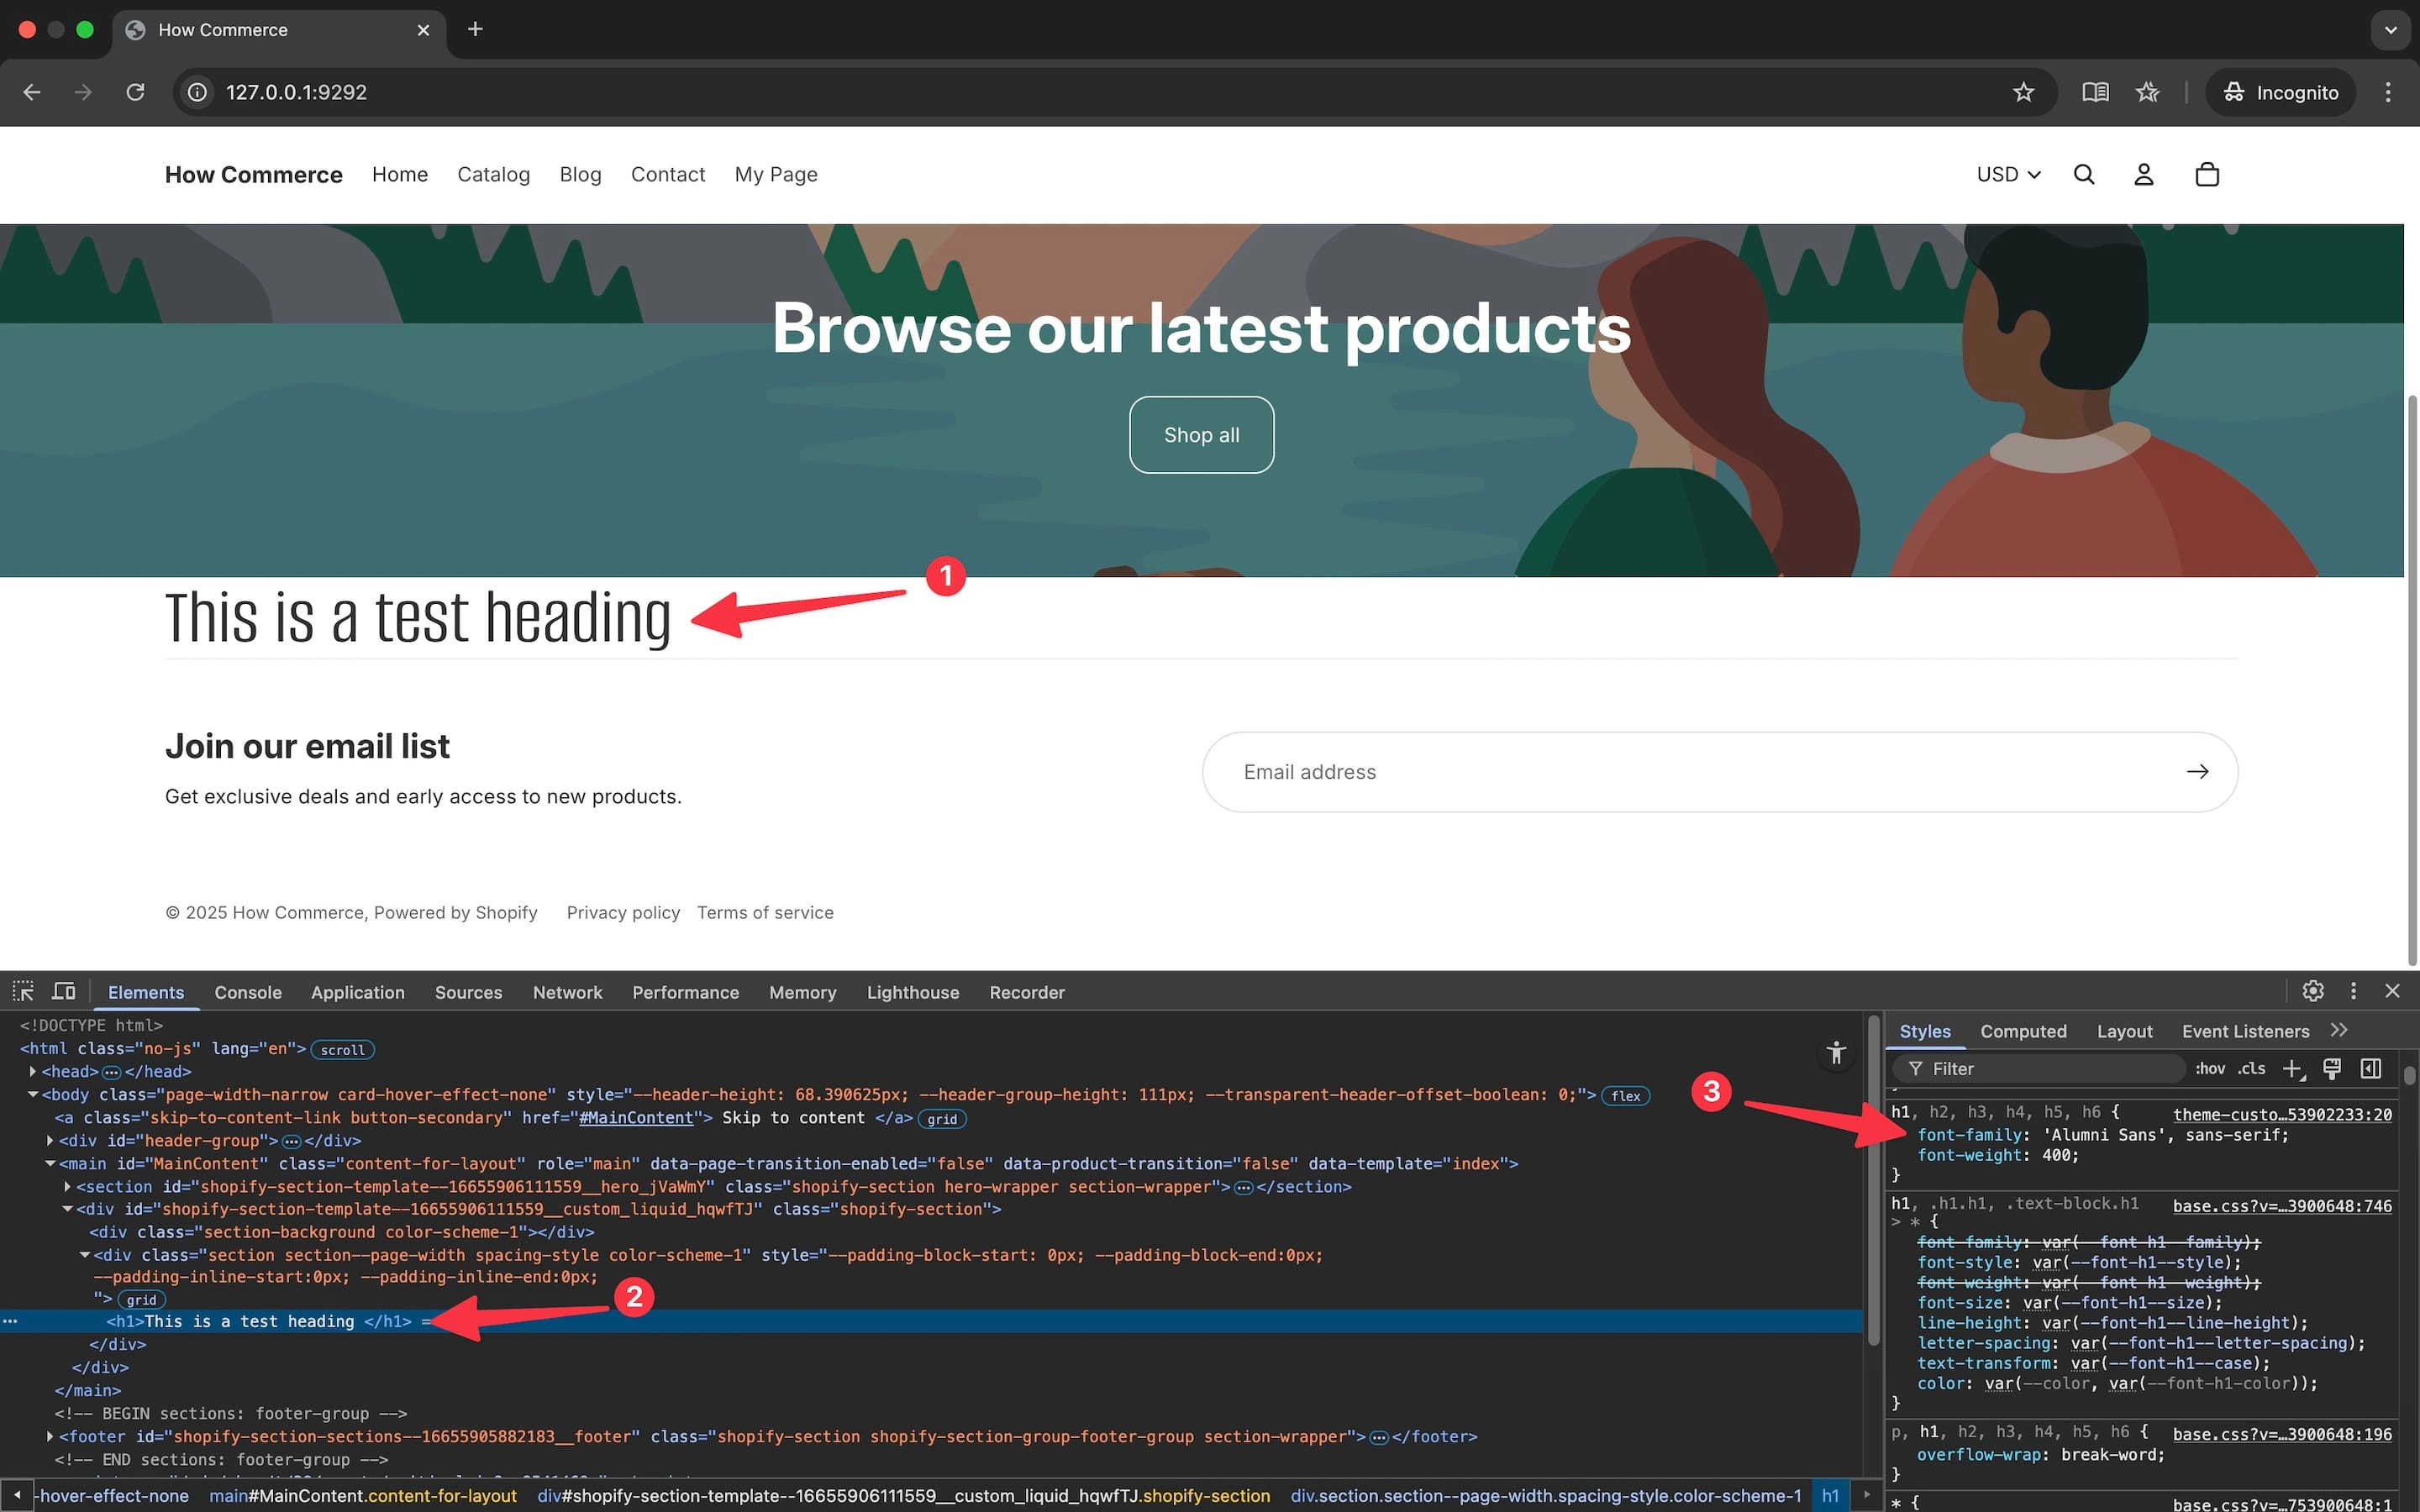
This means your font is added to the theme and the override works correctly.
Conclusion
Adding a custom font to your Shopify store is a straightforward but powerful way to elevate your brand, create a more unique shopping experience, and set your site apart from the competition.
By using modern CSS techniques like @font-face and leveraging high-quality variable font, you gain full control over your store’s typography without relying on third-party apps or bloated solutions.
Whether you stick to Shopify’s default options for simplicity and speed, or implement your own font for a truly branded look, understanding the differences and the correct integration methods will ensure both a professional appearance and top performance.
Take the time to choose the right font, implement it cleanly, and always test your store across devices to guarantee a seamless, accessible experience for all users.
In today’s competitive e-commerce landscape, attention to detail - like custom fonts - can make a measurable difference in both perception and conversion.
Don’t settle for generic.
Invest in your brand’s identity and deliver a store that truly stands out.