
A lot of content these days can be generated automatically in Shopify with text generation via Artificial Intelligence that is integrated inside the platform.
Everybody knows that crafting good product descriptions takes a huge amount of time, especially when you have a lot of products in the store. The same goes for blogs or catchy email marketing subject lines.
With Shopify AI you’ll save countless hours of work.
This new AI addition is called by Shopify, “Shopify Magic”.
This tool not only generates new product descriptions but can help you automate a lot of tedious tasks in your store.
For a developer like me this tool is fantastic since I can quickly generate demo content to test things, especially when I’m building custom themes for my clients.
AI supported languages
Support for automatically generated product descriptions is available in the following languages:
- English
- German
- Spanish
- French
- Italian
- Japanese
- Portuguese (Brazilian)
- Chinese (Simplified)
The language used to generate the AI output suggestions is determined by the default language of your storefront.
If your default storefront language isn't one of the supported languages, then this feature will not be available in your Shopify admin.
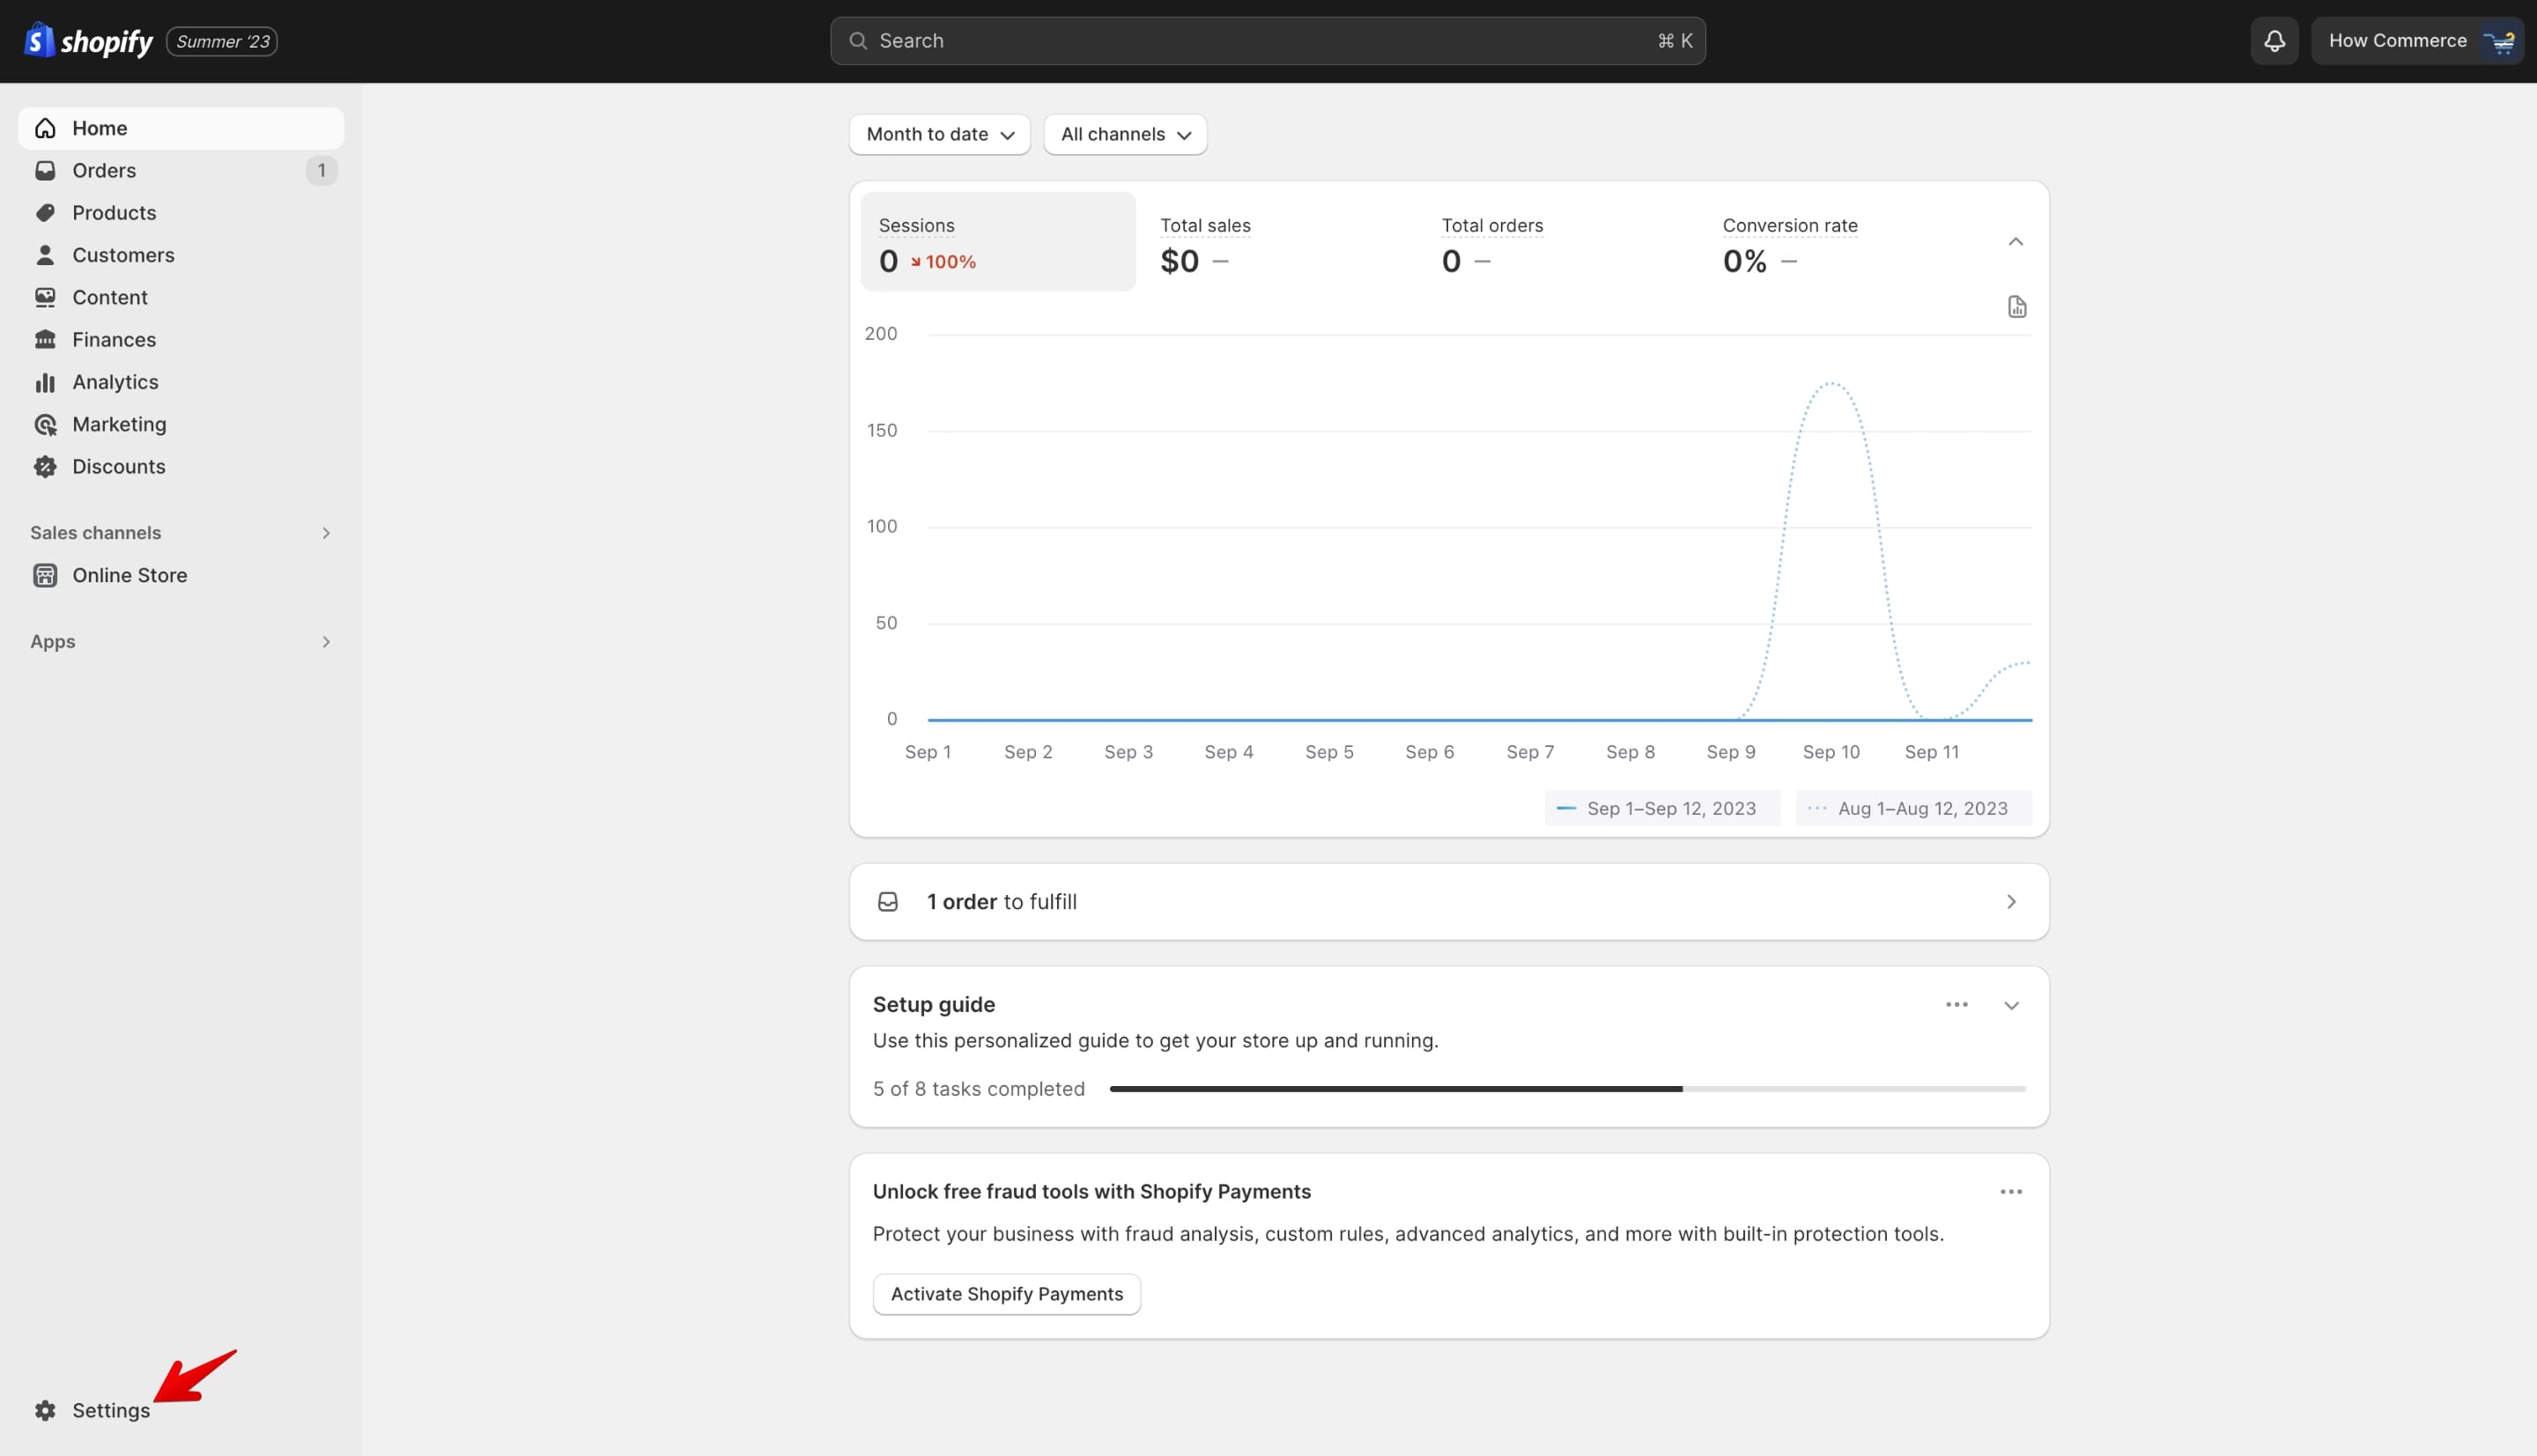
You can update the language setting by going to Settings > Languages and clicking “Change default”.
Got to “Settings” like in the image below:
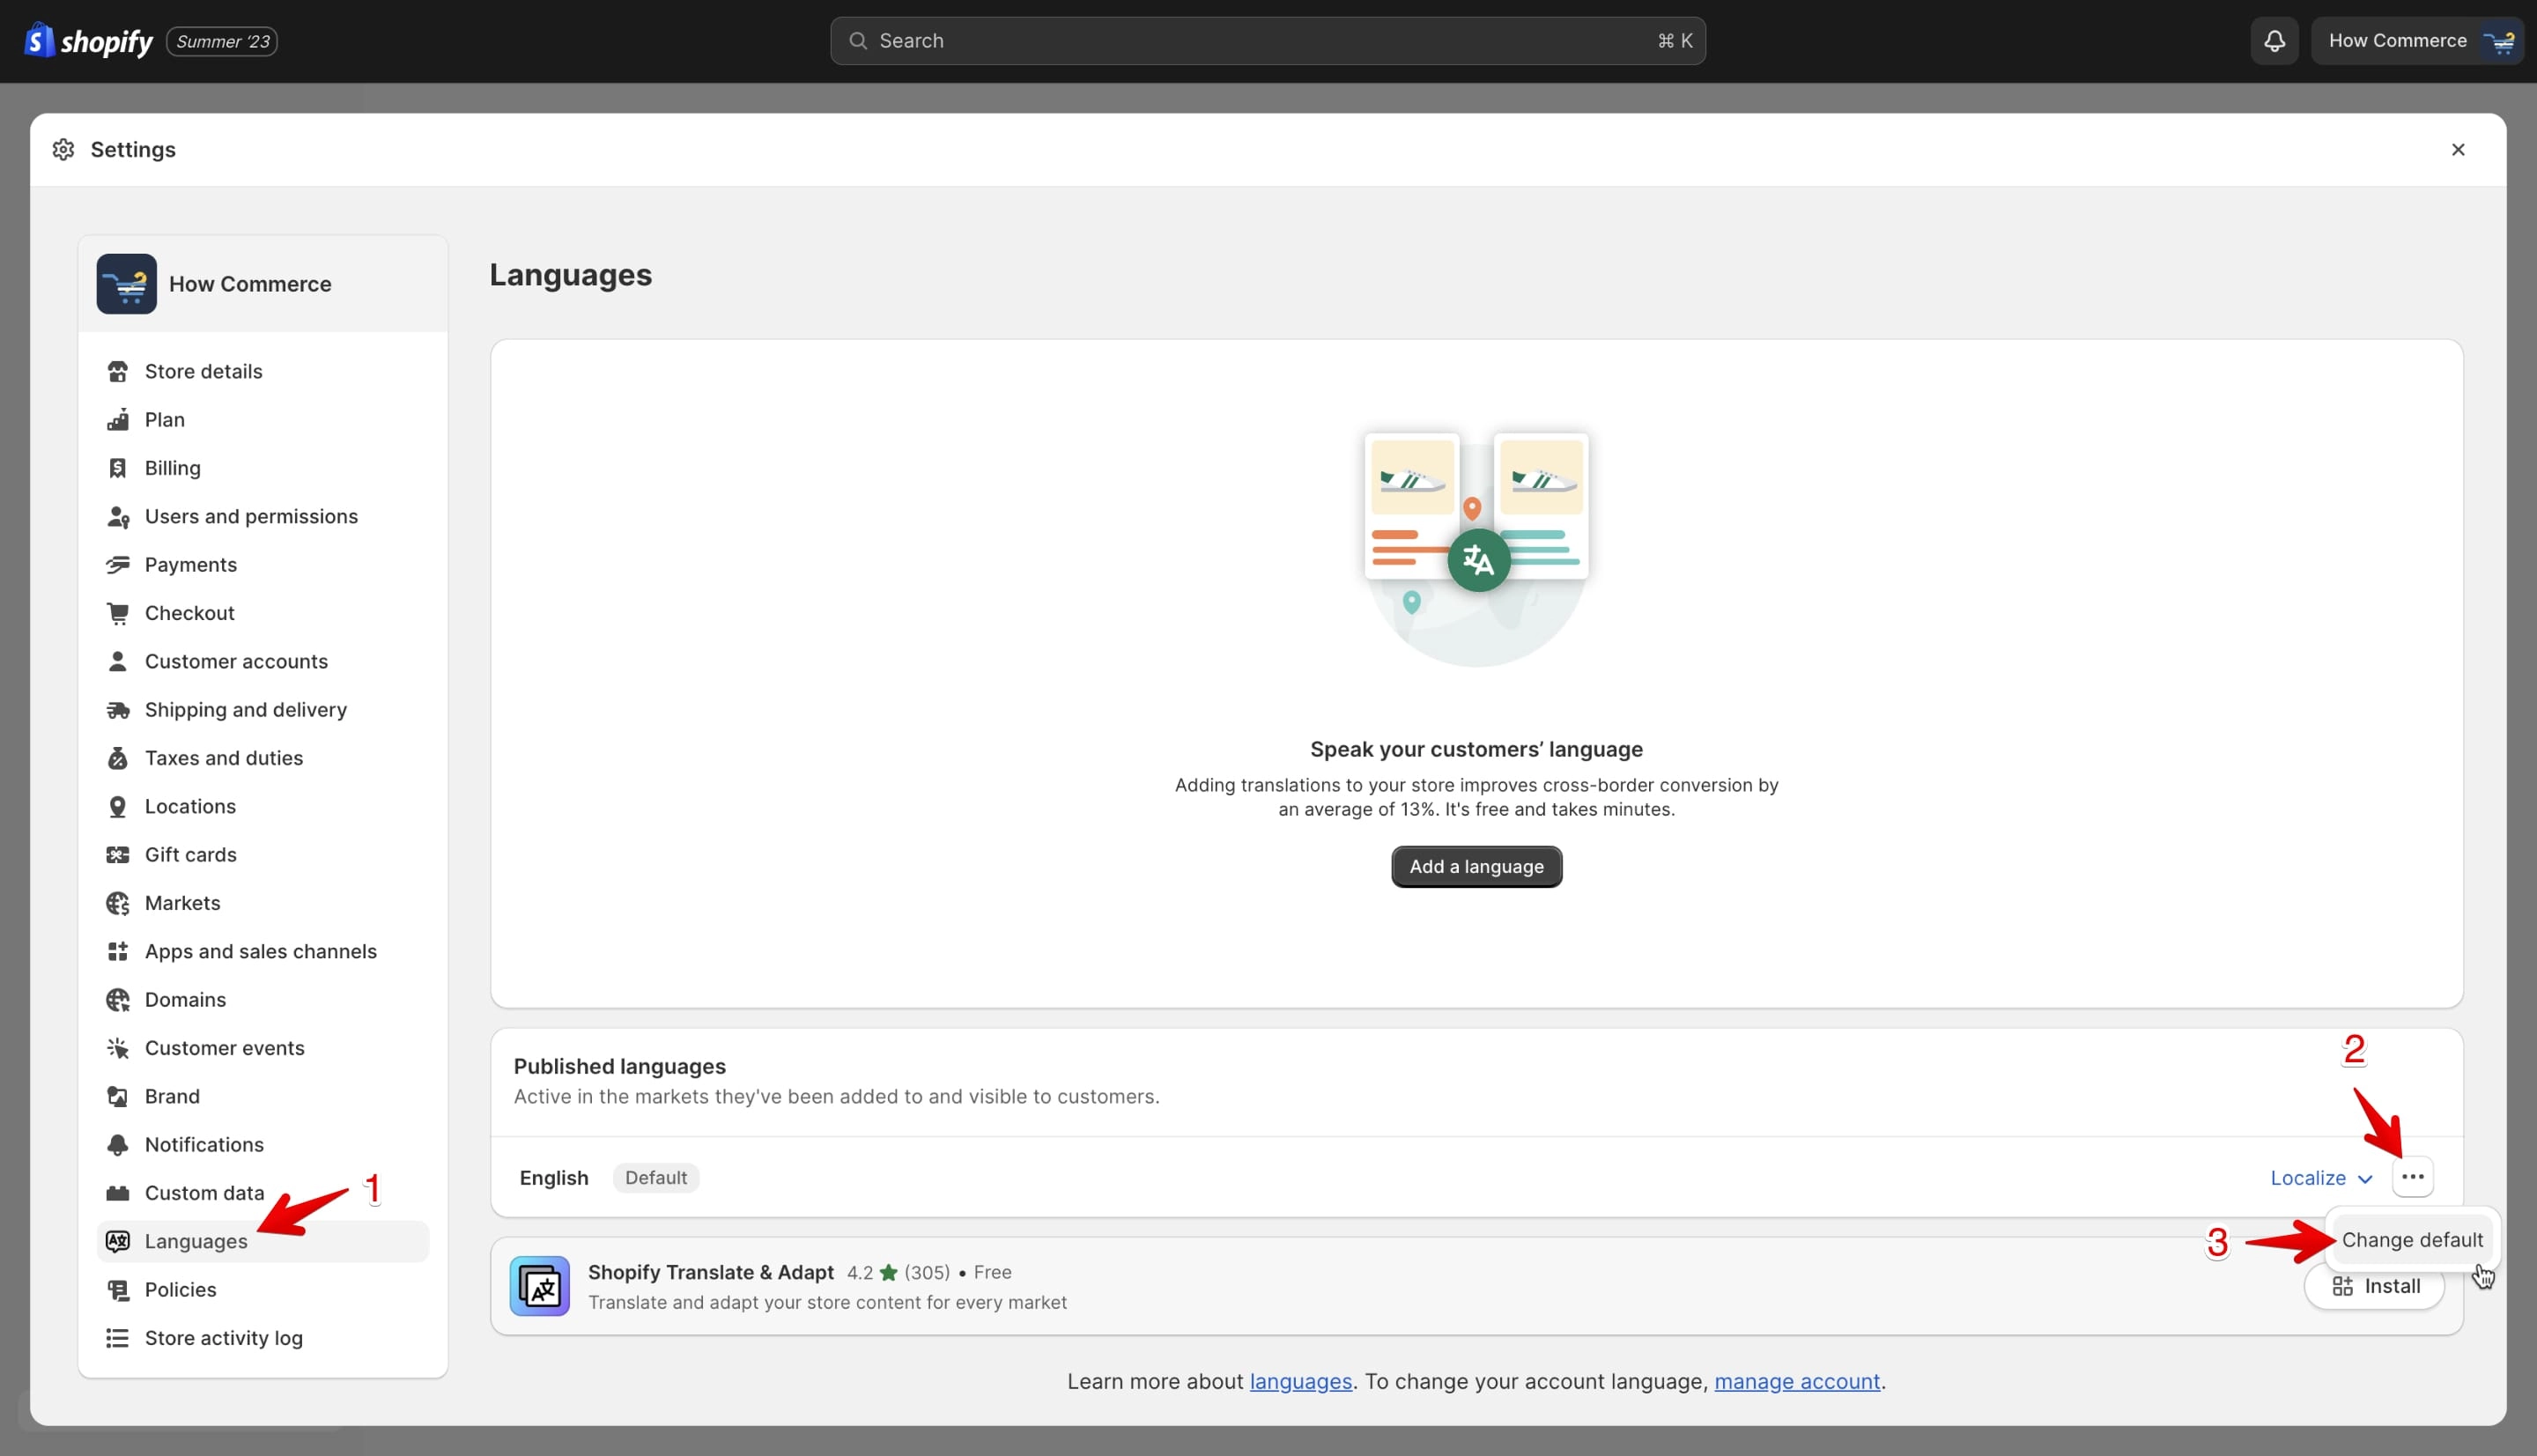
Select “Languages” (marked with 1 in the image below), click on the “...” button (marked with 2 in the image below), click on the “Change default” (marked with 3 in the image below):
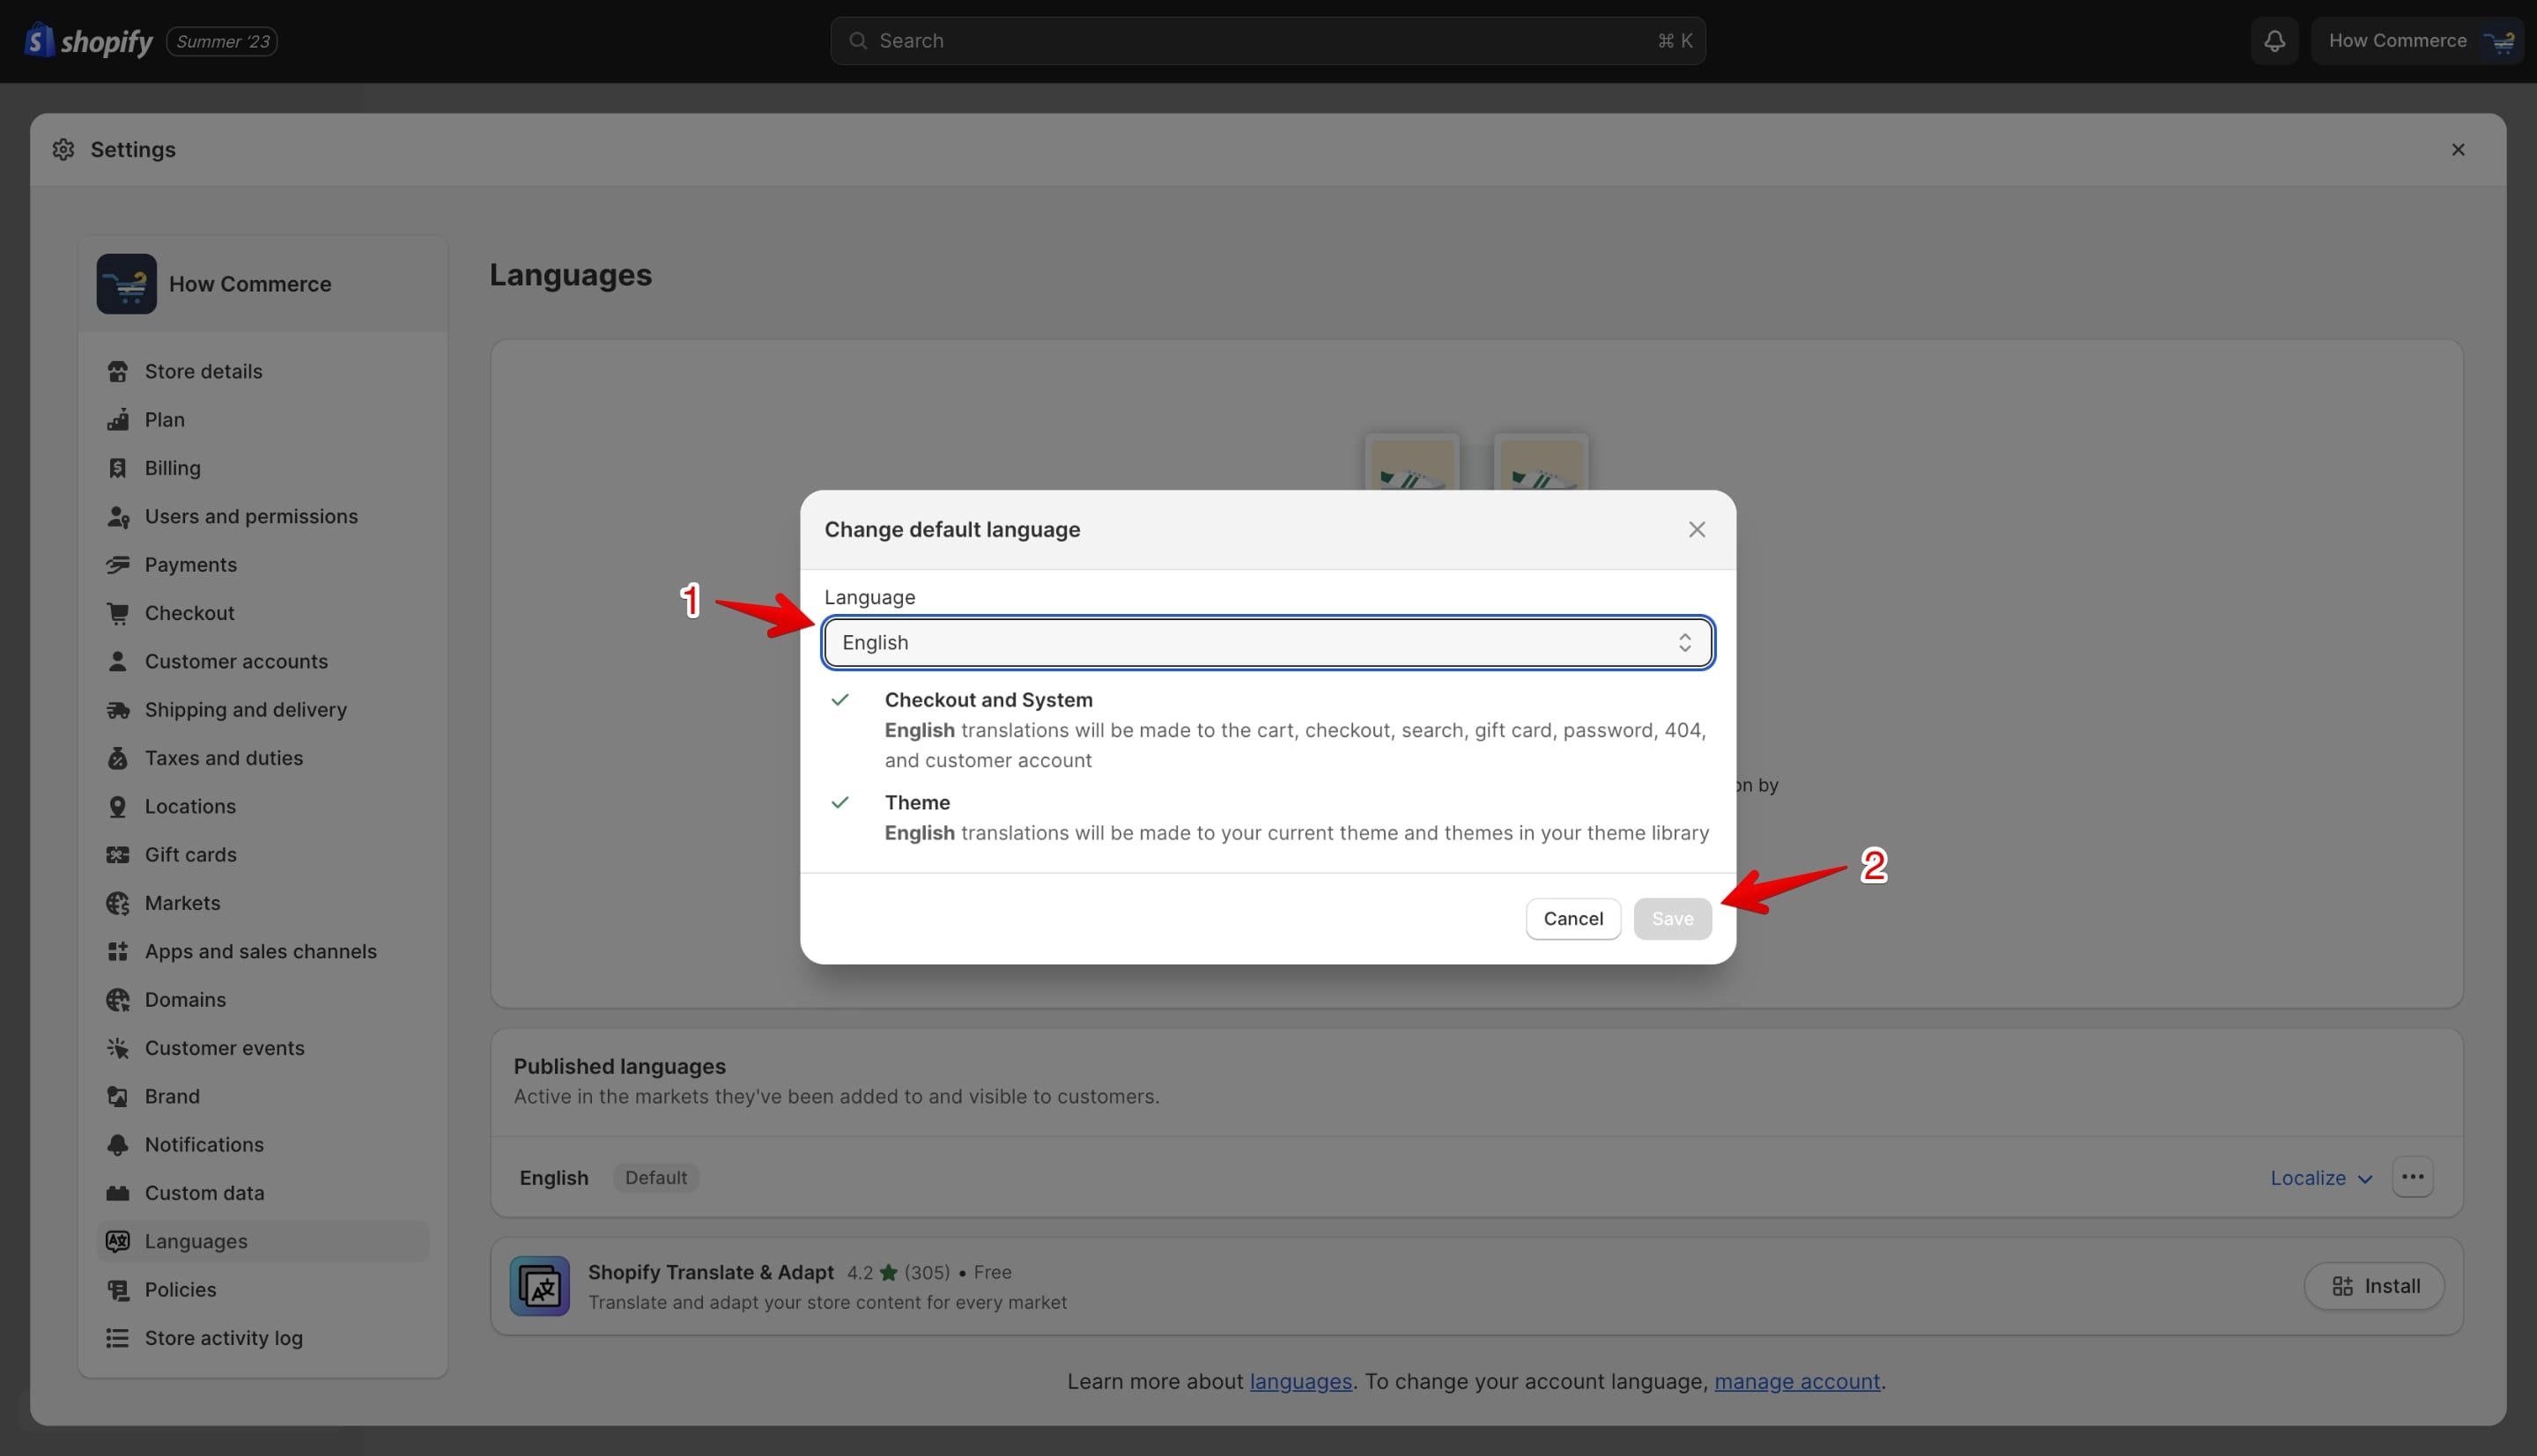
This will open a pop-up with all available languages. Click on the "Language" select box (marked with 1 in the image below) and choose your language.
After you choose your desired language the "Save" button (marked with 2 in the image below) will become active and you can save your new settings.
Where can you use the Shopify AI?
You can generate text with AI in the following parts of your store:
- Blog posts
- Pages
- Product descriptions
- Shopify Email
- Shopify Inbox
- Theme editor
Generate content with AI on blog posts
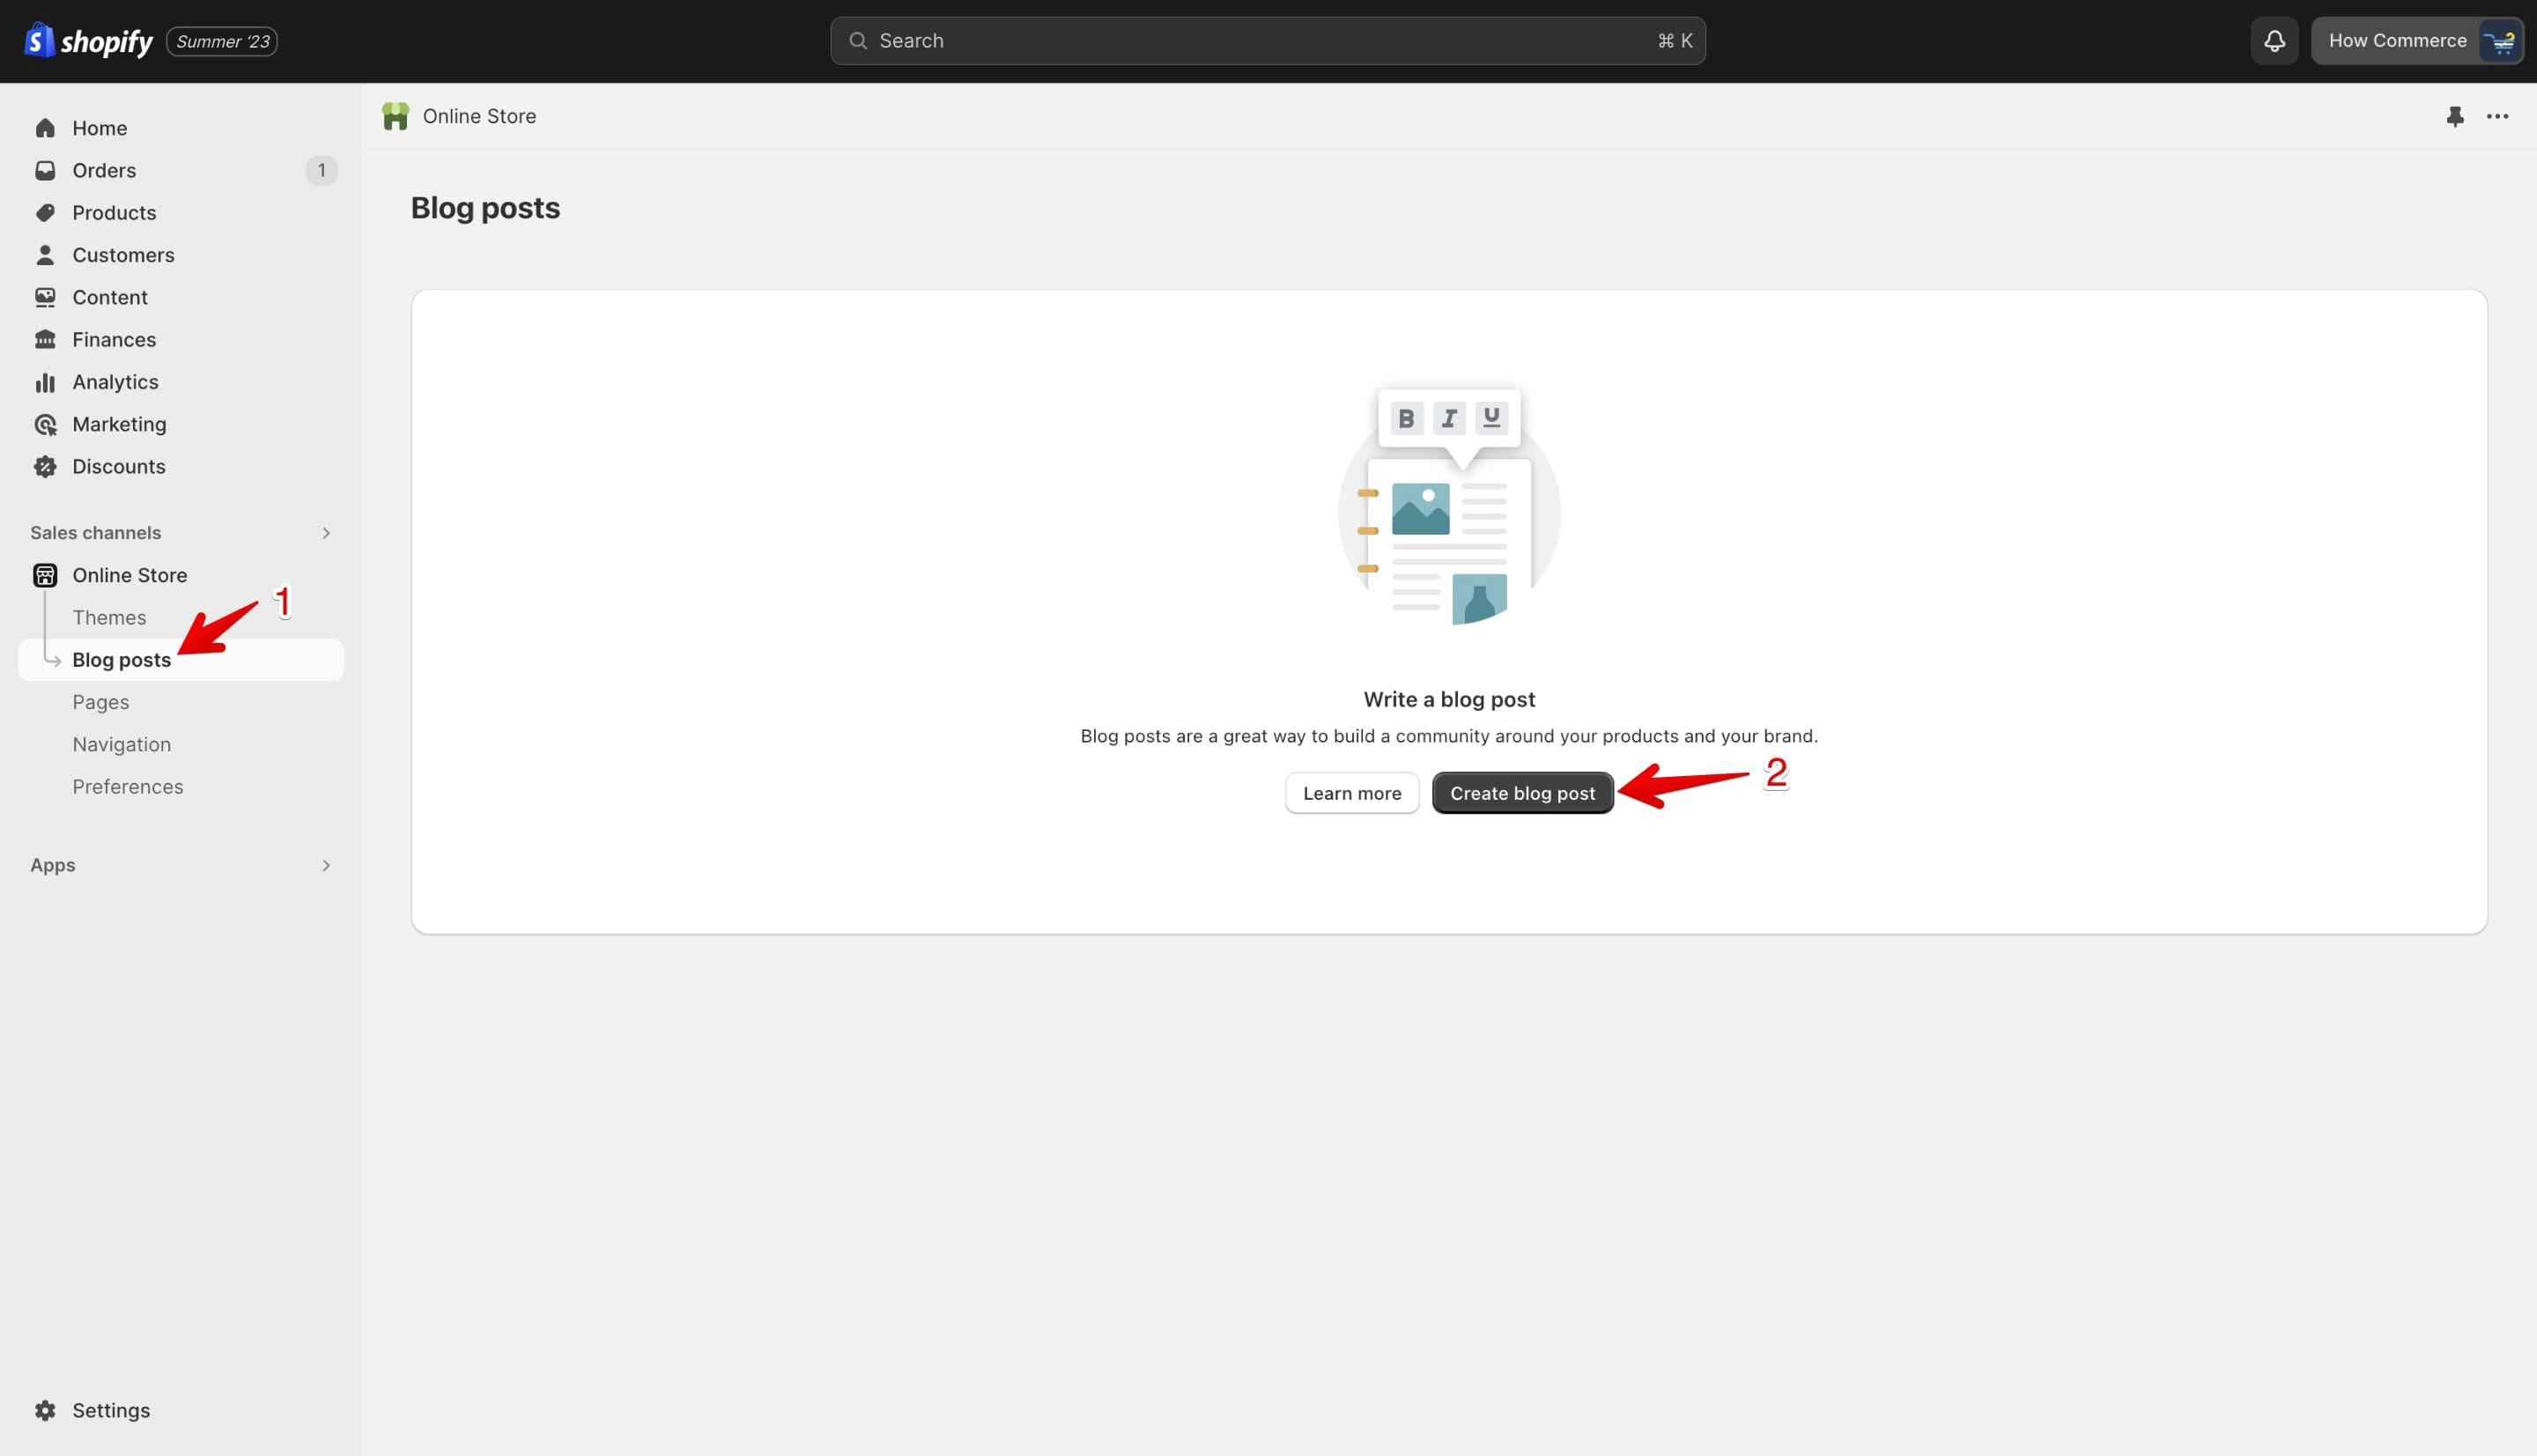
Go to the “Blog posts” menu item (marked with 1 in the image below) and click on the “Create blog post” (marked with 2 in the image below). This is if you do not have any blog posts on the blog, if you have blog posts published already the button will be “Add blog post” in the top right corner.
The Shopify AI is listed with the icons (marked with 1 and 2 in the image below). Wherever you see the AI icon it means you can use the Shopify AI.
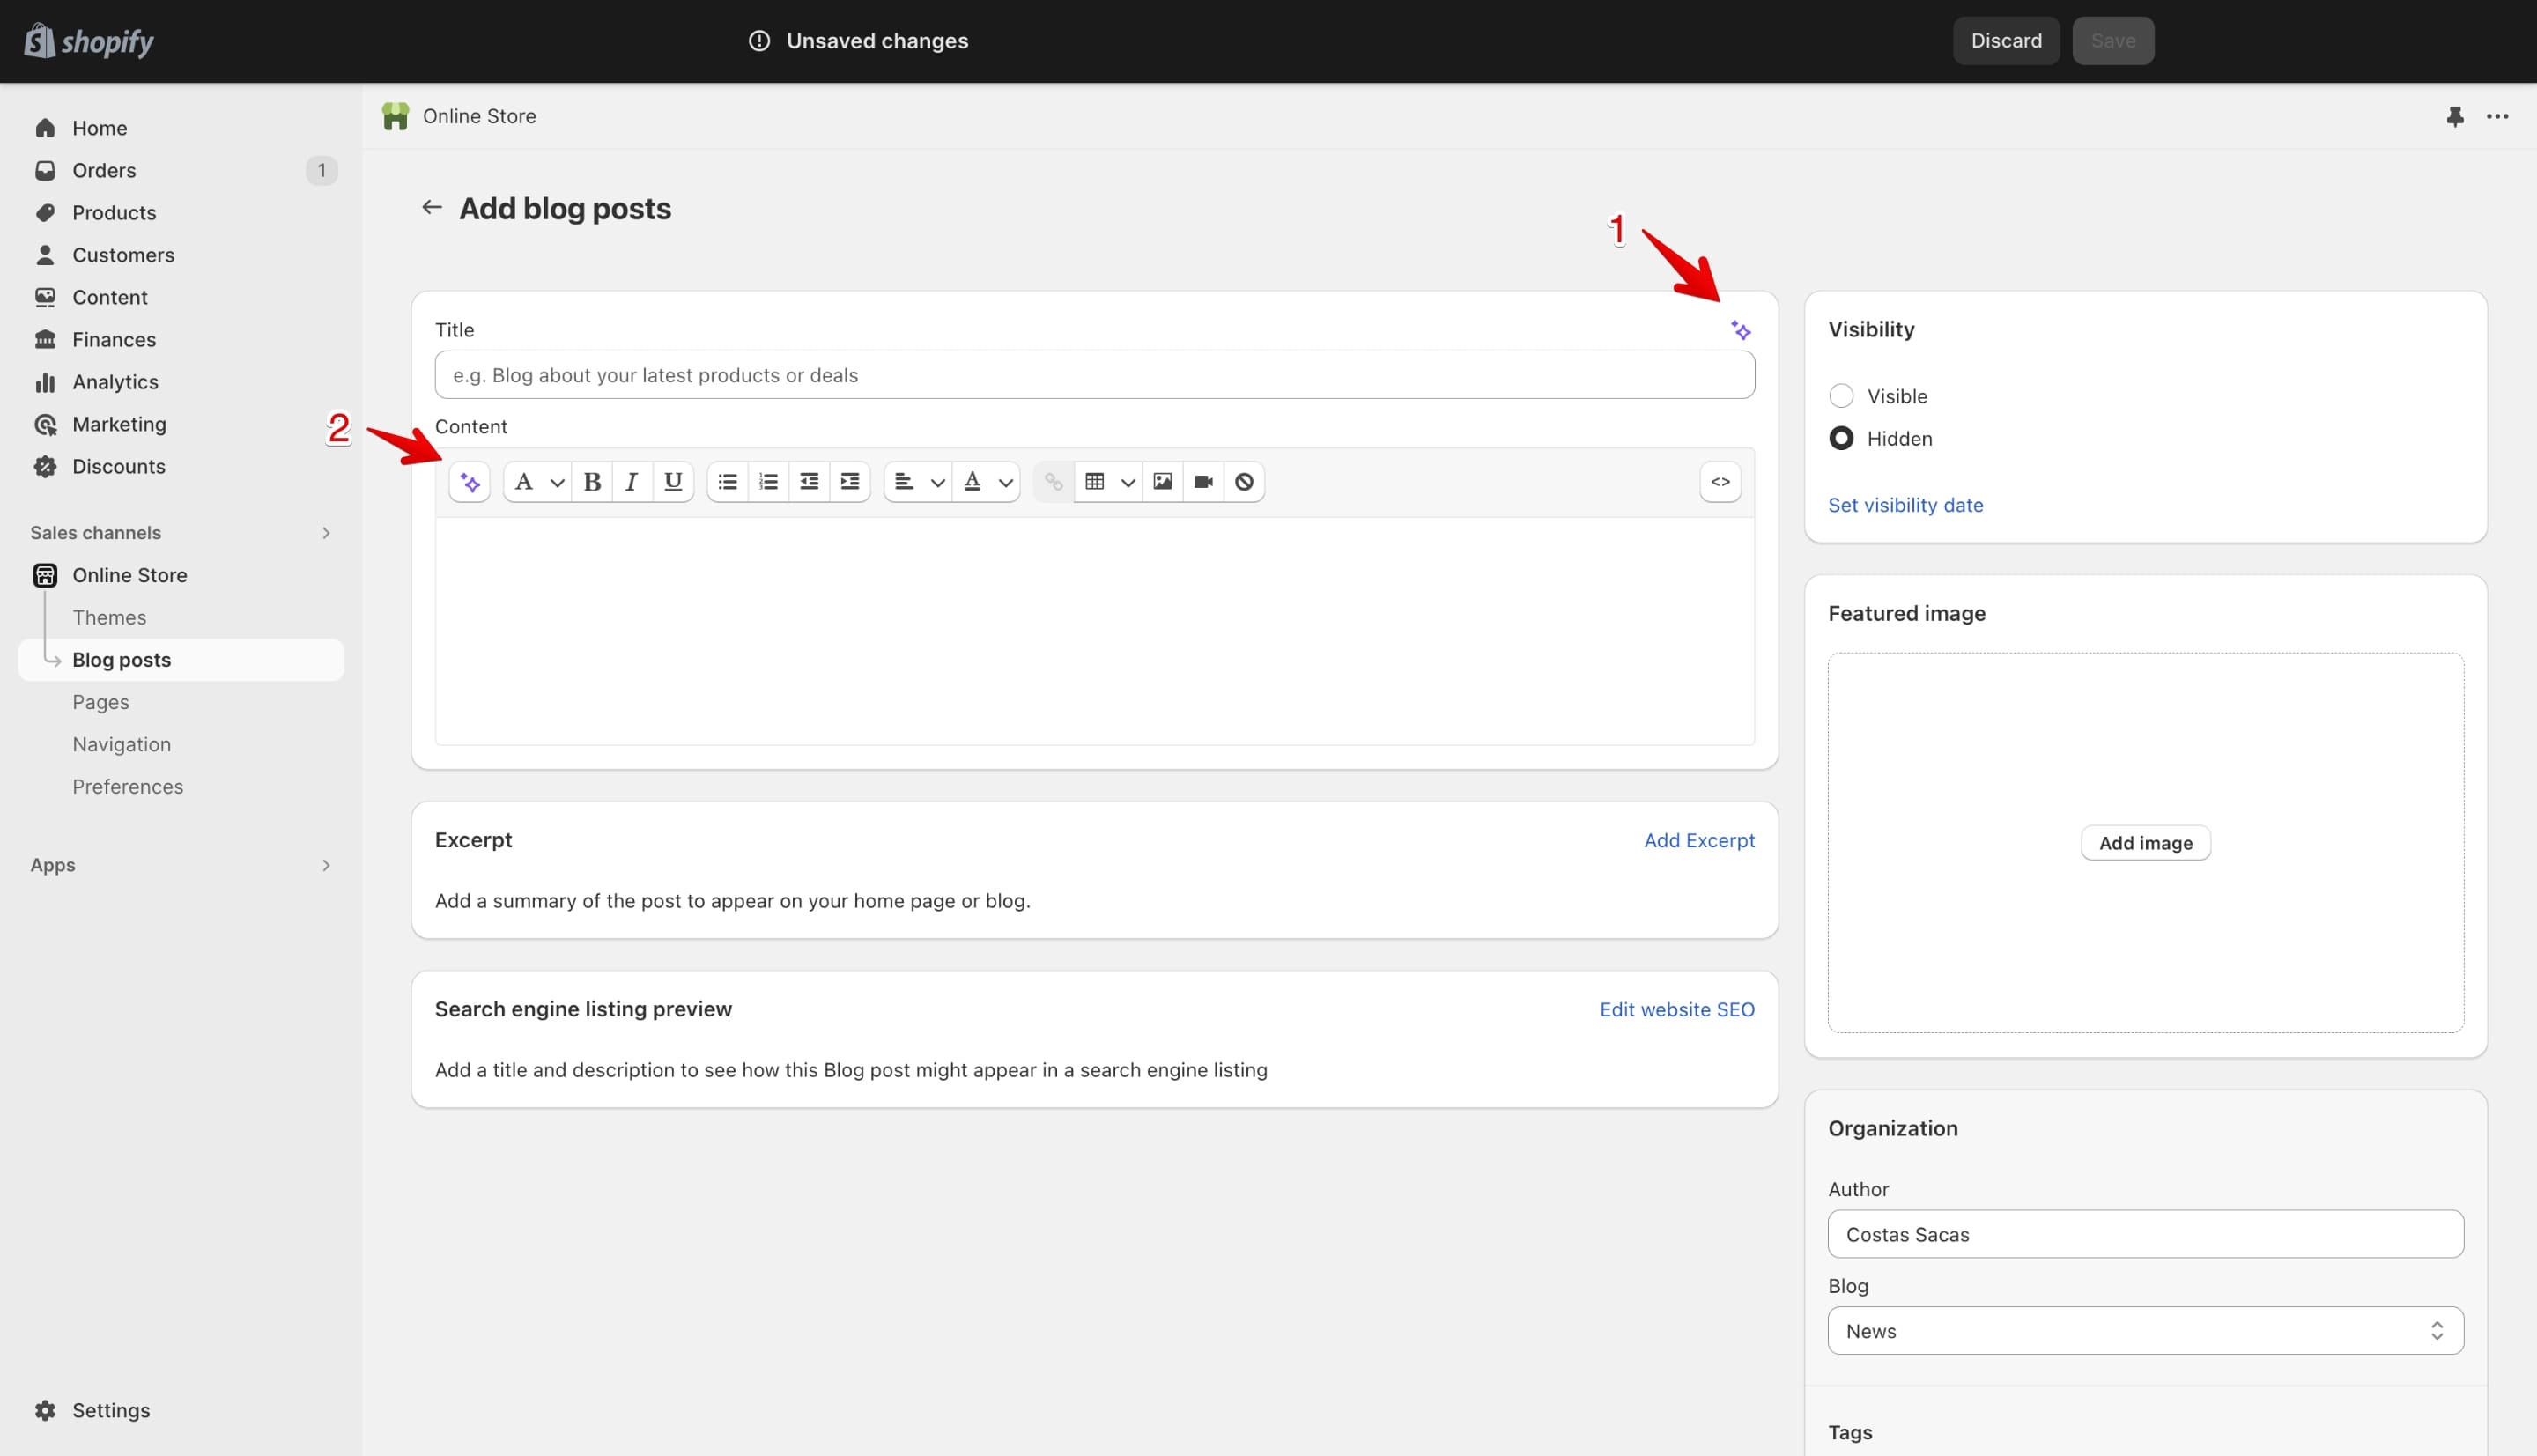
Let’s add a title to the blog post with the Shopify AI.
Click on the AI icon (marked with 1 in the image above).
Now I’m going to give an example of how I’ll do it for my demo store for a jewelry product.
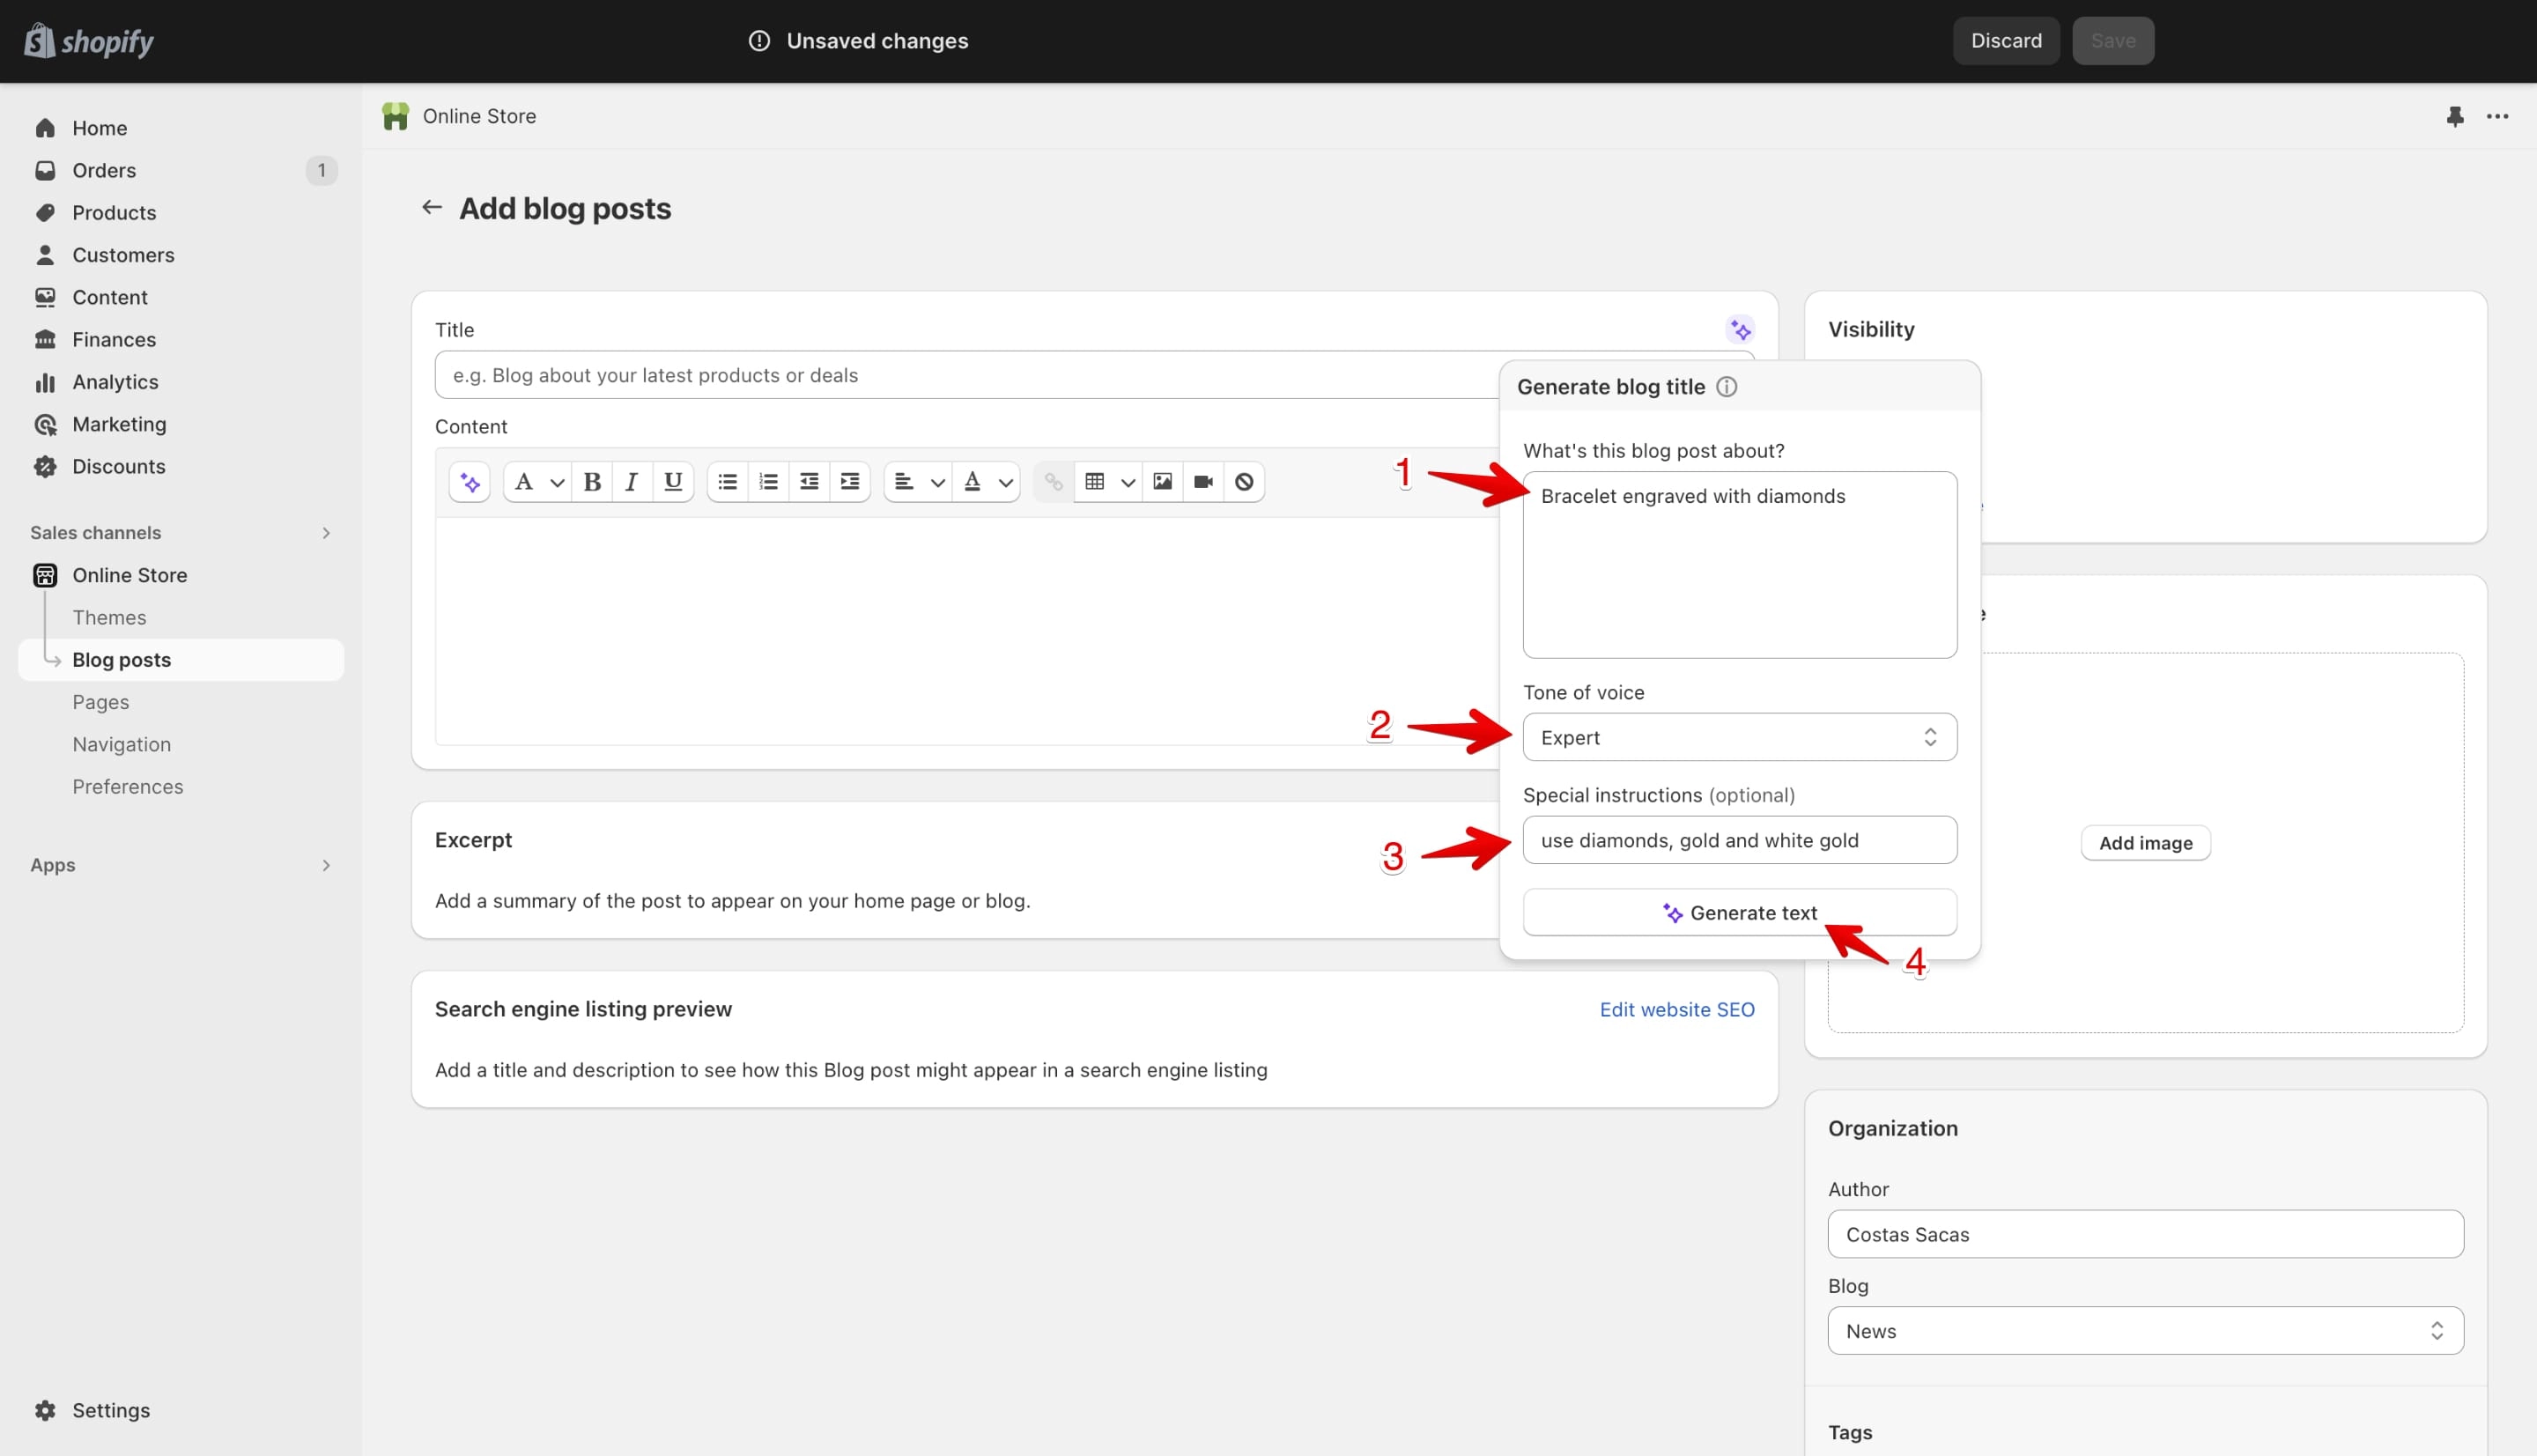
On the “What's this blog post about?” text area (marked with 1 in the image below) I’ll add the name of my product that I want to write an article about: “Bracelet engraved with diamonds”.
You can select from many “Tone of voices” (marked with 2 in the image below), I’ll use the default one which is “Expert”.
I’ll add “Special instructions” (marked with 3 in the image below) to fine tune the results Shopify AI will return by prompting the AI to use: diamonds, gold and white gold in the title generation.
Once you have everything setup click the “Generate text” (marked with 4 in the image below) to prompt the AI.
At this point in time the Shopify AI has all your instructions to generate a title for your blog post.
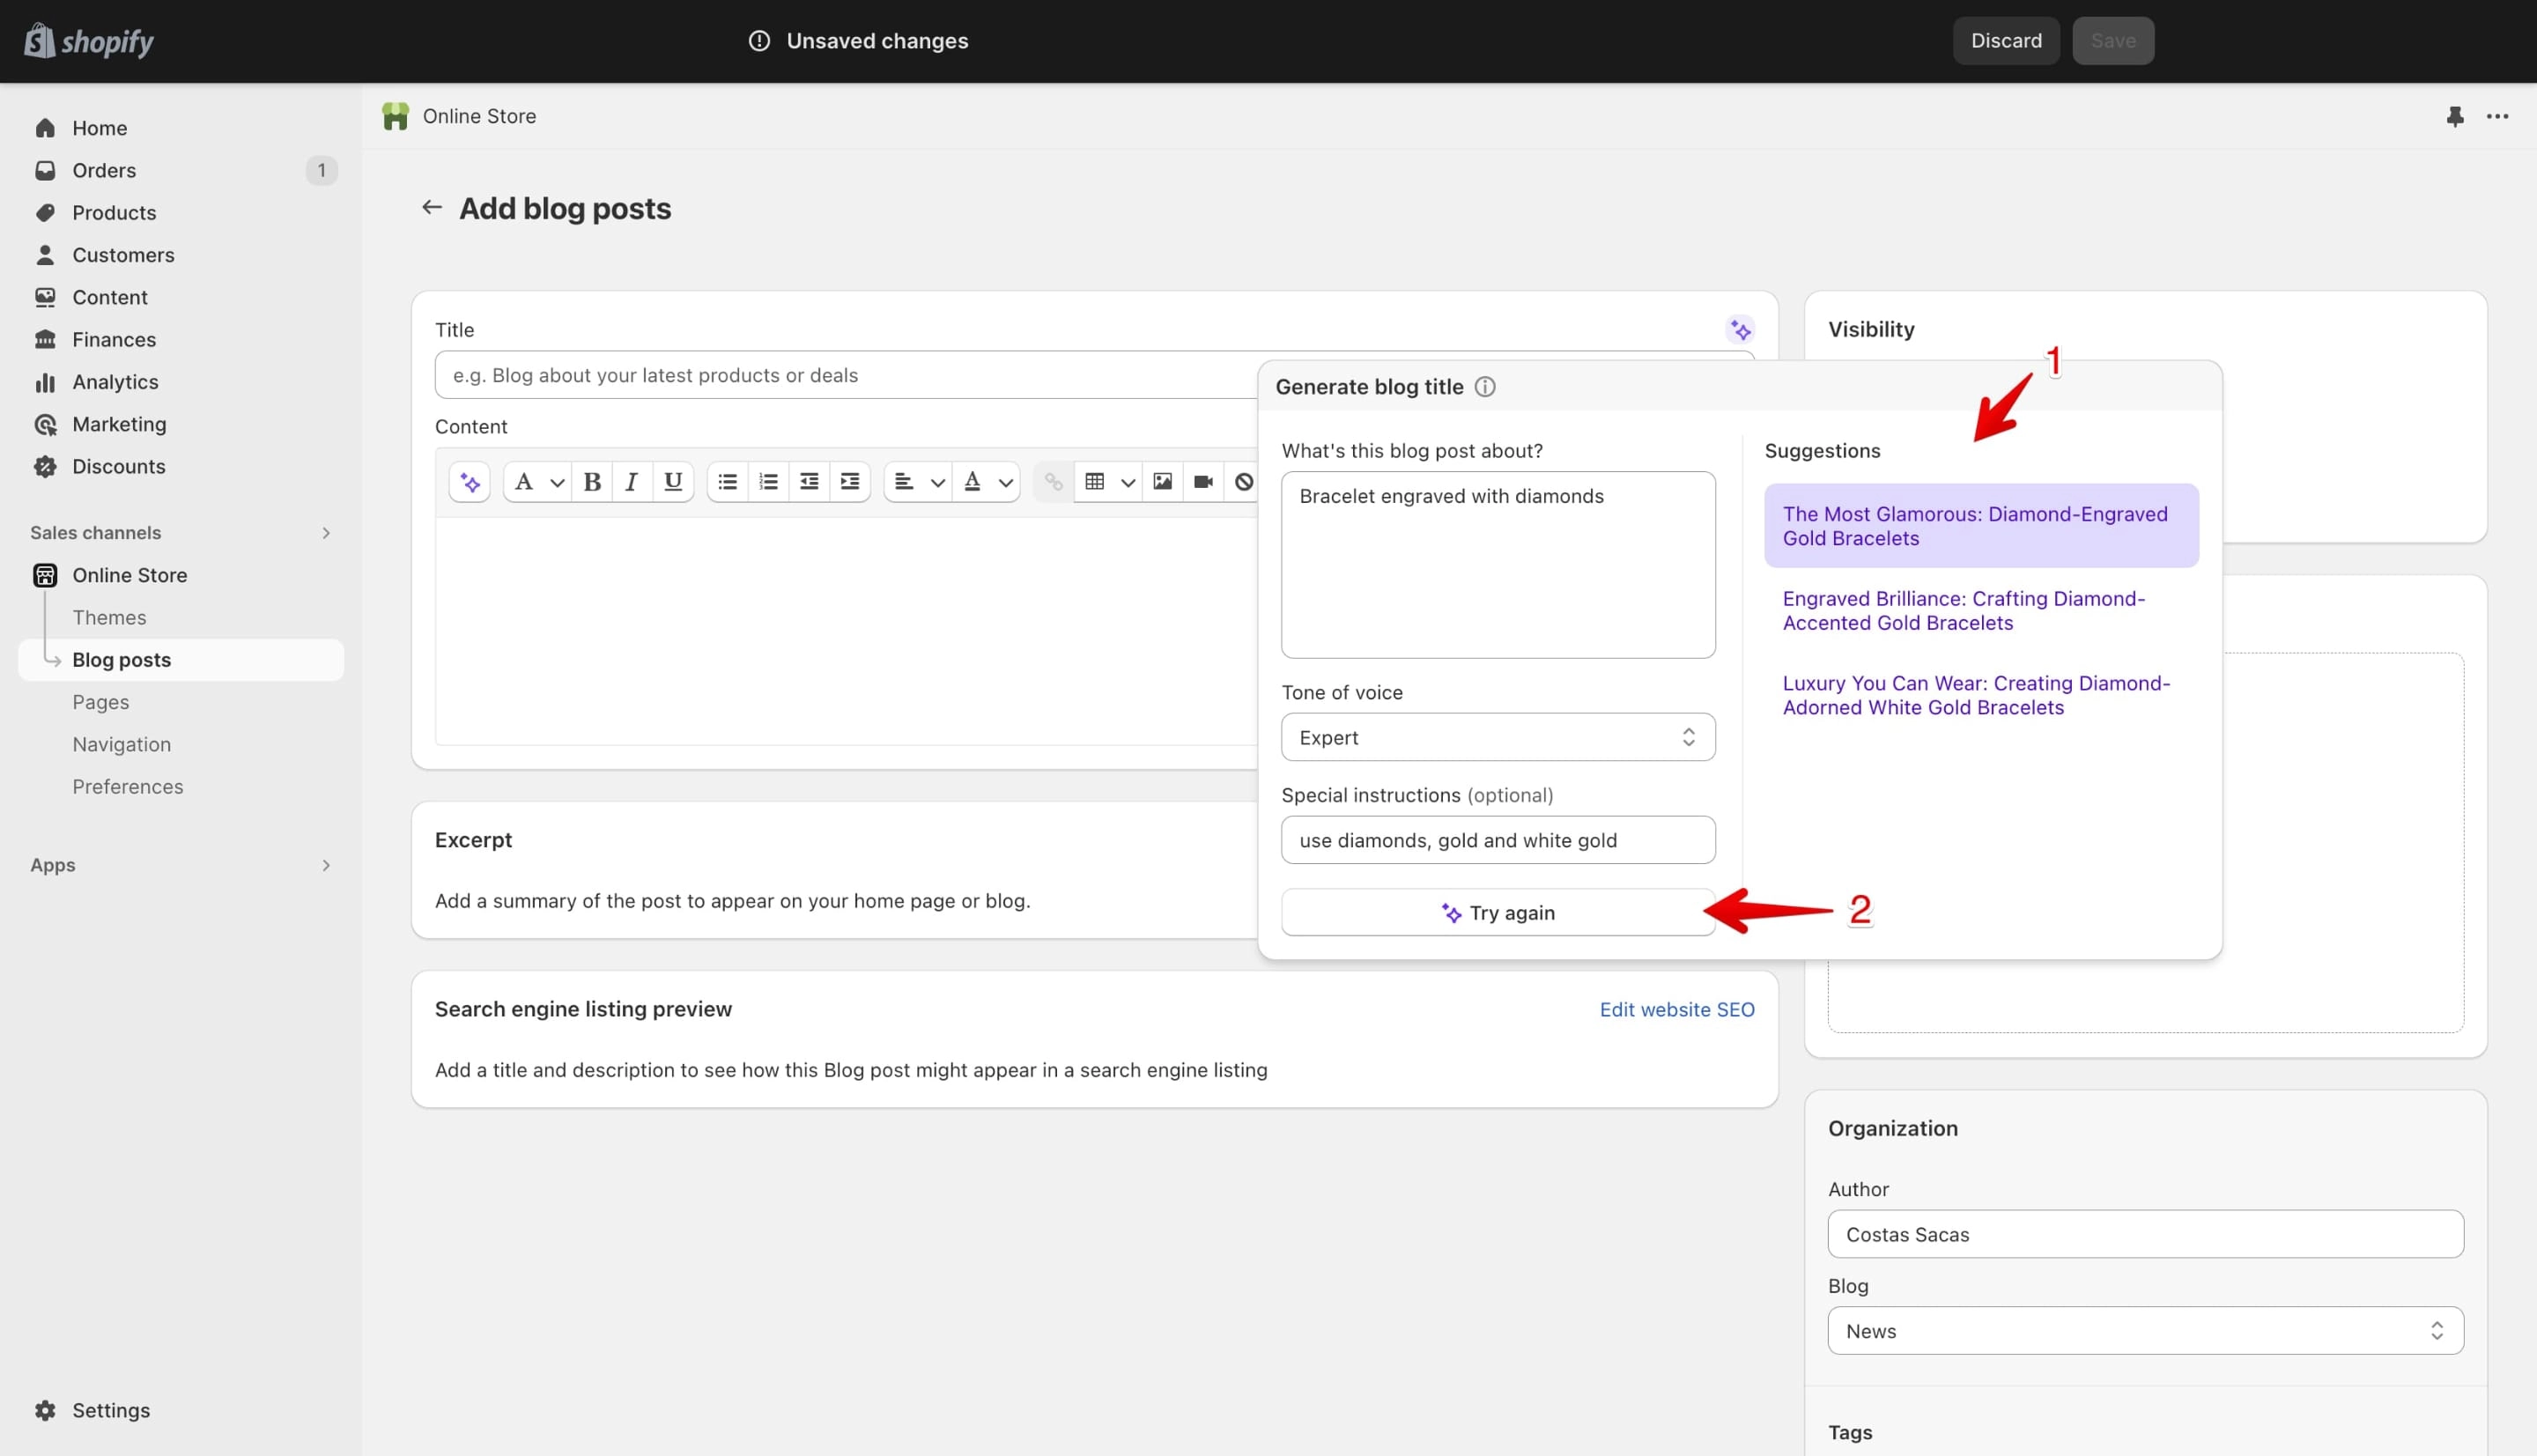
On the right side of the AI pop-up you can see all the titles "Suggestions" (marked with 1 in the image below) returned.
Pick one that you like.
If you do not like either one, you can prompt the AI to generate new blog post titles by clicking on the "Try Again" button (marked with 2 in the image below).
For my blog post I'll select the first result. Once I do that Shopify will fill the “Title” field (marked with 1 in the image below):
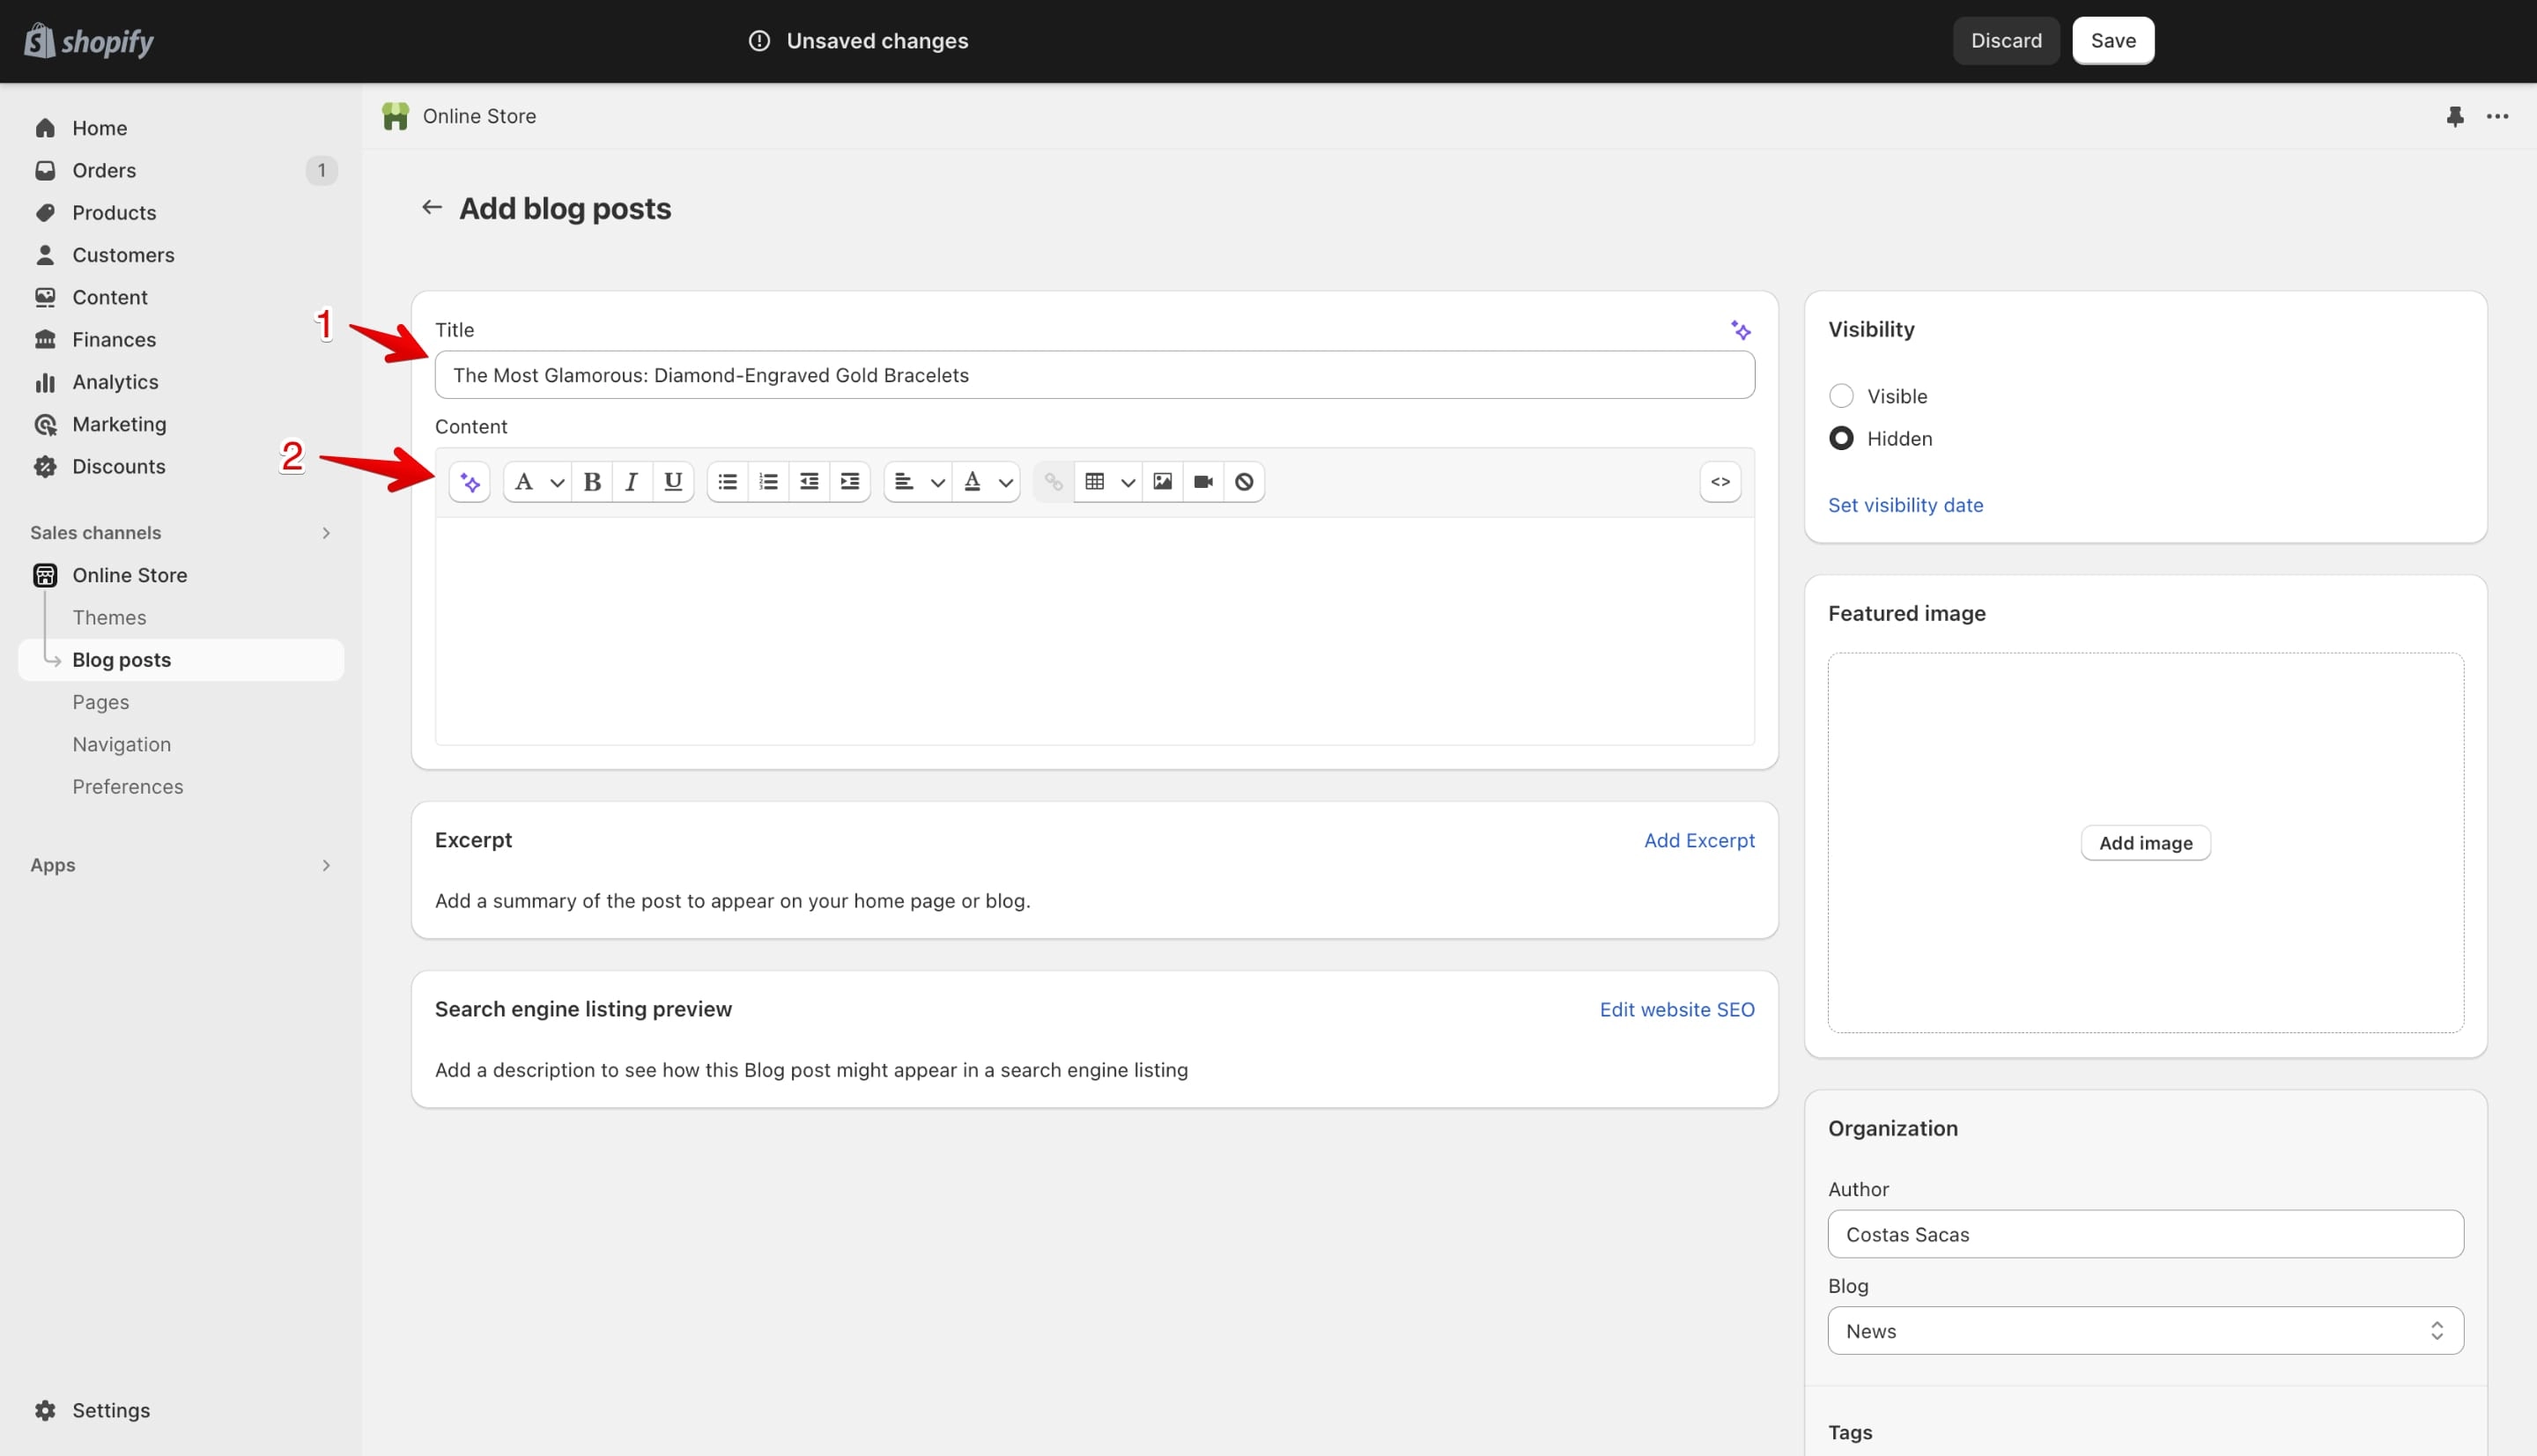
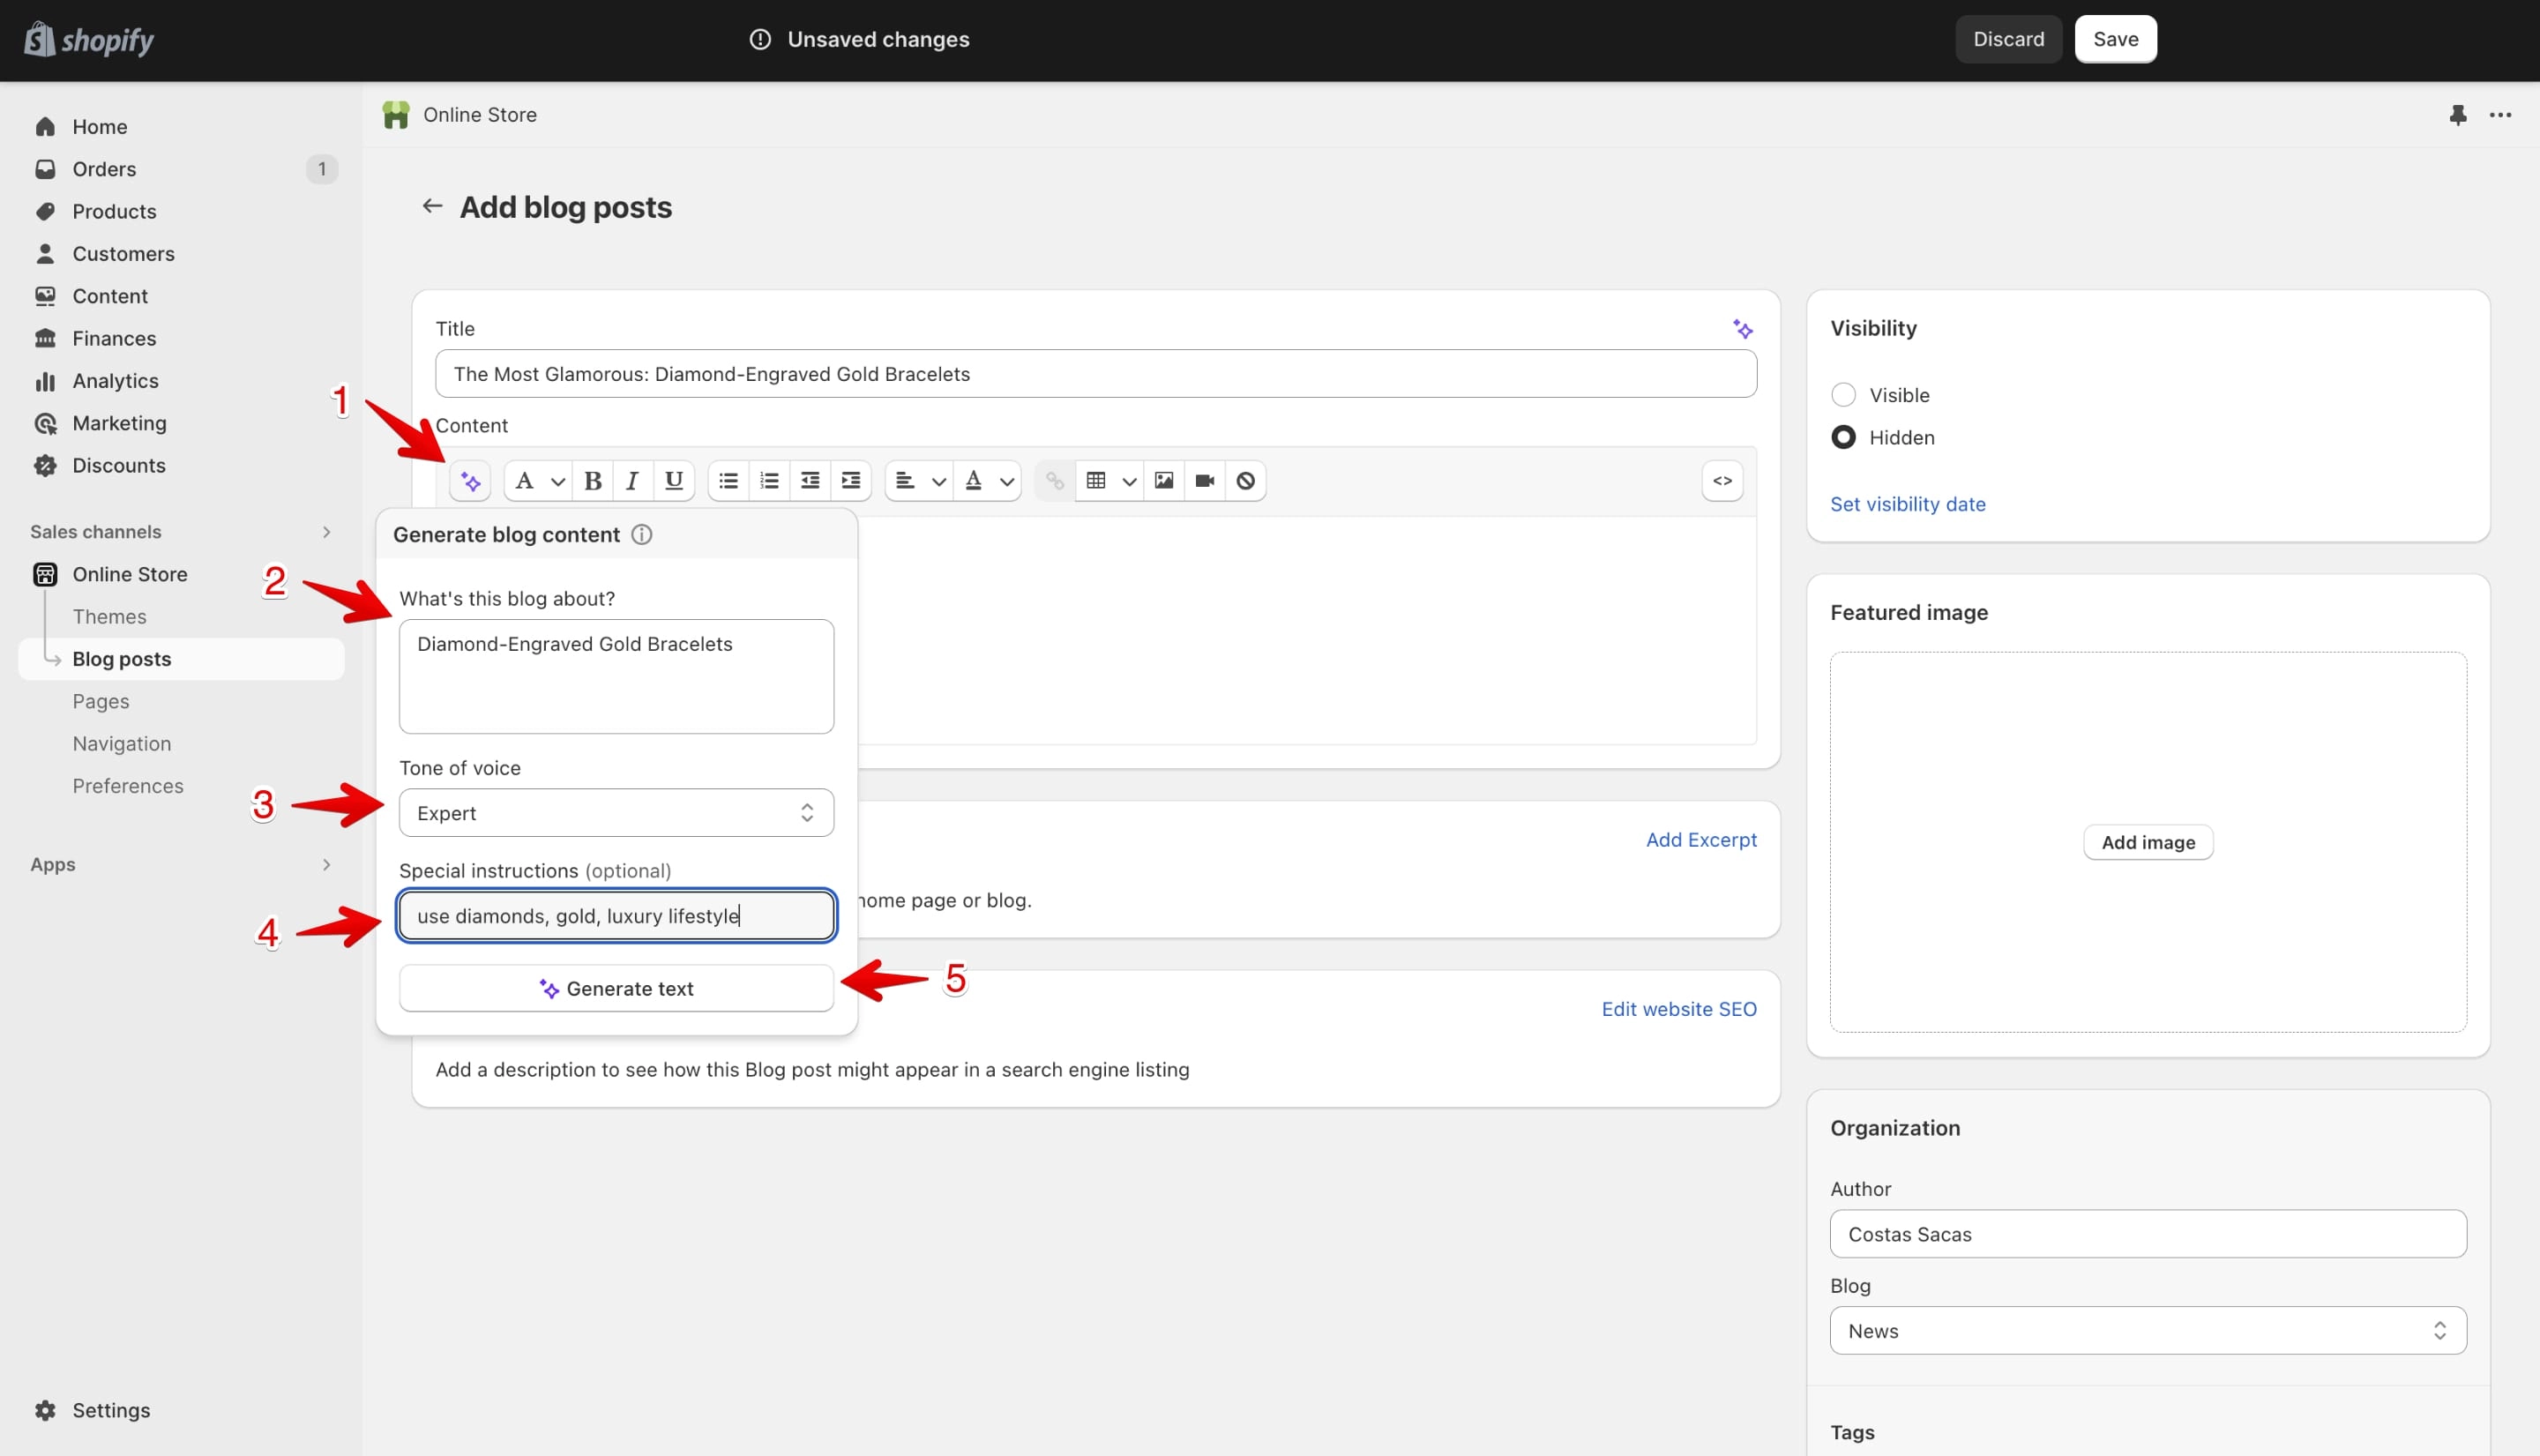
Now let’s move on to the next phase and add the blog post content. Click on the AI icon (marked with 1 in the image below).
On the “What's this blog post about?” text area (marked with 2 in the image below) I’ll add the name of my title generated earlier by AI: “Bracelet engraved with diamonds”.
On the "Tone of voice" (marked with 3 in the image below) I'll use the same "Expert".
On "Special instruction" (marked with 4 in the image below) give the AI as many keywords as possible to help it generate a comprehensive article.
After everything is in place, click the "Generate text" (marked with 5 in the image below) and the Shopify AI will generate a sample post.
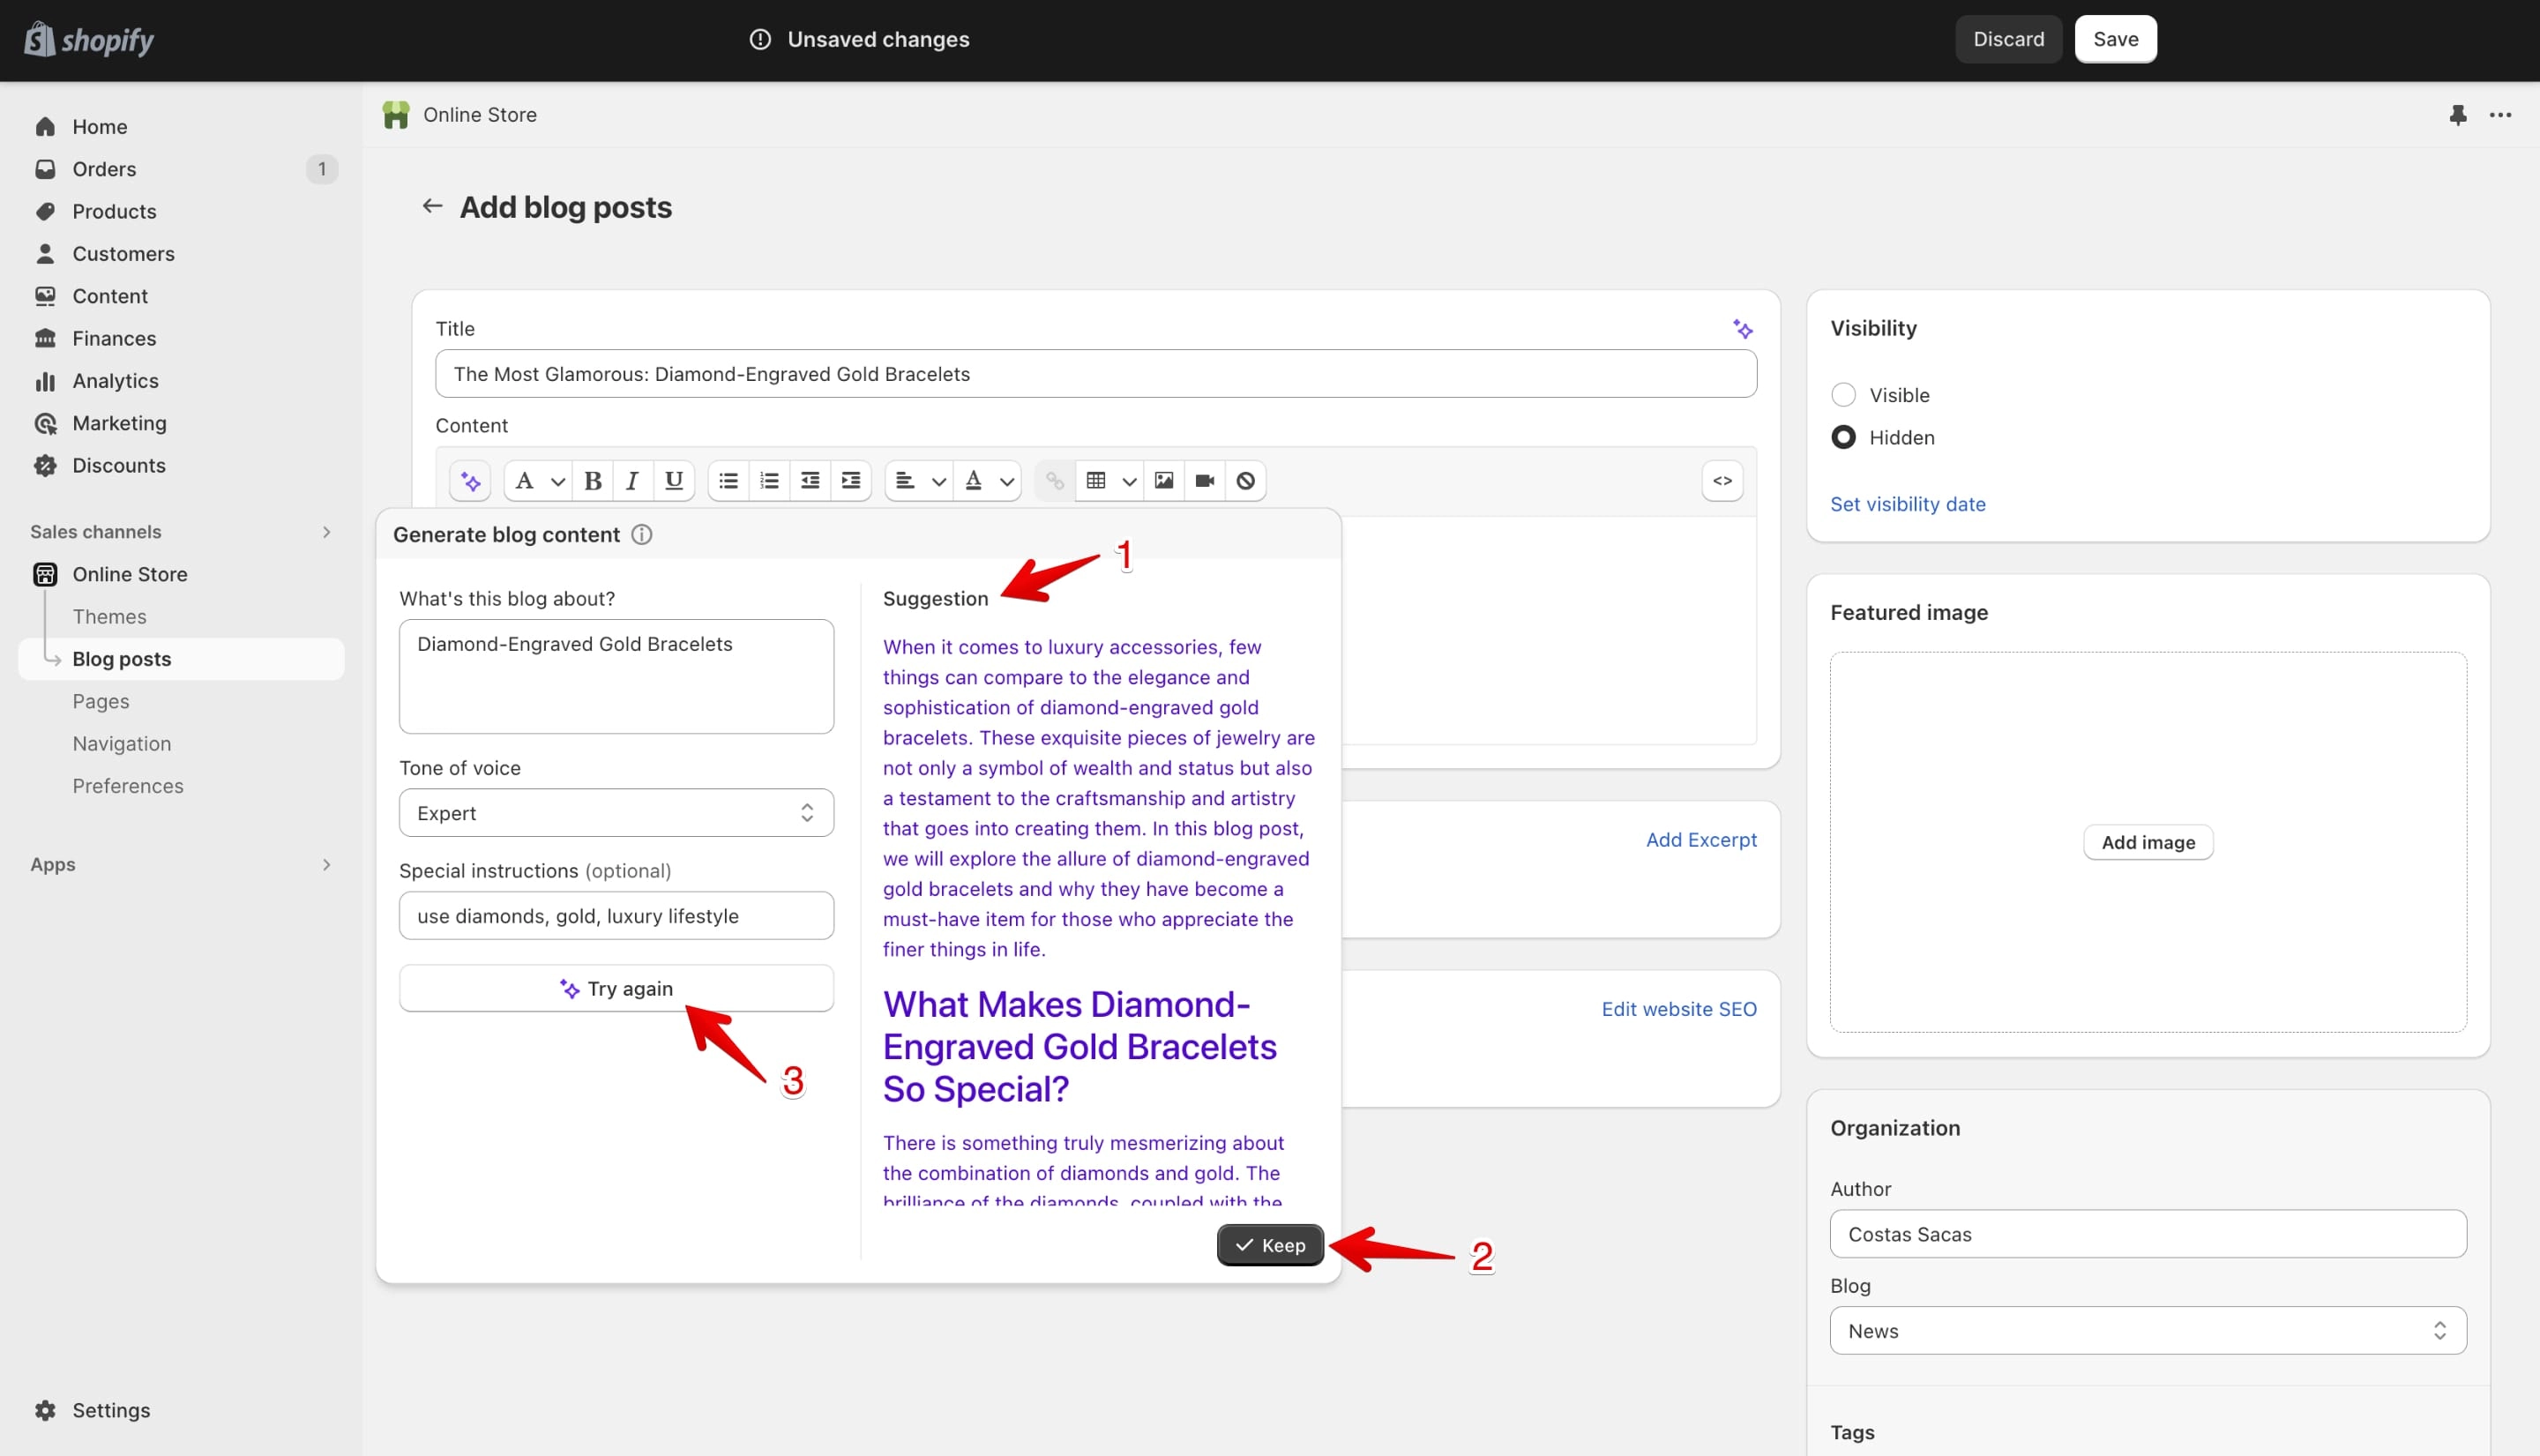
In the next image you can see the sample text generated (marked with 1 in the image below) by the Shopify AI.
Verify the text, see if you like it and once you want to accept the generated post click on the "Keep" button.
If the generated article is not something that you want to use then you can always generate a new one by clicking the "Try again" button (marked with 3 in the image below).
If you decide to keep the article generated by Shopify AI once you’ve clicked the “Keep” button you should see the demo article filled inside your “Content” area field (marked with 1 in the image below).
Now the only thing you need to do is to fill all other details needed like “Featured image”, Excerpt, SEO data and so on and click the “Save” button (marked with 2 in the image below).
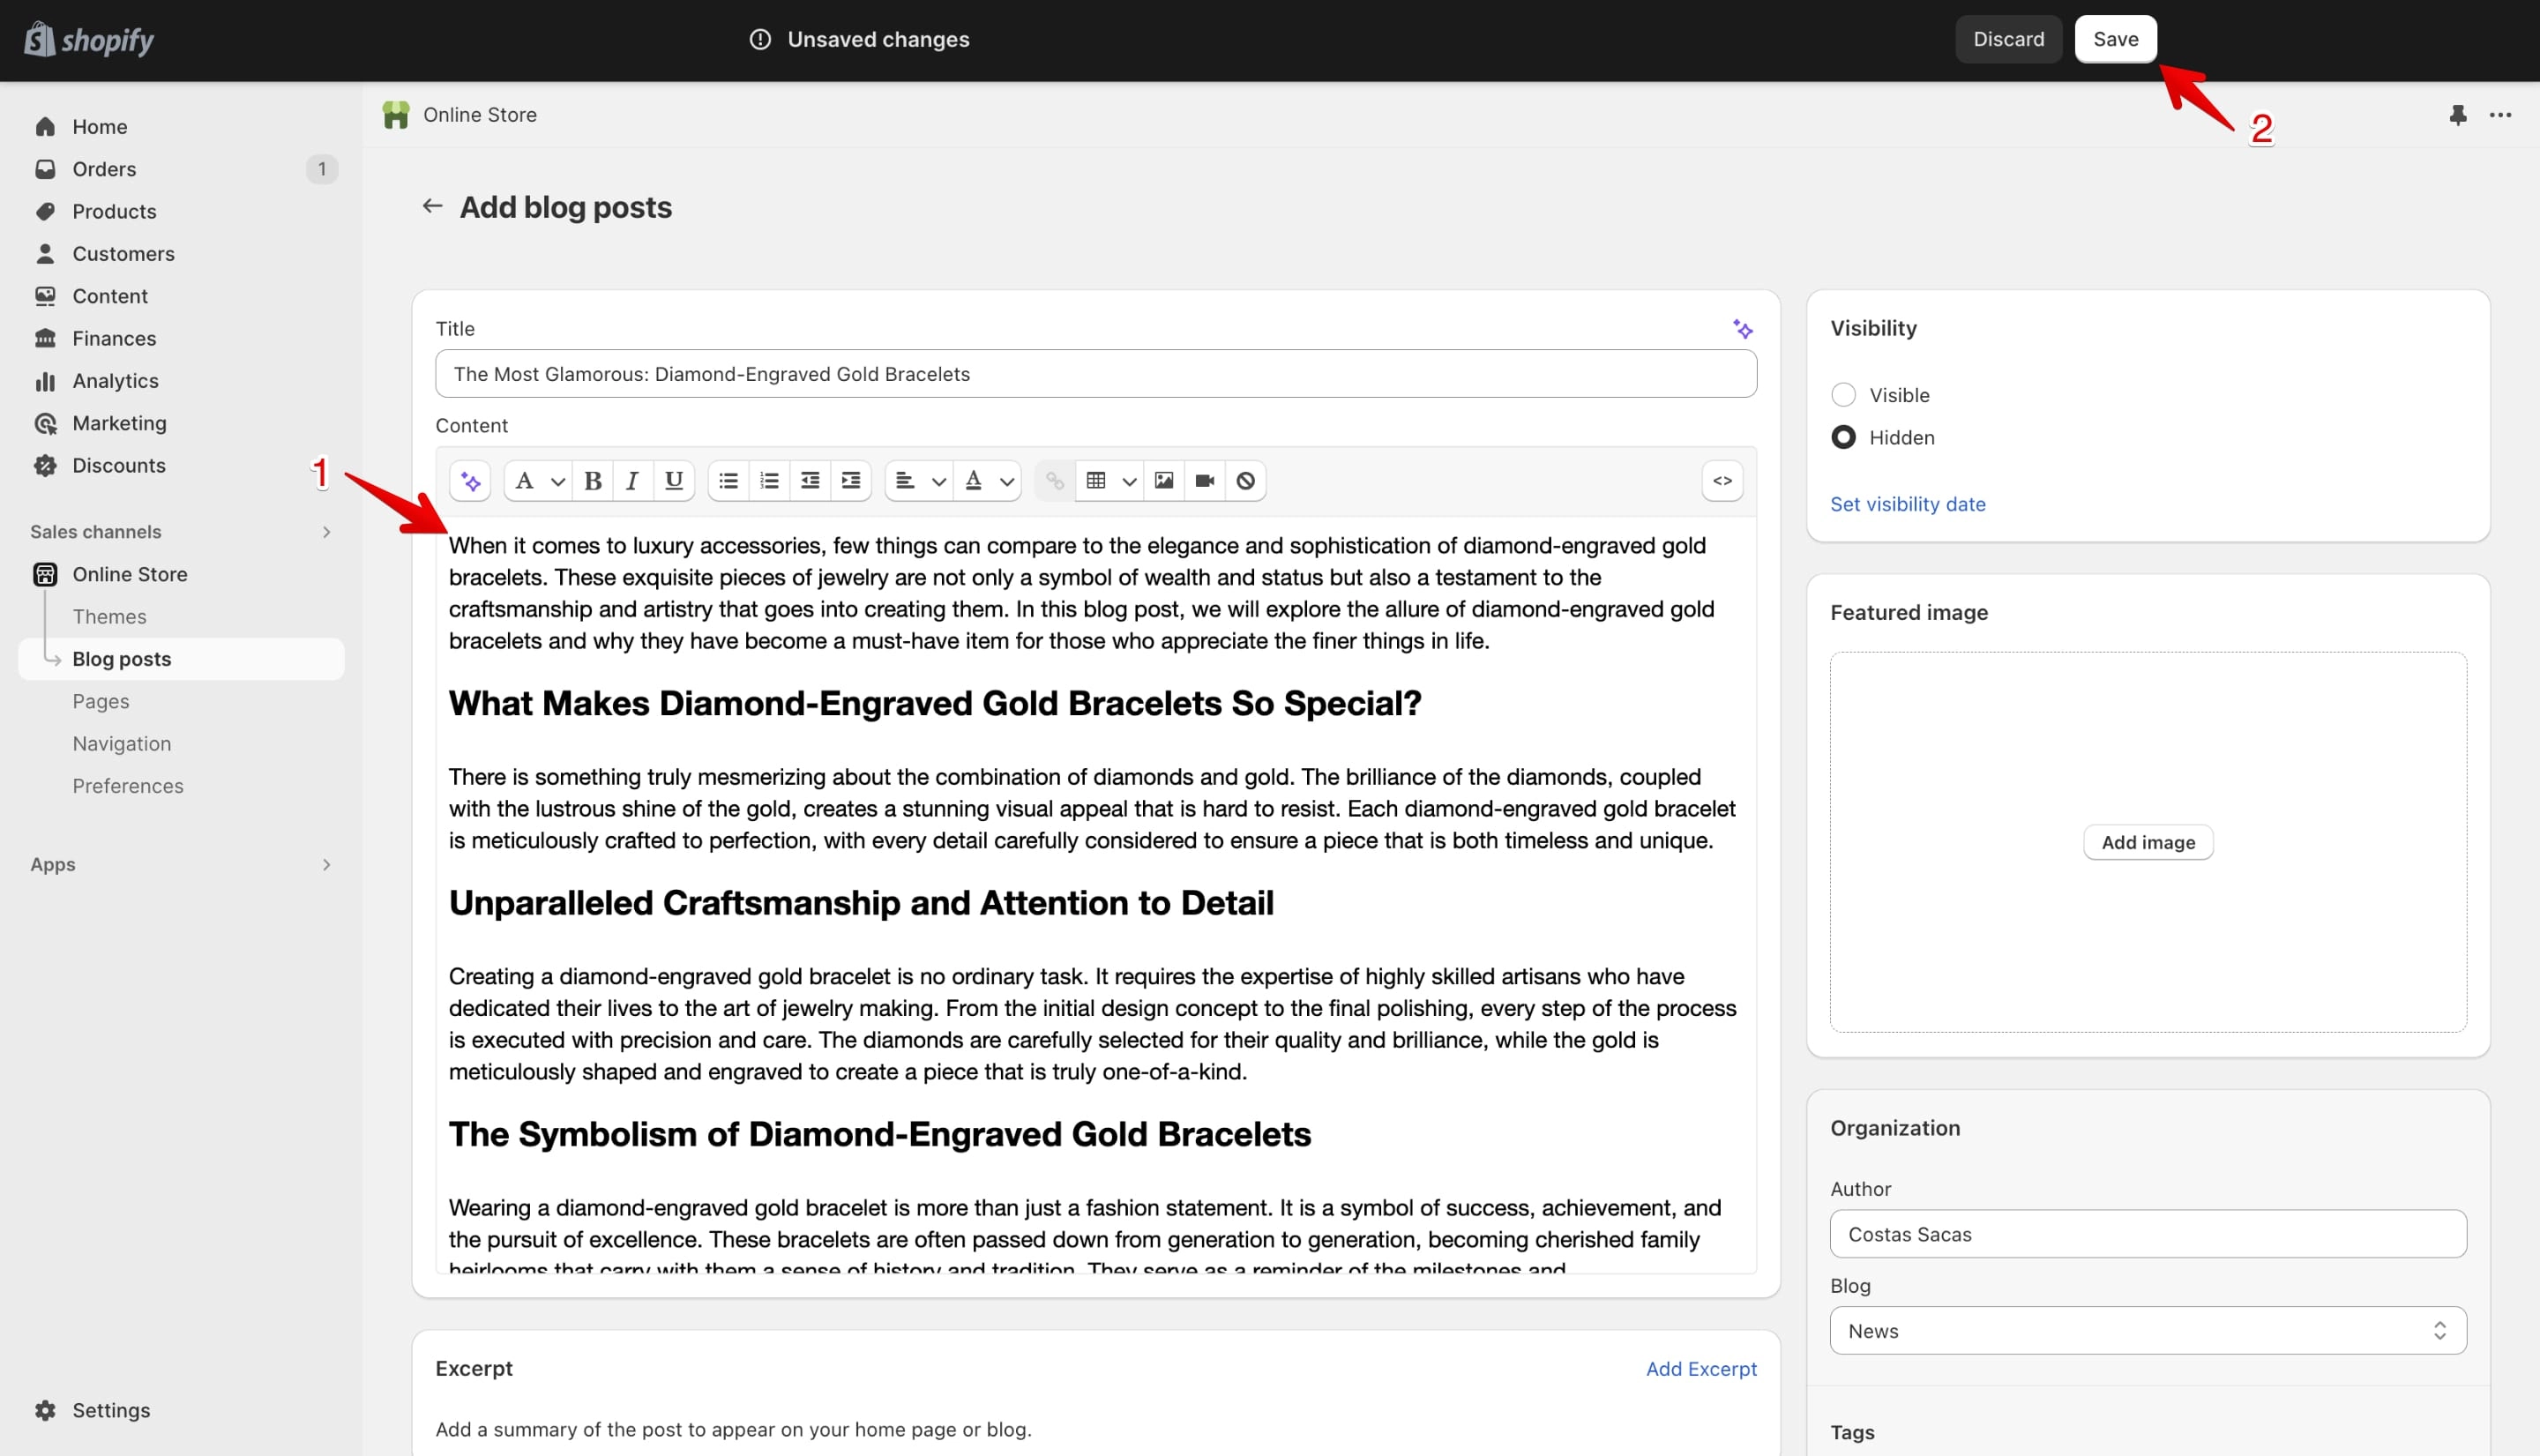
One thing to note is that AI will not generate images for you. This is something that you need to add yourself to the article.
Generate content with AI on product descriptions
On the product page AI can be used only on the product descriptions.
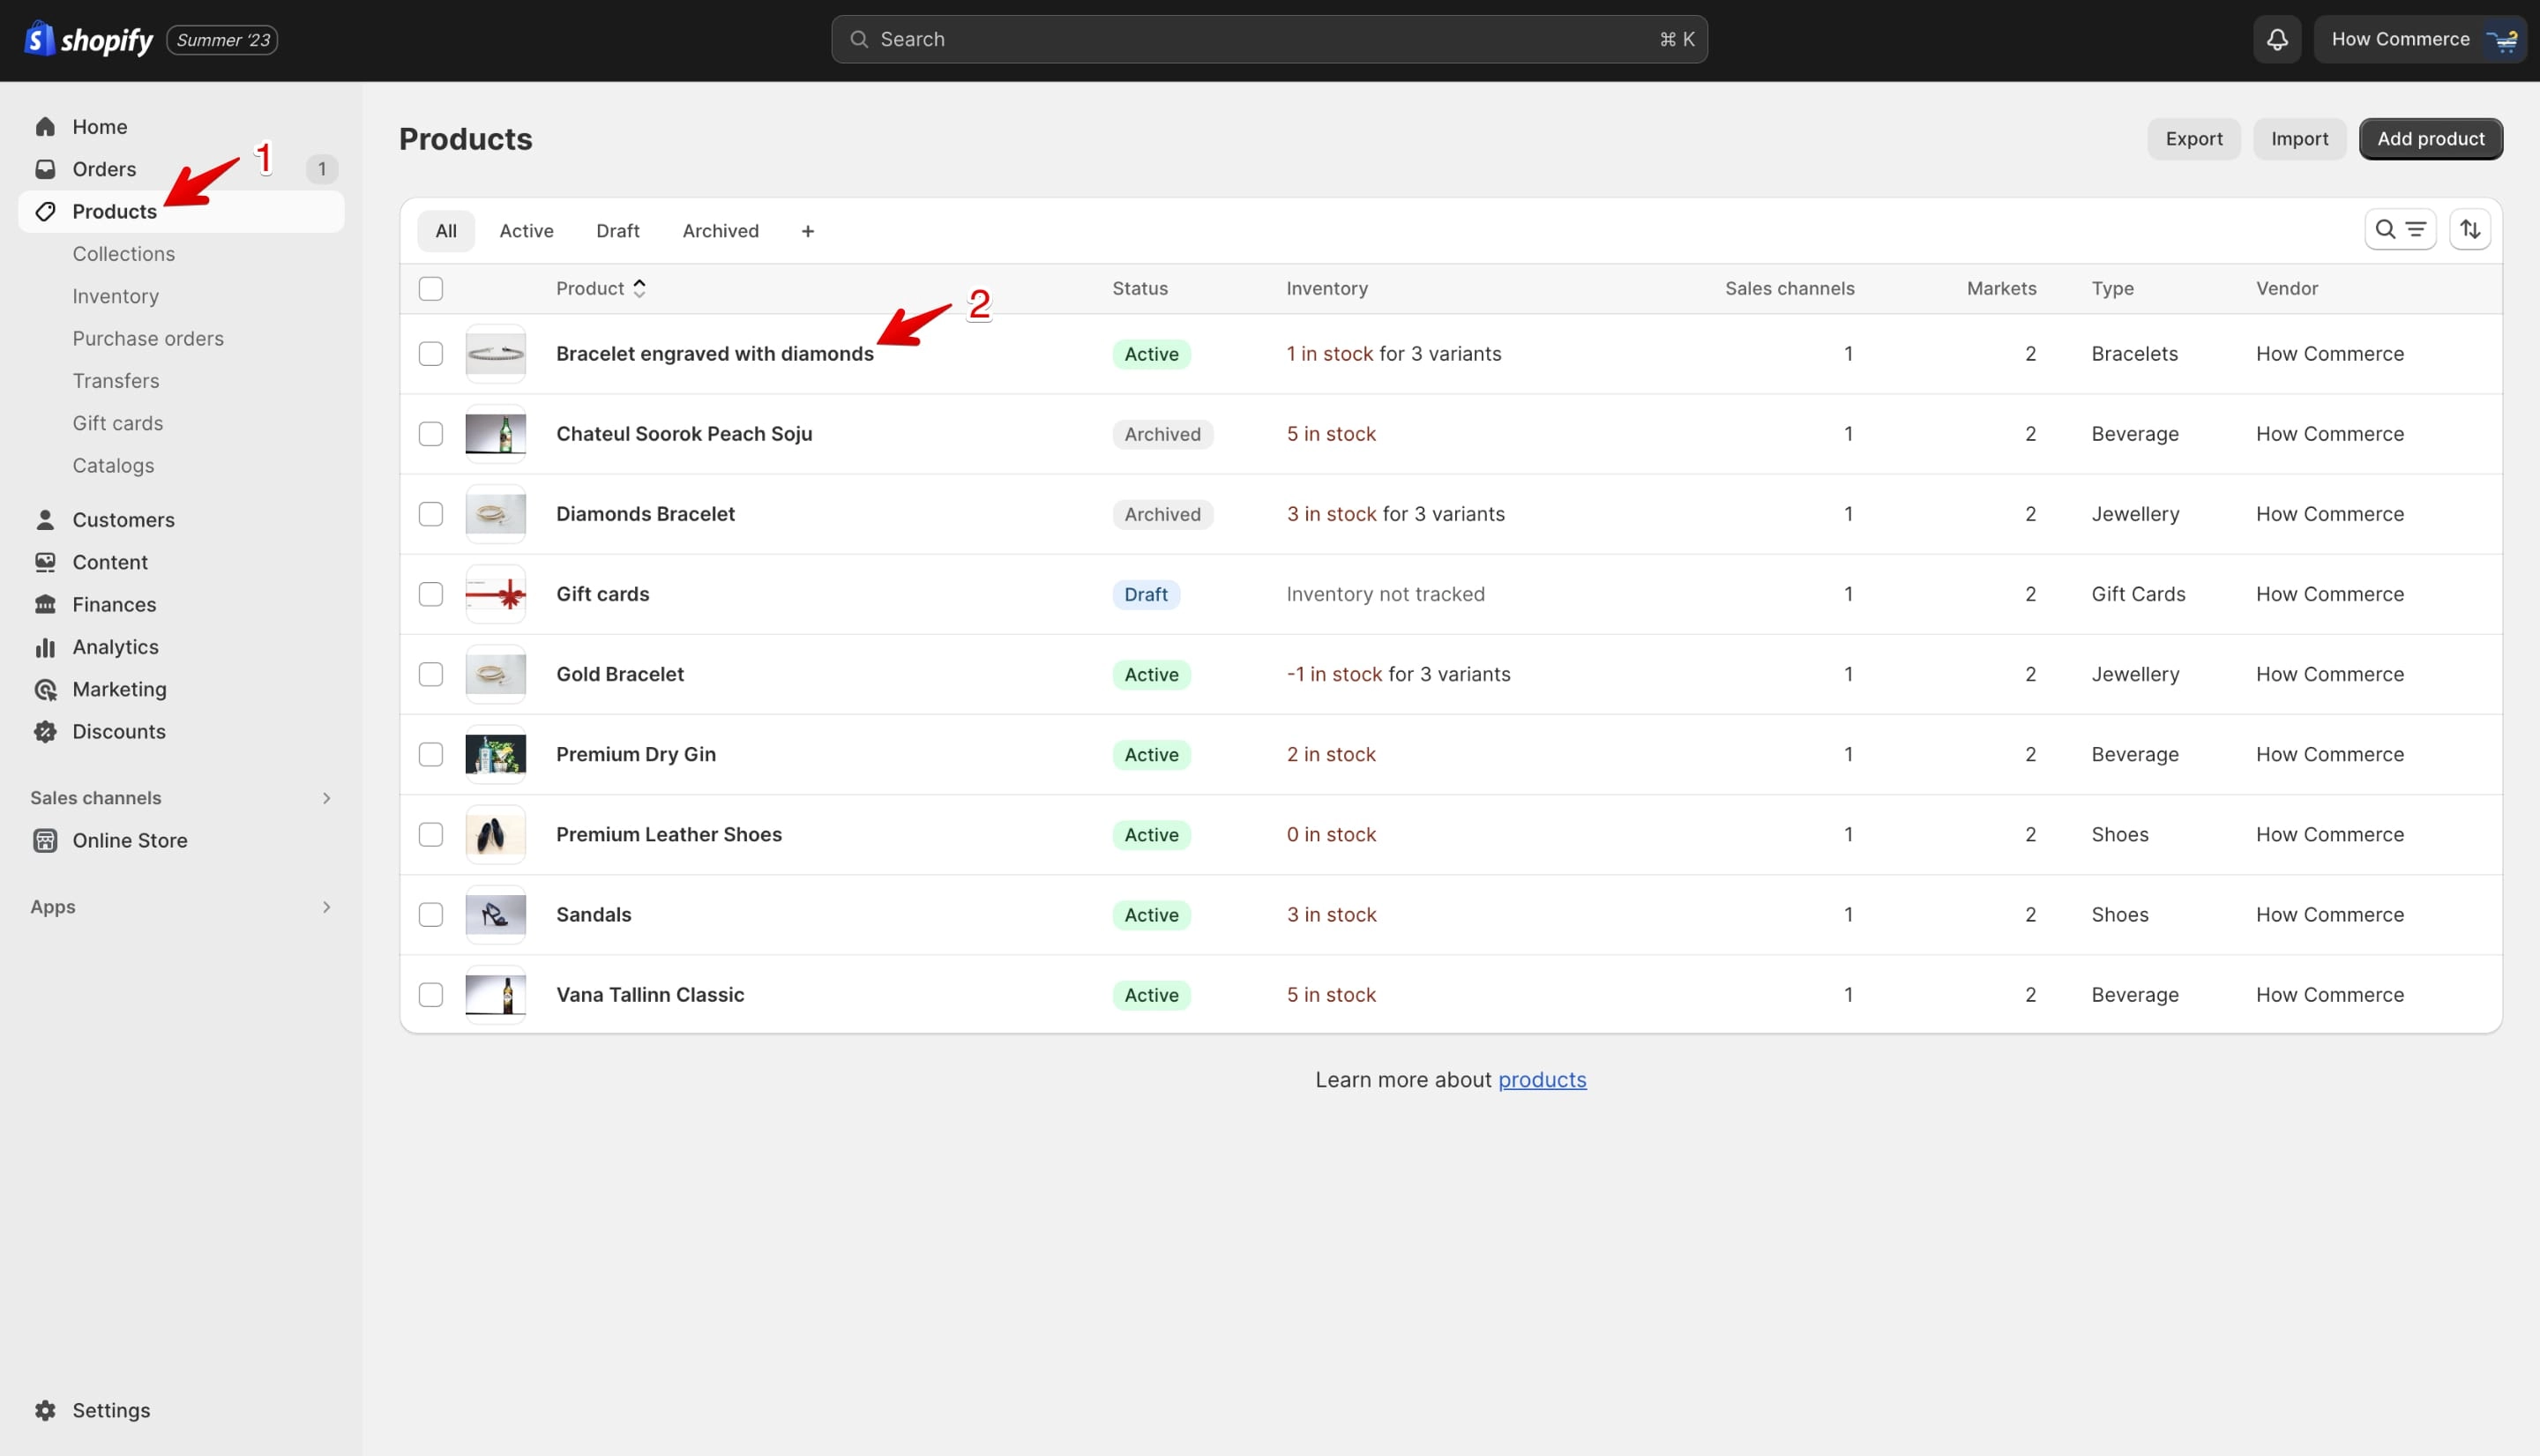
Go to the “Products” listing page (marked with 1 in the image below) and select a product (marked with 2 in the image below):
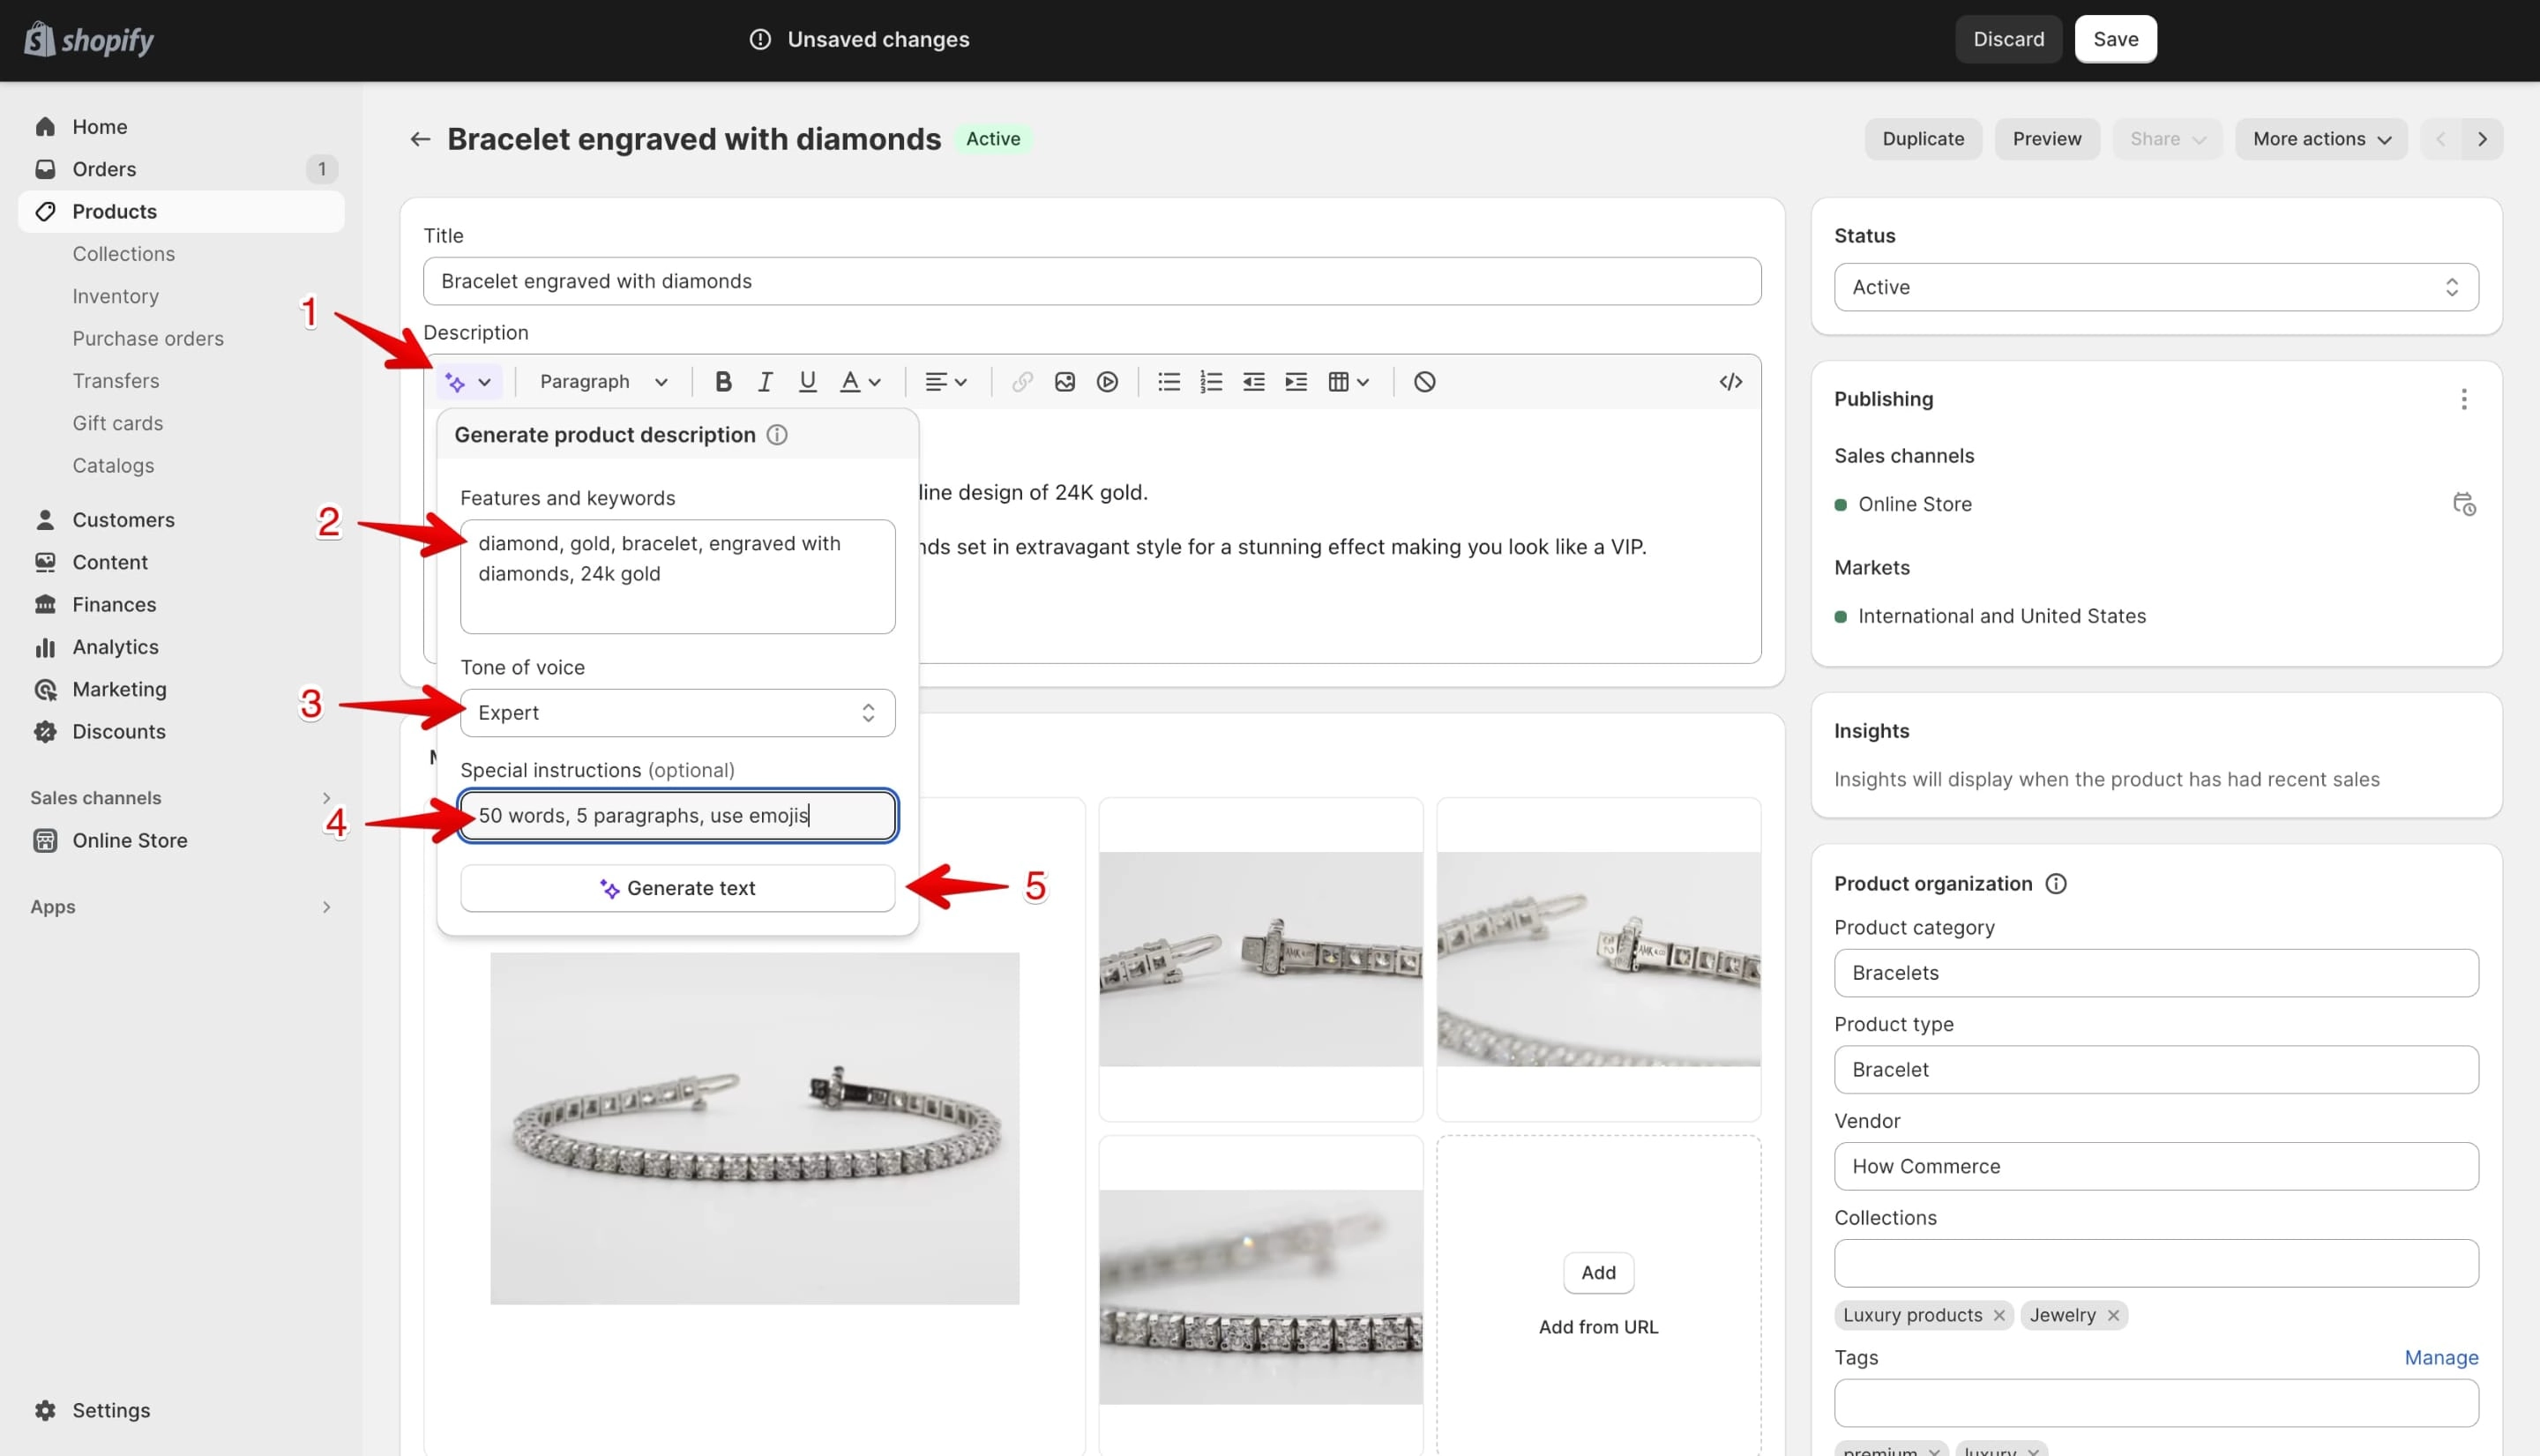
Click on the Shopify AI icon (marked with 1 in the image below) to display the AI prompt menu.
On the “Features and keywords” input box add product features and also keywords that you want to use in your product description.
For my example I have a “Bracelet” product engraved with diamonds and for this specific case I've used keywords like: “diamond, gold, bracelet, engraved with diamonds, 24k gold”.
Based on my input the AI will use those keywords and features to generate the product description which should contain those features and keywords.
For "Tone of voice" (marked with 2 in the image below) you can use whatever you like from the tones. For my example I'll use "Expert".
There are multiple tones which can fine tune your product description like:
- Expert
- Supportive
- Persuasive
- Daring
- Playful
- Sophisticated
- Custom
On “Special instructions” (marked with 3 in the image below) you can add the length of the description, how many paragraphs should have and many other instructions to help the AI understand how you want the description generated.
For my example I use instructions like:
- "50 words" to instruct the AI to limit my description to only 50 words or less
- "5 paragraphs" to instruct the AI to split my product description into 5 paragraphs.
- "use emojis" to instruct the AI to use emojis wherever it thinks looks good.
Note that the “Special instructions” are optional and the AI will not always return text respecting the instructions.
Once you have everything in place click on the "Generate text" button (marked with 5 in the image below).
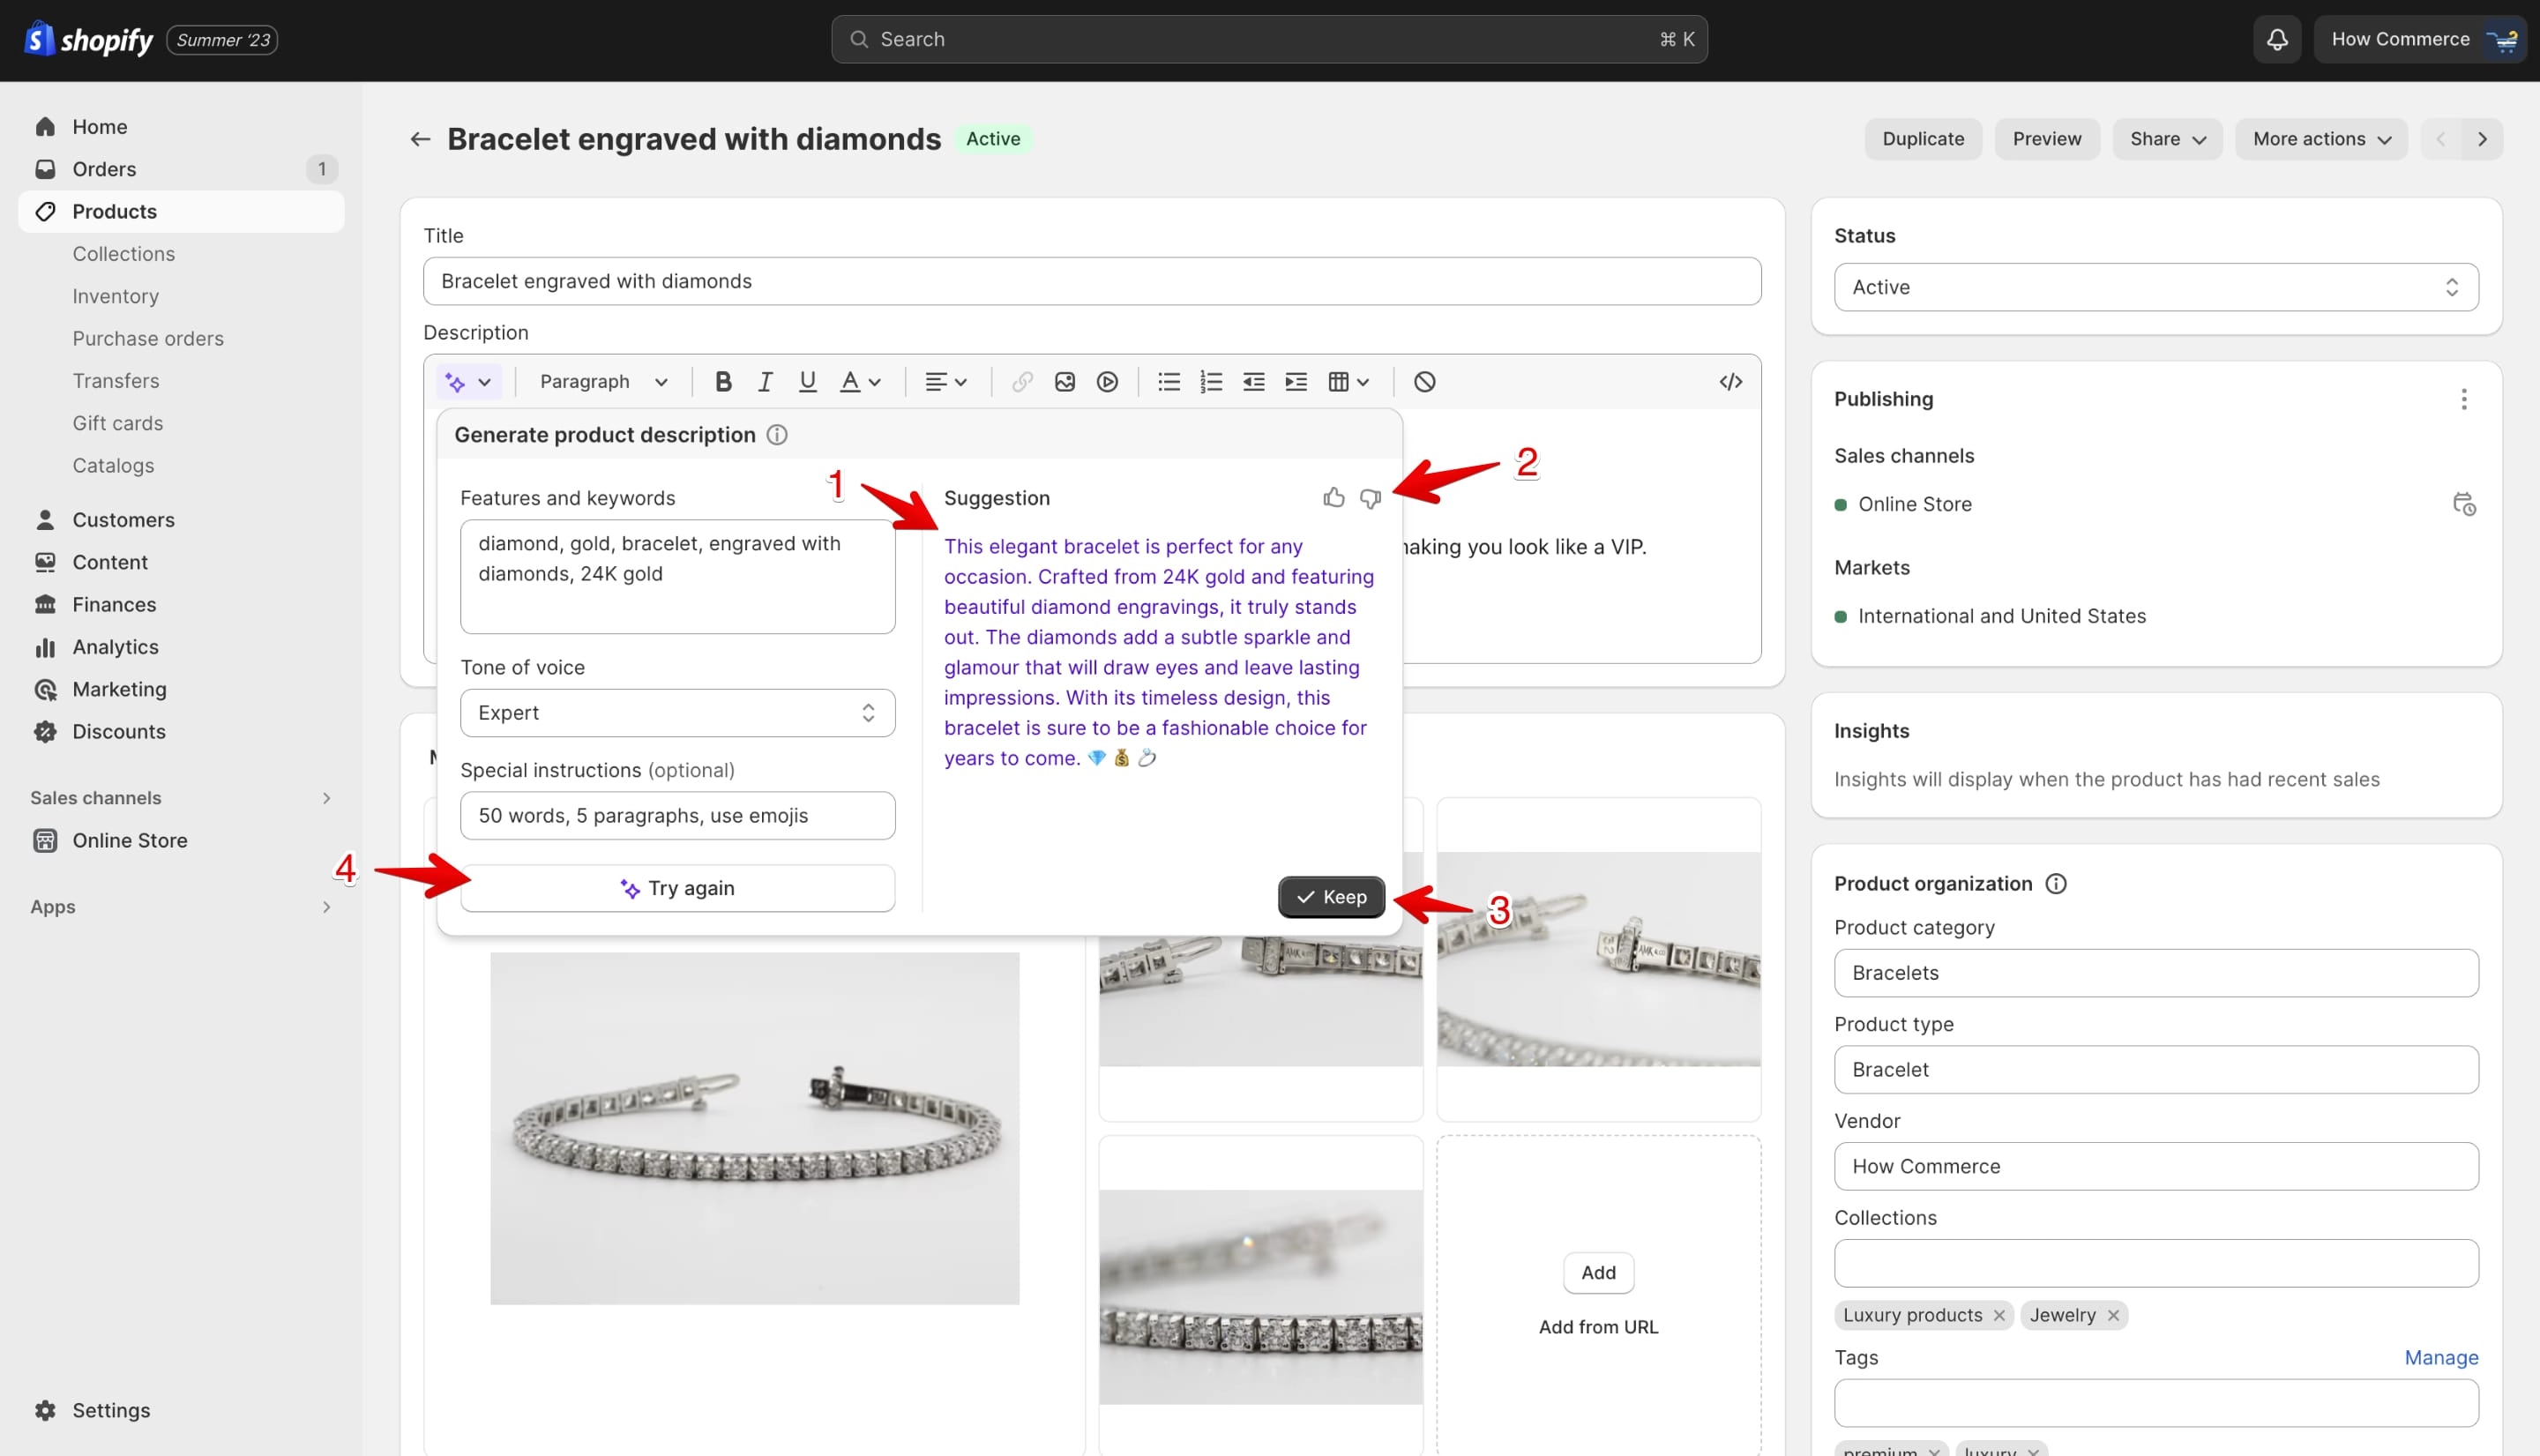
Now the AI will generate the product description (marked with 1 in the image below).
If you want to provide feedback about the results to Shopify you can use the thumbs icons (marked with 2 in the image below).
If you are happy with the result click on the “Keep” button (marked with 3 in the image below) and the AI will fill the “Description” field with the generated description.
If you are not happy with the results click on the “Try again” button (marked with 4 in the image below) to generate a new product description.
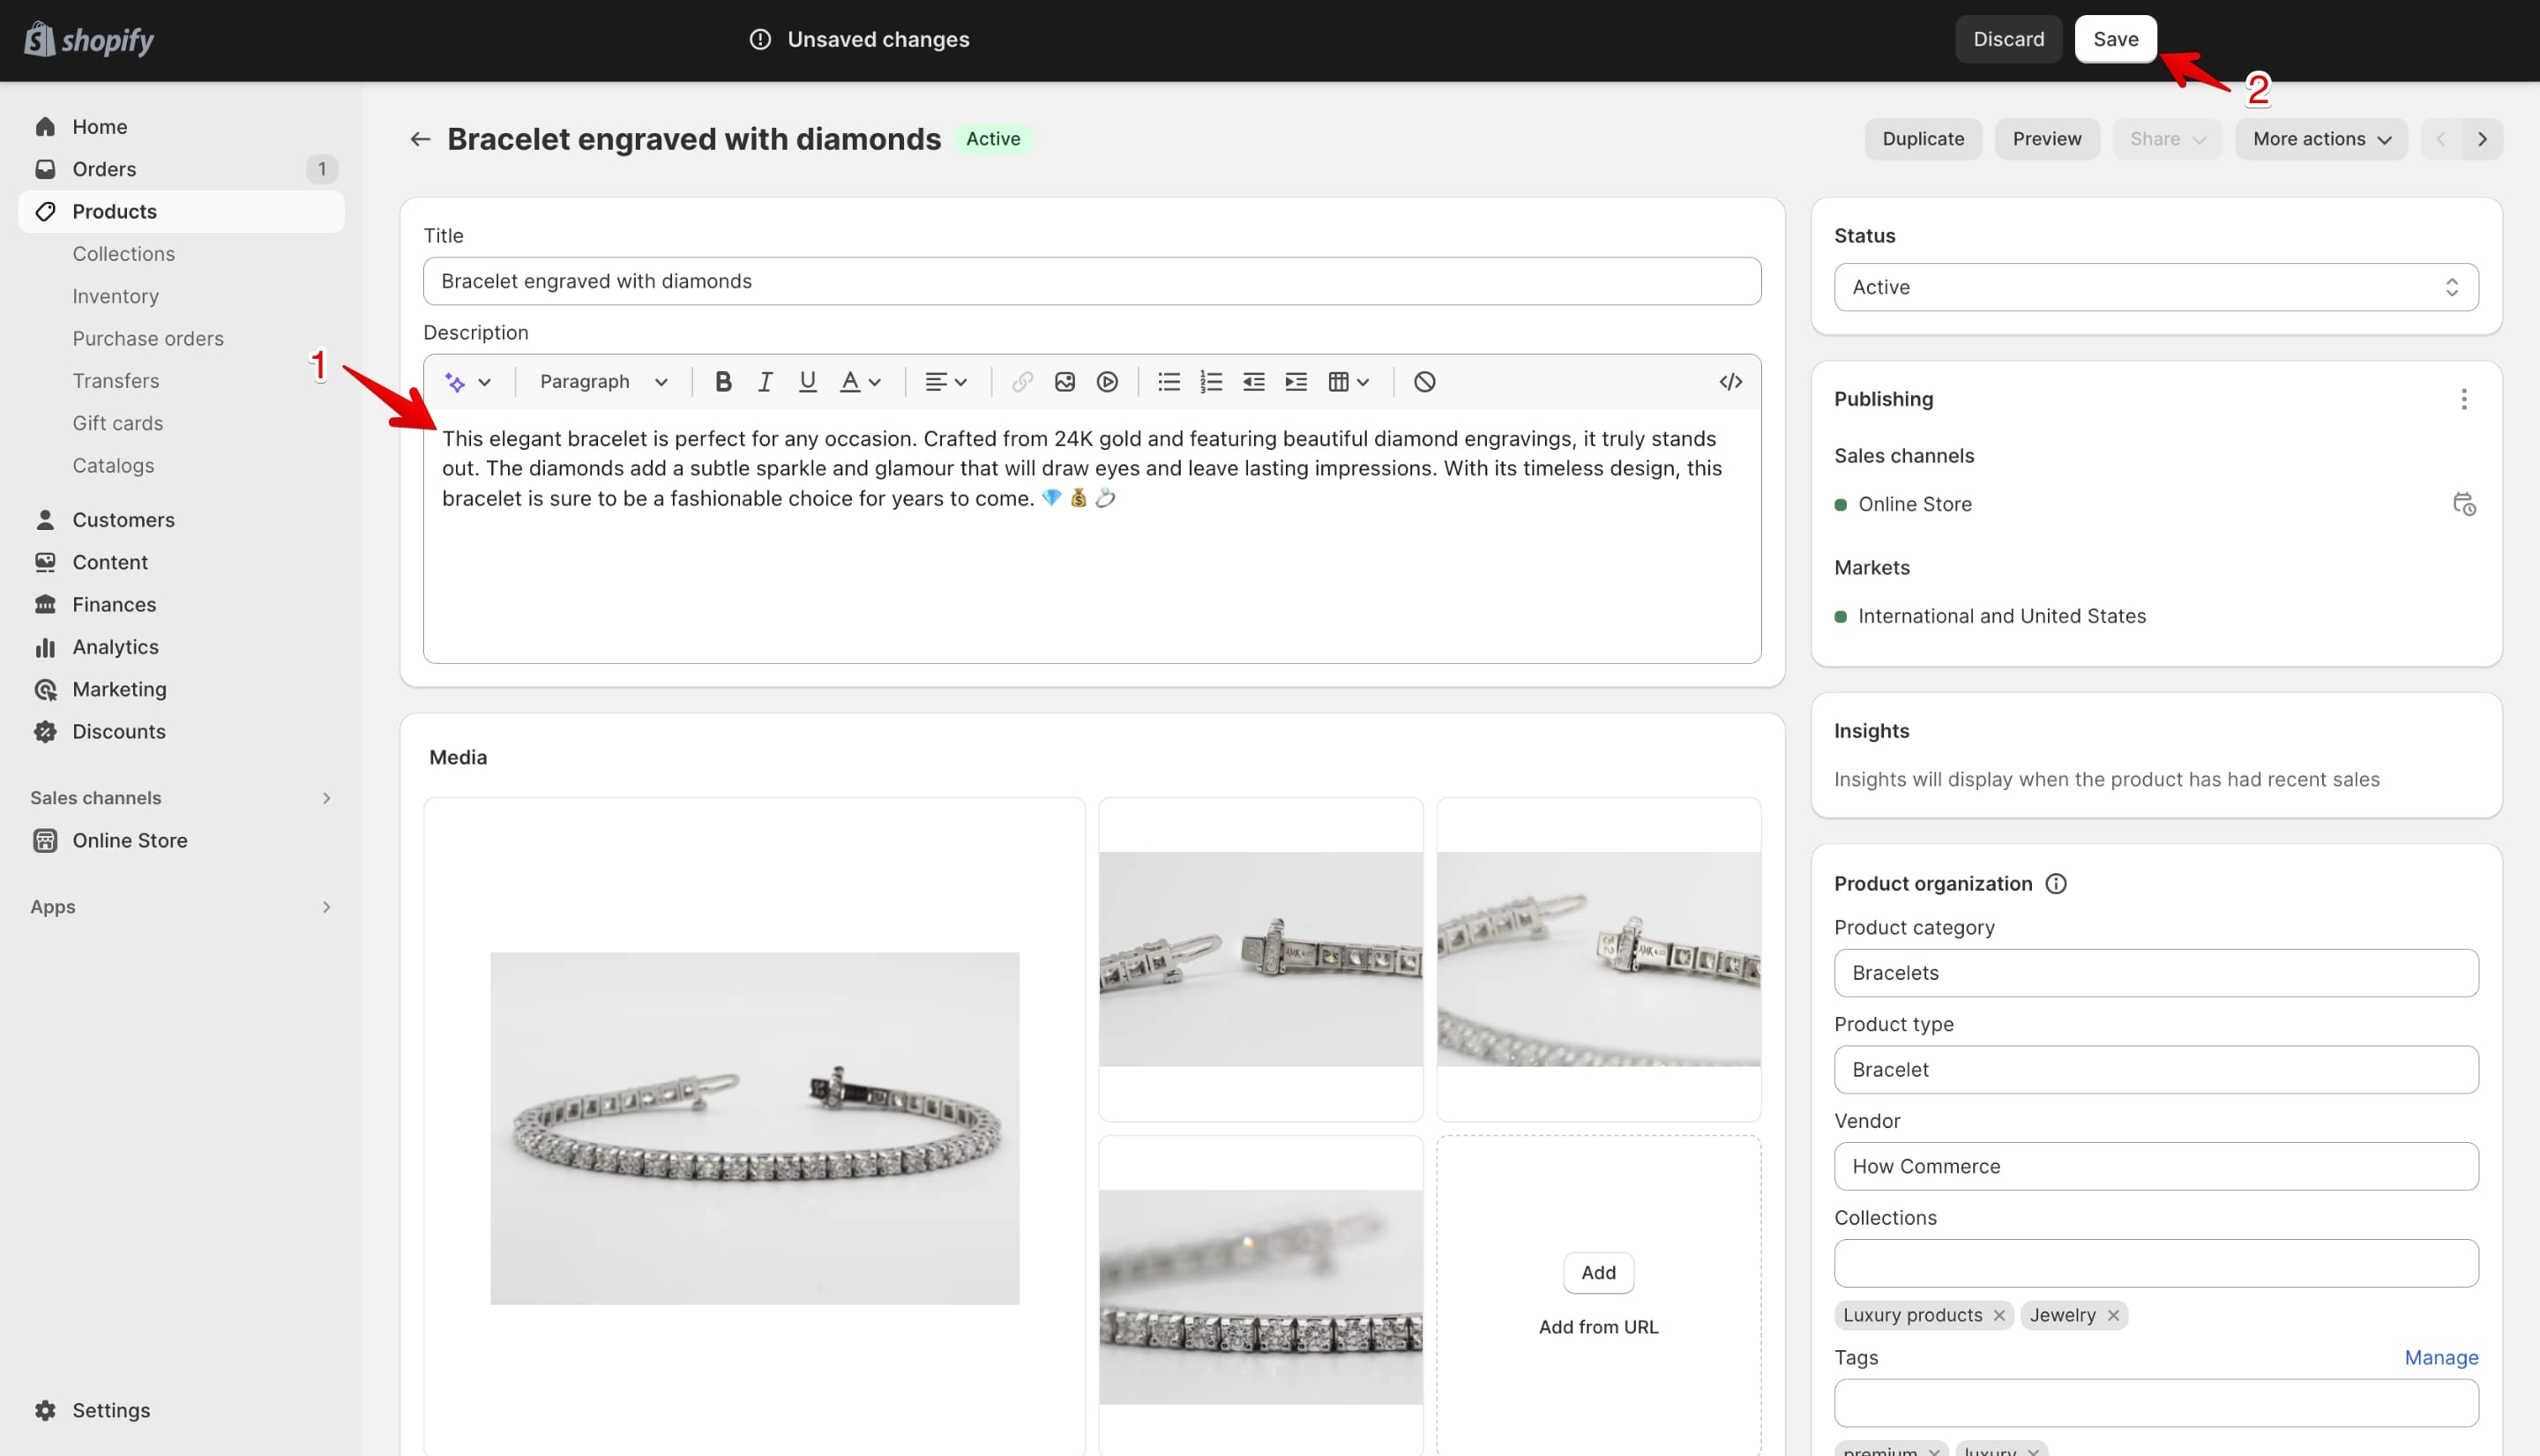
Clicking the "Keep" button will fill the "Description" field (marked with 1 in the image below) with the product description generated by the AI.
To save your newly AI generated product description click on the "Save" button (marked with 2 in the image below).
Generate content with AI on pages
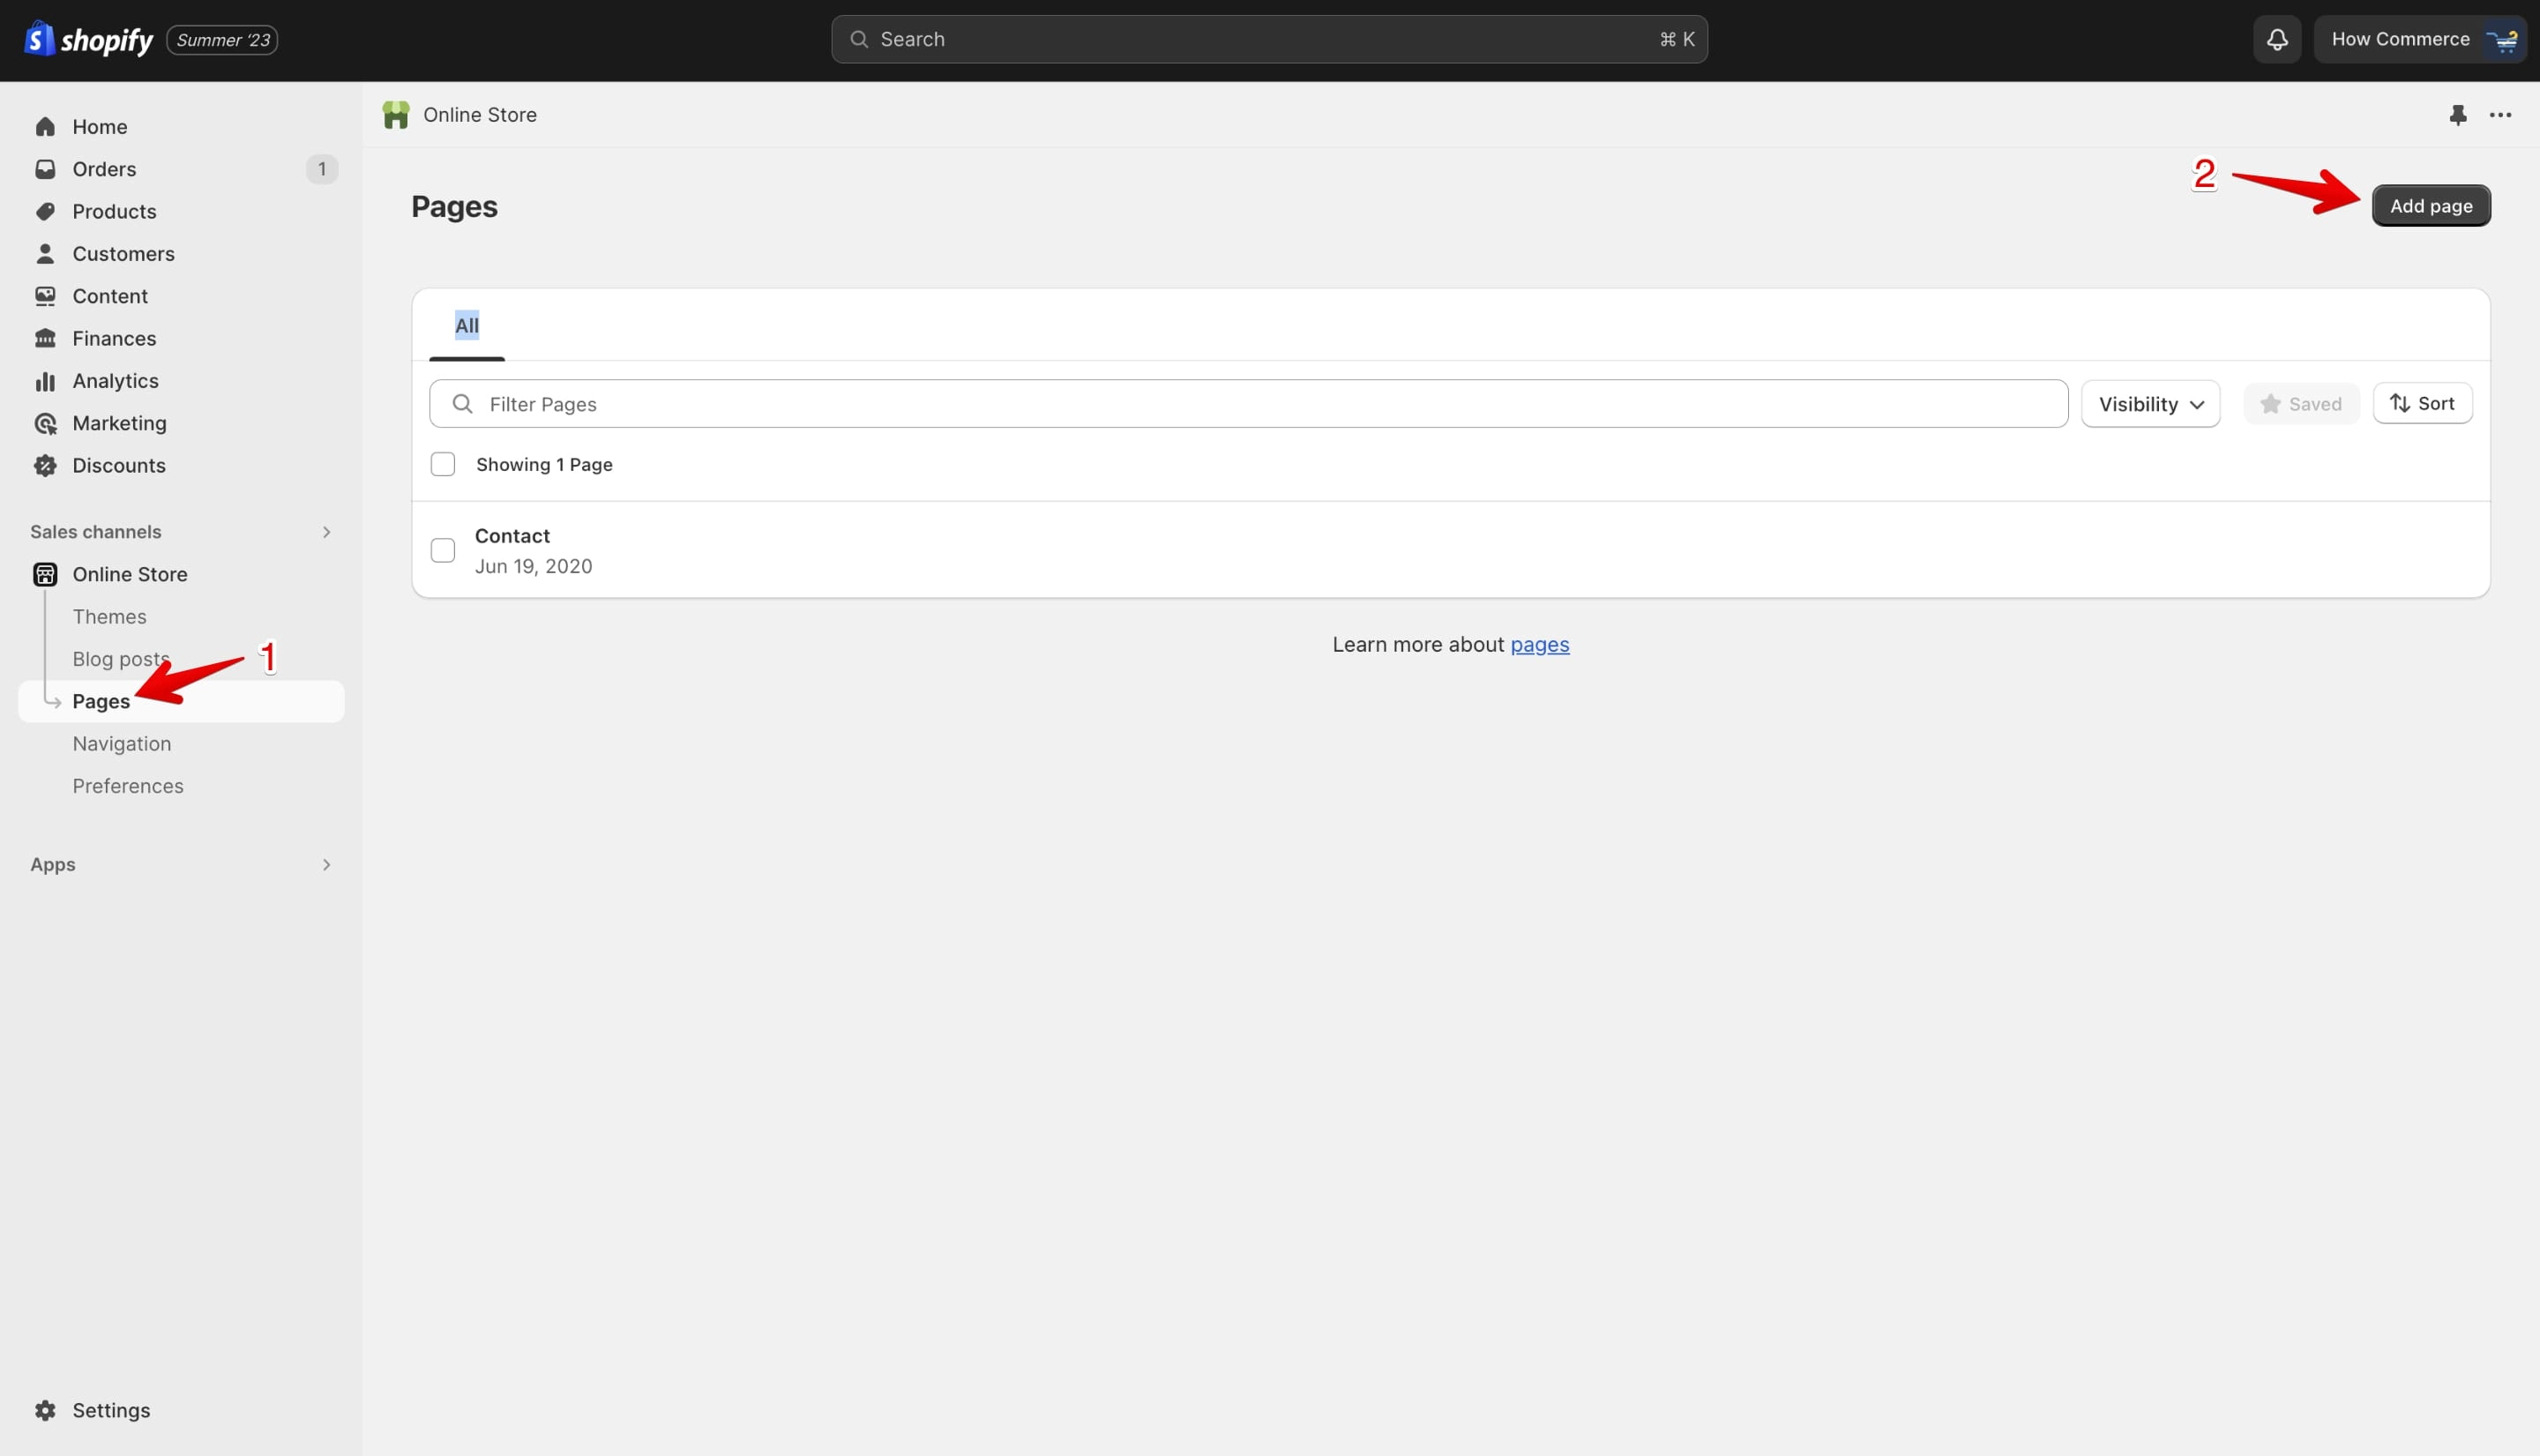
Go to “Pages” (marked with 1 in the image below) and add a new page by clicking the “Add page” button (marked with 2 in the image below):
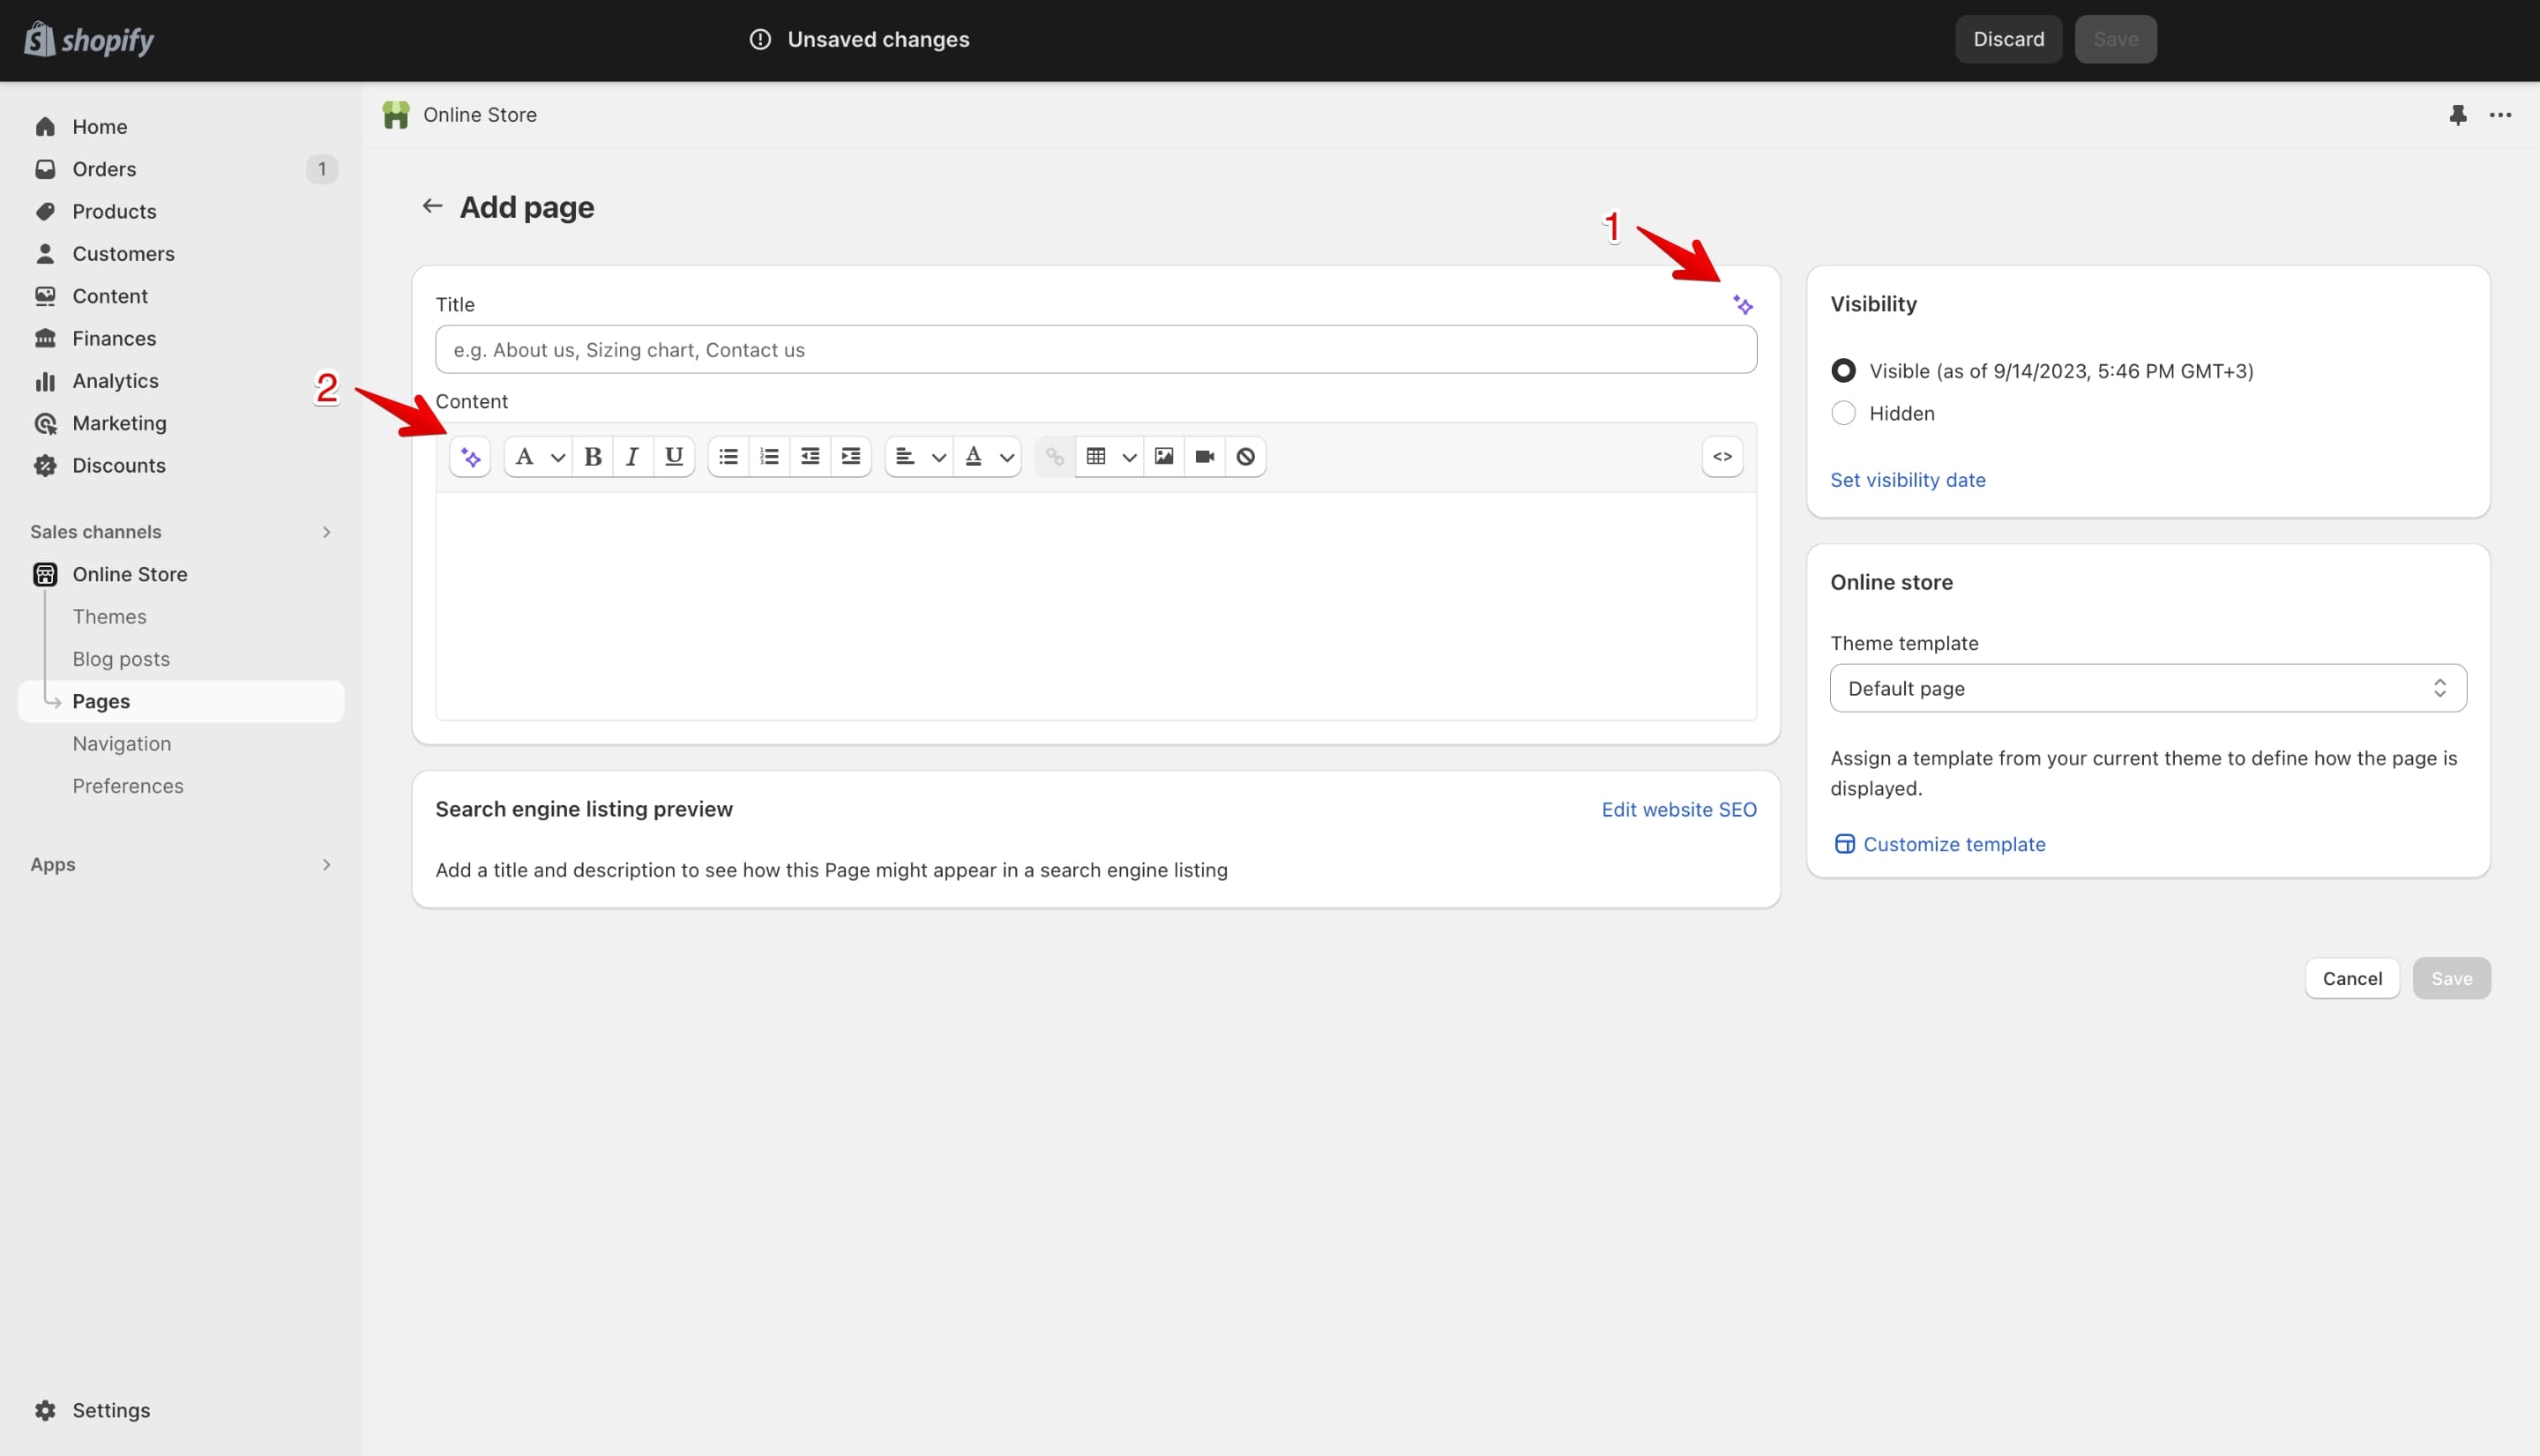
On the pages you can use AI on page title (marked with 1 in the image below) and on content (marked with 2 in the image below):
In my opinion the page title doesn’t need AI, maybe just in case you want to find similar names.
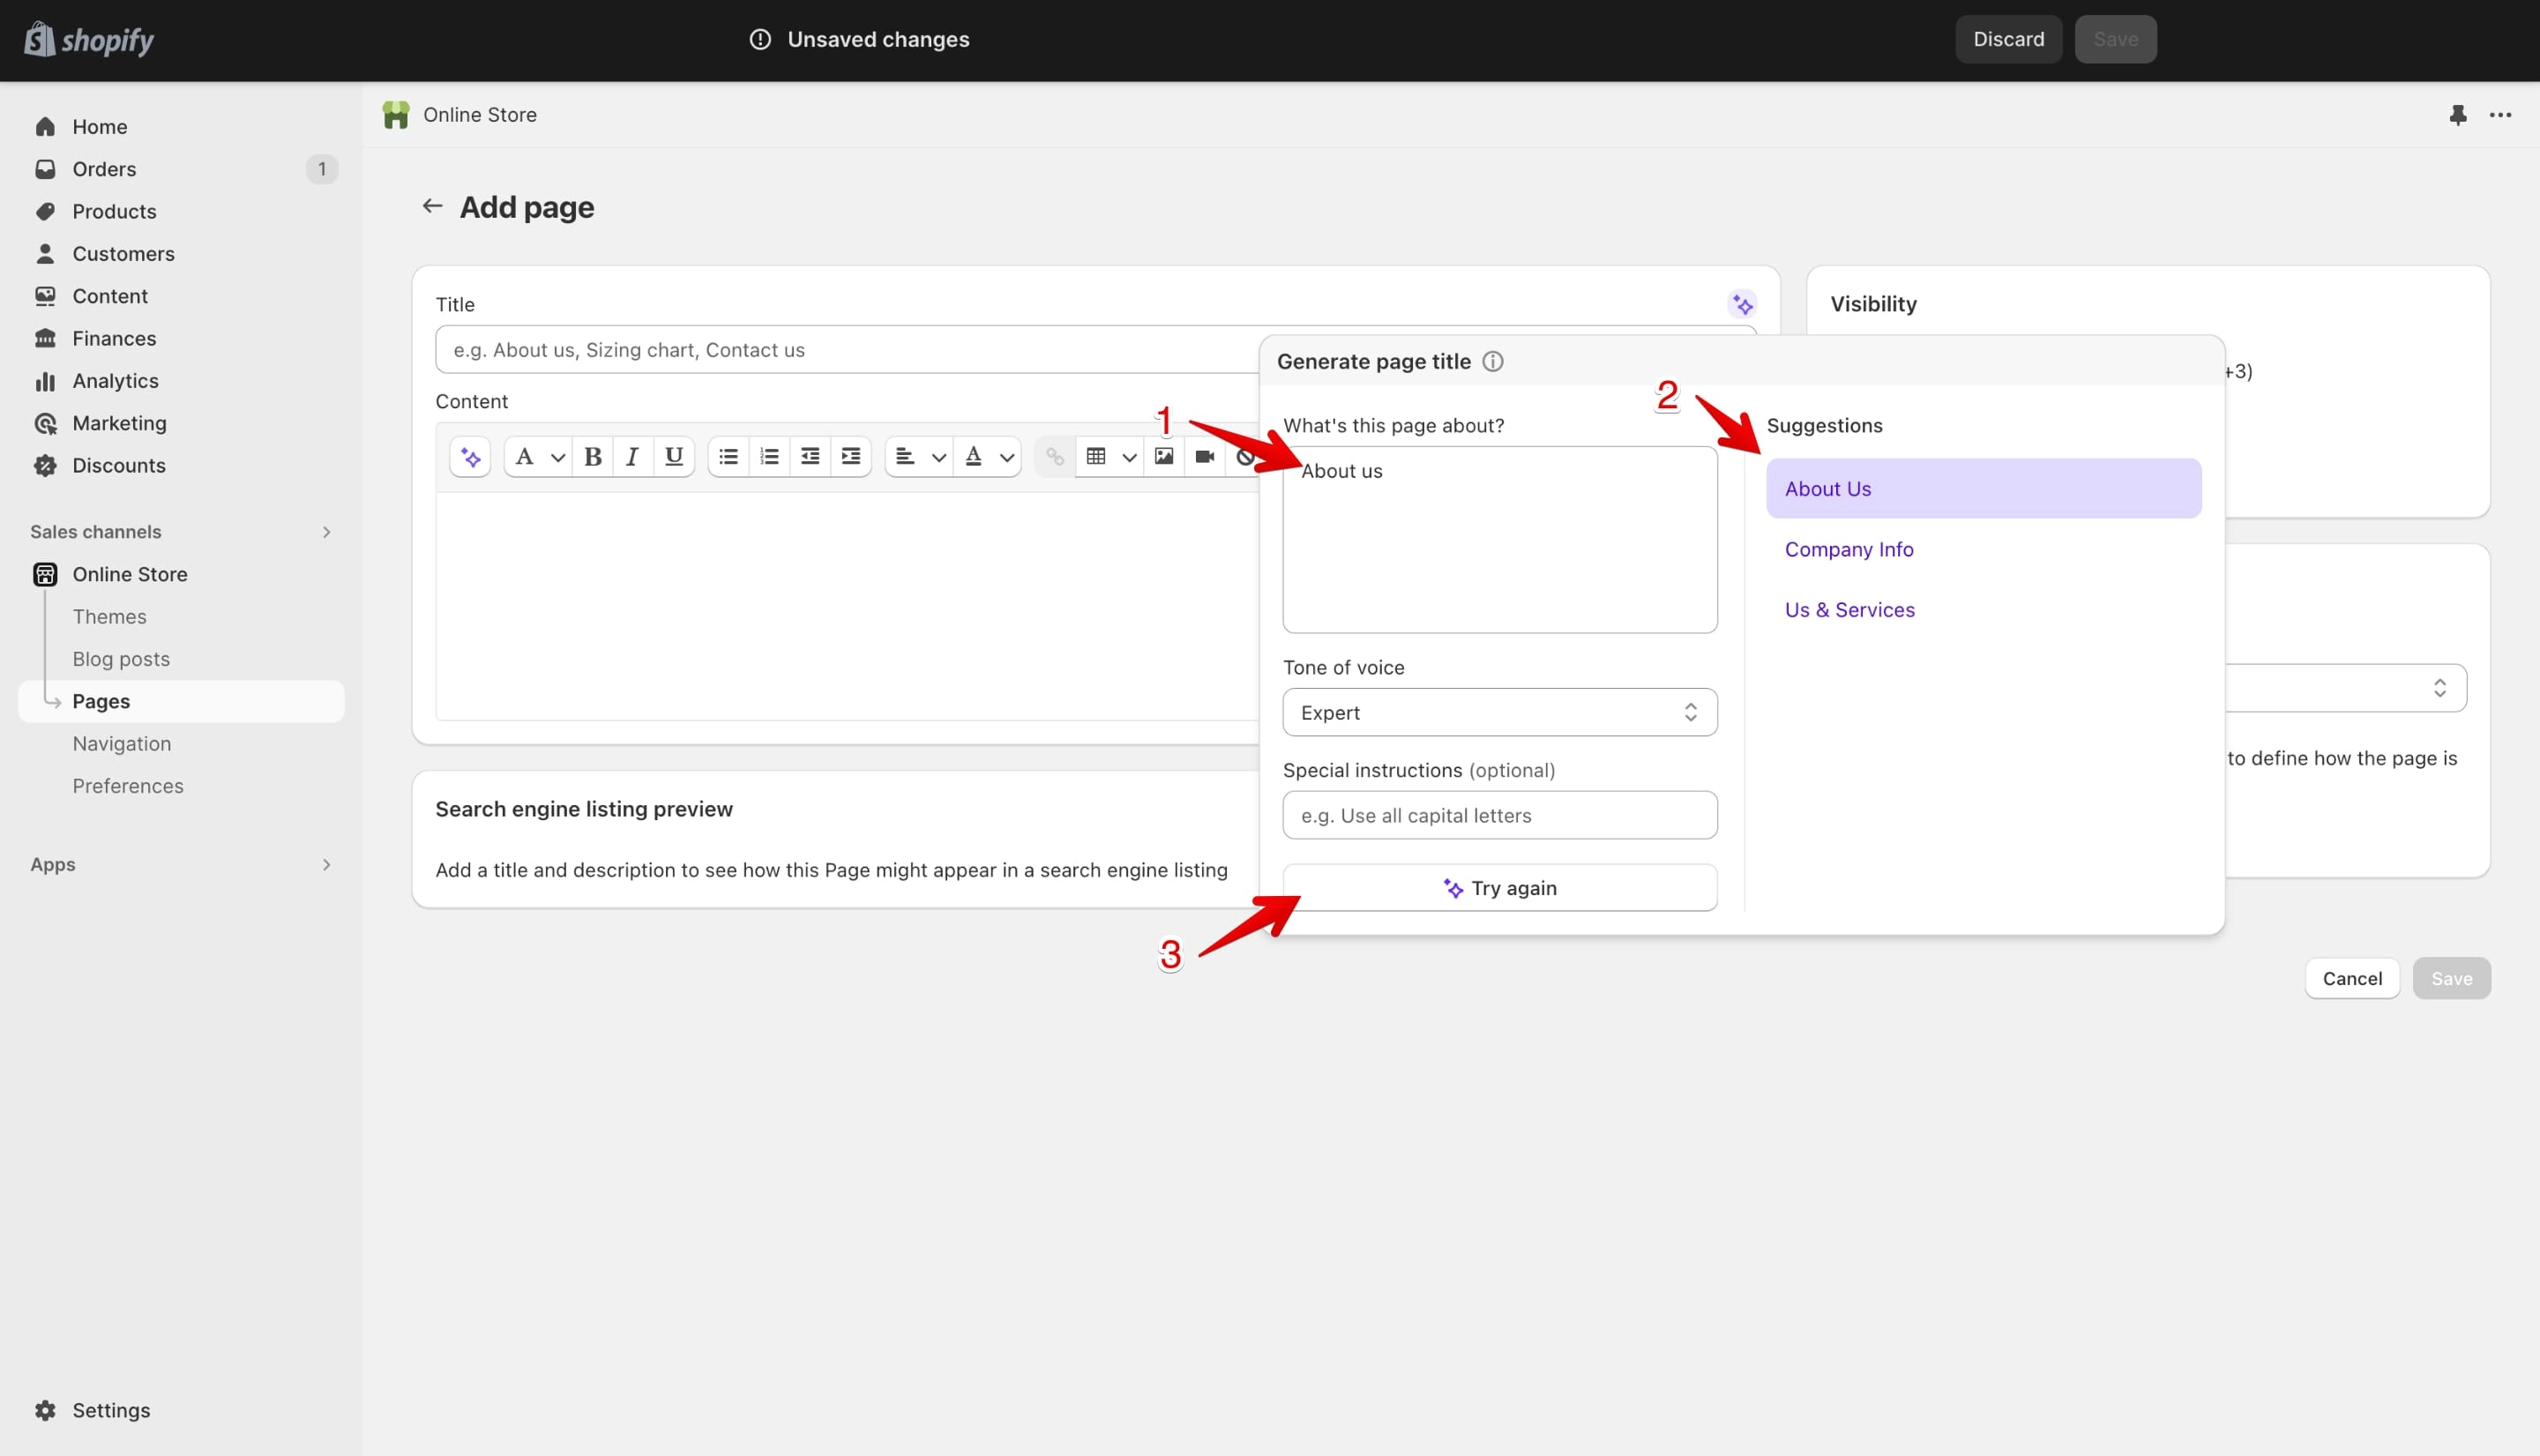
In my example I want to create an About page so in the “What’s this page about?” (marked with 1 in the image below).
I’ve added “About us” but it’s obvious that the name of the page will be “About Us”, so in this case AI is not needed.
But if you want to use it follow my example below and be descriptive in the "What's this page about?" (marked with 1 in the image below).
I’ve left the tone of voice as “Expert” but you can use any of the voice tones.
Once you have everything in place you’ll see the “Suggestions” section generated (marked with 2 in the image below).
In my example similar page titles are generated, but depending on your prompts you can get more detailed page names.
If you like the result click it and the AI will fill the "Title" field. If not you can always change your prompts and click the "Try again" button (marked with 3 in the image below).
Next step is to generate content for the page and here AI could be really helpful.
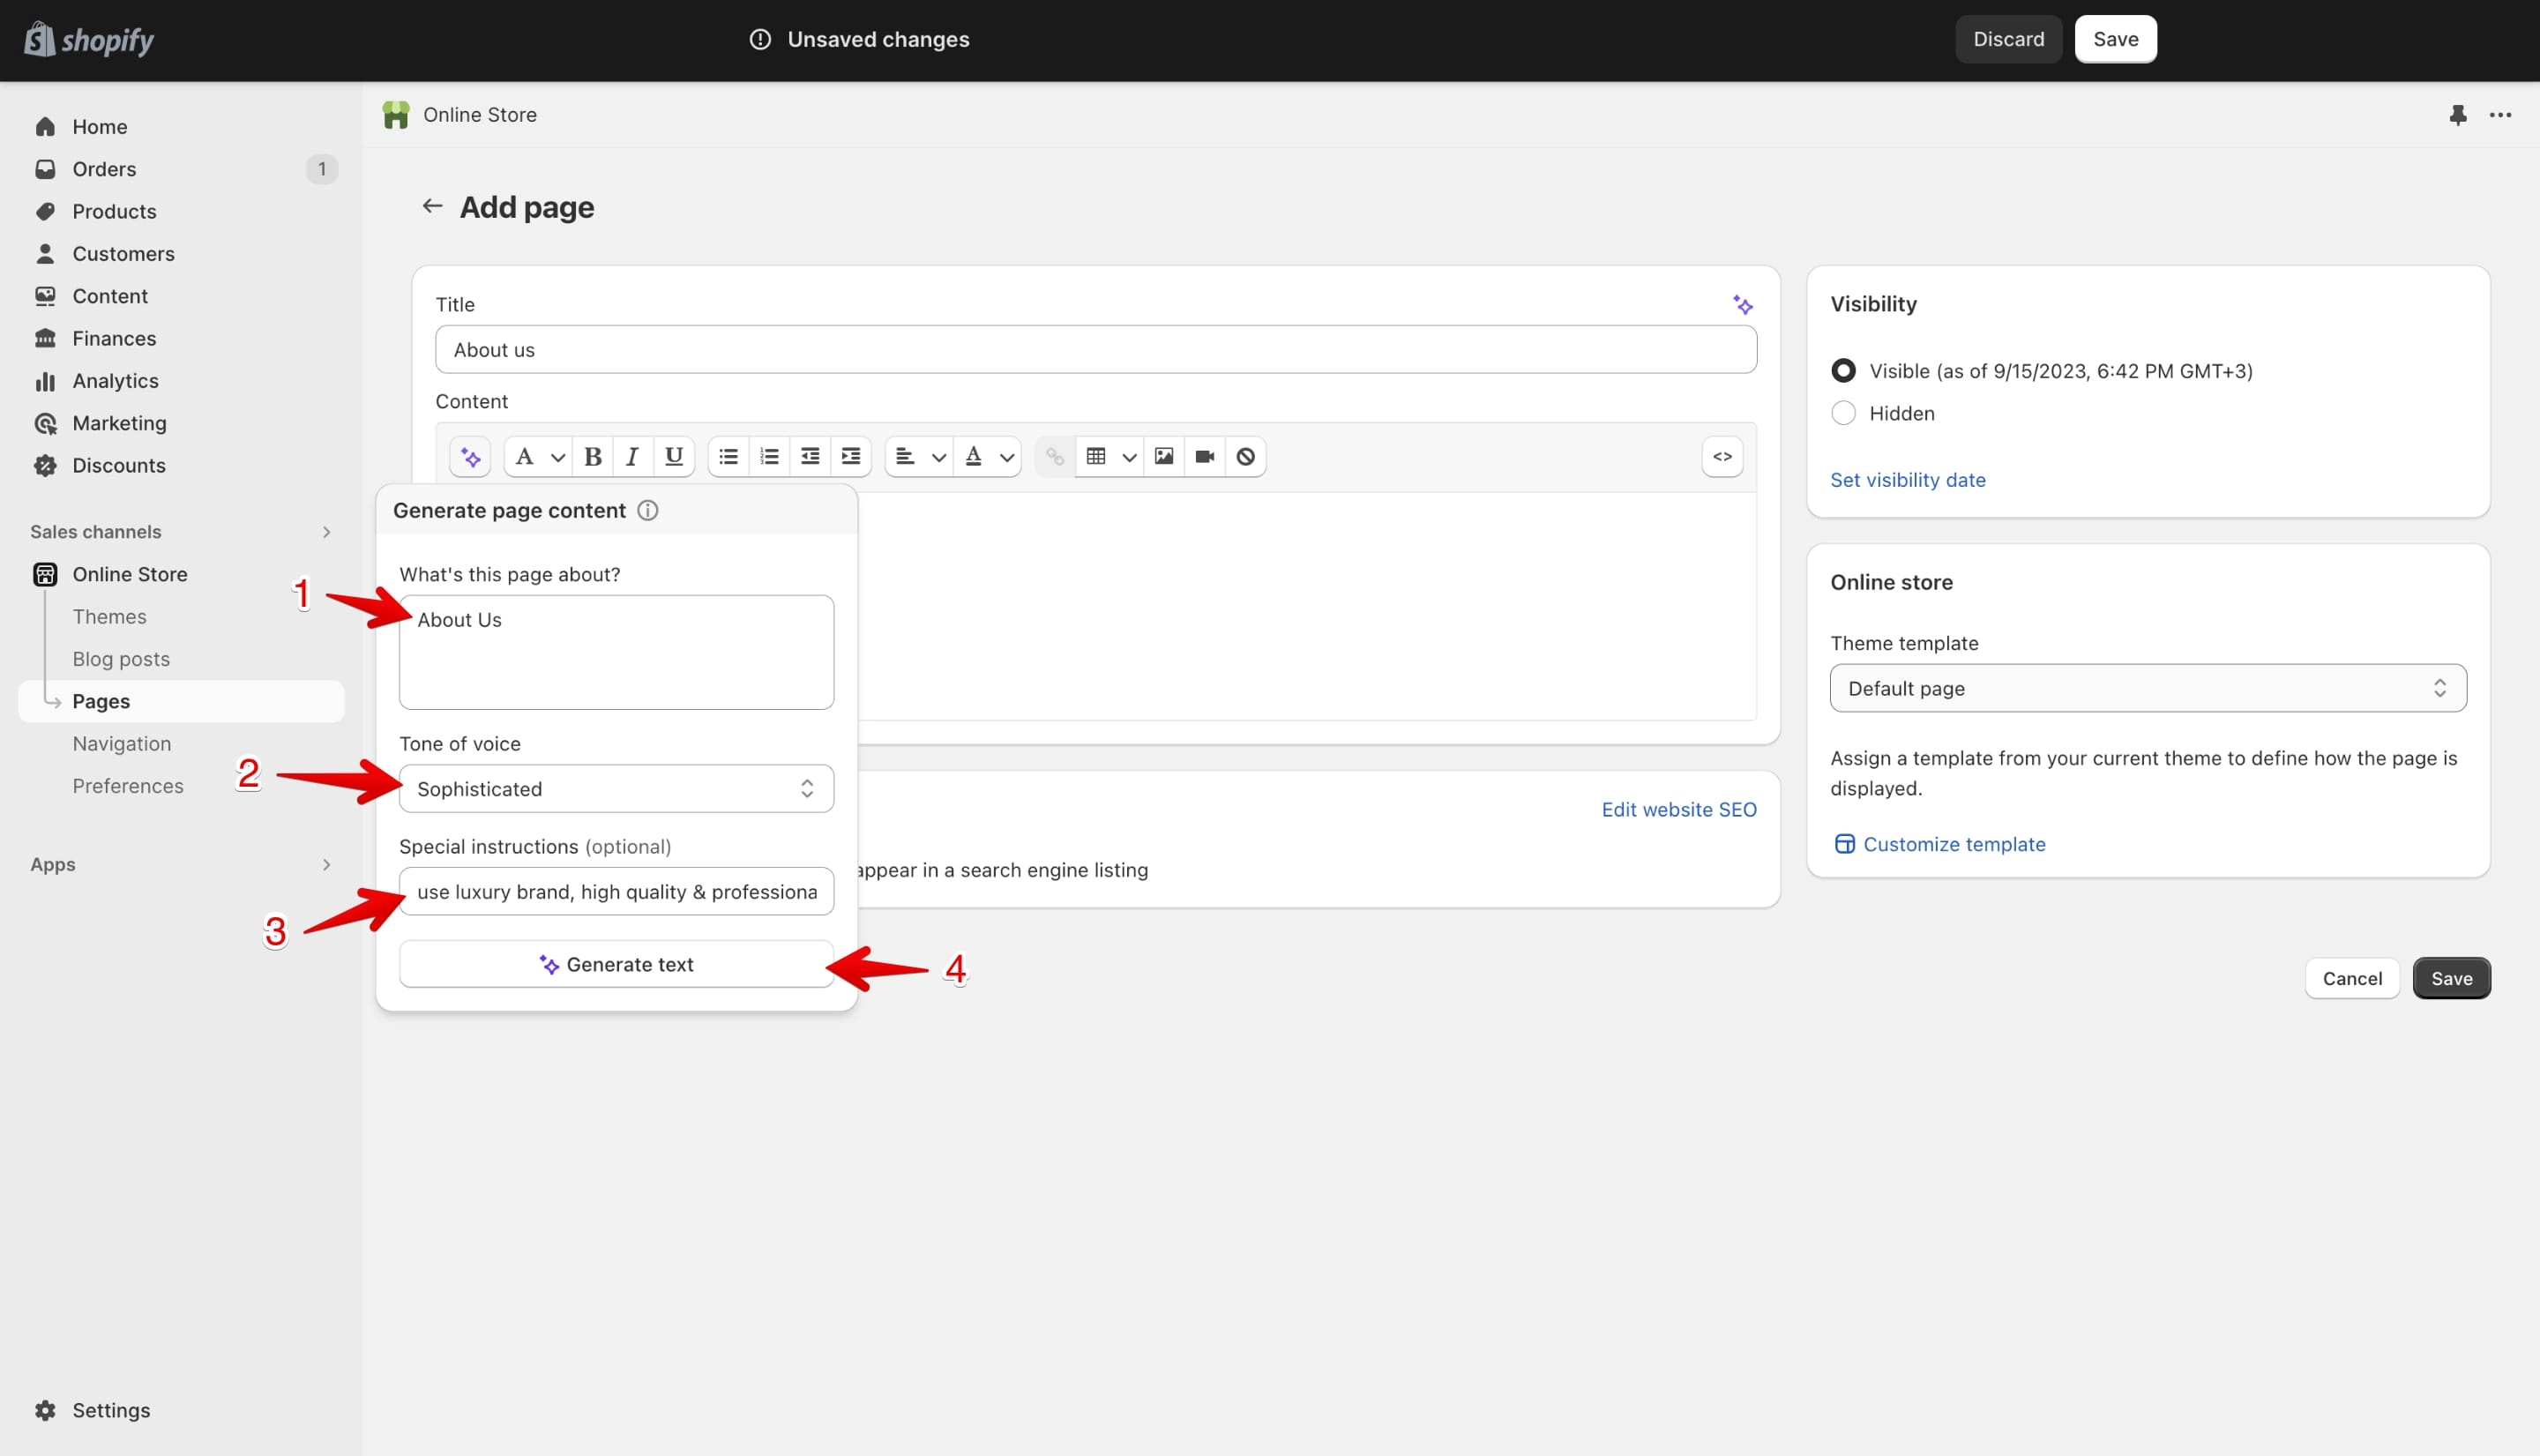
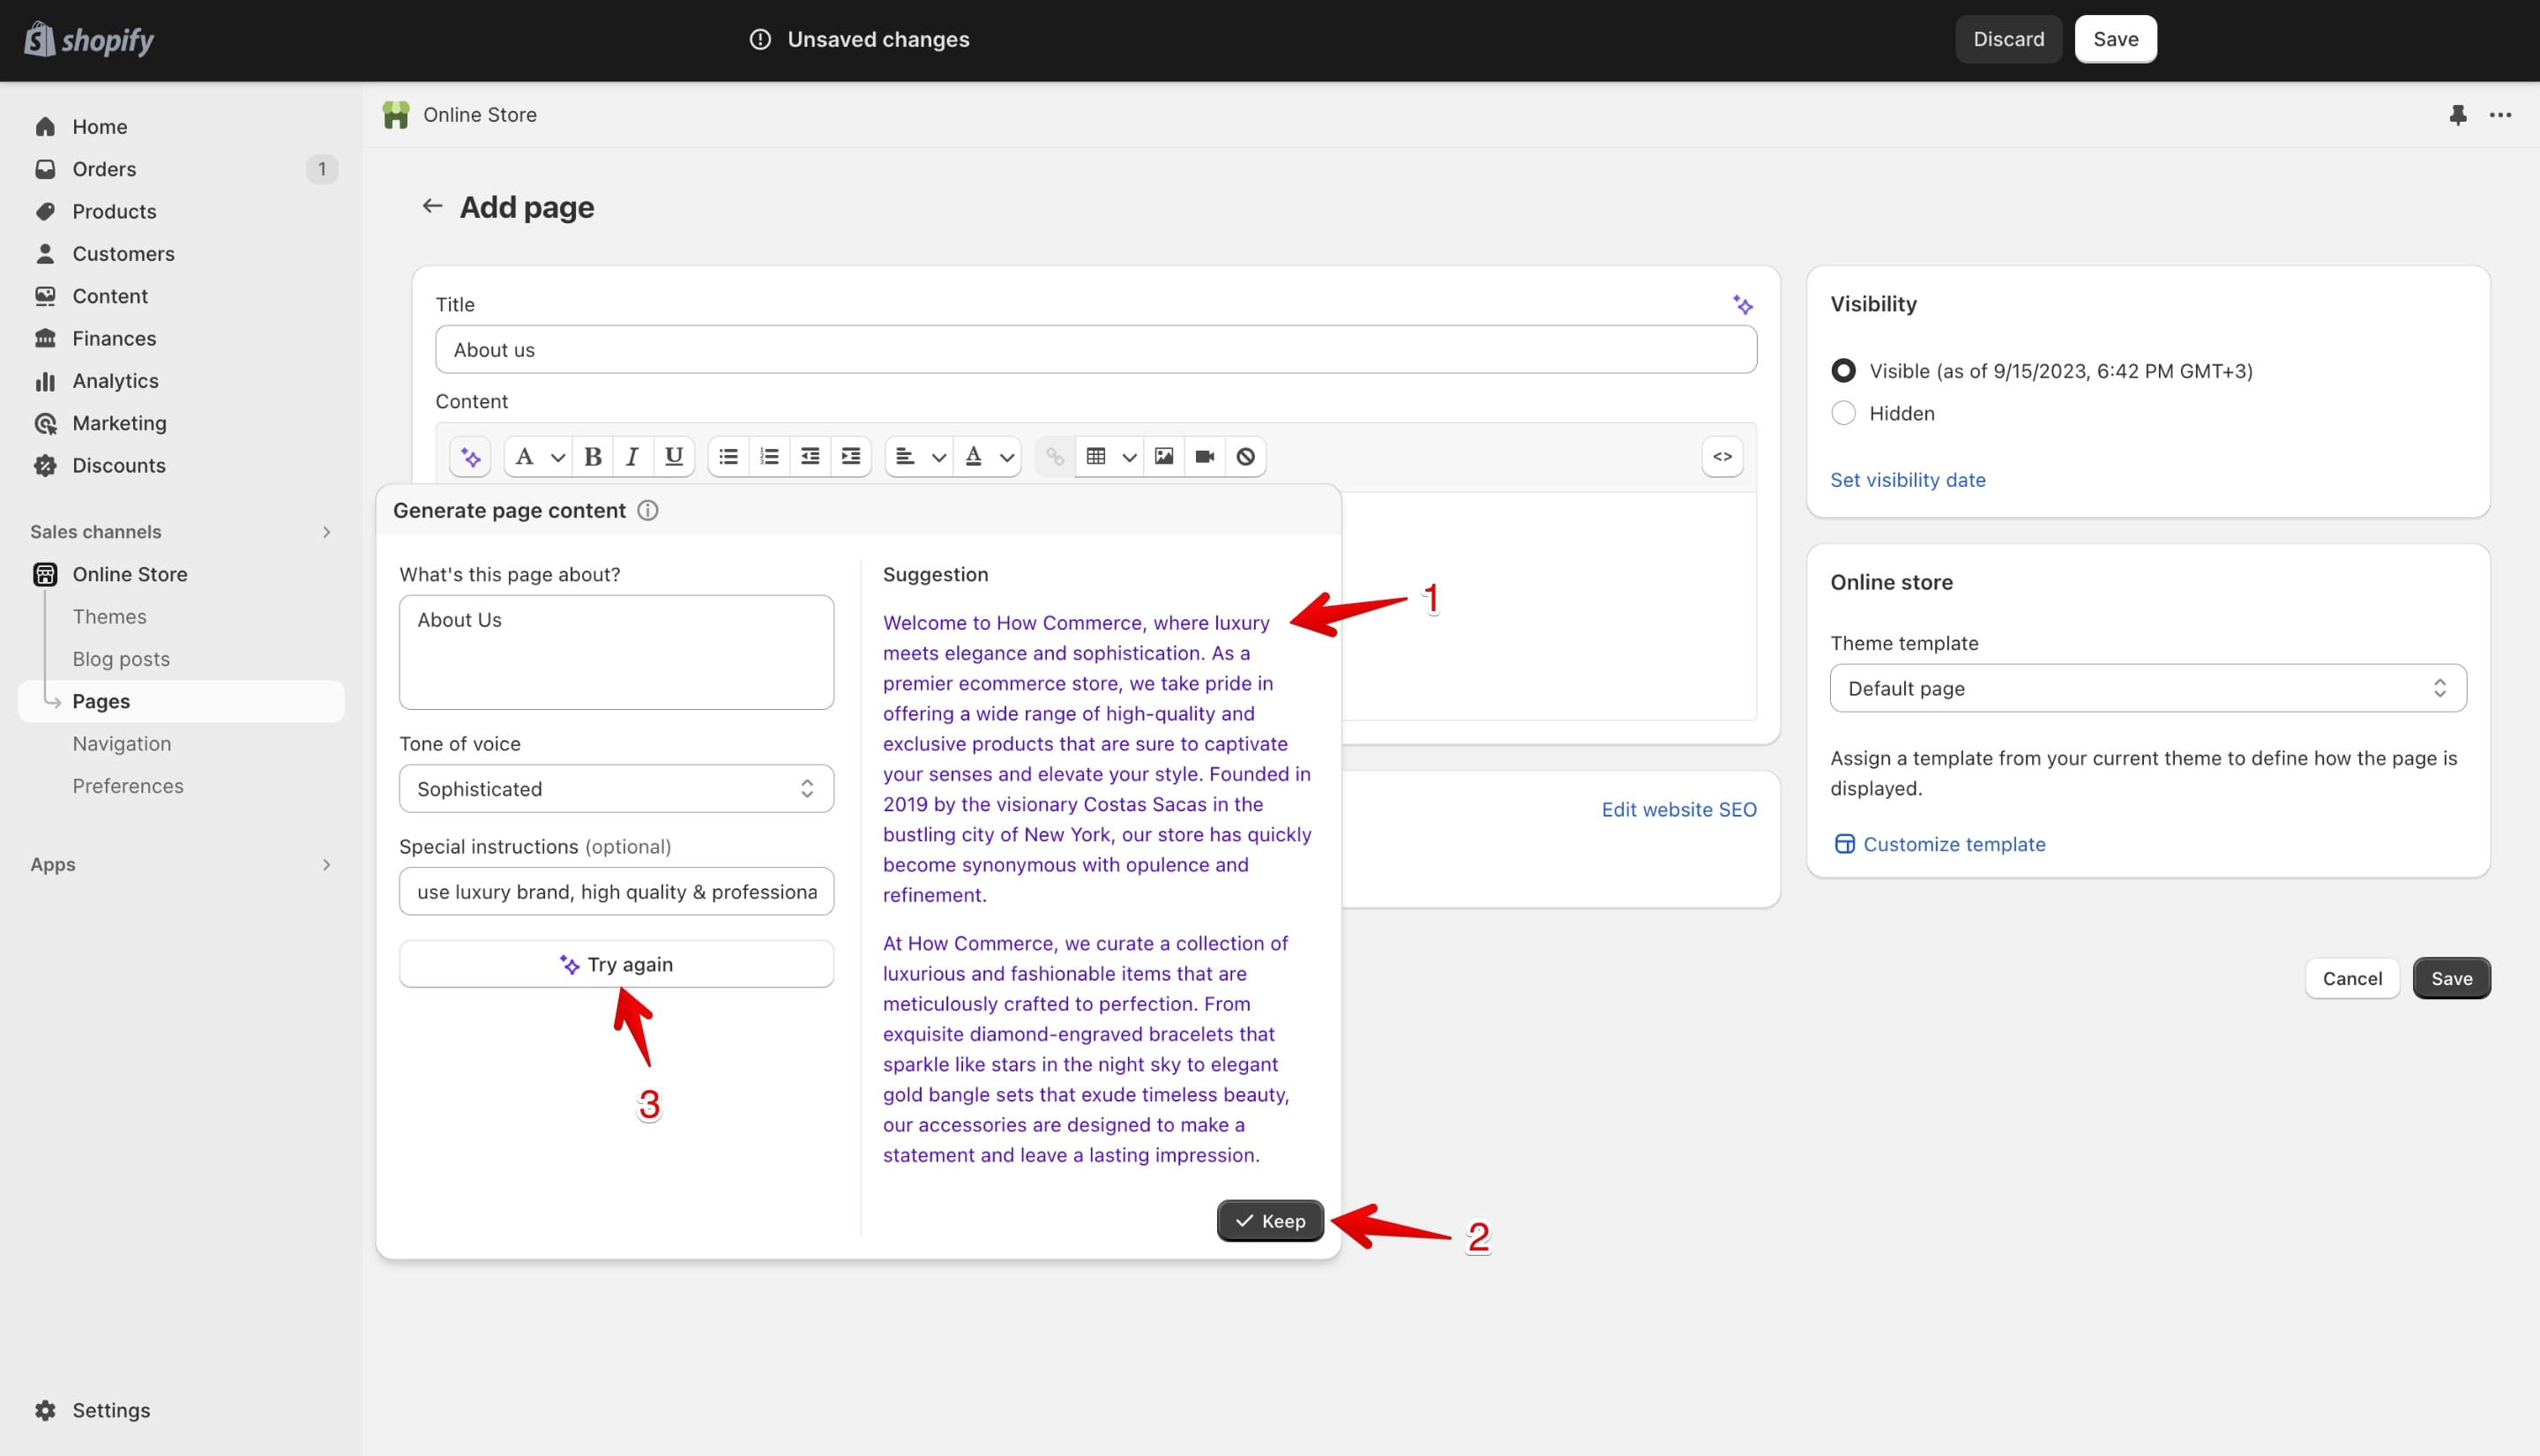
In the “What’s this page about?” (marked with 1 in the image below) type the page title or a description of what you want the page to be about.
This time for the “Tone of voice” (marked with 2 in the image below) I’ll go with “Sophisticated” since I want to make the page professional.
In the "Special instructions" field (marked with 3 in the image below) I'll say "use luxury brands, high quality and professional". All these words will be taken into account by the AI when it generates the page descriptions.
When you have everything in place click on the “Generate text” button (marked with 4 in the image below) to send the instructions to the AI.
In the next image you can see the AI generated text (marked with 1 in the image below).
If you like the text click on the “Keep” button (marked with 2 in the image below) and the AI will fill the “Content” input box with the suggested text.
If you do not like it click the "Try again" button (marked with 3 in the image below).
In the image below you can see the content box (marked with 1 in the image below) filled by the AI with the suggested text.
The AI will also automatically fill the search engine listing preview (marked with 2 in the image below).
Verify all the information and if everything looks good click the save button (marked with 3 in the image below).
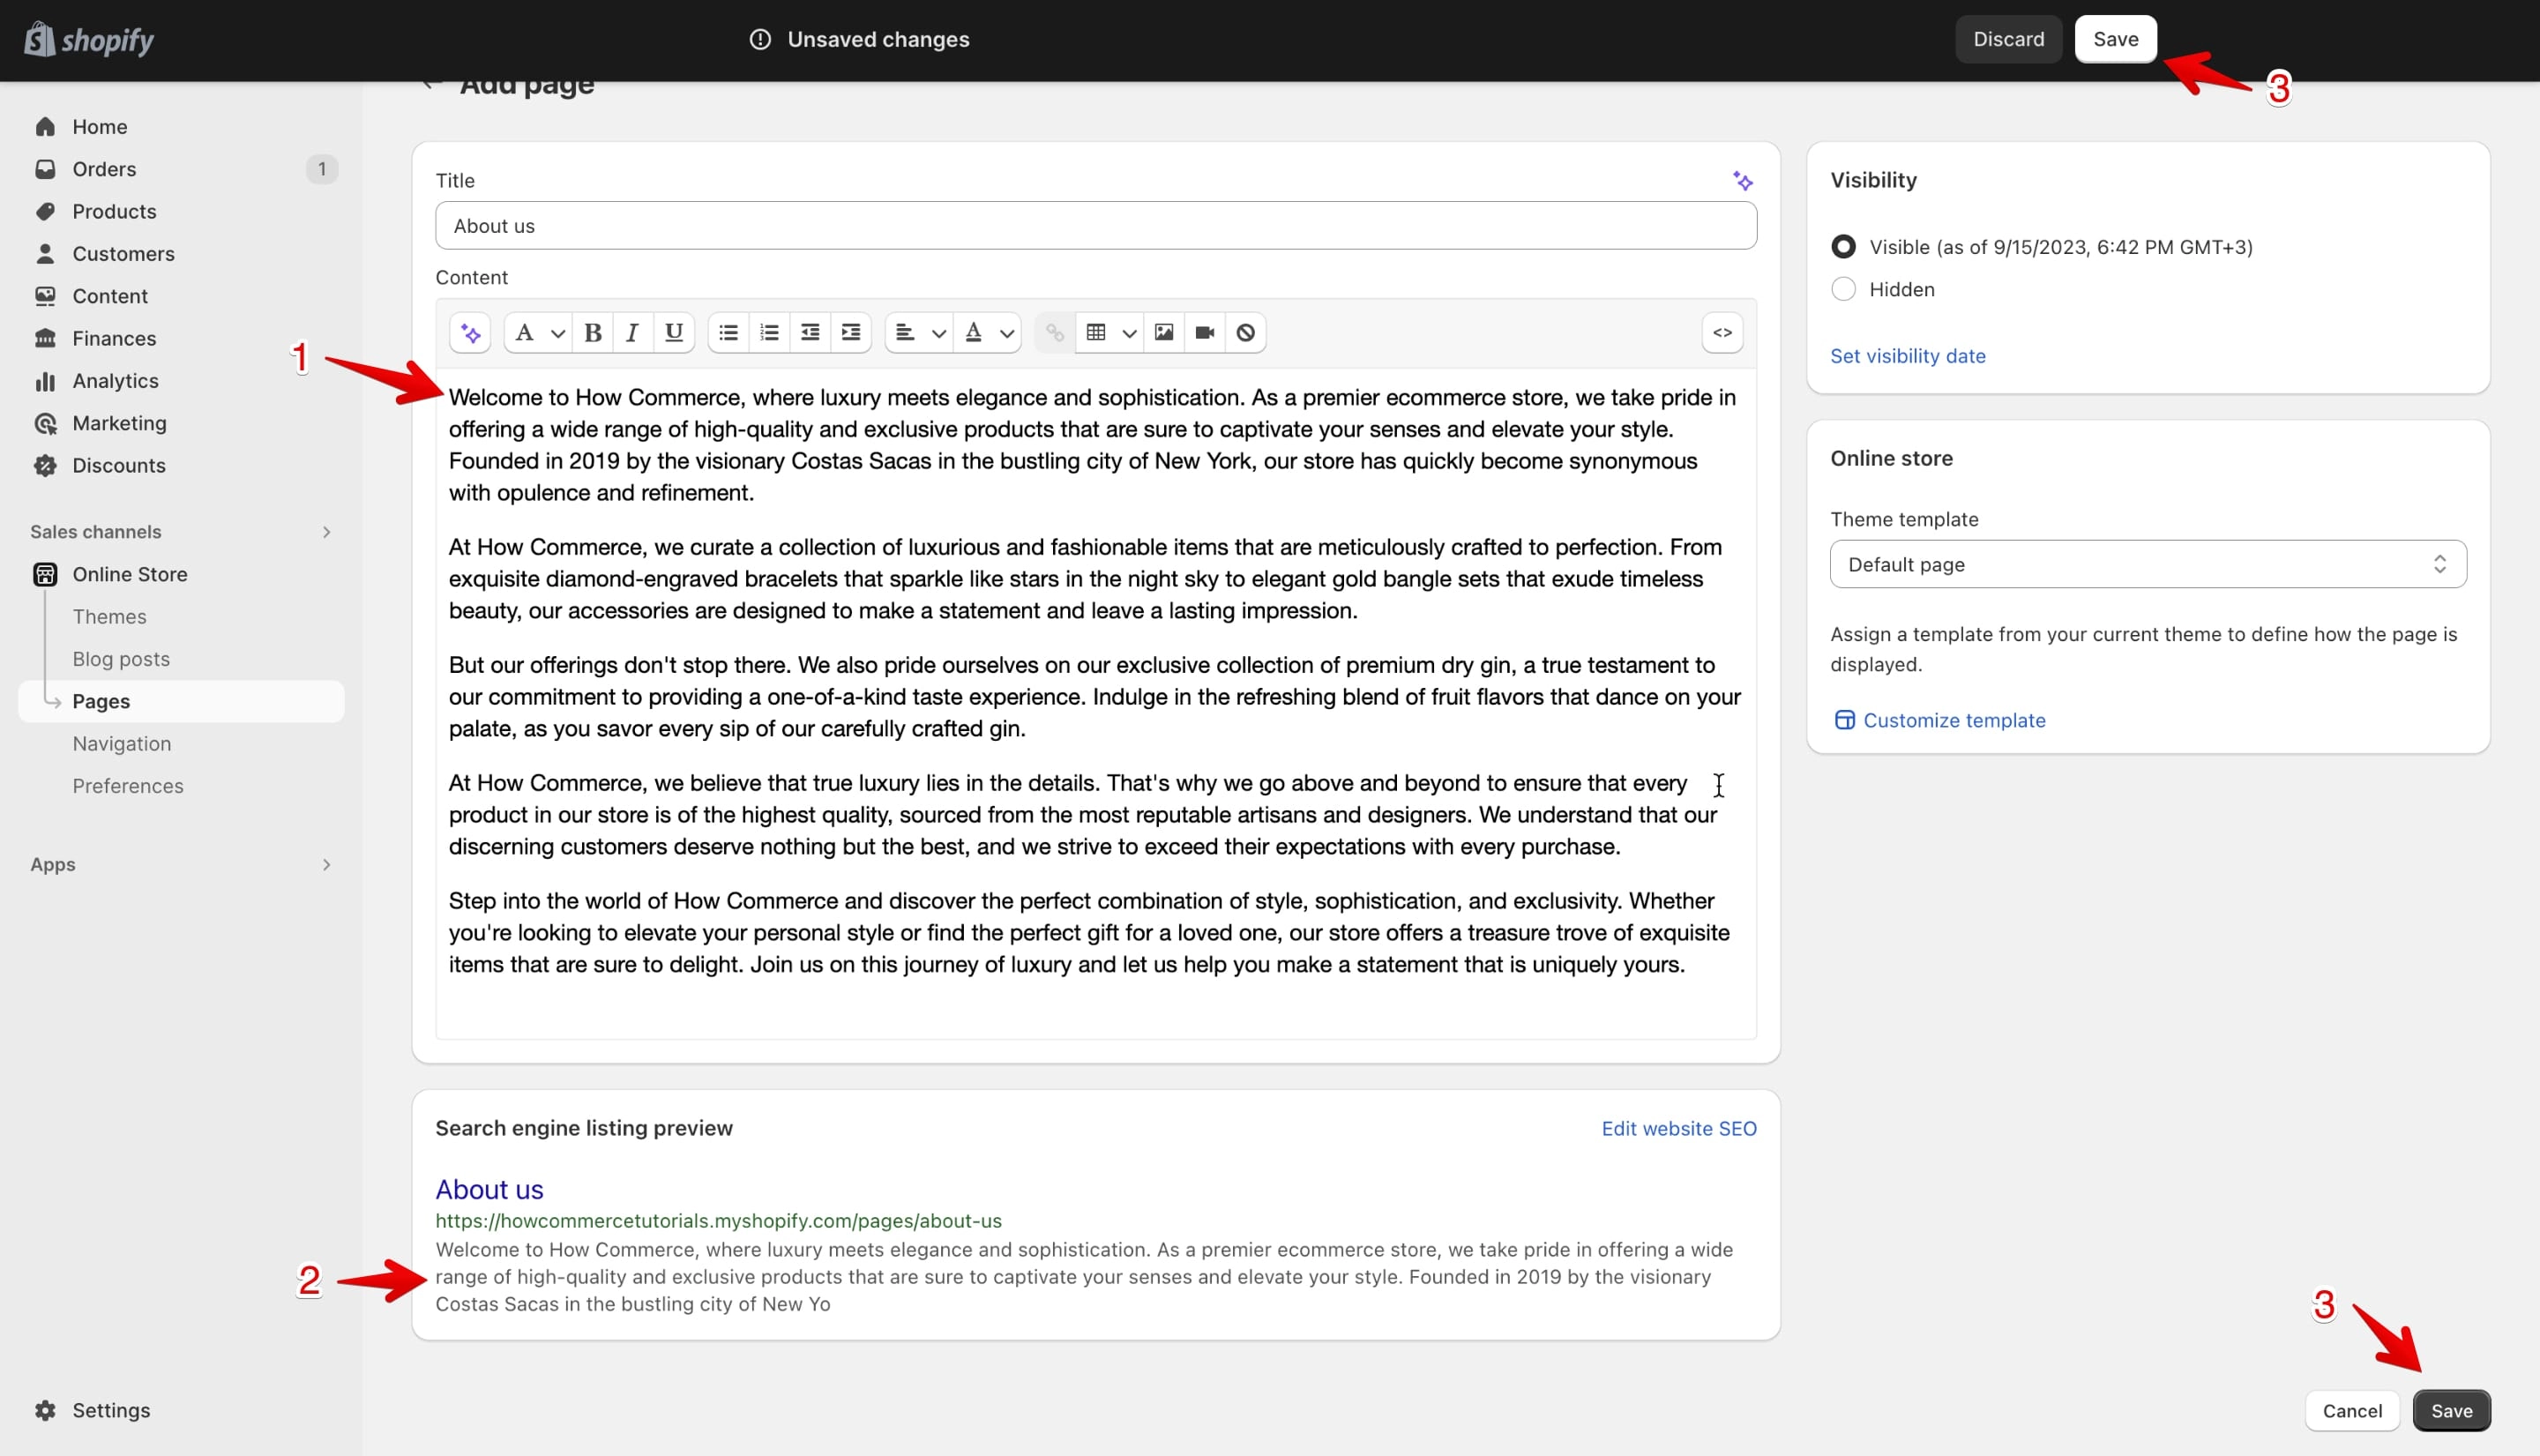
Note that a nice about page will not contain only text but also images and this is something you need to add to the page. AI will generate only the text for you.
Generate content with AI on the Theme Editor
On the “Theme Editor” you can use AI all over where there is an input text box.
If a text box doesn't have the AI icon, then suggestions can't be generated for that field.
Since on the theme editor there are a lot of input text fields I’ll give you one example.
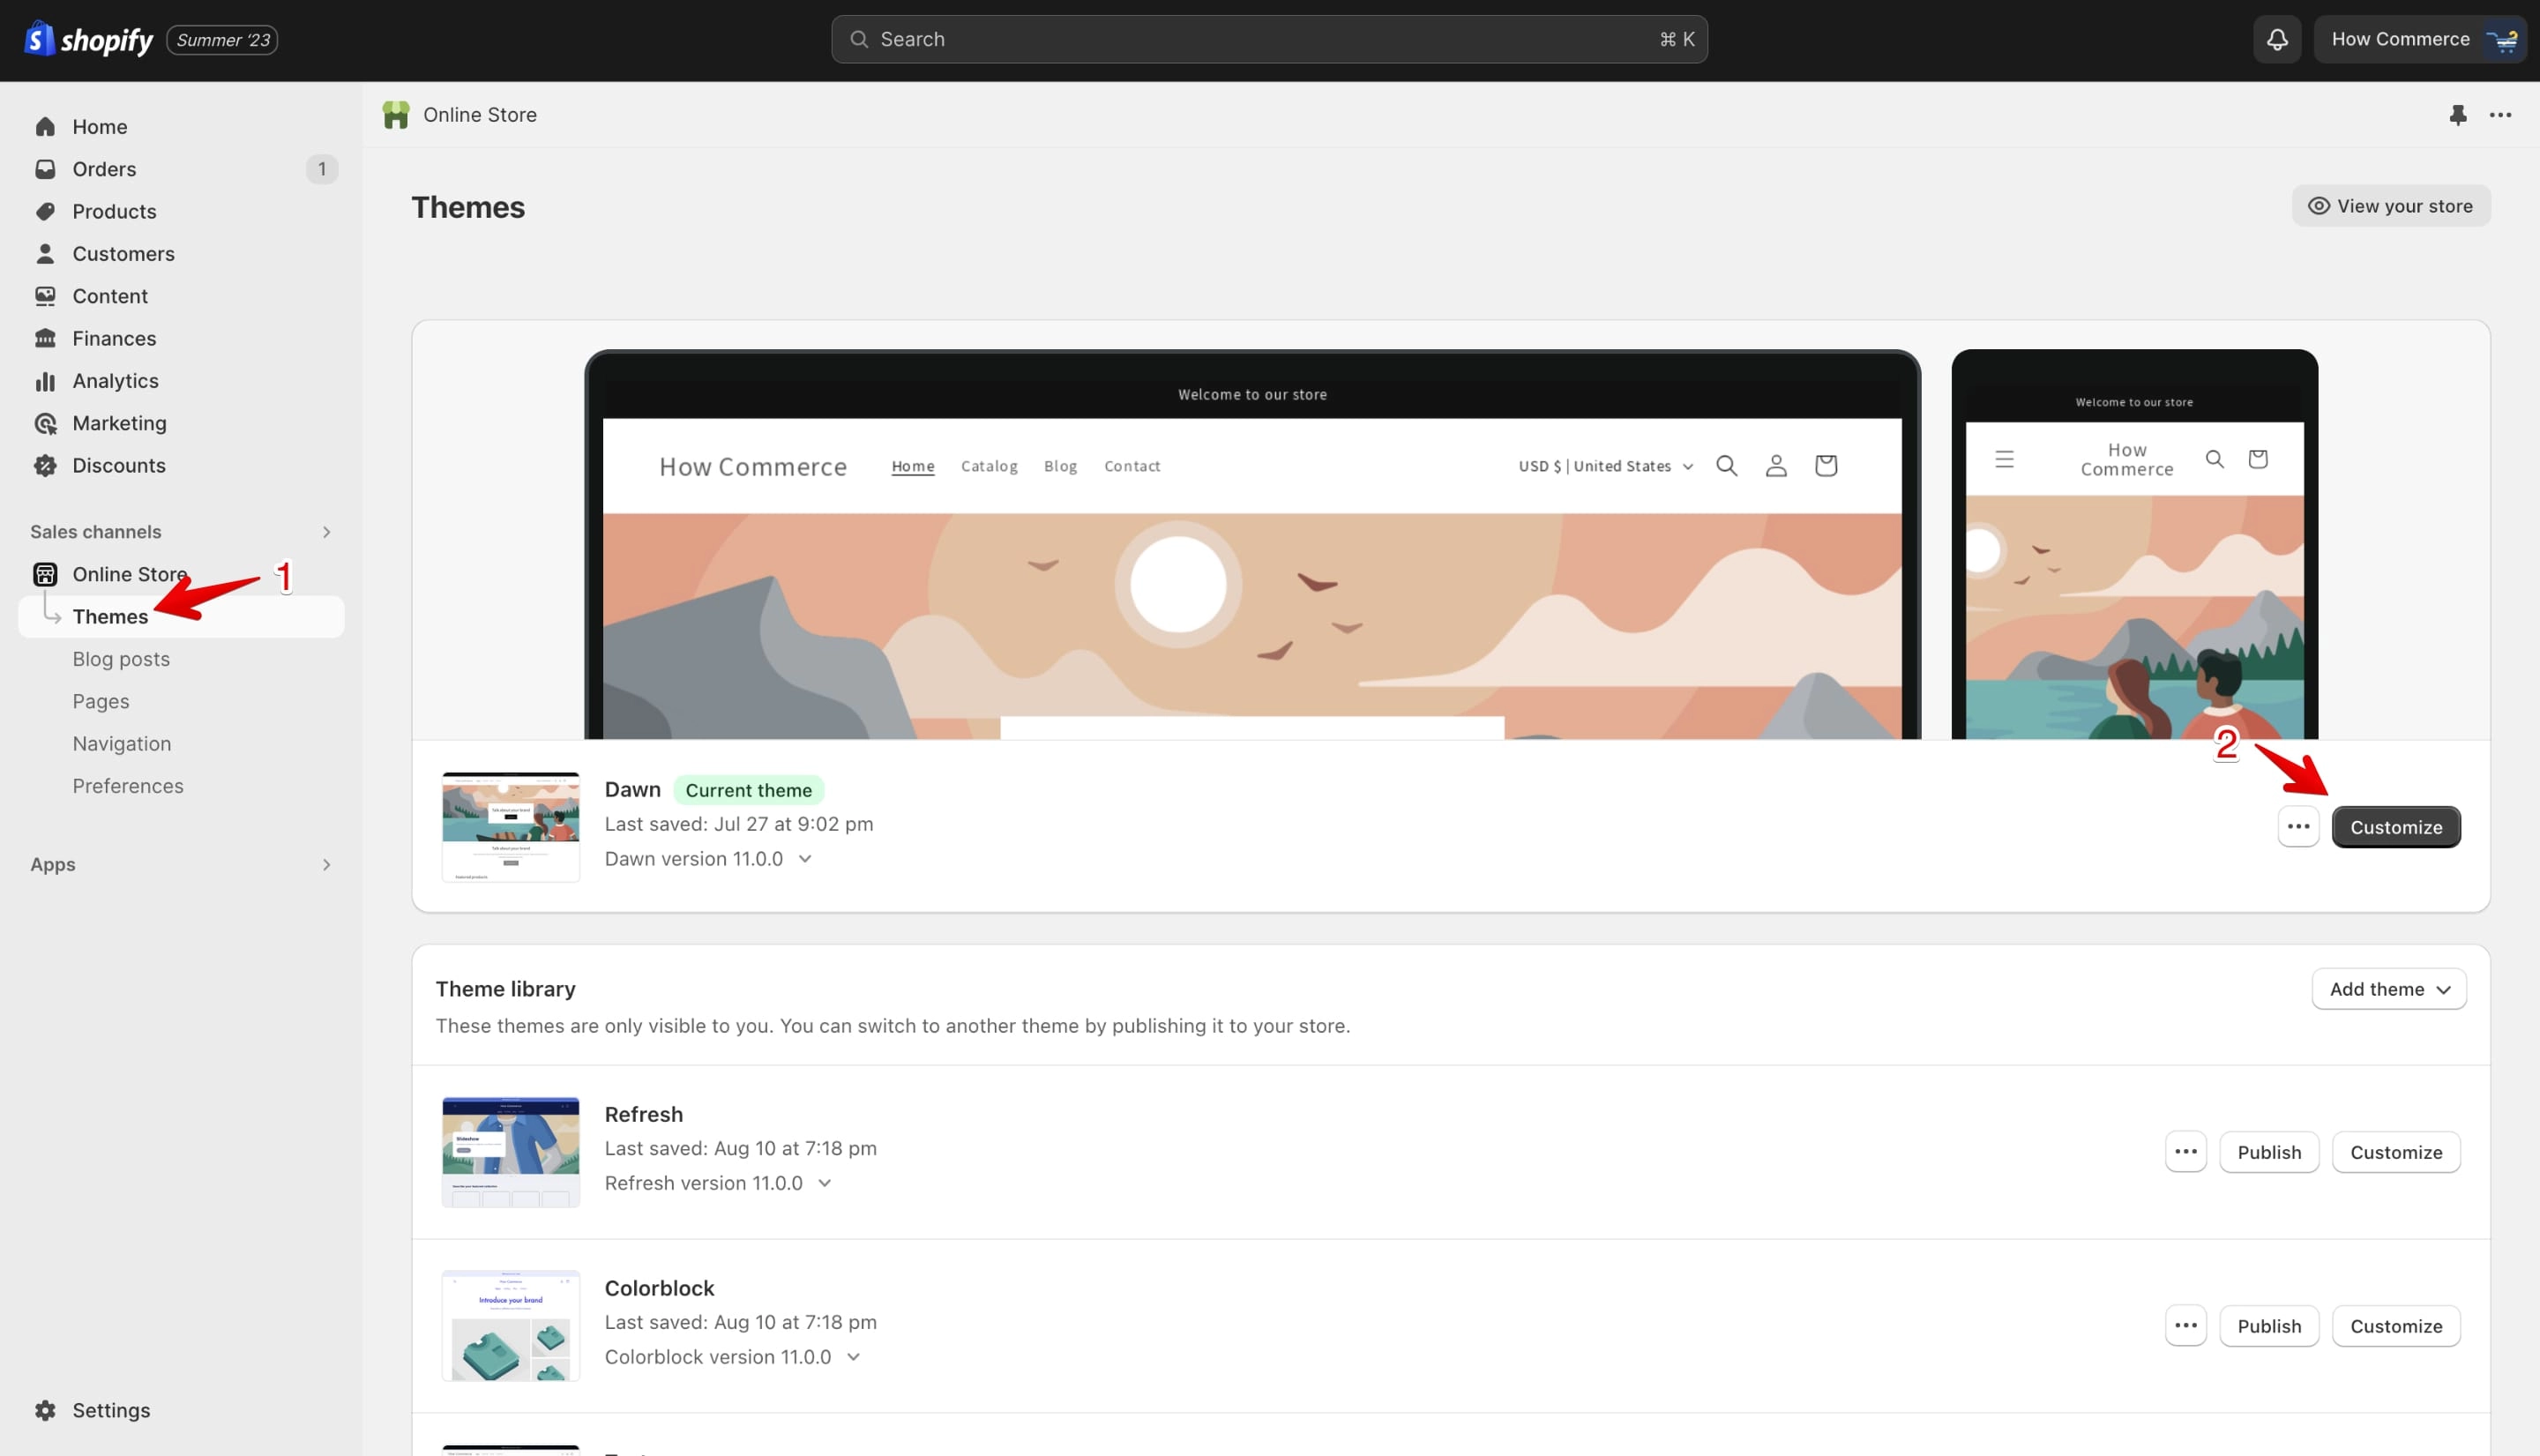
For that go to your theme by going to the "Online Store" > "Themes" (marked with 1 in the image below) and click on the "Customize" button (marked with 2 in the image below).
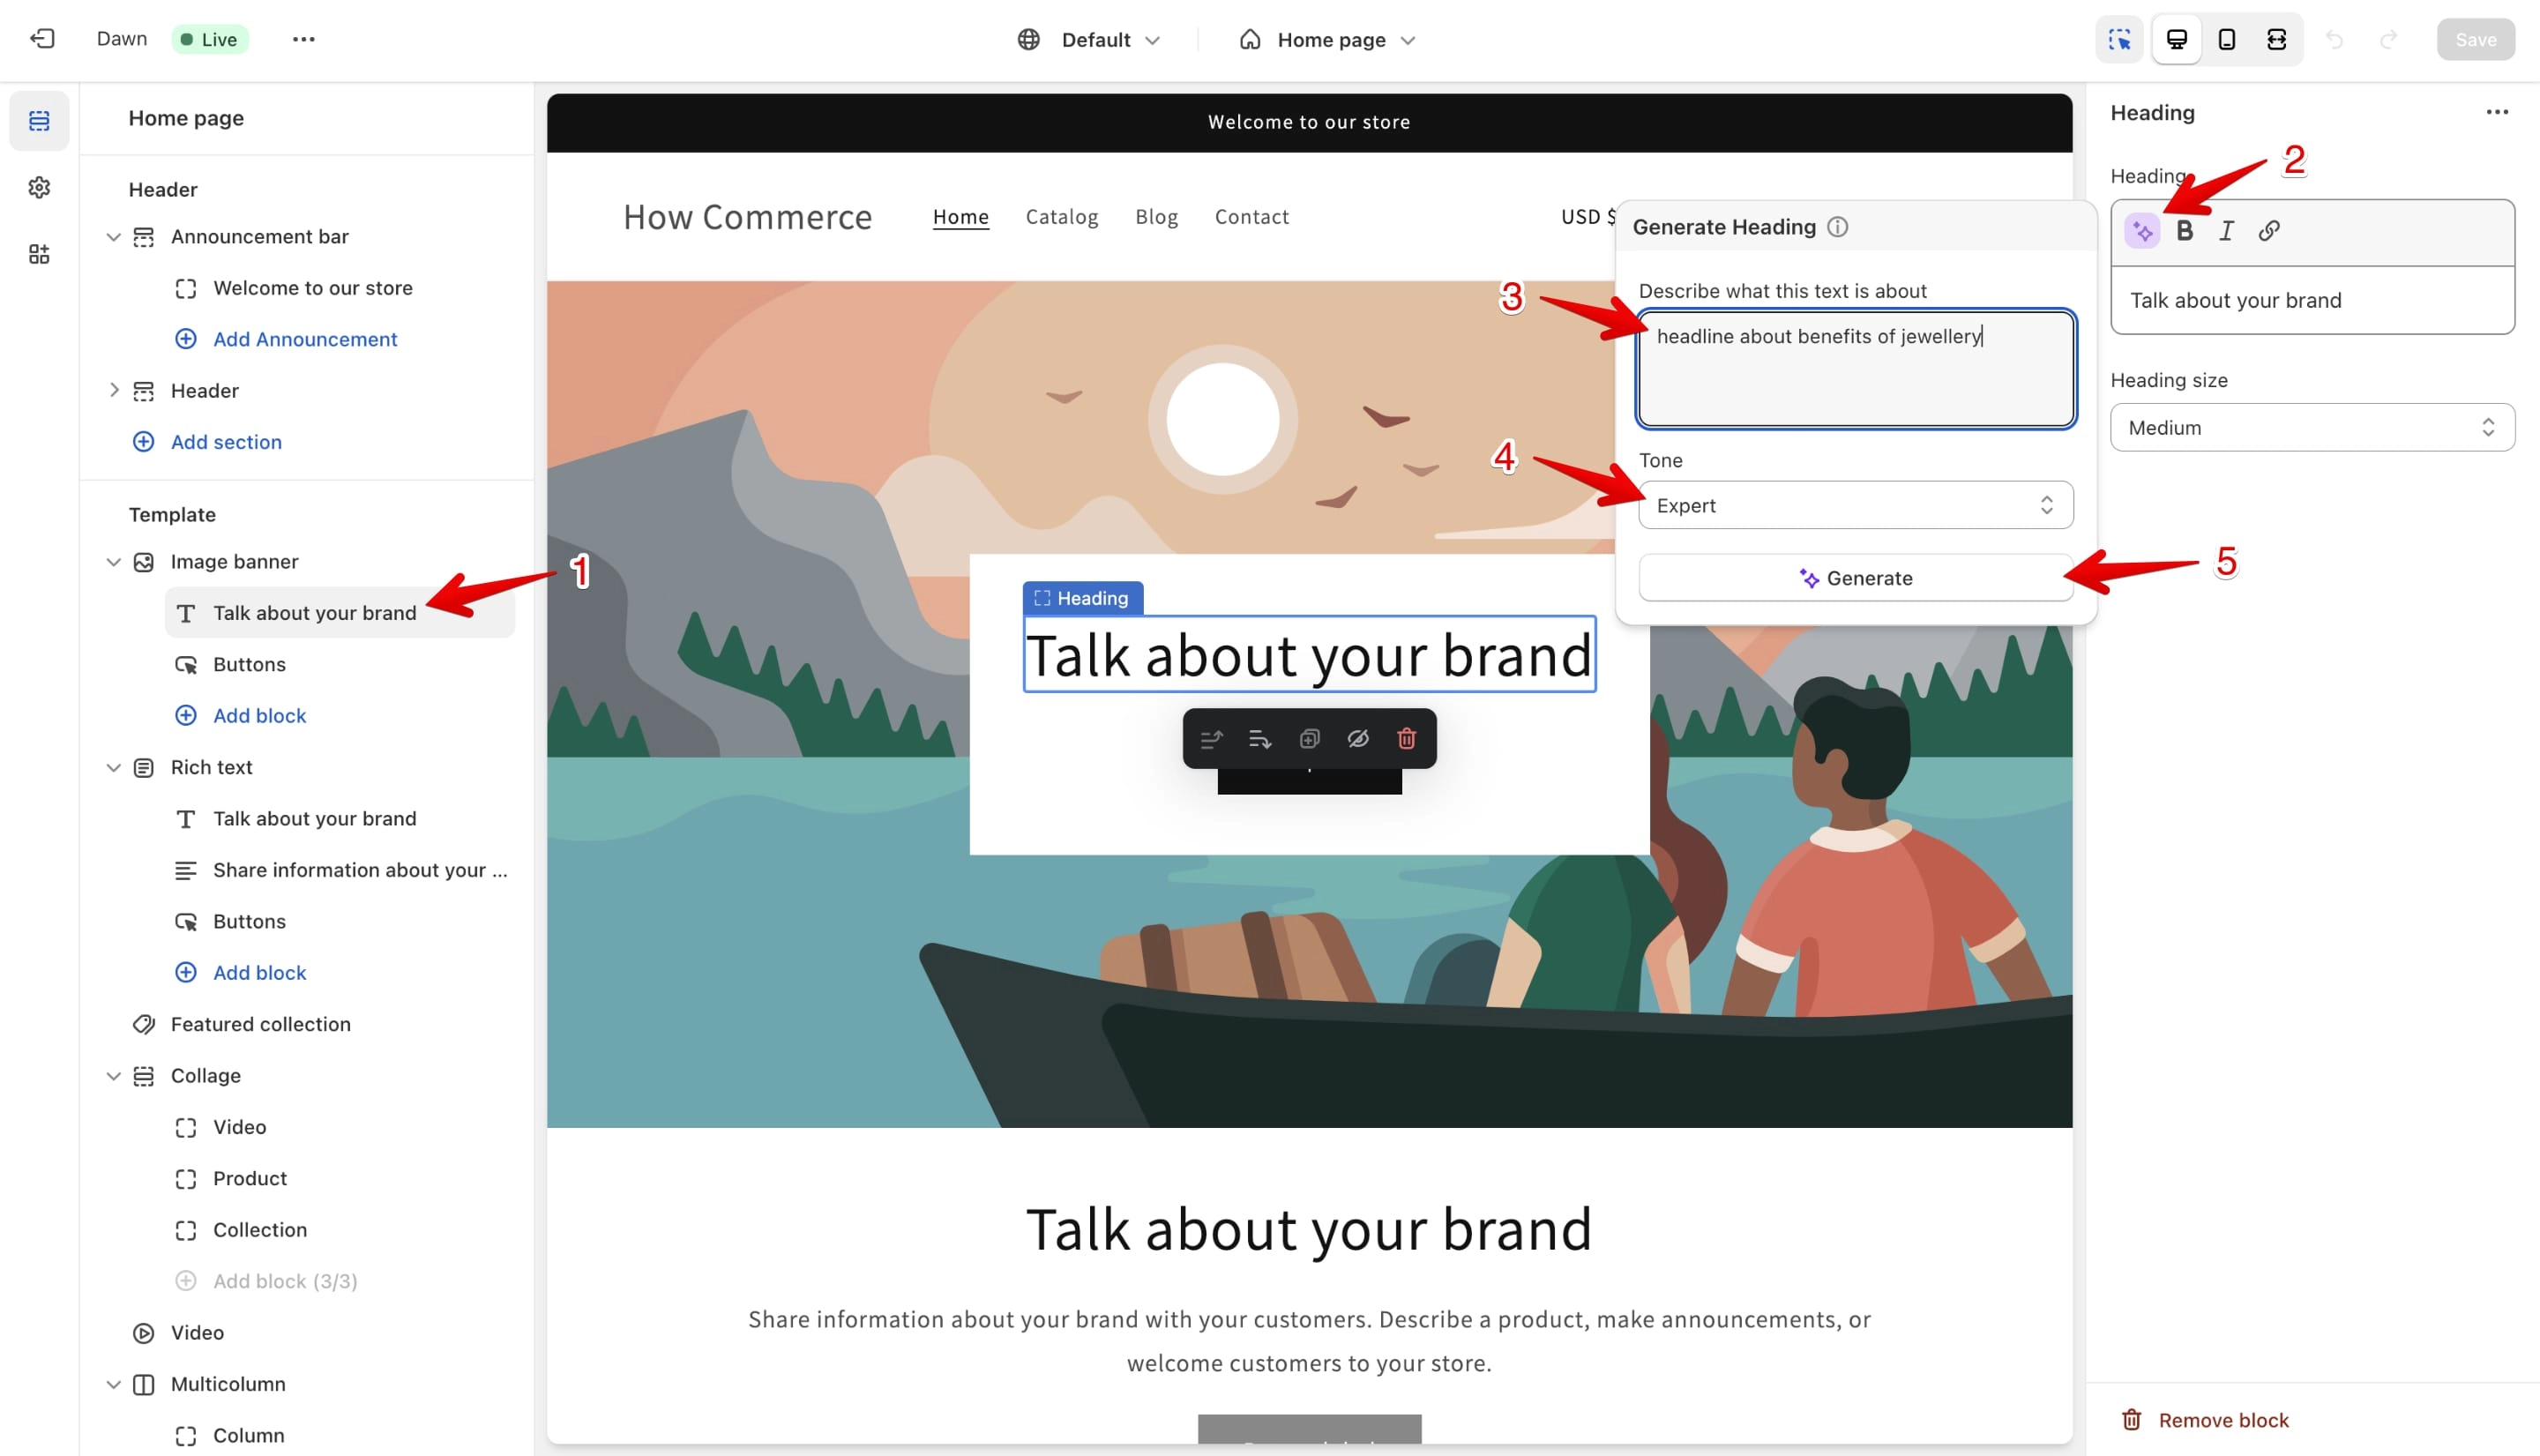
Select a theme setting that contains a “Text input” type (marked with 1 in the image below).
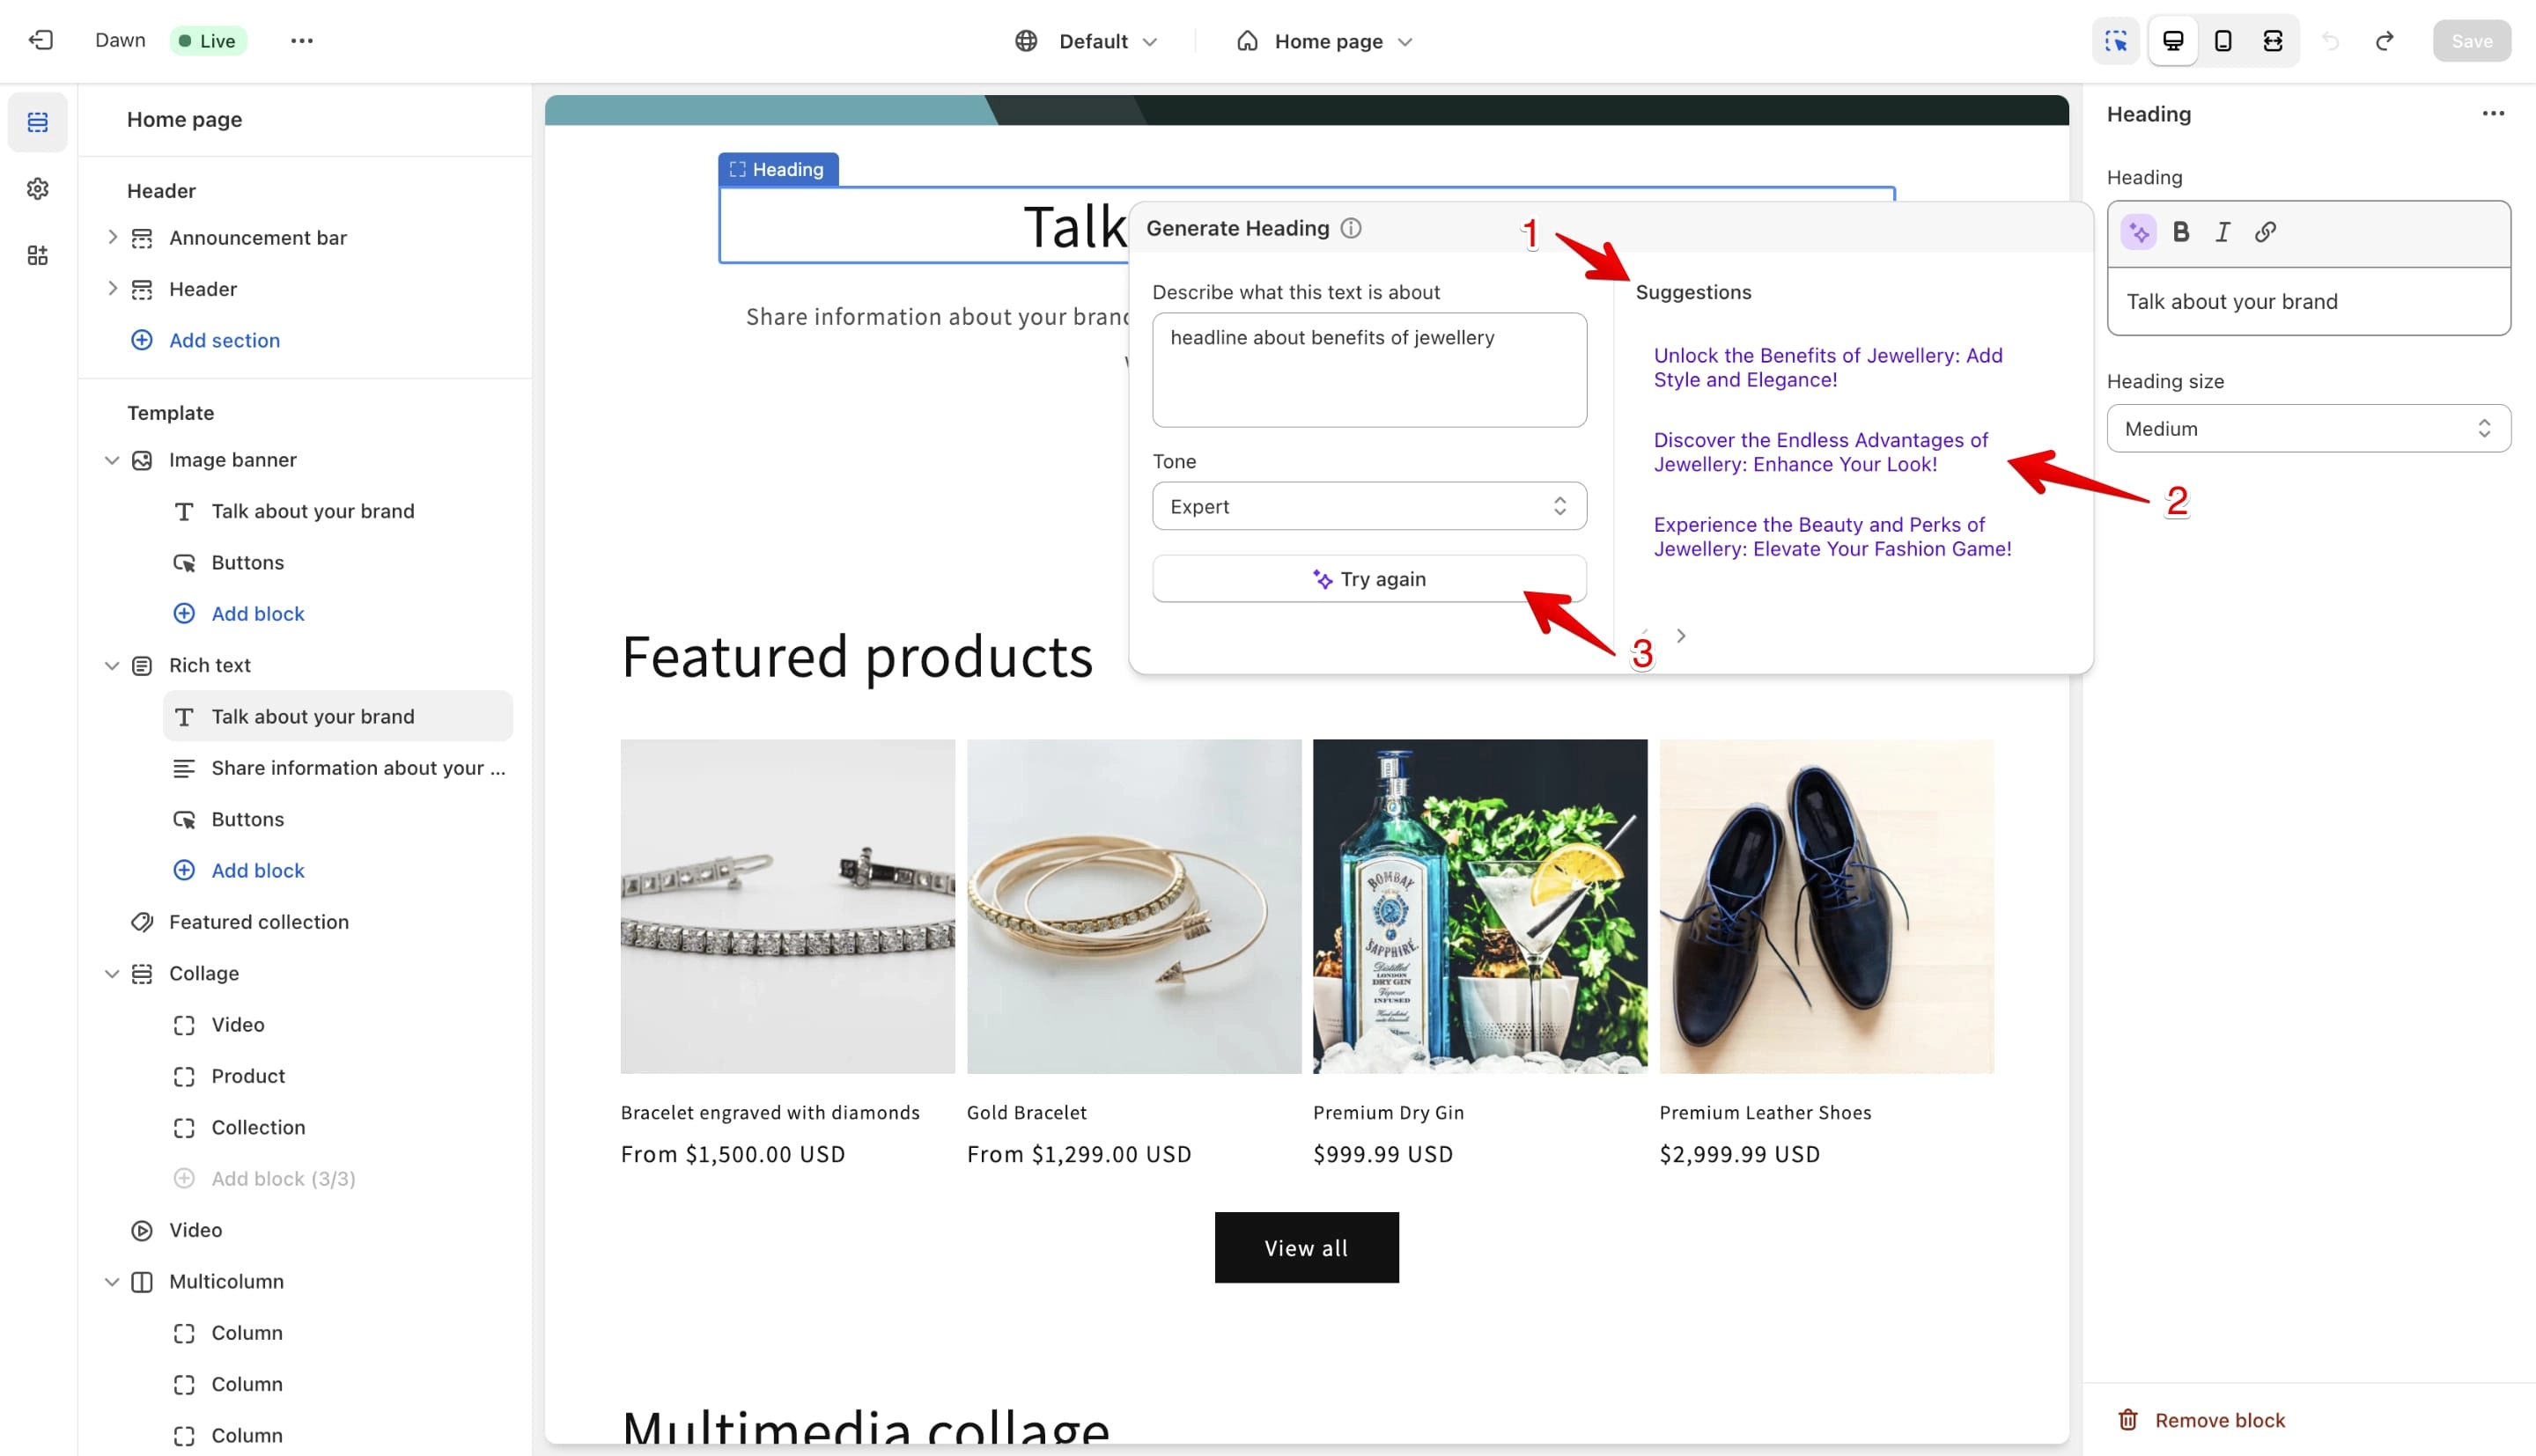
Click on the "AI" icon (marked with 2 in the image below) and prompt the AI by describing what you want to generate. In my example I want to generate a headline for my image banner.
Select a "Tone" (marked with 4 in the image below) and click generate (marked with 5 in the image below).
Conclusion
These days Shopify AI can help you speed up a lot of tasks but it needs your intervention to craft good blog posts, quality product descriptions, and so on.
Use AI to generate ideas and take the content generated and work on it to make it better since search engines especially Google have algorithms that will detect poor quality content.
I for one use it to generate samples for demos to show to my clients. Instead of using dummy text, it makes the custom theme much more beautiful to look at and it also has practical text that will be used in the real-world application.